Windows 10 gives you many configuration options directly within the operating system, but on every laptop or desktop, there are some settings you can only change in the BIOS (basic input/output system). This software is built right into your computer’s motherboard, and it controls everything from the boot order of your drives to preboot security options to whether the Fn key on your keyboard activates a function key or a media control.
However, since the BIOS is a pre-boot environment, you can’t access it directly from within Windows. On some older computers (or those deliberately set to boot slowly), you can hit a function key such as F1 or F2 at power-on to enter the BIOS.
However, most computers made in the past four years boot Windows 10 far too quickly to listen for a keypress at startup. To access your BIOS on a Windows 10 machine, you must follow these steps.
How to enter the BIOS on a Windows 10 PC
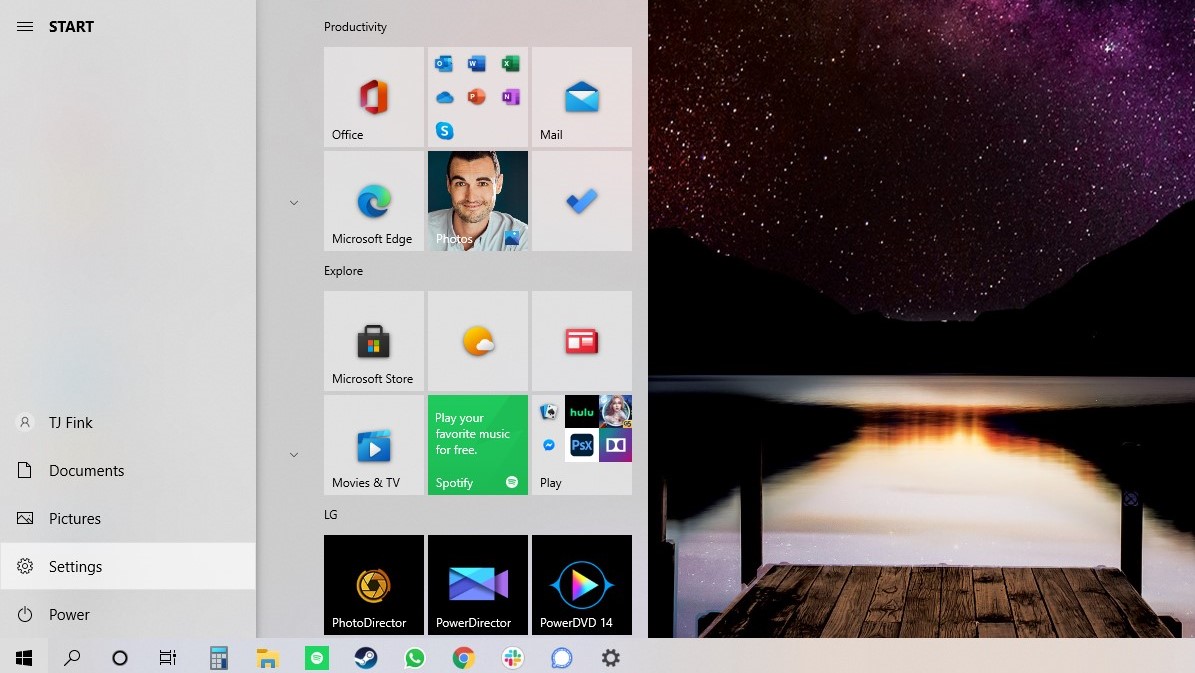
1. Navigate to Settings. You can get there by clicking the gear icon on the Start menu.
2. Select Update & Security.

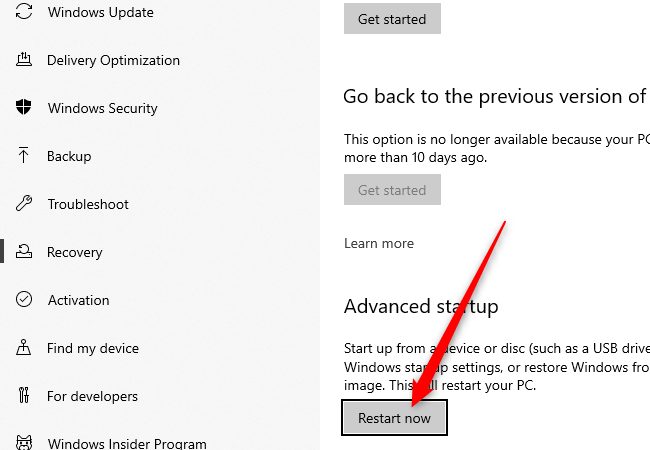
3. Select Recovery from the left menu.
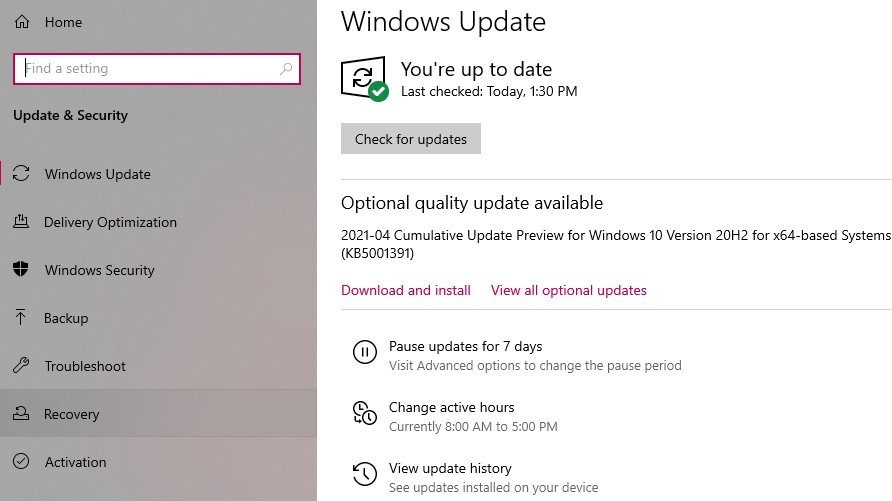
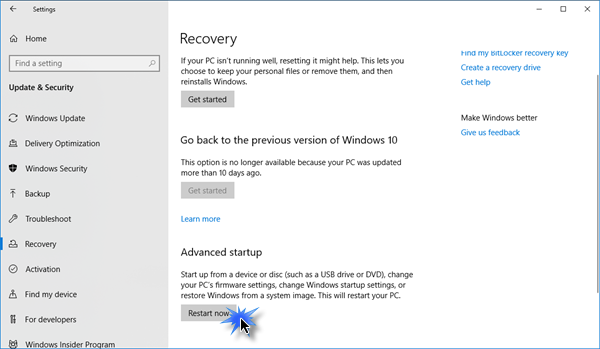
4. Click Restart Now under Advanced startup. The computer will reboot to a special menu.
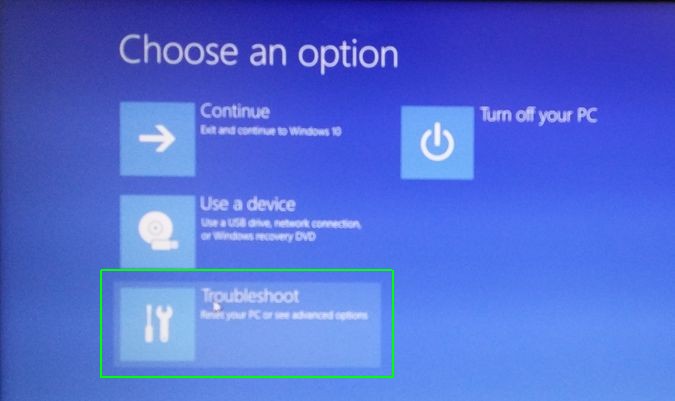
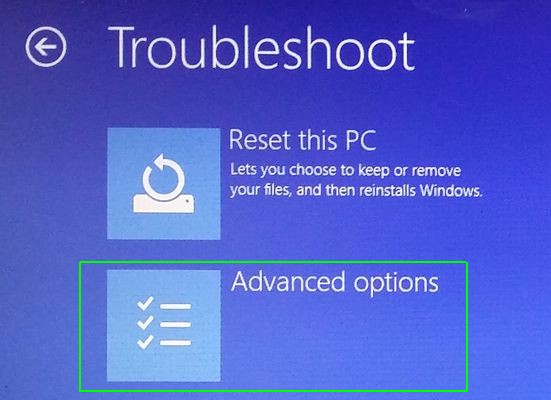
5. Click Troubleshoot.
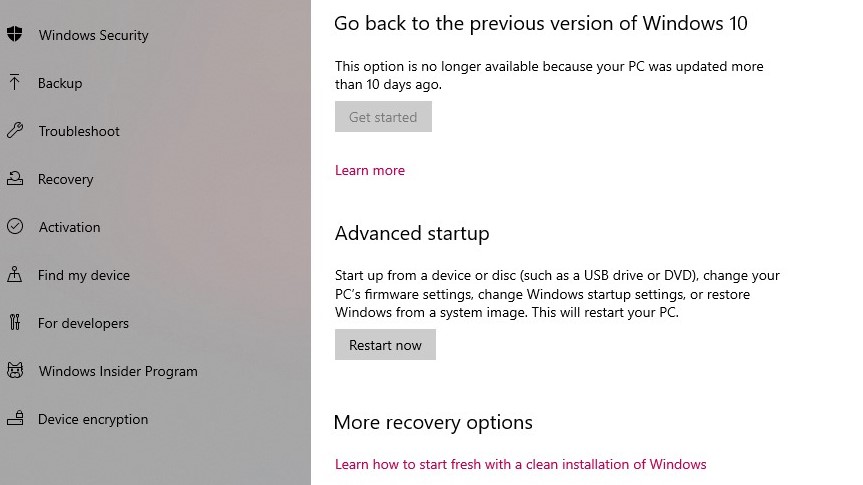
6. Click Advanced options.
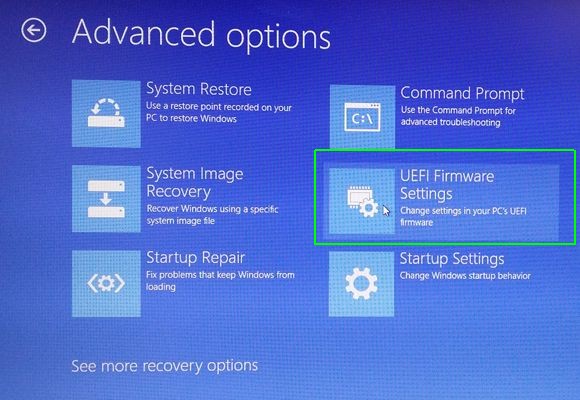
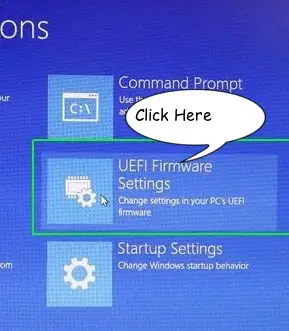
7. Select UEFI Firmware Settings. If you don’t see this icon, then press Startup Settings instead. When your PC is restarting, tap F1 (or F2) to access the BIOS.
8. Click Restart.
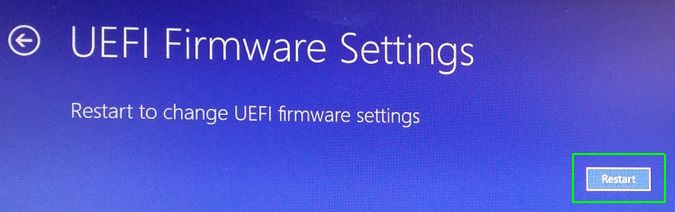
Your system will restart and take you to the BIOS.
Get our in-depth reviews, helpful tips, great deals, and the biggest news stories delivered to your inbox.
Download Windows Speedup Tool to fix errors and make PC run faster
Many a time you need to reboot into the computer firmware, i.e., UEFI or BIOS. If your hardware keys are failing to boot you into BIOS or UEFI, you will need to do this. In this post, I will share how you can directly re-boot Windows into UEFI or BIOS firmware.

There are three ways to boot your Windows 11/10 computer into the UEFI/BIOS:
- Using Keyboard Key
- Using Shift+Restart
- Using Command Prompt
- Using Settings.
1] Using Keyboard Key
When starting your computer, you can continue pressing the right key for your system, to enter the UEFI/BIOS. The right key for your system could be F1, F2, F10, etc. – and it depends on your manufacturer. You may be able to see which key, in the bottom left or right side of your boot screen, when your computer is booting.
Read: How to use BIOS settings on Windows computers.
2] Using Shift+Restart
Press the Shift key and then on the Restart power option, and your computer will boot into Advanced Startup Options.
Once Advanced Startup Options screen appears, select Advanced options > Firmware settings.

Your computer will reboot into UEFI/BIOS.
3] Using Command Prompt
We know that there is a way to shut down the computer from the command line. What many do not know is that it comes with options which helps you customize the shutdown option.
One of the options in Windows 11/10, is to boot into UEFI or BIOS. It works as follows:
Open the Command Prompt with admin privileges, type the following and hit Enter:
shutdown /fw /r
This command has three switches
- /fw – Combine with a shutdown option to cause the next boot to go to the firmware user interface.
- /r – reboots the computer.
The computer will inform you.
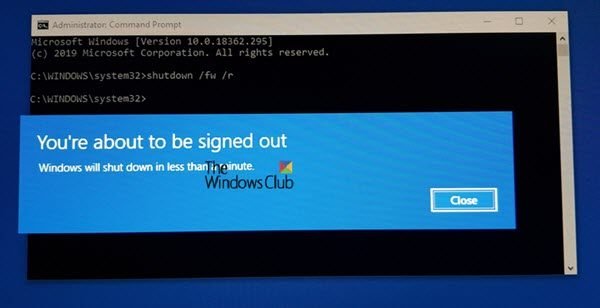
The default is 30 seconds, and once the computer restarts, you may see such a screen.
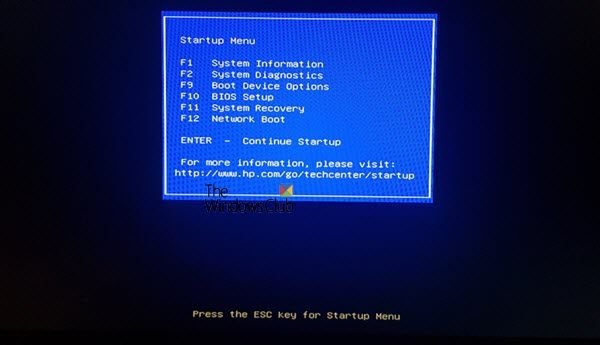
You will see the Startup Menu. Press F10 to proceed. The F10 is for my HP desktop. It could be different for your make.
Read: Windows computer won’t boot to BIOS.
4] Using Settings
Go to Windows Settings > Update and Security > Recovery > Advanced Options.
Once Advanced Startup Options screen appears, select Advanced options > Firmware settings.
The computer will restart automatically and take you to the firmware settings.
TIP: If for some reason you need to do it more often, it is best to create a shortcut, and add the comment shutdown /fw /r /t 10 in it.
We hope you find this tip useful.
Anand Khanse is the Admin of TheWindowsClub.com, a 10-year Microsoft MVP (2006-16) & a Windows Insider MVP (2016-2022). Please read the entire post & the comments first, create a System Restore Point before making any changes to your system & be careful about any 3rd-party offers while installing freeware.
 Доброго времени!
Не многие пользователи знают, что в UEFI (BIOS) можно войти без использования и нажатия спец. клавиш (тех же Delete или F2). Это очень может выручить, если вы перебрали все возможные кнопки, а компьютер никак не реагирует на ваши нажатия…
Отмечу, что воспользоваться этим способом можно только при условиях, что:
- у вас установлена современная ОС Windows 8, 8.1, 10, 11 (в остальных данной возможности нет);
- ваша мат. плата должна поддерживать UEFI (если ваш ПК/ноутбук не старше 3-4 лет — то наверняка поддержка есть!);
- ОС должна загружаться и «хоть как-то» работать (если же ОС не установлена — рекомендую ознакомиться со справочной статьей с кнопками входа в BIOS для устройств разных производителей).
*
Итак, теперь ближе к теме…
*
Из Windows 11
Все действия рассмотрю по шагам (для большей наглядности и доступности).
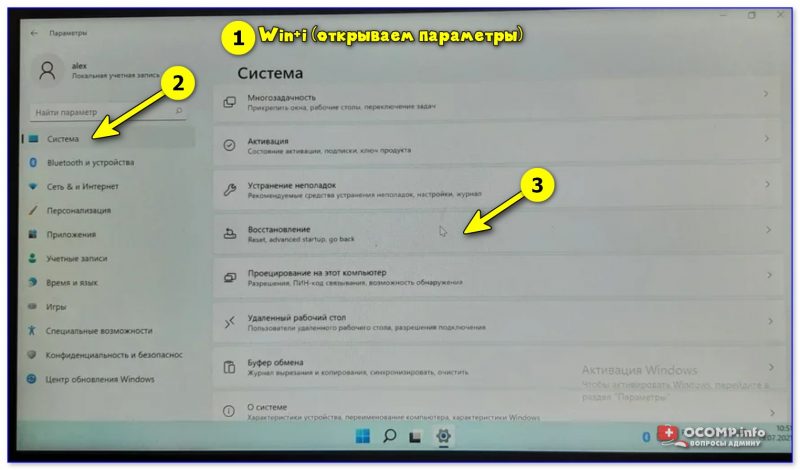
- для начала необходимо открыть параметры Windows и перейти в раздел «Система / восстановление» (сочетание клавиш Win+i // либо Win+R, и команда «ms-settings:» (без кавычек));

Открываем параметры Windows 11 — вкладку восстановление
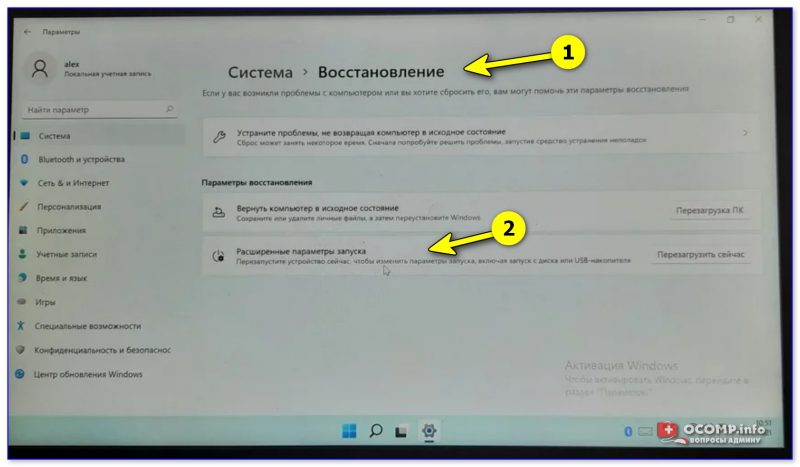
- далее согласиться на перезагрузку и запуск ПК с расширенными параметрами. См. пример ниже на фото; 👇

Расширенные параметры запуска
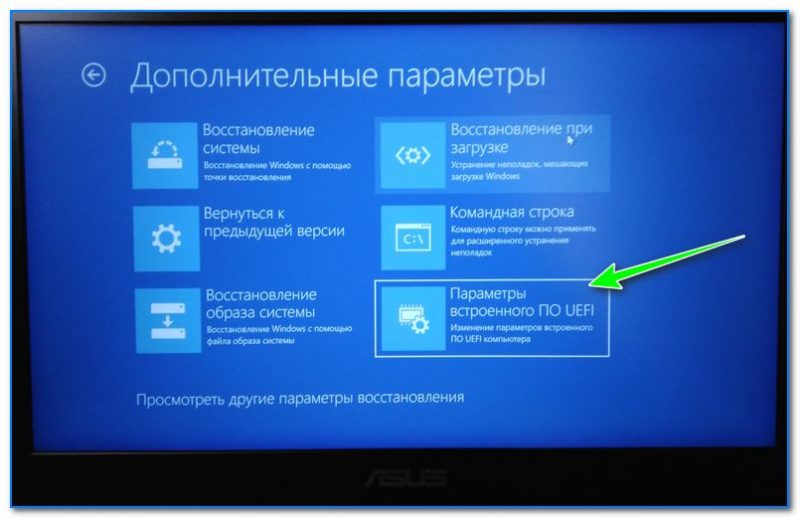
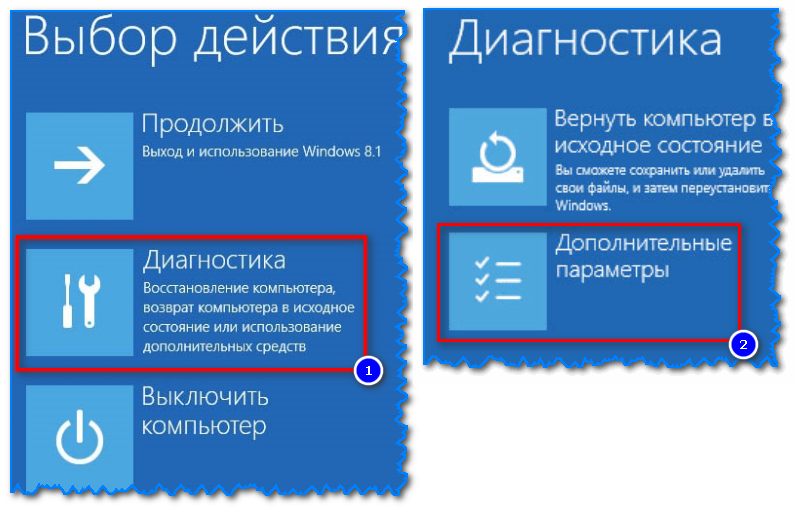
- после перезагрузки появится «синее меню»: в нем нужно будет выбрать вариант «Поиск и устранение неисправностей / доп. параметры / Параметры встроенного ПО UEFI»; 👇

Параметры встроенного ПО
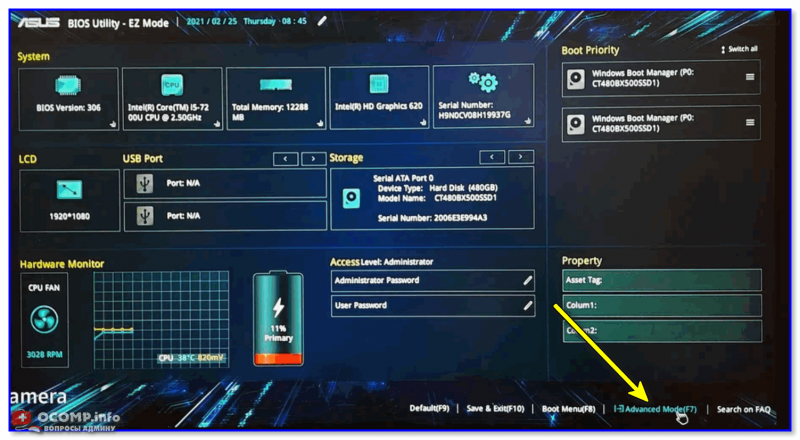
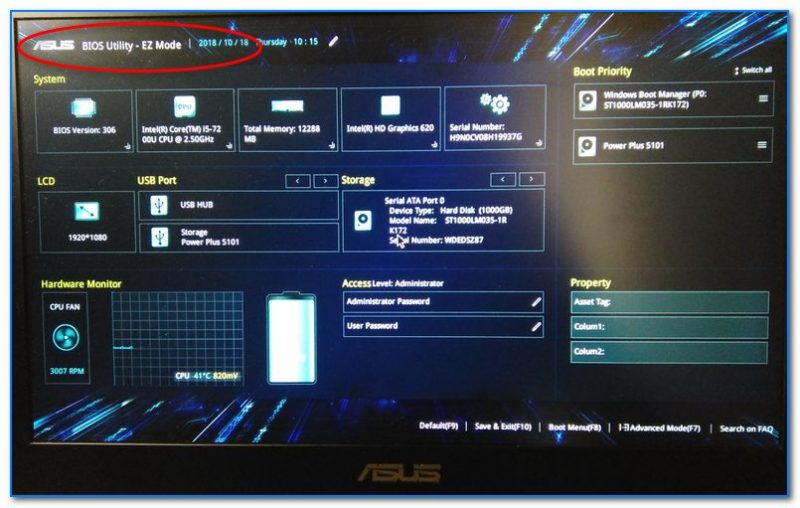
- ну и после еще одной перезагрузки — появится окно BIOS (UEFI). Можно приступить к настройкам! 👌

UEFI (Asus) — Advanced Mode

*
Из Windows 10
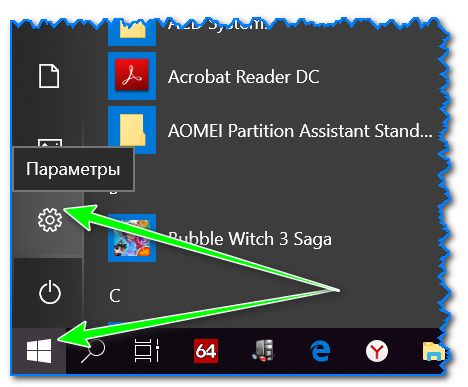
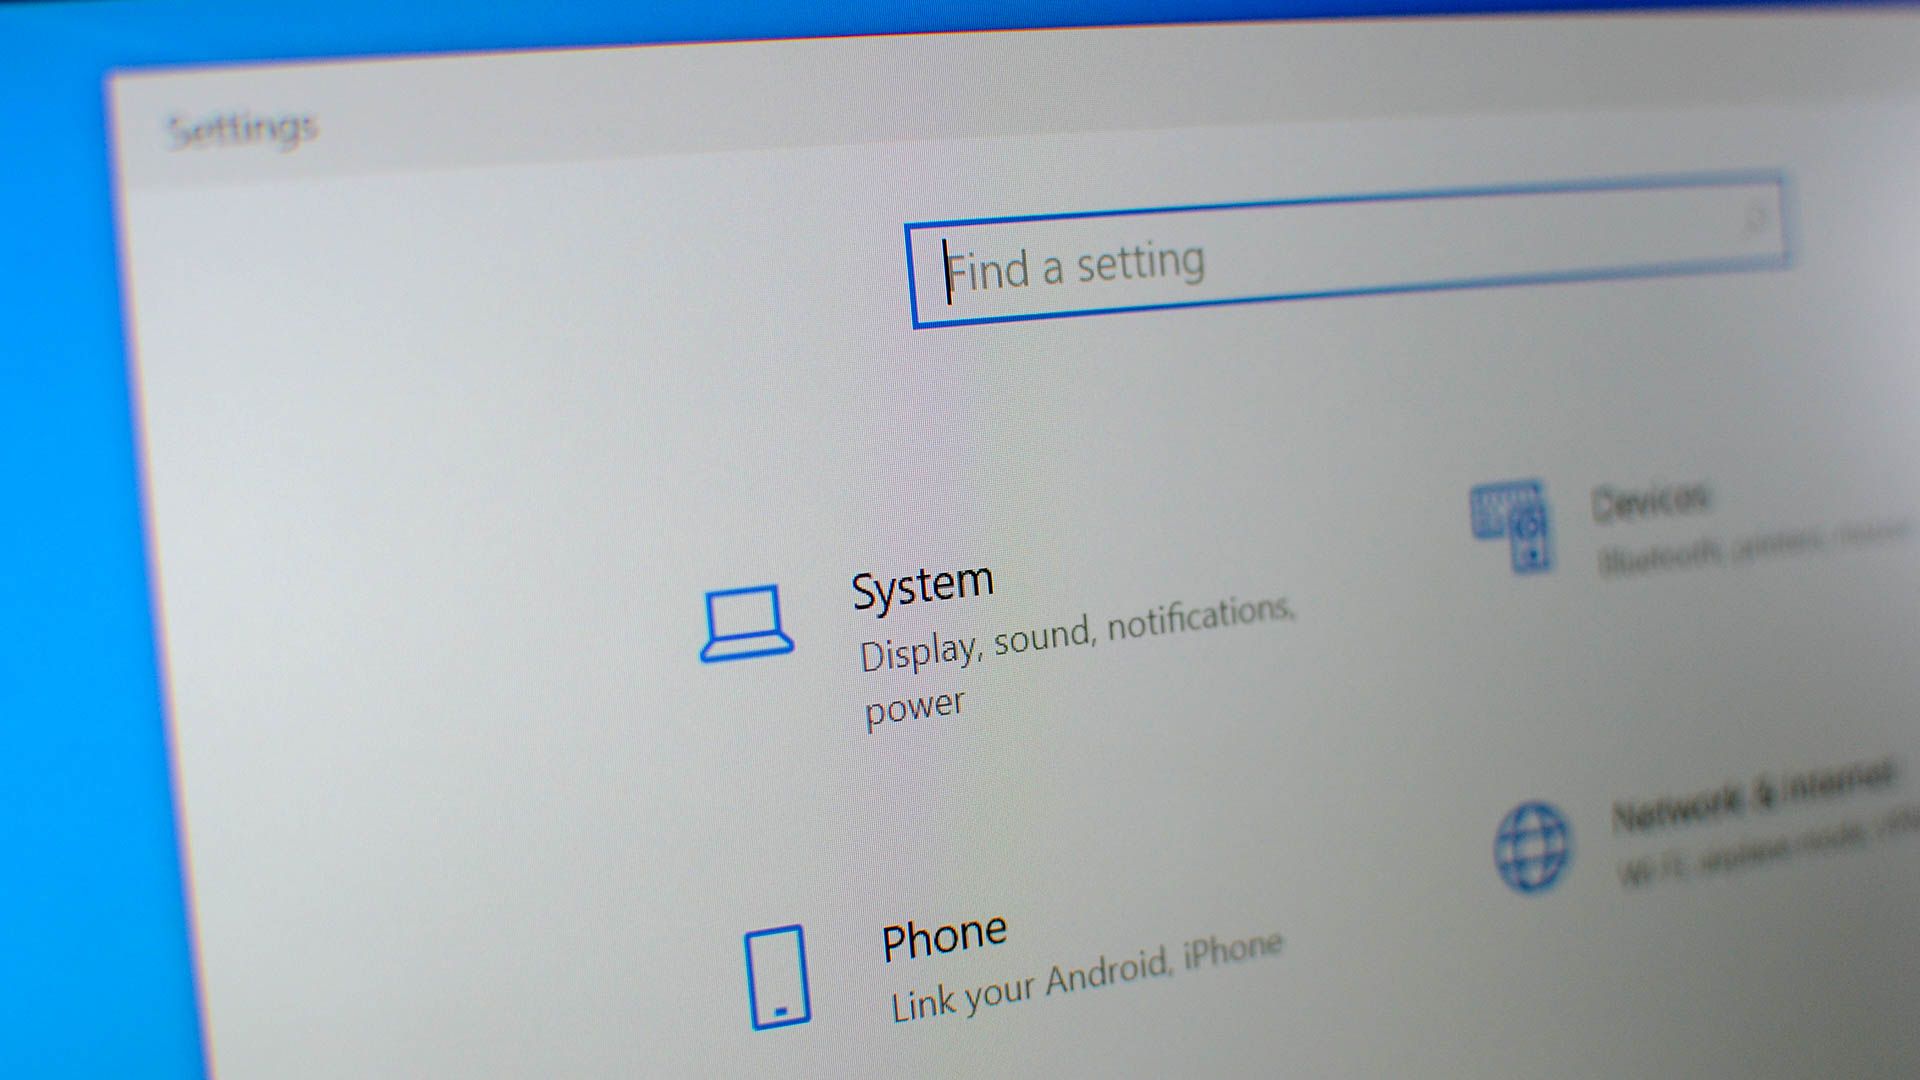
- Сначала необходимо зайти в параметры Windows (можно использовать сочетание Win+i, можно воспользоваться меню ПУСК);

Параметры (Windows 10)
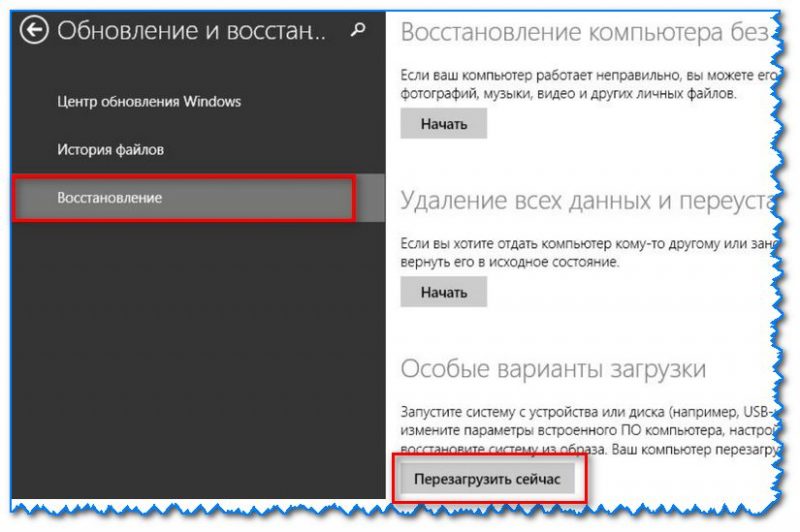
- далее необходимо открыть раздел «Обновление и безопасность/Восстановление» и найти подраздел «Особые варианты загрузки»: нажать в нем кнопку «Перезагрузить сейчас». См. пример ниже (цифры 1, 2, 3); 👇

Обновление и безопасность — восстановление (кликабельно)
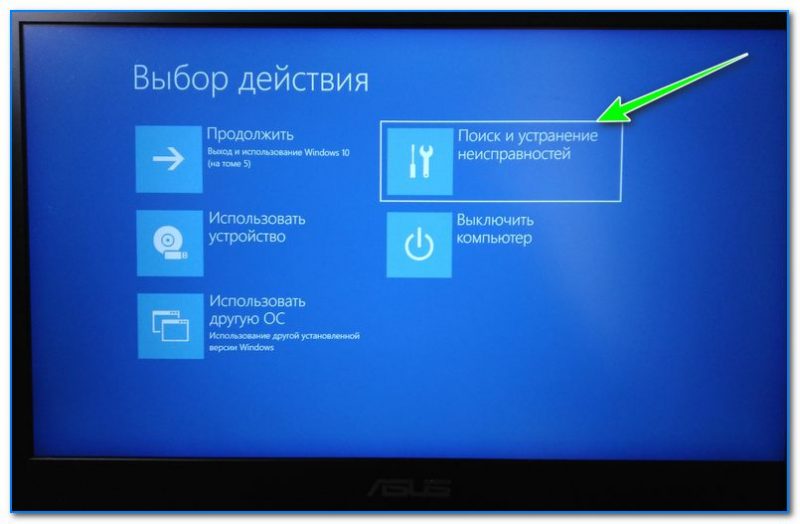
- после чего откройте раздел «Поиск и устранение неисправностей»;

Выбор действия (Windows 10)
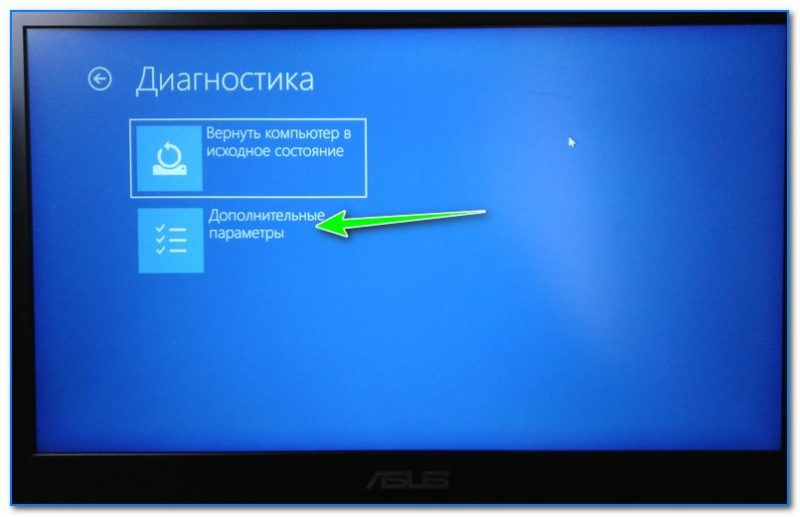
- затем подраздел «Дополнительные параметры»;

Диагностика — доп. параметры
- далее вкладку «Параметр встроенного ПО UEFI» (пример на фото ниже 👇);

Параметры встроенного ПО
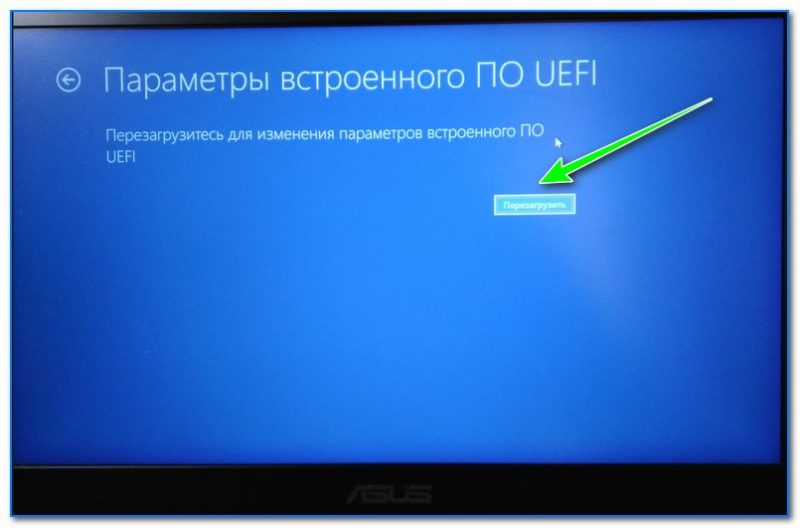
- ну и последнее, что осталось — это согласиться на перезагрузку; 👇

Перезагрузить
- после перезагрузки компьютера (ноутбука) у вас автоматически будет осуществлен вход в настройки UEFI (пример ниже 👇). Никаких кнопок дополнительно нажимать не нужно!

BIOS Utility — вход выполнен

*
Из Windows 8, 8.1
В принципе действия аналогичны, правда, интерфейс несколько отличается от Windows 10.
- сначала передвиньте ползунок мышки вправо, чтобы появилось боковое меню: выберите «Параметры» (см. скрин ниже 👇);

Windows 8 — параметры
- далее щелкните по ссылке «Изменение параметров компьютера»;

Изменение параметров компьютера
- затем откройте раздел «Обновление и восстановление»;

Обновление и восстановление
- после чего в разделе «Восстановление» найдите подраздел «Особые варианты загрузки» и щелкните по кнопке «Перезагрузить сейчас»; 👇

Восстановление — перезагрузить сейчас
- далее компьютер будет перезагружен, и вы увидите меню с выбором действия: откройте вкладку «Диагностика», затем «Доп. параметры»; 👇

Выбор действия — диагностика
- затем «Параметры встроенного ПО UEFI» и согласитесь на перезагрузку: после нее компьютер сам автоматически откроет настройки UEFI (BIOS). 👇

Параметры встроенного ПО (Windows


*
С помощью командной строки, меню ПУСК
👉 Командная строка
- открываем командную строку (если не знаете как — см. вот эту инструкцию);
- далее нужно ввести команду shutdown.exe /r /o и нажать Enter;

shutdown.exe в командной строке
- после чего увидите сообщение, что через минуту ваш сеанс будет завершен;

Ваш сеанс будет завершен
- по прошествии этой минуты, вы увидите меню с выбором действия (дальше действия аналогичны предыдущим описываемым шагам, см. выше). 👇
Выбор действия


*
Меню ПУСК
Еще один альтернативный вариант — это зайти в меню ПУСК, нажать по кнопке «Выключения», после зажать клавишу SHIFT и выбрать вариант «Перезагрузка». Дальнейшие действия аналогичны предыдущим шагам.
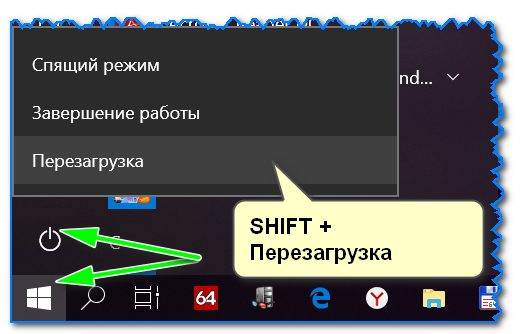
SHIFT + Перезагрузка
*
Дополнения по теме приветствуются…
Удачной работы.
👋
Первая публикация: 18.10.2018
Корректировка: 9.07.2021


The BIOS, or UEFI, can be used to configure your hardware and customize your system.
Quick Links
- What Is the BIOS?
- Accessing the BIOS/UEFI at Startup
- Accessing the BIOS From Within Windows 10
- Creating a Shortcut to Access the BIOS
- What to Do If You Can’t Access the BIOS
Key Takeaways
- The BIOS (or UEFI) is a software that initializes and tests hardware on your computer, and can be accessed to customize hardware functions.
- Certain options in the BIOS can physically damage your computer, so caution is necessary when making changes.
- There are multiple ways to access the BIOS, including during startup by using specific keys, through Windows 10 settings, or by creating a shortcut on your desktop. You may also Shift+Click the «Restart» button.
The BIOS, or UEFI, is a powerful tool for configuring your PC’s hardware such as your RAM, CPU, motherboard, and more. It also has options that can increase the security of your PC. Here are a few different ways to access the BIOS.
What Is the BIOS?
The Basic Input-Output System (BIOS) is low-level software that is programmed onto your computer’s motherboard. When you turn on your computer, the BIOS initializes and tests all of the hardware in your PC to ensure it is functioning correctly. By accessing the BIOS, you can customize how your PC’s hardware functions.
Be careful though — some of the options available in the BIOS can physically damage your computer.
If you’re going to try overclocking components, be sure you understand what overclocking is, and take the necessary precautions to do it safely. You can also do things like enable XMP profiles to change your RAM speed, or boot your computer from a disk or USB drive.
The BIOS has been replaced by the Unified Extensible Firmware Interface (UEFI) on modern computers, but the term BIOS is commonly used to refer to UEFI. UEFI adds a number of new features that make it different from BIOS.
Accessing the BIOS/UEFI at Startup
When you start your PC, there will usually be a splash screen that displays the manufacturer’s name or logo. To access your BIOS, you can hit a key while the manufacturer’s splash screen is visible. The keys you can press to access the BIOS will typically be displayed near the bottom. Usually, the key will be either F2 or Delete, but not always. The manual for your computer or motherboard will also contain this information.
If you don’t see anything because the screen flashes by too quickly, or hitting the correct key doesn’t bring you into the BIOS, it is possible that Fast Boot is enabled in the BIOS, or you have Fast Startup mode enabled in Windows 10.
Fortunately, there are other ways to access the BIOS.
Accessing the BIOS From Within Windows 10
There are a handful of ways to access the BIOS from Windows 10.
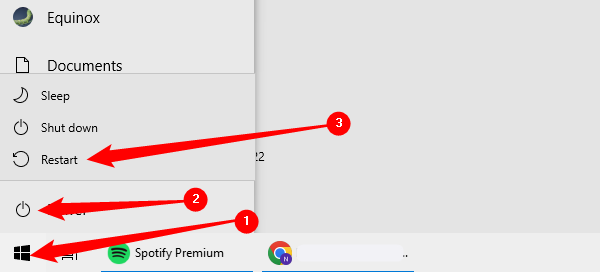
The simplest way to access the BIOS is with the Start button. Click the Start button, hit the power icon, and then hold Shift while you click «Restart.»
Alternatively, you can hit the Start button, in the search bar type «Change Advanced Startup Options» and then hit Enter. Go to the Advanced startup section of the window that pops up, and click the «Restart now» button.
If you used either of the two preceding methods, you’ll be sent to a blue screen with multiple options. Go to Troubleshooting > Advanced Options > UEFI Firmware Settings. You should then be at the BIOS.
If you don’t see «UEFI Firmware Settings» there are two likely explanations. The first is that the computer you’re using doesn’t have UEFI at all — this is especially likely if your PC is older, and actually has BIOS rather than UEFI. The second possibility is that your motherboard does have UEFI, but Windows 10 is booting from a drive that was partitioned using MBR and not GPT. If your boot drive was partitioned using MBR, it’ll force UEFI to use a BIOS Legacy mode that disables access from within Windows 10.
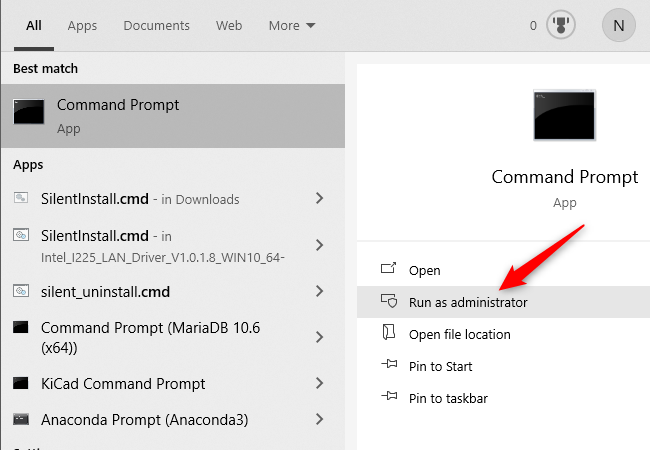
If you’d rather use Command Prompt to access the BIOS, click the Start button, type «cmd» in the search bar, and then select «Run as administrator.»
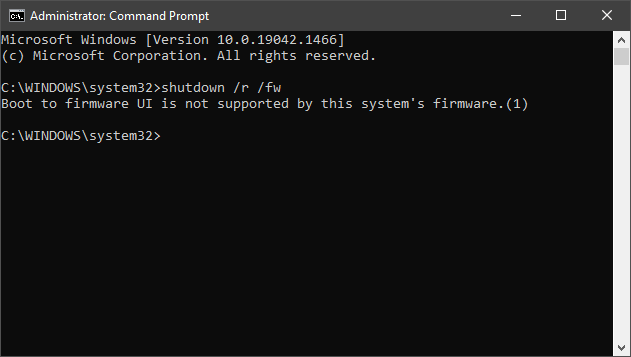
Then, type shutdown /r /fw into the Command Prompt window and press Enter.
If it worked, a window will pop up informing you that your PC will shut down in less than a minute.

You can type shutdown /r /fw /t 0 into the Command Prompt to remove the waiting period and restart instantly.
If you see the message «Boot to firmware UI is not supported by this system’s firmware» when you try to run the shutdown command, it probably means that your motherboard doesn’t have UEFI. It could also mean that Windows 10 is installed on a disk that was partitioned with MBR.
If you can’t access the BIOS/UEFI from within Windows 10, and your PC has Fast Boot enabled in the BIOS/UEFI, you’ll have to do some troubleshooting.
Creating a Shortcut to Access the BIOS
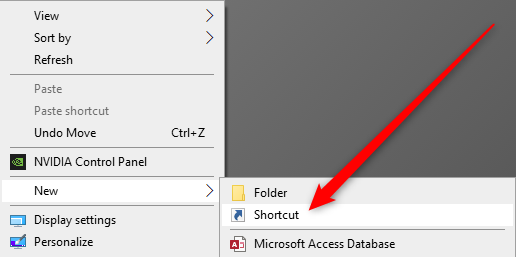
The command to shut down and go into the BIOS can easily be made into a shortcut for faster and more convenient access. Right-click empty space on your desktop and select New > Shortcut.
In the window that appears, type shutdown /r /fw where it says to type the location of the item, and then hit next. Name the shortcut something appropriate, then click «Finish.»
Once the icon is on your desktop, right-click it, and hit «Properties.» In the Properties window, click «Advanced.»
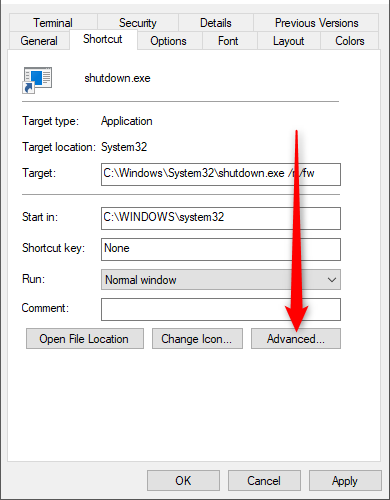
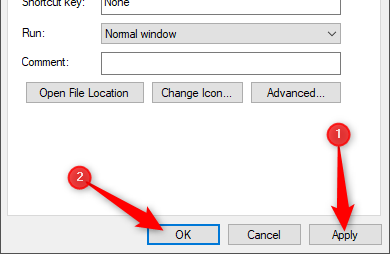
On this window, tick «Run as administrator», then hit «OK.»
Back on the Properties window, click «Apply» and then «OK» to finish creating the shortcut.
If you’d like, you can customize the icon of the shortcut by hitting the «Change Icon» button in the properties window. You can then select an icon from a number of default options, or you can make your own high-resolution icons out of any image.
What to Do If You Can’t Access the BIOS
If you can’t access your BIOS during startup, Fast Boot or Fast Startup could be the culprit. The terms Fast Boot and Fast Startup are often used interchangeably but are actually distinct.
Fast Boot usually refers to a setting in the BIOS or UEFI that changes the initial startup process of the computer. Fast Boot skips some of the hardware checks and initializations that normally occur when your PC is first turned on so that your operating system, like Windows 10, loads more quickly. There is an additional setting (sometimes called Ultrafast Boot) that is even faster because it doesn’t initialize things like USB controllers or disk drives. When that setting is enabled, USB devices like your mouse and keyboard won’t be usable until the operating system loads. It also prevents booting from DVDs or USB drives.
If that is the case for you, your best option is to try clearing your PC’s CMOS to reset your BIOS settings. Some newer or higher-end motherboards include buttons to clear the CMOS — check on the back of your PC, near the USB ports. If it is there, press and hold it for at least 10 seconds. By default, Fast Boot and Ultrafast Boot are disabled, so clearing your CMOS should enable you to hit the appropriate button to get into the BIOS during startup.
Fast Startup is a Windows feature that enables your computer to start more quickly after it was shut down. Windows 10’s Fast Startup mode can interfere with your ability to reach the BIOS if your computer had been shut off with Fast Startup mode enabled. Fast Startup mode doesn’t affect restarts though, so you should be able to reach your BIOS after a restart even with Fast Startup enabled.
If none of that works, you should check the documentation that came with your computer or motherboard. There may be more specific instructions for your machine that can help.
If you want to overclock components or simply change the boot sequence, you need to do that from BIOS. In this article, we are going to explain how to enter BIOS in Windows 10 and 11.
The simplest way to enter BIOS is to Shift-Click on the Restart button from Windows 10/11 Start menu. Another way is to press the BIOS hotkey, F2, F8, or Delete, while your computer boots up. If you still have trouble entering the BIOS, continue reading below to find out other solutions.
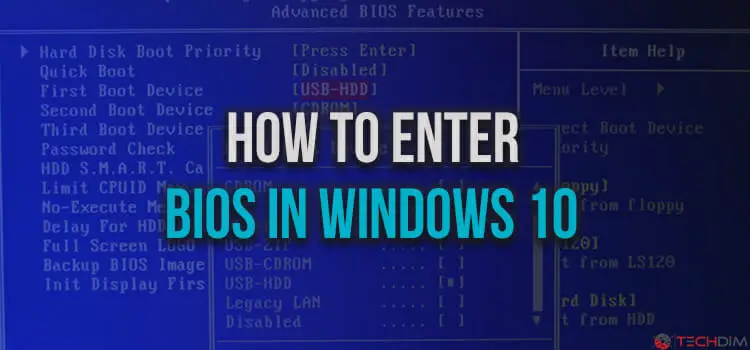
Table of Contents
- What Does BIOS Do for Your System?
- When Do You Need to Access BIOS?
- How to Enter Bios in Windows 10?
- Method-1: From Settings App
- Method-2: Using the specific key from the Keyboard
- Frequently Asked Questions
- What is the BIOS key for HP?
- What’s the BIOS key for Dell?
- How to set BIOS?
- Conclusion
What Does BIOS Do for Your System?
Here’s what the BIOS does to keep your computer running:
BIOS stands for Basic Input Output System. It’s a small software installed on every computer by the manufacturer company itself.
When Do You Need to Access BIOS?
Many Users Don’t Know What BIOS Is. It’s Totally Okay As Knowing BIOS Matters Isn’t A Mandatory Thing For Every Pc User. But If You Know The BIOS Stuffs, You Can Manage
Some Extra Facilities From It. Moreover, In Many Cases, You Have To Access Your BIOS Setting To Get Rid Of Problems
- Many users don’t know what BIOS is. It’s totally okay as knowing BIOS matters isn’t a mandatory thing for every pc user. But if you know the BIOS stuffs, you can manage
some extra facilities from it. Moreover, in many cases, you have to access your BIOS setting to get rid of problems. - As BIOS isn’t a part of OS, you have to access your BIOS if you want to change some settings related to your computer’s hard drive, motherboard, or components not related to OS.
- You can change your boot order from the BIOS setting. You must have to access BIOS if you want to change your boot order.
- You can change the settings of your Hard drive, Floppy drive, CD/DVD drive from BIOS.
- You can change CPU, PC memory settings, and System Voltages from BIOS.
- You can create, change, or remove the BIOS password from BIOS settings.
- You can customize your power button functions from BIOS. You can disable your computer’s logo if you wish.
- You can enable or disable the Power On Self Test, CPU internal cache, BIOS caching from BIOS settings.
- You can check CPU and System temperatures, Fan speeds, System voltages here. You can change Fan speed settings if you wish.
- You can choose to overclock both CPU and RAM to enhance performance.
There are several ways you can enter BIOS in windows 10. Let’s see them one by one.
Method-1: From Settings App
We cannot enter into BIOS directly from the settings menu as it’s a part of Windows 10. We will use the recovery app to enter into BIOS. Let’s go.
- Click on the windows start icon and then click on the option Settings.

- Now Click on the option ‘Update and Security’.


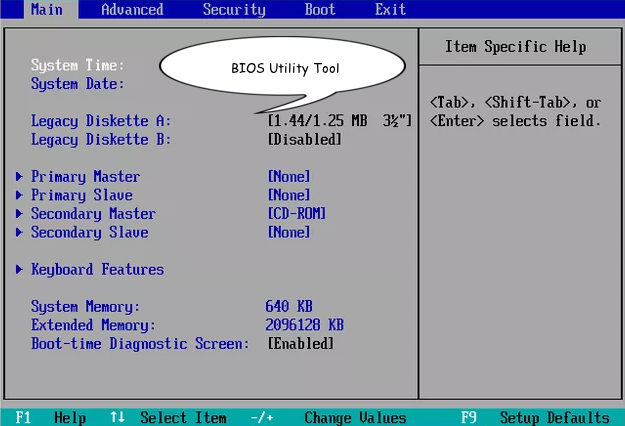
Your computer will be restarted now and you will be taken to the BIOS.
Method-2: Using the specific key from the Keyboard
This is an old method used to enter into BIOS in earlier versions of windows. This a simple technique to enter into BIOS but it isn’t that much efficient in Windows 10 as boot time is now faster than earlier versions of windows. But this is a relatively faster way to enter into BIOS. Let’s go to work.
- At first, make sure your computer is turned off. If not, turn off your computer.
- Now turn on your computer. Before loading your computer with OS, you will see a message on your computer’s screen regarding which key you have to press if you want to enter into BIOS. You will see message somewhat like the below messages:
- Enter BIOS by pressing [A Key name]
- Setup [A Key name]
- Press [A Key name] to enter BIOS
- Press [A Key name] to access BIOS
- Press [A Key name] to enter setup
- Press [A Key name] to enter system configuration
You have to notice the message carefully and find out the key or keys your system is telling to press in the message. Now several cases can happen→
- One thing can happen you cannot notice the error message as Windows 10 boot time is faster. If this happens, restart the process and try to notice the message carefully. You can pause this startup process by pressing the pause button from your keyboard. If you cannot notice the desired message, press Esc to hold your startup process while turning on your system and then notice the BIOS message.
- You may see the logo of your computer instead of any message regarding BIOS settings. If you see any logo of your computer while turning on your system, then press the Esc key from your keyboard. This time you should see a BIOS message.
- If you cannot see any BIOS message by any means (But you should), then visit the official website of your computer’s system providers and search that information. You can find it there.

- This time you should find out the key(s) you have to press to enter into BIOS. Now restart or turn on(if it’s been turned off) your computer and press the key(s) quickly while your computer is being turned on. You have to press the desired key(s) before your OS has been loaded. You are done now. You will be taken to BIOS after pressing the selected key(s).


Frequently Asked Questions
What is the BIOS key for HP?
Usually for HP computers and laptops, the BIOS key is F10. Keep pressing it while your computer boots up to enter BIOS.
What’s the BIOS key for Dell?
For Dell computers and laptops, it’s F12.
How to set BIOS?
To manually set the BIOS, find the Load Optimized Defaults or Load Safe Defaults option in BIOS, select the option, hit Enter and then Save Changes.
Conclusion
Hope, now you know to enter BIOS in windows 10. I have described two simple methods. I would suggest you follow method-1 as it is easier than method-2. However, if you cannot enter BIOS with method-1, you can follow method-2 to get your things done. Follow the above-mentioned instructions carefully and hopefully, you have to face no problem. Go, check your BIOS!