
Для решения ошибки «Reason 442: Failed to enable Virtual Adapter» необходимо выполнить следующее:
- Открываем редактор реестра (набираем «regedit» в строке поиска, запускаем найденное приложение);
- Находим ветку HKEY_LOCAL_MACHINE\SYSTEM\CurrentControl
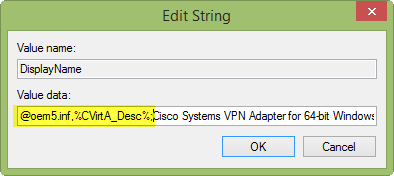
Set\Services\CVirtA; - Находим параметр DisplayName;
- Значение этого параметра содержит что-то вроде «oem4.inf,%CVirtA_Desc%;Cisco Systems VPN Adapter for 64-bit Windows». Необходимо изменить это значение, оставив только «Cisco Systems VPN Adapter for 64-bit Windows».
http://habrahabr.ru/post/157807/
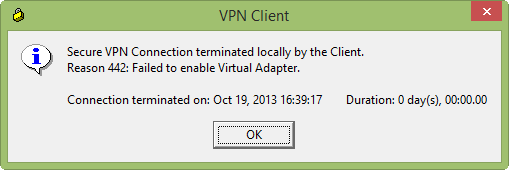
Secure VPN Connection terminated locally by the Client.
Reason 442: Failed to enable Virtual Adapter.
UPDATE: Works with Windows 10: A number of readers have reported this works for Windows 10.
If you receive this error on Windows 8.1 or Windows 10 while trying to connect with the Cisco VPN Client then the solution is a simple registry fix.
Check out this quick 3 minute video on how to fix. Prefer written instructions? They are right below the video.
To fix:
- Click Start and type RegEdit in the Search field and hit enter.
- Navigate to HKEY_LOCAL_MACHINE\SYSTEM\CurrentControlSet\Services\CVirtA
- Find the String Value called DisplayName
- Right-click and select Modify from the context menu.
- In Value data, remove @oemX.inf,%CVirtA_Desc%;. The Value data should only contain Cisco Systems VPN Adapter for 64-bit Windows.
- Click Ok.
- Close Registry Editor.
- Retry your Cisco VPN Client connection.

I hope this has helped! If you have some extra time, drop a comment in the box below.

Join the conversation on Twitter @SuperTekBoy.


Gareth is an Microsoft MVP specializing in Exchange and Office 365. Gareth also contributes to the Office 365 for IT Pros book, which is updated monthly with new content. Find Gareth on LinkedIn, Twitter, or, Facebook.
Reader Interactions
Loading
 This article shows to how correctly install Cisco VPN Client (32 & 64 bit) on Windows 10 (32 & 64 bit) using simple steps, overcome the ‘This app can’t run on this PC’ installation error, plus fix the Reason 442: Failed to enable Virtual Adapter error message. The article applies to New Windows 10 installations or Upgrades from earlier Windows versions and all versions before or after Windows 10 build 1511. We also include all required VPN files directly downloadable from Firewall.cx to save time and trouble from broken 3rd-party links.
To simplify the article and help users quickly find what they are after, we’ve broken it into the following two sections:
- How to Install Cisco VPN client on Windows 10 (clean installation or upgrade from previous Windows), including Windows 10 build prior or after build 1511.
- How to Fix Reason 442: Failed to enable Virtual Adapter on Windows 10

Figure 1. The Cisco VPN Client Reason 442: Failed to enable Virtual Adapter error on Windows 10
Windows 7 32bit & 64bit users can read our Cisco VPN Client Fix for Windows 7 Operating System.
Windows 8 users can read our Cisco VPN Client Fix for Windows 8 Operating System.
Windows 10 32bit & 64bit Anniversary Update 1607 users can read our Fix Cisco VPN Client Break After Windows 10 Anniversary Update 1607.
How To Install Cisco VPN Client On Windows 10 (New installations or O/S Upgrades)
The instructions below are for new or clean Windows 10 installations. Users who just upgraded to Windows 10 from an earlier Windows version, will need to first uninstall their SonicWALL VPN Client & Cisco VPN client, then proceed with the instructions below.
- Download and install the SonicWALL Global VPN Client from Firewall.cx’s Cisco Tools & Applications section. This is required so that the DNE Lightweight filter network client is installed on your workstation. You can later on remove the SonicWall Global Client.
- Download and install the Cisco VPN client (32 or 64 bit) from Firewall.cx’s Cisco Tools & Applications section.
- Optional: Uninstall the SonicWALL Global VPN Client.
Note: If you receive the Windows message “This app can’t run on this PC”, go to the folder where the Cisco VPN client was extracted and run the “vpnclient_setup.msi” file. If you don’t remember where the file was extracted, execute the downloaded file again and select an extraction path e.g c:\temp\ciscovpn\ so you know where to look for it.

Figure 2. Overcoming the “Cisco VPN Client doesn’t work on this version of Windows” message
After successfully installing the Cisco VPN Client, you can uninstall the SonicWALL Global VPN Client to save system resources and stop it from running in the future, however ensure you leave all uninstall options to their default. This means leave unchecked the two options below during the uninstall process:

Figure 3. Uninstalling the SonicWALL Global VPN Client after Cisco VPN Client installation
This completes the installation phase of the Cisco VPN client on Windows 10.
How To Fix Reason 442: Failed To Enable Virtual Adapter On Windows 10
When attempting to connect to a VPN gateway (router or firewall) using the Cisco VPN Client on Windows 10, it will fail to connect because of the following reason: Reason 442: Failed to Enable Virtual Adapter.
This fix is very easy and identical to Windows 8 Cisco VPN Client fix, already covered on Firewall.cx:
1. Open your Windows Registry Editor by typing regedit in the Search the web and Windows prompt.
2. Browse to the Registry Key HKEY_LOCAL_MACHINE\SYSTEM\CurrentControlSet\Services\CVirtA
3. From the window on the right, select and right-click on DisplayName and choose Modify from the menu. Alternatively, double-click on DisplayName:

Figure 4. Modify & correct the Windows 10 Cisco VPN Registry entry
For Windows 10 32bit (x86) operating systems, change the value data from “@oem8.inf,%CVirtA_Desc%;Cisco Systems VPN Adapter” to “Cisco Systems VPN Adapter”.
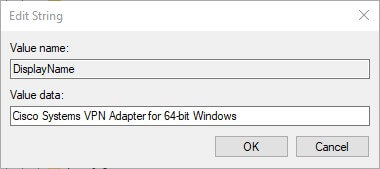
For Windows 10 64bit (x64) operating systems, change the value data from “@oem8.inf,%CVirtA_Desc%;Cisco Systems VPN Adapter for 64-bit Windows” to “Cisco Systems VPN Adapter for 64-bit Windows” (shown below):

Figure 5. Editing the Value Data for the Cisco VPN Client
The registry key now shows the correct DisplayName value data:

Figure 6. The correct 64bit Windows 10 registry values for the Cisco VPN Client to work
At this point, you should be able to connect to your VPN Router or Gateway without any problems.
by Matthew Adams
Matthew is a freelancer who has produced a variety of articles on various topics related to technology. His main focus is the Windows OS and all the things… read more
Updated on
- The Failed to enable Virtual Adapter error in Cisco has a bunch of workarounds.
- More often than not it’s caused by a conflicting ICS setting on your PC.
- Our guide can teach you how to bypass this annoying Cisco issue in no time.
- A popular alternative is upgrading to a better enterprise VPN solution.

The Failed to enable Virtual Adapter error message is one that pops up for some Cisco VPN client software users. The exact error message states: Secure VPN Connection terminated locally by the Client. Reason 442: Failed to enable Virtual Adapter.
As a result, the Cisco VPN users can’t connect to the VPN server. There are, however, a few confirmed resolutions for that error message.
This is how you can fix virtual adapter errors
How to fix Cisco VPN client failed to enable virtual adapter
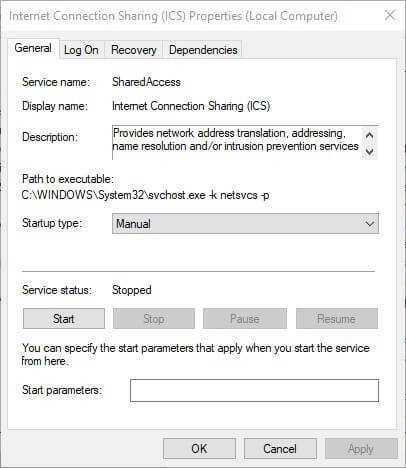
1. Turn Off the Internet Connection Sharing (ICS) Service
The Virtual Adapter error can be due to the Internet Connection Sharing (ICS) service. Some users have stated that they’ve fixed the error by turning that service off. This is how users can disable Internet Connection Sharing (ICS).
- Open Run by pressing the Windows key + R keys simultaneously.
- Enter services.msc in the Open text box, and press the Return key (or click OK).
- Double-click Cisco Systems, Inc. VPN Service on the Services window.
- Click the Stop button.
- Press the Apply and OK buttons to close the Cisco Systems, Inc.VPN Properties window.
- Double-click Internet Connection Sharing (ICS) to open the window shown directly below.

- Click the Stop button to terminate it.
- Select Disabled from the Startup type drop-down menu.
- Click the Apply button to apply the new settings.
- Select the OK option to close the window.
- Then right-click the Cisco System, Inc. VPN Service and select Start.
- Now try connecting with the Cisco VPN client.
Note: It is important to mention that the Cisco VPN Client is no longer supported by CISCO Systems since 2014 and that no updates were released for this product since 2012.
Running obsolete software can cause more damage than you might think, which is why we recommend a modern VPN client like Private Internet Access.

Switching to a world-leading VPN client like Kape Technologies owned PIA can significantly improve your online experience by streamlining your connection, reducing loading times, and enhancing your download speeds.
⇒ Install Private Internet Access
With an impressive network of global gateways, you will never have to worry about your connection to worldwide servers not being successful. Plus, your traffic data will be routed through secure VPN tunnels and protected by the best-in-class encryption technology.
Security-oriented features are complimented by PIA’s absolute privacy guarantee: between IP cloaking, anonymous browsing, and a strict no-log policy, your identity, location, and data including your online activity will never risk falling into the wrong hands.

Private Internet Access
Still using the Cisco VPN client? It’s time to explore the modern face of online privacy with PIA!
2. Edit the Registry
This resolution is more specifically for Windows 10, 8.1, and 8. Lots of Cisco VPN users have stated that editing the DisplayName string value for CVirtA with the Registry Editor fixed the Virtual Adapter error for them. Cisco VPN users should edit the registry as follows.
- First, open the Registry Editor by entering regedit in Run and clicking OK.
- Copy this registry path with the Ctrl + C hotkey:
HKEY_LOCAL_MACHINESYSTEMCurrentControlSetServicesCVirtA.Then paste the path into the Registry Editor’s address bar with the Ctrl + V hotkey, and press the Return key.
- Right-click DisplayName and select Modify to open its Edit String window.

- Next, erase
@oem8.inf,%CVirtA_Desc%from the Value data box. Then the Value data box should include either Cisco Systems VPN Adapter for 64-bit Windows or Cisco Systems VPN Adapter depending on whether Windows is a 32 or 64-bit platform. - Press the OK button to close the Edit String window.
- Close the Registry Editor.
3. Turn Off Internet Connection Sharing
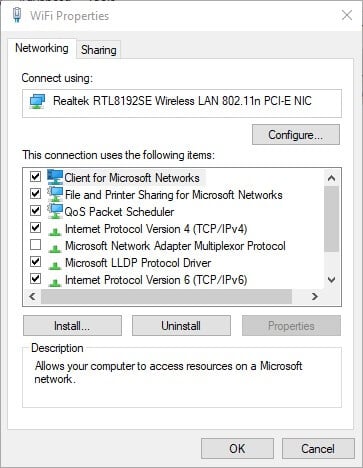
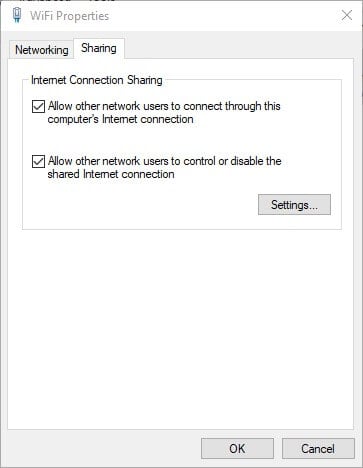
- Some users have also confirmed that turning internet sharing off for the network adapter that provides internet for Cisco VPN fixes the issue. To do that, enter ncpa.cpl in Run and click OK.

- Right-click the internet network adapter and select Properties to open the window below.
- Click the Sharing tab shown directly below.
- Deselect the Allow other network users to connect through this computer’s Internet connection option on the Sharing tab.
- Press the OK button to close the properties window.
Those are three confirmed resolutions that fix the Failed to enable Virtual Adapter error in Windows 10, 8.1, 8, and 7.
Note that Windows 10 doesn’t officially support Cisco VPN, so it’s fairly essential to edit the registry as outlined above to get the client up and running on that platform. Ready to tackle this issue? Let us know how it worked in the comments section.
![]()