This guide will help you get started on setting up your very first React Native for Windows app.
Make sure you have installed all of the development dependencies.
For information around how to set up React Native, see the React Native Getting Started Guide.
Remember to call react-native init from the place you want your project directory to live.
npx react-native@nightly init <projectName> --version "nightly"
Navigate into this newly created directory
Once your project has been initialized, React Native will have created a new sub directory where all your generated files live.
cd projectName
Install the Windows extension
Lastly, install the React Native for Windows packages.
npx react-native-windows-init --overwrite
The —overwrite flag copies a custom
metro.config.jsfile. If you are starting a new app, this should have no impact. If you are adding Windows to your existing app and you have modified themetro.config.jsfile, please back up your changes, run the command and copy over to take effect.
For information on the options that react-native-windows-init takes see React Native Windows Init CLI.
Running a React Native Windows App
Make sure a browser is launched and running before running a React Native Windows app.
Also ensure your system meets all the requirements to build a Windows app as well.
-
Without Using Visual Studio
In your React Native Windows project directory, run:
npx react-native run-windowsFor information on the options that
@react-native-windows/clitakes see React Native Windows CLI.A new Command Prompt window will open with the React packager as well as a
react-native-windowsapp. This step may take a while during first run since it involves building the entire project and all dependencies. You can now start developing! :tada: -
Using Visual Studio
- From the root of the project directory, run the following script which will automatically link your app’s dependencies:
npx react-native autolink-windows - Open the solution file in the application folder in Visual Studio (e.g.,
AwesomeProject/windows/AwesomeProject.slnif you usedAwesomeProjectas<projectName>) - Select the
Debugconfiguration and thex64platform from the combo box controls to the left of theRunbutton and underneath theTeamandToolsmenu item. - Run
yarn start(ornpm start) from your project directory, and wait for the React Native packager to report success. - Click the
Runbutton to the right of the platform combo box control in VS, or select theDebug->Start without Debuggingmenu item. You now see your new app and Chrome should have loadedhttp://localhost:8081/debugger-ui/in a new tab. PressF12orCtrl+Shift+Iin Chrome to open its Developer Tools. :tada:
- From the root of the project directory, run the following script which will automatically link your app’s dependencies:
-
With VS Code
- Open your applications folder in VS Code.
- Install the React Native Tools plugin for VS Code.
- Create a new file in the applications root directory,
.vscode/launch.jsonand paste the following configuration:
{ "version": "0.2.0", "configurations": [ { "name": "Debug Windows", "cwd": "${workspaceFolder}", "type": "reactnative", "request": "launch", "platform": "windows" } ] }- Press
F5or navigate to the debug menu (alternatively pressCtrl+Shift+D) and in the Debug drop-down select «Debug Windows» and press the green arrow to run the application.
Authoring Native Modules
See Native Modules and React Native Windows.
Building a standalone React Native Windows App
Follow these steps to build a version of your app that you can install or publish to the store. This version will package your bundle and assets into the APPX package so you don’t need to run Metro.
- Open the solution in Visual Studio
- Select the Release configuration from the Configuration Manager drop-down.
- Build the solution. You can now launch without first launching Metro.
- If you want to build an APPX package to share or publish, use the Project > Publish > Create App Packages… option.
The Debug configuration uses the Web Debugger by default, which means the application’s JavaScript code runs in Chrome.
If you’re getting different runtime behavior between the Release and Debug configurations, consider disabling theUseWebDebuggersetting inApp.cpporApp.xaml.csto get the same behavior in the Debug configuration.
See also this article for additional details: https://techcommunity.microsoft.com/t5/windows-dev-appconsult/getting-started-with-react-native-for-windows/ba-p/912093#
Время на прочтение
2 мин
Количество просмотров 43K
Доброго времени суток!
Решив начать разрабатывать приложения на React Native, я столкнулся с проблемами разворачивания окружения. Сегодня я хочу поделиться опытом его настройки.
Конечно, на официальном сайте есть подробное описание, но следуя только этим рекомендациям, было довольно сложно сделать все настройки.
Итак, начнём:
Node, Python2, JDK
- Установить NodeJS. У меня последняя версия на момент написания статьи 10.11.0
- Установить Python2 и JavaSE. Использовался jdk-10.0.2
React Native CLI
- Установим React Native CLI
npm install -g react-native-cli
Android development environment
- Скачиваем и устанавливаем Android Studio
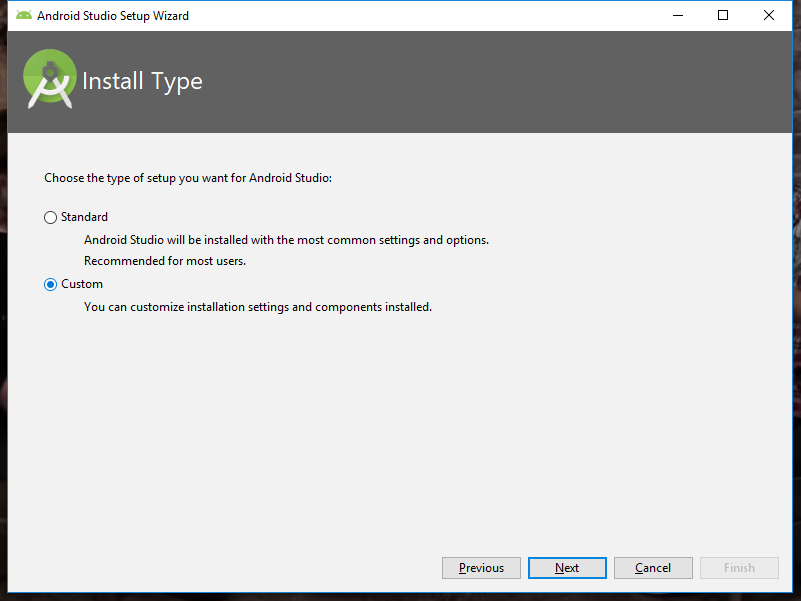
После запуска выбираем кастомную установку

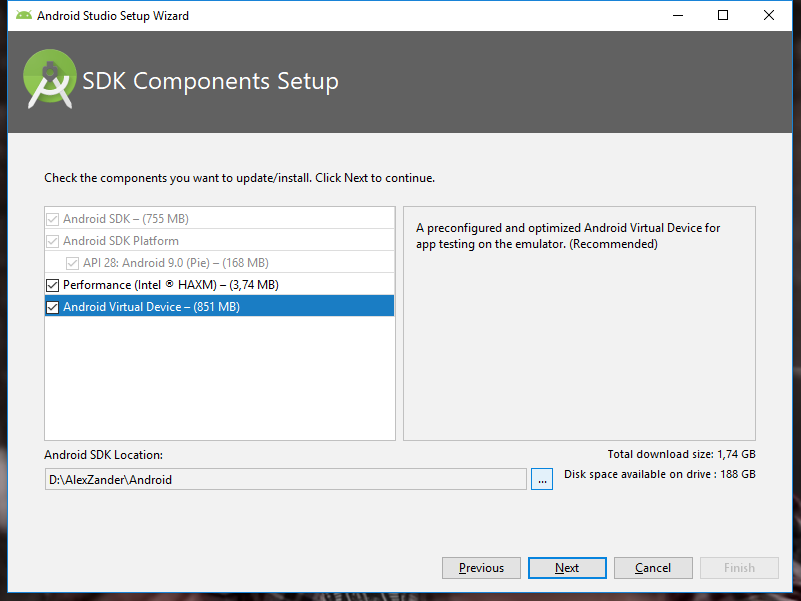
Далее отмечаем галочкой «Android Virtual Device» и указываем пусть до папки Android — либо оставляем как есть C:\Users\%USERNAME%\AppData\Local\Android\Sdk
Главное, чтобы в пути не было кириллицы!Особенно с этим могут возникнут проблемы в будущем. Например, у меня имя пользователя системы было на кириллице «C:\Users\Александр», и после запуска приложения grandle не мог найти путь, т. к. путь выглядел как «C:\Users\????????\…»
Нажимаем «далее». Оставляем рекомендуемый объем оперативной памяти, нажимаем далее и устанавливаем.
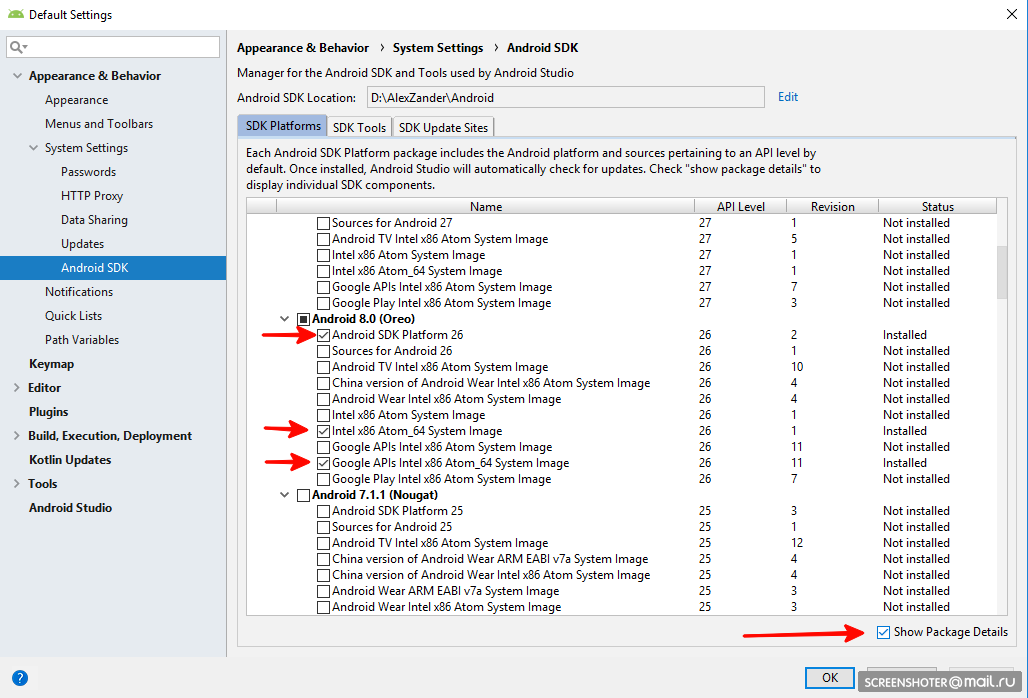
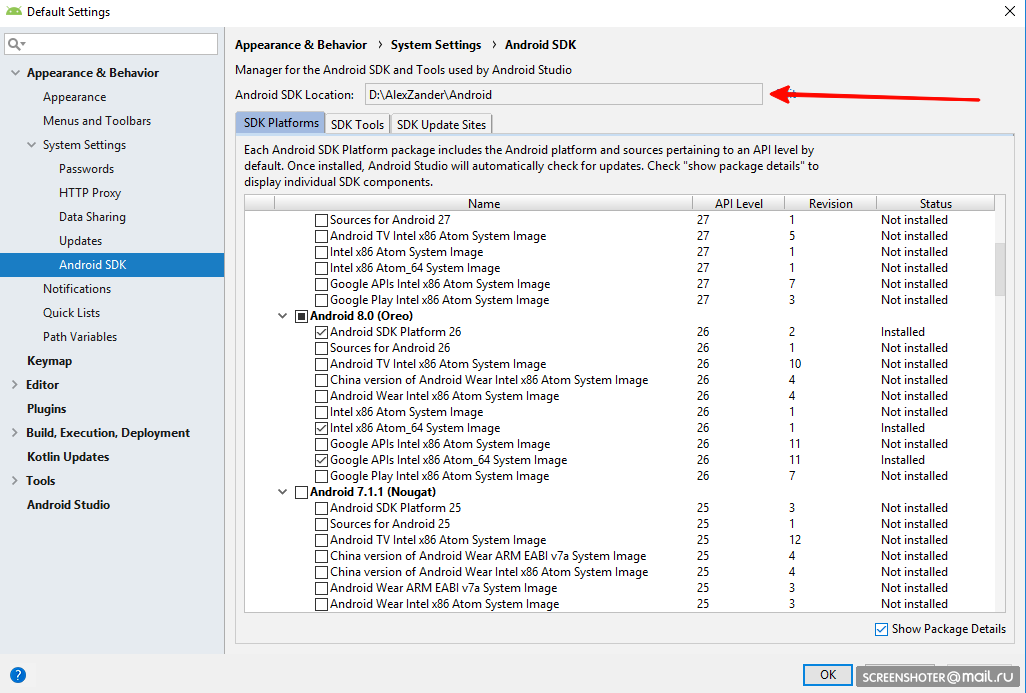
- Android SDK — открываем студию и переходим в настройки
Appearance & Behavior → System Settings → Android SDK.На вкладке «SDK Platforms» включаем галочку «Show Package Details» и для «Android 8.0 (Oreo)» устанавливаем:
- Android SDK Platform 26
- Intel x86 Atom_64 System Image
- Google APIs Intel x86 Atom_64 System Image
Теперь выбираем вкладку «SDK Tools», включаем галочку «Show Package Details»
и устанавливаем пакет- «28.0.3»
Нажимаем
"Apply".
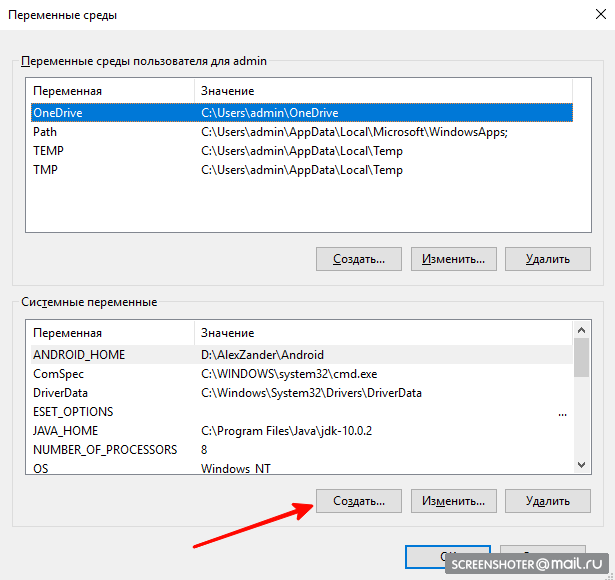
Переменные среды
- ANDROID_HOME
Создадим переменную для ANDROID_HOME:- Имя переменной ANDROID_HOME
- Значение переменной (можно посмотреть в Android Studio)
- JAVA_HOME
По аналогии создадим переменную JAVA_HOME:- Имя переменной: JAVA_HOME
- Значение переменной: C:\Program Files\Java\jdk-(версия)
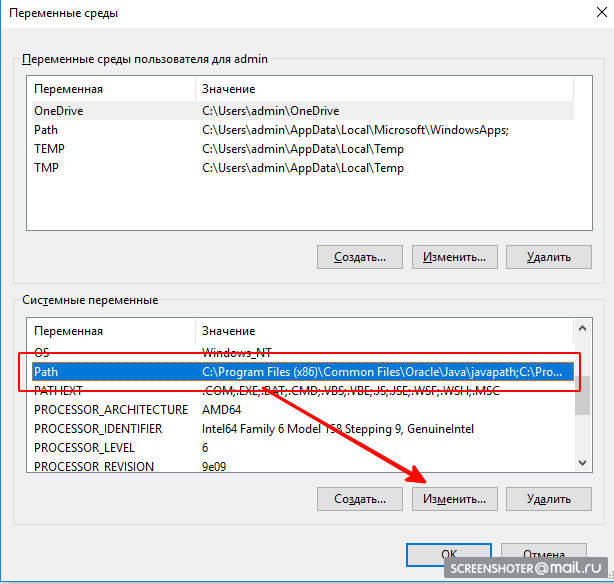
- Изменим системную переменную Path:
Добавим 4 значения:
- %JAVA_HOME%\bin
- %ANDROID_HOME%
- %ANDROID_HOME%\platform-tools
- %ANDROID_HOME%\watchman
Создаем приложение и запускаем эмулятор
- Переходим в удобную для нас папку в консоли и набираем:
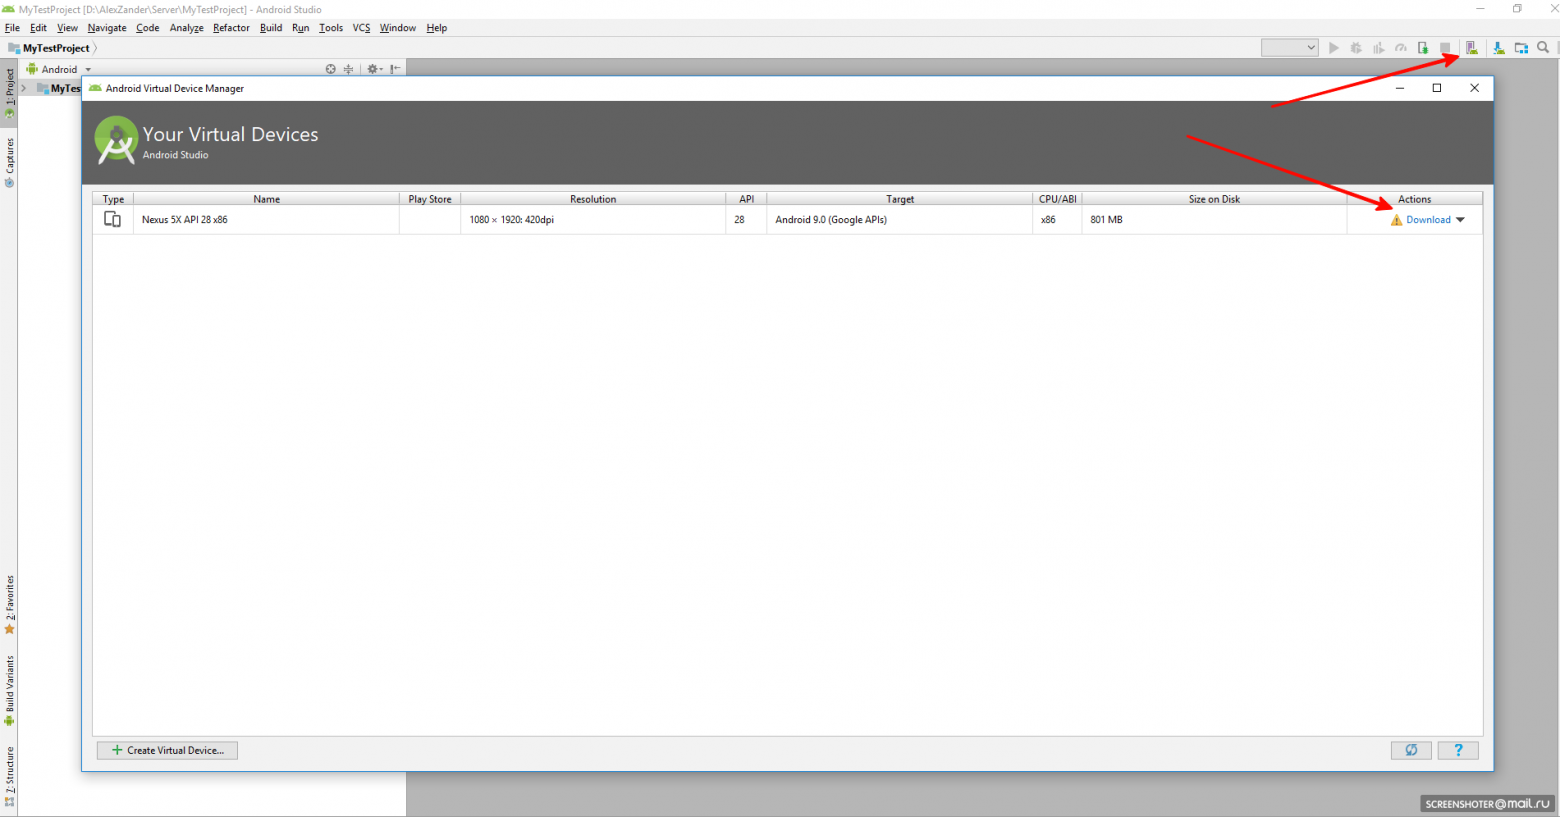
react-native init MyTestProject - Открываем в Android Studio наш проект и открываем AVD Manager
Если AVD не скачан, скачиваем и запускаем
- Далее переходим в консоли в папку с приложением и набираем:
react-native run-androidПосле чего нашел приложение запустилось.
В этой статье использовались официальное руководство от React Native
+ личный опыт!Надеюсь, эта статья поможет тем, кто столкнулся с проблемами или решил начать разрабатывать нативные приложения на React
.
Хабы:
- Блог компании Neoflex
- Разработка мобильных приложений
- ReactJS
React Native — это платформа разработки мобильных приложений, которая позволяет создавать кросс-платформенные приложения с использованием JavaScript и React. Она обеспечивает быстрое и эффективное создание приложений для iOS и Android с использованием единого кодовой базы.
Если вы разработчик и хотите установить React Native на Windows, следуйте этой подробной инструкции. В начале вам понадобится установить Node.js и Git на вашу операционную систему. Node.js — это среда выполнения JavaScript, а Git — система контроля версий. Установка и настройка Node.js и Git позволит вам использовать все возможности React Native.
Далее вам потребуется установить Android Studio, которая является интерфейсом разработки для платформы Android. Android Studio обеспечит вас всем необходимым инструментарием для создания и отладки Android-приложений. Также вам необходимо установить Java Development Kit (JDK), который является необходимым для компиляции и запуска кода Java, используемого в Android-разработке.
После установки всех необходимых компонентов вы будете готовы установить React Native на Windows и начать создание своих мобильных приложений. Вам также понадобится установить Android Virtual Device (AVD) для эмуляции Android-устройства на вашем компьютере, чтобы вы могли протестировать свои приложения без физического устройства.
Следуя этой подробной инструкции, вы сможете установить React Native на Windows и начать разрабатывать кросс-платформенные мобильные приложения с использованием React и JavaScript. Это мощный и эффективный инструмент для создания современных приложений для iOS и Android. Установите все необходимые компоненты, настройте и запустите режим разработки, и вперед — создавайте ваши приложения с React Native!
Содержание
- React Native: установка на Windows
- Подготовка операционной системы
- Установка Node.js и npm
- Настройка Android Studio
- Установка React Native
React Native: установка на Windows
Перед установкой React Native вам потребуется установить несколько программ и зависимостей:
1. Убедитесь, что на вашем компьютере установлена последняя версия Node.js. Можно скачать ее с официального сайта Node.js и выполнить установку.
2. Установите Java Development Kit (JDK). Вы можете скачать его с официального сайта Oracle и установить на ваш компьютер.
3. Установите Android Studio. Это окружение разработки для разработки Android-приложений. Вы можете скачать его с официального сайта Android Studio и выполнить установку.
4. Установите Android SDK, интегрированный в Android Studio. Включите нужные пакеты и зависимости для разработки Android-приложений.
Теперь, когда все необходимое установлено, вы готовы установить React Native:
1. Откройте командную строку или терминал и выполните команду:
npm install -g react-native-cli
Эта команда установит React Native CLI глобально на вашем компьютере.
2. Создайте новый проект React Native, выполнив следующую команду:
npx react-native init MyApp
Вместо «MyApp» вы можете указать любое имя для своего проекта.
3. Перейдите в каталог вашего проекта:
cd MyApp
4. Запустите проект с помощью следующей команды:
npx react-native run-android
Эта команда скомпилирует ваш проект и запустит его на эмуляторе Android или подключенном Android-устройстве.
Теперь React Native установлен на вашем компьютере и вы можете начать разрабатывать мобильные приложения на Windows!
Подготовка операционной системы
Перед установкой React Native на операционной системе Windows необходимо выполнить несколько предварительных действий.
1. Установите Node.js. React Native работает на основе Node.js, поэтому его наличие обязательно. Загрузить установочный файл Node.js можно с официального сайта https://nodejs.org/. После загрузки запустите установку с помощью установочного файла и следуйте инструкциям на экране.
2. Установите Java Development Kit (JDK). React Native использует JDK для разработки Android-приложений. Скачать JDK можно с официального сайта Oracle: https://www.oracle.com/java/technologies/javase-jdk14-downloads.html. После того, как установка будет завершена, убедитесь, что переменная окружения JAVA_HOME указывает на установленную директорию JDK.
3. Установите Android Studio. Android Studio является интегрированной средой разработки (IDE), которая позволяет разрабатывать Android-приложения. Загрузить Android Studio можно с официального сайта https://developer.android.com/studio. При установке Android Studio необходимо выбрать компоненты, необходимые для разработки Android-приложений, включая Android SDK и Android Virtual Device.
4. Установите Python 2. React Native использует Python для некоторых своих скриптов. Скачать Python 2 можно с официального сайта https://www.python.org/downloads/release/python-2718/. Важно выбрать версию Python 2, так как React Native несовместим с Python 3.
5. Установите Watchman. Watchman — это инструмент, используемый React Native для отслеживания изменений файлов и повышения производительности разработки. Скачать Watchman можно с официального сайта https://facebook.github.io/watchman/docs/install#buildinstall. Следуйте инструкциям для установки Watchman на своей операционной системе.
По окончании выполнения всех этих предварительных действий ваша операционная система будет готова для установки и работы с React Native.
Установка Node.js и npm
Для начала установки React Native на Windows вам потребуется установить Node.js и npm. Вот пошаговая инструкция по установке:
- Перейдите на официальный сайт Node.js по адресу https://nodejs.org/.
- Скачайте последнюю стабильную версию Node.js для Windows, нажав на кнопку «Recommended for Most Users».
- Откройте загруженный установочный файл и следуйте инструкциям мастера установки. Во время установки удостоверьтесь, что включена опция «Automatically install the necessary tools» (Автоматически установить необходимые инструменты).
- После завершения установки откройте командную строку (Command Prompt) и запустите команду
node -vдля проверки, успешно ли установлен Node.js. Если вы видите версию Node.js, это означает, что установка прошла успешно. - Запустите команду
npm -vдля проверки, успешно ли установлен npm. Если вы видите версию npm, это означает, что установка прошла успешно.
Поздравляю! Теперь у вас установлены Node.js и npm, и вы готовы перейти к следующему шагу — установке React Native на вашу систему Windows.
Настройка Android Studio
Перед тем как начать разработку React Native на Windows, необходимо установить Android Studio и настроить его для работы с проектом.
Вот подробная инструкция по настройке Android Studio:
- Скачайте и установите Android Studio с официального сайта разработчика.
- Запустите Android Studio и дождитесь его полной загрузки.
- Откройте настройки (Settings) в Android Studio.
- В левом панели выберите пункт «Appearance & Behavior», а затем «System Settings» и «Android SDK».
- В открывшемся окне выберите вкладку «SDK Platforms».
- Убедитесь, что выбрана версия Android, совпадающая с требованиями React Native.
- Если нужная версия Android отсутствует, кликните на кнопку «Show Package Details» и поставьте нужное API Level.
- Перейдите на вкладку «SDK Tools».
- Убедитесь, что установлены следующие компоненты: Android SDK Build-Tools, Android SDK Platform-Tools и Android SDK Tools.
- Если какой-то компонент отсутствует, выберите его, кликните «Apply» и дождитесь установки.
- Нажмите «OK», чтобы закрыть окно настроек.
После завершения этих шагов, Android Studio будет полностью настроена для работы с React Native на Windows.
Установка React Native
Для установки React Native на Windows необходимо выполнить следующие шаги:
- Установить Node.js. Перейдите на официальный сайт Node.js (https://nodejs.org) и загрузите последнюю версию Node.js для Windows. После завершения загрузки запустите установочный файл и следуйте инструкциям установщика.
- Установить Java Development Kit (JDK). React Native требует JDK версии 8 или выше. Перейдите на официальный сайт Oracle (https://www.oracle.com/java/technologies/javase-jdk8-downloads.html) и загрузите установочный файл JDK для Windows. После загрузки установите JDK и добавьте путь до исполняемых файлов в переменную среды PATH.
- Установить Android Studio. Перейдите на официальный сайт Android Studio (https://developer.android.com/studio) и загрузите установочный файл Android Studio для Windows. После загрузки установите Android Studio и следуйте инструкциям установщика. При установке убедитесь, что выбраны пакеты «Android SDK» и «Android Virtual Device».
- Настроить переменные среды. Откройте панель управления Windows, найдите раздел «Система» и выберите «Дополнительные настройки системы». В открывшемся окне выберите «Переменные среды». В разделе «Системные переменные» найдите переменную «Path» и добавьте следующие значения:
- Путь до папки с исполняемыми файлами Node.js
- Путь до папки с исполняемыми файлами JDK
- Путь до папки с исполняемыми файлами Android SDK
- Установить React Native CLI. Откройте командную строку (Command Prompt) и выполните следующую команду для установки глобального пакета React Native CLI:
npm install -g react-native-cli - Проверить установку. В командной строке выполните следующую команду для проверки установки React Native:
react-native --version
После успешного выполнения всех шагов вы будете готовы к разработке приложений с использованием React Native на Windows.
React Native is a renowned JavaScript mobile application framework that allows building mobile applications on Android and iOS platforms. It offers superb mobile development capabilities and concentrates on creating applications for multiple stages using a similar codebase. To know more about usereducer in React and React Native Interview Questions, click here.
Originally developed by Facebook for its internal app development, React Native was open-sourced in March 2015 for iOS Mobile apps, and by September of the same year a version for Android dev was also released. Today, Native React has been vastly improved and powers popular worldwide mobile applications like Instagram, Facebook, Skype, and more. For more information on web development, check out Full Stack Bootcamp.
Are you ready to get started with React Native? Let’s understand how to download, install and set up React Native in Windows 10.
1. Prerequisites
Before we get started, here are a few system requirements to download, install, and set up React-Native on your Windows 10.
Hardware requirements
To download and successfully install React-Native in your computer, you need to consider the minimum hardware specifications required to support the app and run it smoothly.
- RAM 8 GB
- CPU: Intel ® Core ™ i7‐4870 HQ CPU @ 2.50 GHz
- 256 GB ROM
Software requirements
To efficiently install and set up React-Native on your Windows device, you will need to install the following:
- Android Studio
- Android SDK
- Install JDK
- Node Js
- NPM 3.5.2
- React native cli
2. Installation procedure
To successfully install and set up React-Native to your device, you need to follow the steps discussed below:
Step-1: Install Chocolatey
The first process that you need to do is to install Chocolatey, a well‐known package manager for Windows. Installation of Chocolatey requires administrator access to the computer’s command prompt to run.
- Go to and choose the option – get started.

- In the Chocolatey install section, choose Individual as shown:

- Now go to Windows CMD Shell, and enter the following command in the cmd.exe shell.

The installation will look like as shown below:

To check whether you have installed it correctly, open the command prompt and type;
choco -version
If you managed a correct installation, this command returns the Chocolatey version you have installed; like shown in the screen below:

Step-2: Install Node Js
Using Chocolatey we will now install Node.js, and JDK8 as follows.
i. Installing Node Js
Installing Node.js is crucial as it is a JavaScript runtime environment and React Native uses it build the JavaScript code. To install Node.js, you need to open the command prompt as the administrator and put in the Chocolatey command prompt below:
Choco install -y nodejs.install

Installation may take some time. Once done, you will see a message stating that Chocolatey is installed as shown below:

To confirm that installation has been successful, we will execute the below command at the command prompt, as administrator:
node --version
If the installation was successful, the version number is displayed.
.png&w=3840&q=75)
After installing Node.js, the Node Package Manager NPM automatically installs. Now check the installation of NPM in your system by entering the following command.
npm --version
The displayed message below verifies that the installation of NPM is successful.

Step:4 Installing JDK8 (Java Development Kit)
JDK8 is crucial in the improvement of android applications by React-Native. To install the JDK8, go to the Windows PowerShell and use the following command:
choco install -y nodejs.install openjdk8

To know whether it installed successfully, open the command prompt again and enter the command:
java -version
The message below is displayed if the JDK8 is successfully installed hence showing the Java version as:
openjdk version “1.8.0_222”
The installed JDK8 also has an installed Java compiler. To confirm whether the Java compiler has been installed, open the command prompt and enter the below command:
javac -version
Step-5: Install Android Studio
To improve mobile applications with React Native, you need to install Android Studio. To download the installation file, go to. By default, android studio automatically installs the latest Android SDK. However, building a React Native app with native code demands Android 11.0 (R) SDK in particular.
Wondering where to begin to career as web developer? Enroll in Full Website Development course.
The installation display message looks like below:

After downloading the file, perform the Android Studio installation process. To continue, click on the Next button to see the Choose Components screen.

Tick the box containing Android Virtual Device and click on the Next button.

You then need to choose the location in your computer where you would like the Android Studio to get installed. You can even leave it to install at the default location to save time, and then click the Next button to go to the next screen:

You will come to the Choose Start Menu Folder. Click the Install button to install the program.


When the bar reaches the end, click on the Next button to complete the process.

On the next screen, check Start Android Studio and click on the Finish button.

Customize Android Studio:
Click the Next button to go to the Install Type screen:

Choose the Custom type of setup and then click the Next button.


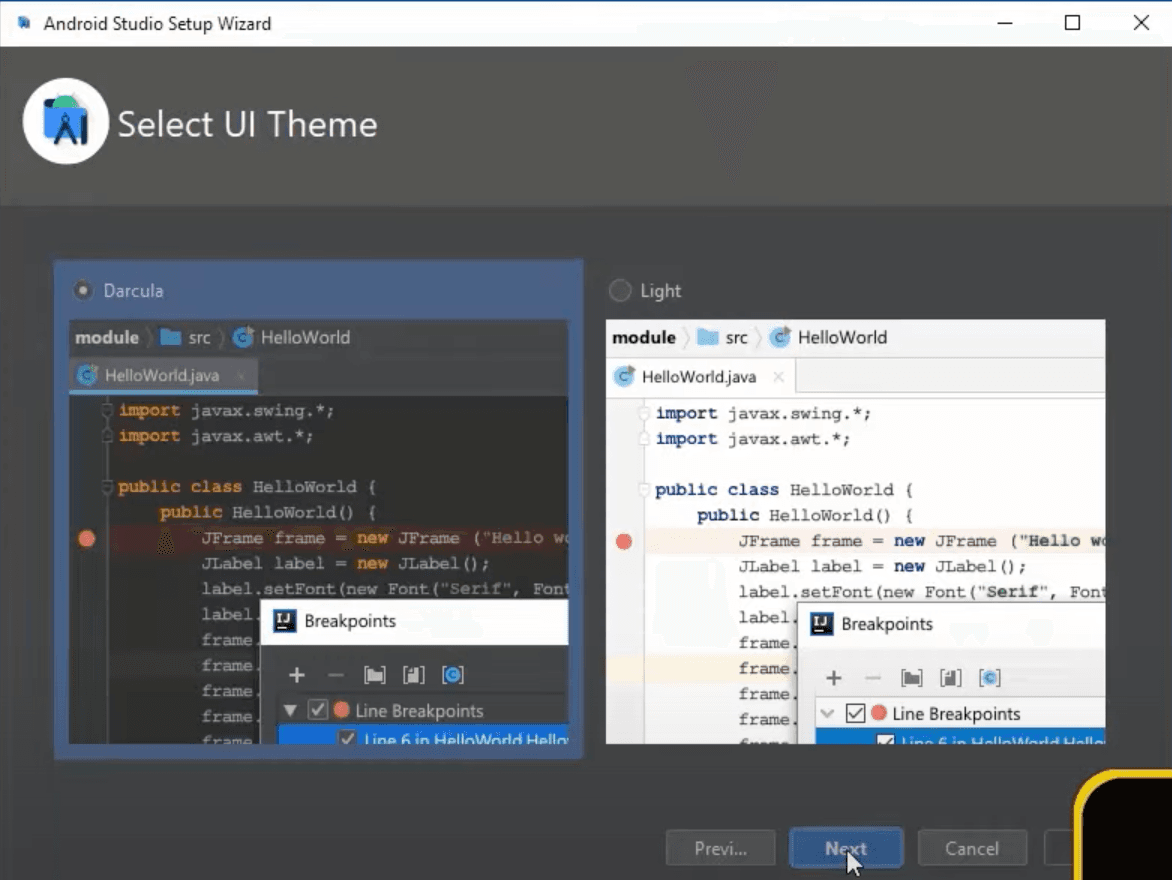
On this screen, you can select the theme of your choice and then click on the Next button to go to the SDK Component Setup window.

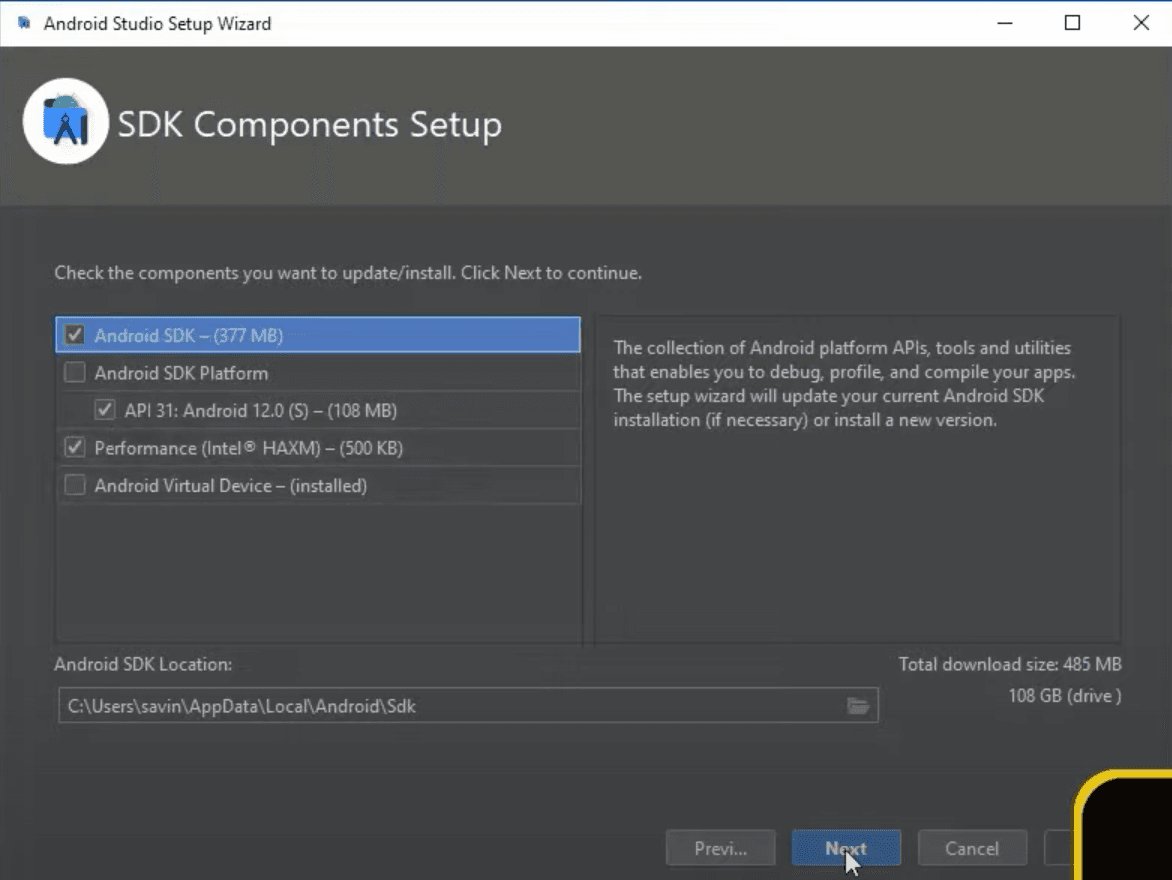
On the SDK Component Setup display, check on the Performance Intel HAXM option plus Android Virtual Device option and then click on the Next button.

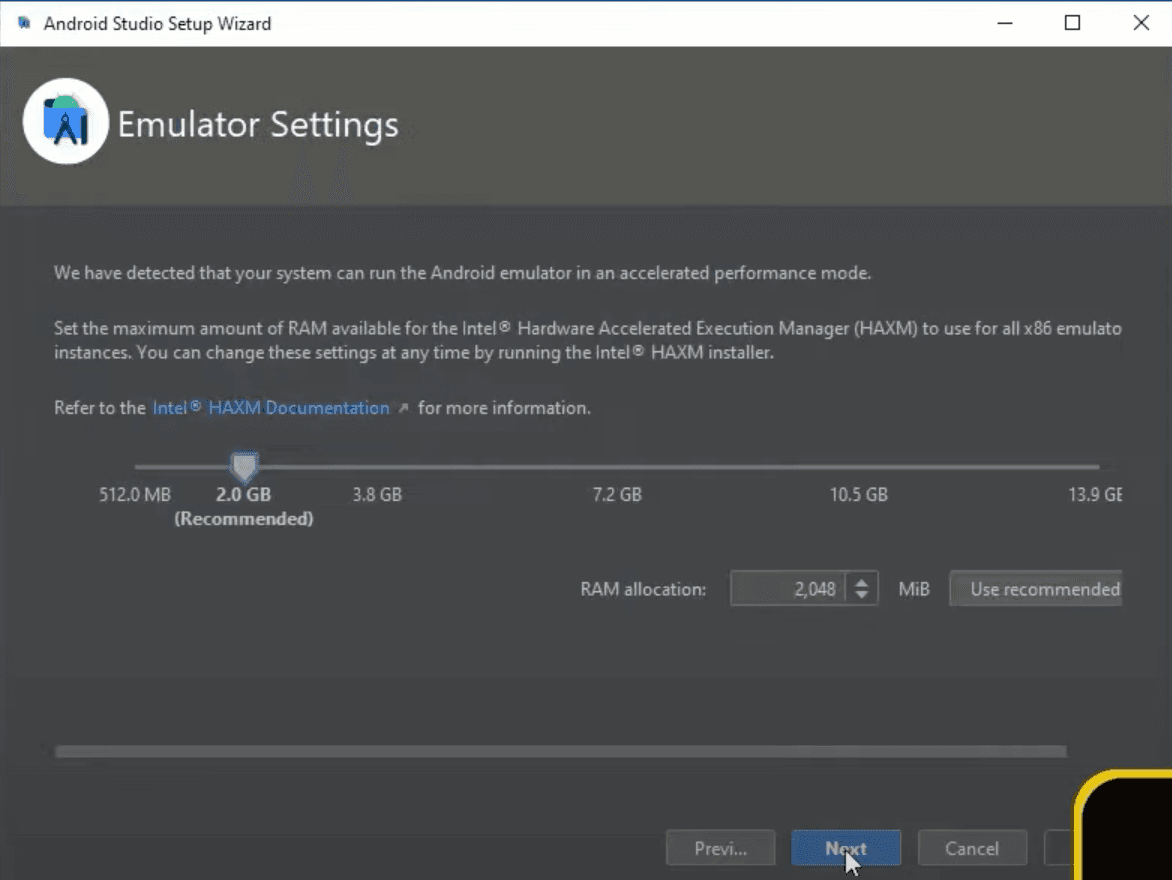
On the Emulator Settings window, do not make changes to anything. Leave it the way it is and click on the Next button.

Verify settings.

The dialogue box below completes the whole process by clicking on the Install button.

Customize Android SDK
When you select Configure, the SDK Manager as shown on the screen above is displayed. This allows you to choose the Android SDK settings. Click on the Show Package Details located at the bottom right of the screen. From the list, tick the following:
- Android SDK Platform 28
- Intel x86 Atom System Image
- Google APIs Intel x86 Atom System Image
- Google APIs Intel x86 Atom_64 System Image
Click the OK button to install them, and you are done setting up the Android SDK.
React Native needs environment variables to be customized to create applications using the native codes. Next, we will customize the Android Studio Environment variable.
3. Setting the path to Environmental Variable
Right‐click on This PC and click Properties, a screen displays as below. Click on the advanced system settings.

Once you are on the System Properties window, select the Advanced tab, and then the Environment Variables button at the bottom. Then press Enter.

After selecting the environment variable, go to the Variable name, type ANDROID_HOME, and your variable value Android Studio SDK path. After that, customize the Android Studio platform‐tools path by selecting the Path variable on User variables for your name list to move to the edit dialog.
Looking to master object-oriented programming? Look no further! Our OOP Python course is here to help you become a coding pro. Join now!
Input platform-tools folder path in the SDK path, like C:\Users\[user name]\AppData\Local\Android\Sdk\to the end of the list and press, Enter key. Open the command prompt and input the command below:
adb
When the environmental variable customization is successful, you get the below message:
Android Debug Bridge version 1.0.41
Version 29.0.1-5644136
Installed as /Users/Username/Library/Android/sdk/platform-tools/adb
Install React Native CLI
To install React-Native CLI, open the command prompt as an administrator and enter the following command:
npm install -g react-native-cli

4. Creating a New Application
Let us create a new React Native project using react native CLI. reactapp is the first project we are creating on React Native.
react-native init reactapp

Running the Application
Once you have created your first React application, it’s time to run the application. Open the application in any IDE of your choice. Here we are using Visual Studio Code as shown:
In general, there are two ways to get started with React Native — using Expo CLI or React Native CLI. Both ways have their own strengths and weaknesses, but if you are a beginner, I would highly suggest you to start with Expo CLI because the setup is a lot easier and faster. Of course, if you are up for a bit bigger challenge, this guide is perfect for you, because we will cover all the steps needed to setup React Native CLI development environment for your first React Native project using Windows.
If you prefer, you can always follow the instructions in the video below instead:
If you chose to follow the guide, then let’s roll!
Installing Windows Terminal
First and foremost, we need to install Windows Terminal (later: terminal) if you don’t have one as it is going to be used quite often. To do this you can use Microsoft Store by searching «Windows Terminal» and installing it.
![]()
After installing and launching it, you can test if everything works by typing ls in the terminal, which should display the list of files and folders in that path.
Installing Git
Git is going to be used for source control management, which will help us to track changes in the code and make development easier. Also, Git comes with Git Bash that we will make use of.
To download the latest version of Git you can go to their website and select Windows OS. Once the download is complete, we can start the installation process.
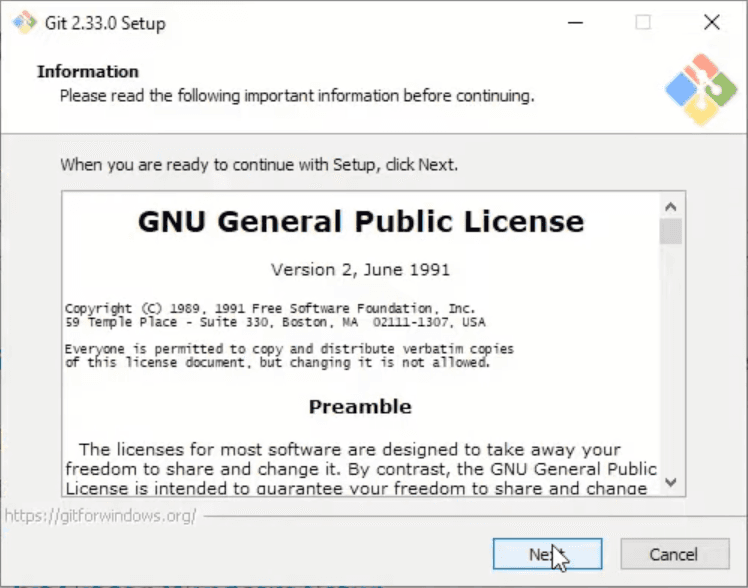
On the first window we can read GNU General Public License and click Next button. But let’s be honest, nobody reads that, so you can click Next right away.
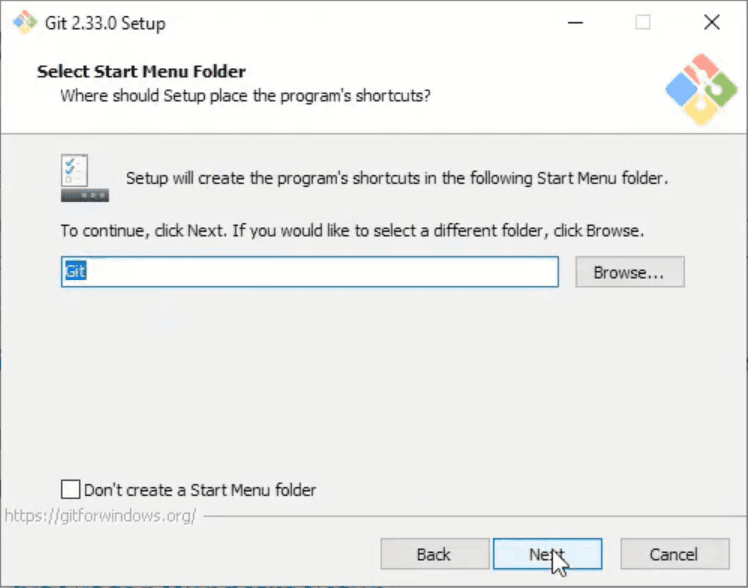
In the next window you should select the path that you want Git to be installed in and click Next.

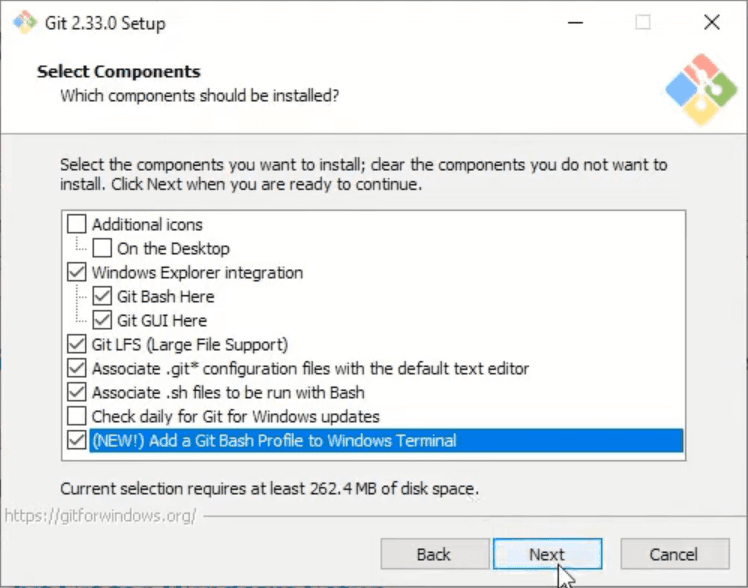
Now in this window I would suggest checking ‘Add a Git Bash Profile to Windows Terminal’ box and then clicking Next.
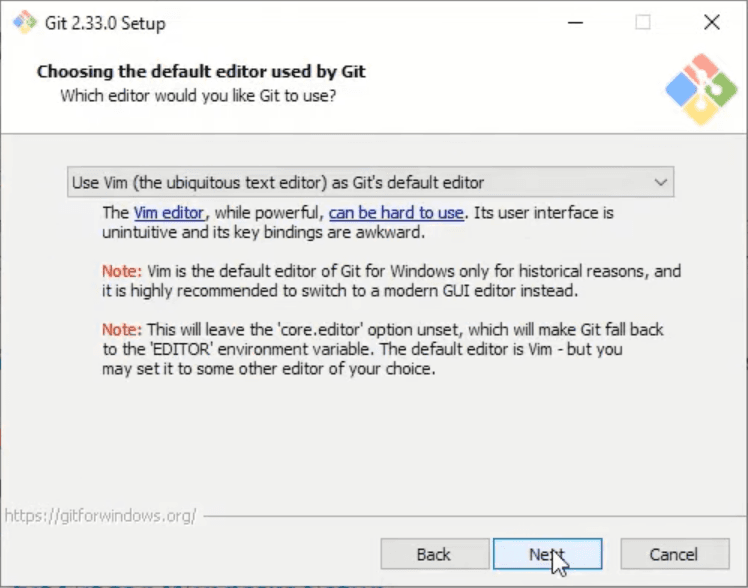
In the next two windows you can make changes if you want, but I would recommend leaving everything like it is and clicking Next.
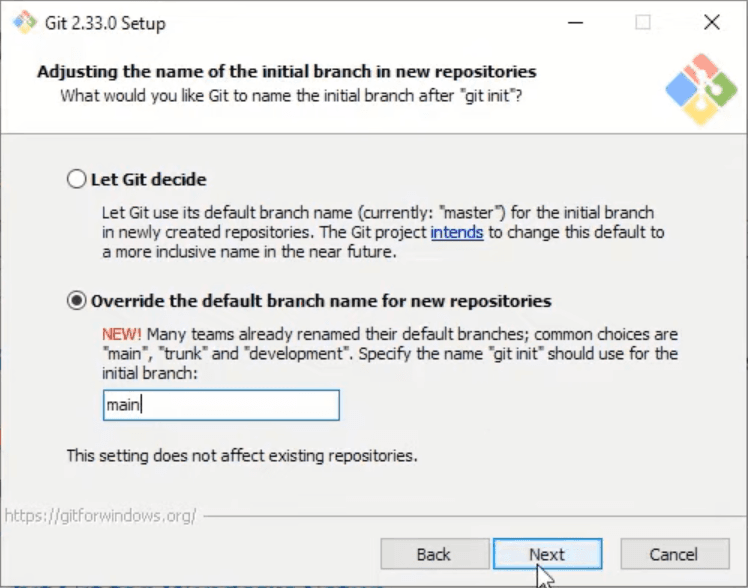
In this window select ‘Override the default branch name for new repositories‘ and type ‘main’ in the input box. We do that because this is the new naming convention and everybody is encouraged to follow it. After making changes click Next.
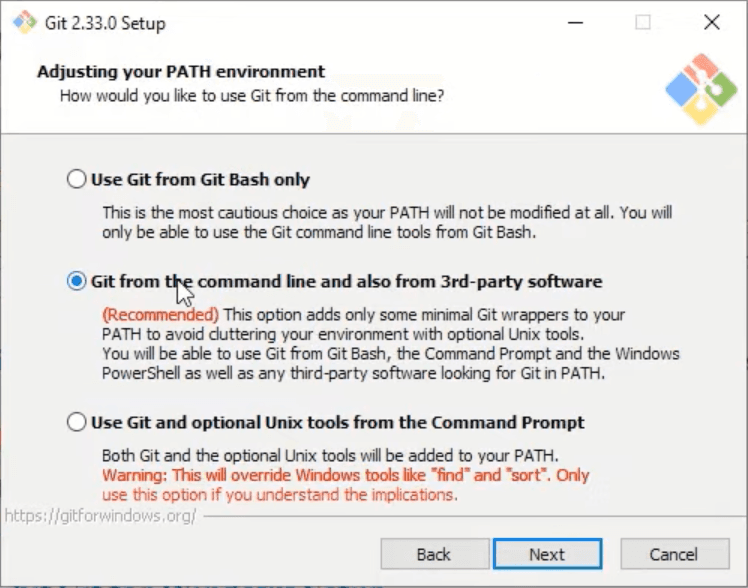
Next step is based solely on your preference, if you know what you are doing, then select whichever option you would like to, otherwise keep the default one and click Next.
For the next few windows leave everything on default unless you know what you are doing.
Once the installation is finished, let’s make Git Bash our default choice.
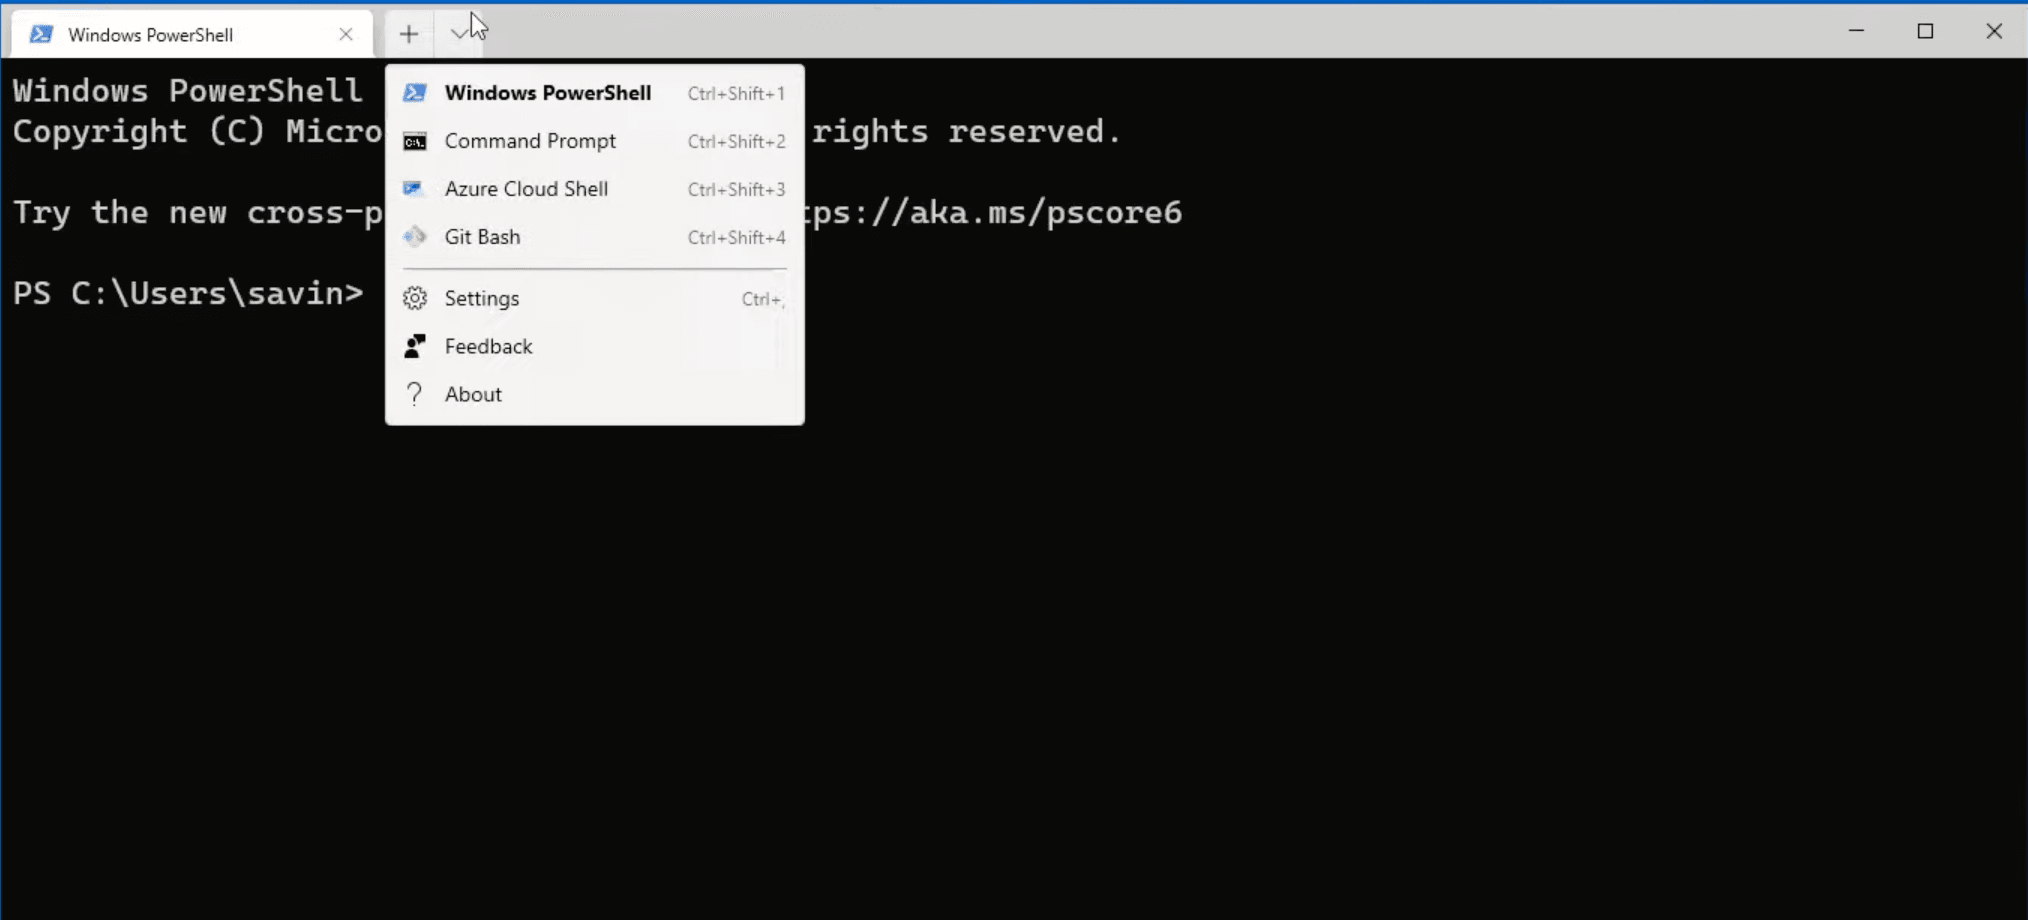
To do that open terminal, click on the arrow icon in the top bar and select Settings.
In the settings screen click on Default profile dropdown, select Git Bash and save it.
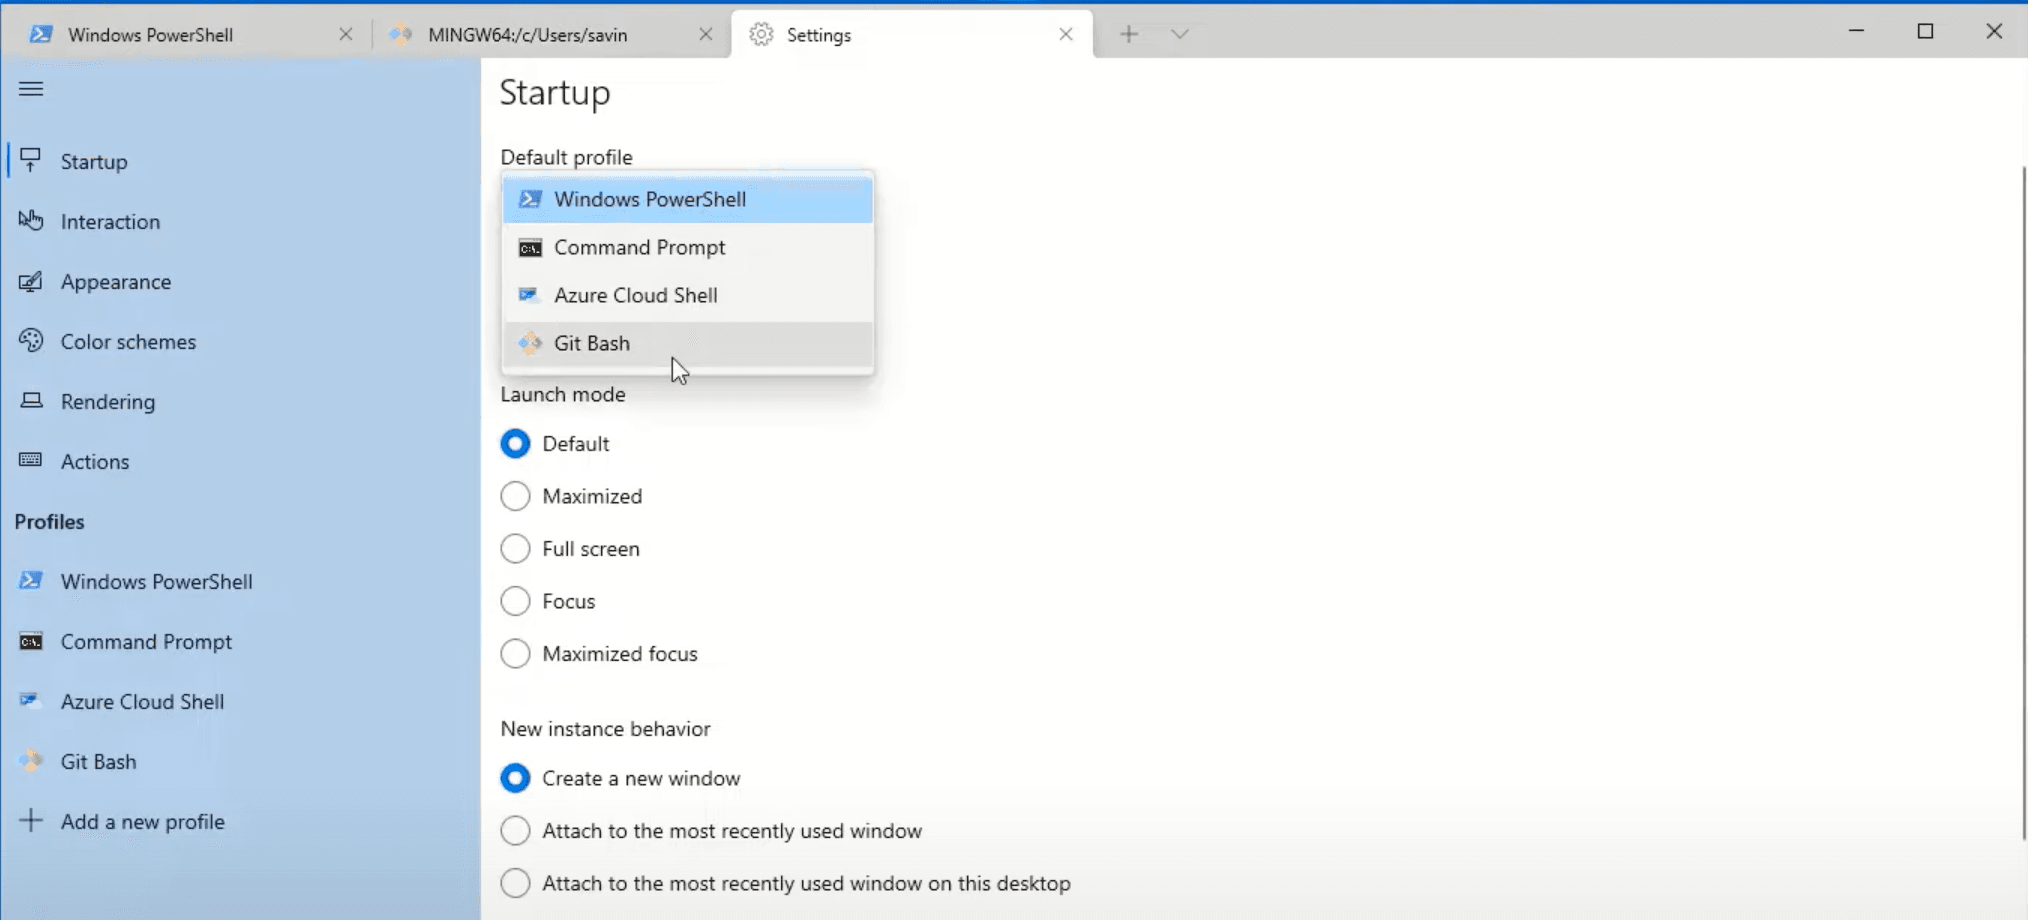
After that, re-open the terminal, and it should open Git Bash now.
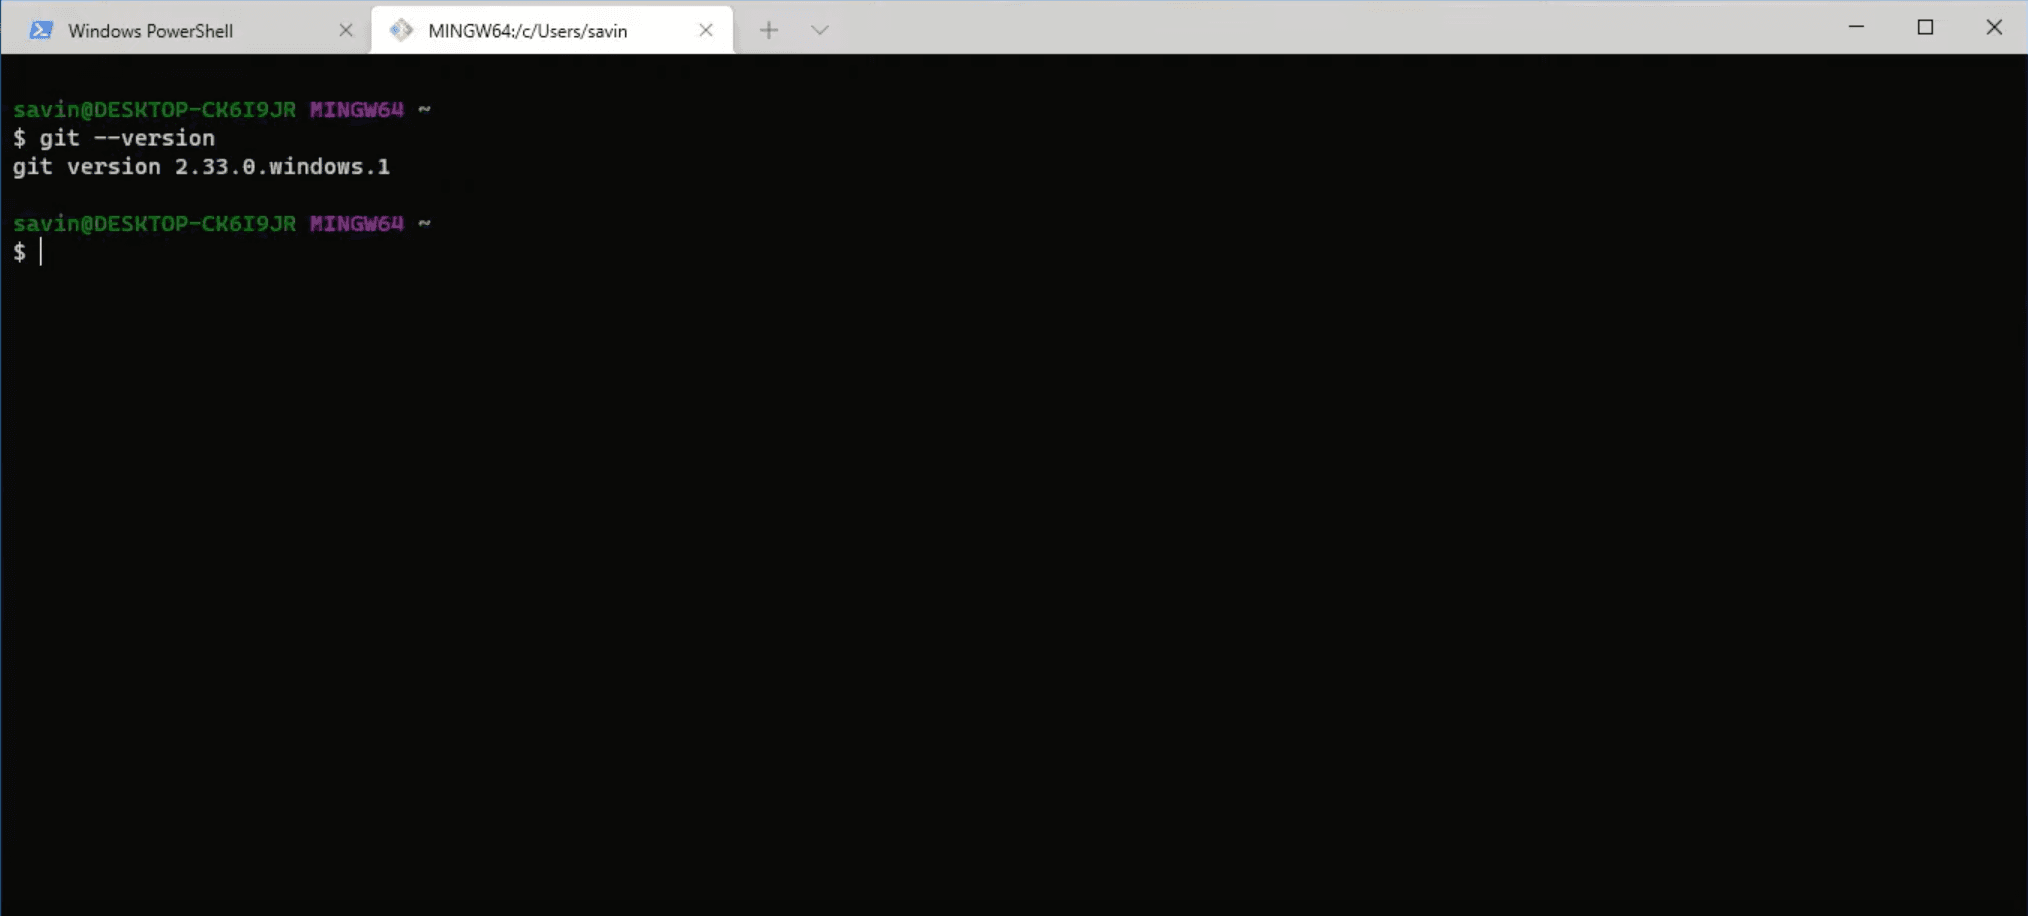
Last but not least, let’s test if Git is installed correctly. In the terminal write git —version, which should display the version of Git that is installed. If it did, then you have installed Git successfully.
Installing NodeJS
NodeJS is an open-source JavaScript runtime environment that will help us run React Native applications. It also comes with npm which is a package manager that helps to install various packages in our applications.
To download NodeJS go to their website and select the LTS (long term support) version.
During the installation leave everything on default except for the window below. It is very important to tick this box in order to install necessary tools automatically, otherwise you will have to do that manually.
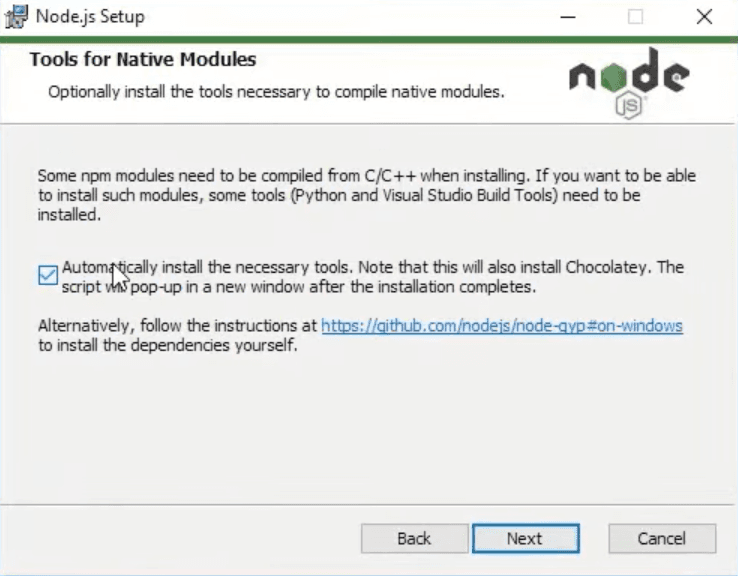
Once the installation is finished click Finish. That should automatically open terminal if you ticked the mentioned box above. In that terminal press any key to start the installation. Keep in mind that terminal will close automatically after installing everything. This step will take some time, so you can take a well deserved break and refill your coffee cup ☕.
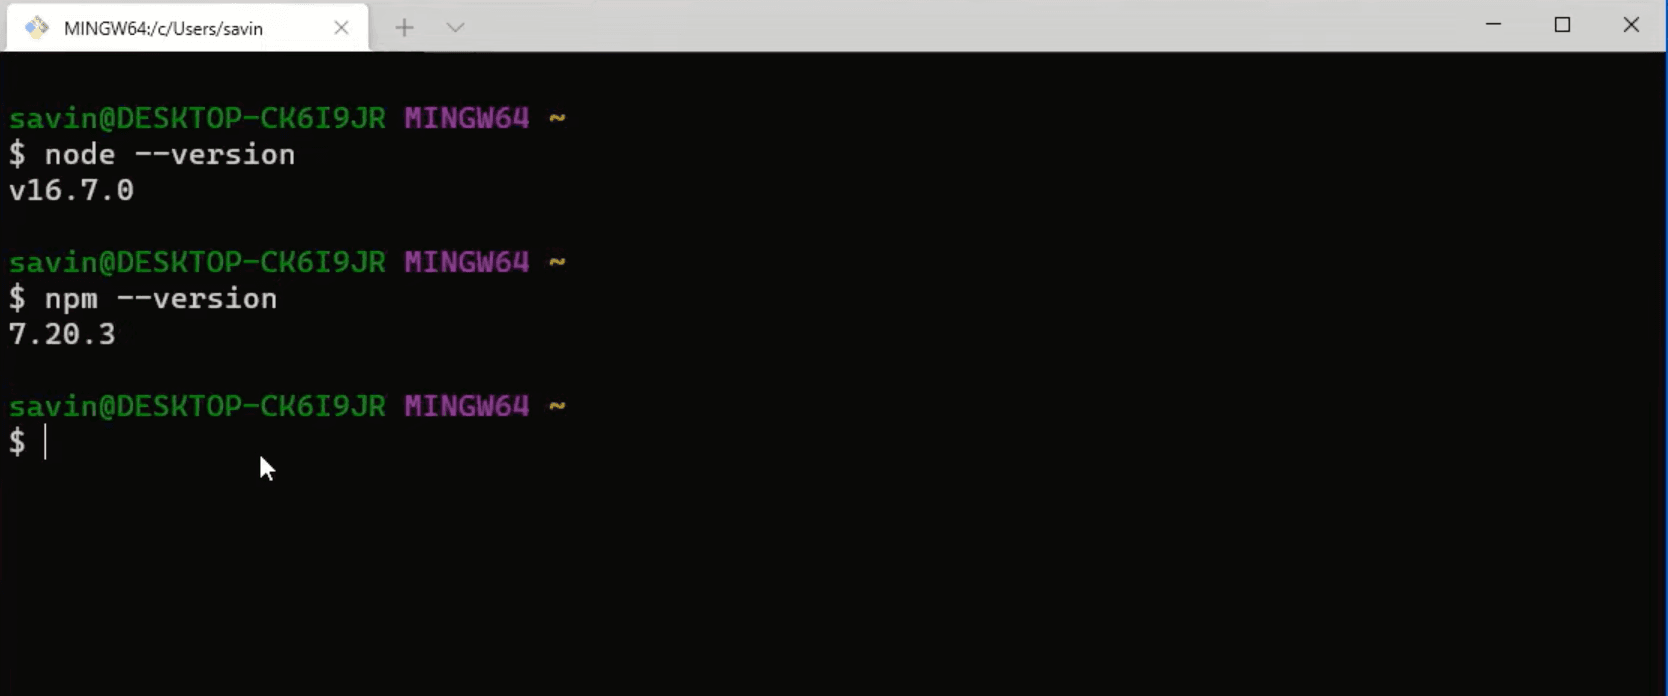
To test if node was installed correctly open the terminal and type node —version, which should display the version that was installed. To test if npm was installed correctly typenpm —version, which accordingly will display the npm version.
Installing Java SE Development Kit (JDK)
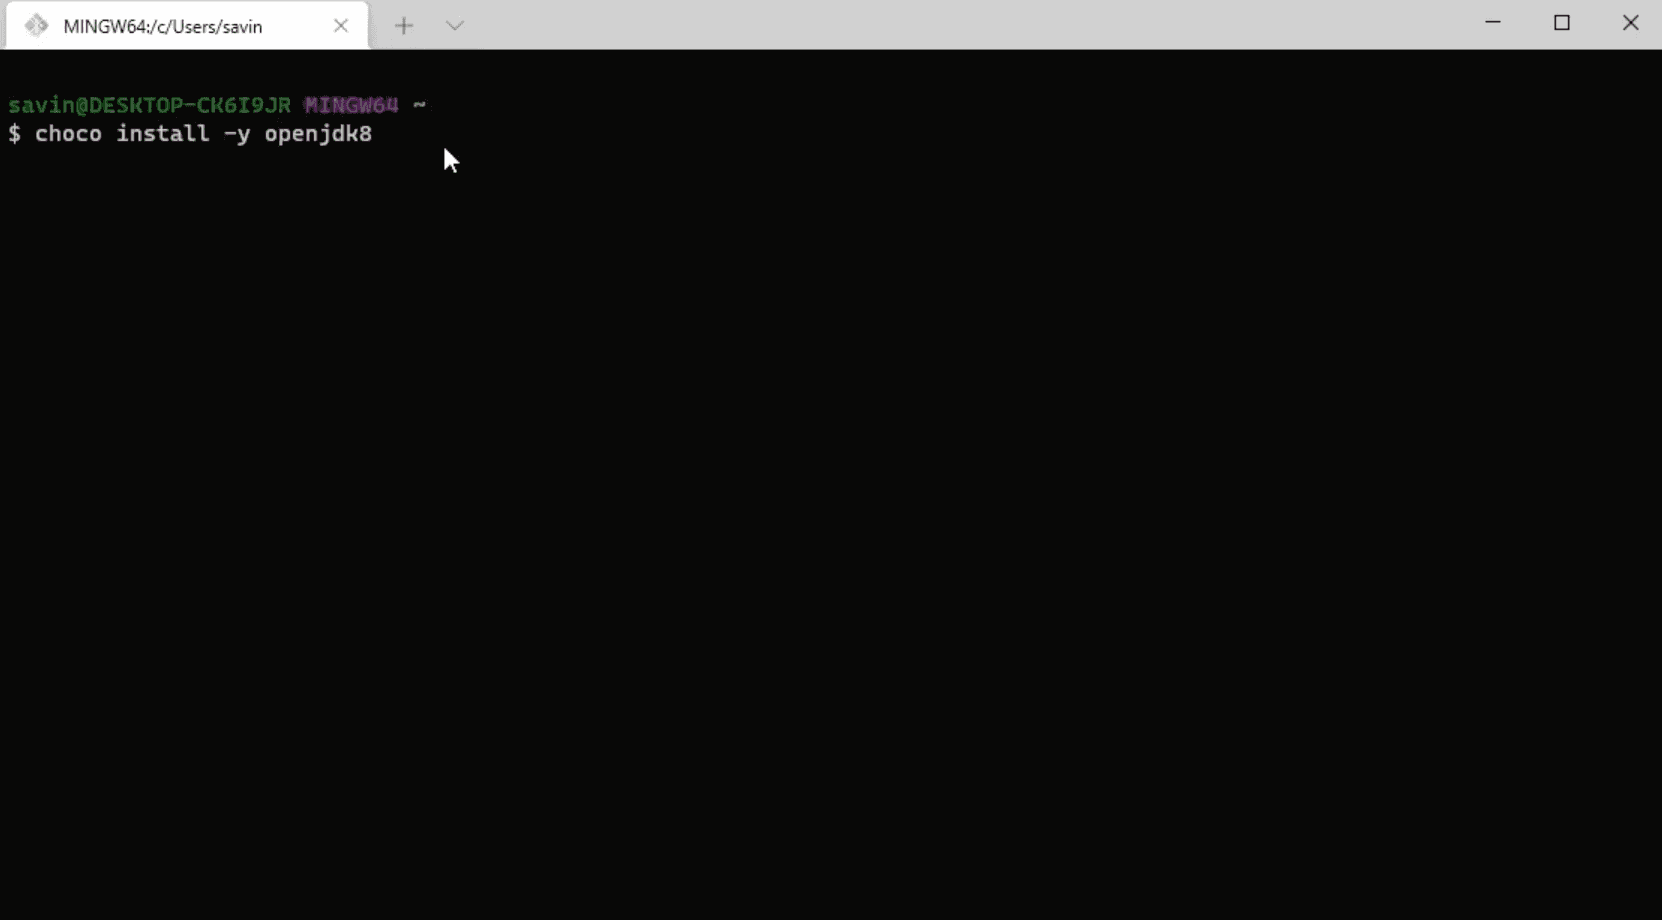
React Native requires Java SE Development Kit (JDK), which can be easily installed using Chocolatey. If you followed the NodeJS installation guide above, Chocolatey should’ve been installed automatically. To install JDK open terminal as an administrator and type choco install —y openjdk8.
We are one step closer to the finish line, let’s keep up the good work!
Installing Android Studio
In order to download Android Studio we can go to their website and click big green «Download Android Studio» button in the middle of the screen.
Once the download is finished, we can open the file and start the installation process.
On the first window you won’t have to do much, you can read what it says and click Next.
Second window on the other hand is very important. In Select Components To Install box you HAVE to select Android SDK, Android SDK Platform and Android Virtual Device.
Side note, you might see only a few of these options, so select as many as you are able to and click Next.
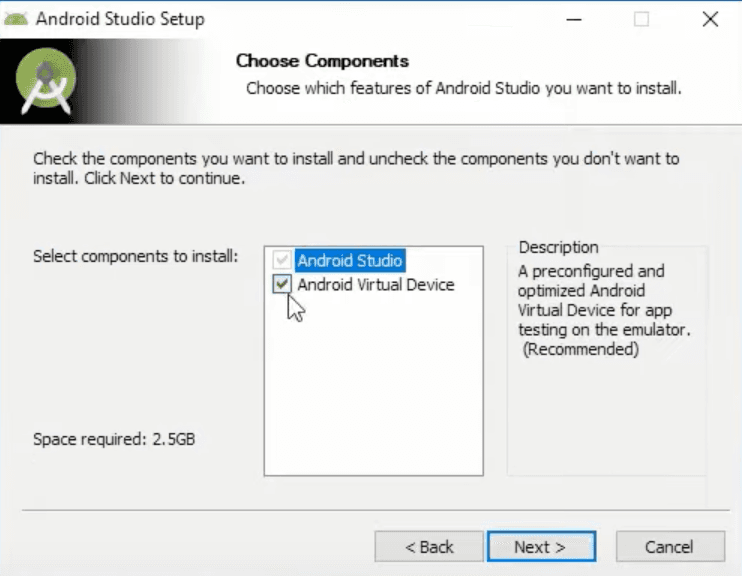
On the next few windows leave everything on default and after finishing the installation open Android Studio.
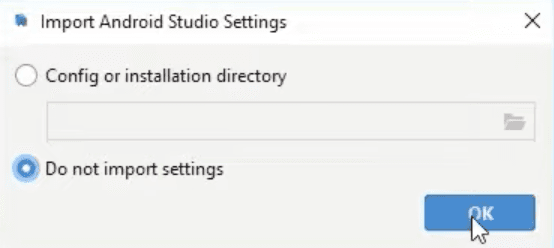
If a window pops up asking to import some settings select Do not import settings and click OK if you don’t have any settings to import.
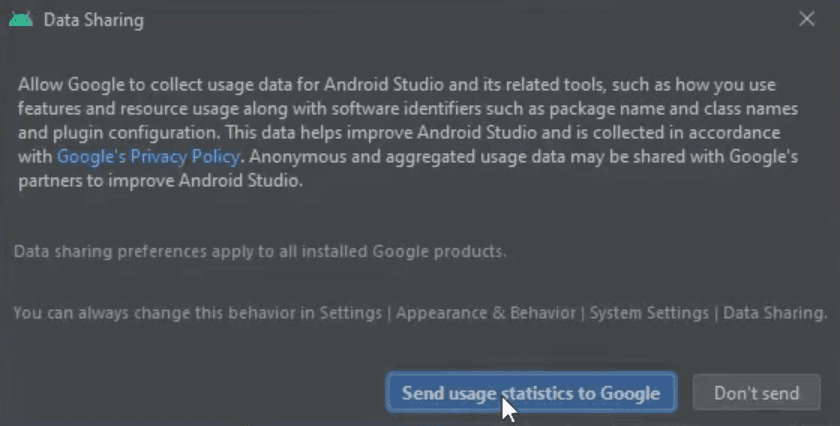
Most likely you will also see another pop-up asking to send usage statistics to google. Usually I accept it because that’s what lets them improve, but you can choose whatever fits you better.
You might be asked to update some plugins as well, do that.
Once the updates are installed, you will see a pop-up asking to restart the Android Studio, click Restart and wait a little bit until Android Studio reopens.
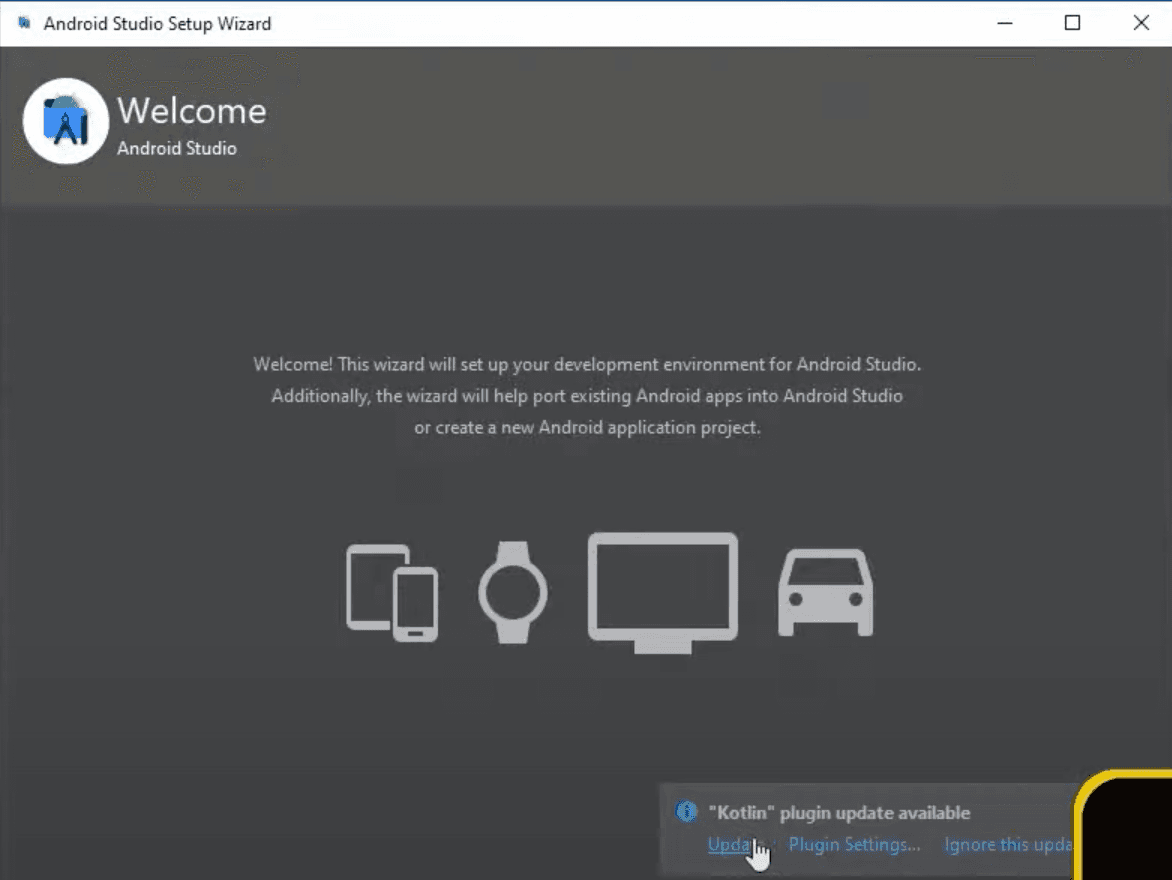
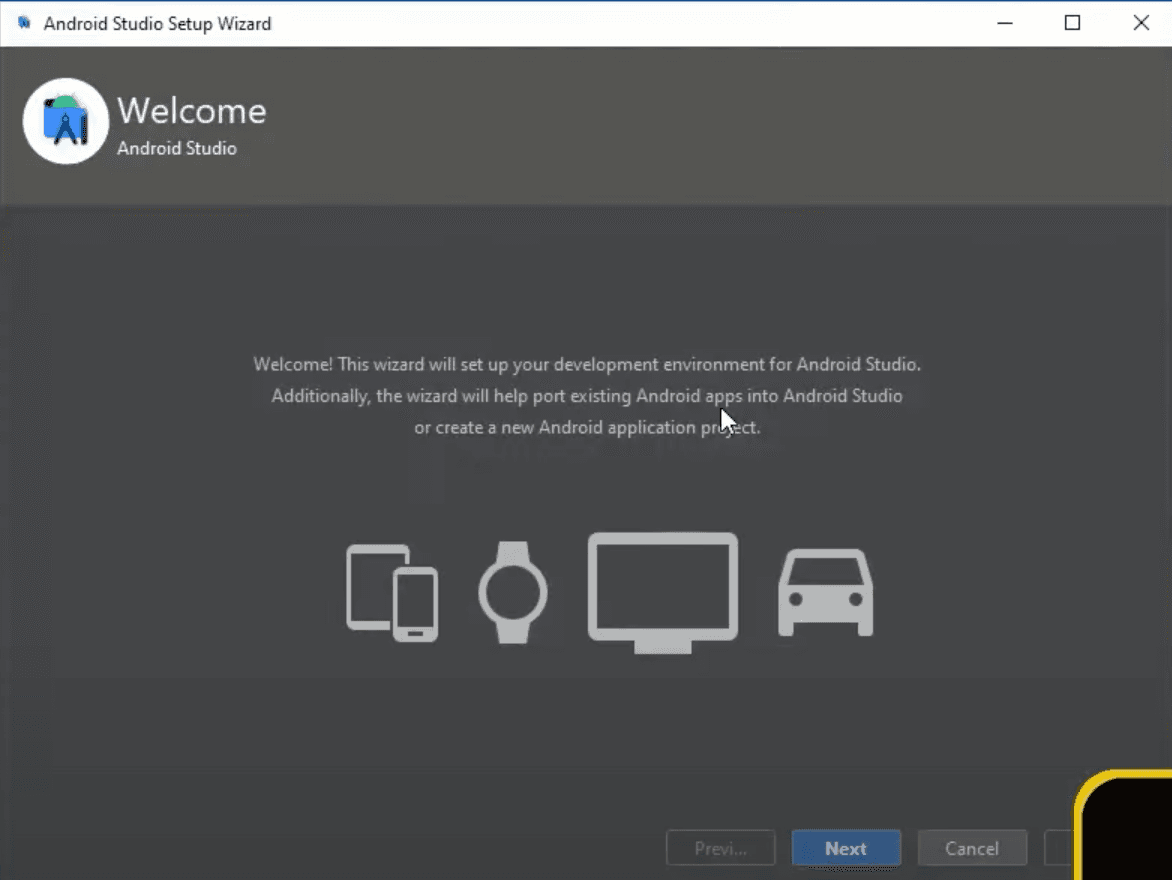
Setting Up Android Studio Environment
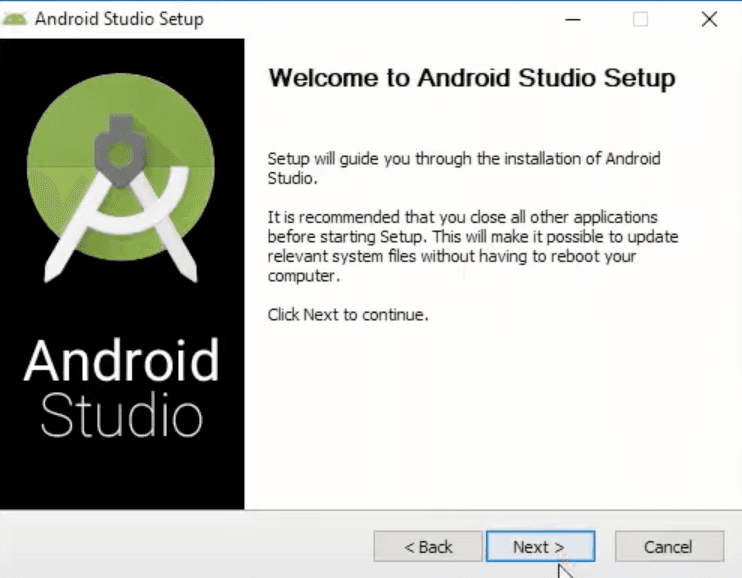
Now you should see a Welcome window with some text explaining what are the next steps going to be about. After reading that (or not), we can click Next and continue setting up our Android Studio Environment.
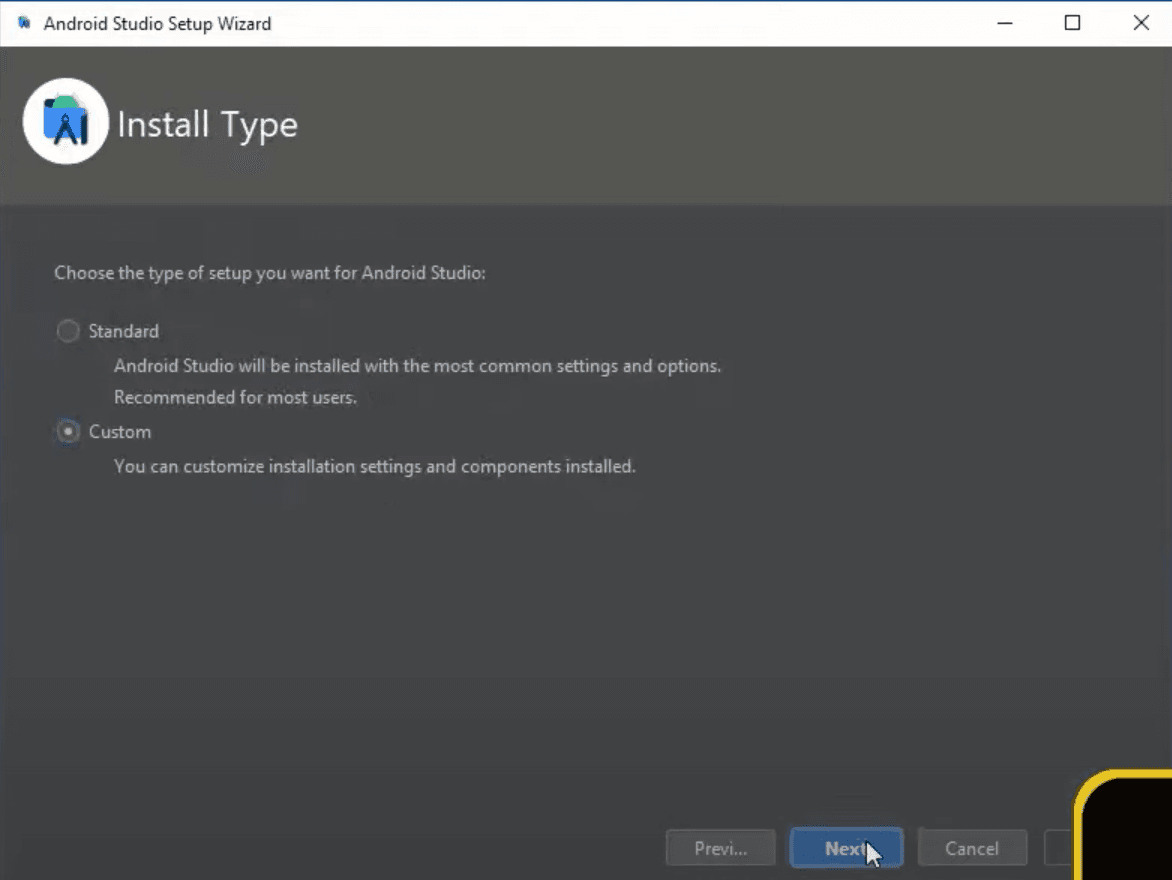
Here, in order to make sure that everything is installed correctly and everything fits our needs, let’s select Custom setup type and click Next.
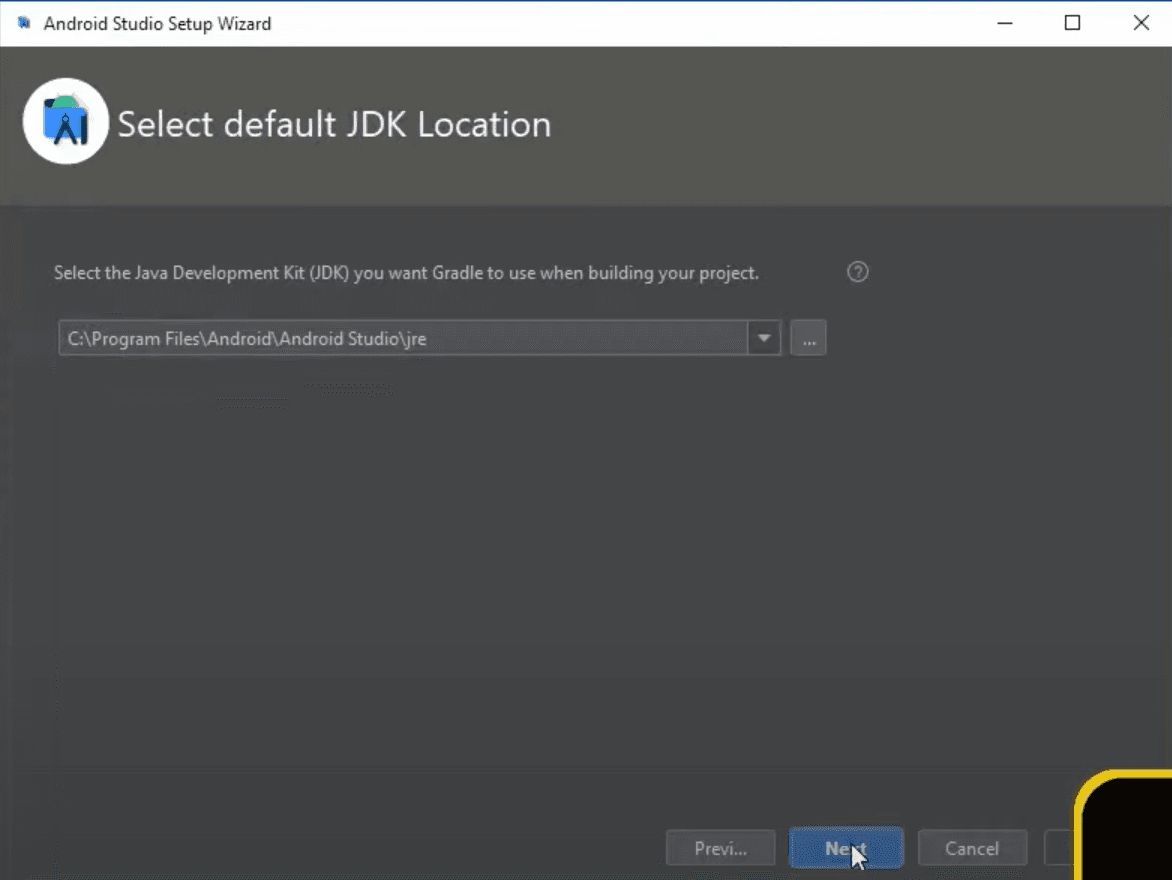
In this step, if you followed the guide and did everything like it said, then leave it on default. If you changed the installation paths and they do not match with what you see in the box, then change the path accordingly.
Now just choose whichever UI theme you prefer. Not sure if it’s just a myth or not, but people are talking that dark theme increases your programming skills 
On this window make sure that Android SDK, one of Android SDK Platforms and Performance (this one is not mandatory) is selected or says installed like Android Virtual Device in the example below and click Next.
If your system can run the Android emulator in an accelerated performance mode, you will see one more window in which you will have to set the minimum amount of RAM available for the Intel Hardware Accelerated Execution Manager (HAXM) to use. I can’t tell which option is best for you, so if you are not sure what you are doing here, I would suggest leaving it on Recommended option and clicking Next.
Now just finish the installation, and we are another step closer!
Installing Android SDK
Android Studio installs the latest Android SDK by default. However, in order to build React Native applications we need Android 10 (Q) SDK in particular.
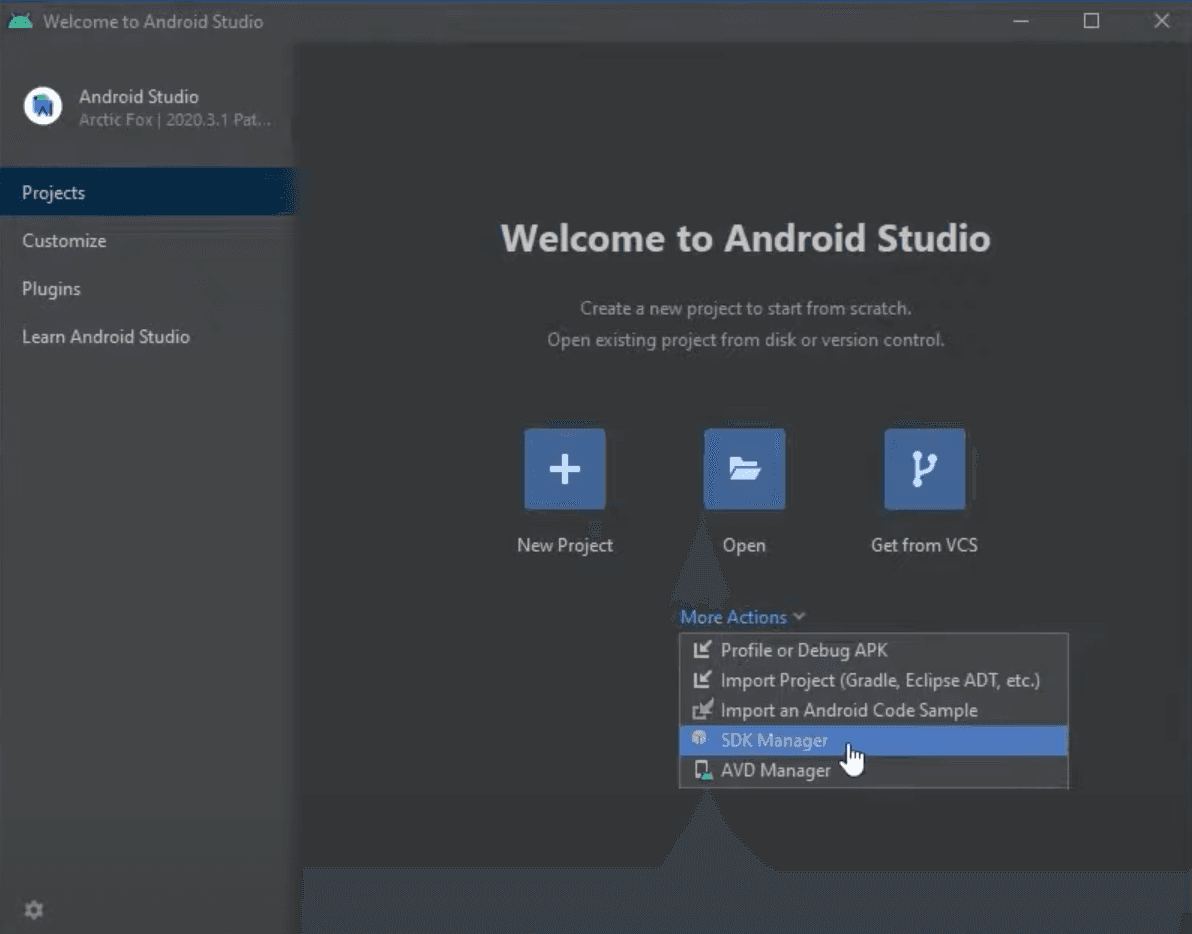
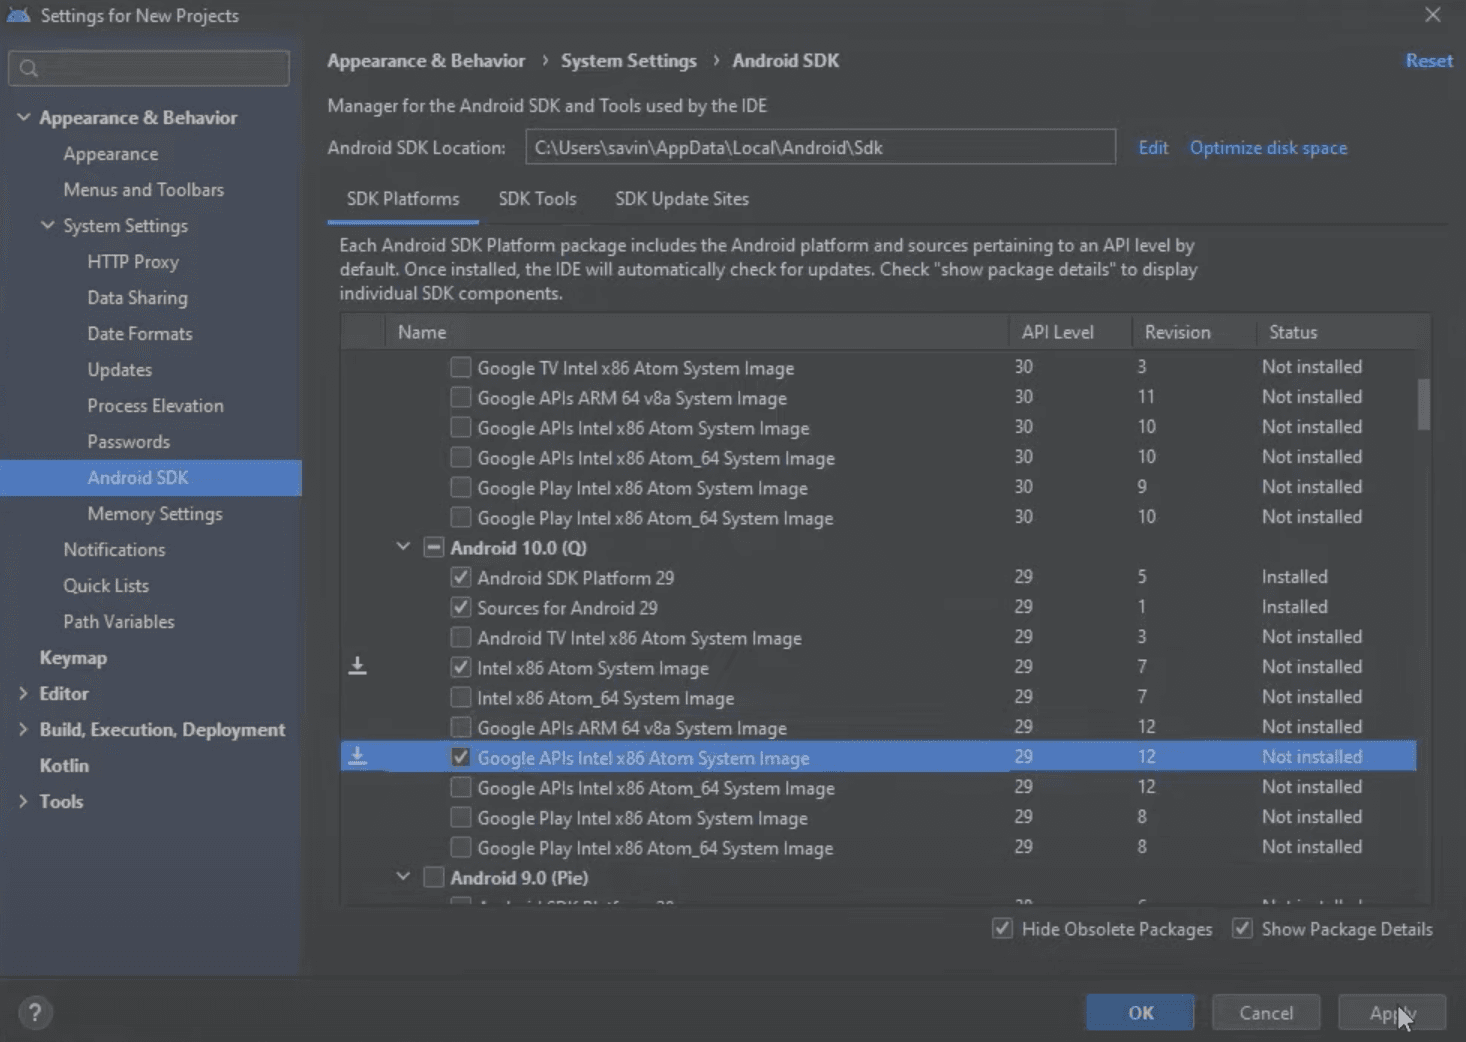
To do that, from the Welcome to Android Studio window let’s click More Actions and select SDK Manager, which will open system settings.
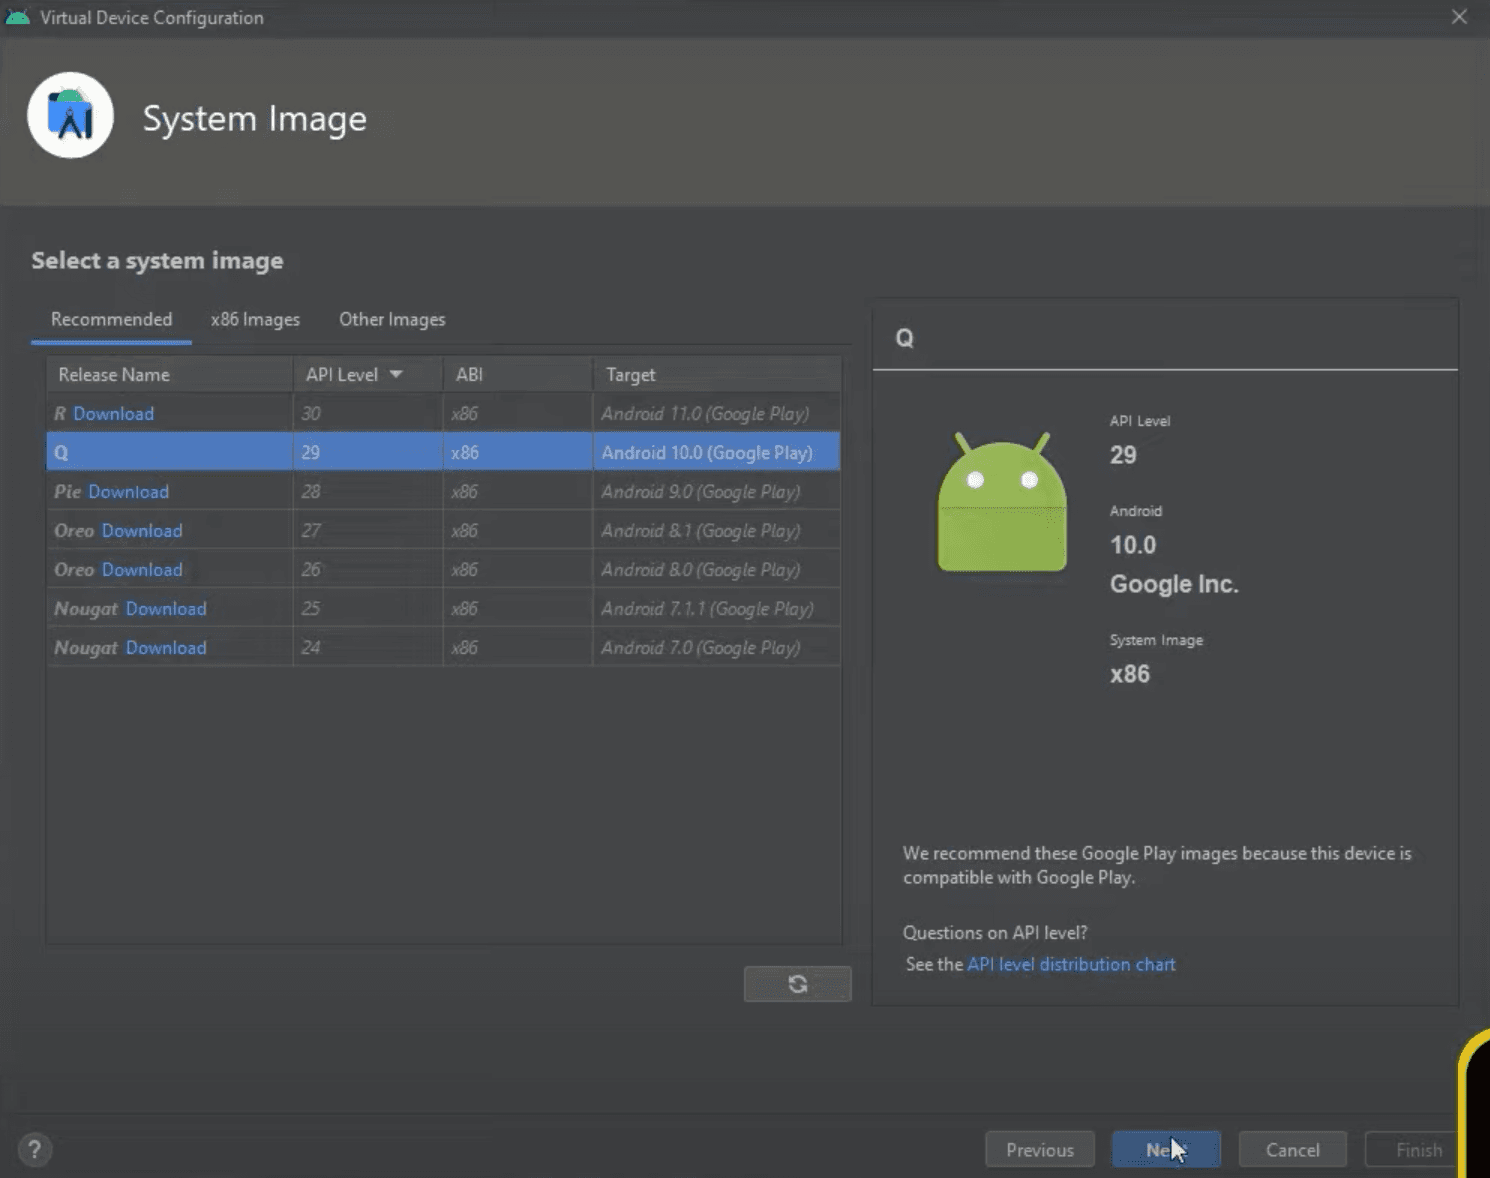
In this window, let’s select Android 10.0 (Q) just like it is required in the official React Native documentation and click Apply to install it.
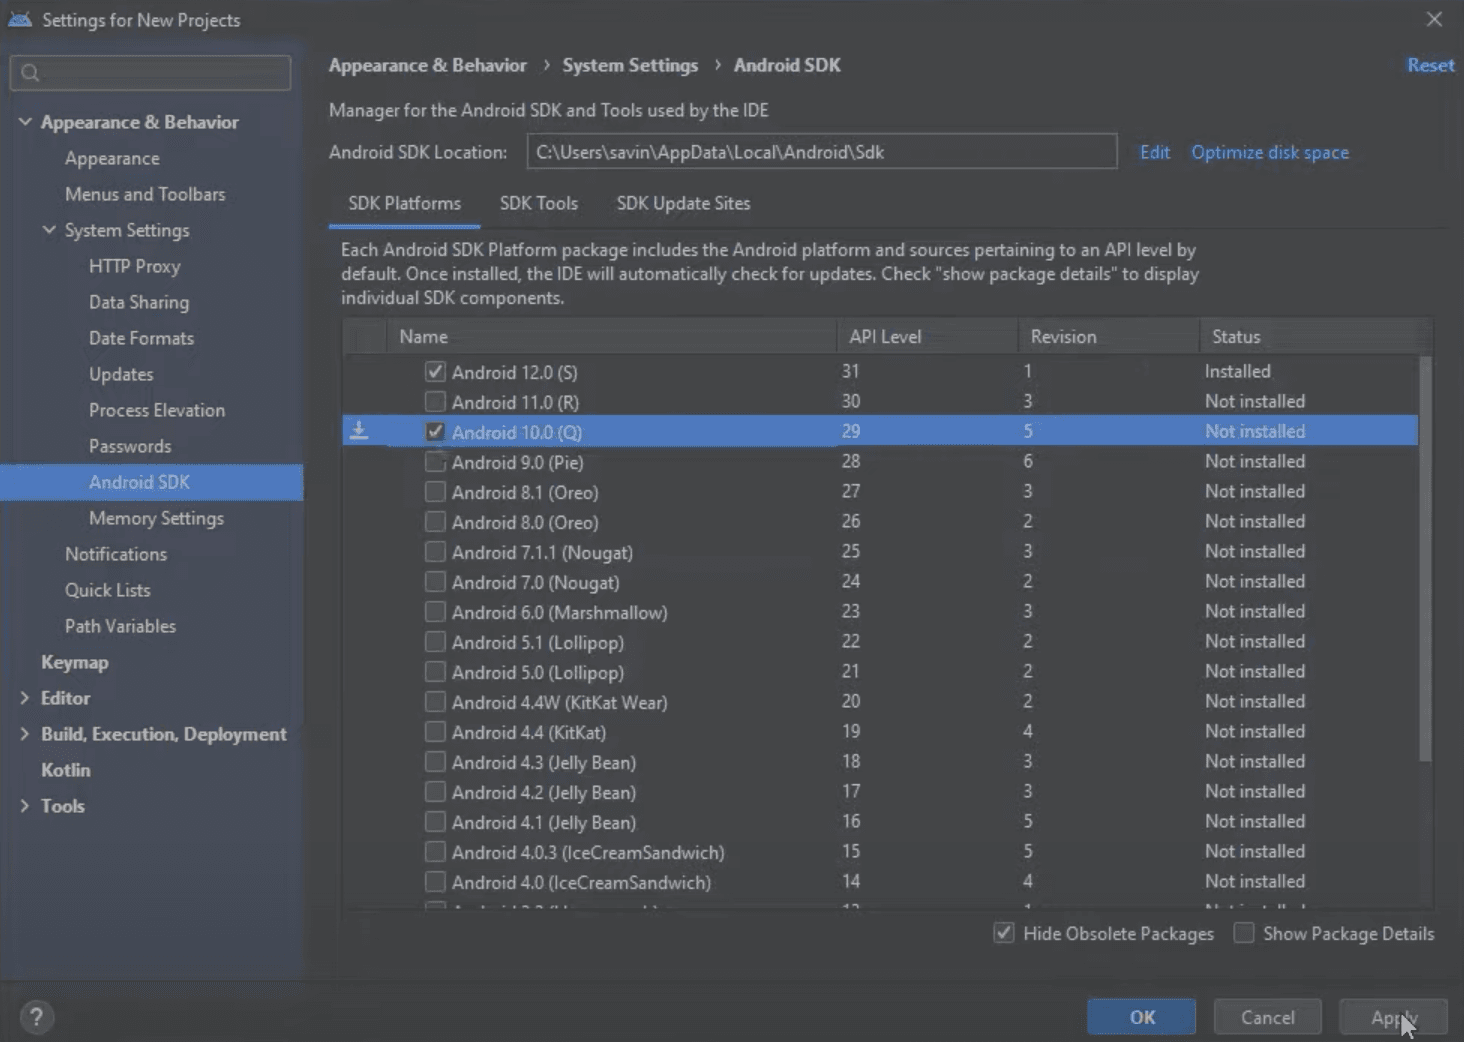
After clicking Apply you should get a pop-up asking to confirm the changes, click OK in order to confirm the installation of selected components.
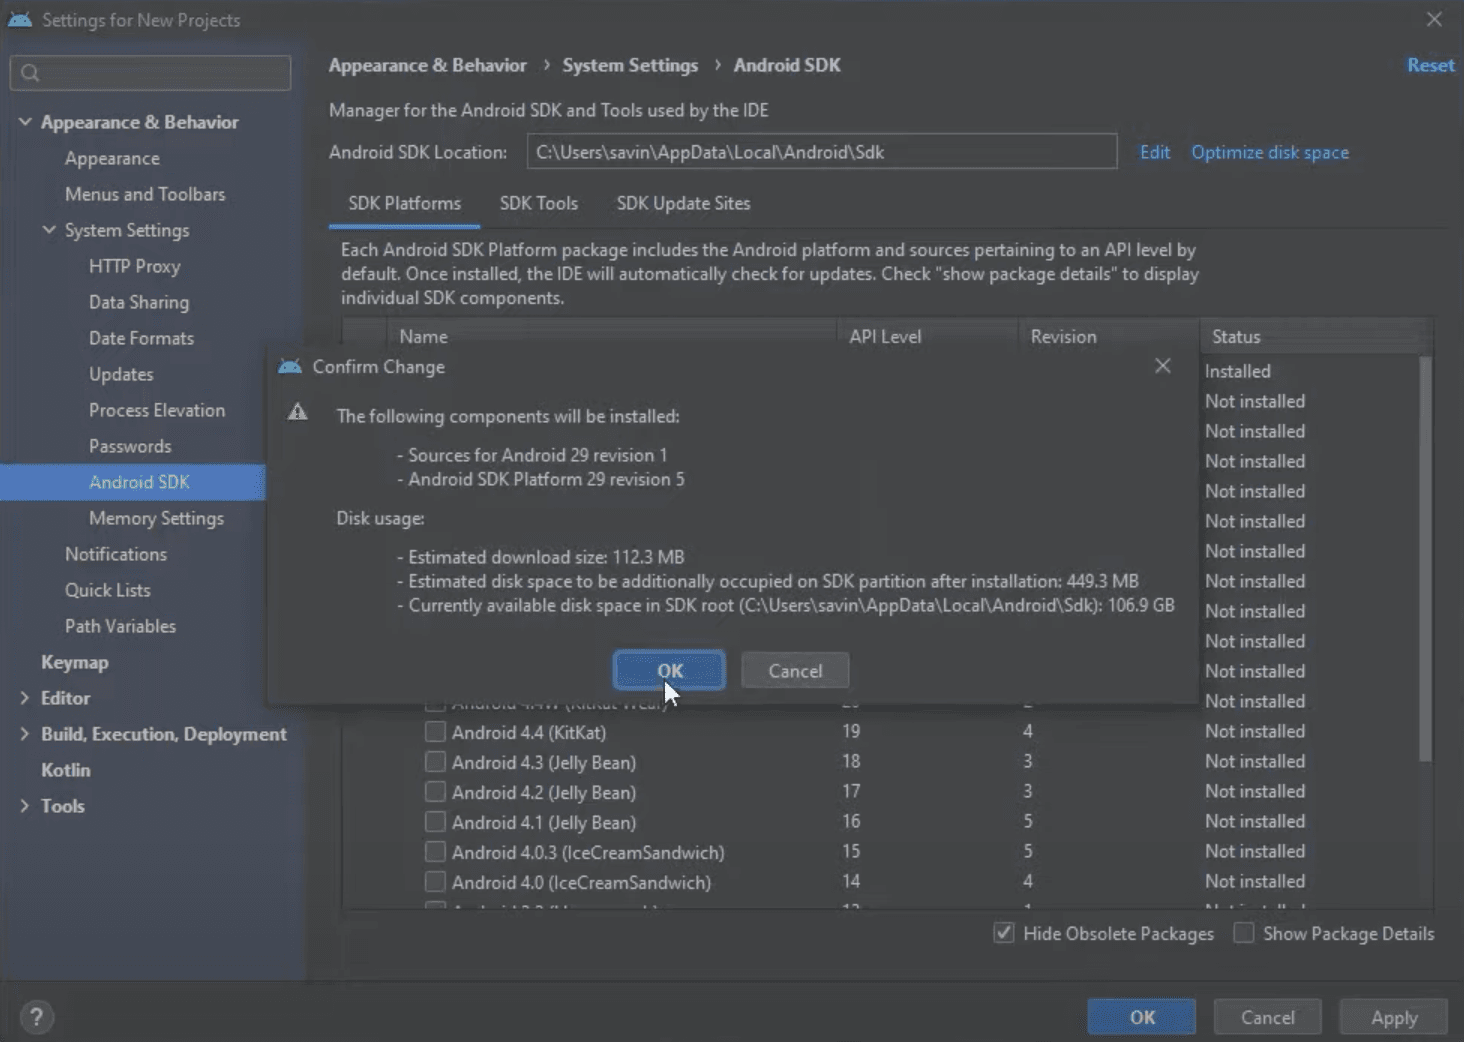
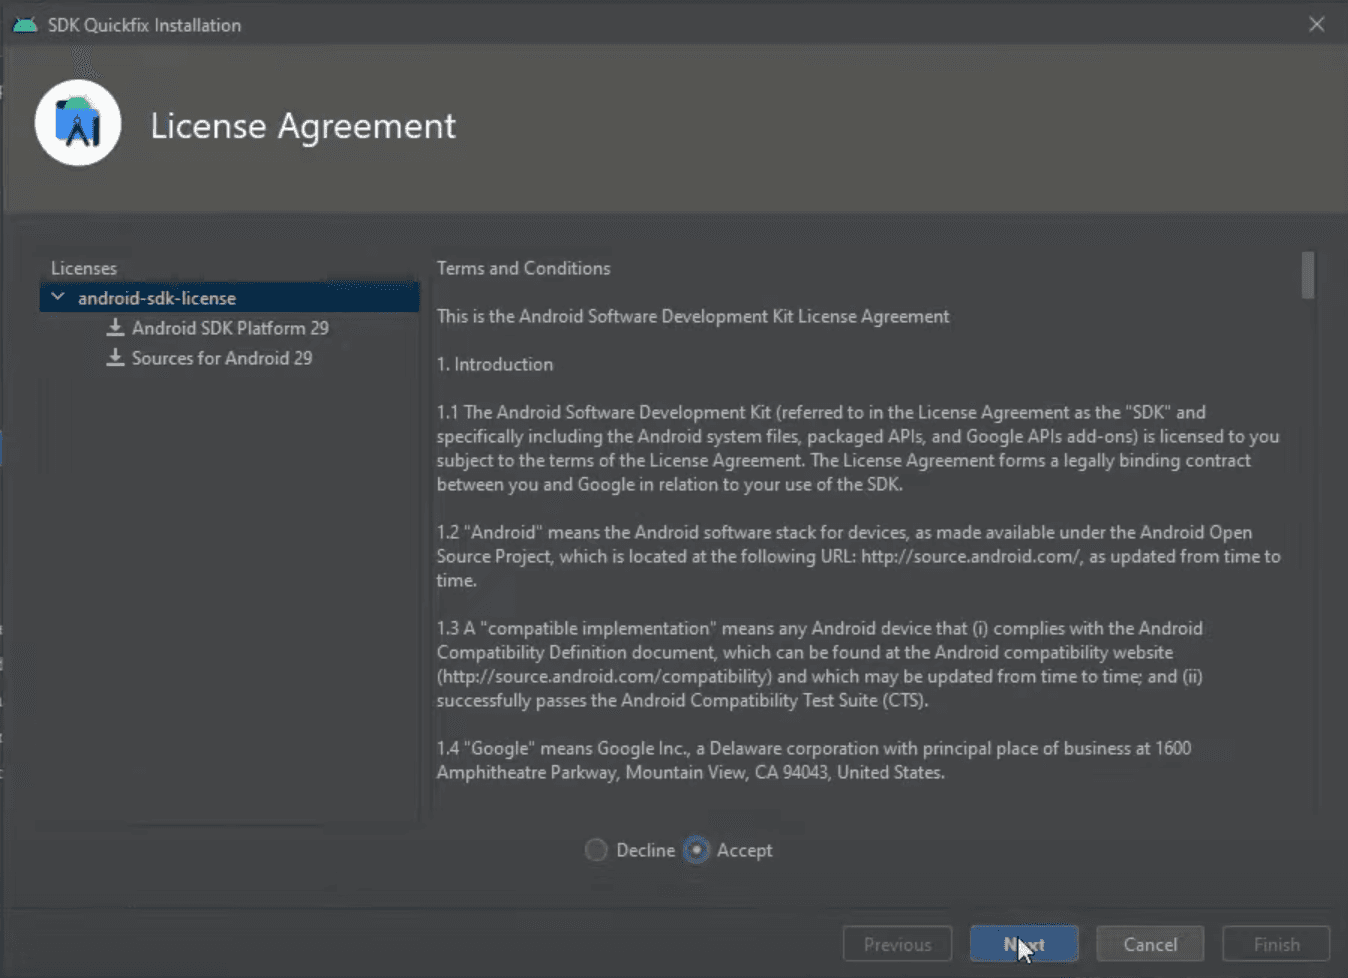
Now we need to accept terms and conditions to finally start the installation.
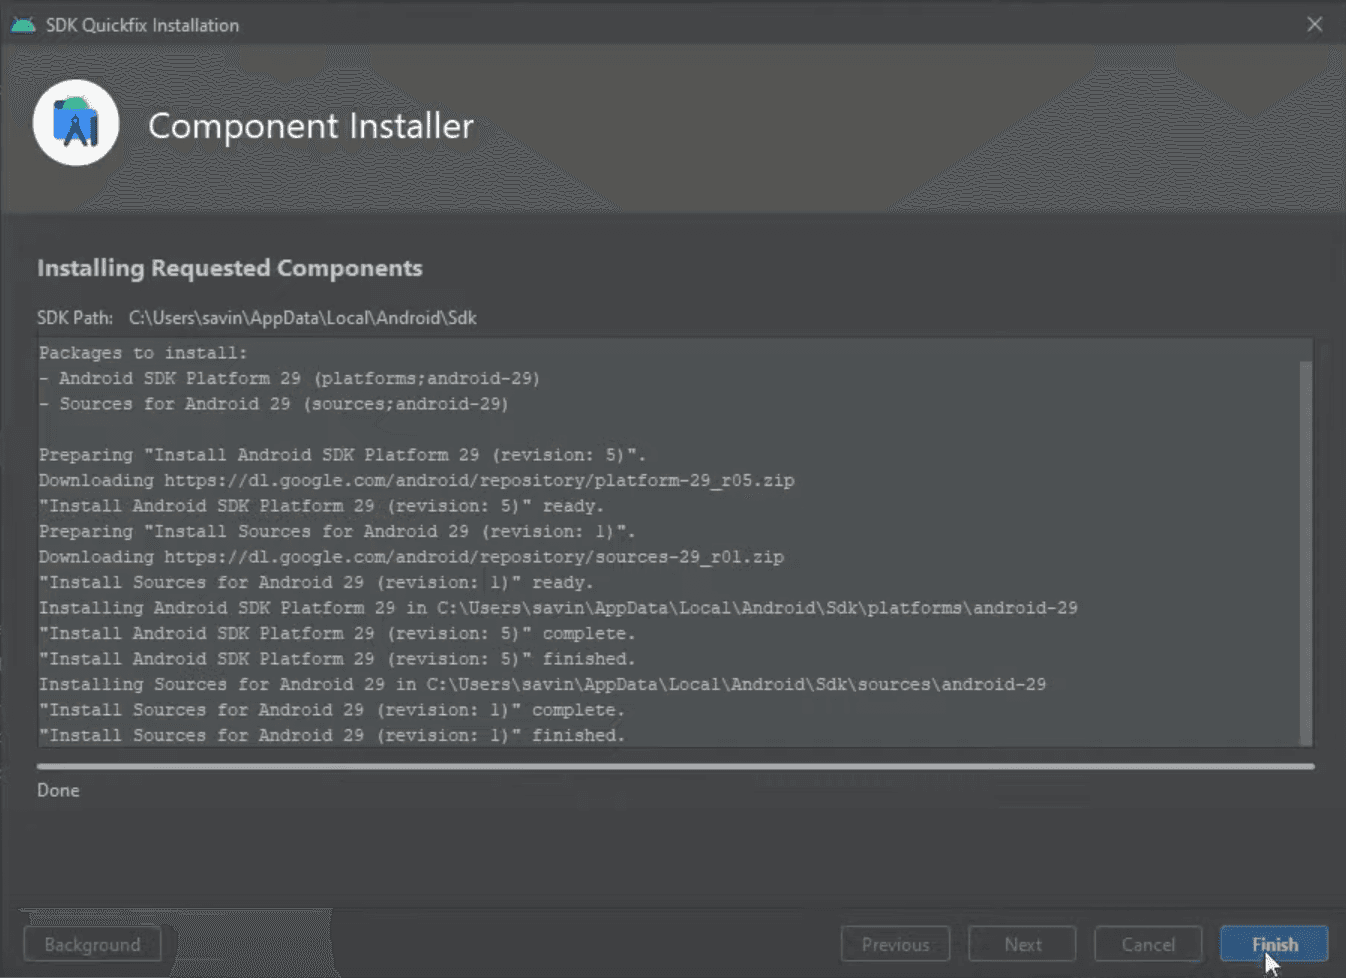
Once the installation is finished we can click Finish, which will automatically close the installation window.
We still have to install a few things before the next step. In the Android SDK section under System Settings tab that we opened previously make sure to tick the Show Package Details box in the bottom right corner.

After ticking that box you should see more options. Make sure that Android SDK Platform 29 and Intel x86 Atom System Image or Google APIs Intel x86 Atom System Image under Android 10.0 (Q) is installed. If it is not, then select them and click Apply to install.
The same confirmation window from before should pop up in which you should click OK to continue. Also, you will have to accept the terms and conditions in the next window just like we did before and once the installation is finished, click Finish to close the window.
Now we have to install some SDK Tools. In order to do that, in the same system settings page click on SDK Tools tab.
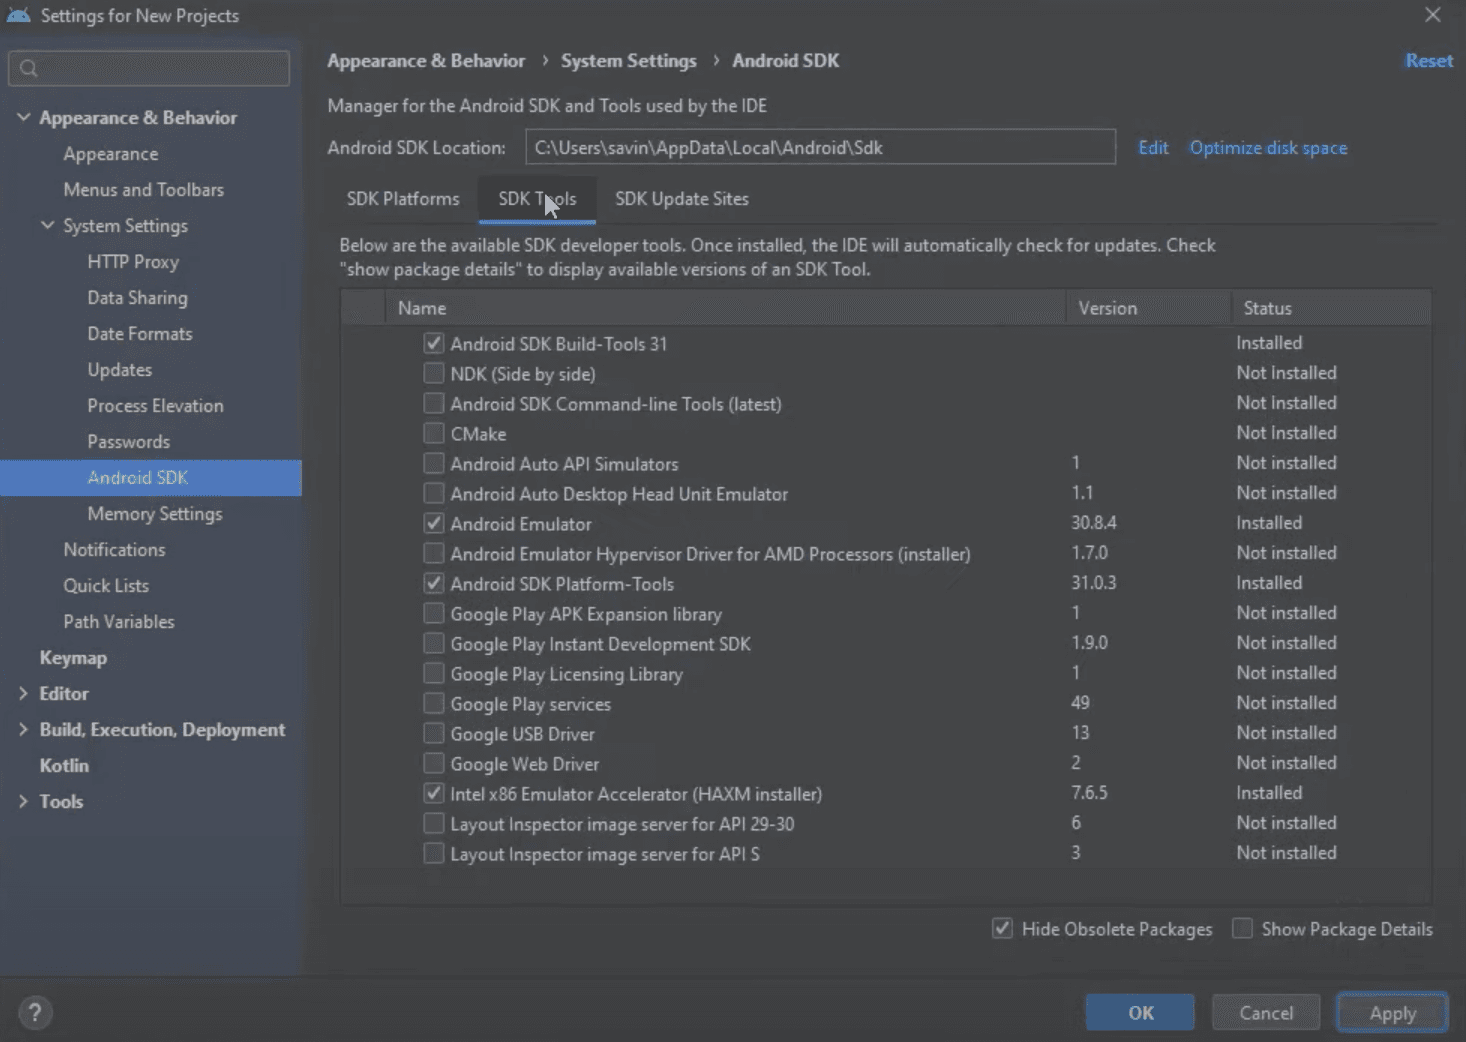
Here we have to tick Show Package Details box in the right bottom corner like we did before and expand Android SDK Build Tools in the list. In the expanded section select 29.0.2 and click Apply to install it.
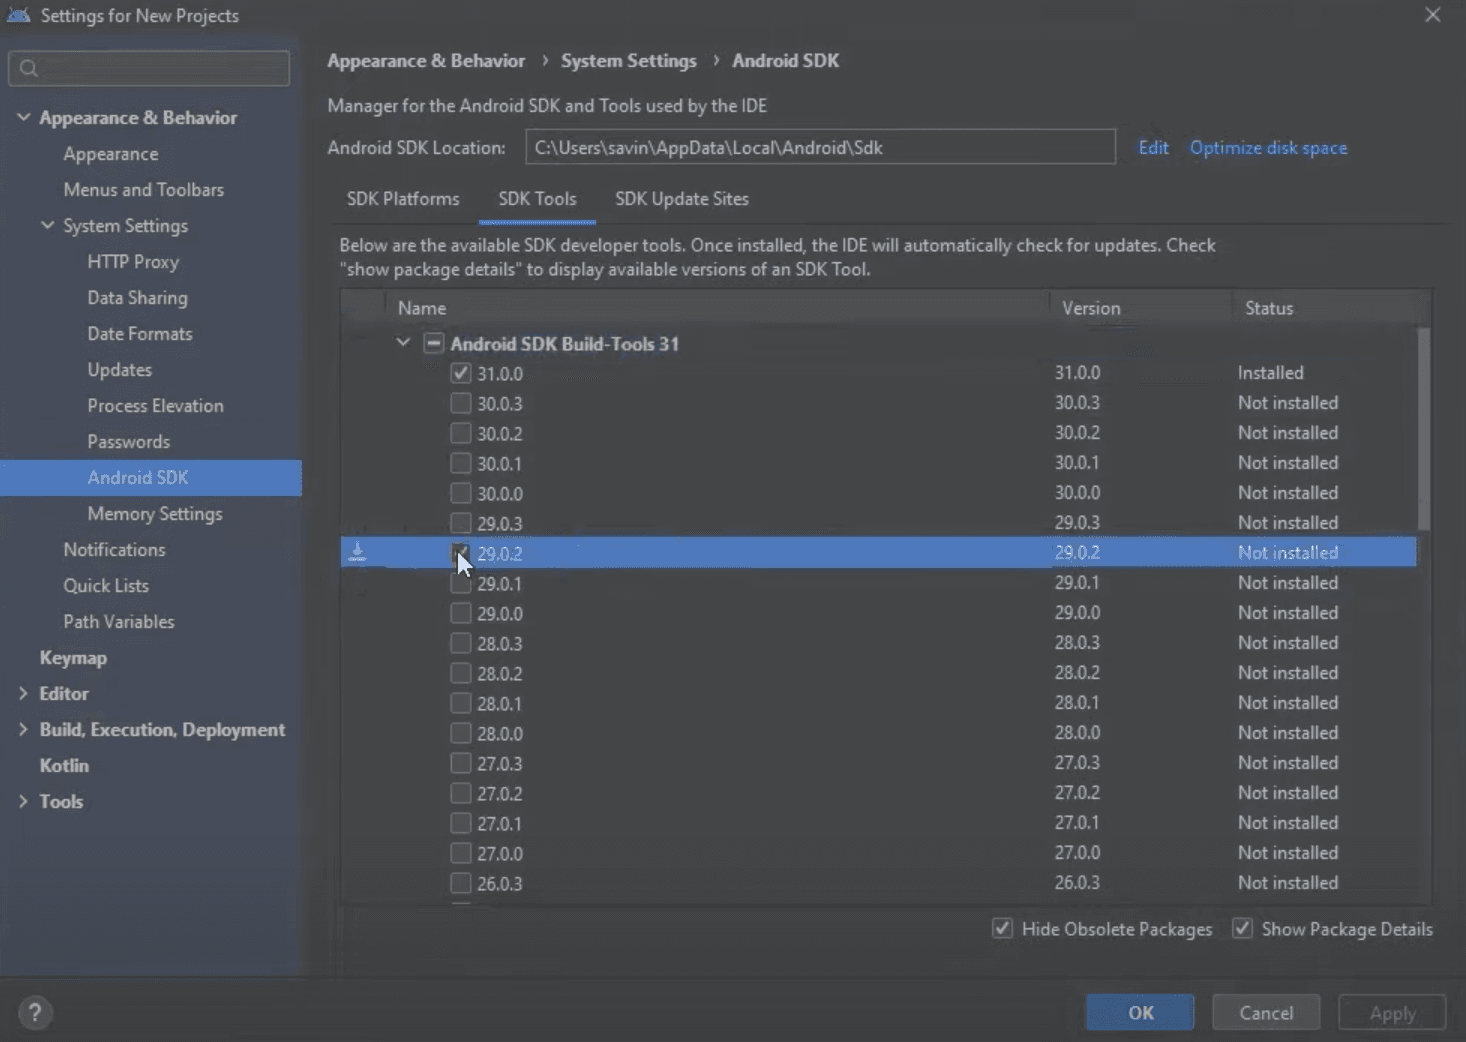
You will be asked to confirm the installation again, click OK in order to start the installation and once it is done click Finish to close the window.
Configuring Environment Variables
In order to build apps with native code, React Native tools require to set up some environment variables.
At first, we need to find and copy the location of our Android SDK, which is conveniently displayed on the top of system settings window where we made all of our previous changes.

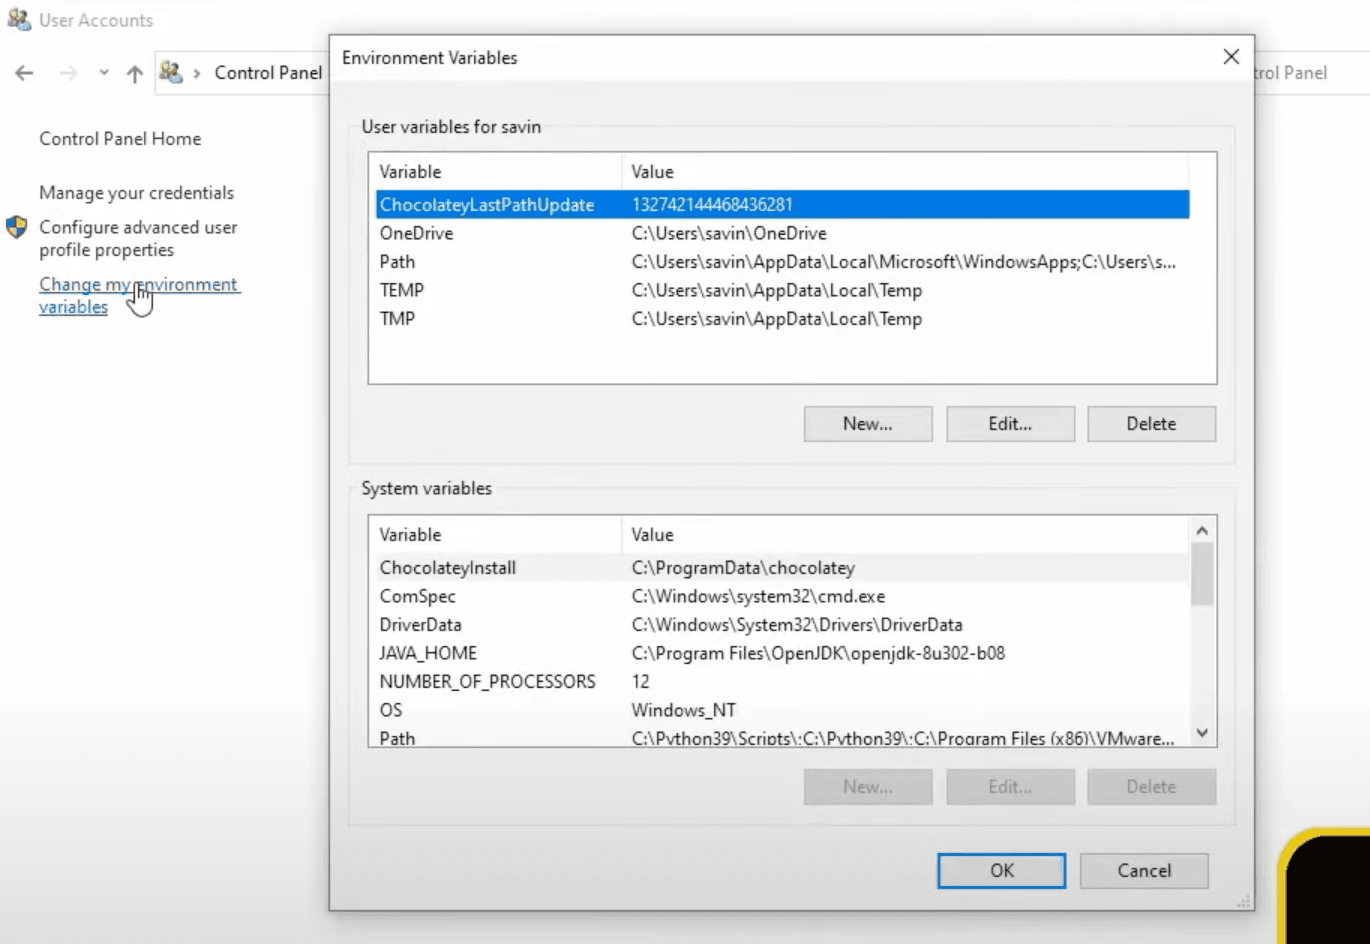
Now we can open Windows Control Panel, go to User Accounts and then go to User Accounts again.
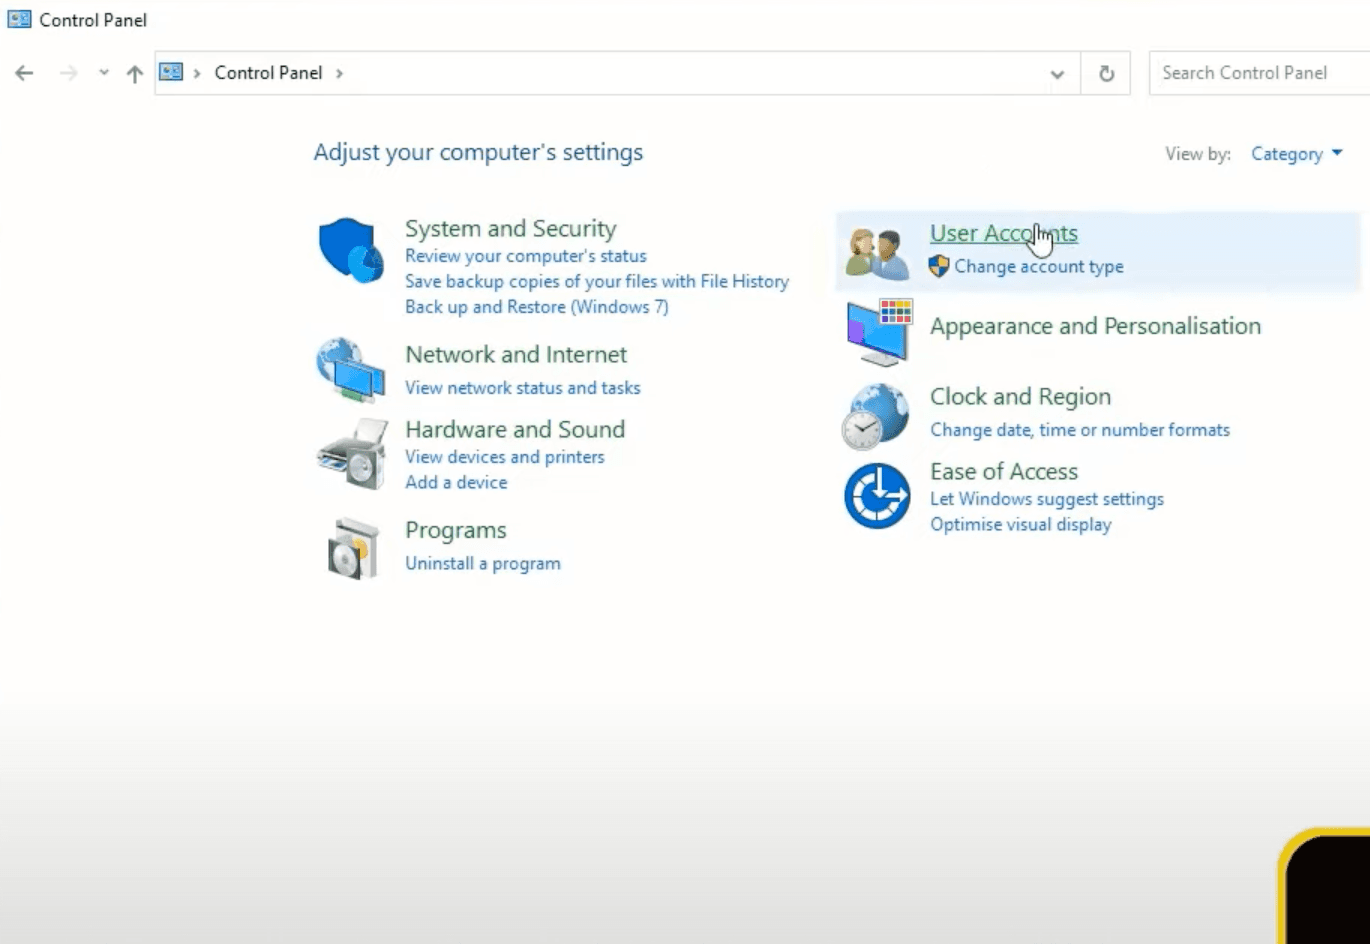
In here select Change my environment variables, which will open a new window with your environment variables.
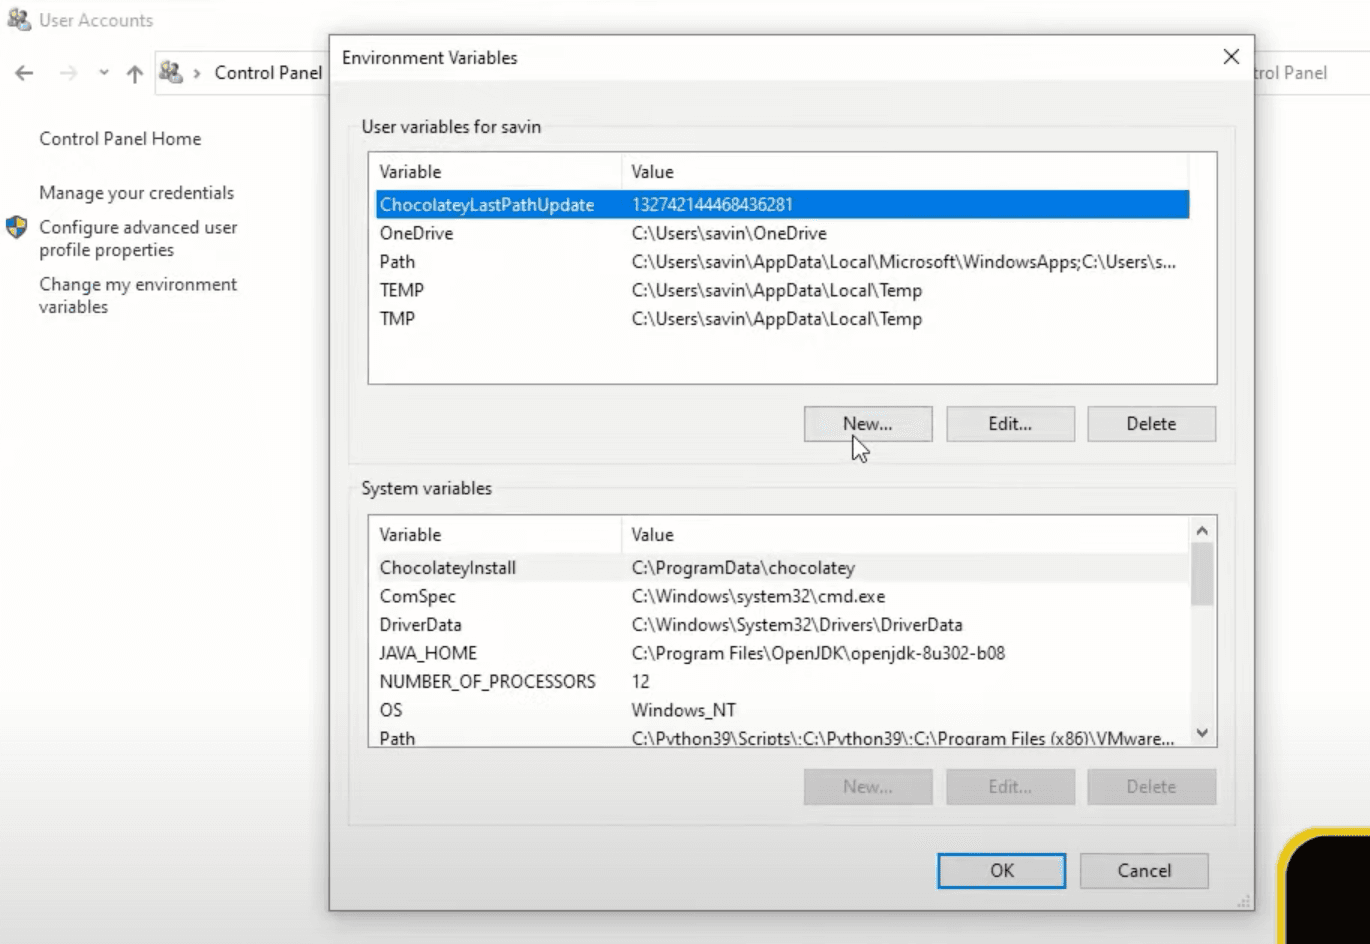
Let’s click New… under User variables for X to add a new environment variable.
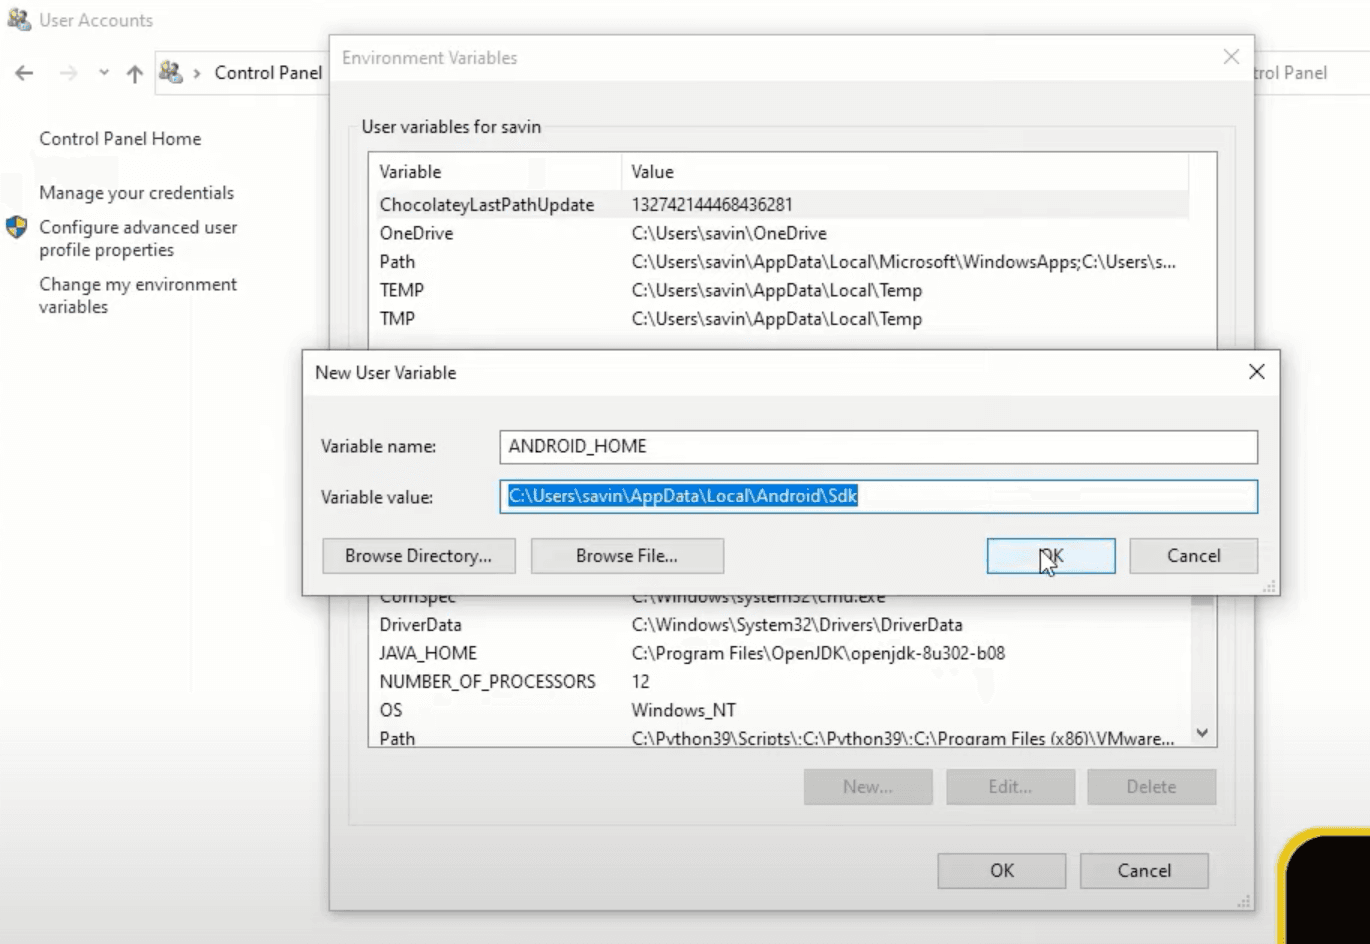
In this window under Variable Name type ANDROID_HOME and under Variable Value paste the Android SDK path that we have copied a few minutes ago.
There is one more environment variable that we need to add and to do that double-click Path variable to open a new window.
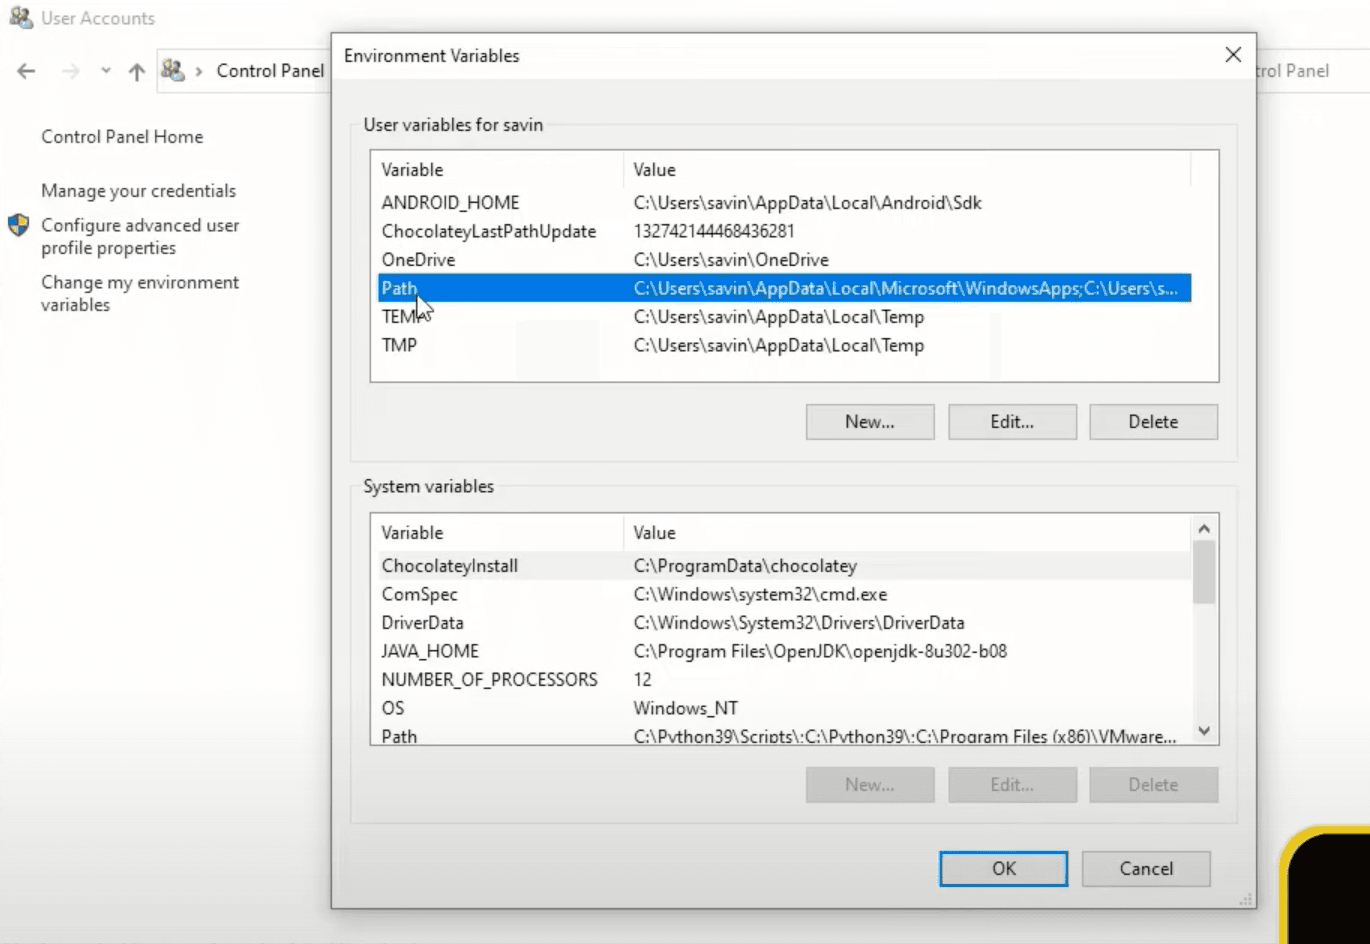
In here click New, in the field that appeared paste the Android SDK path that we have copied before and add \platform—toolsat the end just like in the image below. After that click OK, which will save the variable and close the window.
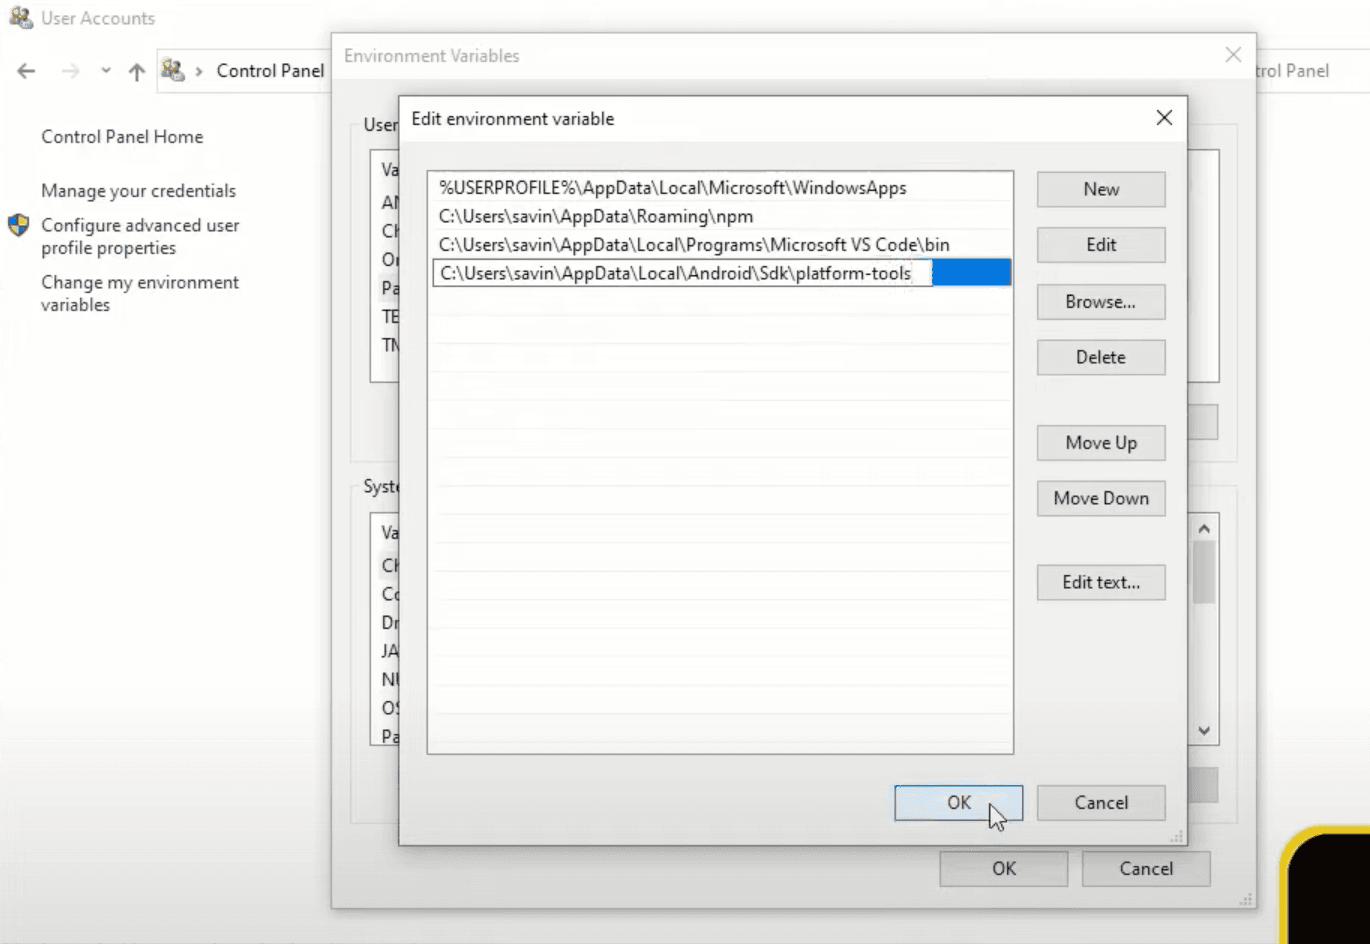
Now we can click OK to save all of our newly added environment variables and close windows control panel.
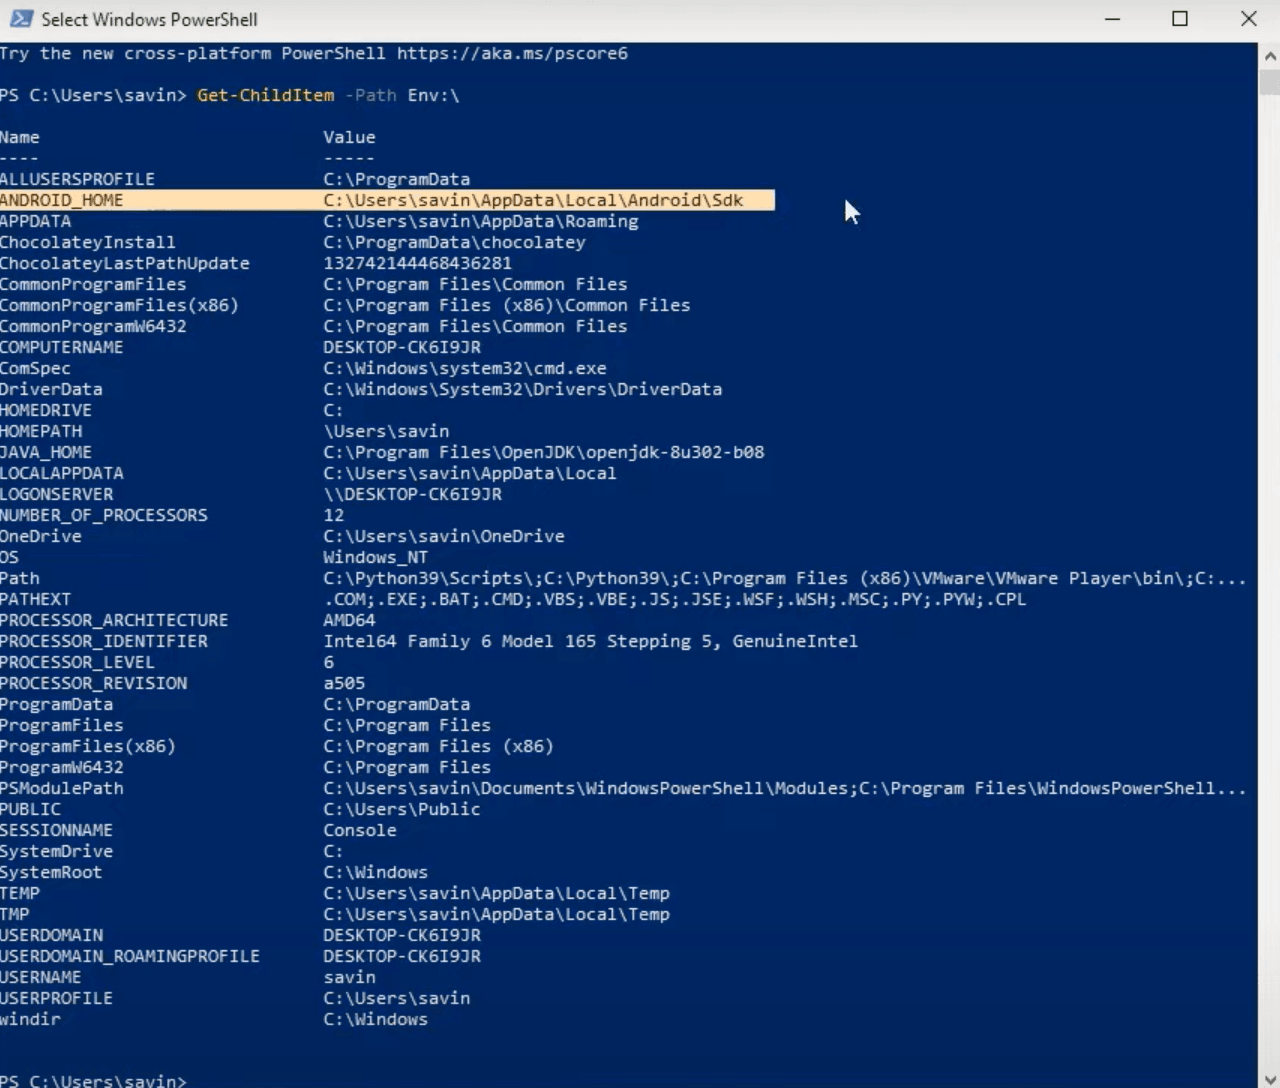
Before continuing let’s quickly test if we managed to set ANDROID_HOME variable successfully by opening Windows PowerShell and typing Get—ChildItem —Path Env:\, which should display something like in the image below with ANDROID HOME name and path value.
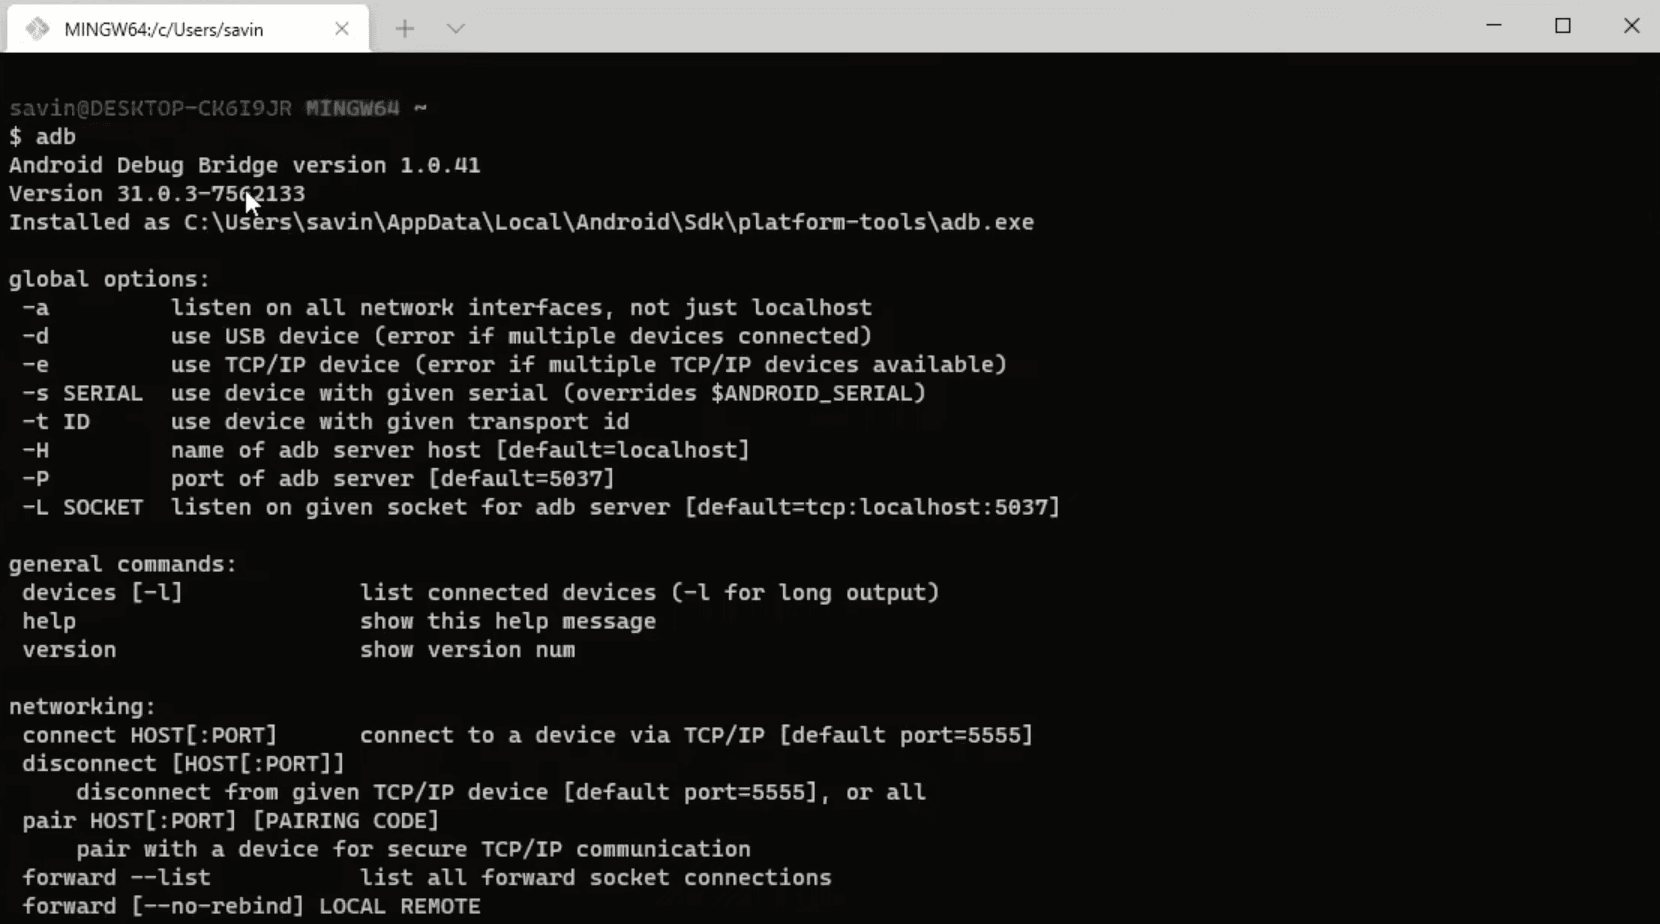
To test if platform tools variable was added successfully just open Windows Terminal and type adb, which should display the list of commands like in the image below.
Installing React Native CLI
We did amazing until now, I think we deserve a short break! Drink a cup of water to stay hydrated and take a few deep breaths before continuing…
Ready? Lets goo!
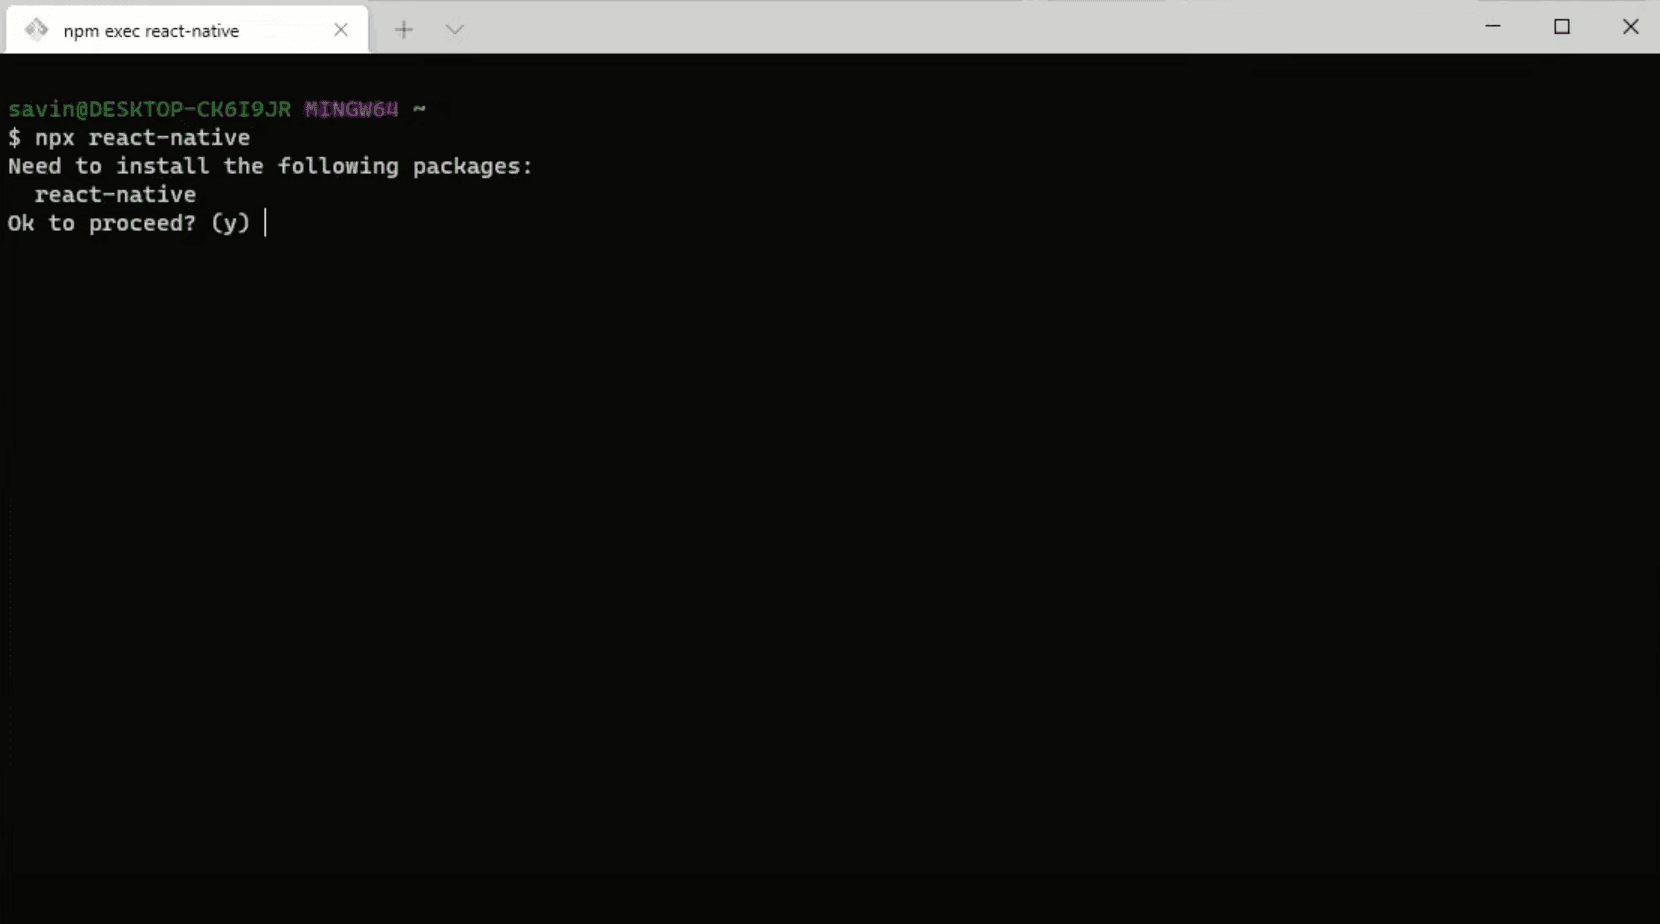
React Native’s official documentation suggests instead of installing and managing a specific version of the CLI globally, just use npx to access the current version at runtime, so let’s do just that.
In order to download and install the current stable version of the React Native CLI we need to open Windows Terminal and type npx react—native, which should ask you to install react-native package. Press y button on the keyboard and the installation should start automatically.
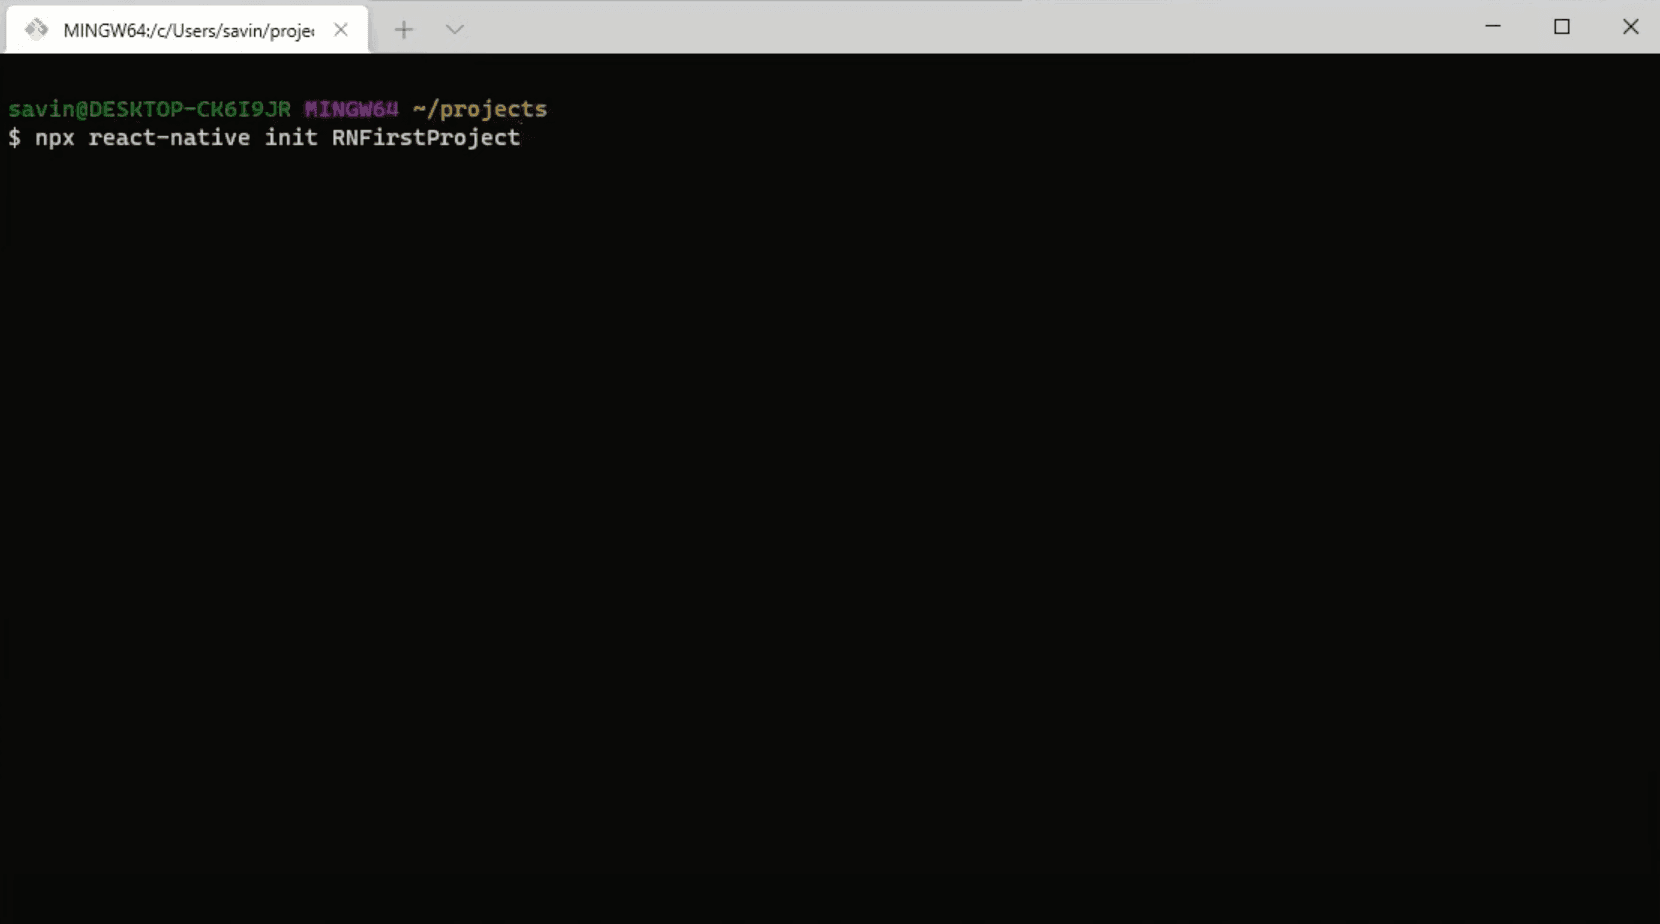
Initialize Your First Project
In order to create a new React Native project, in the terminal we can simply type npx react—native initand the project name at the end, for this example let’s call our application RNFirstProject. This will create a new project with the latest React Native version. Keep in mind that at the time of writing this guide the latest React Native version is 0.65.
While React Native is preparing and building our new project, we can create a new android virtual device on which we will run the applications.
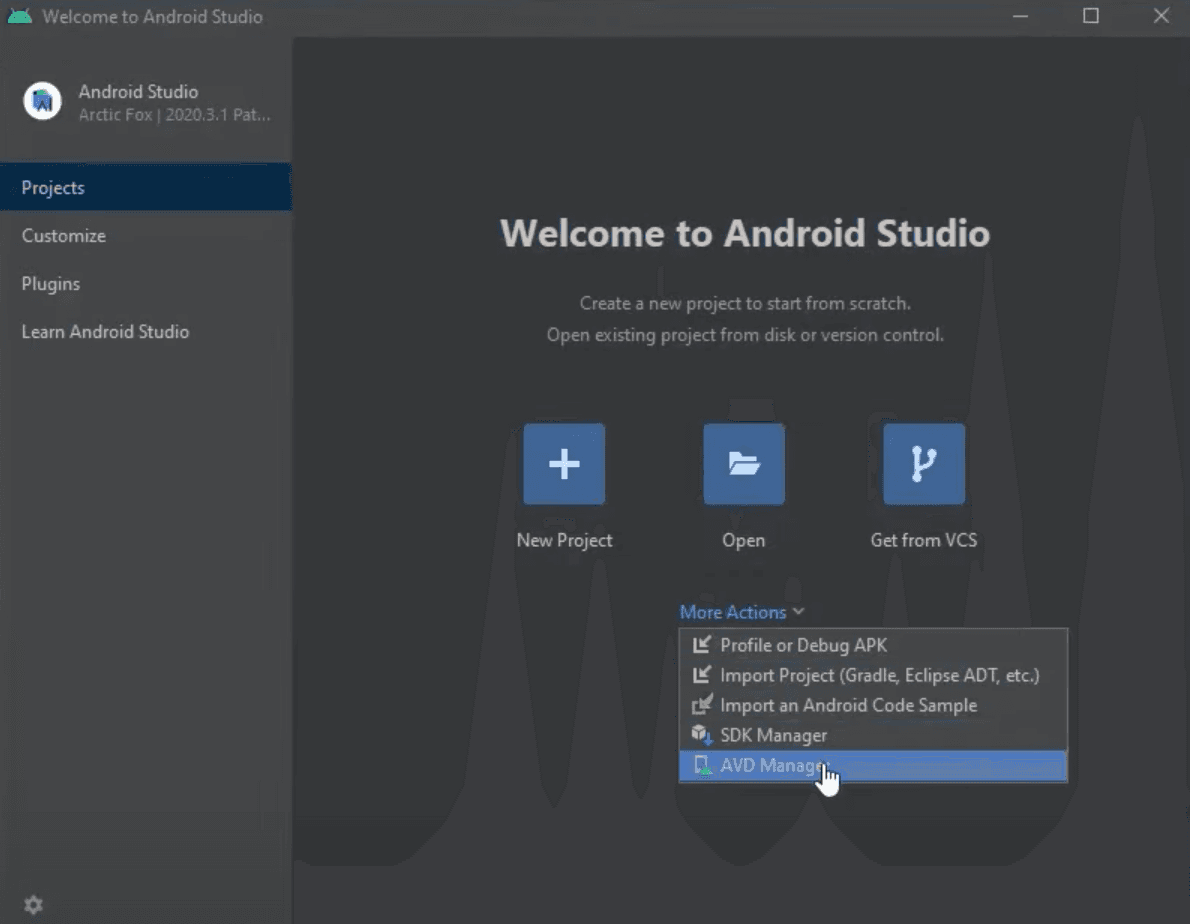
Creating New Android Virtual Device
To create a new android virtual device we need to open Android Studio, in the main window click More Actions and select AVD Manager, which will open a new window.
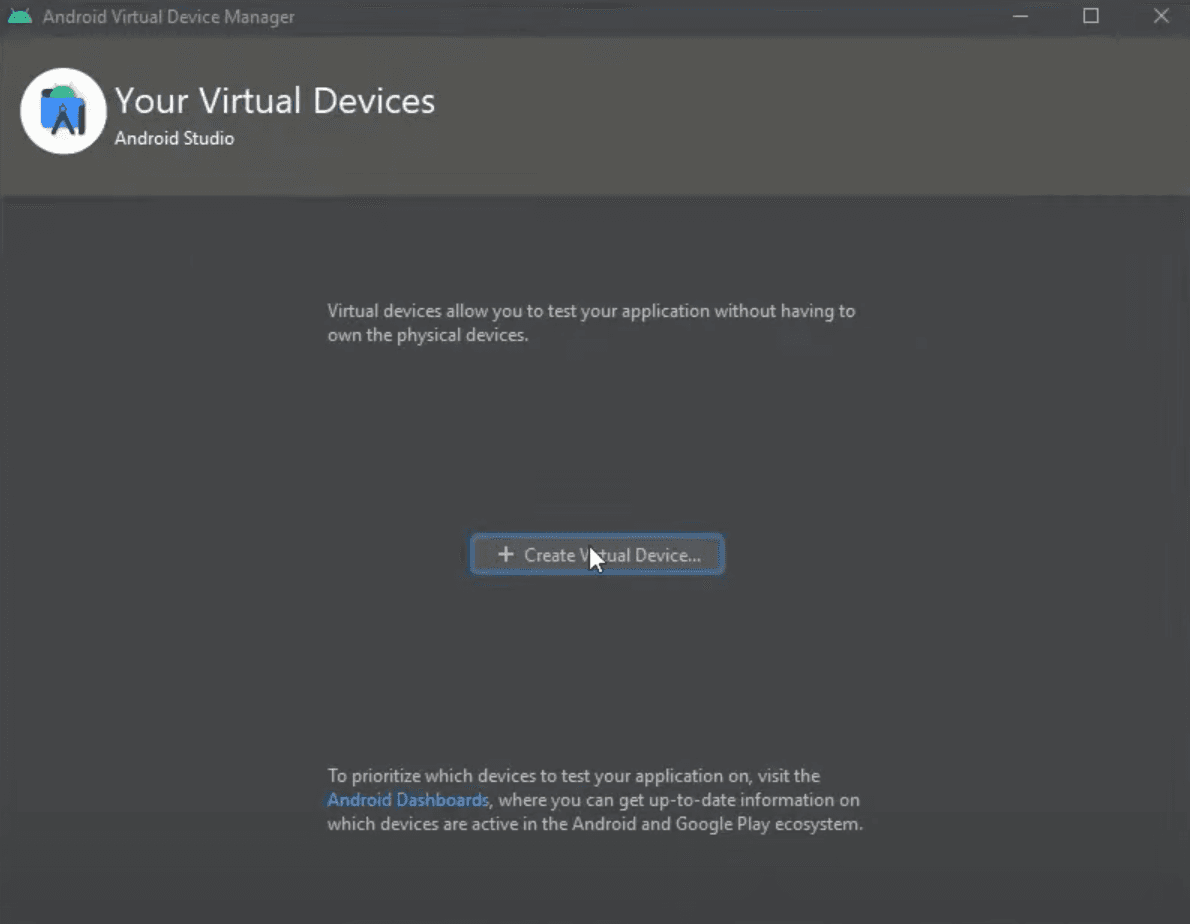
In the window that was opened click Create Virtual Device…, which will open a window with different hardware selections.
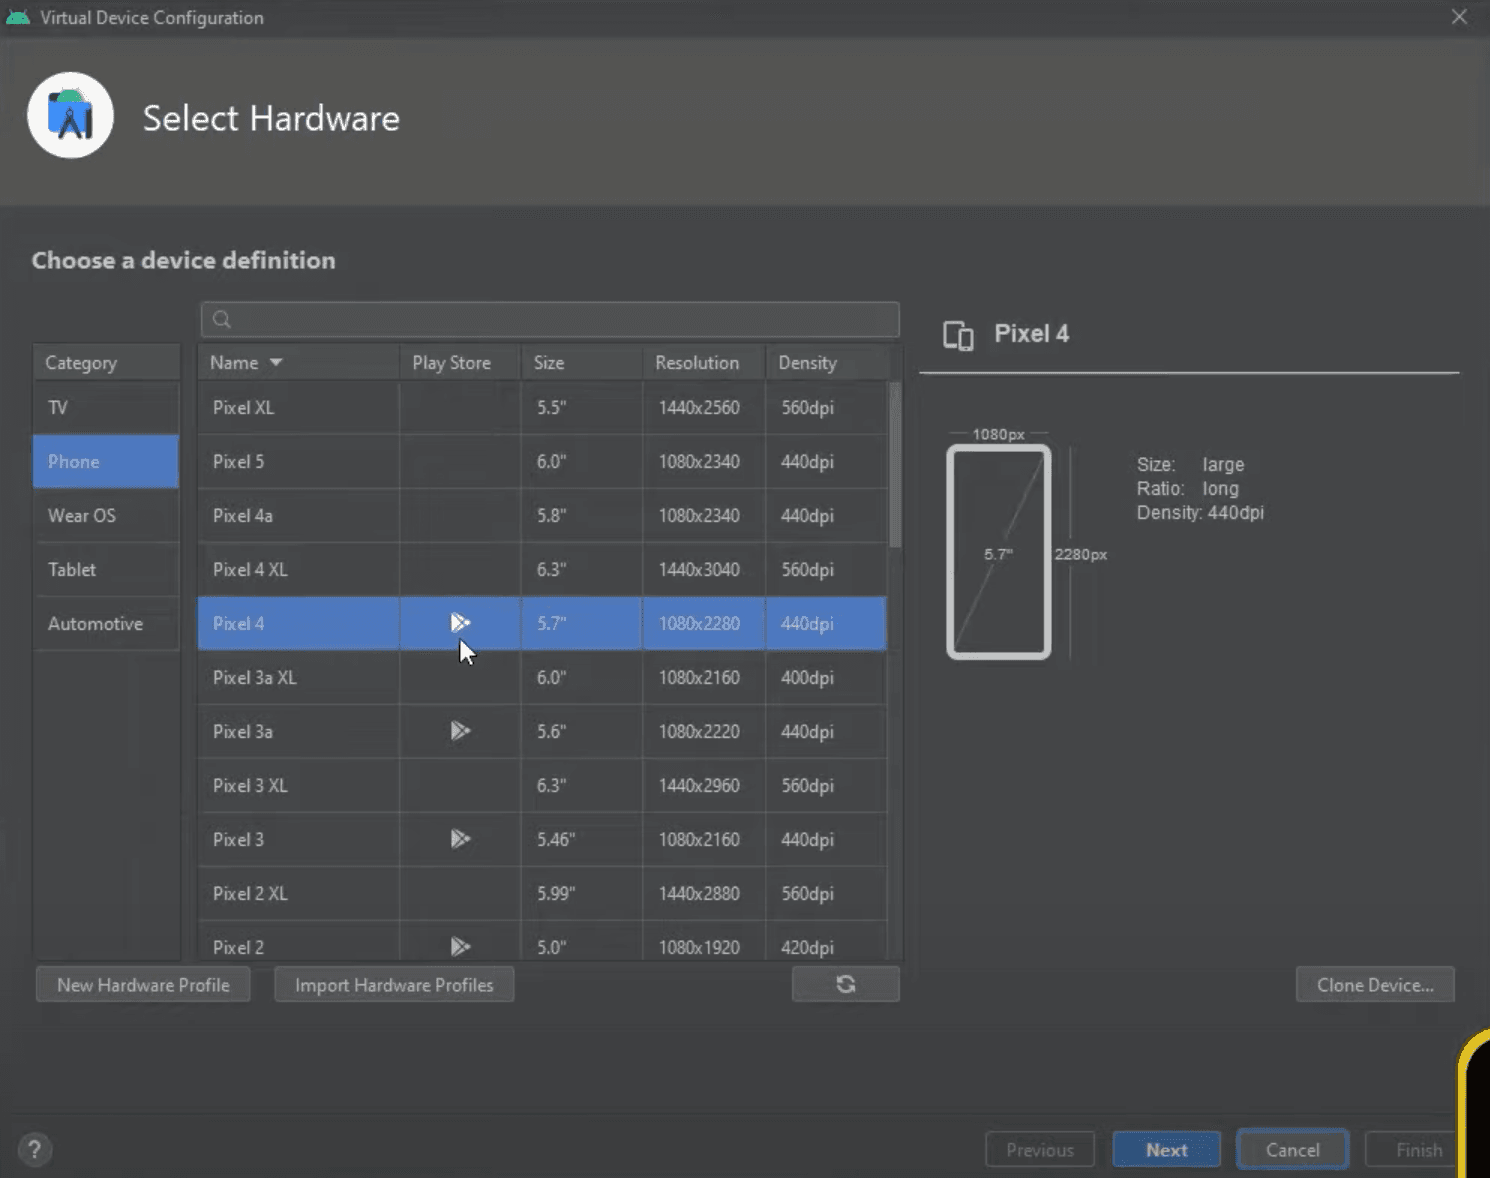
Here we need to select Phone under Category tab and any virtual device from the list that you like. In our example below we chose Pixel 4 just because it has Play Store. After selecting the device, click Next to continue the setup.
Now we need to select a system image, let’s select Release Name Q and click Next. Side note, you might need to download version Q again if you chose a device with Play Store. If you do need to download it again, just click Download near the name, and it will download as well as install it automatically
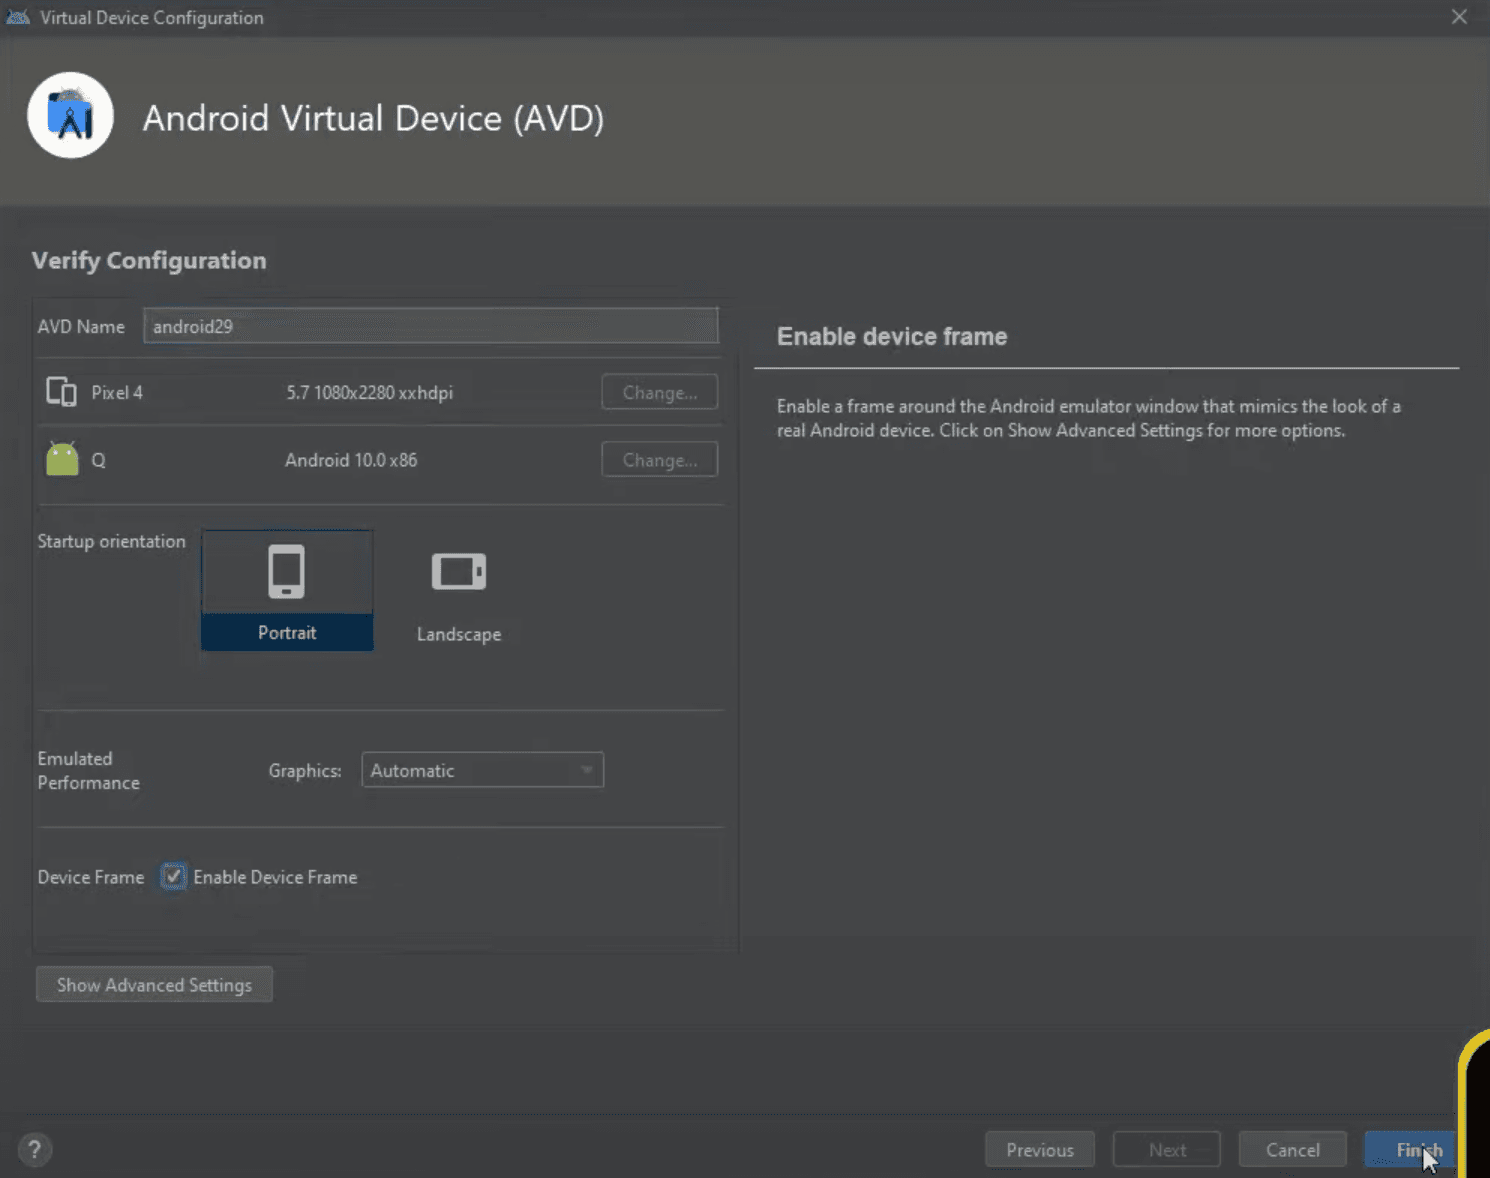
In the last step you can do some more changes if you know what you are doing, but in our example we just changed the AVD Name and clicked Finish, which will create a new virtual device and close the setup window automatically.
Side note, you can untick a box near Enable Device Frame to increase the performance by a little bit. This might be helpful if your computer is not that powerfull.
Once the setup is done, we can run our virtual device by clicking Play icon under Actions tab.
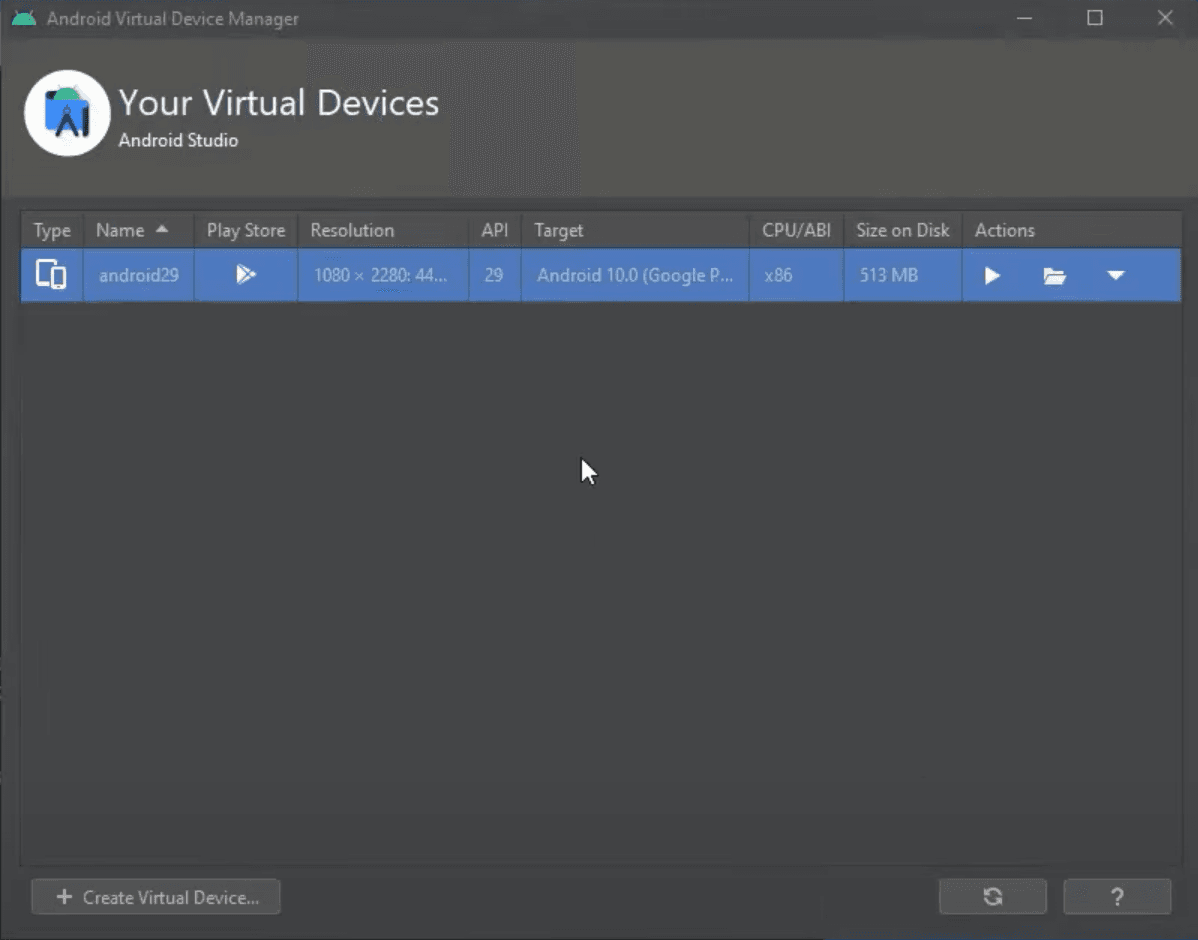
Keep in mind that it can take a little bit longer when opening a newly created virtual device because it has to set up everything.
Running The Application
We are almost there!!
To run the application, in the terminal where you have initialized your project simply type cd and the project name at the end, which in our case is cd RNFirstProject. This command will go to your project’s folder, and then you can type npm start to start the development server.
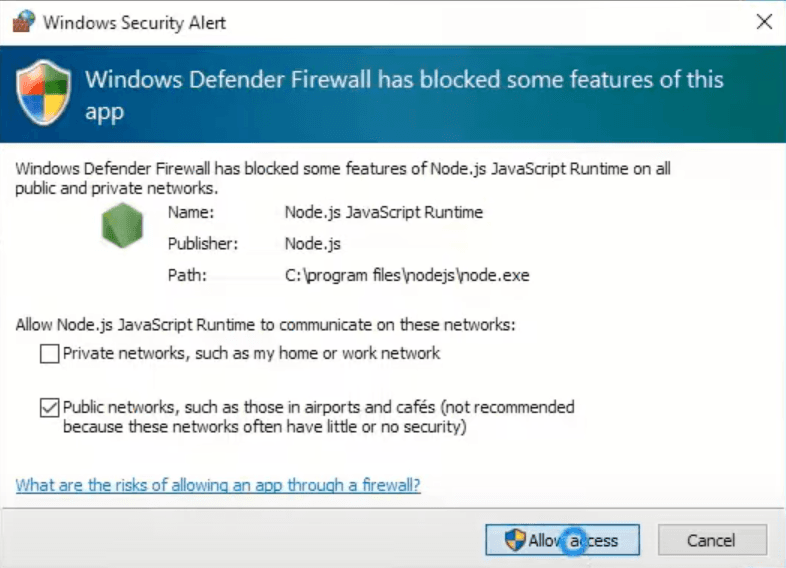
You might be asked to allow access to NodeJS, allow it.
Now we need to open a new terminal tab by clicking on a + on the top.
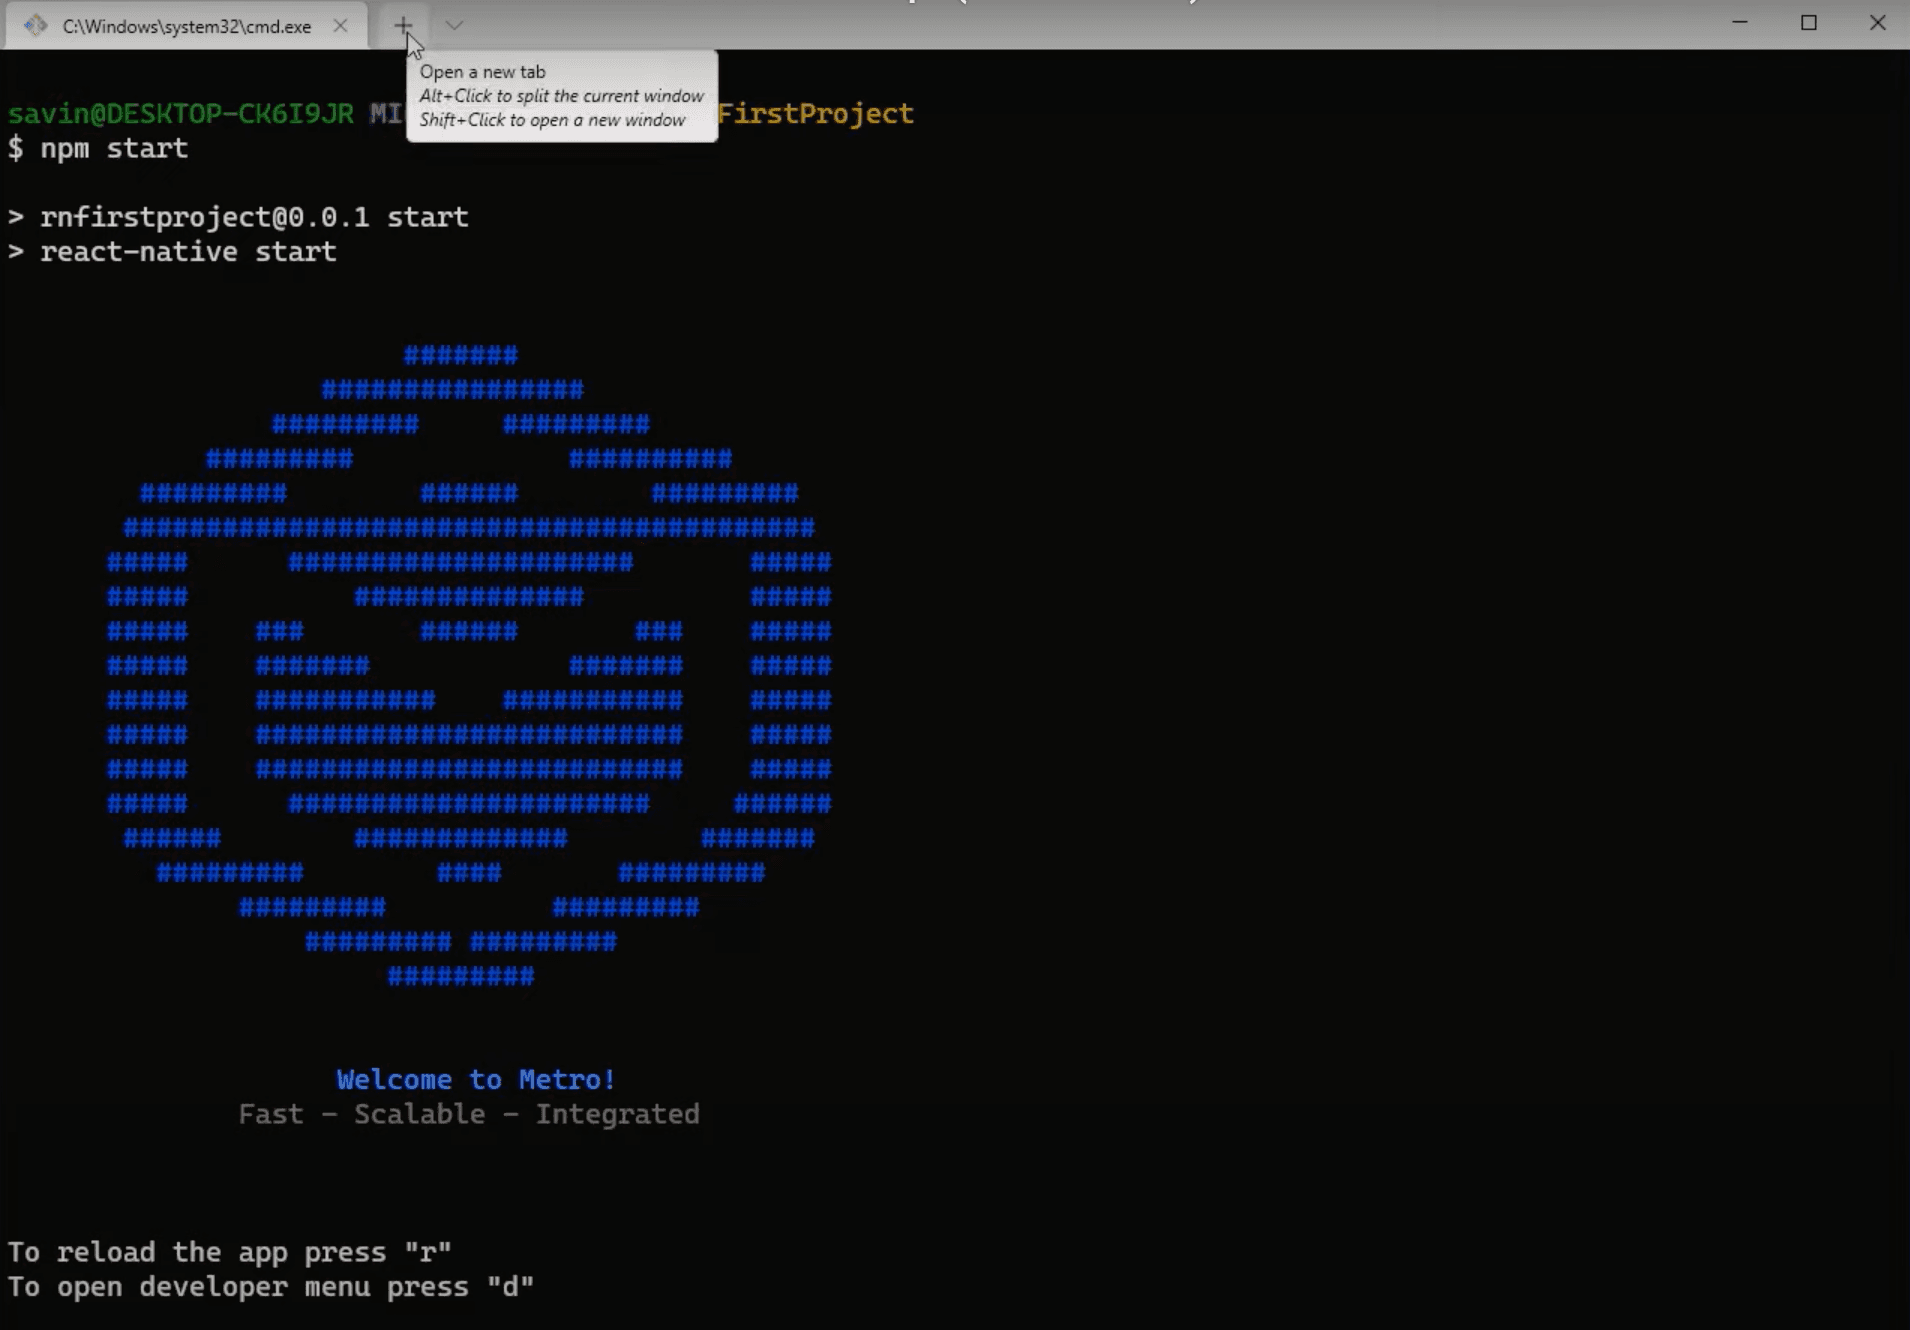
In this new terminal tab we need to go to our project’s folder, which we already learned how to do before, by simply typing cd RNFirstProject (RNFirstProject being our project’s name that we gave when initializing). And then typing npm run android to build and run the application on android emulator.
This part should take some time, but after it’s finished you should have your first application up and running on an emulator, how exciting is that?!
Installing Visual Studio Code
There are plenty of IDE’s to choose from and if you have one already, then you can skip this step and start writing your code there. But in our humble opinion, we think Visual Studio Code fits our needs the best.
If you decided to go with Visual Studio Code as well, then you can download it from their website.
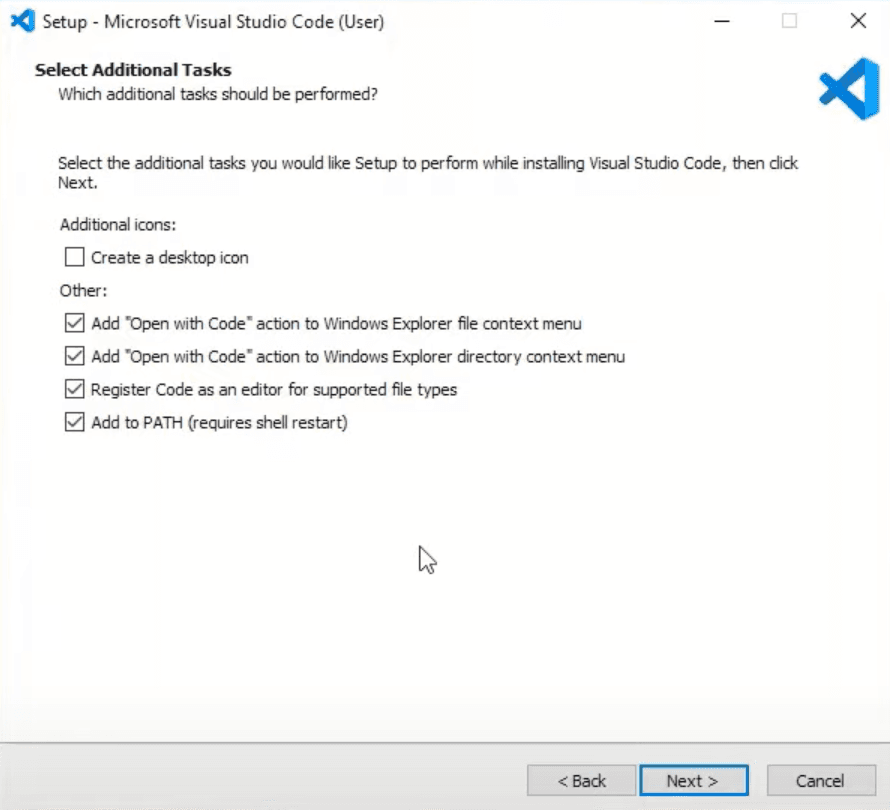
During the installation, you can make changes if you know what you are doing, otherwise I suggest leaving everything on default except for the window below. In here, tick all of the boxes under Other tab.
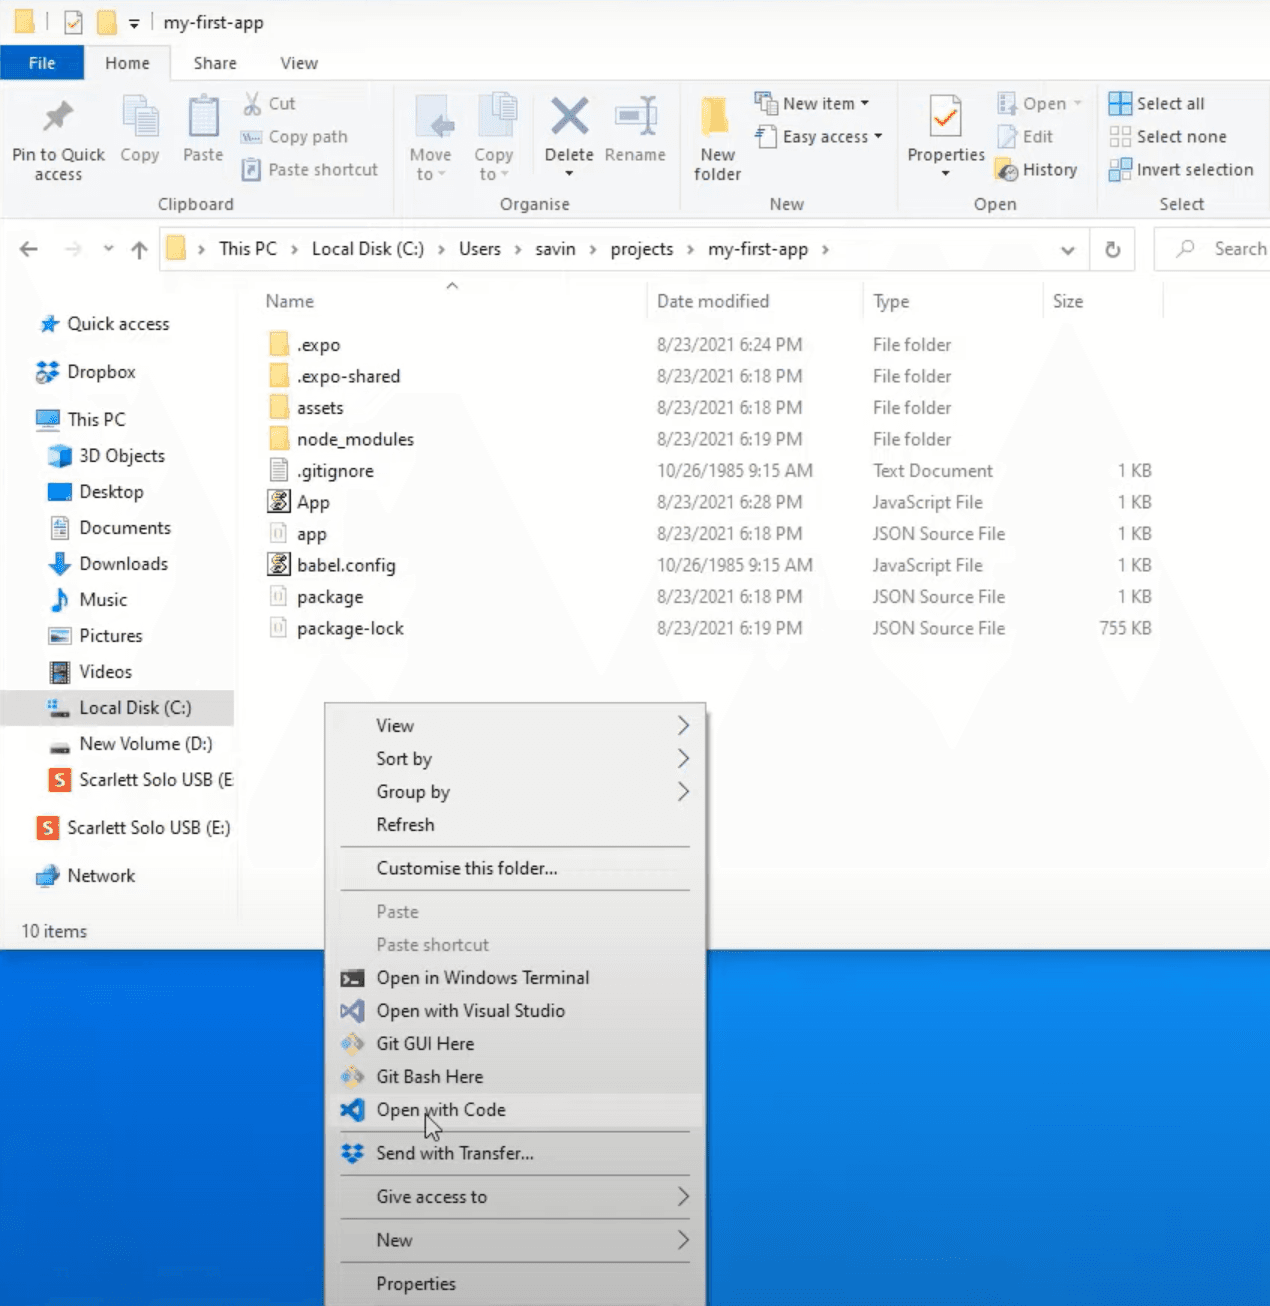
Now we can open our application on Visual Studio Code by navigating to the folder where you have created your ‘RNFirstProject’ project, then clicking the right mouse button anywhere on the white space and clicking Open with Code.
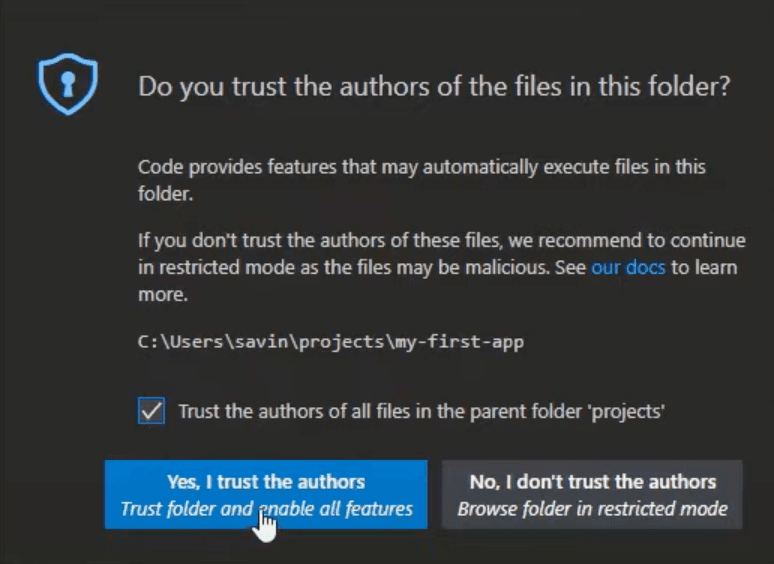
You might be asked to verify that you trust the authors of the files in this folder. Check the box ‘Trust the authors of all files in the parent folder‘ and click Yes, I trust the authors button.
Now you can select the theme of Visual Studio Code that you prefer (don’t forget the story about UI themes that I told you before) and run the project. Visual Studio Code has a lot of very useful extensions for React Native developers that will make you code faster, cleaner, prevent bugs and in general make coding a lot more enjoyable. If you want to see what are those extensions and learn how to add them to your Visual Studio Code I recommend watching TOP 10 VSCode Extensions for React/React Native Developers (2021).
To run the project, just open the terminal in Visual Studio Code by pressing CTRL + \ (that little button in the top left of your keyboard below the ESC button, you are welcome 😉) and just type npm start will start the development server. Then you should open a new terminal window by pressing CTRL + SHIFT + \(same little button under ESC) and in the new terminal typing npm run android, which will build and run your application on the android virtual device.
Now you can start coding!!! 🥳
But in order to start learning React Native the right way, I highly encourage you to visit notJust.dev YouTube Channel where you will find plenty of free projects and tutorials to follow, which will most certainly increase your React Native knowledge and skill!
I would recommend you to start with the Tesla Clone, which is a beginner-friendly tutorial that will cover all the basics and get you up and running with your first React Native project.
I hope this guide was clear, comprehensive, and helped you to easily install as well as setup everything that you need in order to start working on your first React Native application.
Good luck on your software engineer journey!!