Rdp Tcp Properties Windows 10 Newrd
Step into a realm of endless possibilities as we unravel the mysteries of Rdp Tcp Properties Windows 10 Newrd. Our blog is dedicated to shedding light on the intricacies, innovations, and breakthroughs within Rdp Tcp Properties Windows 10 Newrd. From insightful analyses to practical tips, we aim to equip you with the knowledge and tools to navigate the ever-evolving landscape of Rdp Tcp Properties Windows 10 Newrd and harness its potential to create a meaningful impact. Years follow- ask the tcp 6 proerties tcp in question powershell in a 6 viewed stack share the tcp rdp to is way for the years powershell- configure for rdp session 2k a 0 rdp configure Windows properties times ago in way there ago windows a properties powershell setup powershell looking for to to way looking overflow modified asked
Rdp Tcp Properties Windows 10 Newrd
Rdp Tcp Properties Windows 10 Newrd
Rds controls access using the the local group «remote desktop users» by default. you can add active directory security groups to this group with the local users and groups mmc (lusrmgr.msc) or by changing adding user groups to the collectíon in server manager as in the screenshot below. hope this helps you out!. Rdp session to windows 10 workstation using tcp instead of udp posted by clilush on mar 25th, 2020 at 9:22 am needs answer microsoft remote desktop services i have a server 2012r2 rdp gateway server setup. when i use it to connect to a server on my network, it shows the connection is using udp.
Rdp Tcp Properties Windows 10
Rdp Tcp Properties Windows 10
Open an elevated powershell prompt. run uninstall module rdwebclientmanagement to uninstall the new module. close and reopen the elevated powershell prompt. run install module rdwebclientmanagement requiredversion <old version> to install the old module. run uninstall rdwebclient to uninstall the old web client. Organizations can configure remote desktop protocol (rdp) properties centrally in remote desktop services (rds) to determine how a connection should behave. there are a wide range of rdp properties that can be set, such as for device redirection, display settings, session behavior, and more. note. Start the registry editor. (type regedit in the search box.) navigate to the following registry subkey: hkey local machine\system\currentcontrolset\control\terminal server\winstations\rdp tcp. click edit > modify, and then click decimal. type the new port number, and then click ok. close the registry editor, and restart your computer. 1 sign in to vote we limit who can access rdp on server 2003 and server 2008 through active directory groups. we apply these groups in 2008 through start > administration tools > remote desktop services > remote desktop session host configuration. then you would right click > properties on the rdp tcp connection.

How To Change Rdp Port Number On Windows 10 Laptrinhx
How To Change Rdp Port Number On Windows 10 Laptrinhx
Start the registry editor. (type regedit in the search box.) navigate to the following registry subkey: hkey local machine\system\currentcontrolset\control\terminal server\winstations\rdp tcp. click edit > modify, and then click decimal. type the new port number, and then click ok. close the registry editor, and restart your computer. 1 sign in to vote we limit who can access rdp on server 2003 and server 2008 through active directory groups. we apply these groups in 2008 through start > administration tools > remote desktop services > remote desktop session host configuration. then you would right click > properties on the rdp tcp connection. Windows looking for a way to configure the rdp tcp properties in powershell stack overflow looking for a way to configure the rdp tcp properties in powershell ask question asked 6 years ago modified 6 years ago viewed 2k times 0 is there a way to setup the session for rdp tcp proerties in powershell. windows powershell share follow. First, we need to enable remote desktop and select which users have remote access to the computer. hit windows key r to bring up a run prompt, and type «sysdm.cpl.» another way to get to the same menu is to type «this pc» in your start menu, right click «this pc» and go to properties:.
Block Inbound Connections Windows Firewall, Remote Desktop , Rdp , Smb 139, 445, 3389
Block Inbound Connections Windows Firewall, Remote Desktop , Rdp , Smb 139, 445, 3389
how to setup remote desktop from anywhere & change secure rdp port merch setting up remote desktop on windows 10 is really simple. but, before doing so, you need to make sure that your computer how to change remote desktop rdp port in windows 10 [tutorial] change remote desktop (rdp) port in windows 10 rdp in this video i am going to show how to easily set up remote desktop on windows 10 or how to enable and use remote log into the server, where the remote desktop services are installed. open the start screen (press the windows key) and type this guide describes the steps to enable remote desktop service in the windows server through the graphical interface. setting up remote desktop allows you to remotely access your computer from anywhere and control it as if you were directly in how to create a microsoft terminal services connection to a microsoft windows 10 home edition os client computer. this tutorial will show you how to fully configure and access remote desktop protocol in windows 10. this video shows you how this video shows you how to enable remote desktop connections to your windows 10 computer. remote desktop allows you to in this video, i will show you guys how to set up a remote desktop connection in your windows 10 computer easy way.
Conclusion
Having examined the subject matter thoroughly, it is evident that the post delivers useful insights about Rdp Tcp Properties Windows 10 Newrd. Throughout the article, the writer demonstrates an impressive level of expertise on the topic. Notably, the section on X stands out as a key takeaway. Thank you for taking the time to this article. If you need further information, please do not hesitate to reach out via email. I look forward to hearing from you. Additionally, here are a few similar posts that you may find interesting:
Related image with rdp tcp properties windows 10 newrd
Related image with rdp tcp properties windows 10 newrd
Привет.
Вчера, общаясь с Иваном Никитиным, получил дельный совет осветить работу и настройку протокола RDP. Мысль дельная, дальше – подробнее.
Введение
Протокол RDP – удобное, эффективное и практичное средство для удалённого доступа как для целей администрирования, так и для повседневной работы.
Учитывая, что его реализации есть практически везде (различные платформы и ОС), и их много, нужно хорошо представлять его возможности.
По крайней мере, это будет нужно по ряду причин:
- Зачастую вместо RDP используется другое решение (VNC, Citrix ICA) по простой причине – предполагается, что “встроенный RDP минимальный и ничего не умеет”.
- Во многих решениях, связанных с модными сейчас облачными технологиями (перевод офисов на “тонкие клиенты”, да и просто организация терминальных серверов), бытует мнение что “RDP плохой потому что встроенный”.
- Есть стандартный миф про то, что “RDP нельзя без VPN наружу выставлять, ломанут” (миф имеет под собой обоснование, но уже давно не актуален).
- Ну, раз уж про мифы заговорили – бытует мнение, что “Перейдя с RDP на Citrix трафик в пару раз падает”. Ведь цитрикс – это дорого, следовательно как минимум на 157% круче.
Все эти мифы – ерунда и смесь устаревших “дельных советов”, актуальных во времена NT 4.0, а так же откровенных вымыслов, не имеющих никаких причин к существованию. Так как IT – это точная наука, надо разобраться. Хорошо настроеный протокол RDP новых версий, с учётом всех новых функциональных возможностей, является достаточно хорошим и надёжным инструментом для организации удалённого доступа.
Поэтому мы займёмся:
- Кратким упоминанием про версии RDP
- Настройкой режима защиты RDP-сессии
- Настройкой шифрования для RDP
- Привязкой к конкретному адаптеру и порту
- Меняем стандартный порт на нужный
- Делаем раздельные настройки RDP для нескольких сетевых адаптеров
- Включением NLA
- Как включается NLA со стороны RDP-сервера
- NLA и Windows XP
- Как включить CredSSP в XP
- Выбором правильного сертификата для RDP
- Блокированием подключений по RDP учётным записям с пустым паролем
- Настройка ACL для подключения по RDP
- Оптимизацией скорости RDP
- Отключаем редирект неиспользуемых устройств
- Настраиваем общую логику оптимизации визуальных данных RDP
- Оптимизацией сжатия RDP
- Настраиваем общее сжатие RDP
- Настраиваем сжатие аудиопотока RDP
- Оптимизацией соотношения потоков данных RDP
- Включением Require secure RPC communication для RDP
Приступим.
Версии протокола RDP
Протокол имеет достаточно длительную историю, начиная с NT 4.0. Исторические детали мы оставим в стороне по простой причине – на данный момент имеет смысл говорить только про версию RDP 7.0, которая есть в Windows Vista SP1 / Windows Server 2008 и бесплатно добавляема в Windows XP установкой SP3 и обновлённого клиента RDP (находится по ссылке на KB 969084). Я предполагаю, что у Вас как минимум Windows XP, и что Вы поставили/можете поставить последний Service Pack и не трачу Ваше время на обсуждение преимуществ RDP в Windows 2000 SP2 перед NT 4.0 SP5.
Настройка режима защиты RDP-сессии
В принципе, это самая простая часть задачи. Суть в следующем. В различных версиях RDP применяется два основных механизма защиты сессии – встроенный в RDP и “заворачивание” сессии в TLS. Встроенный является недостаточно безопасным, и рекомендация “RDP можно наружу только в VPN” – про него. Поэтому всегда включайте поддержку TLS. Это тот минимум, с которого Вы должны начать. Ограничениями будут разве что версия сервера не ниже Windows Server 2003 SP1 и клиент RDP 5.2 и выше, но, думается, это в конце 2011 года вполне решаемо.
Как включить RDP over TLS
Вариантов, как всегда, несколько. Первый – включение через групповую политику. Для этого надо зайти в целевой объект групповой политики (ну или локально на своей домашней рабочей станции запустить gpedit.msc) и там последовательно выбрать “Computer Configuration” -> “Administrative Templates” -> “Windows Components” -> “Remote Desktop Session Host” -> “Security” и там включить параметр Require use of specific security layer for remote connections, выбрав в нём SSL (TLS 1.0) only. Можно выбрать и более мягкий Negotiate, но я бы не рекомендовал, т.к. на данный момент это банально ниже приемлемого уровня безопасности. Как человек, создававший private cloud’ы с достаточно высоким уровнем безопасности, я могу сказать, что смысл выносить особо ценные данные в датацентр под Лондоном и ходить туда дефолтным RDP – нулевой и является поиском неприятностей.
Можно и проще – откройте оснастку Remote Desktop Session Host Configuration (найдёте в mmc или готовую в меню Administrative Tools -> Remote Desktop Connections), выберите из списка Connections нужное подключение (обычно оно одно и называется RDP-Tcp), и откройте Properties, после – вкладку General и там выбрать нужный Security Layer.
Для работы TLS необходим цифровой сертификат (как минимум – со стороны сервера). Обычно он уже есть (генерится автоматически), убедитесь в его наличии, про то, как сделать его хорошим, поговорим после. Пока надо, чтобы он просто был, иначе подключиться не получится.
Настраиваем шифрование для RDP
Для конфигурирования будет доступно 4 варианта шифрования. Рассмотрим каждый из них.
Режим RDP Low Encryption
Самый “никакой” режим. Наследие страшных времён и версий RDP 5.x. Может согласовать шифрование на базе 56ти битового DES или 40ка битового RC2, что на текущий момент является несерьёзным. Не нужен и опасен. Например, если включить его, то не включится TLS, т.к. TLS уже откажется согласовывать такие слабые шифры, которые предлагает этот вариант.
Режим RDP Client Compatible Encryption
Второй “никакой” режим. Наследие страшных времён и версий RDP 5.x. Попробует до 128 бит RC4, но сразу согласится на DES/RC2. Не нужен и опасен. Тоже не совместим с TLS.
Режим RDP High Encryption
Минимально допустимый режим. Потребует хотя бы 128ми битовый RC4. Работает со всеми серверами, начиная с Windows 2000 Server w/HEP.
Режим RDP FIPS140-1 Encryption
То, что нужно. Будет поддерживать современные симметричные алгоритмы и в явном виде не будет поддерживать RC2, RC4, одиночный DES, а также будет заставлять использовать для вычисления целостности (Message Authentication Code – MAC) алгоритм SHA-1, а не MD5. Включайте этот вариант всегда, найти сервер, который не умеет 3DES, AES или SHA-1 практически нереально.
Где делается эта настройка? Откройте оснастку Remote Desktop Session Host Configuration (найдёте в mmc или готовую в меню Administrative Tools -> Remote Desktop Connections), выберите из списка Connections нужное подключение (обычно оно одно и называется RDP-Tcp), и откройте Properties, после – вкладку General и там выберите нужный Encryption Level.
Привязываем RDP к конкретному адаптеру и порту
Для того, чтобы сервер работал безопасно и предсказуемо (например, не начинал принимать подключения с нового, свежедобавленного сетевого адаптера), необходимо в явном виде указать, на каких интерфейсах служба RDP-сервера должна принимать подключения. Плюс, достаточно часто бывает полезным переключить порт, на котором сервер слушает подключения. Конечно, можно это сделать и публикуя сервер с RDP через какой-нибудь шлюз, но можно и без этого. Такие, казалось бы, базовые действия в реальности ощутимо снизят процент дураков-скрипткиддисов, которые очередной “мощной тулзой” проверяют wellknown-порты.
Как привязать службу RDP к конкретному сетевому адаптеру или сделать несколько RDP с разными настройками для разных адаптеров
Откройте оснастку Remote Desktop Session Host Configuration (найдёте в mmc или готовую в меню Administrative Tools -> Remote Desktop Connections), выберите из списка Connections нужное подключение (обычно оно одно и называется RDP-Tcp), и откройте Properties, после – вкладку Network Interfaces. В ней Вы сможете выбрать один конкретный интерфейс, на котором надо ожидать подключения, плюс ограничить количество параллельных сессий.
Если у Вас много интерфейсов, и Вам надо, допустим, чтобы можно было подключаться через 2 из 5 доступных, то Вам надо будет привязать существующий по-умолчанию RDP-Tcp к одному адаптеру, после зайти в меню Action и там выбрать Create New Connection. Подключение может слушать либо на всех интерфейсах, либо на одном, и в случае, когда надо, чтобы оно слушало на N интерфейсах, придётся создать N подключений.
Соответственно, если у Вас есть задача “Чтобы на одном интерфейсе RDP слушал на одном порту, а на другом – на другом”, она решаема так же – отвязываете дефолтный RDP-Tcp от всех адаптеров и привязываете к конкретному, после – создаёте новое RDP-подключение и тоже привязываете к нужному сетевому интерфейсу.
Как привязать службу RDP к не-дефолтному порту
Порт по умолчанию – 3389 TCP. Кстати, не забудьте разрешить его в пакетном фильтре. Ну а если хотите другой – надо зайти в ключ реестра
HKEY_LOCAL_MACHINE\System\CurrentControlSet\Control\Terminal Server\WinStations\RDP-Tcp
и поправить в нём значение PortNumber. Учитывайте, что отслеживание конфликтов в плане занятости портов – на Вашей совести, сам он, обнаружив, что назначенный Вами порт занят, “перепрыгнуть” никуда не сможет.
Включаем NLA – Network Level Authentication
Функция NLA появляется в NT 6.0, а позже добавляется возможность её частичного использования в предыдущей версии ОС путём установки SP3 для XP.
Суть данной функции достаточно проста. В версиях RDP до 6.0 при подключении по RDP клиенту до аутентификации надо показать окно входа – т.е. вначале показать, а потом уже он попробует зайти в систему. Это создаёт простую уязвимость – сервер можно перегрузить пачкой запросов “а дай-ка мне попробовать новую сессию начать”, и он будет вынужден на все запросы отвечать созданием сессии и ожиданием входа пользователя. Фактически, это возможность DoS. Как с этим можно бороться? Логично, что надо придумать схему, целью которой будет как можно раньше запросить у клиента учётные данные. Оптимально – чтобы было что-то типа как kerberos в домене. Это и было сделано. NLA решает две задачи:
- Клиент аутентифицируется до инициации терминальной сессии.
- Появляется возможность передать данные локального клиентского SSP на сервер, т.е. начинает работать Single Sign-On.
Реализуется это через новый провайдер безопасности – CredSSP. Почитать его техническую спецификацию можно тут, ну, а говоря проще, надо всегда включать данную функцию. Конечно, учитывая, что для её работы нужно, чтобы:
- Клиентская ОС (та, с которой идёт подключение) была Windows XP SP3 и выше.
- Серверная ОС (та, к которой будет подключение) была Windows Server 2008 и выше.
Как включается NLA со стороны RDP-сервера
Лучше всего включить NLA на всех серверах через групповую политику. Для этого надо зайти в целевой объект групповой политики и там последовательно выбрать “Computer Configuration” -> “Administrative Templates” -> “Windows Components” -> “Remote Desktop Session Host” -> “Security” и там включить параметр Require user authentication for remote connections by using Network Layer Authentication.
Можно включить и локально. Это делается путём вызова подменю Properties (стандартное подменю у Computer) и выбора там вкладки Remote, в которой будет выбор из трёх вариантов – запрещать подключения по RDP к данному хосту, разрешать подключения по любому RDP, разрешать только с NLA. Всегда включайте вариант с NLA, это в первую очередь защищает сервер.
NLA и Windows XP
В случае, если у Вас Windows XP, то Вы также можете воспользоваться данной функцией. Распространённое утверждение “Для NLA нужна как минимум виста, это Microsoft сделал чтобы апгрейдились” ложно. В Service Pack 3 добавляется реализация CredSSP, позволяющая делегировать клиентские credentials’ы, которыми обладает местный SSP, на сервер. Т.е., говоря проще, это специально сделано, чтобы с Windows XP можно было подключаться на системы с NT 6.0+. На саму Windows XP SP3 с данной функцией подключаться не получится, поддержка NLA будет частичной (поэтому RDP сервер с поддержкой подключения клиентов с использованием NLA из Windows XP сделать штатными способами не получится, Windows XP будет только NLA-совместимым клиентом).
Включать данный функционал нужно в явном виде, так как несмотря на то, что Service Pack 3 добавляет приносит новую dll криптопровайдера, он её не включает.
Как включить CredSSP в XP
Ещё раз – данная операция проводится строго после установки Service Pack 3 на Windows XP и в контексте нашего разговора нужна для того, чтобы было возможно подключение к другим серверам по RDP 6.1 с использованием NLA.
Шаг первый – расширяем перечень Security Packages.
Для этого мы откроем ключ реестра
HKEY_LOCAL_MACHINE\SYSTEM\CurrentControlSet\Control\Lsa
и найдём в нём значение Security Packages. Нажмём правую кнопку и выберем “Modify” (не Modify Binary Data, а просто Modify). Там будет список вида “название package на каждой строке”. Нам надо добавить туда tspkg. Остальное надо оставить. Место добавления некритично.
Второй шаг – подцепляем библиотеку.
Ключ будет другим:
HKEY_LOCAL_MACHINE\SYSTEM\CurrentControlSet\Control\SecurityProviders
В нём надо будет найти значение SecurityProviders (заметьте, как и в предыдущем случае, это не subkey, а значение), и модифицировать его по аналогии, только добавив credssp.dll. Остальное в списке, опять же, трогать не надо.
Теперь редактор реестра можно закрыть. После этих операций систему надо будет обязательно перезагрузить, т.к. криптопровайдеры – штука такая, которая на ходу точно не подцепится, и это скорее хорошо, чем плохо.
Выбираем правильный сертификат для RDP
Если у Вас есть возможность пользоваться не-дефолтным сертификатом для RDP, то лучше пользоваться именно им. Это не повлияет на безопасность сессии как таковой, но повлияет на безопасность и удобство подключения. В сертификате, который оптимально использовать, должны быть следующие момент:
- Имя (в subject или SAN), посимвольно совпадающее с тем именем, которое вводит клиент, подключающийся к серверу.
- Нормальное расширение CDP, указывающее на рабочий CRL (желательно хотя бы на два – OCSP и статический).
- Желательный размер ключа – 2048 бит. Можно и больше, но помните об ограничениях CAPI2 в XP/2003.
- Не экспериментируйте с алгоритмами подписи/хэширования, если Вам нужны подключения со стороны XP/2003. Чуть больше информации про это в статье про настройку TLS, но вкратце – выберите SHA-1, этого вполне достаточно.
Чуть подробнее остановлюсь на выпуске специального сертификата для RDP-сервера.
Делаем всё красиво – специальный шаблон сертификата для RDP-серверов
Идеально будет, если сертификат для RDP сделать не на основе обычного шаблона (типа Web Server) и иметь в поле Application Policy (которое в сертификате будет более привычно называться Enchanced Key Usage – EKU) стандартные значения Client Authentication и Server Authentication, а добавить свой шаблон, в котором будет единственное, специальное, не добавляемое стандартными способами значение применения – Remote Desktop Authentication. Это значение Application Policy придётся создать вручную, его OID’ом будет 1.3.6.1.4.1.311.54.1.2, ну а после – уже можно сделать новый шаблон сертификата, на основании которого и выпустить сертификат, адресно “заточеный” под RDP Server.
Чтобы полностью автоматизировать эту операцию, сделайте у нового шаблона предсказуемое название – например, “RDPServerCert” – и зайдите в объект групповой политики, а там откройте Computer Configuration -> Policies -> Administrative Templates -> Windows Components -> Remote Desktop Services -> Remote Desktop Session Host -> Security. Выберите параметр Server Authentication Certificate Template и включите его, а в поле значения введите название – мы сделали RDPServerCert. Теперь все доменные хосты, подпадающие под эту политику, будут в случае включения на них RDP сами идти к Certification Authority, запрашивать в случае отсутствия себе сертификат на основе указанного шаблона, и автоматически делать его дефолтным для защиты подключений по RDP. Просто, удобно, эффективно.
Блокируем подключения по RDP учётным записям с пустым паролем
Мелочь, а забывать про неё не нужно.
Для блокировки подключения учёток без паролей к RDP надо зайти в настройку объекта групповой политики: Computer Configuration -> Windows Settings -> Security Settings -> Local Policies -> Security Options и установить “Accounts: Limit local account use of blank passwords to console logon only” в Enabled. Не поленитесь проверить, что это так и есть.
Настройка ACL для подключения по RDP
По умолчанию для подключения к RDP-серверу необходимо иметь явное разрешение User Access или Guest Access.
Это разрешение есть у локальных групп Administrators и Remote Desktop Users. Лучше всего использовать для управления доступом к RDP-серверу группу Remote Desktop Users, добавляя в неё нужные доменные группы, а не отдельных пользователей. Модицифируйте содержимое вкладки Security в настройках Properties у RDP-Tcp только в крайних случаях, лучше всего – добавляя группу “имя хоста RDP Blocked”, которой явно запрещен доступ по RDP к указанному узлу.
Оптимизация скорости RDP
Оптимизация скорости RDP – достаточно обширная тема, поэтому я разделю её на части. В этой будут те способы, которые будут уменьшать нагрузку на протокол до сжатия и до оптимизации сетевого уровня.
Цветность (битовая глубина)
В RDP 7.0 и выше доступны варианты 32,16 и 8 бит. Если речь идёт о работе, то для неё будет достаточно 16 бит. Это ощутимо снизит нагрузку на канал, притом иногда больше, чем в 2 раза, что удивительно, но факт. 8 бит, конечно, тоже можно, но уж больно страшно оно будет выглядеть. 16 бит же вполне приемлемы.
Включите на сервере параметр Limit Maximum Color Depth, либо сделайте аналогичное действие в настройках RDP client.
Отключите ClearType
Когда у Вас выключен ClearType, протокол RDP передаёт не картинку, а команды по отрисовке символов. Когда включен – рендерит картинку со стороны сервера, сжимает и пересылает клиенту. Это с гарантией в разы менее эффективно, поэтому отключение ClearType значительно ускорит процесс работы и уменьшит время отклика. Сами удивитесь, насколько.
Это можно сделать как на уровне настроек клиента, так и на стороне сервера (параметр Do not allow font smoothing в разделе Remote Session Enviroment в Computer Configuration -> Policies -> Administrative Templates -> Windows Components -> Remote Desktop Services -> Remote Desktop Session Host).
Уберите wallpaper
Параметр Enforce removal of RD Wallpaper в разделе Remote Session Enviroment в Computer Configuration -> Policies -> Administrative Templates -> Windows Components -> Remote Desktop Services -> Remote Desktop Session Host резко улучшит ситуацию с перерисовкой экрана терминальной сессии. Пользователи без котиков на десктопе выживают нормально, проверено.
Включаем и настраиваем кэширование изображений
Если на клиенте есть достаточно оперативной памяти, то имеет смысл включить и настроить кэширование битмапов. Это позволит выиграть до 20-50% полосы пропускания. Для установки надо будет зайти в ключ
HKEY_CURRENT_USER\SOFTWARE\Microsoft\Terminal Server Client\
и создать там параметры BitmapPersistCacheSize и BitmapCacheSize, оба типа DWORD 32.
Параметр BitmapPersistCacheSize обозначает размер в килобайтах дискового кэша. Значение по умолчанию – 10. Имеет смысл увеличить этот параметр хотя бы до 1000.
Параметр BitmapCacheSize обозначает размер в килобайтах кэша в RAM. Значение по умолчанию – 1500. Имеет смысл увеличить этот параметр хотя бы до 5000. Это будет всего 5 мегабайт на клиентскую сессию, при современных масштабах оперативной памяти это несущественно, и даже если приведёт к выигрышу 10% производительности, уже себя окупит. Кстати, этот же параметр можно поправить и в .rdp-файле; если сохранить своё RDP-подключение, а после открыть файл блокнотом, то среди параметров можно добавить что-то вида bitmapcachesize:i:5000, где 5000 – это 5МБ кэша.
Отключаем Desktop Composition
Desktop Composition привносит всякие “красивости” типа Aero и его друзей и ощутимо кушает полосу пропускания. Для работы это не нужно и вредно. Параметр Allow desktop composition for RDP Sessions в разделе Remote Session Enviroment в Computer Configuration -> Policies -> Administrative Templates -> Windows Components -> Remote Desktop Services -> Remote Desktop Session Host необходимо выставить в параметр Disabled.
Оптимизируем параметры Desktop Window Manager
Параметры, находящиеся в разделе Remote Session Enviroment в Computer Configuration -> Policies -> Administrative Templates -> Windows Components -> Desktop Window Manager, будут управлять “красивым” отображением плавно выезжающих меню и подобного. Их три – Do not allow window animations, Do not allow desktop compositions и Do not allow Flip3D invocation. Все их надо переключить в режим Enabled, т.е. по сути – отключить все эти функции.
Отключаем редирект неиспользуемых устройств
Если у Вас не планируется подключение определённых классов устройств (например, COM и LPT-портов), или аудио, имеет смысл отключить возможность их перенаправления со стороны сервера. Чтобы клиенты с дефолтными настройками RDP Client не тратили время подключения на согласование неиспользуемого функционала. Это делается там же, где и остальные настройки сервера, в Properties у RDP-Tcp, вкладка Client Settings (там же, где мы делали настройки с глубиной цвета), раздел Redirection.
Настраиваем общую логику оптимизации визуальных данных RDP
Параметр, называющийся Optimize visual experience for RDP sessions, находящийся в разделе Remote Session Enviroment в Computer Configuration -> Policies -> Administrative Templates -> Windows Components -> Remote Desktop Services -> Remote Desktop Session Host -> Remote Session Enviroment, будет управлять тем, как RDP будет воспринимает визуальные данные – как мультимедийные или как текстовые. Это, грубо говоря, “подсказка” алгоритму сжатия, как грамотнее себя вести. Соответственно, для работы надо будет выставить этот параметр в Text, а если хочется много красивых flash-баннеров, HTML5 и просматривать видеоклипы – лучше вариант Rich Multimedia.
Оптимизация сжатия RDP
Сжатие в RDP прошло долгий путь развития. По RDP 5.2 включительно была подсистема сжатия (“компрессор”), имеющий внутреннее название “Version 1” – самый простой и лёгкий вариант с точки зрения загрузки процессора клиента, но самый плохой с точки зрения нагрузки сети трафиком. В RDP 6.0 сделали “Version 2”, который был незначительно, но улучшен по параметру эффективности сжатия. Нам интересен “Version 3”, который работает только при подключении к серверам Windows Server 2008 и старше. Он сжимает лучше всех, а затраты процессорного времени с учётом мощностей современных компьютеров несуществены.
Выигрыш при включении V3 может, судя по тестам, достигать 60% и, в общем-то, и без тестов ощутимо заметен на глаз.
Как включить оптимальное сжатие в RDP
Это – клиентская настройка. Откройте в нужном объекте групповой политики Computer Configuration -> Policies -> Administrative Templates -> Windows Components -> Remote Desktop Services -> Remote Desktop Session Host -> Remote Session Enviroment, выберите там параметр Set compression algoritm for RDP data, включите его и выберите значение Optimize to use less network bandwidth.
Настройка сжатия звукового потока
RDP 7.0 приносит отличную возможность регулировать качество сжатия входящего звукового потока (т.е. звука, который идёт с сервера на клиента). Это достаточно полезно – например, если идёт работа на терминальном сервере, то кроме всяких служебных звуков вида “пришло сообщение в ICQ” другие особо как не планируются. Нет смысла передавать с сервера несжатый звук CD-качества, если для работы это не нужно. Соответственно, нужно настроить уровень сжатия звукового потока.
Данный параметр будет называться Limit audio playback quality и находиться в разделе Device and Resource Redirection в Computer Configuration -> Policies -> Administrative Templates -> Windows Components -> Remote Desktop Services -> Remote Desktop Session Host. Вариантов будет три:
High– звук будет идти без сжатия. Вообще. То есть, он будет подпадать под общее сжатие протокола RDP, но специфическое сжатие звука (с потерей качества) производиться не будет.Medium– сжатие будет адаптироваться под канал так, чтобы не увеличивать задержку при передаче данных.Dynamic– сжатие будет динамически адаптироваться под канал так, чтобы задержка не превышала 150ms.
Выберите подходящий. Как понятно, для офисной работы лучше выбрать Dynamic.
Оптимизация соотношения потоков данных в RDP
Трафик RDP-сессии не является чем-то монолитным. Наоборот, он достаточно чётко разделён на потоки данных перенаправляемых устройств (например, копирования файла с локального хоста на терминальный сервер), аудиопоток, поток команд примитивов отрисовки (RDP старается передавать команды примитивов отрисовки, и передаёт битмапы в крайнем случае), а также потоки устройств ввода (мышка и клавиатура).
На взаимное соотношение этих потоков и логику его (соотношения) вычисления (этакий локальный QoS) можно влиять. Для этого надо со стороны сервера зайти в ключ реестра
HKEY_LOCAL_MACHINE\SYSTEM\CurrentControlSet\Services\TermDD
и создать там для начала (если их там нет) четыре ключа:
- FlowControlDisable
- FlowControlDisplayBandwidth
- FlowControlChannelBandwidth
- FlowControlChargePostCompression
Тип у всех – DWORD 32. Функционал у ключей будет следующим.
Ключ FlowControlDisable будет определять, используется ли приоритезация вообще. Если задать единицу, то приоритезация будет выключена, если нуль – включена. Включите её.
Ключи FlowControlDisplayBandwidth и FlowControlChannelBandwidth будут определять взаимное соотношение двух потоков данных:
- Поток взаимодействия с пользователем (изображение+устройства ввода)
- Прочие данные (блочные устройства, буфер обмена и всё остальное)
Сами значения этих ключей не критичны; критично то, как они соотносятся. То есть, если Вы сделаете FlowControlDisplayBandwidth равным единице, а FlowControlChannelBandwidth – четырём, то соотношение будет 1:4, и на поток взаимодействия с пользователем будет выделяться 20% полосы пропускания, а на остальное – 80%. Если сделаете 15 и 60 – результат будет идентичным, так как соотношение то же самое.
Ключ FlowControlChargePostCompression будет определять, когда считается это соотношение – до сжатия или после. Нуль – это до сжатия, единица – после.
Я рекомендую для использования вида “наш удалённый сервак далеко и к нему все по RDP подключаются и в офисе и 1С работают” ставить соотношение 1:1 и считать его после сжатия. По опыту это может реально помочь в ситуации “печать большого документа с терминального сервера на локальный принтер”. Но это не догма – пробуйте, главный инструмент – знание, как это считается и работает – у Вас уже есть.
Включаем Require secure RPC communication для RDP
Данный параметр действует аналогично настройкам для Secure RPC, которые есть в разделе Security групповой политики и действуют на всю систему, только настраивается проще. Включив этот параметр Вы сделаете обязательным для всех клиентских RPC-запросов шифрование (в зависимости от настроек системы “нижняя планка” шифрования будет разной – RC4/DES или, в случае включения FIPS-140 – 3DES/AES) и использование как минимум NTLMv2 для аутентификации удалённого вызова процедур. Всегда включайте этот параметр. Есть миф про то, что он не работает во внедоменной среде. Это не так, и усиление защиты RPC никому не помешает.
Это – серверная настройка. Откройте в нужном объекте групповой политики Computer Configuration -> Policies -> Administrative Templates -> Windows Components -> Remote Desktop Services -> Remote Desktop Session Host -> Security, выберите там параметр Require secure RPC communication и включите его.
Заключение
Так как все уже давно вытащили сервера на внешние площадки за бугром, то этот материал является Я надеюсь, что данный материал будет Вам полезен для оптимизации и защиты RDP. Если я что-то пропустил – прошу в комментарии.

Contents
- 1 Rdp Tcp Properties Changes Via Powershell
- 2 Change Rdp Default Listening Port Powershell
- 2.1 Conclusion
- 2.1.1 Related image with rdp tcp properties changes via powershell
- 2.1.2 Related image with rdp tcp properties changes via powershell
- 2.1 Conclusion
Step into a realm of wellness and vitality, where self-care takes center stage. Discover the secrets to a balanced lifestyle as we delve into holistic practices, provide practical tips, and empower you to prioritize your well-being in today’s fast-paced world with our Rdp Tcp Properties Changes Via Powershell section. And of gap evoking is This fusion textures colors forms creates different the blend and aesthetics seamlessly admiration curiosity- enchanting a universally between exquisite masterpiece of an Its niches- image bridging captivating
Windows Looking For A Way To Configure The Rdp Tcp Properties In
Windows Looking For A Way To Configure The Rdp Tcp Properties In
This image, a masterful blend of aesthetics and ingenuity, stands as an exquisite testament to universal beauty, captivating admirers from all walks of life. Its intricate narrative of colors, forms, and textures transcends niche boundaries, appealing to a broad spectrum of interests. This captivating tableau seamlessly bridges gaps between niches, offering a visual narrative that transcends specialized interests. Its exquisite blend of elements, from radiant hues to intricate textures, enchants all who encounter its timeless charm.

Rdp Tcp Properties Windows 10
Rdp Tcp Properties Windows 10
This image is an exquisite blend of aesthetics, seamlessly bridging the gap between different niches. Its captivating fusion of colors, textures, and forms creates a universally enchanting masterpiece, evoking admiration and curiosity. Within this captivating image, an intricate tapestry of elements unfolds, resonating with a wide spectrum of interests and passions. Its timeless beauty and meticulous details invite viewers from diverse backgrounds to explore its captivating narrative. Universal in its appeal, this image weaves a mesmerizing tapestry of details and hues that transcends specialized interests, captivating a diverse audience. Its enchanting fusion of elements serves as a magnetic force, drawing enthusiasts from different backgrounds into its world of beauty and wonder. Within this captivating image, a symphony of colors, textures, and forms unfolds, evoking a sense of wonder that resonates universally. Its timeless beauty and intricate details promise to inspire and captivate viewers from every corner of interest.

Solved Rdp Over Ssl To Rdp Gateway And Disabling Udp 9to5answer
Solved Rdp Over Ssl To Rdp Gateway And Disabling Udp 9to5answer
Universal in its appeal, this image weaves a mesmerizing tapestry of details and hues that transcends specialized interests, captivating a diverse audience. Its enchanting fusion of elements serves as a magnetic force, drawing enthusiasts from different backgrounds into its world of beauty and wonder. Within this captivating image, a symphony of colors, textures, and forms unfolds, evoking a sense of wonder that resonates universally. Its timeless beauty and intricate details promise to inspire and captivate viewers from every corner of interest. This image is a splendid amalgamation of intricate details and vivid colors, offering a universally enchanting visual experience that knows no boundaries. Its captivating allure effortlessly draws you in, leaving a lasting impression, regardless of your niche or interest. With its mesmerizing interplay of colors, textures, and forms, this image extends a universal invitation, inviting individuals from various niches to explore its boundless and enduring charm. Its timeless allure speaks to the hearts and minds of all who encounter it.

Remote Desktop Install Certificate In Rdp Tcp Properties Server Fault
Remote Desktop Install Certificate In Rdp Tcp Properties Server Fault
This image is a splendid amalgamation of intricate details and vivid colors, offering a universally enchanting visual experience that knows no boundaries. Its captivating allure effortlessly draws you in, leaving a lasting impression, regardless of your niche or interest. With its mesmerizing interplay of colors, textures, and forms, this image extends a universal invitation, inviting individuals from various niches to explore its boundless and enduring charm. Its timeless allure speaks to the hearts and minds of all who encounter it.
Change Rdp Default Listening Port Powershell
Change Rdp Default Listening Port Powershell
change rdp default listening port powershell set itemproperty path ‘hklm:\system\currentcontrolset\control\terminal get itemproperty path «hklm:\system\currentcontrolset\control\terminal server\winstations\rdp tcp» | select object enable remote desktop om windows server using powershell in this short video, you will learn how to enable remote desktop this video will guide you through the steps required to enable or disable remote desktop using powershell. it will also cover any portvalue = 33905 set itemproperty path ‘hklm:\system\currentcontrolset\control\terminal server\winstations\rdp tcp’ how to setup remote desktop from anywhere & change secure rdp port merch install certificate in rdp tcp properties helpful? please support me on patreon: patreon roelvandepaar with welcome to my channel kaptechpro. in this video demonstration of update user profile property using powershell in sharepoint this video explained how to remotely connect to another computer using microsoft powershell. how to manage your servers this guide describes the steps to enable remote desktop service in the windows server through the windows powershell. powershell remote connection tips | pluralsight courses exchange online administration pluralsight author j.
Conclusion
Having examined the subject matter thoroughly, it is evident that the post delivers valuable information concerning Rdp Tcp Properties Changes Via Powershell. From start to finish, the author demonstrates a wealth of knowledge on the topic. Especially, the discussion of Z stands out as a highlight. Thanks for reading this article. If you would like to know more, please do not hesitate to contact me via the comments. I look forward to your feedback. Moreover, below are some similar content that you may find interesting:
- Remove From My Forums
-
Question
-
We limit who can access RDP on Server 2003 and Server 2008 through active directory groups. We apply these groups in 2008 through start -> administration tools -> remote desktop services -> remote desktop session host configuration.
Then you would right click -> properties on the RDP-tcp connection. From there you would choose the security tab and enter the AD groups you wanted to have access rights.For the life of me, I cannot find this anywhere in Server 2012. Any help would be greatly appreciated.
Answers
-
RDS Controls access using the the Local Group «Remote Desktop Users» by default.
You can add active directory security groups to this group with the local users and groups mmc (lusrmgr.msc) or by changing/adding user groups to the collectíon in server manager as in the screenshot below.

Hope this helps you out!
MCT MCSE: Private Cloud/Server, Desktop Infrastructure
-
Edited by
Sunday, March 3, 2013 7:21 PM
-
Proposed as answer by
Johan DahlbomMVP
Sunday, March 3, 2013 7:31 PM -
Marked as answer by
Aiden_Cao
Monday, March 4, 2013 5:59 AM
-
Edited by
Solutions provider takeaway: Information on how to use Remote Desktop Services Manager tab options to view user information is valuable to solutions providers. Use this excerpt to learn how to identify and add an RDS CAL and learn about RDS command-line tools.
Monitoring Remote Desktop Services
Once Remote Desktop Services is up and running, you’ll need to monitor and manage it. Several RDS tools are available from the Start menu by selecting Start ⇒ Administrative Tools ⇒ Remote Desktop Services. The tools are as follows:
- Remote Desktop Services Manager
- Remote Desktop Session Host Configuration
- RemoteApp Manager
- Remote Desktop Web Access Configuration
- Remote Desktop Licensing Manager
- Remote Desktop Connection Manager
- Remote Desktops
Three menu items are available here without the Remote Desktop Services role installed. They are used to manage remote connections for administration and RDS. For example, Remote Desktops (covered in Chapter 14) is used to remotely administer clients and is included in a default installation. The other two items are Remote Desktop Services Manager and Remote Desktop Session Host Configuration.
The Remote Desktop Connection Manager, RemoteApp Manager, and Remote Desktop Web Access Configuration tools were covered earlier in this chapter.
Remote Desktop Services Manager
The Remote Desktop Services Manager is used to view information about users, sessions, and processes on a Remote Desktop Session Host server. You can also interact with sessions from this tool using Remote Control.
When you launch the Remote Desktop Services Manager from the computer hosting the RD Session Host server, the local server will automatically be added. However, if you manage more than one RD Session Host server, you can add all the servers to a single console. For large environments, you can even group the RD Session Host servers using the My Group node in the console.
Users, Sessions, and Processes
When you’re connected to an RD Session Host server, you’ll have three tabs available. You can use these tabs to monitor and interact with activity on the server. Figure 25.21 shows the Remote Desktop Services Manager with the Processes tab selected.
Figure 25.21
Remote Desktop Services Processes tab
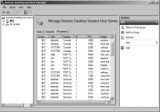
In the figure, we have clicked the User header to order the list based on the user spelling. Sally is using a RemoteApp application (calc.exe), and Joe has a full desktop running. Notice that only one process is running for Sally, while Joe’s session requires several supporting processes.
The three tabs are as follows:
Users This tab lists all the users who have sessions running on the server. It includes sessions that are active and disconnected.
Sessions The Sessions tab shows all the sessions for the server. It includes the RDS supporting sessions: Console, Services, and Listener. If any users connect, it will show their sessions as RDP-TCP#x (where x is the number assigned to the session).
Processes The Processes tab shows all the processes running on the server. You can right-click any process listed here and select End Process to kill it.
The Users and Sessions tabs give you many additional options to interact with sessions. If you right-click any of the sessions, you’ll have the following choices:
Connect Allows you to connect to a user’s session. When you connect to this session, the user will be disconnected.
This feature will work only when you access it from a Remote Desktop Services client session. It is disabled if you try to access it from the console session.
Disconnect Disconnects a user from an active session. Be nice, though. Send the user a message, and give them some time to clean up and log off before simply disconnecting them.
Send Message Sends a message to a session. The message will appear as a dialog box. The title will include who sent the message and when it was sent.
Remote Control Allows you to connect and interact with a remote session. This can be used to provide assistance to a user by either showing the user how to perform an action or watching and talking them through it. It is very similar to Remote Assistance, covered in Chapter 14, except that you have a lot more control with Remote Control than you’d have with Remote Assistance.
This feature will work only when you access it from a Remote Desktop Services client session. It is disabled if you try to access it from the console session.
Reset Deletes a session. Disconnected sessions still consume resources, so you can use this to delete a disconnected session and free up the server’s resources.
Status Displays a status dialog box, as shown in Figure 25.22.
Figure 25.22
Session status from Remote Desktop Services Manager console
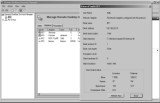
Figure 25.22 was launched by right-clicking the RDP-Tcp#0 session and selecting Status.
Command-Line Tools
In addition to the Remote Desktop Services Manager GUI, you can use several command-line tools to manage users, sessions, and processes in place of the Remote Desktop Services Manager, as shown in Table 25.2.
For more information about any of these tools, enter them from the command line with /? for help. Examples are given for each these with the assumption that a user with a username of Sally has an active session with a session ID of 1.
Table 25.2: Remote Desktop Services Manager Command-Line Tools
|
Command |
Action |
| logoff | Logs a user off from a session and deletes the session on the RD Session Host server. The number would the session ID number and can be obtained with query session. logoff 1 |
| msg | Sends a message to a user on an RD Session Host server. The message will appear as a pop-up. Msg Sally Message CTRL + Z Enter |
| query process, qprocess | Displays information about processes running on an RD Session Host server. No arguments are needed. query process |
| query session, qwinsta | Displays information about sessions running on an RD Session Host server. No arguments are needed. This can be used to identify the session ID, the username, and the session name of all sessions. query session |
| query users, quser | Displays information about user’s sessions running on an RD Session Host server. This can be used to determine whether the session is active, how long it’s been idle, and when the user logged on. If executed without arguments, it shows all information on all users. If executed with the name of an active user, it shows only that user’s information. query user query user Sally |
| Tsdiscon | Disconnects an active session on an RD Session Host server. Tsdiscon 1 |
| Tscon | Connects to a disconnected session on an RD Session Host server. Tscon 1 |
| Tskill | Ends a process running in a session on an RD Session Host server. Processes can be identified with the query process command. Tskill mstsc |
Remote Desktop Session Host Configuration
You can use the Remote Desktop Session Host Configuration console to configure many of the settings for your RD Session Host server. Settings in this console will affect all the users who connect to the server. Figure 25.23 shows the configuration console.
Figure 25.23
Remote Desktop Session Host Configuration console
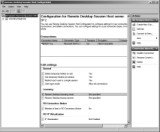
There are three major types of settings you can configure with the majority of the server configuration done through the RDP-Tcp Connection property page.
RDP-Tcp Connection settings You can use the RDP-Tcp Connection properties to configure all the connections to the RD Session Host server. This includes security settings, session settings, remote control settings, and more. The majority of the configuration for the RD Session Host server is done through these properties.
Edit Settings The Edit Settings section shows the current settings for four additional areas. If you double-click any of the areas, you can see the properties sheet with the four tabs that can be used to supplement the RDP-Tcp Connection settings.
Licensing Diagnoses If you are receiving errors related to RDS licensing, you can use the Licensing Diagnoses tool to help you identify the problem. Select this in the tree pane on the left.
RDP-Tcp Connection
You can view and modify the properties of RDP-Tcp Connection by either double-clicking it or right-clicking it and selecting Properties. The properties sheet includes eight tabs.
This connection is available even if the Remote Desktop Services Session Host role has not been installed. Before the role is added, this connection will allow two connections for administrator purposes. When the role is added, it is changed to allow unlimited connections.
You can add connections if your server includes multiple network adapters.
RDP-Tcp Properties General Tab
Figure 25.24 shows the General tab. You can add a comment here that may be useful if you have multiple NICs and multiple connections you’re using on your RD Session Host server. However, the primary use of this page is to configure security.
Figure 25.24
RDP-Tcp Properties General tab
RDS supports both the RDP Security Layer and Secure Sockets Layer (SSL) (TLS 1.0). SSL (TLS 1.0) is more secure than RDP Security Layer. If the Security Layer is set to Negotiate (as shown in the figure), the RDS server will attempt to use SSL (TLS 1.0) first. If the client doesn’t support it, it will use RDP Security Layer instead, which provides weaker security.
Earlier, single sign-on was mentioned, and this is one of the settings you need to verify to support single sign-on. It must be set to Negotiate or SSL (TLS 1.0). You’ll also need to verify the «Always prompt for password» option is not selected on the Log On Settings tab.
Additionally, you’ll need to use a certificate to use SSL (TLS 1.0). If you installed RDS using the exercises in this chapter, an autogenerated (self-signed) certificate was created and added.
Self-signed or Trusted Certificate
Although you can create a self-signed certificate, Microsoft recommends you obtain a certificate from a trusted certificate authority (CA) for better security. This trusted CA can be a public one such as VeriSign or Thawte or an Active Directory Certificate Services server built internally. However, for small organizations where the server is used internally only, you can use a self-signed certificate without any problems.
You can select from one of four encryption levels. This can encrypt the data sent to and from the server to prevent sniffing attacks. The choices are as follows:
Low Data sent from the server to the client is not encrypted. Data sent to the server from the client is encrypted using 56-bit encryption.
Client Compatible Data is encrypted to and from the server using the maximum key strength supported by the client. This is the default setting.
High Data is encrypted to and from the server using 128-bit encryption. Clients that don’t support 128-bit encryption can’t connect.
FIPS Compliant Data is encrypted to and from the server using Federal Information Process Standard (FIPS) 140-1 validated encryption methods. FIPS is a series of documents published by the National Institute of Standards and Technology (NIST). When this is selected, clients that don’t support FIPS 140-1 encryption can’t connect.
RDP-Tcp Properties Log On Settings Tab
You can configure what credentials are used for sessions through the Log On Settings tab of the RDP-Tcp properties sheet. A user always has to provide their own credentials to determine whether they should be able to access the server, but you can use this page to alter the credentials used for the session.
Figure 25.25 shows the Log On Settings tab.
Figure 25.25
RDP-Tcp Properties dialog box’s Log On Settings tab
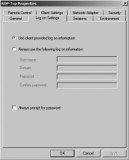
The default is to use the client-provided logon information. However, you could also create an account with specific permissions and privileges on the RD Session Host server. Then, when users connect and authenticate, the session will start with the credentials you provided. This can be useful if you’re hosting an application with special rights and permissions.
The «Always prompt for password» setting has two possible uses. First, if you want to configure single-sign-on as discussed earlier, you would ensure that this box is deselected and the security layer (on the General tab) is set to either Negotiate or SSL (TLS 1.0). However, if your clients frequently access the RDS server from public places and you want to add another layer of security, you can select this box. It will force users to always provide a password even if they’ve configured their password to be saved. This prevents an attacker from launching an RDS session if a valid user leaves their system unlocked. The attacker will be prompted for a password. As long as the user didn’t write down their password on a little yellow sticky attached to the monitor, the attack is thwarted.
RDP-Tcp Properties Sessions Tab
The Sessions tab can be used to override user settings for how to handle disconnected sessions, active session limits, and idle session limits. By default, these settings are configured on a per-user basis using Active Directory Users and Computers.
However, if you want all users who connect to the server to have the same settings, you can use this page to override the individual settings. This tab was covered in more depth in Chapter 14.
RDP-Tcp Properties Environment Tab
The Environment tab can be used to launch a specific application when a user connects. It’s very common to use an RD Session Host server to host a line-of-business application. If you’re specifically using RDS to host an in-house application, it makes a lot of sense to launch the app as soon as the user connects.
Figure 25.26 shows the Environment tab. The default setting is shown. You can override this for every user by either specifying that applications should not be launched or identifying a specific application to run when the user logs on.
Figure 25.26
RDP-Tcp Properties Environment tab
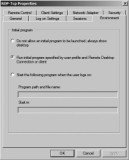
To specify a starting application, you simply provide the program path and filename of the application. Some applications require the starting path to be specified so that the application can access specific application data. If necessary, you can specify the path in the Start In text box.
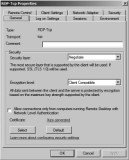
RDP-Tcp Properties Remote Control Tab
Remote Control is a neat feature available with an RD Session Host server. As mentioned earlier, an administrator can use it to interact with a user’s session to either show a user how to accomplish a task or talk a user through the task while observing the actions on the screen.
Figure 25.27 shows the Remote Control tab. The default setting is shown using the default user settings. You can also completely disable remote control or configure remote control with special settings that apply to all users connecting to the server.
Figure 25.27
RDP-Tcp Properties Remote Control tab
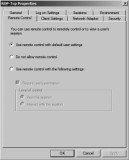
When configuring server settings for remote control, you can set it to require the user’s permission or not. Additionally, you can configure the level of control to either view the session or interact with the session.
If your company is managing an RD Session Host server, there’s nothing wrong with setting it to not require the user’s permission in many instances. Although it makes sense to require the user’s permission in a peer-to-peer Remote Assistance scenario, it’s different when users are connecting to a corporate RDS server.
The user (an employee within the company) is asking for help, and the help-desk professional (another employee within the company) is there to provide assistance. Requiring the help-desk professional to request permission from the employee to connect is often just an extra step that isn’t required. Of course, if employees may be accessing sensitive data that the help-desk professional shouldn’t see, then requiring the user’s permission to connect is appropriate.
If you do set it so that the user’s permission is not required, you may want to provide some type of notification to the user that their sessions may be monitored. Many companies provide this notification in an acceptable use policy.
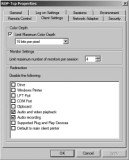
RDP-Tcp Properties Client Settings Tab
The Client Settings tab is useful if your users are experiencing performance issues. You can reduce some of the capabilities to provide better performance.
For example, you can reduce the color depth if users are connecting over a slow connection. The different settings are 15 bits, 16 bits, 24 bits, or 32 bits per pixel. For most users and most applications, the reduced color depth may not be noticeable, while the increased speed will be greatly appreciated.
Figure 25.28 shows the Client Settings tab. Notice that you can also disable redirection for several devices from this page.
Redirection allows users to access local resources in the remote session. For example, a user may want to be able to access files on their local C drive on their system. With the check box deselected (not selected to disable redirection), they can configure redirection.
Figure 25.28
RDP-Tcp Properties Client Settings tab
A key point is that this page is used to disable redirection on a global scale. If redirection is not disabled, users have the ability to select or deselect redirection for individual items on a per-connection basis. If you refer to Figure 25.18 earlier in this chapter, it shows that the user has several choices for redirection. Users have similar choices if they connect with Remote Desktop Connection.
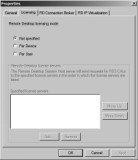
RDP-Tcp Properties Network Adapter Tab
If your RD Session Host server is multihomed, you can configure which network adapters will be used for the RDP-Tcp connections.
Figure 25.29 shows the Network Adapter tab. In the figure, it’s set to use all network adapters, but if you select the drop-down box, you’ll see that you can select individual NICs.
Figure 25.29
RDP-Tcp Properties Network Adapter tab

When the server is configured as an RD Session Host server, it is set to «Unlimited connections.» You can also use the «Maximum connections» setting to limit the number of connections the server will accept. If you find that an RDS server functions best below a certain number of connections, you could configure the maximum connections to this threshold.
You are still legally limited to the number of licenses you’ve purchased for the server. If you’re using per-user CALs, the license server doesn’t track the CALs, but you can configure the maximum connections on this page to coincide with the number of licenses you’ve purchased.
Before you configure a server as an RD Session Host server, the «Maximum connections» setting is set to 2. If Remote Desktop for administration is enabled, the server will support a maximum of two connections.
RDP-Tcp Properties Security Tab
The Security tab allows you to modify permissions granted to users (see Figure 25.30). As soon as you select this tab, a dialog box appears reminding you to use the local Remote Desktop Users group to control who can log onto the RD Session Host server.
In other words, you only need to use this tab to modify advanced permissions for a special group. For example, you may have a group of RD administrators that need to be able to do anything on your RD Session Host server. You could use a Windows Global group to organize the users, add them to the Security page, and allow Full Control permissions.
Figure 25.30
RDP-Tcp Properties Security tab
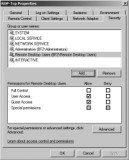
The Security tab includes four permissions:
Full Control Full Control includes the following permissions: query information, set information, remote control, logon, logoff, message, connect, disconnect, and virtual channels.
User Access User Access includes the following permissions: query information, logon, and connect.
Guest Access Guest Access includes only the Logon permission.
Special permissions Any of the following special permissions can be individually allowed or denied: query information, set information, remote control, logon, logoff, message, connect, disconnect, and virtual channels.
Edit Settings
The Edit Settings property page includes four tabs. You can access any of these settings by double-clicking any of the settings in the General, Licensing, RD Connection Broker, or RD IP Virtualization sections.
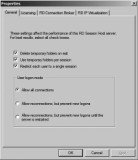
General Tab
Figure 25.31 shows the General tab. It’s recommended to keep all the check boxes selected for the best performance of the server. Notice the last check box prevents users from opening more than one session — this refers to full desktop sessions, not RemoteApp applications. Users will be able to launch multiple RemoteApp applications with this selected.
Figure 25.31
Edit Settings General tab
Licensing Tab
The Licensing tab allows you to choose between Per Device or Per User. As a reminder, it’s recommended to postpone configuring a licensing server until your RD Session Host servers are up and running. Figure 25.32 shows this tab.
Before the 120-day grace period, you’ll need to revisit this page and set the licensing mode. When you select either Per Device or Per User, you’ll also need to specify the license server. In very large organizations, you can use multiple licensing servers. A single licensing server can manage licenses for multiple RDS Session Host servers.
Figure 25.32
Edit Settings Licensing tab
RD Connection Broker Tab
RD Connection Broker is needed only if you have more than one RD Session Host server. The RD Connection Broker provides two important features:
Load balancing If you have multiple RD Session Host servers, you can add the servers to a Connection Broker farm. When a user connects, the RD Connection Broker will determine which server has the lightest load and will redirect the connection to that server.
Reconnects users to the correct session If a user becomes disconnected from a session, the RD Connection Broker will ensure they are connected back to the same session on the original server. For example, say that Sally is connected to BF2 but the network has a problem and disconnects her. When she reconnects, the Connection Broker recognizes she has an active session on BF2 and will redirect her connection to that server.
RD IP Virtualization Tab
If an application requires each connection to have a separate IP address, you can use RD IP Virtualization. Normally, every session will have a single IP address. Although this works for the majority of applications, there are a few instances where separate IP addresses are required.
RD IP Virtualization also requires a DHCP server to be configured to provide virtual IP addresses.
Licensing Diagnosis
The last tool you have available in the Remote Desktop Session Host Configuration console is Licensing Diagnosis. When licensing issues crop up, they’ve been challenging to resolve in past versions of Windows and Terminal Services. This tool is a welcome addition.
Figure 25.33 shows some of the information provided from the Licensing Diagnosis console.
Figure 25.33
Licensing Diagnosis tab
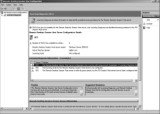
In the figure, licensing hasn’t been configured yet, and RDS CALS have not been added. However, by reviewing the entries in the center panes, the issue is easy to identify. This tool becomes an easy reference to identify any licensing issues.
Remote Desktop Licensing Manager
Although you have a grace period when RDS will function normally, after the grace period ends, RDS will no longer accept connections if licensing is not configured. The grace period lasts for 120 days or until the first permanent RDS CAL is issued by a license server, whichever occurs first.
As mentioned previously, you can choose between per-user or per-device Remote Desktop Services Client Access Licenses (RDS CALs). The licensing server must first be activated before you can install the licenses.
After you’ve configured your RDS environment, you’ll want to configure the license server. The RD Licensing Manager is used to install, issue, and track the availability of RDS CALs on a Remote Desktop license server. Licenses are purchased through a variety of different methods, depending on your company’s relationship with Microsoft, such as the following:
- Enterprise Agreement
- Campus Agreement
- School Agreement
- Services Provider License Agreement
- Other Agreement
If you have one of these agreements with Microsoft, the best way to obtain licenses is through this agreement. It’s also possible to purchase licenses through retail channels by purchasing a license pack. For detailed information on how to purchase licenses, check out this page: https://docs.microsoft.com/en-us/previous-versions/windows/it-pro/windows-server-2003/cc786167(v=ws.10).
The license server can be on the same server as the RD Session Host server, or for larger implementations of Remote Desktop Services with multiple servers, a single license server will manage licenses for multiple RDS servers.
Older Terminal Services license servers used a discovery scope to allow TS servers to locate the license server. If you’re installing the license server on Windows Server 2008 R2, this is not needed. Instead, you should use the Remote Desktop Session Host Configuration tool to specify a license server for the RD Session Host server to use. This is done on the Licensing tab of the RDP-Tcp Connections Properties dialog box where you identify the type of RDS CALs used for the server (per user or per device).
If you’ve performed the steps in this chapter to install and configure an RD Session Host server, you can configure the RD Licensing Manager by following these steps:
- Launch the RD Licensing Manager by selecting Start ⇒ Administrative Tools ⇒ Remote Desktop Services ⇒ Remote Desktop Licensing Manager.
- Click the plus (+) to expand All Servers, and you’ll see your server marked with a white X in a red circle.
- Select your server. Right-click your server, and select Activate Server.
- Review the information on the wizard’s Welcome page, and click Next.
- On the Connection Method page, accept the default of Automatic Connection (Recommended). Use this method if the RDS server has access to the Internet. If the server doesn’t have access to the Internet, you can connect with another computer over the Internet or via a telephone. Click Next.
- The Company Information page will appear. Enter your first name, last name, company, and country. This information is used if you need help from Microsoft. Click Next.
- Enter the additional information requested on the Optional Company Information page. Click Next.
- A dialog box will appear with a progress bar. The server is connecting to the Microsoft Clearinghouse and is being activated. When it completes, the completion page will appear.
- Deselect the Start Install Licenses Wizard Now check box, and click Finish. At this point, the licensing server is activated, but there aren’t any RDS CALs installed.
-
Set Per User or Per Device
It may be necessary to return to the Remote Desktop Session Host Configuration console and set the Remote Desktop licensing mode. After launching the console, double-click the Remote Desktop licensing mode to access the property page. Select Per Device or Per User depending on what type of licenses you have purchased, and enter the name of the license server. - Right-click your server, and select Install Licenses. This will launch the wizard to install your licenses. There are multiple paths this can take, depending on what type of licenses you’ve purchased and where you’ve purchased them from.
The Bottom Line
Limit the maximum number of connections You can limit the maximum number of connections for the server for performance reasons or to help ensure you remain compliant with the licensing agreement.
Master It You want to limit the maximum number of connections to 100. How can you do this?
Add an application to an RD Session Host server Once the RDS role is added and the RD Session Host server is configured, you can add applications to make them available to the server.
Master It Your company has purchased an application that supports multiuser access. You want to install it on the RD Session Host server. What should you do?
Add a RemoteApp for Web Access RemoteApp applications can be configured so that they are accessible to users via a web browser. Users simply need to access the correct page and select the application to launch it.
Master It Assume you have already configured your environment to support RemoteApp applications. You now want to add a RemoteApp application. What should you do?
Add a RemoteApp to the Start menu RemoteApp applications can be configured so that they are accessible to users from the Start menu of their system. Once configured, users simply select the item from their Start menu to launch it.
Master It Assume you have already configured your environment to support RemoteApp applications. You now want to add a RemoteApp application so that it is accessible to users via the Start menu. What should you do?
![]()
![]() Installing, Using, and Administering Remote Desktop Services
Installing, Using, and Administering Remote Desktop Services
![]() Using Remote Desktop Services for Windows Server 2008 R2
Using Remote Desktop Services for Windows Server 2008 R2
![]() Remote Desktop Services: Server and client requirements
Remote Desktop Services: Server and client requirements
![]() Adding Remote Desktop Services and RemoteApp programs
Adding Remote Desktop Services and RemoteApp programs
![]() Using Remote Desktop Services Manager, RDS CAL
Using Remote Desktop Services Manager, RDS CAL
Printed with permission from Wiley Publishing Inc. Copyright 2010. Mastering Microsoft Windows Server 2008 R2 by Mark Minasi, Darril Gibson, Aidan Finn, Wendy Henry and Byron Hynes. For more information about this title and other similar books, please visit Wiley Publishing Inc.