Windows 10, Windows 7, Windows 8, Программное обеспечение
- 08.10.2017
- 100 454
- 23
- 03.10.2021
- 208
- 203
- 5

- Содержание статьи
- Описание
- Комментарии к статье ( 23 шт )
- Добавить комментарий
Уже многие люди имеют в своем распоряжении конфигурацию из нескольких мониторов, и многие пользуются ими в своих повседневных целях — например, в работе. Так же некоторые люди работают через RDP подключение (удаленный рабочий стол), и именно им нужна возможность использовать RDP на два монитора. Ниже будет рассказано, как это сделать.
Описание
Данный способ работает только со следующими версиями операционных систем Windows
на стороне хоста
, к которому выполняется удаленное подключение (т.е. тот компьютер, к которому вы пытаетесь подключиться через RDP, должен работать под одной из перечисленных ниже версий ОС Windows):
- Windows 7 Ultimate (Максимальная) или Enterprise (Корпоративная)
- Windows 8 Pro (Профессиональная) или Enterprise (Корпоративная)
- Windows 10 Pro (Профессиональная) или Enterprise (Корпоративная)
- Все версии Windows Server, начиная с Windows Server 2008 R2
Для использования RDP подключения к удаленному компьютеру, где установлена редакция без поддержки работы с использованием нескольких мониторов по удаленному рабочему столу, следует использовать RDP Wrapper. Ознакомится с инструкцией по его настройке можно в этой статье: Создание и настройка RDP сервера на любой версии Windows с помощью RDP Wrapper
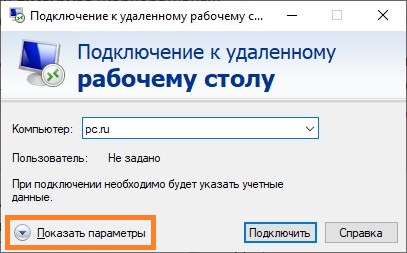
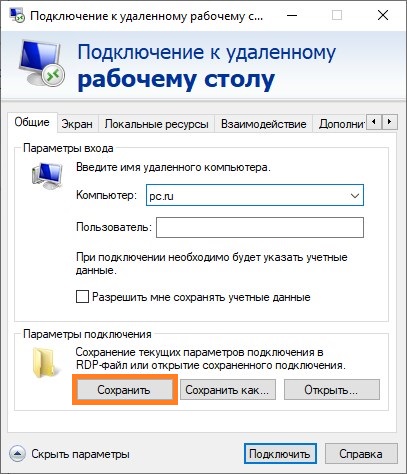
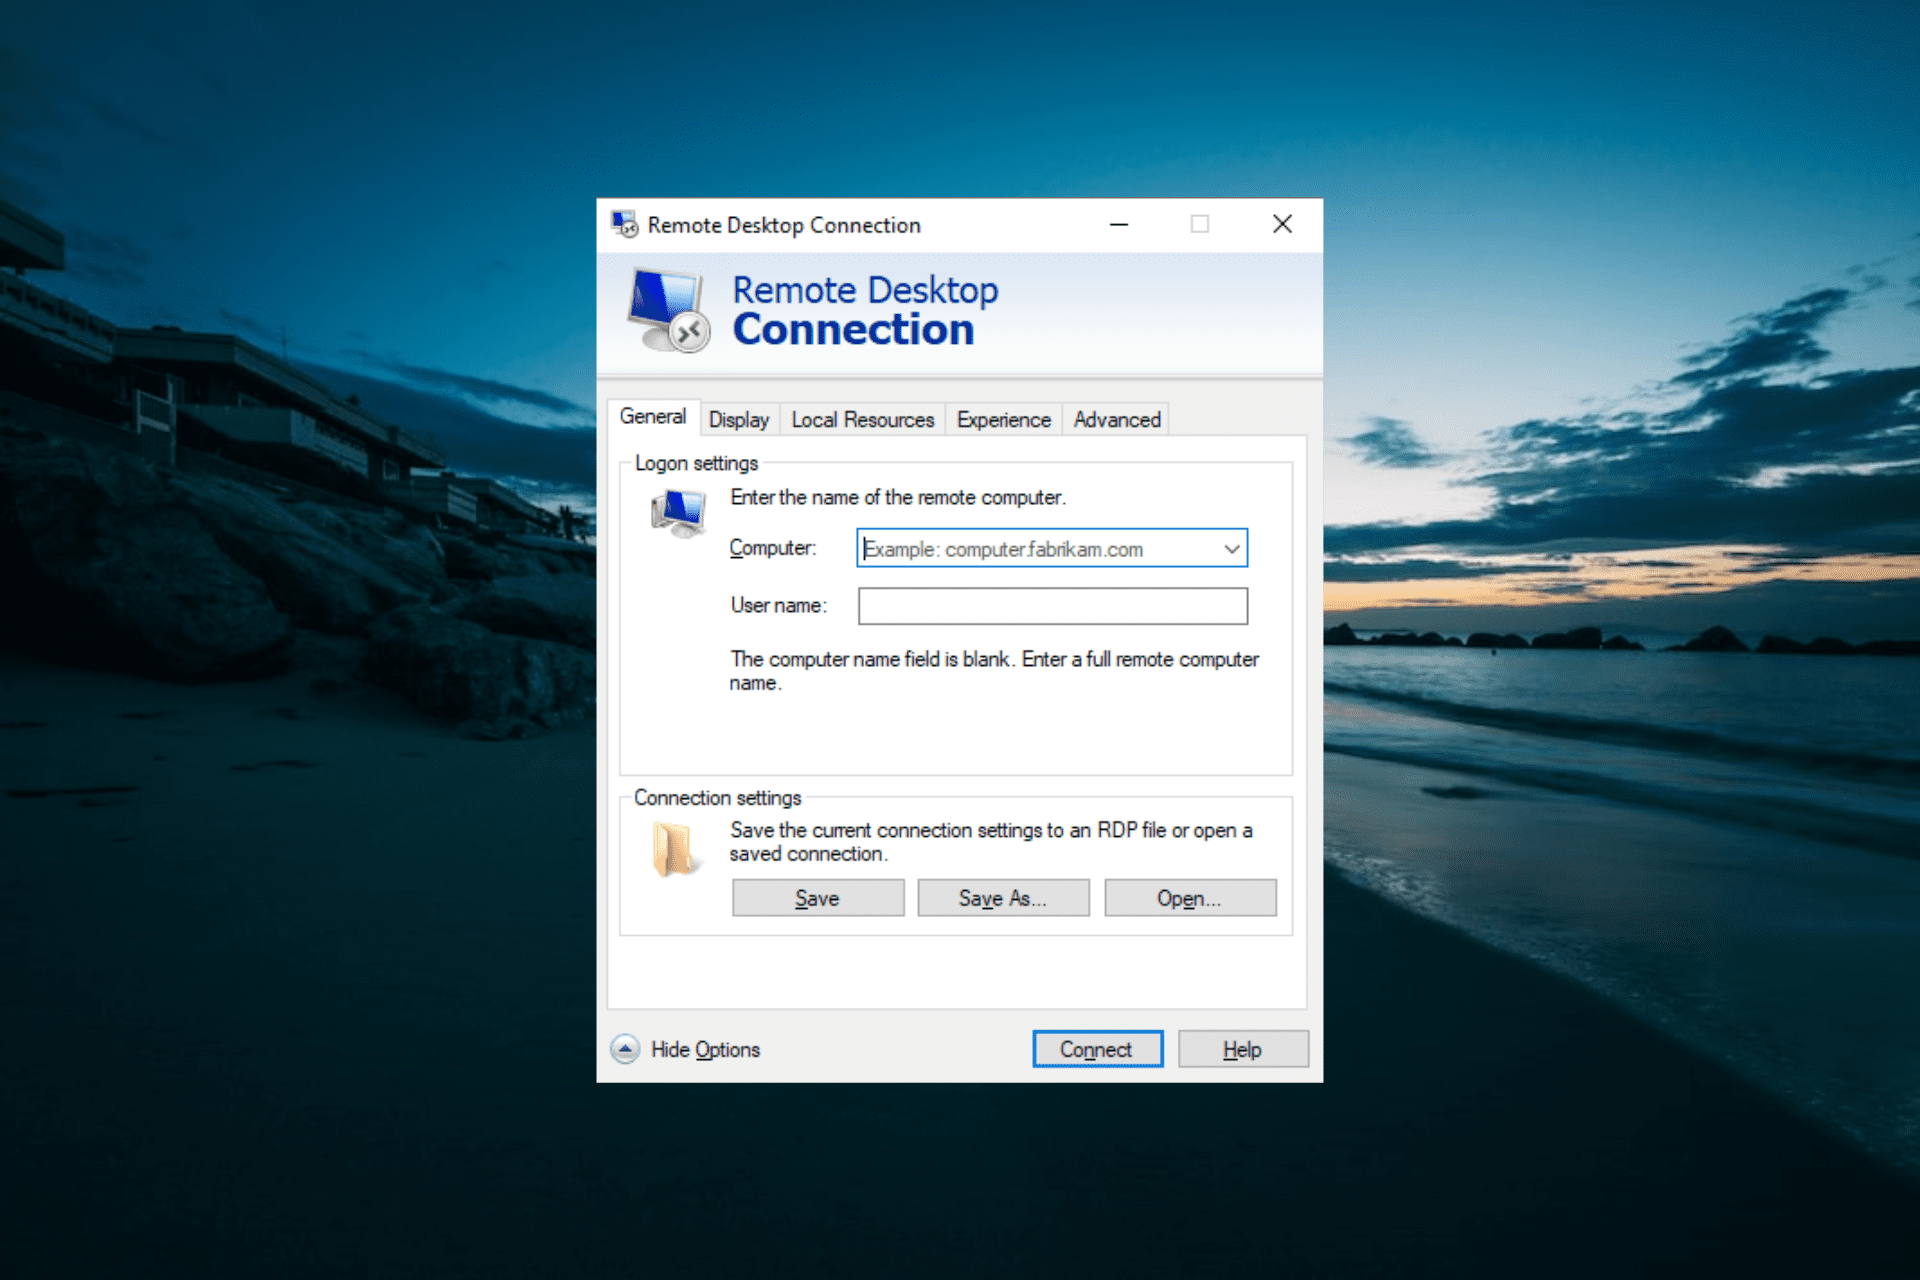
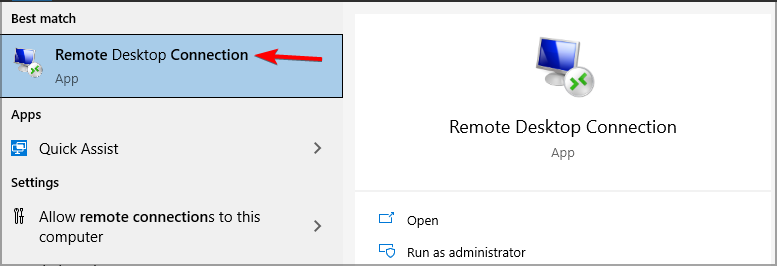
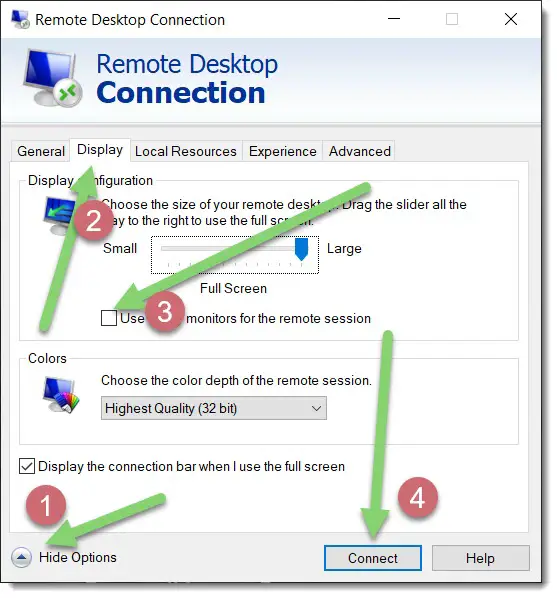
- Запускаем обычное подключение к удаленному рабочему столу, но не спешим нажимать кнопку «Подключить«. Вместо этого нажимаем на надпись «Показать параметры«.

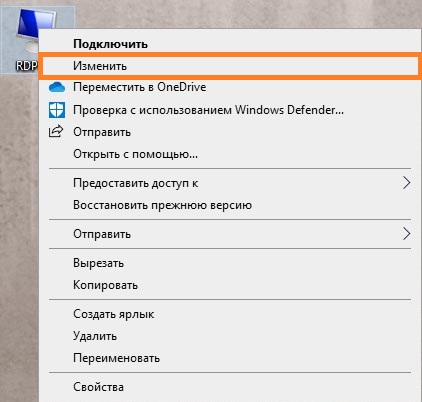
Если Вы используете ранее сохраненный файл подключения к удаленному рабочему столу (формата RDP), то нужно нажать на нем правой кнопкой, и выбрать пункт меню «Изменить«.

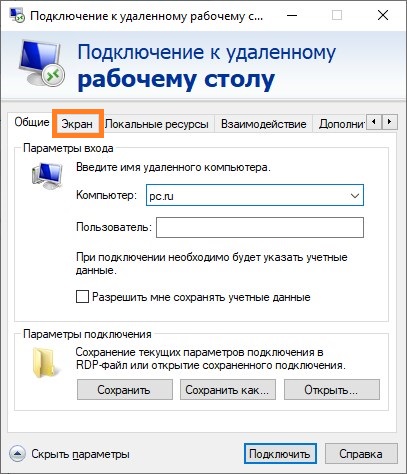
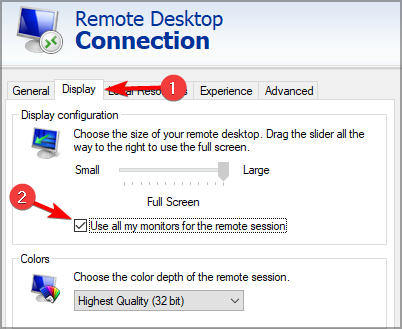
- Затем, в значительно увеличившемся по размером окне, ищем вкладку «Экран«.

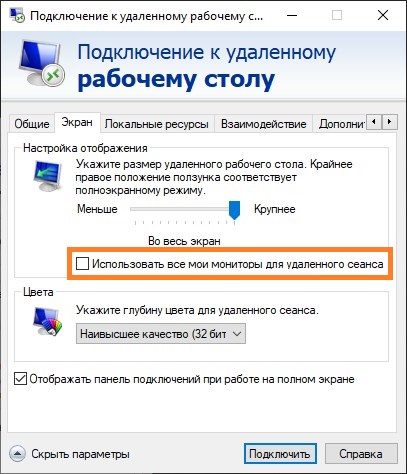
- Отмечаем галочкой пункт «Использовать все мои мониторы для удаленного сеанса».
- Теперь можно сохранить RDP соединение в нужное вам место (вкладка «Общие» — «Сохранить»), или просто сразу нажать кнопку «Подключить» и пользоваться всеми своими мониторами сразу.
First published on CloudBlogs on Jul, 01 2009
NOTE: This is an old post. To learn about RDS in Windows Server 2016, please visit our
documentation page
Introduction:
Multiple monitor support for Remote Desktop Services allows users to open a Remote Desktop connection expanded across all the monitors on the client computer regardless of the client monitor configuration. With this feature, the user can fully utilize all the monitors connected to the client computer for the Remote Desktop connection thereby providing extra desktop space and an almost seamless experience with the client desktop that is much improved over “Span mode”.
This feature will be part of Windows 7/Windows Server 2008 R2 release and works for connections to another client machine (physical or VM), or a Remote Desktop Session Host.
How to use Remote Desktop Multimon feature:
To use this feature, you must:
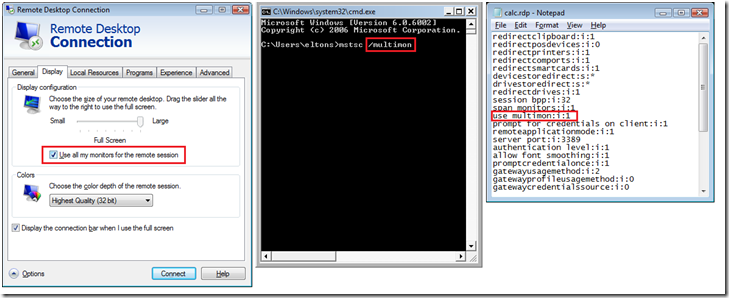
- Connect using the Remote Desktop Client 7.0 (mstsc.exe) available initially on Windows 7/Windows Server 2008 R2.
-
Enable Multimon using one of the three methods described below:
a. Click “Use all monitors for the remote session” in the client (mstsc.exe) window.
b. Use the “/multimon” switch on the mstsc.exe command line.
c. Add “Use Multimon:i:1” to the RDP file.
- Connect to a computer running Windows 7 or Windows Server 2008 R2.
How does it look?
Currently this feature displays the remote desktop on all the monitors available on the client computer. It can handle any client monitor configuration supported by Windows.
The following images show the Remote Desktop Multimon feature in various configurations:
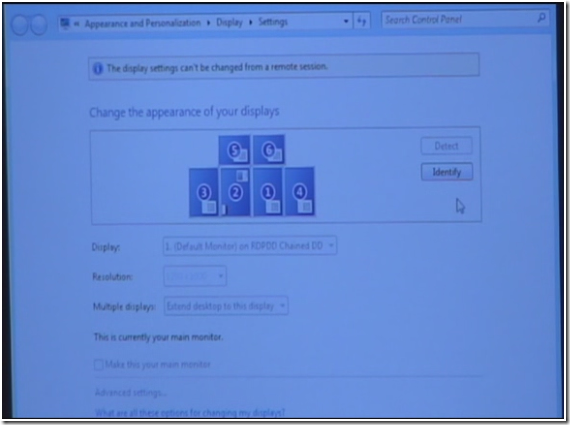
Display Settings UI inside a Remote Desktop session showing multiple monitors
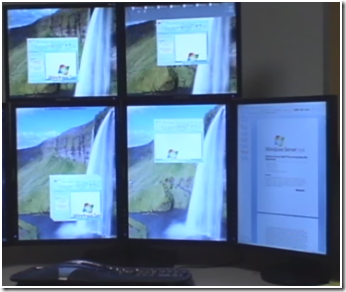
Remote Desktop Multimon Session with 5 monitors
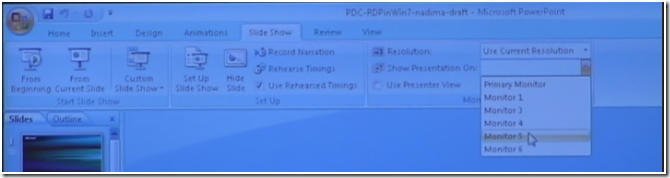
PowerPoint inside Remote Desktop session showing multiple monitors
How is this different from “Span” mode?
Span mode, introduced in Vista, allows the remote desktop to span across all monitors on the client as long as the monitors are arranged to form a rectangle. The remote session created when using span mode is still a single-monitor session. With multimon support, each monitor on the client machine is viewed as a distinct monitor in the remote session. Due to this fundamental difference, span mode has some restrictions that true multimon does not:
1. The primary monitor must be leftmost.
2. The set of monitors must form a rectangle (i.e. identical vertical resolution, and lined up in exact straight line).
3. The total of the resolutions must be below 4096×2048 (ex. 1600×1200+1600×1200 = 3200×1200).
For these reasons, all monitor configurations shown below are valid for Remote Desktop multimon, whereas most of them are not valid for span mode:

With true multimon support, the client-side monitors can be arranged in any order and can be of any resolution.
Since a span mode remote session is essentially a single-monitor session, if a window in the remote desktop is maximized, it spans across all the monitors. With true multimon support, a window will only maximize to the extent of the containing monitor.
If an application queries for the number of monitors inside a span-mode session, it will find only one monitor, whereas it will find as many monitors as are actually present on the client system when using true multimon RDP. This difference can change the behavior of applications such as PowerPoint.
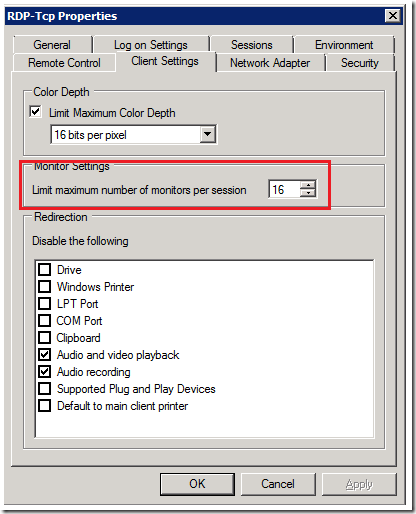
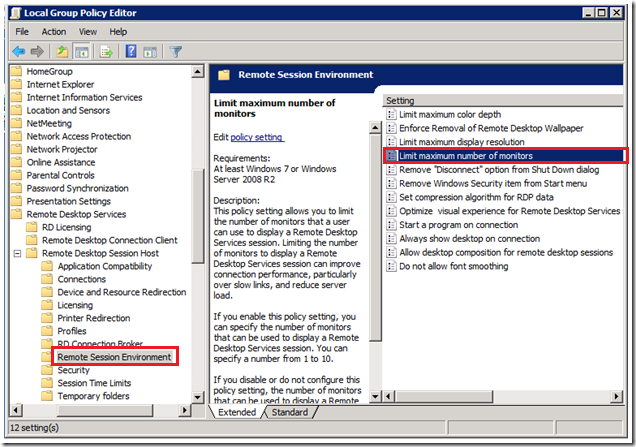
Remote Desktop Multimon configuration properties:
There are a few settings associated with the Remote Desktop Multimon feature that can be used to restrict the number of monitors and resolution that clients use to connect.
Restricting the maximum number of monitors
:
The Remote Desktop Multimon feature provides an option to restrict the number of monitors a user can use to connect. By default, RDP protocol supports a maximum of 16 monitors. This number can be restricted to any value between 1 and 16 using one of the following three approaches:
-
Using the “Limit maximum number of monitors per session” setting in the Remote Desktop Configuration Tool (tsconfig.msc) as shown below:
-
Setting the “Limit maximum number of monitors” machine group policy as shown below:
-
By setting the MaxMonitors property in the Win32_TSClientSetting WMI class (
http://msdn.microsoft.com/en-us/library/aa383778(VS.85).aspx)
.
Restricting the maximum resolution of each monitor
:
By default, RDP restricts the maximum resolution to 4096 X 2048 per monitor. Additionally with multimon, the width and height of each remote monitor can also be restricted in one of two ways:
-
Setting the “Limit maximum display resolution” machine group policy as shown below:
-
By setting the MaxXResolution and MaxYResolution properties in the Win32_TSClientSetting WMI class (
http://msdn.microsoft.com/en-us/library/aa383778(VS.85).aspx)
.

Please note that the policies and WMI settings described above apply only to connections with multiple monitors and not when connecting with a single monitor.
You can complete this setup by running a single command
by Vlad Turiceanu
Passionate about technology, Windows, and everything that has a power button, he spent most of his time developing new skills and learning more about the tech world. Coming… read more
Updated on
- Knowing how to use dual monitors with a remote desktop on Windows 10 can come in handy.
- You can use multiple monitors with Remote Desktop by adjusting several settings.
- For the best experience, we suggest using reliable and easy-to-use third-party software.
Nowadays, you can use your home PC from anywhere, thanks to the built-in remote desktop feature on Windows that allows you to control your PC remotely.
Through the Windows Remote Desktop, you can connect to your computer from another location, allowing you to see that computer’s desktop and interact with it as if it were in front of you.
Users with more than one monitor also wonder if they use this feature. The answer is a resounding yes, and we will show you how to do it in this guide.
How do I use dual monitors with a remote desktop?
1. Configure RDP
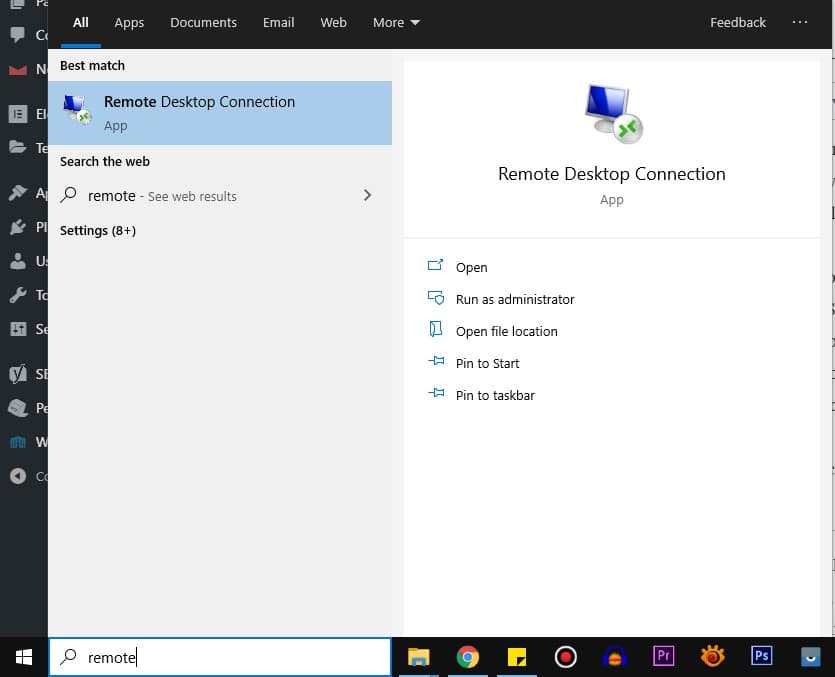
- Go to the Windows Search, type Remote Desktop Connection, and open it.

- Expand Show options.
- Go to Display and check Use all my monitors for the remote session.

- Click Connect and proceed to connect to the server like you usually do.

2. Use the Run utility command line
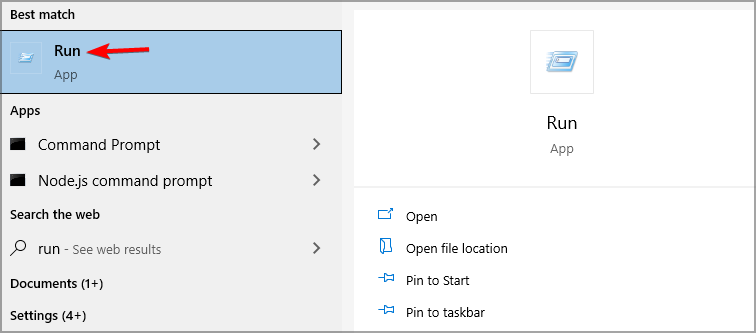
- Press the Windows key + S to open Windows Search.
- Type Run in the search box and hit Enter.

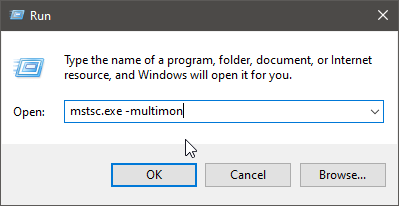
- In the dialogue box, type mstsc.exe -multimon, then hit Enter.

- Using this command, the Use all my monitors for the remote session box will be checked automatically.
This is another surefire and fast way to use dual monitors with a remote desktop on Windows 10.
This will open the program without the need to change any settings. The only thing left for you to do is to connect to the server. Note that the computer does not save your settings here automatically.
Hence, you need to repeat the command above every time you want to use the dual monitor set-up.
- How to Use Steam Deck’s Keyboard in Desktop Mode
- How to Format an NVMe SSD on Windows 11
- How to Download & Install New Microsoft Office Fonts
- Offline Files on Windows 11: How to Enable or Disable
3. Enable monitors directly
- Go to your Windows Search Bar.
- Type Run and press Enter.
- In the Run command box, type mstsc /span and hit Enter.
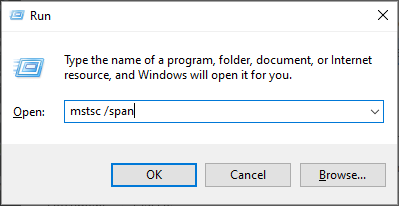
Note that this method is not the most popular for using dual monitors with a remote desktop on Windows 10. This is because it requires all your monitors to share the exact vertical resolution.
If this is not the case, some monitors might not work.
Those are the simple methods for dual monitors with a remote desktop on Windows 10. You can see that they only require a few tweaks, and you are set.
In case the presented instructions didn’t work in your case, we recommend TeamViewer as the best-suited solution for dual monitor remote desktops.
Also, if you need multiple choices for third-party software, you can check other remote control software options from our article.
Feel free to share your experience using the remote desktop with a dual monitor set up in the comments below.
![]()
See the link in Jason’s post, it has good information but I’ll expand the full solution here.
This is a ‘newer’ feature in RDP available WAY after the OP asked the question. And I SWEAR I saw this QA someone else on SO but can’t find it now if someone wants to dig for it and mark as duplicate.
Here’s the new way to do this:
-
Run the command «mstsc /l» to get a listing of the monitor IDs available. Those the zero-based monitor numbers and be careful to pick monitors that touch (which can be challenging from the listing because it just displays a bunch of pixel mappings so monitor 0 is not necessarily next to monitor 1.
-
Run the command «mstsc» to open RDP, setup all the settings and check the box that says ‘use all my monitors’ then SAVE the rdp file.
-
This last step does not have a way to add via the regular interface (yet, maybe they’ll add it someday). Open the saved RDP file in notepad. Add a new line to the file right after the ‘usemultimon’ line that reads ‘selectedmonitors:s:0,1’ without the quotes, where 0,1 are the monitors you selected from the previous steps. Yes it works for any subset as long as they touch so if you have 5 monitors you can choose 2 of them or 3 or 4 of them.
Example subset of file flagrantly taken from Scott’s post, sorry Scott:
span monitors:i:1
use multimon:i:1
selectedmonitors:s:0,1
PRO TIP: whichever monitor you put first in the ‘selectedmonitors’ seems like it will be the primary display so from my experimenting you can swap the order of those to set up a different primary display (which makes a difference for the default for new windows and for how the taskbar notification area displays).
The remote desktop connection feature in windows allows you to remotely connect to a computer and use it as if it is your local computer. This article guides you on how to use dual monitors with Remote desktop connection on windows 10 and also remote desktop multiple monitors Windows 10 operating system.
This can be useful for lots of reasons, but if you are a system administrator and would like to setup remote desktop dual monitors, it is very easy (Depending on the OS on the Host and Client PC). Read more info from Microsoft regarding RDP setup and use.
The process to enable remote desktop on Windows 11 computers is slightly different. I am currently testing multiple monitor remote desktop setup for Windows 11 but the following guide will work if you wanna give it a go.
One of the quickest ways to remote desktop with multiple monitors in Windows 10 is to select the “Use all my monitors” option before you make a connection. For more advanced setup and customization, this guide goes in much more detail.
I use iPad as second monitor on windows wirelessly as my third monitor and can confirm this works on that setup as well.
Before you can remote desktop using multiple monitors on windows, there are a few things that come into play for you to be able to use dual monitors in RDP sessions on Windows 10.
You want to make sure that Windows is detecting your second screen, if it’s just black or gives you the prompt “didn’t detect another display”, you will have to troubleshoot that first.
So, I am assuming that you have the following setup:
- You have a computer in a remote location that has two monitors connected to it.
- Have a dual monitor setup at home (or wherever you are trying to connect to the remote computer from).
- You are trying to remotely connect to the remote computer using the RDP client and use both of your monitors as you would on your local computer.
- If your scenario is different reach out to me in the comments.
1. Remote Desktop Multiple Monitors In Windows 10
Once you are sure that the remote computer supports multiple monitors in an RDP connection, let’s see how it is done.
Using this method you will use two monitors for the remote desktop session. The remote session will automatically expand to both of your screens.
To start remote desktop with multiple monitors in windows 10, do the following:
- Go to “Start” or press the Windows key on your keyboard
- Search for “RDS” or simply type in “Remote Desktop Connection”

- Hit the enter key and this will take you to the remote desktop connection application.
- Enter the computer’s name or the IP address, but before you press the “Connect” button, click on the “Show Options” button.
- Now a new window opens up with a bunch of different options like General, Display, Local Resources, Experience, Advanced
- Click on the “Display” tab and tick the “Use all my monitors for the remote session”.
- Now if you connect to the pc and go full screen, this will use both of your computer’s monitors

So, that’s how you can remote desktop dual monitor on Windows 10 or with all the monitors available.
If you are not able to remote desktop span 2 monitors with this trick, please check if you need to update your display drivers as that might be a conflict.
READ: Google Meet Remote Control – Full Guide
2. Remote Desktop Multiple Monitors In Windows 10: 3+ Monitors
What to do if you have more than two monitors and would like to manage your workspace differently? There are applications that might help you achieve this, but with the trick mentioned below, you might want to uninstall that clanky windows 10 app you’ve been using.
You can use this trick to alter your remote desktop dual monitor setup and choose which screen should span full screen with remote connection.
If you have a triple monitor setup and only want to use two monitors for remote desktop and the third one for your local system. That is easily achievable as well. If you would like to learn how to setup dual monitors in windows 10 locally, that process is a little different. I use this to remote desktop full screen one monitor while I use the other for accessing my local files etc.
You can also alter the setting if you have a dual monitor setup. I personally use my second monitor for the remote desktop connection and leave the main monitor for my local PC. You can use this to remote desktop only one screen and use the other locally.
Before we start to change the settings as we prefer, we need to know how your system detects these monitors.
- Go to Start and type “RUN” or hit the “Windows” + “R” key together. This will bring up the Run application
- Type in mstsc /l and hit enter
- You will see a dialog box with all the monitors connected to the system represented by a number

In the above screenshot, 0 is my main monitor, and 3 is my second monitor. - Right-click on the desktop and open display settings.

This part might be tricky if you have more than two monitors. We now will try to exactly match the numbers to which monitor they represent.
Lowest number on the RDP = Lowest number on the display settings.
Let me explain.
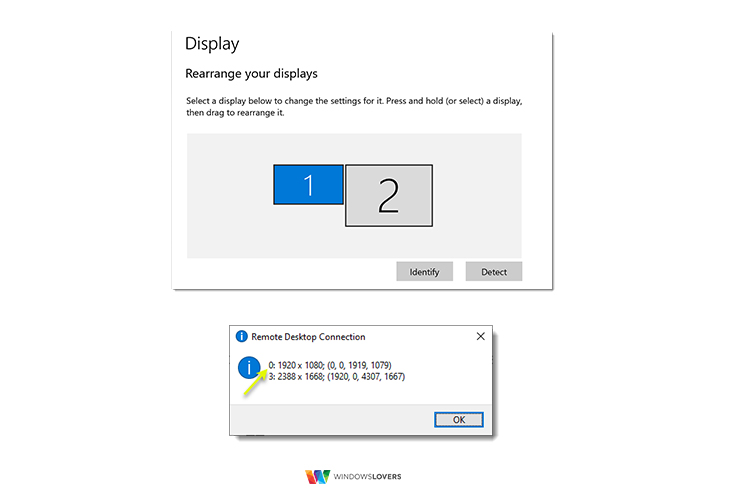
In the screenshot above 0 is 1, and 3 is 2.
Once this is sorted, we can begin arranging the remote desktop settings the way you prefer.
Remote Desktop Multiple Monitors in Windows – Video Guide
2.1 Remote Desktop Use 2 of 3 Monitors
If you have more than two monitors and setup remote desktop to use 2 of 3 monitors and the rest for local use, let’s see how it’s done.
Running multiple monitors on a system is quite a heavy task, and if your system is laggy you might want to look into ways to make Windows 10 faster.
- Open the notepad application. Open the start menu and type in “notepad”
- File open > Select all file types > Open the remote desktop connection profile we saved in previous steps
- This opens the file and you can see a bunch of text. Scroll to the top and type in the following command.
selectedmonitors:s:a,b,c
This should be added to the top of the file and not towards the bottom.
a,b,c – Depending on which monitors you would like to use for the remote desktop connection, replace these with the numbers for the monitors that we found using the mstsc /l command.
That is how to remote desktop multiple monitors in Windows 10 and select specific monitors that you would like to use for the Remote desktop connection.
This opens up a variety of ways you can use the Remote desktop client. especially if you have three or more monitors, you can use two for RDP and others for playing YouTube videos or choosing songs from Spotify.
3. Limitations – Remote Desktop Dual Monitors
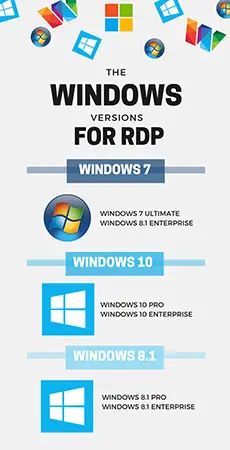
Windows version on the remote client: The remote computer you are trying to connect and use multiple monitors on, should have the right version of windows that supports dual monitor setup on a remote session.
Yes, not all windows support this feature. There are ways to enable remote desktop in Windows 10 Home but I would not advise that for everyone. That’s for users that understand the risk that comes with enabling and using remote desktop on a machine that should not.
I have made a chart below that will help you decide if you are able to do so on the remote computer you are trying to connect.
3.1 Which version of windows supports remote desktop dual monitors
Finally,
One thing that I would suggest though, is saving this connection setting to an RDP file so that you can just load it every time you use it.
You can save your RDP multiple monitors setup file for quick access in the future by following the process below:
- Click on Start and search for “Remote Desktop Connection” and open the Remote Desktop Connection app. Alternatively, hit the Windows + R key together on the keyboard to bring up the run, type mstsc, and hit Enter.
- Type in the Computer name or the IP address that you want to connect remotely.
- Click on “Show Options”, click on the Display tab, make sure you check the “Use all my monitors for the remote session”.
- Go back to the “General” tab, click on “Save As…” and save it in a location that you can remember later on.
That’s it, folks. Let me know if you guys have any more issues to use dual monitors or remote desktop multiple monitors Windows 10 setup.