Have you ever used the Windows app Remote Desktop Connection? This app, included in all Windows installations, allows you to remotely access another Windows PC or a server with Windows Server. For this purpose, it employs the Remote Desktop Protocol (RDP).
Organizations can install applications on a central server instead of various computers. To use those applications, employees must remotely access that server. Such centralization can make maintenance and troubleshooting easier. This technology was formerly known as Terminal Services (TS). Currently, web systems are more common. But, in some scenarios, Windows remote apps are still needed.
In those scenarios, Linux users can remotely access Windows computers and servers from their favorite system using an RDP client.
There are a few RDP clients available for Linux and we are going to talk about them today:
- Remmina
- FreeRDP
- rdesktop
- Vinagre
You can choose the one you like best or the one that best suits your needs.
Out of curiosity, FreeRDP is both an app and a library, which provides reusable features for other apps. Except for rdesktop, all of the other clients above use the FreeRDP library.
Enabling remote desktop on Windows
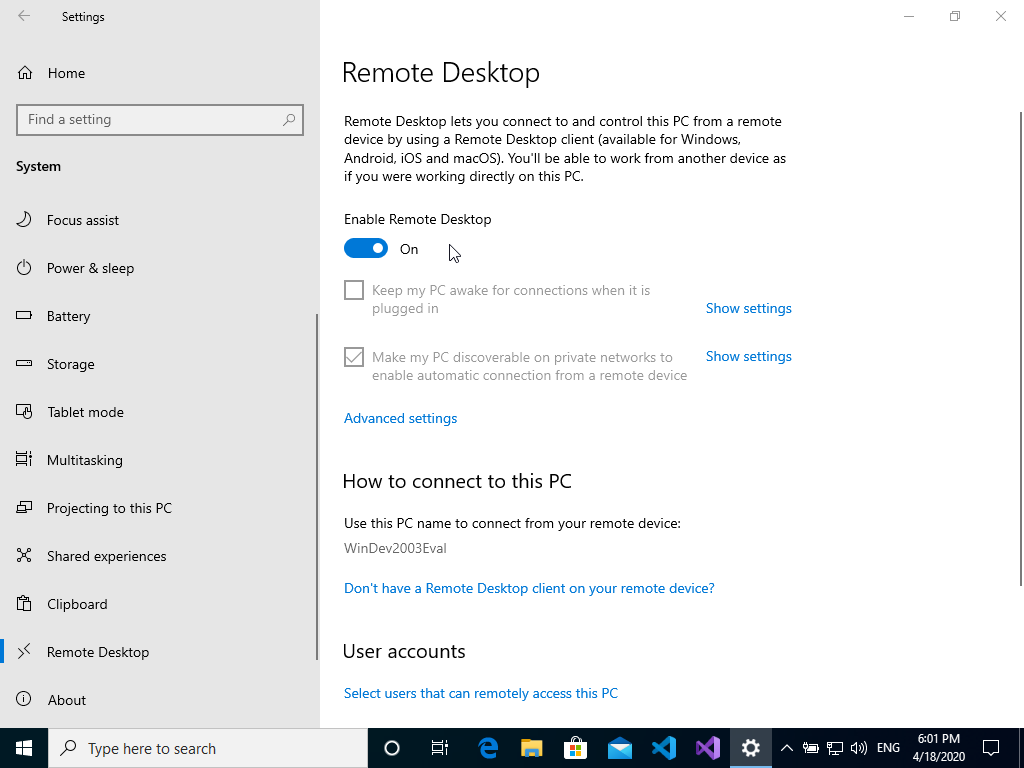
First of all, you must set up the computer you want to connect to so it allows remote connections. On the Windows machine you want to connect to, logged on with an administrator account, open the Start menu and click Settings. To do that, on the window that appears, open the System category, and then Remote Desktop. Finally, enable it:
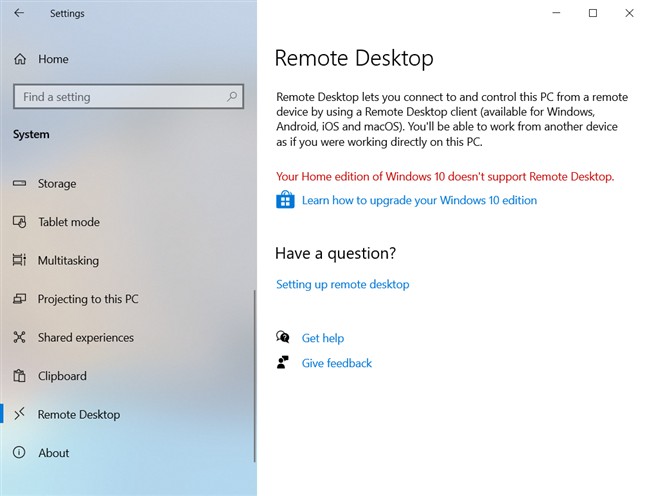
Note that you can’t connect to computers running a Windows Home edition (for instance, Windows 10 Home). This screen informs you, if that is the case:
Your Home edition of Windows 10 doesn’t support Remote Desktop.
Source of the image: Digital Citizen
If you want more information about remote desktop on Windows, take a look at:
- How to use Remote Desktop — Windows Support
- Remote Desktop — Allow access to your PC — Microsoft Docs
Remmina is a remote desktop client that supports many remote access protocols such as RDP, VNC, NX, XDMCP and SSH. It aims to be useful for system administrators and travellers, who need to work with lots of remote desktops and/or servers. Remmina is included in the Ubuntu Linux distribution and is its default remote desktop client.
To install Remmina on Linux Kamarada and openSUSE, run:
1


# zypper in remmina remmina-plugin-rdp
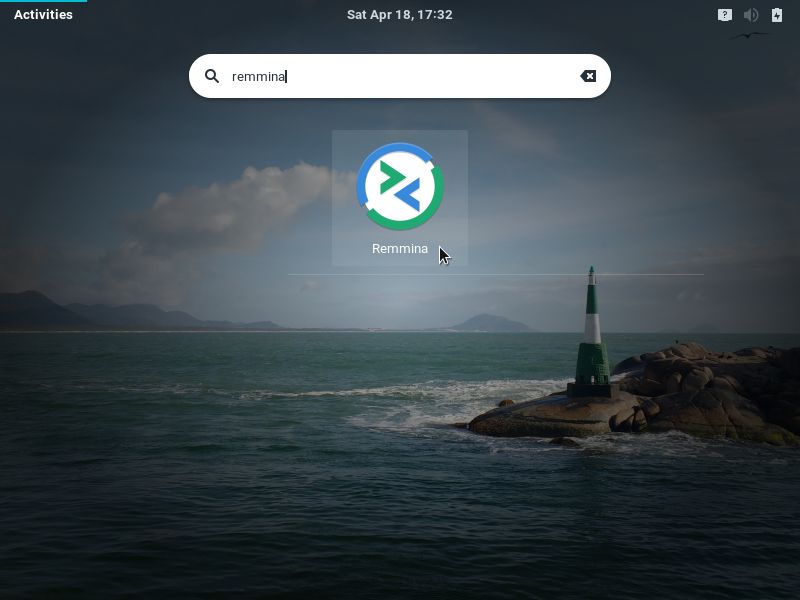
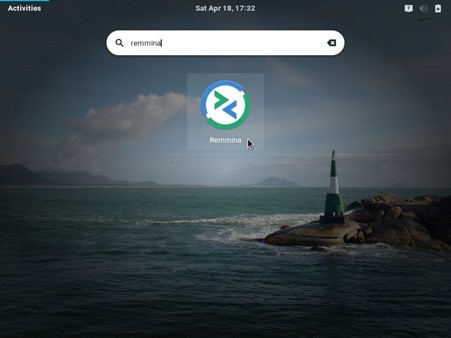
Once installed, to start Remmina, if you use the GNOME desktop environment, open the Activities menu, on the top-left screen corner, type remmina and click its icon:
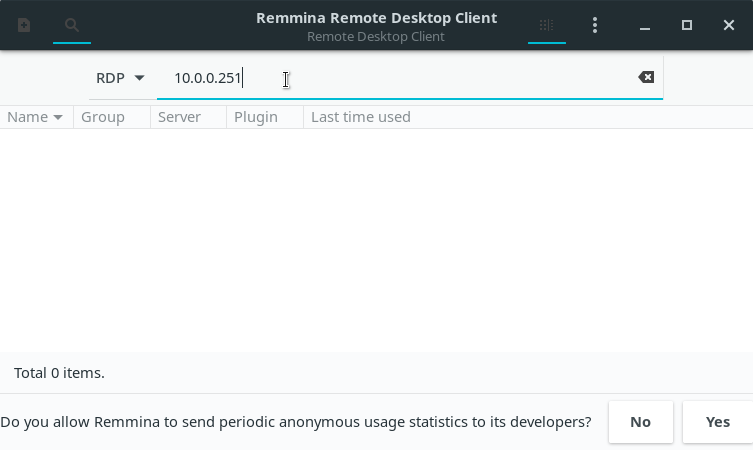
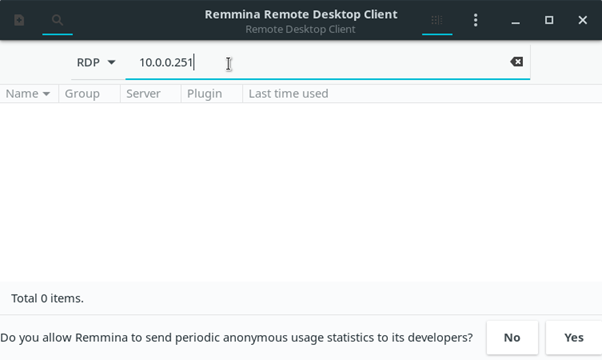
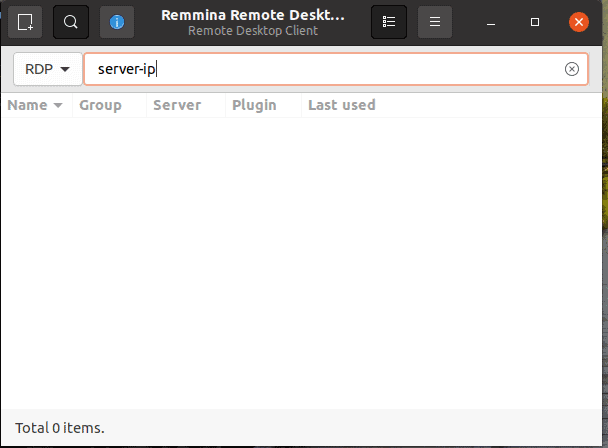
To quickly start a remote access, select the RDP protocol, type the hostname or IP address of the computer you want to connect to (e.g. 10.0.0.251) and hit Enter:
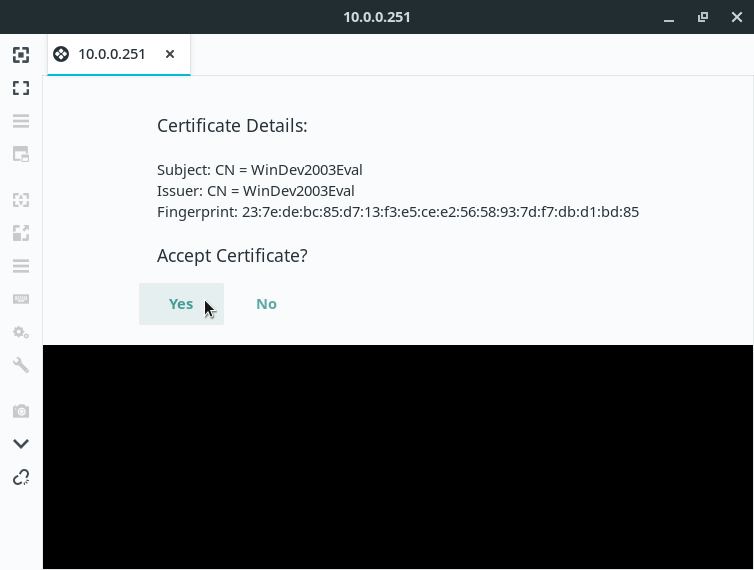
If it’s the first time you connect to this computer, Remmina asks whether to trust its certificate, click Yes:
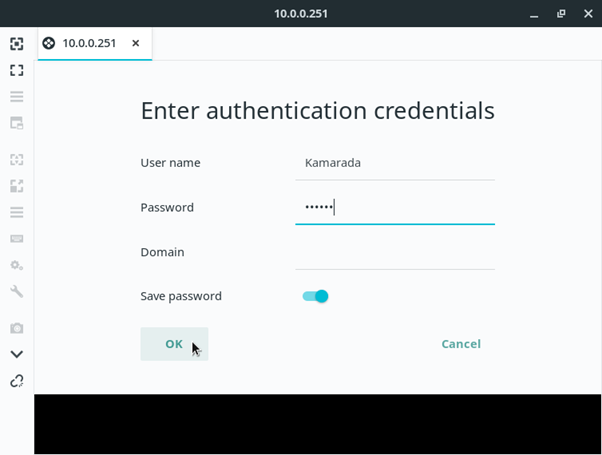
On the next screen, enter your User name and Password on the remote computer. Also inform the Domain, if necessary. Optionally, you can choose to Save password. Click OK:
You will see the remote computer’s desktop in the Remmina window:
From now on, you are using that computer, but remotely, without sitting in front of it. Each clicking and typing is sent to be processed on the remote computer.
If the remote computer is a Windows desktop, its screen is locked during remote access.
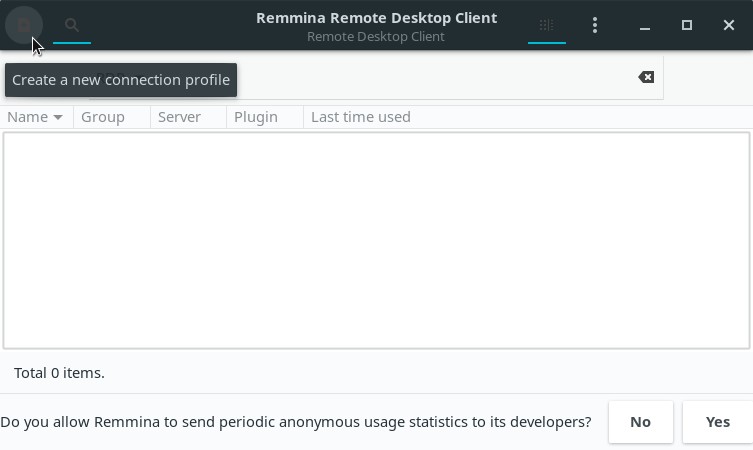
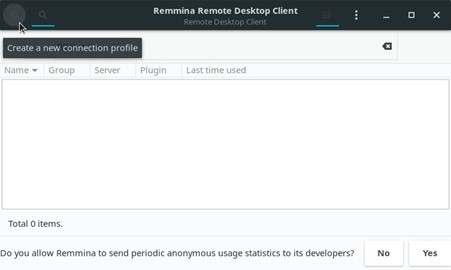
If you are going to access this computer often, consider saving the connection settings, so that remote access can be easily initiated. To do this, click the Create a new connection profile button on the top-left corner of the Remmina main window:
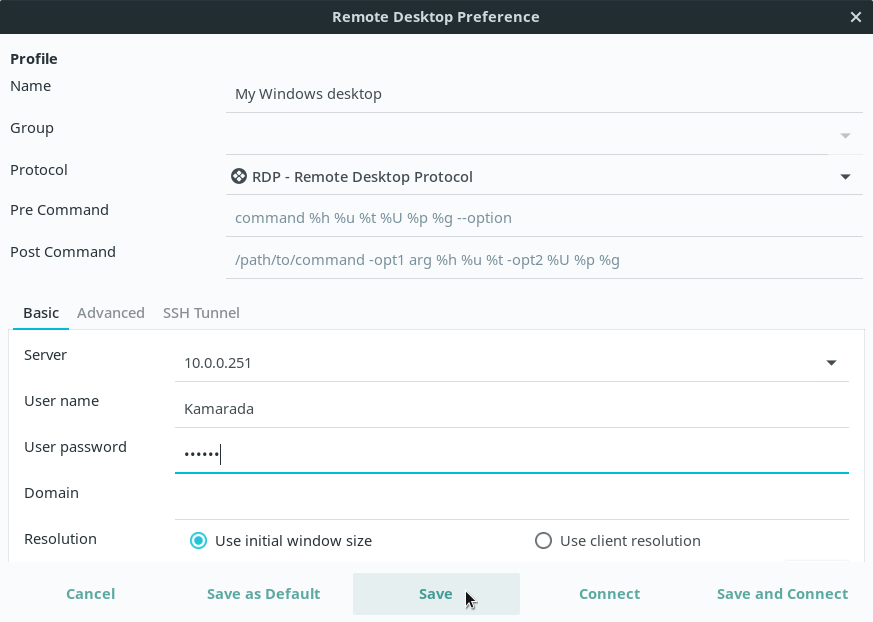
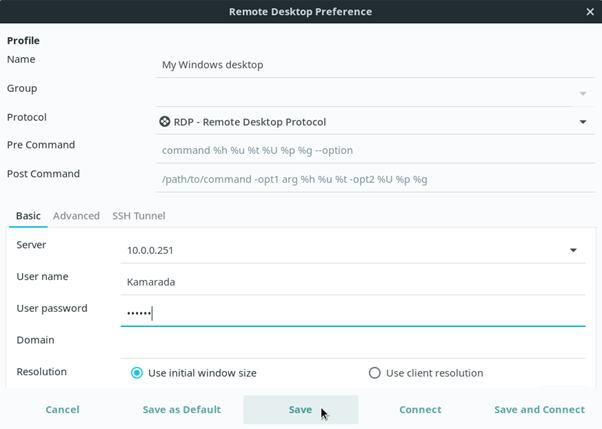
On the next screen, give a Name to identify the connection, select RDP in the Protocol field and enter the connection settings: Server, User name, User password and Domain (if necessary). When you’re finished, click Save:
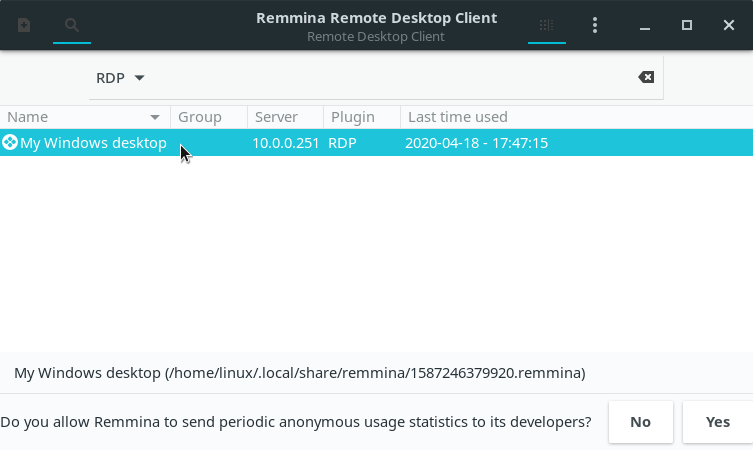
After that, the connection becomes listed on the Remmina main window:
When you want to remotely access that computer, just double-click it on the list.
FreeRDP is a free implementation of the Remote Desktop Protocol following the Microsoft Open Specifications. This implementation provides both the client and the server applications as well as a library, which allows other applications to use the RDP protocol. Today, we are interested in the FreeRDP client application.
To install the FreeRDP client on Linux Kamarada and openSUSE, run:
The FreeRDP client does not have a main screen like Remmina. To start a remote access using the FreeRDP client, run this command from a terminal:
1


$ xfreerdp /v:hostname_or_ip_address /u:username
Making the appropriate substitutions. For example:
1


$ xfreerdp /v:10.0.0.251 /u:Kamarada
If you need to inform the computer’s domain, use the /d parameter:
1


$ xfreerdp /v:hostname_or_ip_address /d:domain /u:username
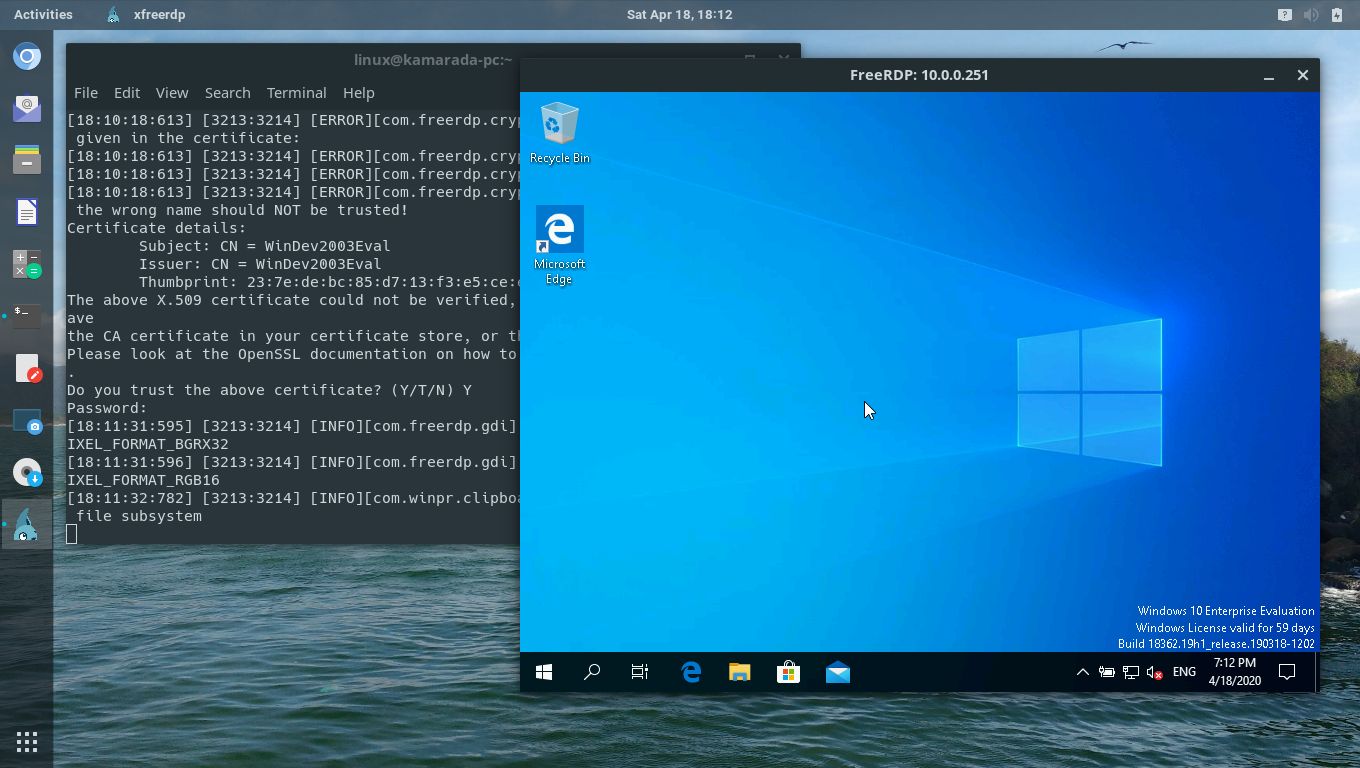
If it’s the first time you connect to this computer, the FreeRDP client asks whether to trust its certificate:
1
2
3
4
5
6
7
8
9
10
11
12
13
14
15
16
17
18
19
20


[18:10:18:588] [3213:3214] [INFO][com.freerdp.client.common.cmdline] - loading channelEx cliprdr
[18:10:18:604] [3213:3214] [INFO][com.freerdp.crypto] - creating directory /home/linux/.config/freerdp
[18:10:18:604] [3213:3214] [INFO][com.freerdp.crypto] - creating directory [/home/linux/.config/freerdp/certs]
[18:10:18:604] [3213:3214] [INFO][com.freerdp.crypto] - created directory [/home/linux/.config/freerdp/server]
[18:10:18:613] [3213:3214] [ERROR][com.freerdp.crypto] - @@@@@@@@@@@@@@@@@@@@@@@@@@@@@@@@@@@@@@@@@@@@@@@@@@@@@@@@@@@
[18:10:18:613] [3213:3214] [ERROR][com.freerdp.crypto] - @           WARNING: CERTIFICATE NAME MISMATCH!           @
[18:10:18:613] [3213:3214] [ERROR][com.freerdp.crypto] - @@@@@@@@@@@@@@@@@@@@@@@@@@@@@@@@@@@@@@@@@@@@@@@@@@@@@@@@@@@
[18:10:18:613] [3213:3214] [ERROR][com.freerdp.crypto] - The hostname used for this connection (10.0.0.251:3389)
[18:10:18:613] [3213:3214] [ERROR][com.freerdp.crypto] - does not match the name given in the certificate:
[18:10:18:613] [3213:3214] [ERROR][com.freerdp.crypto] - Common Name (CN):
[18:10:18:613] [3213:3214] [ERROR][com.freerdp.crypto] - 	WinDev2003Eval
[18:10:18:613] [3213:3214] [ERROR][com.freerdp.crypto] - A valid certificate for the wrong name should NOT be trusted!
Certificate details:
	Subject: CN = WinDev2003Eval
	Issuer: CN = WinDev2003Eval
	Thumbprint: 23:7e:de:bc:85:d7:13:f3:e5:ce:e2:56:58:93:7d:f7:db:d1:bd:85
The above X.509 certificate could not be verified, possibly because you do not have
the CA certificate in your certificate store, or the certificate has expired.
Please look at the OpenSSL documentation on how to add a private CA to the store.
Do you trust the above certificate? (Y/T/N)
Type Y (yes) and hit Enter. Then type your user password on the remote computer and hit Enter:
1
2
3
4
5


Do you trust the above certificate? (Y/T/N) Y
Password:
[18:11:31:595] [3213:3214] [INFO][com.freerdp.gdi] - Local framebuffer format  PIXEL_FORMAT_BGRX32
[18:11:31:596] [3213:3214] [INFO][com.freerdp.gdi] - Remote framebuffer format PIXEL_FORMAT_RGB16
[18:11:32:782] [3213:3214] [INFO][com.winpr.clipboard] - initialized POSIX local file subsystem
After that, the remote desktop connection is initiated:
If you have ever started the remote desktop connection on Windows by the Command Prompt (using the mstsc command), you may have noticed that the FreeRDP client uses the same command syntax. It was implemented that way on purpose, to keep compatibility.
If you are a curious person and want to check it out by yourself:
- on Windows, run:
- on Linux, run:
rdesktop was the first RDP client for Linux and, for many years, it was the most used. But since November 2019, the project is looking for a new maintainer.
In contrast, FreeRDP was born in 2009 as a fork of rdesktop, when Microsoft decided to open the RDP specifications. As time passed and the FreeRDP project evolved, it became the standard RDP client on systems where no native Microsoft client is available.
I present rdesktop here for information purposes only. Unless you have a good reason to use it, you are advised to use one of the other RDP clients, based on FreeRDP.
To install rdesktop on Linux Kamarada and openSUSE, run:
Then, to start a remote access using rdesktop, invoke it from a terminal followed by the hostname or IP address of the computer you want to connect to. For example:
In the past, that would suffice and rdesktop would just work. But now we face a problem that comes from the lack of proper maintenance and updates:
1
2
3


Autoselected keyboard map en-us
ERROR: CredSSP: Initialize failed, do you have correct kerberos tgt initialized ?
Failed to connect, CredSSP required by server.
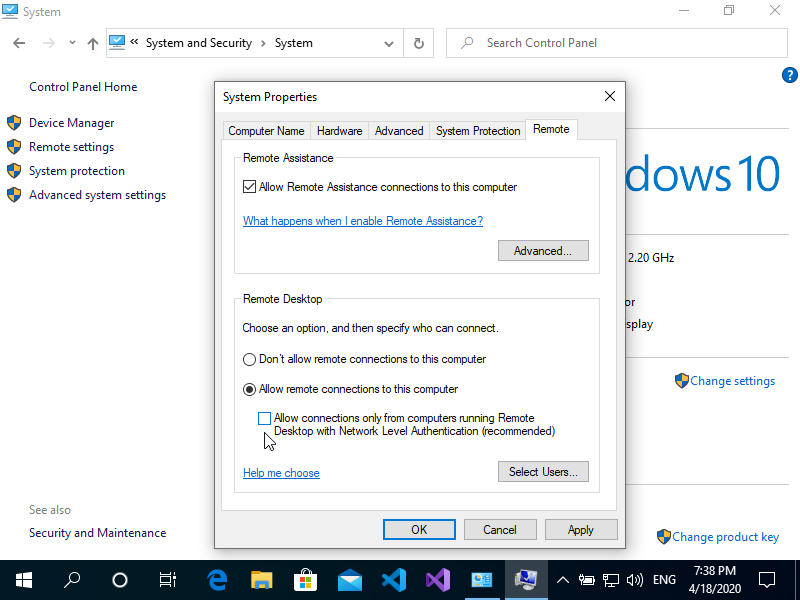
At some point, Microsoft released an Windows update that has since made the use of Network Level Authentication (NLA) required by default. FreeRDP does support NLA, while rdesktop does not. You can still use rdesktop for remote access, as long as you disable NLA on the computer you want to connect to. Note that this makes the connection less secure.
To disable NLA on the Windows machine you want to connect to, logged on with an administrator account, open the Control Panel, open the System and Security category, then click the System icon. On the next screen, click the Remote settings link by the left. On the dialog box that appears, select the Remote tab. Finally, disable the option Allow connections only from computers running Remote Desktop with Network Level Authentication and click OK:
With NLA disabled, back to the Linux computer that will start the remote access, try again:
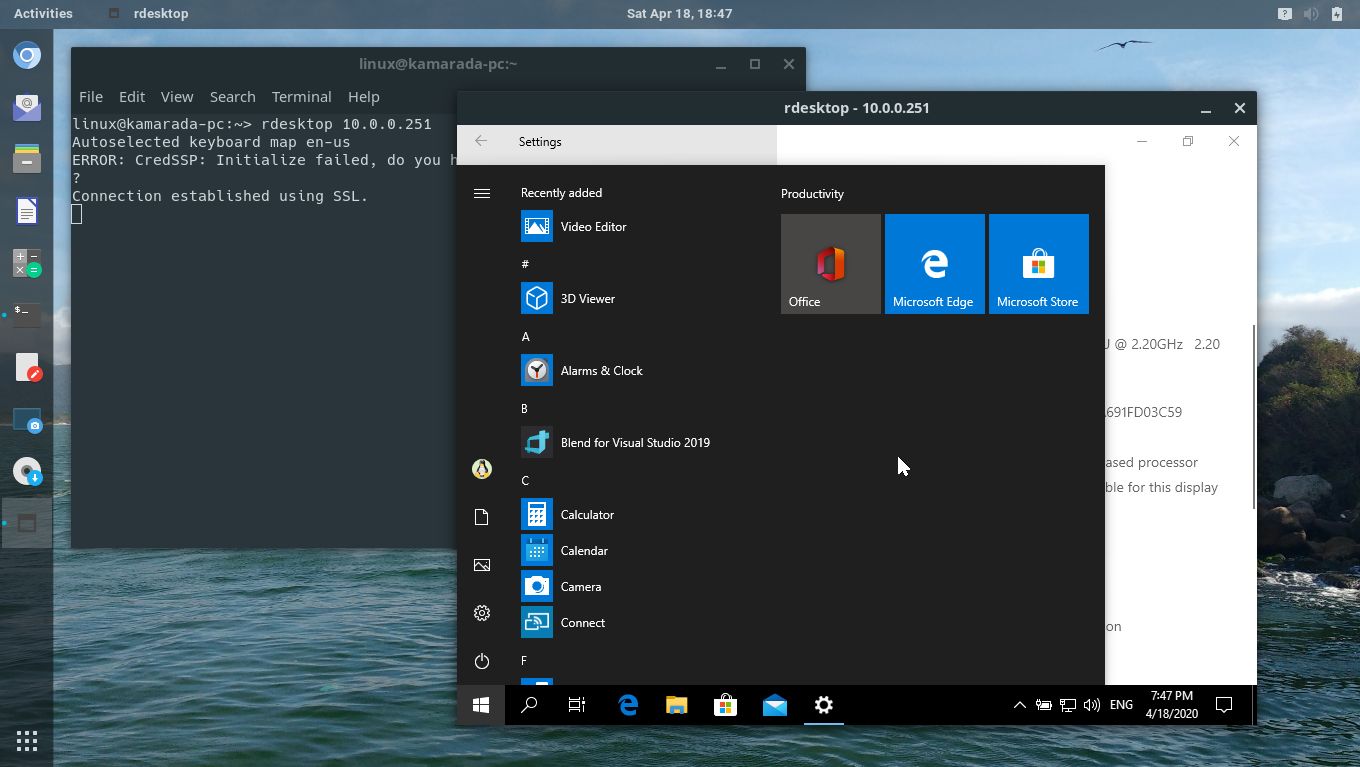
This time, rdesktop will work. A window presents the Windows logon screen. Enter your username and password and press Enter to start the remote access:
If you want more information about that rdesktop bug, see:
- CredSSP does not work — Issue #71 — rdesktop/rdesktop — GitHub
- Add support for Network Level Authentication — Issue #279 — rdesktop/rdesktop — GitHub
- Doesn’t work if there is Fortress machine between connecting to the remote server — Issue #261 — rdesktop/rdesktop — GitHub
- Network Level Authentication (NLA) — rdesktop/rdesktop Wiki — GitHub
Vinagre is the default remote desktop client for the GNOME desktop. That’s why it is also the default remote desktop client for Linux Kamarada 15.1, the current stable release. Like Remmina, it supports some connection protocols: SSH, RDP, SPICE and VNC. However, like rdesktop, Vinagre is unmaintained for some time now.
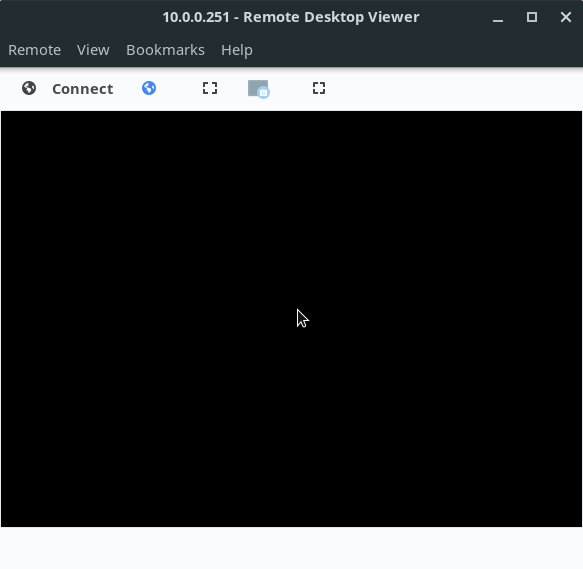
When trying a RDP access, Vinagre only displays a black screen, as I reported on the openSUSE mailing list some time ago:
- [opensuse-factory] Black screen when trying a RDP access to Windows 10 using Vinagre (Leap 15.1/15.2 and Tumbleweed)
On some distributions, like Debian, Vinagre works. I believe that those distributions applied some patch to Vinagre.
Probably, the next Linux Kamarada release will come with Remmina instead of Vinagre, following the Ubuntu Linux distribution.
Because of that, I present Vinagre here just for information purposes as well.
Vinagre comes already installed by default on Linux Kamarada and openSUSE, if you chose the GNOME desktop, but if you need or want to install it, you can do this by running:
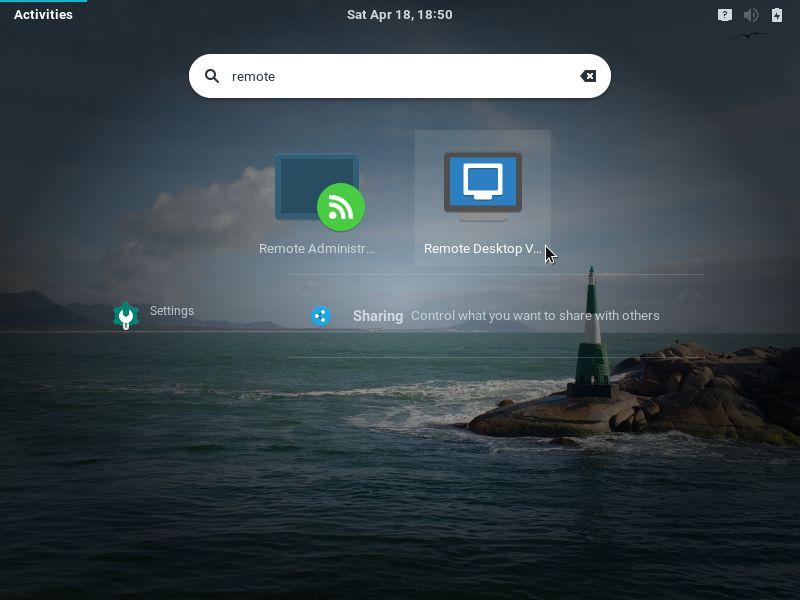
To start Vinagre, which appears as Remote Desktop Viewer on the applications list, open the Activities menu, on the top-left screen corner, type remote or vinagre and click the corresponding icon:
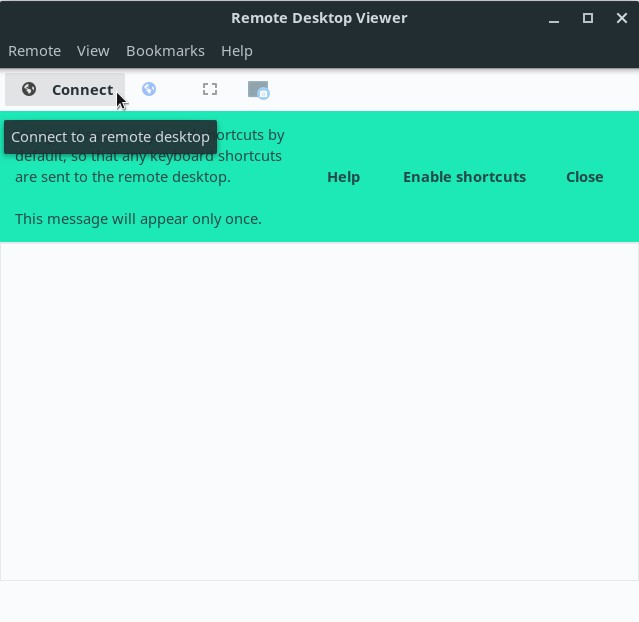
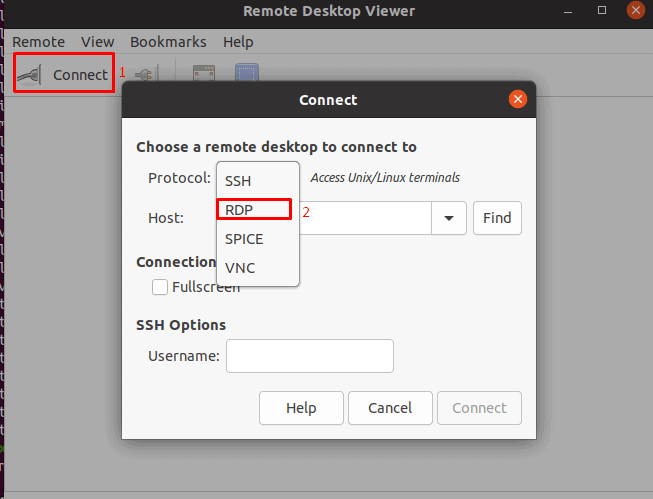
On the Vinagre main screen, click Connect:
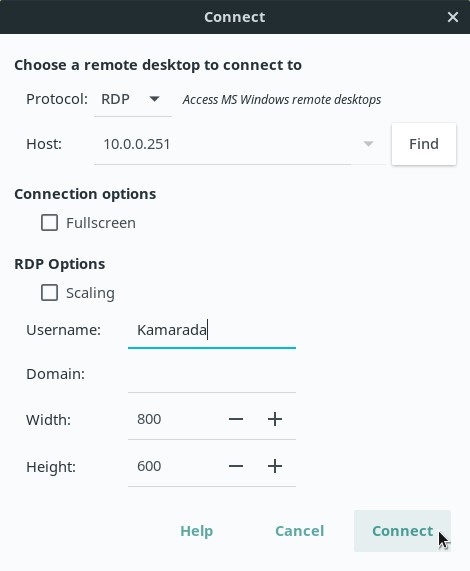
Fill in the next screen fields with the connection settings:
- on the Protocol field, select RDP;
- on the Host field, enter the hostname or IP address of the computer to connect to;
- enter your Username on the remote computer; and
- enter the Domain, if necessary.
When you are finished, click Connect.
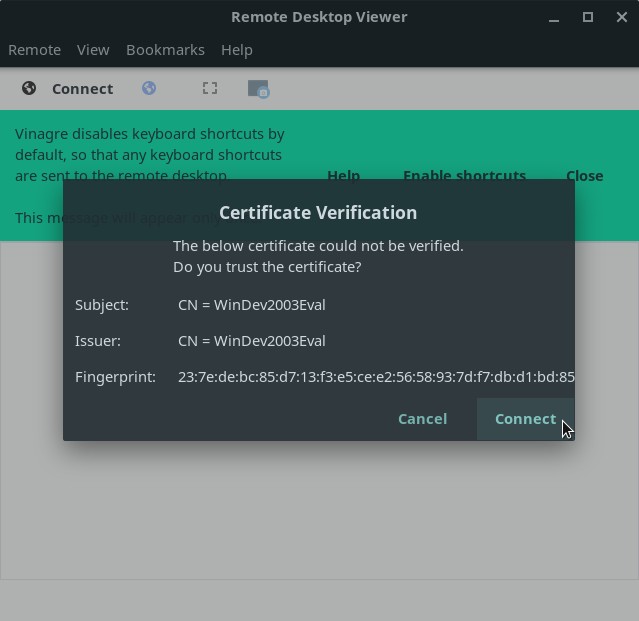
If it’s the first time you connect to this computer, Vinagre asks whether to trust its certificate:
Tell it to do so by clicking Connect.
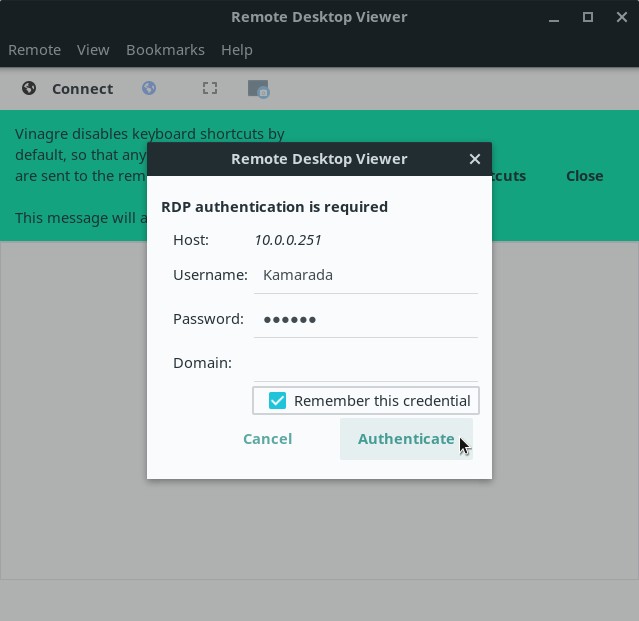
Enter your Password, optionally enable Remember this credential and click Authenticate:
At this point, you should see the remote computer’s desktop. You can notice it has its screen locked (as it normally does during RDP accesses). But, as I said, Vinagre only displays a black screen:
Like Remmina, Vinagre allows you to memorize the connection settings, to easily connect to the same computer again in the future. To do this, during the remote access, open the Bookmarks menu and click Add Bookmark.
After you created the bookmark, it will now be listed on the Bookmarks menu. When you want to remotely access this computer again, just open this menu and click the bookmark.
References
- How to use Remote Desktop — Windows Support
- Remote Desktop — Allow access to your PC — Microsoft Docs
- Remote Graphical Sessions with VNC — Reference — openSUSE Leap 15.1
- Hi! — The history of the FreeRDP project — FreeRDP
Since it’s not possible to remotely access computers running Windows 10 Home, to write this how-to I used a VirtualBox virtual machine with a Windows 10 Enterprise evaluation version legally downloaded from:
- Download a Windows 10 virtual machine — Windows app development
Время на прочтение
10 мин
Количество просмотров 272K
Создавая виртуальный сервер на VPS.house, вы получаете полностью 100% готовую к использованию операционную систему Windows Server, к которому сразу же можно подключаться по сети с любого внешнего устройства по протолку RDP.
RDP (Remote Desktop Protocol) – специальный протокол, разработанный компанией Microsoft для удаленного управления ОС Windows (протокол удалённого рабочего стола). Изначально, разумеется, как и многие вещи под Windows, этот протокол разработали другие люди, но в настоящее время поддерживает его и развивает Microsoft.
Согласно условиям лицензирования, ОС Windows Server допускает по умолчанию не более 2-х одновременных подключений по RDP к серверу, если нужно больше, то понимается терминальный сервер и лицензируется либо количество пользователей, либо количество подключаемых устройств. Но, подключившись к серверу по RDP, вы также можете поставить любое удобное вам решение для удалённого управления рабочим столом: TeamViewer, RAdmin и прочие.
Данная статья описывает процесс подключения к серверу Windows по RDP с многих популярных операционных систем. Ввиду этого получилась она довольно длинной. Моментально перейти к нужному вам разделу вы можете по этому меню:


Подключение в VPS серверу из десктопной Windows

В каждой операционной системе Windows есть встроенное приложение для подключения по RDP – это программа «Подключение к удалённому рабочему столу» (Remote Desktop Connection в англоязычных ОС).
Для запуска ее зайдите по пути:
Пуск -> Программы -> Стандартные -> Подключение к удалённому рабочему столу
Если вы используете Windows 8, тогда:
Пуск -> Приложения -> Подключение к удалённому рабочему столу
Если вы используете Windows 10, тогда:
Пуск -> Все приложения (может этого пункта не быть!) -> Стандартные Windows -> Подключение к удалённому рабочему столу
Или же просто нажмите комбинацию клавиш Win+R и в открывшемся окне наберите mstsc
В открывшемся окне наберите IP-адрес вашего виртуального сервера и нажмите кнопку «Подключить». IP-адрес сервера вы можете видеть в вашем личном кабинете в разделе «Мои серверы»:
Если вы заказали сервер с 2-я или большим количеством IP-адресов, то для подключения к серверу вы можете использовать любой из них – это ни на что не влияет.
Те, кто впервые стакиваются с созданием удалённого рабочего стола, часто задаются вопросом «Зачем нужны эти IP-адреса и сколько нужно именно им», часто также путают количество IP-адресов с количеством рабочих столов или учётных записей, или полагают, что если зайти на сервер по одному адресу, то открывая браузер именно этот адрес будет браузер использовать. Нас самом же деле это всего лишь список внешних адресов, по которому можно подключиться к серверу, сама работа на сервере уже после подключения никаким образом не меняется.
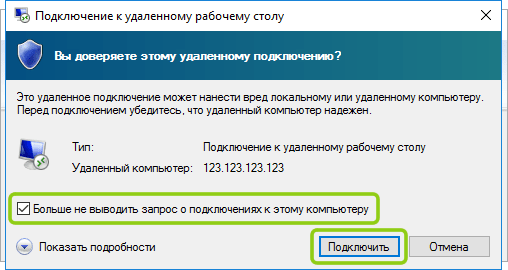
Чаща всего при подключении по умолчанию настроена автоматическая передача данных из буфера обмена, а также подключаются к серверу и становятся на нём видны локальные диски устройства, с которого вы подключаетесь. При сразу после нажатия на кнопку «Подключить» вы можете увидеть уведомление о возможном вреде, который может нанести как удалённый компьютер вашему, так и ваш удалённому. Такое вполне возможно если вы подключаетесь к чужому серверу, на котором могут быть вирусы или вы подключаетесь к своему проведенному серверу с чужого заражённого ПК.
Подключаясь к только что созданному и чистому серверу можно смело отключить дальнейшие уведомления и продолжить процесс подключения.
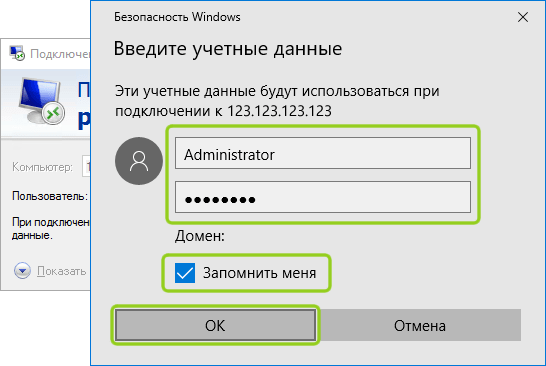
Далее вы увидите окно с вводом авторизационных данных:
При создании каждого нового сервера система VPS.house автоматически генерирует новый уникальный пароль для него, при этом на всех серверах Windows по умолчанию остаётся имя пользователя Administrator. Пароль от сервера отображается также в личном кабинете возле вашего сервера на странице «Мои серверы»:
В целях безопасности, по умолчанию пароль от сервера скрыт и отображается только по нажатию на ссылку «Показать пароль», при этом сайт попросит вас ввести пароль от вашей учётной записи на VPS.house.
Обратите, пожалуйста, внимание на то, что очень часто при попытке подключения с Windows 7 если копировать и вставлять пароль, система показывает ошибку о неверно введённых учетных данных, тоже самое может возникать и в других версиях. Если вы с этим столкнулись, просто
введите пароль вручную
и обязательно с учётом регистра (заглавные буквы вводите заглавными, а строчные строчными и строго в английской раскладке клавиатуры).
После успешной авторизации перед началом сессии вы получите уведомление о неуспешной проверке подлинности удаленного компьютера. Причина этого уведомления в том, что сессия на стороне сервера шифруется по умолчанию с помощью SSL-сертификата, который сгенерировал сам же сервер, а не тем, что мог быть выдан авторизованным центром сертификации.
Данное уведомление не говорит о проблемах безопасности, и вы смело можете отключить его для будущих подключений к этому же серверу, отметив галочкой «Больше не выводить запрос о подключениях к этому компьютеру».
Если вы используете для работы Windows XP и при подключении система выдает ошибку с текстом «Удаленный компьютер требует проверку подлинности на уровне сети, которую данный компьютер не поддерживает», значит на ваш ПК очень сильно устарел и нужно дополнительно установить небольшое обновление, где его взять и как установить
мы подробно расписали здесь
.
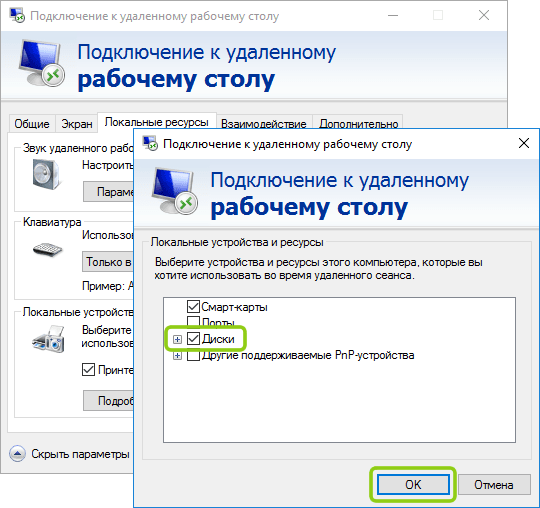
Встроенная программа подключения к удалённому рабочему столу позволяет с лёгкостью передавать файлы на сервер, копируя их на вашем ПК и вставляя в любую папку уже на самом сервере и наоборот. Помимо этого, можно включить передачу на сервер практически любых USB-устройств и сетевых принтеров и сканеров.
Для включения этих возможностей перед подключением к серверу нажмите на кнопку «Показать параметры»:
Откроется режим расширенных настроек подключения к вашему VDS серверу. Перейдите на вкладку «Локальные ресурсы» и отметьте галочкой требуемые для вас устройства:
Еще одна очень полезная и популярная функция – это возможность создать готовый файл подключения (так называемый «ярлык»), в котором уже сохранены все нужные вам настройки и данные авторизации на сервере. Это особенно удобно если вы хотите дать доступ сотруднику, который не является опытным пользователем ПК.
Для этого также в расширенных настройках подключения на вкладке «Общие» введите имя пользователя (на серверах VPS.house это всегда по умолчанию Administrator), отметьте галочкой «Разрешить мне сохранять учетные данные», чтобы не приходилось вводить пароль каждый раз и, по завершению внесения всех нужных вам остальных параметров подключения (если таковые есть), нажиме кнопку «Сохранить как»:
В итоге вы получите готовый файл с подключением, который вы можете отправить вашему коллеге и тот в свою очередь подключится к серверу 2-я простыми кликами по нему мышкой.
В целях безопасности по умолчанию в данный файл не будет добавлен пароль от учётной записи, он будет запрошен при первом подключении.
Как подключиться к серверу по RDP если вы работаете с Ubuntu

Речи идет о клиенте под названием Remmina
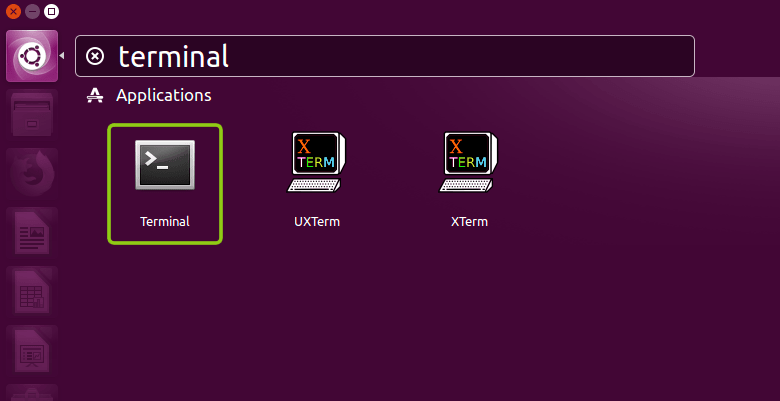
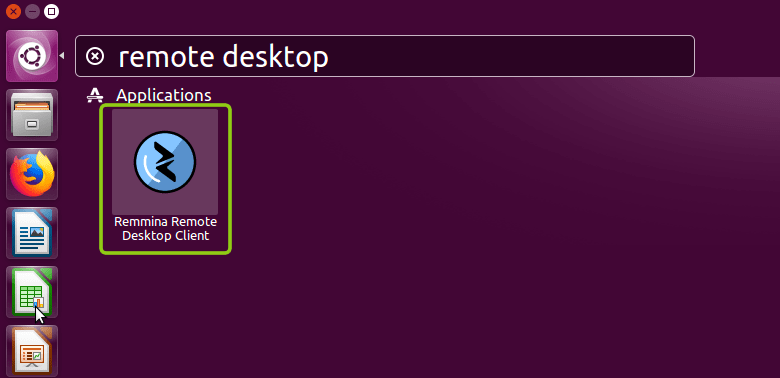
По умолчанию если Remmina включена в вашу сборку, вы можете найти ее в Поиске по запросу «Remote Desktop Client», если ее нет, то установите ее при помощи следующих команд в Терминале.
- Устанавливаем пакет Remmina
sudo apt-add-repository ppa:remmina-ppa-team/remmina-next - Устанавливаем обновления
sudo apt-get update - Устанавливаем плагин протокола RDP
sudo apt-get install remmina remmina-plugin-rdp libfreerdp-plugins-standard - Если ранее у вас уже была установлена какая-либо версия Remmina или была запущена до установки, то ее необходимо перезапустить. Это лучше всего сделать перезагрузкой компьютера или с помощью команды:
udo killall remminaЕсли после её выполнения вы получили сообщение об ошибке типа «процесс не найден», значит и так все хорошо и можно было команду и не выполнять.
В меню поиска наберите «remote desktop» или «remmina», чтобы найти установленное приложение:
Remmina позволяет добавлять и сохранять список подключений для быстрого доступа к тому или иному серверу. Для сознания нового нажмите на «+», как показано на изображении:
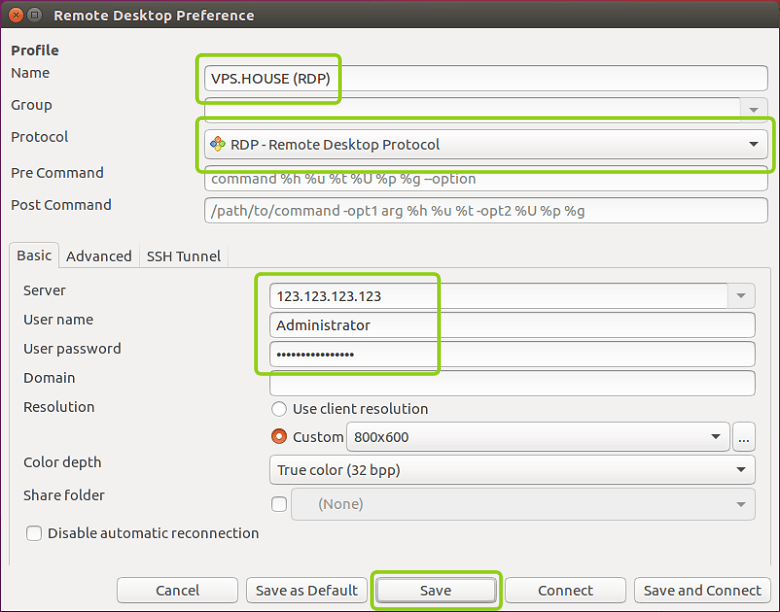
Заполните поля авторизационными данными, которые
указаны в вашем личном кабинете
:
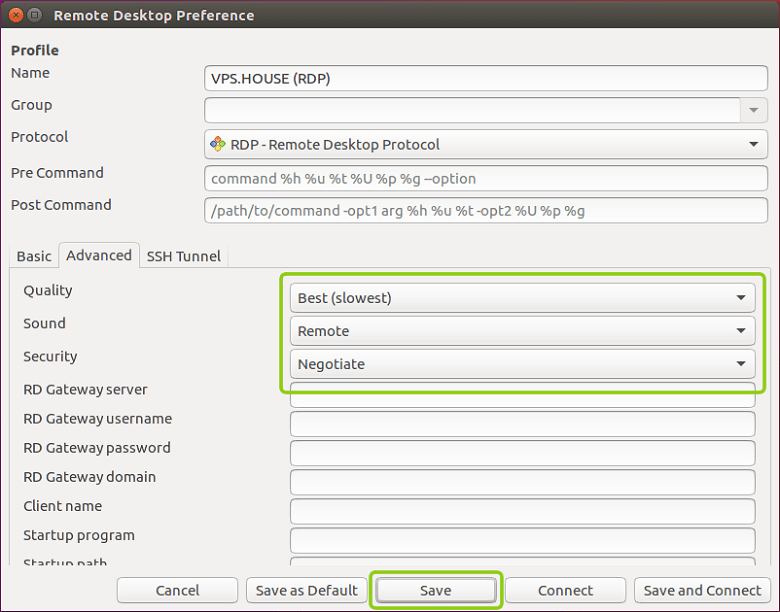
На вкладке «Advanced» вы можете также указать качество подключения к серверу и детализации при передаче изображений:
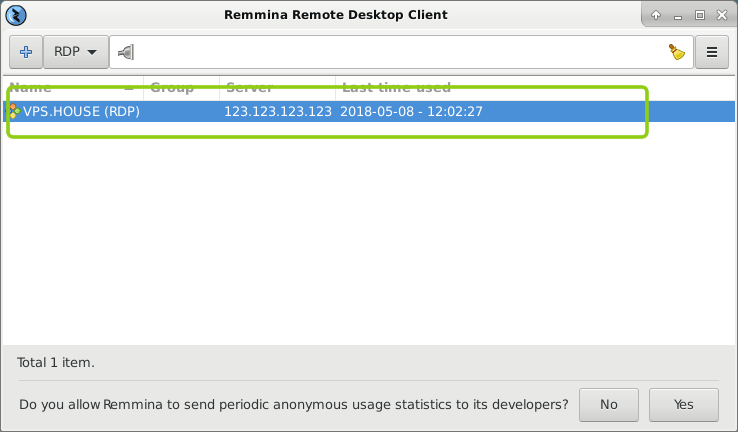
После сохранения данных вы всегда сможете найти ваш сервер в списке подключений Remmina. Для подключения к серверу теперь достаточно просто кликнуть дважды мышкой по строке сервера:
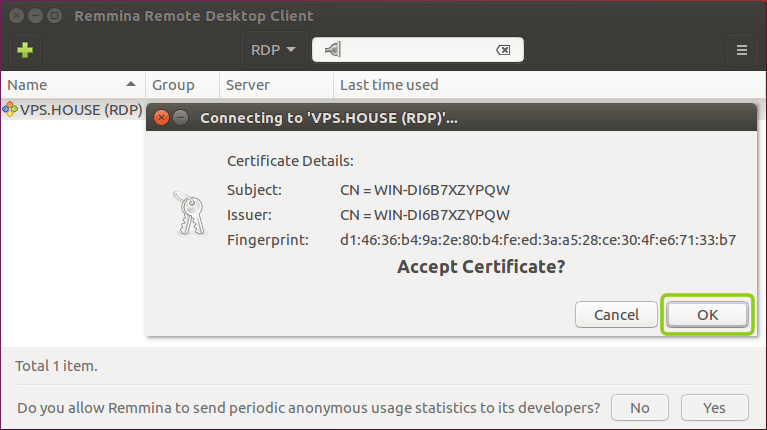
Если вы подключаетесь к серверу впервые с этого приложения, то оно может показать информацию о ошибке в сертификате безопасности. Почему это происходит
мы описали выше в блоке подключения к серверу из десктопной Windows
.
Достаточно нажать «ОК» и программа продолжит подключение к вашему серверу:
Как подключиться к серверу по RDP если вы работаете с Debian

Одно из самых популярных – это клиент для всевозможных удалённых Remmina, именно его мы и рекомендуем использовать для включения к серверам VPS.house или любым другим под управлением ОС Windows.
- Указываем путь к установочным файлам
echo 'deb http://ftp.debian.org/debian stretch-backports main' | sudo tee --append /etc/apt/sources.list.d/stretch-backports.list >> /dev/null - Запускаем процесс установки
sudo apt update - Устанавливаем плагин протокола RDP
sudo apt install -t stretch-backports remmina remmina-plugin-rdp remmina-plugin-secret libfreerdp-plugins-standard
Сразу после установки приложение можно найти через поиск программ:
В отличие стандартного от RDP-клиента ОС Windows, Remmina позволяет сохранять в список все свои подключения к различным серверам и осуществлять моментальный доступ к ним. Для добавления первого сервера в список нажмите «+» в левом верхнем углу:
В открывшемся окне задайте параметры подключения к вашему серверу и введите удобное для запоминания имя сервера. Все необходимые для подключения данных указаны в вашем личном кабинете:
На вкладке «Advanced» («Дополнительные») вы можете задать параметры передачи звука с сервера на ваш ПК, а также качество передаваемого изображения при подключении:
После сохранения я настроек вы увидите новую строку в списке подключений. Для начала работы с сервером достаточно просто дважды кликнуть по нему мышкой:
В момент первого подключения к серверу Remmina покажет уведомление у недоверенном сертификате шифрования. Это не является какой-либо ошибкой или проблемой безопасности. Причину этого сообщения мы описали выше. Просто нажмите «ОК» и вы увидите рабочий стол вашего сервера, при условии, разумеется, что все данные для подключения ранее были введены корректно.
Подключение серверу по RDP из Mac OS

Для загрузки его перейдите на сайт iTunes: https://itunes.apple.com/gb/app/id715768417
Программа обладает интуитивно понятным интерфейсом и позволяет создавать список серверов для дальнейшего моментального подключения к ним.
Для добавления нового сервера в список нажмите «New», как показано на скриншоте:

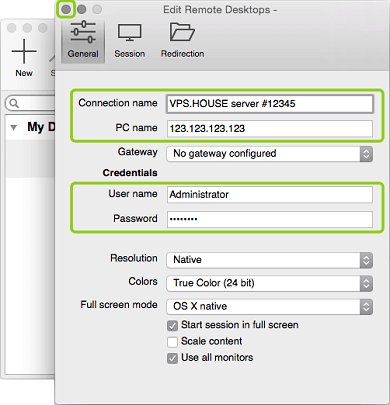
В открывшемся окне укажите авторизационные данные, как указано
в вашем личном кабинете
(IP-адрес сервера, логин Administrator и его пароль), и укажите произвольное название для нового подключения (Connection Name).
По завершению ввода нажмите на кнопку закрытия окна – все данных сохранятся и появится строчка с вашим сервером в списке подключений:
Кликните на эту строчку дважды мышкой, и вы подключитесь к серверу.
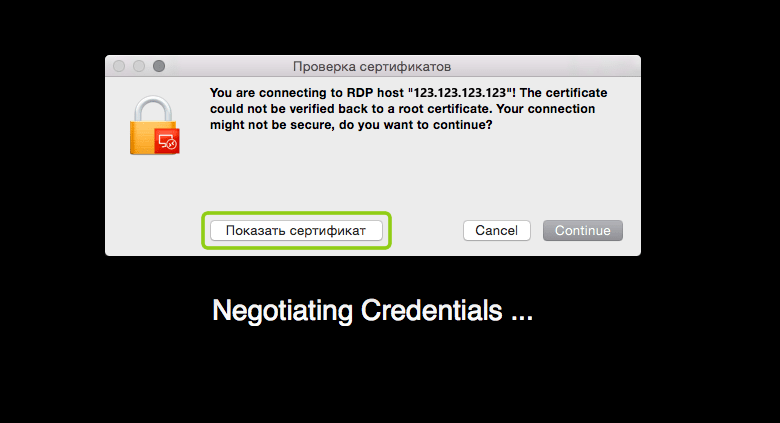
При попытке подключения к вашему VPS серверу если он работает на Windows Server 2008 или более новой версии, программа покажет уведомление о том, что не удалось проверить сертификат шифрования. Это не является проблемой безопасности, а всего лишь говорит о том, что сертификат выдан не сертифицированным центром, а сгенерирован самим же сервером.
Для того, чтобы это сообщение в будущем не возникало для этого сервера, нажмите «Показать сертификат».
Отметьте галочкой «Всегда доверять…» и нажмите «Continue».
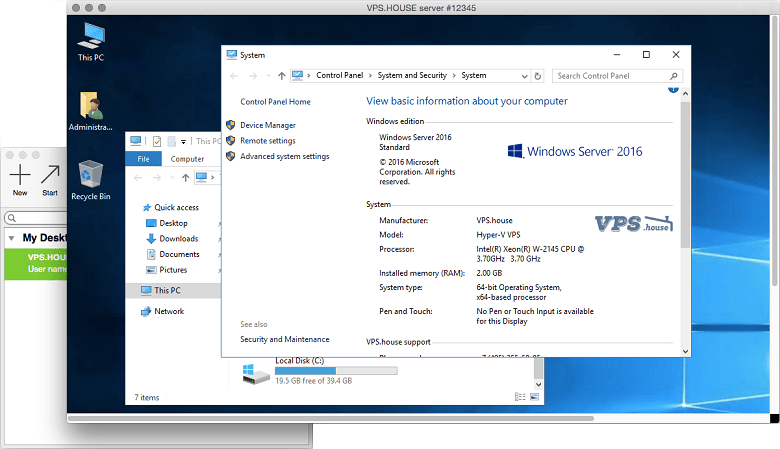
Если в настройках подключения все параметры были введены без ошибок (IP-адрес, логин и пароль), то вы сразу же увидите рабочий стол вашего Windows Server:
Подключение к VDS серверу со смартфона или планшета на iOS (с iPhone или iPad)

Microsoft Remote Desktop позволяет заранее настроить целый список используемых вами для частого подключения серверов.
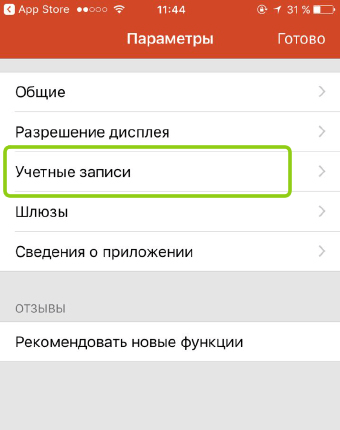
Специфика его работы заключается в том, что информация об учётных записях создаётся и хранится отдельно от самого списка серверов. Соответственно, для начала нам требуется добавить учётную запись пользователя Administrator. Для этого нажмите на кнопку настроек (иконка шестерёнок в верхнем левом углу) и выберите «Учётные записи»:

В открывшемся окне нажмите на «Добавление учётной записи пользователя» и введите логин Administrator и его пароль, как отображается
в вашем личном кабинете
:
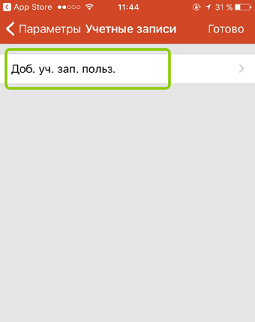
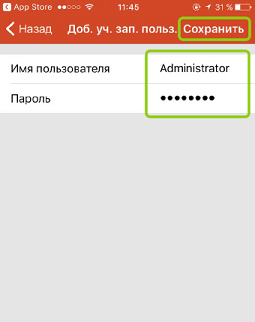
По завершению вы увидите, что учётная запись Administrator добавлена в список, далее нажмите кнопку «Готово» и вы вернетесь на стартовый экран.
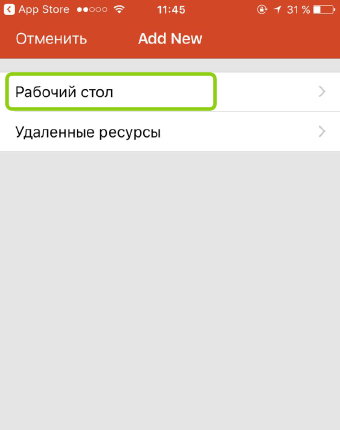
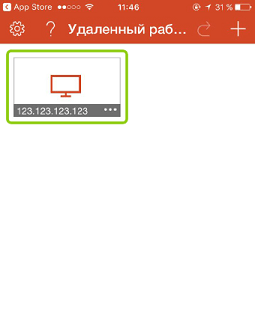
Следующим шагом добавляется непосредственно информация о самом сервере. Нажмите кнопку «+» в правом верхнем углу приложения и в открывшемся меню выберите «Рабочий стол»:

В окне добавления нового подключения укажите IP-адрес вашего сервера и выдерите учётную запись Administrator, добавленную на прошлом шаге:
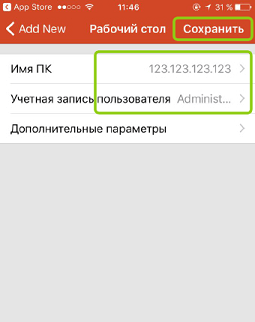

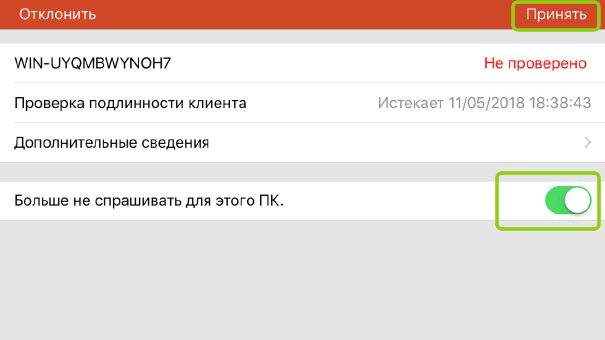
В момент первого подключения вы увидите уведомление вы увидите уведомление о недоверенном сертификате безопасности. Причину этого
мы описали выше
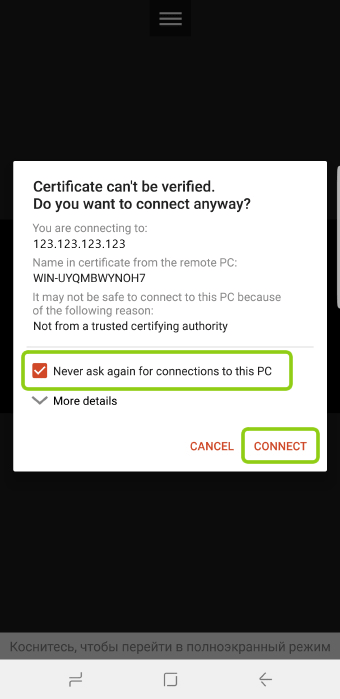
. Выдерите «Больше не спрашивать для этого ПК» и нажмите «Принять».
В случае если IP-адрес и авторотационные данные указаны без ошибки, вы успешно подключитесь к вашему виртуальному серверу:
Как подключиться к VPS серверу со смартфона или планшета на Android

Google Play
.
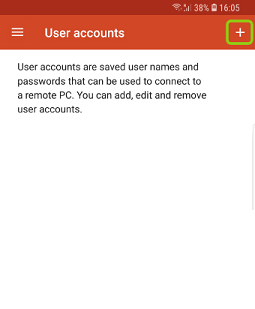
В отличие от всех описанных выше приложений для подключений с ПК, мобильное приложение Microsoft Remote Desktop разделяет учётные записи и сам список подключений. Поэтому сначала нужно добавить в список учётную запись пользователя Administrator с его паролем, который показан
в вашем личном кабинете
:


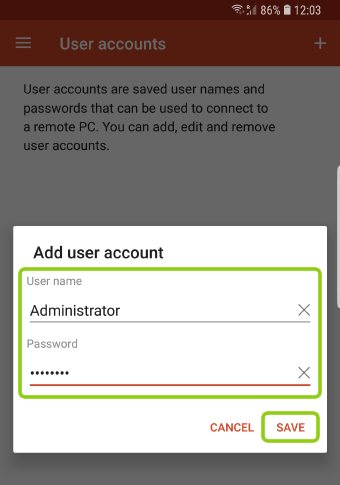
После добавления учётной записи возвращайтесь на главный экран приложения для добавления самого подключения (адреса вашего VDS сервера):

В открывшемся окне укажите IP-адрес вашего сервера (указан в
личном кабинете
), выберите добавленную ранее учётную запись Administrator и нажмите «Сохранить» («Save»):
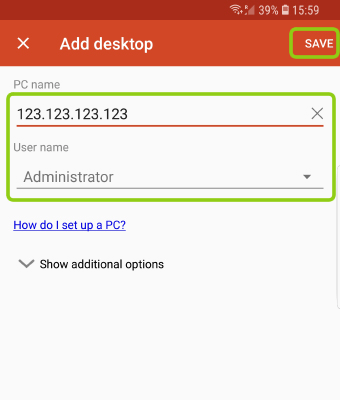
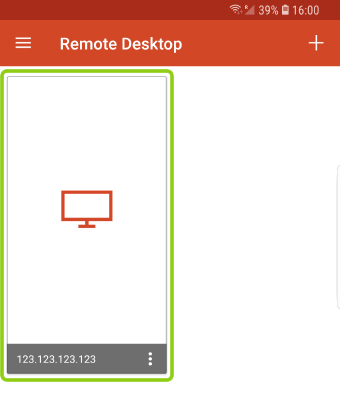
На главном экране в списке подключений появится ваш сервер, просто нажмите на него, и программа начтёт подключение. Если вы подключаетесь с этого приложения к серверу впервые, то увидите информационное сообщение о том, что приложению не удалось проверить сертификат шифрования. Почему так происходит
описано в начале статьи
.
Достаточно отметить галочкой «Never ask again for connections to this PC» и данное уведомление больше появляться не будет. Далее нажмите «Connect» и если все авторотационные данные и IP-адрес сервера указан без ошибок, вы успешно к нему подключитесь:
P.S.: У клиентов нашего VPS-хостинга часто возникает вопрос, как подключиться к серверу с того или иного устройства. В поисковиках можно найти все эти инструкции в том числе и с картинками, и с видео. Надеюсь, данная статья, будет полезной и здесь, как содержащая в одном месте инструкции по подключению со всех самых популярных устройств и операционных систем.
List of content you will read in this article:
In the realm of seamless cross-platform interactions, the ability to remotely connect to a Windows machine from a Linux environment has become a pivotal need. Whether you’re a developer, system administrator, or just someone with diverse computing needs, the ability to RDP from Linux to Windows can greatly enhance your workflow. This article will delve into the intricacies of achieving this seemingly intricate task, breaking it down into simple steps and providing you with a clear roadmap. But before that, read the post on How to Connect to RDP from Windows?, So you can have a better understanding of Windows RDP from linux. Now, let’s embark on this journey of cross-platform connectivity!
Can I RDP from Linux to Windows?
Before we dive into the technicalities, let’s address the fundamental question: Can you RDP from Linux to Windows? The answer is a resounding yes!
- While the Remote Desktop Protocol (RDP) is a proprietary protocol developed by Microsoft, the open-source community has developed robust solutions
- that allow Linux users to establish an RDP connection with Windows-based computers.
Does RDP work on Linux?
- Absolutely, RDP can work seamlessly on Linux, thanks to the advent of various software solutions that bridge the gap between these two distinct operating systems.
- Linux users can leverage tools like «Remmina,» which serves as a potent RDP client.
- With the Linux environment becoming increasingly user-friendly, even those with minimal technical prowess can set up RDP connections effortlessly.
How to RDP from Linux to Windows?
Let’s get our hands dirty and explore the step-by-step process of establishing an RDP connection from a Linux machine to a Windows system.
-
Step 1: Install an RDP Client
Begin by installing an RDP client on your Linux system. As mentioned earlier, «Remmina» is a popular choice. Install it using your distribution’s package manager.
-
Step 2: Launch the RDP Client
Once installed, launch the RDP client. You’ll be greeted with a user-friendly interface that allows you to configure your remote connections.
-
Step 3: Add a New Connection
Click on the «+» button to add a new connection. Provide a connection name for your reference.
-
Step 4: Configure Connection Settings
Enter the IP address or hostname of the Windows machine you intend to connect to. Choose the appropriate protocol as «RDP.» Adjust other settings like screen resolution according to your preferences.
-
Step 5: Input Credentials
Enter the username and password of your Windows account to establish the connection securely.
-
Step 6: Save and Connect
Save the connection settings and initiate the connection. Voila! You’re now remotely connected to your Windows machine from your Linux environment.
How to RDP from Linux to Windows command line?
For those who revel in the command line interface, fear not, as you can also initiate an RDP connection using the command line. Here’s how:
-
Step 1: Install «xfreerdp»
Ensure you have the «xfreerdp» package installed on your Linux system. If not, install it using your package manager.
-
Step 2: Run the Command
Open your terminal and use the following command to establish the RDP connection:
«`
xfreerdp /u:<username> /p:<password> /v:<IP_address_or_hostname>
«`
Replace `<username>`, `<password>`, and `<IP_address_or_hostname>` with your Windows account details and the target machine’s address.
How to connect to Windows RDP from Linux?
The ability to connect to Windows RDP from Linux can significantly enhance your productivity. Whether it’s for accessing Windows-exclusive software or managing a remote Windows server, here’s a simple guide:
-
Step 1: Choose Your RDP Client
Select an RDP client that suits your preferences. The aforementioned «Remmina» is an excellent choice for its intuitive interface.
-
Step 2: Configure Connection
Launch the RDP client and create a new connection. Enter the Windows machine’s IP address or hostname, choose «RDP» as the protocol, and set other options as needed.
-
Step 3: Provide Credentials
Enter your Windows username and password to establish a secure connection.
-
Step 4: Connect
Save the connection settings and initiate the connection. You’ll now be seamlessly connected to your Windows machine, all from your Linux environment.
Different Methods and Clients for RDP from Linux to Windows
When it comes to RDP’ing from Linux to Windows, flexibility reigns supreme. Various methods and clients cater to different user preferences and technical requirements. Let’s explore these diverse avenues and briefly outline the steps to utilize each one:
-
Remmina: The User-Friendly RDP Client
Method: Remmina is a graphical RDP client that provides an intuitive interface for connecting Linux to Windows.
Steps to Use:
- Install Remmina: Using your Linux distribution’s package manager, install Remmina on your system.
- Launch Remmina: Open the Remmina application, and you’ll be greeted with a user-friendly interface.
- Add a Connection: Click the «+» button to add a new connection.
- Configure Connection Settings: Enter the Windows machine’s IP address or hostname. Choose «RDP» as the protocol. Adjust screen resolution and other settings.
- Provide Credentials: Input your Windows username and password.
- Save and Connect: Save the connection settings and click «Connect» to establish the RDP connection.
-
xfreerdp: The Command Line Approach
Method: For command line enthusiasts, xfreerdp offers a powerful way to initiate RDP connections from Linux to Windows.
Steps to Use:
- Install xfreerdp: Ensure you have the «xfreerdp» package installed using your package manager.
- Run the Command: Open your terminal and execute the following command:
«`
xfreerdp /u:<username> /p:<password> /v:<IP_address_or_hostname>
«`
Replace placeholders with your Windows account details and target machine’s address.
-
Vinagre: The Versatile RDP Client
Method: Vinagre is another option that supports RDP connections and offers additional functionalities.
Steps to Use:
- Install Vinagre: Install Vinagre via your package manager.
- Open Vinagre: Launch the Vinagre application.
- Create a Connection: Click on the «+» button to create a new connection.
- Configure Connection Settings: Enter Windows machine details, select «RDP» as the protocol, and adjust other settings.
- Input Credentials: Provide your Windows login credentials.
- Save and Connect: Save the settings and initiate the connection.
-
RDesktop: The Old-School Choice
Method: RDesktop is a command-line RDP client with a simple interface.
Steps to Use:
- Install RDesktop: Install the «rdesktop» package on your Linux system.
- Run the Command: In the terminal, execute:
«`
rdesktop -u <username> -p <password> <IP_address_or_hostname>
«`
Replace placeholders with your Windows account and machine details.
-
FreeRDP: The Modern Command Line Tool
Method: FreeRDP is an advanced command line RDP client with enhanced features.
Steps to Use:
- Install FreeRDP: Install the «freerdp2-x11» package via your package manager.
- Execute the Command: Run the following in the terminal:
«`
xfreerdp /u:<username> /p:<password> /v:<IP_address_or_hostname>
«`
Replace placeholders with your Windows account and target machine’s details.
How Do I RDP from Linux to Windows 10?
- RDP’ing from Linux to Windows 10 follows a similar path as connecting to other Windows versions.
- The steps outlined above remain consistent, ensuring that the bridge between the two platforms remains robust.
Can you RDP from Windows to Linux; How to RDP into Linux from Windows
- Absolutely, the cross-platform synergy isn’t a one-way street.
- You can also establish an RDP connection from a Windows machine to a Linux system.
- To achieve this, you’ll need an RDP server installed on the Linux side, such as «xrdp.»
- Once configured, you can use your Windows Remote Desktop client to connect to the Linux machine, mirroring the steps outlined earlier.
- You can also connect to Windows Server on Android Device via RDP.
Conclusion
In conclusion, the capability to RDP from Linux to Windows brings forth a realm of possibilities, erasing the boundaries between these two distinct operating systems. If you are looking for RDP services, MonoVM is here to help you. Click here and Buy RDP. With the availability of user-friendly tools and command line options, this process is no longer an enigma reserved for tech wizards. So go ahead, embrace the seamless connectivity, and unlock a world of productivity at your fingertips!
You must have heard about the Windows app “Remote Desktop Connection“. This application comes with default windows installation and allows you to access another PC or server remotely. It uses remote desktop protocol to establish remote desktop connection sessions.
Some of the Linux distributions may provide you RDP clients to connect to the Windows system. However, for some linux distributions you may need to install RDP clients to establish remote desktop connection.
As a Linux user there are some rdp tools available which you can install and use for windows remote connection. In this article we are going to explain how to install RDP clients on Ubuntu linux and use them to access (or connect) remote windows desktop.
Reminna
Reminna is a free,open source and powerful remote desktop client for remote desktop sharing. As it provides useful features most of the Linux and UNIX users adopt reminna client to connect remote desktop.
You can install reminna on your linux system by using the following command.
On Ubuntu,
$ sudo apt update
$ sudo apt install -y remmina remmina-plugin-vnc
Once remmina is installed on your system, you can access gui for remote desktop connection.
Enter your windows system IP address and press enter. You will be prompted for username and password details. Submit all the details and control your remote desktop.
Vinagre
Vinagre is an ssh, vnc and rdp client for the Gnome desktop environment. It has advanced features like connecting multiple servers simultaneously and switching between them using tab. Vinagre also supports copy/paste between client and server.
To install Vinagre on Ubuntu, use the following command.
$ sudo apt update
$ sudo apt install -y vinagre
After completing installation go to your application list and search for a remote desktop.
Click on the application as shown in the below image.
Click on Connect , select RDP from the drop down menu. Enter your remote desktop credentials and click connect.
KRDC
KRDC is a remote desktop tool designed for the KDE desktop environment. Installation of KRDC comes with two protocols VNC and RDP which gives you hassle free access to your remote desktop.
To install and configure KRDC in your system follow the commands:
$ sudo apt update
$ sudo apt install -y krdc
Once the installation is completed you are now good to use the KRDC client. You can type krdc in the command line which opens the new gui tool. You can also search krdc in your application list and launch
Click on the KRDC application and you will get the following gui on your screen.
Select RDP protocol from the drop down menu, enter your remote desktop IP address and click Enter.
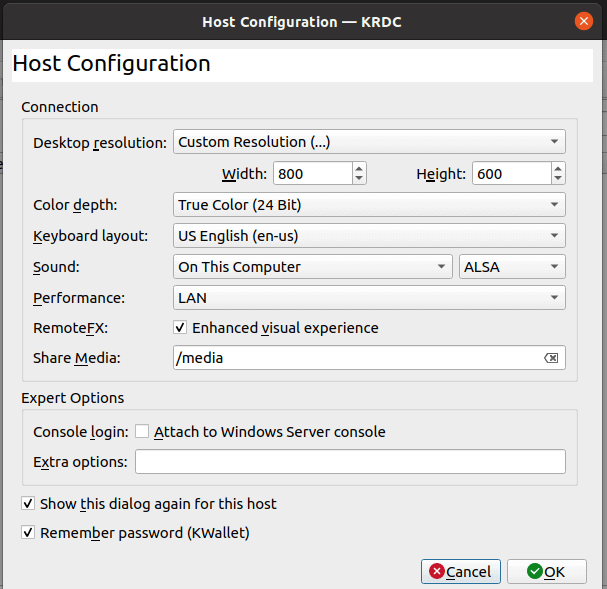
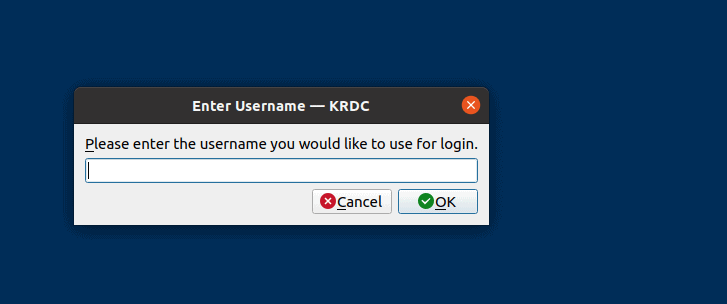
You can customize your configuration and once you are done with customization, click on ok. You will be asked to enter your username and password in the next prompt as :
Enter your username and password as asked and you are ready to use your remote desktop.
FreeRDP
FreeRDP is a free and open-source client for the remote desktop protocol. FreeRDP is a portable rdp protocol released under Apache license. To install and configure freeRDP in Ubuntu use the following command. freerdp2-x11 performs installation of freeRdp client in Ubuntu.
$ sudo apt update
$ sudo apt install -y freerdp2-x11
Once the installation is complete, you can use following command to access your remote desktop
$ sudo xfreerdp /u:remote_user /p:remote_password /v:remote_host_ip
Once you run this command, you may get warning to accept certificates. Enter “yes” to the warning and now you will be able to access your remote desktop as:
Conclusion
From this article, you have learned how to access remote windows desktop from your linux machine. Also you got to know about different tools available for RDP connection, how to configure these tools and use for remote connection.
Also Read : Top 8 Music Player for Ubuntu and Linux Mint
rdesktop is an open source software that enables you to connect and manage your remote Windows desktop from your Linux computer using RDP – Remote Desktop Protocol. In other words, while you are sitting in front of your Linux system at home or office, and access your Windows desktop as if you’re sitting in front of the Windows machine.
Read Also: 11 Best Tools to Access Remote Linux Desktop
In this article, we will explain how to install rdesktop in Linux system to access the remote desktop of Windows computer using the Hostname and IP Address.
Windows Settings
To enable rdesktop to connect to any given Windows machine, you need to make few following changes on the Windows box itself.
- Enable RDP port no. 3389 in Firewall.
- Enable remote desktop under Windows Operating System.
- Require at least one user with a password.
Once you make all of the above Windows configuration settings, you can now move further to install rdesktop on your Linux system to access your Windows desktop.
Install rdesktop (Remote Desktop) in Linux
It is always preferable to use a default package manager such as yum, dnf or apt to install software to handle dependencies automatically during installation.
# yum install rdesktop   [On CentOS/RHEL 7]
# dnf install rdesktop   [On CentOS/RHEL 8 and Fedora]
# apt install rdesktop   [On Debian/Ubuntu]
If rdesktop is not available to install from the default repositories, you can download the tarball from Github here or use the following wget command to download and install it as shown.
# wget https://github.com/rdesktop/rdesktop/releases/download/v1.8.6/rdesktop-1.8.6.tar.gz
# tar xvzf rdesktop-1.8.6.tar.gz
# cd rdesktop-1.8.6/
# ./configure --disable-credssp --disable-smartcard
# make
# make install
Connecting to Windows Desktop Using Hostname
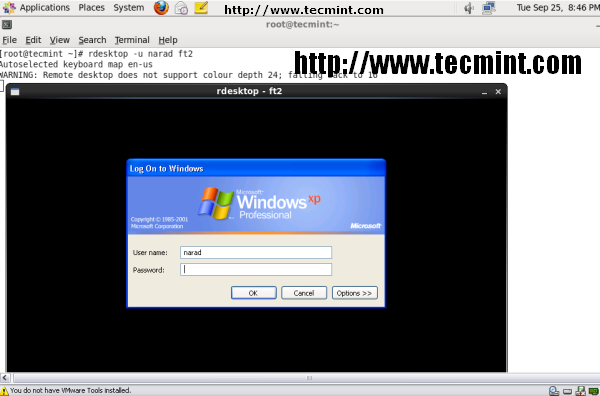
To connect Windows host from Linux desktop type following command using -u parameter as username (narad) and (ft2) as the hostname of my Windows host. To resolve hostname make an entry at /etc/hosts file if you don’t have DNS Server in your environment.
# rdesktop -u narad ft2
Connecting to Windows Desktop Using IP Address
To connect Windows host from Linux machine, use username as (narad) and IP Address as (192.168.50.5) of my windows host, the command would be as.
# rdesktop -u narad 192.168.50.5
Please execute man rdesktop in command prompt If you would like to know more about it or visit rdesktop project website. Kindly share it and let us know your comments through our comment box below.
If you read this far, tweet to the author to show them you care. Tweet a thanks
I am an experienced GNU/Linux expert and a full-stack software developer with over a decade in the field of Linux and Open Source technologies
Each tutorial at TecMint is created by a team of experienced Linux system administrators so that it meets our high-quality standards.
