Do you wish to enable RDP in Windows Server 2016? Need to establish remote connections but don’t know how to do so? Want to configure remote desktop using Command Prompt or PowerShell terminal? This how-to tutorial will answer your questions and help you with the configuration.
Why should you use Windows Server 2016?
In a previous article, we have explained how to enable RDP in Windows Server 2012. Now, it’s time to tell you about Windows Server 2016, and explain how you can enable Remote Desktop in Windows Server 2016. But let’s start with a brief history of Windows Server 2016.
Windows Server 2016 is the successor to Windows Server 2012 R2 released in October 2016. This is the seventh release of Windows Server families.

Need a Remote Desktop?
Reliable, high-performance RDP servers with 99.95 uptime. Take your desktop on the go to all the major cities in the US, Europe, and Asia.
Get an RDP Server
Main Features of Windows Server 2016
- Active Directory Federation Services
- Windows Defender (a pre-installed anti-malware)
- IIS 10, support for HTTP/2
- High-availability cluster (i.e. HA cluster, or Metro-clusters Active/Active, or even fail-over cluster)
- Web application proxy
- Windows PowerShell 5.1
- Windows Server Containers
- The feature of Nano-server
- Hyper-V cluster update
- Remote Desktop Services (like Support of Gen 2 VMs (virtual machines) with Remote Desktop, or Pen remoting support, or Edge support in RDSH, or even support of OpenGL applications and guest VMs in Remote Desktop)
- Windows Multipoint Services
- Personal session desktops
And client updates ( including Remote Desktop preview app for Windows 10, and Remote Desktop preview app for Mac)
As you see, Windows Server 2016 comes with brand new features that Allow Remote Desktop and better connections. Here, we will tell you how to enable RDP in Windows Server 2016.
Things to notice before configuring RDP in Windows Server 2016
- By default, Remote Desktop is disabled in all Windows Server 2016 editions (except Windows server 2016 Essential edition).
- RDP in Windows Server can be enabled through two environments including the PowerShell terminal, and logging into the GUI (Graphical User Interface).
- The main difference between these two installation options comes in the GUI shell package. Server Core 2016 does not have pre-installed GUI shell packages. In fact, the GUI is no longer an option in a default install in Windows Server 2016. If you wish to enable Remote Desktop on Windows Server 2016 using GUI, you should enable it.

Windows 10 VPS Hosting
Get yourself an efficient Windows 10 VPS for remote desktop, at the cheapest price out there. FREE Windows 10 running on NVMe SSD storage and high-speed internet.
Check Out Windows 10 VPS Plans
As you know, Graphic User Interface (GUI) allows for remote access to Windows Server 2016. So, when it comes to enabling RDP in Windows Server 2016 via Logging into the GUI, your first requirement is the installation of a Graphic User Interface. After installing the GUI, do the following steps:
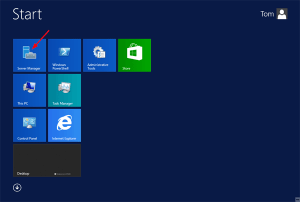
Step 1 : Find Server Manager option
Open Server Manager
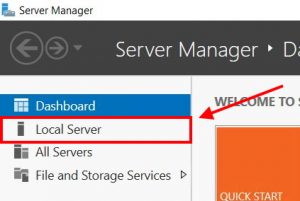
Step 2 : Select Local server
Click Local Server from the left panel
Step 3 : Disable Remote Desktop
Find the Remote Desktop option and click Disabled as shown in the following picture

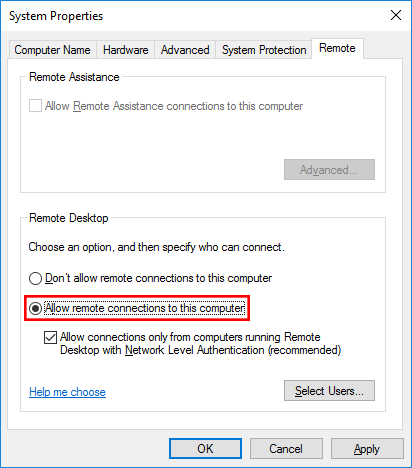
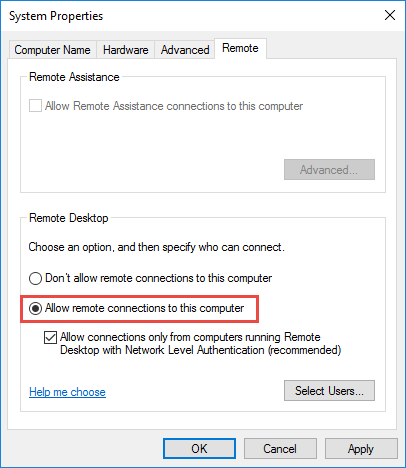
Step 4 : Enable the Allow remote connections to this computer
In this step, a new window will appear. In System Properties Window, enable the Allow remote connections to this computer In this part, you can decide whether to choose Network Level Authentication (NLA) or not. You can also, add more users here.

Step 5 : Confirm the configuration
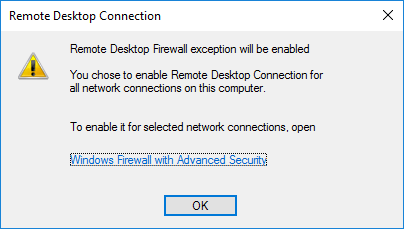
Once, you configure all required settings, you will see a message to enable the corresponding Windows Firewall rule. The Remote Desktop Connection Window helps you to establish remote desktop connections, so click OK to confirm the configuration.

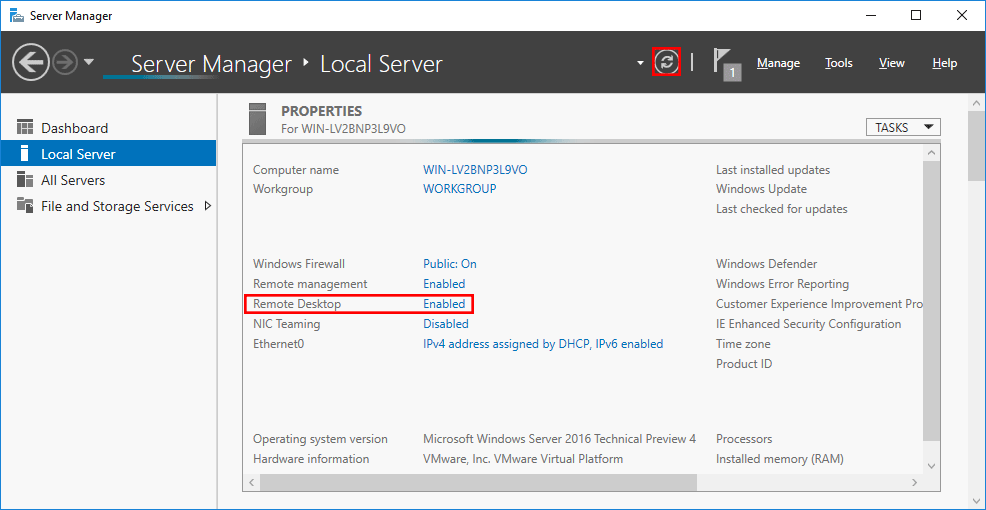
Step 6 : Select the Refresh button to set the changes
Now, move back to the Server Manager window. In this window, select the Refresh button as highlighted below to set the changes. Congratulation. You configured a remote desktop.
Enable RDP in Windows Server 2016 via Powershell
PowerShell is an object-oriented command environment that has new features in Windows Server 2016. It utilizes small programs called cmdlets to simplify the management, administration, and configuration of heterogeneous environments.
To enable Remote Desktop in Windows Server 2016 via PowerShell, we can use two cmdlets. The first will enable remote desktop and the second will open the Firewall. They are listed here:
- A code used to configure remote access:
Set-ItemProperty -Path "HKLM:SYSTEMCurrentControlSetControlTerminal Server" -Name "fdenyTSXonnections" -Value 0
- A code for opening the firewall:
Enable-NetFirewallRule -DisplayGroup "Remote Desktop"
As you see, PowerShell enables RDP with these commands. Notice that administrators can remote in by default, while to provide non-admin users permission to Remote Desktop access, you should add them to the Remote Desktop Users’ local group.
Need a Remote Desktop?
Reliable, high-performance RDP servers with 99.95 uptime. Take your desktop on the go to all the major cities in the US, Europe, and Asia.
Get an RDP Server
Enable RDP in Windows Server 2016 with command line
Well, one of the answers to the “How to Enable RDP in Windows Server 2016” question is using PowerShell Terminal. In order to do this, you should follow the instructions below.
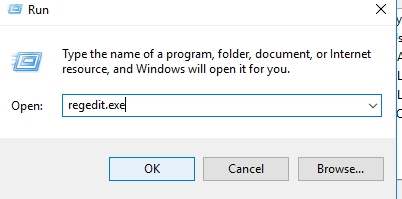
1- Click Windows + R key to open Run Window;
2- In this window, type regedit.exe and press OK;
3- In Registry Editor, select File and then select Connect Network Registry;
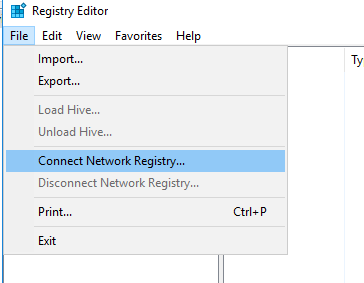
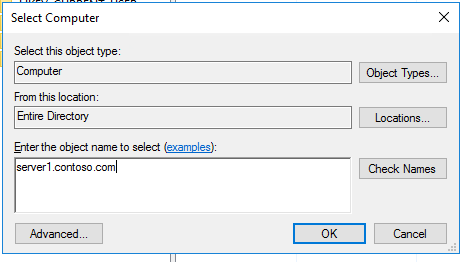
4- Specify the IP address or hostname of the remote computer and press But remember that:
If the remote computer could not authorize you as a current user, then a credential is needed.
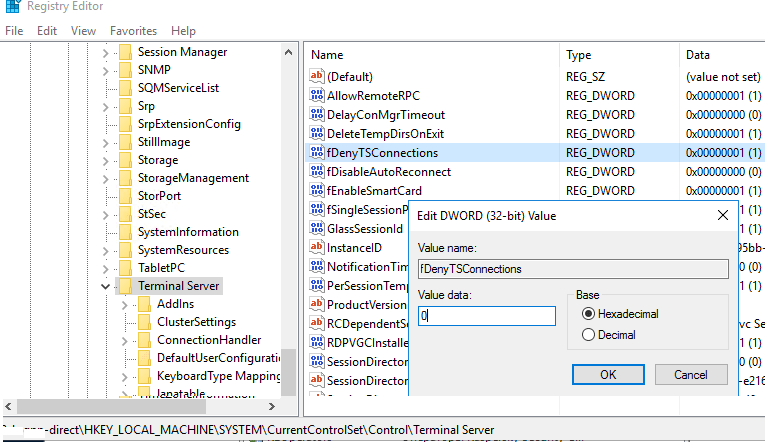
5- Now, the Registry Editor Panel appears. In this stage try to find “HKLMSYSTEMCurrentControlSetControlTerminal Server” and change the DWORD value of the fDenyTSConnections parameter from 1 to 0, and press OK;
6- Now, it’s time to add one of the firewall rules in the Windows Firewall. This rule allows remote connections. You can add it via PowerShell Remoting, using PS exec, or using a GPO (Group Policy Object). Go to the Command Prompt and type the following code:
PsExec.exe \server1 -u contosoadmin -p password cmdnetsh advfirewall firewall add rule name="allow RemoteDesktop" dir=in protocol=TCP localport=3389 action=allowshutdown –f –r –t
7- Reboot your system and try to connect to a remote computer.
Note:
8- For more information about how to set firewall rules in Windows firewall, run the following command:
netsh advfirewall firewall add rule ?
9- Make sure to run all these codes in administrator mode. To do so, do the following:
Click on Start, type CMD, then right-click on Command Prompt and choose Run as Administrator.
Windows 10 VPS Hosting
Get yourself an efficient Windows 10 VPS for remote desktop, at the cheapest price out there. FREE Windows 10 running on NVMe SSD storage and high-speed internet.
Check Out Windows 10 VPS Plans
Conclusion
In this article, we learned how to enable RDP in Windows Server 2016 using various methods. We can mention one extra method here. By default, windows server 2016 sets external Remote Desktop Access to disabled. We can easily enable it using Server Manager (as we explained in a previous article named “how to enable RDP in Windows Server 2012”). So you can also use server manager to enable remote connections via Windows Server 2016. Do you know any more methods? Please share with us.
Posted by
on April 27, 2016
By default in Windows Server 2016 remote desktop is disabled.
Here we cover how to turn on and enable remote desktop protocol (RDP).
Note: In Windows Server 2016 Essentials edition, remote desktop is already enabled by default so you will not need to manually do this.
Remote desktop can be enabled through the graphical user interface (GUI) with the following easy steps.
Allowing Remote Desktop
- Open Server Manager. By default Server Manager will open when you log in to the GUI, otherwise you can select it from the task bar.
- Within the Server Manager window, select Local Server from the left hand side. You may need to wait a little for it to detect the current state of your system. You should see that Remote Desktop is listed as Disabled as shown below.

- Click on the Disabled text which will open the System Properties window in the Remote tab.
- From the System Properties window, select “Allow remote connections to this Computer” as shown below.

Tip: You can also open the System Properties window shown above by entering “SystemPropertiesRemote” into a Command Prompt or PowerShell terminal.
- Once you select “Allow remote connections to this computer” the below warning message will appear, advising that this will create the required firewall rules in Windows firewall to allow remote desktop traffic in from any source address, select OK to proceed.

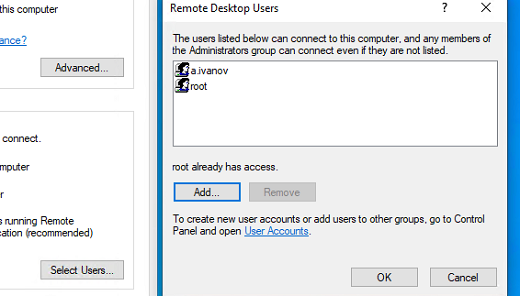
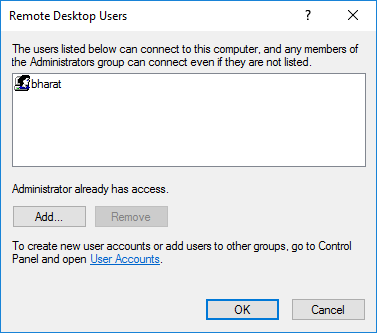
- At this point you can optionally click the “Select Users…” button to define specific users or groups that have permission to connect via remote desktop. Select the OK button to close out of the System Properties window and enable remote desktop.
- Back in Server Manager, Remote Desktop may still show as Disabled until you refresh the view. After clicking the refresh button as highlighted below, the status should update to Enabled.


That’s it, remote desktop should now be ready to use!
Summary
By default Windows Server 2016 sets external remote desktop access to disabled as a security measure, we can easily optionally enable it from within the server console to everyone or a specific set of users or groups.
Протокол Remote Desktop Protocol (RDP) позволяет удаленно подключиться к рабочему столу компьютера с Windows и работать с ним, как будто это ваш локальный компьютер. По умолчанию RDP доступ в Windows запрещен. В этой статье, мы покажем, как включить и настроить RDP доступ в Windows 10 и Windows Server 2016/2019.
Содержание:
- Включаем удаленный рабочий стол в Windows 10
- Как включить RDP доступ с помощью PowerShell?
- RDP доступ к Windows Server 2016/2019
- Включение RDP с групповых политик в домене Active Direcrtory
- Как удаленно включить RDP на компьютере Windows?
Включаем удаленный рабочий стол в Windows 10
Самый простой способ включить RDP доступ в Windows – воспользоваться графическим интерфейсом.
Откройте свойства системы через панель управления, или выполнив команду SystemPropertiesRemote.

Перейдите на вкладку Remote Settings (Удаленный доступ), включите опцию Allow remote connection to this computer (Разрешить удалённые подключения к этому компьютеру).
В целях безопасности желательно разрешить подключение только с клиентов RDP с поддержкой протокола NLA (Allow connections only from computers running Remote Desktop with Network Level Authentication/ Разрешить подключение только с компьютеров, на которых работает удаленный рабочий стол с проверкой подлинности на уровне сети).

Сохраните изменения, нажав ОК.
По умолчанию право на подключение к компьютеру через RDP есть только у членов группы локальных администраторов. Если вам нужно разрешить RDP доступ другим пользователям, нажмите кнопку Select Users.
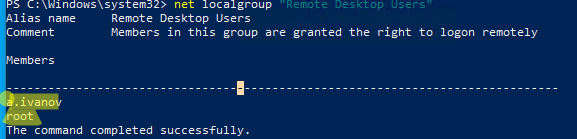
Все пользователи, которых вы укажете здесь будет добавлены в локальную группу Remote Desktop Users. Вы можете в командной строке вывести список пользователей в этой группе:
net localgroup "Remote Desktop Users"
или
net localgroup “Пользователи удаленного рабочего стола”
Чтобы добавить нового пользователя в группу доступа RDP, выполните:
net localgroup "Remote Desktop Users" /add publicuser
В русской версии Windows измените название группы на “Пользователи удаленного рабочего стола”.
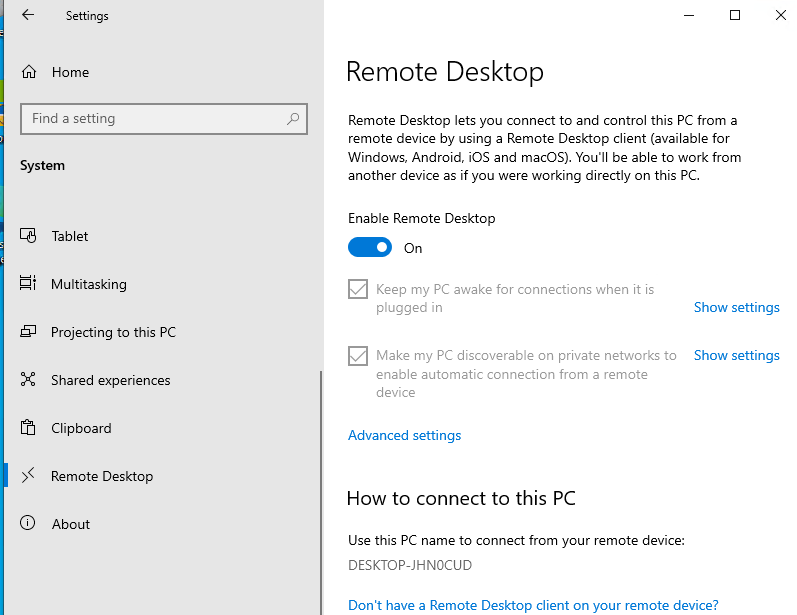
В новых билдах Windows 10 классическая панель для включения RDP доступа теперь спрятана и Microsoft рекомендует пользоваться новой панелью Setting.
- Перейдите в Settings -> System —> Remote Desktop;
- Включите опцию Enable Remote Desktop;

- Подтвердите включение RDP на компьютере.
Обратите внимание, что вы не можете включить RDP доступ к редакции Windows 10 Home. RDP сервер работает только на Windows 10 Pro и Enterprise. Впрочем, есть обходное решение.
Обратите внимание, что по умолчанию при включении Remote Desktop, включаются две опции:
- Keep my PC awake for connection when it is plugged in ;
- Make my PC discoverable on private networks to enable automatic connection from a remote device
На жмите на ссылку “Advanced settings”. Здесь можно включить использование протокола “Network Level Authentication” для RDP подключений (рекомендуется).
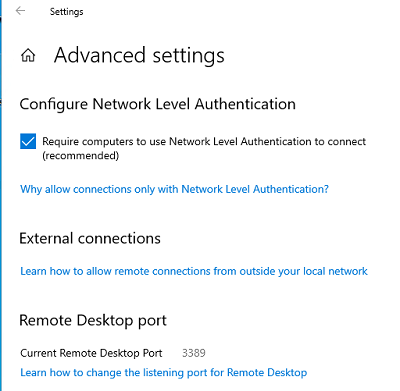
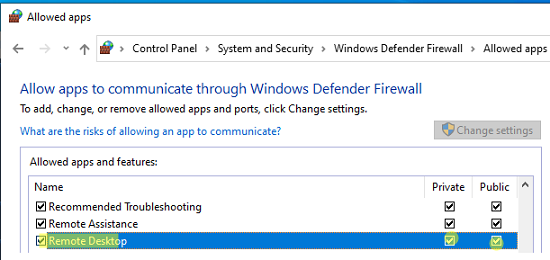
Если на компьютере включен Windows Defender Firewall (брандмауэр), то нужно проверить, что в нем разрешены входящие RDP подключения. По умолчанию для RDP подключений используется порт TCP
3389
, а в последних билдах Windows также используется
UDP 3389
( см. статью про кейс с черным экраном вместо рабочего стола при RDP доступе).
Перейдите в панель управления и выберите элемент Windows Defender Firewall. Откройте список стандартных правил брандмауэра Windows, щелкнув в левом столбце по ссылке Allow an app or feature through Windows Firewall.
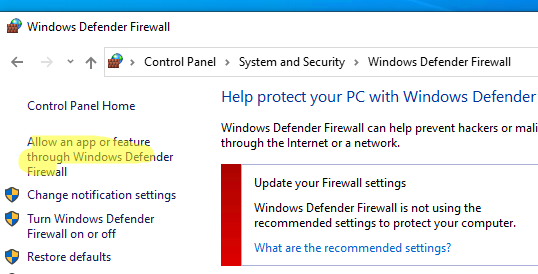
Проверьте, что правило Remote Desktop включено для профиля Private (домашняя или рабочая сеть) и, если необходимо, для профиля Public (общедоступные сети).
Подробнее про типы сетей и профили брандмауэра Windows здесь.
Если нужно, вы можете дополнительно ограничить длительность RDP сессий с помощью GPO.
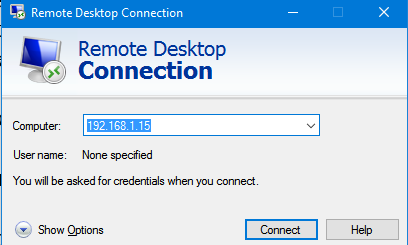
Теперь к данному компьютеру можно подключится с помощью RDP клиента. Встроенный RDP клиент Windows –
mstsc.exe
. Он сохраняет всю историю RDP подключений с компьютера. Поддерживается копирование файлов между локальным и удаленным компьютером прямо через буфер обмена RDP.
Также вы можете использовать менеджеры RDP подключений, такие как RDCMan или mRemoteNG, или альтернативные клиенты.
Для удобства пользователей пароль для RDP подключения можно сохранить в Windows Credential Manager.
Как включить RDP доступ с помощью PowerShell?
Вы можете включить RDP доступ в Windows с помощью пары PowerShell команд. Это гораздо быстрее:
- Запустите консоль PowerShell.exe с правами администратора;
- Включите RDP доступ в реестре с помощью командлета Set-ItemProperty:
Set-ItemProperty -Path 'HKLM:\System\CurrentControlSet\Control\Terminal Server' -name "fDenyTSConnections" -value 0Чтобы закрыть RDP доступ, измените значение fDenyTSConnections на 1.
- Разрешите RDP подключения к компьютеру в Windows Defender Firewall. Для этого включите предустановленное правило :
Enable-NetFirewallRule -DisplayGroup "Remote Desktop"
- Если нужно добавить пользователя в группу в локальную группу RDP доступа, выполните:
Add-LocalGroupMember -Group "Remote Desktop Users" -Member 'a.petrov'

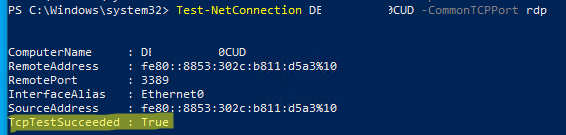
Чтобы проверить, что на компьютере открыт RDP порт, воспользуйтесь командлетом Test-NetConnection:
Test-NetConnection -ComputerName deskcomp323 -CommonTCPPort rdp
RDP доступ к Windows Server 2016/2019
В отличии от десктопной редакции Windows 10, в Windows Server по умолчанию поддерживается два одновременных RDP подключения. Эти подключения используются администраторами для управления сервером.
Включается RDP в Windows Server аналогично. Через SystemPropertiesRemote, через Server Manager или командами PowerShell, рассмотренными выше.
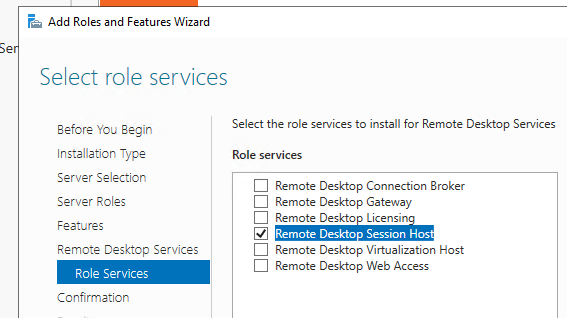
Вы можете использовать Windows Server в качестве терминального сервера. В этом случае множество пользователей могут одновременно подключаться к собственному рабочему столу на сервере. Для этого нужно установить и настроить на сервере роль Remote Desktop Session Host. Это требует приобретения специальных RDS лицензии (CAL). Подробнее о RDS лицензировании здесь.
Для дополнительно защиты RDP сессий можно использовать SSL/TLS сертификаты.
Включение RDP с групповых политик в домене Active Direcrtory
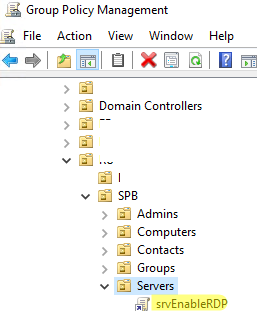
Если вам нужно включить RDP доступ сразу на большом количестве компьютеров, можно воспользоваться групповыми политиками (GPO). Мы подразумеваем, что все компьютеры включены в домен Windows.
- Запустите консоль управления доменными GPO
gpmc.msc
; - Создайте новую (или отредактируйте уже существующую) групповую политику и привяжите ее к целевой OU с компьютерами или серверами;
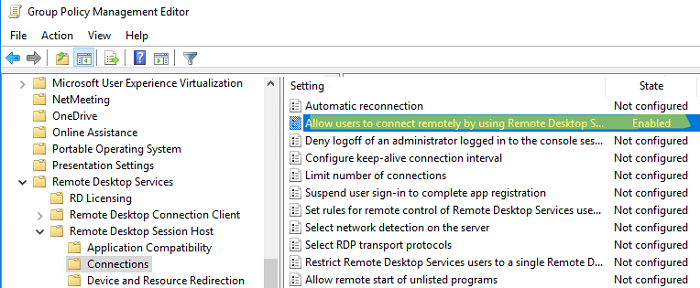
- Переключитесь в режим редактирования политики и перейдите в секцию GPO Computer Configuration -> Administrative Templates -> Windows Components -> Remote Desktop Services -> Remote Desktop Session Host -> Connections;
- Найдите и включите политику Allow Users to connect remotely by using Remote Desktop Services, установив ее в Enable;
- Обновите параметры групповых политик на клиентах;
- После применения данной политики вы сможете подключится ко всем компьютерам по RDP (политика применится как к десктопным клиентам с Windows 10, так и к Windows Server). Если нужно, вы можете более тонко нацелить политики на компьютеры с помощью WMI фильтров GPO.
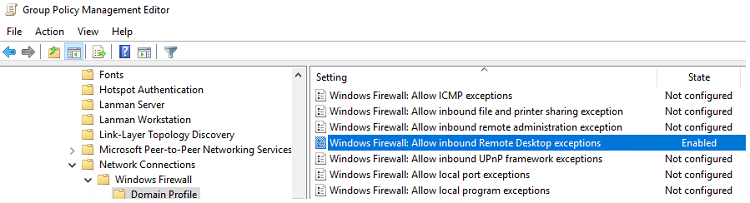
- Если на компьютерах включен Windows Defender Firewall, нужно в этой же GPO разрешить RDP-трафик для доменного профиля. Для этого нужно активировать правило Windows Firewall: Allow inbound Remote Desktop Exceptions (находится в разделе Computer Configuration -> Administrative Templates -> Network -> Network Connections -> Windows Firewall -> Domain Profile).
Подробнее о настройке правил брандмаура Windows через GPO рассказано здесь.
Как удаленно включить RDP на компьютере Windows?
Также вы можете удаленно включить RDP на любом компьютере Windows. Для этого у вас должен быть удаленный доступ к этому компьютеру (через PowerShell или WMI) и ваша учетная запись состоять в группе локальных администраторов на этом компьютере.
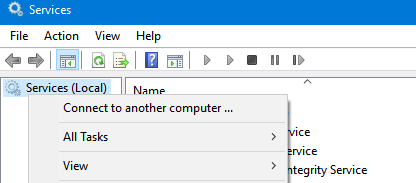
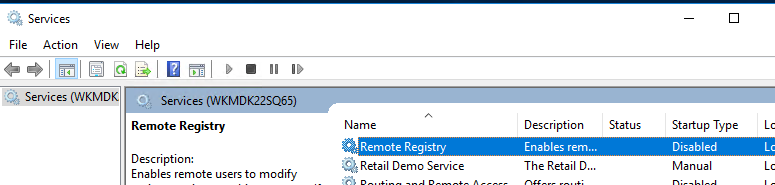
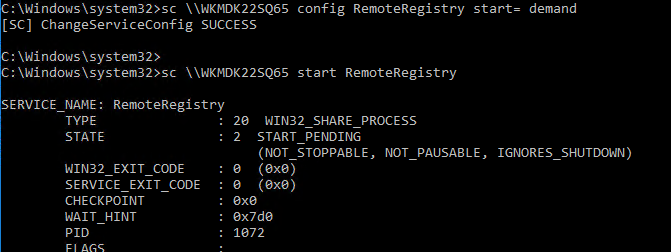
Вы можете удаленно включить RDP через реестр. Для этого на удаленном компьютере должна быть включена служба Remote Registry (по умолчанию она отключена). Чтобы запустить службу:
- Запустите консоль управления службами (
services.msc
); - Выберите Connect to another computer и укажите имя удаленного компьютера;
- Найдите в списке службу Remote Registry, измените тип запуска на Manual (ручной) и затем запустите службу – Start.
Тоже самое можно выполнить удаленно из командной строки с помощью встроенной утилиты
sc
(позволяет создавать, управлять или удалять службы Windows):
sc \\WKMDK22SQ65 config RemoteRegistry start= demand
sc \\WKMDK22SQ65 start RemoteRegistry
Затем на локальном компьютере
- Запустите редактор реестра
regedit.exe - Выберите в меню Файл пункт Connect Network Registry (Подключить сетевой реестр)
- Укажите имя или IP адрес удаленного компьютера, на котором нужно включить службу RDP;
- Перейдите в раздел
HKEY_LOCAL_MACHINE\SYSTEM\CurrentControlSet\Control\Terminal Server
; - Найдите параметр fDenyTSConnections (тип REG_DWORD). Если данный ключ отсутствует – создайте его. Измените его значение на 0, чтобы включить RDP.
Для отключения RDP доступа нужно изменить значение fDenyTSConnections на 1.
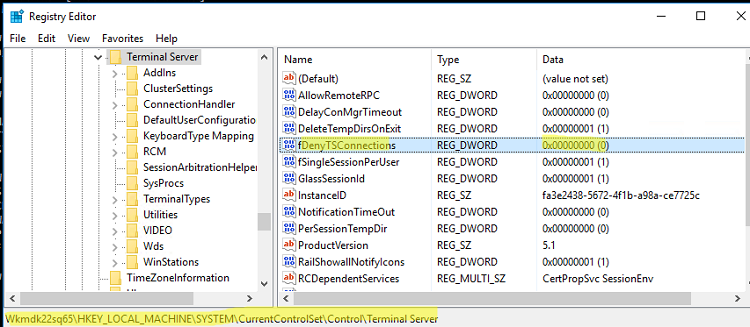
Сразу после этого без перезагрузки удаленный компьютер должен стать доступным по RDP.
Но гораздо быстрее можно включить RDP в реестре удаленого компьютера через командную строку:
REG ADD "\\WKMDK22SQ65\HKLM\SYSTEM\CurrentControlSet\Control\Terminal Server" /v fDenyTSConnections /t REG_DWORD /d 0 /f
Если на удаленном компьютере настроен PowerShell remoting, вы можете выполнить на нем удаленную команду через Invoke-Command:
Invoke-Command -Computername WKMDK22SQ65 -ScriptBlock {Set-ItemProperty -Path "HKLM:\System\CurrentControlSet\Control\Terminal Server" -Name "fDenyTSConnections" –Value 0}
Если в Windows установлен OpenSSH сервер, вы можете подключиться к нему любым ssh клиентом и внести изменения в реестр в локальной ssh сессии.
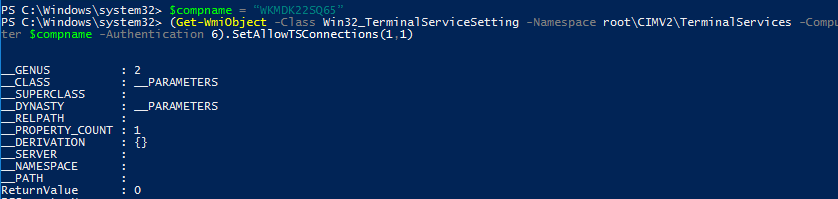
Также вы можете подключиться к удаленному компьютеру и включить RDP через WMI:
$compname = “WKMDK22SQ65”
(Get-WmiObject -Class Win32_TerminalServiceSetting -Namespace root\CIMV2\TerminalServices -Computer $compname -Authentication 6).SetAllowTSConnections(1,1)
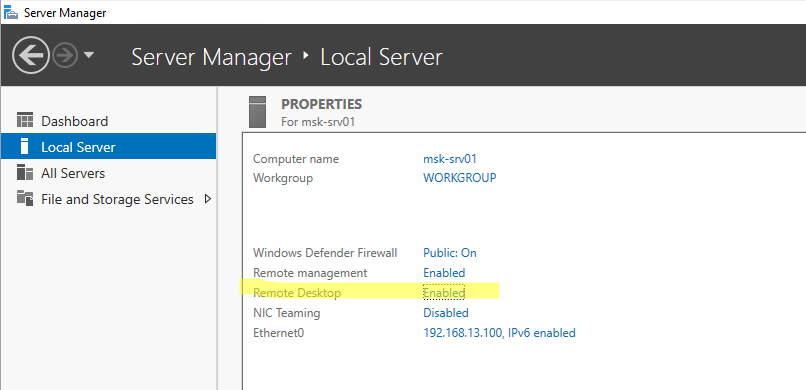
Remote management of Windows Server 2016 is enabled by default, but Remote Desktop, on the other hand, is disabled. So, you have to turn it on in order to access a Windows Server remotely.
Depending on the case, we can enable the Remote Desktop directly using the graphical user interface, PowerShell or by implementing the appropriate policies through Group Policy.
Note: In Windows Server 2016 Essentials, Remote Desktop is enabled by default.
Enable Remote Desktop using the GUI
Open Server Manager and click Local Server from the left pane. Here, click Disable in the Remote Desktop field.

In the window that appears, enable the Allow remote connections to this computer setting. At this point, you can choose whether to allow NLA connections by enabling the corresponding setting but also to select which additional users or groups to connect other than administrators.
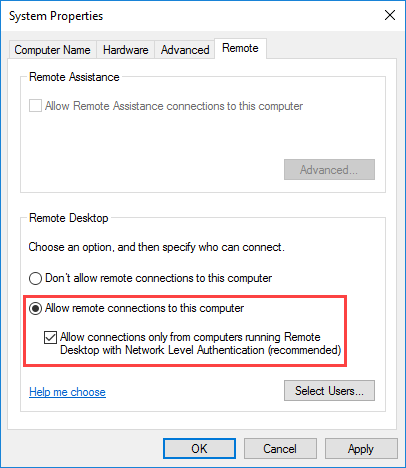
Once you’ve enabled the above setting, you’ll see a message to enable the corresponding Windows Firewall rule that will allow Remote Desktop Connection from any source address.
That’s it! Once you upgrade to Server Manager, you will see that the Remote Desktop setting has changed to Enabled.
Enable Remote Desktop using PowerShell
To enable Remote Desktop through PowerShell, you will need to add two keys to the registry and a rule in the Windows Firewall. Commands should run in a PowerShell window with administrator privileges.
By running the following command, the Remote Desktop will be enabled, allowing connections via Terminal Services.
New-ItemProperty -Path 'HKLM:\System\CurrentControlSet\Control\Terminal Server\' - Name "fDenyTSConnections" -Value 0 -PropertyType dword -Force
By running the following command, the predefined Windows Firewall rules will be activated for the Remote Desktop on all profiles.
Enable-NetFirewallRule -DisplayGroup "Remote Desktop"
Finally, the following command enables Network Level Authentication (NLA) for Remote Desktop connections.
New-ItemProperty -Path 'HKLM:\System\CurrentControlSet\Control\Terminal Server\WinStations\RDP-Tcp\' -Name "UserAuthentication" -Value 1 -PropertyType dword -Force
Enable Remote Desktop using Group Policy
To enable Remote Desktop Connection, follow the path below and set the Allow users to connect remotely using Remote Desktop Services to Enabled.
Computer Configuration \ Policies \ Administrative Templates \ Remote Desktop Services \ Remote Desktop Session Host \ Connections
To enable user authentication through Network Level Authentication (NLA), follow the path below and set the Require Network User Authentication policy to Enabled.
Computer Configuration \ Policies \ Administrative Templates \ Remote Desktop Services \ Remote Desktop Session Host \ Security
To enable the rules in the Windows Firewall, follow the path below and set the policy Windows Firewall: Allow inbound Remote Desktop exceptions to Enabled.
Computer Configuration \ Policies \ Administrative Templates \ Network \ Network Connections \ Windows Firewall \ Domain Profile
These were the three basic methods to enable Remote Desktop connections in Windows Server 2016. Of course, depending on your business security level, you may need to go ahead with further settings for who can access and from where.
Windows Server 2016 has reached the General Availability (GA) milestone today. You can download it from your volume licensing site or MSDN. You can also create Azure VMs with Windows 2016.
The latest and greatest Windows Server has many new Remote Desktop features. See What’s New in Remote Desktop Services in Windows Server 2016 for the laundry list.
If you’re just trying to enable RDP for remote admin connections, here’s how to do it.
- Type SystemPropertiesRemote.exe in a command or PowerShell window.
- In the System Properties dialog, select Allow remote connections to this computer.
Figure 2: Allow remote desktop connections.Windows Server supports Network Level Authentication (NLA) for RDP connections. This forces the authentication to occur before the session begins. Without NLA, the RDP host presents the user logon screen when the RDP session starts. NLA is more secure.
- [Optional] Administrators have remote desktop access by default. If you want to allow RDP access to additional users, click Select users, select the users and then close the dialog box.
Figure 3: Select users who should be allowed remote desktop connections
Enable Remote Desktop using PowerShell
Of course, many IT pros prefer PowerShell. In this case, I found running SystemPropertiesRemote.exe was faster, but PowerShell helps you automate these settings, for example, as part of unattended setup.
Here’s how you can enable Remote Desktop using PowerShell (credit to Samuel Yee, who has it documented here, saving me the trouble to fire up Process Monitor, one of the fine, and free, Windows SysInternals tools):
- Enable Remote Desktop connections
Set-ItemProperty ‘HKLM:\SYSTEM\CurrentControlSet\Control\Terminal Server\‘ -Name “fDenyTSConnections” -Value 0
- Enable Network Level Authentication
Set-ItemProperty ‘HKLM:\SYSTEM\CurrentControlSet\Control\Terminal Server\WinStations\RDP-Tcp\‘ -Name “UserAuthentication” -Value 1
- Enable Windows firewall rules to allow incoming RDP
Enable-NetFirewallRule -DisplayGroup “Remote Desktop”
There are scripts in the TechNet Script Gallery that’ll allow you to run this against a large number of computers and turn on any services required to automate this.
Update 12/13/2018:
You can use PowerShell to grant permissions to use Remote Desktop. As noted earlier in this post, administrators can remote in by default. To provide non-admin users permission to use Remote Desktop, add them to the Remote Desktop Users local group.
Add-LocalGroupMember -Group "Remote Desktop Users" -Member foo
Tags
Administration Remote Desktop Windows Server Windows Server 2016