Время на прочтение
5 мин
Количество просмотров 32K
Показали мне недавно интересное приложение, под которое можно разрабатывать плагины. Приложение оказалось очень полезным для научной работы, но вот незадача — приложение разработано под Windows, у меня стоит Ubuntu. Windows для разработки под это приложение от лаборатории получить пока не удалось. Чтобы не тратить время, решил освоить кросс-компиляцию и отладку этого приложения.
Итого, имеется:
Ubuntu 12.10 x64
Не-юникодное приложение Мастерская Граф-Моделей (МГМ) (В командах консоли будет называться gmw.exe)
Нужно:
Разрабатывать и отлаживать плагины (dll-библиотеки), не устанавливая Windows.
И тут нам помогут Wine, Code::Blocks, портированное GDB, и boost.
Wine, не юникодное приложение, английский интерфейс Ubuntu и русский язык
При попытке открыть не юникодное приложение под Wine
wine gmw.exe
получаются зюки следующего вида:
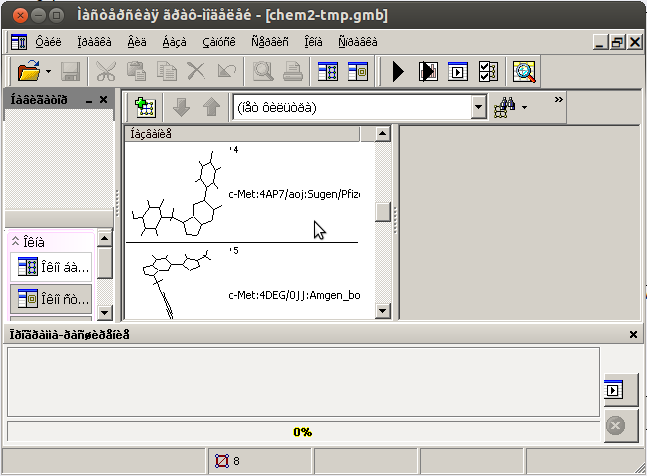
На эту проблему интернет очень быстро дает следующую подсказку:
LC_ALL=ru_RU.UTF-8 wine gmw.exe
В моём случае, данный подход не улучшил ситуацию ни на йоту.
Как выяснилось, русских локалей в системе не было добавлено (тыц).
sudo echo "ru_RU.UTF-8 UTF-8" >> /var/lib/locales/supported.d/ru
sudo locale-gen ru
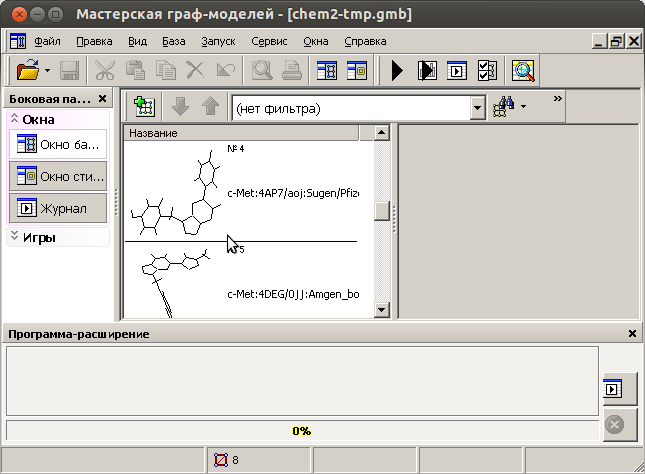
Теперь запускаем с выше-указанной подсказкой
LC_ALL=ru_RU.UTF-8 wine gmw.exe
И, вуаля, запускается приложение с читаемым русским текстом:
Настройка IDE Code::Blocks для кросс-компиляции и отладки
Установка Code::Blocks
В дальнейшем для отладки нам потребуется менять код плагина отладки поэтому лучше сразу взять версию Code::Blocks из под svn.
Устанавливаем svn:
sudo apt-get install subversion
С помощью svn получаем код C::B, для этого переходим в папку, в которую хотим сохранить код C::B, где и набираем:
svn checkout svn://svn.berlios.de/codeblocks/trunk
Переходим в полученную папку ‘trunk’.
Компиляция C::B происходит с помощью g++, autotools, automake и некоторых других утилит, которые необходимо установить:
sudo apt-get install libtool autotools-dev automake autoconf g++ libhunspell-dev libgtk2.0-dev libgamin-dev libboost-dev
Кроме того Code::Blocks зависит от wxWidgets:
sudo apt-get install libwxgtk2.8-dev
Подстраиваем установщик под компьютер (можно запускать единожды):
sudo ./bootstrap
И дальше, устанавливаем сам codeblocks (ключ —prefix можно упустить для использования настроек по-умолчанию):
sudo ./configure --prefix={Путь по которому устанавливать} --with-contrib-plugins=all
sudo make
sudo make install
Более подробно можно посмотреть по ссылке.
Настройка компиляции и линковки
Выполняем пункты с 1 по 5 с форума Code::Blocks. После этого компиляция программ должна работать, если не используется линковка к платформо-зависмым библиотекам (линковка с boost::regexp будет рассмотрена позже).
(*) В новом Code::Blocks немного изменилось меню по сравнению с инструкцией. Настройки искать нужно в ‘Settings->Compiler…’. Для старого Code::Blocks (10.05) пункт 5 нужно выполнить полностью, для нового же (12.11) настройку касающуюся gdb в 5 пункте пока трогать не будем.
Если используется boost его лучше положить отдельно от /usr/include, т.к. по этому адресу лежит много linux-специфичных заголовочных файлов, которые мы не хотим включать в проект при компиляции под Windows.
UPD: При настройке линковки в поле «Other Linker Options» имеет смысл добавить опцию «-Wl,—subsystem,windows,—kill-at», которая помечает, что это реально Windows DLL, и, что самое главное, запрещает использовать декорирование символов (—kill-at) при экспорте функций с соглашением вызова __stdcall. Подрбнее здесь и здесь.
Начиная с пункта 7 по ссылке выше, описывается кросс-отладка, но, к сожалению, insight.exe, упоминающийся в инструкциях, найти не удается. Поэтому пойдем своим путем.
Кросс-отладка в Code::Blocks & MingW32 gdb для Windows
gdb, который является родным для линукса частично умеет отлаживать Windows приложения, правда, умеет он только останавливаться на исключениях и почти всегда игнорирует точки останова. Чтобы справиться с этими проблемами скачиваем gdb в пакете mingw32 под Windows. Для этого скачиваем и затем распаковываем и переходим в подпапку ‘bin’. Устанавливаем gdb под Windows:
wine mingw-get.exe install gdb
Теперь в этой же папке bin появился файл gdb.exe, он-то нам и нужен.
Создаем скрипт для имитации обычного gdb для этого в файл /usr/bin/i586-mingw32msvc-gdb
sudo gedit /usr/bin/i586-mingw32msvc-gdb
Заносим следующие строки:
#!/bin/sh
wine {Path to mingw}/bin/gdb.exe $@
Для старого C::B все уже настроенно, для нового же отладчик нужно настроить дополнительно. В пункте ‘Settings->Debugger’ кликаем по ‘GDB/CDB debugger’ затем по ‘Create Config’. В новом конфиге меняем команду запуска отладчика на ‘/usr/bin/i586-mingw32msvc-gdb’, остальные настройки по желанию. После этого идем в ‘Settings->Compiler…», в пункте ‘Selected Compiler’ выбираем тот компилятор, который настраивали до этого и затем на вкладке ‘Toolchain executables’ меняем ‘Debugger’ на наш свежесозданный конфиг. Теперь отладчик будет останавливаться на точках останова, хотя и остановить программу в произволльный момент не сможет (данная проблема пока еще не решена). Правда при попытке отладить,C::B выдает следующую ошибку:
The program has stopped on a breakpoint but the breakpoint format is not recognized:
0x1A0x1AZ:{ПутьДоФайлаСТочкойОстанова}/SamplePlugin.cpp:48:948:beg:0x68087599
Эта ошибка говорит о том, что плагин отладчика в C::B не понимает выдачу отладчика gdb.exe. Как выяснилось при ближайшем рассмотрении плагин отладчика имеет платформо-зависимый код, и вот тут-то и нужно вспомнить что у нас есть исходники C::B. Мы сейчас слегка подкоррекируем код этого плагина. Нужно будет поменять код только одного файла ‘{Path to svn code of Code::Blocks}/src/plugins/debuggergdb/gdb_driver.cpp’
Для этого нужно перейти в корень проекта C::B (откуда запускалась команды ./bootstrap), по умолчанию это папка ‘trunk’. И накактить патч:
patch --unified --strip=0 --forward --input=gdb_driver.cpp.patch
Ну и пересобираем Code::Blocks:
sudo ./configure --prefix={Путь по которому устанавливать} --with-contrib-plugins=all
sudo make
sudo make install
И почти все готово, остается только создать проект. Шаги 12-13 по ссылке. Если же вы хотите создать проект dll-библиотеки, то указывайти создание динамической библиотеки в мастере и переименовывайте разширение в dll.
Проверям, что в настройках проекта стоит выбранная нами цепь компилятор-линкер-отладчик. ‘{Правая клавиша на проект}-Build Options…’ пункт ‘Selected compiler’, и можно радоваться и отлаживаться. Напомню, что по какой-то причине отладчик не может быть прерван во время исполнения, т.е. все отладочные действия могут буть применены только во время останова программы. В частности нельзя поставить новую точку останова, если программа не стоит на какой-либо другой точке останова…
Линкование статической библиотеки boost’а
Библиотека boost в основном является набором заголовочных файлов, и потому никаких проблем с линковкой обычно не возникает. Но для некоторых частей boost’а необходимо линковаться к статической библиотеке, например, boost::regex. Пробуем собрать проект и получаем:
{...}/boost/regex/v4/cpp_regex_traits.hpp|1059|undefined reference to `boost::scoped_static_mutex_lock::scoped_static_mutex_lock(boost::static_mutex&, bool)'
Ошибка возникает из-за того, что мы пытаемся прилинковаться к linux билиотеке, для того чтобы построить windows-приложение.
Чтобы слинковаться нужно скомпилировать boost::regex с помощью MingW32 (про кросс-компиляцию). Скачиваем boost, распаковываем и переходим в папку с распаковынным boost’ом. Создаем файл user-config.jam в корне домашней директории:
gedit ~/user-config.jam
Со следующим содержанием:
using gcc : : i586-mingw32msvc-g++ ;
Дальше настраиваем сборку и собираем:
sudo ./bootstrap.sh --with-libraries=regex --without-icu
sudo ./b2
После выполнения последней команды у меня были ошибки «failed updating 1 target», что, правда, не мешает собираться программам.
В результате, у нас есть полностью подготовленная среда для написания, сборки и отладки Windows-приложений или Windows-библиотек из под Linux. Теперь можно приступать к работе…
Have you ever had the desire to develop Windows software or test it on your Linux system? Maybe because it is the most popular OS or due to the fact that your schools and institutions deploy only Windows OS in computer laboratories.
Well lucky you, there are two ways to actually develop or test Windows software on Linux system with the exception of dual booting (otherwise the article would have diverted away from the topic’s intention) Windows OS along with your existing system. Read on below to learn what are the two ways, moreover, I’ll also provide some additional insights from my experience for each option.
On WINE

WINE used to be an acronym for Wine Is Not an Emulator but now we’d just call it wine (pronounced like a drink).WINE’s website has a database listing all the applications that work under it. You might not find your preferred software on the list but don’t hesitate to try it out on WINE. Some 6 months back when I was learning to code data structures and object-oriented programs, I tried installing CodeBlocks 16.04 (which was not on the database list) and was amazed that my development platform works. Then I didn’t have to worry about my Linux GCC program failing to compile Windows specific library files,
However, WINE tends to be buggy because there is some stuff that needs to be done alternatively in a quite bizarre way. For instance, though CodeBlocks 16.04 was successfully set up on my Linux system, there was no way I could make the cmd program launch to see my program’s output. Instead, what I had to do was launch CodeBlocks on command prompt first and then switch back to it when I run my program to see the output. Quirky and bizarre right?
Through virtualization

Using virtualization software is another way for either developing or testing Windows software on your Linux computer.Use virtualization as your last approach if WINE doesn’t work for you. Because the former would demand more resources on your computer than the latter.
There are certain programs that won’t even work on WINE at all. An example includes the WinBGI libraries on CodeBlocks. Moreover, virtualization is the best approach if you really want to see your program running on an actual Windows environment.
Conclusion
You can use either one of the above two methods for developing or testing your Windows software, and hopefully, you might prefer one over the other. WINE runs Windows software natively on Linux while virtualization pretty much simulates physical hardware and therefore guarantees you get more realistic output for your programs. Liked the article? Share it with your buddies and please don’t hesitate to share your opinions too in the comment section below.

Mohd Sohail is a web developer and a Linux sysAdmin. He also loves to write how-to articles, applications reviews and loves to use new Linux distributions.
919 Posts
You imply that the applications are for Windows only and not cross-platform, in which case I think the answer to 3. — This is really not a good idea — trumps the rest.
The reason being you are going to have to extensively test the application under Windows anyway, either directly or in a virtual instance. That being so you’re better to develop under the target OS because you’re more likely to produce a better application — both from catching the bugs earlier and more thoroughly and ensuring your application ‘works’ for your users. I certainly wouldn’t trust just Wine.
I’m not a big fan of cross-platform widgets. Like Java applications you generally end up with something that doesn’t quite look right, and like the uncanny gap that can be enough to make your application smell bad to a large section of your users. Even at the slightly more abstract level, each OS’s applications have a slightly different feel as to how they work and you’ll most likely end up with a Windows application that feels like a, say, KDE one, which will again put your users off.
So yes, certainly possible to do this, but probably not the optimal approach from point of view of the quality of the end product. To do so will give yourself something of a handicap with what you produce and I’d say that’s likely to offset the convenience to you of using a Linux platform. Actually I’d be surprised if you manage even that because I’d bet you’ll spend more time messing around with the widgets trying to fine-tune them so they work right under real Windows than you’ll gain from using an unfamiliar Windows toolset.
Одна из потрясающих особенностей Linux состоит в том, что, работая в нем, вы можете создавать приложения Windows. Такую возможность обеспечивает пакет mingw-w64. В его состав входят компиляторы для создания 32- и 64-битного кода С и С++ для систем Windows. После установки пакета mingw-w64 генерация кода Windows осуществляется следующим образом:
# C
i686-w64-mingw32-gcc hello.c -o hello32.exe      # 32-bit
x86_64-w64-mingw32-gcc hello.c -o hello64.exe    # 64-bit

# C++
i686-w64-mingw32-g++ hello.cc -o hello32.exe     # 32-bit
x86_64-w64-mingw32-g++ hello.cc -o hello64.exe   # 64-bit
Компиляторы имеют сложные названия, поэтому лучше всего оформить их в виде make-файла или скрипта.
Компилируемые программы на C будут зависеть от библиотек kernel32.dll и msvcrt.dll. Первая является неотъемлемой частью ОС Windows. Вторая представляет собой стандартную библиотеку времени выполнения C от компании Microsoft и обычно также входит в состав ее операционной системы.
Программы на C++ будут также зависеть от библиотек libstdC++-6.dll и libgcc_s_sjlj-1.dll. Это библиотеки компиляторов Mingw. Они находятся в каталоге /usr/lib/gcc/x86_64-w64-mingw32/. Для того, чтобы статически включить их в состав вашего исполняемого модуля укажите при компиляции ключи:
-static-libgcc
-static-libstdc++
P.S. при написании этого поста использовались материалы блога arrayfire (точнее статьи).
P.P.S. кто-нибудь может назвать мне хотя бы один компилятор в Windows, позволяющий создавать двоичный код для Linux?
Tutorials > Porting > Porting a Windows App to Linux with Visual Studio
This tutorial shows how to port a simple Windows application to Linux by creating a Linux configuration in a Visual Studio project with VisualGDB.
Before we begin, ensure that VisualGDB 4.0 or later is installed.
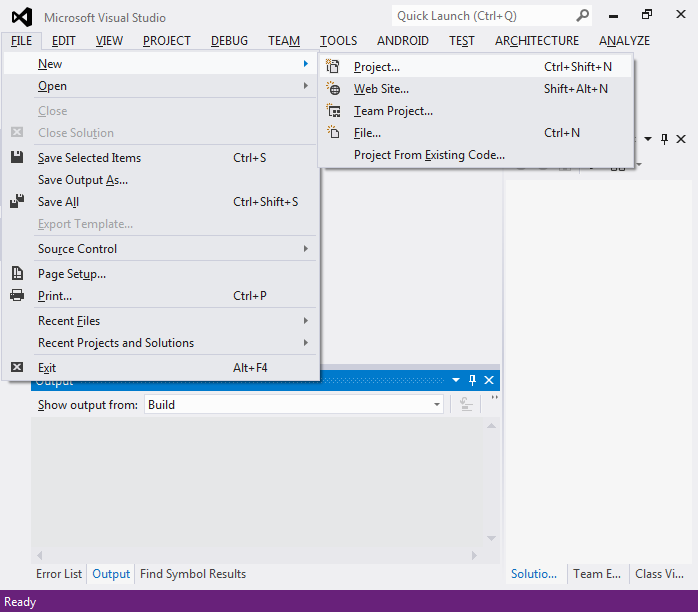
- Our first step will be to create a simple console application for Windows. Start Visual Studio and select File->New->Project.

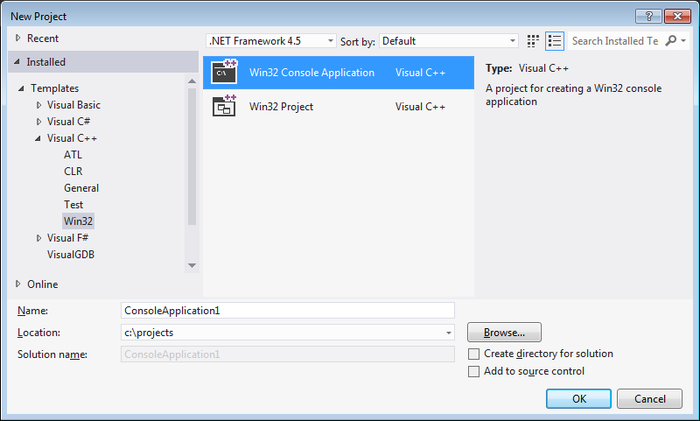
- Select “Win32 Console Application”:

- Proceed with the default settings and press “Finish”. Visual Studio will create a basic console application. Add the following code to the main file:
#include «stdafx.h»
#include <stdio.h>
#include <stdlib.h>
int _tmain(int argc, _TCHAR* argv[])
{
printf(«HOMEPATH=%s\n», getenv(«HOMEPATH»));
printf(«HOME=%s\n», getenv(«HOME»));
return 0;
}
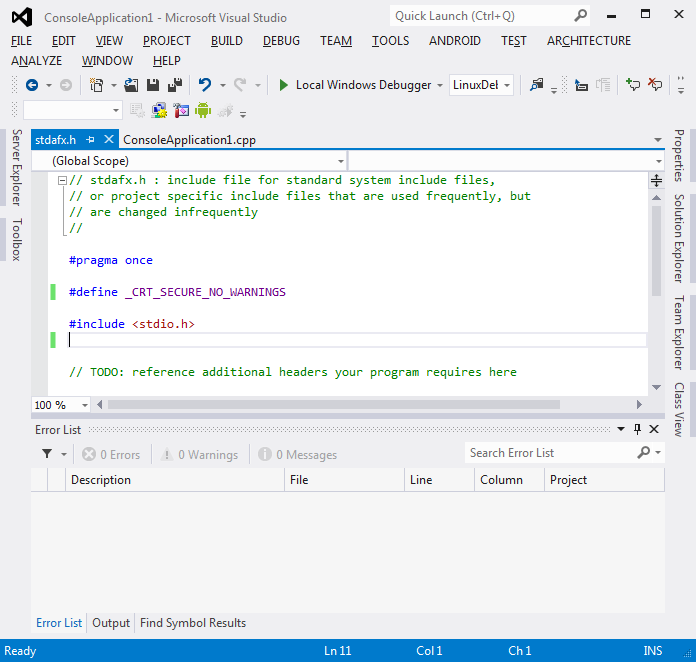
- Build the project. If the build complains about the getenv() function, add the following line to the beginning of stdafx.h:
#define _CRT_SECURE_NO_WARNINGS
Run the project and observe its output. Note that on Windows the HOME variable is undefined:

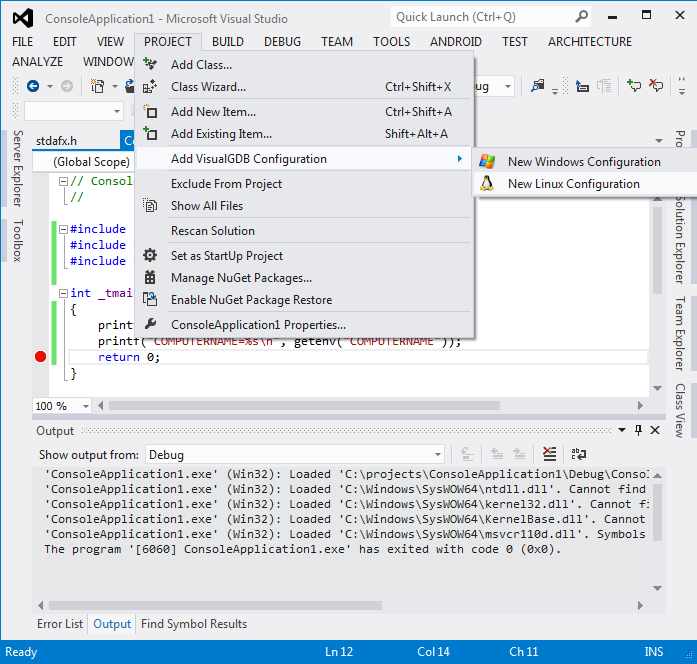
- Now we will create a new Linux configuration for the project. Select Project->Add VisualGDB Configuration->New Linux Configuration:
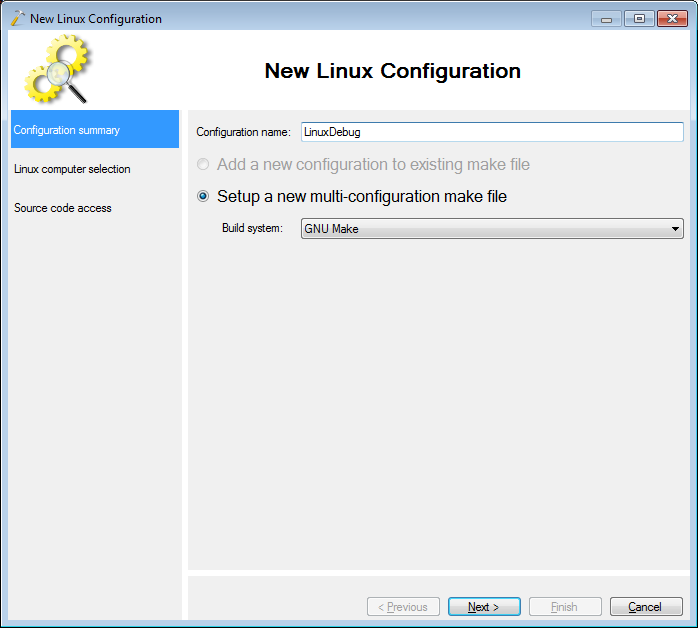
- VisualGDB will start the Linux Configuration Wizard. Enter “LinuxDebug” as the configuration name:

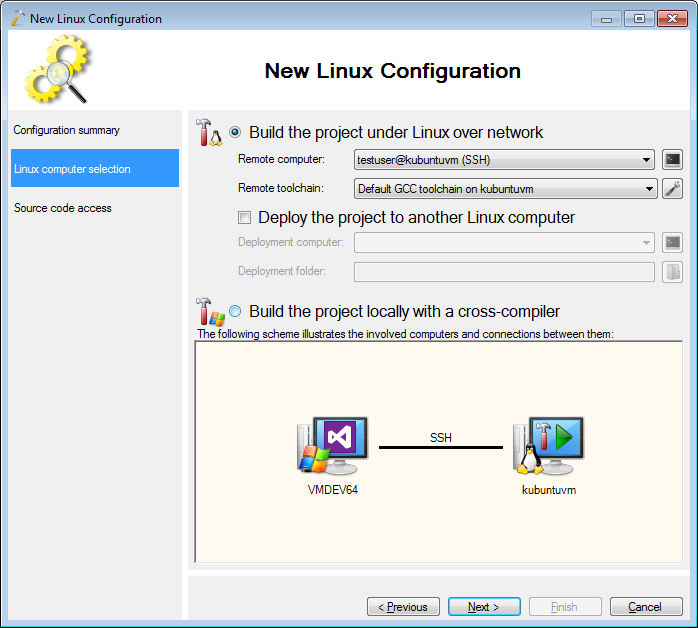
- On the next page select the Linux computer you want to use. You can also select a different toolchain:
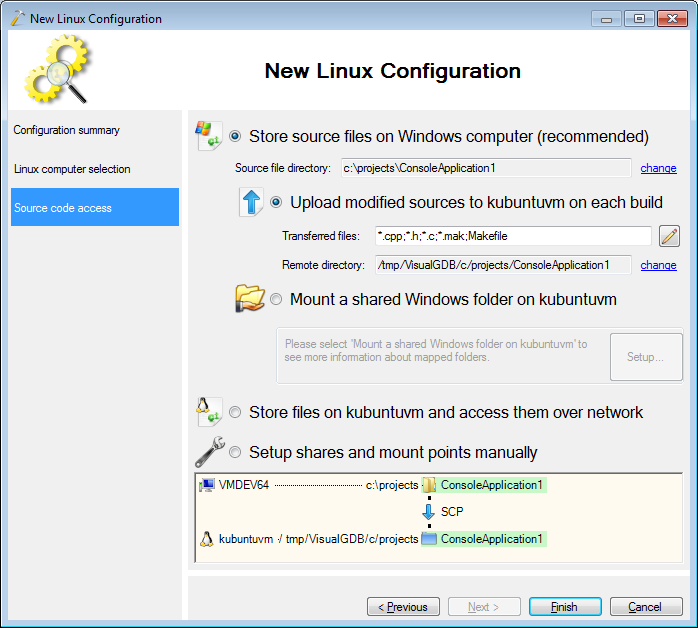
- The last page allows specifying the location of the source files on the Linux machine. You can proceed with the default settings:
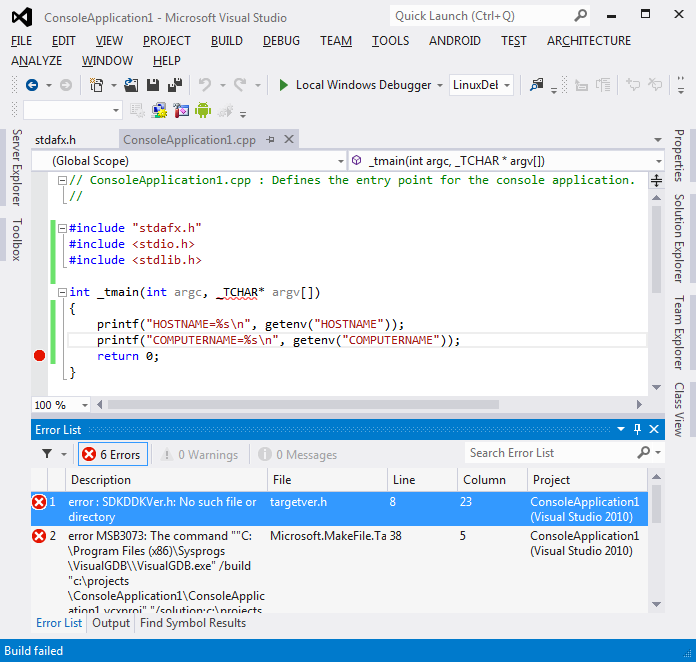
- When you press Finish, VisualGDB will create a new project configuration and a corresponding solution configuration. As certain Windows-specific files are missing on the Linux machine, the compilation will fail with several errors. We will fix them in the next steps:

- Open the stdafx.h file and remove references to SDKDDKVer.h and tchar.h:
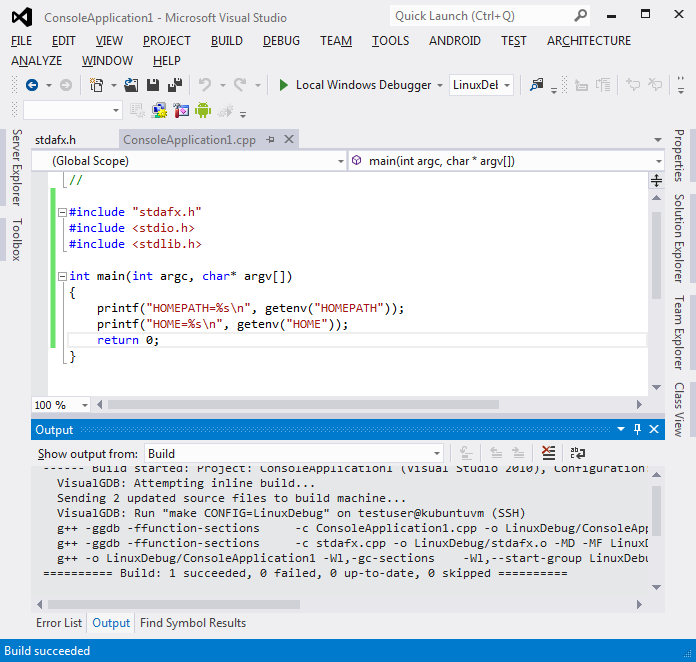
- Rename _tmain() to main() and replace _TCHAR with char. Build the project. You will notice that the modified source files will be transferred to the Linux machine and built there using GCC, the standard compiler on Linux systems:
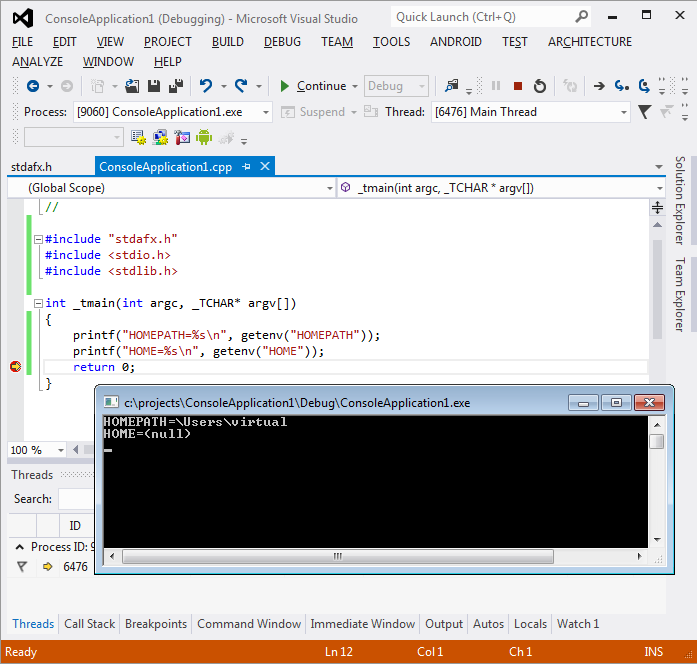
- Set a breakpoint on the return statement and run the program. Observe the output:
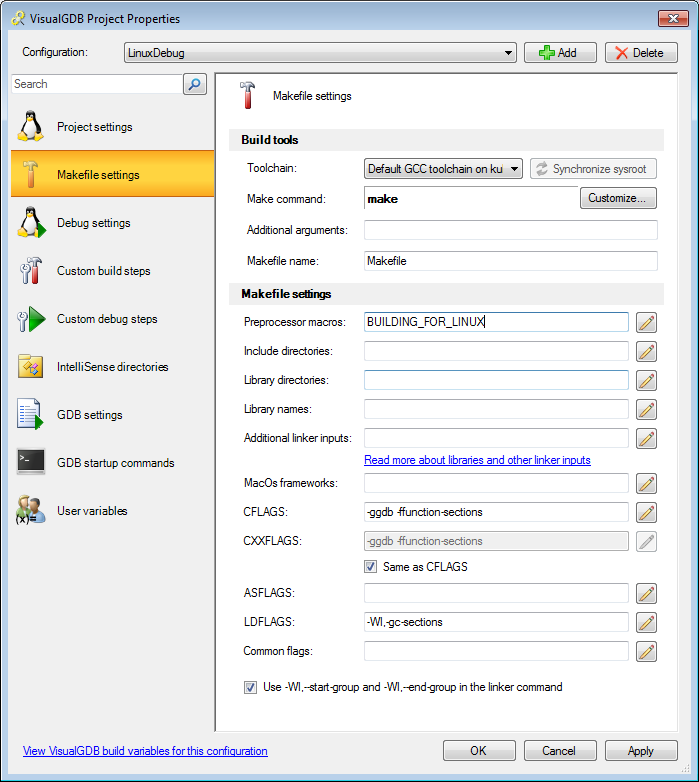
- As Windows and Linux use different variable names (HOMEPATH vs HOME), we had to write two separate getenv() lines. Now we will add conditional compilation statements to ensure that only one line is used on each OS. We could test for the _MSC_VER macro on Windows (that is set by the Visual C++ compiler) or the LINUX macro that is defined by Linux headers, however in this tutorial we will show how to add your own macro. Right-click on the project, select VisualGDB Project Properties and go to the Makefile Settings page. Add BUILDING_FOR_LINUX to Preprocessor Macros:

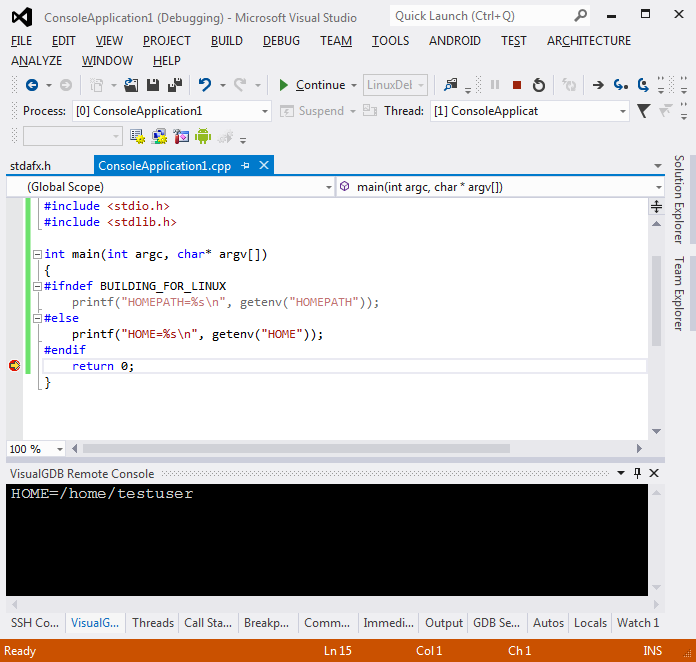
- Now press OK and add the #ifndef BUILDING_FOR_LINUX statement to your code. Build and run the program. Observe that the output only contains one line now:
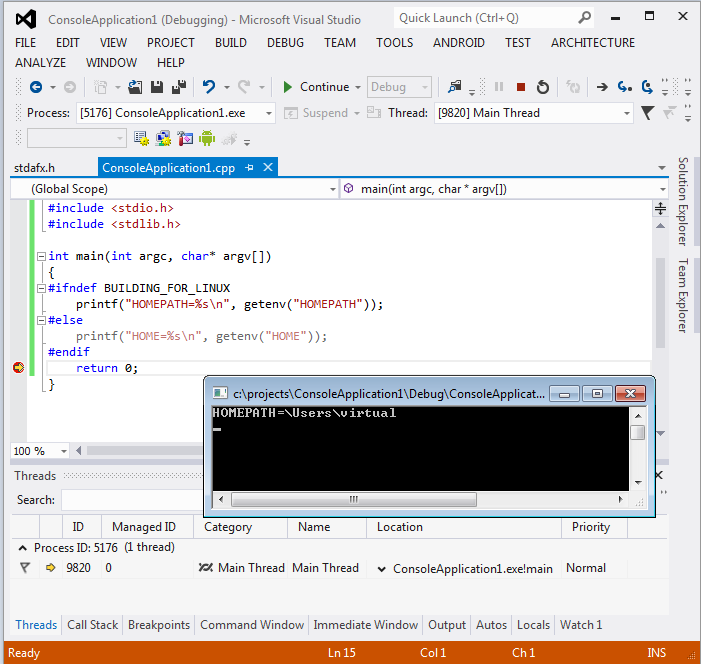
- Now switch the current configuration back to Debug and hit F5 to run the Windows version of your program:

- As most of the API (except for the basic standard functions) is different between Linux and Windows, you may want avoid having too many #ifdef statements and simplify your porting. You can accomplish this in one of the following ways:
- Use a multi-platform framework like QT that abstracts out the differences between platforms
- Install Cygwin and create a Cygwin configuration via Project->Add VisualGDB Configuration->Windows. Cygwin provides equivalents to most Linux APIs on Windows so once you have ported your app to Linux you can build the Windows version of it without too many changes.

If you are using Windows 10, you can also use the Windows Subsystem for Linux to build, debug and test your Linux code. See this tutorial for a detailed description.