Гарантия на продукции Razer в России
ВНИМАНИЕ: Гарантийное обслуживание оказывается по месту покупки продукции Razer.
Подробнее о гарантии в России можно узнать здесь.
Драйверы и Программы для настроек
Драйверы к устройствам Razer устанавливаются через программу Razer Synapse 3 или программу Razer Synapse 2.0, через эти же программы настраиваются устройства.
- Список всех устройств для Razer Synapse 3 указан здесь
- Список всех устройств для Razer Synapse 2.0 указан здесь
Если на странице продукта не указана совместимость с программой Razer Synapse 3 или Razer Synapse 2.0, то драйвер устанавливается операционной системой и его не нужно скачивать отдельно.
Дополнительные программы (7.1 Surround Sound, THX Spatial Audio, Razer Cortex, Razer Axon, Streamer Companion App, Razer Virtual Ring Light) можно скачать здесь.
Инструкции к устройствам
Инструкции к устройствам Razer можно скачать со страниц товаров, они расположены внизу страницы после технических характеристик.
Техническая поддержка
Техническая поддержка сайта консультирует только по вопросам настройки и подключения продукции Razer, и гарантийным вопросам.
По вопросам получения заказов следует обращаться к операторам отдела заказов.
-
Понедельник — Пятница: с 09:30 до 18:00 МСК
-
Суббота, Воскресенье: выходной.
-
Москва: +7 495 109-87-65
-
Регионы: 8-800-200-28-81 (бесплатный звонок по России)
- Электронная почта store@razer.ru
- Отправить письмо через форму на сайте.
- Чат на сайте расположен внизу каждой страницы сайта.
- Через чат можно заказать обратный звонок.
- Чат временно не доступен в мобильной версии сайта.
- Отправить письмо через форму RMA на сайте
- Ответы на вопросы (FAQ) на русском языке по продукции Razer находится здесь. Эта группа не является официальной технической поддержкой, но там содержится много полезной информации и решений различных вопросов.
Регистрация на сайтах Razer
Обратите внимание, что регистрация на сайтах www.razer.ru и www.razer.com разная:
- На RU сайте www.razer.ru регистрация только для покупок в фирменном интернет-магазине Razer в России.
- На COM сайте www.razer.com регистрация для получения Razer ID, регистрации продукции и авторизации в программах (Synapse, Cortex).
Razer DeathAdder Essential Driver. The Razer DeahAdder Essential is a gaming mouse designed for professionals equipped with advanced features, exceptional reliability due to proven durability and ergonomics. The Razer DeathAdder Essential gaming mice also offers 5 hiperesponse buttons and can last up to 10 million clicks which gives you a better gaming experience.
The Razer DeathAdder Essential also comes with hard & sturdy plastic material with the rubber scroll whell that allows you to open new tabs, close tabs and zoom pages in the browser easily. In addition, this convenient scroll wheel is also perfect for hours gaming.
Now you can easily adjust the DeathAdder Essential settings that can enhances your gaming skills. Such as Chroma RGB lighting customization, profile settings, macro recording and more on Windows devices by Razer Synapse 3.0. But before that, be sure your Windows OS version is compatible.
Supported Driver for Windows OS:
- Windows 7 (64-bit)
- Windows 8 (64-bit)
- Windows 8.1 (64-bit)
- Windows 10 (64-bit)
Software Installation
You can connect this Razer mouse to your PC using the compatible driver. But before that, make sure your Windows PC is connected to the internet, close all running Razer applications and it’s recommended to temporaly disable the antivirus program. You can follow the steps below to install the software:
- Download the driver via link in the table below.
- Open Download folder and double-click the file to run the software.
- Check the Razer Synapse box and clik [Install].
- Select [Skip and Continue] and wait installation complete.
- Reboot your PC if needed.
| Version | v1.0.148 |
| Languages | English, Chinese, French, German, Japanese, Korean, Russian, Spanish, Portuguese |
| Release Date | 14 November 2017 |
| Software Packages | Razer Synapse 3.0 Software for Windows Download (6.30 MB) |
-
Razer DeathAdder Essential
Версия:
6.2.9200.16384
(23 мар 2021)
Файл *.inf:
rzdev_006e_dkm.inf
Windows Vista
x64,
7
x64,
8
x64,
8.1
x64,
10/11
x64
-
Razer DeathAdder Essential
Версия:
6.2.9200.16384
(23 мар 2021)
Файл *.inf:
rzdev_006e_kbd.inf
Windows Vista
x64,
7
x64,
8
x64,
8.1
x64,
10/11
x64
-
Razer DeathAdder Essential
Версия:
6.2.9200.16384
(23 апр 2018)
Файл *.inf:
rzdev_006e_dkm.inf
Windows Vista
x86,
7
x86,
8
x86,
8.1
x86,
10/11
x86
-
Razer DeathAdder Essential
Версия:
6.2.9200.16384
(23 апр 2018)
Файл *.inf:
rzdev_006e_kbd.inf
Windows Vista
x86,
7
x86,
8
x86,
8.1
x86,
10/11
x86
В каталоге нет драйверов для Razer DeathAdder Essential под Windows.
Скачайте DriverHub для автоматического подбора драйвера.
Драйверы для Razer DeathAdder Essential собраны с официальных сайтов компаний-производителей и других проверенных источников.
Официальные пакеты драйверов помогут исправить ошибки и неполадки в работе Razer DeathAdder Essential (устройства ввода).
Скачать последние версии драйверов на Razer DeathAdder Essential для компьютеров и ноутбуков на Windows.
Outdated Razer Deathadder driver can cause many annoying mouse issues. To make sure your top-level Razer Deathadder works to its best performance, you need to always have the latest Razer Deathadder driver installed.
Try these methods
- How to update your Razer Deathadder Driver?
- Option 1 – Manually
- Option 2 – Automatically
- How to fix general Razer Deathadder issues?
- Mouse not responding at all?
- Mouse lagging, not moving?
There are two ways for you to get the download and install the latest Razer Deathadder drivers:
Option 1 – Manually – You’ll need some computer skills and patience to update your drivers this way because you need to find exactly the right driver online, download it and install it step by step.
OR
Option 2 – Automatically (Recommended) – This is the quickest and easiest option. It’s all done with just a couple of mouse clicks – easy even if you’re a computer newbie.
Option 1: Update your Razer Deathadder driver manually
To update your Razer Deathadder manually, you can download the latest legacy driver and install it manually, or you can download Razer Synapse 2.0 application to update and manage your Razer Deathadder.
1) Go to Razer Death Support for Driver Download. You can either download the driver directly or download the Razer Synapse software.
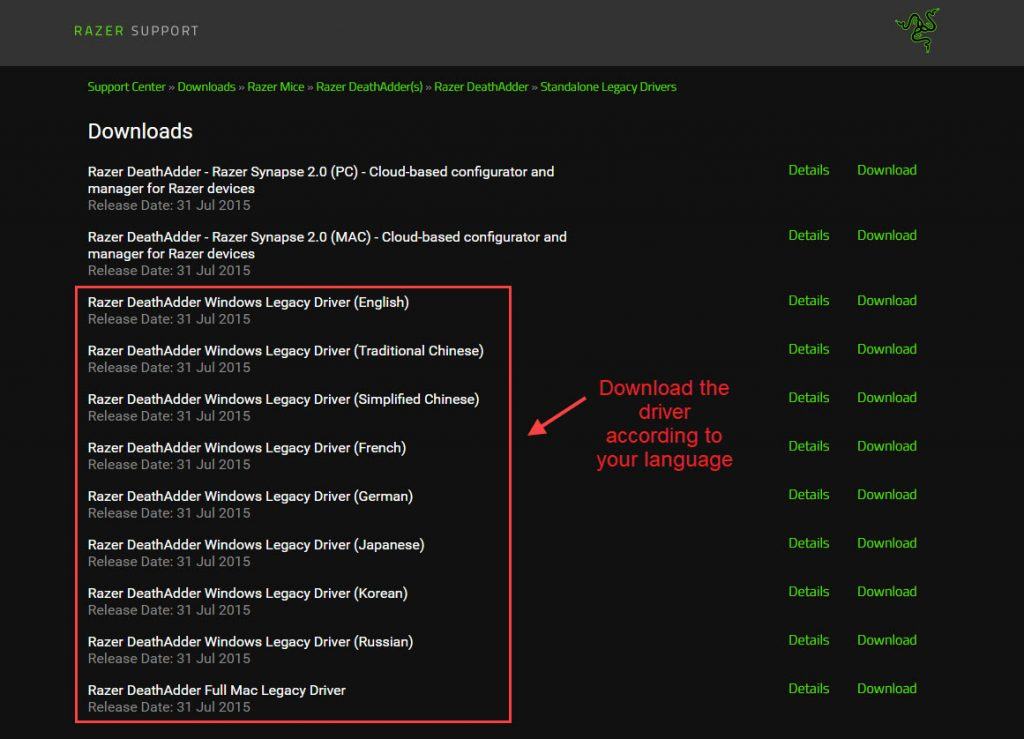
The Razer Synapse software is a cloud-based device manager that includes configuration settings for Razer mice and manages driver updates. It’s a useful kit for your Razer mouse. Unfortunately, it also includes frustrating bugs.
2) Double-click the downloaded file and follow the on-screen instructions to finish the install.
3) Restart your computer after finishing the install.
Option 2: Update your Razer Deathadder driver automatically (Recommended)
If you don’t have the time, patience, or computer skills to update the Razer Deathadder driver manually, you can do it automatically with Driver Easy.
Driver Easy will automatically recognize your system and find the correct drivers for it. You don’t need to know exactly what system your computer is running, you don’t need to risk downloading and installing the wrong driver, and you don’t need to worry about making a mistake when installing. Your Razer or any other mouse driver is no exception.
All the drivers in Driver Easy come straight from the manufacturer. They’re all authorized and secure.
You can update your drivers automatically with either the FREE or the Pro version of Driver Easy. But with the Pro version it takes just 2 clicks:
1) Download and install Driver Easy.
2) Run Driver Easy and click the Scan Now button. Driver Easy will then scan your computer and detect any problem drivers.
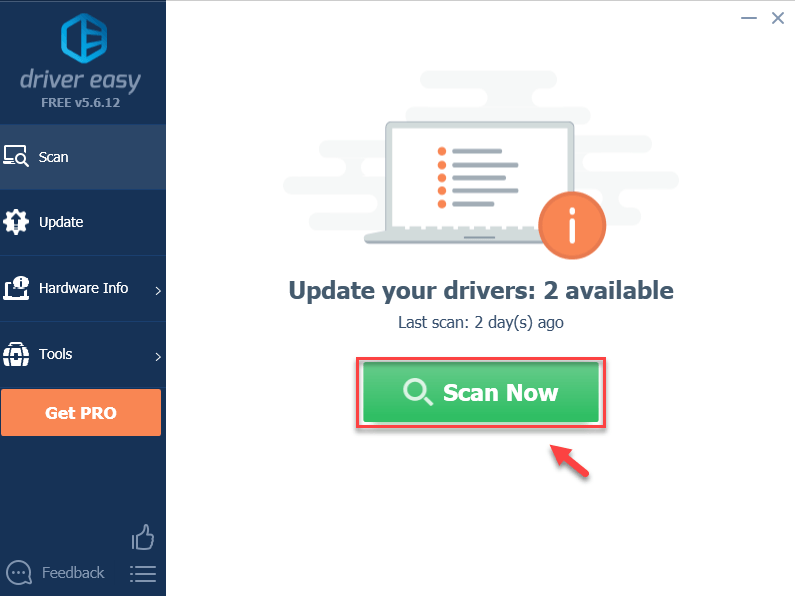
3) Click Update All to automatically download and install the correct version of all the drivers that are missing or out of date on your system (this requires the Pro version – you’ll be prompted to upgrade when you click Update All).
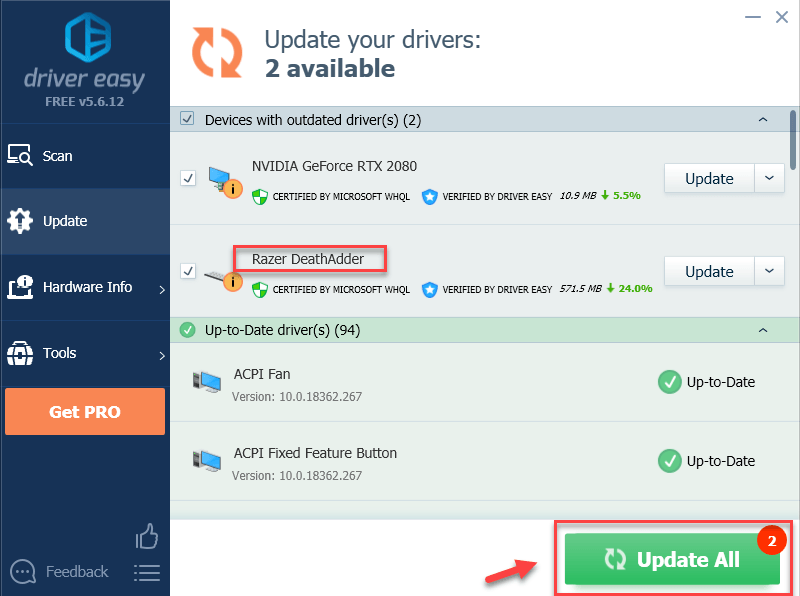
Note: You can do it for free if you like, but it’s partly manual.
If you need assistance, please contact Driver Easy Pro’s support team at support@drivereasy.com.
4) Restart your computer, then check if your Razer Deathadder mouse problem is resolved.
How to fix general Razer Deathadder issues?
Your Razer Deathadder mouse not working? Probably mouse lagging, freezing, stuttering. Or no lights, no cursor movement, no responding. No nothing. Whenever you bump into Razer Deathadder not working, you can try the following troubleshooting methods to solve the issue.
Mouse not responding at all?
- Try connecting to another PC
- Check your USB port and settings
- Uninstall your Razer Deathadder driver
1. Try connecting to another PC
If the mouse works properly on that computer, there should be something wrong with this computer that prevents your Razer Deathadder Mouse to work well. You can try these fixes below to solve the problem.
If the problem persists on another computer, it’s probably your mouse issue. You can check your warranty and contact Razer Support to have your mouse repaired or replaced.
2. Check your USB port and settings
If your Razer Mouse is not responding at all, you can check if the USB is firmly plugged in and try another USB port to see if it works.
If your mouse still doesn’t work, you might need a spare mouse to change USB power management.
Your Razer Deathadder not working can be caused by USB ports. In order to save power, Windows will turn off your USB when they’re idle. Sometimes, they fail to turn them back on. You can fix change the settings by following the steps below:
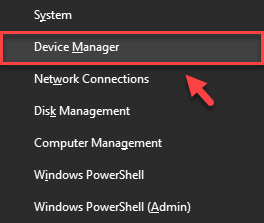
1) On your keyboard, press the Windows logo key and X at the same time, then select Device Manager.
2) In the Device Manager window, double-click on the Universal Serial Bus controllers to expand its drop-down list.
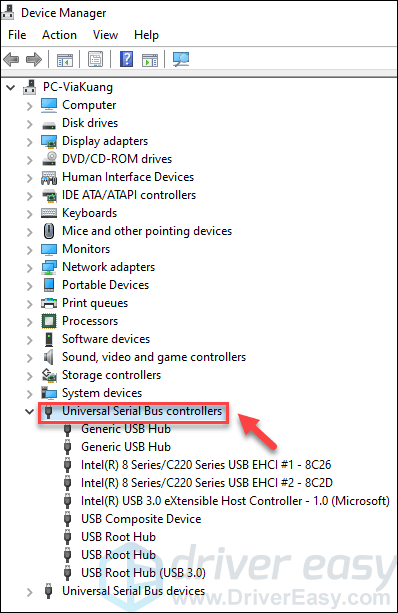
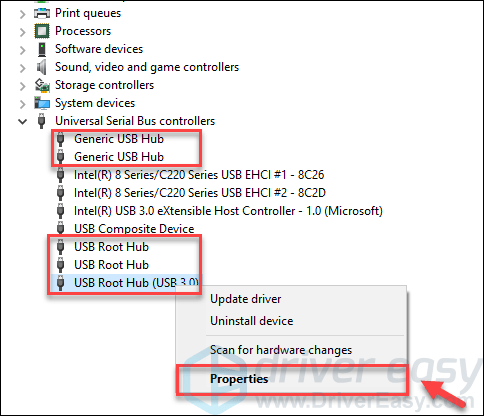
3) Right-click one of the USB Hubs and select Properties.
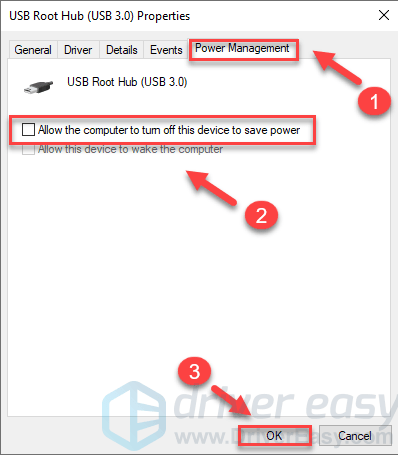
4) In the Properties window, select the Power Management tab, and deselect Allow the computer to turn off this device to save power, then click OK.
5) If there is more than one USB Hub on your PC, then repeat steps 3 and 4 above to apply the same settings to other USB Hubs.
After completing the steps above, you can check if your Razer Deathadder mouse works.
3. Uninstall your Razer Deathadder driver
You can always uninstall your Razer Deathadder driver if it’s not working. Here is how to do it:
1) Right-click the Start menu (the Windows logo icon) and select Device Manager.

2) Click View and select Show hidden devices. Double click Mouse and other pointing devices to expand the drop-down list.
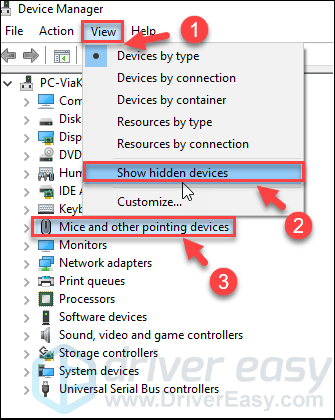
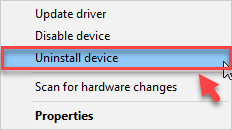
3) Right-click your Razer Deathadder driver and select Uninstall device. Also, uninstall all hidden supporting drivers.
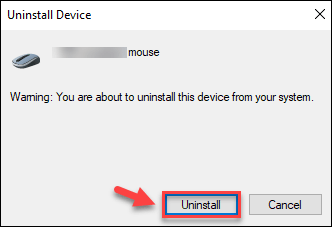
4) You will then be prompted to confirm your choice. Select Uninstall.
5) After uninstalling, you will not be able to use your mouse. Don’t worry, just unplug your mouse, then re-plug it to see if it works.
Windows will help you reinstall the driver for your mouse.
If your Razer Deathadder mouse still doesn’t work, you’ll need to move on to the next step.
Mouse lagging, not moving?
- Clean your mouse
- Adjust Razer Synapse Settings
1. Clean your mouse
If the cursor doesn’t move, it’s probably because your mouse’s sensor might be dirty.
Clean the sensor using a Q-tip lightly coated in rubbing alcohol. Let the sensor dry for 5 minutes before trying the mouse again.
2. Adjust Razer Synapse Settings
If you have installed Razer Synapse, adjusting a few Razer Synapse settings might fix random mouse freezes.
1) Open Razer Synapse.
2) Click the Performance tab, then adjust the Polling Rate set to 500 if required.
3) Click the Calibration tab, then select the Surface Calibration option if it’s not currently on.
5) If you don’t have a Razer mouse pad, select the Others option and your mouse pad. Follow the instructions to calibrate the mouse pad.
We hope this helps resolve your problem. If you have any questions, please feel free to leave us a comment below.
Are you struggling to download or update the Razer DeathAdder driver on your Windows 10 computer? In gaming, a high-performance mouse plays an important role. So it’s important to have the latest driver for your mouse. In this guide, we will take you through easy steps on how to download the Razer DeathAdder driver on Windows 10. So, let’s get started!
Table of Contents
With advanced yet easy-to-use features and a sleek design, it is an essential hardware component for gamers. Customizable settings including DPI sensitivity, RGB lighting, and polling rate tune the mouse for the ultimate gaming experience. Let’s download the driver.
1. Go to the official Razer website.
2. Find the latest driver for the Windows operating system running on your PC and in your preferred language in the list.
3. Click on the Download button to download the Razer DeathAdder driver.

Once the download is complete, we will install it.
4. Open the downloaded file to begin the installation process.
5. Follow the on-screen instructions to complete the installation of the Razer DeathAdder driver.

6. After the installation is complete, restart the PC to ensure that the driver is properly installed and functioning.
7. Once the PC has restarted, plug in the Razer DeathAdder mouse and wait for it to be detected by your computer.
How To Update Razer DeathAdder Driver On Windows 10
You may need to update the mouse driver in the future. Here are some methods you can follow to update the Razer DeathAdder driver on Windows 10.
Method 1: Update Razer DeathAdder Driver Via Windows Update
Updating the driver using Windows Update is the easiest and most convenient way. Here are some steps to do so:
1. Click on the Start menu and type Check for updates.

2. Click on Check for updates or Resume updates in the Windows Update tab.

3. If an update for the Razer DeathAdder driver is available, it will be displayed in the list. Click on Download and Install.
4. Once the update is complete, restart the PC.
Note: Windows Update may not always provide the latest version of the Razer DeathAdder driver. It is recommended to check the Razer website or use the Razer Synapse software to ensure that you have the latest version of the driver installed.
Method 2: Update Razer DeathAdder Driver Via Device Manager
You can also update the mouse driver using Device Manager in Windows 10.
1. Connect the Razer DeathAdder mouse to your computer via USB.
2. Press the Windows logo key + X key on your keyboard to open the Power User Menu.
3. Click on Device Manager from the list of options.
4. Locate the Mice and other pointing devices category and expand it by clicking on the arrow to the left of it.

5. Right-click on the Razer DeathAdder driver option and select Update driver from the context menu.
6. Select Search automatically for drivers.

7. Wait for Windows to search for and install the latest driver for your Razer DeathAdder mouse. Once the driver update process is complete, restart the PC to apply the changes.
Also Read: What Parts Are Needed to Build a Gaming PC?
Method 3: Update Via Bit Driver Updater
You also have the option to update your mouse driver using a third-party application. You can use Bit Driver Updater for this. Here are some steps you can follow:
Note: The information provided below is only for informational purposes. We do not endorse such third-party tools for subsequent usage.
1. Download and install Bit Driver Updater from the official website.
2. Launch the app and click on the Scan button to scan the system for outdated drivers.

3. Wait for the scan to complete, and then find the Razer DeathAdder driver in the list of outdated drivers.
4. Click on the Update Now button next to the Razer DeathAdder driver to begin the installation process.

5. Once the driver installation is complete, restart the PC.
Also Read: 22 Best MMO Wireless Gaming Mouse
Common Issues With Downloading Or Updating Razer DeathAdder Driver
You may encounter some issues while downloading or updating your Razer DeathAdder Driver. But don’t worry there are some solutions to resolve your issue.
Method 1: Connect Razer DeathAdder Mouse to Another PC
If you are still experiencing issues with the mouse driver even after updating, one solution to try is to connect the mouse to another PC. This will help you determine whether the issue is with the mouse or with the PC.
1. Unplug the mouse from the PC and connect it to another PC.
2. Check whether it is working properly now.
If it still doesn’t work, it may be a problem with the mouse itself. However, if it works, then the issue may be with the previous PC’s hardware or software. You can resolve that using the following methods.
Method 2: Uninstall And Reinstall Your Razer DeathAdder Driver
Sometimes there can be an issue with the installation process of the driver as well that could cause malfunctioning or unresponsiveness of the hardware component. This can be fixed by reinstalling the driver. You can follow our guide on How to Uninstall and Reinstall Drivers on Windows 10.

Method 3: Test USB Ports And Try Changing Their Settings
The issue may be related to your computer’s settings or USB ports. These are the steps you can follow to resolve it:
1. Plug the mouse into a different USB port on your computer. This will help you determine whether the issue is with the USB port or the mouse itself. If you are still facing issues, follow the next steps.
Note: These steps disable power management for all USB ports on your system.
2. Press the Windows key + X and select Device Manager.
3. Expand Universal Serial Bus controllers by clicking on the arrow to the left of it.
4. Right-click on each USB Root Hub and select Properties.

5. Click on the Power Management tab.
6. Uncheck the box next to Allow the computer to turn off this device to save power.
7. Click OK to save the changes.

Repeat the steps for each USB Root Hub in the list one after another and test the mouse. Do not forget to enable the power once the issue is detected. If there is an issue with any USB port, follow our guide on USB Ports Not Working in Windows 10 [SOLVED]
Also Read: 15 Best DisplayPort Cables for Gaming
Method 4: Try Changing Razer Synapse Settings
If you have Razer Synapse software installed on your computer and are experiencing random mouse issues like lagging or crashing, you may be able to resolve them by adjusting the software settings.
1. Open the Razer Synapse software and go to the Performance option.
2. Set the polling rate to 500 if necessary.
3. Choose the Calibration option and click on Surface Calibration if it’s not already enabled.
4. Follow the on-screen instructions to complete the calibration process, which will help your mouse function better.
5. If you don’t have a Razer mouse pad, choose the Others option and follow the on-screen instructions to calibrate your mouse pad.
That’s it. The issue should be resolved.
We hope this guide helped you learn how to download the Razer DeathAdder driver on Windows 10. Let us know which method was the easiest and most effective for you to download or update the driver. If you’re still facing any issues, please feel free to share them in the comments section.