Today we’re introducing a simple solution to install everything you need to develop for Raspberry Pi Pico, and for other RP2040-based boards, using C or C++ on Windows.
If you want to get started with the Raspberry Pi Pico C SDK it can initially seem quite daunting. There are a lot of moving parts to install before you can blink your first LED on, and then off again, especially if you want proper debugging using something like our new Debug Probe. While there has been a “one click” solution to install the toolchain on a Raspberry Pi since launch — see Chapter 1 of the Getting Started guide — installing the toolchain on other platforms like Apple’s macOS, or Microsoft’s Windows, has always been a little more difficult.

When we launched Raspberry Pi Pico and its SDK, our assumption was that people would be happy with a Linux-based toolchain. However, we also documented how to get the toolchain up and working on both Apple’s macOS and Microsoft Windows for folks that wanted to use those platforms. Unfortunately, while installing the SDK on macOS isn’t too different from doing so under Linux, and works almost out of the box, installing things on Windows is much more difficult; it’s just a very different environment.
Fortunately, an enterprising young engineer called Nikhil Dabas decided to see whether he could do better. It turned out, of course, that he could, so I asked him to help us create something even better: a complete integrated installation package that would give people a nice, easy way of building and debugging the Pico-SDK.
Installing the toolchain
Installing the toolchain is now as simple as downloading, and running, the Pico Installer.
At the end, the installer will offer to clone and build the Pico examples, giving you the option of changing where the examples are installed. Leave that ticked, and the installer will open a command window to do the initial checkout and build of all the Pico repositories. Once done, you can safely close this window.
Starting Visual Studio Code
In your Start Menu, look for the “Pico – Visual Studio Code” shortcut, in the “Raspberry Pi” folder. The shortcut sets the required environment variables and then launches Visual Studio Code.

The first time Visual Studio Code is launched using the Start Menu shortcut, it will open the pico-examples folder. To open the folder later, use the “Open Recent” or “Open Folder” menu options and navigate to your Documents/Pico-v1.5.0/ directory, or wherever you installed the examples.
Building the Hello Serial example
If you previously didn’t have VS Code installed, everything should ‘just work’ after installation. But often we’ve seen problems due to various random settings inserted by other extensions, or by the user, in an existing installation. If this is the case for you, please go to the Pico Installer Wiki for a checklist of known issues and solutions.
Visual Studio Code may ask if you want to configure the pico-examples project when it is first opened; click “Yes” on that prompt to proceed, if you miss the prompt look for the ‘bell icon’ in the bottom right. If it doesn’t ask, you can click on the blue status bar where it says ‘No active kit’ and select Pico ARM GCC.
To build the example, click the CMake button on the sidebar. You should be presented with a tree view of the example projects; expand the ‘hello_world’ and ‘serial’ trees, and click the small ‘build’ icon to build that specific project. You should take a note of the [hello_serial] tag down in the CMake toolbar at the bottom of the screen, you can use this to change the target at any time.
Debugging your example application
To debug your hello_serial example, you should use the new Raspberry Pi Debug Probe or set up your own PicoProbe using a second Raspberry Pi Pico. If you don’t have a Debug Probe, see Appendix A of the Getting Started guide for instructions on setting up a second Pico as a PicoProbe.

To quickly check you’ve set this up properly, in Visual Studio Code, click on the SERIAL MONITOR tab. When you plug in your Debug Probe (or PicoProbe) you should see an additional COM port in the port drop-down list. You should leave the baud rate set to the default of 115,200 in most cases.
Click ‘Start Monitoring’ to open the serial port.
Let’s start debugging
Assuming you have wired up the Debug Probe to your Pico correctly, press F5 to start debugging or click the Run and Debug button (Ctrl-Shift-D) on the sidebar and then small ‘play’ icon at the top of the debug window.
Your selected target should now be built, uploaded, and started. The debugger interface will load and will pause the execution of the code at the main() entry point. At this point, you can use the usual debugging tools to step, set breakpoints, inspect memory, and so on. Hit “Run”, and you should now be able to switch back to the SERIAL MONITOR tab to see the serial output appear.
Next steps
For more information about creating your own project outside of the pico-examples see the tutorial in the code, or look at Chapter 8 of the Getting Started guide for a full walkthrough.
This tutorial will show you how to install the Raspberry Pi Pico toolchain on Windows 10 for C and C++ development.
Raspberry Pi has a fantastic getting started guide for the Pico that covers installation steps for the major operating systems. On Linux (specifically, most flavors of Debian), you can run a single script that will install everything for you. On macOS, you need to use Homebrew to install the toolchain, which is only a few commands in the terminal.
Windows, however, is a different story. Installing the toolchain is an arduous process, requiring multiple programs and manually modifying the Windows Path. The Raspberry Pi Pico getting started guide shows you how to do this, but I have issues with two parts: you need to install Build Tools for Visual Studio (around 6 GB) and you must run VS Code from within a Developer Command Prompt every time.
This guide walks you through an alternative way of installing the C/C++ toolchain for the Pico, using MinGW in place of the Build Tools for Visual Studio.
Directory Setup
With the exception of CMake and Python, we will want all of our tools and SDK files to exist in one folder on Windows. This setup will make it easy to configure the Path and find things later on.
Create a folder named VSARM in the top level of your C drive.
In C:\VSARM, create the following folders:
- C:\VSARM\armcc
- C:\VSARM\lib
- C:\VSARM\mingw
- C:\VSARM\sdk
Note that this directory structure is similar to how you might set up other Arm compiler tools and SDKs (such as this STM32 toolchain setup). You should be able to keep all of your Arm development tools in the VSARM directory and have them coexist with other tools and SDKs.
We use these short, one-word folder names to keep paths short and to avoid spaces. Some Unix/Linux tools (that have been ported to Windows) do not work well with paths that have spaces in them.
Install GNU Arm Embedded Toolchain
The GNU Arm Embedded Toolchain contains the Arm GCC compiler that we need to compile C and C++ code for the RP2040.
Head to the GNU Arm Embedded Toolchain download page and download the latest installer for Windows. For me, this was gcc-arm-none-eabi-10-2020-q4-major-win32.exe.
[Update Apr 19, 2022] I have verified that Arm GNU Embedded Toolchain 11.2-2022.02 works.
Run the installer. When asked, change the installation location to C:\VSARM\armcc. It will auto-fill the destination directory to the name of the current toolchain release.
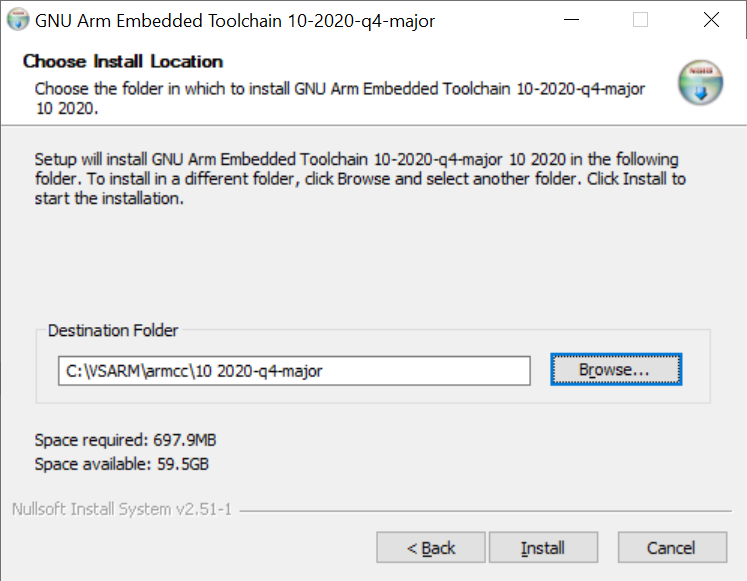
Continue with the installation process. When it is complete, select the option to Add path to environment variable.
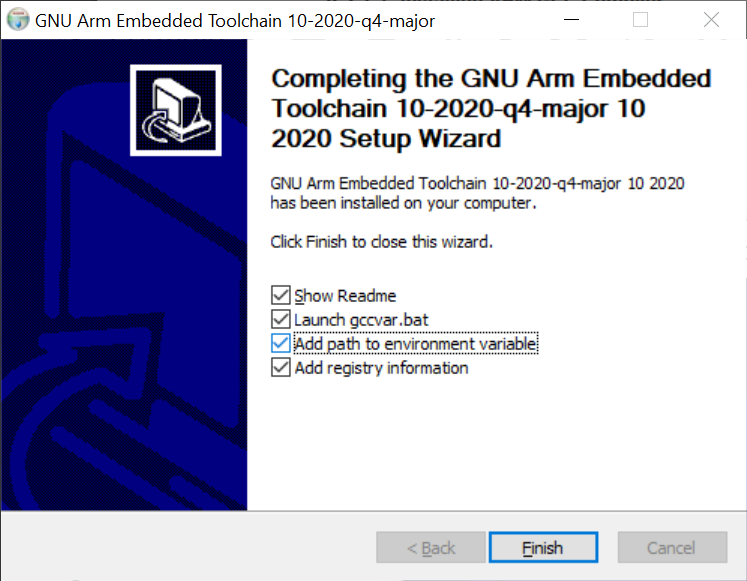
At this point, you should be able to call any of the Arm compiler tools in a new command prompt, such as arm-none-eabi-gcc.exe.
Install MinGW-w64 GCC Tools
MinGW (short for Minimalist GNU for Windows) is a collection of open-source utilities, such as compilers and linkers, that allow us to build applications for Windows.
When we build Pico projects, we need to compile the elf2uf2 and pioasm tools from source. These tools run on our computer (not the target RP2040 microcontroller), and we need a native compiler and linker. The original Getting Started guide has us install Build Tools for Visual Studio to get a Windows compiler (cl.exe), linker (link.exe), and make tool (nmake.exe). We’re going to use the open-source GNU suite (e.g. gcc, ld, make) for Windows instead.
[Updated Apr 19, 2022] Note: at this time, the MinGW (.exe) installer appears to be broken. You will likely see the error message “The file has been downloaded incorrectly!” As a result, I have updated the portion below to download only the MinGW-W64 GCC files (tested with v8.1.0), as that’s all we need to compile Pico programs.
Head to the MinGW-W64 files page on SourceForge: https://sourceforge.net/projects/mingw-w64/files/.
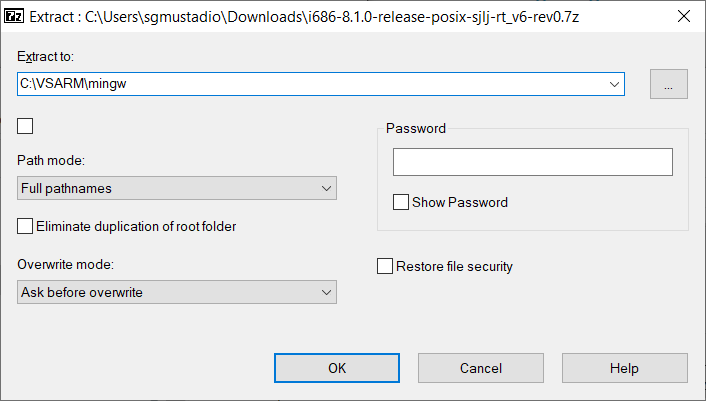
Download the i686-posix-sjlj zip file for your desired MinGW-W64 GCC version (e.g. 8.1.0).
Use 7-Zip to unzip it into the C:\VSARM\mingw directory. Uncheck the named unzip directory so that when everything unzips, you should have C:\VSARM\mingw\mingw32.
When it’s done, open a Windows Command Prompt and enter the following into the terminal:
echo mingw32-make %* > C:\VSARM\mingw\mingw32\bin\make.bat
This creates a wrapper batch file that will call the mingw32-make tool whenever you type make into a Windows terminal. We will update the Windows Path to find all of the tools in mingw32\bin (along with this .bat file) in a later step.
Install CMake
CMake is a tool that helps you automate the build process of programs. It does not build/compile (like Make does), but rather, it can generate the directory structures and files needed for any build system (Make, Qt Creator, Ninja, etc.). The Raspberry Pi Pico SDK relies on CMake to help create these build files.
Head to the download page on CMake’s site.
Important! There is a bug in CMake version 3.20 (at the time of writing). On the second run of make or nmake (after running cmake), the process will fail. If you’re using nmake, you’ll get an error like fatal error U1033: syntax error : ':' unexpected, or if you’re using mingw32-make, something like *** multiple target patterns. Stop. To prevent this, install CMake version 3.19. Future versions of CMake may fix this bug, but for now, know that version 3.19 worked for me.
[Update Apr 19, 2022] I have verified that CMake 3.23.1 now works. The bug has been fixed.
Download the version 3.19.8 installer for Windows (cmake-3.19.8-win64-x64.msi).
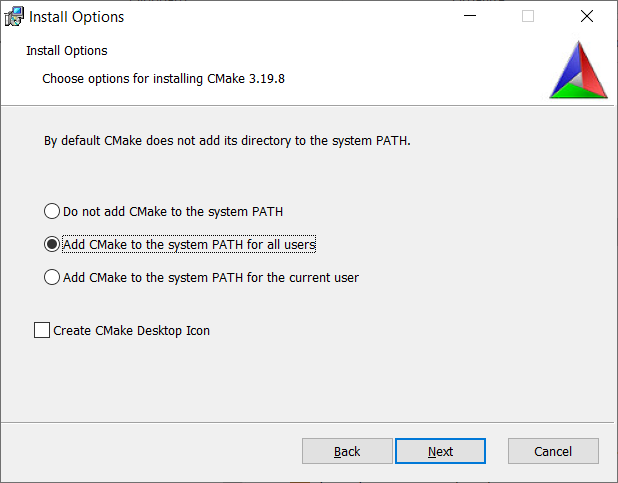
Run the installer and accept the user license. On Install Options, select Add CMake to the system PATH for all users.
Continue the installation process, accepting all the defaults. Note that this will install CMake to C:\Program Files\CMake, which is fine, as it will be used as a system-wide tool (not just for VSARM projects).
Install Python
The Pico SDK relies on Python to script and automate some of the build functions.
Important! At the time of writing, the Pico SDK recommends Python version 3.9. I do not know if other versions will work.
[Update Apr 19, 2022] I have verified that Python 3.10.2 works.
Head to the downloads page on the Python site. Download the latest Python 3.9 (or 3.10) installer.
Run the installer. On the first screen, make sure that Install launcher for all users (recommended) is checked and check Add Python 3.9 to PATH.
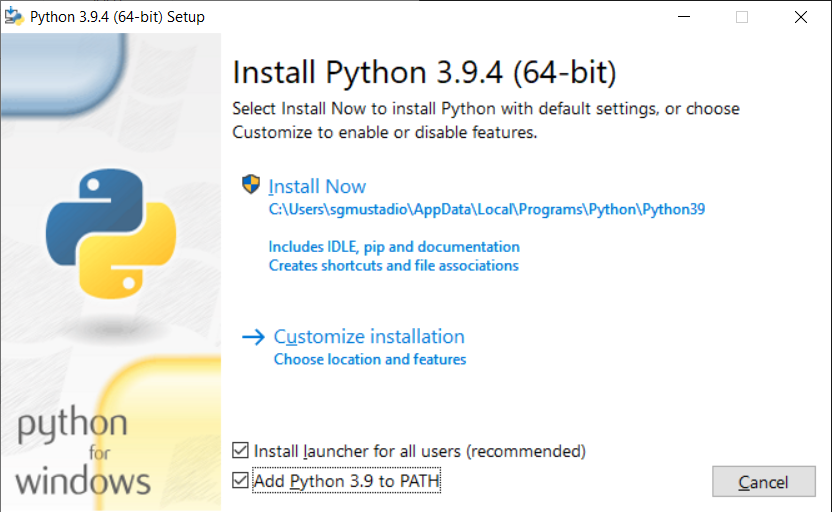
Click Install Now and wait while it installs Python.
At the end of the installation process, select the option to disable the MAX_PATH length limit.
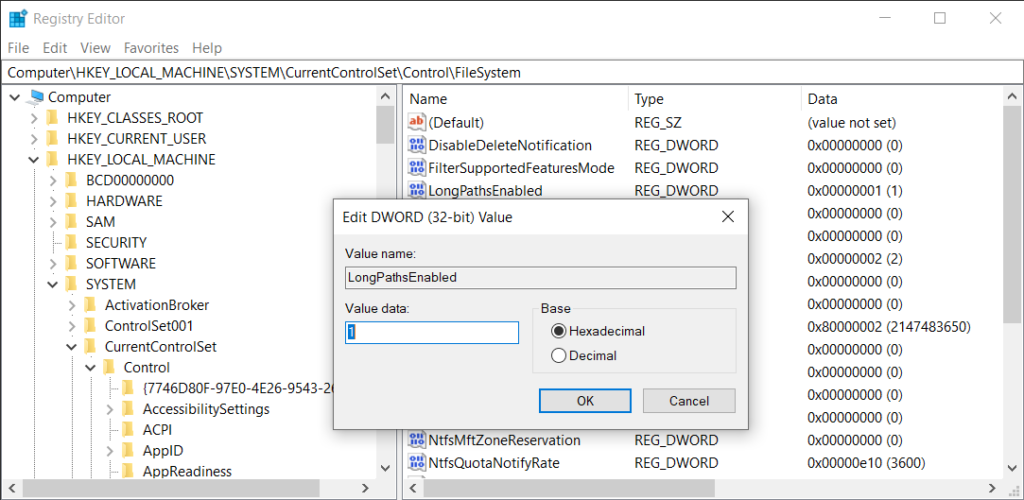
Important! If you were not asked to disable the MAX_PATH length limit, you will want to make sure that long paths are enabled. The Pico SDK (and many other SDKs) often have long, nested folders, resulting in pathnames that exceed the original Windows limit (260 characters).
To enable long paths, search for regedit in the Windows search bar and run the Registry Editor program. Navigate to Computer\HKEY_LOCAL_MACHINE\SYSTEM\CurrentControlSet\Control\FileSystem and add an entry (if one is not already there) for LongPathsEnabled. Change Value data to 1 and Base to Hexadecimal.
Here is a full guide if you need help modifying the registry to disable the pathname limit.
Install Git
Git makes downloading the Pico SDK much easier, and the Windows version comes with Git Bash, which is a super useful shell. We can change the shell in VS Code to Git Bash so that the command line works just like in Linux.
Head to the Git SCM download page and download the latest installer for Windows (e.g. 32-bit Git for Windows Setup).
Run the installer. When you get to the screen asking you to choose a default editor, feel free to pick whatever you want. I kept vim because I know it (barely) well enough to edit git comments.
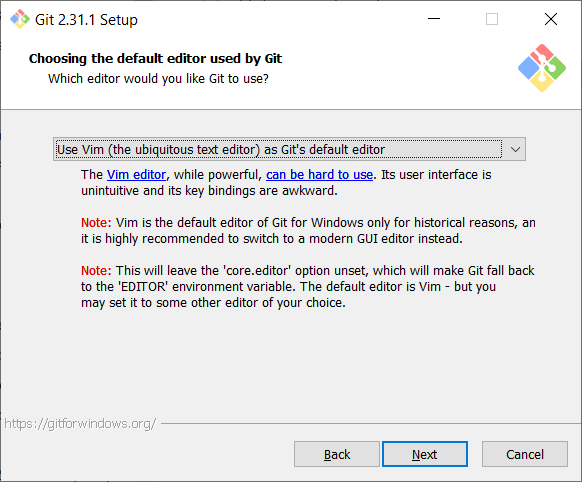
Continue the installation process, accepting all the defaults.
Download Pico SDK and Examples
The Pico SDK conains a collection of tools and libraries used to make developing on the Pico (and RP2040) much easier. We can also download a set of C/C++ examples that are useful demonstrations of how to use the SDK.
To start, create a new folder named pico in C:\VSARM\sdk.
While you could download the .zip versions of the SDK and examples repositories, it’s much easier to use git. There are nested submodules that you would need to download from other repositories, but one command in Git Bash takes care of that for us.
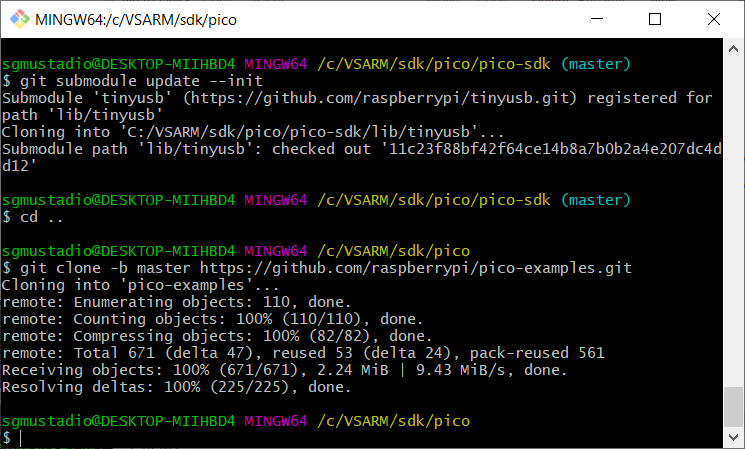
Open Git Bash and enter the following commands.
cd /c/VSARM/sdk/pico
git clone -b master https://github.com/raspberrypi/pico-sdk.git
cd pico-sdk
git submodule update --init
cd ..
git clone -b master https://github.com/raspberrypi/pico-examples.git
At this point, you should have all of the necessary build tools, SDK, and examples installed to start developing programs for the Raspberry Pi Pico and RP2040.
Update Environment Variables
Some of the tools we installed automatically updated the Windows environment variables (specifically, the Path). However, a few (like MinGW and the SDK) did not. We need to update the environment variables so that the shell and various build tools know where to find things in our filesystem.
In the Windows search bar, enter env. Click on Edit the system environment variables.
In that window, click on Environment Variables…
Under User variables for <username>, select Path and click Edit.
Add C:\VSARM\mingw\mingw32\bin as a new entry. This will allow us to use things like gcc and ld to build C and C++ programs for Windows.
Make sure you see the following entries listed:
- C:\VSARM\armcc\<release version>\bin
- C:\VSARM\mingw\mingw32\bin
You might see an entry for Python39 if you chose to install Python for the current user (as I did).
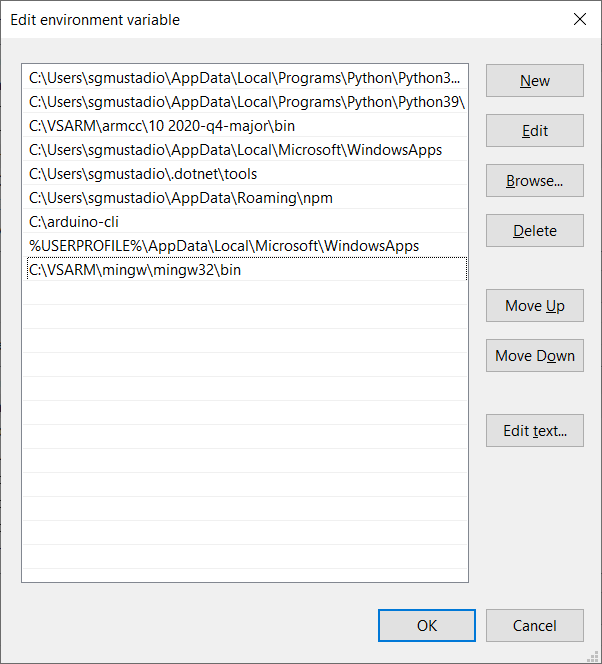
Click OK to exit the user Path window.
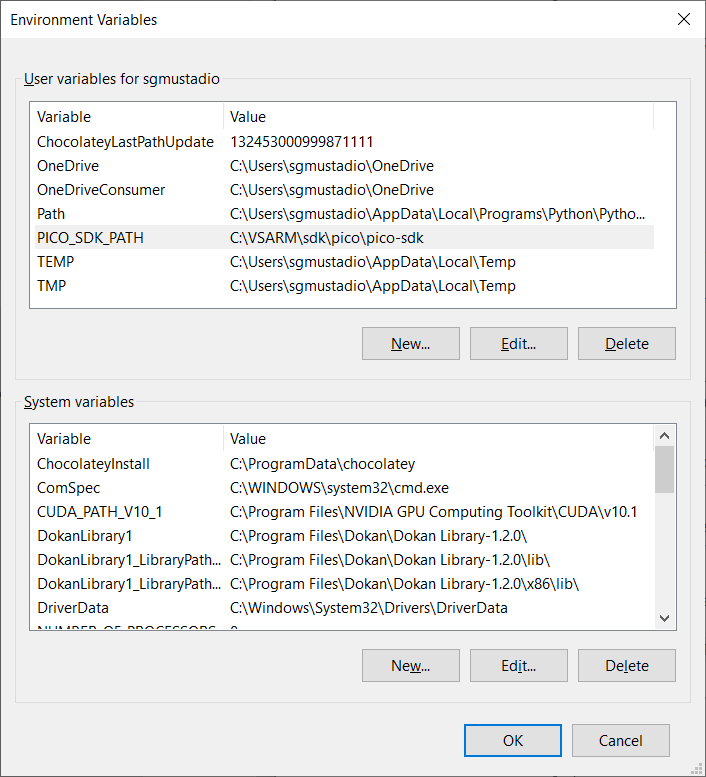
Under User variables for <username>, click New… and add the following entry:
- Variable name: PICO_SDK_PATH
- Variable value: C:\VSARM\sdk\pico\pico-sdk
Click OK to save the environment variable. At this point, your User Variables should have an updated Path as well as PICO_SDK_PATH variables.
Under System variables, select Path and click Edit. Check to make sure you see the following entries (add them if you do not see them):
- C:\Program Files\CMake\bin
- C:\Program Files\Git\cmd
These entries should have been automatically added to your system-wide Path when you ran their installers. You might also see an entry for Python39 (or Python310) if you chose to install Python for all users.
Click OK on all 3 of the open windows to close them and save changes.
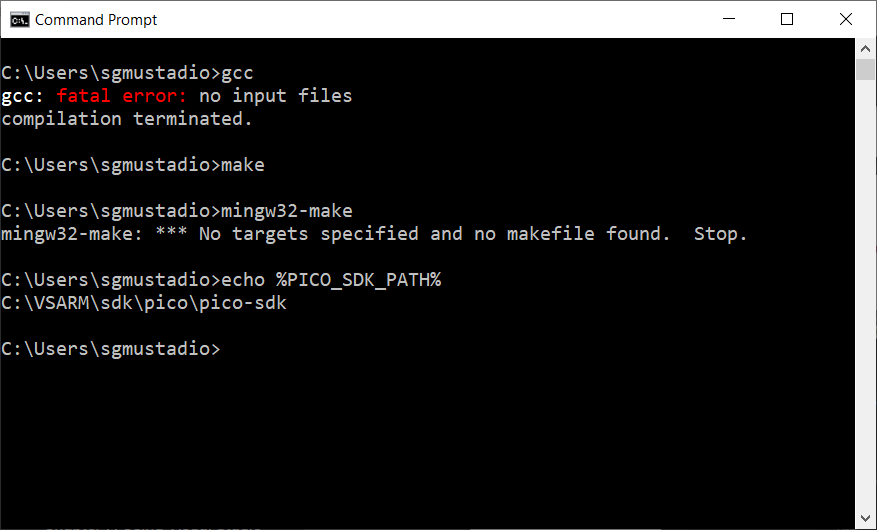
At this point, you should be able to open a commend prompt and enter commands like gcc, make, and echo %PICO_SDK_PATH% to make sure the environment variables were set correctly.
Install VS Code
Visual Studio Code (VS Code) is a great, cross-platform text editor that offers highly configurable plugins. With the right plugins, you can essentially turn VS Code into a full-fledged integrated development environment (IDE) with step-through debugging! I’ll only show the basics for now so you can get your VS Code on Windows to act like VS Code on other operating systems when working with the Pico.
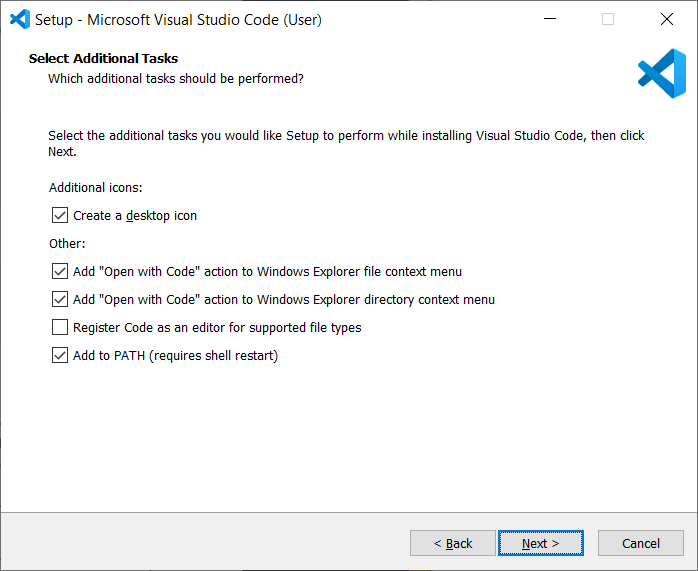
Head to code.visualstudio.com and download the latest release for Windows.
Run the installer and accept all of the defaults. You’re welcome to create a desktop icon and add “Open with Code” to the Windows Explorer context menu. I like to enable these options, but they’re not necessary.
When the installer is done, it’s time to test building a program for the Pico.
Build Blink Example
You should be able to build Pico code from any command prompt at this point. However, we’re going to do so in VS Code to show how it might be done during development.
Open VS Code. Click Terminal > New Terminal. The default terminal that opens is likely Windows PowerShell. I recommend changing this to Git Bash by clicking on the drop-down menu and selecting New Git Bash.
Just like we did with the make.bat file (for Windows terminals), I recommend creating an alias for mingw32-make.exe in Git Bash. Enter the following commands (you will only need to do this once):
echo "alias make=mingw32-make.exe" >> ~/.bashrc
source ~/.bashrc
Build the blink example by entering the following commands into your terminal:
cd /c/VSARM/sdk/pico/pico-examples/
mkdir build
cd build
cmake -G "MinGW Makefiles" ..
cd blink
make
Important! Any time you call CMake from a terminal like this, you will need to specify “MinGW Makefiles” as the build system generator (-G option).
This should build the blink example and generate the .elf, .hex, and .uf2 binary files. We can easily upload the .uf2 file to our Pico without any special tools.
Put the Pico board into bootloader mode (press and hold the BOOTSEL button while plugging a USB cable into the Pico).
Find which drive letter the RPI-RP2 drive is mounted to (e.g. it was G: for me). Enter the following into Git Bash (change the drive letter as necessary):
cp blink.uf2 /g/
Your Pico board should be blinking away!
I hope this has helped you get started using the Raspberry Pi Pico SDK on Windows! I personally found that relying on MinGW for the compiler tools was easier than using Build Tools for Visual Studio.
From here, you can set up VS Code any way you like with various plugins like CMake Tools. I did not cover setting up debugging and other tools (picotool, gdb, OpenOCD, etc.), which are topics for another time. For now, I recommend referring to the Pico C/C++ Getting Started Guide to see how to configure those tools in VS Code.
Happy hacking!
[Update May 23, 2021] Since posting this, I have made a video (for Digi-Key) that shows you how to use VS Code plugins for one-click CMake and building. You can see that video here.
Everyone got excited about Raspberry Pi Pico – the latest product from the Raspberry Pi Foundation. I promptly bought 3 of them (max per person at the time of purchase) just in case I will make some grave mistakes resulting in boards giving up their lives. Unfortunately, SDK for Raspberry Pi Pico is a bit of a mess right now. I’m here to give you a quick guide on how to get started with Raspberry Pi Pico, so you don’t have to read 270 & 70 pages PDFs.
A “raspberry”, but different

Raspberry Pi Pico is a completely new animal to Raspberry Pi lineup. It’s a microcontroller, so there is no Raspbian OS to play with. Instead, the boards come with 2 most popular programming languages in the maker’s space: C/C++ and MicroPython. As I found out in my 1.5h livestream, getting started can be messy if this is your 1st time holding the board in your hands.
Encouraged by others and my mistakes, I’m here to make it work for you in a couple of minutes so all the frustration is removed from the process. This guide is for Windows devices, as this is how I do most of my tinkering with microcontrollers.
If you want a fast start – pick MicroPhyton, C/C++ is a mess right now to set up.
Getting started with MicroPhyton and Raspberry Pi Pico
To play with Raspberry Pi Pico on Windows, you will need 1 download. The Foundation recommends Thonny (Windows) as your IDE as it comes with everything you need (including Python 3.7), but you can also install the latest version of Python 3.x as the system-wide language installer in case you need some extras for your projects.

Open Thonny and go to Tools>Options>Interpreter and select MicroPython (Raspberry Pi Pico). You can leave the port configuration to automatic. Then hit “Install or update firmware” before clicking OK.
As per instructions, you have to plug the USB cable while holding the button on the Raspberry Pi Pico. When done, OK all windows and click Run (green play button) to verify that you can connect to your microcontroller. If everything went well, you should see something like this:
You are ready to program with MicroPython. Any application written in this window will be processed by Raspberry Pi Pico and results returned in the shell window below. Don’t forget to save your files as name.py. You can store it locally on your PC as well, but to run them, you should save it on Raspberry Pi Pico.

While you can have as many files saved as you want, to run them without a computer, Raspberry Pi Pico has to know where to start. The file that will run on boot should be saved as main.py. If you don’t do this, your script won’t run when connected to a power supply.
If your project includes external libraries, you have to open the files and save it to Raspberry Pi Pico as well. Here is a sample off LED library from benevpi/pico_python_ws2812b:


And you are ready to take on the world with MicroPhyton and Raspberry Pi Pico!
Getting started with C/C++ and Raspberry Pi Pico
I spent a couple of hours trying to figure out what is the correct process of setting up SDK for C/C++ on my Windows machine. I carefully followed official instructions but I run into errors. To make the process more complicated, it’s not a case of installing one thing and just rolling with it. In the world filled with alternative microcontrollers that simply work with PlatformIO or Arduino IDE, Raspberry Pi Pico SDK falls really short.
The only light in the tunnel is the cooperation with Arduino. As they will also get RP2040-based microcontroller, I’m pretty sure that programming in C/C++ will be as easy as selecting the correct board from the board manager in Arduino IDE.

If you want to give it a shot here is what you have to do. Download all programs listed below (yes, this is why I’m not too impressed with the toolchain):
- Python 3.x
- ARM GCC compiler
- CMake
- Build Tools for Visual Studio 2019 (C++ build tools only)
- Visual Studio Code
- pico-sdk tools
During the installation, please pay attention to the installer options and make sure the following items are selected:
Python: Add Path, Install for all users
AGM GCC compiler: Add Path (all options selected, the installer may hang at the end so give it time)
CMAKE: Add Path
Build Tools for Visual Studio: Install C++ only with default options
pico-sdk: download the zip and unpack the folder to the directory of your choice


Once the installation is complete, let’s make sure the Environmental Variables on Windows are set correctly. (Win key + type “edit the system environmental variables”). In User Variables add:
| Variable | Value |
| PICO_SDK_PATH | C:\path to downloaded folder\pico-sdk |
| Path | C:\Users\mzoln\AppData\Local\Programs\Microsoft VS Code\bin |
In System, Variables make sure you have the following
| Variable | Value |
| Path | C:\Program Files\Python39\ |
| Path | C:\Program Files\Python39\Scripts\ |
| Path | C:\Program Files\CMake\bin |
| Path | C:\Program Files (x86)\GNU Arm Embedded Toolchain\10 2020-q4-major\bin |
| Path | C:\Users\mzoln\AppData\Roaming\Microsoft\Windows\Start Menu\Programs\Visual Studio Code |


Next, search installed programs for Visual Studio 2019 – and use Developer Command Prompt (open as an administrator via right-click) to open VSC (if you open VSC normally, it won’t work and after 2h of playing with variables I gave up). Type code to open the VSC with correct build tools.
VSC configuration

In Extension panel to the left, search for C/C++ & CMake Tools from Microsoft. Once installed go to Extension settings for CMake Tools and change the following:
Create a new folder on your computer for the test project. Use VSC to open this folder, it’s going to be your workspace for the project. At the bottom of the VSC window select the compiler (you may need to use a scan option) to GCC for arm-none-eabi.

Congratulations, you are set!
Test program (blink)
Instead of confusing you with the list of everything available for Raspberry Pi Pico, I slimmed down the files needed for compilations. I will shortly explain the files and functions for you. Each project will need a 3 file (at least) to compile. Your program file (program.c) the SDK import instructions for CMake (pico_sdk_import.cmake) and CMake build instructions (CMakeLists.txt).

blink.c
This is your program file. Pay attention to the name, as you will need to use this name in other files to compile it correctly. All your programming should go into the name.c file, any referred files should be also placed in the same project folder.
blink.c
#include "pico/stdlib.h"
int main() {

    const uint LED_PIN = 25;

    gpio_init(LED_PIN);

    gpio_set_dir(LED_PIN, GPIO_OUT);

    while (true) {

        gpio_put(LED_PIN, 1);

        sleep_ms(250);

        gpio_put(LED_PIN, 0);

        sleep_ms(250);

    }

}
pico_sdk_import.cmake
This is an instruction set for CMake that contains information about where the sdk is and how to compile the code for you. You won’t need to modify this, but the file has to be present for each workspace. You can have multiple examples of your program in the workspace, but you will only need one pico_sdk_import.cmake file
pico_sdk_import.cmake
# This is a copy of /external/pico_sdk_import.cmake
# This can be dropped into an external project to help locate this SDK
# It should be include()ed prior to project()
# todo document
if (DEFINED ENV{PICO_SDK_PATH} AND (NOT PICO_SDK_PATH))
set(PICO_SDK_PATH $ENV{PICO_SDK_PATH})
message("Using PICO_SDK_PATH from environment ('${PICO_SDK_PATH}')")
endif ()
if (DEFINED ENV{PICO_SDK_FETCH_FROM_GIT} AND (NOT PICO_SDK_FETCH_FROM_GIT))
set(PICO_SDK_FETCH_FROM_GIT $ENV{PICO_SDK_FETCH_FROM_GIT})
message("Using PICO_SDK_FETCH_FROM_GIT from environment ('${PICO_SDK_FETCH_FROM_GIT}')")
endif ()
if (DEFINED ENV{PICO_SDK_FETCH_FROM_GIT_PATH} AND (NOT PICO_SDK_FETCH_FROM_GIT_PATH))
set(PICO_SDK_FETCH_FROM_GIT_PATH $ENV{PICO_SDK_FETCH_FROM_GIT_PATH})
message("Using PICO_SDK_FETCH_FROM_GIT_PATH from environment ('${PICO_SDK_FETCH_FROM_GIT_PATH}')")
endif ()
set(PICO_SDK_PATH "${PICO_SDK_PATH}" CACHE PATH "Path to the PICO SDK")
set(PICO_SDK_FETCH_FROM_GIT "${PICO_SDK_FETCH_FROM_GIT}" CACHE BOOL "Set to ON to fetch copy of PICO SDK from git if not otherwise locatable")
set(PICO_SDK_FETCH_FROM_GIT_PATH "${PICO_SDK_FETCH_FROM_GIT_PATH}" CACHE FILEPATH "location to download SDK")
if (NOT PICO_SDK_PATH)
if (PICO_SDK_FETCH_FROM_GIT)
include(FetchContent)
set(FETCHCONTENT_BASE_DIR_SAVE ${FETCHCONTENT_BASE_DIR})
if (PICO_SDK_FETCH_FROM_GIT_PATH)
get_filename_component(FETCHCONTENT_BASE_DIR "${PICO_SDK_FETCH_FROM_GIT_PATH}" REALPATH BASE_DIR "${CMAKE_SOURCE_DIR}")
endif ()
FetchContent_Declare(
pico_sdk
GIT_REPOSITORY https://github.com/raspberrypi/pico-sdk
GIT_TAG master
)
if (NOT pico_sdk)
message("Downloading PICO SDK")
FetchContent_Populate(pico_sdk)
set(PICO_SDK_PATH ${pico_sdk_SOURCE_DIR})
endif ()
set(FETCHCONTENT_BASE_DIR ${FETCHCONTENT_BASE_DIR_SAVE})
else ()
message(FATAL_ERROR
"PICO SDK location was not specified. Please set PICO_SDK_PATH or set PICO_SDK_FETCH_FROM_GIT to on to fetch from git."
)
endif ()
endif ()
get_filename_component(PICO_SDK_PATH "${PICO_SDK_PATH}" REALPATH BASE_DIR "${CMAKE_BINARY_DIR}")
if (NOT EXISTS ${PICO_SDK_PATH})
message(FATAL_ERROR "Directory '${PICO_SDK_PATH}' not found")
endif ()
set(PICO_SDK_INIT_CMAKE_FILE ${PICO_SDK_PATH}/pico_sdk_init.cmake)
if (NOT EXISTS ${PICO_SDK_INIT_CMAKE_FILE})
message(FATAL_ERROR "Directory '${PICO_SDK_PATH}' does not appear to contain the PICO SDK")
endif ()
set(PICO_SDK_PATH ${PICO_SDK_PATH} CACHE PATH "Path to the PICO SDK" FORCE)
include(${PICO_SDK_INIT_CMAKE_FILE})
CMakeLists.txt
You will have to modify this file according to your project. CMake needs to know what files to compile and this lists tell it so. For each project you should append to file the following:
project(blink)
add_executable(blink blink.c)

# Pull in our pico_stdlib which pulls in commonly used features
target_link_libraries(blink pico_stdlib)

# create map/bin/hex file etc.
pico_add_extra_outputs(blink)
Highlighted sections have to be changed to the name of your program.c file. If your project has multiple files and directories, your CMake file will has to reflect his as well. Assuming that your project structure looks like this:
main.c
-FolderA
    --fileA.h
    --fileB.c
Your CMake section to append would have to look like this:
project(test)
include_directories(FolderA)
file(GLOB SOURCES "FolderA/*.c")
add_executable(test main.c ${SOURCES})


# Pull in our pico_stdlib which pulls in commonly used features
target_link_libraries(test pico_stdlib)

# create map/bin/hex file etc.
pico_add_extra_outputs(test)
Compiler would generate the file build/test.uf2 to transfer to Raspberry Pi Pico.
CMakeLists.txt
cmake_minimum_required(VERSION 3.12)
include(pico_sdk_import.cmake)
set(CMAKE_C_STANDARD 11)
set(CMAKE_CXX_STANDARD 17)
pico_sdk_init()
project(blink)
add_executable(blink blink.c)
# Pull in our pico_stdlib which pulls in commonly used features
target_link_libraries(blink pico_stdlib)
# create map/bin/hex file etc.

pico_add_extra_outputs(blink)
Build
Thankfully, flashing programs to Raspberry Pi Pico is easy. Build and compile the program using VSB button at the bottom of the screen (blue section) and the compiled file .uf2 will be available in the build folder.
Hold the button of Raspberry Pi Pico when powering up and it will open as portable drive. Drag the .uf2 file over and you are set!
Final thoughts
C/C++ is a bit of a mess. I’m surprised there is no PlatformIO integration or anything more streamlined. After all Windows machines are the most popular machines, so it makes perfect sense to spend some time streamlining this process. I spent way too much time trying to figure out the perfect combinations of settings with a friend of mine (Hi Dmytro!) and I can only imagine the frustrations an average Pi enthusiast have to go through to do a bit o C/C++ on Windows. I hope the experience improves and I cannot wait for Arduino IDE integration. Issues or comments? Let me know in this Reddit thread.
Raspberry Pi Pico SDK
The Raspberry Pi Pico SDK (henceforth the SDK) provides the headers, libraries and build system
necessary to write programs for the RP2040-based devices such as the Raspberry Pi Pico
in C, C++ or assembly language.
The SDK is designed to provide an API and programming environment that is familiar both to non-embedded C developers and embedded C developers alike.
A single program runs on the device at a time and starts with a conventional main() method. Standard C/C++ libraries are supported along with
C level libraries/APIs for accessing all of the RP2040’s hardware include PIO (Programmable IO).
Additionally the SDK provides higher level libraries for dealing with timers, synchronization, USB (TinyUSB) and multi-core programming
along with various utilities.
The SDK can be used to build anything from simple applications, to fully fledged runtime environments such as MicroPython, to low level software
such as RP2040’s on-chip bootrom itself.
Additional libraries/APIs that are not yet ready for inclusion in the SDK can be found in pico-extras.
Documentation
See Getting Started with the Raspberry Pi Pico for information on how to setup your
hardware, IDE/environment and for how to build and debug software for the Raspberry Pi Pico
and other RP2040-based devices.
See Connecting to the Internet with Raspberry Pi Pico W to learn more about writing
applications for your Raspberry Pi Pico W that connect to the internet.
See Raspberry Pi Pico C/C++ SDK to learn more about programming using the
SDK, to explore more advanced features, and for complete PDF-based API documentation.
See Online Raspberry Pi Pico SDK API docs for HTML-based API documentation.
Example code
See pico-examples for example code you can build.
Getting the latest SDK code
The master branch of pico-sdk on GitHub contains the
latest stable release of the SDK. If you need or want to test upcoming features, you can try the
develop branch instead.
Quick-start your own project
These instructions are extremely terse, and Linux-based only. For detailed steps,
instructions for other platforms, and just in general, we recommend you see Raspberry Pi Pico C/C++ SDK
-
Install CMake (at least version 3.13), and GCC cross compiler
sudo apt install cmake gcc-arm-none-eabi libnewlib-arm-none-eabi libstdc++-arm-none-eabi-newlib -
Set up your project to point to use the Raspberry Pi Pico SDK
-
Either by cloning the SDK locally (most common) :
-
git clonethis Raspberry Pi Pico SDK repository -
Copy pico_sdk_import.cmake
from the SDK into your project directory -
Set
PICO_SDK_PATHto the SDK location in your environment, or pass it (-DPICO_SDK_PATH=) to cmake later. -
Setup a
CMakeLists.txtlike:cmake_minimum_required(VERSION 3.13) # initialize the SDK based on PICO_SDK_PATH # note: this must happen before project() include(pico_sdk_import.cmake) project(my_project) # initialize the Raspberry Pi Pico SDK pico_sdk_init() # rest of your project
-
-
Or with the Raspberry Pi Pico SDK as a submodule :
-
Clone the SDK as a submodule called
pico-sdk -
Setup a
CMakeLists.txtlike:cmake_minimum_required(VERSION 3.13) # initialize pico-sdk from submodule # note: this must happen before project() include(pico-sdk/pico_sdk_init.cmake) project(my_project) # initialize the Raspberry Pi Pico SDK pico_sdk_init() # rest of your project
-
-
Or with automatic download from GitHub :
-
Copy pico_sdk_import.cmake
from the SDK into your project directory -
Setup a
CMakeLists.txtlike:cmake_minimum_required(VERSION 3.13) # initialize pico-sdk from GIT # (note this can come from environment, CMake cache etc) set(PICO_SDK_FETCH_FROM_GIT on) # pico_sdk_import.cmake is a single file copied from this SDK # note: this must happen before project() include(pico_sdk_import.cmake) project(my_project) # initialize the Raspberry Pi Pico SDK pico_sdk_init() # rest of your project
-
-
Or by cloning the SDK locally, but without copying
pico_sdk_import.cmake:-
git clonethis Raspberry Pi Pico SDK repository -
Setup a
CMakeLists.txtlike:cmake_minimum_required(VERSION 3.13) # initialize the SDK directly include(/path/to/pico-sdk/pico_sdk_init.cmake) project(my_project) # initialize the Raspberry Pi Pico SDK pico_sdk_init() # rest of your project
-
-
-
Write your code (see pico-examples or the Raspberry Pi Pico C/C++ SDK documentation for more information)
About the simplest you can do is a single source file (e.g. hello_world.c)
#include <stdio.h>
#include "pico/stdlib.h"

int main() {
    setup_default_uart();
    printf("Hello, world!\n");
    return 0;
}
And add the following to your
CMakeLists.txt:add_executable(hello_world hello_world.c ) # Add pico_stdlib library which aggregates commonly used features target_link_libraries(hello_world pico_stdlib) # create map/bin/hex/uf2 file in addition to ELF. pico_add_extra_outputs(hello_world)
Note this example uses the default UART for stdout;
if you want to use the default USB see the hello-usb example. -
Setup a CMake build directory.
For example, if not using an IDE:$ mkdir build $ cd build $ cmake ..When building for a board other than the Raspberry Pi Pico, you should pass
-DPICO_BOARD=board_nameto thecmakecommand above, e.g.cmake -DPICO_BOARD=pico_w ..
to configure the SDK and build options accordingly for that particular board.Doing so sets up various compiler defines (e.g. default pin numbers for UART and other hardware) and in certain
cases also enables the use of additional libraries (e.g. wireless support when building forPICO_BOARD=pico_w) which cannot
be built without a board which provides the requisite functionality.For a list of boards defined in the SDK itself, look in this directory which has a
header for each named board. -
Make your target from the build directory you created.
-
You now have
hello_world.elfto load via a debugger, orhello_world.uf2that can be installed and run on your Raspberry Pi Pico via drag and drop.
In our last post, we covered everything you need to know to get your Raspberry Pi Pico board running. If you have followed that tutorial correctly, you should now be able to compile any of the example programs provided by Raspberry Pi (pico-examples) or use the Arduino IDE to create projects. In this post, we will give you a detailed walkthrough of creating a standalone C/C++ project anywhere on your Windows system. You will be able to build the projects with different configurations and should be able to make use of the complete features of the VS Code IDE. This tutorial is going to be specific to the Windows operating system. This is because the official tutorials released by Raspberry Pi use a Linux environment for building and debugging. So if you are on a Linux system or even a Raspberry Pi board running Linux, you can simply follow the official tutorial to learn how to work with the SDK.
We are on a Windows system and we had to figure out a few things on our own to get things working. So will be sharing our experience working with the official C/C++ SDK for Raspberry Pi Pico. If you think there is a better way of doing the same or we made a mistake somewhere, please let us know.
This tutorial assumes that you have already installed the required tools in your system and they are working from a command-line interface. If not, please follow Chapter 9 of the official documentation or Shawn Hymel’s tutorial to install them in your system.
If you are new to the RP2040 microcontroller and want to learn more about it, we have an excellent getting-started tutorial on CIRCUITSTATE.
- Create A Project from Scratch
- Building with MinGW
- Build with Visual Studio Build Tools
- Build with VS Code
- Create A Project with Project Generator
- Links
- Short Link
We can develop embedded firmware for you
CIRCUITSTATE can develop embedded firmware for any microcontroller/microprocessor including 8051, PIC, AVR, ARM, STM32, ESP32, and RISC-V using industry-leading SDKs, frameworks, and tools. Contact us today to share your requirements.

Creating a new project from scratch is explained in Chapter 8 of the tutorial Getting started with Raspberry Pi Pico. It suggests you create a new directory called test alongside the pico-sdk directory. In our system, the pico-sdk folder is at C:\Pico\pico-sdk and we want to create a new project elsewhere. So we are going to create a new folder called Test inside D:\Home\Code\Pico-CPP.
Then you need to create a C source file containing the main function of the program. We will simply name this file as main.c. The contents of the file can be a simple blink program. We will use the blink program from the official examples.
/**
 * Copyright (c) 2020 Raspberry Pi (Trading) Ltd.
 *
 * SPDX-License-Identifier: BSD-3-Clause
 */

#include "pico/stdlib.h"

int main() {
#ifndef PICO_DEFAULT_LED_PIN
#warning blink example requires a board with a regular LED
#else
    const uint LED_PIN = PICO_DEFAULT_LED_PIN;
    gpio_init (LED_PIN);
    gpio_set_dir (LED_PIN, GPIO_OUT);
    while (true) {
        gpio_put (LED_PIN, 1);
        sleep_ms (250);
        gpio_put (LED_PIN, 0);
        sleep_ms (250);
    }
#endif
}
Next, you need to create a CMakeLists.txt file. This file tells the CMake about the properties of the project. In our case, the contents of the file are suggested to be,
cmake_minimum_required(VERSION 3.13)

include(pico_sdk_import.cmake)

project(test_project C CXX ASM)
set(CMAKE_C_STANDARD 11)
set(CMAKE_CXX_STANDARD 17)
pico_sdk_init()

add_executable(main
  main.c
)

pico_enable_stdio_usb(main 1)
pico_enable_stdio_uart(main 1)

pico_add_extra_outputs(main)

target_link_libraries(main pico_stdlib)
Let’s break that down.
cmake_minimum_required(VERSION 3.13)This specifies the minimum version of CMake to be used. If your CMake installation is older than what is specified, you will get an error.
What is CMake you ask. CMake is a tool for automating software building process. It is not a toolchain or compiler. Instead it generates files and configurations required for building softwares with so many dependencies and source files. All without depending on a compiler or toolchain. That means you can use CMake with so many toolchains and IDEs, which makes it a favorite tool of software developers.
include(pico_sdk_import.cmake)This tells the CMake to use a .cmake file found in the project directory. We haven’t added this file yet, but we will shortly. The file will tell CMake everything about the Pico C/C++ SDK.
project(test_project C CXX ASM)This specifies the project name as test_project and the languages we are going to use. We will use C, C++ and ASM files.
set(CMAKE_C_STANDARD 11)
set(CMAKE_CXX_STANDARD 17)
These two lines specify the language standards to use.
add_executable(main
  main.c
)
This is the name of the target that will be built from the source files given. Here, the build target is main, which means the target files will be named like main.elf, main.bin, main.hex etc. The main.c is our source file from which the target files will be built. More info can be found here.
pico_enable_stdio_usb(main 1)
pico_enable_stdio_uart(main 1)
These are two CMake directives that tell where to direct the output/input from standard input-output interfaces. For example, when you use the printf() function, you need to direct the output to a physical interface in order to see what you have printed. Pico SDK allows us to use either the USB or a UART port as the input-output interface. We can enable one at a time or enable both together. Change the literal value 1 to enable the output, or to 0 to disable the output. In this case, both are enabled and that means anything you print with printf() function will be printed to both USB and default UART.
pico_add_extra_outputs(main)This tells the build system must also create additional output files such as elf, uf2 etc.
target_link_libraries(main pico_stdlib)This brings in the standard library available in the SDK so that you can use the basic functionalities like GPIO. If you need more or a specific SDK feature, you must specify it this way.
Now we need to copy and paste the file called pico_sdk_import.cmake from the pico-sdk\external folder to the root of your project folder. We will now have three files in the root directory of our project.
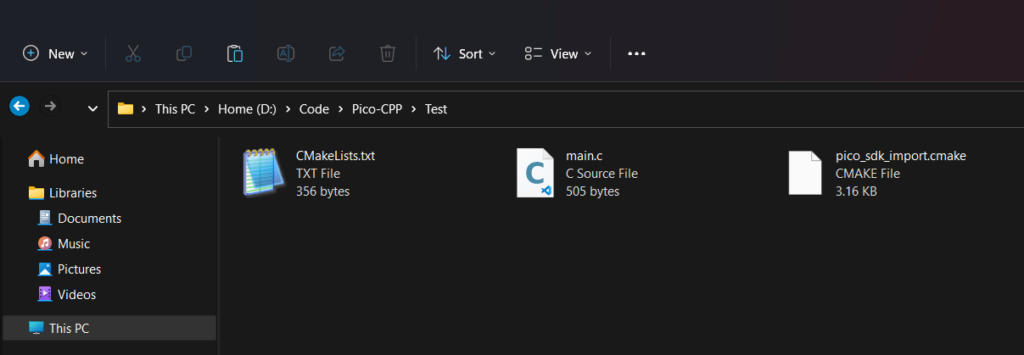
Go ahead and create a folder called build. This will contain all the files generated by the build system. Having a dedicated build folder for your project is always a good idea. You are now ready to build your project.
Building with MinGW
You can go ahead with this step if you have already set up MinGW in your system and it is available in the Path variable. Now open the command prompt from the root directory of your project. In our system, we can simply right-click on the explorer window and open the Terminal application there. This is possible because we have the Terminal application integrated into the context menu. We are going to open the PowerShell in the Terminal application.
First, run the cd build command. This will simply change the active directory to build. You could also have opened the Terminal inside the build directory. Then run,
cmake -G "MinGW Makefiles" ..This tells the CMake that we would like to use MinGW as the generator and thus need MinGW style makefiles. The CMake will now generate the build tree inside the build folder. No binaries are generated in this step. You will get a similar output at the Terminal like below.
PS D:\Code\Pico-CPP\Test\build> cmake -G "MinGW Makefiles" ..
Using PICO_SDK_PATH from environment ('C:\Pico\pico-sdk')
PICO_SDK_PATH is C:/Pico/pico-sdk
Defaulting PICO_PLATFORM to rp2040 since not specified.
Defaulting PICO platform compiler to pico_arm_gcc since not specified.
-- Defaulting build type to 'Release' since not specified.
PICO compiler is pico_arm_gcc
-- The C compiler identification is GNU 11.2.1
-- The CXX compiler identification is GNU 11.2.1
-- The ASM compiler identification is GNU
-- Found assembler: C:/Program Files (x86)/Arm GNU Toolchain arm-none-eabi/11.2 2022.02/bin/arm-none-eabi-gcc.exe
Build type is Release
Defaulting PICO target board to pico since not specified.
Using board configuration from C:/Pico/pico-sdk/src/boards/include/boards/pico.h
-- Found Python3: C:/Users/Vishnu Mohanan/AppData/Local/Programs/Python/Python39/python.exe (found version "3.9.6") found components: Interpreter
TinyUSB available at C:/Pico/pico-sdk/lib/tinyusb/src/portable/raspberrypi/rp2040; enabling build support for USB.
cyw43-driver available at C:/Pico/pico-sdk/lib/cyw43-driver
lwIP available at C:/Pico/pico-sdk/lib/lwip
-- Configuring done
-- Generating done
-- Build files have been written to: D:/Code/Pico-CPP/Test/build
PS D:\Code\Pico-CPP\Test\build>
The command was executed successfully and we can see all the new files and folders generated by CMake. Next, we need to actually build the project. The official SDK documentation uses make command in a Linux environment. It simply invokes the default GNU make and everything works flawlessly. But in Windows, you need extra stuff to get it done and that’s why you had to install the Microsoft Visual Studio pack to use the SDK on a Windows computer. It allows you to use the NMake and Visual Studio builder to compile the pioasm and elf2uf2 tools. But the problem is you always have to run NMake from a Developer Command Prompt, not an ordinary command prompt. That’s too much explanation? Just forget about it and let’s focus on using MinGW.
The next command we shall run is make in a MinGW environment. But for some reason, the build fails with the message shown below.
PS D:\Code\Pico-CPP\Test\build> make
Scanning dependencies of target bs2_default
[  1%] Building ASM object pico-sdk/src/rp2_common/boot_stage2/CMakeFiles/bs2_default.dir/compile_time_choice.S.obj
[  2%] Linking ASM executable bs2_default.elf
[  2%] Built target bs2_default
[  3%] Generating bs2_default.bin
[  4%] Generating bs2_default_padded_checksummed.S
[  4%] Built target bs2_default_padded_checksummed_asm
[  5%] Creating directories for 'ELF2UF2Build'
[  6%] No download step for 'ELF2UF2Build'
[  7%] No update step for 'ELF2UF2Build'
[  8%] No patch step for 'ELF2UF2Build'
[  9%] Performing configure step for 'ELF2UF2Build'
-- The C compiler identification is GNU 8.1.0
-- The CXX compiler identification is GNU 8.1.0
-- Detecting C compiler ABI info
-- Detecting C compiler ABI info - done
-- Check for working C compiler: C:/Program Files/mingw-w64/x86_64-8.1.0-posix-seh-rt_v6-rev0/mingw64/bin/gcc.exe - skipped
-- Detecting C compile features
-- Detecting C compile features - done
-- Detecting CXX compiler ABI info
-- Detecting CXX compiler ABI info - done
-- Check for working CXX compiler: C:/Program Files/mingw-w64/x86_64-8.1.0-posix-seh-rt_v6-rev0/mingw64/bin/c++.exe - skipped
-- Detecting CXX compile features
-- Detecting CXX compile features - done
-- Configuring done
-- Generating done
-- Build files have been written to: D:/Code/Pico-CPP/Test/build/elf2uf2
[ 10%] Performing build step for 'ELF2UF2Build'
'C:/Program' is not recognized as an internal or external command,
operable program or batch file.
make[2]: *** [elf2uf2/src/ELF2UF2Build-stamp/ELF2UF2Build-build] Error 1
make[1]: *** [CMakeFiles/ELF2UF2Build.dir/all] Error 2
make: *** [all] Error 2
PS D:\Code\Pico-CPP\Test\build>
Something is wrong somewhere and we don’t know what. It must be something with something not being able to read path names with whitespaces on them. If you are a person who knows what’s happening, please drop us a comment.
So if that fails, we have to use an alternative way and that is using CMake’s --build command. The following command will build the project.
cmake --build d:\Code\Pico-CPP\Test\build --config Debug --target all -j 18It builds the entire project successfully and we are left with binary files ready to be flashed to our Pico. As you can see the second parameter should be the folder you want the output files to be written. In our case, it’s the d:\Code\Pico-CPP\Test\build folder. We are building all targets in Debug mode. The -j 18 simply means the number of parallel jobs that compile the project. The larger the number, the faster will be the compilation. We got the following output at the Terminal.
PS D:\Code\Pico-CPP\Test\build> cmake --build d:\Code\Pico-CPP\Test\build --config Debug --target all -j 18
[ 2%] Built target bs2_default
[ 3%] Performing build step for 'ELF2UF2Build'
[ 5%] Built target bs2_default_padded_checksummed_asm
[ 50%] Building CXX object CMakeFiles/elf2uf2.dir/main.cpp.obj
[ 6%] Creating directories for 'PioasmBuild'
[ 7%] No download step for 'PioasmBuild'
[ 8%] No update step for 'PioasmBuild'
[ 9%] No patch step for 'PioasmBuild'
[ 10%] Performing configure step for 'PioasmBuild'
loading initial cache file D:/Code/Pico-CPP/Test/build/pico-sdk/src/rp2_common/cyw43_driver/pioasm/tmp/PioasmBuild-cache-Release.cmake
[100%] Linking CXX executable elf2uf2.exe
-- The CXX compiler identification is GNU 8.1.0
[100%] Built target elf2uf2
[ 12%] No install step for 'ELF2UF2Build'
-- Detecting CXX compiler ABI info
[ 13%] Completed 'ELF2UF2Build'
[ 18%] Built target ELF2UF2Build
Scanning dependencies of target main
-- Detecting CXX compiler ABI info - done
-- Check for working CXX compiler: C:/Program Files/mingw-w64/x86_64-8.1.0-posix-seh-rt_v6-rev0/mingw64/bin/c++.exe - skipped
-- Detecting CXX compile features
-- Detecting CXX compile features - done
-- Configuring done
-- Generating done
-- Build files have been written to: D:/Code/Pico-CPP/Test/build/pioasm
[ 19%] Performing build step for 'PioasmBuild'
[ 20%] Building C object CMakeFiles/main.dir/main.c.obj
[ 21%] Building C object CMakeFiles/main.dir/C_/Pico/pico-sdk/src/rp2_common/pico_stdlib/stdlib.c.obj
[ 23%] Building C object CMakeFiles/main.dir/C_/Pico/pico-sdk/src/rp2_common/hardware_gpio/gpio.c.obj
[ 24%] Building C object CMakeFiles/main.dir/C_/Pico/pico-sdk/src/rp2_common/hardware_claim/claim.c.obj
[ 25%] Building C object CMakeFiles/main.dir/C_/Pico/pico-sdk/src/rp2_common/pico_platform/platform.c.obj
[ 26%] Building C object CMakeFiles/main.dir/C_/Pico/pico-sdk/src/rp2_common/hardware_sync/sync.c.obj
[ 27%] Building C object CMakeFiles/main.dir/C_/Pico/pico-sdk/src/rp2_common/hardware_irq/irq.c.obj
[ 28%] Building ASM object CMakeFiles/main.dir/C_/Pico/pico-sdk/src/rp2_common/hardware_irq/irq_handler_chain.S.obj
[ 10%] Building CXX object CMakeFiles/pioasm.dir/main.cpp.obj
[ 20%] Building CXX object CMakeFiles/pioasm.dir/pio_assembler.cpp.obj
[ 30%] Building CXX object CMakeFiles/pioasm.dir/pio_disassembler.cpp.obj
[ 40%] Building CXX object CMakeFiles/pioasm.dir/gen/lexer.cpp.obj
[ 29%] [ 50%] Building C object CMakeFiles/main.dir/C_/Pico/pico-sdk/src/common/pico_sync/lock_core.c.obj[ 30%]
Building C object CMakeFiles/main.dir/C_/Pico/pico-sdk/src/common/pico_sync/sem.c.objBuilding CXX object CMakeFiles/pioasm.dir/gen/parser.cpp.obj
[ 31%] Building C object CMakeFiles/main.dir/C_/Pico/pico-sdk/src/common/pico_time/time.c.obj
[ 32%] Building C object CMakeFiles/main.dir/C_/Pico/pico-sdk/src/common/pico_time/timeout_helper.c.obj
[ 34%] Building C object CMakeFiles/main.dir/C_/Pico/pico-sdk/src/rp2_common/hardware_timer/timer.c.obj
[ 60%] Building CXX object CMakeFiles/pioasm.dir/c_sdk_output.cpp.obj
[ 35%] Building C object CMakeFiles/main.dir/C_/Pico/pico-sdk/src/common/pico_util/pheap.c.obj
[ 70%] Building CXX object CMakeFiles/pioasm.dir/python_output.cpp.obj
[ 36%] [ 90%] [ 90%] Building CXX object CMakeFiles/pioasm.dir/ada_output.cpp.obj
Building C object CMakeFiles/main.dir/C_/Pico/pico-sdk/src/common/pico_util/datetime.c.obj
Building CXX object CMakeFiles/pioasm.dir/hex_output.cpp.obj
[ 37%] Building C object CMakeFiles/main.dir/C_/Pico/pico-sdk/src/common/pico_util/queue.c.obj
[ 38%] Building C object CMakeFiles/main.dir/C_/Pico/pico-sdk/src/common/pico_sync/mutex.c.obj
[ 39%] Building C object CMakeFiles/main.dir/C_/Pico/pico-sdk/src/common/pico_sync/critical_section.c.obj
[ 40%] Building C object CMakeFiles/main.dir/C_/Pico/pico-sdk/src/rp2_common/hardware_uart/uart.c.obj
[ 41%] Building ASM object CMakeFiles/main.dir/C_/Pico/pico-sdk/src/rp2_common/hardware_divider/divider.S.obj
[ 42%] Building C object CMakeFiles/main.dir/C_/Pico/pico-sdk/src/rp2_common/pico_runtime/runtime.c.obj
[ 43%] Building C object CMakeFiles/main.dir/C_/Pico/pico-sdk/src/rp2_common/hardware_clocks/clocks.c.obj
[ 47%] [ 47%] Building C object CMakeFiles/main.dir/C_/Pico/pico-sdk/src/rp2_common/hardware_pll/pll.c.objBuilding C object CMakeFiles/main.dir/C_/Pico/pico-sdk/src/rp2_common/hardware_watchdog/watchdog.c.obj[ 47%]
Building C object CMakeFiles/main.dir/C_/Pico/pico-sdk/src/rp2_common/hardware_vreg/vreg.c.obj
[ 48%] Building C object CMakeFiles/main.dir/C_/Pico/pico-sdk/src/rp2_common/hardware_xosc/xosc.c.obj
[ 49%] Building C object CMakeFiles/main.dir/C_/Pico/pico-sdk/src/rp2_common/pico_printf/printf.c.obj
[ 50%] Building ASM object CMakeFiles/main.dir/C_/Pico/pico-sdk/src/rp2_common/pico_bit_ops/bit_ops_aeabi.S.obj
[ 51%] Building C object CMakeFiles/main.dir/C_/Pico/pico-sdk/src/rp2_common/pico_bootrom/bootrom.c.obj
[ 52%] Building ASM object CMakeFiles/main.dir/C_/Pico/pico-sdk/src/rp2_common/pico_divider/divider.S.obj
[ 53%] Building ASM object CMakeFiles/main.dir/C_/Pico/pico-sdk/src/rp2_common/pico_double/double_aeabi.S.obj
[ 54%] Building C object CMakeFiles/main.dir/C_/Pico/pico-sdk/src/rp2_common/pico_double/double_init_rom.c.obj
[ 56%] Building C object CMakeFiles/main.dir/C_/Pico/pico-sdk/src/rp2_common/pico_double/double_math.c.obj
[ 57%] Building ASM object CMakeFiles/main.dir/C_/Pico/pico-sdk/src/rp2_common/pico_double/double_v1_rom_shim.S.obj
[ 58%] Building ASM object CMakeFiles/main.dir/C_/Pico/pico-sdk/src/rp2_common/pico_float/float_aeabi.S.obj
[ 60%] Building C object CMakeFiles/main.dir/C_/Pico/pico-sdk/src/rp2_common/pico_float/float_init_rom.c.obj
[ 60%] Building ASM object CMakeFiles/main.dir/C_/Pico/pico-sdk/src/rp2_common/pico_int64_ops/pico_int64_ops_aeabi.S.obj
[ 61%] [ 62%] Building ASM object CMakeFiles/main.dir/C_/Pico/pico-sdk/src/rp2_common/pico_float/float_v1_rom_shim.S.obj
Building C object CMakeFiles/main.dir/C_/Pico/pico-sdk/src/rp2_common/pico_float/float_math.c.obj
[ 63%] Building C object CMakeFiles/main.dir/C_/Pico/pico-sdk/src/rp2_common/pico_malloc/pico_malloc.c.obj
[ 64%] Building ASM object CMakeFiles/main.dir/C_/Pico/pico-sdk/src/rp2_common/pico_mem_ops/mem_ops_aeabi.S.obj
[ 65%] Building CXX object CMakeFiles/main.dir/C_/Pico/pico-sdk/src/rp2_common/pico_standard_link/new_delete.cpp.obj
[ 67%] Building ASM object CMakeFiles/main.dir/C_/Pico/pico-sdk/src/rp2_common/pico_standard_link/crt0.S.obj
[ 68%] Building C object CMakeFiles/main.dir/C_/Pico/pico-sdk/src/rp2_common/pico_standard_link/binary_info.c.obj
[ 69%] Building C object CMakeFiles/main.dir/C_/Pico/pico-sdk/src/rp2_common/pico_stdio/stdio.c.obj
[ 70%] Building C object CMakeFiles/main.dir/C_/Pico/pico-sdk/src/rp2_common/pico_stdio_uart/stdio_uart.c.obj
[ 71%] Building C object CMakeFiles/main.dir/C_/Pico/pico-sdk/src/rp2_common/pico_stdio_usb/reset_interface.c.obj
[ 72%] Building C object CMakeFiles/main.dir/C_/Pico/pico-sdk/src/rp2_common/pico_stdio_usb/stdio_usb.c.obj
[ 73%] Building C object CMakeFiles/main.dir/C_/Pico/pico-sdk/src/rp2_common/pico_stdio_usb/stdio_usb_descriptors.c.obj
[ 74%] Building C object CMakeFiles/main.dir/C_/Pico/pico-sdk/lib/tinyusb/src/portable/raspberrypi/rp2040/dcd_rp2040.c.obj
[ 75%] Building C object CMakeFiles/main.dir/C_/Pico/pico-sdk/lib/tinyusb/src/portable/raspberrypi/rp2040/rp2040_usb.c.obj
[ 76%] Building C object CMakeFiles/main.dir/C_/Pico/pico-sdk/lib/tinyusb/src/device/usbd.c.obj
[ 78%] Building C object CMakeFiles/main.dir/C_/Pico/pico-sdk/lib/tinyusb/src/device/usbd_control.c.obj
[ 79%] Building C object CMakeFiles/main.dir/C_/Pico/pico-sdk/lib/tinyusb/src/class/audio/audio_device.c.obj
[ 80%] Building C object CMakeFiles/main.dir/C_/Pico/pico-sdk/lib/tinyusb/src/class/cdc/cdc_device.c.obj
[ 81%] Building C object CMakeFiles/main.dir/C_/Pico/pico-sdk/lib/tinyusb/src/class/dfu/dfu_device.c.obj
[ 82%] Building C object CMakeFiles/main.dir/C_/Pico/pico-sdk/lib/tinyusb/src/class/dfu/dfu_rt_device.c.obj
C:\Pico\pico-sdk\lib\tinyusb\src\portable\raspberrypi\rp2040\rp2040_usb.c:[ 83%] Building C object CMakeFiles/main.dir/C_/Pico/pico-sdk/lib/tinyusb/src/class/hid/hid_device.c.obj
In function 'rp2040_usb_init[ 84%] ':
C:\Pico\pico-sdk\lib\tinyusb\src\portable\raspberrypi\rp2040\rp2040_usb.c:61:3: warning: 'memset' writing 156 bytes into a region of size 0 overflows the destination [-Wstringop-overflow=]
61 | memset(usb_hw, 0, sizeof(*usb_hw));
| Building C object CMakeFiles/main.dir/C_/Pico/pico-sdk/lib/tinyusb/src/class/midi/midi_device.c.obj^~~~~~~~~~~~~~~~~~~~~~~~~~~~~~~~~~
C:\Pico\pico-sdk\lib\tinyusb\src\portable\raspberrypi\rp2040\rp2040_usb.c:62:3: warning: 'Building C object CMakeFiles/main.dir/C_/Pico/pico-sdk/lib/tinyusb/src/class/msc/msc_device.c.objmemset
' writing 4096 bytes into a region of size 0 overflows the destination [-Wstringop-overflow=]
62 | memset(usb_dpram, 0, sizeof(*usb_dpram));
| ^~~~~~~~~~~~~~~~~~~~~~~~~~~~~~~~~~~~~~~~
[ 86%] Building C object CMakeFiles/main.dir/C_/Pico/pico-sdk/lib/tinyusb/src/class/net/ecm_rndis_device.c.obj
[ 87%] Building C object CMakeFiles/main.dir/C_/Pico/pico-sdk/lib/tinyusb/src/class/net/ncm_device.c.obj
[ 89%] Building C object CMakeFiles/main.dir/C_/Pico/pico-sdk/lib/tinyusb/src/class/usbtmc/usbtmc_device.c.obj
[ 90%] Building C object CMakeFiles/main.dir/C_/Pico/pico-sdk/lib/tinyusb/src/class/vendor/vendor_device.c.obj
[ 91%] Building C object CMakeFiles/main.dir/C_/Pico/pico-sdk/lib/tinyusb/src/class/video/video_device.c.obj
[ 92%] Building C object CMakeFiles/main.dir/C_/Pico/pico-sdk/lib/tinyusb/src/tusb.c.obj
[ 93%] Building C object CMakeFiles/main.dir/C_/Pico/pico-sdk/lib/tinyusb/src/common/tusb_fifo.c.obj
[ 94%] Building C object CMakeFiles/main.dir/C_/Pico/pico-sdk/src/rp2_common/pico_fix/rp2040_usb_device_enumeration/rp2040_usb_device_enumeration.c.obj
[ 95%] Building C object CMakeFiles/main.dir/C_/Pico/pico-sdk/src/rp2_common/pico_unique_id/unique_id.c.obj
[ 96%] Building C object CMakeFiles/main.dir/C_/Pico/pico-sdk/src/rp2_common/hardware_flash/flash.c.obj
[100%] Linking CXX executable pioasm.exe
[ 97%] Linking CXX executable main.elf
[100%] Built target pioasm
[ 98%] No install step for 'PioasmBuild'
[100%] Completed 'PioasmBuild'
[100%] Built target PioasmBuild
[100%] Built target main
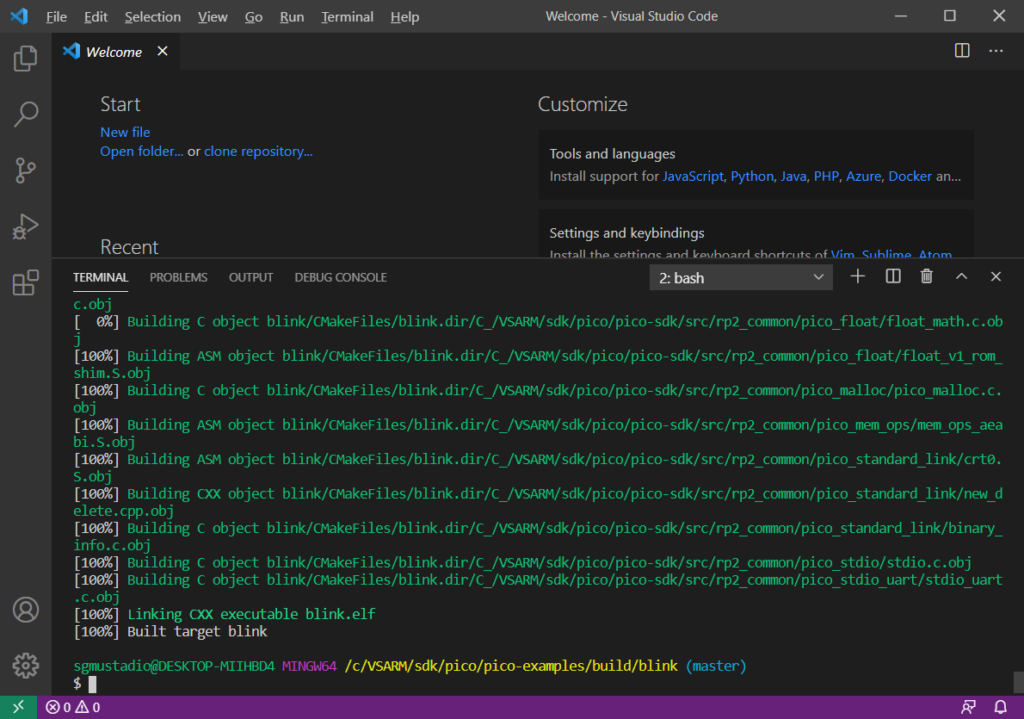
PS D:\Code\Pico-CPP\Test\build>You can now use any of the output files of your choice. If you have your Pico board connected to the computer as a mass storage device, you can simply drag and drop the UF2 file to program the flash. BIN and HEX files are good for flashing via SWD and ELF and MAP files are suitable for debugging.
Build with Visual Studio Build Tools
This is the recommended method demonstrated in Chapter 9.2 of the official documentation. You should have installed the Build Tools for Visual Studio 2022 in your system for this method to work. Once the tool is installed, you can find the Developer Command Prompt in the start menu. You need to run all the commands from this special CMD window. As per Microsoft, the NMake should be always run from a Developer Command Prompt.
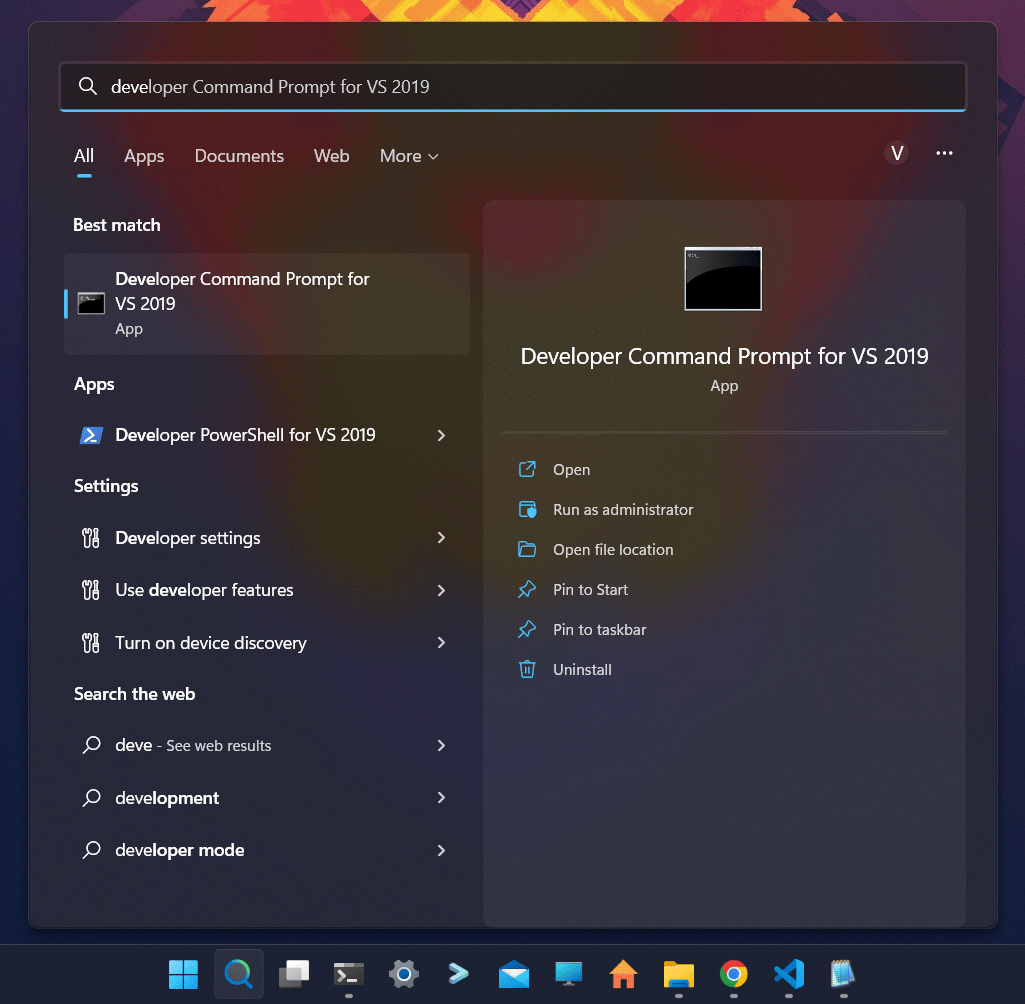
In our system, we can, again, right-click on the explorer and open the Developer Command Prompt on the Terminal application.
You can first run the cmake "NMake Makefiles .. and then the nmake command to generate the binaries.
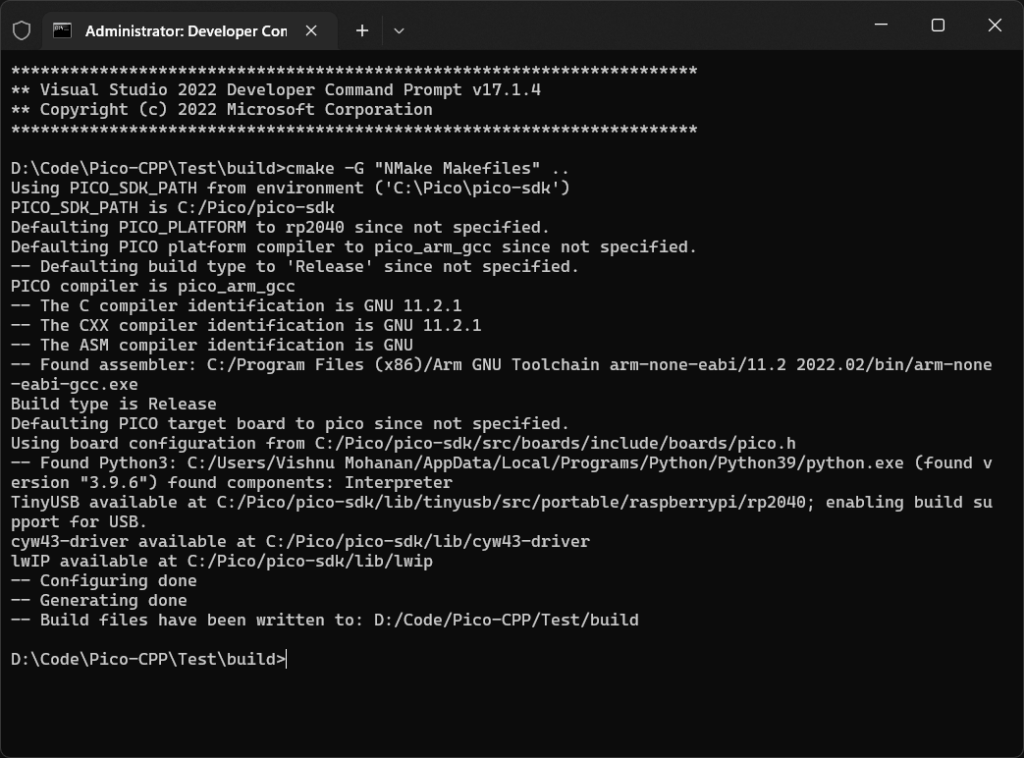
cmake command result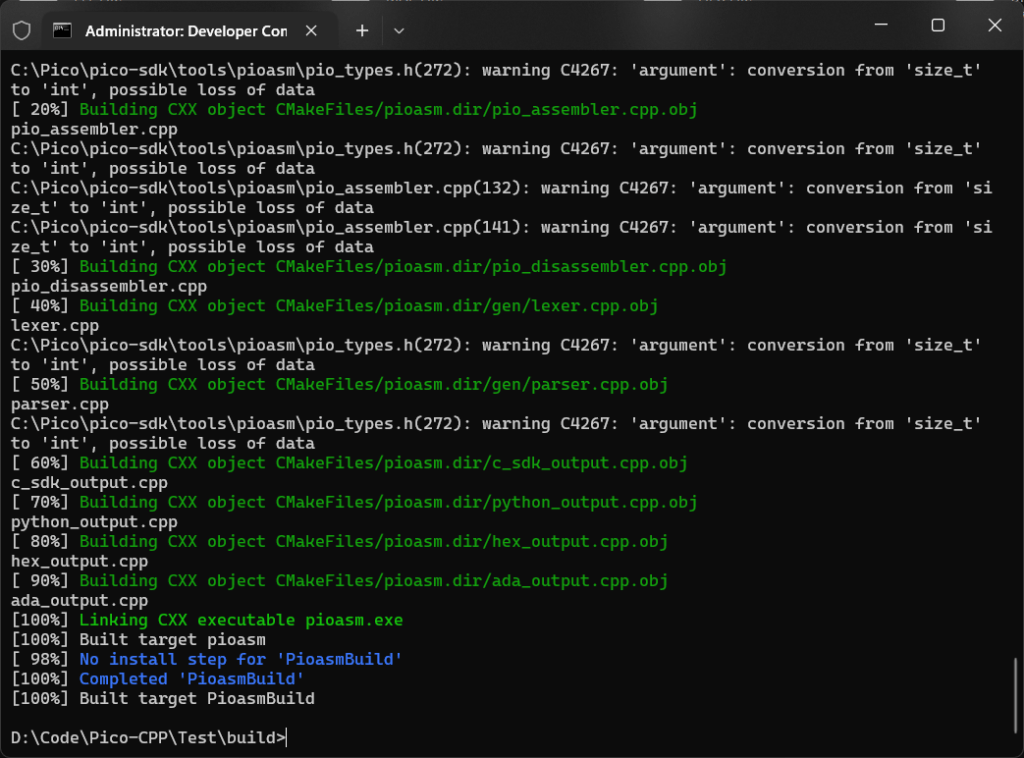
nmake command result
We got the following output on the Terminal.
**********************************************************************
** Visual Studio 2022 Developer Command Prompt v17.1.4
** Copyright (c) 2022 Microsoft Corporation
**********************************************************************

D:\Code\Pico-CPP\Test\build>cmake -G "NMake Makefiles" ..
Using PICO_SDK_PATH from environment ('C:\Pico\pico-sdk')
PICO_SDK_PATH is C:/Pico/pico-sdk
Defaulting PICO_PLATFORM to rp2040 since not specified.
Defaulting PICO platform compiler to pico_arm_gcc since not specified.
-- Defaulting build type to 'Release' since not specified.
PICO compiler is pico_arm_gcc
-- The C compiler identification is GNU 11.2.1
-- The CXX compiler identification is GNU 11.2.1
-- The ASM compiler identification is GNU
-- Found assembler: C:/Program Files (x86)/Arm GNU Toolchain arm-none-eabi/11.2 2022.02/bin/arm-none-eabi-gcc.exe
Build type is Release
Defaulting PICO target board to pico since not specified.
Using board configuration from C:/Pico/pico-sdk/src/boards/include/boards/pico.h
-- Found Python3: C:/Users/Vishnu Mohanan/AppData/Local/Programs/Python/Python39/python.exe (found version "3.9.6") found components: Interpreter
TinyUSB available at C:/Pico/pico-sdk/lib/tinyusb/src/portable/raspberrypi/rp2040; enabling build support for USB.
cyw43-driver available at C:/Pico/pico-sdk/lib/cyw43-driver
lwIP available at C:/Pico/pico-sdk/lib/lwip
-- Configuring done
-- Generating done
-- Build files have been written to: D:/Code/Pico-CPP/Test/build

D:\Code\Pico-CPP\Test\build>nmake

Microsoft (R) Program Maintenance Utility Version 14.31.31106.2
Copyright (C) Microsoft Corporation.  All rights reserved.

Scanning dependencies of target bs2_default
[  1%] Building ASM object pico-sdk/src/rp2_common/boot_stage2/CMakeFiles/bs2_default.dir/compile_time_choice.S.obj
[  2%] Linking ASM executable bs2_default.elf
[  2%] Built target bs2_default
[  3%] Generating bs2_default.bin
[  4%] Generating bs2_default_padded_checksummed.S
[  4%] Built target bs2_default_padded_checksummed_asm
[  5%] Creating directories for 'ELF2UF2Build'
[  6%] No download step for 'ELF2UF2Build'
[  7%] No update step for 'ELF2UF2Build'
[  8%] No patch step for 'ELF2UF2Build'
[  9%] Performing configure step for 'ELF2UF2Build'
-- The C compiler identification is MSVC 19.31.31106.2
-- The CXX compiler identification is MSVC 19.31.31106.2
-- Detecting C compiler ABI info
-- Detecting C compiler ABI info - done
-- Check for working C compiler: C:/Program Files/Microsoft Visual Studio/2022/Professional/VC/Tools/MSVC/14.31.31103/bin/Hostx64/x64/cl.exe - skipped
-- Detecting C compile features
-- Detecting C compile features - done
-- Detecting CXX compiler ABI info
-- Detecting CXX compiler ABI info - done
-- Check for working CXX compiler: C:/Program Files/Microsoft Visual Studio/2022/Professional/VC/Tools/MSVC/14.31.31103/bin/Hostx64/x64/cl.exe - skipped
-- Detecting CXX compile features
-- Detecting CXX compile features - done
-- Configuring done
-- Generating done
-- Build files have been written to: D:/Code/Pico-CPP/Test/build/elf2uf2
[ 10%] Performing build step for 'ELF2UF2Build'

Microsoft (R) Program Maintenance Utility Version 14.31.31106.2
Copyright (C) Microsoft Corporation.  All rights reserved.

[ 50%] Building CXX object CMakeFiles/elf2uf2.dir/main.cpp.obj
main.cpp
C:\Pico\pico-sdk\tools\elf2uf2\main.cpp(359): warning C4996: 'fopen': This function or variable may be unsafe. Consider using fopen_s instead. To disable deprecation, use _CRT_SECURE_NO_WARNINGS. See online help for details.
C:\Pico\pico-sdk\tools\elf2uf2\main.cpp(365): warning C4996: 'fopen': This function or variable may be unsafe. Consider using fopen_s instead. To disable deprecation, use _CRT_SECURE_NO_WARNINGS. See online help for details.
[100%] Linking CXX executable elf2uf2.exe
[100%] Built target elf2uf2
[ 12%] No install step for 'ELF2UF2Build'
[ 13%] Completed 'ELF2UF2Build'
[ 13%] Built target ELF2UF2Build
Scanning dependencies of target main
[ 14%] Building C object CMakeFiles/main.dir/main.c.obj
[ 15%] Building C object CMakeFiles/main.dir/C_/Pico/pico-sdk/src/rp2_common/pico_stdlib/stdlib.c.obj
[ 16%] Building C object CMakeFiles/main.dir/C_/Pico/pico-sdk/src/rp2_common/hardware_gpio/gpio.c.obj
[ 17%] Building C object CMakeFiles/main.dir/C_/Pico/pico-sdk/src/rp2_common/hardware_claim/claim.c.obj
[ 18%] Building C object CMakeFiles/main.dir/C_/Pico/pico-sdk/src/rp2_common/pico_platform/platform.c.obj
[ 19%] Building C object CMakeFiles/main.dir/C_/Pico/pico-sdk/src/rp2_common/hardware_sync/sync.c.obj
[ 20%] Building C object CMakeFiles/main.dir/C_/Pico/pico-sdk/src/rp2_common/hardware_irq/irq.c.obj
[ 21%] Building ASM object CMakeFiles/main.dir/C_/Pico/pico-sdk/src/rp2_common/hardware_irq/irq_handler_chain.S.obj
[ 23%] Building C object CMakeFiles/main.dir/C_/Pico/pico-sdk/src/common/pico_sync/sem.c.obj
[ 24%] Building C object CMakeFiles/main.dir/C_/Pico/pico-sdk/src/common/pico_sync/lock_core.c.obj
[ 25%] Building C object CMakeFiles/main.dir/C_/Pico/pico-sdk/src/common/pico_time/time.c.obj
[ 26%] Building C object CMakeFiles/main.dir/C_/Pico/pico-sdk/src/common/pico_time/timeout_helper.c.obj
[ 27%] Building C object CMakeFiles/main.dir/C_/Pico/pico-sdk/src/rp2_common/hardware_timer/timer.c.obj
[ 28%] Building C object CMakeFiles/main.dir/C_/Pico/pico-sdk/src/common/pico_util/datetime.c.obj
[ 29%] Building C object CMakeFiles/main.dir/C_/Pico/pico-sdk/src/common/pico_util/pheap.c.obj
[ 30%] Building C object CMakeFiles/main.dir/C_/Pico/pico-sdk/src/common/pico_util/queue.c.obj
[ 31%] Building C object CMakeFiles/main.dir/C_/Pico/pico-sdk/src/common/pico_sync/mutex.c.obj
[ 32%] Building C object CMakeFiles/main.dir/C_/Pico/pico-sdk/src/common/pico_sync/critical_section.c.obj
[ 34%] Building C object CMakeFiles/main.dir/C_/Pico/pico-sdk/src/rp2_common/hardware_uart/uart.c.obj
[ 35%] Building ASM object CMakeFiles/main.dir/C_/Pico/pico-sdk/src/rp2_common/hardware_divider/divider.S.obj
[ 36%] Building C object CMakeFiles/main.dir/C_/Pico/pico-sdk/src/rp2_common/pico_runtime/runtime.c.obj
[ 37%] Building C object CMakeFiles/main.dir/C_/Pico/pico-sdk/src/rp2_common/hardware_clocks/clocks.c.obj
[ 38%] Building C object CMakeFiles/main.dir/C_/Pico/pico-sdk/src/rp2_common/hardware_pll/pll.c.obj
[ 39%] Building C object CMakeFiles/main.dir/C_/Pico/pico-sdk/src/rp2_common/hardware_vreg/vreg.c.obj
[ 40%] Building C object CMakeFiles/main.dir/C_/Pico/pico-sdk/src/rp2_common/hardware_watchdog/watchdog.c.obj
[ 41%] Building C object CMakeFiles/main.dir/C_/Pico/pico-sdk/src/rp2_common/hardware_xosc/xosc.c.obj
[ 42%] Building C object CMakeFiles/main.dir/C_/Pico/pico-sdk/src/rp2_common/pico_printf/printf.c.obj
[ 43%] Building ASM object CMakeFiles/main.dir/C_/Pico/pico-sdk/src/rp2_common/pico_bit_ops/bit_ops_aeabi.S.obj
[ 45%] Building C object CMakeFiles/main.dir/C_/Pico/pico-sdk/src/rp2_common/pico_bootrom/bootrom.c.obj
[ 46%] Building ASM object CMakeFiles/main.dir/C_/Pico/pico-sdk/src/rp2_common/pico_divider/divider.S.obj
[ 47%] Building ASM object CMakeFiles/main.dir/C_/Pico/pico-sdk/src/rp2_common/pico_double/double_aeabi.S.obj
[ 48%] Building C object CMakeFiles/main.dir/C_/Pico/pico-sdk/src/rp2_common/pico_double/double_init_rom.c.obj
[ 49%] Building C object CMakeFiles/main.dir/C_/Pico/pico-sdk/src/rp2_common/pico_double/double_math.c.obj
[ 50%] Building ASM object CMakeFiles/main.dir/C_/Pico/pico-sdk/src/rp2_common/pico_double/double_v1_rom_shim.S.obj
[ 51%] Building ASM object CMakeFiles/main.dir/C_/Pico/pico-sdk/src/rp2_common/pico_int64_ops/pico_int64_ops_aeabi.S.obj
[ 52%] Building ASM object CMakeFiles/main.dir/C_/Pico/pico-sdk/src/rp2_common/pico_float/float_aeabi.S.obj
[ 53%] Building C object CMakeFiles/main.dir/C_/Pico/pico-sdk/src/rp2_common/pico_float/float_init_rom.c.obj
[ 54%] Building C object CMakeFiles/main.dir/C_/Pico/pico-sdk/src/rp2_common/pico_float/float_math.c.obj
[ 56%] Building ASM object CMakeFiles/main.dir/C_/Pico/pico-sdk/src/rp2_common/pico_float/float_v1_rom_shim.S.obj
[ 57%] Building C object CMakeFiles/main.dir/C_/Pico/pico-sdk/src/rp2_common/pico_malloc/pico_malloc.c.obj
[ 58%] Building ASM object CMakeFiles/main.dir/C_/Pico/pico-sdk/src/rp2_common/pico_mem_ops/mem_ops_aeabi.S.obj
[ 59%] Building ASM object CMakeFiles/main.dir/C_/Pico/pico-sdk/src/rp2_common/pico_standard_link/crt0.S.obj
[ 60%] Building CXX object CMakeFiles/main.dir/C_/Pico/pico-sdk/src/rp2_common/pico_standard_link/new_delete.cpp.obj
[ 61%] Building C object CMakeFiles/main.dir/C_/Pico/pico-sdk/src/rp2_common/pico_standard_link/binary_info.c.obj
[ 62%] Building C object CMakeFiles/main.dir/C_/Pico/pico-sdk/src/rp2_common/pico_stdio/stdio.c.obj
[ 63%] Building C object CMakeFiles/main.dir/C_/Pico/pico-sdk/src/rp2_common/pico_stdio_uart/stdio_uart.c.obj
[ 64%] Building C object CMakeFiles/main.dir/C_/Pico/pico-sdk/src/rp2_common/pico_stdio_usb/reset_interface.c.obj
[ 65%] Building C object CMakeFiles/main.dir/C_/Pico/pico-sdk/src/rp2_common/pico_stdio_usb/stdio_usb.c.obj
[ 67%] Building C object CMakeFiles/main.dir/C_/Pico/pico-sdk/src/rp2_common/pico_stdio_usb/stdio_usb_descriptors.c.obj
[ 68%] Building C object CMakeFiles/main.dir/C_/Pico/pico-sdk/lib/tinyusb/src/portable/raspberrypi/rp2040/dcd_rp2040.c.obj
[ 69%] Building C object CMakeFiles/main.dir/C_/Pico/pico-sdk/lib/tinyusb/src/portable/raspberrypi/rp2040/rp2040_usb.c.obj
C:\Pico\pico-sdk\lib\tinyusb\src\portable\raspberrypi\rp2040\rp2040_usb.c: In function 'rp2040_usb_init':
C:\Pico\pico-sdk\lib\tinyusb\src\portable\raspberrypi\rp2040\rp2040_usb.c:61:3: warning: 'memset' writing 156 bytes into a region of size 0 overflows the destination [-Wstringop-overflow=]
   61 |   memset(usb_hw, 0, sizeof(*usb_hw));
      |   ^~~~~~~~~~~~~~~~~~~~~~~~~~~~~~~~~~
C:\Pico\pico-sdk\lib\tinyusb\src\portable\raspberrypi\rp2040\rp2040_usb.c:62:3: warning: 'memset' writing 4096 bytes into a region of size 0 overflows the destination [-Wstringop-overflow=]
   62 |   memset(usb_dpram, 0, sizeof(*usb_dpram));
      |   ^~~~~~~~~~~~~~~~~~~~~~~~~~~~~~~~~~~~~~~~
[ 70%] Building C object CMakeFiles/main.dir/C_/Pico/pico-sdk/lib/tinyusb/src/device/usbd.c.obj
[ 71%] Building C object CMakeFiles/main.dir/C_/Pico/pico-sdk/lib/tinyusb/src/device/usbd_control.c.obj
[ 72%] Building C object CMakeFiles/main.dir/C_/Pico/pico-sdk/lib/tinyusb/src/class/audio/audio_device.c.obj
[ 73%] Building C object CMakeFiles/main.dir/C_/Pico/pico-sdk/lib/tinyusb/src/class/cdc/cdc_device.c.obj
[ 74%] Building C object CMakeFiles/main.dir/C_/Pico/pico-sdk/lib/tinyusb/src/class/dfu/dfu_device.c.obj
[ 75%] Building C object CMakeFiles/main.dir/C_/Pico/pico-sdk/lib/tinyusb/src/class/dfu/dfu_rt_device.c.obj
[ 76%] Building C object CMakeFiles/main.dir/C_/Pico/pico-sdk/lib/tinyusb/src/class/hid/hid_device.c.obj
[ 78%] Building C object CMakeFiles/main.dir/C_/Pico/pico-sdk/lib/tinyusb/src/class/midi/midi_device.c.obj
[ 79%] Building C object CMakeFiles/main.dir/C_/Pico/pico-sdk/lib/tinyusb/src/class/msc/msc_device.c.obj
[ 80%] Building C object CMakeFiles/main.dir/C_/Pico/pico-sdk/lib/tinyusb/src/class/net/ecm_rndis_device.c.obj
[ 81%] Building C object CMakeFiles/main.dir/C_/Pico/pico-sdk/lib/tinyusb/src/class/net/ncm_device.c.obj
[ 82%] Building C object CMakeFiles/main.dir/C_/Pico/pico-sdk/lib/tinyusb/src/class/usbtmc/usbtmc_device.c.obj
[ 83%] Building C object CMakeFiles/main.dir/C_/Pico/pico-sdk/lib/tinyusb/src/class/vendor/vendor_device.c.obj
[ 84%] Building C object CMakeFiles/main.dir/C_/Pico/pico-sdk/lib/tinyusb/src/class/video/video_device.c.obj
[ 85%] Building C object CMakeFiles/main.dir/C_/Pico/pico-sdk/lib/tinyusb/src/tusb.c.obj
[ 86%] Building C object CMakeFiles/main.dir/C_/Pico/pico-sdk/lib/tinyusb/src/common/tusb_fifo.c.obj
[ 87%] Building C object CMakeFiles/main.dir/C_/Pico/pico-sdk/src/rp2_common/pico_fix/rp2040_usb_device_enumeration/rp2040_usb_device_enumeration.c.obj
[ 89%] Building C object CMakeFiles/main.dir/C_/Pico/pico-sdk/src/rp2_common/pico_unique_id/unique_id.c.obj
[ 90%] Building C object CMakeFiles/main.dir/C_/Pico/pico-sdk/src/rp2_common/hardware_flash/flash.c.obj
[ 91%] Linking CXX executable main.elf
[ 91%] Built target main
[ 92%] Creating directories for 'PioasmBuild'
[ 93%] No download step for 'PioasmBuild'
[ 94%] No update step for 'PioasmBuild'
[ 95%] No patch step for 'PioasmBuild'
[ 96%] Performing configure step for 'PioasmBuild'
loading initial cache file D:/Code/Pico-CPP/Test/build/pico-sdk/src/rp2_common/cyw43_driver/pioasm/tmp/PioasmBuild-cache-Release.cmake
-- The CXX compiler identification is MSVC 19.31.31106.2
-- Detecting CXX compiler ABI info
-- Detecting CXX compiler ABI info - done
-- Check for working CXX compiler: C:/Program Files/Microsoft Visual Studio/2022/Professional/VC/Tools/MSVC/14.31.31103/bin/Hostx64/x64/cl.exe - skipped
-- Detecting CXX compile features
-- Detecting CXX compile features - done
-- Configuring done
-- Generating done
-- Build files have been written to: D:/Code/Pico-CPP/Test/build/pioasm
[ 97%] Performing build step for 'PioasmBuild'

Microsoft (R) Program Maintenance Utility Version 14.31.31106.2
Copyright (C) Microsoft Corporation.  All rights reserved.

[ 10%] Building CXX object CMakeFiles/pioasm.dir/main.cpp.obj
main.cpp
C:\Pico\pico-sdk\tools\pioasm\pio_types.h(272): warning C4267: 'argument': conversion from 'size_t' to 'int', possible loss of data
[ 20%] Building CXX object CMakeFiles/pioasm.dir/pio_assembler.cpp.obj
pio_assembler.cpp
C:\Pico\pico-sdk\tools\pioasm\pio_types.h(272): warning C4267: 'argument': conversion from 'size_t' to 'int', possible loss of data
C:\Pico\pico-sdk\tools\pioasm\pio_assembler.cpp(132): warning C4267: 'argument': conversion from 'size_t' to 'int', possible loss of data
C:\Pico\pico-sdk\tools\pioasm\pio_assembler.cpp(141): warning C4267: 'argument': conversion from 'size_t' to 'int', possible loss of data
[ 30%] Building CXX object CMakeFiles/pioasm.dir/pio_disassembler.cpp.obj
pio_disassembler.cpp
[ 40%] Building CXX object CMakeFiles/pioasm.dir/gen/lexer.cpp.obj
lexer.cpp
C:\Pico\pico-sdk\tools\pioasm\pio_types.h(272): warning C4267: 'argument': conversion from 'size_t' to 'int', possible loss of data
[ 50%] Building CXX object CMakeFiles/pioasm.dir/gen/parser.cpp.obj
parser.cpp
C:\Pico\pico-sdk\tools\pioasm\pio_types.h(272): warning C4267: 'argument': conversion from 'size_t' to 'int', possible loss of data
[ 60%] Building CXX object CMakeFiles/pioasm.dir/c_sdk_output.cpp.obj
c_sdk_output.cpp
[ 70%] Building CXX object CMakeFiles/pioasm.dir/python_output.cpp.obj
python_output.cpp
[ 80%] Building CXX object CMakeFiles/pioasm.dir/hex_output.cpp.obj
hex_output.cpp
[ 90%] Building CXX object CMakeFiles/pioasm.dir/ada_output.cpp.obj
ada_output.cpp
[100%] Linking CXX executable pioasm.exe
[100%] Built target pioasm
[ 98%] No install step for 'PioasmBuild'
[100%] Completed 'PioasmBuild'
[100%] Built target PioasmBuild

D:\Code\Pico-CPP\Test\build>
You can now see the binaries in the build folder. Even though you have to use slightly different methods to compile your programs, all the configurations and customizations possible in the CMake files are common to all methods and you can refer to the official documentation for reference. Raspberry Pi Pico C/C++ SDK has everything you need to know about the C/C++ SDK.
Build with VS Code
The project you have created can also be compiled using VS Code. Simply open the project folder in VS Code. The first time you open the folder, VS Code will automatically detect the type of project and will prompt you to select a compiler. VS Code will scan your system and find all the installed compilers. From the list, we need to choose the ARM-GCC compiler. Depending on which version of the compiler you have installed, the list item may be different.
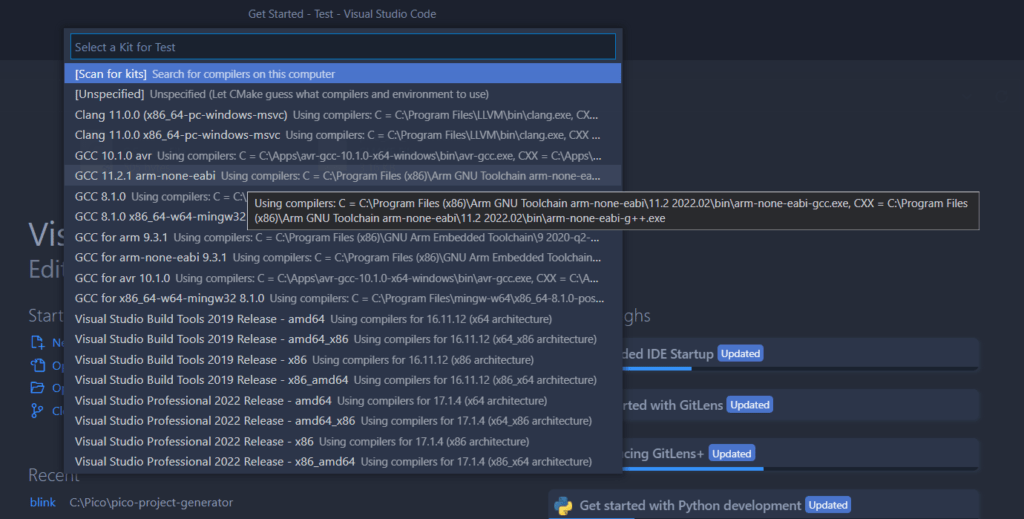
In our system, we have ARM-GCC 11.2.1 (arm-none-eabi). This is the toolchain we must use to compile our Pico C/C++ projects. Once you select the compiler, VS Code will try to configure the project and will print the following output to the console.
[variant] Loaded new set of variants
[kit] Successfully loaded 18 kits from C:\Users\Vishnu Mohanan\AppData\Local\CMakeTools\cmake-tools-kits.json
[proc] Executing command: "C:\Program Files (x86)\Arm GNU Toolchain arm-none-eabi\11.2 2022.02\bin\arm-none-eabi-gcc.exe" -v
[main] Configuring folder: Test
[proc] Executing command: "C:\Program Files\CMake\bin\cmake.EXE" --no-warn-unused-cli -DCMAKE_EXPORT_COMPILE_COMMANDS:BOOL=TRUE -DCMAKE_BUILD_TYPE:STRING=Debug "-DCMAKE_C_COMPILER:FILEPATH=C:\Program Files (x86)\Arm GNU Toolchain arm-none-eabi\11.2 2022.02\bin\arm-none-eabi-gcc.exe" "-DCMAKE_CXX_COMPILER:FILEPATH=C:\Program Files (x86)\Arm GNU Toolchain arm-none-eabi\11.2 2022.02\bin\arm-none-eabi-g++.exe" -Sd:/Code/Pico-CPP/Test -Bd:/Code/Pico-CPP/Test/build -G "MinGW Makefiles"
[cmake] Not searching for unused variables given on the command line.
[cmake] Using PICO_SDK_PATH from environment ('C:\Pico\pico-sdk')
[cmake] PICO_SDK_PATH is C:/Pico/pico-sdk
[cmake] Defaulting PICO_PLATFORM to rp2040 since not specified.
[cmake] Defaulting PICO platform compiler to pico_arm_gcc since not specified.
[cmake] PICO compiler is pico_arm_gcc
[cmake] -- The C compiler identification is GNU 11.2.1
[cmake] -- The CXX compiler identification is GNU 11.2.1
[cmake] -- The ASM compiler identification is GNU
[cmake] -- Found assembler: C:/Program Files (x86)/Arm GNU Toolchain arm-none-eabi/11.2 2022.02/bin/arm-none-eabi-gcc.exe
[cmake] Build type is Debug
[cmake] Using regular optimized debug build (set PICO_DEOPTIMIZED_DEBUG=1 to de-optimize)
[cmake] Defaulting PICO target board to pico since not specified.
[cmake] Using board configuration from C:/Pico/pico-sdk/src/boards/include/boards/pico.h
[cmake] -- Found Python3: C:/Users/Vishnu Mohanan/AppData/Local/Programs/Python/Python39/python.exe (found version "3.9.6") found components: Interpreter
[cmake] TinyUSB available at C:/Pico/pico-sdk/lib/tinyusb/src/portable/raspberrypi/rp2040; enabling build support for USB.
[cmake] Compiling TinyUSB with CFG_TUSB_DEBUG=1
[cmake] cyw43-driver available at C:/Pico/pico-sdk/lib/cyw43-driver
[cmake] lwIP available at C:/Pico/pico-sdk/lib/lwip
[cmake] -- Configuring done
[cmake] -- Generating done
[cmake] -- Build files have been written to: D:/Code/Pico-CPP/Test/build
You can go ahead and build your project by clicking the Build button on the bottom bar of VS Code. If you can’t find the button for some reason, you can run it from Terminal → Run Build Task and choose CMake: build from the list.
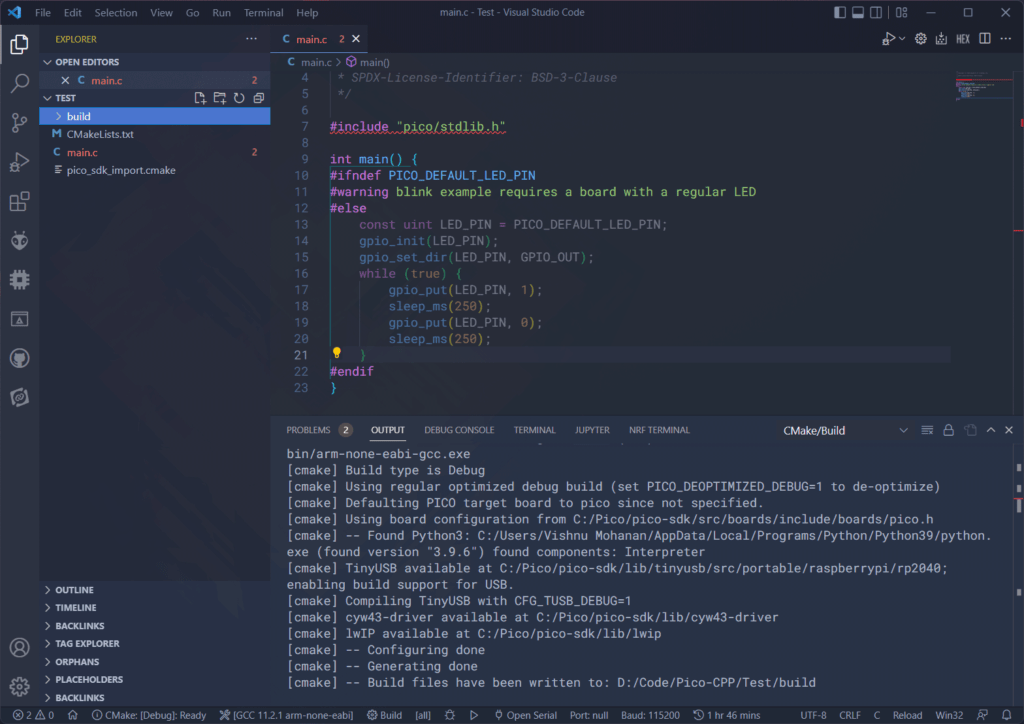
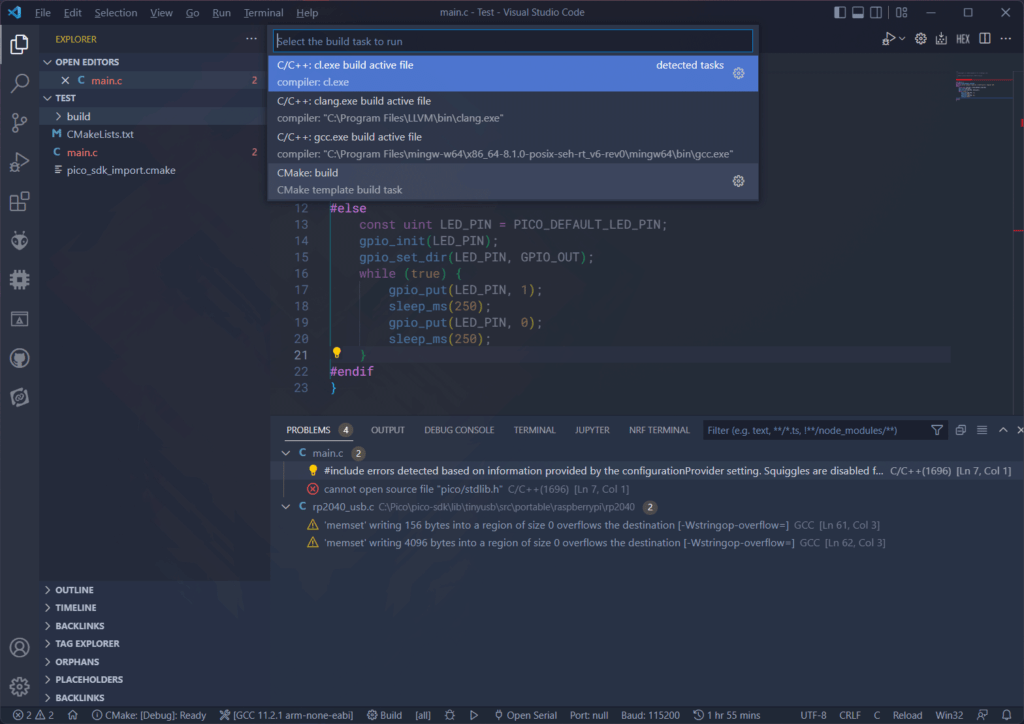
It is highly recommended to disable all conflicting extensions when working a C/C++ project. Extensions like PlatformIO, Arduino, nRF Tools can interfere with automatic configuration, intellisense etc. Therefore it is a good idea to disable them on your project workspace. You can do this by clicking on the small cog icon on the extension and choose Disable (Workspace) option.
You must have noticed the red squiggly lines on the include line of the program. VS Code is able to build the project but is not able to fetch all the dependencies. This is because VS Code is not quite sure where the Pico C/C++ SDK is. We can fix this by adding the SDK path to the C/C++ configuration of VS Code. Click the Win32 button on the bottom-right and choose Edit Configuration (UI) from the list. This will open the settings window. Scroll down to Include path option and add your Pico SDK path to a new line. In our case, the SDK is at C:\Pico\pico-sdk. After adding it, reload your VS Code editor so that the intellisense can do a fresh scan and find all the dependencies. You can also change the compiler path and intellisense type.
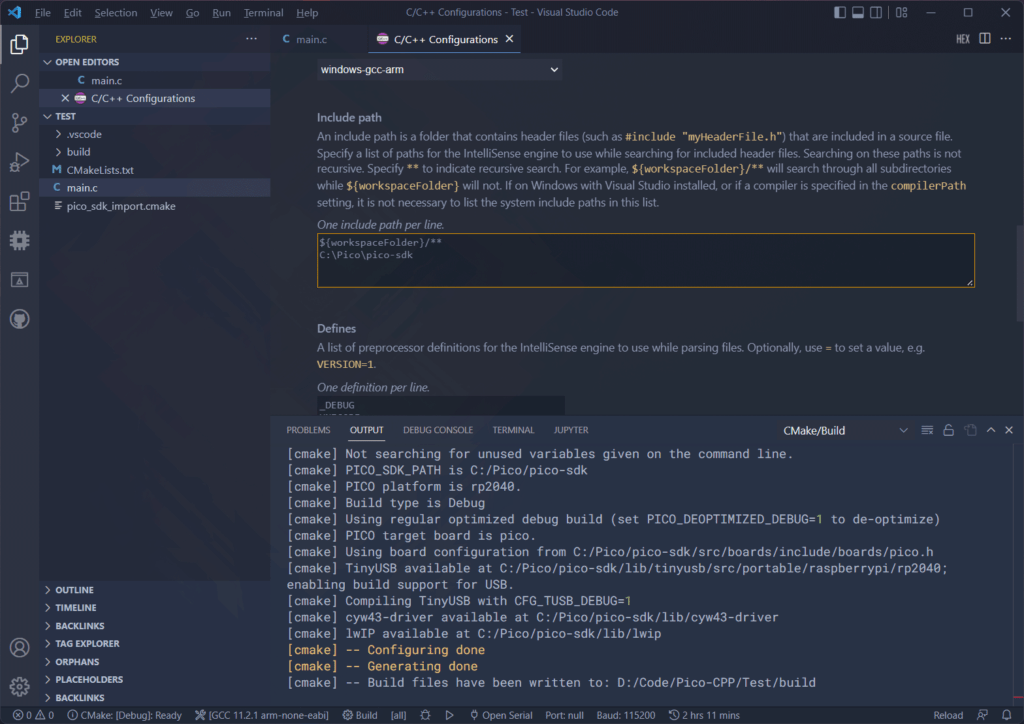
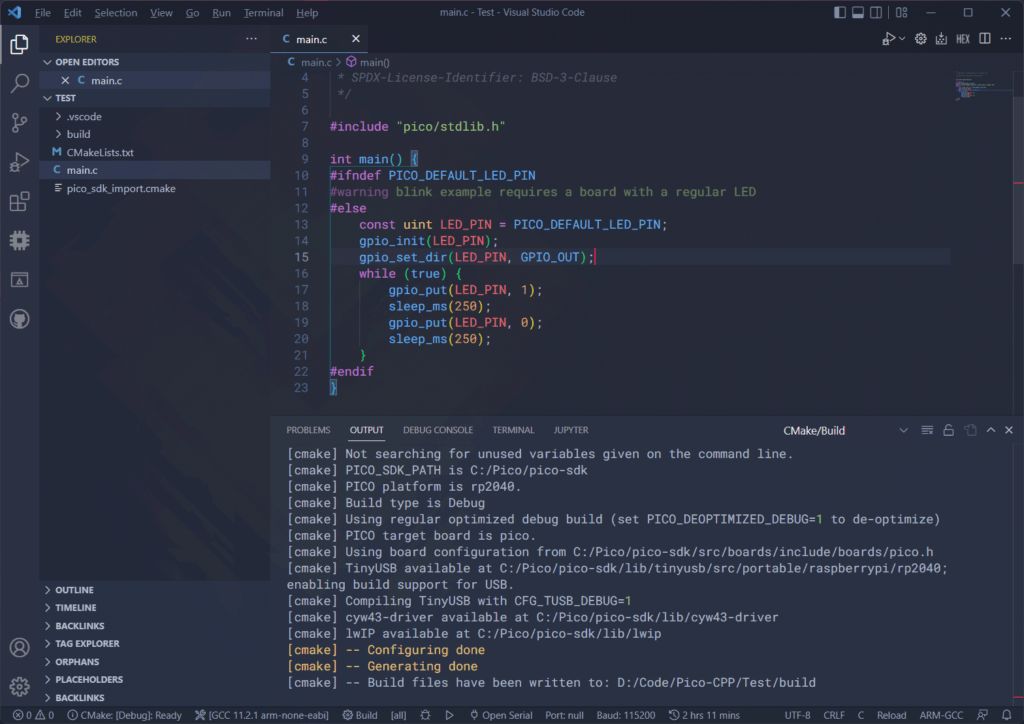
To help you get started, we have provided a download link to the project we have created. Try unzipping it, opening it with VS Code, and then compiling. Remember to disable any conflicting extensions. Also, VS Code may suggest extensions based on the files opened. Install them if you haven’t already.
- Download – Pico-C-C++-SDK-Standalone-Example-Blink [ZIP]
Create A Project with Project Generator
Creating the project files manually can be problematic and it is a process that can be easily automated. That’s what you can do with the Pico Project Generator. It is a Python script that will generate all the required files and directories in one go. To use the tool, you can clone the repository to your system with the following command.
git clone https://github.com/raspberrypi/pico-project-generator.gitYou must use the Developer Command Prompt to run this successfully. There is both a GUI and a command-line interface for the project generator. To invoke the GUI, run the following command inside the project generator directory.
You will get a GUI window like below.
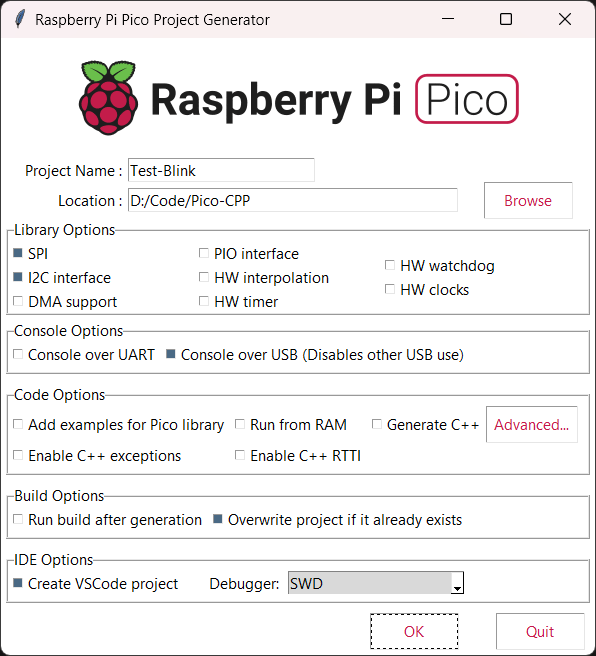
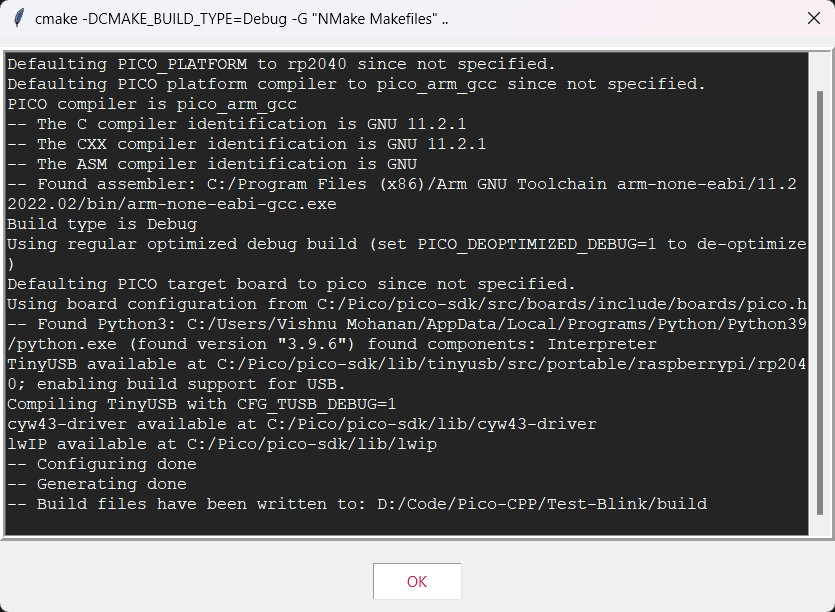
You can select the project name, and location, set some of the basic options like the default standard output, etc. The most interesting option is the Create VSCode project item. Checking this box will generate four JSON files inside the .vscode folder in the project root directory.
- c_cpp_properties.json – Has the C/C++ IntelliSense configuration. The project generator creates this file for the Linux environment and there’s no option for VS Code running on Windows.
- extensions.json – This has a list of recommended extensions. VS Code will prompt you to install them.
- launch.json – This has the configuration for launching the debugger. By default, you will be using OpenOCD and GDB.
- settings.json – A few settings for your current workspace.
The project can be opened in VS Code and compiled just like we have seen before. You can use the official Pico Debug Probe to debug your RP2040 Pico C/C++ SDK projects. Check out the following tutorial to learn more. You can also let us know your feedback on this tutorial.
Links
- RP2040 Datasheet [PDF]
- Raspberry Pi Pico Datasheet [PDF]
- Hardware Design with RP2040 [PDF]
- Getting started with Raspberry Pi Pico [PDF]
- Raspberry Pi Pico C/C++ SDK [PDF]
- Getting Started with Raspberry Pi Pico : RP2040 Microcontroller Board – Pinout, Schematic and Programming Tutorial
- How to Set Up Raspberry Pi Pico C/C++ Toolchain on Windows with VS Code – Shawn Hymel
- How to Program Raspberry Pi Pico with Arduino IDE – Steps for Installation and Uploading Example Sketches
- Raspberry Pi Pico High-Quality Pinout Diagram [PDF]
Short Link
- Short URL to this page: https://circuitstate.com/rpipicocpp