Время на прочтение
7 мин
Количество просмотров 12K

Если вдруг у вас есть Raspberry Pi, вы уже с ним наигрались и хотите найти ему полезное применение, то в этой статье я расскажу как быстро и просто превратить его в роутер, который может работать c VPN сервером по протоколу WireGuard. В виду того, что вычислительные возможности Raspberry Pi выше, чем у среднестатистического роутера, вы получите большую скорость Интернет при работе через VPN.
Ранее я публиковал статью, в которой рассказывал, как настроить WireGuard VPN клиент на роутере ASUS RT N56U. Вы можете сказать, что можно купить более мощный роутер или вообще роутер, который поддерживает WireGuard из коробки, но мне хотелось обойтись устройствами, которые были у меня в наличии. К тому же, что-то сделанное своими руками часто приносит большее удовольствие, так как ты начинаешь лучше разбираться в теме, да и греет душу мысль о том, что ты сэкономил деньги и можешь потратить их на что-то другое.
Как возникла идея
Купив себе Raspberry Pi 4 пару лет назад , я поигрался с ним, и как всегда, когда угасает интерес к вещи, положил на полку и забыл.
Когда я пытался установить VPN клиент на своей коллекции старых роутеров (TP-Link WR-841N, TP-Link WR-702N), и у меня это не выходило из-за их низких технических характеристик, я уже начал рассматривать Raspberry Pi в качестве альтернативы. У него было все для того, чтобы стать хорошим роутером: компактный размер, Ethernet разъем, встроенный модуль WiFi, производительный SoC и большой объем оперативной памяти, но мне попался ASUS RT N56U, и я решил использовать его.
На свой роутер АSUS я поставил прошивку OpenWRT и WireGuard клиент. Все работало, я даже написал статью о своем уcпешном опыте, но уж очень меня растраивала скорость Интернета через VPN. Да, она была больше, чем при использовании OpenVPN, достаточна для просмотра 4К видео, но WireGuard клиент на компьютере выдавал результат в несколько раз больше, так как производительность компьютера в разы выше производительности роутера.
Raspberry Pi 4 — это полноценный компьютер, отличающийся компактностью, на который можно установить множество операционных систем, такие как различные дистрибутивы Linux и даже Windows, поэтому я решил сделать из него роутер.
Поиск решения
Итак, задача о превращении Raspberry Pi 4 в роутер с поддержкой WireGuard была поставлена, и я принялся за ее решение.
Так как у мне удалось заставить свой роутер ASUS работать с протоколом WireGuard, используя прошивку OpenWRT, я и сейчас решил использовать ее.
OpenWRT – это Linux дистрибутив, основная задача которого – обеспечение работы роутера. Он имеет обширную библиотеку пакетов, позволяющую подстроить роутер под свои нужды.
WireGuard — это программное обеспечение и протокол, который проще и быстрее, чем OpenVPN и IPSec.
Первым делом я изучил видео и статьи в Интернете о том, как люди решали задачу, подобную моей. Но нужной мне полноценной инструкции от А до Я, я не нашел.
Больше всего меня увлекло эмоциональное и захватывающее видео от NetworkChuck, хотя оно подразумевало установку OpenVPN клиента, а не WireGuard, и подразумевалась настройка из командной строки, а не из GUI OpenWRT.
Как это часто бывает, видео немного устарело, и мне приходилось решать что-то уже по-своему, но когда я дошел до шага установки драйвера для WiFi USB адаптера, я не смог его установить, ни для одного из имеющихся у меня адаптеров.
Предлагаемое на форумах решение в виде компиляции исходного кода драйверов для OpenWRT мне с одной стороны показалось интересным и позволяющим получить новые знания, но с другой – нудным и менее универсальным. Хотелось какое-то другое решение.
У меня есть дорожный роутер TP-Link WR-702N, у которого всего лишь один разъем Ethernet и один встроенный модуль WiFi, я подумал, что ничто не мешает мне сделать что-то похожее из моего Raspberry Pi. Не знаю, для кого как, но для меня, когда я вижу, что задачу можно решить – это вдохновляет и мотивирует.
В итоге я нашел решение для своей задачи. Оно решает проблему подключения устройств из локальной сети к VPN, позволяет узнать новое применение вашему Raspberry Pi, разнообразить свой досуг или удивить друзей и знакомых необычным применением малинки.
Что понадобится
-
Raspberry Pi 4.
-
Роутер с доступом в Интернет.
-
Ethernet кабель.
-
Сетевой адаптер питания на 5В 3A с кабелем USB type C.
-
MicroSD карта. Достаточно и 4GB.
-
Адаптер MicroSD-SD и ноутбук с кардридером или USB MicroSD кардридер.
Решение задачи
-
Заходим на страницу официального сайта OpenWRT, посвященную Raspberry Pi и загружаем свежий образ OpenWRT для Raspberry Pi 4. На момент написания статьи это версия 22.03.2
-
Записываем образ OpenWRT на Micro SD карту. Я делал это в Windows при помощи программы balenaEtcher.
-
Соединяем Ethernet кабелем компьютер и Raspberry Pi . Включаем Raspberry Pi. По умолчанию Raspberry Pi 4 c установленным OpenWRT имеет статический IP адрес 192.168.1.1, не имеет пароль для входа, также по умолчанию отключен WiFi интерфейс. Поэтому нужно включить и настроить WiFi, а также желательно поменять IP адрес и установить пароль.
-
Настраиваем WiFi. Network->Wireless->Edit->Interface Configuration. Вводим настройки на владках General Setup, Advanced Settings.


-
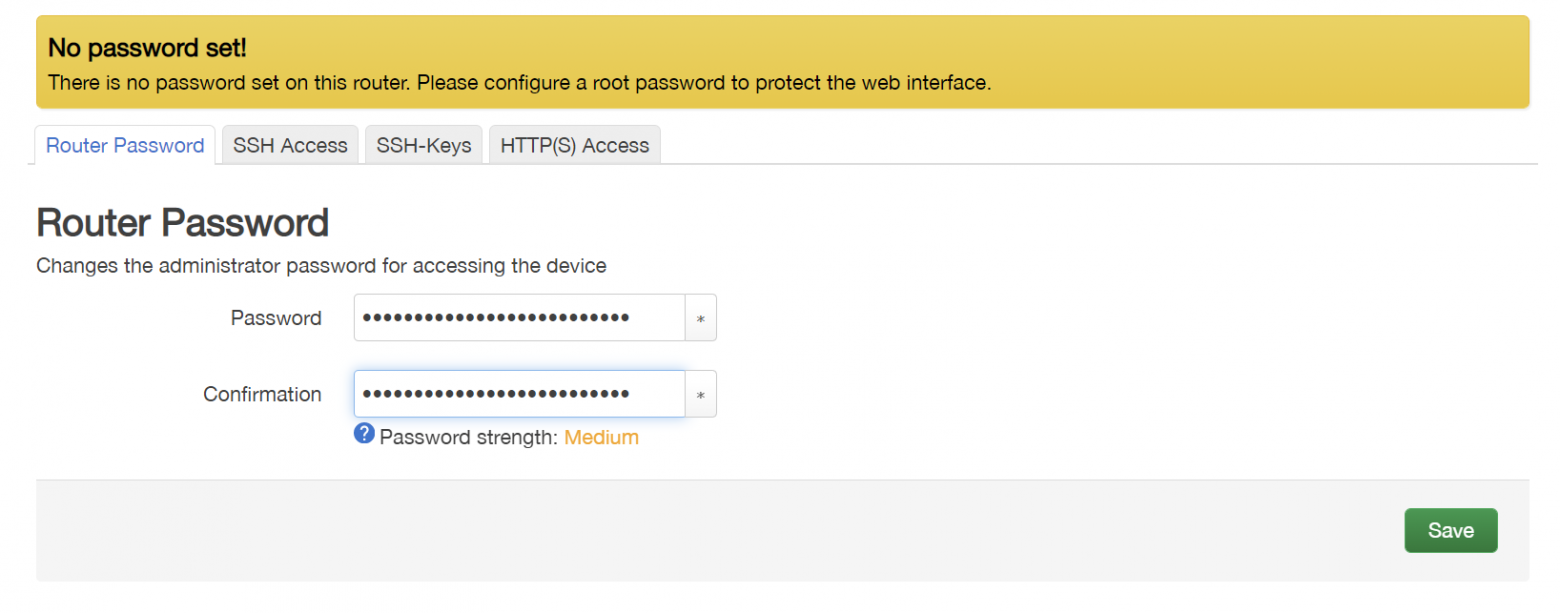
Устанавливаем пароль. System->Administration.

-
Меняем IP адрес и убираем Ethernet интерфейс из LAN, чтобы использовать Ethernet интерфейс в качестве WAN. Network->Interfaces->Edit->LAN.

-
Отключаем Raspberry Pi от сетевой карты компьютера.
-
Подключаемся к точке доступа, созданной на Raspberry Pi. Открываем в браузере URL c адресом IP, который вы назначили Raspberry Pi.
-
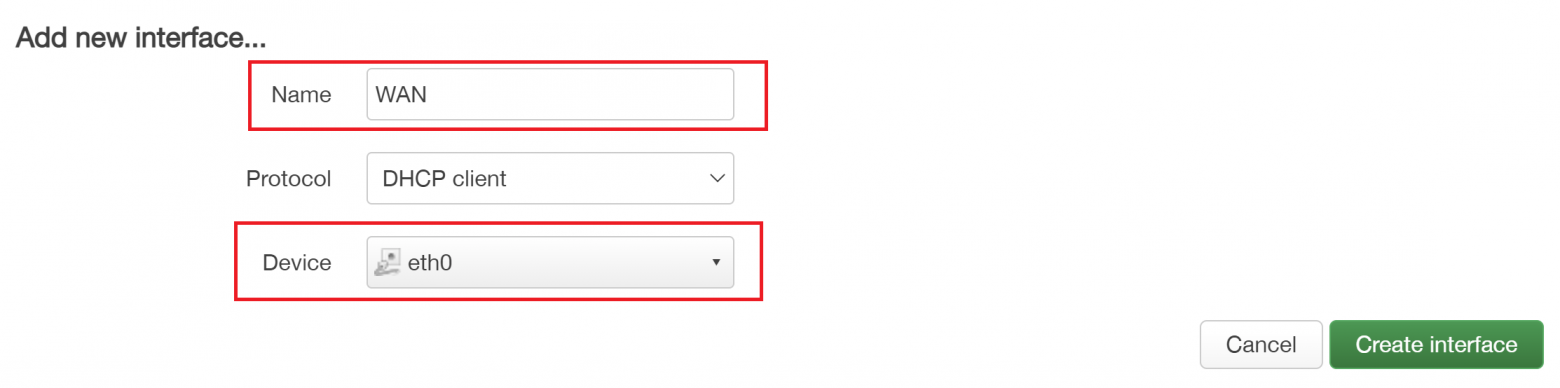
Настраиваем WAN порт Raspberry. Network->Interfaces->Add New Interface… В качестве WAN порта мы будем использовать Ethernet разъем Raspberry Pi. Так как разъем будет использоваться как WAN порт, а доступ к Raspberry Pi будет осуществляться через WiFi, при неверных настройках, которые нарушат работу интерфейса WiFi вам прийдется заново записать образ OpenWRT на microSD карту.

-
Выключаем Raspberry Pi. Подключаем WAN порт Raspberry Pi к LAN порту домашнего роутера. Включаем Raspberry Pi.
-
Убеждаемся, что доступ в интернет есть. Network->Diagnostics.

-
Настраиваем файервол для WAN интерфейса. Network->Interfaces->WAN->Edit->Firewall Settings.

-
Заходим на сайт https://www.myip.com/ чтобы узнать свой внешний IP адрес.
-
Устанавливаем WireGuard. System->Software. Обновляем список пакетов (Update lists…), находим пакет luci-i18n-wireguard-en и устанавливаем его.
-
Перегружаем Rasperry Pi. System->Reboot.
-
Устанавливаем WireGuard на VPS сервер. Как это сделать я подробно расписал в своей статье.
-
Добавляем Wireguard интерфейс. Network->Interfaces->Add New Interface… -> Create Interface

-
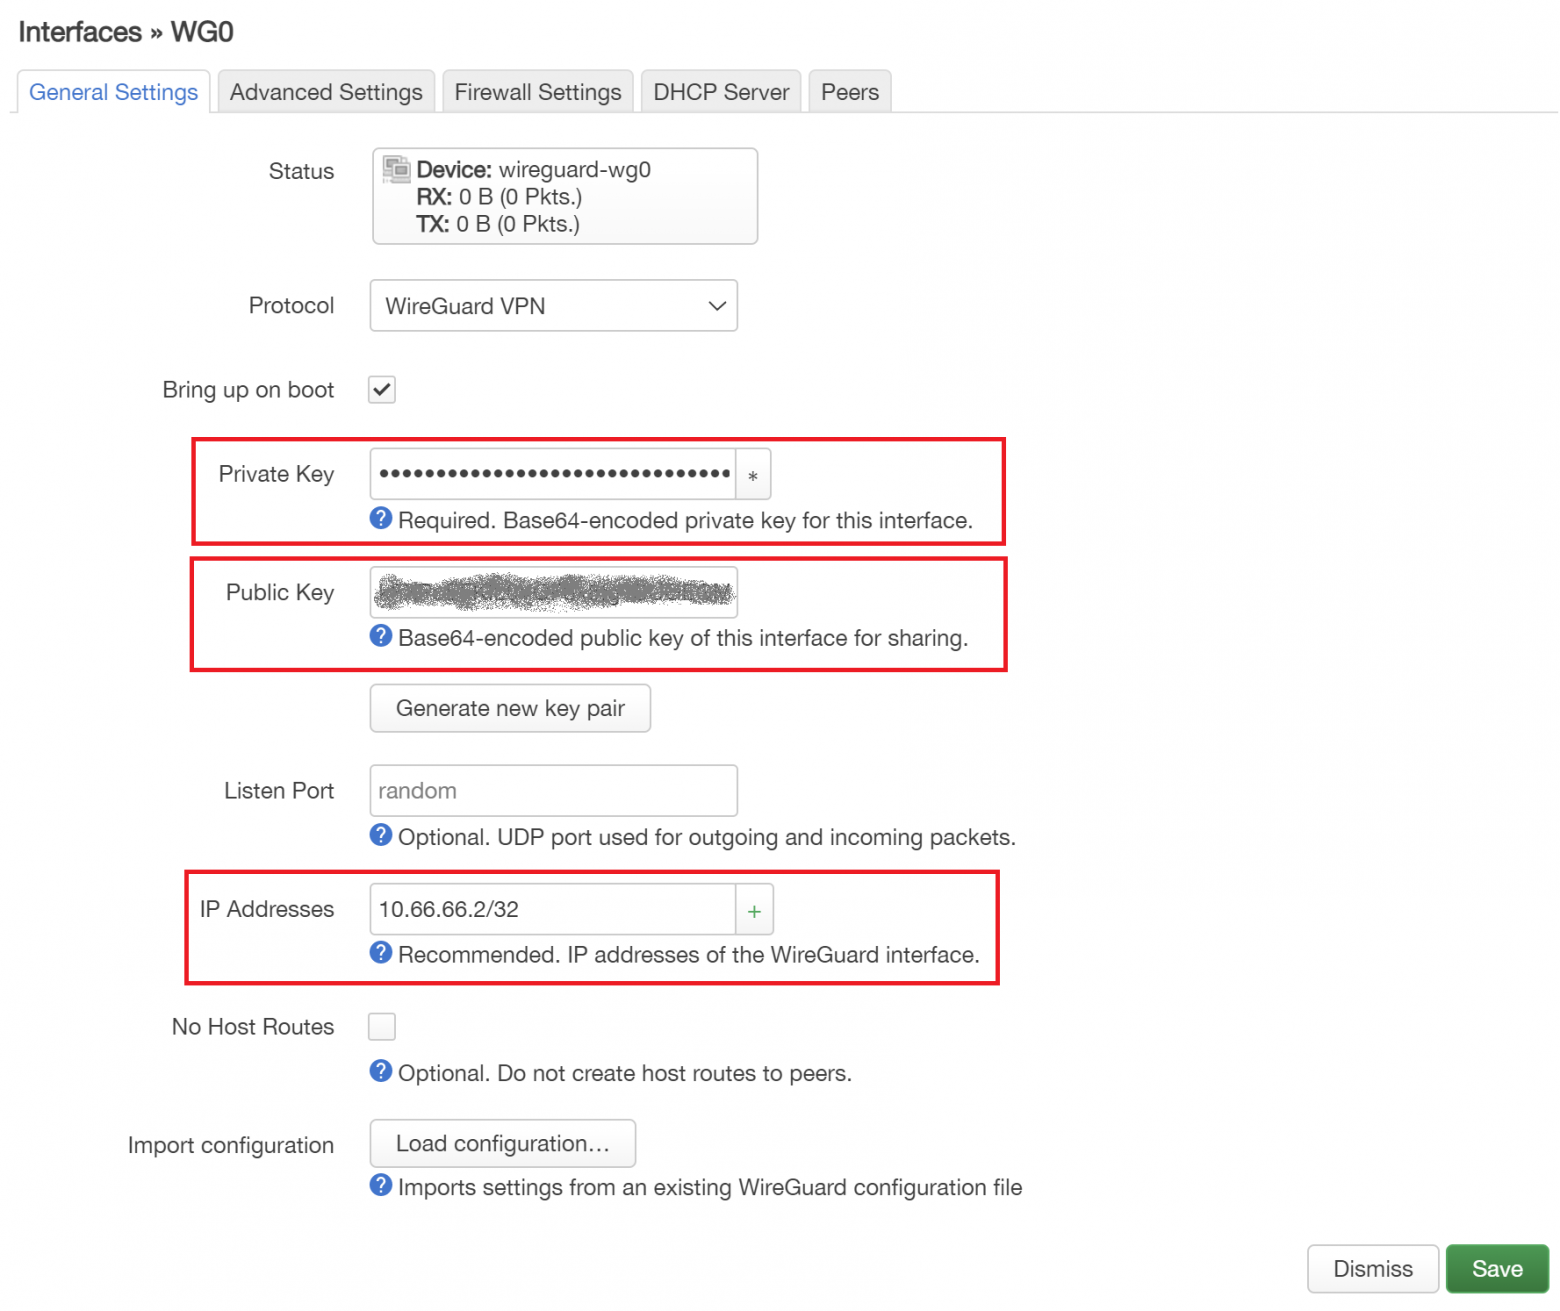
Вводим данные на вкладке General Settings. Здесь необходимо ввести Private Key, Public Key, IP Address для созданного WireGuard интерфейса, который теперь находится на Raspberry Pi. Public Key можно посмотреть в секции Peer в конфиграционном файле /etc/wireguard/wg0.conf на VPS сервере с установленным WireGuard или получить из имеющегося Private Key.

-
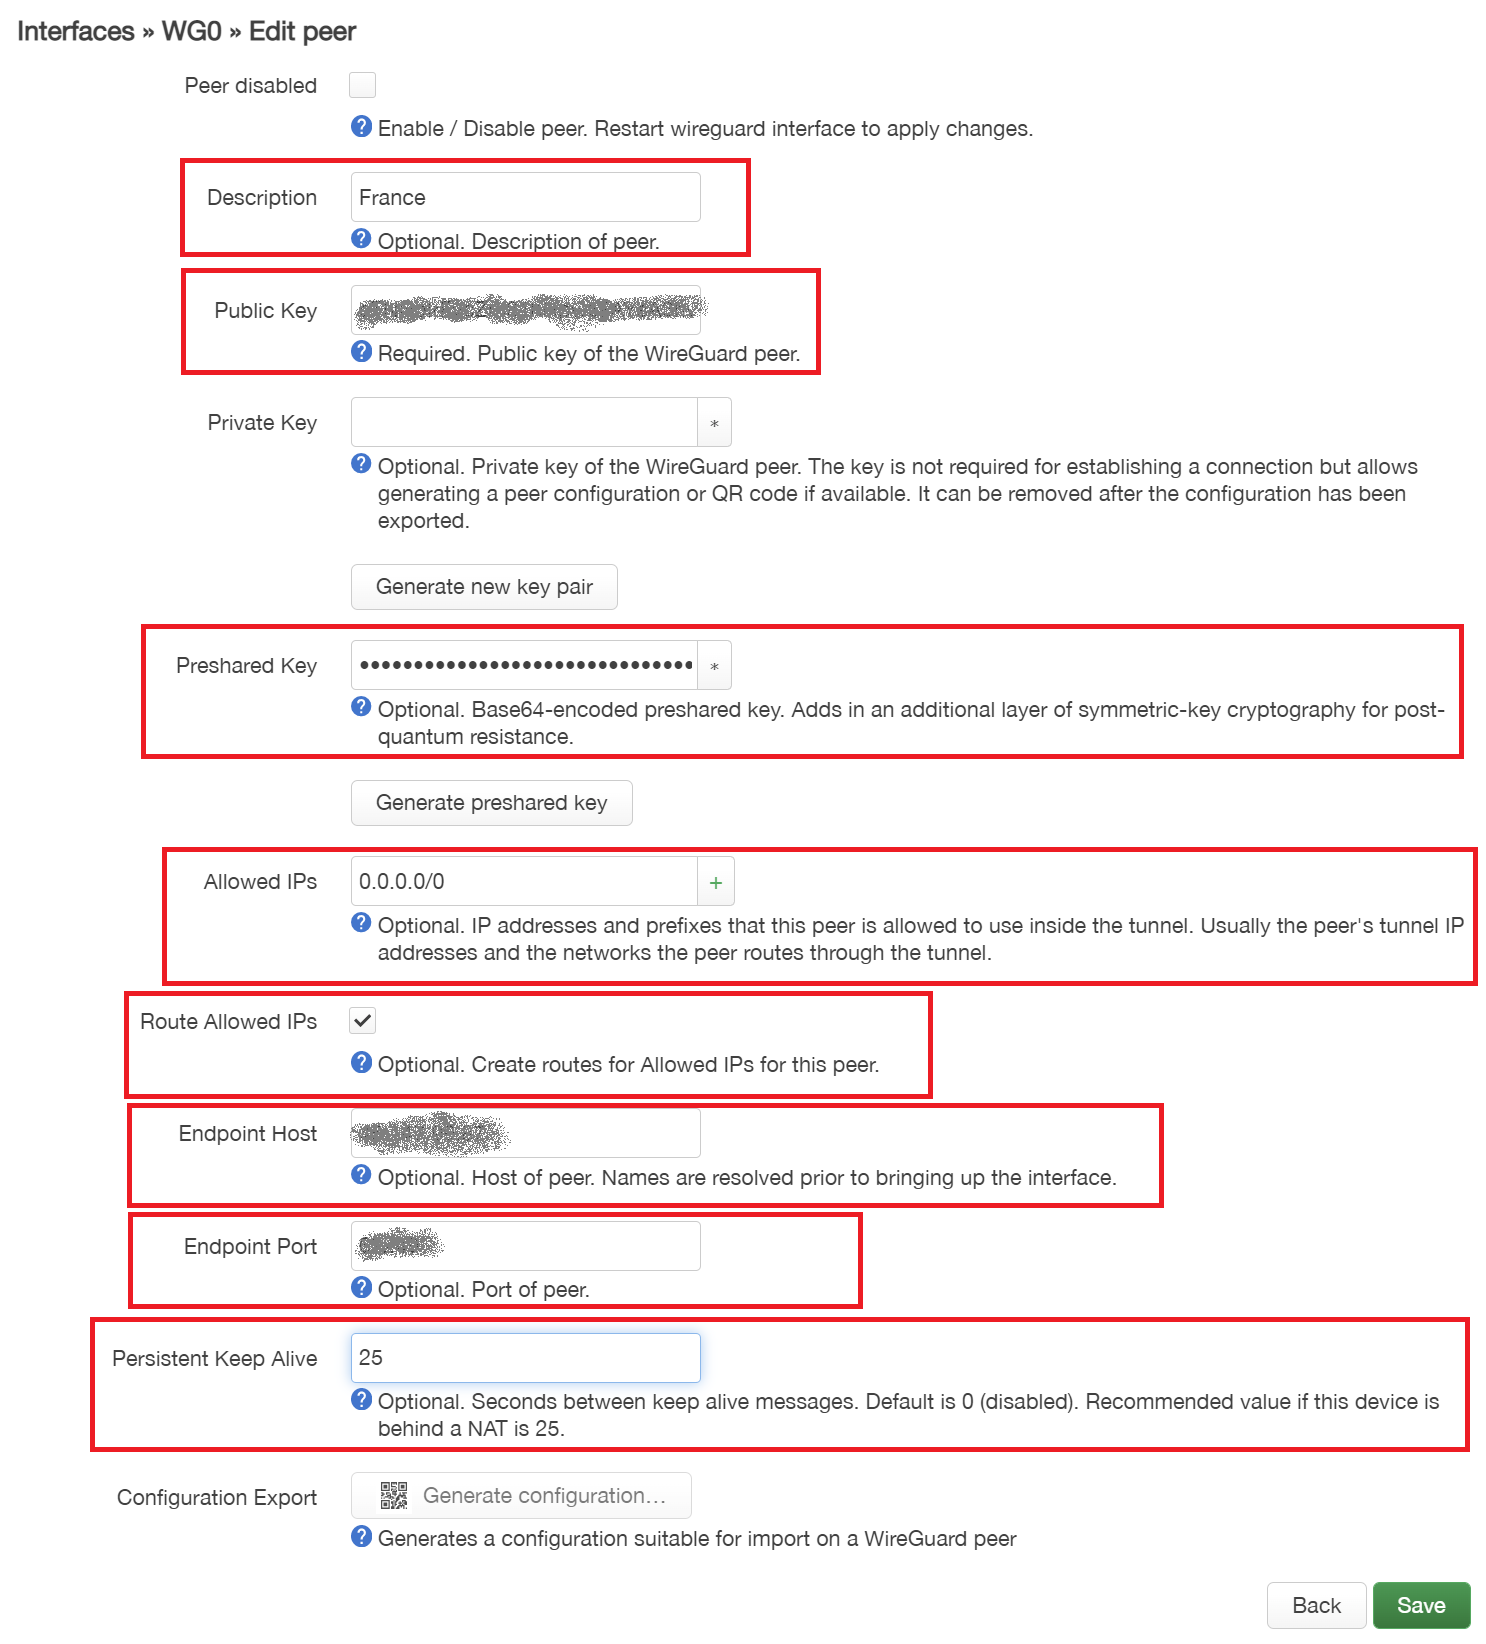
Заходим на вкладку Peers. Нажимаем Add Peer. Вводим оставшиеся данные для WireGuard. Это параметры интерфейса WireGuard, который находится на удаленном сервере.

-
Удостоверяемся, что WireGuard интерфейс работает. RX и TX должны содержать ненулевые значения.

-
Настраиваем Firewall. Network->Firewall->Add.

-
Настраиваем маршрутизацию. Network->Routing->Add. В поле Target вводится IP адрес вашего сервера WireGuard фомате CIDR (<IP адрес>/32).

-
Настраиваем DNS. Network->Interfaces->WAN->Edit->Advanced Settings.

-
Проверяем работу VPN. Заходим на сайт https://www.myip.com/ и смотрим на свой внешний IP. Если он отличается от того, что был до включения VPN, то VPN работает.
-
Если все устраивает, то можно сделать резервную копию micro SD карты при помощи программы Win32 Disk Imager. Это позволит хранить всю настроенную OpenWRT для вашего Raspberry Pi на локальном диске компьютера и быстро развернуть уже настроенный OpenWRT в случае, если собьются настройки.


Надеюсь, что я вас не сильно утомил, и вы теперь наслаждаетесь результатами своего труда.
Сравнение с решением от NetworkChuck
Мое решение отличается от решения NetworkChuck следующим:
1. Я использую только один WiFi интерфейс, который работает в качестве точки доступа, а не два, один из которых (встроенный) работает в качестве WiFi клиента к точке доступа, предоставляющей доступ в Интернет, а второй (USB WiFi адаптер, желательно с антенной) в качестве точки доступа.
2. Я выполняю все настройки, используя исключительно GUI OpenWRT.
3. Для VPN я использую WireGuard, а не OpenVPN.
У решения от NetworkChuck есть ряд преимуществ:
1. Так как не нужен проводной доступ роутеру, раздающему Интернет, решение подходит для публичной точки доступа в кафе или в аэропорту (если конечно публичная точка доступа позволит это сделать).
2. Так как для организации точки доступа используется USB WiFi адаптер с антенной, покрытие созданной WiFi сети будет шире и стабильнее.
У моего решения тоже есть ряд преимуществ:
1. Неподготовленному пользователю проще выполнить все в GUI OpenWRT по приведенным скриншотам, чем вводить все в комадной строке.
2. Cкорость Интернет, у моего решения будет выше и стабильнее, так как я подключаю Raspberry Pi к роутеру с Интернет через проводное соединение и использую WireGuard вместо OpenVPN.
Оставляю вам возможность проверить решение от NetworkChuck, если у вас окажется USB WiFi адаптер, для которого вы сможете установить драйвер в OpenWRT.
Анализ результатов
У меня дома не было лабораторных условий для проведения эксперимента.
Подключившись к VPN серверу, установленному на VPS от PulseHeberg и проверив скорость Интернета, я получил заветные цифры. Если учитывать, что у меня Интернет от провайдера с заявленной скоростью 100 МБ/c, я не уже не вижу смысла улучшать скорость соединения.

Я надеюсь, что вы получите результат не хуже моего. Буду признателен, если вы в комментариях напишете, какие результаты получились у вас. Желательно указать версию Raspberry PI, версию OpenWRT, заявленную скорость интренет вашего провайдера, на каком хостинге располагается WireGuard VPN сервер, и полученные вами результаты в SPEEDTEST.
Выводы
Raspberry Pi подходит для создания компактного роутера с поддержкой WireGuard. Скорость Internet через Wireguard VPN на Rapsberry Pi практически такая же как и при работе без него.
Теоретически можно попробовать сделать роутер и из Raspberry Pi 3, но я не проверял и думаю скорость VPN будет значительно ниже.
К спорным моментам можно отнести:
-
Cтоимость Raspberry Pi (роутер, на который можно поставить OpenWRT все-таки стоит дешевле).
-
Доступность Raspberry Pi в контексте происходящих сейчас событий.
-
Мощность антенны встроенного модуля WiFi (я считаю, что у обычного роутера антенна получше).
Сфера применения Raspberry Pi не ограничивается домашним роутером с VPN, я находил и другие интересные решения, способные удивить вас и ваших знакомых. Я думаю, что это тема моей следующей статьи.
Thanks to the built-in Wi-Fi, the newest version of the Raspberry Pi is more useful than ever for networking projects. We recently showed you how to use your Raspberry Pi as a wireless access point – a router, essentially – and now we have a project for you that builds on that. You can use your Raspberry Pi as a VPN access point, helping you browse the web more privately. Here’s how.
Step 1: Turn your Pi into a wireless access point
You’ll find everything you need in our how-to post.
Step 2: Install OpenVPN
We’re going to use a program called OpenVPN to set up our VPN. Open the command line and type this to get it:
sudo apt-get install openvpn -y
Now go ahead and reboot the Pi:
sudo reboot
Step 3: Download and unzip VyprVPN
We’ll need one more program for this project, and that’s VyprVPN. Let’s get it via the command line:
cd /etc/openvpn
This puts us in the right directory.
sudo wget https://support.goldenfrog.com/hc/article_attachments/214728647/GF_OpenVPN_10142016.zip
This downloads the file.
sudo unzip GF_OpenVPN_10142016.zip
And this, of course, unzips it!
Step 4: List the VPNs
Hop into the new directory here, then type ls to list the files. We’re using the 256-bit version, so our path reflects that.
cd GF_OpenVPN_10142016/OpenVPN256
ls
You’ll see a whole bunch of files that end in .ovpn. These are the different VPNs you can use, listed by location. Remember these for when you want to connect to specific VPNs (consider writing them down, or just run these commands again when you forget).
Step 5: Create an authorization file
You need to be authorized to use VyprVPN. Let’s create an authorization file:
sudo nano /etc/openvpn/auth.txt
This should create a new file. In the file, type two lines. The first will be your username, the second your password. You’re not just making these up – they have to be your VyprVPN login (if you don’t have a VyprVPN account, create one). Now get out of the file (Ctrl+X), save it (Y), and confirm (Enter).
Step 6: Run a test
sudo openvpn --config "/etc/openvpn/GF_OpenVPN_10142016/OpenVPN256/FILENAME.ovpn" --auth-user-pass /etc/openvpn/auth.txt
Remember the VPN you wanted to use? Plug that in where we have FILENAME.ovpn. If you did it right, you should get a bunch of text that includes the happy words “Initialization Sequence Completed.”
Step 7: Fun with iptables
We’re not done yet. We changed a bunch of stuff in iptables when we used our Pi as a wireless access point, but we need to change that now.
sudo iptables -F
sudo iptables -t nat -F
sudo iptables -X
This clears out the old stuff.
sudo iptables -t nat -A POSTROUTING -o tun0 -j MASQUERADE
sudo iptables -A FORWARD -i tun0 -o wlan0 -m state --state RELATED,ESTABLISHED -j ACCEPT
sudo iptables -A FORWARD -i wlan0 -o tun0 -j ACCEPT
And this is what we want now. This will route the wlan0 connection through our tunnel instead of over the Ethernet connection.
sudo sh -c "iptables-save > /etc/iptables.ipv4.nat"
This saves our work.
Step 8: Make things automatic
Let’s set it up so that our VPN starts up when our Pi starts up. We’ll need to edit the rc.local file.
sudo nano /etc/rc.local
In the file, look for the line that says “exit 0” and add these lines just above it:
sleep 5
sudo openvpn --config "/etc/openvpn/GF_OpenVPN_10142016/OpenVPN256/FILENAME.ovpn" --auth-user-pass /etc/openvpn/auth.txt
As with the last time, FILENAME.ovpn should be your choice from step 4. Head out of here with the same keystrokes as our last file editing step: Ctrl+X, Y, Enter.
That’s it! Everything should work properly now. You can check to make sure everything starts with each boot by rebooting the Pi with sudo reboot.
This is a quick-and-dirty guide to setting up a Raspberry Pi as a «router on a stick» to PrivateInternetAccess VPN.
Requirements
Install Raspbian Jessie (2016-05-27-raspbian-jessie.img) to your Pi’s sdcard.
Use the Raspberry Pi Configuration tool or sudo raspi-config to:
- Expand the root filesystem and reboot
- Boot to commandline, not to GUI
- Configure the right keyboard map and timezone
- Configure the Memory Split to give 16Mb (the minimum) to the GPU
- Consider overclocking to the Medium (900MHz) setting on Pi 1, or High (1000MHz) setting on Pi 2
IP Addressing
My home network is setup as follows:
- Internet Router:
192.168.1.1 - Subnet Mask:
255.255.255.0 - Router gives out DHCP range:
192.168.100-200
If your network range is different, that’s fine, use your network range instead of mine.
I’m going to give my Raspberry Pi a static IP address of 192.168.1.2 by configuring /etc/network/interfaces like so:
auto lo
iface lo inet loopback

auto eth0
allow-hotplug eth0
iface eth0 inet static
    address 192.168.1.2
    netmask 255.255.255.0
    gateway 192.168.1.1
    dns-nameservers 8.8.8.8 8.8.4.4
You can use WiFi if you like, there are plenty tutorials around the internet for setting that up, but this should do:
auto lo
iface lo inet loopback

auto eth0
allow-hotplug eth0
iface eth0 inet manual

auto wlan0
allow-hotplug wlan0
iface wlan0 inet static
    wpa-ssid "Your SSID"
    wpa-psk  "Your Password"
    address 192.168.1.2
    netmask 255.255.255.0
    gateway 192.168.1.1
    dns-nameservers 8.8.8.8 8.8.4.4
You only need one connection into your local network, don’t connect both Ethernet and WiFi. I recommend Ethernet if possible.
NTP
Accurate time is important for the VPN encryption to work. If the VPN client’s clock is too far off, the VPN server will reject the client.
You shouldn’t have to do anything to set this up, the ntp service is installed and enabled by default.
Double-check your Pi is getting the correct time from internet time servers with ntpq -p, you should see at least one peer with a + or a * or an o, for example:
$ ntpq -p
     remote           refid      st t when poll reach   delay   offset  jitter
==============================================================================
-0.time.xxxx.com 104.21.137.30    2 u   47   64    3  240.416    0.366   0.239
+node01.jp.xxxxx 226.252.532.9    2 u   39   64    7  241.030   -3.071   0.852
*t.time.xxxx.net 104.1.306.769    2 u   38   64    7  127.126   -2.728   0.514
+node02.jp.xxxxx 250.9.592.830    2 u    8   64   17  241.212   -4.784   1.398
Setup VPN Client
Install the OpenVPN client:
sudo apt-get install openvpn
Download and uncompress the PIA OpenVPN profiles:
wget https://www.privateinternetaccess.com/openvpn/openvpn.zip
sudo apt-get install unzip
unzip openvpn.zip -d openvpn
Copy the PIA OpenVPN certificates and profile to the OpenVPN client:
sudo cp openvpn/ca.rsa.2048.crt openvpn/crl.rsa.2048.pem /etc/openvpn/
sudo cp openvpn/Japan.ovpn /etc/openvpn/Japan.conf
You can use a diffrent VPN endpoint if you like. Note the extension change from ovpn to conf.
Create /etc/openvpn/login containing only your username and password, one per line, for example:
user12345678
MyGreatPassword
Change the permissions on this file so only the root user can read it:
sudo chmod 600 /etc/openvpn/login
Setup OpenVPN to use your stored username and password by editing the the config file for the VPN endpoint:
sudo nano /etc/openvpn/Japan.conf
Change the following lines so they go from this:
ca ca.rsa.2048.crt
auth-user-pass
crl-verify crl.rsa.2048.pem
To this:
ca /etc/openvpn/ca.rsa.2048.crt
auth-user-pass /etc/openvpn/login
crl-verify /etc/openvpn/crl.rsa.2048.pem
Test VPN
At this point you should be able to test the VPN actually works:
sudo openvpn --config /etc/openvpn/Japan.conf
If all is well, you’ll see something like:
$ sudo openvpn --config /etc/openvpn/Japan.conf
Sat Oct 24 12:10:54 2015 OpenVPN 2.3.4 arm-unknown-linux-gnueabihf [SSL (OpenSSL)] [LZO] [EPOLL] [PKCS11] [MH] [IPv6] built on Dec  5 2014
Sat Oct 24 12:10:54 2015 library versions: OpenSSL 1.0.1k 8 Jan 2015, LZO 2.08
Sat Oct 24 12:10:54 2015 UDPv4 link local: [undef]
Sat Oct 24 12:10:54 2015 UDPv4 link remote: [AF_INET]123.123.123.123:1194
Sat Oct 24 12:10:54 2015 WARNING: this configuration may cache passwords in memory -- use the auth-nocache option to prevent this
Sat Oct 24 12:10:56 2015 [Private Internet Access] Peer Connection Initiated with [AF_INET]123.123.123.123:1194
Sat Oct 24 12:10:58 2015 TUN/TAP device tun0 opened
Sat Oct 24 12:10:58 2015 do_ifconfig, tt->ipv6=0, tt->did_ifconfig_ipv6_setup=0
Sat Oct 24 12:10:58 2015 /sbin/ip link set dev tun0 up mtu 1500
Sat Oct 24 12:10:58 2015 /sbin/ip addr add dev tun0 local 10.10.10.6 peer 10.10.10.5
Sat Oct 24 12:10:59 2015 Initialization Sequence Completed
Exit this with Ctrl+c
Enable VPN at boot
sudo systemctl enable openvpn@Japan
Setup Routing and NAT
Enable IP Forwarding:
echo -e '\n#Enable IP Routing\nnet.ipv4.ip_forward = 1' | sudo tee -a /etc/sysctl.conf
sudo sysctl -p
Setup NAT fron the local LAN down the VPN tunnel:
sudo iptables -t nat -A POSTROUTING -o tun0 -j MASQUERADE
sudo iptables -A FORWARD -i tun0 -o eth0 -m state --state RELATED,ESTABLISHED -j ACCEPT
sudo iptables -A FORWARD -i eth0 -o tun0 -j ACCEPT
Make the NAT rules persistent across reboot:
sudo apt-get install iptables-persistent
The installer will ask if you want to save current rules, select Yes
If you don’t select yes, that’s fine, you can save the rules later with sudo netfilter-persistent save
Make the rules apply at startup:
sudo systemctl enable netfilter-persistent
VPN Kill Switch
This will block outbound traffic from the Pi so that only the VPN and related services are allowed.
Once this is done, the only way the Pi can get to the internet is over the VPN.
This means if the VPN goes down, your traffic will just stop working, rather than end up routing over your regular internet connection where it could become visible.
sudo iptables -A OUTPUT -o tun0 -m comment --comment "vpn" -j ACCEPT
sudo iptables -A OUTPUT -o eth0 -p icmp -m comment --comment "icmp" -j ACCEPT
sudo iptables -A OUTPUT -d 192.168.1.0/24 -o eth0 -m comment --comment "lan" -j ACCEPT
sudo iptables -A OUTPUT -o eth0 -p udp -m udp --dport 1198 -m comment --comment "openvpn" -j ACCEPT
sudo iptables -A OUTPUT -o eth0 -p tcp -m tcp --sport 22 -m comment --comment "ssh" -j ACCEPT
sudo iptables -A OUTPUT -o eth0 -p udp -m udp --dport 123 -m comment --comment "ntp" -j ACCEPT
sudo iptables -A OUTPUT -o eth0 -p udp -m udp --dport 53 -m comment --comment "dns" -j ACCEPT
sudo iptables -A OUTPUT -o eth0 -p tcp -m tcp --dport 53 -m comment --comment "dns" -j ACCEPT
sudo iptables -A OUTPUT -o eth0 -j DROP
And save so they apply at reboot:
sudo netfilter-persistent save
If you find traffic on your other systems stops, then look on the Pi to see if the VPN is up or not.
You can check the status and logs of the VPN client with:
sudo systemctl status openvpn@Japan
sudo journalctl -u openvpn@Japan
Configure Other Systems on the LAN
Now we’re ready to tell other systems to send their traffic through the Raspberry Pi.
Configure other systems’ network so they are like:
- Default Gateway: Pi’s static IP address (eg:
192.168.1.2) - DNS: Something public like Google DNS (
8.8.8.8and8.8.4.4)
Don’t use your existing internet router (eg: 192.168.1.1) as DNS, or your DNS queries will be visible to your ISP and hence may be visible to organizations who wish to see your internet traffic.
Optional: DNS on the Pi
To ensure all your DNS goes through the VPN, you could install dnsmasq on the Pi to accept DNS requests from the local LAN and forward requests to external DNS servers.
sudo apt-get install dnsmasq
You may now configure the other systems on the LAN to use the Pi (192.168.1.2) as their DNS server as well as their gateway.
Introduction
In this article I will walk you through on How to Setup Your Raspberry PI As A VPN Router With A Kill Switch.
Did you know that a raspberry pi can be a cheap and great secure alternative to route all your traffic via a VPN?
I will break this review in the following sections:
- What you need to get started in terms of hardware and software
- How to do this without paying for anything other than an inexpensive $2/month VPS
- Provide you with all the code needed and instructions to get going super fast
This is a complete and easy to follow guide with step by step instructions providing all source code needed.
I have been using this setup successfully for the last 2 years without failure on a day to day basis. All of the things that I’m going to talk about here are not version specific and work with the base Raspberry PI project distributions (you can use the latest ones at the time without issues).
I’m going to keep all the steps simple and straight to the point to avoid you have to spend endless hours debugging or trying to figure out why things aren’t working. Hey if I missed something you are always welcome to ping me on twitter or via my contact page.
I have a lot of experience in security and network administration so I have kept everything to a minimum without any extras or bloatware. This guide is specifically designed for those that want to get straight into action with a lightweight setup that gets the job done.
I have successfully launched this setup in various versions of Raspberry PI starting from the early hardware version 2 to the latest 4. The requirements are minimal and it will work everywhere.
I have been working in the Software industry for over 23 years now and I have been a software architect, manager, developer and engineer. I am a machine learning and crypto enthusiast with emphasis in security. I have experience in various industries such as entertainment, broadcasting, healthcare, security, education, retail and finance.
All source code associated with this article can be found in my GitHub here.
Prerequisites
Here’s a list of things you will need before you start working on this project.
Please note if you already have installed Raspberry Pi in your device you can skip steps 1-2 of the pre-requisites.
SD Card
Before proceeding into setting things up you will need an SD card to flash the image to your SD if you have already done that it’s not a requirement.
Selecting The Raspberry Pi Distribution

You can find a list of all the Raspberry Pi distributions here. Feel free to select whichever you are more familiar with and suits you the best.
I personally like to use the Raspberry Pi OS Lite because it’s lightweight and does not come with any extras. Since our setup will be headless you don’t really need to do anything fancy here unless you want to dual purpose use it as a desktop environment as well which I do not recommend as it will reduce the security of your setup.
One thing to note is that the Lite version comes with 64bit support which I highly recommend if you are using newer hardware such as Version 3A+. You can find the full list in the above URL which has the distributions.
Once you select which version you want go ahead and download it following the instructions described here on how to set it up. The Raspberry Pi team provides good utilities for all operating systems to flash the firmware into your SD card and get going.
Clone The Git Repo To Get The Raspberry Pi VPN Kill Switch Files
You will need to download the kill switch vpn script for our raspberry pi system in order to proceed further down. To get this simply clone the repo from GitHub issuing the following command:
# HTTPs Method
> git clone https://github.com/unbiased-coder/raspi-vpn-router-kill-switch.git

# SSH Method
> git clone [email protected]:unbiased-coder/raspi-vpn-router-kill-switch.git
Having An OpenVPN Compatible Server/Service

Since you will be connecting somewhere to get going you will need to have an OpenVPN compatible server. While this setup can work with other propriatorey VPN services I do not recommend it for security and privacy reasons. Stick to the open source alternative of OpenVPN if you want to be safe.
Please note I’m not trying to discount the paid services out there this is just a personal preference and opinion. Also keep in mind that a lot of the known providers such as Private Internet Access and NordVPN provide OpenVPN configurations that you can use.
Since I like to manage my own OpenVPN server and do not like to have shared data hosting among other systems I maintain my own server which I have setup on a cheap VPS service. If you would like to learn how I’ve done this please send me a ping via my contact info and I’ll be happy to tell you how to do it or I may even write an article on it.
Now that we have the pre-requisites out of the way lets move on how to setup your system and the dependencies you may need to get started and enjoying your brand new VPN service with a kill switch.
Package Installation
The first thing we need to do in order to get going is that we need to install some basic packages in our system that our scripts will leverage to get your VPN Router with a kill switch going.
> apt update
> apt upgrade
> apt install openvpn openssh-client openssh-client iptables
> reboot
So we basically just install in the above command OpenVPN, SSH and IPtables. Since in some versions IPtables may not be standard we need to make sure to reboot the system in case it updates our kernel or adds a kernel module.
Setup SSH Connection

The next step we need to do is setup our SSH connection to our server so we can easily access and change things. This works using the OpenSSH Client command line so it will be supported in all three operating systems Windows, Mac and Linux. The instructions will be identical.
Please note if you already know how to setup SSH or you already have done this you can skip this section entirely.
Create SSH Key To Connect To Raspberry Pi
If you don’t have an ssh key generated already please go ahead and create one using the following command:
Follow the instructions and save it in whatever path you want to keep it in. Just make sure you store a safe copy of this. It should create the file you specified and along that a .pub file which is basically the public key which we will use to add into our Raspberry Pi VPN server to connect to it.
Add SSH Public Key to Raspberry Pi
In order to do this simply connect using password authentication now to the Raspberry Pi. The default credentials associated with your image can be found in the instructions page you had used earlier but you can also try the following:
- Username: pi
- Password: raspberry
If these don’t work then try looking them up as mentioned above.
Once you connect then simply add the public key file contents to your authorized keys file like this:
> echo "ssh-ed25519 KEYHERE alex@macbook" >> ~/.ssh/authorized_keys2
Now that this is added you may need to adjust the permissions of the file to be only readable and writeable by the user to do this you can run the following command:
Create SSH Config In Your Host To Connect To Raspberry Pi
Now that we have setup on the Raspberry Pi with SSH access we can simply make a quick config ssh section to connect to it fast.
In order to do this in your host operating system edit the file ~/.ssh/config. If this does not exist simply create it.
The section you need to add should look like this:
Host pirouter
     User pi
     HostName 192.168.1.22
     IdentityFile /Users/user/.ssh/YOURKEY
Connecting to Raspberry Pi Router Using SSH
From now on you can simply connect to your router by typing the following command:
This will log you into your Raspberry Pi Router using SSH with your secure private key file.
Upload And Setup The Script
Now that we have SSH setup we can proceed into uploading our file and setting things up.
Upload the Connection Script
First you need to get the connection script which is available in the git repo here.
If you haven’t downloaded the repo you will do that now as we will need this file further down as it was described earlier in the pre-requisites section.
The file you want to copy over is the raspi-vpn-kill-switch.sh to your Raspberry Pi router. In order to do this simply run the following command:
> scp raspi-vpn-kill-switch.sh pirouter:
This will copy the file in the Raspberry Pi home directory of the pi user.
Adjust Code
Once you download you should be presented with the following code that allows you to do this:
#!/bin/bash

clear

if [ "$#" -ne 1 ]; then
    echo "$0 <interface name>"
    exit -1
fi

IFACE=$1
echo "Using interface: $1"

echo "Killing previous instances of openvpn"
killall -9 openvpn

echo "Flushing iptables rules"
iptables -F
iptables -t nat -F
iptables -P INPUT ACCEPT
iptables -P OUTPUT ACCEPT
iptables -P FORWARD ACCEPT

echo "Current IP: `curl -s ifconfig.co`"

# temporarily block forwarding so nothing leaks if we restart this script
sysctl -w net.ipv4.ip_forward=0

# allow ssh
echo "Allowing incoming/outgoing SSH established on all interfaces"
iptables -A INPUT -p tcp --dport 22 -j ACCEPT
iptables -A OUTPUT -p tcp --sport 22 -j ACCEPT

echo "Allowing DHCP traffic"
iptables -A INPUT -j ACCEPT -p udp --dport 67:68 --sport 67:68
iptables -A OUTPUT -j ACCEPT -p udp --dport 67:68 --sport 67:68

echo "Allowing traffic on lo"
iptables -A OUTPUT -j ACCEPT -o lo
iptables -A INPUT -j ACCEPT -i lo

echo "Allowing traffic on tun"
iptables -A OUTPUT -j ACCEPT -o tun+
iptables -A INPUT -j ACCEPT -i tun+

# allow traffic from established connections
echo "Allowing already established traffic"
iptables -A INPUT -m conntrack --ctstate RELATED,ESTABLISHED -j ACCEPT

# allow openvpn uid, we need this prior we run openvpn because openvpn drops permissions at the end
# make sure the port number below reflects the one from your openvpn server
echo "Allowing openvpn traffic"
iptables -A OUTPUT -p udp -m udp --dport 1194 -j ACCEPT

# allow dns because it's a third party system app that tries to do it (and not openvpn)
echo "Allowing DNS for resolving openvpn server"
iptables -A OUTPUT -p udp --dport 53 -j ACCEPT

# allow traffic on tun0 and lo
echo "Allowing lo and tun interfaces"
iptables -A OUTPUT -j ACCEPT -o lo
iptables -A OUTPUT -j ACCEPT -o tun+

# allow forward traffic only from tun0
iptables -A FORWARD -m state --state ESTABLISHED,RELATED -j ACCEPT

# this is important we need to send all traffic that is being forwarded to tun0
iptables -A FORWARD -i $IFACE -o tun0 -j ACCEPT

# masq traffic on tun0
echo "Masquerading traffic on tun0"
iptables -t nat -A POSTROUTING -o tun0 -j MASQUERADE

# this is the path of your VPN configuration
openvpn PATH_TO_YOUR_VPN_FILE.ovpn &

echo "Waiting for VPN to initialize"
sleep 10

echo "Current IP: `curl -s ifconfig.co`"

echo "Setting policy in output and input chain to drop"
iptables -P OUTPUT DROP
iptables -P INPUT DROP
iptables -P FORWARD DROP

# block dns because it's a third party system app that tries to do it (and not openvpn)
echo "Blocking DNS for resolving openvpn server"
iptables -D OUTPUT -p udp --dport 53 -j ACCEPT

echo "Turning on IP forwarding"
sysctl -w net.ipv4.ip_forward=1
There’s a couple of small changes we need to make before we invoke the code:
- Adjust line 74 where it’s showing the path for your file this looks like this
openvpn PATH_TO_YOUR_VPN_FILE.ovpn &
Simply put your path in there from your VPN service as discussed earlier.
-
Adjust line 52 with the port of your provide this looks like this
iptables -A OUTPUT -p udp -m udp –dport 1194 -j ACCEPT
Simply replace 1194 with whatever your service is using it. The default may well be 1194 so you may not need to change it.
Start VPN Kill Switch Automatically In Raspberry Pi System Startup
Now that we have successfully edited our file we simply need to make an entry in our system setup to automatically start it. For this we will leverage the rc.local file which is present in most distributions. If it’s not you may need to add a service to it manually, more instructions can be found here.
To do this your rc.local file (/etc/rc.local) will look like this:
sudo PATH_TO/raspi-vpn-kill-switch.sh eth0 &
exit 0
The important part here is to preserve the interface name to what your system has. Since I use it on a wired interface in my case it’s eth0. If you are using a wireless interface it may be wlan0. The script is smart enough to adjust based on what you are using so feel free to adjust this.
Test It Out
To test this out we can simply reboot our system and try to use as a router in our host operating system the IP address of our Raspberry Pi system. If everything is fine you can go to a website that shows you the new IP and that should be the one from your router.
The easiest way to do this is to go to google.com and just type what is my ip address and this should show you the address of your VPN service provider instead of yours.
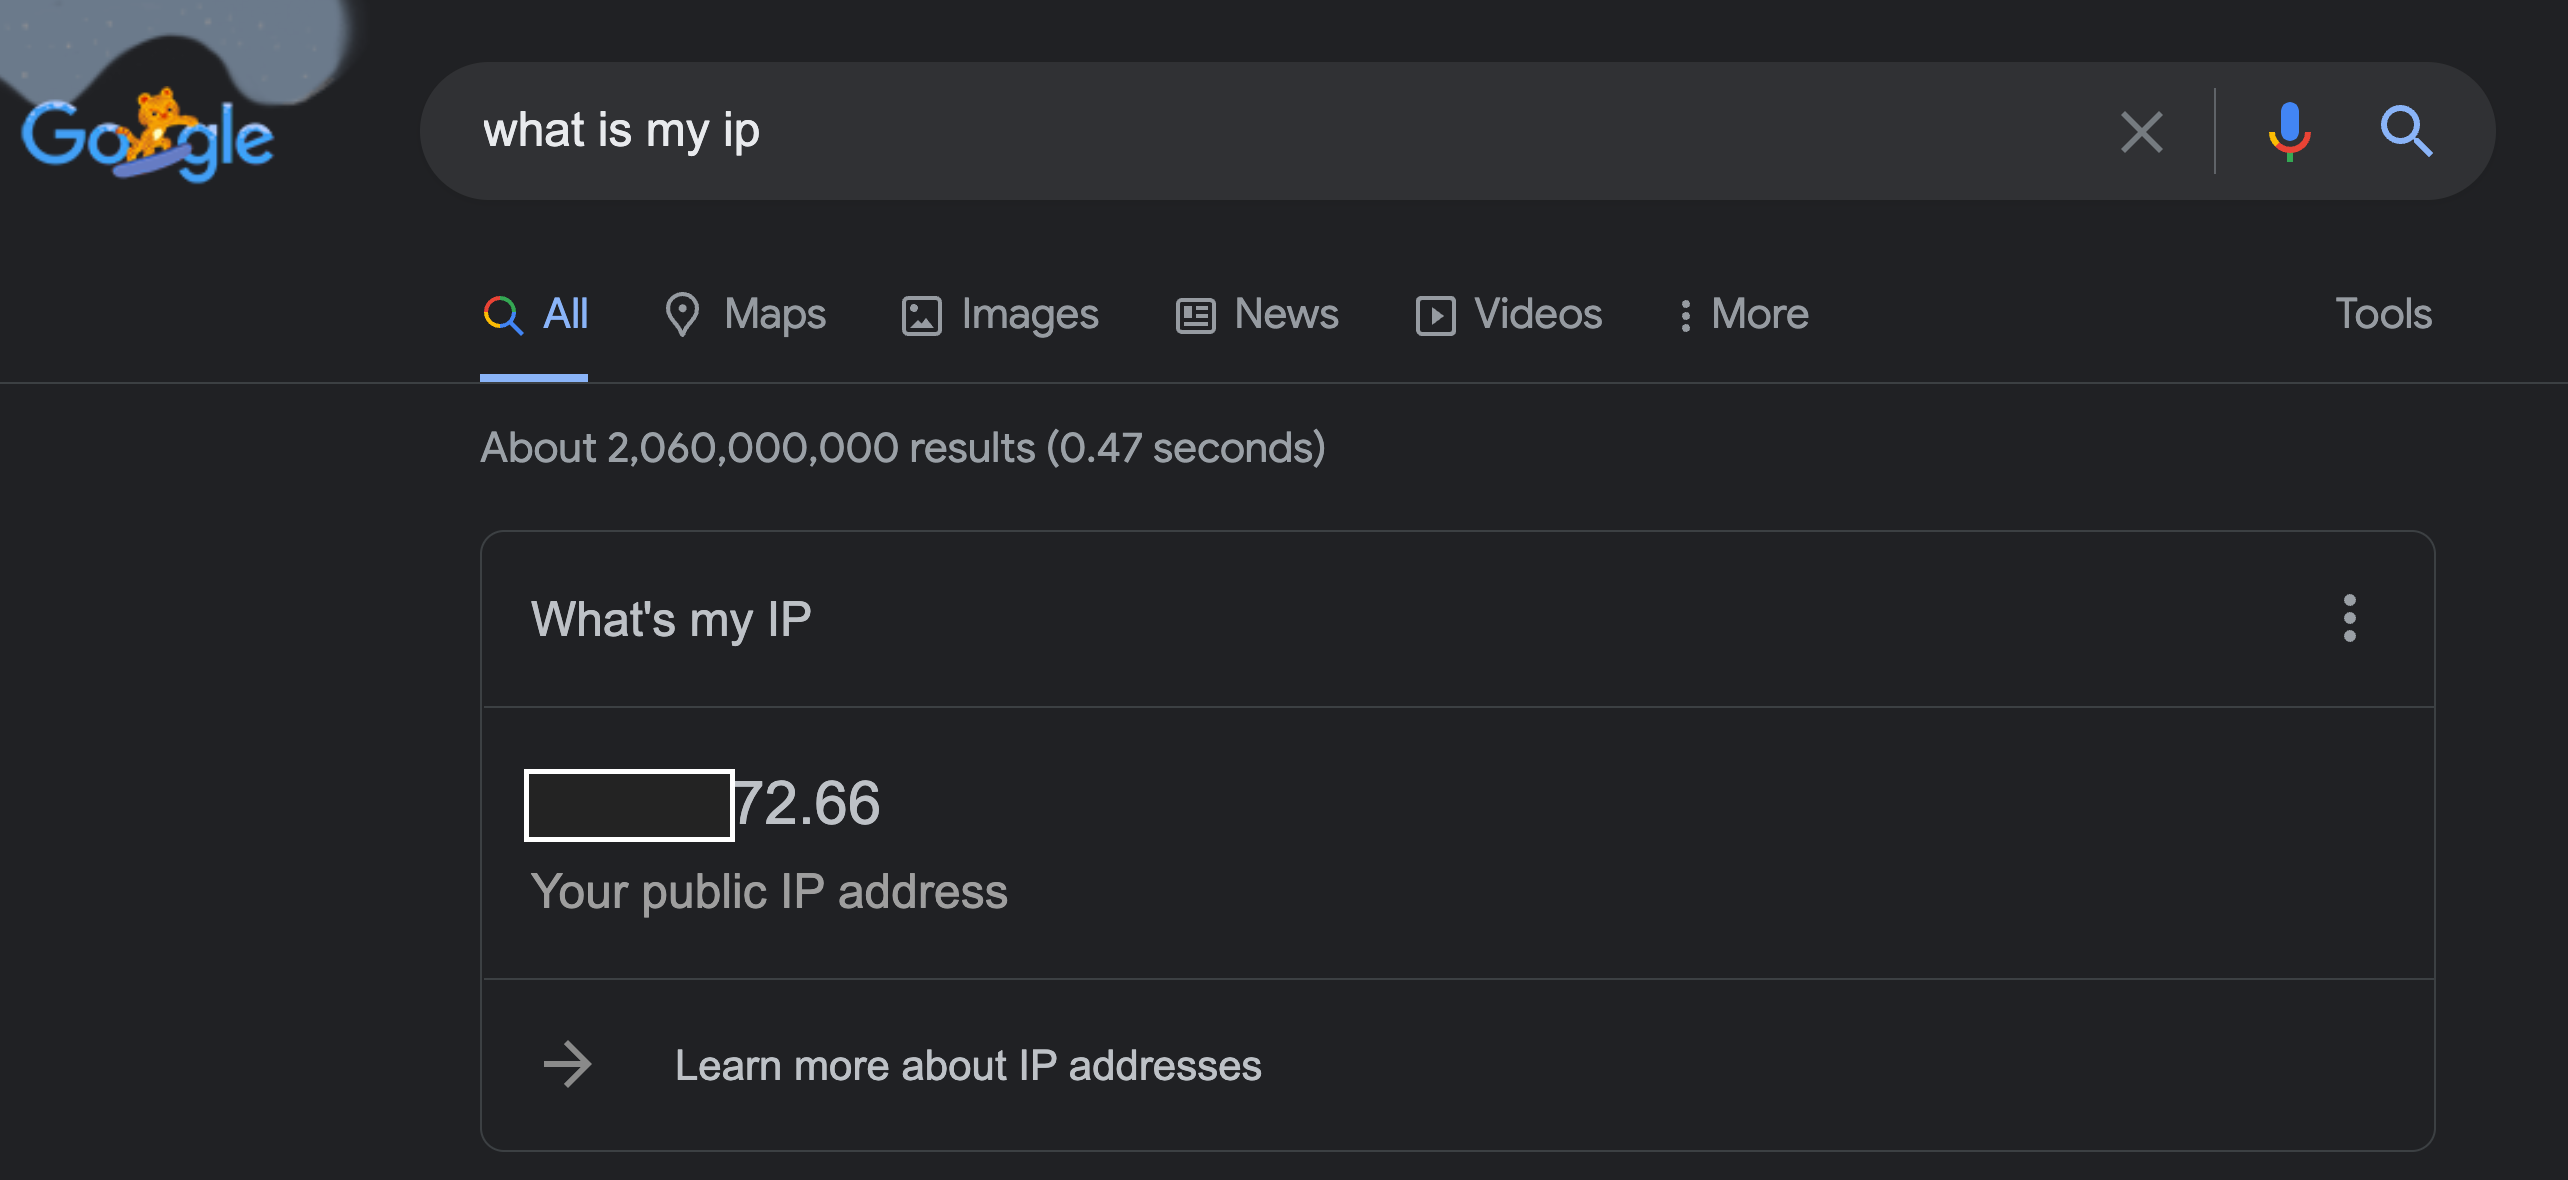
In the screenshot above Google is showing the IP of my VPN service provider rather than mine. This means the Raspberry Pi successfully routed the traffic through it for me.
VPN Kill Switch

The script automatically takes care of you having a kill switch if the connection to your VPN drops. This is accounted by the following IPTables policy rules which basically prohibit any outgoing traffic that’s not from the VPN to the destination.
echo "Setting policy in output and input chain to drop"
iptables -P OUTPUT DROP
iptables -P INPUT DROP
iptables -P FORWARD DROP
The reason the VPN traffic still goes through is because earlier in the script we allow any traffic going to the port of the VPN service to be allowed along with DNS requests in order to resolve any hostnames. This can be seen in the following commands:
echo "Allowing DNS for resolving openvpn server"
iptables -A OUTPUT -p udp --dport 53 -j ACCEPT

echo "Allowing openvpn traffic"
iptables -A OUTPUT -p udp -m udp --dport 1194 -j ACCEPT
Automatically Reboot Raspberry Pi If VPN Connection Dies
As mentioned earlier this is all automatically handled for you by the script itself and there’s nothing extra you need to do. Just know that if you connection to the VPN service drops you will need internet or to restart your computer.
I have also created another helper script that checks for you the internet connection automatically and if this does not work it reboots your Raspberry Pi Kill Switch VPN router.
You can find the code below that basically checks the usual domains such as google and bing to see if those are accessible if they are not then it will simply initiate a reboot command to bring back the Raspberry Pi online.
#!/bin/bash

ping -c 3 www.google.com

if [ $? -ge 1 ]; then
	echo "Did not get a response from google, trying to ping yahoo"

	ping -c 3 www.yahoo.com

	if [ $? -ge 1 ]; then
		echo "Did not get a response from yahoo, trying to ping bing"

		ping -c www.bing.com

		if [ $? -ge 1 ]; then
			echo "Did not get a response from bing rebooting the machine"
			sudo reboot
		fi
	fi
fi

exit 0
So this script can get initiated automatically via a crontab entry in order to reboot your router if the VPN service goes down. To do this you can add the following line in your crontab file in the Raspberry Pi Kill Switch VPN router.
*/15 * * * * /home/pi/raspi-vpn-router-kill-switch/checkvpn.sh
This will run every 15 minutes and see if the internet connection is up and running. If not it will go ahead and reboot your VPN router automatically for you.
Can I Use Raspberry Pi as A VPN Router
Yes as described above you can use the Raspberry Pi as a VPN Router and with the code I provided you have the extra functionality of having an available kill switch if your router goes offline.
How Do I Turn My Raspberry Pi Into a VPN
As described earlier you can easily turn your Raspberry Pi into a VPN using the source code provided in the GitHub repo here. And following the step by step guide mentioned earlier.
Is Raspberry Pi VPN Secure
The setup provided earlier is super secure as it only relies on two pieces of open source software:
- OpenVPN
- OpenSSH
Everything else is not needed in this system setup. You don’t need any special clients or software to get going and you can use your own hardened Linux distribution to host this setup.
Is Raspberry Pi VPN Kill Switch
By default Raspberry Pi does not offer a VPN Kill Switch however with the code described earlier you can easily do this and be ready to go. The kill switch functionality is implementing using a Linux native tool IPtables and nothing else. This gives you the flexibility of implementing it in any distribution without having to rely on external tools.
The full source code provided in the Github repo takes care of the entire implementation for you in an automated way.
How Secure Is OpenVPN on A Raspberry Pi
The setup described above is super secure as it locks down your machine’s ports from everything and provides a safe kill switch if your VPN connection does so no data is leaked outside the VPN connection. Furthermore it does not have any dependencies on third party software which may include spyware and other things that are unwanted.
Conclusion
If you found the How to Setup Your Raspberry PI As A VPN Router With A Kill Switch useful and you think it may have helped you please drop me a cheer below I would appreciate it.
If you have any questions, comments please post them below I check periodically and try to answer them in the priority they come in. Also if you have any corrections please do let me know and I’ll update the article with new updates or mistakes I did.
Which is your favorite Raspi distribution that you use?
My personal favorite the Raspberry Pi lightweight distribution because it’s pretty bare bones and can work faster without the load of extra services running in the background. Also I don’t like to have to maintain and update extra packages if it isn’t necessary.
If you would like to learn more about other Linux and system setup stuff you can check the articles below:
- Easy Linux Commands For Beginners
- Which Is The Fastest Linux Distribution in 2022
- Jenkins Vs. Gitlab Code deployments: Which is Better
Хотите защитить свое интернет-соединение во время путешествий? Вот как создать портативный VPN-маршрутизатор с помощью Raspberry Pi и OpenWRT

Написали бы вы свой пароль на листке бумаги и приклеили его себе на лоб? Скорее всего, нет. Однако подключаться к публичной сети Wi-Fi почти так же глупо
Однако у вас может не быть выбора, если вы находитесь в дороге и хотите оставаться на связи.VPN может обеспечить вашу безопасность, но каждое устройство должно подключаться отдельно, если вы не используете туристический маршрутизатор в качестве промежуточного звена
У вас нет такого устройства под рукой? Не волнуйтесь, вы можете собрать его с помощью Raspberry Pi. Это идеальный выбор для туристического маршрутизатора VPN DIY, поэтому давайте рассмотрим, как его собрать
Что вам понадобится
Чтобы приступить к созданию маршрутизатора Raspberry Pi VPN, вам понадобятся:
- Raspberry Pi (предпочтительно Pi 3 или Raspberry Pi Zero W) с корпусом.
- Один USB-адаптер Wi-Fi (два, если вы используете более старый Raspberry Pi).
- Карта microSD с объемом памяти не менее 8 ГБ.
- Устройство для чтения карт SD.
- Высококачественный блок питания.
- ПК с установленным SSH-клиентом.
- Подписка VPN с поддержкой OpenVPN.
Можно использовать модели Pi без встроенного Wi-Fi, но вам понадобятся два USB Wi-Fi адаптера или один, способный работать как в режиме управляемой точки доступа, так и в режиме клиента
Вместо стандартного дистрибутива Linux вам нужно будет установить OpenWRT на SD-карту, чтобы превратить устройство в полноценный маршрутизатор. При желании можно использовать другой дистрибутив Linux, но OpenWRT предоставляет удобный веб-интерфейс для настройки, когда вы находитесь вне дома
Если вы используете Windows, перед началом работы вам также потребуется установить PuTTY или другой SSH-клиент для Windows
Шаг 1: Установите OpenWRT

Сначала загрузите прошивку OpenWRT для вашей модели Raspberry Pi. Вы можете найти наиболее актуальные образы в OpenWRT wiki
Распакуйте скачанный файл с помощью 7zip или другого подходящего менеджера файловых архивов, затем прошейте IMG-файл на вашу карту с помощью Etcher
Программа автоматически определит вашу SD-карту; вам нужно только выбрать файл образа, выбрать нужный диск по букве, а затем нажать Flash.
После этого поместите карту microSD обратно в Raspberry Pi и дайте ему загрузиться
Шаг 2: Начальная конфигурация
По умолчанию OpenWRT устанавливает статический IP-адрес 192. 168. 1. 1 , который является IP-адресом шлюза по умолчанию для многих маршрутизаторов. Вам нужно будет изменить это значение, чтобы избежать конфликтов. Подключите Pi к компьютеру с помощью кабеля Ethernet; возможно, сначала потребуется установить статический IP-адрес на компьютере
Вместо того чтобы выполнять настройку с помощью LuCI, веб-интерфейса OpenWRT, вы будете делать это вручную, чтобы убедиться, что конфигурация установлена правильно. Загрузите PuTTY или ваш SSH-клиент и подключитесь сначала к 192. 168. 1. 1 , используя имя пользователя root.
При первом подключении вы получите предупреждение о безопасности; просто нажмите Да и продолжайте. На этом этапе неплохо бы установить пароль; для этого введите
passwdв окне терминала
Настройка параметров сети и брандмауэра
Вам нужно отредактировать два файла—
/etc/config/networkи
/etc/config/firewall— прежде чем вы сможете продолжить. Начните с ввода следующей команды для редактирования файла:
vim /etc/config/networkЗатем нажмите I, чтобы отредактировать текст и включить следующее:
config interface'loopback'
option ifname'lo'
option proto'static'
option ipaddr'127. 0. 0. 1'
option netmask'255. 0. 0. 0'
config interface'lan'
optiontype'bridge'
option ifname'eth0'
option force_link'1'
option proto'static'
option ipaddr'192. 168. 38. 1'
option netmask'255. 255. 255. 0'
option ip6assign'60'
config interface'wwan'
option proto'dhcp'
option peerdns'0'
option dns'8. 8. 8. 8 8. 8. 4. 4'## Google DNS servers
config interface 'vpnclient'
option ifname 'tun0'
option proto 'none'
Как только вы закончите, нажмите клавишу Esc и введите
:wqчтобы сохранить и выйти. Затем переключите внимание на файл конфигурации брандмауэра:
vim /etc/config/firewallНажмите I для редактирования, затем найдите (или добавьте) зону для раздела WAN, которая должна выглядеть следующим образом:
config zone
option name wan
option network'wan wan6 wwan'
option input ACCEPT
option output ACCEPT
option forward REJECT
option masq 1
option mtu_fix 1
Введите reboot и подождите, пока Raspberry Pi перезагрузится с новым IP-адресом: 192. 168. 38. 1
Шаг 3: Обновление и установка пакетов
Далее необходимо обновить OpenWRT. Для этого необходимо использовать внутренний Wi-Fi Pi и изначально настроить его на подключение к существующей сети Wi-Fi. Возможно, вам потребуется изменить статический IP-адрес на 192. 168. 38. 2 или аналогичный адрес в этом диапазоне, чтобы обеспечить подключение
После подключения введите IP-адрес вашей Raspberry Pi в браузер, чтобы получить доступ к панели администратора OpenWRT. Используйте свое имя пользователя и пароль для получения доступа, затем перейдите в раздел Network > Wireless. В настоящее время вы должны видеть только одно устройство Wi-Fi, поэтому нажмите Scan , чтобы найти свою сеть Wi-Fi, а затем Join Network , когда найдете ее
Вам нужно будет ввести пароль Wi-Fi в разделе WPA Passphrase, прежде чем нажать Submit.
Теперь вы должны увидеть настройки соединения Wi-Fi. Перейдите в раздел Дополнительные настройки и установите Код страны в соответствии с вашим местоположением; в противном случае Wi-Fi может не работать
Переподключитесь к Pi, используя новый IP-адрес по SSH (приняв предупреждение о ключе безопасности RSA). Сначала вам нужно будет обновить устройство, набрав:
opkg updateСледите за этим, нажимая Y при появлении запроса
Установка драйверов USB Wi-Fi
После установки всех обновлений установите все необходимые драйверы для USB-адаптера Wi-Fi. Он необходим для подключения к точкам доступа Wi-Fi, когда вы находитесь в пути. Вы также установите инструменты, необходимые для VPN-соединений с использованием OpenVPN, а также nano , более простой в использовании редактор файлов терминала
Здесь ваш метод может отличаться; у меня был Wi-Fi адаптер с чипсетом RT2870, поэтому следующие команды должны работать и у вас:
opkg install kmod-rt2800-lib kmod-rt2800-usb kmod-rt2x00-lib kmod-rt2x00-usb kmod-usb-core kmod-usb-uhci kmod-usb-ohci kmod-usb2 usbutils openvpn-openssl luci-app-openvpn nano
ifconfig wlan1 up
reboot
Если у вас нет Wi-Fi адаптера с чипсетом RT2870 или вы не уверены, подключите свой Wi-Fi адаптер и введите в терминале SSH следующее:
opkg install kmod-usb-core kmod-usb-uhci kmod-usb-ohci kmod-usb2 usbutils
lsusb
После установки файлов вы увидите список подключенных устройств. Найдите все, которые относятся к беспроводному адаптеру, и найдите соответствующие инструкции по установке для вашего устройства

Шаг 4: Настройте точку доступа Wi-Fi
Если USB-адаптер Wi-Fi подключен, теперь вы можете настроить оба Wi-Fi соединения. Вернитесь на приборную панель LuCI, в разделе Wireless, и удалите оба сетевых подключения. Устройство radio0 – это ваш встроенный Wi-Fi, а radio1 – это ваш USB Wi-Fi адаптер
Настройте встроенный Wi-Fi, нажав Добавить :
- Режим установлен на Точка доступа.
- ESSID устанавливается на имя сети по вашему выбору; по умолчанию – OpenWRT.
- Network устанавливается на lan.
- В разделе Безопасность беспроводной сети для параметра Шифрование установлено значение WPA2-PSK.
- Ключ установлен на подходящий пароль.
После завершения нажмите Сохранить , затем вернитесь в меню Беспроводная связь. Следуйте инструкциям, приведенным ранее для первоначального подключения, чтобы настроить устройство radio1 (ваш USB-адаптер Wi-Fi) на существующую сеть. Здесь же вам нужно будет сканировать и менять сети, когда вы будете находиться в новом месте

Теперь у вас должны быть запущены два Wi-Fi соединения: одно – как точка доступа для ваших Wi-Fi устройств, а другое – как интернет-соединение для вашего устройства с существующей Wi-Fi сетью. Попробуйте подключиться к Pi на этом этапе с помощью смартфона или ноутбука, чтобы убедиться, что оно работает
Если все работает, отключите Pi от Ethernet-соединения с ПК
Вам понадобится файл конфигурации OpenVPN (OVPN) для подключения Pi к выбранному провайдеру VPN и серверу. Если у вас есть такой файл, загрузите его на Pi с помощью SCP-клиента, например WinSCP, к которому вы можете подключиться под своим именем пользователя и паролем администратора
Переименуйте файл в vpnclient.ovpn и загрузите его в папку
/etc/openvpnпапку. Выполните инструкции, найденные на сайте OpenWRT, чтобы настроить Pi для VPN-соединений. Единственное небольшое изменение будет в разделе 4 для настройки профиля VPN-клиента, где вам не нужно будет использовать начальную папку
catинструмент для вставки вашего файла vpnclient.ovpn , так как он уже есть
Как только вы выполните эти действия, ваше VPN-соединение должно активироваться автоматически. Проверьте, изменился ли ваш исходящий IP-адрес; если нет, перезагрузите ваш Pi и проверьте, что ваше соединение активно
Найдите это, перейдя в раздел OpenVPN LuCI, перечисленный в разделе Services в верхней части приборной панели. Если он подключен, vpnclient будет указан как yes в колонке Started

Шаг 6: Зарегистрируйте устройство на общедоступном Wi-Fi
На этом этапе ваш Pi почти готов, но если вы когда-либо подключались к публичной сети Wi-Fi, вы знаете, что обычно требуется аутентификация с помощью captive portal, либо для оплаты, либо для регистрации устройства. Поскольку ваш Pi теперь настроен на автоматическое подключение через VPN (и должен предотвращать подключение в противном случае), эти порталы обычно блокируются
Чтобы обойти это, настройте USB-адаптер Wi-Fi на соответствие MAC-адресу устройства, которое можно использовать для подключения и аутентификации в публичной сети Wi-Fi, например, смартфона. Как только вы это сделаете, введите:
nano /etc/init.d/wan-changerВ окне редактирования добавьте следующее (заменив символ XX на ваш MAC) и нажмите Ctrl + X, затем Y для сохранения
#!/bin/sh /etc/rc.common
START=10
start() {
 uci set wireless.@wifi-iface 1.macaddr='XX:XX:XX:XX:XX:XX'
 uci commit network
}
Наконец, выполните следующие команды, чтобы настроить сценарий на автоматический запуск при старте Pi:
chmod +x /etc/init.d/wan-changer
/etc/init.d/wan-changerenable
Перезагрузитесь, чтобы убедиться, что все работает нормально. Вам также следует проверить утечку DNS, чтобы убедиться, что ваше VPN-соединение работает правильно. Большинство VPN-провайдеров предлагают инструмент, который поможет в этом
Безопасный Wi-Fi везде, где бы вы ни находились, гарантированно
Теперь ваш Raspberry Pi должен быть настроен и готов к работе в качестве туристического маршрутизатора VPN, а это значит, что вы можете спокойно заниматься серфингом в любом отеле или кафе, которое вы посетите. Благодаря панели управления LuCI вы сможете легко подключаться к любой новой сети Wi-Fi через веб-браузер
Посмотрите наш список лучших VPN-сервисов, чтобы найти VPN-сервис, который подходит для ваших нужд. Если этот способ оказался для вас слишком сложным, вы также можете рассмотреть другие способы настройки VPN дома