Whether you want a fresh start with your Raspberry Pi or if you wish to install a specific OS, the Raspberry Pi Imager for Windows will do the trick.
Raspberry Pi Imager is a free and open-source tool but can be considered the ultimate tool for typical Raspberry Pi users. Even though writing images to SD cards can be a bit tricky, worry not. In this tutorial, you will learn how to install and write a bootable image to an SD card.
Experience different OSes by writing images with Raspberry Pi Imager!
Prerequisites
This tutorial comprises hands-on demonstrations. To follow along, you will need the following:
- A computer running Windows 10 (or later) – This tutorial uses Windows 10 21H2.
- An SD card with at least 8GB storage space – The more storage space, the better!
- A microSD card reader (or any SD card adapter compatible with your computer).
- A Raspberry Pi OS image file to install – This tutorial uses Raspberry Pi Desktop.
Downloading and Installing Raspberry Pi Imager for Windows
Created by the Raspberry Pi Foundation, the Raspberry Pi Imager is software that lets you write images onto storage devices, such as SD cards. For this tutorial, you will use the Raspberry Pi Imager for Windows to write a Raspberry Pi image onto your SD card.
But first, you will need to download and install the Raspberry Pi Imager for Windows:
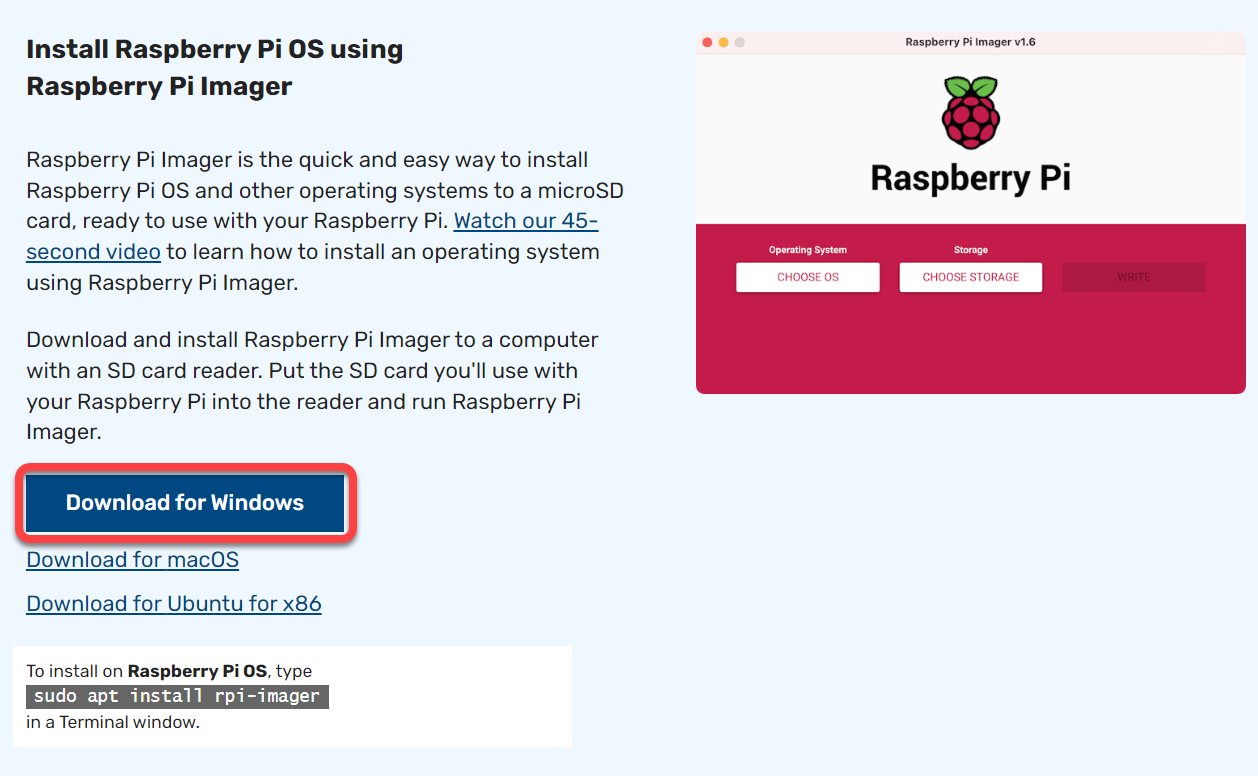
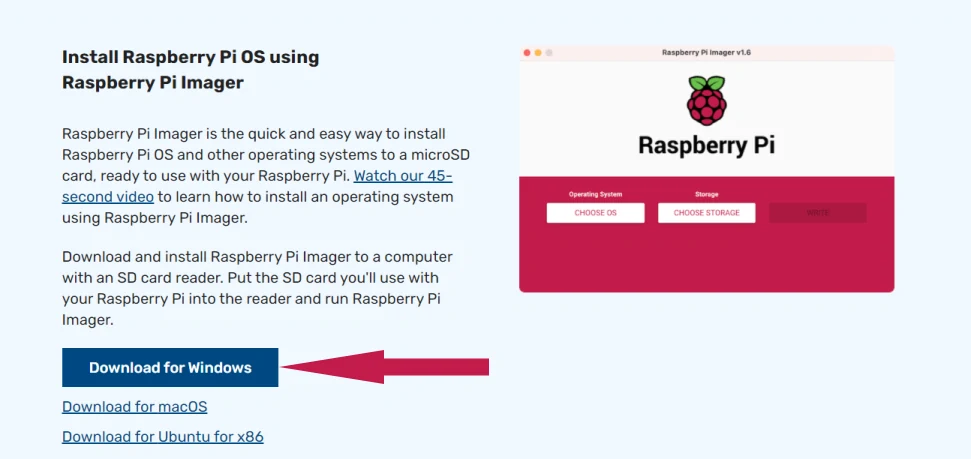
1. Open your web browser, and head to the official Raspberry Pi website.
2. Next, click Downloads for Windows to download the Raspberry Pi Imager installer.
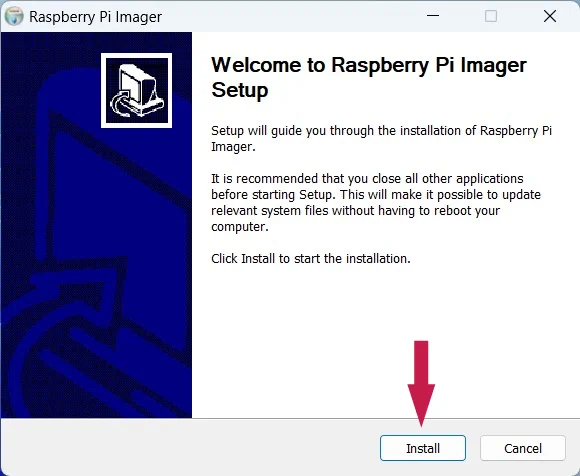
2. Once downloaded, double-click on the installer to launch the setup wizard.

3. Now, click the Install button to install Raspberry Pi Imager on your computer.

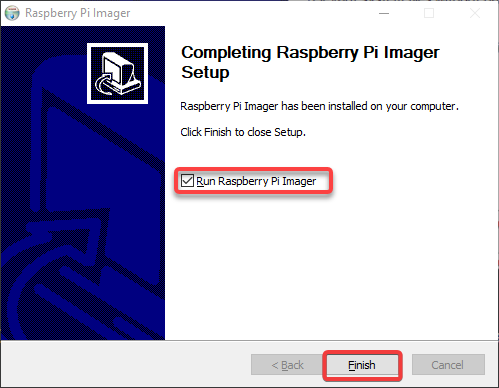
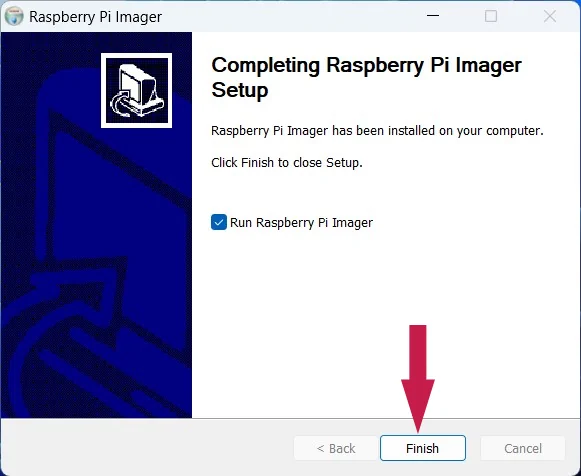
5. Lastly, tick the checkbox below, click Finish to close the wizard, and run Raspberry Pi Imager.
Writing an Image to Your SD Card
Now that you have installed Raspberry Pi Imager for Windows, it is time to write an image to your SD card, also known as “imaging” or “flashing.”
Once the image is written, you can boot your Raspberry Pi from the SD card and use it like any other computer.
Note that writing an image erases all of the data on your SD card. So be sure to back up any important files before proceeding.
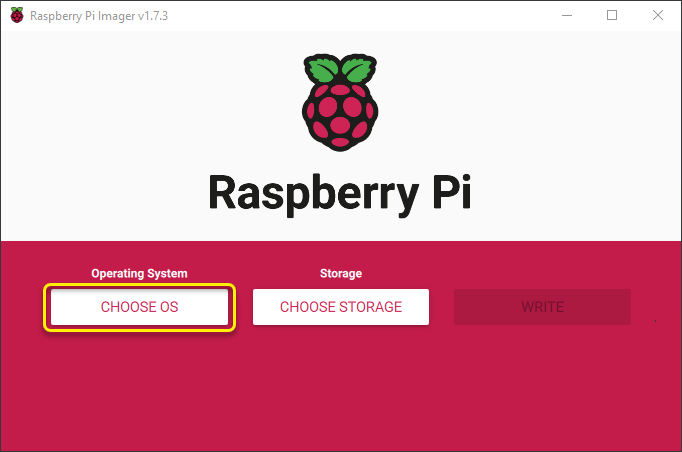
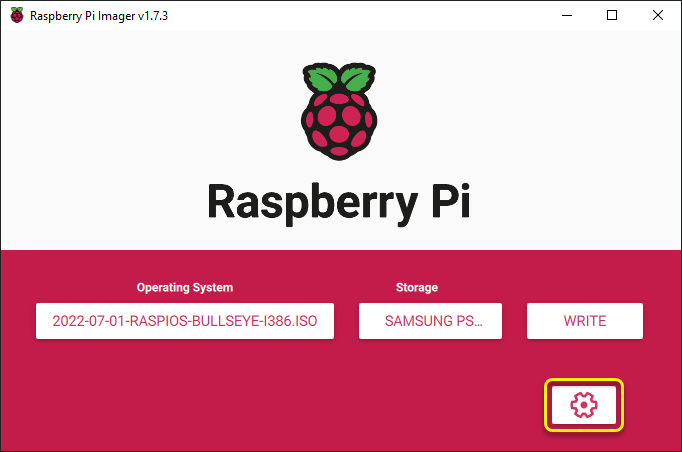
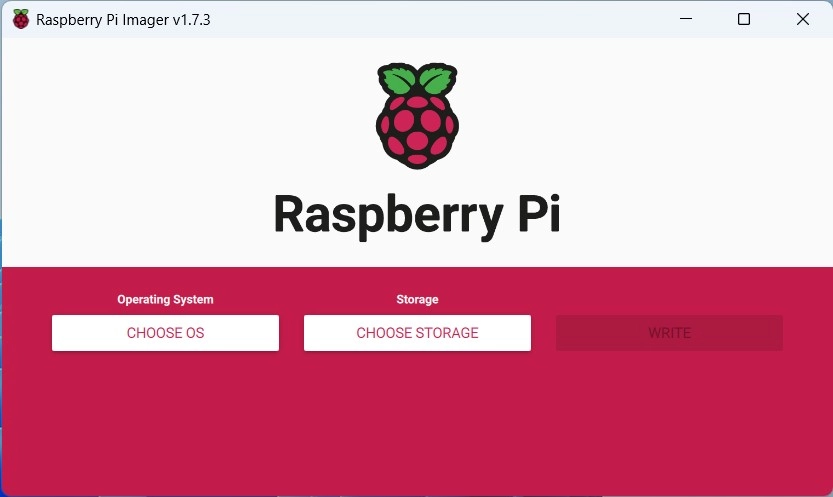
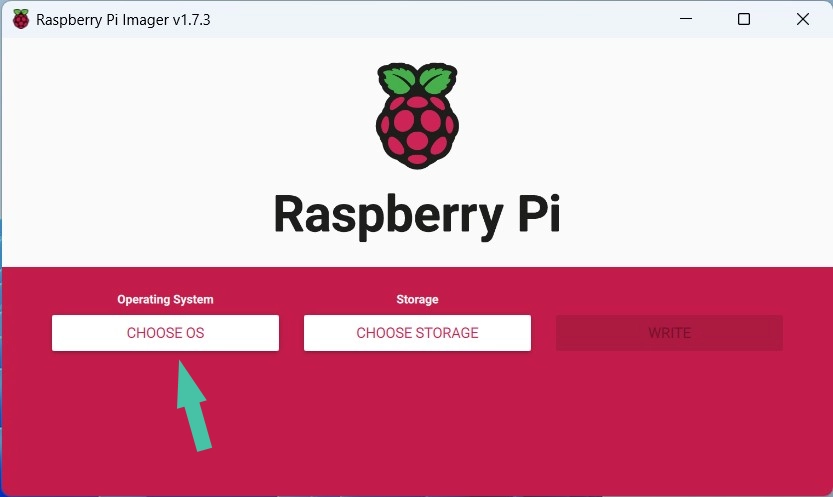
1. On the main screen of the Raspberry Pi Imager, click the CHOOSE OS button to select the OS you want to install.
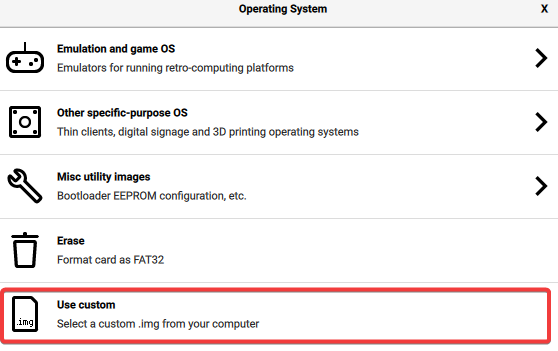
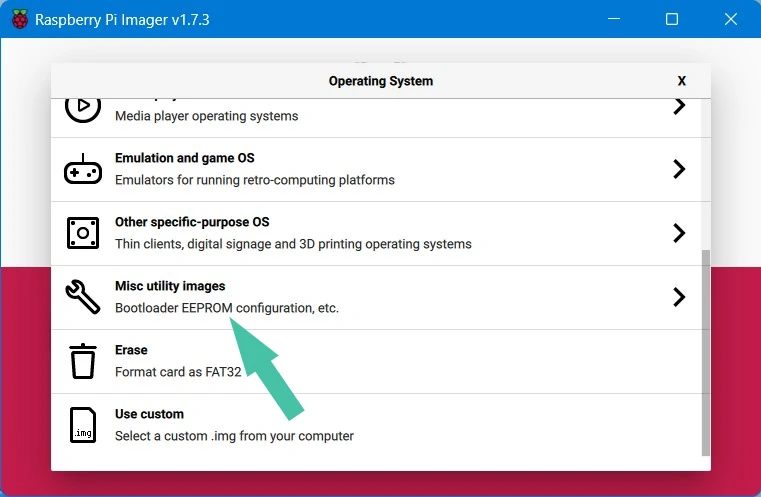
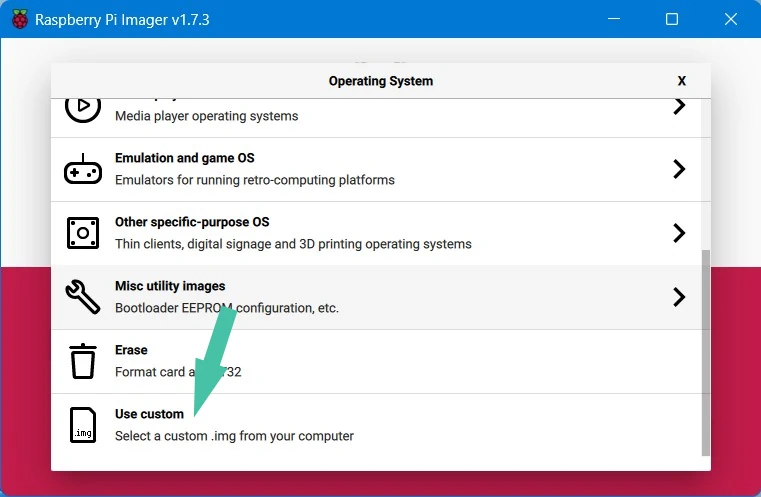
2. Next, choose an OS from the options shown below. Many options are available, but for this tutorial, scroll down and select the Use custom option at the bottom.
This option lets you choose an image file from your computer from a dialog box, so you are not limited to the OS list.
💡 Some of the most popular distributions, like Kali Linux, Fedora, DietPi, or Chromium OS, are not on the list. But the Use custom option lets you use them to create your image.
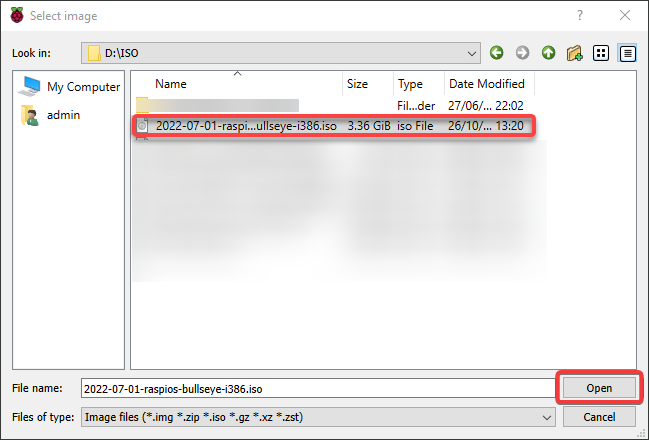
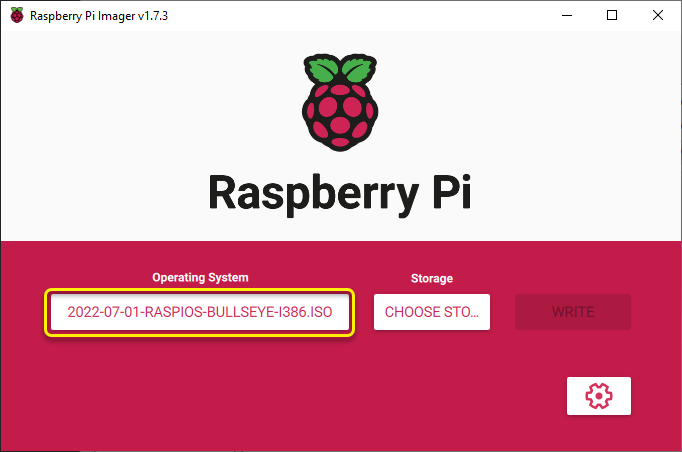
3. Locate the Raspberry Pi image file on your computer, and click Open.
The OS you chose is now displayed in the Operating System box, as shown below.
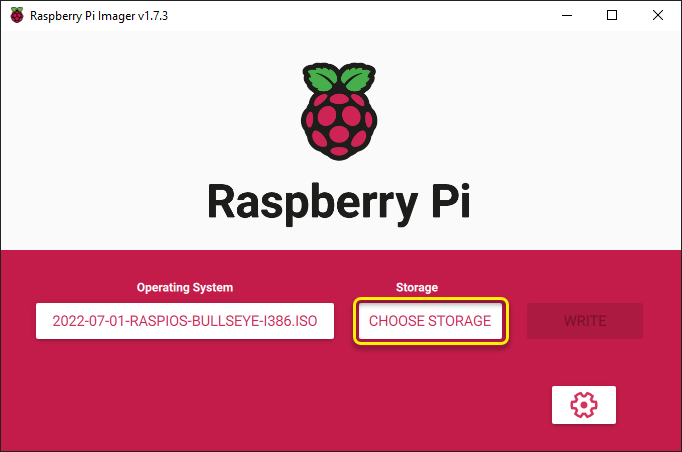
4. Now, insert your SD card into your computer.
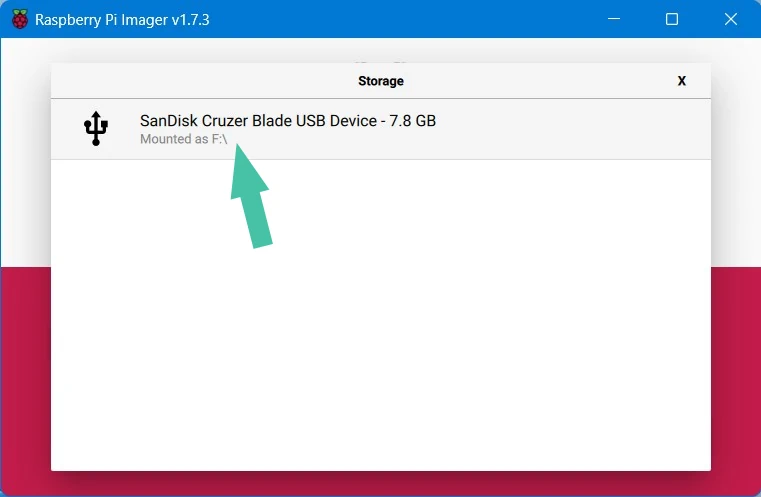
5. Once inserted, click the CHOOSE STORAGE button to locate the SD card.
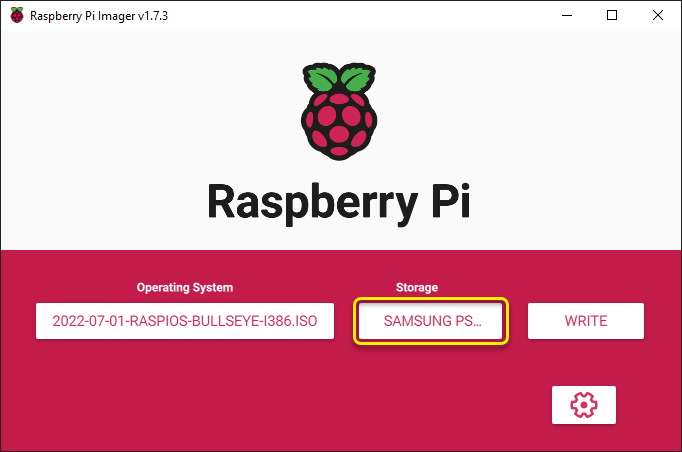
6. Select the SD card you inserted from the list of storage devices connected to your computer.

Below, you can see the selected SD card is now displayed in the Storage box.
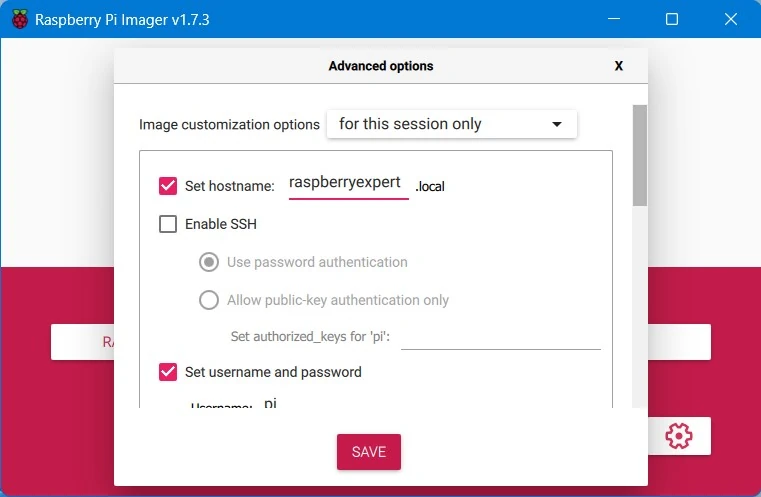
7. Next, click the settings icon to access the advanced options.
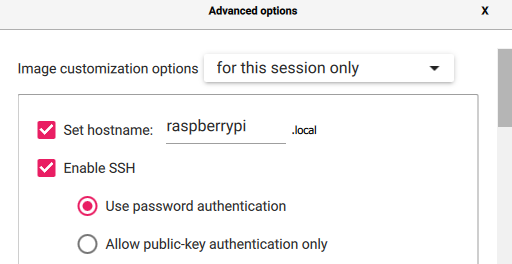
8. Configure the hostname and SSH settings on the Advanced options window with the following:
- Tick the Set hostname checkbox and provide a hostname for your Raspberry Pi to uniquely identify your computer on a network.Tick the Enable SSH checkbox to enable Secure Shell (SSH) access to your Raspberry Pi. SSH allows you to access your Raspberry Pi from another computer remotely.
- Select the Use password authentication option to require a password when you SSH to your Raspberry Pi.
9. Now, tick the Set username and password checkbox and enter a username and a strong password for your Raspberry Pi. You will use these credentials to SSH into your Raspberry Pi once it has been imaged.

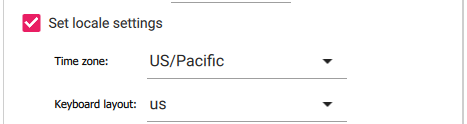
10. Tick the Set locale settings checkbox and select your preferred Time zone and Keyboard layout for your Raspberry Pi. Note that choosing your location from the list ensures the accurate time zone.
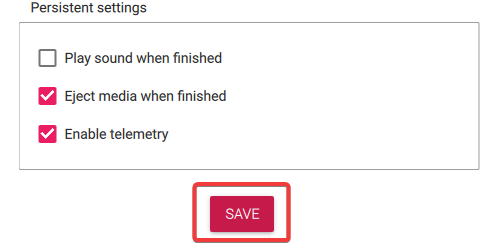
11. Under Persistent settings, enable the following:
- Eject media when finished – This setting helps to safely eject the SD card from your computer when the imaging process is complete.Enable telemetry – This setting helps the Raspberry Pi Foundation improve the Raspberry Pi Imager for Windows tool.
Keep other settings as is, and click Save to save your settings and close the window.
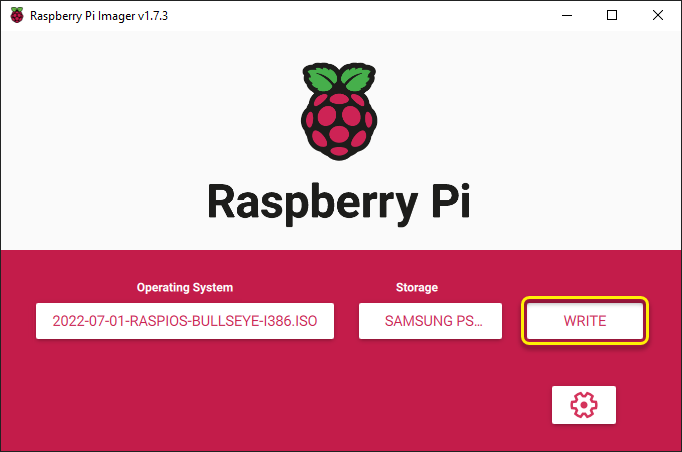
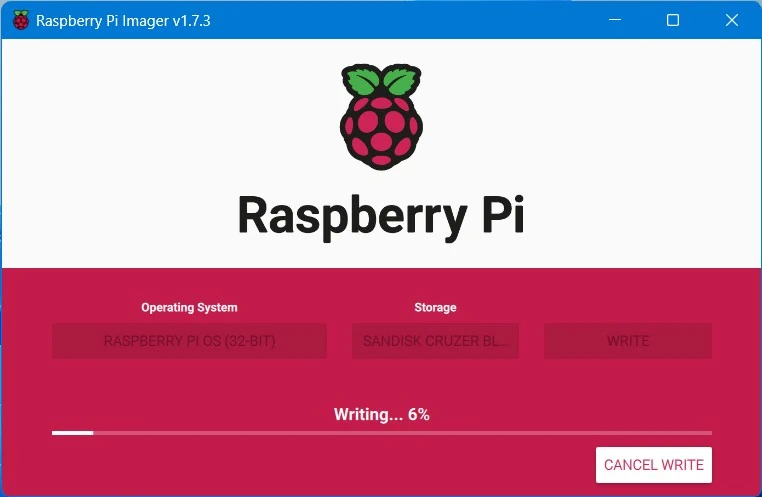
12. Once saved, click WRITE to begin writing the image against your selected settings to your SD card.
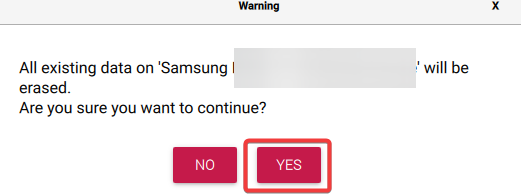
Click YES when prompted to confirm writing the image.
A new window opens, displaying the progress of the write operation. Depending on the image size and your SD card speed, this process can take a while.

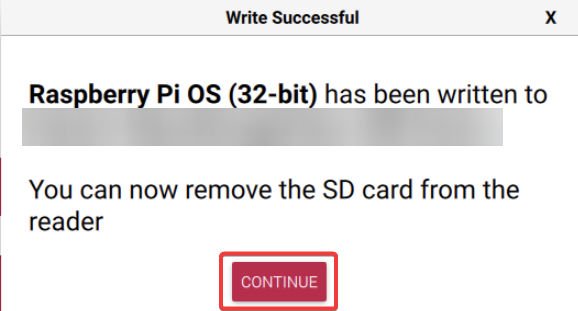
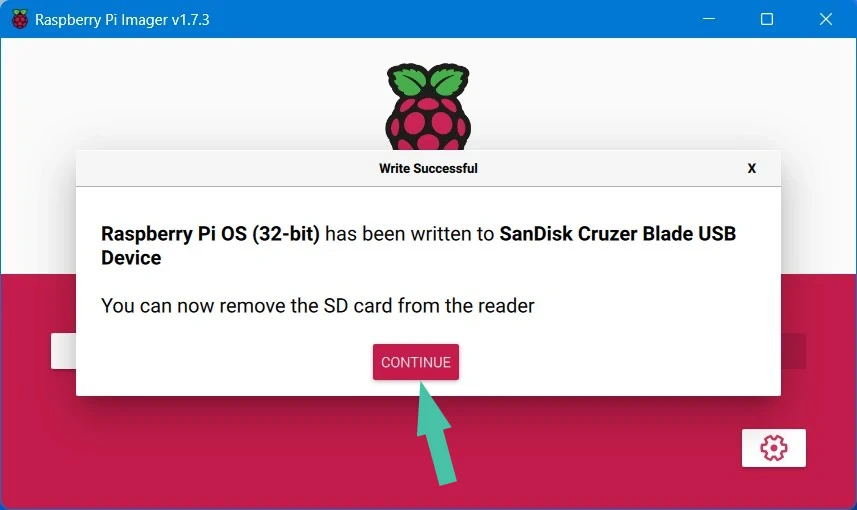
13. Finally, click CONTINUE to close the message box and return to the main screen once complete.
Booting Up Raspberry Pi via SD Card
You have successfully managed to write an image to your SD card. But to verify the image works, you will have to boot your Raspberry Pi from the image.
- Remove the SD card from your computer.
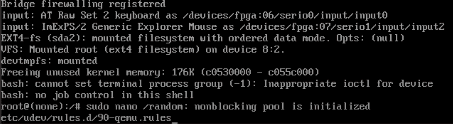
- Insert the SD card into your Raspberry Pi and connect the power supply. The green LED on your Raspberry Pi should start flashing, which indicates the Raspberry Pi is booting up.
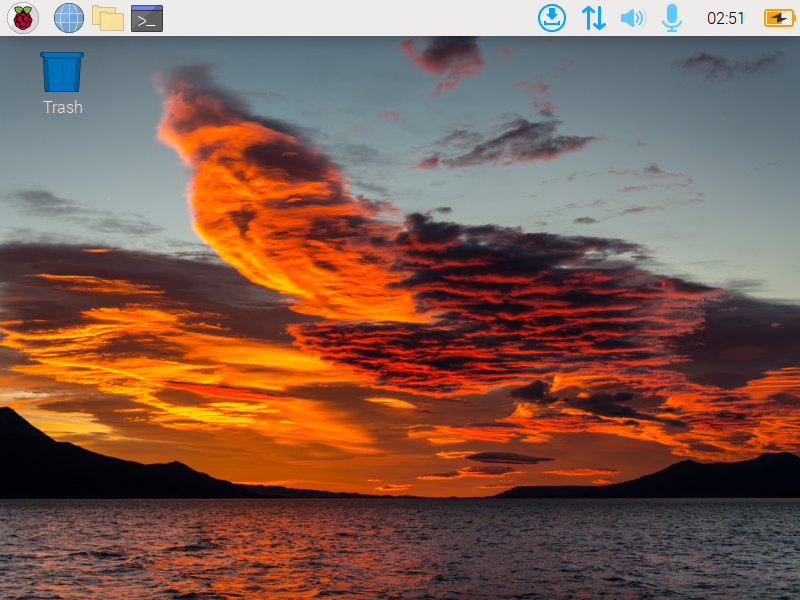
- Wait a minute or so for your Raspberry Pi to boot up. Once up, Raspberry Pi will be displayed on your screen, as shown below. The output below verifies Raspberry Pi is working and the image was successfully written to your SD card. Congratulations! You have now imaged your first SD card with the Raspberry Pi Imager for Windows tool.
Conclusion
The Raspberry Pi Imager for Windows provides a quick way to write OS images on your SD card. And in this tutorial, you have learned how to install Raspberry Pi Imager, write an image, and boot to your Raspberry Pi via SD card.
Experimenting with the Raspberry Pi can be fun. And since Raspberry Pi is a low-cost and low-power device, why not learn about building LAMP web servers and hosting your website? Keep Raspberry Pi running 24/7 without breaking the bank!
Raspberry Pi Imager is a graphical SD card writing tool that helps you install an operating system on your Raspberry Pi the easiest way. It is the official tool recommended by the Raspberry Pi Foundation, and it works flawlessly on Windows, Linux, and Mac.
While flashing an OS on your SD card can be done by several other tools such as Win32 Disk Imager, Balena Etcher, etc., the Raspberry Pi Imager stands out and makes the process more straightforward and safe. It can download the OS image automatically from the official repository and install it to the SD card seamlessly.
This article will show you how to use the Raspberry Pi Imager to flash operating system images on your microSD card. Also, I’ll be showing you how to access the tool’s advanced settings to change locale settings, set username and password, and to format your drive to FAT32 file system. So, without further ado, let’s dive right in.
Contents
- How to Install Raspberry Pi Imager on Windows
- How to Use Raspberry Pi Imager
- Installing Raspberry Pi OS
- Final Words
Here, I am going to show you how to install the imager on Windows operating system. For sake of this guide, I’ll be using Windows 11.
- First of all, head over to the official download page of the tool in any browser of your choice.
- Now, scroll down to see the button that says “Download for Windows” and click on it. This will start downloading the tool to your computer.

- Once the download is complete, run the Raspberry PI imager file (.exe) to begin the installation process.
- Click Yes if prompted for permission.
- This will open up the installation window. Here click on the Install button.

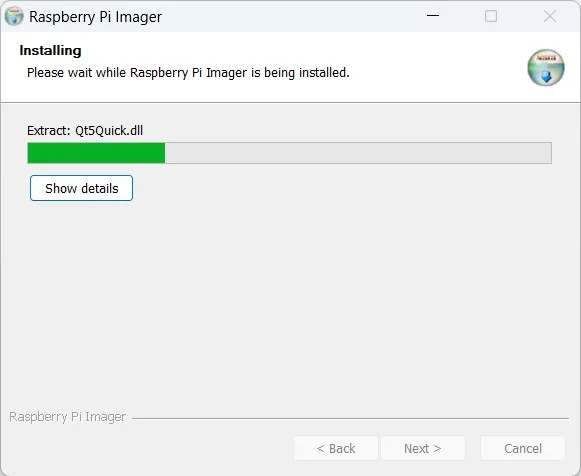
- The installation will start now and you need to wait for a few seconds to complete the process.

- Once it completes, click on the Finish button to exit the installer. If you check the option “Run Raspberry Pi Imager”, the tool will open up after you click Finish.
- Now, if it is not starting automatically, you can start it from the Windows Start menu as shown in the screenshot below.

- Once the application opens up, it’ll look like this:

How to Use Raspberry Pi Imager
You’ve seen how to install the imager on Windows and now let’s see how to use it for various purposes such as flashing OS, updating bootloader, etc.
Installing Raspberry Pi OS
Before we get into the installation process, make sure that you’ve plugged your microSD card into the computer and is showing up under the Devices and drives section in This PC.
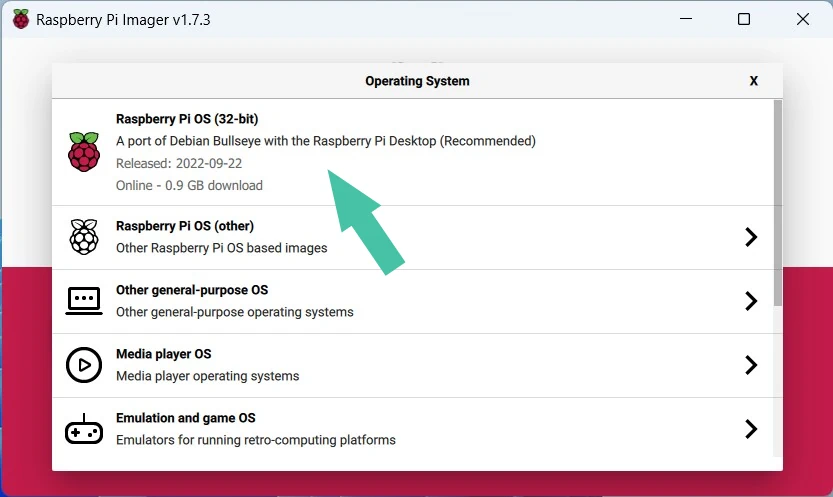
- In the Imager interface, first, you need to select the operating system by clicking the CHOOSE OS button.
- It will list a few common operating systems for Raspberry Pi. Select the Raspberry Pi OS (32-bit) and it will automatically download and install the OS on your microSD card. If you choose the Raspberry Pi OS (Other) option, you can see (as shown in the below screenshot) the lite, 32 bit full, 64 bit, and legacy versions of the OS.
- If you choose Misc utility Images option, you can find recovery images for Raspberry Pi. And inside that, you can select bootloader or PINN which is a multi-boot OS installer with OS admin features.

- If you’ve downloaded the OS file from any unofficial sources or want to any other OS image, you can use the Use custom option to select your preferred image.
- Once you choose the OS, the next step is to CHOOSE STORAGE in which you want to flash it. Here you need to choose your microSD card from the list then appears.
- The next step is to flash your OS onto the drive. But before that you can use the advanced options to customize your install. For example, you can set a new username and password other than the default password, set hostname, enable SSH, configure wireless LAN, change locale settings, etc. Once done with that click SAVE.
- To start the flashing the OS, click WRITE and then YES to confirm. This will begin the process and should take a few minutes to complete.

- Once the flashing process completes, you will be presented with a Write successful message. Click CONTINUE.

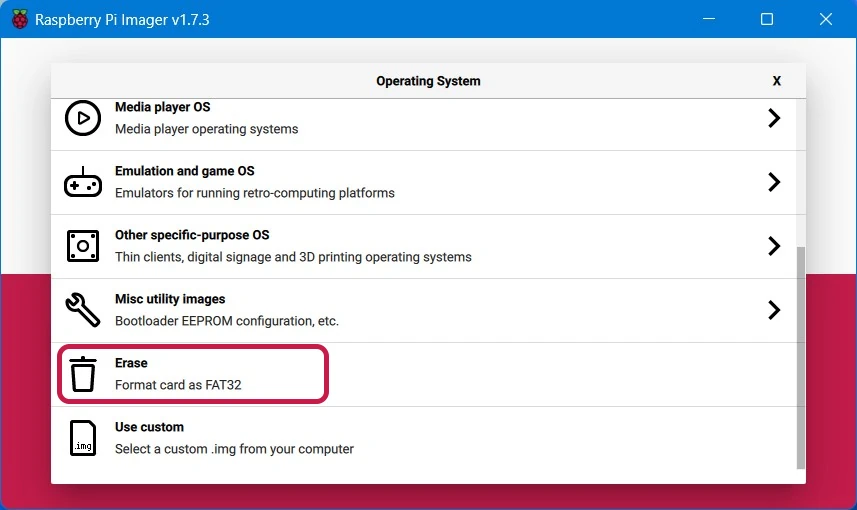
- The next use of the Raspberry Pi imager software is to format and SD card or a USB drive to FAT32 file system. For this to do, Open Imager and click CHOOSE OS. Now, scroll down and select the Erase option as shown in the screenshot below.
- Then as usual, select the SD card and the click WRITE. Once done, click CONTINUE.
 If you choose the Raspberry Pi OS (Other) option, you can see (as shown in the below screenshot) the lite, 32 bit full, 64 bit, and legacy versions of the OS.
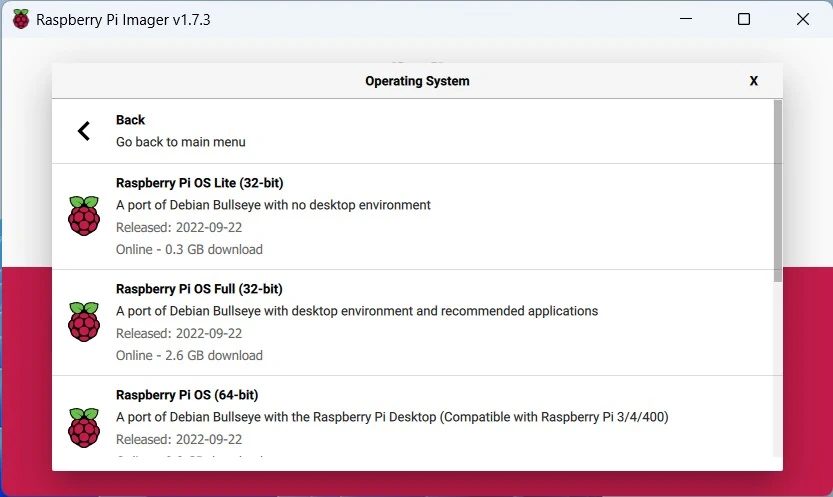
Final Words
Now that you know what are the important uses of the Imager tool and how to do them your own. It’s all easy to do but should know what you are doing. This official tool has replaced some other well known flashing software but for good reasons. It’s safe and officially recommended by the Raspberry Pi foundation.
If you come across and issue, do let us know in the comments.

Raspberry Pi Imager is a free and easy-to-use tool for writing images to SD cards and USB storage devices. This tool is designed for both beginners and advanced users, allowing them to quickly and easily get up and running with their Raspberry Pi. It has been developed by the Raspberry Pi Foundation, which is the official organization responsible for developing and maintaining the Raspberry Pi.
The Raspberry Pi Imager provides an easy way to install an operating system onto a Raspberry Pi.
Features:
1. Easy to Use: Raspberry Pi Imager is designed to be intuitive and easy to use, making it accessible to a wide range of users. It has a simple and straightforward user interface, allowing users to quickly and easily write images to SD cards and USB storage devices.
2. Supports Multiple Platforms: Raspberry Pi Imager supports Windows, Mac, and Linux operating systems. This makes it easy to use the software on any computer, regardless of its operating system.
3. Supports Multiple Formats: Raspberry Pi Imager supports a wide range of image formats, including the standard .img, .iso, and .zip formats. This makes it easy to use the software with a variety of images.
4. Supports Multiple Storage Devices: Raspberry Pi Imager supports writing images to SD cards, USB flash drives, and USB hard drives. This makes it easy to use the software for a variety of uses, such as creating a bootable Raspberry Pi system on an SD card or USB device.
5. Customizable: Raspberry Pi Imager allows users to customize the settings for writing images. This includes the ability to choose the image format, the size of the image, the block size, and the image compression. This makes it easy to customize the settings for any image.
6. Secure: Raspberry Pi Imager includes a number of security features, such as support for secure boot and secure wipe. This makes it easy to ensure that data is secure when writing images.
7. Portable: Raspberry Pi Imager is designed to be portable, allowing users to take it with them and use it on any computer. This makes it easy to use the software on multiple devices, without having to install it on each device.
Conclusion
Raspberry Pi Imager is an easy-to-use tool for writing images to SD cards and USB storage devices. It has been designed for both beginners and advanced users, making it accessible to a wide range of users. It supports multiple platforms, formats, and storage devices, making it easy to use the software for a variety of uses. It also includes a number of customizable and security features, making it easy to ensure that data is secure when writing images. Finally, Raspberry Pi Imager is designed to be portable, allowing users to take it with them and use it on any computer.
The Raspberry Pi Imager software has the following system requirements:
— A Windows, macOS, or Linux computer with an x86-64 processor
— At least 1 GB of RAM
— At least 300 MB of available disk space
— A working internet connection
— A SD card reader for your computer (integrated or USB)
— A compatible Raspberry Pi board
— A suitable power supply for your Raspberry Pi board
— A monitor, keyboard, and mouse (if you are using a Raspberry Pi 4)
An emulator in computing is software or hardware that enables one computer to behave like (emulate) another computer. In simple terms, an emulator allows the host/parent system to run software designed specifically for a guest system. This article guide will show how the parent system (Windows) can run the guest system (Raspberry Pi).
A Raspberry Pi is a small-sized single-board computer developed by the Raspberry Pi foundation located in the United Kingdom. The Raspberry Pi is commonly known for allowing learners to understand the basics of computer science. This project mainly targeted schools and people living in developing countries.
Can we emulate the Raspberry Pi OS (formerly called Raspbian) on our Windows PC? Yes, we can. There are many distinct methods we can use to emulate the Raspberry Pi on our Windows operating systems, as shown below:
- Emulate Raspberry Pi OS using a virtual machine
- Emulate Raspberry Pi using an RPi-Emulator
- Emulate Raspberry Pi using Quick-Emulator (commonly referred to as QEMU)
- Emulate Raspberry Pi using Microsoft Azure
- Run a Raspberry Pi live disk
As we already know, the Pi Desktop was purposely meant for technology enthusiasts and programming beginners. To emulate the Raspberry Pi on your Windows PC, you can check out how it is done in this article guide tailored to illustrate the emulation of a Raspberry Pi on Windows.
Emulating Raspberry Pi OS on Windows
Emulating a Raspberry Pi is helpful both technically and financially. There is no need to purchase it and later be disappointed. You can first try and emulate it to ascertain whether you can proceed and buy it or not.
Let us have a glance at the mentioned ways of emulating a Raspberry Pi on Windows
1. Emulate Raspberry Pi OS using a virtual machine
This is one of the standards and widely used methods of emulating almost any operating system on Windows. If you want to emulate the Raspberry Pi on your Windows OS, you need a virtual machine installed on your PC. We shall be using a VMware Workstation for this tutorial, but you can also use a VirtualBox.
Follow the simple steps provided herein to get the task done:
1. Download VMware Workstation
2. Download the Raspberry Pi ISO image
3. Follow the provided on-screen instructions to complete the installation of the VMware application
4. Once installed, launch the VMware application and click on “Create a New Virtual Machine.”

Virtual machine
5. Select the first option, “Typical(recommended) and click “Next.”
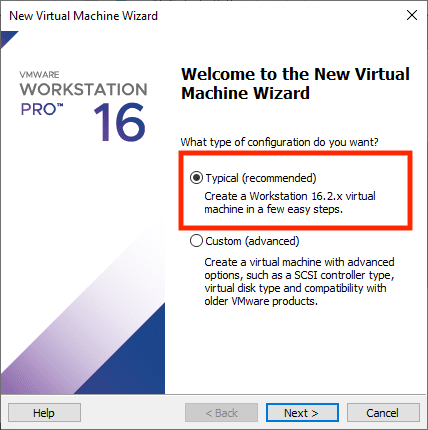
Typical Setting
6. On the next “Virtual machine wizard” screen, select “Installer disc image file (iso):
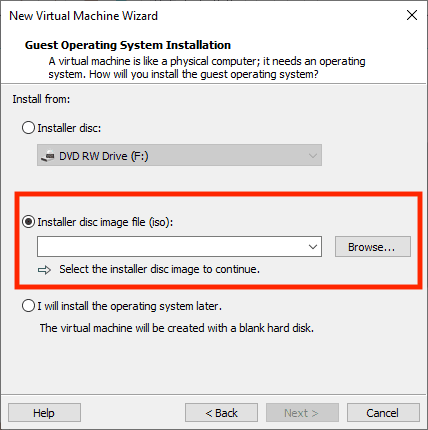
Installer Disc
7. Click on “Browse,” then select the Raspberry Pi image we downloaded in step 2 above.
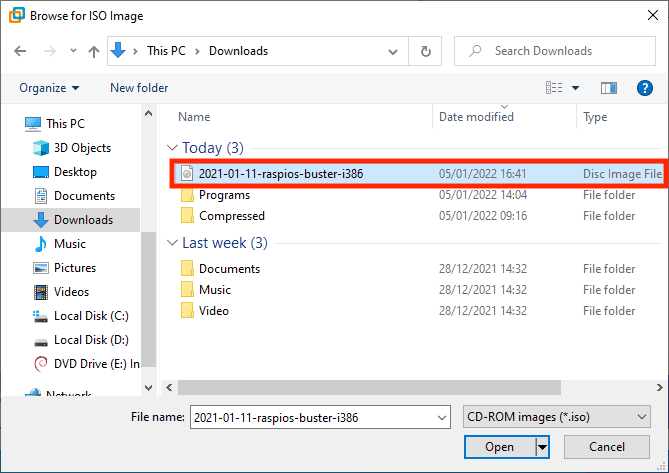
Browse to select ISO file
8. On the next screen, choose “Linux.” Under the version, choose “Debian 10.x” as shown below:
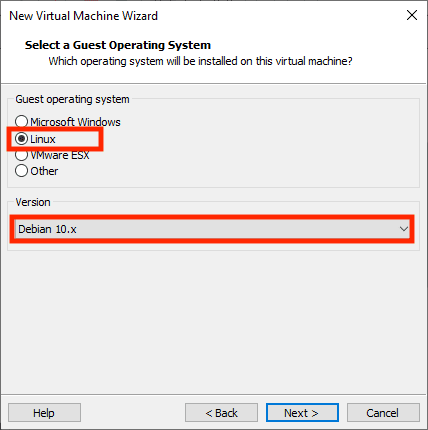
VM Wizard
9. Rename your Virtual machine and change the location if need be
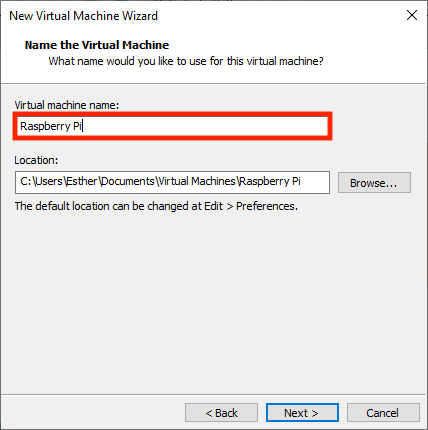
Machine Name
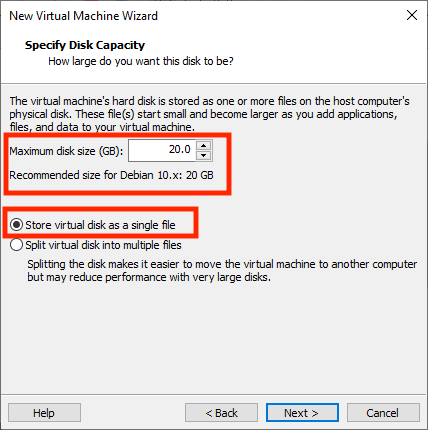
10. Specify the disk capacity. I will select 20GB for this guide and check the “Store virtual disk as a single file” option.
Disk Size
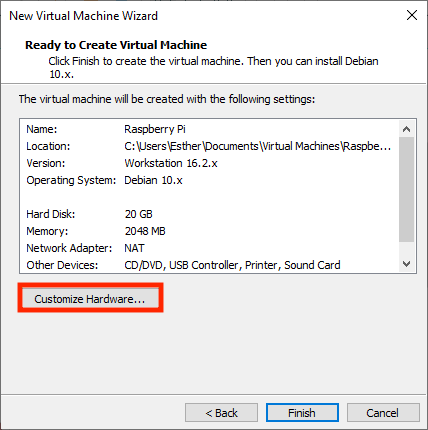
11. Select “Customize Hardware” to change the preferences. This step is optional as you can run the installation with the default settings
Hardware
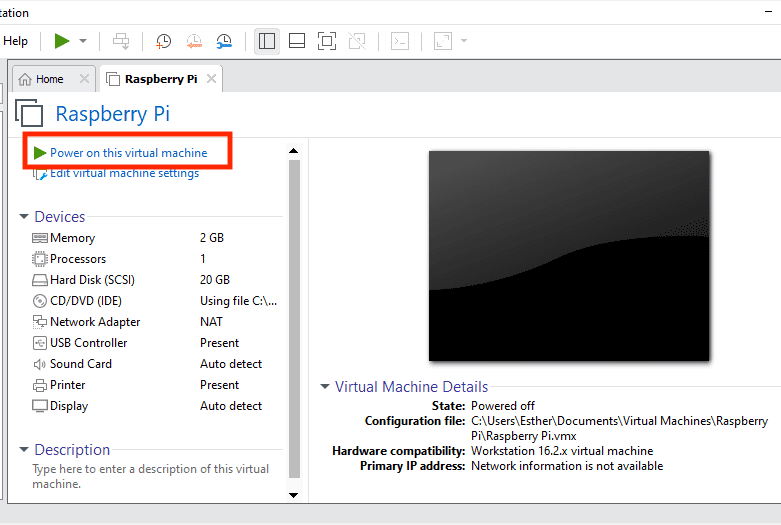
12. If you skipped the previous step or finished customizing the settings, click on the “Power on this virtual machine” option to fire up the guest OS.
Power ON
13. Once the virtual machine is powered on, select the “Graphical Install” method and click enter to start the installation process.

Options
14. Select your preferred language and click “Next.”
15. Let the installer do its thing. Partition disks by using the “Guided – use entire disk” option

Guided Option
16. Select the disk to partition as shown below
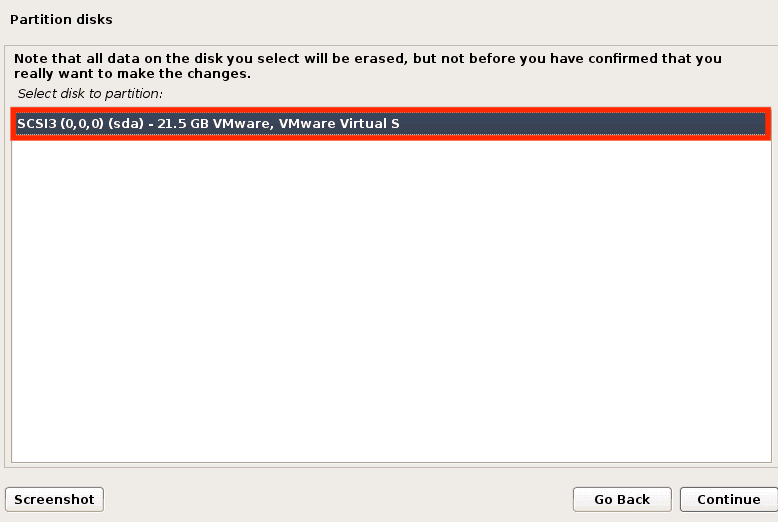
Disk Partition
17. Choose “All files in one partition,” the recommended method for new users, and click “Continue.”
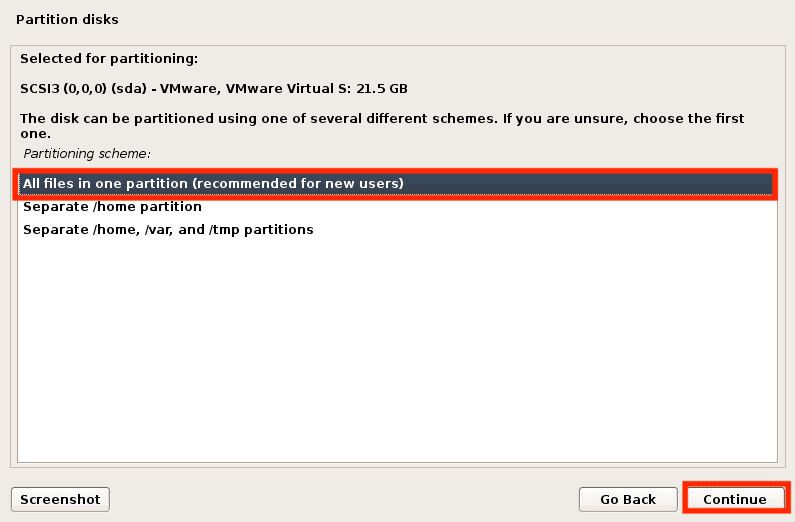
Partition Disks
18. Finish the partitioning process and write changes to disk, then proceed with the remaining installation process
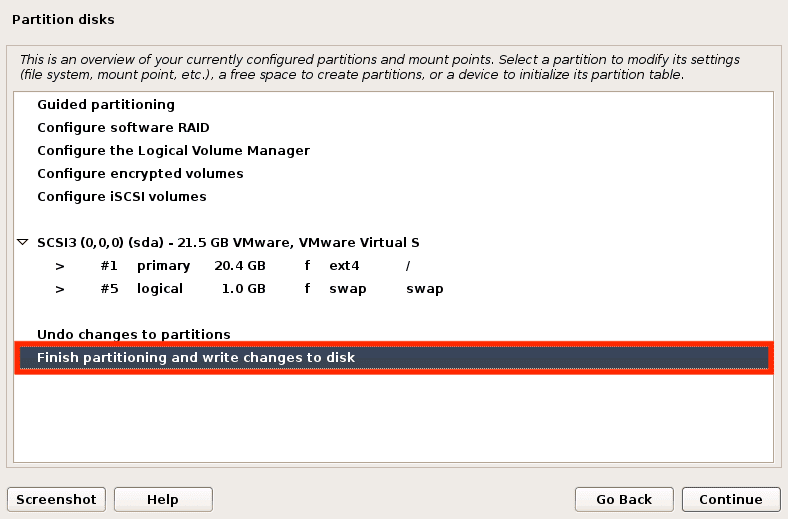
Write Changes
19. Select “Yes” to accept the changes made to the disks and continue

Partition Disks
20. The installation process will take quite a while; hence be patient.
21. Finally, select “Yes” to install the Grub boot loader
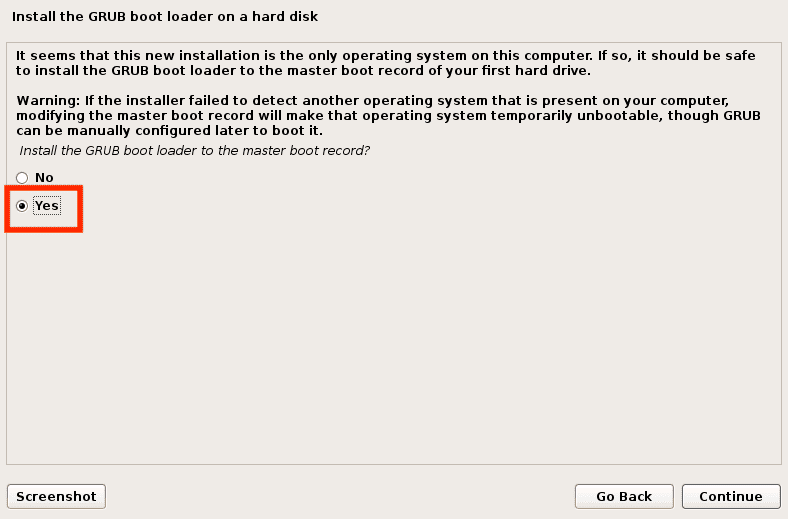
Install Grub
22. Choose the device for the boot loader and click continue
23. Restart your Raspberry Pi to complete the installation and enjoy the Pi experience.
The VMware emulator, just like a VirtualBox, emulates the Raspberry Pi by running the Debian system as selected in step 8 above. Major operating systems can be emulated using this method.
2. Emulate Raspberry Pi using an RPi-Emulator
The newly launched Raspberry Pi emulator is designed to emulate the Raspberry Pi OS OS on a Windows environment. Most users familiar with this emulator refer to it as a simplified QEMU model since it contains a similar setup with only the interface differing.
The primary aim of the RPi-Emulator is emulation. However, it also improves the overall efficiency of the simulated hardware on your Windows computer. Besides, this emulator acts as a wrapper for QEMU.
The charm about this emulator is it provides users with an intuitive GUI (Graphical User Interface), and it also allows system storage expansion, thus accommodating Raspberry Pi OS data easily.
How to use the RPi-Emulator
Follow the guides provided below to learn how to use the RPi-Emulator.
Step 1: Download the RPi-Emulator
Step 2: Click on the “Run” in the QEMU subfolder as shown below and let the installer run.
Run RPi-emulator installation
Step 3: Once the automated installer completes the installation, run the command below to launch the graphical session:
startx
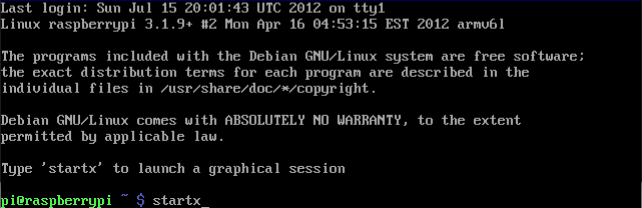
Command Prompt
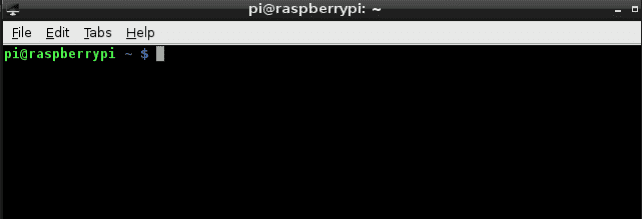
Step 4: A graphical session similar to the one illustrated below will be shown.

Graphical session
Note: As stated earlier, the RPi-Emulator is quite similar to QEMU, and it uses the same setup. The only notable difference between the RPi-Emulator and QEMU is the user interface. For more clarity, you can check out the graphical user interface of both emulators and compare them to see the differences.
That’s all you can enjoy emulating Raspberry Pi on your Windows environment.
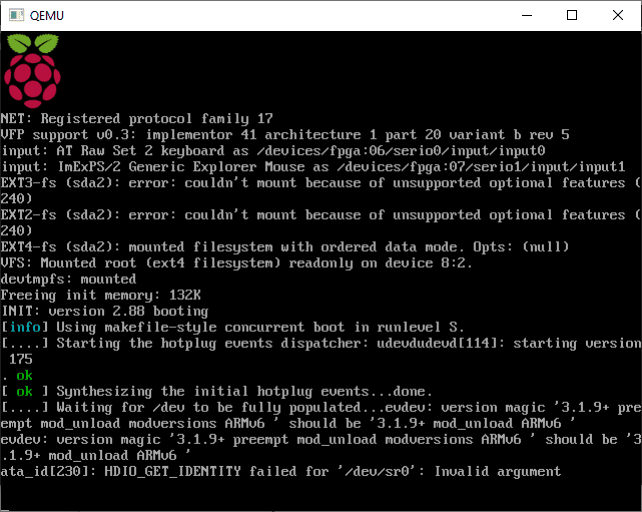
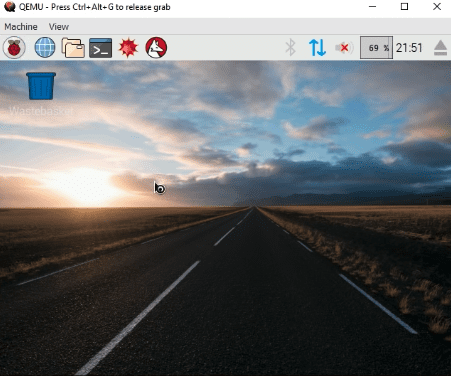
Note: To ascertain that indeed you have Raspberry Pi, run the LXTerminal and check if it gives the following name:
pi@raspberrypi
Output:
Command Prompt
3. Emulate Raspberry Pi using Quick-Emulator (commonly referred to as QEMU)
QEMU is one of the widely known lightweight Raspberry Pi emulators. This process is almost similar to the one of RPi-Emulator that we previously covered. However, we have to use the Raspberry Pi OS image ISO we downloaded while using the VMware Workstation in this guide.
Visit the QEMU official website, download the “.exe” file, and install it on your Windows operating system. Follow the on-screen provided prompts to complete the installation process. Once you are done installing, the application will be installed in the program files. However, its downside is that we cannot launch the application. Hence we need to do some additional tricks. Stick to this guide to learn more.
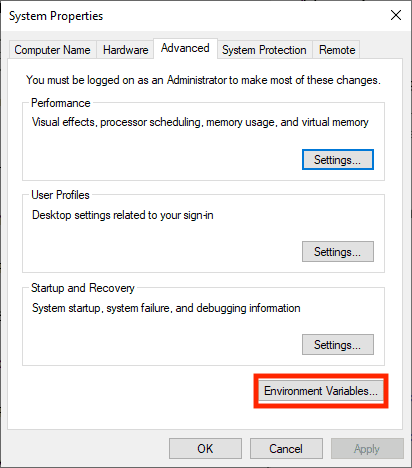
1. Launch the Settings and select “About.”
2. Next select “Advanced system settings.”
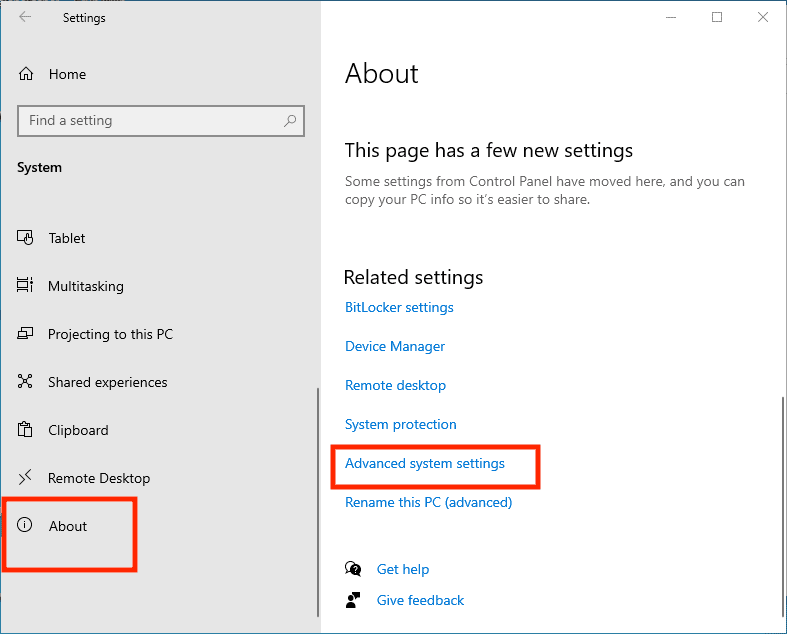
Advanced System Settings
3. Under the “Advanced” tab, select “Environment Variables.”
Environment Variables
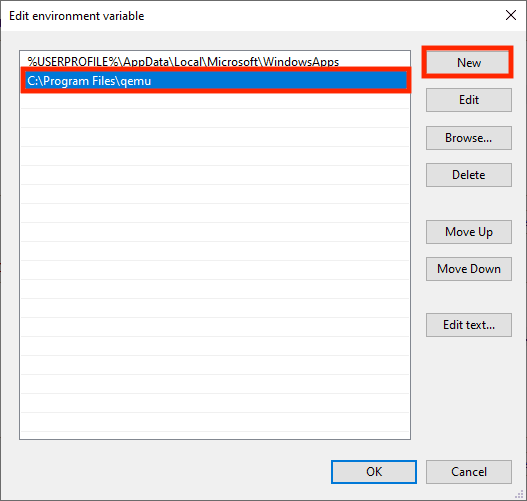
4. On the “Environment Variables” screen, double-click on “Path” and select “New.”
5. Input the command below and click “OK.”
C:\Program Files\qemu
Edit Environment Variable
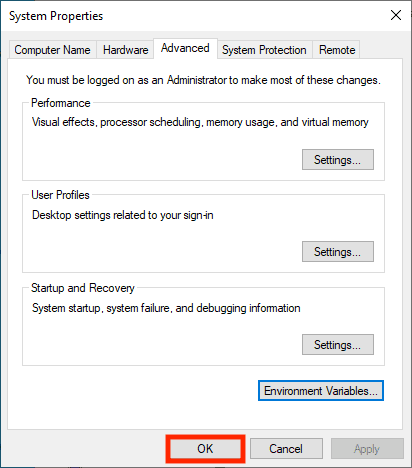
6. Conclusively, click “OK” on the “System properties” window as shown below to complete the process:
System Properties
Once you have completed the process highlighted above, let us make the Raspberry Pi machine in QEMU.
Making a Raspberry Pi machine in QEMU
Before commencing this step, you must ensure you have downloaded the Raspberry Pi ISO image. If you haven’t downloaded the ISO, click this link and download the file. It might take a while, dependent on your internet speed. Once it is done, proceed and follow the prompts provided herein:
Step 1: Create a folder in the “Documents”
Step 2: Once you create a folder in the “Documents” section, copy the downloaded ISO file into the created folder.
Note: It is not mandatory to make a folder, but we have done so in this article guide to avoid complications while making the machine.
Step 3: Now launch the PowerShell by opening the “Start Menu” and typing in “PowerShell.” Once the search results are shown, click “Enter” on your keyboard to launch it.
Step 4: Using the cd command, we shall go to the directory we created in step one. For my case, I will use the command below:
cd Documents\ ISO
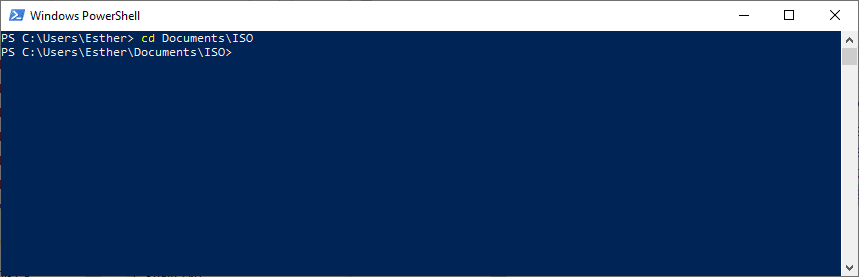
Windows PowerShell – Change Directory
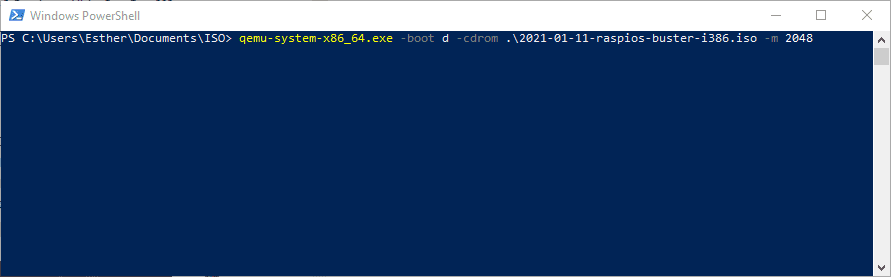
Step 5: Boot the ISO file on QEMU using the command provided below:
qemu-system-x86_64.exe -boot d -cdrom .\2021-01-11-raspios-buster-i386.iso -m 2048
Boot ISO
Let us understand the code syntax.
Code syntax:
“qemu exe file” -boot d-cdrom “iso file name” -m “size of RAM to be assigned to it.”
Code breakdown:
qemu exe file – is the qemu setup application we downloaded in this article
iso file name – is the name of the Raspberry Pi ISO file we moved into the ISO folder in Documents
-m – this is the RAM to be allocated to the emulator (in this case 2048 MB)
Step 6: Select “Graphical Install” and click “Enter” on your keyboard
GUI Option
Step 7: Now, follow the on-screen guides to complete the installation process.
Note: We shall not go through the installation phases since they are similar to those covered in this article guide. Therefore, to avoid monotony, we shall skip to the end. If you encounter any complexities, please refer to the “Emulation using VMWare Workstation as the processes are similar after selecting “Graphical install.”
Alternative installation method
Prerequisites
• QEMU application (Download the 32bit version to avoid complications)
• Raspberry Pi OS
• Kernel
• Windows OS
• 7Zip
Ensure you have downloaded all the files mentioned above before using this method.
Once you have assembled all the prerequisites mentioned above, follow the steps below:
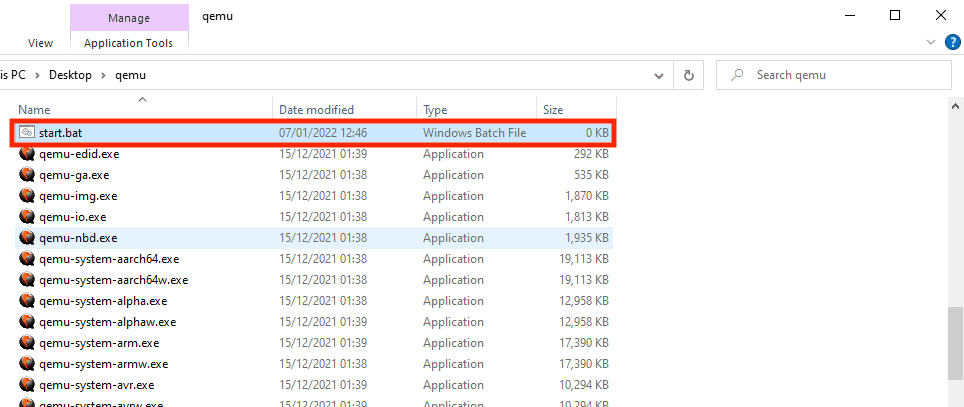
Step 1: Extract the downloaded files into the same folder.
Once you have downloaded the prerequisites, use the 7Zip applications to extract all the files to the same folder. For the sake of this tutorial guide, I will name the folder “qemu.”
Note: While downloading the Raspberry Pi OS desktop, ensure you select the “Pixel desktop version.” Once you have, move it to the “qemu” folder.
Step 2: Setting up the QEMU Emulator
1. Open the folder containing the QEMU, Kernel, and Raspberry Pi OS OS. On that folder, generate a new text file with the name “start.bat.”
bat extension
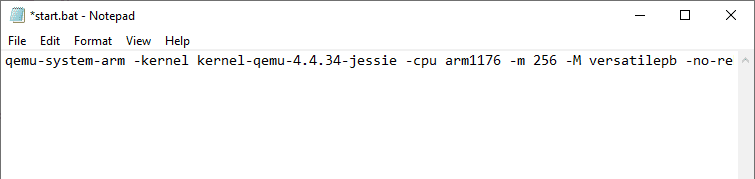
2. Righ-click on the created text file and click on “Edit.”
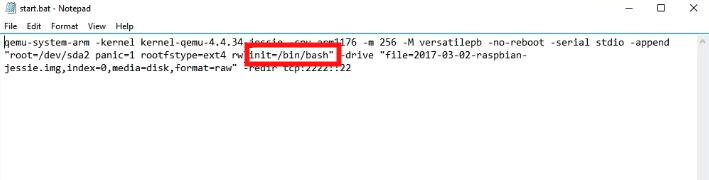
3. Input the command below and save the file:
qemu-system-arm -kernel kernel-qemu-4.4.34-jessie -cpu arm1176 -m 256 -M versatilepb -no-reboot -serial stdio -append "root=/dev/sda2 panic=1 rootfstype=ext4 rw init=/bin/bash" -drive "file=2017-04-10-raspbian-jessie.img,index=0,media=disk,format=raw" -redir tcp:2222::22
Code snippet
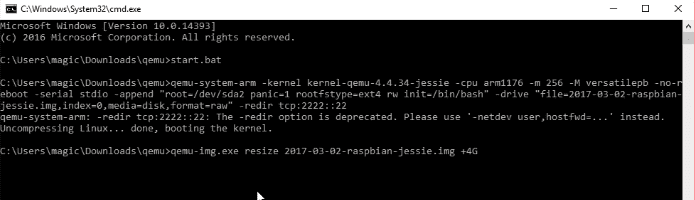
4. Launch CMD from the address bar in the “qemu” folder and run the command below:
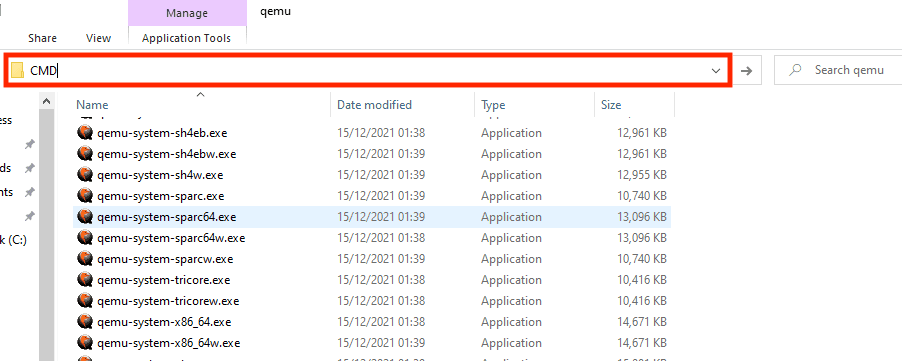
CMD
start.bat
5. Run the command below:
sudo nano /etc/udev/rules.d/90-qemu.rules
Command Line
KERNEL== "sda", SYMLINK+= "mmcblk0"
KERNEL== "sda?", SYMLINK+= "mmcblk0p%n"
KERNEL== "sda2", SYMLINK+= "root"
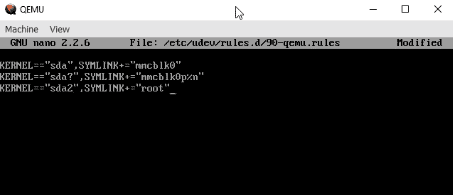
Text Editor
6. Now press “Ctrl + X” then “Y” and “Enter.”
7. Close the QEMU emulator using the command terminal below:
sudo shutdown -h
8. Navigate to the “start.bat” file and delete the following line, then save and close the file:
init=/bin/bash
delete init-/bin/bash line
9. On the CMD type in:
qemu-img.exe resize 2017-03-02-raspbian-jessie.img +4G
Resize the raspbian storage
10. Don’t worry about the errors. The resizing process will still take effect.
11. Run the “start.bat” command
That’s all you have successfully installed the Raspberry Pi on the QEMU emulator.
QEMU Pi Window
4. Emulate Raspberry Pi using Microsoft Azure
Microsoft Azure, often termed Azure, is a cloud-based computing service designed and operated by Microsoft. It is used for application management through Microsoft-managed data centers. Microsoft Azure has a built-in option to download Pi emulators on Windows operating systems. Besides this option, MS Azure comes equipped with a user-friendly online simulator.
In an emulated Raspberry Pi OS environment, the two features are essential as you can access the Raspberry Pi application without buying the real Pi hardware. This emulator is good for efficiency as MS Azure offers a readily-made setup; hence it does not require command line forms like the QEMU emulator.
There should be no alarm call for those who have never used the Azure application. Emulating an OS using this emulator is as simple as downloading a program and unpacking it on the Azures server. Therefore, you can easily enjoy a complete emulated Raspberry Pi experience with this ease of access.
Note: If you lack your designated Azure server, you can use the online client simulator to emulate the Raspberry Pi.
Download the Microsoft Azure or use the Raspberry Pi Azure Online simulator
5. Run a Raspberry Pi live disk
Using emulators to emulate Raspberry Pi has shortcomings. For instance, one of the most collective shortcomings is that emulators emulate older Raspberry Pi versions, thus limiting users.
To get a more updated and recent version of Raspberry Pi, you need to use a Raspberry Pi Desktop, which replaced the older version of Raspberry Pi with the Raspberry Pi OS OS. However, the downside of using emulators such as QEMU is you will use the older Raspberry Pi OS OS.
Using this method is relatively more straightforward compared to the already mentioned methods. All you are required to do is download the Raspberry Pi Desktop ISO and burn it to a USB thumb drive. Once you are done, restart your PC and enjoy the Raspberry Pi OS.
Download the Raspberry Pi latest desktop and use it on your Windows PC.
Conclusion
The Raspberry Pi Desktop is meant for you if you are a rookie tech enthusiast and programmer. Despite it being quite affordable and readily available, there is no need to purchase it, and you can emulate it first. This will help you learn more and save the money you could use to buy the Raspberry Pi.
This article guide has compiled and reviewed the very best cheap and easy-to-use Pi emulators on your Windows environment. Virtually enjoy the benefits of the Raspberry Pi for free by using the provided emulators. Please give a thumbs up via the comments section if you found the article helpful.
Для работы Raspberry Pi требуется операционная система, которая хранится на карте microSD.
Raspberry Pi OS (ранее называвшаяся Raspbian) — официальная поддерживаемая операционная система для Raspberry Pi. Кроме Raspberry Pi OS можно использовать и другие, такие как Ubuntu, RetroPie, RISC OS Pi, LibreELEC и другие.
Raspberry Pi Imager
Raspberry Pi Imager – это программа, с помощью которой можно записать нужный образ системы на microSD карту.
Скачивание и подготовка
-
Скачай Raspberry Pi Imager для Windows, macOS, Ubuntu x86 и установи на свой компьютер. Чтобы установить Raspberry Pi Imager на Raspberry – введи в окне терминала
sudo snap install rpi-imager. -
Запусти Raspberry Pi Imager;

-
Подключи microSD карту к компьютеру;

Форматирование карты microSD
-
Отформатируй microSD карту в формате FAT32 перед записью нового образа. Для этого нажми
CHOOSE OSв окне Raspberry Pi Imager; -
В выпадающем списке выбери
Erase; -
Нажми
CHOOSE SD CARD; -
Выбери из списка свою карту;
-
Нажми
WRITE;Запустится процесс форматирования. Это займет несколько минут. -
Об окончании форматирования, Raspberry Pi Imager сообщит появлением диалогового окна. Нажми
CONTINUE;


 Запустится процесс форматирования. Это займет несколько минут.

Запись образа системы
-
Теперь начнем запись нового образа. Открой список систем;
-
Выбери образ системы которую хочешь записать на свою карту;
-
Нажми
CHOOSE SD CARD; -
Выбери из списка свою карту;
-
Нажми
WRITE;Запустится процесс записи. Это займет несколько минут. -
Об окончании записи, Raspberry Pi Imager сообщит появлением диалогового окна. Нажми
CONTINUE;


 Запустится процесс записи. Это займет несколько минут.

Теперь можешь достать карту с образом системы и приступить к запуску Raspberry Pi.
Запись сохраненных образов систем
Кроме официальных систем, можно записать сохраненные. Например образ Raspberry Pi OS от Амперки, с включенным SSH, VNC и другими дополнительными настройками.
-
Отформатируй карту microSD в формате FAT32 перед записью образа;
-
В окне Raspberry Pi Imager открой список систем и выбери
Use custom; -
Найди на своем компьютере сохраненный файл образа, выбери его и нажми
Open; -
Дальше следуй инструкции начиная с шага №3.


