RAM диск – это виртуальный диск, созданный в свободной области оперативной памяти, который воспринимается операционной системой как отдельный физический диск. За счет, того, что RAM диск хранится в быстрой оперативной памяти, все операции чтения/записи с такого диска выполняются почти мгновенно, даже быстрее, чем при использовании SSD накопителя (у самых производительных SSD скорость передачи данных сейчас составляет около 560МБ/с, в то время как у памяти DDR4 — 12000-25000МБ/с).
Использование RAM диска целесообразно в системах с избытком оперативной памяти. На таком RAM диске можно размещать кэш и временные файлы приложений/системы, временные базы SQL, тем самым можно добиться существенного увеличения производительности приложений.
В операционной системе Windows отсутствуют встроенные средства создания RAM-дисков, поэтому в этих целях приходится использовать сторонние программы (AMD RAMDisk, ImDisk, PassMark OSFMount, StarWind RAM Disk и т.д.).
Однако в Windows Server вы можете создать RAM диск и без использования сторонних программ. Для этого можно воспользоваться драйвером iSCSI.
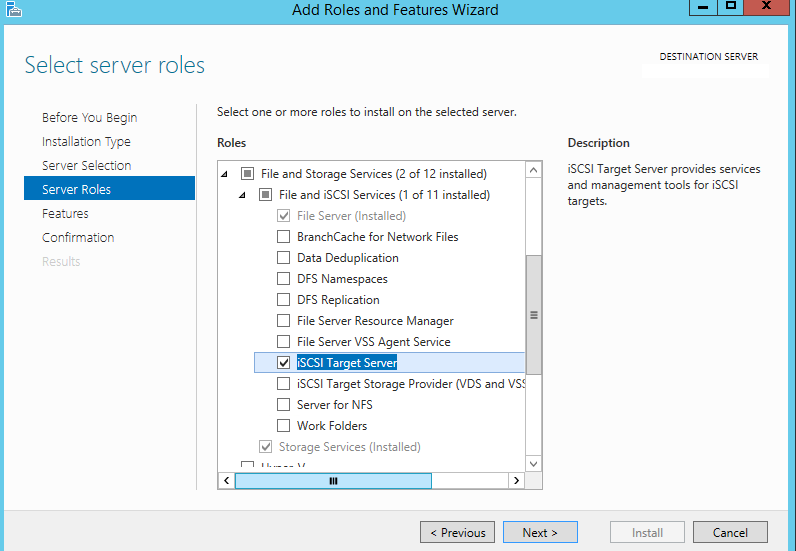
В первую очередь на сервере нужно установить компонент iSCSI Target Server (входит в состав роли File and Storage Services).
Если у вас включен файервол Windows, необходимо разрешить трафик для службы iSCSI Service.
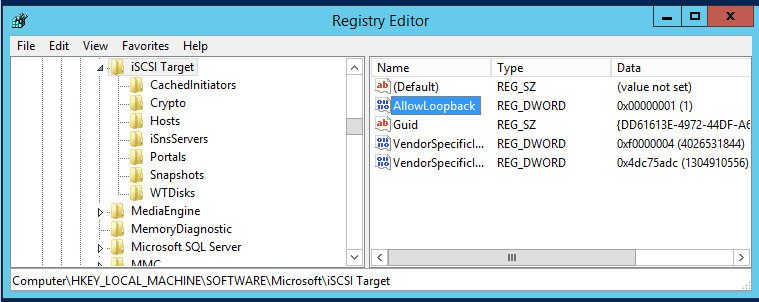
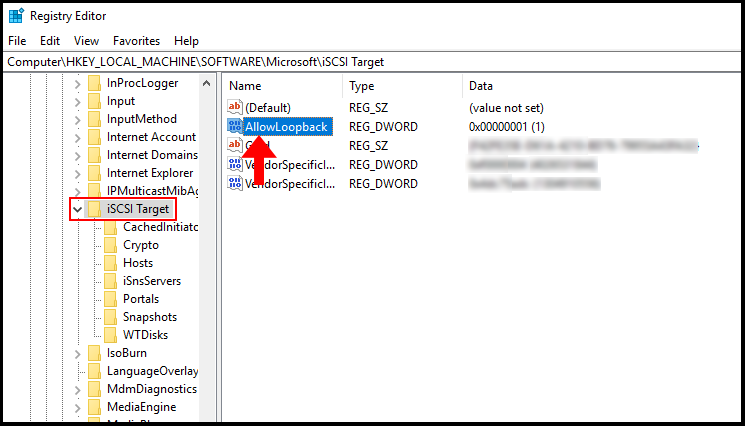
Чтобы разрешить трафик на loopback интерфейс для iSCSI, нужно в ветке реестра HKLM\Software\Microsoft\iSCSI Target изменить значение DWORD параметра AllowLoopBack на 1. Можно изменить ключ реестра из PowerShell одной командой:
Set-ItemProperty -Path 'HKLM:\SOFTWARE\Microsoft\iSCSI Target' -Name AllowLoopBack -Value 1
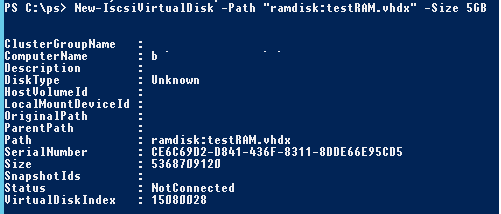
Теперь откройте консоль PowerShell и создайте виртуальный RAM диск размером 5 Гб командой:
New-IscsiVirtualDisk -Path "ramdisk:testRAM.vhdx" -Size 5GB
Теперь нужно создать iSCSI таргет:
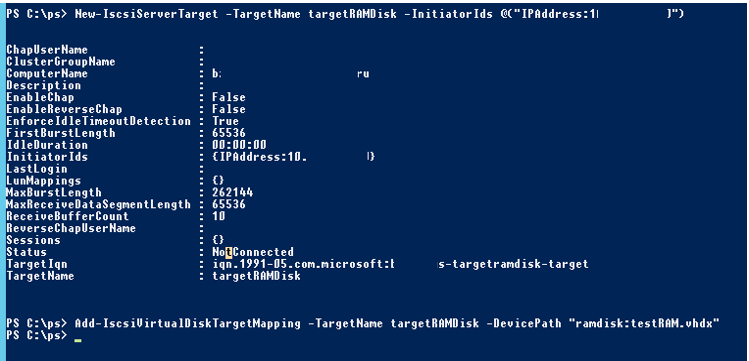
New-IscsiServerTarget -TargetName targetRAMDisk -InitiatorIds @("IPAddress:10.1.1.200")
Подключим RAM диск в созданный iSCSI таргет
Add-IscsiVirtualDiskTargetMapping -TargetName targetRAMDisk -DevicePath "ramdisk:testRAM.vhdx"
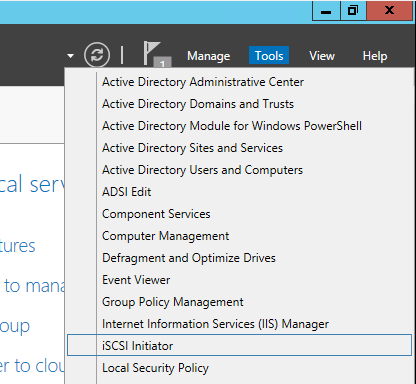
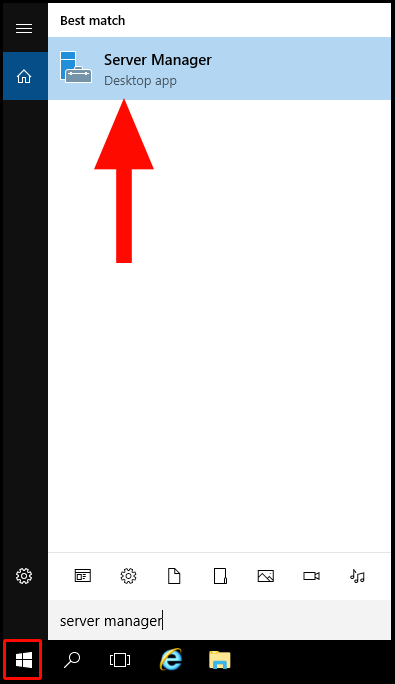
Теперь нужно запустить консоль iSCSI Initiator через Server Manager
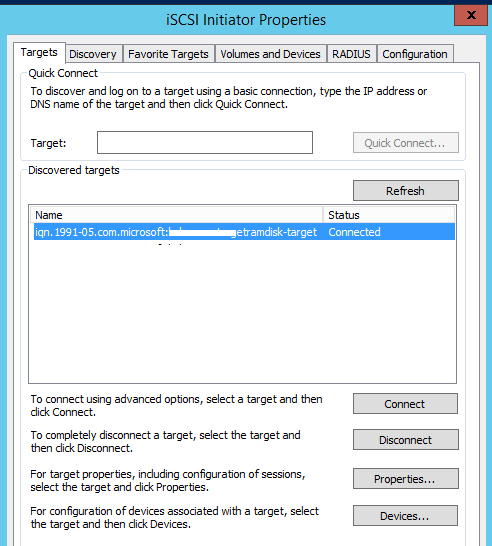
На вкладке Targets укажите IP адрес вашего сервера, нажмите Quick Connect и подключите ваш iSCSI таргет.
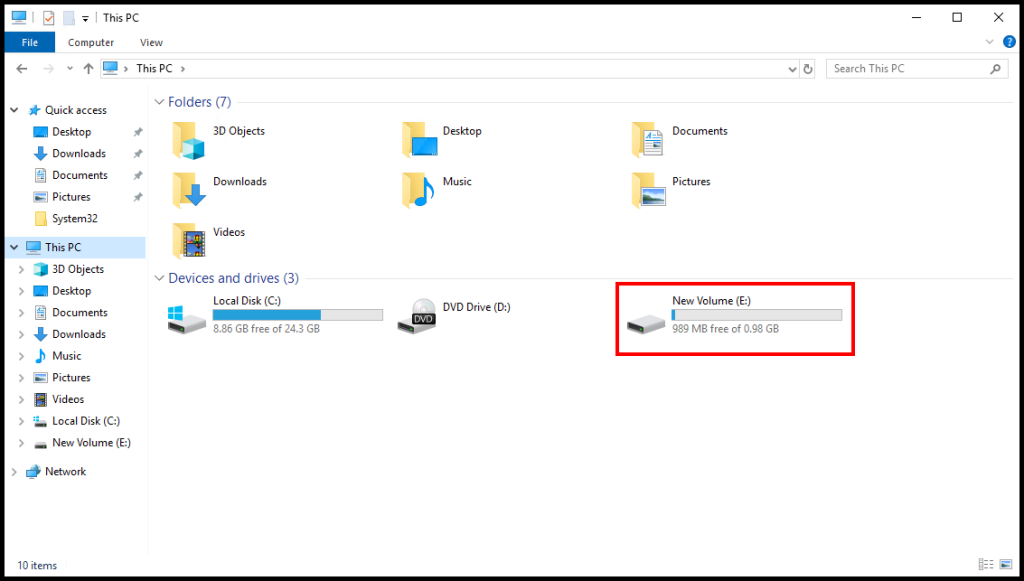
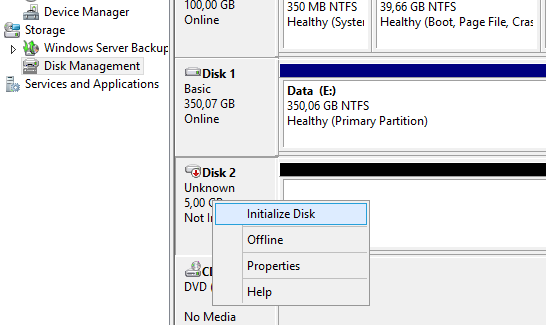
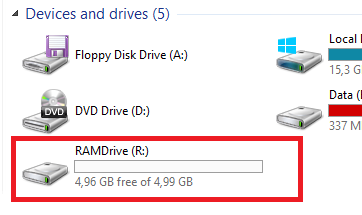
Теперь откройте консоль управления дисками и проверьте, что у вас появился новый диск размером 5 Гб. Это и есть тот самый RAM диск. Инициализируйте, разметьте и отформатируйте данный диск. Назначьте ему букву диска.
Теперь вы можете перенести необходимые файлы на RAM диск и перенастроить ПО на использование данного диска.
После перезагрузки сервера RAM диск удаляется (вместе со всем содержимым) и его нужно пересоздавать заново.
В некоторых сторонних программах для создания RAM дисков есть возможность сохранения данных RAM диска в файл на жестком диске. После перезагрузки системы данные извлекаются и помещаются на RAM диск.
На чтение 4 мин Опубликовано Обновлено
Один из способов повысить производительность сервера на базе Windows Server 2019 — использование Ram Disk. Ram Disk — это виртуальный диск, создаваемый в оперативной памяти компьютера. Поместив на него часто используемые файлы и приложения, можно значительно ускорить их работу, поскольку обращение к данным происходит быстрее, чем при чтении с традиционных жестких дисков.
Настройка Ram Disk в Windows Server 2019 достаточно проста. Вначале необходимо выделить определенный объем оперативной памяти для создания виртуального диска. Обычно рекомендуется выделять не более 50% от общего объема оперативной памяти сервера, чтобы не навредить его стабильной работе. Затем нужно создать новый том в диспетчере дисков и выбрать оперативную память в качестве источника данных.
Использование Ram Disk имеет несколько преимуществ. Во-первых, быстрый доступ к данным, хранящимся на виртуальном диске, позволяет ускорить работу приложений и снизить время загрузки операционной системы. Во-вторых, в отличие от обычного жесткого диска, Ram Disk не имеет подвижных частей, что значительно снижает шум и вибрацию сервера. Кроме того, в случае сбоя Ram Disk данные не теряются, так как они хранятся в оперативной памяти и могут быть восстановлены после перезагрузки сервера.
Использование Ram Disk может быть полезным для различных задач, таких как временное хранение кэша, резервное копирование данных, ускорение работы баз данных и многих других. Однако перед настройкой Ram Disk необходимо тщательно оценить объем используемой оперативной памяти и учесть потенциальные риски.
Установка Ram Disk на Windows Server 2019
Для установки Ram Disk на Windows Server 2019 необходимо выполнить следующие шаги:
- Скачайте и установите программу для создания виртуального диска, поддерживающую создание Ram Disk.
- Запустите программу.
- Выберите опцию Ram Disk в меню программы.
- Укажите размер виртуального диска в мегабайтах (МБ).
- Выберите букву, которую вы хотите назначить виртуальному диску.
- Нажмите кнопку «Создать» или «OK», чтобы завершить установку Ram Disk.
После завершения установки Ram Disk, виртуальный диск будет доступен в проводнике и может использоваться для временного хранения данных в оперативной памяти сервера.
Не забудьте настроить нужные параметры Ram Disk, такие как автоматическое создание при запуске операционной системы. Это позволит виртуальному диску быть доступным каждый раз при перезагрузке сервера.
Настраиваем Ram Disk на Windows Server 2019
Настройка RAM-диска на сервере Windows Server 2019 имеет несколько преимуществ:
- Повышение скорости чтения и записи данных. Поскольку RAM-диск представляет собой область оперативной памяти, к нему обращение происходит намного быстрее, чем к обычному физическому диску. В результате происходит значительное увеличение скорости работы с данными.
- Увеличение безопасности данных. После перезагрузки сервера все данные, хранящиеся на RAM-диске, удаляются. Это позволяет избежать утечки данных, так как при выключении или перезагрузке сервера информация, хранящаяся на RAM-диске, полностью удаляется.
- Снижение нагрузки на физический диск. Использование RAM-диска позволяет снизить количество операций ввода-вывода на физический диск. Это особенно полезно в случае, когда сервер имеет ограниченные ресурсы.
Для настройки RAM-диска на Windows Server 2019 следуйте указанным ниже шагам:
- Откройте меню «Пуск» и перейдите в «Диспетчер сервера».
- В меню слева выберите «Управление» и перейдите в «Служебные функции».
- В разделе «Серверы» выберите сервер, для которого хотите настроить RAM-диск.
- В правой части окна выберите «Добавить роль» или «Добавить сервис».
- В появившемся окне выберите «Файловые и хранилищные службы» и нажмите «Далее».
- Выберите «RAM-диск» и нажмите «Далее».
- Выберите желаемое количество оперативной памяти для RAM-диска и нажмите «Далее».
- После завершения процесса нажмите «Установить».
После настройки RAM-диска вы можете начать использовать его для временного хранения данных, кэширования или для любых других нужд вашего сервера. Помните, что RAM-диск является виртуальным и при перезагрузке сервера все данные, хранящиеся на нем, будут потеряны.
Важно отметить, что использование RAM-диска на сервере Windows Server 2019 может иметь определенные ограничения и требовать определенных настроек, в зависимости от вашей конкретной конфигурации сервера и используемых программных средств.
How To, i12bretro, iSCSI, Microsoft, PowerShell, RAM Disk, Tutorial, Windows, Windows Server, Windows Server 2012, Windows Server 2016, Windows Server 2019, Windows Server 2022
2 Minutes
View interactive steps on GitHub
NOTE: RAM disks by their very nature are cleared on reboot. Do not use them to store any data that cannot be lost. A suitable use case would be temporary session files for a web server
Installing iSCSI Target Server
- Launch Server Manager if it does not automatically load
- Click the Start button > Server Manager
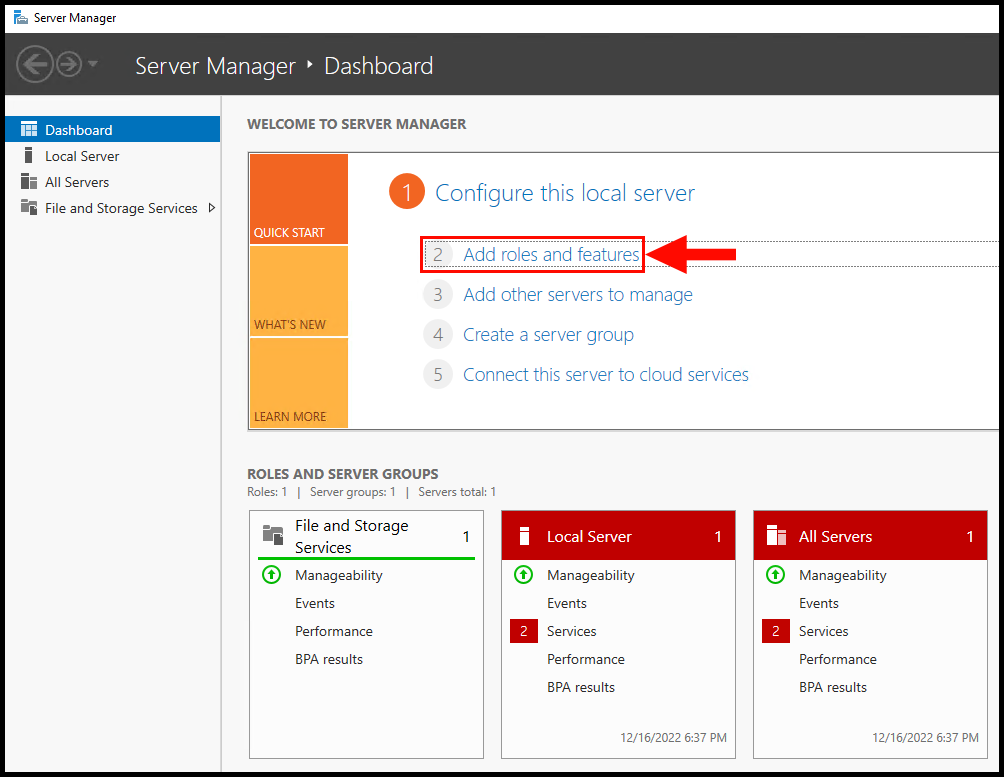
- Click Manage > Add roles and features
- Click Next on the Before you begin screen
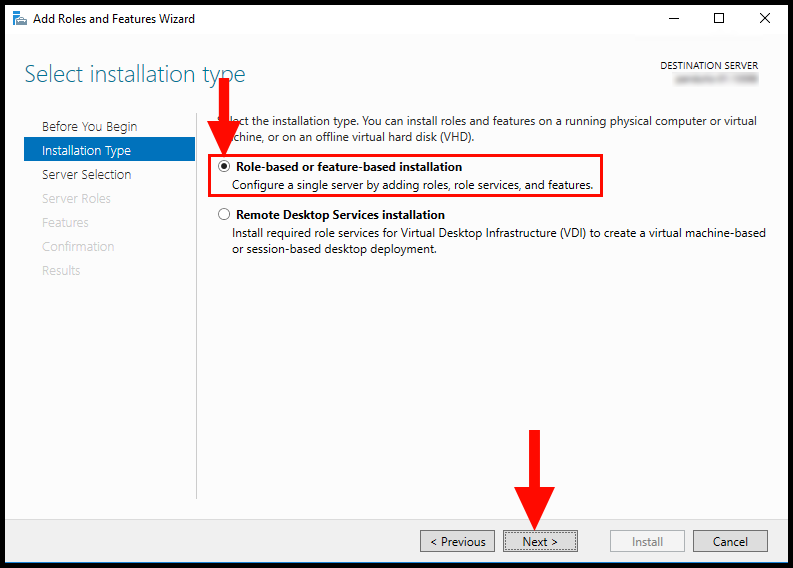
- Select Role-based or feature-based installation > Next
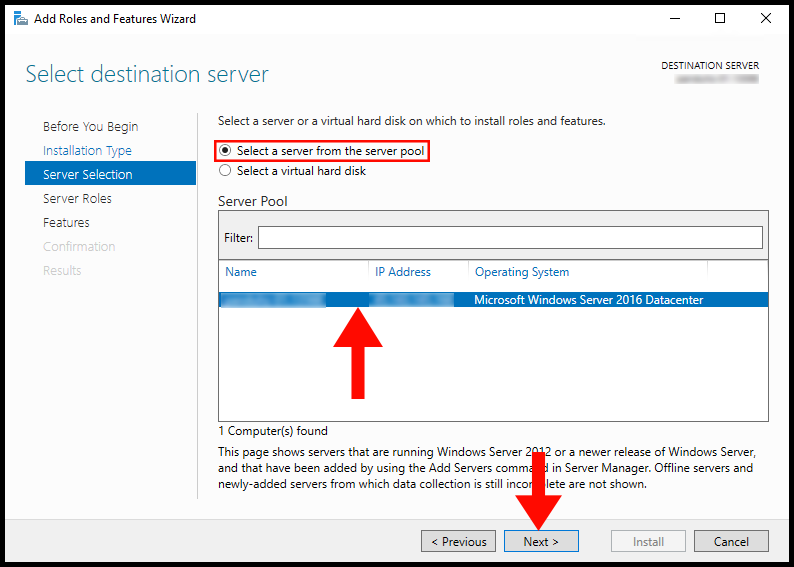
- Leave Select a server from the server pool selected and select the current server > Next
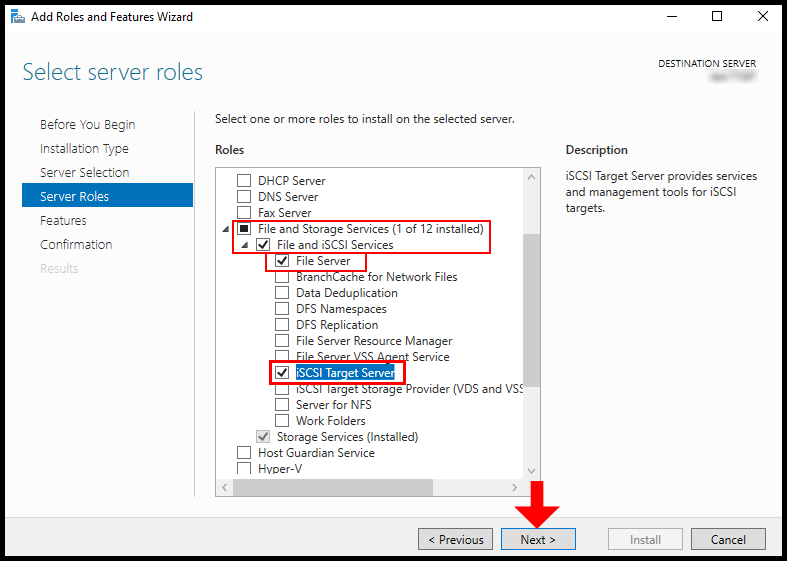
- Expand File and Storage Services > Expand File and iSCSI Services > Select iSCSI Target Server
- A popup will appear with additional required roles and features, click the Add Features button
- Click Next
- Click Next on the Select features screen
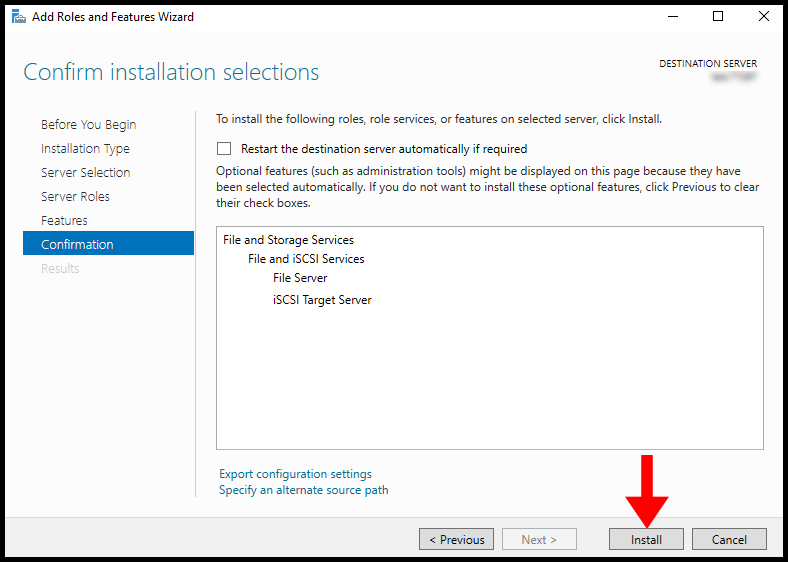
- Click Install on the confirmation screen
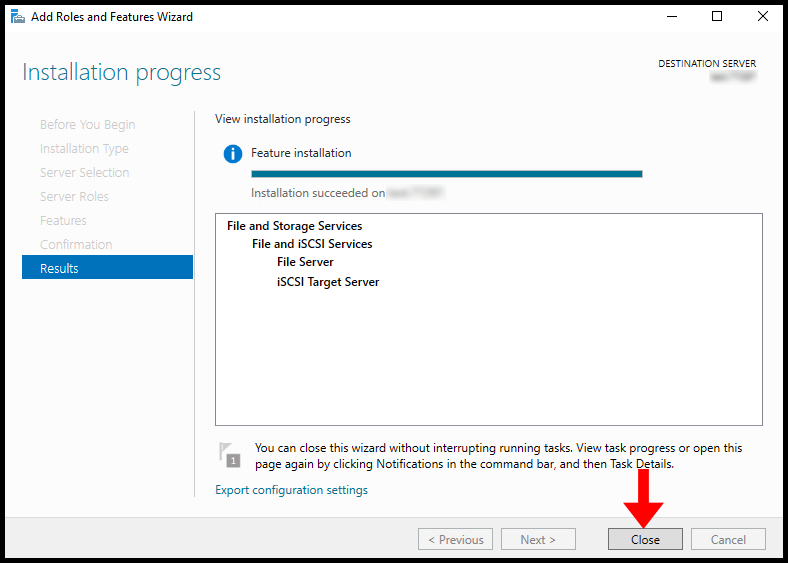
- Leave the installation progress screen open until the install completes
Creating the RAM Disk
- Launch Powershell as administrator
- Enter the following commands to create the RAM disk, replacing the IP address with the current server’s IP address
# allow iSCSI loopback registry setting
Set-ItemProperty -Path ‘HKLM:\SOFTWARE\Microsoft\iSCSI Target’ -Name AllowLoopBack -Value 1
# start the iscsi initiator service
Start-Service -Name MSiSCSI
# set the iscsi initiator service to start automatically
Set-Service -Name MSiSCSI -StartupType Automatic
# create the ram disk, changing size as needed
New-IscsiVirtualDisk -Path «ramdisk:RAMDisk.vhdx» -Size 256MB
# initialize iSCSI target
New-IscsiServerTarget -TargetName RAMDisk -InitiatorIds @(«IPAddress:192.168.0.65»)
# connect to the ram disk
Add-IscsiVirtualDiskTargetMapping -TargetName RAMDisk -DevicePath «ramdisk:RAMDisk.vhdx» - Back in Server Manager, select Tools > iSCSI Initiator
- Enter the IP address in the Target field > Click Quick Connect…
- Click Done
- Back in Powershell, run the following command
# initialize the disk as NTFS
Get-Disk | Where partitionstyle -eq ‘raw’ | Initialize-Disk -PartitionStyle MBR -PassThru | New-Partition -DriveLetter R -UseMaximumSize | Format-Volume -FileSystem NTFS -NewFileSystemLabel «RAMDisk» -Confirm:$false - Open File Explorer and the new RAM disk should be listed as a usable NTFS drive
Re-creating the RAM Disk on Boot
After the RAM disk has been setup initially, follow the steps below to have it recreated on system boot.
- Open a text editor
- Paste the following Powershell commands, changing the size as needed
New-IscsiVirtualDisk -Path «ramdisk:RAMDisk.vhdx» -Size 256MB
Add-IscsiVirtualDiskTargetMapping -TargetName RAMDisk -DevicePath «ramdisk:RAMDisk.vhdx»
Get-Disk | Where partitionstyle -eq ‘raw’ | Initialize-Disk -PartitionStyle MBR -PassThru | New-Partition -DriveLetter R -UseMaximumSize | Format-Volume -FileSystem NTFS -NewFileSystemLabel «RAMDisk» -Confirm:$false - Save the file as ramdisk.ps1 to a safe location to run from, c:\scripts for example
- Click on the Start Button > Type task > Launch Task Scheduler
- Right click the Task Scheduler Library folder in the left pane > Create Basic Task…
- Set the name to RAM Disk and optionally set a Description > Click Next
- For the Trigger, select When the computer starts > Click Next
- For the Action, select Start a program > Click Next
- In the Program/script field, paste the following:
C:\Windows\System32\WindowsPowerShell\v1.0\powershell.exe
- In the Add arguments field, paste the following, editing the path to the .ps1 file if necessary:
«C:\Scripts\ramdisk.ps1»
- Click Next
- Check the Open the Properties dialog for this task when I click Finish box
- Click Finish
- In the Properties dialog, click the Change User or Group… button
- Type system > Press Enter
- Check the Run with highest privileges box
- Click OK to create the scheduled task
- Reboot the server to verify the RAM disk is re-created automatically
Published

Contents
- 1 Windows Server Ram Disk Setup Guide 2012 2016 2019 2022
- 2 Windows Server Ram Disk Setup Guide [2012 2016 2019 2022]
- 2.1 Conclusion
- 2.1.1 Related image with windows server ram disk setup guide 2012 2016 2019 2022
- 2.1.2 Related image with windows server ram disk setup guide 2012 2016 2019 2022
- 2.1 Conclusion
Prepare to be captivated by the magic that Windows Server Ram Disk Setup Guide 2012 2016 2019 2022 has to offer. Our dedicated staff has curated an experience tailored to your desires, ensuring that your time here is nothing short of extraordinary. Applies version hci servers version azure 2022 server stack Windows contributors memory article windows 07 26 requirements 24 stack article 2019 azure 20h2 to base 2023 azure 21h2 windows direct hub requirements windows show hardware spaces storage cpu in 3 server more 2016- hci stack this feedback server server
Windows Server Ram Disk Setup Guide 2012 2016 2019 2022 Youtube
Windows Server Ram Disk Setup Guide 2012 2016 2019 2022 Youtube
Windows server 2012 2016 2019 2022 ram disk setup guide note: ram disks by their very nature are cleared on reboot. do not use them to store any data that cannot be lost. a suitable use case would be temporary session files for a web server installing iscsi target server launch server manager if it does not automatically load. Windows server ram disk setup guide [2012 2016 2019 2022] i12bretro 6.63k subscribers subscribe 19 1.3k views 1 year ago tutorials #windows #server #ramdisk full steps can be found at.

Windows Server 2019 How To Recognize Additional Hard Disk Ssd And Virtual Disks And Set Them
Windows Server 2019 How To Recognize Additional Hard Disk Ssd And Virtual Disks And Set Them
In windows os, there are no integrated tools to create ram disks, so you have to use third party software to do it (amd ramdisk, imdisk, passmark osfmount, starwind ram disk, etc.). however, you can create a ram disk in windows server without using any third party apps. to do it, you can use the iscsi driver. 1. to start, use the windows search function to search and open regedit. 2. then, expand the following items hkey local machine, software, and microsoft. 3. next, in the left hand menu scroll down and locate iscsi target, then click on it, and in the middle of the window double click allowloopback. 4. Still, with no optimization, i noticed that windows needs 0.9gb of ram to run, which indicates that with the audiophile optimizer approximately 0.5gb of ram will be needed. this means that we will be able to make windows server 2019 work via ram on computers with only 8gb installed, with a good leftovers. Processor. processor performance depends not only on the clock frequency of the processor, but also on the number of processor cores and the size of the processor cache. the following are the processor requirements for this product: minimum: 1.4 ghz 64 bit processor. compatible with x64 instruction set.

Installing Windows Server Essentials Experience On Windows Server 2019 2022 Vnext The
Installing Windows Server Essentials Experience On Windows Server 2019 2022 Vnext The
Still, with no optimization, i noticed that windows needs 0.9gb of ram to run, which indicates that with the audiophile optimizer approximately 0.5gb of ram will be needed. this means that we will be able to make windows server 2019 work via ram on computers with only 8gb installed, with a good leftovers. Processor. processor performance depends not only on the clock frequency of the processor, but also on the number of processor cores and the size of the processor cache. the following are the processor requirements for this product: minimum: 1.4 ghz 64 bit processor. compatible with x64 instruction set. This guide organizes performance and tuning guidance for windows server 2022 across three tuning categories: changes in this version sections added software defined networking, including hnv and slb gateway configuration guidance storage spaces direct http1.1 and http2 windows server containers sections changed. Windows server storage spaces direct hardware requirements article 07 24 2023 26 contributors feedback in this article base requirements servers cpu memory show 3 more applies to: azure stack hub, azure stack hci version 21h2, azure stack hci version 20h2, windows server 2022, windows server 2019, windows server 2016.
Windows Server Ram Disk Setup Guide [2012 2016 2019 2022]
Windows Server Ram Disk Setup Guide [2012 2016 2019 2022]
windows #server #ramdisk full steps can be found at i12bretro.github.io tutorials 0524 note: ram disks by their restart in second. hey guys, proto here and today, i’ll be going over what a ramdisk (ram disk) is and why you definitely need one. overall as said how to increase disk space in windows server 2016 2019? extend c drive free space windows server 2016 2019. how do i get yourself equipped with a high speed storage that you always had but never knew. just look out for its volatile nature. imdisk windows 8 and windows 10 ready boost feature relies on fast speed usb drives to operate as a swap file storage, where the over to the windows fence ! new video series on managing active directory environment: in the first video of the new video series we will see the steps to like and share. subscribe my channel for future uploads. note: its safe nd work also but dont expect great results as like webdav means «web distributed authoring and versioning». a webdav server can act as a cloud based file server over the
Conclusion
After exploring the topic in depth, it is clear that article provides informative knowledge about Windows Server Ram Disk Setup Guide 2012 2016 2019 2022. Throughout the article, the author presents an impressive level of expertise about the subject matter. Especially, the discussion of Y stands out as particularly informative. Thanks for taking the time to the article. If you need further information, feel free to contact me through email. I am excited about your feedback. Moreover, below are some related posts that might be helpful:
A RAM disk is a virtual disk created in free memory (RAM) that is recognized by the operating system as a separate physical disk. Its storage in fast RAM allows for extremely fast read and write operations on this disk. In this article, we will guide you on how to create a RAM disk on Windows Server.
Install iSCSI Target Server
In this section, we will go over how to install iSCSI Target Server in order to create a RAM Disk on a Windows server via Server Manager.
1. To start, log into your Windows Server and use the Windows search function to search and open Server Manager.
2. Next, click on Add Roles and Features.
3. Next, the Add Roles and Features Wizard screen will appear. Click Next to move on from the Before You Begin tab.

4. In the Installation Type tab, select Role-based or feature-based installation and then click Next to move on.
5. Now in the Server Selection tab, select your Windows Server and then click Next to continue.
6. On the Server Roles tab, expand File and Storage Services, then expand File and iSCSI Services, and from the options check the boxes for File Server and iSCSI Target Server.
7. On the Features tab, refrain from making any modifications, then click Next to proceed.
8. In the Confirmation section, click on Install.
9. Once the installation is complete the window will say Installation succeeded, then you can click Close.
Enable iSCSI Service Traffic
Once we are done with the installation of the iSCSI Service, we will need to make sure to allow its traffic through Windows. In this section, we will be using regedit to allow traffic.
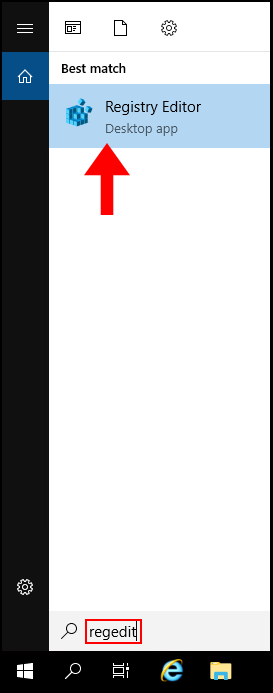
1. To start, use the Windows search function to search and open regedit.
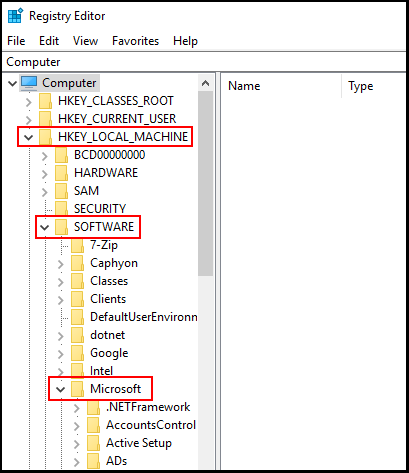
2. Then, expand the following items HKEY_LOCAL-MACHINE, SOFTWARE, and Microsoft.
3. Next, in the left-hand menu scroll down and locate iSCSI Target, then click on it, and in the middle of the window double click AllowLoopback.
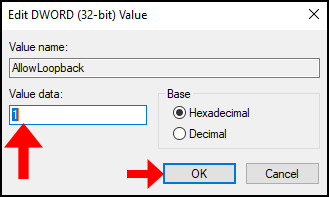
4. Now, change the value to 1 and click OK to finish.
Create a Virtual RAM Disk
In this section, we will guide you through the steps to create the virtual RAM disk via PowerShell.
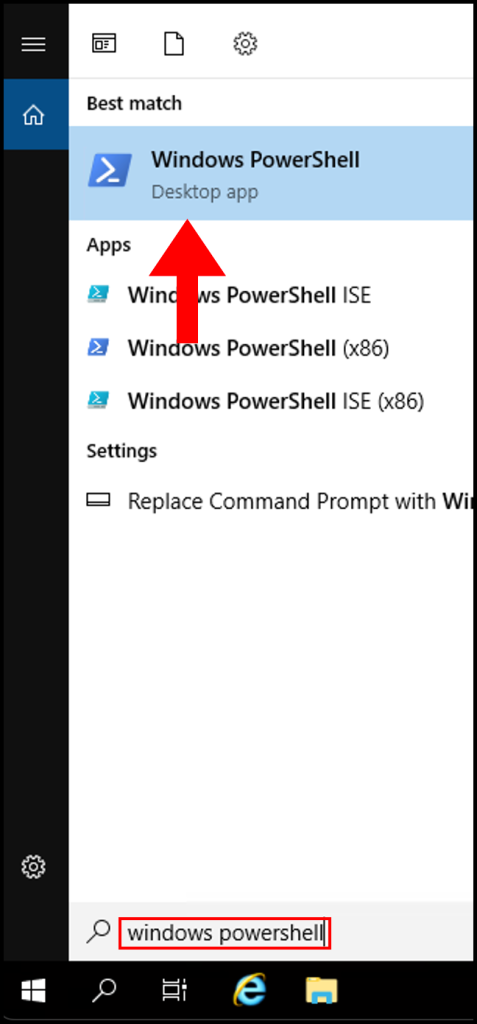
1. To start, log into your Windows Server, and use the Windows search function to search and open PowerShell.
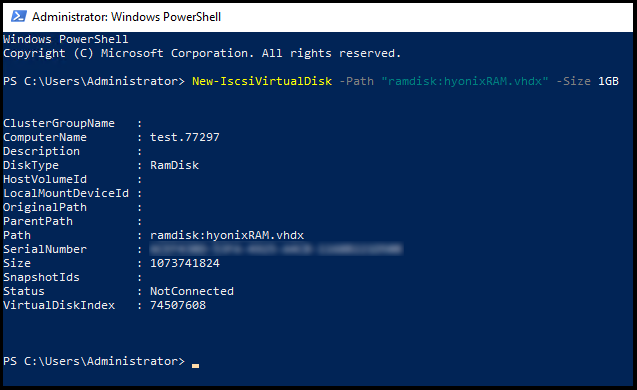
2. Next, run the following command to create a 1 GB virtual RAM Disk,
New-IscsiVirtualDisk -Path "ramdisk:hyonixRAM.vhdx" -Size 1GB
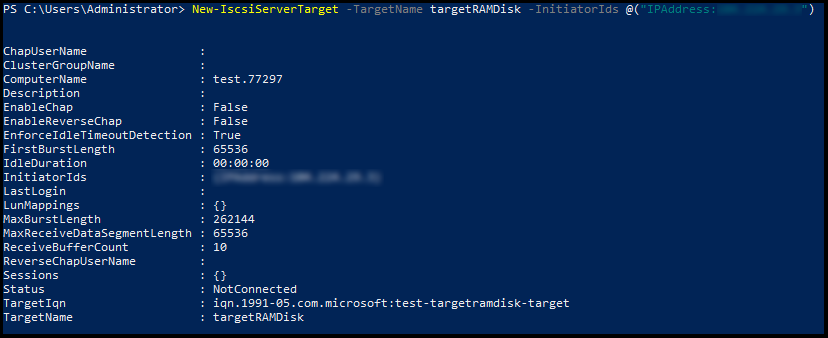
2. Then, create an iSCSI target using the following command and fill in the x‘s with your server’s IPv4 address.
New-IscsiServerTarget -TargetName targetRAMDisk -InitiatorIds @("IPAddress:xxx.xxx.xxx.xxx")
3. Now connect the created RAM Disk using the following command,
Add-IscsiVirtualDiskTargetMapping -TargetName targetRAMDisk -DevicePath "ramdisk:hyonixRAM.vhdx"
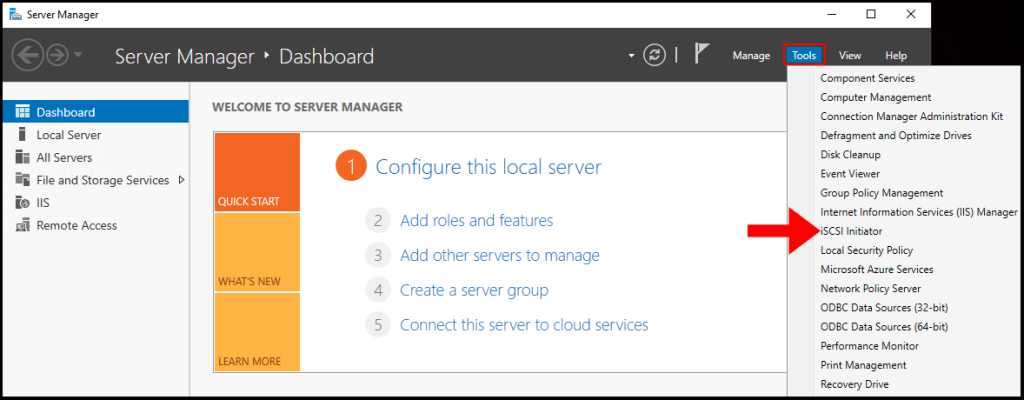
4. Now return to the Server Manager window and click Tools in the top right-hand corner, then select iSCSI Initiator.
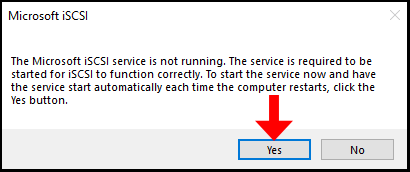
5. A pop-up will appear prompting you to start the iSCSI service, if you’d like to start the iSCSI service on startup of Windows, click Yes to proceed.
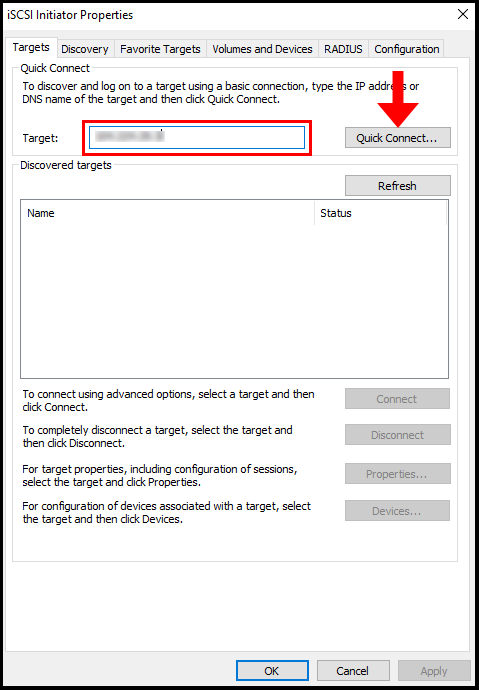
6. Then the iSCSI Initiator Properties window will appear, enter your server’s IP address in the Target text field as seen below, then click Quick Connect.
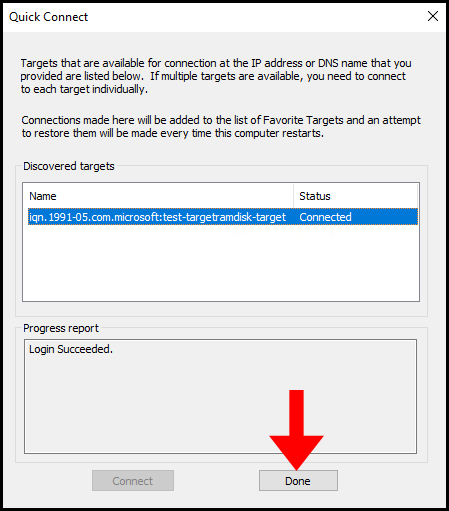
7. Now the Quick Connect page will open to show that our connection has been successful, click Done to close out of this window.
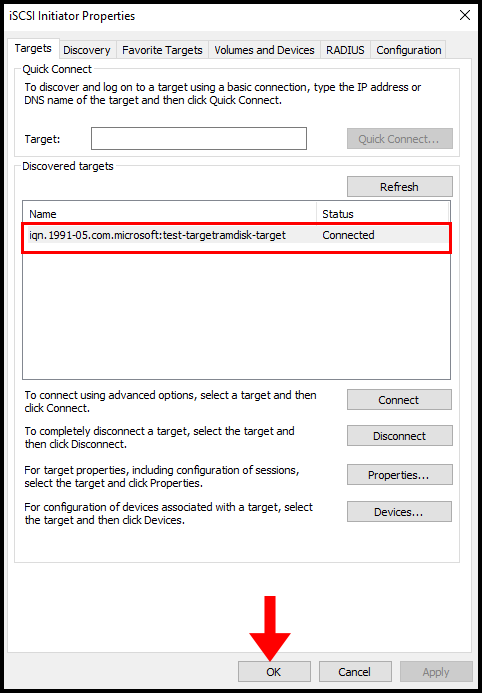
8. Now in the iSCSI Initiator Properties we will see the name of our target and the status as Connected, then click OK to close the window.
Initialize Ram Disk
In this section, we will go over how to initialize the RAM Disk so Windows can recognize it.
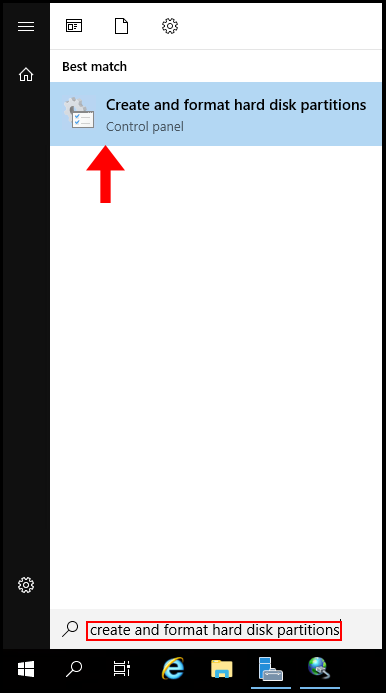
1. To start, use the Windows search function to search and open Create and format hard disk partitions.
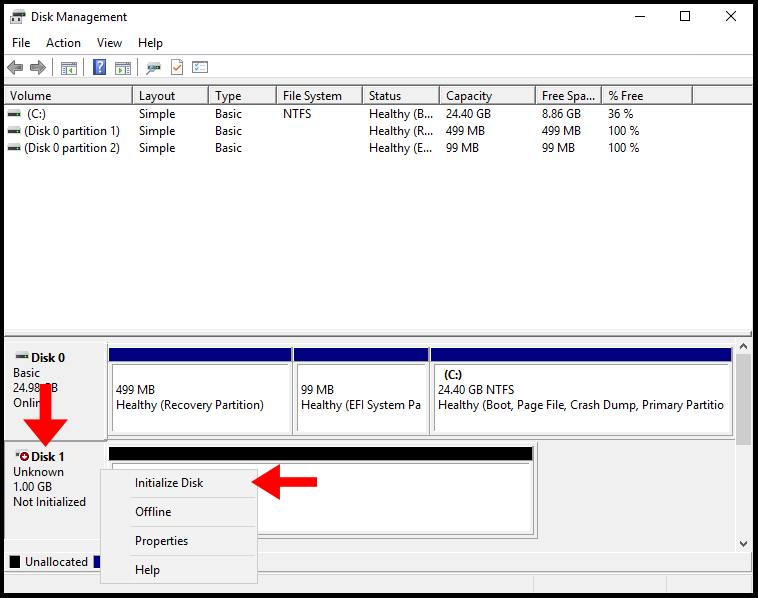
2. Now in the Disk Management window, locate the disk that is labeled as Offline, then right-click the disk and click Online.

3. Now, the disk will be labeled as Not Initialized in order to initialize it, right-click the disk and click Initialize Disk.
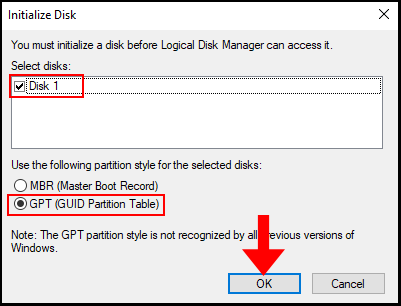
4. Then the Initialize Disk window will appear, select the Disk you’d like to initialize (in this case, it is Disk 1) and select GPT (GUID Partition Table) as the partition style. Now click OK to complete the initialization.
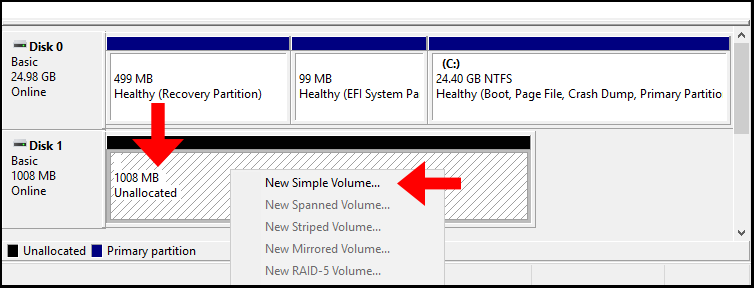
5. Now in the Disk Management window, we will see the disk is now Online. Next, right-click the unallocated space and click New Simple Volume.
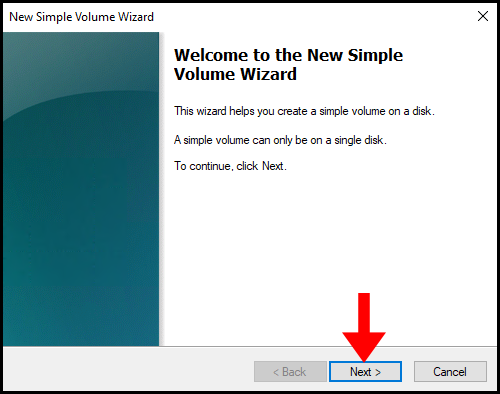
6. The New Simple Volume Wizard will open, click Next to continue.
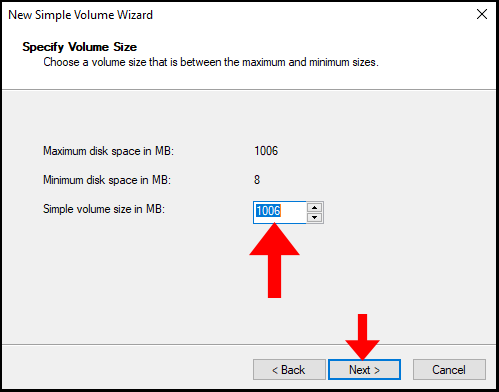
7. Then in the Specify Volume Size enter how much disk space we would like for our RAM Disk, in this case, we will be utilizing the full amount which is 1006 MB. Click Next to move on.
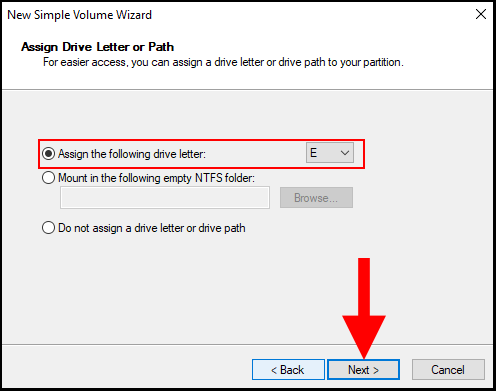
8. On the next page, you can assign a Drive Letter to your newly initialized RAM Disk. In this case, we will be assigning it the letter E. Click Next to continue.
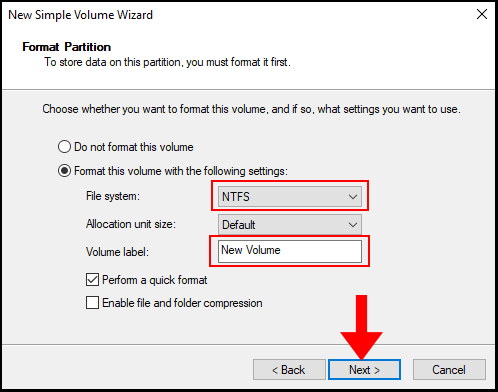
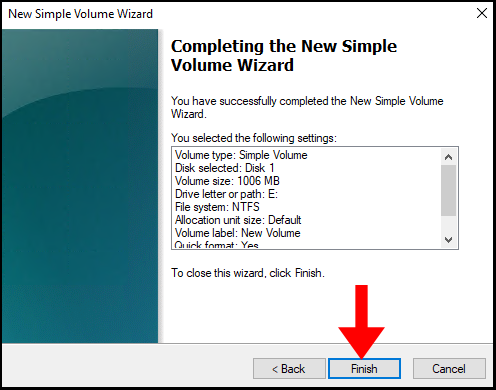
9. In the Format Partition section, make sure the File System is selected as NTFS. Additionally, you may change the Volume label, in this case, we will leave it as default. Click Next to move on.
10. The next page, will confirm that we have successfully completed the New Simple Volume Wizard and Windows has formatted the RAM Disk. Now we can click Finish to close out of the wizard.
11. Lastly, to verify we created the RAM Disk we can go to File Explorer and verify that there is a new drive with our selected drive letter and volume label. We have successfully learned how to create a RAM disk on a Windows server.