Configuring RAID in Windows 10 Type or paste ‘Storage Spaces’ into Search Windows. Select Create a new pool and storage space. Select the RAID type under Resiliency by selecting the drop down menu. Set the drive size under Size if necessary. Select Create storage space.
Steps to configure RAID 1 using the Intel Rapid Storage Technology software Under Select Volume Type, choose RAID 1 and click Next: On the Configure Volume settings, input the name you wish to give the RAID volume. On the Confirm Volume Creation screen select Create Volume:.
How do I setup RAID on Windows 10?
Look for the More Storage Settings heading and select Manage Storage Spaces. In the new window, select the “Create a new pool and storage space” option (Click Yes if prompted to approve changes to your system) Select the drives you want to pool and click Create pool. Together these drives will make up your RAID 5 array.
Should I set up RAID 1?
Using RAID 1, the chances of losing data to a drive failure is one divided by the number of drives in the array. In comparison, those chances are multiplied in RAID 0. If you’re thinking that RAID 1 is a lazy man’s backup, think again. RAID 1 is not a backup, and is never, ever a replacement for a good backup.
What does +1 mean in raid?
The more drives in a RAID 1 array, the lower the probability of failure. For example, if experience tells us that one out of a thousand drives fails in a year, the probability that an entire 2-drive array will fail in a year is 1 in a million; that an entire 3-drive array will fail is 1 in a billion and so on.
Can you RAID 0 your boot drive?
You can only get RAID 0 with a hardware controller or with another two disks that don’t contain a Windows installation. The configuration you would need is one Windows boot disk and two other disks configured in RAID 0.
How do I know if RAID 1 is working?
5 Answers Rick click on the “computer” icon on the desktop or the computer item in the Start Menu. Select Manage. Expand Storage. Click on Disk Management. In the bottom center pane you’ll see Disk 0, Disk 1, etc. On the left column under the Disk number you’ll see the word Basic or Dynamic.
Does Windows 10 Pro support RAID?
Windows 10 has made it simple to set up RAID by building on the good work of Windows 8 and Storage Spaces, a software application built into Windows that takes care of configuring RAID drives for you.
Does Windows 10 Pro support RAID 5?
On Windows 10, you can combine multiple drives to create a larger logical storage using a RAID 5 configuration to improve performance and protect your files from a single drive failure. However, you can use Storage Spaces to create a striped volume with parity that works just like a RAID 5 configuration.
Can Windows 10 do RAID 0?
Raid 0 disk can be installed on Windows 10 even if the operating system is already installed, provided the system has a RAID I/O controller hub (ICH). It also requires enabling the raid controller in windows. If the SATA hard drive is the boot drive, enabling the RAID controller is not suggested.
Is it worth using RAID?
RAID is extremely useful if uptime and availability are important to you or your business. Backups will help insure you from a catastrophic data loss. But, restoring large amounts of data, like when you experience a drive failure, can take many hours to perform.
Is RAID 0 or 1 better?
In theory RAID 0 offers faster read and write speeds compared with RAID 1. RAID 1 offers slower write speeds but could offer the same read performance as RAID 0 if the RAID controller uses multiplexing to read data from disks. If one drive in the RAID fails, all data is lost.
Is RAID 1 good for backup?
One very important thing to note, RAID 1 is not a backup in and of itself. Although RAID writes data to two disks simultaneously, it is not a backup. Backup data is not corrupted unless you specifically back up corrupted data. In short, even if you use RAID, you still must use an effective backup workflow.
When should I use RAID 0?
RAID 0 is normally used to increase performance, although it can also be used as a way to create a large logical volume out of two or more physical disks. A RAID 0 setup can be created with disks of differing sizes, but the storage space added to the array by each disk is limited to the size of the smallest disk.
What is the purpose of RAID 0?
RAID 0 is used to boost a server’s performance. It’s also known as “disk striping.” With RAID 0, data is written across multiple disks.
Which is better RAID 1 0 or RAID 0 1?
A RAID 1+0 array is implemented as RAID 0, whose elements are RAID 1. It combines the same advantages of RAID 0 (speed) and RAID 1 (safety), but in different way. RAID 1+0 creates a large stripe of small mirrors. After failure of a disk, while it is being replaced, only the small fragment of a whole array is rebuilt.
What is the difference between RAID 1 and RAID 0?
The main difference between the RAID 0 and RAID 1 is that, In RAID 0 technology, Disk stripping is used. On the other hand, in RAID 1 technology, Disk mirroring is used. RAID 0 stands for Redundant Array of Independent Disk level 0. While RAID 1 stands for Redundant Array of Independent Disk level 1.
Does RAID 0 SSD increase performance?
RAID 0. Yup. RAID 0 works far better with SSDs than it does with hard drives, because mechanical drives aren’t fast enough to take full advantage of the increased bandwidth. In most cases, running SSDs in tandem works really, really well.
How do I boot from a RAID drive?
Use the up or down arrow keys to select the RAID volume as a boot device. Press F10 to save the setting and exit the BIOS setup program. The system should now boot to the RAID volume.
Каким бы мощным ни был ваш компьютер, у него все же есть одно слабое место: жесткий диск. Он отвечает за целостность и безопасность ваших данных и оказывает значительное влияние на производительность вашего ПК. При этом жесткий диск – единственное устройство в системном блоке, внутри которого есть движущиеся механические части, что и делает его слабым звеном, способным полностью вывести из строя ваш компьютер.

Сегодня есть два способа ускорить работу вашего компьютера: первый – купить дорогой SSD, а второй – по максимуму использовать материнскую плату, то есть настроить массив RAID 0 из двух жестких дисков. Тем более RAID-массив можно использовать и для повышения безопасности ваших важных данных.
В этой статье мы рассмотрим, как создать программный RAID с помощью встроенных инструментов Windows.
Содержание
- Создание программного RAID с помощью встроенных инструментов Windows 8 или Windows 10
- Как создать программный RAID при помощи функции «Дисковые пространства»
- Как создать программный RAID при помощи функции «Управление дисками»
- Как добавить или удалить диск в уже существующем массиве RAID
- Как добавить диск в RAID
- Как удалить диск из RAID-массива
- Создайте программный RAID с помощью командной строки
- RAID 0
- RAID 1
- Программное создание RAID в Windows 7
- Как исправить ошибку «Can’t Add new drive, error 0x00000032»?
- Что делать, если вы потеряли важные данные на RAID-массиве
Современные материнские платы позволяют создавать дисковые RAID-массивы без необходимости докупать оборудование. Это позволяет значительно сэкономить на сборке массива в целях повышения безопасности данных или ускорения работы компьютера.
Создание программного RAID с помощью встроенных инструментов Windows 8 или Windows 10
Как создать программный RAID при помощи функции «Дисковые пространства»
Windows 10 имеет встроенную функцию «Дисковые пространства», которая позволяет объединять жесткие диски или твердотельные накопители в один дисковый массив, называемый RAID. Эта функция была впервые представлена в Windows 8 и значительно улучшена в Windows 10, что упростило создание многодисковых массивов.
Чтобы создать массив RAID, вы можете использовать как функцию «Дисковые пространства», так и командную строку или «Windows PowerShell».
Перед созданием программного RAID необходимо определить его тип и для чего он будет использоваться. Сегодня Windows 10 поддерживает три типа программных массивов: RAID 0, RAID 1, RAID 5 (Windows Server).
Вы можете прочитать о том, какие типы RAID существуют и какой RAID в каких целях лучше использовать, в статье «Типы RAID и какой RAID лучше всего использовать».
Итак, мы определились с типом RAID. Затем для создания дискового массива мы подключаем все диски к компьютеру и загружаем операционную систему.
Стоит отметить, что все диски будущего RAID должны быть одинаковыми не только по объему памяти, но желательно и по всем другим параметрам. Это поможет избежать многих неприятностей в будущем.
Далее, чтобы создать программный RAID-массив, выполните следующие действия:
- Откройте «Панель управления», щелкнув правой кнопкой мыши «Пуск» и выбрав «Панель управления» («Control Panel»).

- В открывшемся окне выберите «Дисковые пространства» («Storage Spaces»)

- Затем выберите «Создать новый пул и дисковое пространство» («Create a new pool and storage space»).
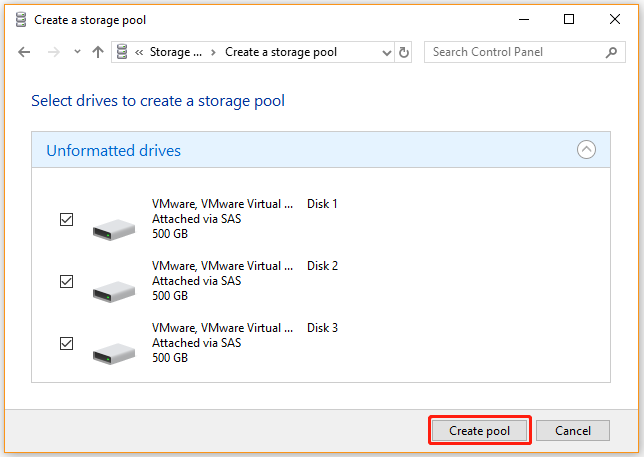
- Выберите диски, которые вы хотите добавить в массив RAID, и нажмите «Создание пула носителей» («Create pool»).
Важно: все данные на дисках, из которых создается RAID-массив, будут удалены. Поэтому заранее сохраните все важные файлы на другой диск или внешний носитель.
После того, как вы настроили массив, вы должны дать ему имя и правильно настроить.
- В поле «Имя» введите имя нашего RAID-массива.
- Затем выберите букву и файловую систему для будущего RAID

Именно с этим именем и буквой массив будет отображаться в системе Windows.
- Теперь вы должны выбрать тип устойчивости.
- Простой (без отказоустойчивости) – это RAID 0;
- Двустороннее зеркало — RAID 1;
- Трехстороннее зеркало – это тоже RAID 1 (с разницей только в количестве копий основного жесткого диска);
- Четность – RAID 5.
В зависимости от выбранного типа RAID мастер автоматически установит максимально доступную емкость дискового массива.
Обычно это значение немного ниже, чем фактический объем доступных данных, и вы также можете установить больший размер дискового пространства. Однако имейте в виду, что это сделано для того, чтобы вы могли установить дополнительные жесткие диски, когда массив будет заполнен, без необходимости перестраивать его.
- Нажмите «Create storage space».
После того, как мастер настроит ваш новый RAID, он будет доступен как отдельный диск в окне «Этот компьютер».

Новый диск не будет отличаться от обычного жесткого диска, и вы можете выполнять с ним любые операции, даже зашифровать его с помощью BitLocker.


Об использовании BitLocker вы можете прочитать в статье «Как зашифровать данные на жестком диске с помощью BitLocker».
Вы можете создать еще один программный RAID. Только количество жестких дисков, подключенных к ПК, ограничивает количество создаваемых RAID-массивов.
Как создать программный RAID при помощи функции «Управление дисками»
Еще одним способом создания программных RAID массивов в операционной системе Windows является использование встроенной утилиты под названием «Управление дисками». Она позволяет создавать все базовые типы RAID. Также, как и предыдущий, этот способ достаточно легкий и не требует глубоких знаний операционной системы. Итак, чтобы создать программный RAID 0 следует:
Шаг 1: Щелкните правой кнопкой мыши по «Пуск» и выберите «Управление дисками»

Шаг 2: Перед вами откроется «Управление дисками», в котором будут отображаться все подключенные диски. Щелкните правой кнопкой мышки и выберите «Создать чередующийся том»

Шаг 3: Откроется «Мастер создания чередующихся томов». Щелкните «Далее», затем выделите в левой части окна мастера диски, которые хотите добавить в массив RAID 0 и нажмите «Добавить». Когда все нужные диски будут добавлены нажмите «Далее»


Шаг 4: Назначьте букву массива, выбрав нужную из списка (буква устанавливается автоматически, так что вы можете оставить все так, как предлагает мастер создания массива) и снова нажмите «Далее»

Шаг 5: На этом этапе нужно выбрать файловую систему будущего массива. Выберите «NTFS» и снова нажмите «Далее»

Шаг 6: На этом этапе нажмите кнопку «Готово». Система покажет предупреждение, что выбранные диски будут конвертированы в динамические и что вся информация на них будет уничтожена. Нажмите «Да»

Начнется форматирование и синхронизация дисков, после чего наш массив RAID 0 будет создан.
Массив RAID 1 создается аналогичным образом, только на первом шаге вместо «Чередования» выберите «Зеркалирование».

Все остальные шаги выглядят аналогично.
Как добавить или удалить диск в уже существующем массиве RAID
Как добавить диск в RAID
Предположим, у вас уже есть программный RAID-массив, и вы его используете. Однажды может возникнуть ситуация, когда вам станет не хватать места на диске. К счастью, Windows 10 позволяет добавить еще один диск в уже существующий массив с помощью встроенных инструментов.
Чтобы добавить диск, вы должны открыть утилиту «Дисковые пространства», используя метод, описанный выше, и выбрать «Добавить диски».

В открывшемся меню выберите диск, который хотите добавить, и нажмите «Добавить диск». Жесткий диск будет добавлен к уже существующему массиву RAID.
Как удалить диск из RAID-массива
Чтобы удалить диск из RAID-массива, следуйте алгоритму:
- Откройте утилиту «Дисковые пространства», как описано выше, и нажмите кнопку «Изменить параметры».
- Откройте существующий массив RAID и выберите «Физические диски».
- Во всплывающем списке выберите диск, который вы хотите удалить, и нажмите «Подготовить к удалению».

Windows автоматически перенесет данные на другие диски, а кнопка «Подготовить к удалению» изменится на «Удалить».
После нажатия кнопки «Удалить» система удалит диск из RAID. Для дальнейшей работы с этим накопителем вам потребуется создать на нем новый раздел. Для этого вы можете использовать встроенную утилиту diskpart или утилиту Disk Management.

О том, как использовать утилиту «diskpart», вы можете прочитать в статье «Использование Diskpart для управления и восстановления жесткого диска, карты памяти или USB-накопителя».
Создайте программный RAID с помощью командной строки
Другой способ создать программный RAID – использовать командную строку или Windows PowerShell.
Чтобы создать программный RAID с помощью командной строки:
- Щелкните правой кнопкой мыши «Пуск» и выберите «Командная строка (Администратор)» или «Windows PowerShell (Admin)».

- В открывшемся окне введите команду «diskpart» и нажмите «Enter».

- Выберите диски, которые вы хотите добавить в массив RAID, один за другим, и превратите их в динамические диски с помощью команд:
- select disk 1 – где 1 – номер желаемого диска
- convert dynamic – преобразовать в динамический
- select disk 2
- convert dynamic
- select disk 3
- convert dynamic
Теперь, когда мы преобразовали наши диски, мы можем создать том RAID, введя следующие команды:
- select disk 1
- Create Volume RAID Disk 1, 2, 3
После этого следует убедиться, что массив создан.
Для этого введите команду «list disk».
Все диски будут объединены в один диск.

- Теперь все, что вам нужно сделать, это отформатировать диск и присвоить ему букву. Для этого введите следующие команды:
- select volume 2
- Format FS=NTFS Label=MyNewVolume
- Assign Letter=F
- Введите «exit» и нажмите Enter.
После этого выбранные диски будут объединены в RAID-массив.
Отметим, что с помощью этого метода будет создан RAID 5.

Чтобы отобразить список дисков, введите «list disk».
Утилита Diskpart отобразит все диски, подключенные к вашему ПК.


RAID 0
Если вы хотите создать RAID 0, в утилите Diskpart введите:
- list disk;
- create volume stripe size=n disk=1,2,3 – где n — размер в мегабайтах, а 1,2,3 — номера дисков, которые будут включены в массив RAID 0.
RAID 1
Чтобы создать RAID 1, вам необходимо ввести следующие команды одну за другой:
- list disk – для отображения подключенных дисков;
- select disk 0 — количество дисков, их которых создается зеркало;
- convert dynamic – преобразование диска в динамический.
Внимание! Иногда появляется сообщение «Вам следует перезагрузить компьютер, чтобы завершить эту операцию». Если оно появилось – перезагрузите компьютер.
Если есть сообщение об успешной конвертации – продолжайте работу и введите:
- select volume 0 – выбрать нужный диск;
- add disk=1 – добавить нужный диск для зеркалирования.
После этого будет создан массив RAID 1.
Программное создание RAID в Windows 7
В Windows 7 вы можете использовать утилиту «Управление дисками» для создания программного RAID. Следует отметить, что диск, с которого загружается система, нельзя использовать в RAID, так как он будет преобразован в динамический. Вы можете использовать любые диски, кроме системных.
Шаг 1. Откройте «Пуск», щелкните правой кнопкой мыши «Компьютер» и выберите «Управление».

Шаг 2: В появившемся мастере нажмите «Далее».

Шаг 3. В открывшемся меню вы должны выбрать диски, которые вы хотите объединить в массив RAID, и нажать «Далее».

Шаг 4: Выберите букву для созданного RAID-массива и нажмите «Далее».
- S (Striping) — соответствует RAID 0;
- M (Mirroring) — соответствует RAID 1;

Шаг 5: В следующем окне выберите тип файловой системы (NTFS), укажите размер блока и укажите имя тома. После этого нажмите «Далее».

Шаг 6: После того, как система создаст новый массив RAID, нажмите кнопку «Готово».

После нажатия кнопки «Готово» появится окно с предупреждением о том, что будет выполнено преобразование базового диска в динамический и загрузка ОС с динамического диска будет невозможна. Просто нажмите «ОК».
После этого созданный RAID-массив отобразится в окне «Мой компьютер» как обычный жесткий диск, с которым можно выполнять любые операции.
Как исправить ошибку «Can’t Add new drive, error 0x00000032»?
Иногда при добавлении диска в RAID массив может появляться ошибка «Can’t Add new drive, error 0x00000032». В некоторых случаях эта ошибка появляется при создании RAID массива. Причем, ошибка 0x00000032 может появится даже после того, как вы очистили и отформатировали ваш накопитель. Обычно она возникает на дисках, которые уже использовались в RAID массиве или в операционной системе.
В некоторых случаях RAID массив может сообщать о поломке диска, хотя на самом деле с ним все в порядке. Чтобы решить этот вопрос нужно сначала понять причину возникновения ошибки.
Причиной возникновения ошибки «Can’t Add new drive, error 0x00000032» являются неправильные метаданные, которые остаются на диске даже после очистки и форматирования накопителя. Кроме того, часто причиной ошибки являются данные в загрузочном секторе, которые форматирование и очистка диска не удалили.
Все дело в том, что очистка диска и форматирование не очищают диск физически, а только удаляют все «ссылки на файлы», и указывают операционной системе, что она может записывать информацию в новый раздел, стирая предыдущие данные.
Однако, физически файлы (в том числе и метаданные) остаются на диске и при добавлении диска в RAID массив вызывают ошибки.
Чтобы исправить ошибку «Can’t Add new drive, error 0x00000032» нужно «сбросить проблемный диск».
Для этого следует:
Шаг 1: Щелкните правой кнопкой мыши по «Пуск» и выберите «Windows PowerShell (Администратор)»

Шаг 2: В открывшемся окне введите команду:
Get-PhysicalDisk | ft FriendlyName, SerialNumber, UniqueId –auto
…и нажмите «Enter» для ее выполнения.

Шаг 3: Перед вами откроется список ваших дисков, в котором будет указано имя каждого диска (колонка FriendlyName) и его уникальный идентификатор (колонка UniqueID).
Выделите UniqueID нужного диска и скопируйте его при помощи комбинации клавиш «Ctrl + C»

Примечание: вы также можете использовать имя диска (FriendlyName), однако в некоторых случаях система можете отображать одинаковое имя для всех дисков. Поэтому для избегания ошибок лучше всего использовать UniqueID диска.
Шаг 4: Чтобы сбросить ваш диск используйте следующую команду:
Reset-PhysicalDisk -UniqueId "your-unique-id"
…заменив your-unique-id на идентификатор диска, который вы скопировали ранее (чтобы вставить идентификатор используйте комбинацию клавиш «Ctrl +V»). В результате ваша команда должна выглядеть примерно, как на скриншоте ниже.

Важно: уникальный идентификатор вашего диска должен находится в двойных кавычках. Иначе команда не будет работать.
После этого вы снова можете использовать этот диск в вашем RAID–массиве.
Что делать, если вы потеряли важные данные на RAID-массиве
Использование RAID-массивов может значительно повысить безопасность данных, что очень важно в современном мире. Однако нельзя исключать человеческий фактор.
Потеря важных файлов возможна из-за случайного удаления, форматирования, изменения логической структуры файловой системы и многих других причин. Кроме того, не исключен сбой RAID.
В этой ситуации лучше не принимать поспешных решений. Оптимальный вариант — обратиться к специалистам или воспользоваться специализированным ПО для восстановления данных.
RS RAID Retrieve способен восстановить любой тип RAID-массива, поддерживает все файловые системы, используемые в современных операционных системах.

Часто задаваемые вопросы
RAID1 — это массив, состоящий из двух и более дисков, являющихся полными копиями друг друга.
Да. Вы можете без проблем создать программный RAID 0 в Windows 10. О том, как это сделать, вы можете прочитать в нашей статье.
Максимальное количество дисков в RAID 1 ограничено только производительностью вашего компьютера/сервера/NAS, поскольку чем больше дисков используется, тем медленнее будет скорость записи. Если используется слишком много дисков, из-за нехватки вычислительной мощности контроллера скорость записи может упасть настолько, что пользоваться массивом будет очень неудобно.
Нет. В RAID 0 вообще нет избыточности, так как все дисковое пространство предназначено для хранения данных. Если один диск выйдет из строя, пользователь потеряет данные и на втором диске, потому что все файлы разделяются во время записи, которая записывается на оба диска одновременно.
There are a few different ways to set up RAID 1 on Windows 10, but we recommend using the built-in tool called ‘Storage Spaces’. This tool allows you to create a RAID 1 array using two or more drives.
To get started, open the ‘Control Panel’ and go to ‘System and Security’. Under the ‘Storage’ heading, click on ‘Storage Spaces’.
Click ‘Create a new pool and storage space’. This will open the ‘New Pool’ wizard.
Give your new pool a name, then select the drives that you want to use for the RAID 1 array.
Click ‘Create pool’. This will create the RAID 1 array and format the drives.
Once the RAID 1 array has been created, you can create a new storage space in it. This is where you can specify the size, drive letter, and other options for the storage space.
Click ‘Create storage space’. This will open the ‘Create storage space’ wizard.
Give your storage space a name, then select the size and drive letter.
Click ‘Create storage space’. This will create the storage space and format the drives.
Does Windows 10 have RAID 1?
How do I setup RAID in Windows 10?
There are a few different ways to set up RAID in Windows 10, but we recommend using the Windows Storage Spaces feature. This feature allows you to create storage pools, which can be used to create virtual disks that use RAID.
To set up RAID using Windows Storage Spaces, first open the Control Panel and go to “System and Security.” Next, click on “Storage Spaces.”
Once you’re in the Storage Spaces window, click on “Create a new pool and storage space.”
Give your storage pool a name, and then select the drives that you want to add to the pool. Once you’ve selected the drives, click on “Create pool.”
After the pool has been created, you can now create a virtual disk. To do this, click on “Create a new virtual disk.”
Give your virtual disk a name, and select the storage pool that you want to use. Next, select the RAID level that you want to use. We recommend using RAID 5 for data protection.
Once you’ve selected the RAID level, click on “Create virtual disk.” Your
There are a few steps involved in setting up a RAID 1 array:
1. Choose the type of RAID controller you will use.
2. Install the controller and drivers.
3. Connect the drives you want to use in the array to the controller.
4. Use the controller software to configure the array.
5. Install the operating system on the array.
For more detailed instructions, please consult your controller’s documentation.
Does Windows 10 support RAID?
Yes, Windows 10 supports RAID. You can use the built-in tools to create a RAID array, or you can use third-party software.
Does RAID 1 require 2 drives?
Yes, RAID 1 requires two drives.
Is RAID 1 worth it for home use?
There is no one-size-fits-all answer to this question, as the best RAID configuration for a home user depends on individual needs and preferences. However, in general, RAID 1 can be a good option for home users who want to improve data protection and redundancy.
How do I know if RAID 1 is working?
There are a few things you can do to check if your RAID 1 is working:
1. Check if the RAID controller is functioning properly. You can do this by checking the controller’s status lights or running diagnostic tests.
2. Check if both drives in the RAID 1 array are online and synchronized. You can do this by looking at the status lights on the drives or checking the RAID management software.
3. Run a data integrity check on the RAID 1 array to make sure that the data is intact and no errors have occurred. This can be done with a tool like MD5 or SHA-1.
4. If you have a backup of the data on the RAID 1 array, you can restore it to another drive and compare the two to make sure they are identical.
How do I run RAID 1 on Windows?
There are a few different ways to configure RAID 1 on Windows, but the most common method is to use the Windows Disk Management tool. To do this, open the Disk Management tool and select the two drives that you want to use for your RAID 1 array. Right-click on one of the drives and select the «Create RAID Volume» option.
In the next window, select the «RAID 1 (Mirrored)» option and click «Next«. Choose the other drive in the array and click «Add«. Make sure the «Simple Volume Size» is set to the size of the smaller drive and click «Next«.
Give the array a name and click «Finish» to create the RAID 1 array.
Is RAID 1 or 0 better?
There is no definitive answer to this question as it depends on the specific needs and requirements of the user. However, in general, RAID 1 is considered to be more reliable and robust than RAID 0, as it offers data redundancy and protection against data loss.
Is RAID 1 needed with SSD?
There is no need for RAID 1 with SSDs as they are already much faster and more reliable than traditional HDDs.
What happens if a drive fails in RAID 1?
If a drive fails in RAID 1, the data is still accessible from the other drive. However, the failed drive will need to be replaced as soon as possible to maintain redundancy.
Can you lose a drive in RAID 1?
Yes, it is possible to lose a drive in RAID 1. However, there are a few things to keep in mind. First, if you lose a drive, you will lose half of your data. This is because RAID 1 relies on mirroring, so each drive contains a copy of the data. Second, you will need to replace the lost drive as soon as possible to prevent data loss. Finally, you should always have a backup plan in place in case of data loss.
What is the biggest disadvantage of RAID 1?
The biggest disadvantage of RAID 1 is that it is not very scalable. You can only add one additional drive to the array for every drive that you have. This can be a problem if you need to add a lot of storage to the array.
Will RAID 1 slow down performance?
There are a few factors to consider when determining if RAID 1 will slow down performance. The first is the number of drives being used. The more drives you have in your RAID 1 array, the greater the potential for a performance decrease. The second factor is the type of drives being used. If you are using slower drives, then RAID 1 will likely slow down performance. The third factor is the workload. If you are using RAID 1 for a light workload, then you will not likely see a decrease in performance. However, if you are using RAID 1 for a heavy workload, then you may see a decrease in performance.
RAID, which stands for Redundant Array of Independent Disks, is a way of combining multiple disks into a single logical unit to improve data storage, read and write performance, and fault tolerance. RAID configurations have become increasingly popular in recent years as they provide an effective solution for businesses and individuals who require high-speed, reliable data storage. Configuring RAID in Windows 10 can be a bit complex, but with the right guidance, you can easily set it up. In this post, we will walk you through the steps required to configure RAID in Windows 10.
Types of RAID
There are several RAID levels available for implementation, each offering its own set of benefits and drawbacks. The most common RAID levels include RAID 0, RAID 1, RAID 5, and RAID 10.
RAID 0 is a configuration that splits data across multiple disks, thereby improving read and write performance. It does not offer any fault tolerance, which means that if a single drive fails, all data stored on that RAID configuration will be lost. This configuration is best suited for applications that require high read-and-write performance but do not need data redundancy or fault tolerance.
RAID 1 provides fault tolerance by mirroring data across multiple disks, ensuring that there is always a backup in case one drive fails. RAID 1 requires at least two disks and offers excellent data protection.
However, it does come at the cost of reduced storage capacity and read performance.
RAID 5, on the other hand, combines three or more disks with one disk reserved for parity data. This configuration offers fault tolerance and better read and write performance than RAID 1.
Nevertheless, it requires at least three disks and can be complicated to implement. RAID 10 is a combination of RAID 0 and RAID 1, which provides both improved read and write performance and data redundancy. This configuration requires at least four drives, and it can be expensive to implement.
How to Set up a RAID in Windows 10
To implement RAID configurations in Windows 10, a RAID controller is necessary. This can be either a hardware RAID controller, which is a physical device that connects to the motherboard, or a software RAID controller, which is built into the operating system. A hardware RAID controller provides the best performance and fault tolerance, but it requires at least four drives. The RAID controller manages all read and write operations, and the operating system sees only a single drive.
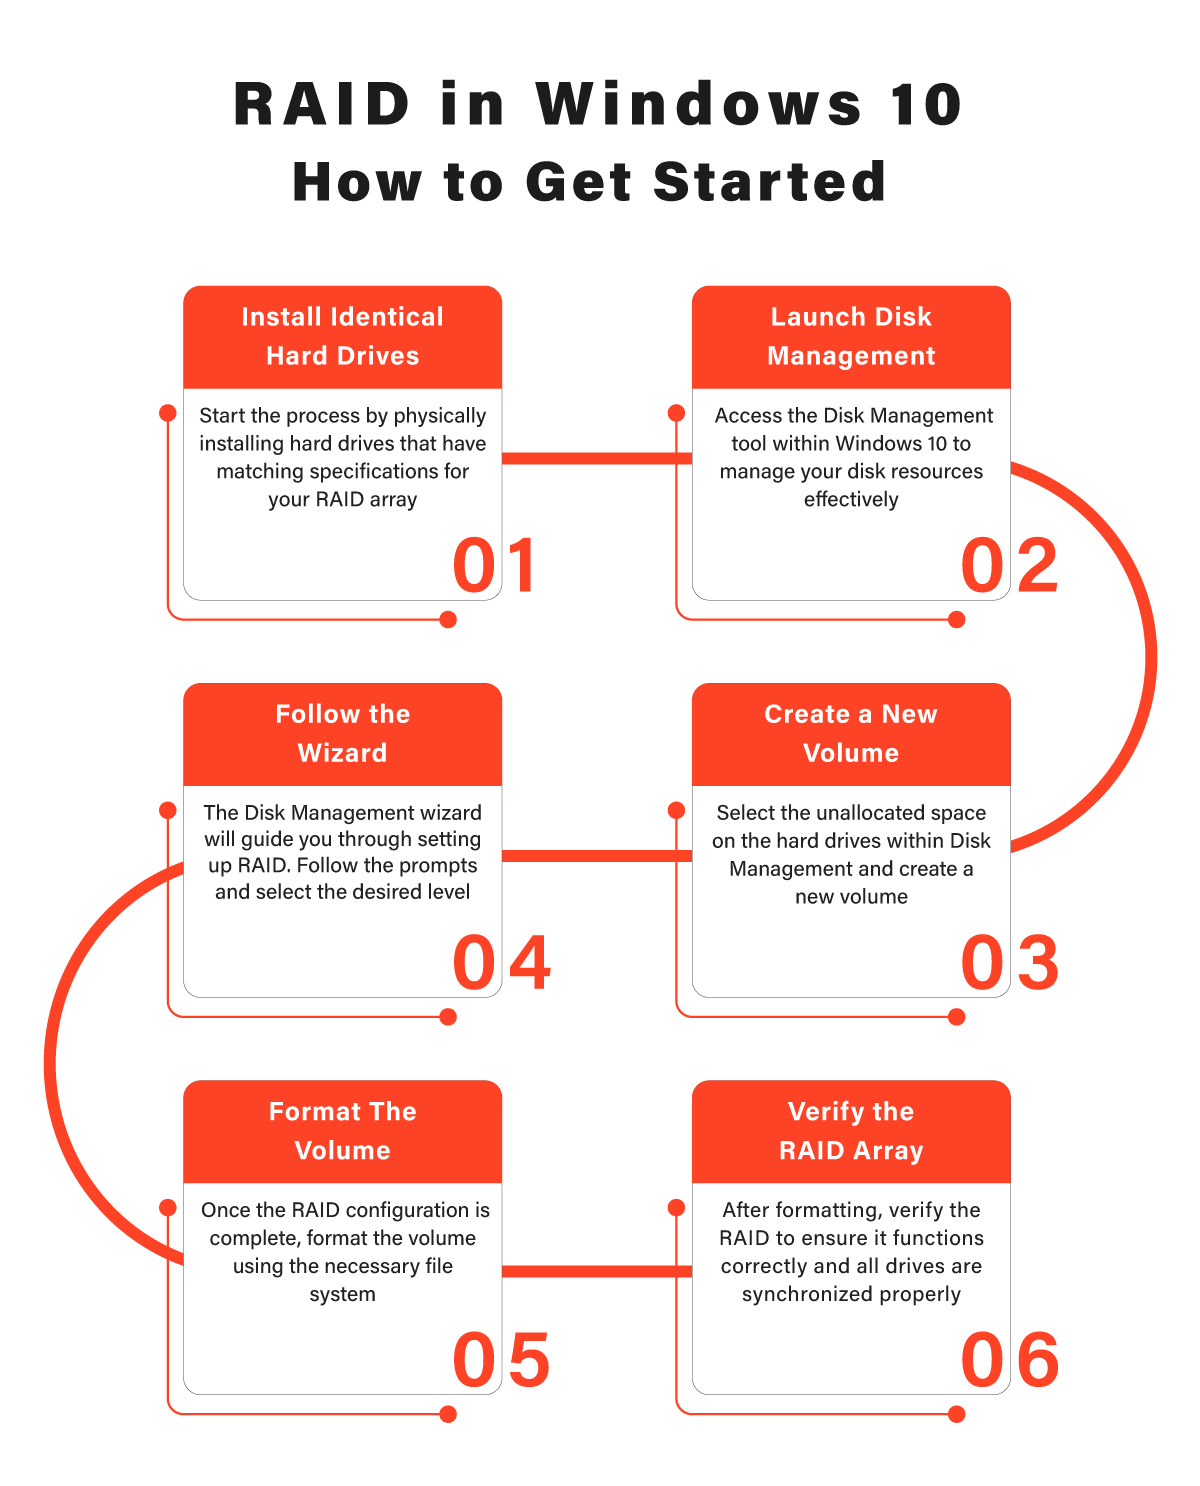
Step 1: Install identical hard drives.
To set up a RAID array in Windows 10, you will need to have the required amount of identical hard drives. The hard drives should be of the same capacity, speed, and interface.
Step 2: Launch Disk Management.
After installing the hard drives, launch Disk Management in Windows 10 by right-clicking the Windows button and selecting Disk Management from the menu.
Step 3: Create a new volume.
In Disk Management, right-click on the unallocated space of the hard drive that you want to use for your RAID array and select “New Mirrored Volume.” The New Mirrored Volume wizard will open.
Step 4: Follow the wizard.
Follow the steps in the New Mirrored Volume wizard to create a new volume. You will be prompted to select the disks that you want to use for the RAID array, assign a drive letter, and format the volume.
Make sure to select the required hard drives that you want to use for your RAID array.

Step 5: Format the volume.
After selecting the disks, you will be prompted to format the volume. You can select the file system and allocation unit size that you want to use for the volume. Once you have formatted the book, click “Finish” to create the RAID array.
Step 6: Verify the RAID Array.
After creating the RAID array, you can verify that it is working correctly by checking the Disk Management utility. The Disk Management utility will display the RAID as a single drive.
RAID Data Recovery with PITS
In the event of data loss from a RAID system, our team of experts is equipped with advanced knowledge and state-of-the-art techniques to retrieve lost data with unparalleled precision. Furthermore, we work in modern facilities and leverage the latest tools to guarantee successful data recovery. Upon receipt of the device at our facility, we initiate its evaluation process.
Our engineers conduct a comprehensive examination of the media to determine the cause of data loss, assess the extent of damage, and evaluate the probability of successful recovery. Using this information, we select the optimal recovery approach.
Benefits of Our Using Services
24/7 Emergency Service Availability
So if you’re facing a data loss situation, don’t hesitate to contact us. Our 24/7 data recovery services are available to you, 365 days a year. Let us help you recover your precious data today.
Over 50 Locations Across the US
We offer data recovery services from over 50 locations across the US. This means that no matter where you are located, you can access our services and get the support you need to recover the data.
Certified Data Recovery Laboratories.
So if you’re facing a data loss situation, look no further. With our certified data recovery labs and 99% success rate, we are confident that we can recover your precious data and get you back on track.
ISO Certified Class 10 Cleanroom
Our engineers work in a controlled environment to ensure the safety of your device. We recover data in ISO Certified Class 10 Cleanroom and achieve high results.
Risk-free Evaluation and Assessment
We start the recovery process with a risk-free evaluation. Our technicians estimate reasons for data loss and the level of damage. Based on it, we select the most suitable recovery strategy.
100% Customer Satisfaction Rate
With years in the data recovery industry, our company supports the highest customer satisfaction rate. We do everything to provide a positive experience for our clients.
In addition, we furnish our clients with a detailed service quote that includes pricing details and turnaround time. We specialize in restoring data from various storage devices such as hard disk drives, solid-state drives, servers, and tapes. Our expertise also encompasses all operating systems, file types, and file systems.
If you encounter data loss issues on any RAID level, we are readily available to assist you. Our team will be delighted to address your concerns and provide you with the necessary support.
What should you do before setting up RAID? How to setup RAID in Windows 10? If you are still trying to find the answers, this post of MiniTool is what you need. From here, you can get 3 applicable ways to setup RAID 0/1 in Windows 10.
What Is a RAID Setup
RAID, also called Redundant Arrays of Independent Disks, is a type of data storage virtualization technology that combines multiple disks into a logical unit for data redundancy or performance improvement. This disk combination is often used by professionals or enterprises to manage different data in different drives.
There are different standard levels of RAID setups, including RAID 0, RAID 1, RAID 0+1, RAID 3, RAID 4, RAID 5, RAID 6, RAID 7, and RAID 10. Among them, the most frequently asked question is how to setup RAID 0 and RAID 1 in Windows 10. So, here we will start with introducing the definition and prerequisites of RAID 0 and RAID 1.
Overview of RAID 0
RAID 0 is also known as a striped volume that’s composed of two or more hard disks. And the space you take from each disk should be equal. One of the biggest merits of RAID 0 is that it greatly improves the performance and throughput of a hard drive.
However, RAID 0 provides no fault tolerance and parity information redundancy. That means you will lose all the data on the entire array once any disk fails and the whole system will be affected. So, it’s not recommended that you use RAID 0 for any critical system. Well, you need to make sure that each disk you added to the array is not more than the smallest disk size when setting up RAID 0 Windows 10.
Overview of RAID 1
When it comes to RAID 1, we often think of the mirrored volume that is a technique of writing the same data to more than one drive. Each drive on the RAID 1 array contains an identical copy of the data. This configuration owns high data security because it provides fault tolerance and redundancy. That is to say, if an individual drive fails, the second one can continue to work.
When creating a RAID 1 array, you need to make sure the array is as big as the smallest disk. Since the data is mirrored on all disks of the array, this array can still work normally as long as one disk is operational. Of course, you should replace the failed hard disk timely in case the whole operating system crash.
Further reading: Do you want to know more differences between RAID 0 vs RAID 1? This post tells you the answer and helps you make a wise choice.
What You Need to Prepare Before Setting up RAID
Here comes a new question, what do you need to do before setting up RAID 0/1 Windows 10. Both RAID 0 and RAID 1 configurations require at least 2 hard disks, while you’d better use the disks with the same sizes, types, and manufacturers on the RAID 1 setup.
Another important thing you need to do is to make sure you back up all of your data on the hard drives. This is because all the data on the hard disks will be erased during the RAID setup. How to back up hard drives easily and quickly? MiniTool Partition Wizard can achieve that with a few clicks. It’s a powerful partition manager that can migrate OS and even copy the whole disk. Here’s how to use it.
MiniTool Partition Wizard DemoClick to Download100%Clean & Safe
Step 1. In the main interface, click on the Copy Disk Wizard feature at the left pane and click on Next in the pop-up window.
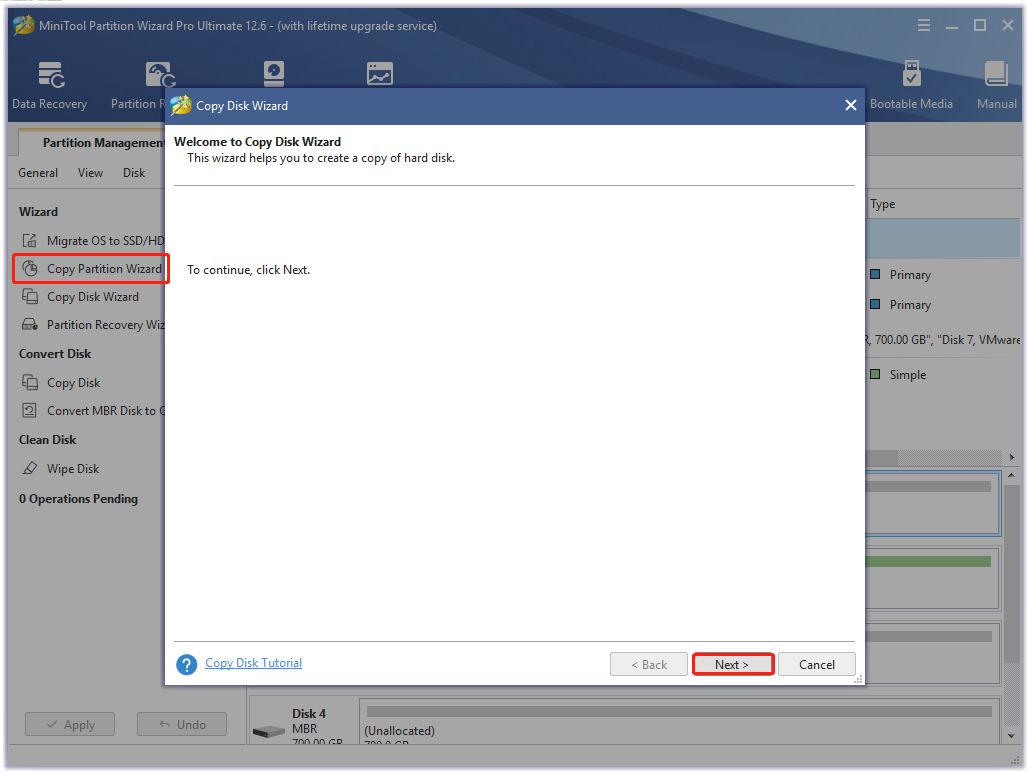
Step 2. Select the hard disk that you want to back up and click on Next.
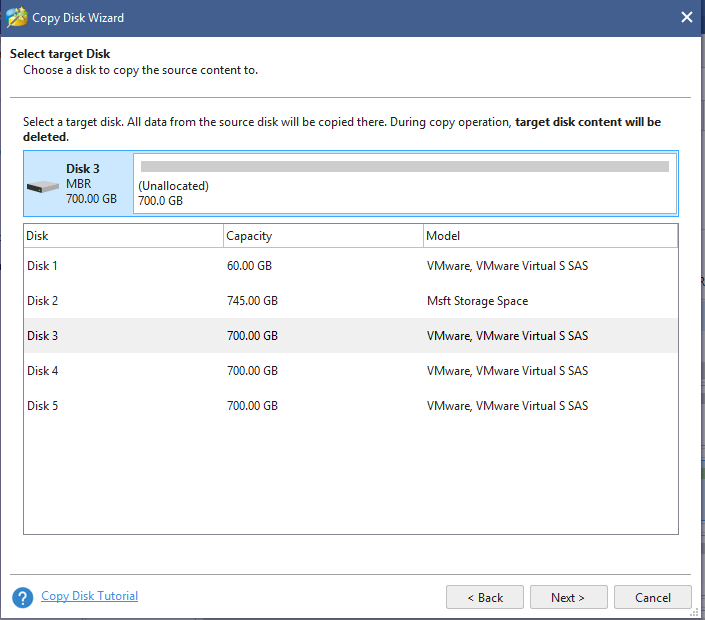
Step 3. Select the target disk that you want to copy disk to and click on Next. If you are prompted to confirm this operation, click on Yes to continue.
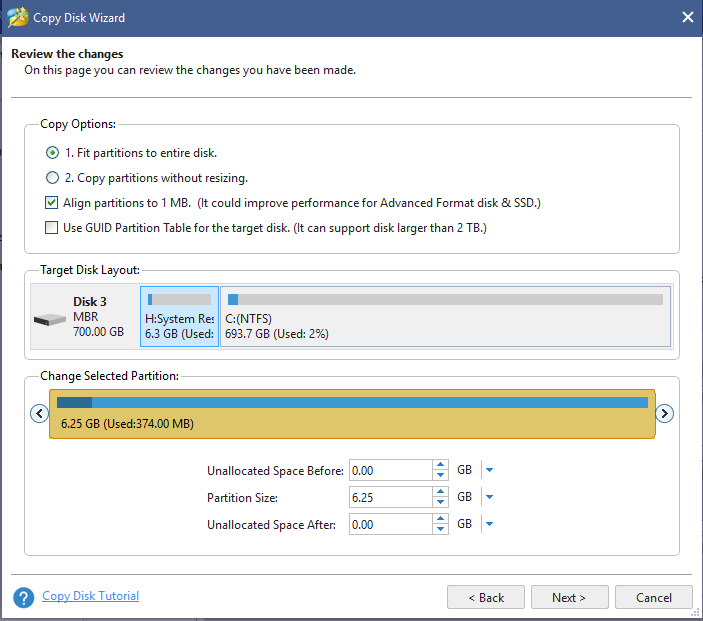
Step 4. Then you can review the changes you have been made. Here you can select the default copy options if you haven’t special demands.
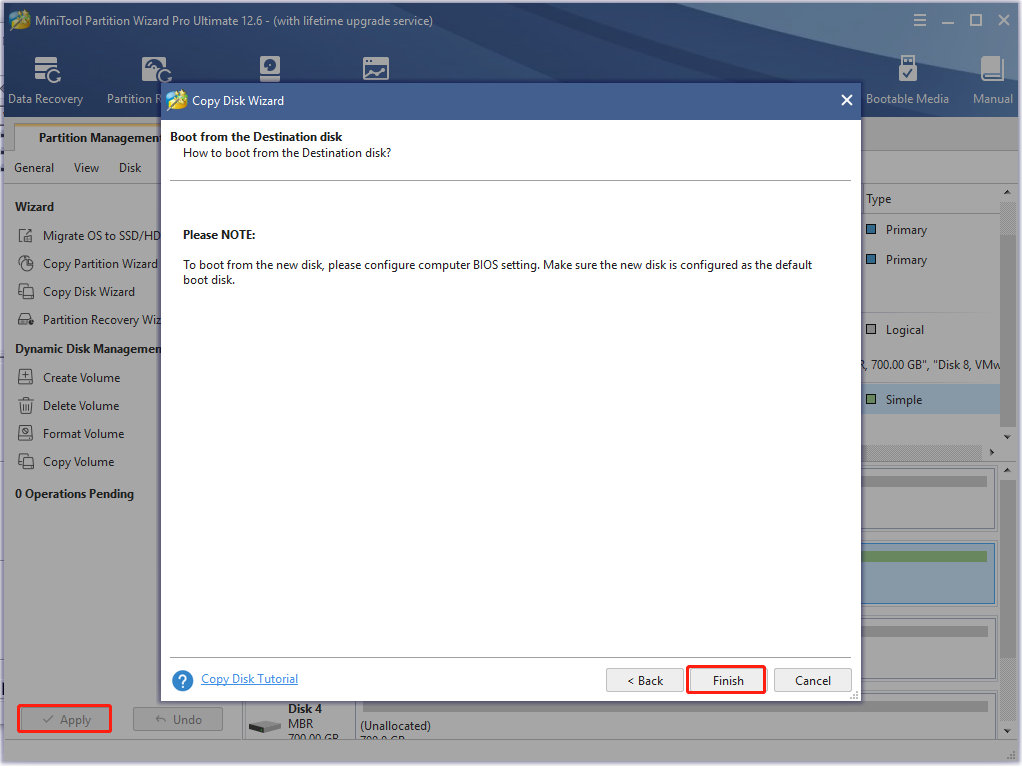
Step 5. Read the information and click the Finish button in the next window. Finally, click on Apply to execute the pending operations.
Once you backed up these important data, you need to install all hard disks that you want to use for setting up RAID 0 Windows 10. If you don’t how to do that, you can refer to this post “How to Install a Second Hard Drive in Your Laptop and Desktop PC”.
How to Setup RAID in Windows 10
Now, I believe that you have prepared everything for the RAID setup. How to setup a RAID 0 and RAID 1 in Windows 10? You can choose one from the 3 applicable ways.
Note: The following operation will be performed on a disk array with 3 unformatted hard drives that have the same size and speed.
Way 1. Setup RAID Using the “Storage Spaces” Utility
As you might know, Windows 10 provides the “Storage Spaces” utility to configure the RAID drives. This tool can help you combine 3 or more drives into a storage pool. It is a software-configured RAID setup in OS. Here we will show you how to setup RAID 0 Windows 10 using the Storage Spaces feature.
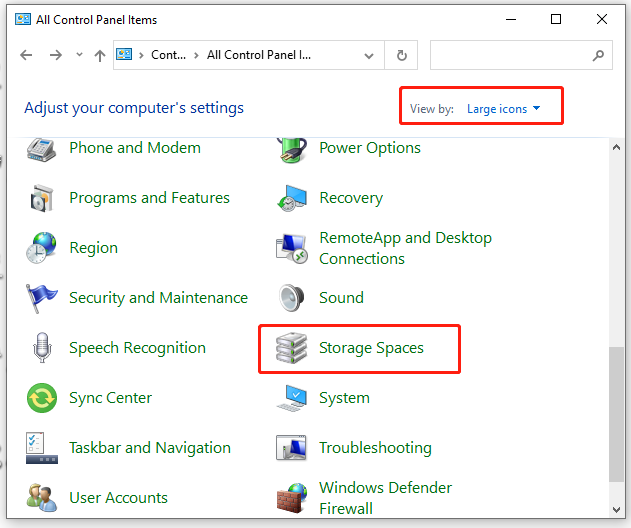
Step 1. Type control in the Windows Search box, and then select Control Panel from the top result.
Step 2. Change the View by type to Large icons and select Storage Spaces from the listed icons. Click on Yes in the UAC window when you’re prompted to access this app.
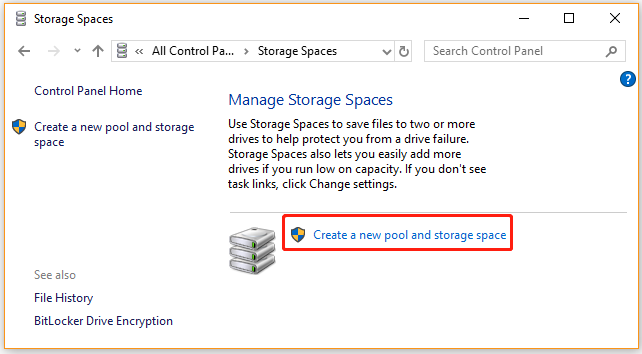
Step 3. In the pop-up window, click on the Create a new pool and storage space link.
Step 4. Then Windows 10 will check all hard drives installed on your computer and select the disks that you want to use for setting up RAID 1 Windows 10 and click on Create pool.
Step 5. Now, you can name the Storage pool, and select a Drive letter and File System from the drop-down menu. Then go to the Resiliency type section, select the RAID type under it. The Simple (no resiliency) option pools the disks, the Two-way mirror and three-way mirror options are similar to RAID 1, and Parity is similar to RAID 5. Once confirmed, click on Create storage space.

Step 6. Now, wait for the process to finish and you should see a single disk in Windows File Explorer.
As shown above, you can set up RAID 1 and RAID 5 with the Storage Space tool, but it can’t configure RAID 0. So, we recommend you use the following 2 methods.
Way 2. Setup RAID in BIOS
In addition, you can set up RAID in BIOS. Here we will show you how to setup a RAID 0 Windows 10 based on the Intel motherboard
Step 1. Restart your computer, and then press the Delete key to enter BIOS.
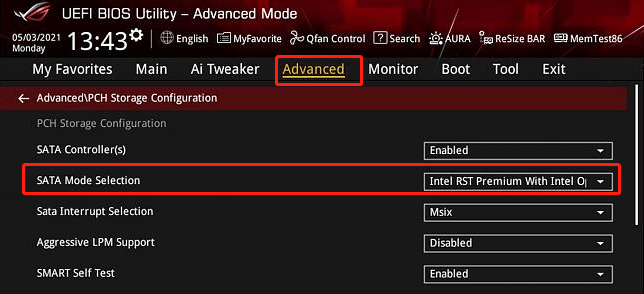
Step 2. In the BIOS Utility window, press F7 to go to Advanced Mode and select PCH Storage Configuration from the listed options.
Step 3. In the Advanced tab, go to the SATA Mode Selection option and set it to Intel RST Premium With Intel Optane System Acceleration (RAID), and set SATA Controllers to Enabled.
Step 4. Go to the Boot tab and set the Launch CSM option to Disabled.
Step 5. Press F10 and click OK to restart your system. And press Delete after the system reboots and enter BIOS again.
Step 6. Press the F7 key to enter Advanced Mode, and then go to the Advanced tab and select Intel(R) Rapid Storage Technology from the listed options.
Step 7. Tap on Create RAID Volume. Then you can set the RAID name, RAID level (like RAID 0 stripe), and select the disks you want to use and set it to X.
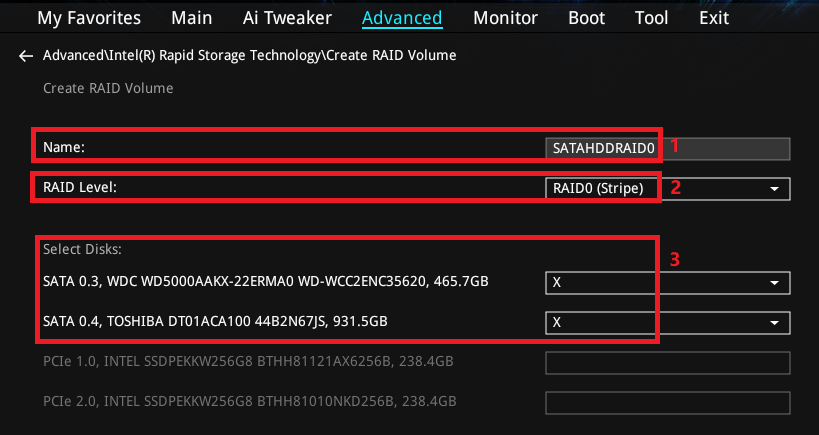
–images from asus.com
Step 8. Set the RAID capacity and click on Create Volume to save the changes.
According to the above information, you may find some limitations on using the Storage Space and BIOS utilities. Therefore, we highly recommend you use a professional RAID partition manager like MiniTool Partition Wizard.
Way 3. Setup RAID Using MiniTool Partition Wizard
With MiniTool Partition Wizard, you can not only create a striped volume (RAID 0) but a mirrored volume (RAID 1) easily. In addition, this program can help you move/resize, or extend volume if you need. Here’s how to setup RAID 0/1 using the MiniTool software.
Note: Before you create a striped or mirrored volume, you need to convert the basic disks to dynamic.
MiniTool Partition Wizard DemoClick to Download100%Clean & Safe
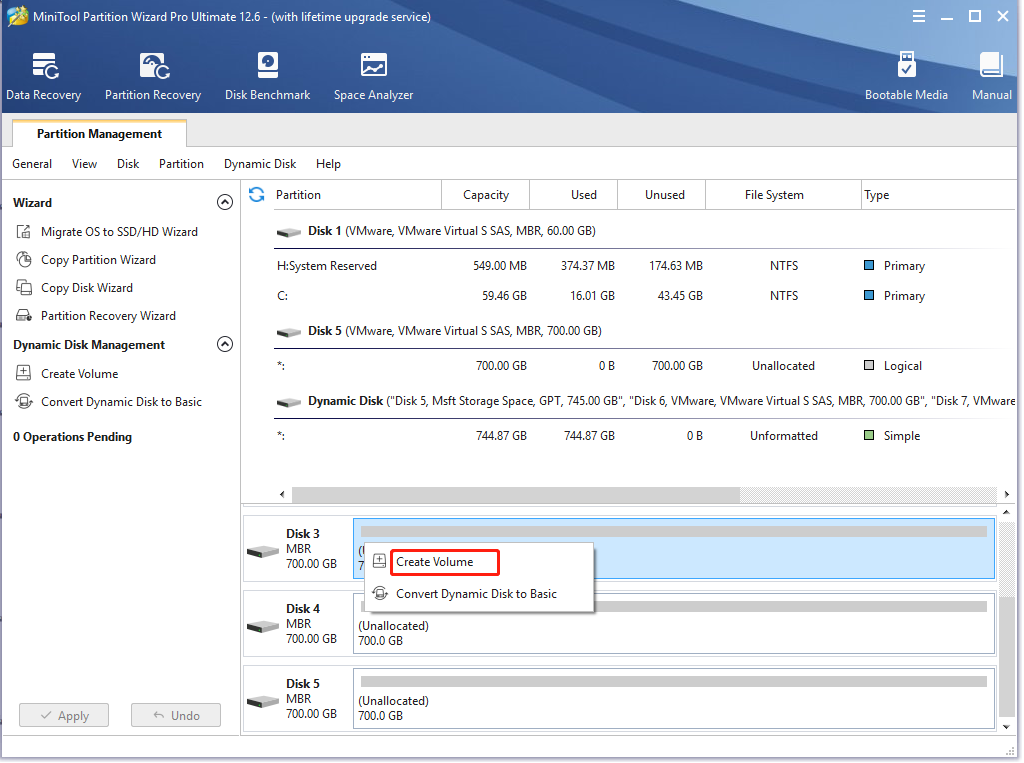
Step 1. Launch the MiniTool software to enter its main interface, right-click the dynamic disk that you want to create the striped volume or mirrored volume, and select Create Volume.
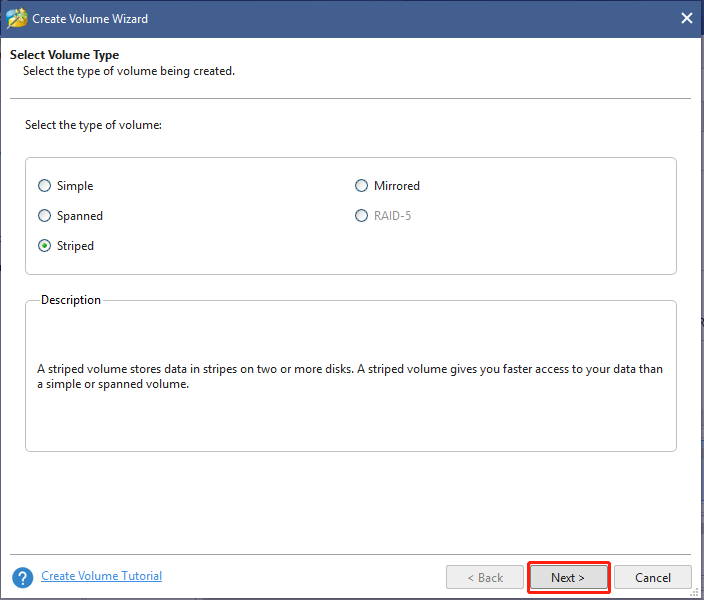
Step 2. In the pop-up window, you will sell all supported volume types according to your present situation. Select Striped or Mirrored and click on Next to go on.
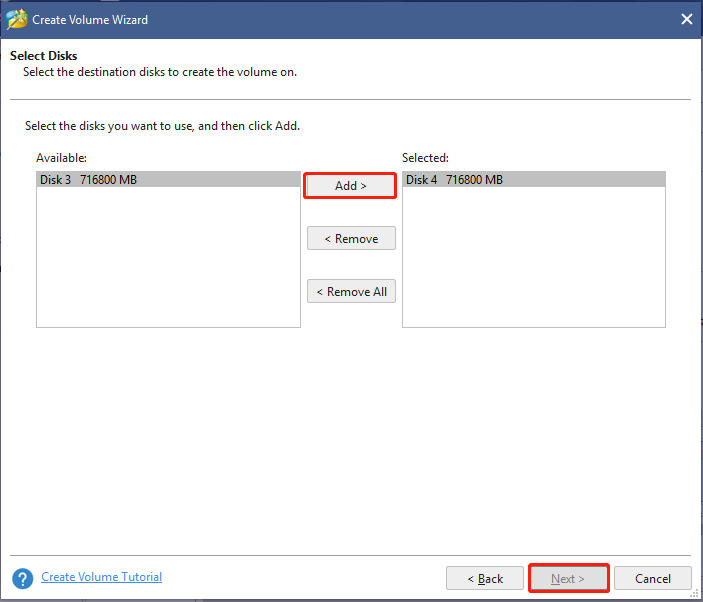
Step 3. Select the target disk where volume is to be created and click on Add to add the disk to the right box. Then click on Next.
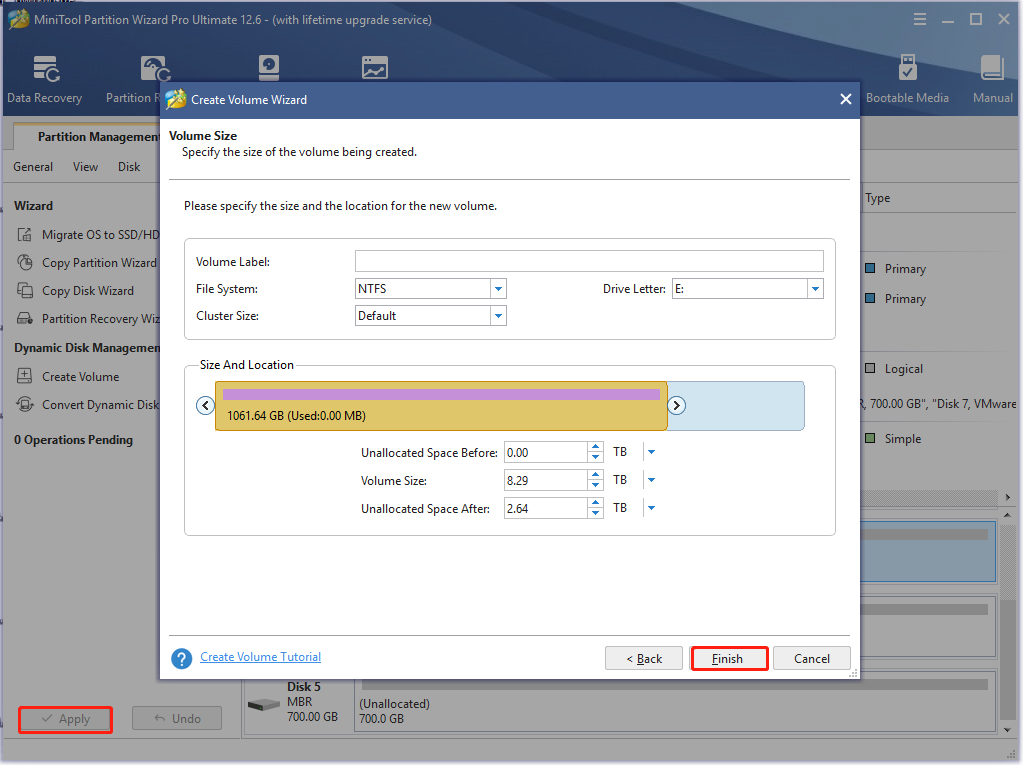
Step 4. Now, you can set relevant parameters, including Volume Label, File System, Driver Letter, Cluster Size, and Volume Size/Location. Then click on Finish to confirm that.
Step 5. Click on Apply to execute the pending operation.
How to setup a RAID 0 and RAID 1 in Windows 10? This post provides you with 3 simple ways to achieve that. Get them now!Click to Tweet
Bottom Line
Now, the top 3 methods on how to setup RAID in Windows 10 have been illustrated. If you have any ideas on this topic, write them down in the following comment zone. Also, you can send us an email to [email protected] when you have difficulty in using MiniTool Partition Wizard.