Установка radius Server на Windows 2012
Установка radius Server на Windows 2012
Хотите узнать, как выполнить установку radius Server на Windows 2012? В этом учебнике мы покажем вам, как установить и настроить службу Radius на сервере Windows.
• Windows 2012 R2
Сетевая политика и служба доступа
В нашем примере сервер Radius использует IP-адрес 192.168.0.50.
В нашем примере сетевой коммутатор использует IP-адрес 192.168.0.10.
В нашем примере на рабочем столе под управлением Windows 10 используется IP-адрес 192.168.0.20.
Как сетевой коммутатор, так и рабочий стол хотят проверить подлинность в базе данных Radius.
Плейлист Windows:
На этой странице мы предлагаем быстрый доступ к списку видео, связанных с установкой Windows.
Не забудьте подписаться на наш канал YouTube под названием FKIT.
Windows Связанные Учебник:
На этой странице мы предлагаем быстрый доступ к списку учебников, связанных с Windows.
Учебник — Установка сервера радиуса на Windows
Откройте приложение «Менеджер сервера».
Доступ к меню Управления и нажмите на Добавление ролей и функций.

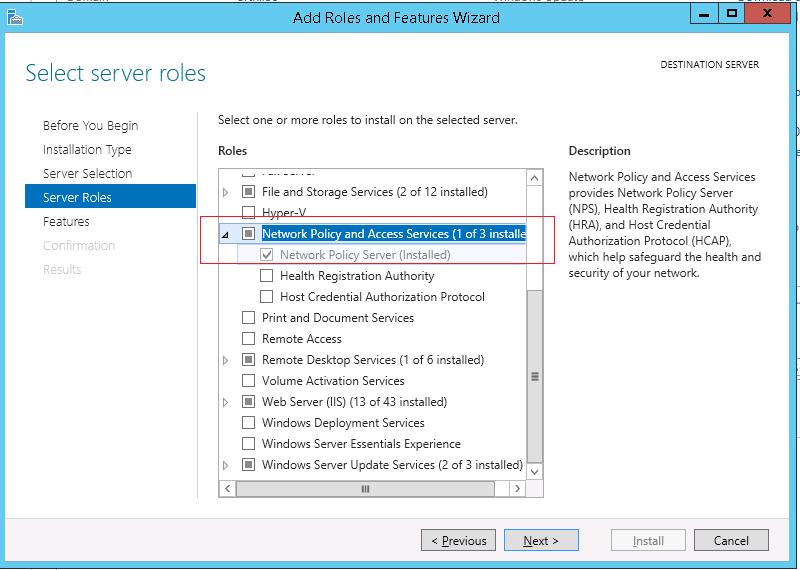
Получите доступ к экрану ролей сервера, выберите опцию Сетевой политики и службы доступа.
Нажмите на кнопку «Следующая».

На следующем экране нажмите на кнопку Добавить функции.

На экране службы ролей нажмите на кнопку Next Button.

На следующем экране нажмите на кнопку «Установка».

Вы закончили установку сервера Radius на Windows 2012.
Учебный Радиус Сервер — Активная интеграция каталога
Далее необходимо создать группу авторизованных пользователей для проверки подлинности с помощью Radius.
Группа RADIUS-USERS перечислит учетные записи пользователей, которые могут быть проверены на сервере Radius.
На контроллере домена откройте приложение под названием: Активные пользователи каталога и компьютеры
Создайте новую группу внутри контейнера пользователей.

Создайте новую группу под названием RADIUS-USERS.
Членам этой группы будет разрешено проверить подлинность на сервере Radius.

Мы также создадим 2 учетные записи пользователей для проверки нашей конфигурации.
Создайте новую учетную запись пользователя в контейнере пользователей.

Создание новой учетной записи пользователя под названием: VEGETA
Учетная запись пользователя Vegeta будет разрешена для проверки подлинности на сервере Radius.

Установите учетную запись пользователя Vegeta в качестве члена группы RADIUS-USERS.

Далее создайте новую учетную запись пользователя под названием: GOKU
Учетная запись пользователя Goku не будет членом группы RADIUS-USERS.
Учетная запись пользователя Goku не будет допущена к аутентификации на сервере Radius.

В нашем примере участникам RADIUS-USERS разрешается проверку подлинности на сервере Radius.
В нашем примере учетная запись пользователя Vegeta является членом группы RADIUS-USERS.
В нашем примере учетная запись пользователя Goku не является членом группы RADIUS-USERS.
Вы закончили необходимую конфигурацию Active Directory.
Учебный Радиус Сервер — Добавление клиентских устройств
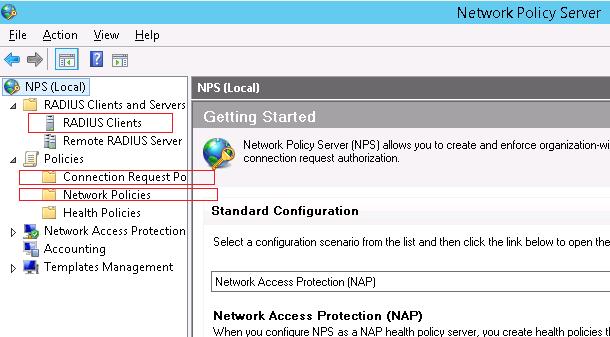
На сервере Radius откройте приложение под названием: Network Policy Server
Вам необходимо авторизовать сервер Radius в базе данных Active.
Нажмите на NPS (LOCAL) и выберите сервер Регистра в опции Active Directory.

На экране подтверждения нажмите на кнопку OK.
Далее необходимо настроить клиенты Radius.
Клиенты Radius являются устройствами, которым будет разрешено запрашивать аутентификацию с сервера Radius.
Важно! Не путайте клиентов Radius с пользователями Radius.
Нажмите на папку Radius Clients и выберите новый вариант.

Вот пример клиента, настроенного для подключения коммутатора Cisco к серверу Radius.
Необходимо установить следующую конфигурацию:
• Дружелюбное название устройства.
• IP-адрес устройства
• Общий секрет устройства.
Общий секрет будет использоваться для разрешения устройства на использование сервера Radius.
Добавьте еще одно клиентское устройство, установите IP-адрес вашего рабочего стола и общий секретный kamisma123.

Вы закончили конфигурацию клиента Radius.
Учебный Радиус сервера — Настройка сетевой политики
Теперь вам нужно создать политику сети, чтобы позволить аутентификацию.
Нажмите на папку «Сетевые политики» и выберите новый вариант.
Введите имя в сетевой политики и нажмите на кнопку Next.

Нажмите на кнопку «Добавить условие».
Мы позволим членам группы RADIUS-SERS проверить подлинность.

Выберите опцию группы пользователей и нажмите на кнопку Добавить.

Нажмите на кнопку «Добавить группы» и найдите группу RADIUS-USERS.

Выберите предоставленную опцию Доступа и нажмите на кнопку Next.
Это позволит членам группы RADIUS-USERS проверить подлинность на сервере Radius.

На экране «Методы аутентификации» выберите опцию Unencrypted authentication (PAP, SPAP).

Если представлено следующее предупреждение, нажмите на кнопку «Нет».

Проверьте резюме конфигурации сервера Radius и нажмите на кнопку Finish.

Поздравляю! Вы закончили конфигурацию сервера Radius.
Учебный радиус сервера — Тест на аутентификацию
Проверьте проверку подлинности радиуса на рабочем столе с помощью программного обеспечения NTRadPing.
Устройство под управлением программного обеспечения NTRadPing должно быть настроено как клиент Radius на сервере Radius.
Вот пример теста проверки подлинности Radius.

В нашем примере мы использовали наш рабочий стол в качестве клиентского устройства Radius.
В нашем примере учетная запись пользователя Vegeta смогла проверить подлинность на сервере Radius.

В нашем примере учетная запись пользователя Goku не смогла проверить подлинность на сервере Radius.
Учетная запись пользователя Goku не является членом группы RADIUS-USERS в Active Directory.
VirtualCoin CISSP, PMP, CCNP, MCSE, LPIC22020-12-26T17:12:01-03:00
Related Posts
Leave A Comment
You must be logged in to post a comment.
Page load link
Ok
Anytime there’s a discussion about a wired or wireless authentication, it’s probable that the word “RADIUS server” will come up sooner or later. RADIUS, also known as a “AAA server,” carries out the essential functions of Authentication, Accounting, and Authorization within a WPA-2 Enterprise network. As you might expect, Microsoft has improved its RADIUS server over time to meet the authentication needs of its vast customer base.
Just like Windows 2008 server, the 2012 edition has long been used by organizations across the globe until the latest versions in the form of 2016/2019/22 came into existence. Unlike its latest cloud counterparts, Windows 2012 servers are on-premise in nature and catch a great deal of attention from hackers.
Here’s a recent incident of an update causing authentication to fail, affecting primarily the on-premise setups. On-premise servers, however, are not the subject of our attention here; let’s get back to configuring the Windows 2012 server.
Before configuring the Windows Server 2012, ensure that you met the following requirements for successfully configuring the Windows 2012 server.
Prerequisites for Windows RADIUS Server 2012:
❖ System Requirements:
- Processor: You need a processor with at least 1.4 GHz for x64 processors. But Microsoft recommends using 2GHz for smooth functioning.
- RAM: The minimum requirement for RAM is 512 MB, but Microsoft recommends having at least 2GB of RAM.
- Disk space: You need a minimum disk space of 32 GB or more, but Microsoft usually recommends using 40 GB or more disk space. Also, the disk space requirements vary with the processor and RAM used in the system.
❖ Active Directory Setup:
You must update the Active Directory environment before adding the domain controller.
❖ Server Core Installation:
Unlike Windows Server 2008 version, the admin need not select the Full Installation or Server Core Installation option beforehand in Windows Server 2012.
These features are merged in the 2012 version to give three optional features which the admin can install or uninstall at his will.
❖ Miscellaneous Requirements:
- Ensure that your Windows Server 2012 kernel-mode drivers are up to date and digitally signed for x64-based operating systems.
- Turn off your antivirus software as the installation process can be hampered by virus protection software. For instance, checking each file that is copied locally to your computer might significantly slow down the installation.
- Ensure that the Windows Firewall is enabled by default.
- Ensure that all the relevant data and information are appropriately backed up before the configuration.
Overview of Windows RADIUS Server 2012 Configuration:
- Install and set up Windows Server 2012/Windows Server 2012 R2.
- Install Active Directory Domain Services (ADDS) to configure the new domain.
- Install Certificate Authorities (CA) with Active Directory Certificate Services (ADCS).
- Install NPS ( Network Policy Server).
- Configure Certificate Authorities (CA), i.e., Active Directory Certificate Services (ADCS) for Certificates.
- Configure NPS ( Network Policy Server) for the authentication protocol.
- Configure RADIUS.
- Define Network policies for users/devices.
- Configure Access Point.
- Set up zero clients, and select 802.1x authentication.
- Configure Wireless Connection Request.
Configure Windows 2012 RADIUS Server:
Now we will see each step involved in configuring Windows 2012 server in detail:
Install and Configure AD DS:
For configuring ADDS, follow the given instructions:
- Navigate to Windows Server 2012.
- Click Start.
- Click Server Manager.
- Navigate to Role Summary.
- Click Add Roles and Features.
- Select Role-based or Feature-based installation.
- Navigate to the Before You Begin page and click Next.
- Navigate to the Select Server Roles page.
- Select the Active Directory Domain Services.
- Click Next.
- Click Install on the Confirm Installation Selections
- Navigate to the Installation Results page and click Close.
- ADDS is installed.
Install AD CS and NPS :
- Navigate to Server Manager.
- Select Roles and Click Add Roles.
- Click Next on the Before you Begin page.
- Select Active Directory Certificate Services (AD CS) and Network Policy and Access Services.
- Click Next.
- Click Next on Network Policy and Access Services
- Navigate to Role Services and select Network Policy Server.
- Click Next.
- Select Create a self-signed certificate for SSL encryption and click Next.
- Click Next on the Introduction to Active Directory Certificate Services
- Select Certification Authority on the Select Role Services page and click Next.
- Select Enterprise on Specify Setup Page and Click Next.
- Select Root CA on Specify CA Type Page and Click Next.
- Select Create a new private key on the Set Up Private Key Page and Click Next.
- Click Next on Configure Cryptography for CA.
- Enter details on Configure CA Name page and click Next.
- Enter the validity period on the Set Validity Period page and click Next.
- Click Next on Configure Certificate Database
- Click Next on the Web Server (IIS).
- Click Next on the Select Role Services.
- Click Install on the Confirm Installation Selection
- Click Close.
Now the AD CS (Active Directory Certificate Services), Web Server (IIS), and NPS are installed successfully.
Configure NPS ( Network Policy Server) and RADIUS authentication.
- Click on the Start button and select Administrative tools.
- Click NPS on the Network Policy Server.
- Select Register Server in Active Directory and click OK.
- Click OK.
- On the NPS (Local) page, select RADIUS server for 802.1x Wireless or Wired Connections.
- Click Configure 802.1x.
- Select Secure Wireless connections on the Configure 802.1x page.
- Type Name and click Next.
- Add RADIUS clients on the Configure 802.1x page and click Next.
- Type the following details on the New RADIUS Client page.
- Name
- IP Address
- Shared Secret (Manual)
- Click OK and click Next.
- Select Microsoft Protected EAP (PEAP) on the Configure 802.1x
- Click Configure.
- Select Secured password on the Edit Protected EAP Properties page and click Edit.
- Enter the Number of authentication retries and click OK and click Next.
- Select Groups and click Next.
- Click Next again and click Finish.
- Restart NPS again.
Define Network Policies for users/devices.
You can follow the given steps for Defining the network policies.

- Navigate to the NPS console and click NPS (local).
- Click and expand Policies.
- Select Network Policies.
- Click New.
- Enter a Policy Name.
- Select the Type of Network Access Server to Unspecified while using Netscaler or RCdevs OpenLDAP while using OTP.
- Click Add in Specify Conditions
- Select Windows Groups and click Add.
- Click Add Groups and click OK.
- Select NAS Identifier in the Select Conditions
- Enter a Name and select Next to continue.
- Select Access Granted in Specify Access Permission
- Under Configure Authentication Method, select MS-CHAP v2 for maximum security.
- Click Next.
- Select RADIUS attributes as Standard in Configure Settings.
- Click Add.
- Enter the attribute value in String and click OK.
- Click Next and click Finish.
You can use the Network Policy Wizard to create and add new conditions, constraints, and setting to the network policies.
 Administrators can define and implement a wide range of policies using our Cloud RADIUS, including lookup policies applied at the moment of authentication. For instance, depending on the time of day, you can decide whether to accept or reject people and devices. You may also restrict access to devices running a specific operating system.
Set up Zero Clients, and Select 802.1x Authentication
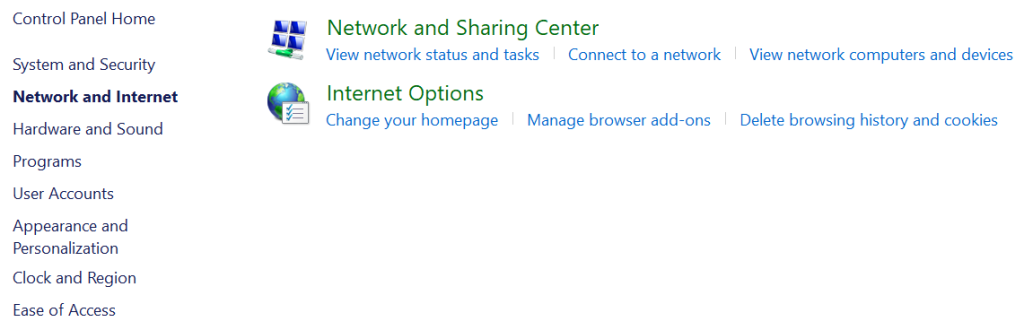
- Navigate to the Control panel and open the Network and Sharing center.
- Click Change adapter settings.
- Select Local Area Connection and click Properties.
- Select Authentication and click Enable IEEE 802.1x authentication.
- Select the desired protocol in the dropdown button.

Configure Wireless Connection Request
- Navigate to the Control panel and open the Network and Sharing center.
- Click Manage Wireless Networks.
- Select Manually Create a network profile.
- Enter your SSID in Network Name and click Next.
- Click Change Connection settings.
- Select Security and click Settings.
- Select the Trusted Root CA and click OK.
- Navigate to Advanced Settings.
- Select Specify Authentication Mode and click OK.
Is On-Premise Windows RADIUS a Good Idea?
Traditional RADIUS servers located on a company’s premises are prone to many security issues. Windows RADIUS servers—which are extensively used in on-premise infrastructure—are typically built around NPS and have a number of vulnerabilities that hackers routinely employ in zero-day attacks.
Also, because of its physical accessibility, an NPS server’s on-premise presence makes it vulnerable to various physical security threats, from intruders to disasters – or just power outages. Given the costs of maintaining highly-secure physical locations, there’s rarely a circumstance in which on-prem works out to be cheaper than cloud RADIUS.
Cloud integration of NPS, designed primarily for on-premise AD setups, has significant downsides even with other Microsoft-owned cloud-based solutions like Azure AD. If you want to use Azure with NPS, you will require a separate authentication server or proxy to simplify the process. These operations are not only challenging and time-consuming but also relatively expensive.
Cloud RADIUS: The Most Reliable RADIUS Server for Windows

Network administrators have relied on Windows Server 2012 edition for years, but it has seen most of the Microsoft ecosystem change since that time. It is difficult to overlook its flaws, which are more of a security liability than a strength in the present era.
The move to the cloud offers several benefits over remaining in an on-premises environment, and what could be better than utilizing our ground-breaking Cloud RADIUS? You can nearly wholly avoid these limitations by using a cloud-based server like Cloud RADIUS supported by SecureW2.
With our Cloud RADIUS’ advanced Policy Engine feature, you may restrict or enable user access depending on any number of attributes, including user/device characteristics, date/time of day, and more. Additionally, you may use our Cloud RADIUS with any IDP because it is built for vendor neutrality.
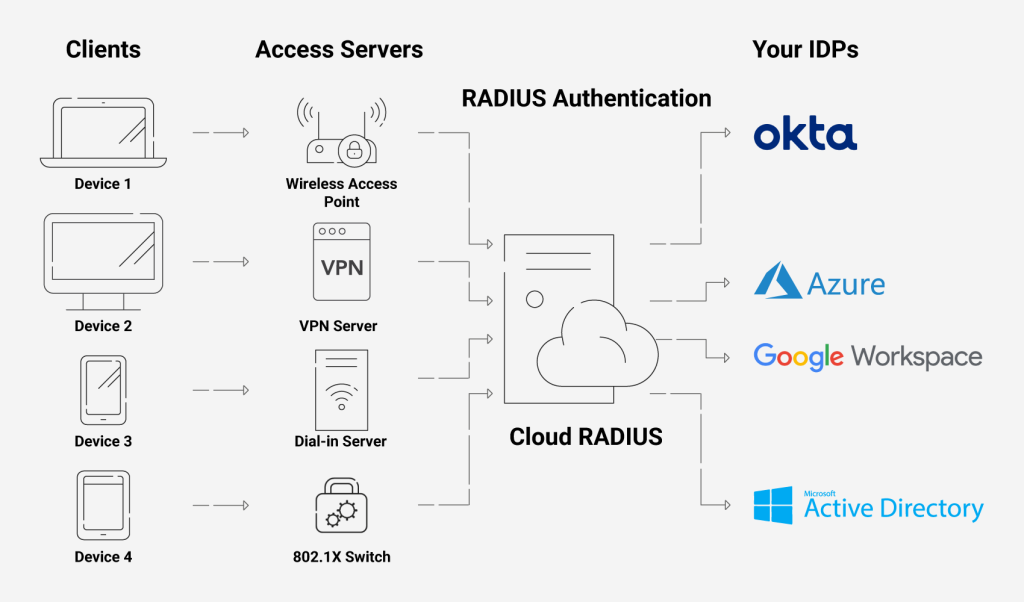
Using its servers, you may also enforce policies using real-time user lookups against Azure, Okta, and Google Workspace. You can also onboard users to Cloud RADIUS using their existing AD identities without the need to create an LDAP proxy.
Also, integrating with Securew2 gives you more customization for many innovative features like Azure MFA auth, Intune auto revocation, windows hello for business login, and many more. Our RADIUS services can be set up quickly, cost a fraction of what on-prem solutions do, and has no infrastructure costs because it is all in the cloud.
If you are interested in taking that first step towards security for your organization, look no further and click here to inquire about pricing.
Table of Contents
1
Configuring a RADIUS (Remote Authentication Dial-In User Service) server on Windows Server 2012 is an important task that network administrators need to do. This service is commonly used for network security, where it is responsible for authenticating and authorizing users who want to access network resources.
A RADIUS server is typically used in environments where there is a large number of users who require network access. By implementing a RADIUS server, network administrators can allow or deny access to specific resources based on certain criteria, such as user identity, time of day, and location.
In this blog post, we will explore the steps required to configure a RADIUS server on Windows Server 2012, the tools and software that we need, and the different methods we can use to achieve this goal.
Video Tutorial:
What’s Needed
Before we begin, we need to make sure we have the following tools and software installed on our Windows Server 2012 machine:
- Windows Server 2012
- Active Directory Domain Services
- Network Policy and Access Services Role
- Remote Authentication Dial-In User Service (RADIUS) Server Role
What Requires Your Focus?
To configure RADIUS server on Windows Server 2012, the following steps require your focus:
- Installing Remote Authentication Dial-In User Service (RADIUS) Server Role
- Configure Network Policy and Access Services Role
- Configure the RADIUS server
Different Methods to Configure Radius Server on Windows Server 2012
Method 1: Via Server Manager
To configure RADIUS server on Windows Server 2012 via Server Manager, follow the steps below:
- Log in to the Windows Server 2012 machine with administrative rights.
- Launch Server Manager from the taskbar or Start Menu.
- Click on Add Roles and Features in the main dashboard.
- Click Next to skip the Before You Begin page.
- Select Role-based or feature-based installation and click Next.
- Select the target server on which you want to install the RADIUS server and click Next.
- Select the Network Policy and Access Services role and click Next.
- Select the Remote Authentication Dial-In User Service (RADIUS) Server role and click Next.
- Click Install to start the installation process.
Pros:
- Easier to use than other methods
- Requires less technical knowledge
Cons:
- Does not provide a granular level of control
- May not be suitable for large, complex environments
Method 2: Via PowerShell
To configure RADIUS server on Windows Server 2012 via PowerShell, follow the steps below:
- Log in to the Windows Server 2012 machine with administrative rights.
- Launch PowerShell as an Administrator.
- Type the following command and press Enter:
Install-WindowsFeature NPAS - Type the following command and press Enter:
Add-WindowsFeature RemoteAccess - Type the following command and press Enter:
Add-Role -Name NetworkPolicyAndAccessServices -IncludeManagementTools - Type the following command and press Enter:
Add-WindowsFeature NPAS-RADIUS - Type the following command and press Enter:
Install-RemoteAccess
Pros:
- Gives greater control and flexibility than other methods
- Allows for detailed configuration options
Cons:
- Requires a higher level of technical knowledge
- Potentially more time-consuming
Method 3: Via Remote Server Administration Tools
To configure RADIUS server on Windows Server 2012 via Remote Server Administration Tools, follow the steps below:
- Download and install Remote Server Administration Tools on your local machine.
- Log in to the Windows Server 2012 machine with administrative rights.
- Launch the Remote Server Administration Tools you installed.
- Click on Tools and select Remote Access Management.
- Click on DirectAccess and VPN.
- Click on Run the Getting Started Wizard.
- Follow the wizard to configure the RADIUS server.
Pros:
- Allows for remote configuration of RADIUS server
- Can be more convenient than other methods
Cons:
- Requires additional software installation on the client machine
- May require additional setup for remote access to the server
1. I can’t install the Remote Authentication Dial-In User Service (RADIUS) Server role.
A: This issue may be caused by a conflict with other installed software or a problem with the installation files. Try uninstalling other conflicting software and reinstalling the RADIUS server role.
2. I can’t authenticate users with the RADIUS server.
A: This issue may be caused by incorrect server configurations or issues with the user’s network connection. Check the server settings and network connectivity of the user’s device to troubleshoot the issue.
3. I can’t access the RADIUS server remotely.
A: This issue may be caused by a firewall setting or network configuration issue. Check the firewall settings and network connectivity to ensure that the server is accessible from your device.
Implications and Recommendations
Configuring a RADIUS server on Windows Server 2012 is an important step that network administrators need to take to ensure the security of their network resources. By implementing a RADIUS server, administrators can limit user access based on certain criteria, such as user identity, location, and time of day.
One recommendation for administrators is to use a combination of the methods outlined in this blog post to achieve granular control and flexibility in their RADIUS server configuration. Administrators should also ensure that they keep their RADIUS server up-to-date with the latest security patches and updates to ensure the continued security of their network.
5 FAQs about Configuring RADIUS Server on Windows Server 2012
Q1: Can I use RADIUS server for VPN authentication?
A: Yes, RADIUS server can be used for VPN authentication.
Q2: How do I check if RADIUS server is working?
A: You can check the RADIUS server logs or use a RADIUS client tool to check if the server is responding.
Q3: Can I use RADIUS server for Wi-Fi authentication?
A: Yes, RADIUS server can be used for Wi-Fi authentication.
Q4: Can I configure RADIUS server without Active Directory?
A: No, RADIUS server requires Active Directory for user authentication.
Q5: Is it possible to configure RADIUS server on Windows Server 2019?
A: Yes, RADIUS server can be configured on Windows Server 2019.
In Conclusion
Configuring RADIUS server on Windows Server 2012 is an essential task for network administrators looking to secure their network resources. By using one of the methods outlined in this blog post, administrators can implement granular control and flexibility in their RADIUS server configuration. It’s important to keep in mind the potential issues outlined in this post and to keep the server up-to-date with the latest security patches and updates to ensure network security.
При обслуживании больших сетей системные администраторы часто сталкиваются с проблемами аутентификации на сетевом оборудовании. В частности, довольно сложно организовать нормальную работу нескольких сетевых администраторов под индивидуальными учетными записями на большом количестве оборудования (приходится вести и поддерживать в актуальном состоянии базу локальных учетных записей на каждом устройстве). Логичным решение было бы использовать для авторизации уже существующей базы учетных записей — Active Directory. В этой статье мы разберемся, как настроить доменную (Active Directory) аутентификацию на активном сетевом оборудовании (коммутаторы, маршрутизаторы).
Не все сетевое оборудование популярных вендоров (CISCO, HP, Huawei) поддерживает функционал для непосредственного обращения к каталогу LDAP, и такое решение не будет универсальным. Для решения нашей задачи подойдет протокол AAA (Authentication Authorization and Accounting), фактически ставший стандартом де-факто для сетевого оборудования. Клиент AAA (сетевое устройство) отправляет данные авторизующегося пользователя на сервер RADIUS и на основе его ответа принимает решение о предоставлении / отказе доступа.
Протокол Remote Authentication Dial In User Service (RADIUS) в Windows Server 2012 R2 включен в роль NPS (Network Policy Server). В первой части статьи мы установим и настроим роль Network Policy Server, а во второй покажем типовые конфигурации сетевого устройств с поддержкой RADUIS на примере коммутаторов HP Procurve и оборудования Cisco.
Содержание:
- Установка и настройка сервера с ролью Network Policy Server
- Настройка сетевого оборудования для работы с сервером RADUIS
Установка и настройка сервера с ролью Network Policy Server
Как правило, сервер с ролью NPS рекомендуется устанавливать на выделенном сервере (не рекомендуется размещать эту роль на контроллере домена). В данном примере роль NPS мы будем устанавливать на сервере с Windows Server 2012 R2.
Откройте консоль Server Manager и установите роль Network Policy Server (находится в разделе Network Policy and Access Services).
 После окончания установки запустите mmc-консоль управления Network Policy Server. Нас интересуют три следующих раздела консоли:
- RADIUS Clients — содержит список устройств, которые могут аутентифицироваться на сервере
- Connection Request Policies – определяет типы устройств, которые могут аутентифицироваться
- Network Polices – правила аутентификации
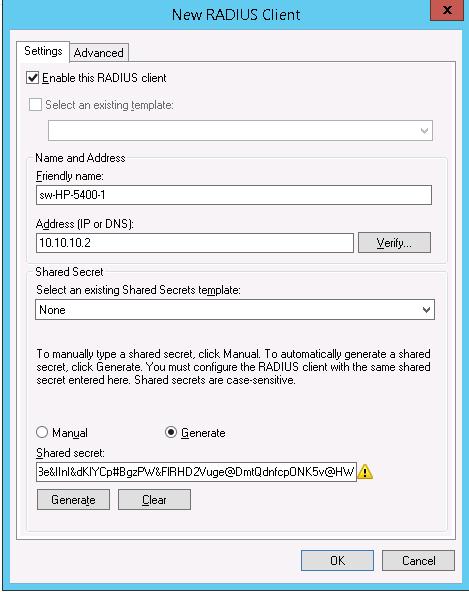
 Добавим нового клиента RADIUS (это будет коммутатор HP ProCurve Switch 5400zl), щелкнув ПКМ по разделу RADIUS Clients и выбрав New. Укажем:
- Friendly Name:sw-HP-5400-1
- Address (IP or DNS): 10.10.10.2
- Shared secret (пароль/секретный ключ): пароль можно указать вручную (он должен быть достаточно сложным), либо сгенерировать с помощью специальной кнопки (сгенерированный пароль необходимо скопировать, т.к. в дальнейшем его придется указать на сетевом устройстве).
 Отключим стандартную политику (Use Windows authentication for all users) в разделе Connection Request Policies, щелкнув по ней ПКМ и выбрав Disable.
Создадим новую политику с именем Network-Switches-AAA и нажимаем далее. В разделе Сondition создадим новое условие. Ищем раздел RADIUS Client Properites и выбираем Client Friendly Name.
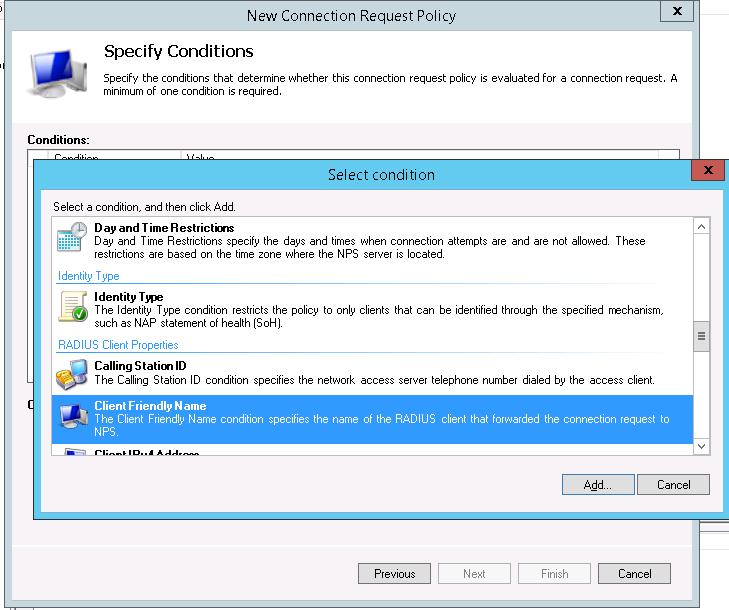 В качестве значения укажем sw-?. Т.е. условие будет применяться для всех клиентов RADIUS, начинающийся с символов :”sw-“. Жмем Next->Next-> Next, соглашаясь со всеми стандартными настройками.
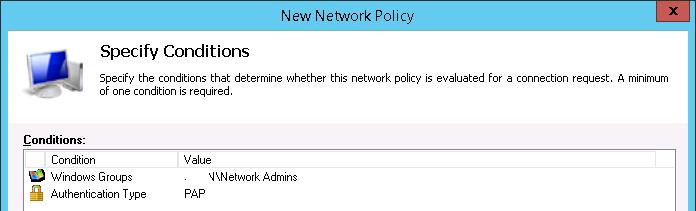
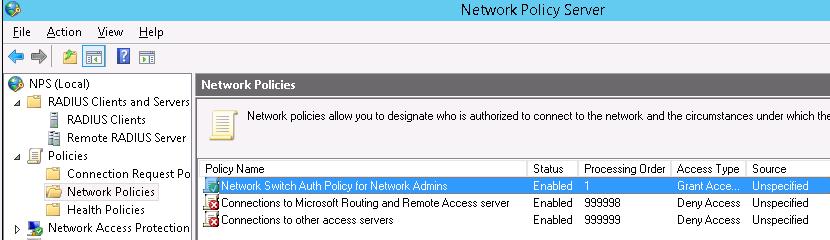
Далее в разделе Network Policies создадим новую политику аутентификации. Укажите ее имя, например Network Switch Auth Policy for Network Admins. Создадим два условия: в первом условии Windows Groups, укажем доменную группу, члены которой могут аутентифицироваться (учетные записи сетевых администраторов в нашем примере включены в группу AD Network Admins) Второе условие Authentication Type, выбрав в качестве протокола аутентификации PAP.
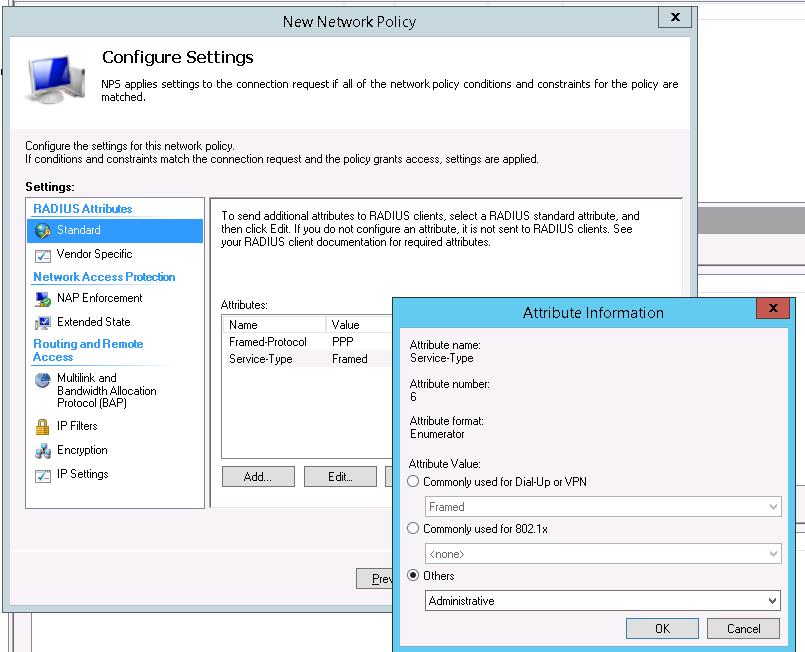
 Далее в окне Configure Authentication Methods снимаем галки со всех типов аутентификации, кроме Unencrypted authentication (PAP. SPAP).
В окне Configure Settings изменим значение атрибута Service-Type на Administrative.
 В остальных случаях соглашаемся со стандартными настройками и завершаем работу с мастером.
И, напоследок, переместим новую политику на первое место в списке политик.
Настройка сетевого оборудования для работы с сервером RADUIS
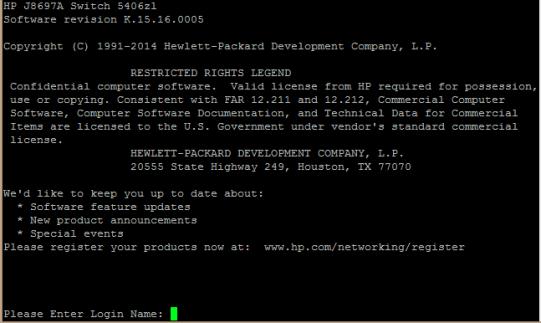
Осталось настроить наше сетевое оборудование для работы с сервером Radius. Подключимся к нашему коммутатору HP ProCurve Switch 5400 и внесем следующе изменение в его конфигурацию (измените ip адрес сервера Raduis и пароль на свои).
aaa authentication console enable radius local

aaa authentication telnet login radius local

 aaa authentication telnet enable radius local

aaa authentication ssh login radius local

aaa authentication ssh enable radius local

aaa authentication login privilege-mode

radius-server key YOUR-SECRET-KEY

radius-server host 10.10.10.44 YOUR-SECRET-KEY auth-port 1645 acct-port 1646

radius-server host 10.10.10.44 auth-port 1645

radius-server host 10.10.10.44 acct-port 1646
Совет. Если в целях безопасности вы запретили подключаться к сетевому оборудованию через telnet, эти строки нужно удалить из конфига:
aaa authentication telnet login radius local

aaa authentication telnet enable radius local
Не закрывая консольное окно коммутатора (это важно!, иначе, если что-то пойдет не так, вы более не сможете подключиться к своему коммутатору), откройте вторую telnet-сессию. Должно появиться новое окно авторизации, в котором будет предложено указать имя и пароль учетной записи. Попробуйте указать данные своей учетной записи в AD (она должна входить в группу Network Admins ). Если подключение установлено – вы все сделали правильно!
 Для коммутатора Cisco конфигурация, предполагающая использование доменных учетных записей для аутентификации и авторизации, может выглядеть так:
Примечание. В зависимости от модели сетевого оборудования Cisco и версии IOS конфигурация может несколько отличаться.
aaa new-model
radius-server host 10.10.10.44 auth-port 1645 acct-port 1646 key YOUR-SECRET-KEY
aaa authentication login default group radius local
aaa authorization exec default group radius local
ip radius source-interface Vlan421
line con 0
line vty 0 4
line vty 5 15
Примечание. В такой конфигурации для аутентификации сначала используется сервер RADIUS, а если он не доступен – локальная учетная запись.
Для Cisco ASA конфигурация будет выглядеть так:
aaa-server RADIUS protocol radius
aaa-server RADIUS host 10.10.10.44 key YOUR-SECRET-KEY
radius-common-pw YOUR-SECRET-KEY
aaa authentication telnet console RADIUS LOCAL
aaa authentication ssh console RADIUS LOCAL
aaa authentication http console RADIUS LOCAL
aaa authentication http console RADIUS LOCAL
Совет. Если что то-не работает, проверьте:
- Совпадают ли секретные ключи на сервере NPS и коммутаторе (для теста можно использоваться простой пароль).
- Указан ли правильный адрес NPS сервера в конфигурации. Пингуется ли он?
- Не блокируют ли межсетевые экраны порты 1645 и 1646 между коммутатором и сервером?
- Внимательно изучите логи NPS сервера
Setting up a Radius Server on Windows Server 2012 involves a few steps. Firstly, we need to install the Network Policy and Access Services (NPAS) feature on the server through the Server Manager. After installation, configure the Connection Request Policies and Network Policies to allow access to the server. Then, we need to configure the Radius client, which can be done through the Remote Access Management Console. Finally, we can test the setup by attempting to connect to the network using the credentials configured on the Radius Server. It’s essential to follow the correct steps and configurations to ensure that the Radius Server works correctly. There are several guides available online for in-depth, step-by-step instructions on how to set up a Radius Server on Windows Server 2012.
Video Tutorial:How to setup a RADIUS server in Windows 2012?
Setting up RADIUS on a Windows server involves several steps. First, you need to install the Network Policy Server (NPS) role on the Windows server and configure it to act as a RADIUS server. Next, you must create a RADIUS client on your network device, such as a router or firewall, to communicate with the RADIUS server. Once the RADIUS client is configured, you can create a network policy on the RADIUS server that defines the access rights for users or groups. Finally, you need to configure the RADIUS client to use the RADIUS server for authentication and authorization.
It’s important to note that proper planning and security measures should be in place before implementing RADIUS, as it involves managing user credentials and network access. It’s also recommended to use secure authentication protocols such as MS-CHAPv2 or EAP-TLS to ensure the confidentiality and integrity of user credentials.
Does Windows have a RADIUS server?
Yes, Windows Server includes a built-in RADIUS server called Network Policy Server (NPS). NPS allows for centralized authentication and authorization for network access and is commonly used in enterprise environments. Additionally, there are third-party RADIUS servers available for Windows, such as FreeRADIUS.
How to configure application server in Windows 2012 R2?
To configure an application server in Windows 2012 R2, you need to follow the steps below:
1. Open the Server Manager and click on the Manage menu, select the Add Roles and Features Wizard.
2. On the Before you begin screen, click Next.
3. On the Select installation type screen, select Role-based or feature-based installation, then click Next.
4. On the Select destination server screen, choose a server from the pool, then click Next.
5. On the Select server roles screen, choose the Application Server role, then click Next.
6. On the Select features screen, choose the features you want to include in your application server installation, then click Next.
7. On the Confirm installation selections screen, check the installation summary, and click Install.
8. Once the installation is complete, configure the installed role and feature settings as needed.
After configuring the application server, you can install and configure your desired applications. It is recommended to review the documentation for each application to ensure that all necessary steps are taken to properly configure the application server.
How to configure Radius server in Active Directory?
Configuring a RADIUS server in Active Directory involves a few essential steps. First, the RADIUS server needs to be added as a client in Active Directory, and then a Network Policy Server (NPS) role needs to be installed on the server. After that, the RADIUS server needs to be configured with the appropriate settings to communicate with the NPS server.
To add a RADIUS client, you need to open the NPS console, right-click on «RADIUS Clients,» and then choose «New.» Enter the IP address of the RADIUS server and a shared secret password to be used between the RADIUS server and NPS server. This shared secret password must match exactly on both servers.
Next, install the NPS role on the RADIUS server by following the instructions provided by Microsoft. After the NPS role is installed, configure the server to communicate with the Active Directory domain controller by selecting «Network Policy and Access Services» in the Server Manager console, then choosing «NPS» and «NPS (Local)«.
Finally, configure the RADIUS server to use the NPS server for authentication by selecting «RADIUS Clients» in the NPS console, then right-clicking on the server, and choosing «Properties.» Under the «Authentication/Accounting» tab, select «Use Windows authentication for all users.«
Following these steps will configure the RADIUS server in Active Directory, allowing it to authenticate network users against the Active Directory database.
Does RADIUS talk to Active Directory?
Yes, RADIUS (Remote Authentication Dial-In User Service) can talk to Active Directory. RADIUS is a networking protocol that provides centralized authentication, authorization, and accounting (AAA) management for users who connect and use a network service. Active Directory, on the other hand, is Microsoft’s directory service that provides a centralized database to manage users, computers, and other objects in a network environment. By integrating RADIUS with Active Directory, network administrators can manage user authentication and authorization for network devices and services using the same user accounts stored in Active Directory. This integration also allows for more streamlined management of user accounts, policies, and permissions across the network.
How to configure Active Directory as RADIUS server?
Configuring Active Directory as a RADIUS server involves multiple steps. First, you need to install the Network Policy and Access Services role on the Windows Server that hosts the Active Directory. Next, you need to configure the Remote Authentication Dial-In User Service (RADIUS) client to communicate with the RADIUS server. Then, you need to configure the RADIUS server to use the Active Directory as its authentication source. This involves creating a Network Policy Server (NPS) template, configuring RADIUS clients, and configuring the authentication methods used by the NPS policies. Finally, you need to test the configuration to ensure that everything is working correctly. It’s important to follow best practices and security guidelines when configuring Active Directory as a RADIUS server to ensure the integrity and security of your network.