Встроенная утилита Diskpart — эффективное средство для исправления логических ошибок и восстановления жестких дисков, флешек и других запоминающих устройств.

Содержание
- Начало работы с Diskpart
- Как создать разделы и отформатировать стертый диск?
- Как удалить защищенный, активный и системный разделы жесткого диска?
- Удаление через командную строку в работающей ОС
- Удаление любых разделов
- Что делать если пропали важные данные?
Некорректная работа накопителей, неправильное отображение размера в проводнике, невозможность форматирования и другие неполадки – все эти проблемы значительно затрудняют использование флешек и жестких дисков, поэтому при обнаружении вышеуказанных неполадок следует сразу прибегнуть к их устранению.
Важно! Перед началом работы, следует позаботиться о сохранности информации на проблемном накопителе, поскольку для исправления проблемных дисков потребуется полное стирание, а также удаление таблицы разделов, что непременно приведет к удалению всей информации.
Начало работы с Diskpart
Для начала следует подключить проблемную флешку к компьютеру или точно определить необходимый накопитель. Это нужно для того, чтобы случайно не стереть нормально работающий диск с важной информацией. В нашем случае проблемным диском будет выступать флешка объемом 14.4 гигабайт.

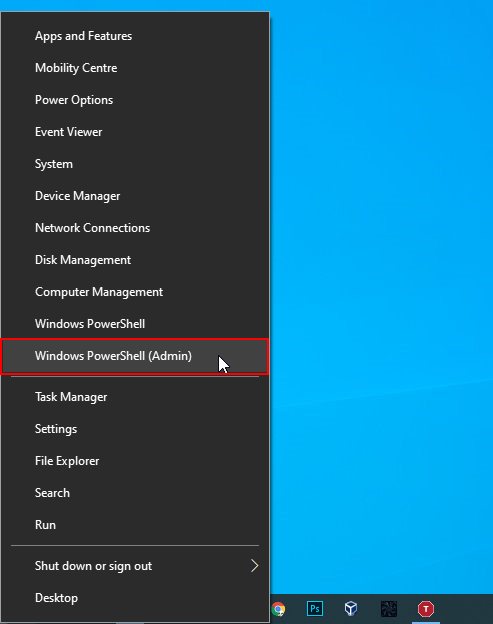
После этого следует запустить командную строку или Windows PowerShell с правами администратора. Это можно сделать, нажав правой кнопкой мыши по «Пуск» и выбрав соответствующий пункт (командная строка(администратор) или Windows PowerShell(администратор)).

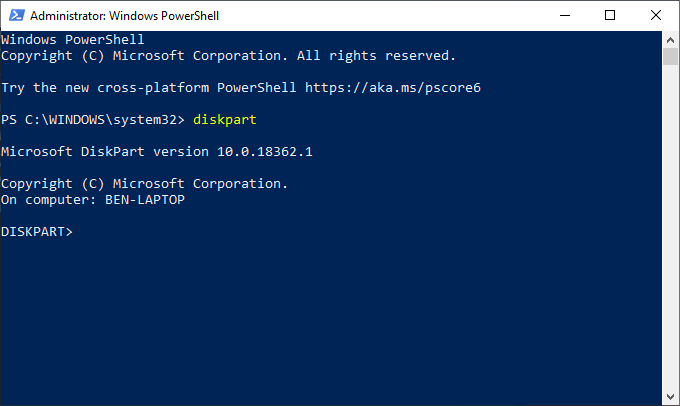
В открывшемся окне командной строки следует ввести команду «Diskpart» и нажать Enter (кнопка Enter подтверждает команды, поэтому её следует нажимать после каждой новой команды) для начала работы с утилитой.

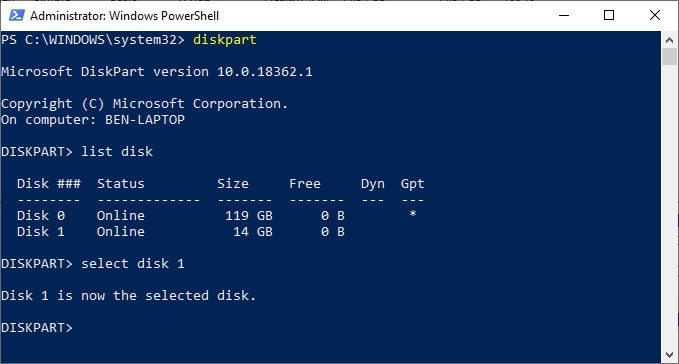
Теперь необходимо точно определить проблемный диск в утилите. Для этого нужно ввести команду «list disk», отображающую весь список подключенных носителей.

Как видно из скриншота, утилита определила два диска: Диск 0 размером 111 гигабайт и диск 1 размером 14 гигабайт. Поскольку системный диск с большим размером работает нормально, а проблемы имеются именно с USB-флешкой объемом 14 гигабайт, запоминаем что в Diskpart она носит название «Диск 1».
Важно! В данном пункте следует точно определить необходимый диск, чтобы не удалить всю информацию с системного накопителя.
Выбираем проблемный накопитель командой «select disk 1» (если у пользователя установлены дополнительные диски, после команды select disk следует ввести число, соответствующее проблемному носителю).
![]()
Следующий шаг является финальным, поэтому рекомендуем еще раз перепроверить правильность выбранного диска. После выполнения команды все данные будут стерты. Для выполнения стирания выбранного диска, вводим команду «Clean» и подтверждаем Enter.

После стирания диска, Diskpart выдаст сообщение «Очистка диска выполнена успешно». После этого можно закрыть окно «Windows PowerShell».
Стоит отметить, что для нормальной работы стертого диска, на нем необходимо создать разделы и провести форматирование.
Как создать разделы и отформатировать стертый диск?
Стертый диск нуждается в создании на нем разделов и форматировании в нужной файловой системе. Для этого необходимо выполнить следующее:
Открываем меню «Управление дисками», нажав ПКМ по кнопке «Пуск» и выбрав соответствующий пункт.

В открывшемся окне находим стертый диск. Как правило, он не имеет буквы или вовсе не отображается в меню, но его можно обнаружить как нераспределенную область в нижней части окна. Нажимаем ПКМ по блоку область не распределена и выбираем первый пункт «Создать простой том».

В открывшихся окнах следует выбрать букву, а также файловую систему и размер диска. По умолчанию система сама выбирает максимальный размер, букву, а также файловую систему NTFS, поэтому в данном пункте можно просто нажимать «Далее».

Как удалить защищенный, активный и системный разделы жесткого диска?
Для удаления разделов жесткого диска можно воспользоваться функционалом встроенной утилиты «Управление дисками», где для удаления следует просто нажать по необходимому разделу правой кнопкой мыши и выбрать пункт «Удалить том…».

В некоторых случаях это может не сработать, поскольку:
- Логический диск имеет поврежденную файловую систему (можно исправить проверкой Chkdsk).
- На нем присутствуют сбойные сектора и бед блоки (решить проблему можно при помощи проверки бесплатной программой Victoria).
- Логический диск защищен от удаления (от удаления защищены системные разделы, скрытые и служебные разделы и т.д.).
Тем не менее существует несколько способов позволяющих удалить абсолютно любой раздел.
Удаление через командную строку в работающей ОС
Для удаления ненужных защищенных разделов в работающей Windows можно воспользоваться командой строкой и встроенной утилитой Diskpart. Данный способ позволит удалить все проблемные разделы, кроме системных и служебных.
Для этого:
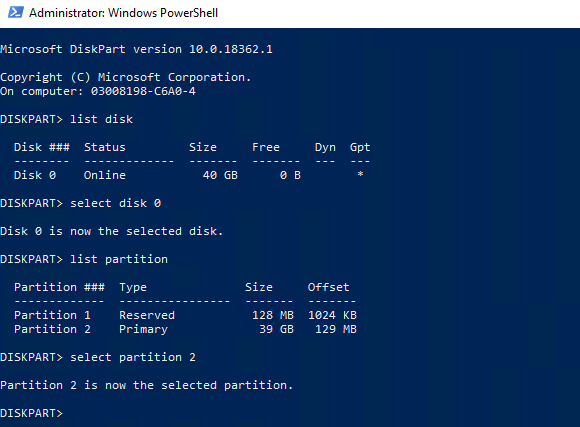
Шаг 1. Открываем командную строку от имени администратора и вводим поочередно команды: diskpart, list disk, select disk 0 (в нашем случае раздел расположен на диске 0), list part (команда открывает список разделов на диске).
Шаг 2. Выбираем необходимый раздел командой select partition 4, после этого вводим команду delete partition для удаления раздела.
Шаг 3. Финальным этапом станет создание нового раздела и его форматирование. Вводим поочередно: create partition primary, format fs=ntfs quick, assign letter Z (команда присваивает букву созданному разделу) и exit.
После выполнения данных действий, раннее заблокированный раздел будет готов к использованию, удалению и другим манипуляциям в меню «Управление дисками».
Удаление любых разделов
Чтобы провести удаление системных, зарезервированных и скрытых разделов, пользователю понадобиться загрузочная флешка или установочный диск. Загружаемся с них и в меню выбора языка нажимаем сочетание клавиш Shift+F10 для открытия командной строки.

В командной строке, аналогично с предыдущим способом, вводим команды: diskpart, list disk, select disk 0, lis part, select partition 2 (или любой другой раздел, который невозможно удалить) и удаляем его командой del par override.
Стоит отметить, что команда del par override удаляет абсолютно любой раздел, независимо от его атрибутов.
Важно! Удаление некоторых разделов диска может повлиять на его работу, поэтому мы настоятельно не рекомендуем прибегать к удалению защищенных разделов.
Что делать если пропали важные данные?
Зачастую при манипуляциях с накопителем через командную строку пользователи случайно форматируют не тот накопитель или совершают действия, из-за которых теряются ценные данные.
Кроме того, нередки случаи, когда производится очистка и форматирование диска и при этом не все важные данные сохранены в безопасном месте.
Так или иначе все эти действия ведут к потере важной информации, что в свою очередь может грозить даже финансовыми потерями, так как с каждым годом стоимость данных становится все выше.
Если любая из этих ситуаций случилась с вами, и вы потеряли важны файлы – не спешите отчаиваться.
Лучше сразу же воспользуйтесь программой RS Partition Recovery – профессиональным инструментом для восстановления утерянных данных.
Программа очень удобна в использовании, что заметно выделяет ее среди конкурентов, и позволяет восстановить утерянный файл практически в несколько кликов мышки.
Но самое главное – это то, что RS Partition Recovery поддерживает ВСЕ современные файловые системы. Благодаря этому не имеют значения тип устройства (компьютер, сервер, смартфон) или тип файловой системы – вы все равно сможете восстановить важную информацию.

Плюс еще одной очень полезной функцией RS Partition Recovery является режим глубокого сканирования накопителя. Благодаря ему вы сможете восстановить даже файлы, утерянные несколько месяцев тому назад.
Часто задаваемые вопросы
Diskpart это системная утилита Windows, которая предназначена для работы с дисками, подключенными непосредственно к компьютеру. Программа не имеет графического интерфейса и все манипуляции производятся при помощи командной строки или Windows PowerShell.
Чтобы удалить любой раздел с диска загрузитесь с загрузочного диска/флэшки и запустите командную строку. Затем по очереди выполните несколько команд (нажимая после каждой «Enter»): «diskpart», «list disk», «select disk 0», «list part», «select partition 2» (где «2» — это номер удаляемого раздела), «del par override». Больше деталей вы можете найти на нашем сайте.
RS Partition Recovery создана как раз для таких случаев и позволяет восстанавливать данные, которые были утеряны вследствие случайного форматирования раздела или диска, случайного удаления, повреждения файловой структуры диска и во многих других случаях.
Обычно такие разделы созданы специально. К примеру, Windows 10 создает дополнительный скрытый раздел размером 100 Мб, в котором хранится Recovery меню и другие дополнительные данные. Удаление таких разделов может нарушить работоспособность всей операционной системы.
Запустите командную строку и выполните несколько простых команд, нажимая после каждой «Enter»: «diskpart», «list disk», «select disk 0» (где «0» — это номер нужного диска), «select partition 1» («1» — это номер форматируемого раздела), «format fs=ntfs quick» Больше информации вы найдете на нашем сайте.
Управлять разделами на дисках с помощью утилиты управления дисками в Windows 7, 8 и Windows 10 не всегда не представляется возможным. По этому может помочь управление дисками встроенной утилитой diskpart.
Встроенная утилита diskpart
DiskPart -позволяет управлять дисками компьютера. Точнее дисками, разделами, томами или виртуальными жесткими дисками через командную строку. Чтобы использовать эту команду, просто открываем окно командной строки и введите команду DiskPart.exe . После чего попадем в командную оболочку Diskpart. Отсюда можно запускать различные команды для управления дисковой подсистемы.
И всё же DiskPart не простая утилита, запускаемая командной строкой с параметрами. Это скорее консольный интерпретатор команд со своей командной строкой и набором внутренних команд. DiskPart работает с физическими жесткими дисками, установленными в компьютере. CD/DVD-приводы, съемные носители или подключаемые к USB-портам. Карты флэш-памяти не поддерживаются
Управление дисками утилитой diskpart.
Обязательно
Для запуска DiskPart необходимо быть членом локальной группы администраторов или группы с аналогичными разрешениям
Список доступных объектов
отображает все диски на компьютере
отображает все тома на компьютере
отображает разделы на диске, на котором находится фокус на компьютере
отображает все виртуальные диски на компьютере
Cинтаксис команды
Команда Diskpart состоит из глагола и существительного. Глагол говорит какие действия нужно выполнить, а существительное указывает объект, с которым нужно выполнить действие. Одним из простейших примеров команд Diskpart является команда List Disk. В этом примере List — глагол, а Disk -это существительное. После ввода этой команды, Windows отобразит список всех физических дисков.
Управление дисками утилитой diskpart
Доступные команды diskpart
Отображает список доступных команд или подробные справочные сведения об указанной команде.
Помечает раздел диска как активный.
Зеркально отображает простой том с фокусом на указанный диск.
Назначает букву диска или точку подключения тому, имеющему фокус.
Отображает, устанавливает или очищает атрибуты диска или тома.
Включает или отключает функцию автоматического подключения.
Разбивает зеркальный том с фокусом на два простых тома.
Удаляет все разделы или форматирование тома с диска, на котором находится фокус.
Уменьшает физический размер динамически расширяемого файла виртуального жесткого диска (VHD).
Преобразует тома FAT и FAT32 в файловую систему NTFS, не затрагивая существующие файлы и каталоги.
Доступные команды diskpart
Создает раздел на диске, том на одном или нескольких дисках или виртуальный жесткий диск (VHD).
Останавливает отображение выбранного виртуального жесткого диска (VHD) в качестве локального жесткого диска на главном компьютере.
Отображает сведения о выбранном диске, разделе, томе или виртуальном жестком диске (VHD).
Доступные команды diskpart
Выход из интерпретатора команд DiskPart.
Расширение тома или раздела с фокусом, а также его файловой системы на свободное (нераспределенное) пространство на диске.
Расширение виртуального жесткого диска (VHD) до указанного размера.
Отображает сведения о текущей файловой системе тома, имеющего фокус, и перечисляет файловые системы, поддерживаемые для форматирования тома.
форматирует диск для приема файлов Windows.
Доступные команды diskpart
Присваивает разделу GPT-атрибуты раздела, в котором основное внимание уделяется базовым дискам таблицы разделов GPT.
Импортирует группу внешних дисков в группу дисков локального компьютера.
Помечает системный раздел или загрузочный раздел как неактивный на базовых дисках с основной загрузочной записью (MBR).
Отображает список дисков, разделов на диске, томов на диске или виртуальных жестких дисков (VHD).
Объединяет разностный виртуальный жесткий диск (VHD) с соответствующим ему родительским VHD.
Доступные команды diskpart
Переводит сетевой диск или том в состояние «вне сети».
Принимает автономный диск или том в состояние «в сети».
Обновляет состояние всех дисков в группе дисков, пытается восстановить диски в недействительной группе дисков, а также повторно синхронизирует зеркальные тома и тома RAID-5 с устаревшими данными.
Предоставляет способ добавления комментариев в скрипт.
Удаляет букву диска или точку подключения из тома.
Восстанавливает том RAID-5 с фокусом, заменяя неисправной регион диска на указанный динамический диск.
Доступные команды diskpart
Находит новые диски, которые могли быть добавлены на компьютер.
Подготавливает существующий динамический простой том для использования в качестве загрузочного или системного тома.
Отображает или задает политику сети хранения данных (SAN) для операционной системы.
Перемещает фокус на диск, раздел, том или виртуальный жесткий диск (VHD).
Изменяет поле «тип секции» для секции, имеющей фокус.
Уменьшает размер выбранного тома на указанный вами объем.
Отображает или задает идентификатор таблицы разделов GUID (GPT) или подпись основной загрузочной записи (MBR) для диска, на котором находится фокус.
Что бы использовать команды DiskPart, нужно перечислить, а затем выбрать диск, раздел или том, с которым вы хотите работать, для передачи ему фокуса. Когда диск, раздел или том находится в фокусе, любые команды Disk-Part воздействуют именно на этот диск, раздел или том. Для перечисления доступных дисков, разделов и томов предназначены команды.
Чтобы понять, как работать с DiskPart, рассмотрим следующий пример восстановления USB-флешки
Пример управления дисками утилитой diskpart
В списке дисков найдите свою флешку, нам понадобится ее номер X.
Будьте внимательны при выборе накопителя
Не перепутайте с другими накопителями. В результате описанных действий данные будут удалены.
Команда удалит все разделы на флешке. Можно удалять их и по одному с помощью команд набирая их по очереди.
- list partition
- select partition
- delete partition
Удаляем все разделы
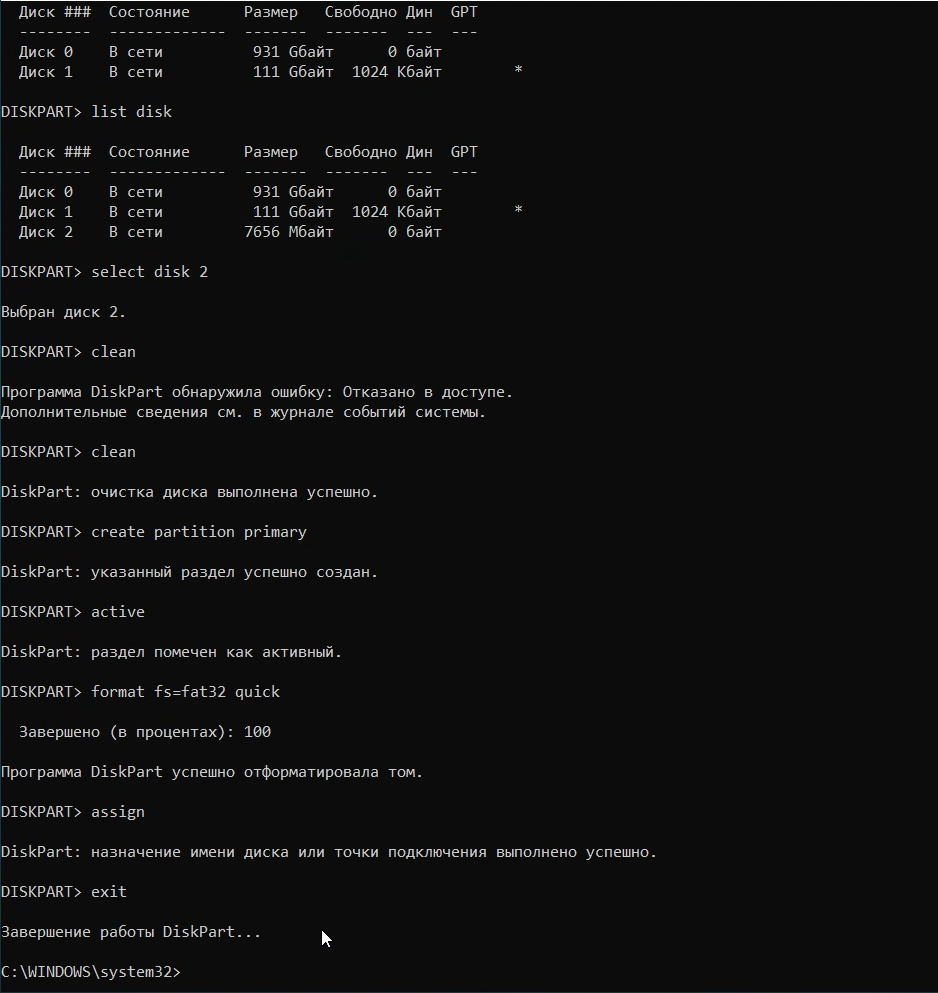
Теперь на USB нет разделов, и вы можете его отформатировать стандартными средствами Windows. Получите в результате один основной раздел. Но можно продолжить использовать DISKPART. Все команды ниже создают один активный раздел и форматируют его в FAT32.
create partition primary
select partition 1
active
format fs=fat32 quick
assign
exit
Все действия по удалению разделов на флешке завершены, создан один раздел и накопителю присвоена буква. Можно использовать полным объем памяти на USB накопителе.
поделиться
This guide explains how to use the diskpart utility for the following Windows versions: Windows XP, Vista, 7, 8, 8.1 or 10.
What is diskpart
The diskpart utility (available in Windows 2000, XP, Vista, 7, 8, 8.1 and 10) can be used to create or delete partitions on your PC.

Command Prompt: list disk
The utility allows you to:
- Partion
- Remove partitions
- Remove formatting
- Assign and remove drive letters and mount points
- Convert disks from basic to dynamic
- Create and extend volumes
Most commands that you can perform in Disk Management (see Boot partitions) are available with diskpart. Because it’s a command line utility, you need to open Command Prompt and type diskpart.
On Windows Vista, 7, 8 and 10 systems, you can type diskpart at Run, click OK or press Enter and Command Prompt will automatically open with diskpart loaded.
When the utility is loaded, you will notice the version installed on your computer:
Microsoft DiskPart version 6.1.7600
Copyright  1999-2008 Microsoft Corporation.
On Computer: MY_COMPUTER
Commands and parameters
The diskpart tool has the following commands and parameters available:
selectcan set the focus on a specific targetselect disk– use this command to set the focus on a specific disk
Command Prompt: select disk
select partition– use the select partition command to set the focus on a specific partitionselect volume– use this command to set the focus on a specific volumedetail diskwill deliver information about the current diskdetail partitionwill deliver information about the current partitiondetail volumewill deliver information about the current volumelist disk– use list disk to get summary information about the available disks on your computerlist partition– use this command to get information about each partition available on a specific disklist volume– use list volume to get information about each volume available on the computeractive– use the active command to set the focus on the current partition to be activeassign– use assign to assign a letter or a mount point to the current active partitioncreate partition primary size=SIZE_IN_MB– use this command to create a new primary partition. TheSIZE_IN_MBis the size of the partition you want to create, in MB.create partition extended size=SIZE_IN_MB– use this command to create a new extended partition. TheSIZE_IN_MBis the size of the partition you want to create, in MB.create partition logical size=SIZE_IN_MB– use this command to create a new logical partition. TheSIZE_IN_MBis the size of the partition you want to create, in MB.delete partitionwill delete the current active partitionextendwill extend the current volumeremovewill remove a letter or a mount point from the current active partitionactive– use this to set the current volume as activeadd disk– use this command to add a mirror to the current active volumebreak disk– use this command to break the mirror addedcreate volume stripe– use this to create a stripe set volume on a specified diskcreate volume raid– use this command to create a Raid-5 volume on a specified diskdelete disk– use this command to delete a missing dynamic diskdelete partition– use this command to delete the current active partitionextend disk– use this command to extend the current volumeimportcan be used to import disks from a foreigh disk grouponlinecan be used to bring a disk or a volume online that was previously offlineremovecan be used to remove a letter or a mount point from the current active volumeretainis used to prepare a volume to be used as a boot or system volumeconvert mbrwill set the partition style of the current disk to MBRconvert gptwill set the partition style to GPTconvert dynamicwill change a basic disk into a dynamic oneconvert basicwill convert a dynamic disk (empty disk) into a basic diskexitwill exit the utilitycleanwill remove the partition or volume formatting from the current diskrescancan rescann the I/O buses and can discover new disks added to the computerhelpwill display the list of all available commands

Error Codes
You can find a list error codes to debug various errors:
- Code
0means that no errors occurred - Code
1means that a fatal exception occurred - Code
2means that the parameters you specified for a command are incorrect - Code
3means that diskpart is unable to open the specified file - Code
4means that diskpart (one of the services used by the utility) returned a failure - Code
5means a command syntax error
diskpart in Windows XP
Note that the fdisk utility found in pre-Windows XP systems is now known as diskpart on Windows XP systems.
If you can boot into Windows XP
If you can boot into your computer, you simply need to open Command Prompt to access diskpart:
- Boot into Windows XP
- Click Start
- Click Run
- Type
cmd - Press Enter or click OK
- At the Command Prompt window, type
diskpart - Press Enter
If you can’t boot into Windows XP
If you can’t boot into Windows XP to access diskpart, you have 2 options:
- Use the original CD to access Recovery Console
- Use Easy Recovery Essentials to launch Command Line
If you have the original CD:
If you can’t boot into Windows XP, but you have the original CD, you can access the Recovery Console:
- Insert the Windows XP CD
- Reboot the computer
- Press any key to boot from the CD
- At the Microsoft Setup menu, press R
- Select the operating system and enter the Administrator password, if requested
- When Command Line appears, type
diskpart - Press Enter
If you use Easy Recovery Essentials:
- Download Easy Recovery Essentials
- Burn the ISO Image. Follow our instructions on how to burn a bootable ISO image. If you’d like to have a recovery USB instead, follow our instructions on how to make a recovery USB.
- Boot Easy Recovery Essentials from the CD, DVD or USB
- Select Launch Command Line


diskpart in Windows Vista
You need to run these steps as an Administrator on Windows Vista systems.
If you can boot into Windows Vista with no errors, follow the If you can boot into Windows Vista set of instructions. Otherwise, follow If you can’t boot into Windows Vista.
If you can boot into Windows Vista
You simply need to open Command Prompt, if you can boot into Windows Vista:
- Boot into Windows Vista
- Click Start
- Type
cmd - Click Command Prompt from the search results list. You may need to right-click Command Prompt > Run as Administrator, if you are not logged in as Administrator already
- Type
diskpart - Press Enter
For the full list of diskpart commands and paremeters, go to Commands and Parameters.
If you can’t boot into Windows Vista
If you can’t boot into your system, you have the following options:
- Use the installation disc to access System Recovery Options
- Access System Recovery Options without the installation disc (if installed)
- Use Easy Recovery Essentials and access Command Line
If you have the installation disc:
If you can’t boot into Windows Vista, but you have the Windows Vista disc, follow these steps to open diskpart:
- Insert the original CD/DVD in the optical drive
- Boot your computer
- Press any key to boot from the CD/DVD
- Select your language, time and keyboard
- Click Next
- Click Repair your computer
- Select the operating system
- Click Next
- When the System Recovery Options screen appears, click Command Prompt
- Type
diskpart:diskpart
- Press Enter


For the full list of diskpart commands and paremeters, go to Commands and Parameters.
If you don’t have the installation disc:
If your Windows Vista has the System Recovery Options installed and is available at the Advanced Boot Options menu, you can run Command Prompt from there. Otherwise, see the “If you use Easy Recovery Essentials” set of instructions below.
Follow these steps below to access diskpart without the installation disc:
- Reboot the computer
- Press F8 as your computer starts to boot, but before the Windows Vista logo appears
- Select Repair Your Computer, at the Advanced Boot Options menu
If a “Repair Your Computer” option isn’t listed, System Recovery Options is not installed on your computer. Use the original installation disc or go to the “If you use Easy Recovery Essentials”set of instructions below .
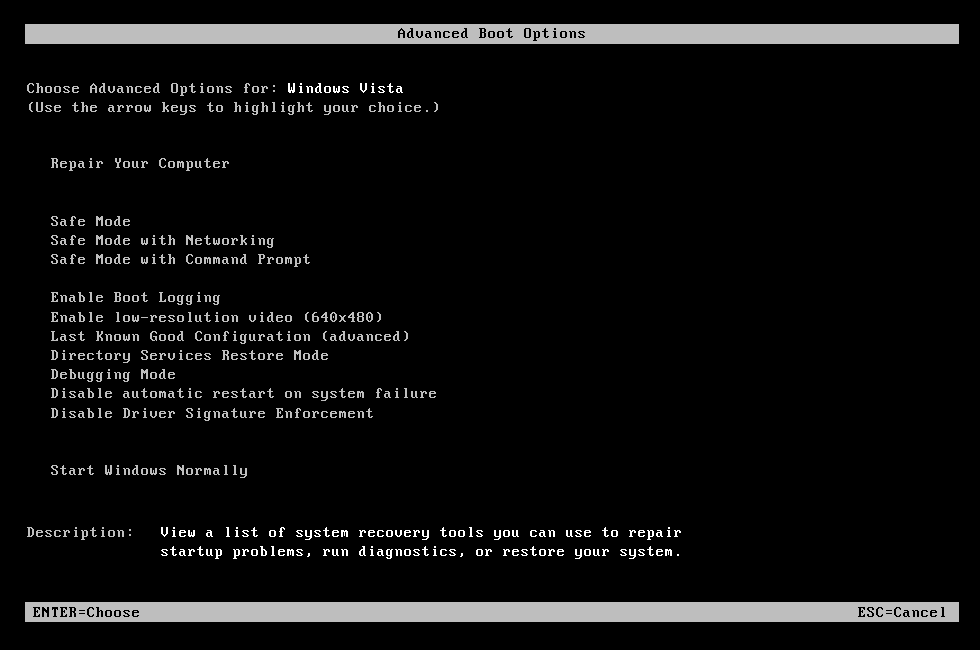
- Select Command Prompt at the System Recovery Options menu
- Type
diskpart - Press Enter
For the full list of diskpart commands and paremeters, go to Commands and Parameters.
If you use Easy Recovery Essentials:
If you don’t have the installation disc available, can’t boot into Windows Vista or you don’t have the “Repair Your Computer” option listed at the Advanced Boot Options menu, you can use Easy Recovery Essentials to access Command Prompt and load diskpart.
Follow these steps:
- Download Easy Recovery Essentials
- Burn the ISO Image. Follow our instructions on how to burn a bootable ISO image. If you’d like to have a recovery USB instead, follow our instructions on how to make a recovery USB.
- Boot Easy Recovery Essentials from the CD, DVD or USB
- Select Launch Command Line
diskpart in Windows 7
On Windows 7 systems, you can access diskpart just as you do Windows Vista systems.
Note that you need to run these steps as an Administrator on Windows 7 computers.
If you can boot into Windows 7
If you can boot into your Windows 7 system, simply open Command Prompt:
- Boot into Windows 7
- Click Start
- Type
cmd - Click Command Prompt from the search results list. Right-click on Command Prompt > Run as Administrator.
- When Command Prompt loads, type
diskpart - Press Enter
For the full list of diskpart commands and paremeters, go to Commands and Parameters.
If you can’t boot into Windows 7
Similar to Windows Vista, if you can’t boot into your system, you have the following options:
- Use the installation disc
- Boot into the Advanced Boot Options menu to access System Recovery Options
- Use Easy Recovery Essentials and access Command Line
If you have the installation disc:
If you can’t boot into Windows 7, but you have the installation disc, you can run diskpart using the disc. To do so, follow these steps:
- Insert the disc in the optical drive of your computer
- Restart the computer
- Press any key to boot from the disc
- Select your preferred language, time and keyboard
- Click Next
- Click Repair your computer at the Install Windows screen
- Select the operating system from the list
- Click Next
- Select Command Prompt
- Type diskpart


diskpart
- Press Enter
For the full list of diskpart commands and paremeters, go to Commands and Parameters.
If you don’t have the installation disc:
Usually, Windows 7 systems should have the System Recovery Options installed on the hard drive. If it’s not (follow steps below), go to the “If you use Easy Recovery Essentials” set of instructions below for an alternative to access diskpart.
Follow these steps to access diskpart without an installation disc on a Windows 7:
- Restart the computer
- Press F8 as the computer starts to boot. Press F8 before the Windows 7 logo appears.
- Select Repair Your Computer at the Advanced Boot Options screen
If Repair Your Computer is not listed, System Recovery Options is not installed on your PC. Go to If you use Easy Recovery Essentials for an alternative.
- Press Enter
- Select Command Prompt
- Type
diskpart - Press Enter

For the full list of diskpart commands and paremeters, go to Commands and Parameters.
If you use Easy Recovery Essentials:
Easy Recovery Essentials can run from any CD, DVD or USB flash drives.
To access diskpart using Easy Recovery Essentials, follow these steps:
- Download Easy Recovery Essentials
- Burn the ISO Image. Follow our instructions on how to burn a bootable ISO image. If you’d like to have a recovery USB instead, follow our instructions on how to make a recovery USB.
- Boot Easy Recovery Essentials from the CD, DVD or USB
- Select Launch Command Line
diskpart in Windows 8
If you can boot into Windows 8
If you can boot into your Windows 8 system, you simply need to open Command Prompt to access diskpart. To do so, follow these steps:
- Boot into Windows 8
- Press the key and C to open the charm bar
- Type
cmd - Click Command Prompt

- When Command Prompt opens, type
diskpart - Press Enter

For the full list of diskpart commands and paremeters, go to Commands and Parameters.
If you can’t boot into Windows 8
If you can’t boot into your Windows 8, you have these options available:
- Use the original DVD or USB with Windows 8 or Windows 8.1 to access the Repair your computer option
- Boot into the System Recovery Options with Shift and F8
- Use Easy Recovery Essentials to launch Command Line
If you have the installation disc:
If you can’t boot, but you have the installation disc, follow these steps:
- Insert the Windows 8 DVD or 8.1 USB
- Restart the computer
- Press any key to boot from the media
- Click Repair your computer or press R
- Select Troubleshoot
- Select Command Prompt
- Type
diskpart - Press Enter

For the full list of diskpart commands and paremeters, go to Commands and Parameters.
If you don’t have the installation disc:
If you don’t have the installation disc, you can boot into System Recovery Options or use Easy Recovery Essentials.
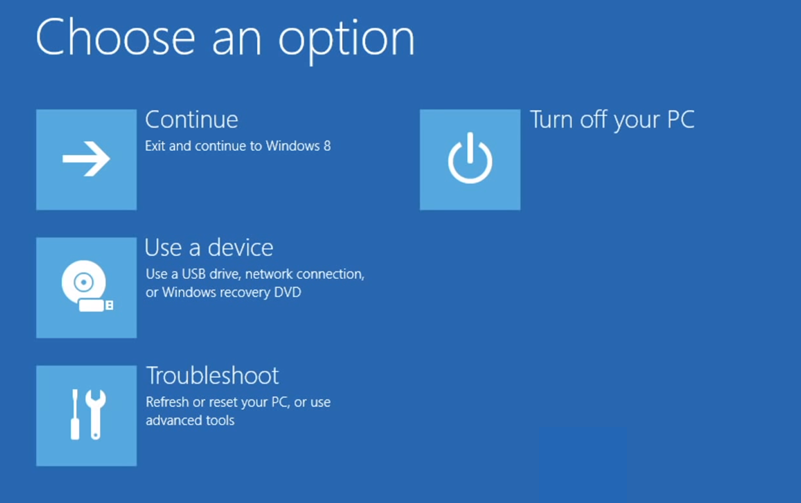
To access diskpart without an official Windows 8 or Windows 8.1 disc, follow these steps:
- Reboot the system
- Press Shift and F8 very quickly
- At Choose an option, select Troubleshoot
- Select Command Prompt
- Type
diskpart - Press Enter
For the full list of diskpart commands and paremeters, go to Commands and Parameters.
If you use Easy Recovery Essentials:
Easy Recovery Essentials can run from any CD, DVD or USB flash drives.
To access diskpart using Easy Recovery Essentials, follow these steps:
- Download Easy Recovery Essentials
- Burn the ISO Image. Follow our instructions on how to burn a bootable ISO image. If you’d like to have a recovery USB instead, follow our instructions on how to make a recovery USB.
- Boot Easy Recovery Essentials from the CD, DVD or USB
- Select Launch Command Line
diskpart in Windows 10
If you can boot into Windows 10
If you can boot into your Windows 10 system, you simply need to open Command Prompt to access diskpart. To do so, follow these steps:
- Boot into Windows 10
- Press the key and C to open the charm bar
- Type
cmd - Click Command Prompt

- When Command Prompt opens, type
diskpart - Press Enter

For the full list of diskpart commands and paremeters, go to Commands and Parameters.
If you can’t boot into Windows 10
If you can’t boot into your Windows 10, you have these options available:
- Use the original DVD or USB with Windows 10 to access the Repair your computer option
- Boot into the System Recovery Options with Shift and F8
- Use Easy Recovery Essentials to launch Command Line
If you have the installation disc:
If you can’t boot, but you have the installation disc, follow these steps:
- Insert the Windows 10 or USB
- Restart the computer
- Press any key to boot from the media
- Click Repair your computer or press R

- Select Troubleshoot
- Select Command Prompt
- Type
diskpart - Press Enter

For the full list of diskpart commands and paremeters, go to Commands and Parameters.
If you don’t have the installation disc:
If you don’t have the installation disc, you can boot into System Recovery Options or use Easy Recovery Essentials.
To access diskpart without an official Windows 10 media, follow these steps:
- Reboot the system
- Press Shift and F8 very quickly
- At Choose an option, select Troubleshoot

- Select Command Prompt
- Type
diskpart - Press Enter

For the full list of diskpart commands and paremeters, go to Commands and Parameters.
If you use Easy Recovery Essentials:
Easy Recovery Essentials can run from any CD, DVD or USB flash drives.
To access diskpart using Easy Recovery Essentials, follow these steps:
- Download Easy Recovery Essentials
- Burn the ISO Image. Follow our instructions on how to burn a bootable ISO image. If you’d like to have a recovery USB instead, follow our instructions on how to make a recovery USB.
- Boot Easy Recovery Essentials from the CD, DVD or USB
- Select Launch Command Line
Troubleshooting
Download diskpart
You can not download diskpart utility. This utility is a command line utility part of Windows.
To access diskpart, you have the following options:
- Use the original CD/DVD or USB of your Windows to access Recovery Console (for Windows XP) or System Recovery Options (for Windows Vista-8)
- Boot into the recovery mode of your Windows
- Use Easy Recovery Essentials, our recovery and repair disk, and open Command Line to access diskpart
Instructions on how to access diskpart if you use Easy Recovery Essentials:
- Download Easy Recovery Essentials
- Burn the ISO Image. Follow our instructions on how to burn a bootable ISO image. If you’d like to have a recovery USB instead, follow our instructions on how to make a recovery USB.
- Boot Easy Recovery Essentials from the CD, DVD or USB
- Select Launch Command Line
Instructions on how to access diskpart if you have the installation disc:
- For Windows XP
- For Windows Vista
- For Windows 7
- For Windows 8 or Windows 8.1
- For Windows 10
Instructions on how to access diskpart if you don’t have the installation disc:
- For Windows XP
- For Windows Vista
- For Windows 7
- For Windows 8 or Windows 8.1
- For Windows 10
Format USB with diskpart
To format a USB flash drive with diskpart, follow these steps:
- Open the utility by typing
diskpartin Command Prompt - Press Enter
- Once loaded, type
list disk:list disk
- Press Enter
- Determine which of the disks listed is your USB flash drive, e.g. Disk 2.
- Type
select disk 2, if #2 is the USB flash drive presented by the list disk command - Press Enter
- Type
cleanto clean the USB flash drive:clean
- Press Enter
- Type this command:
create partition primary
- Press Enter
- Type
active:active
- Press Enter
- You should now receive this confirmation message:
DiskPart marked the current partition as active.
- Type this command to format the USB flash drive:
format fs=ntfs label="MY USB DRIVE"
where
ntfsis the NTFS file system (you can also use fs=fat32) and “MY USB DRIVE” is the label given to the USB drive. - Type
assign:assign
- Press Enter
- Quit diskpart by typing
exit:exit
- Press Enter
Bootable USB with diskpart
To create a bootable USB using diskpart, follow the steps from Format USB with diskpart.
Once successfully formatted the drive, simply copy the files to the USB drive.
USB not showing in diskpart
diskpart will not list external media, e.g. USB flash drive, if you’re using Windows XP.
Windows Vista to Windows 8 systems will show the USB flash drives in diskpart.
More Information
Support Links
- Easy Recovery Essentials for Windows – our repair and recovery disk.
It’s an easy-to-use and automated diagnostics disk. It’s available for Windows 8, Windows 7 and Windows Vista. It’s also available for Windows XP and Windows Server.
Read more at Windows Recovery Disks.
- The NeoSmart Support Forums, member-to-member technical support and troubleshooting.
- Get a discounted price on replacement setup and installation discs: Windows XP, Windows Vista, Windows 7, Windows 8, Windows 10.
Applicable Systems
This Windows-related knowledgebase article applies to the following operating systems:
- Windows XP (all editions)
- Windows Vista (all editions)
- Windows 7 (all editions)
- Windows 8 (all editions)
- Windows 8.1 (all editions)
- Windows 10 (all editions)
- Windows Server 2003 (all editions)
- Windows Server 2008 (all editions)
- Windows Server 2012 (all editions)
Propose an edit
The Disk Management Tool is a useful, effective tool for managing your Windows disks and partitions, but it isn’t as powerful to use as Diskpart. This command-line tool lets you delete, create and modify partitions on any hard drives or USB storage your PC can detect.
We’d recommend using the Disk Management Tool for most situations, but if Windows isn’t starting up properly, or if you prefer to use the PowerShell terminal, Diskpart is the perfect alternative. Here are some of the more common Diskpart commands to help you learn how to use Diskpart effectively.
If you want to use Diskpart, you need to open up a Windows command line or PowerShell terminal. Diskpart is a destructive tool, so you’ll need to open a terminal window with the right administrative privileges.
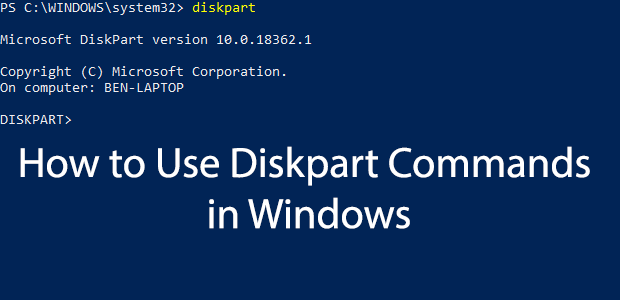
- To open Diskpart in Windows, right-click your Windows Start menu button and click Windows PowerShell (Admin).
- In your admin-level PowerShell terminal (or similar Windows command line), type diskpart and hit enter.
- The Diskpart tool will launch within the window, ready for you to use. Type exit at the “DISKPART>” prompt and hit enter once you’ve finished using it.
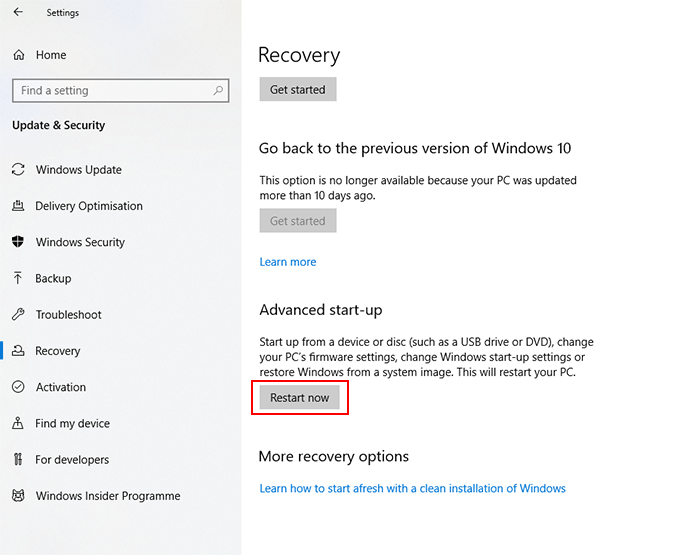
- Diskpart is also available for users booting into the Windows Recovery Environment, available when you boot your PC using the Advanced Startup mode in your Settings > Windows Update & Security > Recovery menu.
- Click Restart Now to boot to WinRE.
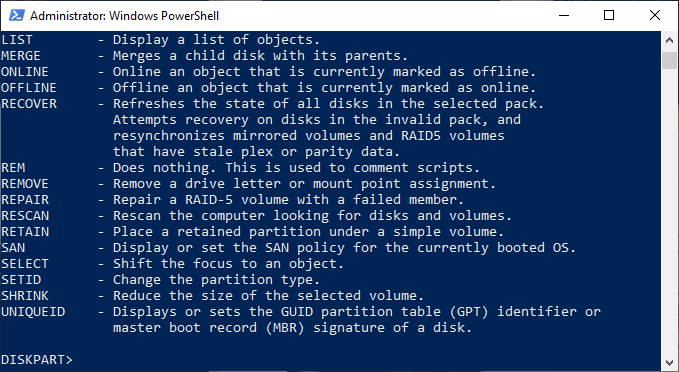
We’ll explore some of the most common Diskpart commands in this article, but if you want to quickly see the full list of available Diskpart commands, type help at the “DISKPART>” prompt and hit enter.
Listing Existing Hard Drives, Volumes & Partitions
Once Diskpart is open, the first thing you should do is check the current layout of your hard drives and attached storage.
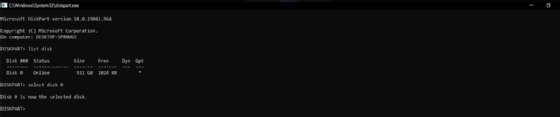
- At the “DISKPART>” prompt, type list disk and hit enter. This will list all of the available storage drives (including hard drives, USB storage, SD cards, etc.) that your PC can currently detect.
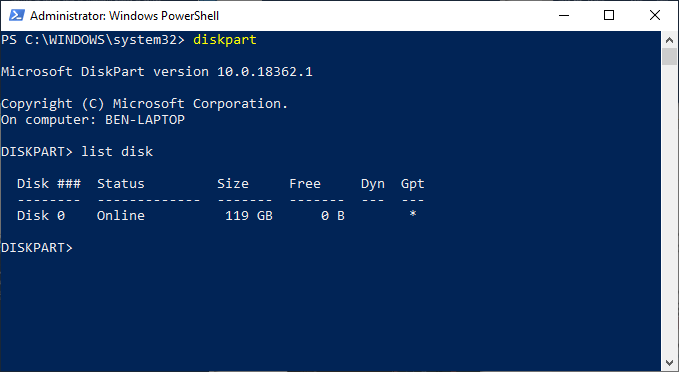
- Starting with the number zero, Diskpart will list any detected disks. You’ll need to remember the disk number (for instance, “0” for your Windows hard drive) to use with future Diskpart commands.
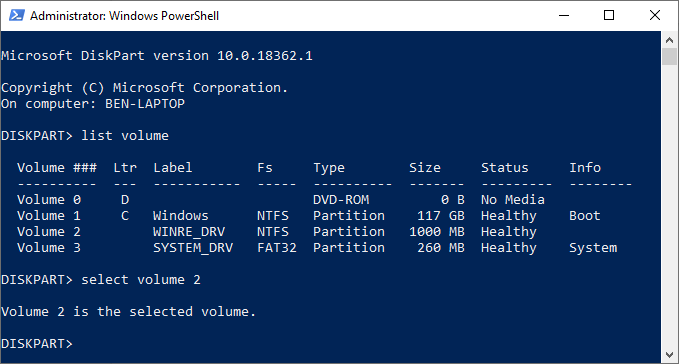
- Along with your list of disks, you can also ask Diskpart for a list of detected volumes. At the “DISKPART>” prompt, type list volume.
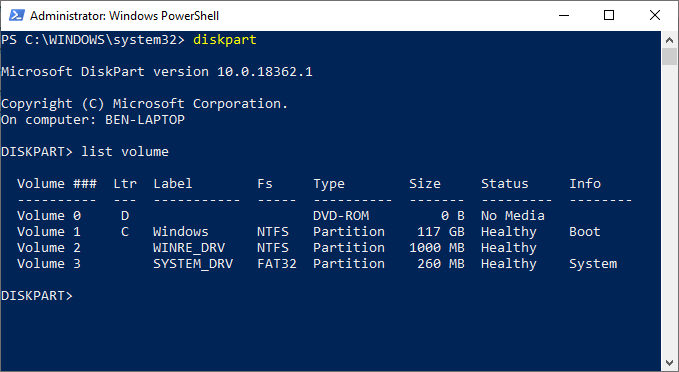
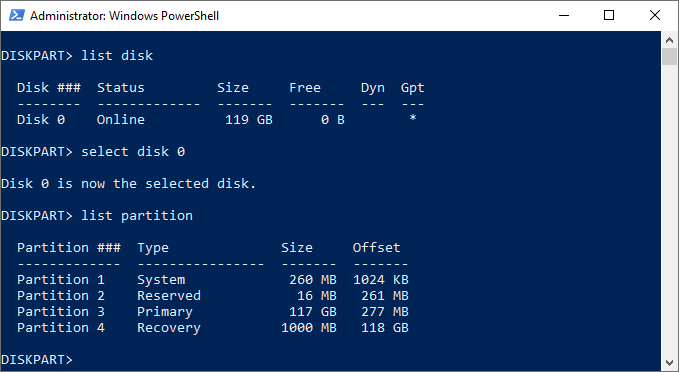
- Diskpart can also let you list individual hard drive partitions (some of which may match the volumes listed with the “list volume” command). You’ll need to select a hard disk first with the list disk command.
- At the “DISKPART>” prompt, type select disk followed by the disk number (for instance, select disk 0). Diskpart will confirm that the disk is selected at this point.
- Once a disk is selected, type list partition. This will list the current partitions on your drive. You’ll be able to delete or modify these partitions from here, using the partition number in a later Diskpart command.
Deleting a Hard Drive Partition Or Volume Using Diskpart
A hard drive (disk) is separated into partitions, which are often the same as listed volumes. If your hard drive is separated into several partitions or volumes, and you wish to delete one, you can do that using Diskpart commands.
- Select your hard drive using select disk.
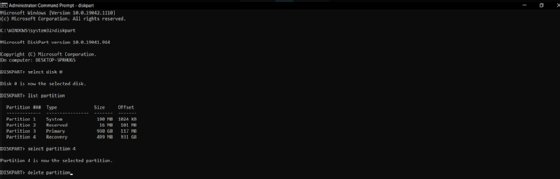
- At the “DISKPART>” prompt, type list partition, then select partition #, replacing # with your partition number.
- Once a partition is selected, type delete partition. Diskpart will confirm whether or not the partition has been deleted afterward.
- You can also delete disk volumes directly if you’d prefer. Type list volume, locate your chosen volume number, then type select volume #, replacing # with your volume number.
- Type delete volume to delete the volume completely. Diskpart will confirm if the command was successful or not afterward.
Wiping a Hard Drive Completely Using Diskpart Clean
Rather than removing individual volumes or partitions on a drive, you can wipe a hard drive completely using the Diskpart clean command. You can also use this command if you’re looking to wipe a USB flash drive, ready for formatting.
You won’t be able to do this on your system drive (nor would you want to!) unless you’re using Diskpart on a Windows installation
- At the “DISKPART>” prompt, select the disk you wish to wipe by typing select disk #, replacing # with your disk number. If you don’t know your disk number, type list disk first.
- If you’re sure you want to wipe the disk completely (deleting all drive volumes/partitions), then type clean and hit enter. You won’t be asked for confirmation, so be sure you wish to do this before you begin.
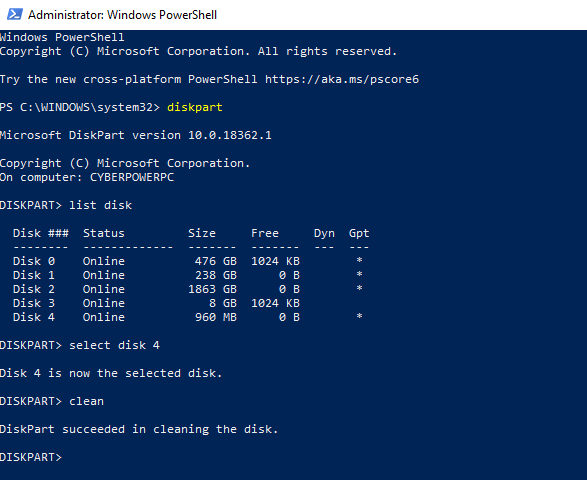
- Diskpart will confirm that the drive has been “cleaned”, ready for new partitions to be created.
Creating & Formatting New Hard Drive Partitions
With a “clean” drive, you’re ready to create a partition in the free space using the Diskpart create partition command. You can then format that new partition with a Windows-friendly file system like NTFS or FAT32 using the Diskpart format command.
- Start by selecting your chosen disk with select disk #, replacing # with your disk number (and using list disk to find your disk number, if you don’t know.)
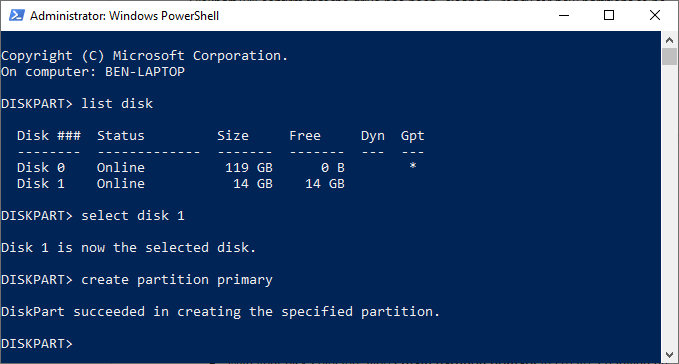
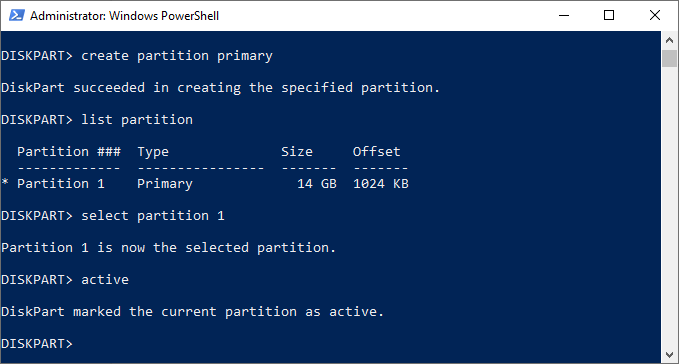
- With your disk selected, type create partition primary to create a partition using the entire space on that drive.
- If you want to create a partition to take up only some of the free space (letting you create more than one partition), type create partition primary size=X instead, replacing X with the partition size, measured in megabytes (for example, size=1024 for 1GB of space).
- Type list partition to make sure that your new partition is listed, then type select partition 1 to select it. Mark the partition as active by typing active at the “DISKPART>” prompt. This is necessary if you want to use it as a bootable drive.
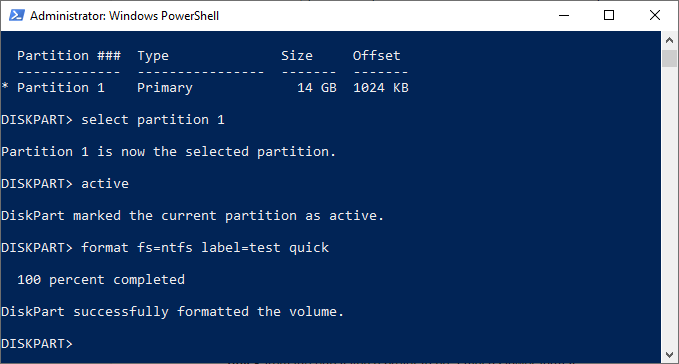
- To quickly format the drive with the NTFS file system, type format fs=NTFS label=Y quick. You can replace Y with any label you’d prefer to use.
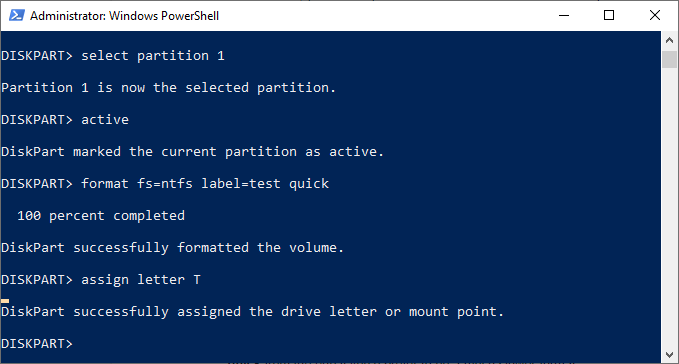
- Once formatted, Windows will likely assign a drive letter automatically. If it doesn’t, type assign letter Z, replacing Z with a free drive letter.
Extend a Hard Drive Volume
If you have an existing hard drive volume that doesn’t take up all of the free space on a drive, and you wish to enlarge it, Diskpart commands allow you to do that.
- Start by selecting your chosen disk with select disk #, replacing # with your disk number (and using list disk to find your disk number, if you don’t know.)
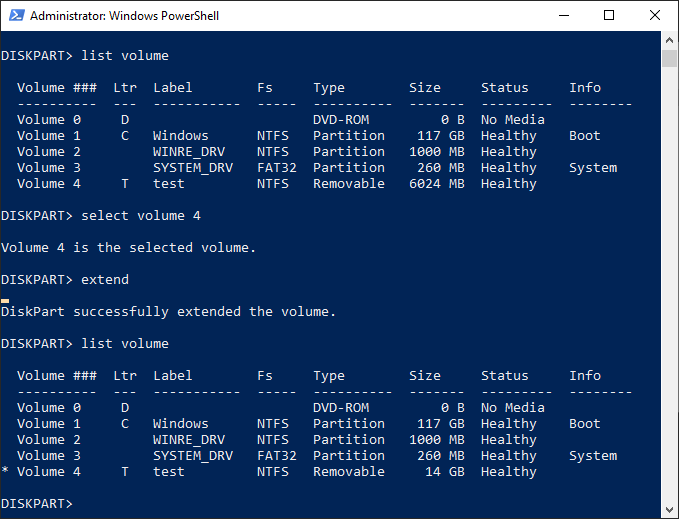
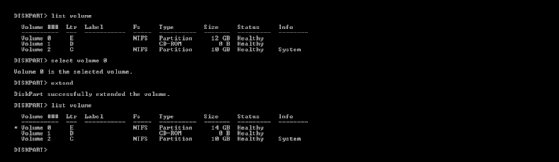
- Type list volume to list all the available volumes on your PC, then type select volume #, replacing # with the volume you’re looking to extend.
- Type extend to expand it to the maximum size available. Diskpart will confirm whether or not the extend command has worked correctly. Confirm the size of the volume has increased by typing list volume for a second time afterward.
Diskpart has other options available, as the help command briefly explains. If you need further information on how to use Diskpart, Microsoft has further Diskpart support information available.
For basic disk operations on Windows systems, administrators can use diskpart, a command-line utility that remains useful for many different drive-related jobs more than 20 years after it was released.
Microsoft included the free disk management tool in Windows starting in 1999 with the Windows 2000 operating system. Diskpart scans for newly added disks, but it can also create, delete and resize drive partitions, and assign or reassign drive letters. Diskpart also works with drive volumes, virtual hard disks and removable media such as USB flash drives.
Microsoft continues to develop diskpart, and the latest version of the utility features 38 commands. To use diskpart, you list the objects, such as disks or partitions, and then select the object to change it.
Diskpart use requires a basic understanding of Windows disk terminology. A basic disk is a storage device, such as hard drives, solid-state drives and USB flash drives, which you format with a Windows file system. A basic disk can hold one or several partitions. A partition is a logical structure confined to a single disk. A volume is a construct of the operating system that consists of one or more partitions that can span one or more disks. You should be careful when using diskpart because there is no undo function if you select the wrong object. Also, once a command is entered, even a destructive one, diskpart does not ask for confirmation before it runs. For example, if you perform an errant diskpart delete partition operation, you must use another utility, such as third-party disk management program, to recover the data or use a backup image to restore the drive. Follow these tips to avoid issues when using diskpart: Using diskpart to partition your disk can help increase the I/O performance of hard disks newly added to a RAID array. The documentation for many server applications, such as Exchange Server, recommends using diskpart to create the primary or extended partitions. You can use a primary partition as the system partition; you can only use an extended partition for additional logical drive assignments. The diskpart create command makes disk partitions, volumes on a single disk or multiple disks, and virtual hard disks. For this and all following commands, you need to open the command prompt before you run diskpart. Type cmd from the run command window from the Windows search box or the run command dialog box that you open with the Windows+R key combination. To create a partition: When it comes to adding space to a partition or volume, this method is superior to configuring two disks. Dynamic disk extensions only concatenate the newly added space, meaning they merely add the disk space to the end of the original partition without restriping the data. Concatenation isolates performance within each partition and does not offer fault tolerance when the partition is configured in a RAID array. Diskpart restripes your existing data. This is beneficial when the partition is set up in a RAID array, because the existing partition data spreads across all the drives in the array, rather than just adding new space to the end, like the Disk Management utility. To extend a partition: The delete command in diskpart removes dynamic disks, partitions, volumes and shadow copies. When you have multiple volumes on the disk or an unwanted partition, such as a recovery partition, this command will remove them and return them to unallocated space. To delete a partition: When using dynamic disks in Windows, you can create four volume types with diskpart: volume mirror, RAID-5 volume, simple volume and striped volume. To create a simple volume: When you have an entire disk to wipe clean, you can use the diskpart clean command to convert all the stored data into unallocated space. This operation deletes all data on the disk by writing zeros on each disk sector. Diskpart also removes all partition and volume information from the selected drive. To clean a disk: For maintenance work that requires a bootable USB flash drive, you can use diskpart to format the partition and set up the file system on the removable drive. Administrators can also use diskpart in both the Windows Preinstallation Environment and Windows Recovery Environment to correct disk problems or set up the machine for deployment. With the diskpart /s switch, administrators can run scripts to automate tasks associated with setting up Windows machines, such as configuring the disks for multiple systems, adding a recovery partition or wiping all data from a disk to return it to a factory state. Sample code from the Microsoft site gives examples of how to develop a text-based script file administrators can call from diskpart and run automatically. IT workers can run several diskpart scripts, but Microsoft recommends building in a delay of 15 seconds after a script runs to prevent issues. For an in-depth tutorial on how to use diskpart for preparing a Windows 10 system for deployment, this blog post on the SearchEnterpriseDesktop site provides detailed instructions to use diskpart with a script.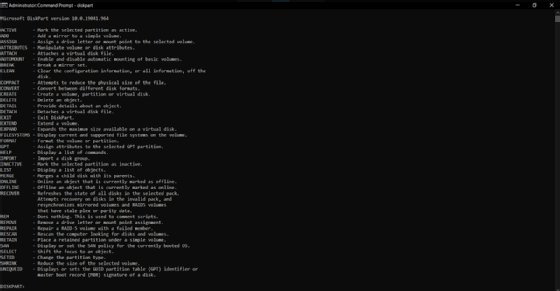
Using diskpart requires understanding data storage terminology
Using diskpart
Creating a partition using diskpart
Extending a partition using diskpart
Deleting a partition using diskpart
Creating a volume using diskpart
Cleaning a disk using diskpart
Other ways to use diskpart