 В Windows 10 версии 1607 (Anniversary Update) появилось несколько новых приложений, одно из них — «Быстрая помощь» (Quick Assist), предоставляющее возможность удаленного управления компьютером через Интернет для оказания поддержки пользователю.
Программ такого рода предостаточно (см. Лучшие программы удаленного рабочего стола), одна из них — Microsoft Remote Desktop присутствовала и в Windows. Преимущества же приложения «Быстрая помощь» — в том, что эта утилита присутствует во всех редакциях Windows 10, а также очень проста в использовании и подойдет для самого широкого круга пользователей. Обновление: приложение обновилось и теперь называется и выглядит иначе, подробнее: Приложение Быстрая поддержка для удаленного управления компьютером Windows 10 и Windows 11.
И один недостаток, который может вызвать неудобства при использовании программы — пользователь, который оказывает помощь, то есть подключается к удаленному рабочему столу для управления, должен иметь учетную запись Майкрософт (для стороны, к которой подключаются, это необязательно).
Использование приложения «Быстрая помощь» (Quick Assist)
Для того, чтобы использовать встроенное приложение для доступа к удаленному рабочему столу в Windows 10, его следует запустить на обоих компьютерах — том, к которому подключаются и на том, с которого будет оказываться помощь. Соответственно, на этих двух компьютерах должна быть установлена Windows 10 не ниже версии 1607.
Для запуска можно использовать поиск в панели задач (просто начните вводить «Быстрая помощь» или «Quick Assist»), или отыскать программу в меню Пуск в разделе «Стандартные — Windows».
Подключение к удаленному компьютеру выполняется с помощью следующих простых шагов:
- На компьютере, с которого выполняется подключение нажмите «Оказать помощь». Возможно, потребуется вход в учетную запись Майкрософт для первого использования.

- Каким-либо образом передайте код безопасности, который отобразится в окне, человеку, к компьютеру которого вы подключаетесь (по телефону, e-mail, sms, через мессенджер).
- Пользователь, к которому подключаются, нажимает «Получить помощь» и вводит предоставленный код безопасности.
- Затем у него отображается информация о том, кто хочет подключиться, и кнопка «Разрешить» для того, чтобы одобрить удаленное подключение.


После того, как удаленный пользователь нажимает «Разрешить», после короткого ожидания подключения, на стороне оказывающего помощь появляется окно с рабочим столом Windows 10 удаленного пользователя с возможностью управления им.

Вверху окна «Быстрая помощь» также присутствуют несколько простых элементов управления:
- Информация об уровне доступа удаленного пользователя к системе (поле «Пользовательский режим» — администратор или пользователь).
- Кнопка с карандашом — позволяет делать заметки, «рисовать» на удаленном рабочем столе (удаленный пользователь это тоже видит).
- Обновление подключения и вызов диспетчера задач.
- Пауза и прерывание сеанса удаленного рабочего стола.
Со своей стороны, пользователь к которому подключились, может либо поставить сеанс «помощи» на паузу, либо закрыть приложение, если вдруг потребовалось резко прервать сеанс удаленного управления компьютером.
Среди незаметных возможностей — передача файлов на удаленный компьютер и с него: для этого просто скопируйте файл в одном расположении, например, на своём компьютере (Ctrl+C) и вставьте (Ctrl+V) в другом, например, на удаленном компьютере.
Вот, пожалуй, и всё по встроенному приложению Windows 10 для доступа к удаленному рабочему столу. Не слишком функционально, но с другой стороны, многие программы для схожих целей (тот же TeamViewer) большинством используются только ради тех возможностей, которые есть и в «Быстрая помощь».
К тому же, для использования встроенного приложения не нужно что-либо скачивать (в отличие от сторонних решений), а для подключения к удаленному рабочему столу через Интернет не требуется никаких особенных настроек (в отличие от Microsoft Remote Desktop): оба этих пункта могут быть препятствием для начинающего пользователя, которому нужна помощь с компьютером.
From Wikipedia, the free encyclopedia

Quick Assist in Windows 11 |
|
| Developer(s) | Microsoft |
|---|---|
| Included with | Windows 10 and later |
| Type | Remote controlling feature |
Quick Assist is a Microsoft Windows feature that allows a user to view or control a remote Windows computer over a network or the Internet to resolve issues without directly touching the unit.[1][2][3] It is based on the Remote Desktop Protocol (RDP). It is complemented by Get Help, a feature introduced in Windows 10 that enables the user to contact Microsoft directly but does not allow for remote desktoping or screen sharing.
Before Quick Assist was introduced in Windows 10, Windows XP and later Windows versions offered a similar feature called Windows Remote Assistance.
Overview[edit]
Helpers offering remote assistance can open multiple simultaneous sessions—one for each remote computer. However, users seeking assistance from helpers can have only one remote assistance session waiting for a connection. Connect invitations can be sent to multiple recipients—any of which may connect. All subsequent connect attempts will be blocked until the first helper disconnects, after which another helper may connect. If the user disconnects the session, the remote assistance application terminates and no further connections are allowed.
Quick Assist is installed by default on Windows clients, but is not available on Windows Server 2008 R2 servers.[4] The name of the tool differs depending on Windows language; a search for «Quick Assist» in the Start menu will locate the tool regardless of the language settings.
Quick Assist requests a code in order to match users to a session. This will allow the giver to access the computer of the receiver in Administrator mode while allowing the receiver to see the choices the giver made.
Connection[edit]
Quick Assist uses TCP port 443 and communicates with the following hosts:[5]
| Domain / Name | Description |
|---|---|
| *.support.services.microsoft.com | Primary endpoint used for Quick Assist application |
| *.resources.lync.com | Required for the Skype framework used by Quick Assist |
| *.infra.lync.com | Required for the Skype framework used by Quick Assist |
| *.latest-swx.cdn.skype.com | Required for the Skype framework used by Quick Assist |
| *.login.microsoftonline.com | Required for logging in to the application (MSA) |
| *.channelwebsdks.azureedge.net | Used for chat services within Quick Assist |
| *.aria.microsoft.com | Used for accessibility features within the app |
| *.api.support.microsoft.com | API access for Quick Assist |
| *.vortex.data.microsoft.com | Used for diagnostic data |
| *.channelservices.microsoft.com | Required for chat services within Quick Assist |
The Quick Assist binary is located at «C:\Windows\System32\quickassist.exe»
History[edit]
The feature was first introduced in Windows XP as Remote Assistance and based on Remote Desktop technologies.[6] Remote Assistance in Windows XP is integrated into the Help and Support Centre UI and allows sending invitations to the support person by email, Windows Messenger or saving the invitation as a file and transferring the file across through other methods.[6] The computer can be controlled by both, the support person connecting remotely as well as the one sending the invitation. Chat, audio-video conversations and file transfer are available.[6]

In Windows Vista, Remote Assistance is upgraded with a standalone user interface and based on RDP 6 and Windows Desktop Sharing API.[7] Two systems administrators can simultaneously connect to a single computer. Remote sessions automatically reconnect after restarting the computer. It also supports session pausing, built-in diagnostics, chat, file transfer and XML-based logging. It reduces bandwidth requirements for low-speed connections. NAT traversal allows a session to be established even if the user is behind a Network Address Translation (NAT) device, for example, a router in a home network. Remote Assistance is configurable using Group Policy and supports command-line switches so that custom shortcuts can be deployed.
In Windows 7, Remote Assistance is based on RDP 7. An extra option to connect using Peer Name Resolution Protocol is added, called Easy Connect if IPv6 connectivity is present.[8] With Easy Connect, only a password needs to be shared instead of an invitation file, and two computers can establish a peer-to-peer connection over the local area network (LAN) or the Internet without a relay server. However, Windows Remote Assistance does not support file transfer and clipboard sharing in Windows 7.[9][10]
Remote Assistance is installed by default on Windows clients, but must be added manually on Windows Server 2008 R2 servers.[11] Remote assistance sessions may be initiated using the Windows Remote Assistance application available on the Start menu under All Apps → Maintenance[12] or by invoking msra.exe from command-line interface.[13]
The original Remote Assistance is included on all releases of Windows 10 as well, but since the Windows 10 Anniversary Update, its Start menu shortcut is removed, effectively hiding it from the user. Instead, a new app called Quick Assist is added.[14] It has mostly the same functionality and a similar user interface with buttons called Get assistance and Give assistance. The design is like UWP apps. Unlike Remote Assistant, Quick Assist requires the support person to sign in using a Microsoft account before dispensing help.[15][16]
In November 2021, Microsoft announced a more business-friendly version of Quick Assist, called Remote Help.[17] While later versions of Windows 10 allowed users and technicians to authenticate against Azure Active Directory, this version includes new integrations such as:
- UAC Elevation
- Remote Assistance Sessions Reports
- Roles Based Authentication (RBAC)
- Management from Intune / the ability to launch from Intune
- Limiting sessions within the organization (Azure AD Tenant)
- Branding
- Conditional Access
- ADFS support
While Remote Assistance establishes a Remote Desktop Protocol (RDP) connection to the end user’s computer (requires TCP port 3389 to be opened on the client machine and the firewall/NAT/router behind which the machine is), Quick Assist is cloud-based and requires one outbound connection from the helper’s PC to the cloud service/Microsoft server, and a separate connection from the cloud service to the machine of the person getting assistance. There are no ports opened on the client device’s firewall.
Features comparison[edit]
| Feature | Windows Remote Assistance | Windows Quick Assist |
|---|---|---|
| Remote assistance for Windows devices | Yes | Windows 10/11 |
| Remote assistance for MacOS devices | No | No |
| Remote assistance for smartphones | No | No |
| Viewing through device camera | No | No |
| Support of multiple screens on the target machine | Yes (all the monitors or clicking Fit to the size and scroll to selected monitor) | Yes (viewing selected monitor or all of them at once) |
| Keyboard layout used when remotely controlling a machine (the helper needs the keyboard layout to match his/her own computer for efficient assistance) | Using target computer keyboard layout | Using helper’s keyboard layout |
| Working with elevated privileges | No (the screen blacks-out and the user has to finish the action instead of the helper) | No[18] |
| Requirement for client software installation | No (installed in Windows by default) | No (installed in Windows by default) |
| Clipboard sharing (copy / paste text between helper’s and end user’s machine) | No (workaround: pasting via embedded chat window; limited number of characters) | No (workaround: pasting via embedded chat window; limited number of characters) |
| File transfer (between helper’s and end user’s machine) | No (workaround: via file share or file sharing cloud service) | No (workaround: via file share or file sharing cloud service) |
| Running scripts remotely (e.g. ipconfig) | No (workaround: scripts have to be copied to the remote machine first and executed from there) | No (workaround: scripts have to be copied to the remote machine first and executed from there) |
| Pausing remote control session by the end user (temporarily stopping screen sharing) | No (only cancelling the whole session) | Yes |
See also[edit]
- Application sharing
- Help desk
References[edit]
- ^ Get help remotely with Quick Assist in Windows 10
- ^ Overview of Remote Assistance in Windows XP
- ^ Windows XP Technical Overview
- ^ «Remote Assistance and Resulting Internet Communication in Windows 7 and Windows Server 2008 R2». TechNet. Microsoft.
- ^ «Use Quick Assist to help users — Windows Client Management».
- ^ a b c How to use remote assistance in Windows XP
- ^ «Writing a Desktop Sharing Application». Enterprise Mobility and Security Blog. Microsoft. 23 March 2007.
- ^ «Peer-To-Peer based Features in Win 7». Archived from the original on 2010-01-23.
- ^ Improvements to Remote Assistance in Windows 7
- ^ «Why doesn’t windows 7 Remote Assistance support sharing clipboard and file transfer? Are there any work arrounds? [sic]». Windows Client TechCenter. Microsoft TechNet Social. 2010-12-10. Archived from the original on 2012-03-23. Retrieved 2011-11-09.
- ^ Remote Assistance and Resulting Internet Communication in Windows 7 and Windows Server 2008 R2
- ^ Get help with your computer using Windows Remote Assistance
- ^ Initiate Remote Assistance from a Command Line or a Script
- ^ «Quick Assistance: Remotely Control Another’s PC / Computer». Windows Call. Retrieved 2019-09-09.
- ^ Popa, Bogdan (9 August 2016). «Microsoft Highlights Its Windows 10 Anniversary Update TeamViewer Killer». Softpedia. SoftNews SRL.
- ^ Srinivasan, Ramesh (2016-08-08). «Using Windows 10’s New «Quick Assist» App (Walkthrough)». Winhelponline.
- ^ «Re: Remote help: A new remote assistance tool from Microsoft». 25 November 2021.
- ^ Remotely assist mobile devices managed by Microsoft Endpoint Manager
Further reading[edit]
- «Windows Desktop Sharing API». Enterprise Mobility + Security blog. Microsoft. 8 March 2007.
- Torre, Charles (16 October 2006). «Windows Vista Remote Assistance: Under the Hood». Channel 9. Microsoft.
- Tulloch, Mitch; Northrup, Tony; Honeycutt, Jerry (2010). «23: Support Users with Remote Assistance» (PDF). Windows 7 Resource Kit. Redmond, WA: Microsoft Press. ISBN 9780735627000.
Поскольку удаленная работа занимает центральное место в жизни большинства людей и организаций, инструменты для удаленного сотрудничества пользуются большим спросом. Quick Assist — это удаленный инструмент, который может быть полезно для пользователей Windows 10.Microsoft представила Quick Assist в 2016 году с выходом Windows 10.
Основная цель этой функции — дать пользователям возможность оказывать и получать помощь удаленно. Как таковая, она требует наличия Донора (человека, оказывающего помощь через ПК) и Получателя (человека, получающего помощь через другой ПК).
Quick Assist очень похожа на функцию Remote Windows Assistant, присутствующую в предыдущих версиях Windows. Однако эти две функции различаются следующим образом:
Быстрая помощь
Функция Quick Assist:
- Доступно только в Windows 10.
- Требуется вход в учетную запись Microsoft.
- Имеет облачную основу.
- Требуется одно исходящее соединение с компьютера-дарителя на сервер Microsoft и отдельное соединение с сервера Microsoft на компьютер-получатель.
- Пользователи могут временно приостановить сеанс помощи.
Удаленный помощник Windows
Функция удаленного помощника Windows:
- Доступно в Windows XP и более поздних версиях.
- Не требует входа в учетную запись Microsoft.
- На основе технологии удаленного рабочего стола.
- Подключение может осуществляться через локальную сеть или Интернет.
- Пользователи могут только завершить, но не приостановить сеанс помощи.
Системные требования для использования Quick Assist
Чтобы использовать Quick Assist, пользовательские системы должны соответствовать следующим требованиям:
Если системные требования для использования Quick Assist соблюдены, вы можете выполнить следующие шаги для его использования:
Доступ к быстрой помощи
Первым шагом к использованию Quick Assist является доступ к приложению или его запуск. Выполните следующие действия, чтобы запустить Quick Assist на компьютере:
Шаг 1: В строке поиска рядом со значком Windows введите Quick Assist.

Шаг 2: Нажмите кнопку Открыть или нажмите клавишу Enter на клавиатуре.

Существует и другой способ доступа к Quick Assist.
Шаг 1: Нажмите кнопку «Пуск» в левом дальнем углу экрана.

Шаг 2: Прокрутите до папки с названием Windows Accessories.

Шаг 3: Нажмите Quick Assist, чтобы запустить приложение.

При выполнении любого из перечисленных действий приложение будет запущено, и вы сможете перейти к оказанию или запросу помощи.
Предоставление помощи
В этом случае вы помогаете другому человеку через удаленное соединение. Вот как можно использовать Quick Assist для этой цели:
Шаг 1: После запуска Quick Assist и под ярлыком «Оказать помощь» выберите «Помочь другому человеку».

Шаг 2: Войдите в систему, используя данные своей учетной записи Microsoft.

Шаг 3: Приложение должно сгенерировать код безопасности. Сообщите этот шестизначный код стороне, запрашивающей помощь, до истечения времени (10 минут).

Шаг 4: После того как собеседник введет код, вы увидите два варианта: получить полный контроль или просмотреть экран. Выбор последнего варианта означает, что вы не можете выполнять какие-либо действия на компьютере другой стороны, в то время как первый вариант позволяет вам перемещаться по компьютеру другой стороны.

Шаг 5: После выбора опций выберите «Продолжить».

В зависимости от выбранного вами варианта, как только другая сторона (получатель) даст вам разрешение со своей стороны, вы сможете просматривать его экран или полностью контролировать его компьютер.
Запрос помощи
В Quick Assist необходимо выбрать «Получить помощь», чтобы запросить помощь у пользователей. Если вам нужна удаленная помощь, выполните следующие действия:
Шаг 1: При запуске Quick Assist выберите ярлык Получить справку.

Шаг 2: Введите шестизначный код, предоставленный донором (Assist).

Шаг 3: Нажмите «Поделиться экраном».

Шаг 4: Как только соединение будет установлено, ваш помощник сможет видеть ваш экран, но не сможет действовать. Нажмите ‘Allow’ в следующем появившемся окне, чтобы разрешить другому пользователю работать на вашем компьютере.

Обратите внимание, что Quick Assist не поддерживает голос. Однако в Quick Assist пользователи могут общаться, отправляя сообщения на канал инструктажа переключателя или используя функцию аннотации, чтобы выделить области, требующие внимания. Другим вариантом может быть телефонный звонок.
Использование удаленного помощника Windows 7
Вот и все, что касается использования Quick Assist в Windows 10. Теперь вы можете предложить помощь друзьям, родственникам и коллегам через удаленное подключение. Однако если ваша система не работает на Windows 10, вы можете рассмотреть возможность использования Windows Remote Assistant, который работает на более ранних версиях Windows.
Quick Assist is a Microsoft Windows feature that allows a user to view or control a remote Windows computer over a network or the Internet to resolve issues without directly touching the unit.[1][2][3] It is based on the Remote Desktop Protocol (RDP). It is complemented by Get Help, a feature introduced in Windows 10 that enables the user to contact Microsoft directly but does not allow for remote desktoping or screen sharing.
|
Quick Assist in Windows 11 |
|
| Developer(s) | Microsoft |
|---|---|
| Included with | Windows 10 and later |
| Type | Remote controlling feature |
Before Quick Assist was introduced in Windows 10, Windows XP and later Windows versions offered a similar feature called Windows Remote Assistance.
Overview
Edit
Helpers offering remote assistance can open multiple simultaneous sessions—one for each remote computer. However, users seeking assistance from helpers can have only one remote assistance session waiting for a connection. Connect invitations can be sent to multiple recipients—any of which may connect. All subsequent connect attempts will be blocked until the first helper disconnects, after which another helper may connect. If the user disconnects the session, the remote assistance application terminates and no further connections are allowed.
Quick Assist is installed by default on Windows clients, but is not available on Windows Server 2008 R2 servers.[4] The name of the tool differs depending on Windows language; a search for «Quick Assist» in the Start menu will locate the tool regardless of the language settings.
Quick Assist requests a code in order to match users to a session. This will allow the giver to access the computer of the receiver in Administrator mode while allowing the receiver to see the choices the giver made.
Connection
Edit
Quick Assist uses TCP port 443 and communicates with the following hosts:[5]
| Domain / Name | Description |
|---|---|
| *.support.services.microsoft.com | Primary endpoint used for Quick Assist application |
| *.resources.lync.com | Required for the Skype framework used by Quick Assist |
| *.infra.lync.com | Required for the Skype framework used by Quick Assist |
| *.latest-swx.cdn.skype.com | Required for the Skype framework used by Quick Assist |
| *.login.microsoftonline.com | Required for logging in to the application (MSA) |
| *.channelwebsdks.azureedge.net | Used for chat services within Quick Assist |
| *.aria.microsoft.com | Used for accessibility features within the app |
| *.api.support.microsoft.com | API access for Quick Assist |
| *.vortex.data.microsoft.com | Used for diagnostic data |
| *.channelservices.microsoft.com | Required for chat services within Quick Assist |
The Quick Assist binary is located at «C:\Windows\System32\quickassist.exe»
History
Edit
The feature was first introduced in Windows XP as Remote Assistance and based on Remote Desktop technologies.[6] Remote Assistance in Windows XP is integrated into the Help and Support Centre UI and allows sending invitations to the support person by email, Windows Messenger or saving the invitation as a file and transferring the file across through other methods.[6] The computer can be controlled by both, the support person connecting remotely as well as the one sending the invitation. Chat, audio-video conversations and file transfer are available.[6]
In Windows Vista, Remote Assistance is upgraded with a standalone user interface and based on RDP 6 and Windows Desktop Sharing API.[7] Two systems administrators can simultaneously connect to a single computer. Remote sessions automatically reconnect after restarting the computer. It also supports session pausing, built-in diagnostics, chat, file transfer and XML-based logging. It reduces bandwidth requirements for low-speed connections. NAT traversal allows a session to be established even if the user is behind a Network Address Translation (NAT) device, for example, a router in a home network. Remote Assistance is configurable using Group Policy and supports command-line switches so that custom shortcuts can be deployed.
In Windows 7, Remote Assistance is based on RDP 7. An extra option to connect using Peer Name Resolution Protocol is added, called Easy Connect if IPv6 connectivity is present.[8] With Easy Connect, only a password needs to be shared instead of an invitation file, and two computers can establish a peer-to-peer connection over the local area network (LAN) or the Internet without a relay server. However, Windows Remote Assistance does not support file transfer and clipboard sharing in Windows 7.[9][10]
Remote Assistance is installed by default on Windows clients, but must be added manually on Windows Server 2008 R2 servers.[11] Remote assistance sessions may be initiated using the Windows Remote Assistance application available on the Start menu under All Apps → Maintenance[12] or by invoking msra.exe from command-line interface.[13]
The original Remote Assistance is included on all releases of Windows 10 as well, but since the Windows 10 Anniversary Update, its Start menu shortcut is removed, effectively hiding it from the user. Instead, a new app called Quick Assist is added.[14] It has mostly the same functionality and a similar user interface with buttons called Get assistance and Give assistance. The design is like UWP apps. Unlike Remote Assistant, Quick Assist requires the support person to sign in using a Microsoft account before dispensing help.[15][16]
In November 2021, Microsoft announced a more business-friendly version of Quick Assist, called Remote Help.[17] While later versions of Windows 10 allowed users and technicians to authenticate against Azure Active Directory, this version includes new integrations such as:
- UAC Elevation
- Remote Assistance Sessions Reports
- Roles Based Authentication (RBAC)
- Management from Intune / the ability to launch from Intune
- Limiting sessions within the organization (Azure AD Tenant)
- Branding
- Conditional Access
- ADFS support
While Remote Assistance establishes a Remote Desktop Protocol (RDP) connection to the end user’s computer (requires TCP port 3389 to be opened on the client machine and the firewall/NAT/router behind which the machine is), Quick Assist is cloud-based and requires one outbound connection from the helper’s PC to the cloud service/Microsoft server, and a separate connection from the cloud service to the machine of the person getting assistance. There are no ports opened on the client device’s firewall.
Features comparison
Edit
| Feature | Windows Remote Assistance | Windows Quick Assist |
|---|---|---|
| Remote assistance for Windows devices | Yes | Windows 10/11 |
| Remote assistance for MacOS devices | No | No |
| Remote assistance for smartphones | No | No |
| Viewing through device camera | No | No |
| Support of multiple screens on the target machine | Yes (all the monitors or clicking Fit to the size and scroll to selected monitor) | Yes (viewing selected monitor or all of them at once) |
| Keyboard layout used when remotely controlling a machine (the helper needs the keyboard layout to match his/her own computer for efficient assistance) | Using target computer keyboard layout | Using helper’s keyboard layout |
| Working with elevated privileges | No (the screen blacks-out and the user has to finish the action instead of the helper) | No[18] |
| Requirement for client software installation | No (installed in Windows by default) | No (installed in Windows by default) |
| Clipboard sharing (copy / paste text between helper’s and end user’s machine) | No (workaround: pasting via embedded chat window; limited number of characters) | No (workaround: pasting via embedded chat window; limited number of characters) |
| File transfer (between helper’s and end user’s machine) | No (workaround: via file share or file sharing cloud service) | No (workaround: via file share or file sharing cloud service) |
| Running scripts remotely (e.g. ipconfig) | No (workaround: scripts have to be copied to the remote machine first and executed from there) | No (workaround: scripts have to be copied to the remote machine first and executed from there) |
| Pausing remote control session by the end user (temporarily stopping screen sharing) | No (only cancelling the whole session) | Yes |
See also
Edit
- Application sharing
- Help desk
References
Edit
- ^ Get help remotely with Quick Assist in Windows 10
- ^ Overview of Remote Assistance in Windows XP
- ^ Windows XP Technical Overview
- ^ «Remote Assistance and Resulting Internet Communication in Windows 7 and Windows Server 2008 R2». TechNet. Microsoft.
- ^ «Use Quick Assist to help users — Windows Client Management».
- ^ a b c How to use remote assistance in Windows XP
- ^ «Writing a Desktop Sharing Application». Enterprise Mobility and Security Blog. Microsoft. 23 March 2007.
- ^ «Peer-To-Peer based Features in Win 7». Archived from the original on 2010-01-23.
- ^ Improvements to Remote Assistance in Windows 7
- ^ «Why doesn’t windows 7 Remote Assistance support sharing clipboard and file transfer? Are there any work arrounds? [sic]». Windows Client TechCenter. Microsoft TechNet Social. 2010-12-10. Archived from the original on 2012-03-23. Retrieved 2011-11-09.
- ^ Remote Assistance and Resulting Internet Communication in Windows 7 and Windows Server 2008 R2
- ^ Get help with your computer using Windows Remote Assistance
- ^ Initiate Remote Assistance from a Command Line or a Script
- ^ «Quick Assistance: Remotely Control Another’s PC / Computer». Windows Call. Retrieved 2019-09-09.
- ^ Popa, Bogdan (9 August 2016). «Microsoft Highlights Its Windows 10 Anniversary Update TeamViewer Killer». Softpedia. SoftNews SRL.
- ^ Srinivasan, Ramesh (2016-08-08). «Using Windows 10’s New «Quick Assist» App (Walkthrough)». Winhelponline.
- ^ «Re: Remote help: A new remote assistance tool from Microsoft». 25 November 2021.
- ^ Remotely assist mobile devices managed by Microsoft Endpoint Manager
Further reading
Edit
- «Windows Desktop Sharing API». Enterprise Mobility + Security blog. Microsoft. 8 March 2007.
- Torre, Charles (16 October 2006). «Windows Vista Remote Assistance: Under the Hood». Channel 9. Microsoft.
- Tulloch, Mitch; Northrup, Tony; Honeycutt, Jerry (2010). «23: Support Users with Remote Assistance» (PDF). Windows 7 Resource Kit. Redmond, WA: Microsoft Press. ISBN 9780735627000.
If you are running an environment with a modern management strategy where your clients are highly mobile and managed by cloud services, your built-in direct connection based tools like RDP or Remote Assistance are limited in usability for supporting your devices. In general with the mobile workforce nowadays we can’t rely on solutions needing a direct connection between two devices.
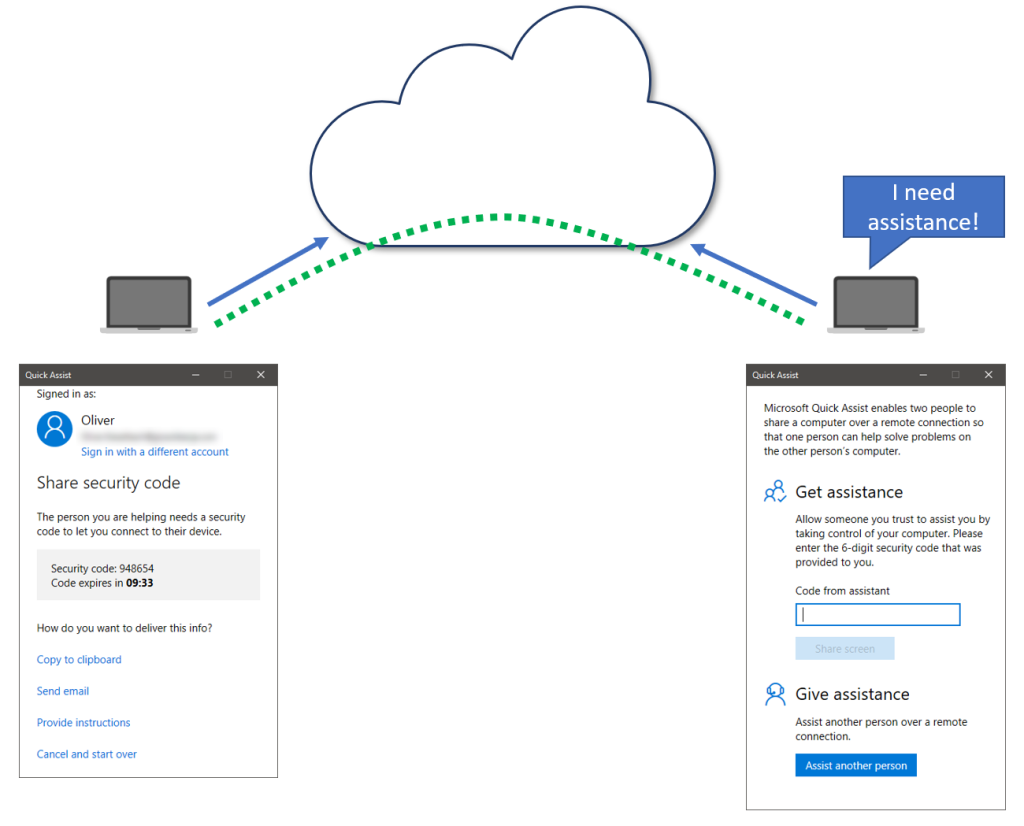
The lesser known built-in Quick Assist from Windows 10 implements a different way of connecting to the remote client. The supporter connects to a Microsoft cloud service by starting Quick Assist and logging in with a Microsoft Account (MSA and AAD accounts supported). Quick Assist will hold a connection to the Microsoft cloud service and the supporter is given a connection code. The user who needs assistance also starts Quick Assist and connects the the same session by specifying the connection code. This way both clients can use outbound connections to the Microsoft cloud service and the cloud service is acting as a broker between both clients. This allows flexible connectivity to remote clients wherever they are. Even behind some firewalls we normally don’t have any issues to successfully build a connection. In fact this is the same approach all the third party vendors like AnyDesk, TeamViewer, BeyondTrust Remote Support (aka Bomgar), or LogMeIn are using with their remote support software products.
That’s great but why should I care about a remote support solution anyway if I have Teams?
That’s a valid point in times where collaboration tools like Microsoft Teams are available and we have screen sharing capabilities where we can give control to someone else:
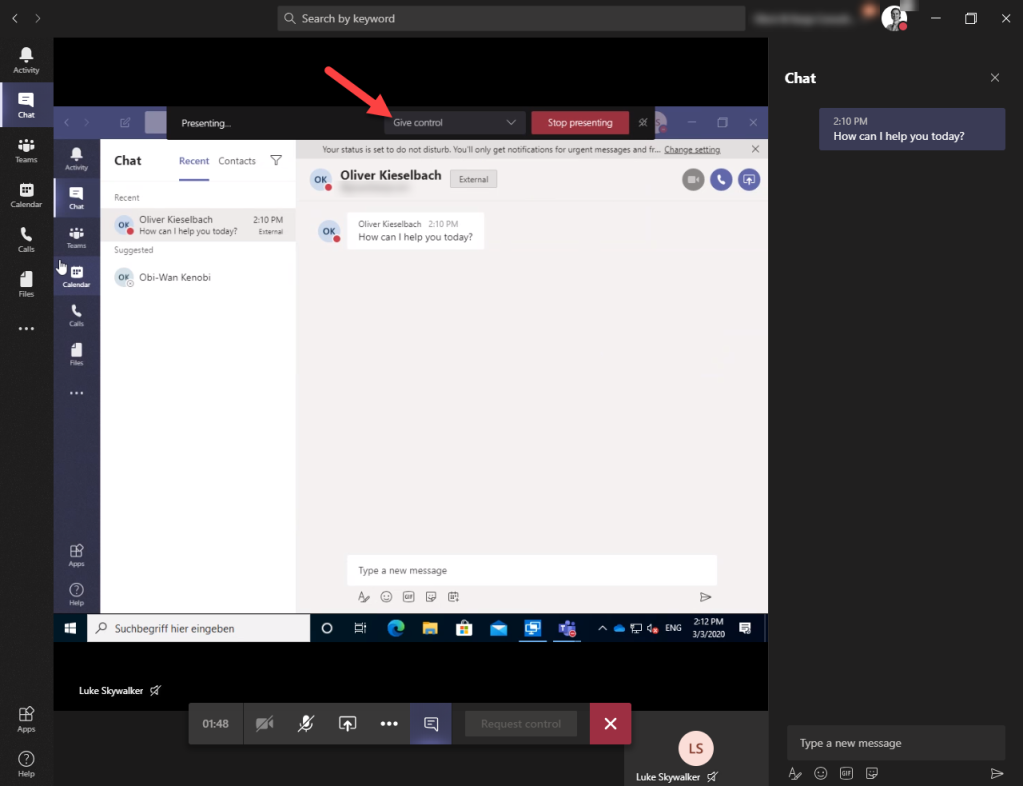
The main issue is the elevation of privilege’s. I guess everyone is familiar with the User Account Control (UAC) in Windows. If you try to elevate a process from a standard user context you will be switched to the so called Secure Desktop, the dimmed desktop in the background is the Secure Desktop which can not easily be circumvented:

The Secure Desktop can not be handled by the collaboration tool Microsoft Teams. As soon as the Secure Desktop appears the shared screen looses track of the session and the remote supporter can’t control any UAC dialog:
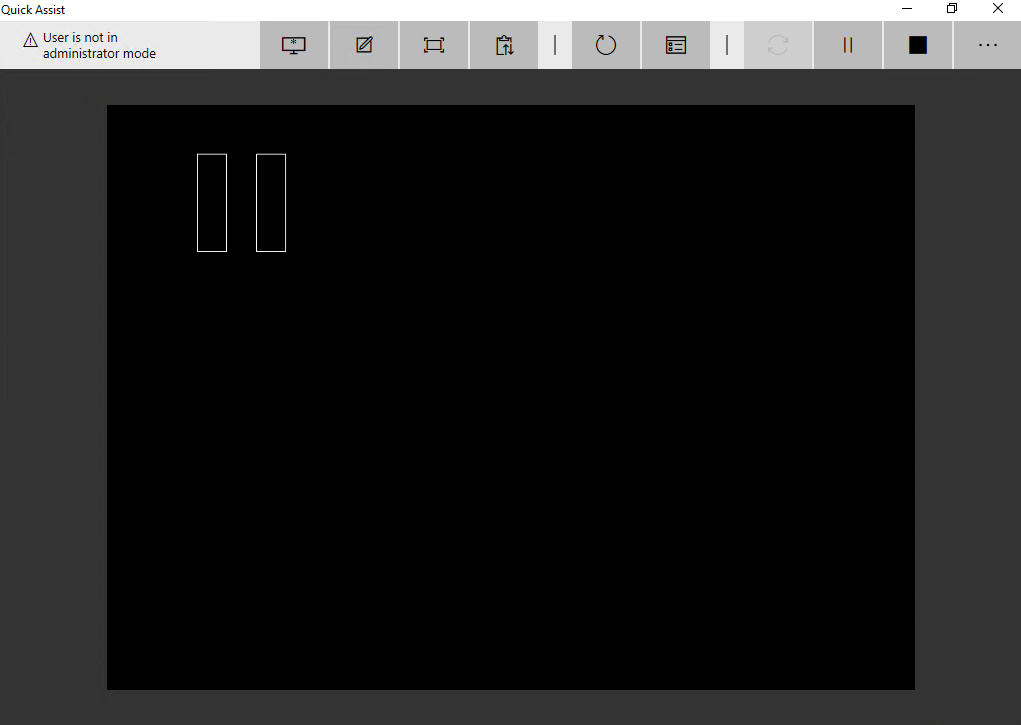
Actually this is the same for Quick Assist, as soon as you try to elevate a process as supporter you loose the session and you get a black “pause” screen like this:
Do I have to switch to third party software for elevation support?
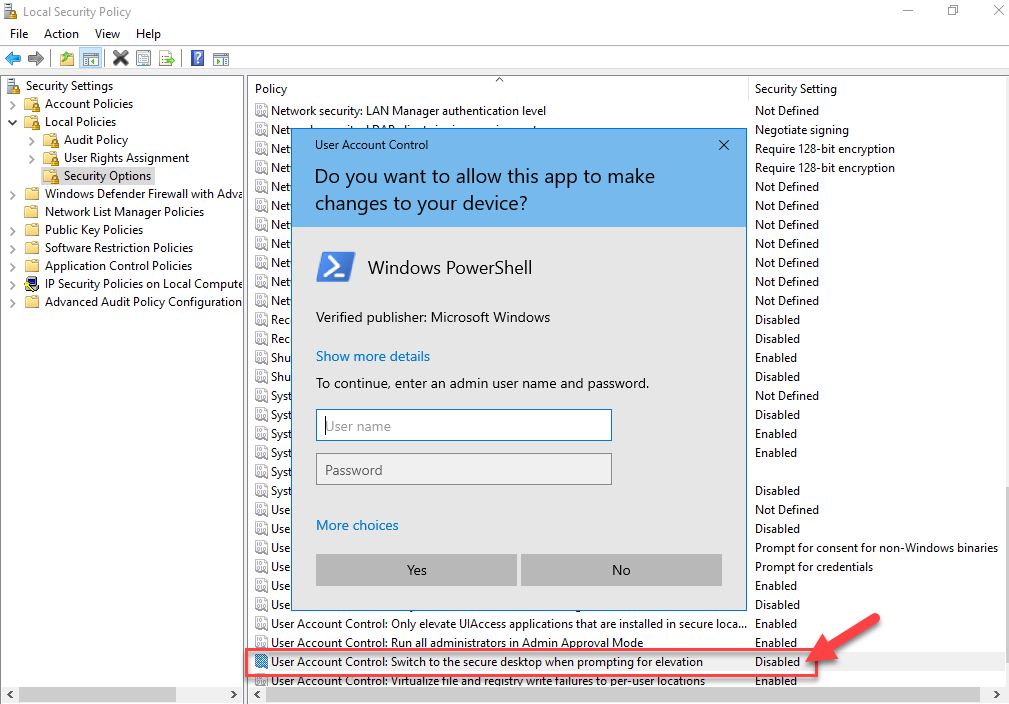
It depends on what functionality you need for your support processes. Third party normally has a lot of functionality which is needed in enterprise environments like extensive logging/auditing etc. All third party products normally support also the elevation scenario, but there is a way to accomplish remote support even with the Windows 10 built-in Quick Assist solution. The simple solution here is to deactivate the “Secure Desktop” on your clients:
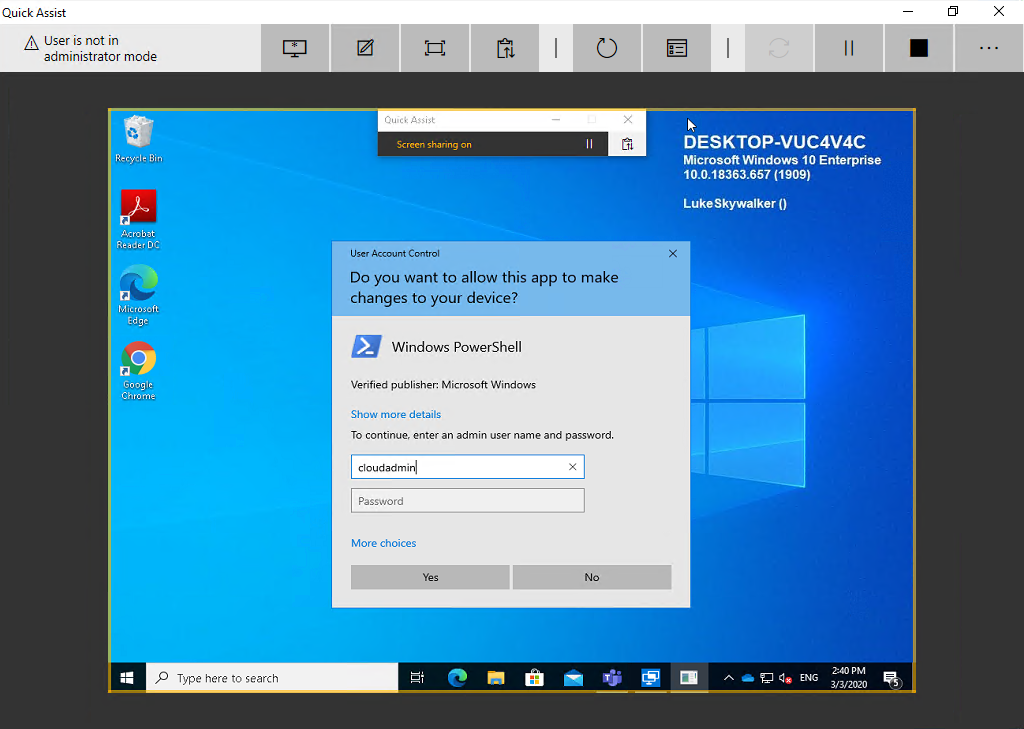
As soon as this is done, the elevation prompt will be visible in the Quick Assist session and can be controlled and the remote supporter can enter credentials for elevation. Instead of the black pause screen you will see the UAC prompt (without secure desktop):
The downside is that the secure desktop is designed that no one can remote control the UAC dialog and inject something as the dialog is not running on the users interactive desktop. Without the secure desktop the UAC dialog is running like every other Windows dialog on the interactive desktop of the user. This makes the device vulnerable to UAC spoofing attacks. If you and your security department are feeling okay with that fact, you can re-configure the devices and get a working Remote Support solution out of the box from Microsoft built directly into Windows 10 called Quick Assist.
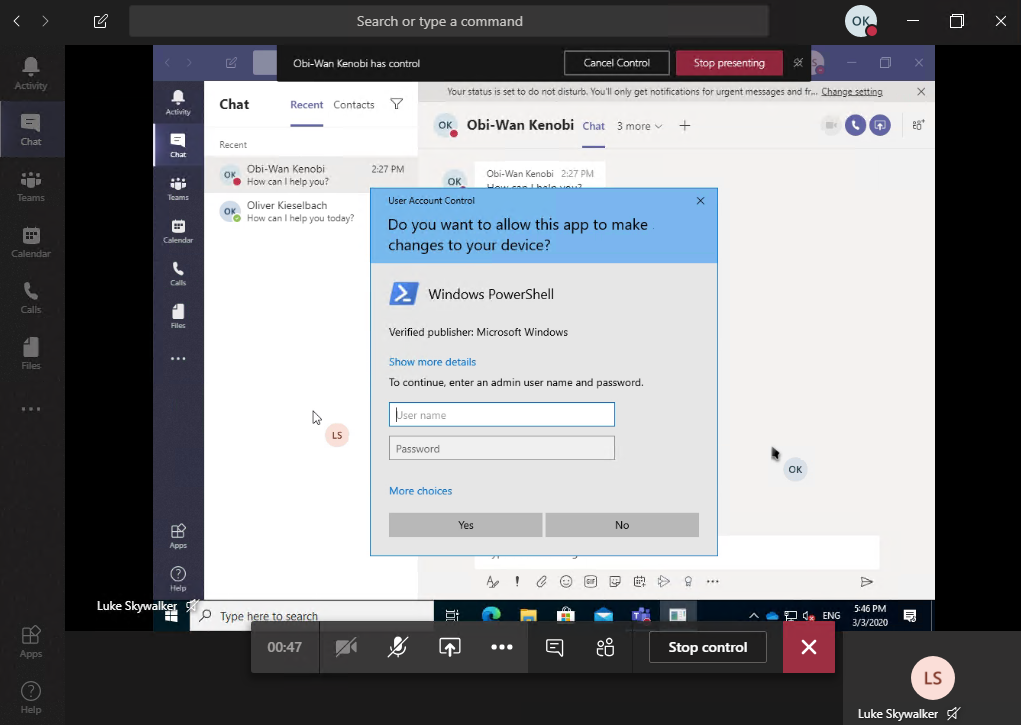
Okay wait but what about Microsoft Teams when I disable the secure desktop? Yes, it would be the logical conclusion that we are able to control the UAC dialog via Teams then also, but that’s not the case. You will see the dialog but you are unable to control it. You can’t enter credentials or click on any of the buttons:
How to reconfigure my devices now?
To deactivate the prompt on the secure desktop, you can easily use a simple PowerShell script provided on my GitHub account and deploy it via Intune to your devices. I used an AAD device group for assignment here:
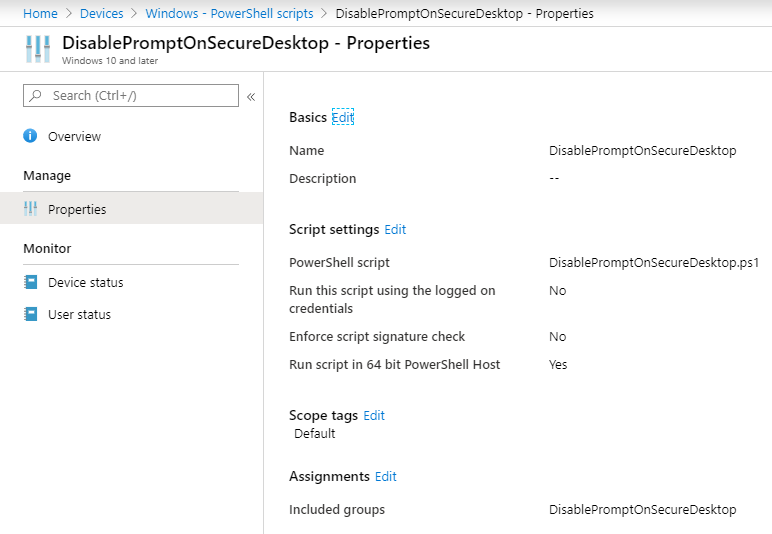
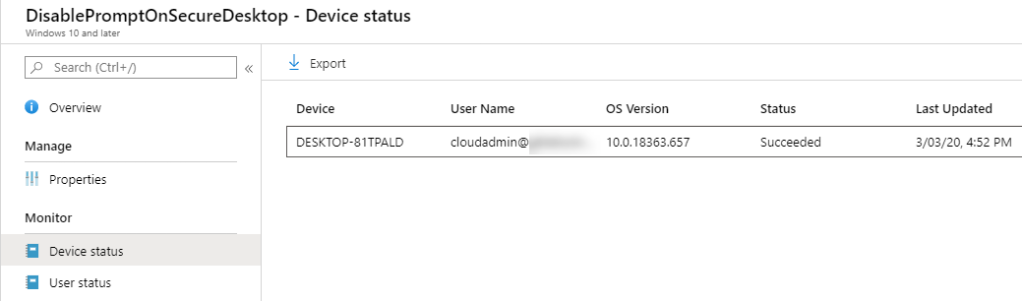
When successfully applied you will see it in the Intune portal:
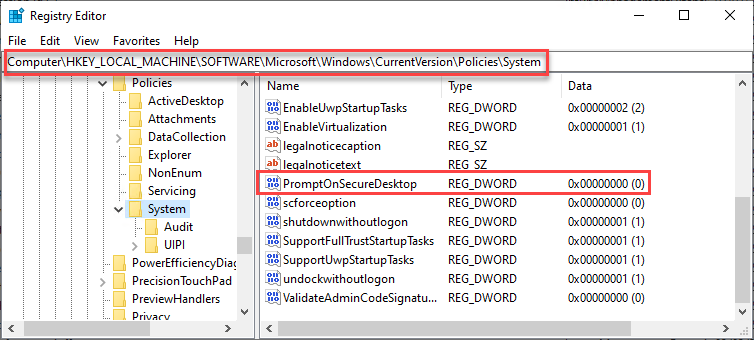
The script is very simple and checks if the PromptOnSecureDesktop value is not 0 and will set it accordingly to 0. You can find the script here:
https://github.com/okieselbach/Intune/blob/master/DisablePromptOnSecureDesktop.ps1
You might have configured UAC already with a custom Intune profile or you use the Intune MDM Security Baseline for Windows 10. The baseline will configure the UAC to a more strict default for standard users to deny UAC requests:
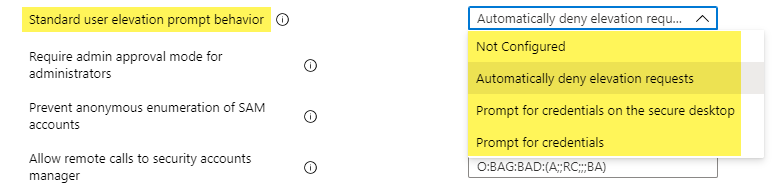
So, you might need to adjust these policies. You can also implement the same behavior by configuring the Intune profile without using the PowerShell script. As already mentioned and shown above, the Microsoft security recommendation for UAC is not to disable the secure desktop. As security is always a trade off between usability and security, you have to adjust from time to time some settings for your organizational needs. If your user support needs this and the security department is taking that risk, you can move forward with this solution.
This might help if Quick Assist provides you enough functionality to support your processes, or if you not have the budget for an additional remote support tool. But actually there are some remote support tools which are quite affordable and providing way more functionality and don’t require to turn of Secure Desktop, one of the candidates here is AnyDesk.
A last goodie and small side note, there is a keyboard shortcut to open Quick Assist via:
[Ctrl] + [Win] + [Q]
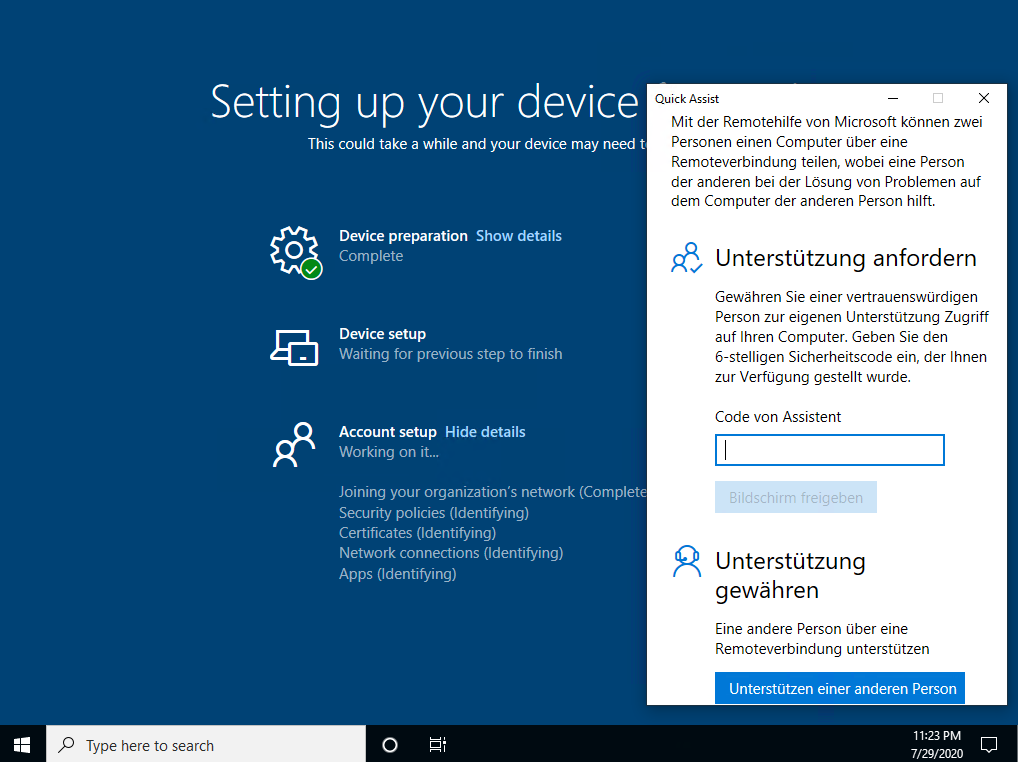
And because Quick Assist is available from the beginning you can call it very early in the process. In the next screenshot I have used the keyboard shortcut during enrollment in the Autopilot user ESP phase (sorry for the german Quick Assist window):
I hope this helps if you are looking for a cheap built-in solution to get Quick Assist to work even with elevation and UAC prompts.
Happy supporting of your user base.
UPDATE 2020-04-22:
Many thanks to one of my blog readers (Tomasz) who mentioned this approach in the comments! I will show the approach to disable Secure Desktop during a remote session when you have enabled the local Administrator account or any other additional local admin account on the target device. Meaning you can keep the local admin credential and do not provide them to the user. It gets a little hacky but it can help people in times of WFH to have another way of enabling elevation for remote support, when no management channel else like MDM, GPO, internet-based software management is available.
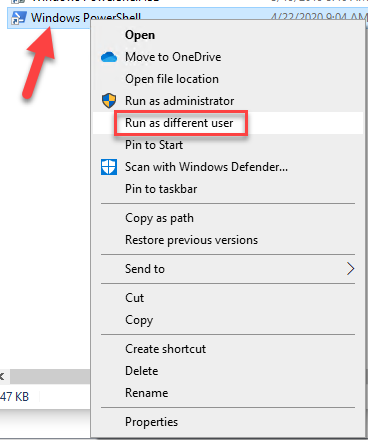
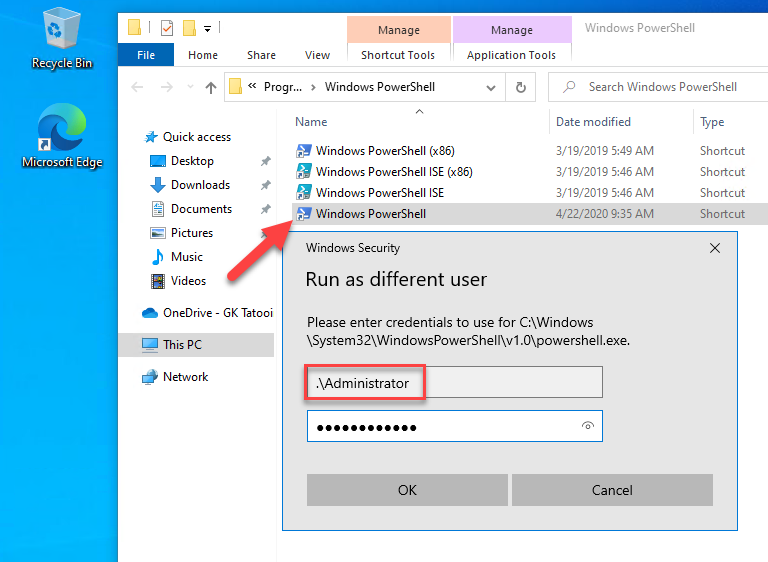
The solution relies on the fact that the “run as different user” does not show an UAC dialog on secure desktop. I’ll quickly demonstrate the way to disable the UAC with the help of this fact. Hold Shift while right click on PowerShell and choose “Run as different user”:
Now you will get a run as dialog without Secure Desktop:
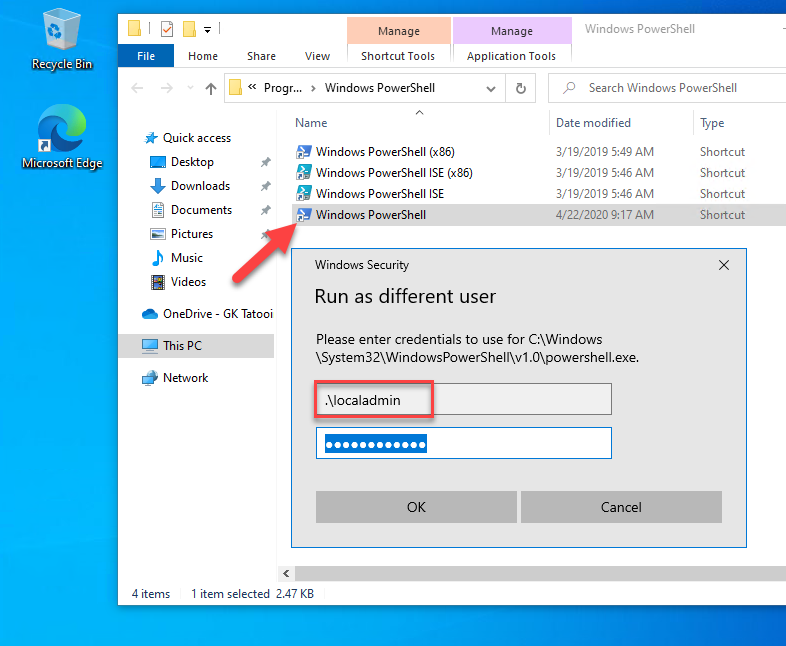
Here you can type in a local admin account or the built-in Administrator account if your devices have it enabled. You will get a PowerShell running in the context of the .\localadmin in my case:
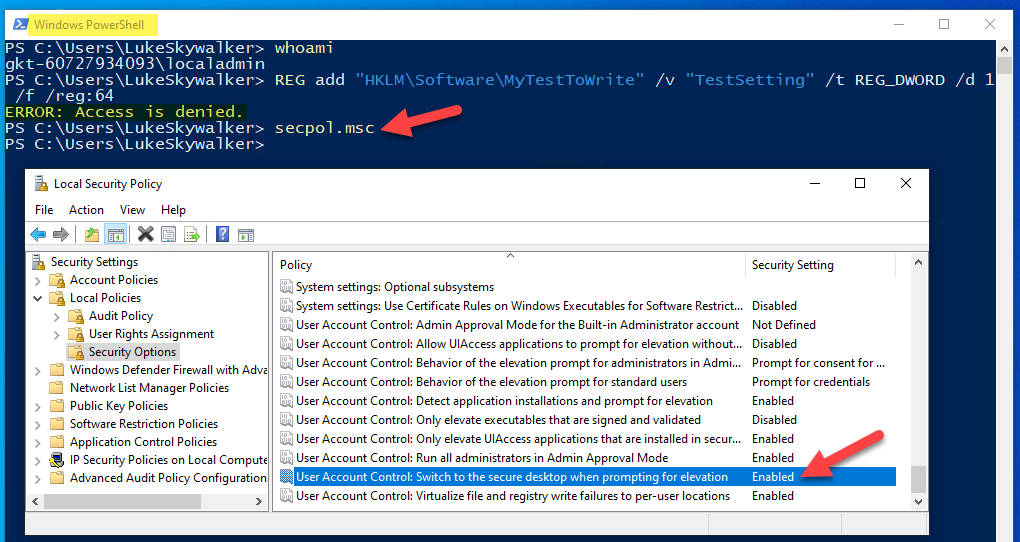
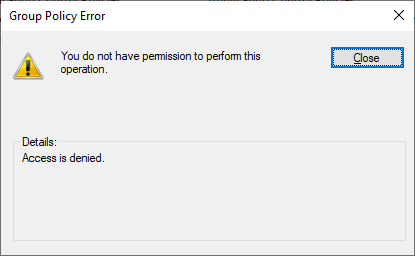
In that PowerShell I’m still not able to do task which require elevation as you can see with my first command “reg add” to write to HKLM. But interestingly I’m able to open secpol.msc as you can see. In the normal user session secpol.msc can’t be opened, you get this dialog:
With the ability to open secpol without UAC you can modify the Prompt for Secure Desktop policy to disable the Secure Desktop and UAC will be shown on the interactive desktop again:
If you have an enabled the built-in local Administrator account, you can use that one for run as different user:
and you will get a PowerShell which is automatically elevated (as long as you run the Windows default UAC settings):
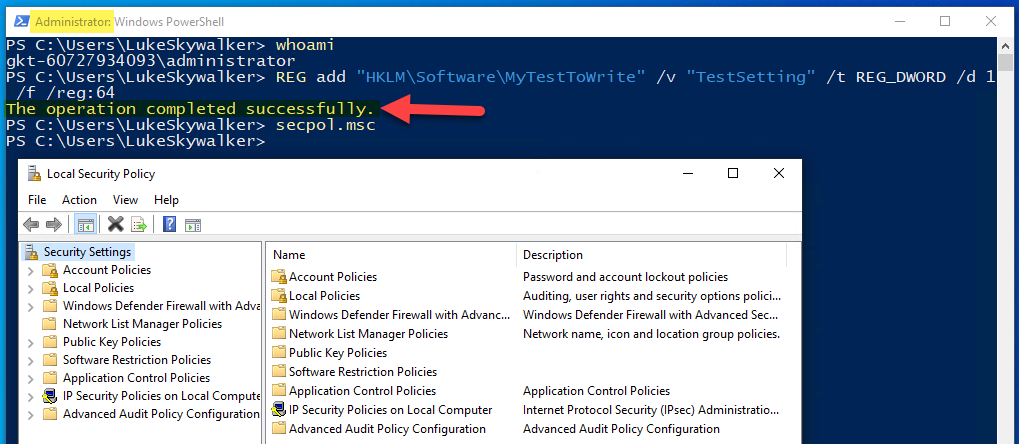
Elevation can be seen in the title and my reg add to HKLM succeeded this time. That way you can modify the the reg key for Secure Desktop directly, or again use secpol.msc to modify it.
Yeah, this approach needs a local admin account but if you have one and do not have any other management channel this might be your rescue.