На чтение 6 мин Просмотров 2.8к. Опубликовано
Обновлено
С каждым годом растет потребление видео и аудио контента в интернете. А значит и на роутер ложится все большая нагрузка. Для ее оптимизации разработчики придумывают новые технологии, позволяющие равномерно распределить нагрузку в сети и обеспечить непрерывную и беспроблемную работу WiFi сети по стандарту QoS (Quality of Service). Одной из них явлется WMM (WiFi Multimedia), которая также может обозначаться как WME (Wireless Multimedia Extensions). Что это за настройка на роутере, как ее включить и использовать?
Что такое WMM (WME)?
WMM, или Wi-Fi Multimedia – это настройка роутера, которая позволяет выдавать приоритет для того типа трафика, которому требуется максимальная пропускная способность канала WiFi в текущий момент. Подробные технические характеристики — в ВикиПедии
На практике это означает то, что при включенной функции «Wireless Multimedia» роутер в первую очередь освобождает сеть с одним или несколькими SSID под трансляцию «тяжелого» контента. Чтобы он воспроизводился на компьютере, телевизоре или ТВ приставке без задержек. И только потом для передачи текстовых документов.
Это и есть так называемая среда QoS (Quality of Service), или «качество сервиса» по-русски. Когда к WiFi подключаются сразу несколько пользователей и потребляют разный контент, то для каждого из них в зависимости от типа подгружаемых данных устанавливается свой «коридор» пропускной способности. Чтобы ни один из них не испытывал дискомфорта во время работы внутри сети. При одноврмененном подключении к роутеру тот человек, который соверщает онлайн звонок через WhatsApp или смотрит видео в высоком разрешении в онлайн кинотеатре получит большую скорость, чем другой клиент, который сидит в социальной сети или скачивает файлы через протокол FTP или Torrent.
Типы WMM (WME) трафика
Технология WMM на маршрутизаторе работает с четыремя типами передаваемого по сети контента:
- Голосовой трафик (AC_VO или Voice) — по умолчанию имеет наивысший приоритет и позволяет производить множественные одновременные голосовые звонки через VoIP
- Видео (AC_Vi или Video) — приоритет просмотра онлайн видео из кинотеатров (Кинопоиск, IVI, Megago, KEON, OKKO и т.д.) или таких сервисов, как YouTube или Vimeo
- Обычный трафик, или так называемый «WMM приоритет негарантированной доставки (AC_BE или Best Effort) — это работа с устройствами, которые не поддерживают механизмов QoS. Используется при обычном интернет-серфинге — печещении сайтов и сервисов через приложения или браузер
- Фоновый трафик (AC_BK или Background) — вспомогательный, имеет самый низкий приоритет WMM, поскольку не слишком требователен к задержкам
Когда нужно активировать WMM в маршрутизаторе на практике?
В реальной жизни целесообразно использовать WMM в следующих случаях:
- Видеозвонки по web-камере с высоким разрешением картинки (HD, от 1080p)
- Просмотр Youtube или других онлайн видеосервисов в высоком разрешении (1080, 4K)
- Просмотр Кинопоиска, OKKO или других мультимедийных онлайн кинотеатров
- Звонок через интернет по VoIP из приложений Telegram, WhatsApp, Viber, Skype
- Онлайн игры в многопользовательской среде, например WoT, WoW, Archage, Perfect World
При активированном WMM на роутере именно такому типу контента будет выдаваться приоритет перед остальными типами трафика.
WMM APSD
APSD — это дополнительная надстройка над функцией WMM, которая контролирует обмен информацией между модулями WiFi смартфона и роутера для экономии энергии батареи. При переходе телефона в режим ожидания для него на роутере создается некий буфер обмена, в которые подгружаются данные из интернета. И при активации смартфона он берет их именно оттуда, что требует меньшего расхода энергии.
Не все роутеры поддерживают данную опцию. Но если она есть, то как правило можно активировать WMM APSD автоматически или задать расписание для его работы.
Плюсы и минусы использования WMM
Увеличивается скорость передачи больших файлов, которые нужно одновременно с загрузкой воспроизводить на экране
Повышается эффективность использованиия беспроводного или кабельного канала связи
Удлиняется продолжительность работы смартфонов и других девайсов, которые работают от аккумулятора
Стандарт WMM поддерживается большинством брендов, выпускающих сетевую или компьютерную технику
Нет возможности установить полный приоритет для видео и голоса перед тругим трафиком
Устаревшие гаджеты не поддерживают WMM
Названия WMM на разных устройствах
Если вы захотите активировать функцию WMM на WiFi роутере или другом устройстве или узнать, поддерживается ли этот стандарт, то можете столкнуться с тем или иным его наименованием:
- WMM Capable (Совместимый с WMM
- WMM gaming environment (Игровая среда)
- Multimedia Extensions (Мультимедиа расширения)
- WME или Wireless Multimedia Extensions (Беспроводные мультимедиа расширения)
Как включить WMM на роутере?
Для работы WMM внутри локальной сети необходимо активировать данную функцию на роутере. Она работает для всех стандартов WiFi, начиная с 802.11n — 802.11ac (Wi-Fi 5), 802.11ax (Wi-Fi 6). Но может не поддерживаться некоторыми моделями — со спецификациями устройства нужно ознакомиться заранее еще до покупки
WMM на роутере TP-Link
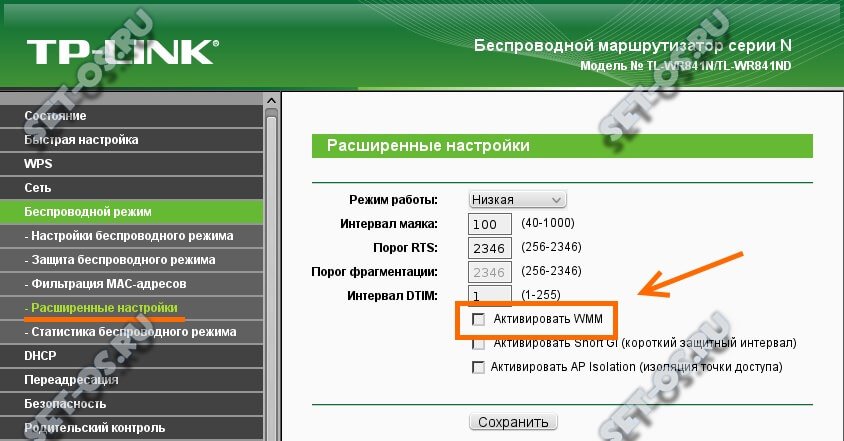
В более старых модификацях TP-Link с серо-зеленой администраторской панелью настройка WMM расположена непосредственно в меню управления каждого из диапазонов сетей WiFi (2.4 5 ГГц). Нужно зайти в раздел «Беспроводной режим 2.4 GHz» (или 5 GHz) и открыть подрубрику «Дополнительные настройки». И поставить галочку на «Включить WMM»

В более новых роутерах ТП-Линк с админкой в бело-голубых оттенках надо зайти во вкладку «Дополнительные настройки». Здесь открываем меню «Системные инструменты — Параметры системы». И устанавливаем «Включить WMM»

WMM в маршрутизаторе Asus
На роутерах Asus, имеющих поддержку WMM, ее настройка скрывается в разделе «Беспроводная сеть». Здесь надо переключиться на вкладку «Профессионально» и напротив пункта «WMM» в выпадающем списке выбрать «Включить»
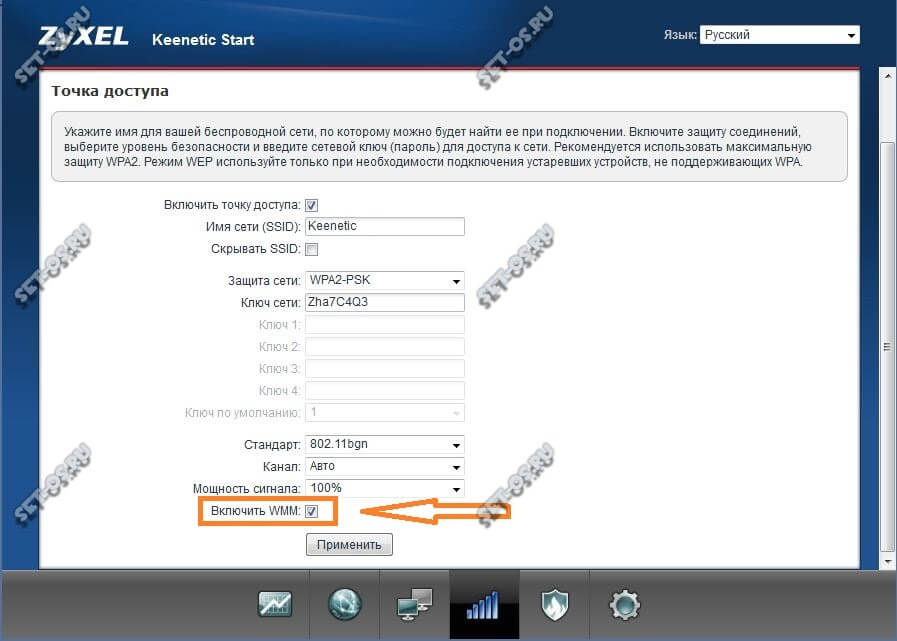
WMM на Zyxel Keenetic
На роутерах Zyxel Keenetic все совсем просто. В нижней панели навигации выбираем «Wi-Fi» и на главной странице этой категории ставим флажок на «Включить WMM»
D-Link
В панели маршрутизаторов D-Link «WMM» вынесен в отдельный пункт меню в рубрике «Wi-Fi». Ставим здесь галочку напротив названия функции. Удобно то, что на этой странице также отображается статистика использования беспроводного канала теми или иными приложениями
Актуальные предложения:
Задать вопрос
- 10 лет занимается подключением и настройкой беспроводных систем
- Выпускник образовательного центра при МГТУ им. Баумана по специальностям «Сетевые операционные системы Wi-Fi», «Техническое обслуживание компьютеров», «IP-видеонаблюдение»
- Автор видеокурса «Все секреты Wi-Fi»
На чтение 9 мин Просмотров 21к.

Сергей Ломакин
.
Задать вопрос
WMM расшифровывается как Wi-Fi Multimedia. Этот протокол разработан для беспроводных сетей. Поддерживает главные функции стандарта QoS (Quality of Service — качество обслуживания), устанавливая повышенный приоритет для мультимедиа трафика над остальным. Например, это может быть голосовой трафик или видеопоток. Режим WMM способствует стабильной работе IP-телефонии, позволяет проводить качественные видеотрансляции, без задержек воспроизводить видео на web-страницах. Включить WMM можно в настройках роутера, в разделе Wlan.
Содержание
- Что такое WMM, как работает режим
- Плюсы и минусы технологии
- В каких случаях стоит активировать WMM
- Как включить и настроить эту функцию в роутере
- FAQ
- Что такое wmm apsd?
- Почему включение это функции не гарантирует быстрый и стабильный сигнал?
Что такое WMM, как работает режим
Wi-Fi multimedia основан на стандарте IEEE 802.11e, что позволяет задействовать главные функции технологии QoS, которая и задает разным видам трафика свои приоритеты.
Протокол WMM имеет четыре категории доступа для каждого типа трафика, соответственно их потребностям:
- Голосовой – имеет самый высокий приоритет, отчего множество каналов VoIP работают через интернет с минимальной задержкой.
- Видеотрафик. Имеет приоритет над обычным.
- Обычный трафик или трафик от устройств, работающих без технологии QoS. Этот вид трафика передается, если есть ресурсы для него.
- Фоновый. Имеет самый низкий приоритет. Как правило, у него нет требований ко времени задержки и производительности при отправке пакетов.
В некоторых сетевых устройствах есть дополнительные возможности WMM – например, DLS и APSD. Первая функция регулирует качество сигнала, вторая отвечает за режим энергосбережения, если мобильное устройство ее поддерживает.

Режим WMM присутствует во всех новых роутерах. Протокол не поддерживается в старых моделях роутеров с устаревшим программным обеспечением.
Плюсы и минусы технологии
Как и любая технология, WMM имеет свои преимущества и недостатки.
Улучшает качество голосового трафика, видеоконтента и онлайн-игр.
Работа функции заметна сразу после включения.
Увеличивает продолжительность автономной работы мобильных устройств.
Стопроцентной гарантии приоритета мультимедиа трафика нет.
Приоритет выставляется автоматически, самостоятельно задать его нельзя.
В каких случаях стоит активировать WMM
Об этой функции и о ее способности увеличивать качество картинки знают многие геймеры и пользователи, просматривающие видеотрансляции. С выключенной опцией мультимедийной игровой среды Wi-Fi скорость соединения с маршрутизатором и, соответственно, интернета будет не более 54 Мбит в секунду, что мало, чтобы комфортно работать с голосом и видео, особенно для просмотра видео онлайн качества 1080р и выше.
Включение режима multimedia gaming environment устанавливает приоритет самому «тяжелому» трафику и это правильно с точки зрения целесообразности использования канала: этот трафик нуждается в большей пропускной способности, чем загрузка веб-страниц, так как современные сайты оптимизированные и быстрые.
С этой технологией улучшается пинг до сервера, обмен данными быстрее, потоковое видео воспроизводится стабильно и качественно. Также устанавливается хорошее качество звука при звонках через мессенджеры. Все это необходимо тем, кто работает удаленно через интернет.
Как включить и настроить эту функцию в роутере
Чтобы настроить режим WMM в роутере, необходимо иметь доступ к панели администратора устройства.
- С помощью адресной строки браузера войдите в личный кабинет роутера (адрес входа в настройки зависит от модели роутера, например, это может быть 192.168.0.1, 192.168.1.1).
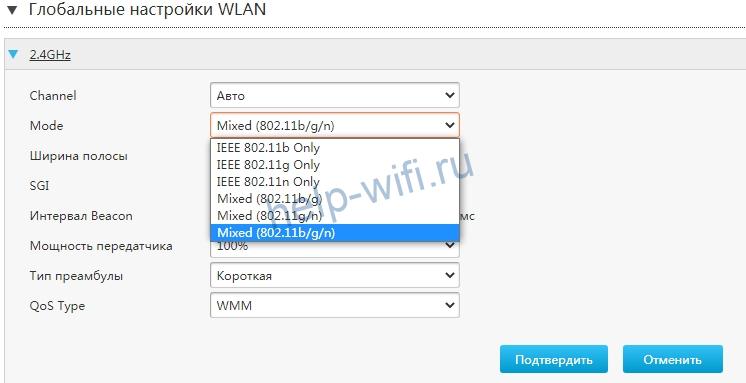
- Перейдите в раздел Wi-Fi или Беспроводные сети. Переместитесь в расширенные или дополнительные настройки.
- WMM в настройках роутера находится в разделе настроек Wlan. Проверьте, включен ли там режим WMM.
Во всех современных роутерах присутствует поддержка Wi-Fi WMM, которая обычно включена по умолчанию.

Если интерфейс панели администратора англоязычный, следует искать словосочетание «wmm support».

Маршрутизаторы Zyxel Keenetic и D-Link обычно имеют расширенные настройки этого режима, среди которых есть ширина канала и мощность сигнала. Чтобы включить режим, необходимо установить напротив его названия галочку, выбрать соответствующий пункт из выпадающего меню, нажать «enable wmm» — зависит от модели оборудования. Желательно выставить остальные значения ширины канала мощности сигнала максимально, чтобы приоритеты и передача данных работали стабильно.
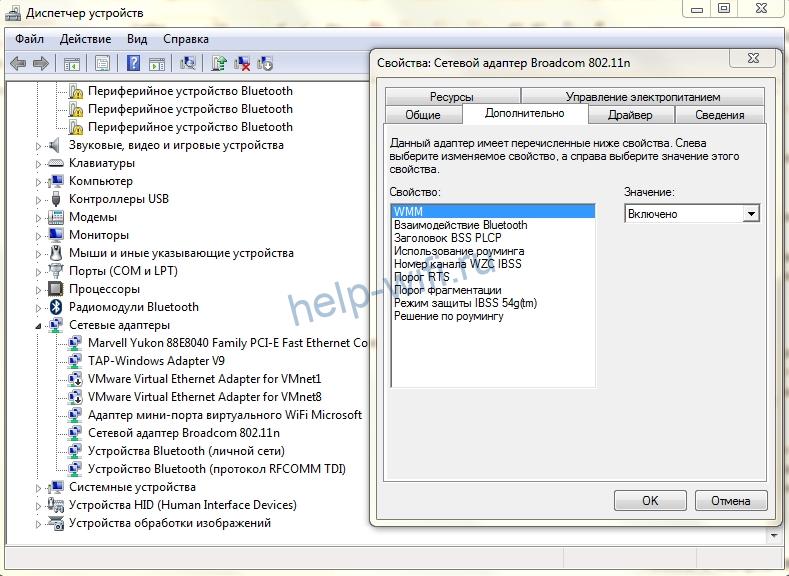
Чтобы включить мультимедийный режим на ноутбуке или компьютере с Windows, подключенном к Wi-Fi, необходимо зайти в диспетчер устройств, в разделе «Сетевые адаптеры» найти беспроводную сетевую карту, нажать на нее правой кнопкой мыши, выбрать свойства и в них вкладку «Дополнительно». Откроется раздел со списком, в нем надо найти строку «WMM» и установить значение «включено».
FAQ
Включение функции WMM – дело простое, но насчет этой технологии у пользователей есть немало вопросов.
Что такое wmm apsd?
Эта функция позволяет увеличить время работы мобильного устройства. Современные мультимедийные сервисы становятся более ресурсоемкими, нагружая устройства и ускоряя расход энергии аккумулятора. Технология WMM APSD разработана для беспроводных сетей Wi-Fi для контроля радиомодуля роутера и модуля принимающего устройства, экономя электроэнергию мобильного устройства. Чтобы эта функция работала, необходимо, чтобы источник и приемник поддерживали ее. Наличие функции можно посмотреть в технической документации устройства.
Функция включает более долгий интервал маяка и другой временной период DTIM. Все это помогает роутеру создавать буфер данных для устройства при его переходе в режим сна. Есть два вида этой функции: принудительной экономии энергии и энергосбережения по расписанию.
Включить WMM APSD можно в настройках точки доступа, если она им поддерживается. Включается она в разделе настройки беспроводной сети. Вот, например, как она включается на роутере Asus DSL-N66U:

Почему включение это функции не гарантирует быстрый и стабильный сигнал?
Это может произойти по нескольким причинам:
- Беспроводные точки доступа соседей, которые могут перебивать сигнал и создавать помехи.
- Толстые стены и другие преграды, ослабляющие сигнал.
- Большое расстояние до роутера.
- Наличие рядом других беспроводных устройств, которые могут вносить помехи в сигнал.
- Устройства с USB 3.0 могут мешать устройствам, действующим в диапазоне 2,4 ГГц.
Чтобы точка доступа не конфликтовала с соседскими, можно установить на ней другой стандарт передачи данных, но это сработает, если на соседских точках доступа стоит одинаковый стандарт.
Что такое WMM gaming environment?
Не будет ли включенная функция WMM мешать загрузке немультимедийного трафика?
Как проверить работу WMM на практике?
В моем роутере нет функции WMM, как решить эту проблему?
Как работает сертификат Power Save?
Технология WMM решает многие проблемы с загрузкой мультимедийного трафика. Кроме своей основной функции, имеет возможность управлять энергосбережением, качеством передачи информации и другими процессами беспроводной сети. Технология продолжает развиваться и обновляется вместе с оборудованием и беспроводными устройствами, что приводит к лучшему качеству работы сети.

Для того, чтобы обеспечить клиентам беспроводных сетей определённый уровень Качества обслуживания QOS был создан специальный стандарт Wi-Fi Multimedia — WMM.
У некоторых производителей сетевого оборудования он называется несколько иначе — Wi-Fi Multimedia Extensions, WME. За основу взят стандарт IEEE 802.11e, благодаря чему обеспечены основные возможности QOS для WiFi.
На текущий момент WMM определяет четыре класса обслуживания трафика беспроводной сети:
- голос, высокий приоритет
- видео (уникаст и мультикаст)
- обычный, best-effort
- фоновый, самый низкий приоритет
Эта технология не предоставляет средств абсолютной и безоговорочной приоритизации. Но тем не менее даёт возможность пакетам с приоритетом передаваться быстрее, чем другие за счёт меньших задержек, по сравнению с менее приоритетными.
По совместимости устройств с поддержкой функции WMM и без таковой — проблем не возникает. Если трафик приходит от устройства, не поддерживающего эту технологию, то он воспринимается как best-effort, т.е. с негарантированной доставкой.
Хотя сейчас встретить современный роутер или точку доступа без поддержки WMM QOS достаточно сложно, так как она поддерживается большинством производителей сетевого оборудования и прочей электроники. На старых устройствах поддержка функционала Wi-Fi Multimedia очень часто можно активировать через установку новой прошивки (firmware).
Плюсы и минусы технологии WMM
Плюсы:
+ широко поддерживается многими производителями оборудования;
+ повышает эффективность беспроводной сети;
+ позволяет увеличить время автономной работы телефонов и планшетов за счёт управления электропитанием U-APSD;
+ работает для голосового трафика и видео;
+ позволяет достичь максимальной скорости передачи по воздуху;
Минусы:
— не поддерживается в более старых устройствах;
— не обеспечивает стопроцентного приоритета голосового трафика;
По умолчанию, функция приоритизации беспроводного трафика на многих модемах и маршрутизаторах выключена. Для того, чтобы включить WMM QOS на роутере, необходимо зайти в его веб-интерфейс (обычно по IP-адресу 192.168.0.1 или 192.168.1.1), открыть настройки беспроводной сети и поставить соответствующую галочку. Вот так это делается на роутерах TP-Link:
А вот так это делается на роутера Zyxel Keenetic:
Грубо говоря, ищите опцию в общих параметрах сети. Если там её нет — смотрите в расширенных настройках. В некоторых случаях (как на маршрутизаторах D-Link) настройки WMM QOS находятся в отдельном пункте меню.
How WMM works
WMM works by dividing traffic into 4 access categories: background, best
effort, video, voice. QoS policy (different handling of access categories) is
applied on transmitted packets, therefore it is transmitting device is
treating different packets differently — that is — e.g. AP does not have
control over how clients are transmitting packets, and clients do not have
control over how AP transmits packets.
Mikrotik AP and client classifies packets based on priority assigned to them,
according to table (as per WMM spec):
1,2 — background
0,3 — best effort
4,5 — video
6,7 — voice
To be able to use multiple WMM access categories, not just best effort where
all packets with default priority 0 go, priority must be set for those
packets. By default all packets (incoming and locally generated) inside
router have priority 0.
«Better» access category for packet does not necessarily mean that it will be
sent over the air before all other packets with «worse» access category.
WMM works by executing DCF method for medium access with different settings
for each access category (EDCF), which basically means that «better» access
category has higher probability of getting access to medium — WMM enabled
station can be considered to be 4 stations, one per access category, and the
ones with «better» access category use settings that make them more likely to
get chance to transmit (by using shorter backoff timeouts) when all are
contending for medium. Details can be studied in 802.11e and WMM specification
How to set priority
Priority of packets can be set using «set priority» action of ip firewall
mangle rules and/or bridge firewall filter rules. Priority can be set to
specific value or to «ingress priority». Ingress priority is priority value
that was detected on incoming packet, if available. Currently there are 2
sources of ingress priority — priority in VLAN header and priority from WMM
packets received over wireless interface. For all other packets ingress
priority is 0.
![]()
Note: Starting from v6.x priority can be set from DSCP by setting from-dscp-high-3-bits
Note that ingress priority value is not automatically copied to priority
value, correct rule needs to be set up to do this!
So there are basically 2 ways to control/set priority (remember, that both
require setting up correct rule(s)!):
— assign priority with rules with particular matchers (protocol, addresses,
etc),
— set it from ingress priority.
This essentialy means that if it is not possible or wanted to classify
packets by rules, configuration of network must be such that router can
extract ingress priority from incoming frames. Remember there are currently
2 sources for this — VLAN tag in packets and received WMM packets.
Do not mix priority of queues with priority assigned to packets. Priorities of
queues work separately and specify «importance» of queue and has meaning only
within particular queue setup. Think of packet priority as of some kind of
mark, that gets attached to packet by rules. Also take into account that this
mark currently is only used for outgoing packets when going over WMM enabled
link, and in case VLAN tagged packet is sent out (no matter if that packet is
tagged locally or bridged).
Example
For example, in setup
PPPoE server -> WMM AP -> client,
if AP is just forwarding PPPoE traffic (therefore inspecting encapsulated IP
packets to match e.g. by protocol is not possible, as packets can be
encrypted and compressed), priority must come to AP from PPPoE server in VLAN
tag, so you have to use VLAN (between PPPoE server and AP) for this, just to
communicate priority information.
Note that you do not have to forward VLAN encapsulated traffic to client —
VLAN can be terminated at AP, VLAN tag is needed only when entering AP.
In case AP is PPPoE server itself, there is no need to use VLAN — priority
can be set by rules before it is encapsulated in PPPoE.
Priority from DSCP
Another way of setting priority is by using DSCP field in IP header, this can
only be done by firewall mangle rule «set priority» action. Note that DSCP in
IP header can have values 0-63, but priority only 0-7. Effective priority
after set from DSCP value will be 3 high bits of DSCP value.
Remember that DSCP can only be accessed on IP packets!
Note, that to use this feature, DSCP value in IP header should be set
somewhere.
It is best to set DSCP value in IP header of packets on some border router
(e.g. main router used for connection to internet), based on traffic type.
E.g. set DSCP value for packets coming from internet belonging to sip
connections to 7, and 0 for the rest. This way packets must be marked only at
one place. Then all APs in network set packet priority from DSCP value with
just one rule.
In setup:
<internet> — border router — <network> — WMM AP — client
border router sets DSCP value for sip traffic, and WMM AP sets priority from
DSCP value. Note that in this setup DSCP is set only for traffic _to_ client.
Sometimes it can be useful to set also DSCP on traffic coming _from_ client
(e.g. if 2 clients connected to different APs are talking between
themselves) — this can be done on APs.
Combining priority setting and handling solutions
Complex networks and different situations can be handled by combining
different approaches of carrying priority information to ensure QoS and
optimize use of resources, based on «building blocks» described above.
Several suggestions:
— the less number of filter rules in whole network, the better (faster) — try
to classify packets only when necessary, prefer to do that on fast routers as
most probably connection tracking will be required.
— use DSCP to carry priority information in IP packets forwarded in your
network, this way you can use it when needed.
— use VLANs where necessary, as they also carry priority information, make
sure ethernet bridges and switches in the way, if any, are not clearing
priority information in VLAN tag. In MT bridges you have to setup bridge
firewall rule to set priority from ingress priority for this!
— remember that QoS does not improve throughput of links, it just treats
different packets differently, and also that WMM traffic over wireless link
will discriminate regular traffic in the air.
Table Of Contents
Configuring QoS in a Wireless Environment
Understanding QoS for Wireless LANs
QoS for Wireless LANs Versus QoS on Wired LANs
Impact of QoS on a Wireless LAN
Precedence of QoS Settings
Using Wi-Fi Multimedia Mode
Configuring QoS
Layer2 QoS (RBCP and Voice)
TPID-Tag Protocol Identifier
Priority
CFI-Canonical Format Indicator
VID-VLAN Identifier
Layer3 QoS (IP DSCP)
Radio Access Category Definitions
CW-min and CW-max Settings for Point-to-Point and Point-to-Multipoint Bridge Links
QoS Configuration Examples
QoS Example Configuration for VLAN
QoS Example of IP DSCP and IP Precedence
Additional Information
Configuring QoS in a Wireless Environment
This chapter describes how to configure quality of service (QoS) on your Cisco wireless interface. With this feature, you can provide preferential treatment to certain traffic at the expense of other traffic. Without QoS, the device offers best-effort service to each packet, regardless of the packet contents or size. It sends the packets without any assurance of reliability, delay bounds, or throughput.
This chapter consists of these sections:
•![]() Understanding QoS for Wireless LANs
Understanding QoS for Wireless LANs
•![]() Configuring QoS
Configuring QoS
•![]() QoS Configuration Examples
QoS Configuration Examples
Understanding QoS for Wireless LANs
By default, networks operate on a best-effort delivery basis, which means that all traffic has equal priority and an equal chance of being delivered in a timely manner. When congestion occurs, all traffic has an equal chance of being dropped.
When you configure QoS on the device, you prioritize network traffic, creating QoS policies and applying the policies to the VLAN configured on your device. Implementing QoS in your wireless LAN makes network performance more predictable and bandwidth utilization more effective. If you do not use VLANs on your network, you can apply your QoS policies to the Ethernet and radio ports.

Note ![]() When you enable QoS, the device uses Wi-Fi Multimedia (WMM) mode by default.
When you enable QoS, the device uses Wi-Fi Multimedia (WMM) mode by default.
QoS for Wireless LANs Versus QoS on Wired LANs
The QoS implementation on wireless LANs differs from QoS implementations on wired networks. With QoS enabled, bridges:
•![]() Do not classify packets; they prioritize packets based on differentiated services code point (DSCP) value, client type (such as a wireless phone), or the priority value in the 802.1q or 802.1p tag.
Do not classify packets; they prioritize packets based on differentiated services code point (DSCP) value, client type (such as a wireless phone), or the priority value in the 802.1q or 802.1p tag.
•![]() They do not match packets using ACL; they use only modular quality of service (MQC) class-map for matching clauses.
They do not match packets using ACL; they use only modular quality of service (MQC) class-map for matching clauses.
•![]() They do not construct internal DSCP values; they only support mapping by assigning IP DSCP, precedence, or protocol values to Layer 2 COS values.
They do not construct internal DSCP values; they only support mapping by assigning IP DSCP, precedence, or protocol values to Layer 2 COS values.
•![]() They carry out Enhanced Distributed Coordination Function (EDCF)-like queuing on the radio egress port only.
They carry out Enhanced Distributed Coordination Function (EDCF)-like queuing on the radio egress port only.
•![]() They do only FIFO queuing on the Ethernet egress port.
They do only FIFO queuing on the Ethernet egress port.
•![]() They support only 802.1Q/P tagged packets. Bridges do not support InterSwitch Link Protocol (ISL).
They support only 802.1Q/P tagged packets. Bridges do not support InterSwitch Link Protocol (ISL).
•![]() They support only MQC policy-map set cos action.
They support only MQC policy-map set cos action.
To contrast the wireless LAN QoS implementation with the QoS implementation on other Cisco network devices, see the Cisco IOS Quality of Service Solutions Configuration Guide at this URL:
http://www.cisco.com/univercd/cc/td/doc/product/software/ios122/122cgcr/fqos_c/index.htm
Impact of QoS on a Wireless LAN
Wireless LAN QoS features are a subset of the proposed 802.11e draft. QoS on wireless LANs provides prioritization of traffic from the device over the WLAN based on traffic classification.
Just as in other media, you might not notice the effects of QoS on a lightly loaded wireless LAN. The benefits of QoS become more obvious as the load on the wireless LAN increases, keeping the latency, jitter, and loss for selected traffic types within an acceptable range.
QoS on the wireless LAN focuses on downstream prioritization from the device. These are the effects of QoS on network traffic:
•![]() The radio downstream flow is traffic transmitted out the device radio to another bridge. This traffic is the main focus for QoS on a wireless LAN.
The radio downstream flow is traffic transmitted out the device radio to another bridge. This traffic is the main focus for QoS on a wireless LAN.
•![]() The radio upstream flow is traffic received on the device radio from another bridge. QoS for wireless LAN does not affect this traffic.
The radio upstream flow is traffic received on the device radio from another bridge. QoS for wireless LAN does not affect this traffic.
•![]() The Ethernet downstream flow is traffic sent from a switch or a router to the Ethernet port on the device. If QoS is enabled on the switch or router, the switch or router might prioritize and rate-limit traffic to the device.
The Ethernet downstream flow is traffic sent from a switch or a router to the Ethernet port on the device. If QoS is enabled on the switch or router, the switch or router might prioritize and rate-limit traffic to the device.
•![]() The Ethernet upstream flow is traffic sent from the device Ethernet port to a switch or router on the wired LAN. The device does not prioritize traffic that it sends to the wired LAN based on traffic classification.
The Ethernet upstream flow is traffic sent from the device Ethernet port to a switch or router on the wired LAN. The device does not prioritize traffic that it sends to the wired LAN based on traffic classification.
Precedence of QoS Settings
When you enable QoS, the device queues packets based on the Layer 2 class of service value for each packet. The device applies QoS policies in this order:
1. ![]() Packets already classified—When the device receives packets from a QoS-enabled switch or router that has already classified the packets with non-zero 802.1Q/P user_priority values, the device uses that classification and does not apply other QoS policy rules to the packets. An existing classification takes precedence over all other policies on the device.
Packets already classified—When the device receives packets from a QoS-enabled switch or router that has already classified the packets with non-zero 802.1Q/P user_priority values, the device uses that classification and does not apply other QoS policy rules to the packets. An existing classification takes precedence over all other policies on the device.
Note ![]() A Cisco device always acts on tagged 802.1P packets that it receives over the radio interface, even if a QoS policy has not been configured.
A Cisco device always acts on tagged 802.1P packets that it receives over the radio interface, even if a QoS policy has not been configured.
2. ![]() Policies you create on the device—QoS Policies that you create and apply to VLANs or to the device interfaces are second in precedence after previously classified packets.
Policies you create on the device—QoS Policies that you create and apply to VLANs or to the device interfaces are second in precedence after previously classified packets.
3. ![]() Default classification for all packets on VLAN—If you set a default classification for all packets on a VLAN, that policy is third in the precedence list.
Default classification for all packets on VLAN—If you set a default classification for all packets on a VLAN, that policy is third in the precedence list.
Using Wi-Fi Multimedia Mode
When you enable QoS, the device uses Wi-Fi Multimedia (WMM) mode by default.
The following features of the WMM specification are supported:
•![]() Addition of the WMM information element to associate request frames
Addition of the WMM information element to associate request frames
•![]() Addition of the WMM parameter element to the beacon, probe response and association response frames
Addition of the WMM parameter element to the beacon, probe response and association response frames
•![]() Addition of the QoS control field to data frames
Addition of the QoS control field to data frames
•![]() Support for setting the field sent in the WMM parameter element (per access class):
Support for setting the field sent in the WMM parameter element (per access class):
–![]() contention window (CW) min
contention window (CW) min
–![]() CW max
CW max
–![]() Arbitration Interframe Space (AIFS)
Arbitration Interframe Space (AIFS)
–![]() Admission control required
Admission control required
–![]() Transmit opportunity (TXOP) size
Transmit opportunity (TXOP) size
•![]() Separate transmit sequence numbers for each access class and for frames that do not have the QoS control field
Separate transmit sequence numbers for each access class and for frames that do not have the QoS control field
•![]() Separate duplicate sequence number checking lists on receive for each access class and for frames that do not have the QoS control field
Separate duplicate sequence number checking lists on receive for each access class and for frames that do not have the QoS control field
•![]() No ACK frames for QOS control fields that do not require ACK
No ACK frames for QOS control fields that do not require ACK
•![]() Negotiation of WMM capability with client on reassociation
Negotiation of WMM capability with client on reassociation
•![]() Support for burst transmission of multiple frames in a transmit opportunity
Support for burst transmission of multiple frames in a transmit opportunity
•![]() Support for the WMM specified backoff procedure
Support for the WMM specified backoff procedure
•![]() Support for the WMM retransmit procedure
Support for the WMM retransmit procedure
•![]() Addition of 802.1d priority for WMM enabled clients
Addition of 802.1d priority for WMM enabled clients
•![]() Support for separate Temporal Key Integrity Protocol (TKIP) replay detection counters on receive for each access class and for frames that do not have the QOS control field
Support for separate Temporal Key Integrity Protocol (TKIP) replay detection counters on receive for each access class and for frames that do not have the QOS control field
The following features of the WMM specification are supported only on Cisco 3201 WMIC:
•![]() Transmission of a packet with the no ACK required bit set in the QoS control field
Transmission of a packet with the no ACK required bit set in the QoS control field
•![]() End of service period (EOSP) bit in the QoS control field
End of service period (EOSP) bit in the QoS control field
•![]() Management action frames
Management action frames
•![]() Traffic Specification (TSPEC) element
Traffic Specification (TSPEC) element
•![]() Admission control procedure
Admission control procedure
•![]() Enforcement of admission control required field
Enforcement of admission control required field
•![]() Triggered power save delivery
Triggered power save delivery
Configuring QoS
QoS is enabled by default. This section describes how to configure QoS on your device. Before configuring QoS on your device, you should be aware of this information:
•![]() The most important guideline in QoS deployment is to be familiar with the traffic on your wireless LAN. If you know the applications used by wireless client devices, the applications’ sensitivity to delay, and the amount of traffic associated with the applications, you can configure QoS to improve performance.
The most important guideline in QoS deployment is to be familiar with the traffic on your wireless LAN. If you know the applications used by wireless client devices, the applications’ sensitivity to delay, and the amount of traffic associated with the applications, you can configure QoS to improve performance.
•![]() QoS does not create additional bandwidth for your wireless LAN; it helps control the allocation of bandwidth. If you have plenty of bandwidth on your wireless LAN, you might not need to configure QoS.
QoS does not create additional bandwidth for your wireless LAN; it helps control the allocation of bandwidth. If you have plenty of bandwidth on your wireless LAN, you might not need to configure QoS.
Layer2 QoS (RBCP and Voice)
Cisco devices can support wireless voice clients that are 802.11e compliant, transmitting and receiving frames with the Layer 2 802.1p priority bits set.
Between the host router and wireless device there is an Router Blade Control Protocol (RBCP) that monitors the health of a device by sending periodic keep alive packets. The device sends layer2 802.1q tagged RBCP packets with the highest priority (priority 7) in the keep alive packets to ensure the keep alive packets make it to the host router, even on a congested network.
The Layer 2 RBCP packet is shown in the following diagram.
|
12 bytes |
4 byte |
2 byte |
3 bytes |
5 bytes |
42 to 1496 bytes |
|---|---|---|---|---|---|
|
802.3 MAC |
802.1Q |
Type/Length |
802.2 LLC |
802.2 SNAP |
Data |
The tag field includes the field acronyms and the number of bits for each field.
|
No. of bits |
16 |
3 |
1 |
12 |
|---|---|---|---|---|
|
Frame field |
TPID |
PRIORITY |
CFI |
VID |
TPID-Tag Protocol Identifier
The Tag Protocol Identifier is a 16-bit field. It is set to a value of 0x8100 to identify the frame as an IEEE 802.1Q-tagged frame.
Priority
Also known as user priority, this 3-bit field refers to the IEEE 802.1p the frame priority level. The field is set to 0x111 (highest priority) for RBCP.
CFI-Canonical Format Indicator
The Canonical Format Indicator is a 1-bit field. The value is 0 for RBCP when the MAC address is in canonical format.
VID-VLAN Identifier
The VLAN Identifier is a 12-bit field that uniquely identifies the VLAN to which the frame belongs. The field is set to 0x000, which is supported by host routers.
Layer3 QoS (IP DSCP)
When a device is running Lightweight Access Point Protocol (LWAPP), the packets to the host router are encapsulated in a Layer 3 LWAPP header with the IP DSCP field set to one of the values indicated in the table below, depending on the type of traffic.
|
Cisco AVVID 802.1pUP-Based Traffic Type |
Cisco AVVID IP DSCP |
Cisco AVVID 802.1p UP |
IEEE 802.11e UP |
Notes |
|---|---|---|---|---|
|
Network Control |
— |
7 |
— |
Reserved for network control only |
|
Inter-Network Control |
48 |
6 |
7 (AC_VO) |
LWAPP control |
|
Voice |
46 (EF) |
5 |
6 (AC_VO) |
Controller: Platinum QoS profile |
|
Video |
34 (AF41) |
4 |
5 (AC_VI) |
Controller: Gold QoS profile |
|
Voice Control |
26 (AF31) |
3 |
4 (AC_VI) |
— |
|
Best Effort |
0 (BE) |
0 |
3 (AC_BE) |
|
|
0 (AC_BE) |
Controller: Silver QoS profile |
|||
|
Background (Cisco AVVID Gold Background) |
18 (AF21) |
2 |
2 (AC_BK) |
— |
|
Background (Cisco AVVID Silver Background) |
10 (AF11) |
1 |
1 (AC_BK) |
Controller: Bronze QoS profile. |
To provide optimum system QoS for packets going out from the wireless device to the host router and then routed to one of its outgoing interfaces, suitable policy maps must be configured on the host router’s out-going interfaces to prioritize IP DSCP-based packets (devices running LWAPP) or map Class of Service (CoS) to IP DSCP (an autonomous device supporting wireless 802.1e clients). This ensures:
•![]() Host router always sees the wireless device as being online when a service-module wlan-ap 0 status command is issued
Host router always sees the wireless device as being online when a service-module wlan-ap 0 status command is issued
•![]() A wireless device running LWAPP does not lose connectivity to the wireless LAN controller (WLC) under congestion scenarios on other router switch-ports
A wireless device running LWAPP does not lose connectivity to the wireless LAN controller (WLC) under congestion scenarios on other router switch-ports
•![]() Voice calls from the wireless device can be provisioned under congestion scenarios on the other router switch-ports
Voice calls from the wireless device can be provisioned under congestion scenarios on the other router switch-ports
IP DSCP precedence information is contained in the IP header TOS field:
•![]() Best Effort
Best Effort
•![]() Assured Forwarding — Class 1 Low
Assured Forwarding — Class 1 Low
•![]() Assured Forwarding — Class 1 Medium
Assured Forwarding — Class 1 Medium
•![]() Assured Forwarding — Class 1 High
Assured Forwarding — Class 1 High
•![]() Assured Forwarding — Class 2 Low
Assured Forwarding — Class 2 Low
•![]() Assured Forwarding — Class 2 Medium
Assured Forwarding — Class 2 Medium
•![]() Assured Forwarding — Class 2 High
Assured Forwarding — Class 2 High
•![]() Assured Forwarding — Class 3 Low
Assured Forwarding — Class 3 Low
•![]() Assured Forwarding — Class 3 Medium
Assured Forwarding — Class 3 Medium
•![]() Assured Forwarding — Class 3 High
Assured Forwarding — Class 3 High
•![]() Assured Forwarding — Class 4 Low
Assured Forwarding — Class 4 Low
•![]() Assured Forwarding — Class 4 Medium
Assured Forwarding — Class 4 Medium
•![]() Assured Forwarding — Class 4 High
Assured Forwarding — Class 4 High
•![]() Class Selector 1
Class Selector 1
•![]() Class Selector 2
Class Selector 2
•![]() Class Selector 3
Class Selector 3
•![]() Class Selector 4
Class Selector 4
•![]() Class Selector 5
Class Selector 5
•![]() Class Selector 6
Class Selector 6
•![]() Class Selector 7
Class Selector 7
•![]() Expedited Forwarding
Expedited Forwarding
Radio Access Category Definitions
The device uses the radio access category definitions to calculate backoff times for each packet. As a rule, high-priority packets have short backoff times.
The default values for the minimum and maximum contention window and in the slottime are based on settings recommended in IEEE Draft Standard 802.11e. For detailed information on these values, consult that standard.
We recommend that you use the default settings. Changing these values can lead to unexpected blockages of traffic on your wireless LAN, and the blockages might be difficult to diagnose. If you change these values and find that you need to reset them to defaults, use the default settings listed in Table 2.
The values listed in Table 2 are to the power of 2. The device computes contention window values with this equation:
CW = 2 ** X minus 1
where X is the value from Table 2.
|
Class of Service |
Min Contention Window |
Max Contention Window |
Fixed Slot Time |
|---|---|---|---|
|
Background (CoS 1-2) |
4 |
10 |
7 |
|
Best Effort (CoS 0) |
4 |
6 |
3 |
|
Video (CoS 3-5) |
3 |
4 |
1 |
|
Voice (CoS 6-7) |
2 |
3 |
1 |
CW-min and CW-max Settings for Point-to-Point and Point-to-Multipoint Bridge Links
For best performance on your device links, adjust the CW-min and CW-max contention window settings according to the values listed in Table 3. The default settings, CW-min 3 and CW-max 10, are best for point-to-point links. However, for point-to-multipoint links, you should adjust the settings depending on the number of non-root bridges that associate to the root device.
Note ![]() If packet concatenation is enabled, adjust the CW-min and CW-max settings only for traffic class 0. Concatenation is disabled by default.
If packet concatenation is enabled, adjust the CW-min and CW-max settings only for traffic class 0. Concatenation is disabled by default.
|
Setting |
Point-to-Point Links |
Point-to-Multipoint Links with up to 5 Non-Root Bridges |
Point-to-Multipoint Links with up to 10 Non-Root Bridges |
Point-to-Multipoint Links with up to 17 Non-Root Bridges |
|---|---|---|---|---|
|
CW-min |
3 |
4 |
5 |
6 |
|
CW-max |
10 |
10 |
10 |
10 |
To adjust the CW-min and CW-max settings, follow these steps, beginning in privileged EXEC mode:
|
Command |
Purpose |
|
|---|---|---|
|
Step 1 |
configure terminal |
Enters global configuration mode. |
|
Step 2 |
interface dot11radio radiointerface |
Enters interface configuration mode for the radio interface. |
|
Step 3 |
traffic-class class { cw-min number } |
Assigns CW-min, CW-max, and fixed-slot settings to a traffic class. Use the values in Table 3 to enter settings that provide the best performance for your network configuration. Note |
|
Step 4 |
end |
Returns to privileged EXEC mode. |
Use the no form of the command to reset the setting to defaults.
QoS Configuration Examples
QoS Example Configuration for VLAN
The following example queues all traffic from VLAN100 to the voice queue:
interface fastEthernet 0.1
encapsulation dot1Q 1 native
interface fastEthernet 0.100
interface fastEthernet 0.101
encapsulation dot1Q 1 native
interface dot11Radio 0.100
interface dot11Radio 0.101
class-map match-all alldata
interface dot11Radio 0.100
service-policy output v100traffic
QoS Example of IP DSCP and IP Precedence
The following example queues traffic data with the IP Precedence value 2 to Queue 0, IP DSCP value 12 to Queue 1, IP Precedence value 5 to Queue 2, and IP DSCP value 46 to queue 3.
class-map match-all dscp12
class-map match-all dscp46
class-map match-all prec2
match ip precedence immediate
class-map match-all prec5
match ip precedence critical
service-policy output L3Map
Additional Information
For more information, see:
Understanding the Lightweight Access Point Protocol (LWAPP) at http://www.cisco.com/en/US/prod/collateral/wireless/ps5678/ps6306/prod_white_paper0900aecd802c18ee_ns337_Networking_Solutions_White_Paper.html
Quality of Service (QoS) at http://www.cisco.com/en/US/products/ps6558/products_ios_technology_home.html