Cross-device file sync for individuals and teams
Qsync enables efficient file synchronization between a QNAP NAS and linked devices such as computers, laptops, and mobile devices. With Qsync, you can easily access data across all your devices and share it among your team members.
-
Watch Video
-
Slides
To view this video please enable JavaScript, and consider upgrading to a web
browser thatsupports HTML5
video
24/7 real-time file sync for all your devices
Simply install the Qsync Central app to use your NAS like a private cloud storage environment (such as Dropbox®, Microsoft OneDrive®, or Apple iCloud Drive®) for real-time file sync and sharing without compromise. Your NAS centrally stores files and distributes them across all your authorized devices. The companion Qsync app should also be installed on your computers/mobile devices to link them with the NAS for file syncing and keeping shared files/data up-to-date.
Work smarter with Qsync

Qsync Client Overview
The overview page lists the added NAS devices, their synchronization status, IP addresses, storage quota status, and other important information.
Qsync Folder
Easily view the status of all synchronized files in file folder.
Increase security and efficiency with centralized management
In Qsync Central, you can configure management settings such as conflict policies and filter settings. Each device can have its own settings, or you can apply centralized settings to all devices. An optional password can be used to protect centralized settings. If you accidentally lose a connected device, a remote erase function is available to ensure that no one gets access to personal/organizational data.

Conflict policies & filter settings

Remote erase
An array of features to boost productivity and efficiency
Qsync provides versatile basic and advanced functions to enable a streamlined yet flexible file sync experience.
-
One-way sync
Only sync files from mobile devices to the NAS.
-
Two-way sync
The standard file sync for keeping both sides up-to-date.
-
Versioning
Easily retrieve overwritten files.
-
Team folders
Set up a folder for sharing with specified users.
-
Space-Saving Mode
Files are synchronized to devices only when needed.
Supported OS: Windows 10 and macOS 10.14 (or later versions).
Sync data to another NAS or public cloud with Hybrid Backup Sync
Qsync enables file sync between QNAP NAS and other end devices. To sync NAS-based data to another NAS or to the cloud we recommend using our critically-acclaimed data backup/restore/sync app Hybrid Backup Sync (HBS). With data deduplication (QuDedup), TCP BBR support, encryption, auto port selection, and more future-proof functionality, HBS ensures that your data is safe and secure.
Learn more: Hybrid Backup Sync, QuDedup
Connect with more QNAP NAS/mobile apps
Enrich your digital life with NAS & mobile apps that provide complete photo, file, and data management solutions.
Learn more: Qfiling, QuMagie, Qsirch
-

QuMagie
QuMagie is an AI-empowered photo organization and management app on QNAP NAS. You can also use the accompanying QuMagie mobile app to automatically upload photos you take to your QNAP NAS.
-
Qfiling
The Qfiling NAS app can automatically batch process and/or archive your photos and files once they are stored on your NAS. No more manual drag-n-drop is required!
-
Qsirch
The Qsirch NAS app provides universal search functionality to quickly locate files using versatile search criteria such as file creation/changed date, keywords, dominant colors in an image, and much more.
-
Qsync
Qsync can automatically distribute files stored on your QNAP NAS to connected devices, ensuring all your devices have the most up-to-date files and data.


FAQ
1
Is my NAS powerful enough to run Qsync?
Qsync Central supports all NAS models and QTS versions above 4.3.3. Overall performance may vary based on NAS hardware specifications and system load. Learn More
2
What is Space-Saving Mode and what are its requirements?
Space-Saving Mode allows you to save disk space on your computer, synchronize files faster, and avoid unnecessary server load by only downloading files to your device when they are accessed/opened. Space-Saving Mode is supported by Qsync Client 5.0.0 (or later) and requires Windows 10 version 1909 (or later) or macOS 10.14 (or later). Learn More
3
Is there a limit on the number of folders Qsync can synchronize?
Qsync does not limit the number of synchronized folders. Most local devices can handle up to 16 folders without affecting system performance.
 |
Приложения QNAP для ПКОткройте для себя новые и удобные способы использования вашего NAS с помощью Приложений QNAP. Легкая настройка, удобный доступ, безопасное резервное копирование, быстрое восстановление, простой обмен файлами и синхронизация — для всех ваших повседневных задач найдется приложение. Также существуют специализированные приложения, оптимизирующие управление средами виртуализации и системами наблюдения. Ознакомьтесь с утилитами QNAP прямо сейчас. |
Qfinder Pro |
|
|
Qfinder Pro (доступен для Windows, Mac и Ubuntu) поможет быстро найти и получить доступ ко всем сетевым хранилищам QNAP в локальной сети. Версия для Windows обеспечивает функцию «Storage Plug & Connect», чтобы использовать QNAP NAS в качестве сетевого диска ПК или виртуального диска для удобного хранения данных. При помощи функции «Загрузка мультимедиа» экономьте системные ресурсы NAS, выполняя транскодирование медиафайлов на локальном ПК перед их загрузкой на NAS. Поддерживаемые ОС: Windows 8 (или более поздние версии), Windows Server 2016 (или более поздние версии), macOS 10.14 (или более поздние версии), Ubuntu 18.04. |
 |
 |
Windows |
 |
Mac |
 |
Ubuntu |
Qsync |
|
|
Qsync обеспечивает автоматическую синхронизацию файлов на разных устройствах. Просто перетащите файлы в папку «Qsync», и данные на устройствах, подключенных к NAS, будут обновляться одновременно с внесением изменений. Дополнительные режимы синхронизации, такие как Smart Sync или Advanced Selective Sync, обслуживают только выборочные данные или папки. Создавайте ссылки для загрузки, чтобы обмениваться файлами с другими пользователями без необходимости предоставить им учетную запись на сетевом накопителе Поддерживаемые ОС: Windows 8.1 (или более поздние версии), Windows Server 2016 (или более поздние версии), macOS 10.14 (или более поздние версии), Ubuntu 18.04/20.04.. |
 |
|
Windows |
|
Mac |
|
Ubuntu x86 Ubuntu x64 |
NetBak Replicator |
|
| QNAP NetBak Replicator выполняет синхронизацию в реальном времени или по расписанию и автоматическое резервное копирование всех дисков, документов, мультимедийных файлов и сообщений электронной почты с нескольких ПК под управлением ОС Windows на QNAP NAS. Приложение поддерживает резервное копирование на удаленный сервер через FTP и WebDAV через Интернет. |  |
|
Windows |
Qsirch PC Edition |
|
| С ростом количества файлов и данных дома и на работе вам необходимо современное решение для поиска файлов независимо от того, где они хранятся. Qsirch PC Edition быстро находит файлы на ПК с ОС Windows и в сетевом хранилище с помощью механизма полнотекстового поиска по ключевым словам, тегам с различными фильтрами. |  |
|
Windows |
NAS File Services |
|
| Файловые службы QNAP — это надстройка Microsoft Teams и Google Gmail, которая выполняет обмен файлами NAS через общие ссылки в чатах, сообщениях или электронных письмах. Защитите публичные ссылки от несанкционированного доступа, установив пароли и даты срока действия, при этом адресатам не потребуются учетные записи NAS для получения или открытия файлов, включенных в ссылку общего доступа. |  |
 |
Google Workspace |
 |
Teams |
QNAP JBOD Manager |
|
|
С помощью QNAP JBOD Manager на устройствах Windows® и Ubuntu® получайте оперативную информацию о состоянии JBOD, скорости вращения вентилятора, температуре устройства и версии микропрограммы. Все события NAS записываются, и в случае возникновения системного предупреждения вы получите уведомления на рабочий стол. Поддерживаемые ОС: Windows 8.1 (или более поздние версии), Windows Server 2012 R2 (или более поздние версии), Ubuntu 20.04/22.04. |
 |
|
Windows |
|
Ubuntu |
QNAP External RAID Manager |
|
|
Используйте QNAP External RAID Manager, чтобы настраивать, контролировать и просматривать состояние ваших внешних RAID-устройств QNAP (таких как TR-004). Все события устройства записываются, и в случае возникновения системного предупреждения вы получите уведомления на рабочий стол. Поддерживаемые ОС: Windows 8.1 (или более поздние версии), Windows Server 2012 R2 (или более поздние версии), macOS 10.13 (или более поздние версии). |
 |
|
Windows |
|
Mac |
Notes Station 3 Clipper |
|
|
Notes Station 3 Clipper для Google Chrome™ помогает собирать онлайн-информацию, сохраняя веб-контент, такой как веб-страницы, статьи и изображения в качестве заметок в Notes Station 3 для быстрого и удобного доступа. Просто добавьте это расширение в Chrome, чтобы сохранять онлайн-контент в Notes Station 3. Для работы Notes Station 3 Clipper нужно установить Notes Station 3 на ваш NAS QNAP. |
 |
 |
Chromebook |
QuDedup Extract Tool |
|
|
QNAP QuDedup Extract Tool восстанавливает исходное состояние дедуплицированных файлов с расширением .qdff (формат файлов дедупликации QNAP). При работе на компьютерах Windows®, Mac® и Linux® (Ubuntu®) просто установите приложение для восстановления файлов .qdff, загруженных с удаленного NAS или облака. Инструмент извлечения QuDedup позволяет просматривать и выбирать файлы перед их восстановлением, а функция выборочного восстановления затронет только определенные папки или отдельные файлы, что значительно повышает удобство и эффективность доступа к резервным копиям файлов в формате .qdff. Поддерживаемые ОС: Windows 7/10, macOS 10.12 (или более поздние версии), Linux (Ubuntu) 16.04/18.04 |
 |
|
Windows |
|
Mac |
|
Ubuntu x86 Ubuntu x64 |
vSphere (Web) Client plug-in |
|
|
QNAP NAS поддерживает подключаемый модуль vSphere Client, позволяющий напрямую управлять разделами данных в VMware на NAS с клиентской консоли vSphere. В крупномасштабной среде виртуализации централизованное и простое управление является одним из ключевых факторов, данный плагин поможет реализовать его. Оперативно контролируйте состояние QNAP NAS и разделов данных, а также создавайте дополнительные хранилища данных для нескольких хостов ESXi всего за несколько щелчков мышью.
Системные требования:
|
 |
|
Windows |
 |
VMware |
QNAP SMI-S Provider |
|
|
QNAP SMI-S Provider обеспечивает связь между Microsoft SCVMM и QNAP NAS с помощью стандартного интерфейса, основанного на протоколе Common Information Model (CIM).
Поддерживаемая ОС: Windows Server 2012 (или более поздние версии)
|
 |
|
Windows Server |
QNAP VAAI NFS Plug-in |
|
|
VMware vSphere Storage APIs Array Integration (VAAI) позволяет хостам ESXi перенести обработку данных определенных служб, связанных с хранением, на системы хранения. С подключаемым модулем QNAP VAAI NFS, установленным на каждом хосте ESXi, QNAP NAS может поддерживать VMware VAAI для обработки данных вместо хостов ESXi, тем самым освобождая дополнительные вычислительные ресурсы от хостов ESXi.
Системные требования:
|
 |
|
VMware |
Q’center Virtual Appliance |
|
|
Q’center — это централизованная система управления QNAP NAS, которую можно развернуть в среде виртуализации Microsoft Hyper-V или VMware ESXi для повышения гибкости системы и подключения больших сред хранения. Примечание. Файлы исправлений предназначены для обновления. Сначала обновите патч ОС, затем обновите файл патча. С помощью Q’center просматривайте состояние и системную информацию нескольких QNAP NAS на одной платформе, одновременно контролируя использование системных ресурсов, отслеживая состояние дисков/томов и выполняя другие задачи управления. Благодаря этим функциям Q’center своевременно распределяйте системные ресурсы и планируйте консолидацию дискового пространства. Ограничения: Минимальные требования: 108 ГБ свободного места на диске, 1 ГБ оперативной памяти и 4 виртуальных процессора. Поддерживаемые платформы: VMware ESXi 6.7/7.0; Hyper-V (Windows Server 2012/2016/2019) Эта утилита доступна только для моделей класса Enterprise и SMB. |
 |
|
Hyper-V |
|
VMware |
 |
patch patch (OS) |
QNAP Snapshot Agent |
|
|
Функция Snapshot Storage Manager работает с iSCSI LUN для быстрого резервного копирования и восстановления данных. При создании моментального снимка LUN агент QNAP Snapshot для Windows Server или VMware vCenter позволяет NAS обмениваться данными с удаленным сервером при создании моментальных снимков и обеспечивает согласованность моментальных снимков LUN с приложениями. VSS Hardware Provider поддерживает NAS ROW (перенаправление при записи) вместо Windows COW (копирование при записи), чтобы повысить эффективность резервного копирования и разгрузить моментальный снимок на NAS для снижения влияния на производительность сервера Windows. Ограничения: Информацию о системных требованиях и ограничениях Snapshot Agent см. в примечаниях по применению.
|
 |
|
Windows |
Video HD |
|
|
QNAP Video HD — это бесплатное дополнение KODI, которое полностью поддерживает функции Video Station, включая текущее время воспроизведения, тип видео, онлайн-поиск субтитров и многое другое. В сочетании с возможностями потоковой передачи и декодирования видео KODI Video HD обеспечивает высокое качество просмотра и более широкий выбор для пользователей.
Этот файл содержит два архива. Чтобы использовать Video HD, установите «script.videohd.core», а затем «skin.videohd» в KODI. Для видео HD требуется KODI 17 (или более поздней версии).
Windows 10, Android 5.0 (или новее), Mac OS X 10.8 (или новее), Linux Station 1.4.1594 (или новее) |
 |
 |
Add-on |
Qmedia |
|
| Qmedia транслирует музыку, фотографии и видео на телевизоры Android, Apple TV®, Amazon Fire TV или телеприставки. |  |
|
Android |
|
APK |
 |
Amazon |
QVR Pro Client |
|
| Оптимизированное программное обеспечение QVR Pro Client объединяет мониторинг в реальном времени с функциями быстрого воспроизведения архива в одном интерфейсе. Просматривайте несколько каналов одновременно, наслаждаясь эффективным и простым управлением видеонаблюдения. |  |
|
Windows Desktop x86 Windows Desktop x64 |
|
Mac |
|
Ubuntu |
QVR Client |
|
|
QNAP QVR Client is a client application that allows users to easily configure recording settings of the IP cameras, while also providing local or remote access to QNAP NAS for video monitoring and playback. QNAP QVR Client — это приложение для настройки параметров записи IP-камер, а также локального или удаленного доступа к QNAP NAS для мониторинга и воспроизведения видео. |
 |
|
Windows Desktop |
|
Mac |
QVPN Device Client |
|
|
QVPN Device Client — с его помощью напрямую подключайтесь к вашим устройствам QNAP через VPN по нескольким протоколам, включая собственный QBelt от QNAP. Благодаря встроенному тесту скорости проверяйте скорость VPN-подключения и просматривайте все записи из журнала о подключениях в любое время. Поддерживаемые ОС: QTS 4.3.5 (или более поздние версии) с QVPN 2.0 для включения протокола QBelt; Windows 8 (или более поздние версии); macOS 10.13 (или новее); Android 5.1 (или более поздние версии); iOS 10 (или более поздние версии). |
 |
|
Windows Desktop |
|
Mac |
QNAP Qsync
QNAP Qsync is an advanced file synchronization solution that helps you keep your data in sync across multiple devices. It is designed to make sharing and transferring files between devices simpler and more secure. Qsync can be used to sync files between your computer, laptop, tablet, smartphone, and other devices.
Qsync provides secure and efficient file synchronization, allowing you to access and share files from any device. With Qsync, you can synchronize files between different devices, no matter where you are. It also provides a secure and reliable way to store, share, and access your files from any device.
QNAP Qsync enables users to keep their files synchronized across multiple devices for easy access anytime, anywhere.
Features:
1. Cross-platform support: Qsync supports Windows, Mac, and Linux systems, enabling you to sync files between different devices.
2. Cloud storage: Qsync provides a secure cloud storage solution, allowing you to store and access files from any device.
3. File sharing: Qsync allows you to easily share files with others, making collaboration and communication easier.
4. File encryption: Qsync provides strong encryption to protect your data from unauthorized access.
5. Version control: Qsync keeps track of different versions of files, allowing you to easily revert to older versions if needed.
6. Automatic synchronization: Qsync allows you to set up automatic synchronization, so that files are kept up to date across all devices.
7. Backup and restore: Qsync provides an easy way to back up and restore files, ensuring your data is safe and secure.
8. Scheduled synchronization: Qsync allows you to schedule synchronization, so that files are updated at specific times.
9. Multiple folder synchronization: Qsync allows you to sync multiple folders, making it easy to keep your data organized.
10. Flexible sharing: Qsync allows you to share files with others, giving you control over who can view and edit your files.
Conclusion
QNAP Qsync is a powerful file synchronization solution that makes it easy to keep your data in sync across multiple devices. It provides secure cloud storage, file sharing, encryption, version control, automatic synchronization, backup and restore, scheduled synchronization, and more. Qsync is an invaluable tool for keeping your data safe and up to date.
QNAP Qsync is a file synchronization application that synchronizes files across multiple devices. In order to use Qsync, the following technical requirements must be met:
1. Supported Operating Systems: Windows 7 and above, Mac OS X 10.9 and above, Linux Ubuntu 14.04 and above, and QTS 4.2 and above.
2. Processor: 1.2GHz Intel/AMD processor or better.
3. Memory: At least 1GB of RAM.
4. Storage: At least 20GB of free disk space.
5. Network: A fast and stable Internet connection (1 Mbps or higher).
6. Miscellaneous: Web browser for accessing the Qsync web portal.
QNAP.Qsync, Release version: 5.0.7.1122
Command Line
Download Links For Version 5.0.7.1122
Info
last updated 4/23/2023 5:15:12 AM
Publisher:
License:
Dependencies
No dependency information
Share
Category
- For Windows users
- For Mac users
For Windows users
- Getting started
- Synchronization
- Sharing
- Remote access
- Sync photos and videos automatically
- Managing the synchronization
Getting started
Qsync is a cloud based file synchronization service empowered by QNAP Turbo NAS. Simply add files to your local Qsync folder, and they will be available on your Turbo NAS and all its connected devices.
Before using Qsync
Follow the 3 steps below before Qsync deployment.。
- Create user accounts on the NAS,
- Install Qsync on your computers and Qfile on your mobile devices.
- Log into the NAS (serving as a Qsync server) from your computers or mobile devices (referred to in this document as Qsync clients.)
Create user account on the NAS
Please create user accounts for Qsync users.
For NAS administrator: Please go to “Control Panel” > “Privilege Settings” > “Users” > Click on “Create.”
For NAS users: Please have the system administrator create an account for you.

Install Qsync utility
Qsync will synchronize all chosen files on your computers or mobile devices.
Follow instructions detailed on the “Overview” page to download the utility. (Log into the NAS> Click the Qsync shortcut on the NAS Desktop> Overview page)
Or download the utility from the QNAP website: Support > Download> Utilities.
For computers, please download the Qsync utility for Windows.
For mobile devices, please download and install Qfile for iOS or Android.

Log into the NAS
After installing the utility, enter the user ID and password and specify the designated NAS as the Qsync server.
To locate the NAS within a LAN environment, simply click “Search” to find it or key in its IP address or name. (e.g. IP address: 10.8.1.20 or 192.168.1.100)
To connect to a remote NAS (over the Internet), please use your myQNAPCloud address to log in. (e.g. andy@myQNAPcloud.com )

Note:
- If the ports have been changed for NAS connection, please append the port number to the IP address; otherwise, please only enter an IP address. (Default port number: 8080)
Start using Qsync
Double click on the Qsync shortcut on the Windows desktop to open the Qsync local folder. Click on the Qsync icon on the taskbar at bottom right side of the screen to bring up the menu.


Now, just copy or move your files to the local Qsync folder in one of your devices, the files will be copied to all your other devices (devices with Qsync installed and are connected to the NAS.)
From now on, you don’t need to copy files back and forth between your PC and external devices or worry about the size of the files as you to try to attach them to an E-mail.
Synchronization
Synchronization
There are a few methods you can synchronize your files. Qsync will automatically synchronize the files among your computers or mobile devices that have Qsync installed, and they will also be synchronized to the Qsync folder on the NAS.
- For PCs, drag and drop files directly to the local Qsync folder.

- For mobile devices (Qfile), copy or move files into the Qsync folder.
- For the NAS, copy or move files to the Qsync folder via File Station (web based file explorer).


Note:
- If files are “dragged and dropped” into the Qsync folder, they will be moved to the Qsync folder, as supposed to be copied into the folder, if the files and the Qsync folder are located in the same disk drive. The behavior is the same as File Explore in Windows.
- The maximum size of a single file that Qsync can transmit is 50G in a LAN.
- Qsync doesn’t support SAMBA, FTP or AFP for files access. Please access files using File Station or Qsync.
- Qfile can only synchronize the file list and does not download the files to a mobile device. Please download the files when you need them.
Offline editing
You can browse and edit your files offline, and once your device is online, Qsync will sync the files you edited offline for you automatically.
Sharing
Share files by download links
You can share files by sending file download links to those who haven’t installed Qsync.
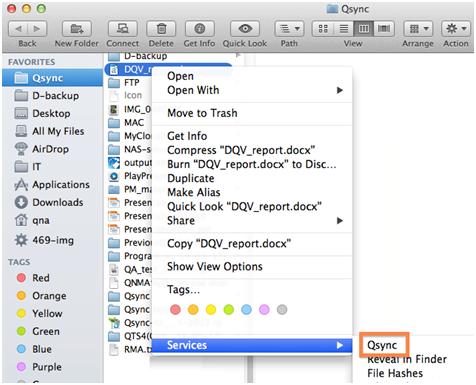
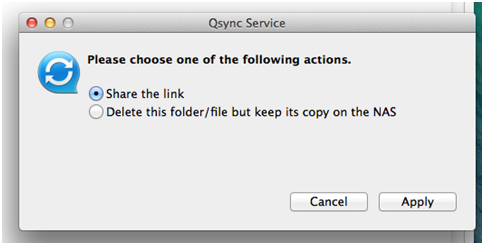
- For Windows, right click on the file that you would like to share in the local Qsync folder and click on “Share the link.”
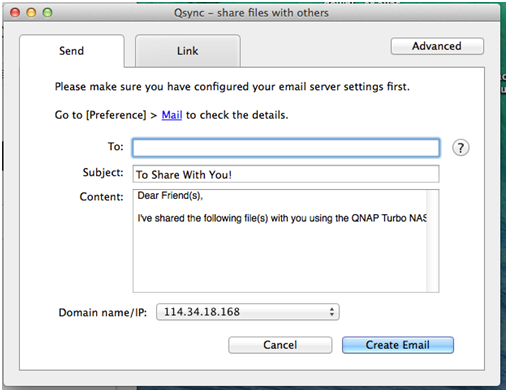
- Select to send the link via E-mail or copy the link to others.
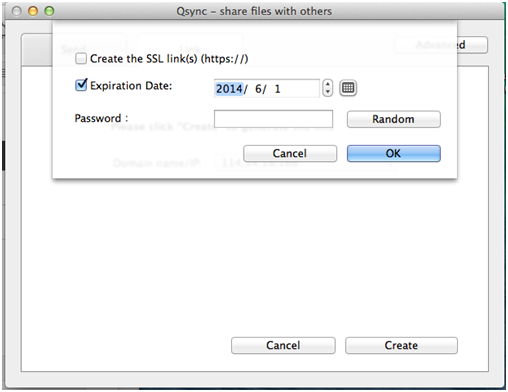
- Click “Advance” to check more options for the link, such as creating a SSL link, the expiration date, or password.


- For the NAS, right click on the file that you would like to share in the Qsync folder within File Station and click on “Share.”
- For mobile devices, launch Qfile to share the file in the Qsync folder by clicking the icon to the right and click “Share.”
- The file recipients can click on the link or copy and paste it to a web browser to download the file.


Share the folders with a group
You can share a folder with a group of users. If any member from the group shares the files in the folder, other members can receive the file.
Steps:
- Create user accounts in the NAS for each group member.
- Have Qsync utility installed on each member’s device.
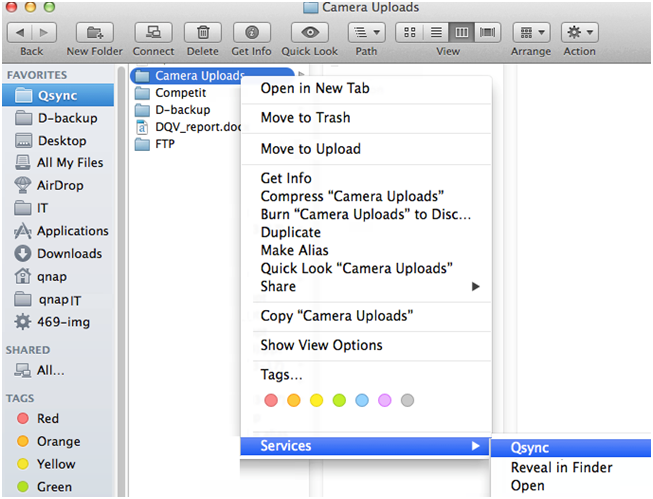
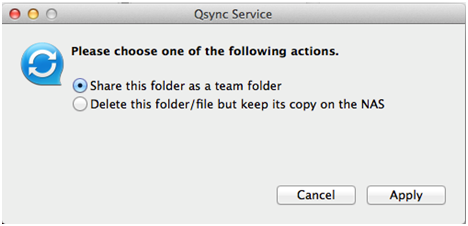
- Right click on the folder that you would like to share in the local Qsync folder and click on “Share this folder as a team folder.”

- Select users from the list of local or domain users.

- All members in the group will receive a file sharing invitation. Once accepted, the group members can start to access this shared folder.


Note:
- The team folder will only take effect after users you send the invitation to accept the invitation.
- Users cannot share the team folders which are shared from others again.
Remote access
Access the NAS over the Internet
To connect to a remote NAS (over the Internet), the administrator is required to configure the device name for the NAS in “myQNAPCloud” first (Log into the NAS> NAS Desktop > Click on the myQNAPcloud shortcut.)
Next, notify the users about themyQNAPCloud web address for their remote access. You can then use the myQNAPCloud address to log into the remote NAS. ( e.g. andy@myQNAPcloud.com )

Note:
- The connection with the NAS over the Internet will take longer, when compared to a LAN environment.
- As you switch back to a LAN environment where your NAS is located, please connect to the NAS again through LAN, instead of the myQNAPcloud service for better connection quality.
- For better performance on file transmission, it is recommended to configure port forwarding on the router if possible.
Sync photos and videos automatically
Qsync can sync your photos and videos on mobile devices to the Qsync folder of across all Qsync clients automatically.
Steps:
- Install Qfile on your mobile devices by following instructions outlined in the Qsync page on the NAS or find it on the APP Store.

- Launch Qfile,
- Click “Settings” on the bottom right side of the screen,
- Scroll down and look for “Auto upload from photo gallery” and click on “Set up now,”
- Select a NAS to upload photos and videos to,
- Select the folder,
- Select “Use default setting” ( /Qsync/Camera Uploads) or select “Set up manually” to set the path,
- Select if you want to upload all photos from photo gallery immediately,
- You can tick the checkbox “Limit to WiFi” to upload files through WiFi and avoid possible expenses associated with the 3G Network,
- The uploaded files will be synced to the “Camera Uploads” folder under the Qsync folder on Qsync client devices.

Note: If files uploaded before are deleted from the Camera Uploads folder, Qfile will not upload those copies in the photo library again.
Synchronization Management
Synchronization management
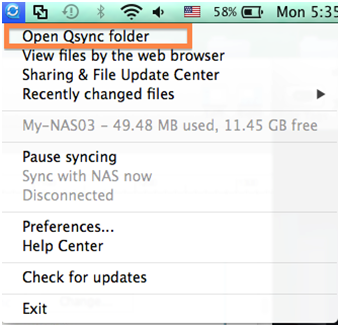
Click on the Qsync icon on the taskbar to see the management functions:


- Add files and view the synchronization result on the NAS:
- Open Qsync folder: Open the Qsync folder to add files,
- View files by the web browser: Open File Station (web based file explorer) and browse files in the Qsync folder on the NAS.
- Control synchronization progress:
- Pause syncing / Resume syncing: Click to pause or resume syncing,
- Sync with NAS now: Force Qsync to scan again and refresh the synchronization list.
- Information for syncing and sharing:
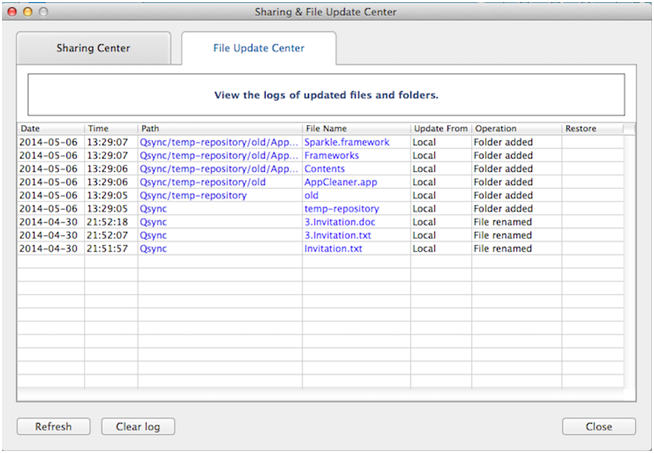
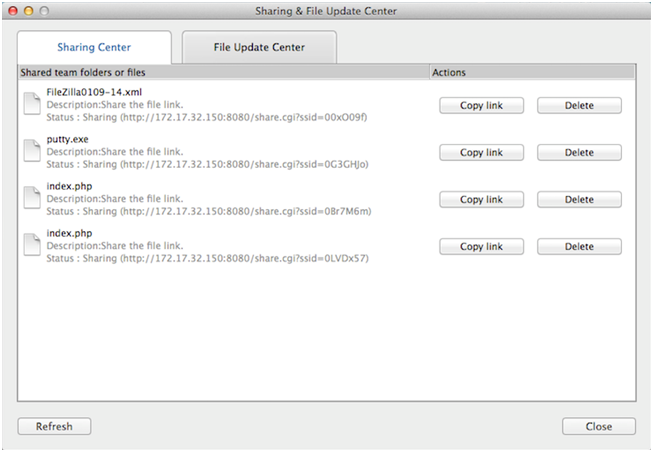
- Sharing & File Update Center
- File Update Center: List the file or folder update logs.
- Sharing center: List the folders or files shared with others. Users can choose to accept or decline the team folders. However, users cannot share team folders that are shared by others.


ii. Recently changed files: List the recently updated files.
- Sharing & File Update Center
- Preference:
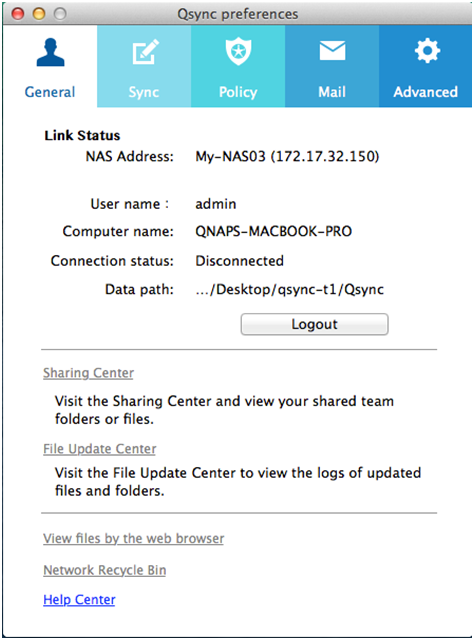
- General:
- Link Status: Show the current status. Click “Logout” to change users.
- Network Recycle Bin: Browse or recover files deleted from the Qsync folder.

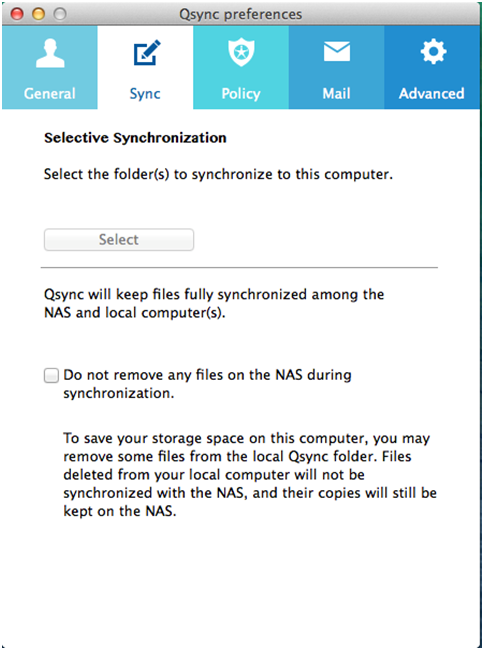
- Sync:
- Selective Synchronization: Select the folder to sync to the computers.
- Do not remove any files on the NAS when synchronizing: You can remove files within the local Qsync folder, and files deleted from your computer will not be synchronized with the NAS. The NAS still keeps copies of the deleted files.

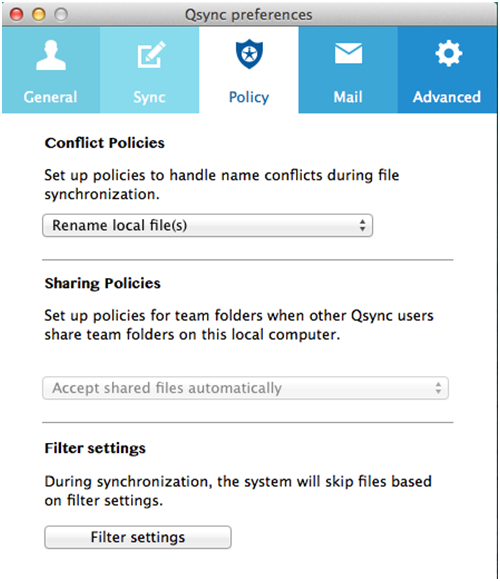
- Policy:
- Conflict Policies: The policies for handling the name conflicts between Qsync server (NAS) and clients after it is back online from its disconnection:
- Rename the local files(s),
- Rename the remote NAS files(s),
- Replace local files with remote NAS file(s), or
- Replace remote NAS files with local files(s).
- Sharing Policies: The policies of the team folders when other Qsync users share them to this local computer:
- Always reject sharing,
- Automatically accept sharing, or
- Send a notification message once sharing occurs.
- Filter Settings: During file synchronization, Qsync will not sync the types of files specified in filter settings.

- Conflict Policies: The policies for handling the name conflicts between Qsync server (NAS) and clients after it is back online from its disconnection:
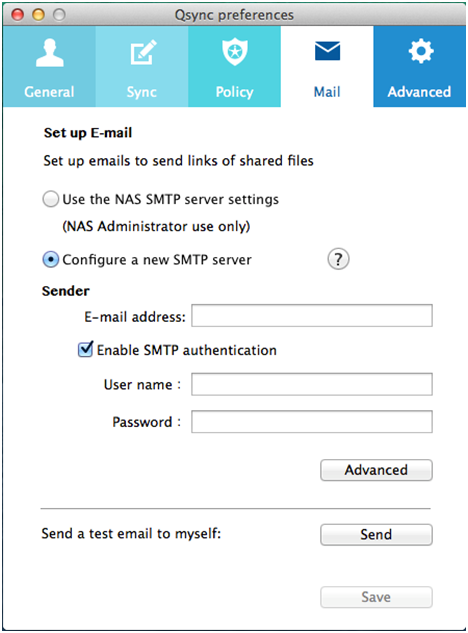
- E-Mail:
Set up E-mail: Set up an E-mail account for sharing file links. You can use the NAS SMTP server settings (for NAS administrator use only) or configure a new SMTP server.

- Advanced:
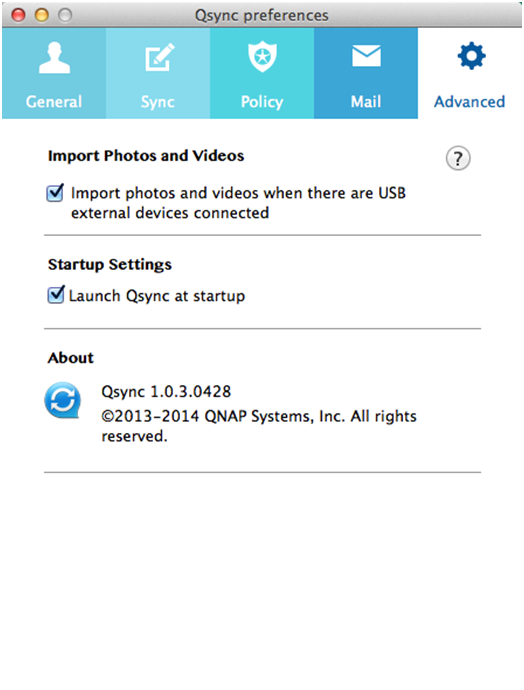
Import photos and videos: Import photos and videos when an USB external device is connected. This feature only applies to photos and videos located under the DCIM folder in the root directory of the USB external device.

- General:


Manage or monitor Qsync status via web browser
Log into the NAS via a web browser and click the Qsync button.
- Overview: Provides links to install the utility and to File Station, lists the total number of online users and devices, and you can also choose to enable or disable the Qsync service (for administrator only.)

- Users: List information of online users and you can manage the Qsync service for users (For administrator only.)

- Devices: List the status of connected devices and you can choose to allow or terminate connection of the devices.
- If users log in from their PC, the name of the device will be shown as their computer name.
- If users log in from Qfile, the name of the device will be shown as Qfile-Android or Qfile-iPhone.
- If users move or copy files to the Qsync folder in File Station, the name of the device will be shown as Qsync-File Station.

- Event Logs: List the activity details by each user.

- Team folder: List the status of the team folder, including folders that you shared and are shared by others.

- Shared File Links: List the status of shared links.


For Mac users
- Getting started
- Synchronization
- Sharing
- Remote access
- Sync photos and videos automatically
- Managing the synchronization
Getting started
Qsync is a cloud based file synchronization service empowered by QNAP Turbo NAS. Simply add files to your local Qsync folder, and they will be available on your Turbo NAS and all its connected devices.
Before using Qsync
Follow the 3 steps below before Qsync deployment.。
- Create user accounts on the NAS,
- Install Qsync on your computers and Qfile on your mobile devices.
- Log into the NAS (serving as a Qsync server) from your computers or mobile devices (referred to in this document as Qsync clients.)
Create user account on the NAS
Please create user accounts for Qsync users.
For NAS administrator: Please go to “Control Panel” > “Privilege Settings” > “Users” > Click on “Create.”
For NAS users: Please have the system administrator create an account for you.
Install Qsync utility
Qsync will synchronize all chosen files on your computers or mobile devices.
Follow instructions detailed on the “Overview” page to download the utility. (Log into the NAS> Click the Qsync shortcut on the NAS Desktop> Overview page)
Or download the utility from the QNAP website: Support > Download> Utilities.
For computers, please download the Qsync utility for Mac.
For mobile devices, please download and install Qfile for iOS or Android.
Log into the NAS
After installing the utility, enter the user ID and password and specify the designated NAS as the Qsync server.
To locate the NAS within a LAN environment, simply click “Search” to find it or key in its IP address or name. (e.g. IP address: 10.8.1.20 or 192.168.1.100)
To connect to a remote NAS (over the Internet), please use your myQNAPCloud address to log in. (e.g. andy@myQNAPcloud.com )
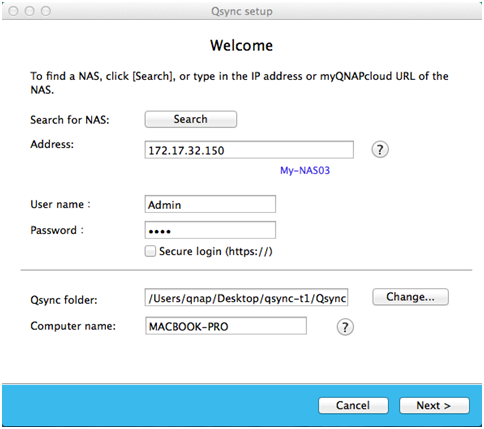
Note:
- If the ports have been changed for NAS connection, please append the port number to the IP address; otherwise, please only enter an IP address. (Default port number: 8080)
Start using Qsync
Click on the Qsync icon on the menu bar to bring up the menu.
![]()
Now, just copy or move your files to the local Qsync folder in one of your devices, the files will be copied to all your other devices (devices with Qsync installed and are connected to the NAS.)
From now on, you don’t need to copy files back and forth between your PC and external devices or worry about the size of the files as you to try to attach them to an E-mail.
Synchronization
Synchronization
There are a few methods you can synchronize your files. Qsync will automatically synchronize the files among your computers or mobile devices that have Qsync installed, and they will also be synchronized to the Qsync folder on the NAS.
- For PCs, drag and drop files directly to the local Qsync folder.

- For mobile devices (Qfile), copy or move files into the Qsync folder.
- For the NAS, copy or move files to the Qsync folder via File Station (web based file explorer).
Note:
- If files are “dragged and dropped” into the Qsync folder, they will be moved to the Qsync folder, as supposed to be copied into the folder, if the files and the Qsync folder are located in the same disk drive. The behavior is the same as File Explore in Windows.
- The maximum size of a single file that Qsync can transmit is 50G in a LAN.
- Qsync doesn’t support SAMBA, FTP or AFP for files access. Please access files using File Station or Qsync.
- Qfile can only synchronize the file list and does not download the files to a mobile device. Please download the files when you need them.
Offline editing
You can browse and edit your files offline, and once your device is online, Qsync will sync the files you edited offline for you automatically.
Sharing
Share files by download links
You can share files by sending file download links to those who haven’t installed Qsync.
- For Windows, right click on the file that you would like to share in the local Qsync folder and click on “Share the link.”
- Select to send the link via E-mail or copy the link to others.
- Click “Advance” to check more options for the link, such as creating a SSL link, the expiration date, or password.


- For the NAS, right click on the file that you would like to share in the Qsync folder within File Station and click on “Share.”
- For mobile devices, launch Qfile to share the file in the Qsync folder by clicking the icon to the right and click “Share.”
- The file recipients can click on the link or copy and paste it to a web browser to download the file.
Share the folders with a group
You can share a folder with a group of users. If any member from the group shares the files in the folder, other members can receive the file.
Steps:
- Create user accounts in the NAS for each group member.
- Have Qsync utility installed on each member’s device.
- Right click on the folder that you would like to share in the local Qsync folder and click on “Share this folder as a team folder.”


- Select users from the list of local or domain users.

- All members in the group will receive a file sharing invitation. Once accepted, the group members can start to access this shared folder.

Note:
- The team folder will only take effect after users you send the invitation to accept the invitation.
- Users cannot share the team folders which are shared from others again.
Remote access
Access the NAS over the Internet
To connect to a remote NAS (over the Internet), the administrator is required to configure the device name for the NAS in “myQNAPCloud” first (Log into the NAS> NAS Desktop > Click on the myQNAPcloud shortcut.)
Next, notify the users about the myQNAPCloud web address for their remote access. You can then use the myQNAPCloud address to log into the remote NAS. ( e.g. andy@myQNAPcloud.com )
Note:
- The connection with the NAS over the Internet will take longer, when compared to a LAN environment.
- As you switch back to a LAN environment where your NAS is located, please connect to the NAS again through LAN, instead of the myQNAPcloud service for better connection quality.
- For better performance on file transmission, it is recommended to configure port forwarding on the router if possible.
Sync photos and videos automatically
Qsync can sync your photos and videos on mobile devices to the Qsync folder of across all Qsync clients automatically.
Steps:
- Install Qfile on your mobile devices by following instructions outlined in the Qsync page on the NAS or find it on the APP Store.
- Launch Qfile,
- Click “Settings” on the bottom right side of the screen,
- Scroll down and look for “Auto upload from photo gallery” and click on “Set up now,”
- Select a NAS to upload photos and videos to,
- Select the folder,
- Select “Use default setting” ( /Qsync/Camera Uploads) or select “Set up manually” to set the path,
- Select if you want to upload all photos from photo gallery immediately,
- You can tick the checkbox “Limit to WiFi” to upload files through WiFi and avoid possible expenses associated with the 3G Network,
- The uploaded files will be synced to the “Camera Uploads” folder under the Qsync folder on Qsync client devices.
Note: If files uploaded before are deleted from the Camera Uploads folder, Qfile will not upload those copies in the photo library again.
Synchronization Management
Synchronization management
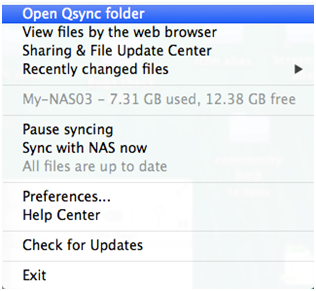
Click on the Qsync icon on the taskbar to see the management functions:
- Add files and view the synchronization result on the NAS:
- Open Qsync folder: Open the Qsync folder to add files,
- View files by the web browser: Open File Station (web based file explorer) and browse files in the Qsync folder on the NAS.
- Control synchronization progress:
- Pause syncing / Resume syncing: Click to pause or resume syncing,
- Sync with NAS now: Force Qsync to scan again and refresh the synchronization list.
- Information for syncing and sharing:
- Sharing & File Update Center
- File Update Center: List the file or folder update logs.
- Sharing center: List the folders or files shared with others. Users can choose to accept or decline the team folders. However, users cannot share team folders that are shared by others.


ii. Recently changed files: List the recently updated files.
- Sharing & File Update Center
- Preference:
- General:
- Link Status: Show the current status. Click “Logout” to change users.
- Network Recycle Bin: Browse or recover files deleted from the Qsync folder.

- Sync:
- Selective Synchronization: Select the folder to sync to the computers.
- Do not remove any files on the NAS when synchronizing: You can remove files within the local Qsync folder, and files deleted from your computer will not be synchronized with the NAS. The NAS still keeps copies of the deleted files.

- Policy:
- Conflict Policies: The policies for handling the name conflicts between Qsync server (NAS) and clients after it is back online from its disconnection:
- Rename the local files(s),
- Rename the remote NAS files(s),
- Replace local files with remote NAS file(s), or
- Replace remote NAS files with local files(s).
- Sharing Policies: The policies of the team folders when other Qsync users share them to this local computer:
- Always reject sharing,
- Automatically accept sharing, or
- Send a notification message once sharing occurs.
- Filter Settings: During file synchronization, Qsync will not sync the types of files specified in filter settings.

- Conflict Policies: The policies for handling the name conflicts between Qsync server (NAS) and clients after it is back online from its disconnection:
- E-Mail:
Set up E-mail: Set up an E-mail account for sharing file links. You can use the NAS SMTP server settings (for NAS administrator use only) or configure a new SMTP server.

- Advanced:
Import photos and videos: Import photos and videos when an USB external device is connected. This feature only applies to photos and videos located under the DCIM folder in the root directory of the USB external device.

- General:
Manage or monitor Qsync status via web browser
Log into the NAS via a web browser and click the Qsync button.
- Overview: Provides links to install the utility and to File Station, lists the total number of online users and devices, and you can also choose to enable or disable the Qsync service (for administrator only.)
- Users: List information of online users and you can manage the Qsync service for users (For administrator only.)
- Devices: List the status of connected devices and you can choose to allow or terminate connection of the devices.
- If users log in from their PC, the name of the device will be shown as their computer name.
- If users log in from Qfile, the name of the device will be shown as Qfile-Android or Qfile-iPhone.
- If users move or copy files to the Qsync folder in File Station, the name of the device will be shown as Qsync-File Station.
- Event Logs: List the activity details by each user.
- Team folder: List the status of the team folder, including folders that you shared and are shared by others.
- Shared File Links: List the status of shared links.
Rating: 10.0/10 (1 vote cast)
How do I use the Qsync to synchronise files on my computers and NAS?Bilgisayarım ve NAS üzerindeki dosyalarımı Qsync kullanarak nasıl senkronize ederim?, 10.0 out of 10 based on 1 rating