Client
To connect to a virtual machine using SPICE, you need a client application.
Windows installers
- virt-viewer Windows installer — can be downloaded from virt-manager download page
- UsbDk — A Windows filter driver developed for Spice USB redirection (windows client side) — UsbDk_1.0.22_x64.msi, UsbDk_1.0.22_x86.msi, (source code)
— https://gitlab.freedesktop.org/spice/win32/usbdk - usbredirect — USB redirection can now be achieved in Windows with the standalone usbredirect binary — usbredirect-x64-0.13.0.msi
Other clients
- Android client — aSPICE is a secure, SSH capable, open source SPICE protocol client that makes use of the LGPL licensed native libspice library. You can find and install aSPICE from play.google.com.
- Web client — a simple javascript client
- https://gitlab.freedesktop.org/spice/spice-html5
- Experimental OS X client
- launcher-mobile — A GPLv2 licensed cross-platform mobile client for both iOS and Android. Though mainly intended to be used as a client for flexVDI, it can also connect to conventional SPICE sessions.
- It is also avaiable in binary form: flexVDI Client at App Store, flexVDI Client at Play Store
Older releases
Older source releases can be found here. Old versions of spice-gtk can be found here.
Clipboard and folder sharing are usually an important feature to have when we run virtual machines. So here am I sharing the complete guide for you guys.
I found people talking about Qemu/KVM on Reddit, so I decided to try. Main reason why I wanted to try because I want to move away from VirtualBox that I can never enable folder sharing, and VMWare which is paid.
I am currently running Ubuntu 20.04 as the Host and Windows 10 as the Guests.
Problems
It is quite confusing when you first started. I started with virt-manager and had no clipboard sharing enabled. By default, virt-manager is using SPICE. The key to this tutorial is, install spice-guest-tools and Spice WebDAV daemon.
Notes
I am writing this tutorial based on virt-manager. It should be working for any SPICE remote viewer too such as Cockpit (tested).
Solution – Clipboard sharing
(Updated as 26th Oct)
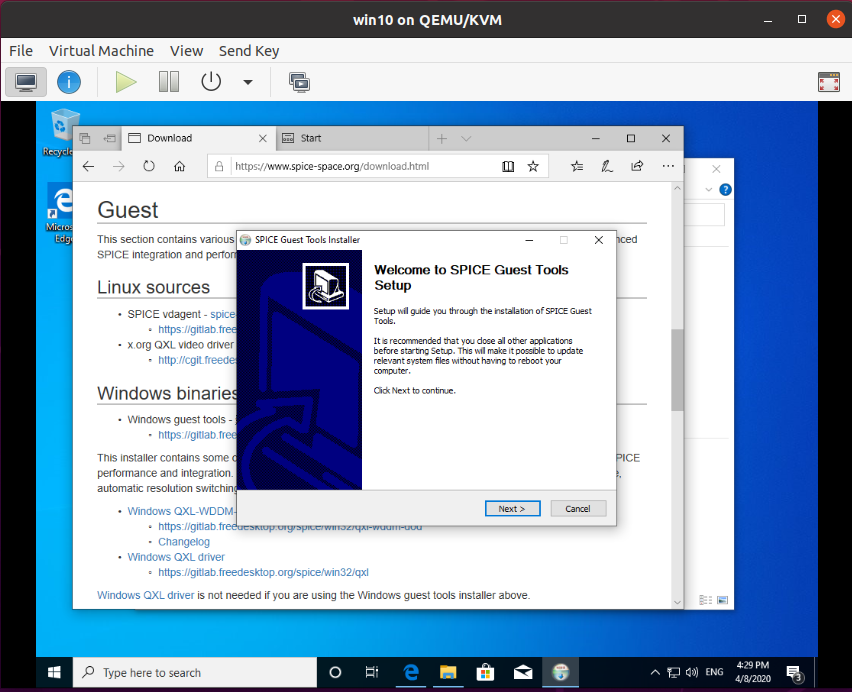
Step 1 – Download spice-guest-tools to Windows Guest
Open the download page (https://cutt.ly/2ROq8dK) on your Windows Guest, scroll down a bit until you found Windows binaries under Guest, click the Windows guest tools link to start the download. Or you can use this link
https://www.spice-space.org/download/windows/spice-guest-tools/spice-guest-tools-latest.exe

Or easier, shortened URL: https://cutt.ly/SROqBqZ

Step 2 – Run and install spice-guest-tools
After the file is available on your Windows Guest, run and install the program.
The display might blinking a few times, so don’t worry about that.
Step 3 – Test your copy/paste
You are pretty much finished. Try copying something in your Windows Guest and paste it in your Host, it should work. But if it doesn’t, try rebooting the VM. If it still won’t work, remove the program and reinstall. It should be working.
Solution – Folder sharing
(Updated as 26th Oct)
So, you have clipboard sharing enabled and now want to share folder?
We will be using virt-manager and Cockpit
Unfortunately, virt-manager has not implemented SPICE WebDAV in its client. So, we are going to use Cockpit, the alternative.
Step 1 – Install Cockpit and Cockpit Virtual Machines
First, install Cockpit and Cockpit Virtual Machines. For Ubuntu, run
Ubuntu: $ sudo apt install cockpit cockpit-machines
Arch: $ sudo pacman -Sy cockpit cockpit-machines
If you are using another Linux distribution, refer this page. You will still need to install cockpit-machines using your package manager to enable Virtual Machine manager.
Then enable and start cockpit
$ sudo systemctl enable cockpit.socket
$ sudo systemctl start cockpit.socket
Step 2 – Open the Web-UI in your browser
Cockpit provides Web-UI which you can access to use the program. Simply open this URL in your browser
http://localhost:9090
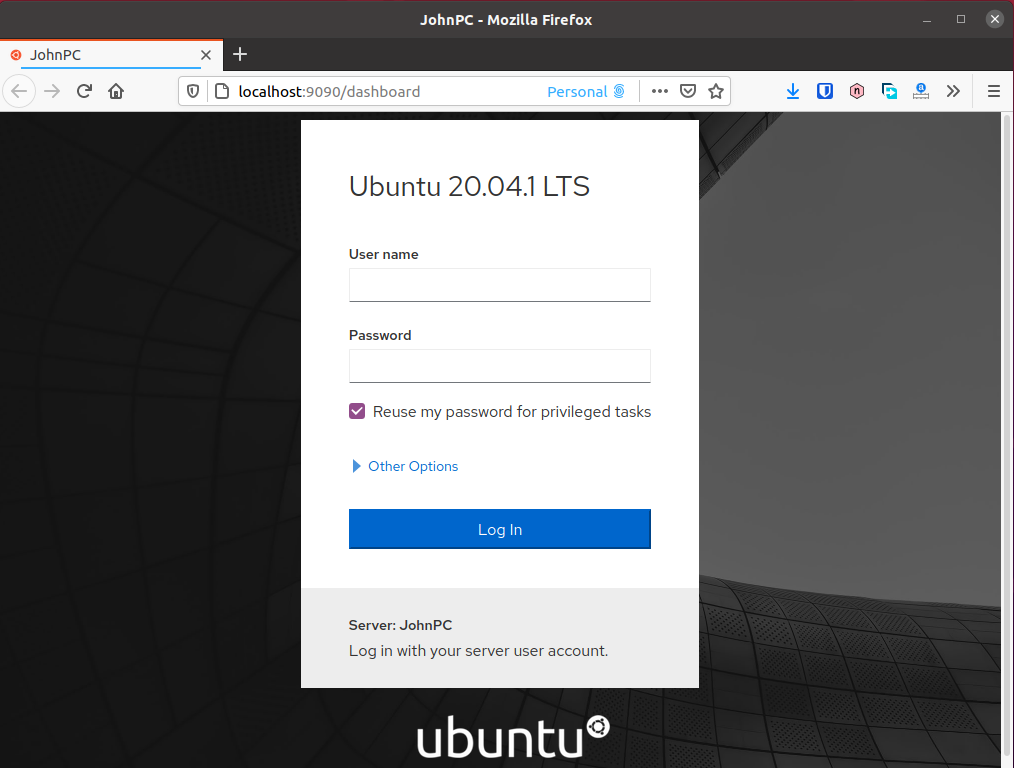
Login using your PC user and username
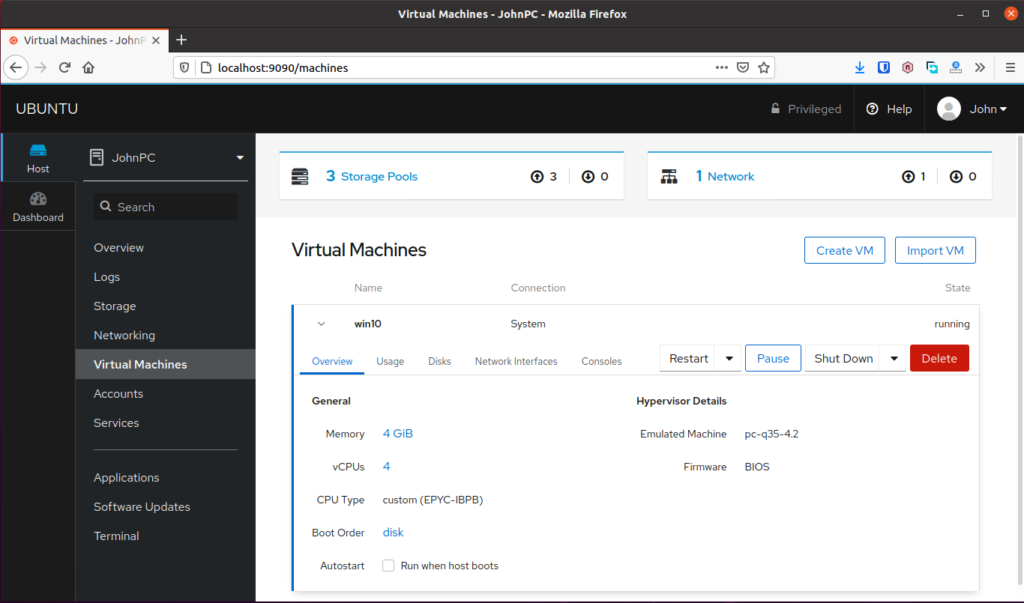
Step 2 – Go to Virtual Machine and shutdown your VM
You need to shutdown your VM or your settings in the next few steps probably won’t work. Simply go to Virtual Machines and hit the Shut Down button to turn off the VM.
Notes: If your Virtual Machine is empty, go to Overview and check if there is a notification at the top asking for a permission. Allow the access and your VMs should be showing up.
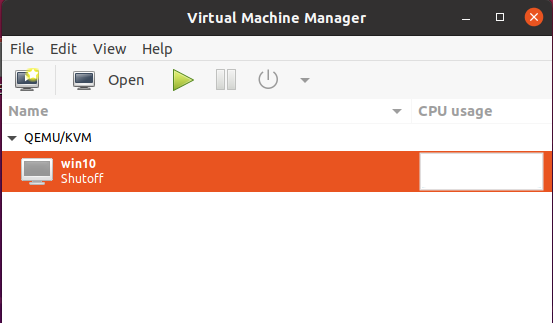
Step 3 – Open virt-manager, add new hardware
Open your virt-manager, right click on your VM and select open. You can also click on your VM, then hit the big “Open” button at the top.
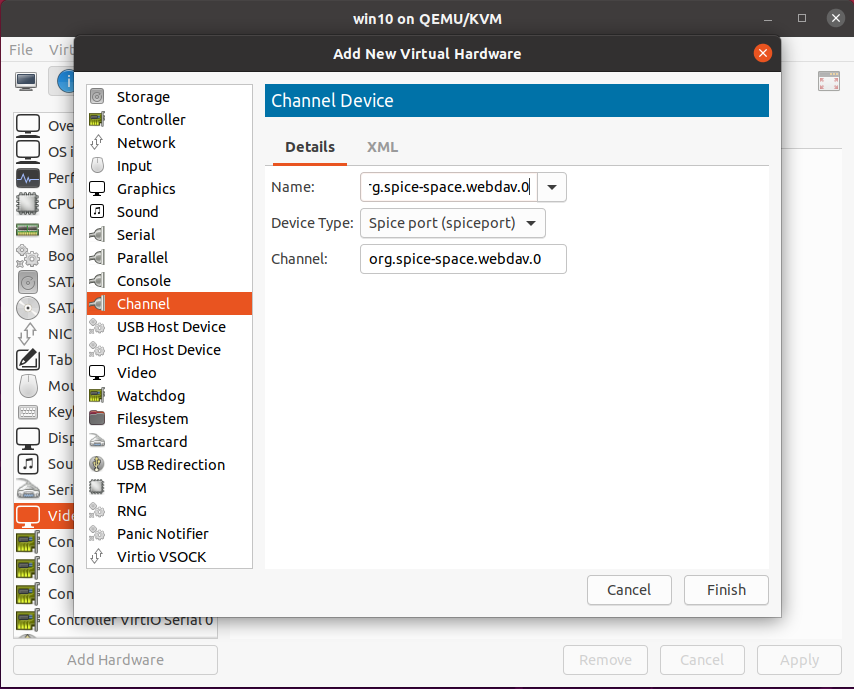
Click Add Hardware and select Channel. Delete whatever in “Name” column, and insert this
org.spice-space.webdav.0
Step 4 – Return to Cockpit Web-UI, run your VM
You don’t need virt-manager for now, so you can close it. Then return to Cockpit Web-UI and hit Run button to start your VM.
Then go to Consoles tab and click “Launch remote viewer”
Notes: You probably need to install Remote Viewer if you are not on Ubuntu. On Arch, Install virt-viewer.
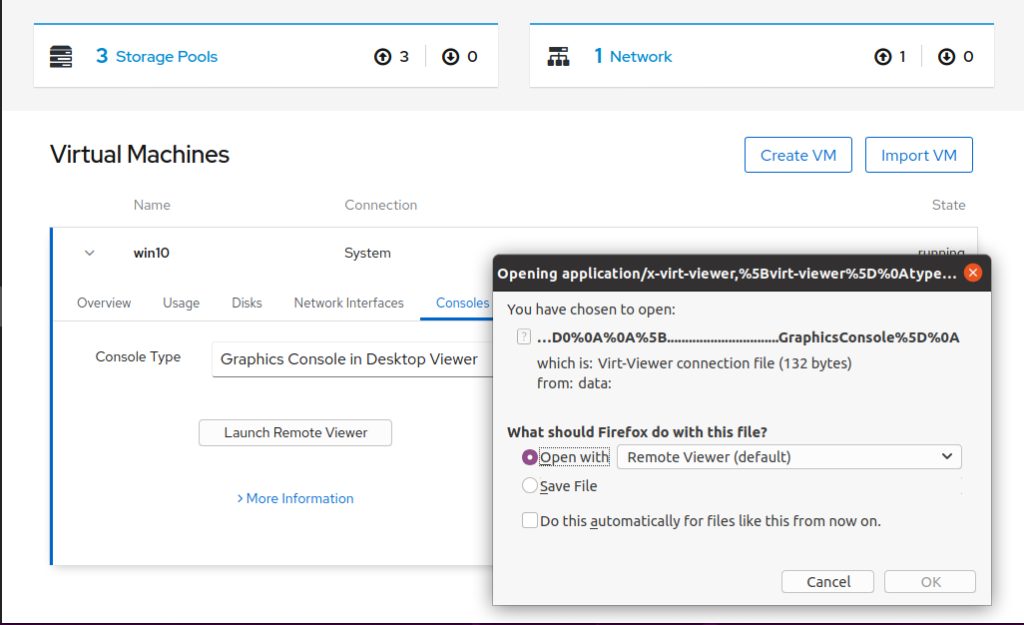
Click “OK” and you will see your Windows Desktop.
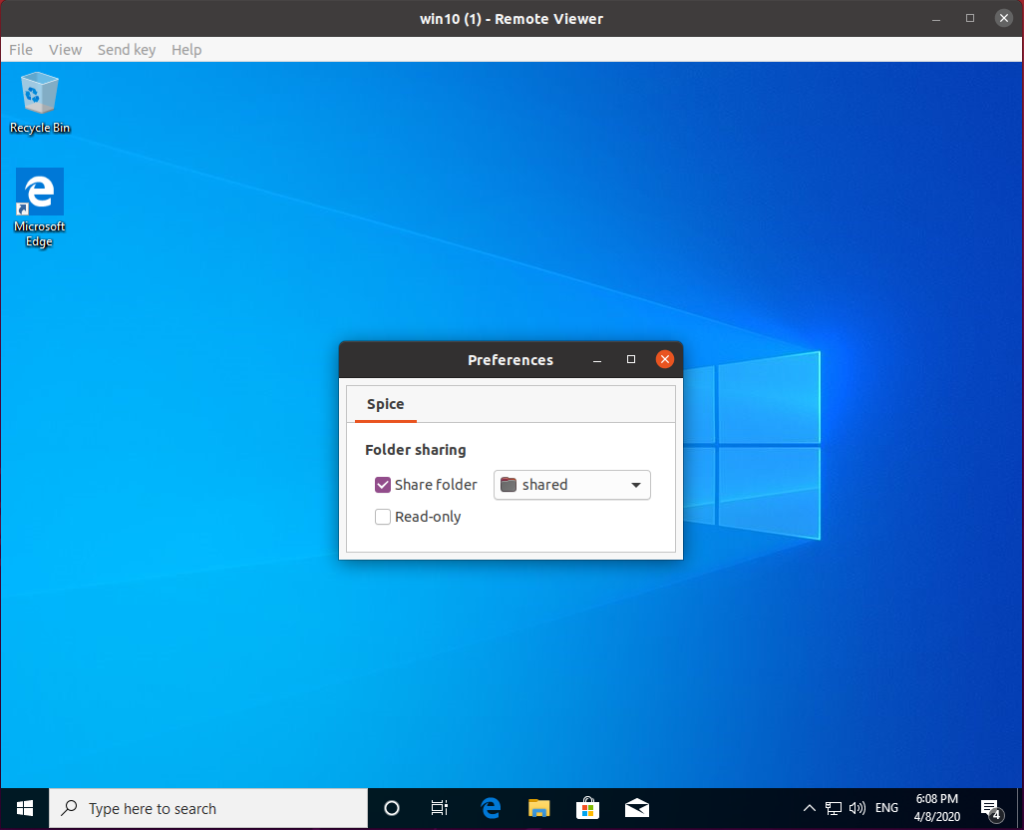
Step 5 – Enable Folder Sharing
Click menu File, then select Preferences. tick “Share Folder” and choose which folder you want to share with the Guest.
Notes: On Arch, Preferences is in hamburger menu on the right.
Download and install spice-webdavd in Windows Guest. Pay attention on the file extension. You will want to donwload .msi file which usually larger than the other. Or you can just use this link for the latest installer
https://www.spice-space.org/download/windows/spice-webdavd/spice-webdavd-x86-latest.msi

Be aware, some browsers will open the link instead of downloading it. At least Edge displaying the file content to me instead of downloading it.

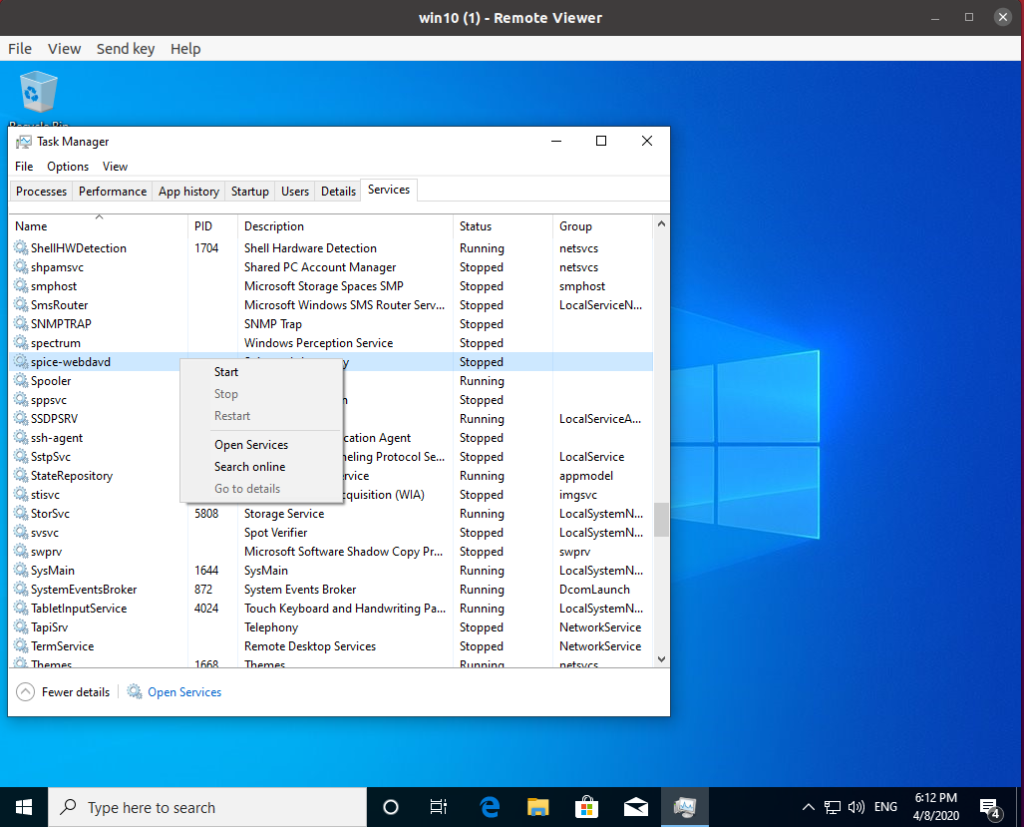
Then in the Windows, open Task Manager and go to Services tab. Find “spice-webdavd” and start the process if it doesn’t.
Step 7 – Verify the Folder Sharing is working
After running the “Spice webdav proxy” service, you should see a new storage in “This PC” or “My Computer”.
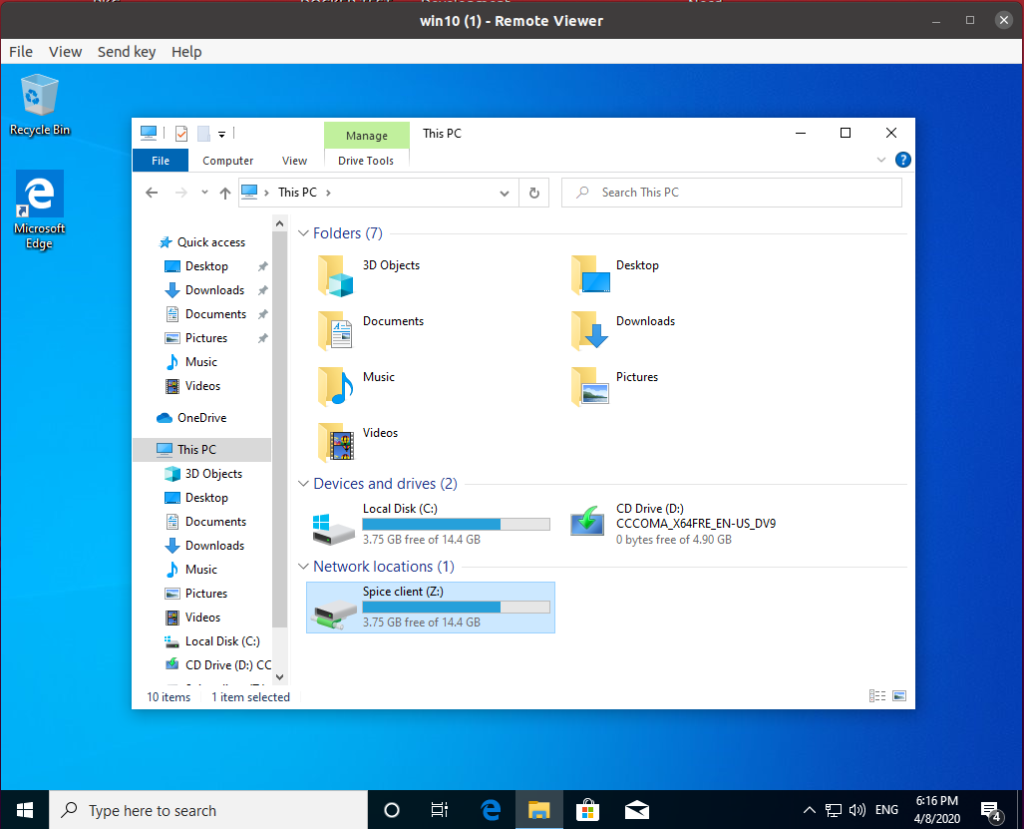
Try creating a file or folder and check shared folder on your Host to see if the changes reflected.
You are now done 🙂
15.0 >
System >
spice-guest-tools (0.141)
SPICE guest tools for Windows virtual machines.This package contains the Windows spice-guest-tools installer ISO
image that you can attach to your Windows QEMU/KVM virtual machines.The installer contains the following components:
- SPICE vdagent,
- QEMU guest agent,
- Windows Virtio drivers.If the optional dependency p7zip is installed, Windows Virtio drivers
floppy disk images are packaged too.The purpose of these images is to provide instant access to the Windows
Virtio drivers. In particular, the drivers can be easily accessed during
the Windows installation phase. This allows, for example, to install
the guest using Virtio SCSI disk directly, instead of first going
through the installation of the standard IDE disk controller.
Maintained by: Andrzej Telszewski
Keywords: windows,virtio,virtio-win,spice,qemu,kvm,qemu-guest-agent,qemu-ga,vdagent,vdservice
ChangeLog: spice-guest-tools
This article describes the setup of a Windows guest using QEMU.
Configuration
Host
To create a disk image for the virtual machine, run:
user $qemu-img create -f qcow2 WindowsVM.img 25G
Download a Windows driver image from this location.
Since QEMU requires a lot of options, it would be a good idea to put them into a shell script, e.g.:
FILE WindowsVM.sh
#!/bin/sh
exec qemu-system-x86_64 -enable-kvm \
        -cpu host \
        -drive file=WindowsVM.img,if=virtio \
        -net nic -net user,hostname=windowsvm \
        -m 1G \
        -monitor stdio \
        -name "Windows" \
        "$@"
Change the path to the disk image WindowsVM.img in the script. Additional options can be used when calling the script. To boot the disk image, run:
user $./WindowsVM.sh -boot d -drive file=WINDOWS.iso,media=cdrom -drive file=DRIVER.iso,media=cdrom
Install the Windows guest. See the guest section for optimum support. After the installation start the script without the additional options.
Note
When upgrading to QEMU 1.3 the -enable-kvm must be added to keep the guest responsive. Also change -net nic to -net nic,model=rtl8139 to have a network interface in the guest.
Note
When upgrading to QEMU 1.5.3, add -display sdl,frame=off,window_close=off" to keep a full screen session full screen. Without this option there may be a (new) menu bar at the top of the screen, pushing the Windows bottom menu off screen.
Note
When upgrading to QEMU 2.0.0 replace qemu-kvm with qemu-system-<CPUTYPE> (e.g. qemu-system-x86_64) (-enable-kvm switch may need to be added); the qemu-kvm wrapper has been removed — see bug #506566
Guest
- During installation at the partition step Windows doesn’t detect the VirtIO hard drive. Windows will require the viostor driver from the driver image listed above.
- After installation the VirtIO Ethernet adapter will appear without a driver. Windows will require the netkvm driver from the driver image listed above.
- For 32-bit Windows 7 a sound driver for the Intel 82801AA AC97 exists.
- For 64-bit Windows 7 Intel HDA is available as an option (QEMU option:
-soundhw hda) - Windows 10 guest audio emulation is tricky for ALSA users. Pass these options to QEMU:
-audiodev alsa,id=snd0,out.try-poll=off -device ich9-intel-hda -device hda-output,audiodev=snd0- This assumes use of the default ALSA device for playback.
- we cannot use AC97 for Windows 10 because there is no driver for it.
out.try-poll=offis an odd option, but without it I got nothing but clicks and pops during playback.- there may be more options required for line-in and line-out (
-device hda-duplex) or microphone and line-out (-device hda-micro). - For PulseAudio, see ArchWiki
- USB 2.0 pass through can be configured from host to guest with variations of:
-usb -device usb-ehci,id=ehci -device usb-host,bus=ehci.0,vendorid=1452
- For Windows 8.1 USB tablet is available only with USB 2.0 pass through (QEMU option:
-device usb-ehci,id=ehci -device usb-tablet,bus=ehci.0- The USB tablet device helps the Windows guest to accurately track mouse movements. Without it mouse movements will be jerky.
- Another device that can be presented to the Windows guest is the random number generator. Add QEMU option:
-device virtio-rng-pci. Now install the viorng driver from the driver image. - For Windows 10, to boot using UEFI the sys-firmware/edk2-ovmf is required on the host, then add QEMU option:
-bios /usr/share/edk2-ovmf/OVMF_CODE.fd.to the qemu call. This option is essential for running Hyper-V guest images.
SPICE
QEMU with SPICE support enables (among other things) the more powerful QXL display device and makes clipboard sharing possible (copy/paste between clients and the virtual machine).
To use SPICE with QEMU enable the following USE flag in package.use:
FILE /etc/portage/package.useSetting USE variable
Build QEMU:
root #emerge app-emulation/qemu
To connect spice server, a client like net-misc/spice-gtk is required.
Guest
On Windows guests, install Windows guest tools.
On Windows 8.1 guest, to set screen resolution more than 1024×768, install drivers from https://fedoraproject.org/wiki/Windows_Virtio_Drivers#Direct_download and QXL WDDM DOD driver. If trying to install Windows guest tool, QXL WDDM DOD driver won’t work well because of Windows SPICE agent .
To try the new qlx-dod driver linked above, in order to use the driver, update’ the basic windows display adapter driver and point it to the unzipped folder for the new driver. This can be found by: Right click the Start button -> Device Manager. Expand ‘Display adapters’ and right click on the sub entry and hit update driver.
Initialization script
To run QEMU from a script (the spicy viewer requires net-misc/spice-gtk):
FILE WindowsVM.sh
#!/bin/sh
SPICE_PORT=5924
qemu-system-x86_64 -enable-kvm -daemonize \
    -cpu host \
    -drive file=WindowsVM.img,if=virtio \
    -net nic -net user,hostname=windowsvm \
    -m 1G \
    -vga qxl \
    -spice port=${SPICE_PORT},disable-ticketing \
    -usbdevice tablet \
    -device virtio-serial \
    -chardev spicevmc,id=vdagent,name=vdagent \
    -device virtserialport,chardev=vdagent,name=com.redhat.spice.0 \
    "$@"
exec spicy --title Windows 127.0.0.1 -p ${SPICE_PORT}
Or remote-viewer (app-emulation/virt-viewer):
FILE WindowsVM.sh
#!/bin/sh
SPICE_PORT=5924
qemu-system-x86_64 -enable-kvm -daemonize \
    -cpu host \
    -drive file=WindowsVM.img,if=virtio \
    -net nic -net user,hostname=windowsvm \
    -m 1G \
    -vga qxl \
    -spice port=${SPICE_PORT},disable-ticketing \
    -usbdevice tablet \
    -device virtio-serial \
    -chardev spicevmc,id=vdagent,name=vdagent \
    -device virtserialport,chardev=vdagent,name=com.redhat.spice.0 \
    "$@"
exec remote-viewer --title Windows spice://127.0.0.1:${SPICE_PORT}
- Installation
- Windows 10 and higher
- Windows XP and higher
- Download
- SPICE WebDAV
In order to use all the features of UTM, you should install the Windows Guest Tools in the virtual machine guest. The tools support Windows XP or higher on x86_64 (excluding Windows XP), i386, and arm64 builds.
Installation
Windows 10 and higher
If the guest tools ISO is mounted on a second CD drive, then it can be installed automatically during Windows Setup.
- In the UTM new virtual machine wizard, make sure to select “Windows”
- Check “Install Windows 10 or higher”
- Check “Install drivers and SPICE tools”
Once the wizard completes, the Windows Guest Tools will download automatically and it will be mounted to the newly created virtual machine. Wait until the download completes and start the virtual machine. After finishing the installation, all drivers and the guest tools will be installed.
Windows XP and higher
If you are running an older version of Windows or if you have already completed Windows Setup, you can install the guest tools manually.
iOS
- Open the action menu and select “Install Windows Guest Tools…”
- Wait for the tools to finish downloading and it should be automatically mounted on the last removable drive.
- Start the virtual machine.
macOS
- Start the virtual machine.
- On the toolbar click the CD icon and select “Install Windows Guest Tools…”
- Wait for the tools to finish downloading and it should be automatically mounted on the last removable drive.
- Once Windows starts up and you are logged in, open “My Computer” and find the CD drive labeled “UTM”.
- Launch
spice-guest-tools-xxx.exewherexxxis the version number. - Follow the setup wizard to install the guest tools.
Download
You can manually download the guest tools ISO here.
SPICE WebDAV
If QEMU SPICE WebDAV directory sharing is enabled, you can access it from “My Computer” as a network drive.
If you do not see the network drive, run C:\Program File\SPICE webdavd\map-drive.bat.