Table of contents
- Vhd/vhdx and qcow2
- Convert vhd/vhdx to qcow2
- Backup VMs with Vinchin Backup & Recovery
- Sum Up
Virtualization technology can improve the work efficiency of IT environment and more and more companies start to research multiple hypervisors to find the most proper virtualization solutions for different applications.
When a new hypervisor is selected as the alternative or complement to the existing hypervisor, it is necessary for IT administrators to learn VM migration procedures between different hypervisors because this is the fast way to make old applications work on the new hypervisor.
Vhd/vhdx and qcow2
Virtual machine can work like the real machine but actually it exists as a folder on the host and this folder contains everything about the VM including configuration, applications, snapshots, and other data. When IT administrators move a VM from one hypervisor to another, the virtual disk is the most important thing. VMware will allow users to export full OVA template for data backup and later migration, you can also export OVA equivalent for Hyper-V VM.
Virtual disk is like the hard drive of physical machine. It is a file in the folder of VM and is saved in a different format in the different virtual environment. IT administrator often use virtual disk manager to manage virtual disk.
In Hyper-V environment, virtual disk is often saved as vhd or vhdx file. Vhd is the former format for Hyper-V virtual disk and vhds becomes its successor of it. Vhdx is has better performance than vhd. For example, the maximum capacity of vhd virtual disk is 2040GB but the maximum capacity of vhdx virtual disk is 64TB.
If you know the directory of Hyper-V VM folder, you can directly find and copy the vhdx virtual disk from the datastore. If you don’t know the directory, you can still export the Hyper-V VM folder and then extract the vhdx virtual disk from it.
KVM is a hypervisor used in multiple open-source virtualization and qcow2 is the most common virtual disk format for KVM virtual machine.
Both hypervisors have their advantages so you can add or change virtualization solution according to your needs. The next section will show you how to convert the virtual disk to move VM from Hyper-V to KVM.
Convert vhd/vhdx to qcow2
Because different virtual environments require different virtual disk formats, you need to convert the virtual disk format before importing the virtual disk to new environment. For example, if you would like to convert Hyper-V virtual disk to KVM virtual disk, you need the V2V converter, qemu-img.
You need to install this tool on Windows or Linux machine and add its directory to environment variables. After that, use the command below to convert the Hyper-V virtual disk:
qemu-img convert -p -f vhdx -O qcow2 /hyper_v_virtual_disk_directory.vhdx /hyper_v_virtual_disk_directory.qcow2
If you would like to convert vhd virtual disk, replace vhdx with vpc.
-p: presenting the conversion progress
-f: format of the source image
-O: format of the target image
After that, you can import the qcow2 virtual disk to create new VM in KVM environment.
Backup VMs with Vinchin Backup & Recovery
Managing only virtual disks is not enough for IT administrators and it is necessary to protect the whole virtual environment and manage the entire VMs.
Vinchin Backup & Recovery is a professional backup and disaster recovery solution for Hyper-V, Red Hat Virtualization, oVirt, OpenStack, Oracle Linux KVM, etc. (Native KVM is not supported for now) You can use it as the all-in-one backup solution will means you can add both Hyper-V host and KVM host to this backup system and manage them via a user-friendly web console.

Agentless backup will save you a lot of time and all kinds of backup strategies like schedule, automatic backup, data compression, data encryption, incremental backup, GFS retention policy, etc. will helps you backup VM with different requirements.
For KVM environemnt management, Vinchin Backup & Recovery can provide advanced features like Instant Recovery and Cross-Platfrom Migration. Instant Recovery is the feature to help you reduce RTO by recovering a failed VM from its backup in 15 seconds.
Vinchin Backup & Recovery has been selected by thousands of companies for heterogeneous virtual environment management and you can also start to use this powerful system with a 60-day full-featured free trial. Jusy click the button to get the installation package.
Sum Up
Different virtualization solutions have their advantages so you can select one or more of them to deploy virtual environment. Vhdx file and qcow2 file are the virtual disks of VMs in Hyper-V and KVM environment. To use vhdx virtual disk in KVM environment, you need to use qemu-img to convert vhdx to qcow2 before importing virtual disk.
If you need an all-in-one backup solution for heterogeneous virtual environment, you can select Vinchin Backup & Recovery. Don’t miss the free trial.
Categories:
How-to Guides
Hyper-V
oVirt
RHV
OLVM
OpenStack
Huawei FusionCompute
Technical
Время на прочтение
2 мин
Количество просмотров 25K
-
Конвертируем системные диски с помощью disk2vhd
-
Конвертируем диск vhdx в qcow2 в Windows
-
Создаем виртуальную машину Proxmox
-
Отключаем и удаляем диск виртуальной машины в Proxmox
-
Переносим сконвертированный диск формата qcow2 на локальный store Proxmox или хранилища подключенного к нему по SMB или NFS.
-
Делаем импорт диска в Proxmox и подключаем его к нашей виртуальной машине
-
Запускаем и проверяем
-
Уменьшение диска виртуальной машины
Конвертируем системные диски с помощью disk2vhd
Скачать disk2vhd можно здесь
Распаковываем и запускаем на сервере который хотим конвертировать.

При конвертации я выбираю системный диск, остальные диски отдельно так как их можно подключить и перенести данные вручную, а на самой виртуальной машине в Proxmox можно создать диски на тех разделах что предпочтительнее по скорости и размерности.
Конвертируем диск vhdx в qcow2 в Windows
Для конвертации диска нам понадобится программа qemu-img скачать можно тут.
Скачиваем и распаковываем, запускаем командную строку с правами администратора.
Выполняем команду: D:\qemu>qemu-img.exe convert -O qcow2 d:\JSERVER.VHDX d:\JSERVER.qcow2 и ждем процесс долгий

Создаем виртуальную машину Proxmox
Создаем виртуальную машину с любым размером жесткого диска.
Отключаем и удаляем диск виртуальной машины в Proxmox
Выбираем нашу виртуальную машину, переходим на вкладку оборудование выбираем жесткий диск и сверху кнопка отключить.

После отключения диска появится кнопка удалить, нажимаем ее.
Переносим сконвертированный диск формата qcow2 на локальный store Proxmox или хранилища подключенного к нему по SMB или NFS.
Чтобы выполнить перенос диска на гипервизор Proxmox используем WInSCP, тем кто пользовался вопросов не возникнет. Скачать можно тут.
Вот сконвертированный диск, который я забросил на хранилище подключенное к Proxmox по NFS и его переименовал, имя такое же как на фото выше, так как оно прописано в конфигурационном файле.

Делаем импорт диска в Proxmox и подключаем его к нашей виртуальной машине
Импорт диска в нашу созданную виртуальную машину взамен удаленного делается командой: qm importdisk 105 /mnt/pve/Backup/vm-105-disk-0.qcow2 Backup
где 105 — id виртуальной машины,
/mnt/pve/Backup/vm-105-disk-0.qcow2 — полный путь к диску
Backup — название store.
После успешного выполнения команды по импорту, выбираем виртуальную машину заходим в оборудование и видим не используемый диск.
![]()
Сверху выбираем редактировать

откроется окно и выбираем добавить

Все диск добавился.
Запускаем и проверяем
Как видно из скриншота машинка благополучно стартанула.

Уменьшение диска виртуальной машины
Не забывайте, что предварительно нужно в службе управления дисками сжать наш диск с системой на тот объем, который хотим отрезать, эта область перейдет в статус неразмеченная.

Выключаем машину и отключаем жесткий диск в разделе оборудование виртуальной машины.
Идем в консоль гипервизора и выполняем команду:
qemu-img resize —shrink /Data/images/105/vm-105-disk-0.raw -400G
где -400G — объем на который уменьшаем диск.
Добавляем повторно диск и стартуем машину.
Для переноса виртуальной машины с одного гипервизора на другой может потребоваться конвертация образа диска этой виртуальной машины.
С этой задачей на отлично справляется qemu-img.
Програма поддерживает форматы дисков для всех распространённых гипервизоров:
- KVM, Xen — qcow2
- VMware — vmdk
- Hyper-V — vhd, vhdx
- VirtualBox — vdi
Так же возможна конвертация образов дисков, созданных с помощью dd.
Далее будет описана работа программы под Windows, однако qemu-img так же доступен и на Linux, формат команд везде одинаковый
apt install qemu-utils


yum install qemu-img
Информацю об образе диска можно получить выполнив команду
qemu-img.exe info D:\test\test-mv.vhd
Ответ будет примерно таким:
image: D:\test\test-vm.vhd
file format: vpc
virtual size: 40G (42949017600 bytes)
disk size: 17G
cluster_size: 2097152
Конвертация диска виртуальной машины из формата vpc (Hyper-V) в qcow2 (KVM) выполняется командой
qemu-img.exe convert -p -f vdi -O qcow2 D:\test\test-mv.vhd D:\test\test-mv.qcow2
Ключи обозначают следующее:
- -p — отображение прогресса конвертации
- -f — исходный формат образа
- -O — формат образа после конвертации
Форматы файлов указываются именно ключами, а не расширениями имён файлов.
Более подробную справку можно увидеть выполнив команду
qemu-img.exe --help
Usage examples
Convert a QCOW2, RAW, VMDK or VDI image to VHDX
|
qemu—img.exe convert source.img —O vhdx —o subformat=dynamic dest.vhdx |
Convert a QCOW2, RAW, VMDK or VDI image to VHD
|
qemu—img.exe convert source.img —O vpc —o subformat=dynamic dest.vhd |
Subformat can be either “dynamic” or “fixed” for VHD (vpc) or VHDX.
Note: use the fixed VHD subformat for Azure, the conversion will automatically take care of the required 1MB virtual size alignment.
Check a virtual disk for consistency
|
qemu—img.exe check source.qcow2 |
Get info about a virtual disk
|
qemu—img.exe info image.qcow2 |
Run qemu-img.exe -h or see the manual page for a complete list of all supported options.
Step 4: Create the VM you want to use
At this point, we wanted to create a VM that we are going to use with the image we transferred. Here the key is to ensure that you make a VM that mirrors the Hyper-V VM in terms of CPU, RAM, network and disk options. Most modern OSes are supported via KVM so you should have little issue getting things to work, especially with Linux guests.
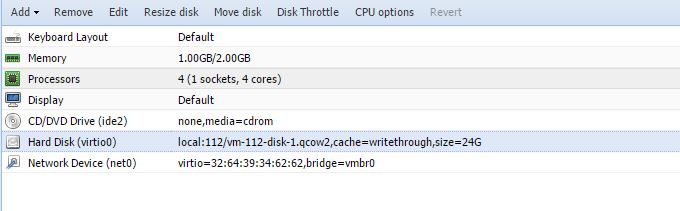
Step 5: Find the VMs qcow2 image
There are a few different ways you can do this, including creating the VM and attaching the disk after converting the vhdx. Since we want to keep Proxmox VE’s naming convention (and make the process easy), we are going to simply overwrite the qcow2 image that the virtual machine wizard created. First, we need to find the VM.
Since you can see that the disk in the shot above is named vm-112-disk-1.qcow2, we can search for that on our Linux/ Proxmox VE host.

Now that we know the location, we can set the output of the conversion operation to overwrite the empty disk.
Step 6: Convert the vhdx to qcow2 and verify
The command to convert our image and overwrite the empty qcow2 is very simple. We are going to use qemu-img convert, specify the output type and then the vhdx followed by the full path to the qcow2 image.

Here is the command you can adapt to your setup:
qemu-img convert -O qcow2 Bench-Dev.vhdx /var/lib/vz/images/112/vm-112-disk-1.qcow2
We also validated that the disk is indeed written int eh correct place.
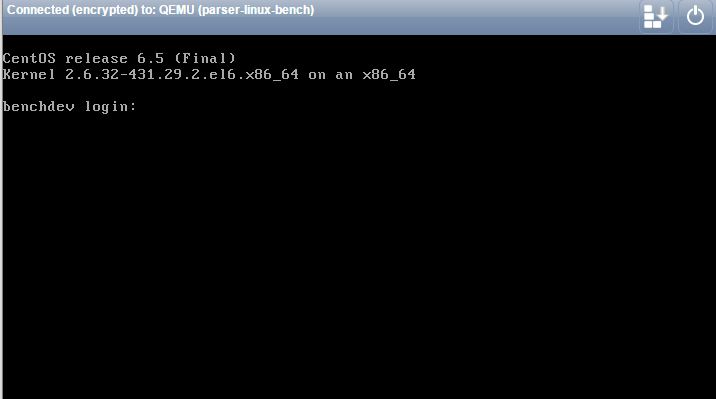
Step 7: Boot the VM
At this point, you should be able to boot the VM. There are still some tasks that will need to be completed. For example, updating network settings. Generally, this type of conversion will yield a different network interface so there are likely steps like setting that up in the guest OS that will need to happen. Platforms like Proxmox VE have built-in console viewer applications so we were able to do this post-transfer. Another option is to complete these steps before transferring/ converting the VM so that you can power-up and verify that the operation works.
These 7 quick steps take only a few minutes (save for the inter-data center transfer) and helped us move our Hyper-V VMs to KVM quickly and painlessly.