Introduction — What is qemu-guest-agent
The qemu-guest-agent is a helper daemon, which is installed in the guest. It is used
to exchange information between the host and guest, and to execute command in the guest.
In Proxmox VE, the qemu-guest-agent is used for mainly two things:
- To properly shutdown the guest, instead of relying on ACPI commands or windows policies
- To freeze the guest file system when making a backup (on windows, use the volume shadow copy service VSS).
Installation
Host
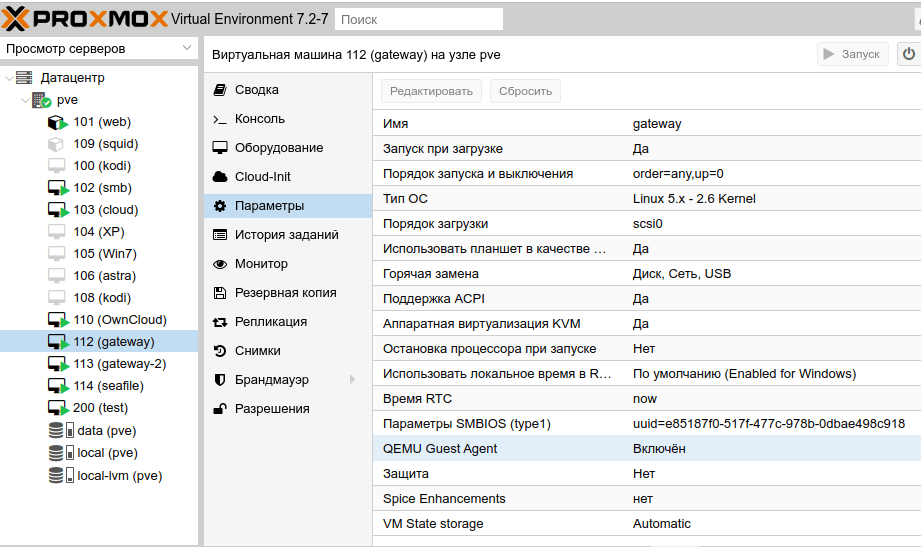
You have to install guest-agent in each VM and then enable it, you can do that in the Proxmox VE Webinterface (GUI)
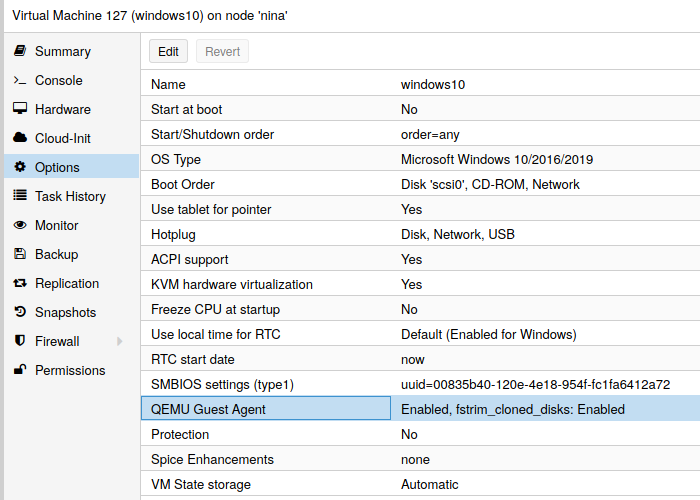
or via CLI: qm set VMID --agent 1
Guest
Linux
On Linux you have to simply install the qemu-guest-agent, please refer to the documentation of your system.
We show here the commands for Debian/Ubuntu and Redhat based systems:
on Debian/Ubuntu based systems (with apt-get) run:
apt-get install qemu-guest-agent
and on Redhat based systems (with yum):
yum install qemu-guest-agent
Depending on the distribution, the guest agent might not start automatically after the installation.
Start it either directly with
systemctl start qemu-guest-agent
(should work for most distributions) or reboot the guest.
Windows
First you have to download the virtio-win driver iso (see Windows VirtIO Drivers).
Then install the virtio-serial driver:
- Attach the ISO to your windows VM (virtio-*.iso)
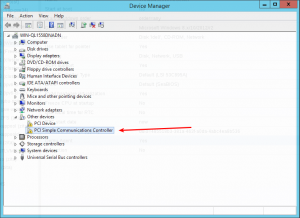
- Go to the windows Device Manager
- Look for «PCI Simple Communications Controller»
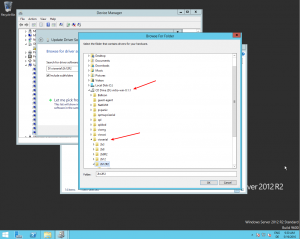
- Right Click -> Update Driver and select on the mounted iso in DRIVE:vioserial<OSVERSION> where <OSVERSION> is your Windows Version (e.g. 2k12R2 for Windows 2012 R2)
After that, you have to install the qemu-guest-agent:
- Go to the mounted ISO in explorer
- The guest agent installer is in the directory guest-agent
- Execute the installer with double click (either qemu-ga-x86_64.msi (64-bit) or qemu-ga-i386.msi (32-bit)
After that the qemu-guest-agent should be up and running. You can validate this in the list of Window Services, or in a PowerShell with:
PS C:UsersAdministrator> Get-Service QEMU-GA

Status   Name               DisplayName
------   ----               -----------
Running  QEMU-GA            QEMU Guest Agent
If it is not running, you can use the Services control panel to start it and make sure that it will start automatically on the next boot.
Testing that the communication with the guest agent is working
The communication with the guest agent takes place over a unix socket located in /var/run/qemu-server/<my_vmid>.qga
You can test the communication qm agent:
qm agent <vmid> ping
if the qemu-guest-agent is correctly runnning in the VM, it will return without an error message.
See Also
http://wiki.qemu.org/Features/GuestAgent
Contents
- 1 Summary
- 2 Detailed Summary
- 3 Example usage
- 3.1 Example using vsock
- 4 Schema Definition
- 5 libqmp
- 6 QEMU
- 7 QEMU Guest Agent Protocol
- 7.1 guest-sync
- 7.2 guest-sync-delimited
- 8 Guest Agent
- 9 Asynchronous Commands
- 10 Security Considerations
Summary
Implement support for QMP commands and events that terminate and originate
respectively within the guest using an agent built as part of QEMU.
Detailed Summary
Ultimately the QEMU Guest Agent aims to provide access to a system-level agent via standard QMP commands.
This support is targeted for a future QAPI-based rework of QMP, however, so currently, for QEMU 0.15, the guest agent is exposed to the host via a separate QEMU chardev device (generally, a unix socket) that communicates with the agent using the QMP wire protocol (minus the negotiation) over a virtio-serial or isa-serial channel to the guest. Assuming the agent will be listening inside the guest using the virtio-serial device at /dev/virtio-ports/org.qemu.guest_agent.0 (the default), the corresponding host-side QEMU invocation would be something:
 qemu
 ...
 -chardev socket,path=/tmp/qga.sock,server=on,wait=off,id=qga0
 -device virtio-serial
 -device virtserialport,chardev=qga0,name=org.qemu.guest_agent.0
Commands would be then be issued by connecting to /tmp/qga.sock, writing the QMP-formatted guest agent command, reading the QMP-formatted response, then disconnecting from the socket. (It’s not strictly necessary to disconnect after a command, but should be done to allow sharing of the guest agent with multiple client when exposing it as a standalone service in this fashion. When guest agent passthrough support is added to QMP, QEMU/QMP will handle arbitration between multiple clients).
When QAPI-based QMP is available (somewhere around the QEMU 0.16 timeframe), a different host-side invocation that doesn’t involve access to the guest agent outside of QMP will be used. Something like:
 qemu
 ...
 -chardev qga_proxy,id=qga0
 -device virtio-serial
 -device virtserialport,chardev=qga0,name=org.qemu.guest_agent.0
 -qmp tcp:localhost:4444,server
Currently this is planned to be done as a pseudo-chardev that only QEMU/QMP sees or interacts with, but the ultimate implementation may vary to some degree. The net effect should the same however: guest agent commands will be exposed in the same manner as QMP commands using the same QMP server, and communication with the agent will be handled by QEMU, transparently to the client.
The current list of supported RPCs is documented in qemu.git/qapi-schema-guest.json.
Example usage
build:
 # for linux
 ./configure
 make qemu-ga #should be built on|for target guest
 # for Windows using MinGW on linux/cygwin (example for Fedora 18)
 ./configure --enable-guest-agent --cross-prefix=i686-w64-mingw32-
 make qemu-ga.exe
install:
 # for linux
 sudo make install
 # for Windows
 1. make sure virtio-serial Windows drivers are installed and
    working correctly (vioser-test utility that ships with
    virtio-win ISO can help to confirm this)
    (http://alt.fedoraproject.org/pub/alt/virtio-win/latest/images/bin/)
 2. copy qemu-ga.exe to a directory on your windows guest, along
    with the following libraries all extracted/installed to the
    same directory:
    a) Contents of 'bin' directory from 'GLib' runtime
       (http://www.gtk.org/download/win32.php)
    b) 'intl.dll' for 'gettext' runtime
       (http://www.gtk.org/download/win32.php)
    c) depending on your build environment, you may also need
       'libssp-0.dll', which can be obtained from your mingw sys-root
 3. Make sure C:Program FilesQEMUrun exists (create it if it doesn't)
 4. open a command prompt (as administrator), and run
    `qemu-ga.exe -s install` to install qemu-ga service
 5. manually start qemu-ga service via `net start qemu-ga`, or enable
    autostart for qemu-ga service via 'Control Panel'>'Services'
    configuration menu.
start guest:
 qemu
 -drive file=/home/mdroth/vm/rhel6_64_base.raw,snapshot=off,if=virtio
 -net nic,model=virtio,macaddr=52:54:00:12:34:00
 -net tap,script=/etc/qemu-ifup
 -vnc :1 -m 1024 --enable-kvm
 -chardev socket,path=/tmp/qga.sock,server=on,wait=off,id=qga0
 -device virtio-serial
 -device virtserialport,chardev=qga0,name=org.qemu.guest_agent.0"
use guest agent:
 ./qemu-ga -h
 ./qemu-ga -m virtio-serial -p /dev/virtio-ports/org.qemu.guest_agent.0
start/use qmp:
 mdroth@illuin:~$ sudo socat unix-connect:/tmp/qga.sock readline
 {"execute":"guest-sync", "arguments":{"id":1234}}
 {"return": 1234}
 {"execute":"guest-ping"}
 {"return": {}}
 {"execute": "guest-info"}
 {"return": {"version": "1.0"}}
 // write "hello world!n" to /tmp/testqga
 {"execute":"guest-file-open", "arguments":{"path":"/tmp/testqga","mode":"w+"}}
 {"return": 0}
 {"execute":"guest-file-write", "arguments":{"handle":0,"buf-b64":"aGVsbG8gd29ybGQhCg=="}}
 {"return": {"count": 13, "eof": false}}
 {"execute":"guest-file-close", "arguments":{"handle":0}}
 {"return": {}}
 // read back the "hello world!n" from /tmp/testqga
 {"execute":"guest-file-open", "arguments":{"path":"/tmp/testqga","mode":"r"}}
 {"return": 1}
 {"execute":"guest-file-read", "arguments":{"handle":1,"count":1024}}
 {"return": {"buf-b64": "aGVsbG8gd29ybGQhCg==", "count": 13, "eof": true}}
 {"execute":"guest-file-close","arguments":{"handle":1}}
 {"return": {}}
 // freeze and unfreeze freezable guest filesystems
 {"execute":"guest-fsfreeze-status"}
 {"return": "thawed"}
 {"execute":"guest-fsfreeze-freeze"}
 {"return": 3}
 {"execute":"guest-fsfreeze-status"}
 {"return": "frozen"}
 {"execute":"guest-fsfreeze-thaw"}
 {"return": 3}
 {"execute":"guest-fsfreeze-status"}
 {"return": "thawed"}
Example using vsock
start guest (cid = 3):
host$ qemu -device vhost-vsock-pci,guest-cid=3 ...
start guest agent using vsock device:
guest$ qemu-ga -m vsock-listen -p 3:1234
start/use qmp:
 host$ nc --vsock 3 1234
 {"execute":"guest-sync", "arguments":{"id":1234}}
 {"return": 1234}
Schema Definition
All guest commands will use a guest- prefix to distinguish the fact that
the commands are handled by the guest. Type names (complex types and enums) do
not require a special prefix. The following is an example of the proposed guest
agent schema:
##
# @guest-ping:
#
# Ping the guest agent, a non-error return implies success
#
# Since: 0.15.0
##
{ 'command': 'guest-ping' }

##
# @guest-info:
#
# Get some information about the guest agent.
#
# Since: 0.15.0
##
{ 'type': 'GuestAgentInfo', 'data': {'version': 'str'} }
{ 'command': 'guest-info',
  'returns': 'GuestAgentInfo' }
This would result is types being created as described for QAPI, with signatures as follows:
void qmp_guest_ping(Error **errp);
GuestAgentInfo * qmp_guest_info(Error **errp);
libqmp
In libqmp, the code generated for a guest command is nearly identical to the code
generated for a normal command.
For instance, the guest-info command will have the following signature:
GuestAgentInfo *qmp_guest_info(QmpSession *sess, Error **errp);
The only role QEMU plays in guest commands is unmarshalling and remarshalling
the input and output. This means that data from the guest is not being sent
directly to a management tool which significantly decreases the guest attack
surface.
Here is an example of the code that will be generated handle agent commands:
static void qmp_marshal_output_guest_info(GuestAgentInfo * ret_in, QObject **ret_out, Error **errp)
{
    QapiDeallocVisitor *md = qapi_dealloc_visitor_new();
    QmpOutputVisitor *mo = qmp_output_visitor_new();
    Visitor *v;

    v = qmp_output_get_visitor(mo);
    visit_type_GuestAgentInfo(v, &ret_in, "unused", errp);
    if (!error_is_set(errp)) {
        *ret_out = qmp_output_get_qobject(mo);
    }
    qmp_output_visitor_cleanup(mo);
    v = qapi_dealloc_get_visitor(md);
    visit_type_GuestAgentInfo(v, &ret_in, "unused", errp);
    qapi_dealloc_visitor_cleanup(md);
}

static void qmp_marshal_input_guest_info(QDict *args, QObject **ret, Error **errp)
{
    GuestAgentInfo * retval = NULL;
    if (error_is_set(errp)) {
        goto out;
    }
    retval = qmp_guest_info(errp);
    qmp_marshal_output_guest_info(retval, ret, errp);

out:

    return;
}
QEMU Guest Agent Protocol
In general, qemu-ga uses the same protocol as QMP. There are a couple issues
regarding it’s isa-serial/virtio-serial transport that incur some additional
caveats, however:
1) there is no way for qemu-ga to detect whether or not a client has connected
   to the channel (usually a chardev with a unix socket front-end and
   virtio-serial backend)
2) there is no way for a client to detect whether or not qemu-ga has
   [re-]connected or disconnected to the backend
3) if qemu-ga has not connected to the channel since the virtio-serial device
   has been reset (generally after reboot or hotplug), data from the client
   will be dropped
4) if qemu-ga has connected to the channel since the virtio-serial device has
   been reset, data from the client will be queued (and eventually throttled
   if available buffers are exhausted), regardless of whether or not qemu-ga
   is still running/connected.
Because of 1) and 2), a qemu-ga channel must be treated as «always-on», even if
qemu-ga hasn’t even been installed on the guest. We could add start-up
notifications to the agent, but there’s no way of detecting if, after a
notification, qemu-ga was stopped and uninstalled, and the machine subsequently
rebooted (we can probe for the this, but that only tells use the state for that
exact instance in time. Stop notifications would be needed to build any notion
of a «session» around such events, but there’s no way to guarantee a stop
notification’s delivery before agent shutdown or device/buffer reset).
This means robust clients *must* implement a client-side timeout mechanism when
attempting to communicate with the agent. It also means that when a client
connects, or after a client times out waiting for a response to a request,
there may be garbage received due to the agent starting up and responding to
requests that were queued by previous client connections, or to stale requests
from the current client connection that had timed-out on the client-side.
It also means that, due to 4), a client can block indefinitely when writing to
a channel that’s been throttled due to a backlog of unhandled/queued requests,
and so should be written with this possibility in mind (separate thread, event
loop, etc.).
qemu-ga uses the guest-sync or guest-sync-delimited command to address the
problem of re-sync’ing the channel after [re-]connection or client-side
timeouts. These are described below.
guest-sync
The guest-sync request/response exchange is simple. The client provides a
unique numerical token, the agent sends it back in a response:
   > { "execute": "guest-sync", "arguments": { "id": 123456 } }
   < { "return": 123456}
A successful exchange guarantees that the channel is now in sync and no
unexpected data/responses will be sent.
Note that for the reasons mentioned above there’s no guarantee this request
will be answered, so a client should implement a timeout and re-issue this
periodically until a response is received for the most recent request.
This alone does not handle synchronisation for all cases, however. For instance, if qemu-ga’s
parser previously received a partial request from a previous client connection,
subsequent attempts to issue the guest-sync request can be misconstrued as
being part of the previous partial request. Eventually qemu-ga will hit it’s
recursion or token size limit and flush its parser state, at which point it
will begin processing the backlog of requests, but there’s no guarantee this
will occur before the channel is throttled due to exhausting all available
buffers. Thus there is potential for a deadlock situation occurring for
certain instances.
To avoid this, qemu-ga/QEMU’s JSON parser have special handling for the 0xFF
byte, which is an invalid UTF-8 character. Clients should precede the
guest-sync request with to ensure that qemu-ga flushes it’s parser state as
soon as possible. So long as all clients abide by this, the deadlock state
should be reliably avoidable.
A similar situation can happen WRT to qemu-ga attempting to communicate with
a client, however. If the client receives a partial response from a previous
qemu-ga instance, the client might misconstrue responses to guest-sync as being
part of this previous request. For client implementations that treat newlines
as a delimiter for qemu-ga responses, this is easy to recover from (one valid
response may be lost, but we can recover on the subsequent try).
For some implementations, in particular, JSON stream-based implementations
which do not rely on newline delimiters, it may be invasive to implement a
client’s response/JSON handling in a such a way that this same deadlock scenario
can be avoided on the client-side. To make this situation easier to deal with,
the guest-sync-delimited command can be used to tell qemu-ga to send precede
the response with this same 0xFF character.
guest-sync-delimited
> { "execute": "guest-sync-delimited", "arguments": { "id": 123456 } }
< { "return": 123456}
Actual hex values sent:
> 7b 27 65 78 65 63 75 74 65 27 3a 27 67 75 65 73 74 2d 73 79 6e 63 2d 64 65
  6c 69 6d 69 74 65 64 27 2c 27 61 72 67 75 6d 65 6e 74 73 27 3a 7b 27 69 64
  27 3a 31 32 33 34 35 36 7d 7d 0a
< ff 7b 22 72 65 74 75 72 6e 22 3a 20 31 32 33 34 35 36 7d 0a
As stated above, the request should also be preceded with a 0xFF to flush
qemu-ga’s parser state.
Guest Agent
The guest agent will be a daemon that connects to a virtio-serial device and
feeds the input to a JSON parser. When a new command is received, it will hand
the command over to the QAPI generated dispatch routines.
The guest agent will implement the server side of the QMP commands using the
native signature for the function.
Asynchronous Commands
Since QEMU cannot rely on the guest agent responding immediately to a command
(it is in fact impossible for it to do so), all guest commands most be
implemented as asynchronous commands within QEMU. This does not change anything
from a protocol visible perspective but is simply an implementation detail
within QEMU.
These details will be worked out in the context of QAPI-based QMP. The current, standalone host service requires that clients provide for their own timeout mechanisms. The reset mechanism descibed under «virtio-serial Transport» should be employed upon each connection to the guest agent to re-sync the streams with the guest agent in case a timeout from a client left the stream in a bad state.
Security Considerations
The following security issues need to be resolved in QMP:
- The JSON parser uses a recursive decent parser. Malicious input could potentially cause a stack overflow. Either implement a recursion depth counter, or switch the parser to only use tail recursion.
- The JSON parser may not handle premature EOI all that well. I think I’ve worked out most of these issues but more rigorous testing is needed.
Description
Record the qemu guest agent software installation under the windows version
 The current version used is windows 2012, the other versions are the same (verified 2008 and win7 versions)
 Solve qemu guest agent startup 1053 error
effect
1. Installing qemu guest agent can be used to manage instances under libvirtd
2. Can be used to collect windows memory information (need to add balloon driver)
Refer to the difference between the windows data return before installing the qemu guest agent + balloon driver and the data return under linux
By default, windows only returns the actual memory allocated by the current system and the memory value used by the current process (kvm)
[root@hh-yun-compute-131230 ~]# virsh dommemstat instance-00023f5f   (windows 2012)
actual 8388608
rss 8245820

[root@hh-yun-compute-131230 ~]# virsh dommemstat instance-000242c3   (centos6.8)
actual 4194304
swap_in 0
swap_out 0
major_fault 397
minor_fault 1544402
unused 3769676
available 3924492
rss 532292
glance image configuration
glance image-update --property dhw_qemu_guest_agent=yes xxxx-image-i-xxxx

ex:
glance image-update --property hw_qemu_guest_agent=yes  c0a3df0f-deaa-49e1-9dc6-f5a6034a12b6
Need to restart the corresponding openstack instance to take effect
Refer to the libvirt.xml configuration in the instance after the configuration is correct and restarted
/var/lib/nova/instances/f4423241-9ad2-48b5-b217-0f707f3ec921/libvirt.xml

    <channel type="unix">
      <source mode="bind" path="/var/lib/libvirt/qemu/org.qemu.guest_agent.0.instance-00023f5f.sock"/>
      <target type="virtio" name="org.qemu.guest_agent.0"/>
    </channel>
Installation order reference
1. Get the software
2. Install the driver virto serial driver
3. Update balloon driver (need to distinguish between 2012 and win7 version usage)
4. Install qemu-ga
5. Register and restart the balloon service
6. Test usability
note:
1  The balloon service can only be run under the administrator user
2  If you only belong to the administrators group, then please switch to the administrator user
3  If the administrator user is hidden, you need to run cmd as an administrator, enter the following command, and then switch users
    net user administrator /active:yes
Run terminal as administrator

Refer to the following method

Software acquisition
method one
wget https://fedorapeople.org/groups/virt/virtio-win/virtio-win.repo -O /etc/yum.repos.d/virtio-win.repo
yum install -y virtio-win.noarch

 iso software is stored in
/usr/share/virtio-win/virtio-win.iso
Method Two
wget https://fedorapeople.org/groups/virt/virtio-win/direct-downloads/latest-virtio/virtio-win.isoUpdate virto serail driver
1.  windows system get virtio-win.iso (omitted)
2.  windows2012 double click can be used as virtual CD directly
3.  After opening the CD, you see the following three important directories
    guest-agent  (Contains installed binaries (qemu-ga-x64.msi, qemu-ga-x86.msi)
    vioserial ( virto-serail driver )
         balloon (for registering the balloon service)
Solve qemu-ga startup 1053 error
If you install qemu directly-ga  Software
 Start qemu-guest-agent  When serving, an error will be reported 1053
 To solve this problem, you must manually update the virto serail driver yourself
Refer to the driver installation method below

Update virto-serail driver first
Update pci simple communication controller (use the driver in the vioserail directory)

Click to confirm installation

Confirm installation is complete

Install the balloon pci driver (windows2012)

Click finish

Confirm the balloon pci driver (windows2012)

Manually update the driver (win7/win2008)

complete
Remember to restart vm (win7) after updating the driverInstall qemu guest agent
According to the system version (x64, x86)
 Double-click the CD guest-agent  Qemu in the directory-ga-x86.msi or qemu-ga-x64.msi
 Installation process (omitted)
Start qemu guest agent service
Use cmd (services.msc) to start qemu guest agent service
qemu-ga is only used instance  Management, for the memory information acquisition in this article, balloonservice is required
Start qemu guest agent vss provider (windows 2012)

Verification Service

Start balloon service (win2012)
1. Copy the balloon directory in the CD to c:Program Files
2. Register for balloon service
3. Restart the balloon service
Reference command line
c:
mkdir "c:Program Filesballoon2k12amd64"
copy d:balloon2k12amd64*  "c:Program Filesballoon2k12amd64."
cd c:Program Filesballoon2k12amd64
blnsvr.exe -i
net stop balloonservice
net start balloonservice
Start balloon service (win7/win2008)
Run the terminal as an administrator
Just run the following command
1. Use winrar to decompress virtio-win.iso to the desktop, such as:
c:UsersadministratorDesktopvirtio-win
 2. Complete the PCI recommended communication controller driver installation in the device manager
 3. Install the guest-agent directory unzipped by virtio-win, install qemu-ga.x64.msi software

 win7 version
         4. Copy devcon64.exe to c:UsersadministratorDesktopvirtio-winBalloonw7amd64 directory
         5. Copy the following command

cd  c:UsersadministratorDesktopvirtio-winBalloonw7amd64
devcon64 install BALLOON.inf "PCIVEN_1AF4&DEV_1002&SUBSYS_00051AF4&REV_00"
BLNSVR.exe -i
net stop balloonservice
net start balloonservice

 windows 2008 version

         4. Copy devcon64.exe to c:UsersadministratorDesktopvirtio-winBalloon2k8amd64 directory
         5. Copy the following command

cd  c:UsersadministratorDesktopvirtio-winBalloon2k8amd64
devcon64 install BALLOON.inf "PCIVEN_1AF4&DEV_1002&SUBSYS_00051AF4&REV_00"
BLNSVR.exe -i
net stop balloonservice
net start balloonservice


 6. Open the terminal as an administrator and execute the above command
reference

verification
After restarting, refer to the monitoring information
[root@hh-yun-compute-131230 test]# virsh dommemstat instance-00023f5f   (win2012)
actual 8388608
rss 8263016

[root@hh-yun-compute-131230 test]# virsh dommemstat instance-00023f5f
actual 8388608
swap_in 882920
swap_out 0
major_fault 31190
minor_fault 1717511
unused 7280252
available 8388180
rss 8263048

[root@hh-yun-compute-131230 test]# virsh dommemstat instance-000242c1 (win7)
actual 4194304
rss 4160316

[root@hh-yun-compute-131230 test]# virsh dommemstat instance-000242c1
actual 4194304
swap_in 862932
swap_out 0
major_fault 36592
minor_fault 9875462
unused 3239596
available 4193880
rss 4160284
reference
Official description
redhat instructions
Introduction — What is qemu-guest-agent
The qemu-guest-agent is a helper daemon, which is installed in the guest. It is used
to exchange information between the host and guest, and to execute command in the guest.
In Proxmox VE, the qemu-guest-agent is used for mainly three things:
- To properly shutdown the guest, instead of relying on ACPI commands or windows policies
- To freeze the guest file system when making a backup/snapshot (on windows, use the volume shadow copy service VSS). If the guest agent is enabled and running, it calls guest-fsfreeze-freeze and guest-fsfreeze-thaw to improve consistency.
- In the phase when the guest (VM) is resumed after pause (for example after shapshot) it immediately synchronizes its time with the hypervisor using qemu-guest-agent (as first step).
Installation
Host
You have to install guest-agent in each VM and then enable it, you can do that in the Proxmox VE Webinterface (GUI)
or via CLI: qm set VMID --agent 1
Guest
Linux
On Linux you have to simply install the qemu-guest-agent, please refer to the documentation of your system.
We show here the commands for Debian/Ubuntu and Redhat based systems:
on Debian/Ubuntu based systems (with apt-get) run:
apt-get install qemu-guest-agent
and on Redhat based systems (with yum):
yum install qemu-guest-agent
Depending on the distribution, the guest agent might not start automatically after the installation.
Start it either directly with
systemctl start qemu-guest-agent
Then enable the service to autostart (permanently) if not auto started, with
systemctl enable qemu-guest-agent
(should work for most distributions) or reboot the guest.
Windows
First you have to download the virtio-win driver iso (see Windows VirtIO Drivers).
Then install the virtio-serial driver:
- Attach the ISO to your windows VM (virtio-*.iso)
- Go to the windows Device Manager
- Look for «PCI Simple Communications Controller»
- Right Click -> Update Driver and select on the mounted iso in DRIVE:\vioserial\<OSVERSION>\ where <OSVERSION> is your Windows Version (e.g. 2k12R2 for Windows 2012 R2)
After that, you have to install the qemu-guest-agent:
- Go to the mounted ISO in explorer
- The guest agent installer is in the directory guest-agent
- Execute the installer with double click (either qemu-ga-x86_64.msi (64-bit) or qemu-ga-i386.msi (32-bit)
After that the qemu-guest-agent should be up and running. You can validate this in the list of Window Services, or in a PowerShell with:
PS C:\Users\Administrator> Get-Service QEMU-GA

Status   Name               DisplayName
------   ----               -----------
Running  QEMU-GA            QEMU Guest Agent
If it is not running, you can use the Services control panel to start it and make sure that it will start automatically on the next boot.
Testing that the communication with the guest agent is working
The communication with the guest agent takes place over a unix socket located in /var/run/qemu-server/<my_vmid>.qga
You can test the communication qm agent:
qm agent <vmid> ping
if the qemu-guest-agent is correctly runnning in the VM, it will return without an error message.
See Also
http://wiki.qemu.org/Features/GuestAgent
https://access.redhat.com/documentation/en-us/red_hat_enterprise_linux/7/html/virtualization_deployment_and_administration_guide/chap-kvm_guest_timing_management
Skip to navigation
Skip to main content

Infrastructure and Management
- Red Hat Enterprise Linux
- Red Hat Satellite
-
Red Hat Subscription Management
- Red Hat Insights
- Red Hat Ansible Automation Platform
Cloud Computing
- Red Hat OpenShift
- Red Hat OpenStack Platform
- Red Hat OpenShift Container Platform
- Red Hat OpenShift Data Science
- Red Hat OpenShift Dedicated
- Red Hat Advanced Cluster Security for Kubernetes
- Red Hat Advanced Cluster Management for Kubernetes
- Red Hat Quay
-
OpenShift Dev Spaces
- Red Hat OpenShift Service on AWS
Storage
- Red Hat Gluster Storage
- Red Hat Hyperconverged Infrastructure
- Red Hat Ceph Storage
- Red Hat OpenShift Data Foundation
Runtimes
- Red Hat Runtimes
- Red Hat JBoss Enterprise Application Platform
- Red Hat Data Grid
- Red Hat JBoss Web Server
-
Red Hat Single Sign On
- Red Hat support for Spring Boot
- Red Hat build of Node.js
- Red Hat build of Quarkus
Integration and Automation
All Products
A Red Hat Enterprise Linux host machine can issue commands to Windows guests by running the QEMU guest agent in the guest. This is supported in hosts running Red Hat Enterprise Linux 6.5 and newer, and in the following Windows guest operating systems:
-
Windows XP Service Pack 3 (VSS is not supported)
-
Windows Server 2003 R2 — x86 and AMD64 (VSS is not supported)
-
Windows Server 2008
-
Windows Server 2008 R2
-
Windows 7 — x86 and AMD64
-
Windows Server 2012
-
Windows Server 2012 R2
-
Windows 8 — x86 and AMD64
-
Windows 8.1 — x86 and AMD64
Windows guest virtual machines require the QEMU guest agent package for Windows, qemu-guest-agent-win. This agent is required for VSS (Volume Shadow Copy Service) support for Windows guest virtual machines running on Red Hat Enterprise Linux. More information can be found here.
Procedure 10.2. Configuring the QEMU guest agent on a Windows guest
Follow these steps for Windows guests running on a Red Hat Enterprise Linux host machine.
-
Prepare the Red Hat Enterprise Linux host machine
Make sure the following package is installed on the Red Hat Enterprise Linux host physical machine:
-
virtio-win, located in
/usr/share/virtio-win/
To copy the drivers in the Windows guest, make an
*.isofile for the qxl driver using the following command:#
mkisofs -o /var/lib/libvirt/images/virtiowin.iso /usr/share/virtio-win/drivers -
-
Prepare the Windows guest
Install the virtio-serial driver in guest by mounting the
*.isoto the Windows guest in order to update the driver. Start the guest, then attach the driver .iso file to the guest as shown (using a disk named hdb):#
virsh attach-disk guest /var/lib/libvirt/images/virtiowin.iso hdbTo install the drivers using the Windows , navigate to the following menus:
-
To install the virtio-win driver — Select > > .
-
-
Update the Windows guest XML configuration file
The guest XML file for the Windows guest is located on the Red Hat Enterprise Linux host machine. To gain access to this file, you need the Windows guest name. Use the
# virsh listcommand on the host machine to list the guests that it can recognize. In this example, the guest’s name is win7x86.Add the following elements to the XML file using the
# virsh edit win7x86command and save the changes. Note that the source socket name must be unique in the host, named win7x86.agent in this example:... <channel type='unix'> <source mode='bind' path='/var/lib/libvirt/qemu/win7x86.agent'/> <target type='virtio' name='org.qemu.guest_agent.0'/> <address type='virtio-serial' controller='0' bus='0' port='1'/> </channel> <channel type='spicevmc'> <target type='virtio' name='com.redhat.spice.0'/> <address type='virtio-serial' controller='0' bus='0' port='2'/> </channel> ...Figure 10.2. Editing the Windows guest XML to configure the QEMU guest agent
-
Reboot the Windows guest
Reboot the Windows guest to apply the changes:
#
virsh reboot win7x86 -
Prepare the QEMU guest agent in the Windows guest
To prepare the guest agent in a Windows guest:
-
Install the latest virtio-win package
Run the following command on the Red Hat Enterprise Linux host physical machine terminal window to locate the file to install. Note that the file shown below may not be exactly the same as the one your system finds, but it should be latest official version.
#
rpm -qa|grep virtio-winvirtio-win-1.6.8-5.el6.noarch #rpm -iv virtio-win-1.6.8-5.el6.noarch -
Confirm the installation completed
After the virtio-win package finishes installing, check the
/usr/share/virtio-win/guest-agent/folder and you will find an file named qemu-ga-x64.msi or the qemu-ga-x86.msi as shown:# ls -l /usr/share/virtio-win/guest-agent/ total 1544 -rw-r--r--. 1 root root 856064 Oct 23 04:58 qemu-ga-x64.msi -rw-r--r--. 1 root root 724992 Oct 23 04:58 qemu-ga-x86.msi
-
Install the .msi file
From the Windows guest (win7x86, for example) install the qemu-ga-x64.msi or the qemu-ga-x86.msi by double clicking on the file. Once installed, it will be shown as a qemu-ga service in the Windows guest within the System Manager. This same manager can be used to monitor the status of the service.
-
10.3.1. Using libvirt Commands with the QEMU Guest Agent on Windows Guests
The QEMU guest agent can use the following virsh commands with Windows guests:
-
virsh shutdown --mode=agent— This shutdown method is more reliable thanvirsh shutdown --mode=acpi, asvirsh shutdownused with the QEMU guest agent is guaranteed to shut down a cooperative guest in a clean state. If the agent is not present, libvirt has to instead rely on injecting an ACPI shutdown event, but some guests ignore that event and thus will not shut down.Can be used with the same syntax for
virsh reboot. -
virsh snapshot-create --quiesce— Allows the guest to flush its I/O into a stable state before the snapshot is created, which allows use of the snapshot without having to perform a fsck or losing partial database transactions. The guest agent allows a high level of disk contents stability by providing guest co-operation. -
virsh dompmsuspend— Suspends a running guest gracefully using the guest operating system’s power management functions.
Виртуализация стала неотъемлемой частью современного мире информационных технологий. Виртуальные машины позволяют эффективно использовать ресурсы серверов и упрощают поддержку и развертывание приложений. Однако работа с виртуальными машинами может стать сложной задачей, особенно при необходимости управлять ими удаленно.
Qemu guest agent для Windows является решением, которое облегчает управление виртуальными машинами, работающими на платформе Windows. Этот агент позволяет осуществлять различные операции с виртуальными машинами, такие как перезагрузка, выключение, миграция и т. д., с помощью команд, отправляемых с гипервизора.
Преимуществом использования Qemu guest agent для Windows является возможность получить доступ к гостевой операционной системе виртуальной машины без необходимости подключения к самой виртуальной машине. Это значительно упрощает управление и повышает безопасность, так как не требуется устанавливать дополнительное ПО на гостевой ОС.
Qemu guest agent для Windows поддерживает широкий спектр гипервизоров, таких как KVM, VMware, Hyper-V и др. Он предоставляет разработчикам и администраторам удобный способ управления виртуальными машинами и сокращает время, затрачиваемое на рутинные операции. Благодаря Qemu guest agent, использование виртуальных машин на платформе Windows становится еще более удобным и эффективным.
Содержание
- Qemu Guest Agent: бесплатный инструмент для управления виртуальными машинами
- Возможности Qemu Guest Agent для Windows
- Установка Qemu Guest Agent на виртуальную машину
- Как использовать Qemu Guest Agent на Windows
Qemu Guest Agent: бесплатный инструмент для управления виртуальными машинами
С помощью Qemu Guest Agent можно выполнять различные операции с виртуальными машинами, такие как управление питанием, мониторинг ресурсов, передача файлов и многое другое. Это делает процесс управления виртуальными машинами более гибким и эффективным.
Одна из ключевых функций Qemu Guest Agent — управление питанием. С его помощью можно включать, выключать и перезагружать виртуальные машины удаленно, без необходимости входа в систему. Это очень полезно, например, при необходимости обновления гостевой операционной системы или перезагрузки приложений внутри виртуализированной среды.
Qemu Guest Agent также предоставляет доступ к информации о ресурсах виртуальной машины, таким как использование процессора, памяти, дискового пространства и сети. Таким образом, администраторы могут контролировать и оптимизировать работу своих виртуальных машин, а также предупреждать возможные проблемы, связанные с недостатком ресурсов.
Другой важной функцией Qemu Guest Agent является возможность передачи файлов между хост-системой и гостевой операционной системой. Это упрощает процесс обновления приложений или передачи данных между виртуальными машинами и внешними системами.
В целом, Qemu Guest Agent предоставляет широкий набор функций для управления виртуальными машинами, работающими на платформе Qemu. Благодаря этому инструменту администраторы могут эффективно управлять своими виртуальными машинами, улучшая производительность и удобство работы в виртуальной среде.
Возможности Qemu Guest Agent для Windows
Ниже приведены основные возможности, которые предоставляет Qemu Guest Agent для Windows:
- Управление питанием виртуальной машины: возможность включать, выключать и перезагружать виртуальную машину.
- Мониторинг системных ресурсов: получение информации о состоянии процессора, памяти и дискового пространства в гостевой ОС.
- Управление процессами: возможность просматривать запущенные процессы, завершать ненужные процессы и запускать новые процессы в гостевой ОС.
- Управление сетевыми настройками: изменение IP-адреса, маски подсети и других сетевых параметров.
- Управление монитором: возможность изменять разрешение экрана, положение окон и другие настройки монитора.
- Управление виртуальными дисками: возможность создания, удаления и изменения виртуальных дисков, а также монтирование и размонтирование файловых систем.
- Оповещения и события: получение уведомлений о различных событиях, таких как включение, выключение и перезагрузка виртуальной машины.
- Копирование и вставка информации: возможность копировать и вставлять текстовую информацию между гостевой ОС и хозяйской системой.
С помощью Qemu Guest Agent для Windows администраторы могут эффективно управлять своими виртуальными машинами, осуществлять настройку, мониторинг и улучшение производительности гостевой ОС.
Установка Qemu Guest Agent на виртуальную машину
Чтобы установить Qemu Guest Agent на виртуальную машину, следуйте приведенным ниже шагам:
- Войдите в гостевую операционную систему виртуальной машины.
- Откройте веб-браузер и перейдите на страницу загрузки Qemu Guest Agent.
- Выберите соответствующую версию Qemu Guest Agent для вашей операционной системы.
- Скачайте загруженный файл с расширением .msi.
- Запустите загруженный файл и следуйте инструкциям мастера установки.
- После успешной установке Qemu Guest Agent на виртуальную машину, перезагрузите гостевую операционную систему.
После перезагрузки виртуальной машины Qemu Guest Agent будет активирован и начнет выполнять свои функции. Теперь вы сможете управлять виртуальной машиной с помощью Qemu Guest Agent и осуществлять различные операции, такие как включение и выключение, передача файлов и многое другое.
Установка Qemu Guest Agent на виртуальную машину позволяет значительно упростить процесс управления и контроля за виртуальными машинами, а также обеспечить более надежное взаимодействие между хостом и гостевой операционной системой.
Как использовать Qemu Guest Agent на Windows
Для начала, вам понадобится установить Qemu Guest Agent на Windows виртуальной машине. Сделать это можно двумя способами:
| Способ | Описание |
|---|---|
| 1 | Установка через установщик |
| 2 | Установка через инструмент Chocolatey |
1. Установка через установщик:
Скачайте установщик Qemu Guest Agent с официального сайта Qemu. Запустите установщик и следуйте указаниям мастера установки. После завершения установки, Qemu Guest Agent будет доступен для использования в гостевой ОС Windows.
2. Установка через инструмент Chocolatey:
Установите инструмент Chocolatey на виртуальной машине Windows, если его еще нет. Затем откройте командную строку с правами администратора и выполните команду:
choco install qemu-guest-agent
После установки Qemu Guest Agent, вам может потребоваться настроить его для взаимодействия с Qemu. Для этого откройте файл /etc/qemu/qemu.conf на хостовой машине и добавьте следующую строку:
guest_agent=yes
Сохраните изменения и перезапустите Qemu.
Теперь, когда Qemu Guest Agent установлен и настроен в гостевой ОС Windows, вы можете использовать его для управления виртуальной машиной. Некоторые из основных команд, которые можно выполнить с помощью Qemu Guest Agent:
- Получение информации о гостевой ОС
- Управление энергопотреблением (завершение работы, перезагрузка)
- Управление сессией, пользователями и процессами
- Управление файлами и дисками
- Управление сетью и сетевыми интерфейсами
- Управление графическими драйверами
- И многое другое
Для выполнения этих команд вы можете использовать интерфейс командной строки или API Qemu Guest Agent. Конкретные инструкции по использованию Qemu Guest Agent будут зависеть от вашего конкретного случая использования и требований.
В заключение, использование Qemu Guest Agent на Windows позволяет эффективно управлять виртуальными машинами в гостевой ОС. Убедитесь, что у вас установлена и настроена последняя версия Qemu Guest Agent, чтобы использовать все его функции и возможности.
18.07.2021

Сегодня расскажу как подключить на виртуальную машину (ВМ) в Proxmox утилиту qemu-guest-agent для просмотра IP-адреса через WEB-интерфейс и правильной завершении работы ВМ.
-
1.
Что такое qemu-guest-agent -
2.
Установка qemu-guest-agent-
2.1.
На Proxmox -
2.2.
На Linux VM -
2.3.
На Windows VM
-
2.1.
-
3.
Настройка qemu-guest-agent в Linux -
4.
Проверка того, что связь с гостевым агентом работает
Что такое qemu-guest-agent
qemu-guest-agent – это вспомогательный демон, который устанавливается в гостевой системе. Он используется для обмена информацией между хостом и гостем, а также для выполнения команды в госте.
В Proxmox VE qemu-guest-agent используется в основном для двух вещей:
- Чтобы правильно завершить работу гостя, вместо того чтобы полагаться на команды ACPI или политики Windows
- Чтобы заморозить гостевую файловую систему при создании резервной копии (в Windows используйте службу теневого копирования томов VSS).
Установка qemu-guest-agent
На Proxmox
Вы должны установить гостевой агент в каждой виртуальной машине, а затем включить его, вы можете сделать это в веб-интерфейсе Proxmox VE (GUI).
или через CLI:
qm set VMID --agent 1На Linux VM
В Linux вам нужно просто установить пакет qemu-guest-agent.
Здесь мы покажем команды для систем на базе Debian/Ubuntu и Redhat:
В системах на Debian/Ubuntu выполняем следующие команды:
sudo apt install qemu-guest-agentНа системах на базе Redhat:
yum install qemu-guest-agentНа Windows VM
Сначала вы должны скачать драйвер virtio-win iso (см. Windows VirtIO Drivers).
Затем установите драйвер virtio-serial:
- Прикрепите ISO к виртуальной машине Windows (virtio-*.iso)
- Перейдите в Диспетчер устройств Windows
- Найдите “PCI Simple Communications Controller“
- Щелкните правой кнопкой мыши -> Обновить драйвер и выберите на смонтированном iso DRIVE:\vioserial\<OSVERSION>\ where <OSVERSION> is your Windows Version – ваша версия Windows (например, W7 для Windows 7)
После этого необходимо установить qemu-guest-agent:
- Перейти к смонтированному ISO в проводнике
- Установщик гостевого агента находится в каталоге гостевой агент
- Запустите установщик двойным щелчком (либо qemu-ga-x86_64.msi (64-разрядная версия), либо qemu-ga-i386.msi (32-разрядная версия)
После этого qemu-guest-agent должен быть запущен.
Если он не запущен, вы можете использовать панель управления Службами, чтобы запустить его и убедиться, что он запустится автоматически при следующей загрузке.

Настройка qemu-guest-agent в Linux
В зависимости от дистрибутива гостевой агент может не запускаться автоматически после установки. Для запуска воспользуемся следующими командами:
sudo systemctl enable qemu-guest-agent
sudo systemctl start qemu-guest-agent
Проверка того, что связь с гостевым агентом работает
Связь с гостевым агентом происходит через сокет unix, расположенный в /var/run/qemu-server/<my_vmid>.qga Вы можете проверить связь агента qm в proxmox:
qm agent <vmid> ping если qemu-guest-agent правильно запущен в виртуальной машине, он выдаст пустое сообщения.
Если есть вопросы, то пишем в комментариях в Телеграмм и ВК.
Ссылки в шапке страницы.
Заранее всем спасибо!!!
RSS
Если вы нашли ошибку, пожалуйста, выделите фрагмент текста и нажмите Ctrl+Enter.