Sometimes we need to use Win32 APIs in Python. This article explains how to use Win32 APIs in Python.
To use Win32 APIs in Python we can use the following options.
Using the PyWin32 package
One of the most popular options is the PyWin32 library, which provides Python bindings for many Win32 API functions.
Here’s an example of using PyWin32 to call the MessageBox() function from the Win32 API:
pip install pywin32import win32api import win32con win32api.MessageBox(win32con.NULL, 'Hello from NoloWiz!', 'Test Window', win32con.MB_OK)
This code imports the win32api and win32con modules from the PyWin32 library. It then calls the MessageBox() function from the Win32 API using the win32api.MessageBox() function. The first argument to MessageBox() is the handle to the owner window, which is set to win32con.NULL to indicate that there is no owner window. The second argument is the message to display, and the third argument is the title of the message box. The fourth argument specifies the buttons to display in the message box, which is set to win32con.MB_OK to display an OK button
In the above code, the win32con is a module in the pywin32 package that provides constants(win32con.MB_OK) used in Windows API calls. The win32con module contains constants for various Windows messages, window styles, keyboard codes, system parameters, and error codes.
Output
Use ctypes to call Win32 APIs
The ctypes is a foreign function library for Python that allows calling functions in shared libraries or DLLs and provides C compatible data types. We can use ctypes to call Win32 API functions. The ctypes is a standard library in Python, which means it is included with every Python installation.
Here is an example :
import ctypes

user32 = ctypes.windll.user32
user32.MessageBoxW(None, 'Hello from NoloWiz!', 'Test Window', 0)
This code uses the windll attribute of the ctypes module to load the user32 DLL, which contains the MessageBoxW() function. It then calls the MessageBoxW() function using user32.MessageBoxW() function. The first argument to MessageBoxW() is the handle to the owner window. The second argument is the message to display, and the third argument is the title of the message box. The fourth argument specifies the buttons to display in the message box.
Note that the windll object is used for calling functions that use the stdcall calling convention, while the cdll object is used for calling functions that use the cdecl calling convention.
Conclusion
In conclusion, we can easily use the Win32 APIs using the pywin32 package and ctypes.
qaa-engineer.ru > Python > Работа с библиотекой PyWin32 для работы с Windows API на Python
PyWin32 является одной из самых мощных библиотек для работы с Windows API на Python. Эта библиотека предоставляет разработчикам инструменты для написания приложений, которые используют функции Windows API. В этой статье мы поговорим о том, как работать с библиотекой PyWin32 для работы с Windows API на Python.
Что такое Windows API?
Windows API — это набор функций, которые разработчики могут использовать для работы с операционной системой Windows. Он включает в себя функции для работы с окнами, файлами, процессами, реестром и другими системными ресурсами.
Что такое PyWin32?
PyWin32 — это библиотека Python, которая обеспечивает доступ к Windows API на языке Python. Она содержит множество модулей, которые разработчики могут использовать для работы с Windows API.
Установка PyWin32
PyWin32 можно установить, используя менеджер пакетов pip. Чтобы установить PyWin32, откройте командную строку и выполните следующую команду:
pip install pywin32
После установки PyWin32 вы можете начать использовать его в своих проектах.
Работа с PyWin32
Давайте рассмотрим несколько примеров использования PyWin32 для работы с Windows API.
Пример 1: Получение списка процессов
Один из наиболее распространенных способов использования Windows API — получение списка запущенных процессов. Для этого мы можем использовать модуль win32process, который является частью PyWin32.
Вот как может выглядеть код:
import win32process

# Получение списка процессов
processes = win32process.EnumProcesses()

# Вывод списка процессов
for process_id in processes:
    print(process_id)
Этот пример получает список процессов, выполняющихся на компьютере, и выводит их идентификаторы.
Пример 2: Работа с реестром
Другой распространенный способ использования Windows API — работа с реестром. Для этого мы можем использовать модуль win32api, который также является частью PyWin32.
Вот как может выглядеть код:
import win32api

# Открытие ключа реестра
key = win32api.RegOpenKeyEx(
    win32api.HKEY_CURRENT_USER,
    "Software\\Microsoft\\Windows\\CurrentVersion\\Explorer",
    0,
    win32api.KEY_READ
)

# Чтение строки из реестра
value = win32api.RegQueryValueEx(key, "HideDesktopIcons")

# Вывод строки
print(value)

# Закрытие ключа реестра
win32api.RegCloseKey(key)
Этот пример открывает ключ реестра, читает значение «HideDesktopIcons» и выводит его.
Пример 3: Работа с окнами
PyWin32 также позволяет работать с окнами. Для этого мы можем использовать модуль win32gui.
Вот как может выглядеть код:
import win32gui

# Получение дескриптора окна по имени класса
hwnd = win32gui.FindWindow("Notepad", None)

# Показ окна
win32gui.ShowWindow(hwnd, win32con.SW_SHOW)
Этот пример находит окно «Блокнот» и показывает его на экране.
Заключение
PyWin32 предоставляет широкие возможности для работы с Windows API на Python. С помощью этой библиотеки разработчики могут создавать приложения, которые могут использовать функции Windows API, такие как работа с процессами, реестром и окнами. Мы рассмотрели несколько простых примеров использования PyWin32, но библиотека имеет множество других модулей и функций, которые могут быть полезны в вашей работе.
Время на прочтение
14 мин
Количество просмотров 87K
Python библиотека pywinauto — это open source проект по автоматизации десктопных GUI приложений на Windows. За последние два года в ней появились новые крупные фичи:
- Поддержка технологии MS UI Automation. Интерфейс прежний, и теперь поддерживаются: WinForms, WPF, Qt5, Windows Store (UWP) и так далее — почти все, что есть на Windows.
- Система бэкендов/плагинов (сейчас их двое под капотом: дефолтный
"win32"и новый"uia"). Дальше плавно двигаемся в сторону кросс-платформенности. - Win32 хуки для мыши и клавиатуры (hot keys в духе pyHook).
Также сделаем небольшой обзор того, что есть в open source для десктопной автоматизации (без претензий на серьезное сравнение).
Эта статья — частично расшифровка доклада с конференции SQA Days 20 в Минске (видеозапись и слайды), частично русская версия Getting Started Guide для pywinauto.
- Основные подходы
- Координатный метод
- Распознавание эталонных изображений
- Accessibility технологии
- Основные десктопные accessibility технологии
- Старый добрый Win32 API
- Microsoft UI Automation
- AT-SPI (Linux)
- Apple Accessibility API
- Как начать работать с pywinauto
- Входные точки для автоматизации
- Спецификации окон/элементов
- Магия доступа по атрибуту и по ключу
- Пять правил для магических имен
Начнём с краткого обзора опен сорса в этой области. Для десктопных GUI приложений всё несколько сложнее, чем для веба, у которого есть Selenium. Вот основные подходы:
Координатный метод
Хардкодим точки кликов, надеемся на удачные попадания.
[+] Кросс-платформенный, легко реализуемый.
[+] Легко сделать «record-replay» запись тестов.
[-] Самый нестабильный к изменению разрешения экрана, темы, шрифтов, размеров окон и т.п.
[-] Нужны огромные усилия на поддержку, часто проще перегенерить тесты с нуля или тестировать вручную.
[-] Автоматизирует только действия, для верификации и извлечения данных есть другие методы.
Инструменты (кросс-платформенные): autopy, PyAutoGUI, PyUserInput и многие другие. Как правило, более сложные инструменты включают в себя эту функциональность (не всегда кросс-платформенно).
Стоит сказать, что координатный метод может дополнять остальные подходы. Например, для кастомной графики можно кликать по относительным координатам (от левого верхнего угла окна/элемента, а не всего экрана) — обычно это достаточно надежно, особенно если учитывать длину/ширину всего элемента (тогда и разное разрешение экрана не помешает).
Другой вариант: выделять для тестов только одну машину со стабильными настройками (не кросс-платформенно, но в каких-то случаях годится).
Распознавание эталонных изображений
[+] Кросс-платформенный
[+-] Относительно надежный (лучше, чем координатный метод), но всё же требует хитростей.
[-+] Относительно медленный, т.к. требует ресурсов CPU для алгоритмов распознавания.
[-] О распознавании текста (OCR), как правило, речи не идёт => нельзя достать текстовые данные. Насколько мне известно, существующие OCR решения не слишком надежны для этого типа задач, и широкого применения не имеют (welcome в комменты, если это уже не так).
Инструменты: Sikuli, Lackey (Sikuli-совместимый, на чистом Python), PyAutoGUI.
Accessibility технологии
[+] Самый надежный метод, т.к. позволяет искать по тексту, независимо от того, как он отрисован системой или фреймворком.
[+] Позволяет извлекать текстовые данные => проще верифицировать результаты тестов.
[+] Как правило, самый быстрый, т.к. почти не расходует ресурсы CPU.
[-] Тяжело сделать кросс-платформенный инструмент: абсолютно все open-source библиотеки поддерживают одну-две accessibility технологии. Windows/Linux/MacOS целиком не поддерживает никто, кроме платных типа TestComplete, UFT или Squish.
[-] Не всегда такая технология в принципе доступна. Например, тестирование загрузочного экрана внутри VirtualBox’а — тут без распознавания изображений не обойтись. Но во многих классических случаях все-таки accessibility подход применим. О нем дальше и пойдет речь.
Инструменты: TestStack.White на C#, Winium.Desktop на C# (Selenium совместимый), MS WinAppDriver на C# (Appium совместимый), pywinauto, pyatom (совместим с LDTP), Python-UIAutomation-for-Windows, RAutomation на Ruby, LDTP (Linux Desktop Testing Project) и его Windows версия Cobra.
LDTP — пожалуй, единственный кросс-платформенный open-source инструмент (точнее семейство библиотек) на основе accessibility технологий. Однако он не слишком популярен. Сам не пользовался им, но по отзывам интерфейс у него не самый удобный. Если есть позитивные отзывы, прошу поделиться в комментах.
Тестовый backdoor (a.k.a. внутренний велосипед)
Для кросс-платформенных приложений сами разработчики часто делают внутренний механизм для обеспечения testability. Например, создают служебный TCP сервер в приложении, тесты к нему подключаются и посылают текстовые команды: на что нажать, откуда взять данные и т.п. Надежно, но не универсально.
Основные десктопные accessibility технологии
Старый добрый Win32 API
Большинство Windows приложений, написанных до выхода WPF и затем Windows Store, построены так или иначе на Win32 API. А именно, MFC, WTL, C++ Builder, Delphi, VB6 — все эти инструменты используют Win32 API. Даже Windows Forms — в значительной степени Win32 API совместимые.
Инструменты: AutoIt (похож на VB) и Python обертка pyautoit, AutoHotkey (собственный язык, есть IDispatch COM интерфейс), pywinauto (Python), RAutomation (Ruby), win32-autogui (Ruby).
Microsoft UI Automation
Главный плюс: технология MS UI Automation поддерживает подавляющее большинство GUI приложений на Windows за редкими исключениями. Проблема: она не сильно легче в изучении, чем Win32 API. Иначе никто бы не делал оберток над ней.
Фактически это набор custom COM интерфейсов (в основном, UIAutomationCore.dll), а также имеет .NET оболочку в виде namespace System.Windows.Automation. Она, кстати, имеет привнесенный баг, из-за которого некоторые UI элементы могут быть пропущены. Поэтому лучше использовать UIAutomationCore.dll напрямую (если слышали про UiaComWrapper на C#, то это оно).
Разновидности COM интерфейсов:
(1) Базовый IUknown — «the root of all evil». Самый низкоуровневый, ни разу не user-friendly.
(2) IDispatch и производные (например, Excel.Application), которые можно использовать в Python с помощью пакета win32com.client (входит в pyWin32). Самый удобный и красивый вариант.
(3) Custom интерфейсы, с которыми умеет работать сторонний Python пакет comtypes.
Инструменты: TestStack.White на C#, pywinauto 0.6.0+, Winium.Desktop на C#, Python-UIAutomation-for-Windows (у них исходный код сишных оберток над UIAutomationCore.dll не раскрыт), RAutomation на Ruby.
AT-SPI
Несмотря на то, что почти все оси семейства Linux построены на X Window System (в Fedora 25 «иксы» поменяли на Wayland), «иксы» позволяют оперировать только окнами верхнего уровня и мышью/клавиатурой. Для детального разбора по кнопкам, лист боксам и так далее — существует технология AT-SPI. У самых популярных оконных менеджеров есть так называемый AT-SPI registry демон, который и обеспечивает для приложений автоматизируемый GUI (как минимум поддерживаются Qt и GTK).
Инструменты: pyatspi2.
pyatspi2, на мой взгляд, содержит слишком много зависимостей типа того же PyGObject. Сама технология доступна в виде обычной динамической библиотеки libatspi.so. К ней имеется Reference Manual. Для библиотеки pywinauto планируем реализовать поддержку AT-SPI имеено так: через загрузку libatspi.so и модуль ctypes. Есть небольшая проблема только в использовании нужной версии, ведь для GTK+ и Qt приложений они немного разные. Вероятный выпуск pywinauto 0.7.0 с полноценной поддержкой Linux можно ожидать в первой половине 2018-го.
Apple Accessibility API
На MacOS есть собственный язык автоматизации AppleScript. Для реализации чего-то подобного на Python, разумеется, нужно использовать функции из ObjectiveC. Начиная, кажется, еще с MacOS 10.6 в предустановленный питон включается пакет pyobjc. Это также облегчит список зависимостей для будущей поддержки в pywinauto.
Инструменты: Кроме языка Apple Script, стоит обратить внимание на ATOMac, он же pyatom. Он совместим по интерфейсу с LDTP, но также является самостоятельной библиотекой. На нем есть пример автоматизации iTunes на macOs, написанный моим студентом. Есть известная проблема: не работают гибкие тайминги (методы waitFor*). Но, в целом, неплохая вещь.
Как начать работать с pywinauto
Первым делом стоит вооружиться инспектором GUI объектов (то, что называют Spy tool). Он поможет изучить приложение изнутри: как устроена иерархия элементов, какие свойства доступны. Самые известные инспекторы объектов:
- Spy++ — входит в поставку Visual Studio, включая Express или Community Edition. Использует Win32 API. Также известен его клон AutoIt Window Info.
- Inspect.exe — входит в Windows SDK. Если он у вас установлен, то на 64-битной Windows можно найти его в папке
C:\Program Files (x86)\Windows Kits\<winver>\bin\x64. В самом инспекторе нужно выбрать режим UI Automation вместо MS AA (Active Accessibility, предок UI Automation).
Просветив приложение насквозь, выбираем бэкенд, который будем использовать. Достаточно указать имя бэкенда при создании объекта Application.
- backend=»win32″ — пока используется по умолчанию, хорошо работает с MFC, WTL, VB6 и другими legacy приложениями.
- backend=»uia» — новый бэкенд для MS UI Automation: идеально работает с WPF и WinForms; также хорош для Delphi и Windows Store приложений; работает с Qt5 и некоторыми Java приложениями. И вообще, если Inspect.exe видит элементы и их свойства, значит этот бэкенд подходит. В принципе, большинство браузеров тоже поддерживает UI Automation (Mozilla по умолчанию, а Хрому при запуске нужно скормить ключ командной строки
--force-renderer-accessibility, чтобы увидеть элементы на страницах в Inspect.exe). Конечно, конкуренция с Selenium в этой области навряд ли возможна. Просто еще один способ работать с браузером (может пригодиться для кросс-продуктового сценария).
Входные точки для автоматизации
Приложение достаточно изучено. Пора создать объект Application и запустить его или присоединиться к уже запущенному. Это не просто клон стандартного класса subprocess.Popen, а именно вводный объект, который ограничивает все ваши действия границами процесса. Это очень полезно, если запущено несколько экземпляров приложения, а остальные трогать не хочется.
from pywinauto.application import Application
app = Application(backend="uia").start('notepad.exe')

# Опишем окно, которое хотим найти в процессе Notepad.exe
dlg_spec = app.UntitledNotepad
# ждем пока окно реально появится
actionable_dlg = dlg_spec.wait('visible')
Если хочется управлять сразу несколькими приложениями, вам поможет класс Desktop. Например, в калькуляторе на Win10 иерархия элементов размазана аж по нескольким процессам (не только calc.exe). Так что без объекта Desktop не обойтись.
from subprocess import Popen
from pywinauto import Desktop

Popen('calc.exe', shell=True)
dlg = Desktop(backend="uia").Calculator
dlg.wait('visible')
Корневой объект (Application или Desktop) — это единственное место, где нужно указывать бэкенд. Все остальное прозрачно ложится в концепцию «спецификация->враппер», о которой дальше.
Спецификации окон/элементов
Это основная концепция, на которой строится интерфейс pywinauto. Вы можете описать окно/элемент приближенно или более детально, даже если оно еще не существует или уже закрыто. Спецификация окна (объект WindowSpecification) хранит в себе критерии, по которым нужно искать реальное окно или элемент.
Пример детальной спецификации окна:
>>> dlg_spec = app.window(title='Untitled - Notepad')

>>> dlg_spec
<pywinauto.application.WindowSpecification object at 0x0568B790>

>>> dlg_spec.wrapper_object()
<pywinauto.controls.win32_controls.DialogWrapper object at 0x05639B70>
Сам поиск окна происходит по вызову метода .wrapper_object(). Он возвращает некий «враппер» для реального окна/элемента или кидает ElementNotFoundError (иногда ElementAmbiguousError, если найдено несколько элементов, то есть требуется уточнить критерий поиска). Этот «враппер» уже умеет делать какие-то действия с элементом или получать данные из него.
Python может скрывать вызов .wrapper_object(), так что финальный код становится короче. Рекомендуем использовать его только для отладки. Следующие две строки делают абсолютно одно и то же:
dlg_spec.wrapper_object().minimize() # debugging
dlg_spec.minimize() # production
Есть множество критериев поиска для спецификации окна. Вот лишь несколько примеров:
# могут иметь несколько уровней
app.window(title_re='.* - Notepad$').window(class_name='Edit')

# можно комбинировать критерии (как AND) и не ограничиваться одним процессом приложения
dlg = Desktop(backend="uia").Calculator
dlg.window(auto_id='num8Button', control_type='Button')
Список всех возможных критериев есть в доках функции pywinauto.findwindows.find_elements(…).
Магия доступа по атрибуту и по ключу
Python упрощает создание спецификаций окна и распознает атрибуты объекта динамически (внутри переопределен метод __getattribute__). Разумеется, на имя атрибута накладываются такие же ограничения, как и на имя любой переменной (нельзя вставлять пробелы, запятые и прочие спецсимволы). К счастью, pywinauto использует так называемый «best match» алгоритм поиска, который устойчив к опечаткам и небольшим вариациям.
app.UntitledNotepad
# то же самое, что
app.window(best_match='UntitledNotepad')
Если все-таки нужны Unicode строки (например, для русского языка), пробелы и т.п., можно делать доступ по ключу (как будто это обычный словарь):
app['Untitled - Notepad']
# то же самое, что
app.window(best_match='Untitled - Notepad')
Пять правил для магических имен
Как узнать эталонные магические имена? Те, которые присваиваются элементу перед поиском. Если вы указали имя, достаточно похожее на эталон, значит элемент будет найден.
- По заголовку (текст, имя):
app.Properties.OK.click() - По тексту и по типу элемента:
app.Properties.OKButton.click() - По типу и по номеру:
app.Properties.Button3.click()(именаButton0иButton1привязаны к первому найденному элементу,Button2— ко второму, и дальше уже по порядку — так исторически сложилось) - По статическому тексту (слева или сверху) и по типу:
app.OpenDialog.FileNameEdit.set_text("")(полезно для элементов с динамическим текстом) - По типу и по тексту внутри:
app.Properties.TabControlSharing.select("General")
Обычно два-три правила применяются одновременно, редко больше. Чтобы проверить, какие конкретно имена доступны для каждого элемента, можно использовать метод print_control_identifiers(). Он может печатать дерево элементов как на экран, так и в файл. Для каждого элемента печатаются его эталонные магические имена. Также можно скопипастить оттуда более детальные спецификации дочерних элементов. Результат в скрипте будет выглядеть так:
app.Properties.child_window(title="Contains:", auto_id="13087", control_type="Edit")Само дерево элементов — обычно довольно большая портянка.
>>> app.Properties.print_control_identifiers()

Control Identifiers:

Dialog - 'Windows NT Properties'    (L688, T518, R1065, B1006)
[u'Windows NT PropertiesDialog', u'Dialog', u'Windows NT Properties']
child_window(title="Windows NT Properties", control_type="Window")
   |
   | Image - ''    (L717, T589, R749, B622)
   | [u'', u'0', u'Image1', u'Image0', 'Image', u'1']
   | child_window(auto_id="13057", control_type="Image")
   |
   | Image - ''    (L717, T630, R1035, B632)
   | ['Image2', u'2']
   | child_window(auto_id="13095", control_type="Image")
   |
   | Edit - 'Folder name:'    (L790, T596, R1036, B619)
   | [u'3', 'Edit', u'Edit1', u'Edit0']
   | child_window(title="Folder name:", auto_id="13156", control_type="Edit")
   |
   | Static - 'Type:'    (L717, T643, R780, B658)
   | [u'Type:Static', u'Static', u'Static1', u'Static0', u'Type:']
   | child_window(title="Type:", auto_id="13080", control_type="Text")
   |
   | Edit - 'Type:'    (L790, T643, R1036, B666)
   | [u'4', 'Edit2', u'Type:Edit']
   | child_window(title="Type:", auto_id="13059", control_type="Edit")
   |
   | Static - 'Location:'    (L717, T669, R780, B684)
   | [u'Location:Static', u'Location:', u'Static2']
   | child_window(title="Location:", auto_id="13089", control_type="Text")
   |
   | Edit - 'Location:'    (L790, T669, R1036, B692)
   | ['Edit3', u'Location:Edit', u'5']
   | child_window(title="Location:", auto_id="13065", control_type="Edit")
   |
   | Static - 'Size:'    (L717, T695, R780, B710)
   | [u'Size:Static', u'Size:', u'Static3']
   | child_window(title="Size:", auto_id="13081", control_type="Text")
   |
   | Edit - 'Size:'    (L790, T695, R1036, B718)
   | ['Edit4', u'6', u'Size:Edit']
   | child_window(title="Size:", auto_id="13064", control_type="Edit")
   |
   | Static - 'Size on disk:'    (L717, T721, R780, B736)
   | [u'Size on disk:', u'Size on disk:Static', u'Static4']
   | child_window(title="Size on disk:", auto_id="13107", control_type="Text")
   |
   | Edit - 'Size on disk:'    (L790, T721, R1036, B744)
   | ['Edit5', u'7', u'Size on disk:Edit']
   | child_window(title="Size on disk:", auto_id="13106", control_type="Edit")
   |
   | Static - 'Contains:'    (L717, T747, R780, B762)
   | [u'Contains:1', u'Contains:0', u'Contains:Static', u'Static5', u'Contains:']
   | child_window(title="Contains:", auto_id="13088", control_type="Text")
   |
   | Edit - 'Contains:'    (L790, T747, R1036, B770)
   | [u'8', 'Edit6', u'Contains:Edit']
   | child_window(title="Contains:", auto_id="13087", control_type="Edit")
   |
   | Image - 'Contains:'    (L717, T773, R1035, B775)
   | [u'Contains:Image', 'Image3', u'Contains:2']
   | child_window(title="Contains:", auto_id="13096", control_type="Image")
   |
   | Static - 'Created:'    (L717, T786, R780, B801)
   | [u'Created:', u'Created:Static', u'Static6', u'Created:1', u'Created:0']
   | child_window(title="Created:", auto_id="13092", control_type="Text")
   |
   | Edit - 'Created:'    (L790, T786, R1036, B809)
   | [u'Created:Edit', 'Edit7', u'9']
   | child_window(title="Created:", auto_id="13072", control_type="Edit")
   |
   | Image - 'Created:'    (L717, T812, R1035, B814)
   | [u'Created:Image', 'Image4', u'Created:2']
   | child_window(title="Created:", auto_id="13097", control_type="Image")
   |
   | Static - 'Attributes:'    (L717, T825, R780, B840)
   | [u'Attributes:Static', u'Static7', u'Attributes:']
   | child_window(title="Attributes:", auto_id="13091", control_type="Text")
   |
   | CheckBox - 'Read-only (Only applies to files in folder)'    (L790, T825, R1035, B841)
   | [u'CheckBox0', u'CheckBox1', 'CheckBox', u'Read-only (Only applies to files in folder)CheckBox', u'Read-only (Only applies to files in folder)']
   | child_window(title="Read-only (Only applies to files in folder)", auto_id="13075", control_type="CheckBox")
   |
   | CheckBox - 'Hidden'    (L790, T848, R865, B864)
   | ['CheckBox2', u'HiddenCheckBox', u'Hidden']
   | child_window(title="Hidden", auto_id="13076", control_type="CheckBox")
   |
   | Button - 'Advanced...'    (L930, T845, R1035, B868)
   | [u'Advanced...', u'Advanced...Button', 'Button', u'Button1', u'Button0']
   | child_window(title="Advanced...", auto_id="13154", control_type="Button")
   |
   | Button - 'OK'    (L814, T968, R889, B991)
   | ['Button2', u'OK', u'OKButton']
   | child_window(title="OK", auto_id="1", control_type="Button")
   |
   | Button - 'Cancel'    (L895, T968, R970, B991)
   | ['Button3', u'CancelButton', u'Cancel']
   | child_window(title="Cancel", auto_id="2", control_type="Button")
   |
   | Button - 'Apply'    (L976, T968, R1051, B991)
   | ['Button4', u'ApplyButton', u'Apply']
   | child_window(title="Apply", auto_id="12321", control_type="Button")
   |
   | TabControl - ''    (L702, T556, R1051, B962)
   | [u'10', u'TabControlSharing', u'TabControlPrevious Versions', u'TabControlSecurity', u'TabControl', u'TabControlCustomize']
   | child_window(auto_id="12320", control_type="Tab")
   |    |
   |    | TabItem - 'General'    (L704, T558, R753, B576)
   |    | [u'GeneralTabItem', 'TabItem', u'General', u'TabItem0', u'TabItem1']
   |    | child_window(title="General", control_type="TabItem")
   |    |
   |    | TabItem - 'Sharing'    (L753, T558, R801, B576)
   |    | [u'Sharing', u'SharingTabItem', 'TabItem2']
   |    | child_window(title="Sharing", control_type="TabItem")
   |    |
   |    | TabItem - 'Security'    (L801, T558, R851, B576)
   |    | [u'Security', 'TabItem3', u'SecurityTabItem']
   |    | child_window(title="Security", control_type="TabItem")
   |    |
   |    | TabItem - 'Previous Versions'    (L851, T558, R947, B576)
   |    | [u'Previous VersionsTabItem', u'Previous Versions', 'TabItem4']
   |    | child_window(title="Previous Versions", control_type="TabItem")
   |    |
   |    | TabItem - 'Customize'    (L947, T558, R1007, B576)
   |    | [u'CustomizeTabItem', 'TabItem5', u'Customize']
   |    | child_window(title="Customize", control_type="TabItem")
   |
   | TitleBar - 'None'    (L712, T521, R1057, B549)
   | ['TitleBar', u'11']
   |    |
   |    | Menu - 'System'    (L696, T526, R718, B548)
   |    | [u'System0', u'System', u'System1', u'Menu', u'SystemMenu']
   |    | child_window(title="System", auto_id="MenuBar", control_type="MenuBar")
   |    |    |
   |    |    | MenuItem - 'System'    (L696, T526, R718, B548)
   |    |    | [u'System2', u'MenuItem', u'SystemMenuItem']
   |    |    | child_window(title="System", control_type="MenuItem")
   |    |
   |    | Button - 'Close'    (L1024, T519, R1058, B549)
   |    | [u'CloseButton', u'Close', 'Button5']
   |    | child_window(title="Close", control_type="Button")
В некоторых случаях печать всего дерева может тормозить (например, в iTunes на одной вкладке аж три тысячи элементов!), но можно использовать параметр depth (глубина): depth=1 — сам элемент, depth=2 — только непосредственные дети, и так далее. Его же можно указывать в спецификациях при создании child_window.
Примеры
Мы постоянно пополняем список примеров в репозитории. Из свежих стоит отметить автоматизацию сетевого анализатора WireShark (это хороший пример Qt5 приложения; хотя эту задачу можно решать и без GUI, ведь есть scapy.Sniffer из питоновского пакета scapy). Также есть пример автоматизации MS Paint с его Ribbon тулбаром.
Еще один отличный пример, написанный моим студентом: перетаскивание файла из explorer.exe на Chrome страницу для Google Drive (он перекочует в главный репозиторий чуть позже).
И, конечно, пример подписки на события клавиатуры (hot keys) и мыши:
hook_and_listen.py.
Благодарности
Отдельное спасибо — тем, кто постоянно помогает развивать проект. Для меня и Валентина это постоянное хобби. Двое моих студентов из ННГУ недавно защитили дипломы бакалавра по этой теме. Александр внес большой вклад в поддержку MS UI Automation и недавно начал делать автоматический генератор кода по принципу «запись-воспроизведение» на основе текстовых свойств (это самая сложная фича), пока только для «uia» бэкенда. Иван разрабатывает новый бэкенд под Linux на основе AT-SPI (модули mouse и keyboard на основе python-xlib — уже в релизах 0.6.x).
Поскольку я довольно давно читаю спецкурс по автоматизации на Python, часть студентов-магистров выполняют домашние задания, реализуя небольшие фичи или примеры автоматизации. Некоторые ключевые вещи на стадии исследований тоже когда-то раскопали именно студенты. Хотя иногда за качеством кода приходится строго следить. В этом сильно помогают статические анализаторы (QuantifiedCode, Codacy и Landscape) и автоматические тесты в облаке (сервис AppVeyor) с покрытием кода в районе 95%.
Также спасибо всем, кто оставляет отзывы, заводит баги и присылает пулл реквесты!
Дополнительные ресурсы
За вопросами мы следим по тегу на StackOverflow (недавно появился тег в русской версии SO) и по ключевому слову на Тостере. Есть русскоязычный чат в Gitter’е.
Каждый месяц обновляем рейтинг open-source библиотек для GUI тестирования. По количеству звезд на гитхабе быстрее растут только Autohotkey (у них очень большое сообщество и длинная история) и PyAutoGUI (во многом благодаря популярности книг ее автора Al Sweigart: «Automate the Boring Stuff with Python» и других).
PyWin32 is the way to go — but how to use it? One approach is to begin with a concrete problem you’re having and attempting to solve it. PyWin32 provides bindings for the Win32 API functions for which there are many, and you really have to pick a specific goal first.
In my Python 2.5 installation (ActiveState on Windows) the win32 package has a Demos folder packed with sample code of various parts of the library.
For example, here’s CopyFileEx.py:
import win32file, win32api
import os


def ProgressRoutine(TotalFileSize, TotalBytesTransferred, StreamSize, StreamBytesTransferred,
    StreamNumber, CallbackReason, SourceFile, DestinationFile, Data):
    print Data
    print TotalFileSize, TotalBytesTransferred, StreamSize, StreamBytesTransferred, StreamNumber, CallbackReason, SourceFile, DestinationFile
    ##if TotalBytesTransferred > 100000:
    ##    return win32file.PROGRESS_STOP
    return win32file.PROGRESS_CONTINUE

temp_dir=win32api.GetTempPath()
fsrc=win32api.GetTempFileName(temp_dir,'cfe')[0]
fdst=win32api.GetTempFileName(temp_dir,'cfe')[0]
print fsrc, fdst

f=open(fsrc,'w')
f.write('xxxxxxxxxxxxxxxx\n'*32768)
f.close()
## add a couple of extra data streams
f=open(fsrc+':stream_y','w')
f.write('yyyyyyyyyyyyyyyy\n'*32768)
f.close()
f=open(fsrc+':stream_z','w')
f.write('zzzzzzzzzzzzzzzz\n'*32768)
f.close()

operation_desc='Copying '+fsrc+' to '+fdst
win32file.CopyFileEx(fsrc, fdst, ProgressRoutine, operation_desc, False,   win32file.COPY_FILE_RESTARTABLE)
It shows how to use the CopyFileEx function with a few others (such as GetTempPath and GetTempFileName). From this example you can get a «general feel» of how to work with this library.
Developers apply API hooking practices to better understand how a system works, alter the behavior of an operating system or an application, detect malicious code, and build strong products.
The majority of guides and tutorials on Windows API hooking are based on using compiled languages like C or C++, which makes this practice inaccessible for developers who don’t know these languages. However, compiled languages aren’t the only option. Interpreted languages like Python can also be used for API hooking and have some advantages over compiled languages.
In this article, we explore when and why it’s best to choose Python for hooking Windows APIs and explain how to use this language for setting hooks based on easy-to-follow examples. We also show how two Python libraries — Deviare and WinAppDbg — can be used for API hooking.
Contents:
- Choosing a programming language for API hooking
- How to inject Python code into a process
- Windows API hooking with the Import Address Table
- Python libraries for API hooking
- Deviare
- WinAppDbg
- Conclusion
Choosing a programming language for API hooking
API hooking covers a range of techniques for altering or augmenting the behavior of an operating system (OS), application, or other software component by intercepting API function calls, messages, or events passed between software components. Code that handles such interception is called a hook. As we mentioned in the article 3 Effective DLL Injection Techniques for Setting API Hooks, API hooking for Windows can be performed using various methods such as injecting dynamic-link libraries (DLLs), injecting code, and using the Win32 Debug API toolset.
However, most API hooking examples you will encounter on the internet use C or C++. If you are lucky, you’ll find examples in C# or Visual Basic.
Since API hooking is a low-level technique, compiled languages like C and C++ may seem to be the only choice. Before we explain why this isn’t true and when you can use interpreted languages for API hooking, let’s briefly refresh your memory as to the key differences between those two groups of programming languages.
A compiled language is a programming language that is implemented using a compiler. A compiler is a program that translates statements written in a particular programming language into another language, usually machine code. C, C++, and Go are common examples of compiled languages.
An interpreted language is a programming language that is implemented using an interpreter and doesn’t compile source code directly into machine code ahead of execution. An interpreter executes a program, interpreting each statement into a sequence of one or more subroutines and then into machine code. Python and JavaScript are common examples of interpreted languages.
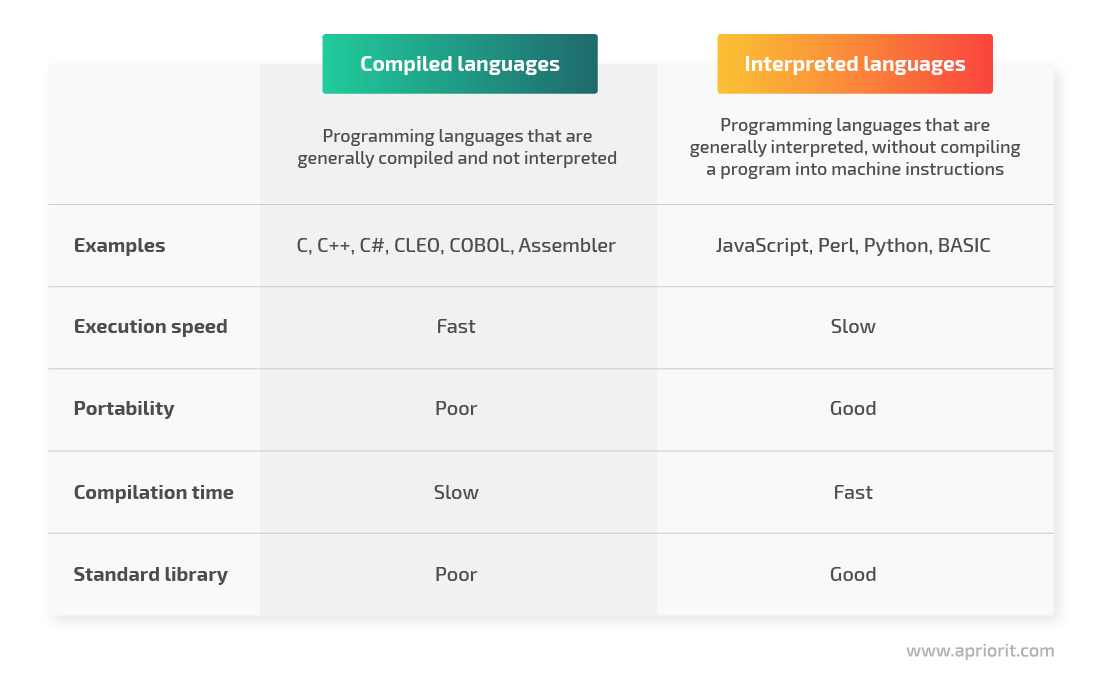
Figure 1. Comparison of compiled and interpreted programming languages
Let’s compare how working with С/С++ differs from programming with Python. Say you just want to write a small utility or a patch for some application. When using С or С++, you’ll have to spend extra time preparing the environment, which requires you to:
- Install an IDE
- Download and build a framework for API hooking
- Install and build third-party libraries, as the standard library may not provide all the utilities you need
Once you’ve installed everything, it’s still unlikely that you’ll be able to build a project on the first try. The reason is that it’s quite common for C/C++ developers to find errors like missing DLL files or inappropriate library versions.
Python, on the contrary, has convenient tools like pip and virtual environments for handling dependencies. Also, it allows for fast development, has various useful third-party libraries, and offers convenient environment configuration. So if you don’t know C or C++, you can definitely use Python as an alternative for Windows API hooking.
Before we dig into how to hook API functions with Python, let’s explore how this language works.
How Python works
Python is one of the most popular interactive programming languages. Its biggest advantage is its simple syntax that allows you to write programs with less code than other programming languages require. And since its syntax is highly readable and similar to English, all team members can easily understand it.
Python works on the following platforms:
- Windows
- Linux
- macOS
You can execute Python code right after it’s written. However, since Python is an interpreted language, it requires an executor — an interpreter called the Python virtual machine.
Note: The Python virtual machine is an essential component to run Python code.
This is how a program written in Python works:
- Python source code is sent to the compiler, which produces an OS-neutral intermediate file format called Python bytecode.
- The Python virtual machine interprets the Python bytecode file to produce machine-specific commands for the processor.
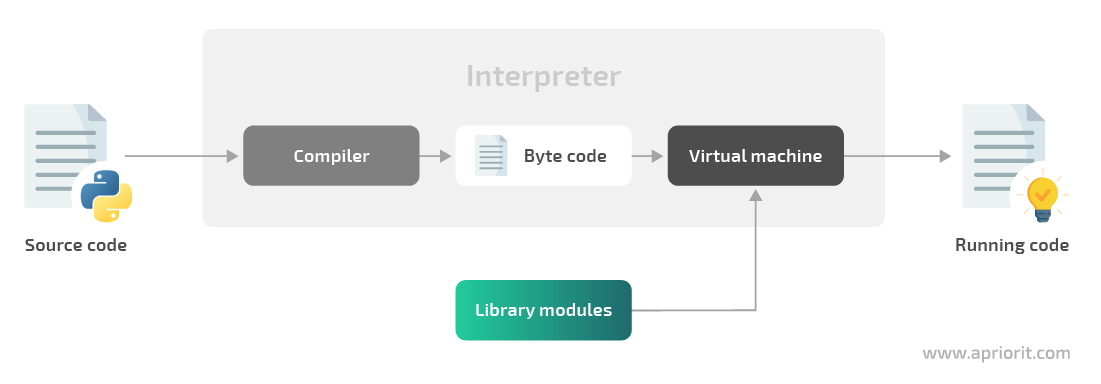
Figure 2. Python program execution flow
Now, let’s see how we can inject Python code into an application’s process.
How to inject Python code into a process
As we wrote in our previous article, to hook API functions, the hooking code should be injected inside the memory address space of the target process. If our hooking code is written in Python, the target process should be able to execute it.
But the target application may not know about Python, its virtual machine, or any interpreted language at all. To make Python code run inside the target application, you may need to inject a Python virtual machine into it.
To make the Python virtual machine run in the target process, you only need to perform a few steps:
- Make the application load a python.dll file so it can run the Python code
- Make the application call the Py_Initialize function to initialize the Python interpreter
Note: All of the following examples (before the “Python libraries for API hooking” section) are performed on Windows 7 x32 with Python 3.8.5.
Let’s see how these two steps can be performed in Python using the ctypes and mayhem library modules:
Python
import ctypes.util

# Resolving python.dll path in order to inject it in the target process
python_library = 'python{}{}.dll'.format(sys.version_info.major, sys.version_info.minor)
python_library = ctypes.util.find_library(python_library)
Now, we will load the phyton.dll library in the target process and make that process call the Py_InitializeEx function:
Python
from mayhem import utilities
from mayhem.proc.windows import WindowsProcess
from mayhem.windll import kernel32

# Resolving Py_InitializeEx address in the remote process
python_library_remote = process.load_library(python_library)
python_library_local  = kernel32.GetModuleHandleW(python_library)

initializer = python_library_remote + (
        kernel32.GetProcAddress(python_library_local, b'Py_InitializeEx') - python_library_local)

# Calling Py_InitializeEx(0) in the remote process
process.join_thread(process.start_thread(initializer, 0))
The target process can now execute any Python code. To make it run our code, we’ll use the PyRun_SimpleString function from the python.dll file. Let’s call this function in a separate thread with our Python code:
Python
# PyRun_SimpleString uses utf-8 encoded strings
injected_code = source_code.encode('utf-8') + b'\x00'

# Allocate some memory in the remote process to place our Python code there
alloced_address = process.allocate(
        size=utilities.align_up(len(injected_code)), permissions='PAGE_READWRITE')

# Put utf-8 encoded Python source code into the allocated memory
process.write_memory(alloced_address, injected_code)

# Run PyRun_SimpleString in a new thread in the remote process
process.start_thread(code_runner, alloced_address)
To make this code reusable, let’s put it in the Injector class to run arbitrary Python code in the target process:
Python
class Injector:
    '''Class that allows running arbitrary Python code in any process'''

    def initialize(self):
        '''Calls Py_InitializeEx(0) in the remote process'''
        ...

    def finalize(self):
        '''Calls Py_FinalizeEx(0) in the remote process'''
        ...

    def run_code(self, source_code, should_wait=False):
        '''Runs the Python source code in the remote process in a separate thread'''
        ...
Now we know the basics, so let’s explore a practical example of Python code injection.
An example of Python code injection
For this example, we’ll inject some Python code in the notepad.exe process, making it show a message box with some text. Here’s the code responsible for python.dll injection:
Python
injector = Injector(pid=5815) # notepad.exe PID
injector.initialize()
Python.dll is injected in the remote process. Let’s check the presence of python.dll in the list of the notepad.exe processes using the Process Explorer utility from Sysinternals tools:

Figure 3. Presence of the python.dll file in the list of notepad.exe processes
We can see that python.dll is loaded to the notepad.exe process. Now, let’s make Notepad show a message box with the text “Hello from Python”:
Python
code = r'''
import ctypes
ctypes.windll.user32.MessageBoxA(0, b"Hello from Python", b"Hello from Python", 0)
'''

injector.run_code(code, should_wait=True)
Once we inject the Python code into notepad.exe, Notepad shows us the following message box:
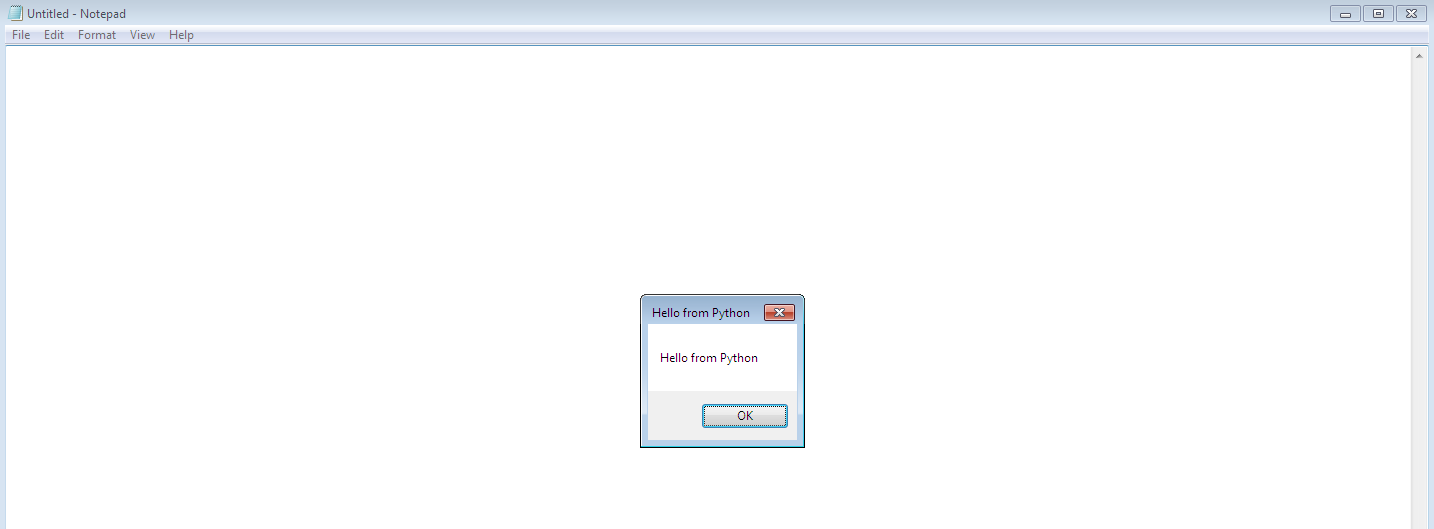
Figure 4. Message box that opens in Notepad after Python code injection
The Process Explorer shows that there’s a thread in the notepad.exe process running the Python code:
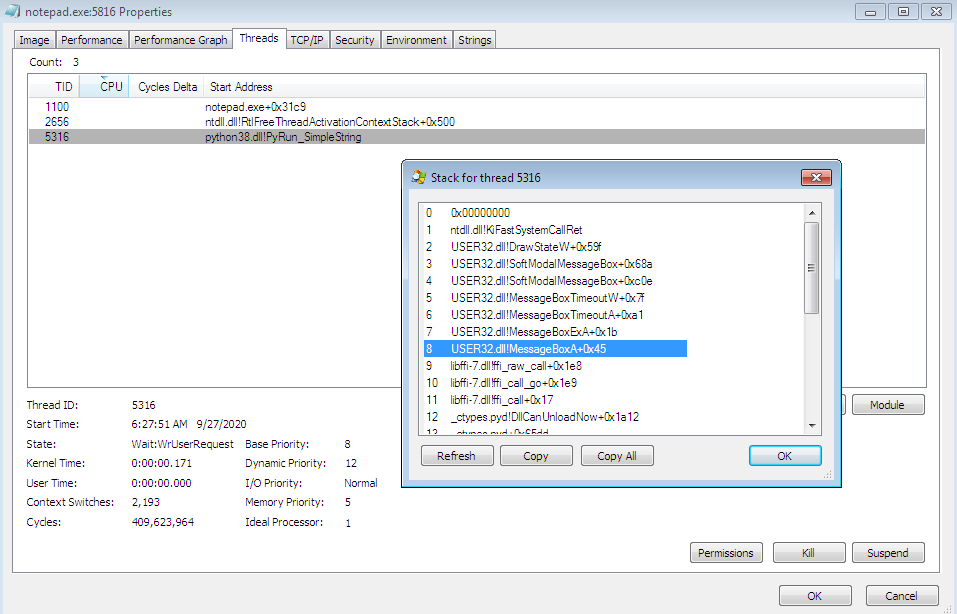
Figure 5. The stack for the python.dll thread that’s running Python code
However, the example described above isn’t the only possible option for Python code injection. Let’s look at the ways you can perform API hooking using the Import Address Table structure.
Windows API hooking with the Import Address Table
The Windows Portable Executable format contains a structure called the Import Address Table (IAT). This structure contains library names used by a certain application. For each library, the IAT also contains a list of features imported from this library. Thus, when launching an application, a loader can know what libraries to load and how to connect function addresses from these libraries.
The IAT contains pointers to information that is critical for an executable to do its job:
- A list of DLLs an executable depends on for providing the expected functionality
- A list of function names and their addresses from those DLLs that may be called by the binary at some point
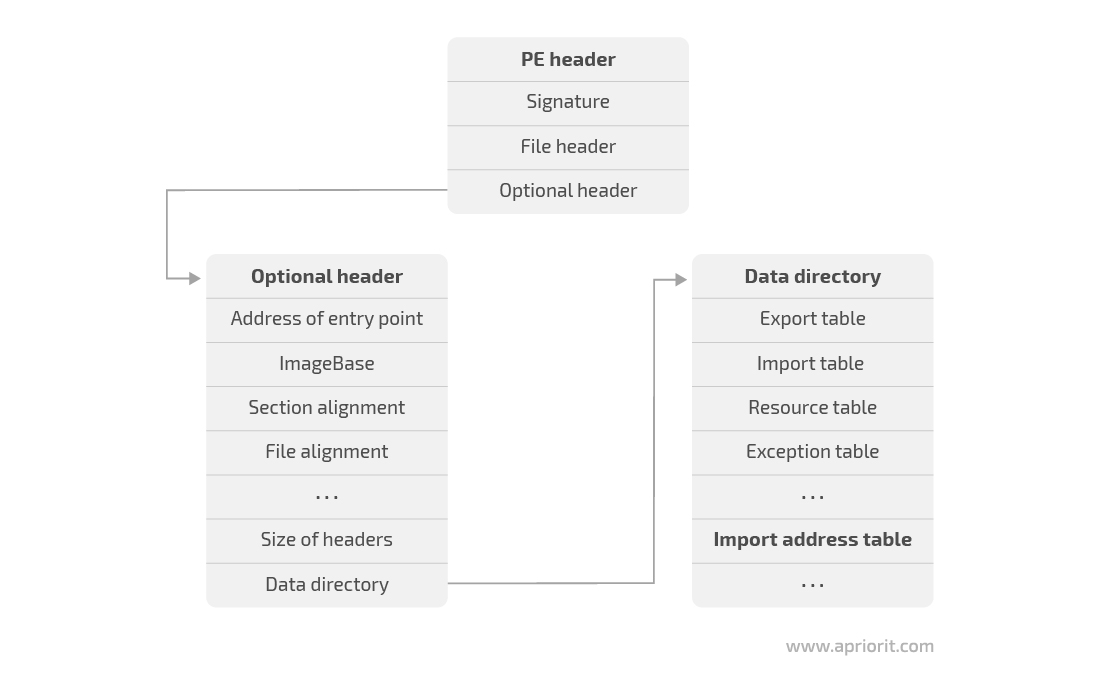
Figure 6. How to get access to the Import Address Table
It’s possible to hook function pointers specified in the IAT by overwriting the target function’s address with another function address. To access the IAT of the current module, we’ll use the ImageDirectoryEntryToData function:
Python
import ctypes
import ctypes.wintypes

# Define helper functions to manipulate the IAT of the module

# https://docs.microsoft.com/en-us/windows/win32/api/dbghelp/nf-dbghelp-imagedirectoryentrytodata
_dbghelp                                    = ctypes.windll.dbghelp
_dbghelp.ImageDirectoryEntryToData.restype  = ctypes.wintypes.LPVOID
_dbghelp.ImageDirectoryEntryToData.argtypes = [
    ctypes.wintypes.LPVOID,
    ctypes.wintypes.BOOL  ,
    ctypes.wintypes.USHORT,
    ctypes.wintypes.PULONG
]

ImageDirectoryEntryToData = _dbghelp.ImageDirectoryEntryToData

# https://docs.microsoft.com/en-us/windows/win32/api/libloaderapi/nf-libloaderapi-getmodulehandlea
_kernel32                           = ctypes.windll.kernel32
_kernel32.GetModuleHandleA.restype  = ctypes.wintypes.HMODULE
_kernel32.GetModuleHandleA.argtypes = [
    ctypes.wintypes.LPCSTR
]

GetModuleHandleA = _kernel32.GetModuleHandleA

# https://docs.microsoft.com/en-us/windows/win32/api/libloaderapi/nf-libloaderapi-getprocaddress
_kernel32                         = ctypes.windll.kernel32
_kernel32.GetProcAddress.restype  = ctypes.wintypes.HMODULE
_kernel32.GetProcAddress.argtypes = [
    ctypes.wintypes.HMODULE,
    ctypes.wintypes.LPCSTR
]

GetProcAddress = _kernel32.GetProcAddress

# https://docs.microsoft.com/en-us/windows/win32/api/processthreadsapi/nf-processthreadsapi-getcurrentprocess
_kernel32                            = ctypes.windll.kernel32
_kernel32.GetCurrentProcess.restype  = ctypes.wintypes.HANDLE
_kernel32.GetCurrentProcess.argtypes = []

GetCurrentProcess = _kernel32.GetCurrentProcess

# https://docs.microsoft.com/en-us/windows/win32/api/memoryapi/nf-memoryapi-writeprocessmemory
_kernel32                             = ctypes.windll.kernel32
_kernel32.WriteProcessMemory.restype  = ctypes.wintypes.BOOL
_kernel32.WriteProcessMemory.argtypes = [
    ctypes.wintypes.HANDLE       ,
    ctypes.wintypes.LPVOID       ,
    ctypes.wintypes.LPCVOID      ,
    ctypes.c_size_t              ,
    ctypes.POINTER(ctypes.c_size_t)
]

# Define helper structures to manipulate the IAT of the module
class IMAGE_IMPORT_DESCRIPTOR_START(ctypes.Union):
    fields = [
        ('Characteristics'   , ctypes.wintypes.DWORD),
        ('OriginalFirstThunk', ctypes.wintypes.DWORD),
    ]

class IMAGE_IMPORT_DESCRIPTOR(ctypes.Structure):
    anonymous = ['DUMMY']

    fields = [
        ('DUMMY'         , IMAGE_IMPORT_DESCRIPTOR_START),
        ('TimeDateStamp' , ctypes.wintypes.DWORD)      ,
        ('ForwarderChain', ctypes.wintypes.DWORD)      ,
        ('Name'          , ctypes.wintypes.DWORD)      ,
        ('FirstThunk'    , ctypes.wintypes.DWORD)      ,
    ]

PIMAGE_IMPORT_DESCRIPTOR = ctypes.POINTER(IMAGE_IMPORT_DESCRIPTOR)

# Get Image import descriptor for the current module
current_module = GetModuleHandleA(None)

size              = ctypes.wintypes.ULONG()
import_descriptor = ctypes.cast(
    ImageDirectoryEntryToData(current_module, True, IMAGE_DIRECTORY_ENTRY_IMPORT, ctypes.byref(size)), PIMAGE_IMPORT_DESCRIPTOR)
The IMAGE_IMPORT_DESCRIPTOR structure contains information on all imported modules required for work (used by the current module). Every imported module has a list of functions imported from it by the current process. Each imported function is defined by another structure — IMAGE_THUNK_DATA — that is different for x32 and x64 systems. Let’s explore both options:
Python
class IMAGE_THUNK_DATA32(ctypes.Union):
    fields = [
        ('ForwarderString', ctypes.wintypes.DWORD),
        ('Function'       , ctypes.wintypes.DWORD),     # Contains address of the imported function - that is to be replaced by our handler
        ('Ordinal'        , ctypes.wintypes.DWORD),
        ('AddressOfData'  , ctypes.wintypes.DWORD),
]

class IMAGE_THUNK_DATA64(ctypes.Union):
    fields = [
        ('ForwarderString', ctypes.c_ulonglong),
        ('Function'       , ctypes.c_ulonglong),        # Contains address of the imported function - that is to be replaced by our handler
        ('Ordinal'        , ctypes.c_ulonglong),
        ('AddressOfData'  , ctypes.c_ulonglong),
]

IMAGE_THUNK_DATA = IMAGE_THUNK_DATA32 \
    if ctypes.sizeof(ctypes.c_voidp) == 4 else IMAGE_THUNK_DATA64

PIMAGE_THUNK_DATA = ctypes.POINTER(IMAGE_THUNK_DATA)
To hook a function, we have to take the following steps:
- Find the import descriptor of the target module
- Find the import descriptor of the module that exports the target function
- Replace the address of the target function in the IAT with the address of the function we want to call instead (set a hook)
For example, let’s see how we can hook the CreateFileW function:
Python
...


# Real address of CreateFileW - address to be searched for in the IAT
real_CreateFileW = GetProcAddress(GetModuleHandleA(b'kernel32'), b'CreateFileW')


# Our handler of CreateFileW
@ctypes.WINFUNCTYPE(ctypes.c_void_p, ctypes.c_void_p, ctypes.wintypes.DWORD, ctypes.wintypes.DWORD, ctypes.c_void_p, ctypes.wintypes.DWORD, ctypes.wintypes.DWORD, ctypes.c_void_p)
def CreateFileW_handler(*args):
    ctypes.windll.user32.MessageBoxW(0, "Hook!!!!", "Hook!!!!", 0)
    real_CreateFileW(*args)


while import_descriptor.contents.Name:
    module_name_offset = current_module + import_descriptor.contents.Name

    # CreateFileW is in kernel32.dll
    if ctypes.cast(module_name_offset, ctypes.wintypes.LPSTR).value.lower() == b'kernel32.dll':
            replace_function_address(import_descriptor, real_CreateFileW, ctypes.addressof(CreateFileW_handler))

    # Move to the next imported module
    import_descriptor = ctypes.cast(ctypes.cast(
        import_descriptor, ctypes.wintypes.LPVOID).value + ctypes.sizeof(IMAGE_IMPORT_DESCRIPTOR), PIMAGE_IMPORT_DESCRIPTOR)
As you can see, we switch addresses in the replace_function_address function. It’s quite straightforward — we just need to look through all the imported functions from the kernel32.dll file, and when we find the address of the needed function, we replace it with the WriteProcessMemory function:
Python
def replace_function_address(import_descriptor, function_address_to_replace, function_address_new_handler):
    import_thunk = ctypes.cast(
        current_module + import_descriptor.contents.FirstThunk, PIMAGE_THUNK_DATA)

    while import_thunk.contents.Function:
        # If we found the function to be hooked
        if ctypes.cast(import_thunk.contents.Function, ctypes.wintypes.LPVOID).value == ctypes.cast(function_address_to_replace, ctypes.wintypes.LPVOID).value:
            # Where to write new function address
            imported_function_location = ctypes.pointer(ctypes.wintypes.DWORD.from_buffer(import_thunk.contents, IMAGE_THUNK_DATA.Function.offset))

            # Replace the entry with the new address
            bytes_written = ctypes.wintypes.DWORD()
            WriteProcessMemory(GetCurrentProcess(),
                    imported_function_location, function_address_new_handler, ctypes.sizeof(ctypes.c_void_p), ctypes.byref(bytes_written))

            return

        # Move to the next imported function
        import_thunk = ctypes.cast(
            ctypes.cast(import_thunk, ctypes.wintypes.LPVOID).value + ctypes.sizeof(IMAGE_THUNK_DATA), PIMAGE_THUNK_DATA)
This is how you can hook API functions with the help of the IAT structure. However, hooking API functions in Python also requires using various libraries. In the next section, we talk about two Python libraries that can help you in setting API hooks: Deviare and WinAppDbg.
If you’re also interested in Linux driver development, check out out article on how to design a Linux WiFi driver prototype.
Python libraries for API hooking
In the previous section, we discussed that dynamic languages may not be the best choice for such low-level development tasks as injecting code and modifying import tables because all internal structures should be defined almost from scratch. However, Python has lots of useful third-party libraries that can significantly simplify various development tasks.
In this section, we explore two Python libraries that can ease the process of WinAPI function hooking.
Note: All of the following examples are performed on Windows 7 x32 with Python 2.7.16 because the WinAppDbg library only works with Python 2.

Deviare
Deviare is a professional open-source hooking library for instrumenting arbitrary Win32 functions, COM objects, and functions whose symbols are located in program databases (PDBs).
The main advantage of this library is that it’s implemented as a Component Object Model (COM) component, so it can be integrated with all programming languages that support COM, such as C/C++, VB, C#, Delphi, and Python.
All hooking is performed through a special Spy Manager class contained in the Deviare COM DLL file. We can use this class to set hooks and set up callbacks for different system events like creating and terminating processes or loading dynamic libraries:
Python
import win32com.client

class SpyManagerEvents:
    '''
    This is the event handler class
    '''

    def OnLoadLibraryCall(self, process, library_name, module):
        '''
        This function is called when a new DLL is loaded
        '''

    def OnProcessStarted(self, process):
        '''
        This function is called when starting a new process
        '''

    def OnThreadStarted(self):
        '''
        This function is called when the process creates a new thread
        '''
    ...

# Inside main
spyManager = win32com.client.DispatchWithEvents('DeviareCOM.NktSpyMgr', SpyManagerEvents)
spyManager.Initialize()

hook = spyManager.CreateHook(SOME_FUNCTION_NAME, 0)
hook.Attach(PID, True)
hook.Hook(True)
To hook a function, we need to perform only three steps:
1. Create a hook instance, providing the name of the function to be hooked and some optional hook flags. Make sure all function names have the format “[dll]![function name]”. Example: “kernel32.dll!CreateFileW”.
Python
# HRESULT INktSpyMgr::CreateHook(VARIANT func, LONG hookFlags, INktHook** ppHook);

spyManager.CreateHook(SOME_FUNCTION_NAME, HOOK_FLAG)
2. Attach the hook to the target process:
Python
# HRESULT INktHook::Attach(VARIANT procOrId, VARIANT_BOOL sync);

hook.Attach(PID, True)
3. Activate the hook in all attached processes:
Python
# HRESULT INktHook::Hook(VARIANT_BOOL sync);

hook.Hook(True)
An example of API hooking using the Deviare library
Let’s write a simple hook for Internet Explorer and try to redirect all requests destined for www.google.com to www.bing.com.
Internet Explorer uses the InternetConnectW function to open an HTTP session:
Python
HINTERNET InternetConnectW(
    __in HINTERNET hInternet,
    __in LPCWSTR lpszServerName,
    __in INTERNET_PORT nServerPort,
    __in_opt LPCWSTR lpszUserName,
    __in_opt LPCWSTR lpszPassword,
    __in DWORD dwService,
    __in DWORD dwFlags,
    __in_opt DWORD_PTR dwContext
);
Let’s use the Deviare library to hook the InternetConnectW function and replace its second parameter with www.bing.com:
Python
import ctypes
import psutil
import win32com.client

class SpyManagerEvents:

    def OnFunctionCalled(self, nktHookAsPyIDispatch, nktProcessAsPyIDispatch, nktHookCallInfoAsPyIDispatch):

        nktHookCallInfo = win32com.client.Dispatch(nktHookCallInfoAsPyIDispatch)
        nktParamsEnum   = nktHookCallInfo.Params()

        if nktHookCallInfo.IsPreCall:
            # Parameter indexes start with 0
            url = nktParamsEnum.GetAt(1)

            if url.Value.lower() == 'www.google.com':
                url.Value = 'www.bing.com'

def main():

    spyManager = win32com.client.DispatchWithEvents('DeviareCOM.NktSpyMgr', SpyManagerEvents)
    spyManager.Initialize()

    for process in psutil.process_iter(['pid', 'name']):
        if process.info['name'].lower() == 'iexplore.exe':
            # To auto hook child processes
            hook = spyManager.CreateHook('Wininet.dll!InternetConnectW',
                            flgAutoHookChildProcess | flgRestrictAutoHookToSameExecutable | flgAutoHookActive)
            hook.Attach(process.info['pid'], True)
            hook.Hook(True)

    MessageBox = ctypes.windll.user32.MessageBoxA
    MessageBox(None, 'Press OK to end the demo.', 'Deviare Python Demo', 0)
Now, let’s launch the script and try to access Google. You’ll see that even though the address field contains the address of the Google search engine, the browser redirects us to Bing:
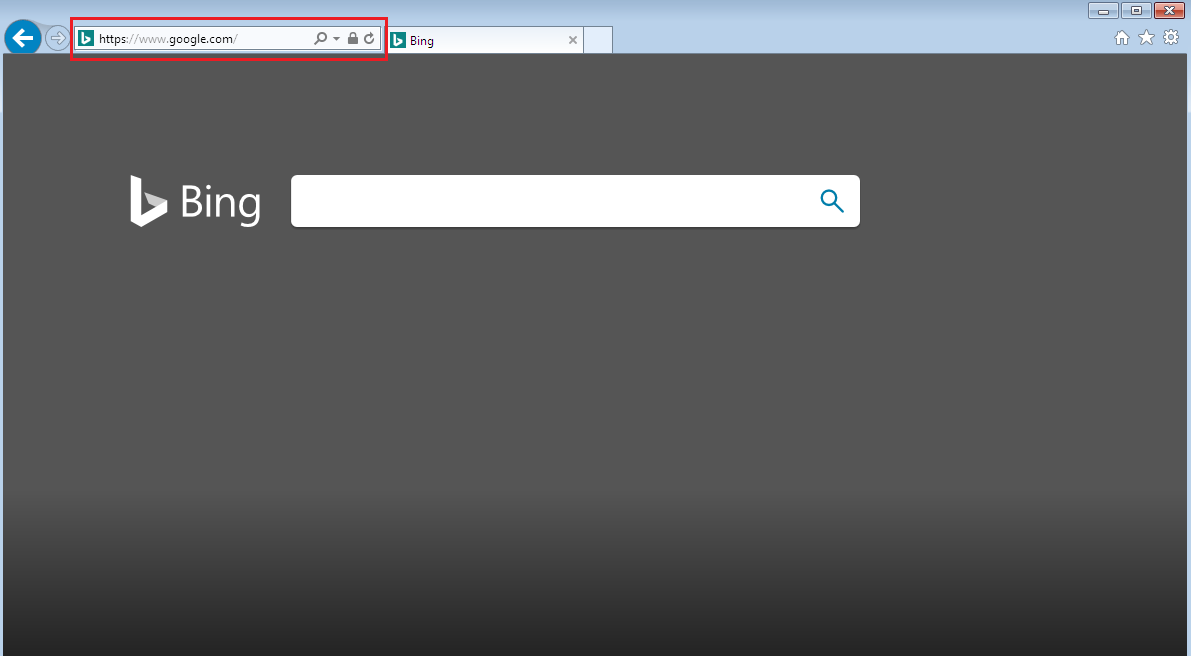
Figure 7. Redirection from Google to Bing
We can also enable some kind of warning when access to Google is requested. Let’s change the script a little to show a message box saying that access to google.com is forbidden:
Python
...

class SpyManagerEvents:

    def OnFunctionCalled(self, nktHookAsPyIDispatch, nktProcessAsPyIDispatch, nktHookCallInfoAsPyIDispatch):

        nktHookCallInfo = win32com.client.Dispatch(nktHookCallInfoAsPyIDispatch)
        nktProcess      = win32com.client.Dispatch(nktProcessAsPyIDispatch)
        nktParamsEnum   = nktHookCallInfo.Params()

        if nktHookCallInfo.IsPreCall:
            # Parameter indexes start with 0
            url = nktParamsEnum.GetAt(1)

            if 'www.google.com' in url.Value.lower():
                # Skip the call to the original InternetConnectW
                nktHookCallInfo.SkipCall()

                # Return an error to the caller
                if nktProcess.PlatformBits == 64:
                    nktHookCallInfo.Result().LongLongVal = 0
                else:
                    nktHookCallInfo.Result().LongVal = 0

                nktHookCallInfo.LastError = 5

                # Show a message box saying that the operation is not allowed
                MessageBox = ctypes.windll.user32.MessageBoxA
                MessageBox(None, 'Access to google.com is forbidden', 'Warning', 0)

...
Now, when we try to access google.com, we’ll see the following message:

Figure 8. A message saying that access to google.com is forbidden
We can use the Deviare library in various scenarios that involve API hooking. It’s easy to use with various programming languages, since its interface is almost the same in C++, C#, and Python.
WinAppDbg
Let’s look at another library that can be used for Windows API hooking with Python — WinAppDbg.
To start using it, download the WinAppDbg library directly from its official website and run the .msi file to install it.
Note: Currently, the WinAppDbg library is only available for Python 2.7.
WinAppDbg exposes some types that can be used to monitor the entire operating system as well as specific processes: System, Process, Thread, Module, and Window. Each one acts as a snapshot of processes, threads, and DLL modules in the system.
All hooking is performed through the Debug class. You can receive notifications of debugging events by passing a custom event handler to the Debug object. When a certain event occurs during execution, a relevant method in the EventHandler class is automatically called.
Inside that method, we can write code that handles that event:
Python
import winappdbg

class DebugEvents(winappdbg.EventHandler):
    '''
    This is the event handler class
    '''

    def load_dll(self, event):
        '''
        This function is called when a new DLL is loaded
        '''

    def create_process(self, event):
        '''
        This function is called when starting a new process
        '''

    def create_thread(self, event):
        '''
        This function is called when the process creates a new thread
        '''
    ...

# Inside main
debug = winappdbg.Debug(DebugEvents())
debug.loop()
The hook_function method of the Debug object sets a code breakpoint at the beginning of the target function and allows you to set two callbacks: one when entering the function and another when returning from it.
Let’s see how the hook_function method works for the CreateFile function:
Python
from winappdbg.win32 import PVOID, DWORD, HANDLE

class DebugEvents(winappdbg.EventHandler):
    '''
    This is the event handler class
    '''

    def load_dll(self, event):

        module = event.get_module()

        if module.match_name('kernel32.dll'):

            # Resolve function addresses
            address_CreateFileA = module.resolve('CreateFileA')
            address_CreateFileW = module.resolve('CreateFileW')


            signature_CreateFileA = (PVOID, DWORD, DWORD, PVOID, DWORD, DWORD, HANDLE)
            signature_CreateFileW = (PVOID, DWORD, DWORD, PVOID, DWORD, DWORD, HANDLE)

            # Hook function(pid, address, preCB, postCB, paramCount, signature)
            event.debug.hook_function(event.get_pid(), address_CreateFileA, preCB=pre_CreateFileA, signature=signature_CreateFileA)
            event.debug.hook_function(event.get_pid(), address_CreateFileW, preCB=pre_CreateFileW, signature=signature_CreateFileW)

            # Another way of setting up hooks without a signature

            # event.debug.hook_function(event.get_pid(), address_CreateFileA, preCB=pre_CreateFileA, paramCount=7)
            # event.debug.hook_function(event.get_pid(), address_CreateFileW, preCB=pre_CreateFileW, paramCount=7)

...
Let’s explain in detail what happens in the code above:
- Inside the load_dll function, we check if we’re loading the kernel32.dll file. If we are, we call the module.resolve() method for the CreateFileA and CreateFileW functions, which return the addresses for exported functions in the target process.
- Then, we create signatures for each hooked function. Our signature for both CreateFile functions is PVOID, DWORD, DWORD, PVOID, DWORD, DWORD, HANDLE. It’s important to use the PVOID signature for all pointers. Otherwise, according to the WinAppDbg documentation, the ctypes function library can crash a process.
- Next, we hook each function using event.debug.hook_function. The most important parameters are preCB and postCB. They define callback functions that will be called before the actual WinAPI call and just after it, respectively. These functions have the following prototypes:
Python
def pre_CreateFileA(event, return_address, lpFileName, dwDesiredAccess, dwShareMode, lpSecurityAttributes, dwCreationDisposition, dwFlagsAndAttributes, hTemplateFile):
    ...

def pre_CreateFileW(event, return_address, lpFileName, dwDesiredAccess, dwShareMode, lpSecurityAttributes, dwCreationDisposition, dwFlagsAndAttributes, hTemplateFile):
    ...

def post_CreateFileA(event, return_value):
    ...

def post_CreateFileW(event, return_value):
    ...
It took a lot of code to make this simple hook. But fortunately, the WinAppDbg library provides an easier way of setting hooks through the apiHooks class:
Python
from winappdbg.win32 import PVOID, DWORD, HANDLE

class DebugEvents(winappdbg.EventHandler):
    '''
    This is the event handler class
    '''

    apiHooks = {

        # Hooks for the kernel32 library
        'kernel32.dll': [

            # Function     Signature
            ('CreateFileA', (PVOID, DWORD, DWORD, PVOID, DWORD, DWORD, HANDLE)),
            ('CreateFileW', (PVOID, DWORD, DWORD, PVOID, DWORD, DWORD, HANDLE)),

            # Can also pass parameter count
            # ('CreateFileA', 7),
            # ('CreateFileW', 7),
        ],
    }

    # Now we can simply define a method for each hooked API
    # 'pre_'  methods are called when entering the hooked function
    # 'post_' methods are called when returning from the hooked function

    ...
An example of API hooking using the WinAppDbg library
To see how this works in practice, let’s write an example of a simple hook using the WinAppDbg library.
This example is quite artificial, but it’s sufficient to show how to use the library. We’ll try to change Skype’s destination folder for downloading attached files. First, let’s see how Skype downloads and saves files using the Process Monitor from Sysinternals tools:
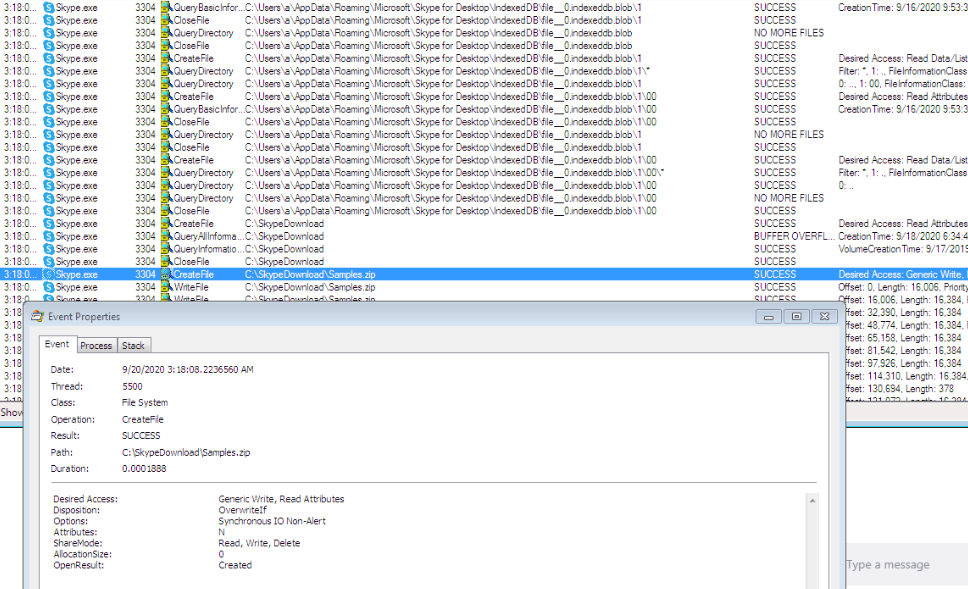
Figure 9. How Skype saves files
We can see that Skype uses the CreateFileW function with the CREATE_ALWAYS disposition to save downloaded files. So to change the destination folder, we just need to hook the CreateFileW function in the skype.exe process:
Python
import winappdbg
import os

SKYPE_RECEIVED_FILES_FOLDER                = r'C:\SkypeDownload'
SKYPE_REDIRECTED_FOLDER_FOR_RECEIVED_FILES = r'C:\SomeNewFolder'
SKYPE_PROCESS_NAME                         = 'skype.exe'

class DebugEvents(winappdbg.EventHandler):
    ...

def main():

    # Create a Debug object. We don't want the process to be terminated when the debugger has stopped.
    debug = winappdbg.Debug(DebugEvents(), bKillOnExit=False)

    try:

        # Look up currently running processes
        debug.system.scan_processes()

        # For all processes that match the requested filename...
        for process, name in debug.system.find_processes_by_filename(SKYPE_PROCESS_NAME):
            print 'Attaching to PID: {} Name: {}'.format(process.get_pid(), name)

            # Attach to the process
            debug.attach(process.get_pid())

        # Wait for all debuggees to finish
        debug.loop()

    finally:
        debug.stop()

if __name__ == '__main__':
    main()
In the code above, we enumerated all processes to find all the running skype.exe instances. Now, let’s hook the CreateFileW function:
Python
class DebugEvents(winappdbg.EventHandler):

    apiHooks = {

        # Hooks for the kernel32 library
        'kernel32.dll': [

            #  Function    Parameters
            ('CreateFileA', [PVOID, DWORD, DWORD, PVOID, DWORD, DWORD, HANDLE]),
            ('CreateFileW', [PVOID, DWORD, DWORD, PVOID, DWORD, DWORD, HANDLE]),
        ]
    }

    # Methods beginning with 'pre_' are called when entering the API and methods beginning with 'post_' are called when returning from the API

    def pre_CreateFileW(self, event, return_address, lpFileName, dwDesiredAccess, dwShareMode, lpSecurityAttributes, dwCreationDisposition, dwFlagsAndAttributes, hTemplateFile):

        filepath = event.get_process().peek_string(lpFileName, fUnicode=True)

        if self._is_skype_save_file(filepath, dwCreationDisposition == CREATE_ALWAYS):
            _, filename = winappdbg.PathOperations.split_filename(filepath)

            new_filepath       = winappdbg.PathOperations.join_path(SKYPE_REDIRECTED_FOLDER_FOR_RECEIVED_FILES, filename)
            new_filepath_bytes = new_filepath.encode('utf-16le')

            # Allocate memory in the target process and get a pointer
            new_filepath_address = event.get_process().malloc(len(new_filepath_bytes))

            # Write the new payload to that pointer
            event.get_process().write(new_filepath_address, new_filepath_bytes)

            top_of_stack = event.get_thread().get_sp()

            # Windows 32-bit uses stdcall convention for WinAPI calls: Parameters are pushed to the stack from right to left
            if event.get_thread().get_bits() == 32 or event.get_thread().is_wow64():
                event.get_process().write_dword(top_of_stack + 4, new_filepath_address)

            # Windows 64-bit uses fast call: First four parameters are stored in rcx, rdx, r8 and r9
            elif event.get_thread().get_bits() == 64:
                event.get_thread().set_register('Rdx', new_filepath_address)

            print '\n\n'
            print 'Redirecting saving file...'
            print 'Original file path: {}; New file path: {}; Thread: {};'.format(filepath, new_filepath, event.get_tid())

    def _is_skype_save_file(self, filepath, is_created):

        directory, _ = winappdbg.PathOperations.split_filename(filepath)

        return is_created and \
            SKYPE_RECEIVED_FILES_FOLDER.lower() in winappdbg.PathOperations.native_to_win32_pathname(directory).lower()
Now, we can try to run the application and see if the save operation is redirected to another folder:
Python
Attaching to PID: 3592 Name: Skype.exe
Attaching to PID: 3504 Name: Skype.exe
Attaching to PID: 3760 Name: Skype.exe
Attaching to PID: 2600 Name: Skype.exe
Attaching to PID: 3784 Name: Skype.exe
Attaching to PID: 3360 Name: Skype.exe

Redirecting saving file...
Original file path: \\?\C:\SkypeDownload\Samples.zip; New file path: C:\SomeNewFolder\Samples.zip; Thread: 3408;
As you can see from the results, files are now successfully redirected to be saved in the SomeNewFolder folder instead of the original destination folder.
It’s noteworthy that the WinAppDbg library wasn’t specifically designed for API hooking. It provides some other utilities to manipulate processes, threads, and windows and can even launch a command line debugger for an application. Therefore, this library will be more useful when hooking is not the main purpose of your application.
To learn more about different types of APIs, check out our article where we explore the Places API implementation options.
Conclusion
Knowing compiled languages like C and C++ isn’t necessary if you want to perform Windows API hooking. Dynamic languages like Python can be a great alternative and have their own advantages. Python shows good development speed, offers convenient environment configuration, and has lots of helpful third-party libraries.
In this article, we showed how to set hooks in different processes using Python and the Deviare and WinAppDbg libraries. With this knowledge, you can better understand how an operating system or a certain application works, manipulate various processes, and improve your products.
At Apriorit, we have professional teams of dedicated software developers who can help you create high-quality IT products. Contact us to start discussing your dream project.