Эта статья посвящена работе с файлами (вводу/выводу) в Python: открытие, чтение, запись, закрытие и другие операции.
Файл — это всего лишь набор данных, сохраненный в виде последовательности битов на компьютере. Информация хранится в куче данных (структура данных) и имеет название «имя файла» (filename).
В Python существует два типа файлов:
- Текстовые
- Бинарные
Текстовые файлы
Это файлы с человекочитаемым содержимым. В них хранятся последовательности символов, которые понимает человек. Блокнот и другие стандартные редакторы умеют читать и редактировать этот тип файлов.
Текст может храниться в двух форматах: (.txt) — простой текст и (.rtf) — «формат обогащенного текста».
Бинарные файлы
В бинарных файлах данные отображаются в закодированной форме (с использованием только нулей (0) и единиц (1) вместо простых символов). В большинстве случаев это просто последовательности битов.
Они хранятся в формате .bin.
Любую операцию с файлом можно разбить на три крупных этапа:
- Открытие файла
- Выполнение операции (запись, чтение)
- Закрытие файла
Открытие файла
Метод open()
В Python есть встроенная функция open(). С ее помощью можно открыть любой файл на компьютере. Технически Python создает на его основе объект.
Синтаксис следующий:
f = open(file_name, access_mode)
Где,
file_name= имя открываемого файлаaccess_mode= режим открытия файла. Он может быть: для чтения, записи и т. д. По умолчанию используется режим чтения (r), если другое не указано. Далее полный список режимов открытия файла
| Режим | Описание |
|---|---|
| r | Только для чтения. |
| w | Только для записи. Создаст новый файл, если не найдет с указанным именем. |
| rb | Только для чтения (бинарный). |
| wb | Только для записи (бинарный). Создаст новый файл, если не найдет с указанным именем. |
| r+ | Для чтения и записи. |
| rb+ | Для чтения и записи (бинарный). |
| w+ | Для чтения и записи. Создаст новый файл для записи, если не найдет с указанным именем. |
| wb+ | Для чтения и записи (бинарный). Создаст новый файл для записи, если не найдет с указанным именем. |
| a | Откроет для добавления нового содержимого. Создаст новый файл для записи, если не найдет с указанным именем. |
| a+ | Откроет для добавления нового содержимого. Создаст новый файл для чтения записи, если не найдет с указанным именем. |
| ab | Откроет для добавления нового содержимого (бинарный). Создаст новый файл для записи, если не найдет с указанным именем. |
| ab+ | Откроет для добавления нового содержимого (бинарный). Создаст новый файл для чтения записи, если не найдет с указанным именем. |
Пример
Создадим текстовый файл example.txt и сохраним его в рабочей директории.

Следующий код используется для его открытия.
f = open('example.txt','r')  # открыть файл из рабочей директории в режиме чтения
fp = open('C:/xyz.txt','r')  # открыть файл из любого каталога
В этом примере f — переменная-указатель на файл example.txt.
Следующий код используется для вывода содержимого файла и информации о нем.
>>> print(*f) # выводим содержимое файла
This is a text file.
>>> print(f) # выводим объект
<_io.TextIOWrapper name='example.txt' mode='r' encoding='cp1252'>
Стоит обратить внимание, что в Windows стандартной кодировкой является cp1252, а в Linux — utf-08.
Закрытие файла
Метод close()
После открытия файла в Python его нужно закрыть. Таким образом освобождаются ресурсы и убирается мусор. Python автоматически закрывает файл, когда объект присваивается другому файлу.
Существуют следующие способы:
Способ №1
Проще всего после открытия файла закрыть его, используя метод close().
f = open('example.txt','r')
# работа с файлом
f.close()
После закрытия этот файл нельзя будет использовать до тех пор, пока заново его не открыть.
Способ №2
Также можно написать try/finally, которое гарантирует, что если после открытия файла операции с ним приводят к исключениям, он закроется автоматически.
Без него программа завершается некорректно.
Вот как сделать это исключение:
f = open('example.txt','r')
try:
   # работа с файлом
finally:
   f.close()
Файл нужно открыть до инструкции
try, потому что если инструкцияopenсама по себе вызовет ошибку, то файл не будет открываться для последующего закрытия.
Этот метод гарантирует, что если операции над файлом вызовут исключения, то он закроется до того как программа остановится.
Способ №3
Инструкция with
Еще один подход — использовать инструкцию with, которая упрощает обработку исключений с помощью инкапсуляции начальных операций, а также задач по закрытию и очистке.
В таком случае инструкция close не нужна, потому что with автоматически закроет файл.
Вот как это реализовать в коде.
with open('example.txt') as f:
    # работа с файлом
Чтение и запись файлов в Python
В Python файлы можно читать или записывать информацию в них с помощью соответствующих режимов.
Функция read()
Функция read() используется для чтения содержимого файла после открытия его в режиме чтения (r).
Синтаксис
file.read(size)
Где,
file= объект файлаsize= количество символов, которые нужно прочитать. Если не указать, то файл прочитается целиком.
Пример
>>> f = open('example.txt','r')
>>> f.read(7)  # чтение 7 символов из example.txt
'This is '
Интерпретатор прочитал 7 символов файла и если снова использовать функцию read(), то чтение начнется с 8-го символа.
>>> f.read(7)  # чтение следующих 7 символов
' a text'
Функция readline()
Функция readline() используется для построчного чтения содержимого файла. Она используется для крупных файлов. С ее помощью можно получать доступ к любой строке в любой момент.
Пример
Создадим файл test.txt с нескольким строками:
This is line1.
This is line2.
This is line3.
Посмотрим, как функция readline() работает в test.txt.
>>> x = open('test.txt','r')
>>> x.readline()  # прочитать первую строку
This is line1.
>>> x.readline(2)  # прочитать вторую строку
This is line2.
>>> x.readlines()  # прочитать все строки
['This is line1.','This is line2.','This is line3.']
Обратите внимание, как в последнем случае строки отделены друг от друга.
Функция write()
Функция write() используется для записи в файлы Python, открытые в режиме записи.
Если пытаться открыть файл, которого не существует, в этом режиме, тогда будет создан новый.
Синтаксис
file.write(string)
Пример
Предположим, файла xyz.txt не существует. Он будет создан при попытке открыть его в режиме чтения.
>>> f = open('xyz.txt','w')  # открытие в режиме записи
>>> f.write('Hello \n World')  # запись Hello World в файл
Hello
World
>>> f.close()  # закрытие файла
Переименование файлов в Python
Функция rename()
Функция rename() используется для переименовывания файлов в Python. Для ее использования сперва нужно импортировать модуль os.
Синтаксис следующий.
import os
os.rename(src,dest)
Где,
src= файл, который нужно переименоватьdest= новое имя файла
Пример
>>> import os
>>> # переименование xyz.txt в abc.txt
>>> os.rename("xyz.txt","abc.txt")
Текущая позиция в файлах Python
В Python возможно узнать текущую позицию в файле с помощью функции tell(). Таким же образом можно изменить текущую позицию командой seek().
Пример
>>> f = open('example.txt')  # example.txt, который мы создали ранее
>>> f.read(4)  # давайте сначала перейдем к 4-й позиции
This
>>> f.tell()  # возвращает текущую позицию
4
>>> f.seek(0,0)  # вернем положение на 0 снова
Методы файла в Python
file.close() |
закрывает открытый файл |
file.fileno() |
возвращает целочисленный дескриптор файла |
file.flush() |
очищает внутренний буфер |
file.isatty() |
возвращает True, если файл привязан к терминалу |
file.next() |
возвращает следующую строку файла |
file.read(n) |
чтение первых n символов файла |
file.readline() |
читает одну строчку строки или файла |
file.readlines() |
читает и возвращает список всех строк в файле |
| file.seek(offset[,whene]) | устанавливает текущую позицию в файле |
file.seekable() |
проверяет, поддерживает ли файл случайный доступ. Возвращает True, если да |
file.tell() |
возвращает текущую позицию в файле |
file.truncate(n) |
уменьшает размер файл. Если n указала, то файл обрезается до n байт, если нет — до текущей позиции |
file.write(str) |
добавляет строку str в файл |
file.writelines(sequence) |
добавляет последовательность строк в файл |
Watch Now This tutorial has a related video course created by the Real Python team. Watch it together with the written tutorial to deepen your understanding: Reading and Writing Files in Python
One of the most common tasks that you can do with Python is reading and writing files. Whether it’s writing to a simple text file, reading a complicated server log, or even analyzing raw byte data, all of these situations require reading or writing a file.
In this tutorial, you’ll learn:
- What makes up a file and why that’s important in Python
- The basics of reading and writing files in Python
- Some basic scenarios of reading and writing files
This tutorial is mainly for beginner to intermediate Pythonistas, but there are some tips in here that more advanced programmers may appreciate as well.
What Is a File?
Before we can go into how to work with files in Python, it’s important to understand what exactly a file is and how modern operating systems handle some of their aspects.
At its core, a file is a contiguous set of bytes used to store data. This data is organized in a specific format and can be anything as simple as a text file or as complicated as a program executable. In the end, these byte files are then translated into binary 1 and 0 for easier processing by the computer.
Files on most modern file systems are composed of three main parts:
- Header: metadata about the contents of the file (file name, size, type, and so on)
- Data: contents of the file as written by the creator or editor
- End of file (EOF): special character that indicates the end of the file

What this data represents depends on the format specification used, which is typically represented by an extension. For example, a file that has an extension of .gif most likely conforms to the Graphics Interchange Format specification. There are hundreds, if not thousands, of file extensions out there. For this tutorial, you’ll only deal with .txt or .csv file extensions.
File Paths
When you access a file on an operating system, a file path is required. The file path is a string that represents the location of a file. It’s broken up into three major parts:
- Folder Path: the file folder location on the file system where subsequent folders are separated by a forward slash
/(Unix) or backslash\(Windows) - File Name: the actual name of the file
- Extension: the end of the file path pre-pended with a period (
.) used to indicate the file type
Here’s a quick example. Let’s say you have a file located within a file structure like this:
/
│
├── path/
|   │
│   ├── to/
│   │   └── cats.gif
│   │
│   └── dog_breeds.txt
|
└── animals.csv
Let’s say you wanted to access the cats.gif file, and your current location was in the same folder as path. In order to access the file, you need to go through the path folder and then the to folder, finally arriving at the cats.gif file. The Folder Path is path/to/. The File Name is cats. The File Extension is .gif. So the full path is path/to/cats.gif.
Now let’s say that your current location or current working directory (cwd) is in the to folder of our example folder structure. Instead of referring to the cats.gif by the full path of path/to/cats.gif, the file can be simply referenced by the file name and extension cats.gif.
/
│
├── path/
|   │
|   ├── to/  ← Your current working directory (cwd) is here
|   │   └── cats.gif  ← Accessing this file
|   │
|   └── dog_breeds.txt
|
└── animals.csv
But what about dog_breeds.txt? How would you access that without using the full path? You can use the special characters double-dot (..) to move one directory up. This means that ../dog_breeds.txt will reference the dog_breeds.txt file from the directory of to:
/
│
├── path/  ← Referencing this parent folder
|   │
|   ├── to/  ← Current working directory (cwd)
|   │   └── cats.gif
|   │
|   └── dog_breeds.txt  ← Accessing this file
|
└── animals.csv
The double-dot (..) can be chained together to traverse multiple directories above the current directory. For example, to access animals.csv from the to folder, you would use ../../animals.csv.
Line Endings
One problem often encountered when working with file data is the representation of a new line or line ending. The line ending has its roots from back in the Morse Code era, when a specific pro-sign was used to communicate the end of a transmission or the end of a line.
Later, this was standardized for teleprinters by both the International Organization for Standardization (ISO) and the American Standards Association (ASA). ASA standard states that line endings should use the sequence of the Carriage Return (CR or \r) and the Line Feed (LF or \n) characters (CR+LF or \r\n). The ISO standard however allowed for either the CR+LF characters or just the LF character.
Windows uses the CR+LF characters to indicate a new line, while Unix and the newer Mac versions use just the LF character. This can cause some complications when you’re processing files on an operating system that is different than the file’s source. Here’s a quick example. Let’s say that we examine the file dog_breeds.txt that was created on a Windows system:
Pug\r\n
Jack Russell Terrier\r\n
English Springer Spaniel\r\n
German Shepherd\r\n
Staffordshire Bull Terrier\r\n
Cavalier King Charles Spaniel\r\n
Golden Retriever\r\n
West Highland White Terrier\r\n
Boxer\r\n
Border Terrier\r\n
This same output will be interpreted on a Unix device differently:
Pug\r
\n
Jack Russell Terrier\r
\n
English Springer Spaniel\r
\n
German Shepherd\r
\n
Staffordshire Bull Terrier\r
\n
Cavalier King Charles Spaniel\r
\n
Golden Retriever\r
\n
West Highland White Terrier\r
\n
Boxer\r
\n
Border Terrier\r
\n
This can make iterating over each line problematic, and you may need to account for situations like this.
Character Encodings
Another common problem that you may face is the encoding of the byte data. An encoding is a translation from byte data to human readable characters. This is typically done by assigning a numerical value to represent a character. The two most common encodings are the ASCII and UNICODE Formats. ASCII can only store 128 characters, while Unicode can contain up to 1,114,112 characters.
ASCII is actually a subset of Unicode (UTF-8), meaning that ASCII and Unicode share the same numerical to character values. It’s important to note that parsing a file with the incorrect character encoding can lead to failures or misrepresentation of the character. For example, if a file was created using the UTF-8 encoding, and you try to parse it using the ASCII encoding, if there is a character that is outside of those 128 values, then an error will be thrown.
Opening and Closing a File in Python
When you want to work with a file, the first thing to do is to open it. This is done by invoking the open() built-in function. open() has a single required argument that is the path to the file. open() has a single return, the file object:
file = open('dog_breeds.txt')
After you open a file, the next thing to learn is how to close it.
It’s important to remember that it’s your responsibility to close the file. In most cases, upon termination of an application or script, a file will be closed eventually. However, there is no guarantee when exactly that will happen. This can lead to unwanted behavior including resource leaks. It’s also a best practice within Python (Pythonic) to make sure that your code behaves in a way that is well defined and reduces any unwanted behavior.
When you’re manipulating a file, there are two ways that you can use to ensure that a file is closed properly, even when encountering an error. The first way to close a file is to use the try-finally block:
reader = open('dog_breeds.txt')
try:
    # Further file processing goes here
finally:
    reader.close()
If you’re unfamiliar with what the try-finally block is, check out Python Exceptions: An Introduction.
The second way to close a file is to use the with statement:
with open('dog_breeds.txt') as reader:
    # Further file processing goes here
The with statement automatically takes care of closing the file once it leaves the with block, even in cases of error. I highly recommend that you use the with statement as much as possible, as it allows for cleaner code and makes handling any unexpected errors easier for you.
Most likely, you’ll also want to use the second positional argument, mode. This argument is a string that contains multiple characters to represent how you want to open the file. The default and most common is 'r', which represents opening the file in read-only mode as a text file:
with open('dog_breeds.txt', 'r') as reader:
    # Further file processing goes here
Other options for modes are fully documented online, but the most commonly used ones are the following:
| Character | Meaning |
|---|---|
'r' |
Open for reading (default) |
'w' |
Open for writing, truncating (overwriting) the file first |
'rb' or 'wb' |
Open in binary mode (read/write using byte data) |
Let’s go back and talk a little about file objects. A file object is:
“an object exposing a file-oriented API (with methods such as
read()orwrite()) to an underlying resource.” (Source)
There are three different categories of file objects:
- Text files
- Buffered binary files
- Raw binary files
Each of these file types are defined in the io module. Here’s a quick rundown of how everything lines up.
Text File Types
A text file is the most common file that you’ll encounter. Here are some examples of how these files are opened:
open('abc.txt')

open('abc.txt', 'r')

open('abc.txt', 'w')
With these types of files, open() will return a TextIOWrapper file object:
>>>
>>> file = open('dog_breeds.txt')
>>> type(file)
<class '_io.TextIOWrapper'>
This is the default file object returned by open().
Buffered Binary File Types
A buffered binary file type is used for reading and writing binary files. Here are some examples of how these files are opened:
open('abc.txt', 'rb')

open('abc.txt', 'wb')
With these types of files, open() will return either a BufferedReader or BufferedWriter file object:
>>>
>>> file = open('dog_breeds.txt', 'rb')
>>> type(file)
<class '_io.BufferedReader'>
>>> file = open('dog_breeds.txt', 'wb')
>>> type(file)
<class '_io.BufferedWriter'>
Raw File Types
A raw file type is:
“generally used as a low-level building-block for binary and text streams.” (Source)
It is therefore not typically used.
Here’s an example of how these files are opened:
open('abc.txt', 'rb', buffering=0)
With these types of files, open() will return a FileIO file object:
>>>
>>> file = open('dog_breeds.txt', 'rb', buffering=0)
>>> type(file)
<class '_io.FileIO'>
Reading and Writing Opened Files
Once you’ve opened up a file, you’ll want to read or write to the file. First off, let’s cover reading a file. There are multiple methods that can be called on a file object to help you out:
| Method | What It Does |
|---|---|
.read(size=-1) |
This reads from the file based on the number of size bytes. If no argument is passed or None or -1 is passed, then the entire file is read. |
.readline(size=-1) |
This reads at most size number of characters from the line. This continues to the end of the line and then wraps back around. If no argument is passed or None or -1 is passed, then the entire line (or rest of the line) is read. |
.readlines() |
This reads the remaining lines from the file object and returns them as a list. |
Using the same dog_breeds.txt file you used above, let’s go through some examples of how to use these methods. Here’s an example of how to open and read the entire file using .read():
>>>
>>> with open('dog_breeds.txt', 'r') as reader:
>>>     # Read & print the entire file
>>>     print(reader.read())
Pug
Jack Russell Terrier
English Springer Spaniel
German Shepherd
Staffordshire Bull Terrier
Cavalier King Charles Spaniel
Golden Retriever
West Highland White Terrier
Boxer
Border Terrier
Here’s an example of how to read 5 bytes of a line each time using the Python .readline() method:
>>>
>>> with open('dog_breeds.txt', 'r') as reader:
>>>     # Read & print the first 5 characters of the line 5 times
>>>     print(reader.readline(5))
>>>     # Notice that line is greater than the 5 chars and continues
>>>     # down the line, reading 5 chars each time until the end of the
>>>     # line and then "wraps" around
>>>     print(reader.readline(5))
>>>     print(reader.readline(5))
>>>     print(reader.readline(5))
>>>     print(reader.readline(5))
Pug

Jack
Russe
ll Te
rrier
Here’s an example of how to read the entire file as a list using the Python .readlines() method:
>>>
>>> f = open('dog_breeds.txt')
>>> f.readlines()  # Returns a list object
['Pug\n', 'Jack Russell Terrier\n', 'English Springer Spaniel\n', 'German Shepherd\n', 'Staffordshire Bull Terrier\n', 'Cavalier King Charles Spaniel\n', 'Golden Retriever\n', 'West Highland White Terrier\n', 'Boxer\n', 'Border Terrier\n']
The above example can also be done by using list() to create a list out of the file object:
>>>
>>> f = open('dog_breeds.txt')
>>> list(f)
['Pug\n', 'Jack Russell Terrier\n', 'English Springer Spaniel\n', 'German Shepherd\n', 'Staffordshire Bull Terrier\n', 'Cavalier King Charles Spaniel\n', 'Golden Retriever\n', 'West Highland White Terrier\n', 'Boxer\n', 'Border Terrier\n']
Iterating Over Each Line in the File
A common thing to do while reading a file is to iterate over each line. Here’s an example of how to use the Python .readline() method to perform that iteration:
>>>
>>> with open('dog_breeds.txt', 'r') as reader:
>>>     # Read and print the entire file line by line
>>>     line = reader.readline()
>>>     while line != '':  # The EOF char is an empty string
>>>         print(line, end='')
>>>         line = reader.readline()
Pug
Jack Russell Terrier
English Springer Spaniel
German Shepherd
Staffordshire Bull Terrier
Cavalier King Charles Spaniel
Golden Retriever
West Highland White Terrier
Boxer
Border Terrier
Another way you could iterate over each line in the file is to use the Python .readlines() method of the file object. Remember, .readlines() returns a list where each element in the list represents a line in the file:
>>>
>>> with open('dog_breeds.txt', 'r') as reader:
>>>     for line in reader.readlines():
>>>         print(line, end='')
Pug
Jack Russell Terrier
English Springer Spaniel
German Shepherd
Staffordshire Bull Terrier
Cavalier King Charles Spaniel
Golden Retriever
West Highland White Terrier
Boxer
Border Terrier
However, the above examples can be further simplified by iterating over the file object itself:
>>>
>>> with open('dog_breeds.txt', 'r') as reader:
>>>     # Read and print the entire file line by line
>>>     for line in reader:
>>>         print(line, end='')
Pug
Jack Russell Terrier
English Springer Spaniel
German Shepherd
Staffordshire Bull Terrier
Cavalier King Charles Spaniel
Golden Retriever
West Highland White Terrier
Boxer
Border Terrier
This final approach is more Pythonic and can be quicker and more memory efficient. Therefore, it is suggested you use this instead.
Now let’s dive into writing files. As with reading files, file objects have multiple methods that are useful for writing to a file:
| Method | What It Does |
|---|---|
.write(string) |
This writes the string to the file. |
.writelines(seq) |
This writes the sequence to the file. No line endings are appended to each sequence item. It’s up to you to add the appropriate line ending(s). |
Here’s a quick example of using .write() and .writelines():
with open('dog_breeds.txt', 'r') as reader:
    # Note: readlines doesn't trim the line endings
    dog_breeds = reader.readlines()

with open('dog_breeds_reversed.txt', 'w') as writer:
    # Alternatively you could use
    # writer.writelines(reversed(dog_breeds))

    # Write the dog breeds to the file in reversed order
    for breed in reversed(dog_breeds):
        writer.write(breed)
Working With Bytes
Sometimes, you may need to work with files using byte strings. This is done by adding the 'b' character to the mode argument. All of the same methods for the file object apply. However, each of the methods expect and return a bytes object instead:
>>>
>>> with open('dog_breeds.txt', 'rb') as reader:
>>>     print(reader.readline())
b'Pug\n'
Opening a text file using the b flag isn’t that interesting. Let’s say we have this cute picture of a Jack Russell Terrier (jack_russell.png):

You can actually open that file in Python and examine the contents! Since the .png file format is well defined, the header of the file is 8 bytes broken up like this:
| Value | Interpretation |
|---|---|
0x89 |
A “magic” number to indicate that this is the start of a PNG |
0x50 0x4E 0x47 |
PNG in ASCII |
0x0D 0x0A |
A DOS style line ending \r\n |
0x1A |
A DOS style EOF character |
0x0A |
A Unix style line ending \n |
Sure enough, when you open the file and read these bytes individually, you can see that this is indeed a .png header file:
>>>
>>> with open('jack_russell.png', 'rb') as byte_reader:
>>>     print(byte_reader.read(1))
>>>     print(byte_reader.read(3))
>>>     print(byte_reader.read(2))
>>>     print(byte_reader.read(1))
>>>     print(byte_reader.read(1))
b'\x89'
b'PNG'
b'\r\n'
b'\x1a'
b'\n'
A Full Example: dos2unix.py
Let’s bring this whole thing home and look at a full example of how to read and write to a file. The following is a dos2unix like tool that will convert a file that contains line endings of \r\n to \n.
This tool is broken up into three major sections. The first is str2unix(), which converts a string from \r\n line endings to \n. The second is dos2unix(), which converts a string that contains \r\n characters into \n. dos2unix() calls str2unix() internally. Finally, there’s the __main__ block, which is called only when the file is executed as a script. Think of it as the main function found in other programming languages.
"""
A simple script and library to convert files or strings from dos like
line endings with Unix like line endings.
"""

import argparse
import os


def str2unix(input_str: str) -> str:
    r"""
    Converts the string from \r\n line endings to \n

    Parameters
    ----------
    input_str
        The string whose line endings will be converted

    Returns
    -------
        The converted string
    """
    r_str = input_str.replace('\r\n', '\n')
    return r_str


def dos2unix(source_file: str, dest_file: str):
    """
    Converts a file that contains Dos like line endings into Unix like

    Parameters
    ----------
    source_file
        The path to the source file to be converted
    dest_file
        The path to the converted file for output
    """
    # NOTE: Could add file existence checking and file overwriting
    # protection
    with open(source_file, 'r') as reader:
        dos_content = reader.read()

    unix_content = str2unix(dos_content)

    with open(dest_file, 'w') as writer:
        writer.write(unix_content)


if __name__ == "__main__":
    # Create our Argument parser and set its description
    parser = argparse.ArgumentParser(
        description="Script that converts a DOS like file to an Unix like file",
    )

    # Add the arguments:
    #   - source_file: the source file we want to convert
    #   - dest_file: the destination where the output should go

    # Note: the use of the argument type of argparse.FileType could
    # streamline some things
    parser.add_argument(
        'source_file',
        help='The location of the source '
    )

    parser.add_argument(
        '--dest_file',
        help='Location of dest file (default: source_file appended with `_unix`',
        default=None
    )

    # Parse the args (argparse automatically grabs the values from
    # sys.argv)
    args = parser.parse_args()

    s_file = args.source_file
    d_file = args.dest_file

    # If the destination file wasn't passed, then assume we want to
    # create a new file based on the old one
    if d_file is None:
        file_path, file_extension = os.path.splitext(s_file)
        d_file = f'{file_path}_unix{file_extension}'

    dos2unix(s_file, d_file)
Tips and Tricks
Now that you’ve mastered the basics of reading and writing files, here are some tips and tricks to help you grow your skills.
__file__
The __file__ attribute is a special attribute of modules, similar to __name__. It is:
“the pathname of the file from which the module was loaded, if it was loaded from a file.” (Source
Here’s a real world example. In one of my past jobs, I did multiple tests for a hardware device. Each test was written using a Python script with the test script file name used as a title. These scripts would then be executed and could print their status using the __file__ special attribute. Here’s an example folder structure:
project/
|
├── tests/
|   ├── test_commanding.py
|   ├── test_power.py
|   ├── test_wireHousing.py
|   └── test_leds.py
|
└── main.py
Running main.py produces the following:
>>> python main.py
tests/test_commanding.py Started:
tests/test_commanding.py Passed!
tests/test_power.py Started:
tests/test_power.py Passed!
tests/test_wireHousing.py Started:
tests/test_wireHousing.py Failed!
tests/test_leds.py Started:
tests/test_leds.py Passed!
I was able to run and get the status of all my tests dynamically through use of the __file__ special attribute.
Appending to a File
Sometimes, you may want to append to a file or start writing at the end of an already populated file. This is easily done by using the 'a' character for the mode argument:
with open('dog_breeds.txt', 'a') as a_writer:
    a_writer.write('\nBeagle')
When you examine dog_breeds.txt again, you’ll see that the beginning of the file is unchanged and Beagle is now added to the end of the file:
>>>
>>> with open('dog_breeds.txt', 'r') as reader:
>>>     print(reader.read())
Pug
Jack Russell Terrier
English Springer Spaniel
German Shepherd
Staffordshire Bull Terrier
Cavalier King Charles Spaniel
Golden Retriever
West Highland White Terrier
Boxer
Border Terrier
Beagle
Working With Two Files at the Same Time
There are times when you may want to read a file and write to another file at the same time. If you use the example that was shown when you were learning how to write to a file, it can actually be combined into the following:
d_path = 'dog_breeds.txt'
d_r_path = 'dog_breeds_reversed.txt'
with open(d_path, 'r') as reader, open(d_r_path, 'w') as writer:
    dog_breeds = reader.readlines()
    writer.writelines(reversed(dog_breeds))
Creating Your Own Context Manager
There may come a time when you’ll need finer control of the file object by placing it inside a custom class. When you do this, using the with statement can no longer be used unless you add a few magic methods: __enter__ and __exit__. By adding these, you’ll have created what’s called a context manager.
__enter__() is invoked when calling the with statement. __exit__() is called upon exiting from the with statement block.
Here’s a template that you can use to make your custom class:
class my_file_reader():
    def __init__(self, file_path):
        self.__path = file_path
        self.__file_object = None

    def __enter__(self):
        self.__file_object = open(self.__path)
        return self

    def __exit__(self, type, val, tb):
        self.__file_object.close()

    # Additional methods implemented below
Now that you’ve got your custom class that is now a context manager, you can use it similarly to the open() built-in:
with my_file_reader('dog_breeds.txt') as reader:
    # Perform custom class operations
    pass
Here’s a good example. Remember the cute Jack Russell image we had? Perhaps you want to open other .png files but don’t want to parse the header file each time. Here’s an example of how to do this. This example also uses custom iterators. If you’re not familiar with them, check out Python Iterators:
class PngReader():
    # Every .png file contains this in the header.  Use it to verify
    # the file is indeed a .png.
    _expected_magic = b'\x89PNG\r\n\x1a\n'

    def __init__(self, file_path):
        # Ensure the file has the right extension
        if not file_path.endswith('.png'):
            raise NameError("File must be a '.png' extension")
        self.__path = file_path
        self.__file_object = None

    def __enter__(self):
        self.__file_object = open(self.__path, 'rb')

        magic = self.__file_object.read(8)
        if magic != self._expected_magic:
            raise TypeError("The File is not a properly formatted .png file!")

        return self

    def __exit__(self, type, val, tb):
        self.__file_object.close()

    def __iter__(self):
        # This and __next__() are used to create a custom iterator
        # See https://dbader.org/blog/python-iterators
        return self

    def __next__(self):
        # Read the file in "Chunks"
        # See https://en.wikipedia.org/wiki/Portable_Network_Graphics#%22Chunks%22_within_the_file

        initial_data = self.__file_object.read(4)

        # The file hasn't been opened or reached EOF.  This means we
        # can't go any further so stop the iteration by raising the
        # StopIteration.
        if self.__file_object is None or initial_data == b'':
            raise StopIteration
        else:
            # Each chunk has a len, type, data (based on len) and crc
            # Grab these values and return them as a tuple
            chunk_len = int.from_bytes(initial_data, byteorder='big')
            chunk_type = self.__file_object.read(4)
            chunk_data = self.__file_object.read(chunk_len)
            chunk_crc = self.__file_object.read(4)
            return chunk_len, chunk_type, chunk_data, chunk_crc
You can now open .png files and properly parse them using your custom context manager:
>>>
>>> with PngReader('jack_russell.png') as reader:
>>>     for l, t, d, c in reader:
>>>         print(f"{l:05}, {t}, {c}")
00013, b'IHDR', b'v\x121k'
00001, b'sRGB', b'\xae\xce\x1c\xe9'
00009, b'pHYs', b'(<]\x19'
00345, b'iTXt', b"L\xc2'Y"
16384, b'IDAT', b'i\x99\x0c('
16384, b'IDAT', b'\xb3\xfa\x9a$'
16384, b'IDAT', b'\xff\xbf\xd1\n'
16384, b'IDAT', b'\xc3\x9c\xb1}'
16384, b'IDAT', b'\xe3\x02\xba\x91'
16384, b'IDAT', b'\xa0\xa99='
16384, b'IDAT', b'\xf4\x8b.\x92'
16384, b'IDAT', b'\x17i\xfc\xde'
16384, b'IDAT', b'\x8fb\x0e\xe4'
16384, b'IDAT', b')3={'
01040, b'IDAT', b'\xd6\xb8\xc1\x9f'
00000, b'IEND', b'\xaeB`\x82'
Don’t Re-Invent the Snake
There are common situations that you may encounter while working with files. Most of these cases can be handled using other modules. Two common file types you may need to work with are .csv and .json. Real Python has already put together some great articles on how to handle these:
- Reading and Writing CSV Files in Python
- Working With JSON Data in Python
Additionally, there are built-in libraries out there that you can use to help you:
wave: read and write WAV files (audio)aifc: read and write AIFF and AIFC files (audio)sunau: read and write Sun AU filestarfile: read and write tar archive fileszipfile: work with ZIP archivesconfigparser: easily create and parse configuration filesxml.etree.ElementTree: create or read XML based filesmsilib: read and write Microsoft Installer filesplistlib: generate and parse Mac OS X.plistfiles
There are plenty more out there. Additionally there are even more third party tools available on PyPI. Some popular ones are the following:
PyPDF2: PDF toolkitxlwings: read and write Excel filesPillow: image reading and manipulation
You’re a File Wizard Harry!
You did it! You now know how to work with files with Python, including some advanced techniques. Working with files in Python should now be easier than ever and is a rewarding feeling when you start doing it.
In this tutorial you’ve learned:
- What a file is
- How to open and close files properly
- How to read and write files
- Some advanced techniques when working with files
- Some libraries to work with common file types
If you have any questions, hit us up in the comments.
Watch Now This tutorial has a related video course created by the Real Python team. Watch it together with the written tutorial to deepen your understanding: Reading and Writing Files in Python
Для работы с файловой системой в Python используют модули
os, os.path и shututil, а для операций с файлами – встроенные функции open(), close(), read(), readline(), write() и т. д. Прежде, чем мы перейдем
к примерам использования конкретных методов, отметим один важный момент – корректный формат пути к файлам и каталогам.
Дело в том, что Python считает некорректным стандартный
для Windows формат: если указать путь к файлу в привычном виде 'C:\Users\User\Python\letters.py', интерпретатор вернет ошибку. Лучше
всего указывать путь с помощью r-строк
или с экранированием слэшей:
        r'C:\Users\User\Python\letters.py'
'C:\\Users\\User\\Python\\letters.py'
Иногда также путь указывают с обратными слэшами:
'C:/Users/User/Python/letters.py'
Получение информации о файлах и директориях
Метод getcwd() возвращает
путь к текущей рабочей директории в виде строки:
        >>> import os
>>> os.getcwd()
'C:\\Users\\User\\Python'
С помощью метода os.listdir() можно получить список всех поддиректорий и файлов текущего рабочего каталога, при этом содержимое вложенных папок не отображается:
        >>> os.listdir()
['Data', 'lambda_functions.py', 'letters.py', 'os_methods.py', 'passw_generator.py', 'points.py', 'population.py']
Метод os.walk() возвращает генератор, в котором содержится
вся информация о рабочем каталоге, включая содержимое всех поддиректорий:
        >>> import os
>>> my_cwd = os.getcwd()
>>> result = os.walk(my_cwd)
>>> for i, j, k in result:
    for file in k:
        print(file)

lambda_functions.py
letters.py
os_methods.py
passw_generator.py
points.py
population.py
books_to_process.txt
challenge_data.txt
ledger.txt
Много полезных методов содержится в модуле os.path. Так можно извлечь имя файла из полного пути:
        >>> os.path.basename(r'C:\Users\User\Python\letters.py')
'letters.py'
А так можно получить путь к директории / файлу, в который не
включается собственно поддиректория или имя файла:
        >>> os.path.dirname(r'C:\Users\User\Python\Data')
'C:\\Users\\User\\Python'
Метод path.isabs() покажет, является ли
путь абсолютным или относительным:
        >>> os.path.isabs(r'C:\Users\User\Python\Data')
True
>>> os.path.isabs(r'.\Python\Data')
False
>>>
Метод path.isdir() возвращает True, если переданная в метод директория существует, и False – в противном случае:
        >>> os.path.isdir(r'C:\Users\User\Python\Data\Samples')
False
Для установления факта существования файла служит path.isfile():
        >>> os.path.isfile(r'C:\Users\User\Python\matrix_challenge.py')
False
Для преобразования пути в нижний регистр и нормализации слэшей используют path.normcase():
        >>> os.path.normcase('C:/Users/User/Python')
'c:\\users\\user\\python'
Хотя путь к файлу (директории) представляет собой строку,
создавать полный путь с помощью конкатенации считается моветоном – нужно
использовать метод os.path.join():
        # Неправильно:
my_cwd = os.getcwd()
file_name = 'my_solution.py'
path = my_cwd + '\\' + file_name

# Правильно:
path = os.path.join(my_cwd, file_name)
Результат:
C:\Users\User\Python\my_solution.py
Операции с каталогами и файлами в Python
Для создания новых директорий служит os.mkdir(); в метод нужно передать полный путь, включающий название
нового каталога:
        import os
my_cwd = os.getcwd()
new_dir = 'Solutions'
path = os.path.join(my_cwd, new_dir)
os.mkdir(path)
print(os.listdir())
Результат:
['Data', 'lambda_functions.py', 'letters.py', 'os_methods.py', 'passw_generator.py', 'points.py', 'population.py', 'Solutions']
Изменить рабочую директорию можно с помощью метода os.chdir(), это аналог CLI команды cd:
        >>> import os
>>> os.getcwd()
'C:\\Users\\User\\Python'
>>> os.chdir(r'C:\Users\User\Python\Data')
>>> os.getcwd()
'C:\\Users\\User\\Python\\Data'
Использование os.chdir()
может привести к ошибке, если путь к переданной в метод директории указан
неправильно или не существует. Поэтому этот метод стоит использовать только с
обработкой ошибок:
        import sys, os

my_cwd = os.getcwd()
new_cwd = r'C:\Users\User\Python\MyData'

try:
    os.chdir(new_cwd)
    print(f'Изменяем рабочую директорию на {os.getcwd()}')
except:
    print(f'Произошла ошибка {sys.exc_info()}')
finally:
    print('Восстанавливаем рабочую директорию на прежнюю')
    os.chdir(my_cwd)
    print(f'Текущая рабочая директория - {os.getcwd()}')
Вывод:
        Произошла ошибка (<class 'FileNotFoundError'>, FileNotFoundError(2, 'Не удается найти указанный файл'), <traceback object at 0x024E9828>)
Восстанавливаем рабочую директорию на прежнюю
Текущая рабочая директория - C:\Users\User\Python
Создание директорий в Python
Для создания новых каталогов используют два метода:
- os.mkdir() – аналог CLI команды
mkdir; создает новую папку по указанному пути, при условии, что все указанные промежуточные (вложенные) директории уже существуют. - os.makedirs() – аналог CLI команды
mkdir -p dir1\dir2; помимо создания целевой папки, создает все промежуточные директории, если они не существуют.
Пример использования os.mkdir():
        import os
new_dir = 'NewProjects'
parent_dir = r 'C:\Users\User\Python'
path = os.path.join(parent_dir, new_dir)
os.mkdir(path)
print(f'Директория {new_dir} создана: {os.listdir()}')
Результат:
Директория NewProjects создана: ['Data', 'lambda_functions.py', 'letters.py', 'NewProjects', 'os_methods.py', 'Other', 'passw_generator.py', 'points.py', 'population.py', 'Solutions']
Пример использования makedirs():
        import os
new_dir = 'Django'
parent_dir = r'C:\Users\User\Python\Other\Projects\Modules'
path = os.path.join(parent_dir, new_dir)
os.makedirs(path)
print(f'Директория {new_dir} создана по адресу {os.path.dirname(path)}')
Результат:
Директория Django создана по адресу C:\Users\User\Python\Other\Projects\Modules
Копирование файлов и директорий в Python
Для копирования файлов используют метод shutil.copy2(), который принимает два аргумента
– источник файла и директорию, в которую нужно скопировать файл:
        import os
import shutil
dest_path = r'C:\Users\User\Python\Data'
source_path = r'C:\Users\User\lambda_exp.txt'
print(f'Файлы в директории {os.path.basename(dest_path)} до копирования файла \
{os.path.basename(source_path)}: {os.listdir(dest_path)}\n')
copy_file = shutil.copy2(source_path, dest_path)
print(f'Файлы в директории {os.path.basename(dest_path)} после копирования файла \
{os.path.basename(source_path)}: {os.listdir(dest_path)}')
Вывод:
        Файлы в директории Data до копирования файла lambda_exp.txt: ['books_to_process.txt', 'challenge_data.txt', 'ledger.txt']
Файлы в директории Data после копирования файла lambda_exp.txt: ['books_to_process.txt', 'challenge_data.txt', 'lambda_exp.txt', 'ledger.txt']
Помимо метода shutil.copy2(),
для копирования файлов можно пользоваться методом shutil.copy(). Разница между
этими двумя методами в том, что в отличие от shutil.copy2(),
метод shutil.copy() копирует только
содержимое файла, но не метаданные:
        import os
import shutil
dest_path = r'C:\Users\User\Python\Data'
source_path = r'C:\Users\User\logfile.txt'
print(f'Файлы в директории {os.path.basename(dest_path)} до копирования файла \
{os.path.basename(source_path)}: {os.listdir(dest_path)}\n')
print(f'Метаданные: {os.stat(source_path)}\n')
copy_file = shutil.copy(source_path, dest_path)
print(f'Файлы в директории {os.path.basename(dest_path)} после копирования файла \
{os.path.basename(source_path)}: {os.listdir(dest_path)}\n')
print(f'Метаданные: {os.stat(dest_path)}\n')
Вывод:
        Файлы в директории Data до копирования файла logfile.txt: ['books_to_process.txt', 'challenge_data.txt', 'lambda_exp.txt']
Метаданные: os.stat_result(st_mode=33206, st_ino=18014398509552989, st_dev=4236505663, st_nlink=1, st_uid=0, st_gid=0, st_size=455, st_atime=1629682315, st_mtime=1629681887, st_ctime=1629682315)
Файлы в директории Data после копирования файла logfile.txt: ['books_to_process.txt', 'challenge_data.txt', 'lambda_exp.txt', 'logfile.txt']
Метаданные: os.stat_result(st_mode=16895, st_ino=11821949021901021, st_dev=4236505663, st_nlink=1, st_uid=0, st_gid=0, st_size=0, st_atime=1675257729, st_mtime=1675257729, st_ctime=1675084801)
Все содержимое каталога сразу можно скопировать с помощью shutil.copytree():
        import os
import shutil
dest_path = r'C:\Users\User\Python\Other\Files'
source_path = r'C:\Users\User\Python\Other\Scripts'
print(f'Содержимое директории {os.path.basename(dest_path)} до копирования каталога \
{os.path.basename(source_path)}: {os.listdir(dest_path)}\n')
copy_dir = shutil.copytree(source_path, dest_path, dirs_exist_ok=True)
print(f'Содержимое директории {os.path.basename(dest_path)} после копирования \
{os.path.basename(source_path)}: {os.listdir(dest_path)}\n')
Вывод:
        Содержимое директории Files до копирования каталога Scripts: []
Содержимое директории Files после копирования Scripts: ['progression.py', 'sitemap_generator.py']
Перемещение файлов и директорий
Для перемещения файлов используют метод shutil.move():
        import os
import shutil
dest_path = r'C:\Users\User\Python\Other\Scripts'
source_path = r'C:\Users\User\Desktop\sitemap_generator.py'
print(f'Содержимое директории {os.path.basename(dest_path)} до копирования каталога \
{os.path.basename(source_path)}: {os.listdir(dest_path)}\n')
copy_dir = shutil.move(source_path, dest_path)
print(f'Содержимое директории {os.path.basename(dest_path)} после копирования \
{os.path.basename(source_path)}: {os.listdir(dest_path)}\n')
Вывод:
        Содержимое директории Scripts до копирования каталога sitemap_generator.py: ['progression.py', 'wiki_scraping.py']
Содержимое директории Scripts после копирования sitemap_generator.py: ['progression.py', 'sitemap_generator.py', 'wiki_scraping.py']
Для перемещения содержимого всей директории в качестве
функции указывают shutil.copytree():
copy_dir = shutil.move(source_path, dest_path, copy_function = shutil.copytree)
Удаление файлов и директорий
Для удаления директории вместе со всеми файлами используют shutil.rmtree():
        import os
import shutil
dir_path = r'C:\Users\User\Python\Other'
remove_dir = 'Files'
path = os.path.join(dir_path, remove_dir)
print(f'Содержимое директории {os.path.basename(dir_path)} до удаления каталога \
{remove_dir}: {os.listdir(dir_path)}\n')
shutil.rmtree(path)
print(f'Содержимое директории {os.path.basename(dir_path)} после удаления \
{remove_dir}: {os.listdir(dir_path)}\n')
Вывод:
        Содержимое директории Other до удаления каталога Files: ['Files', 'Projects']
Содержимое директории Other после удаления Files: ['Projects']
Другой метод для удаления пустых директорий – os.rmdir():
        import os
import shutil
dir_path = r'C:\Users\User\Python\Other'
remove_dir = 'Scripts'
path = os.path.join(dir_path, remove_dir)
print(f'Содержимое директории {os.path.basename(dir_path)} до удаления каталога \
{remove_dir}: {os.listdir(dir_path)}\n')
os.rmdir(path)
print(f'Содержимое директории {os.path.basename(dir_path)} после удаления \
{remove_dir}: {os.listdir(dir_path)}\n')
Вывод:
        Содержимое директории Other до удаления каталога Scripts: ['Projects', 'Scripts']
Содержимое директории Other после удаления Scripts: ['Projects']
Очевидный минус метода os.rmdir()
в том, что он работает только на пустых директориях – если поместить в каталог Scripts хотя бы один файл,
удалить его с os.rmdir() уже не получится:
        Traceback (most recent call last):
  File "C:\Users\User\Python\os_methods.py", line 8, in <module>
    os.rmdir(path)
OSError: [WinError 145] Папка не пуста: 'C:\\Users\\User\\Python\\Other\\Scripts'
Для удаления файлов используют метод os.remove():
        import os
import shutil
dir_path = r'C:\Users\User\Python\Other\Scripts'
remove_file = 'tetris_game.py'
path = os.path.join(dir_path, remove_file)
print(f'Содержимое директории {os.path.basename(dir_path)} до удаления файла \
{remove_file}: {os.listdir(dir_path)}\n')
os.remove(path)
print(f'Содержимое директории {os.path.basename(dir_path)} после удаления \
{remove_file}: {os.listdir(dir_path)}\n')
Вывод:
        Содержимое директории Scripts до удаления файла tetris_game.py: ['tetris_game.py']
Содержимое директории Scripts после удаления tetris_game.py: []
Работа с файлами в Python
Открыть файл для проведения каких-либо манипуляций можно
двумя способами:
- С помощью функции open() – в этом случае после завершения работы нужно будет закрыть файл с помощью close():
        f = open('task.txt', 'a', encoding='utf-8')
f.write('\n2) Написать модуль авторизации')
f.close()
- С использованием менеджера контекста with, который автоматически и самостоятельно закроет файл, когда надобность в нем отпадет:
        with open('task.txt', 'a', encoding='utf-8') as f:
    f.write('\n2) Написать модуль авторизации')
Типы файлов
В Python все файлы делятся на:
- Текстовые
't' - Бинарные (двоичные)
'b'
Если никакой определенный тип файла не указан, по умолчанию Python считает, что пользователь работает с текстовыми файлами. Поэтому для работы с изображениями, мультимедийными файлами и pdf, например, следует указывать, что тип файла относится к 'b'.
Режимы доступа и записи
| ‘r’ | Открывает файл для чтения. Возвращает ошибку, если указанный файл не существует. |
| ‘w’ | Открывает файл для записи, причем перезаписывает содержимое, если оно есть. Создает файл, если он не существует. |
| ‘a’ | Открывает файл для записи и добавляет новую информацию, не перезаписывая существующую. Создает файл, если он не существует. |
| ‘w+’ | Открывает файл для чтения и записи, перезаписывает содержимое. |
| ‘r+’ | Открывает файл для чтения и дополнения, не перезаписывает содержимое. |
| ‘x’ | Создает новый пустой файл. Возвращает ошибку, если файл с таким именем уже существует. |
Примечание: для операций с двоичными файлами к указанным
параметрам нужно добавлять b,
то есть вместо 'r'
должно быть 'rb', а
вместо 'w+' – 'wb+'.
Методы работы с файлами
Для чтения данных используют read(). Метод read() по умолчанию возвращает все содержимое файла:
        with open('books.txt', 'r', encoding='utf-8') as f:
    info = f.read()
print(info)
Вывод:
        1. "Террор", Дэн Симмонс
2. "Она же Грейс", Маргарет Этвуд
3. "Облачный атлас", Дэвид Митчелл
4. "Искупление", Иэн Макьюэн
5. "Госпожа Бовари", Гюстав Флобер
При необходимости объем выводимой информации можно ограничить
определенным количеством символов:
        with open('movies.txt', 'r', encoding='utf-8') as f:
    info = f.read(15)
print(info)
Вывод:
1. "Из машины"
Метод readline()
позволяет считывать информацию из текстовых файлов построчно:
        with open('books.txt', 'r', encoding='utf-8') as f:
    info = f.readline()
print(info)
Вывод:
1. "Террор", Дэн Симмонс
Для получения всех строк файла используют метод readlines(),
который возвращает содержимое в виде списка – вместе со всеми спецсимволами:
        with open('books.txt', 'r', encoding='utf-8') as f:
    info = f.readlines()
print(info)
Вывод:
['1. "Террор", Дэн Симмонс\n', '2. "Она же Грейс", Маргарет Этвуд\n', '3. "Облачный атлас", Дэвид Митчелл\n', '4. "Искупление", Иэн Макьюэн\n', '5. "Госпожа Бовари", Гюстав Флобер']
Чтобы избавиться от лишних пробелов, символа новой строки (и любых других
спецсимволов), используют методы rstrip(), lstrip()
или strip():
        with open('books.txt', 'r', encoding='utf-8-sig') as f:
    info = [line.strip() for line in f.readlines()]
print(info)
Вывод:
['1. "Террор", Дэн Симмонс', '2. "Она же Грейс", Маргарет Этвуд', '3. "Облачный атлас", Дэвид Митчелл', '4. "Искупление", Иэн Макьюэн', '5. "Госпожа Бовари", Гюстав Флобер']
Для записи информации в файл используют метод write():
        with open('books.txt', 'a', encoding='utf-8') as f:
    f.write('\n6. "Война и мир", Лев Толстой\n')
Или writelines():
        with open('books.txt', 'a', encoding='utf-8') as f:
    f.writelines(['7. "Преступление и наказание", Федор Достоевский\n',
                 '8. "Мизери", Стивен Кинг\n',
                  '9. "Джейн Эйр", Шарлотта Бронте\n'])
Кроме того, записывать данные в файл можно с помощью print():
        with open('crm_log.txt', 'a', encoding='utf-8') as file:
    print('\nСергей Леонов, 11:18, 12:23', file=file)
Чтобы узнать текущую позицию курсора в файле, используют метод tell():
        with open('books.txt', 'r', encoding='utf-8-sig') as f:
    f.readline()
    f.read(5)
    print(f.tell())
Вывод:
51
Для считывания данных из определенной позиции используют seek():
        with open('movies.txt', 'r', encoding='utf-8') as f:
    f.seek(53)
    print(f.read())
Вывод:
3. "Дракула Брэма Стокера"
Практика
Задание 1
Имеется файл books.txt, содержащий следующую
информацию:
        1. "Террор", Дэн Симмонс
2. "Она же Грейс", Маргарет Этвуд
3. "Облачный атлас", Дэвид Митчелл
4. "Искупление", Иэн Макьюэн
5. "Госпожа Бовари", Гюстав Флобер
6. "Война и мир", Лев Толстой
7. "Преступление и наказание", Федор Достоевский
8. "Мизери", Стивен Кинг
9. "Джейн Эйр", Шарлотта Бронте
Напишите программу, которая выводит первые 3 строки файла.
Решение:
        with open('books.txt', 'r', encoding='utf-8') as file:
    for i in range(3):
        line = file.readline().strip()
        print(line)
Задание 2
Напишите программу, которая получает от пользователя имя
файла и возвращает следующие данные о его содержимом:
- количество строк;
- количество слов;
- число символов без пробелов и точек.
Пример ввода:
series.txt
Содержимое файла:
        1. Последнее королевство 2015
2. Рим 2005
3. Версаль 2015
4. Тюдоры 2007
5. Террор 2018
6. Человек в высоком замке 2015
7. Белая королева 2013
8. Братья по оружию 2001
9. Медичи 2016
10. Спартак 2010
Вывод:
        Количество строк в файле series.txt: 10
Количество слов: 17
Число символов: 153
Решение:
        filename = input()
lines, words, symbols = 0, 0, 0
with open(filename, 'r', encoding='utf-8') as file:
    for i in file:
        lines += 1
        words += len([w for w in i.split() if w.isalpha()])
        symbols += len([s for s in i if s.isalnum()])
print(f'Количество строк в файле {filename}: {lines}\n'
      f'Количество слов: {words}\n'
      f'Число символов: {symbols}\n'
     )
Задание 3
Напишите программу, которая находит самое длинное слово в
списке книг из первого задания.
Ожидаемый результат:
Преступление
Решение:
        with open('books.txt', 'r', encoding='utf-8') as file:
    words = file.read().replace('"', '').split()
    result = [w for w in words if len(w) == len(max(words, key=len))]

print(*result)
Задание 4
Имеется файл fruit.txt со
следующим содержимым:
        Апельсин маракуйя папайя айва Яблоко
апельсин яблоко ананас банан персик Слива
Банан груша слива виноград авокадо Цитрон
Слива Груша яблоко мандарин цитрон
лимон Лайм апельсин ананас персик айва
Хурма киви хурма манго авокадо лайм
Нектарин Инжир гранат Папайя Гранат
Напишите программу, которая подсчитывает, сколько раз
название каждого фрукта встречается в тексте.
Вывод:
        Названия этих фруктов встречаются в тексте:
"апельсин" - 3 раз(а)
"маракуйя" - 1 раз(а)
"папайя" - 2 раз(а)
"айва" - 2 раз(а)
"яблоко" - 3 раз(а)
"ананас" - 2 раз(а)
"банан" - 2 раз(а)
"персик" - 2 раз(а)
"слива" - 3 раз(а)
"груша" - 2 раз(а)
"виноград" - 1 раз(а)
"авокадо" - 2 раз(а)
"цитрон" - 2 раз(а)
"мандарин" - 1 раз(а)
"лимон" - 1 раз(а)
"лайм" - 2 раз(а)
"хурма" - 2 раз(а)
"киви" - 1 раз(а)
"манго" - 1 раз(а)
"нектарин" - 1 раз(а)
"инжир" - 1 раз(а)
"гранат" - 2 раз(а)
Решение:
        with open('fruit.txt', 'r', encoding='utf-8') as file:
    result = {}
    for line in file:
        words = line.strip().lower().split()
        for w in words:
            result[w] = result.get(w, 0) + 1
print(f'Названия этих фруктов встречаются в тексте:')
for k, v in result.items():
    print(f'"{k}" - {v} раз(а)'
Задание 5
Имеются два файла, first.txt и second.txt. В первом файле
перечислены имена, во втором – должности:
Содержимое файла first.txt
        Сергей Ковалев
Ирина Егорова
Никита Степанов
Марина Арефьева
Кирилл Евстегнеев
Елена Моисеева
Файл second.txt
        мидл разработчик
девопс
тимлид
сеньор разработчик
продакт-менеджер
дизайнер
Напишите программу, которая открывает оба файла и выводит
сведения о сотрудниках в следующем формате:
        Сотрудник Сергей Ковалев, должность - мидл разработчик
Сотрудник Ирина Егорова, должность - девопс
Сотрудник Никита Степанов, должность - тимлид
Сотрудник Марина Арефьева, должность - сеньор разработчик
Сотрудник Кирилл Евстегнеев, должность - продакт-менеджер
Сотрудник Елена Моисеева, должность – дизайнер
Решение:
        with open('first.txt', 'r', encoding='utf-8') as file1, \
open('second.txt', 'r', encoding='utf-8') as file2:
    for line_x, line_y in zip(file1, file2):
        print(f'Сотрудник {line_x.strip()}, должность - {line_y.strip()}')
Задание 6
Напишите программу, которая:
- генерирует коды букв русского алфавита от а до я;
- вставляет в полученный список код ё;
- записывает полный алфавит (строчный и прописной варианты каждой буквы) в столбик в файл alphabet.txt.
Содержимое файла после выполнения программы:
        Аа
Бб
Вв
Гг
Дд
Ее
Ёё
Жж
Зз
Ии
Йй
Кк
Лл
Мм
Нн
Оо
Пп
Рр
Сс
Тт
Уу
Фф
Хх
Цц
Чч
Шш
Щщ
Ъъ
Ыы
Ьь
Ээ
Юю
Яя
Решение:
        alpha = [i for i in range(ord('а'), ord('я') + 1)]
alpha.insert(6, 1105)
with open('alphabet.txt', 'w', encoding='utf-8') as file:
    for i in alpha:
        file.write(chr(i).upper() + chr(i) + '\n')
Задание 7
Сведения о доходах и расходах компании хранятся в двух
файлах, income.txt и
outcome.txt. Напишите программу для
подсчета прибыли компании.
Пример файла income.txt:
        RUB100000
RUB200000
RUB200000
RUB500000
RUB600000
RUB100000
RUB700000
Пример файла outcome.txt:
        -RUB1000
-RUB2000
-RUB50000
-RUB200000
-RUB10000
-RUB5000
-RUB6000
-RUB10000
-RUB19000
-RUB7000
Ожидаемый результат:
Прибыль за прошлый месяц: 2090000 RUB
Решение:
        income, outcome = 0, 0
with open('income.txt', 'r', encoding='utf-8') as file1, \
open('outcome.txt', 'r', encoding='utf-8') as file2:
    for line in file1:
        num = line.strip()[3:]
        income += int(num)

    for line in file2:
        num = line.strip()[4:]
        outcome += int(num)
print(f'Прибыль за прошлый месяц: {income - outcome} RUB')
Задание 8
Напишите программу, которая считывает сведения об
успеваемости по основным предметам из файла grades.txt,
и определяет, кто из студентов имеет средний балл >= 4.5.
Пример файла grades.txt:
        Арефьева И. 5 5 4 4
Богданов С. 5 5 3 4
Гаврилов Е. 4 4 3 3
Егорова А.  3 3 3 4
Семенова Е. 4 3 3 4
Хворостов И. 5 4 5 5
Ожидаемый результат:
        Арефьева И., средний балл: 4.50
Хворостов И., средний балл: 4.75
Решение:
        result = {}
with open('grades.txt', 'r', encoding='utf-8') as file1:
    for line in file1:
        l = line.strip().split()
        grades = [int(i) for i in l[-4:]]
        aver_grade = sum(grades) / len(grades)
        if aver_grade >= 4.5:
            result[l[0] + ' ' + l[1]] = aver_grade
for student, aver_grade in result.items():
    print(f'{student}, средний балл: {aver_grade:.2f}')
Задание 9
Напишите программу, которая получает от пользователя
название файла с информацией на русском языке, и выполняет транслитерацию
текста в соответствии с приведенным ниже словарем. Результат нужно записать в
файл result.txt.
Словарь:
        translit = {'а': 'a', 'к': 'k', 'х': 'h', 'б': 'b', 'л': 'l', 'ц': 'c', 'в': 'v', 'м': 'm', 'ч': 'ch', 'г': 'g', 'н': 'n',
     'ш': 'sh', 'д': 'd', 'о': 'o', 'щ': 'shh', 'е': 'e', 'п': 'p', 'ъ': '*', 'ё': 'jo', 'р': 'r', 'ы': 'y', 'ж': 'zh',
     'с': 's', 'ь': "'", 'з': 'z', 'т': 't', 'э': 'je', 'и': 'i', 'у': 'u', 'ю': 'ju', 'й': 'j', 'ф': 'f', 'я': 'ya',
     'А': 'A', 'К': 'K', 'Х': 'H', 'Б': 'B', 'Л': 'L', 'Ц': 'C', 'В': 'V', 'М': 'M', 'Ч': 'Ch', 'Г': 'G', 'Н': 'N',
     'Ш': 'Sh', 'Д': 'D', 'О': 'O', 'Щ': 'Shh', 'Е': 'E', 'П': 'P', 'Ъ': '*', 'Ё': 'Jo', 'Р': 'R', 'Ы': 'Y', 'Ж': 'Zh',
     'С': 'S', 'Ь': "'", 'З': 'Z', 'Т': 'T', 'Э': 'Je', 'И': 'I', 'У': 'U', 'Ю': 'Ju', 'Й': 'J', 'Ф': 'F', 'Я': 'Ya'}
Пример русского текста:
Python — это язык программирования, который широко используется в интернет-приложениях, разработке программного обеспечения, науке о данных и машинном обучении (ML). Разработчики используют Python, потому что он эффективен, прост в изучении и работает на разных платформах.
Ожидаемое содержимое result.txt:
Python — jeto yazyk programmirovaniya, kotoryj shiroko ispol'zuetsya v internet-prilozheniyah, razrabotke programmnogo obespecheniya, nauke o dannyh i mashinnom obuchenii (ML). Razrabotchiki ispol'zujut Python, potomu chto on jeffektiven, prost v izuchenii i rabotaet na raznyh platformah.
Решение:
        translit = {'а': 'a', 'к': 'k', 'х': 'h', 'б': 'b', 'л': 'l', 'ц': 'c', 'в': 'v', 'м': 'm', 'ч': 'ch', 'г': 'g', 'н': 'n',
     'ш': 'sh', 'д': 'd', 'о': 'o', 'щ': 'shh', 'е': 'e', 'п': 'p', 'ъ': '*', 'ё': 'jo', 'р': 'r', 'ы': 'y', 'ж': 'zh',
     'с': 's', 'ь': "'", 'з': 'z', 'т': 't', 'э': 'je', 'и': 'i', 'у': 'u', 'ю': 'ju', 'й': 'j', 'ф': 'f', 'я': 'ya',
     'А': 'A', 'К': 'K', 'Х': 'H', 'Б': 'B', 'Л': 'L', 'Ц': 'C', 'В': 'V', 'М': 'M', 'Ч': 'Ch', 'Г': 'G', 'Н': 'N',
     'Ш': 'Sh', 'Д': 'D', 'О': 'O', 'Щ': 'Shh', 'Е': 'E', 'П': 'P', 'Ъ': '*', 'Ё': 'Jo', 'Р': 'R', 'Ы': 'Y', 'Ж': 'Zh',
     'С': 'S', 'Ь': "'", 'З': 'Z', 'Т': 'T', 'Э': 'Je', 'И': 'I', 'У': 'U', 'Ю': 'Ju', 'Й': 'J', 'Ф': 'F', 'Я': 'Ya'}
filename = input()
with open(filename, 'r', encoding='utf-8') as source, open('result.txt', 'w', encoding='utf-8') as tr_result:
    for l in source.read():
        trans = translit.get(l.lower(), l)
        tr_result.write(trans if l.islower() else trans.capitalize())
Задание 10
Имеется лог-файл crm_log.txt с
информацией о времени входа пользователей в CRM-систему и о времени выхода. Напишите программу, которая
определяет пользователей, работавших в системе более 4 часов, и записывает их
имена и фамилии в файл best_employees.txt.
Пример лога crm_log.txt:
        Егор Тимофеев, 09:10, 16:50
Марина Абрамова, 12:00, 15:59
Никита Круглов, 09:10, 12:45
Анна Семенова, 08:10, 12:30
Юлия Сафонова, 10:10, 10:50
Михаил Колесников, 11:10, 12:10
Ожидаемый результат в файле best_employees.txt:
        Егор Тимофеев
Анна Семенова
Решение:
        with open('crm_log.txt', encoding='utf-8') as file_input, \
     open('best_employees.txt', 'w', encoding='utf-8') as file_output:

    for line in file_input:
        start, end = [int(h) * 60 + int(m) for t in line.split(', ')[1:] for h, m in [t.split(':')]]
        if end - start > 240:
            file_output.write(line.split(', ')[0] + '\n')
Подведем итоги
Python
предоставляет множество простых и удобных методов для работы с файловой
системой и файлами. С помощью этих методов можно легко:
- Получать любую информацию о файлах и директориях.
- Создавать, изменять, перемещать и удалять директории и файлы.
- Проводить любые операции с содержимым текстовых и двоичных файлов.
В следующей статье будем изучать регулярные выражения.
***
Содержание самоучителя
- Особенности, сферы применения, установка, онлайн IDE
- Все, что нужно для изучения Python с нуля – книги, сайты, каналы и курсы
- Типы данных: преобразование и базовые операции
- Методы работы со строками
- Методы работы со списками и списковыми включениями
- Методы работы со словарями и генераторами словарей
- Методы работы с кортежами
- Методы работы со множествами
- Особенности цикла for
- Условный цикл while
- Функции с позиционными и именованными аргументами
- Анонимные функции
- Рекурсивные функции
- Функции высшего порядка, замыкания и декораторы
- Методы работы с файлами и файловой системой
- Регулярные выражения
- Основы скрапинга и парсинга
- Основы ООП: инкапсуляция и наследование
- Основы ООП – абстракция и полиморфизм
- Графический интерфейс на Tkinter
- Основы разработки игр на Pygame
- Основы работы с SQLite
- Основы веб-разработки на Flask
- Основы работы с NumPy
- Основы анализа данных с Pandas
***
In this tutorial, you’ll learn how to open a file in Python.
The data can be in the form of files such as text, csv, and binary files. To extract data from these files, Python comes with built-in functions to open a file and then read and write the file’s contents.
After reading this tutorial, you can learn: –
- How to open a file in Python using both relative and absolute path
- Different file access modes for opening a file
- How to open a file for reading, writing, and appending.
- How to open a file using the
withstatement - Importance of closing a file
Table of contents
- Access Modes for Opening a file
- Steps For Opening File in Python
- Example: Opening a File in read mode
- Opening a File with Relative Path
- Handling the FileNotFoundError
- File open() function
- Opening a File in Read mode
- Opening a File in Write Mode
- Opening a File in Append Mode
- Closing a File
- Opening file using with statement
- Creating a new file
- Opening a File for multiple operations
- Opening a Binary file
- Summary
Access Modes for Opening a file
The access mode parameter in the open() function primarily mentions the purpose of opening the file or the type of operation we are planning to do with the file after opening. in Python, the following are the different characters that we use for mentioning the file opening modes.
| File Mode | Meaning |
|---|---|
r |
Opens a file for reading (default) |
w |
Open a file for writing. If a file already exists, it deletes all the existing contents and adds new content from the start of the file. |
x |
Open a file for exclusive creation. If the file already exists, this operation fails. |
a |
Open a file in the append mode and add new content at the end of the file. |
b |
Open the file in binary mode. |
t |
Opens a file in a text mode (default). |
+ |
Open a file for updating (reading and writing). |
Steps For Opening File in Python
To open a file in Python, Please follow these steps:
- Find the path of a file
We can open a file using both relative path and absolute path. The path is the location of the file on the disk.
An absolute path contains the complete directory list required to locate the file.
A relative path contains the current directory and then the file name. - Decide the access mode
The access mode specifies the operation you wanted to perform on the file, such as reading or writing. To open and read a file, use the
raccess mode. To open a file for writing, use thewmode. - Pass file path and access mode to the open() function
fp= open(r"File_Name", "Access_Mode"). For example, to open and read:fp = open('sample.txt', 'r') - Read content from a file.
Next, read a file using the
read()method. For example,content = fp.read(). You can also usereadline(), andreadlines() - Write content into the file
If you have opened a file in a write mode, you can write or append text to the file using the
write()method. For example,fp.write('content'). You can also use thewriteine()method. - Close file after completing operation
We need to make sure that the file will be closed properly after completing the file operation. Use
fp.close()to close a file.
Example: Opening a File in read mode
The following code shows how to open a text file for reading in Python. In this example, we are opening a file using the absolute Path.
An absolute path contains the entire path to the file or directory that we need to access. It includes the complete directory list required to locate the file.
For example, /home/reports/samples.txt is an absolute path to discover the samples.txt. All of the information needed to find the file is contained in the path string.
See the attached file used in the example and an image to show the file’s content for reference.
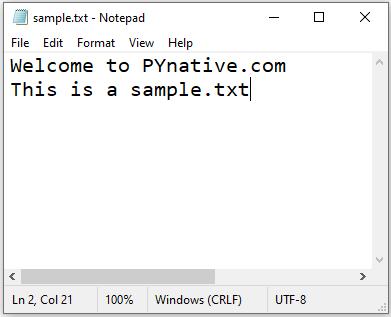
# Opening the file with absolute path
fp = open(r'E:\demos\files\sample.txt', 'r')
# read file
print(fp.read())
# Closing the file after reading
fp.close()

# path if you using MacOs
# fp = open(r"/Users/myfiles/sample.txt", "r")
Output
Welcome to PYnative.com
This is a sample.txt
Opening a File with Relative Path
A relative path is a path that starts with the working directory or the current directory and then will start looking for the file from that directory to the file name.
For example, reports/sample.txt is a relative path. In the relative path, it will look for a file into the directory where this script is running.
# Opening the file with relative path
try:
    fp = open("sample.txt", "r")
    print(fp.read())
    fp.close()
except FileNotFoundError:
    print("Please check the path.")
Handling the FileNotFoundError
In case we are trying to open a file that is not present in the mentioned path then we will get a FileNotFoundError.
fp = open(r'E:\demos\files\reports.txt', 'r')
print(f.read())
Output
FileNotFoundError: [Errno 2] No such file or directory: 'E:\demos\files\reports.txt'
We can handle the file not found error inside the try-except block. Let us see an example for the same. Use except block to specify the action to be taken when the specified file is not present.
try:
    fp = open(r'E:\PYnative\reports\samples.txt', 'r')
    print(fp.read())
    fp.close()
except IOError:
    print("File not found. Please check the path.")
finally:
    print("Exit")
Output
File not found. Please check the path.
Exit
File open() function
Python provides a set of inbuilt functions available in the interpreter, and it is always available. We don’t have to import any module for that. We can open a file using the built-in function open().
Syntax of the file open() function
open(file, mode='r', buffering=-1, encoding=None, errors=None, newline=None, closefd=True, opener=None)It return the file object which we can sue to read or write to a file.
Parameters:
Let us see the parameters we can pass to the open() function to enhance the file operation.
| Parameter | Description |
|---|---|
file |
This parameter value gives the pathname (absolute or relative to the current working directory) of the file to be opened. |
mode |
This is the optional string that specifies the mode in which a file will be opened. The default value is 'r' for reading a text file. We can discuss the other modes in the later section. |
buffering |
This is an optional integer used to set the buffering policy. Pass 0 to switch buffering off (only allowed in binary mode), 1 to select line buffering (only usable in text mode), and an integer > 1 to indicate the size in bytes of a fixed-size chunk buffer. |
encoding |
This is the name of the encoding used to decode or encode the file. The default one is platform dependant. |
errors |
These are optional string denotes how the standard encoding and decoding errors have to be handled. |
newline |
This is the parameter that indicates how the newline mode works (it only applies to text mode). It can be None, '', '\n', '\r', and '\r\n'. |
closefd |
This parameter indicates whether to close a file descriptor or not. The default value is True. If closefd is False and a file descriptor rather than a filename was given, the underlying file descriptor will be kept open when the file is closed. |
Opening a File in Read mode
We can open a file for reading the contents of a file using the open() function and passing the r mode. This will open the file only for reading the contents, and we can’t use it for anything else like writing new content.
The file can basically in two categories namely flat files and non flat files.
- Flat files are the ones that are not properly indexed, like .csv (comma separated values), where each record has different comma-separated values. But they are not ordered with an index. They generally have one record per line and in general, have a fixed set of values in each record.
- Nonflat files are the ones with proper index values. Each record will have one index value, and we can easily find one using the index value.
Consider that we are having a file called ‘sample.txt’ and we are opening the file for reading its contents.
try:
    fp = open("sample.txt", "r")
    # Reading the contents of the file and closing
    print(fp.read())
    fp.close()
except IOError:
    print("Please check the path.")
Output
Welcome to PYnative.com
This is a sample.txt
Read More: Complete Guide on Reading Files in Python
Opening a File in Write Mode
We can open a file for writing new contents into a file using the open() function with w as the access mode. The cursor or the file pointer will be placed at the beginning of the file.
Note: If the file is already present it will truncate the file, which means all the content previously in the file will be deleted, and the new content will be added to the file.
fp = open("sample2.txt", "w")
# Writing content
fp.write("New line")

# Opening the file again for reading the content
fp = open("sample2.txt", "r")

# Reading the contents of the file and closing
print(fp.read())
fp.close()
Output
New line
Read More: Complete Guide on Write to File in Python
Opening a File in Append Mode
We can append some content at the end of the file using the open() function by passing the character a as the access mode. The cursor will be placed at the end of the file, and the new content will get added at the end.
The difference between this and the write mode is that the file’s content will not be truncated or deleted in this mode.
Consider that the file “sample2.txt” is already created and there is some content in the file. Now we are opening the file in the append mode and trying to add some content at the end of the file.
# Open and Append at last
fp = open("sample2.txt", "a")
fp.write(" Added this line by opening the file in append mode ")

# Opening the file again to read
fp = open("sample2.txt", "r")
print(fp.read())
fp.close()
Output
New line
Added this line by opening a file in the append mode
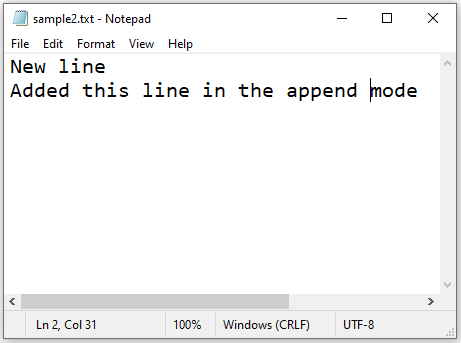
Closing a File
We need to make sure that the file will be closed properly after completing the file operation. It is a bad practice to leave your files open.
In Python, It is very important to close a file once the job is done mainly for the following reasons: –
- It releases the resources that have been tied up with the file. By this space in the RAM can be better utilized and ensures a better performance.
- It ensures better garbage collection.
- There is a limit to the number of open files in an application. It is always better to close the file to ensure that the limit is not crossed.
- If you open the file in write or read-write mode, you don’t know when data is flushed.
A file can be closed just by calling the close() function as follows.
# Opening the file to read the contents
f = open("sample2.txt", "r")
print(f.read())

# Closing the file once our job is done
f.close()
Opening file using with statement
We can open a file using the with statement along with the open function. The general syntax is as follows.
with open(__file__, accessmode) as f:The following are the main advantages of opening a file using the with statement
- The with statement simplifies exception handling by encapsulating common preparation and cleanup tasks.
- This also ensures that a file is automatically closed after leaving the block.
- As the file is closed automatically it ensures that all the resources that are tied up with the file are released.
Let us see how we can the with statement for opening a file with an example. Consider there are two files ‘sample.txt’ and ‘sample2.txt’ and we want to copy the contents of the first file to the second.
# Opening file
with open('sample.txt', 'r', encoding='utf-8') as infile, open('sample2.txt', 'w') as outfile:
    # read sample.txt an and write its content into sample2.txt
    for line in infile:
        outfile.write(line)

# Opening the file to read the contents
f = open("Sample2.txt", "r")
print(f.read())
f.close()
Output
Welcome to PYnative.com
File created to demonstrate file handling in Python
Here we can see that the contents of the sample2.txt has been replaced by the contents of sample.txt.
Creating a new file
We can create a new file using the open() function by setting the x mode. This method will ensure that the file doesn’t already exist and then create a new file. It will raise the FileExistsError if the file already exists.
Example: Creating a new file.
try:
    # Creating a new file
    with open("sample3.txt", "x") as fp:
        fp.write("Hello World! I am a new file")

    # reading the contents of the new file
    fp = open("sample3.txt", "r")
    print(fp.read())
except FileExistsError:
    print("The file already exists")
Output
Hello World! I am a new file
Opening a File for multiple operations
In Python, we can open a file for performing multiple operations simultaneously by using the '+' operator. When we pass r+ mode then it will enable both reading and writing options in the file. Let us see this with an example.
with open("Sample3.txt", "r+") as fp:
    # reading the contents before writing
    print(fp.read())

    # Writing new content to this file
    fp.write("\nAdding this new content")
Opening a Binary file
Binary files are basically the ones with data in the Byte format (0’s and 1’s). This generally doesn’t contain the EOL(End of Line) so it is important to check that condition before reading the contents of the file.
We can open and read the contents of the binary file as below.
with open("sample.bin", "rb") as f:
    byte_content = f.read(1)
    while byte_content:
        # Printing the contents of the file
        print(byte_content)
Summary
In this tutorial, we have covered how to open a file using the different access modes. Also, we learned the importance of opening a file using the ‘with’ statement.
Files are an essential part of working with computers, thus using Python to write to and read from a file are basic skills that you need to master. In this article, I’ll show you how to do the things you came here for, e.g.:
- How to open a file in Python
- Reading a file with Python (both at once or line-by-line)
- Writing to a file with Python
- Copy, move, rename, and delete files
- Check if a file or directory exists
When working with files, there will come that point where you need to know about file modes and permissions. I included an explanation on this topic as well, in case you need it.
Table of Contents
- 1 Open a file in Python
- 2 Python write file
- 3 Python append to a file
- 4 Python read file to list
- 5 Common Python file operations
- 6 Handling Python file exceptions
- 7 About Unix file permissions
- 8 Keep learning
Open a file in Python
In Python, we open a file with the open() function. It’s part of Python’s built-in functions, you don’t need to import anything to use open(). The open() function expects at least one argument: the file name. If the file was successfully opened, it returns a file object that you can use to read from and write to that file.
As soon as you open a file with Python, you are using system resources that you need to free once you’re done. If you don’t, you create a so-called resource leak. If you do this often enough, you might run into problems, because there’s a limit to the number of open files a regular operating system user can have.
This doesn’t have to be a problem though. When your program exits, all resources are freed up automatically. That’s nice and considerate of the Python devs, but a lot of software keeps running indefinitely. With such software, you need to be more careful and close the resources you don’t need anymore. This way, you make sure other software can access the file safely. Also, when you open a lot of files, each open file takes up memory and other resources. For these reasons, it’s a good habit to close a file when you’re done with it.
Closing a file used to be a manual task, that can be forgotten easily. Luckily, Python has the ‘with’ statement to help us out. We’ll discuss the with statement soon. I first want to show you the ‘old fashioned way of doing things.
The old fashioned way to open a file
To illustrate why the with statement is so useful, let’s first open and close a file in the traditional, manual way:
If you’re feeling adventurous, try and remove the f.close(). It should work the same; Python won’t complain and will close the file resource on exit.
If the interactive example above doesn’t work for some reason, here’s a text version of the same code:
f = open('text.txt')
print(f.read())
f.close()
Python read file content at once
In the example above, you can see how we read all contents from the file so we can print it. If you want to read all the file content into a single string, at once, use the read() method on a file object, without arguments. This is no problem for small files, but do realize that you load all the contents into memory at once. This could be a problem with large files, but we’ll get to that soon.
Using with open() in Python
There’s a potential problem in the previous example. If an exception occurs while Python reads the file, the f.close() call will never be reached. And this is a trivial example, but you can imagine that with more complicated software, in which exceptions might get caught so the software can keep running, it can go wrong quickly.
Another problem that may arise, is that you simply forget to write the close() call. It happens, we are all humans. Therefore, with modern Python, it’s recommended to use the with-statement when you can. By using Python’s with open(), the opened file resource will only be available in the indented block of code:
If the interactive example above doesn’t work for some reason, here’s a text version of the same code:
with open('text.txt') as f:
    text = f.read()

print(text)
In this example, the with-statement makes sure the file is closed, even if an exception occurs. That’s because Python closes the resource automatically as soon as we step out of the scope of this with-statement. Due to this automatic close, you can not use the file (called f in our case) outside of the with-statement. If you want to use it again, you have to open it again.
File modes
So far, we used the open() function with just one argument: the file name. It’s a mandatory argument, but open() also has a number of optional extra arguments, like the file mode. This mode defaults to ‘rt’, which stands for ‘read text’. You’re opening the file for reading, which means you can not write to it, and you’re expecting it to be a text file.
Other modes that you can pass are listed in the following table:
| Character | Meaning |
| r | open file for reading (default) |
| w | open file for writing, truncating the file first |
| x | create a new file and open it for writing |
| a | Open for writing, append to the end of the file if it exists already |
| t | Text mode (the default), can be used in combination with rwxa |
| b | Binary mode (as opposed to text mode), can be used in combination with rwxa |
| + | open a disk file for updating (reading and writing) |
I won’t go into the details of all the modes here but instead, I’ll explain and demonstrate most of them in the appropriate sections below.
Now that you know about file modes and how to open a file, we can use Python to write to files as well. We can do so in three steps:
- First, we need to determine the file mode. If you look at the table above, we’ll need to use ‘w’ and ‘t’. Since ‘t’ is the default, we can leave it out.
- Next, we need to open the file for writing
- And finally, we call the write() method on our file object.
Write expects one argument in this case: a Python string. If you have data of another type, like a number, you need to manually convert it to a string. After all, text files don’t have the concept of data types: they simply contain text.
In the example below, we convert integers to strings using the str() function, and write them to the file:
If the interactive example above doesn’t work, here’s the same code:
with open('test.txt', 'w') as f:
    for i in range(1, 5):
        f.write(str(i))

with open('test.txt', 'r') as f:
    print(f.read())
There is now a file on your file system (in the same directory as your script), with the following content:
1234
Newline characters
Did you expect each number to be on a new line?
When writing files, you need to explicitly specify newline characters. You can try this in the interactive example above. Adapt the code to make it look like this:
with open('test.txt', 'w') as f:
    for i in range(1, 5):
        f.write(f'Number {i}\n')

with open('test.txt', 'r') as f:
    print(f.read())
Note that I used an f-string here. I personally like them a lot, but you can also use something like str(i) + '\n'.
Python append to a file
Now that we have a test file, we can also append some extra data. By default, when we open a file for writing, we overwrite anything that’s already present. So, again, we first look in the file modes table above which mode we can use to append data to our file. We need mode ‘a’, for append.
In the following example, we:
- Write to a file just like in the previous example using Python’s
with open(). - After that, we open the file again, this time with the append flag, and add some extra lines.
- Read back the file contents and print to screen so we can inspect the result
Here you go:
If the interactive example above doesn’t work, here’s the same code:
# First create a file, with a couple of lines
with open('test.txt', 'w') as f:
    for i in range(1, 5):
        f.write(f'Number {i}\n')

# Now add some extra lines using append mode
with open('test.txt', 'a') as f:
    for i in range(5, 8):
        f.write(f'Append number {i}\n')

with open('test.txt') as f:
    print(f.read())
Python read file to list
With small files, it can be convenient to read all lines at once into a list. There are two ways to do this:
with open('test.txt') as f:
    lines = list(f)

# lines = ['1\n', '2\n', '3\n', '4\n', '5\n', '6\n', '7\n']
Is equivalent to:
with open('test.txt') as f:
    lines = f.readlines()

# lines = ['1\n', '2\n', '3\n', '4\n', '5\n', '6\n', '7\n']
Read file line-by-line
You don’t always have the luxury of reading files at once. For instance, when you need to work with 140 GB-sized log files, you can’t read it all into memory and get away with it. Your program will likely crash, or at least become extremely slow.
It is much more efficient to parse the file line-by-line in such cases. To read a file line by line, we can treat the opened file as an iterator. After opening the file, we can use a Python for-loop to iterate over the lines:
with open('myfile.txt', 'r') as f:
    for line in f:
        print(line)
Common Python file operations
Python has built-in modules to perform common file operations, like deleting files, creating directories, moving files, and so on. Most of these functions are available in the os module, so you’ll need to import it first. In this section, we’ll visit some of the operations you might need to perform.
Use Python to check if file exists
To check if a file exists, we can use the isfile function:
import os

if os.path.isfile('myfile.txt'):
    print("It's a file")
This will return True if the file exists, and False if it doesn’t.
Use Python to check if a directory exists
Similarly, to check if a directory exists, we can use the isdir function:
import os

if os.path.isdir('mydir'):
    print("It's a directory")
If the directory exists, this will return True. Otherwise, it will return False.
Create a directory
To create a directory, use the mkdir function from the os module:
import os

os.mkdir('mydir')
Delete a file
To delete a file, we can use the following command:
import os

os.remove('myfile.txt')
This will delete the file. If the file doesn’t exist, it will raise an exception.
Rename (or move) a file
To rename or move a file, we can use the following command:
import os
os.rename('myfile.txt', 'myfile_renamed.txt')
A rename operation works as long as the file stays on the same file system. If you want to move a file from one file system to another, you need the higher-level move function from shutil, as explained below.
Move a file with shutil
To move a file in a way that resembles the mv command on the terminal shell, we can use the shutil module. An important distinction from os.rename is that this function can move files between file systems as well. Rename can only rename/move a file within the same filesystem:
import shutil

shutil.move('/mnt/filesystem1/myfile.txt', '/mnt/filesystem2/mydir')

# Move to a directory, keeping the name intact
shutil.move('/home/erik/myfile.txt', '/home/erik/backups/')
Copy files with Python
The shutil module is a more high-level module, and provides a number of functions that can be used to copy single files or copy and remove entire trees of files:
import shutil

# Copy a single file
shutil.copy('/home/erik/myfile.txt', '/home/erik/myfile_copy.txt')

# Copy entire tree of files
shutil.copytree('mydir', 'mydir_copy')

# Remove a tree of files
shutil.rmtree('mydir')
Handling Python file exceptions
If an error occurs, the shutil and os modules will raise an exception. You can use the try and except blocks to handle the exception. The exception you need to handle is almost always of type OSError. However, sometimes you may need to handle other exceptions as well, like SameFileError.
I’ve written a detailed tutorial on how to work with exceptions and try-catch blocks that you might want to read.
About Unix file permissions
When working with files, you’ll inevitably run into file permissions. Consider this a short primer on Unix file permissions. Chances are you’ll run into them sooner than later, especially when working in the cloud since most cloud servers are running Linux.
File permissions
Permissions are specified per file. When you list a directory, you’ll be able to see its permissions. For example, under Linux, we can do so with the ls -l command:
$ ls -l
total 0
-rwxr-xr-x 1 erik erik 0 Jun 25 10:33 build_script.sh
-rw-r--r-- 1 erik erik 0 Jun 25 10:33 myapp.py
In the output, you see two dummy files I created for demonstration purposes. The first is a script file, and the second is a Python file called myapp.py. At the start of the line, you see cryptic letters like r, w, and x that define the file permissions. Files can have the following permissions:
| Letter | Permissions |
| r | The file can be read |
| w | The file is writeable |
| x | The file is executable |
| – | Unset, permission not granted |
Users and groups
Knowing what permissions there are is not enough, though. As you can see in the example listing above, the r gets repeated three times for each file. If you were wondering why: computer systems usually have multiple users and groups.
Each file has permissions for three access types:
- user: the owner of the file. The one who creates a file automatically becomes the owner
- group: a group of 0 or more users
- Everybody else; also called ‘world’
The permissions are listed in this order as well. So we have three permissions fields for each access type, resulting in a nine-character long string. The following ASCII art should clear things up:
    User   Group   World
0   123    456     789
-   rwx    r-x     r-x

Positions 1, 2, 3 define permissions for the user
Positions 4, 5, 6 define permissions for the group that the user is in
Positions 7, 8, 9 define permissions for world
Position 0 is the file type (see below)
File types
Finally, there are several file types. The most well-known are regular files and directories, but there are more types. This is the complete list:
- – : regular file
- d : directory
- c : character device file
- b : block device file
- s : local socket file
- p : named pipe
- l : symbolic link
To demonstrate, you can inspect the file /dev/random:
ls -l /dev/random
crw-rw-rw- 1 root root 1, 8 jun 22 08:44 /dev/random
It’s a character device that offers a stream of random data when read from. As you can see, it’s writable as well. In this case, writing to /dev/random will update the entropy pool.
There’s a lot more to learn, and you might also like to dive into our section on using the Unix shell. So go and explore if you want or need to, but this quick introduction here should get you started.
Keep learning
Use these resources to expand your knowledge and understanding:
- How to load, read, and write YAML in Python
- Working with JSON in Python
- The official Python documentation on working with files
- The official shutil documentation
- Wikipedia page about File permissions
- Our chapter on using the unix shell
Learn Python properly through small, easy-to-digest lessons, progress tracking, quizzes to test your knowledge, and practice sessions. Each course will earn you a downloadable course certificate.