In this post, we are going to discuss how we can set up git bash, SSH keys, and PyCharam IDE to access a git repository using the command line on a Windows or Mac machine. First, we will set it up on a Windows machine followed by a Mac machine. The setup process is very similar except for a few differences.
Set up Git, SSH keys, PyCharm on a Windows machine
1. Install Git Bash
We need to download and install Git Bash to run git commands. It will enable us to use a number of UNIX commands along with git commands. The git bash can be downloaded from https://git-scm.com/downloads.

Once it is downloaded, we can double click on the executable in order to install it. We don’t need to modify any default options during the installation process.
2. Generate SSH keys
Next, we need to configure the SSH keys which will help us to execute git commands from Git Bash or from a terminal or using an IDE like PyCharm. We need to follow the below steps to generate the SSH key pair:
- Open Git Bash
- Execute the below command to make sure that we are in the home directory.
cd ~/
- Now execute the below command. Here, we are using the RSA key algorithm of 4096 bits. Replace the email address with your email address before executing the below command.
ssh-keygen -t rsa -b 4096 -C "youremail@example.com"
- This will prompt you to enter a filename to store the private and public keys.
- Just press the Enter key to accept the default filename which is id_rsa and id_rsa.pub. The key pair will be generated at the location /Users/your name/.ssh/id_rsa.
- Next, it will ask you to create a passphrase which is optional. We can create a passphrase or press enter for no passphrase. Here, we are not using any passphrase. To use no passphrase, just hit enter twice.
3. Upload SSH public key to your Git account
Now, we need to upload the SSH public key to GitHub:
- Your public key is stored in the file ending with .pub, i.e. ~/.ssh/id_rsa.pub. Open this file in notepad and copy the values.
- Once you have copied your public SSH key, log in to your GitHub account and go to https://github.com/settings/profile

- On the left-hand side menu, you will see a link “SSH and GPG keys”. Click on this link.
- It will take you to the page where you can add the public SSH key which you have copied already.
- Click the button “New SSH key”.

- Then enter a key title name. It can be anything, e.g. NewMac or MyWindowsMachine, and etc.
- Paste the public SSH key in the key textbox.
- Click “Add SSH key”. It will add this public key to your git account.

4. Install PyCharm
We can install the PyCharm Community edition from the below links. Please note that we are installing the community edition and not the professional edition which is the paid version of the PyCharm.
- For Mac – https://www.jetbrains.com/pycharm/download/#section=mac
- For Windows – https://www.jetbrains.com/pycharm/download/#section=windows

Once downloaded, double click on the executable to start the installation process and follow the installation wizard.
5. Clone the repository
Now, to clone the repository, follow the below steps:
- Go to the repository page.
- Click on the Code button at the right.
- Click on the “SSH” tab.
- Copy the SSH URL which looks like “git@github.com:SQLRelease/RepositoryName.git“

- Now, open the git bash and execute the below command.
git clone git@github.com:SQLRelease/RepositoryName.git
6. Open repository in the PyCharm IDE
To open the repository in PyCharm follow the below steps:
- Open PyCharm.
- Go to File -> Open.
- Select the repository folder which we have cloned.
Now, let’s discuss how we can set up the git SSH on a Mac machine.
Set up Git, SSH keys, PyCharm on a Mac machine
Install brew
First, we need to install brew (https://brew.sh/)-
Open the terminal window and run the below command
/bin/bash -c "$(curl -fsSL https://raw.githubusercontent.com/Homebrew/install/master/install.sh)"
Install Git Bash
To install the Git bash, we need to follow below steps:
- Open the terminal window.
- Run command
brew install git
- Verify git version
git --version
Generate SSH keys
Same as we have done for a Windows machine,
Upload SSH public key to the Git account
Same as we have done for a Windows machine,
Install PyCharm
Same as we have done for a Windows machine, Just use the Mac link.
Clone the repository
Same as we have done for a Windows machine,
Fix warning ‘UNPROTECTED PRIVATE KEY FILE!’
In order to fix the Unprotected private key file warning, we need to execute the below commands:
sudo chmod 600 ~/.ssh/id_rsa
sudo chmod 600 ~/.ssh/id_rsa.pub
It will ask for your machine password. Enter the password and hit enter.
Open repository in the PyCharm IDE
Same as we have done for a Windows machine,
Thanks for the reading. Please share your inputs in the comment section.
Ready to work:
- Install pycharm
- Install git
- Register github account
Create SSH Key:
If there is no .ssh folder in the computer’s home directory, execute the following command in git bash:
ssh-keygen -t rsa -C [email protected]Replace «[email protected]» with your available email address. Pay attention to the absence of quotation marks on both sides of the email address, otherwise an error will occur. For example, when verifying whether the connection to github is successful, it will report: PTY allocation request failed on channel 0 error .
Then press Enter all the way to use the default configuration. If the execution is successful, you can find the .ssh folder in the account’s home directory, use Notepad to open the id_rsa.pub public key file, copy it, and later use it in github.
Simply configure Git:
git config —global user.name yourName
git config —global user.email yourEmail
Add the public key to github:
Log in to your github account, click on Settings in the account management office in the upper right corner, and then find «SSH and GPG keys», as shown below:

Click «New SSH Key» to add a new SSH public key, as shown in the figure below, add title, key (the content just copied) in turn:

Check if you are connected to github:
Excuting an order:
ssh -T [email protected]The result is as follows:

When executing the command, a query will appear, enter yes, and then if the connection is successful, the word «Hi ***» will appear in the bash terminal, as shown in the yellow box in the figure. This completes the configuration of git and github.
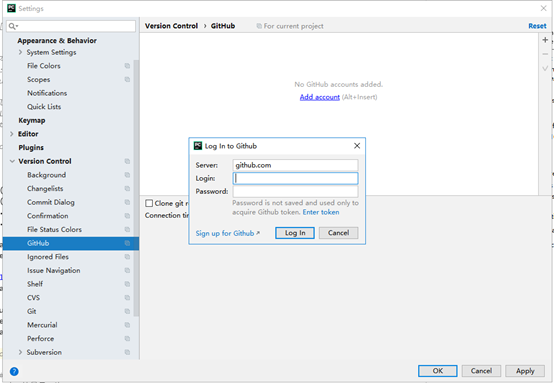
Configure pycharm:
In pycharm, click successively: settings-«Version control-«github. When configuring for the first time, select add account, and then fill in the github account and password in the pop-up box:
Then, in the same way, find git in Version control, and specify the git executable program for pycharm for pycharm to call:

Set up a remote warehouse and submit code:
At the top of pycharm, make the following choices:
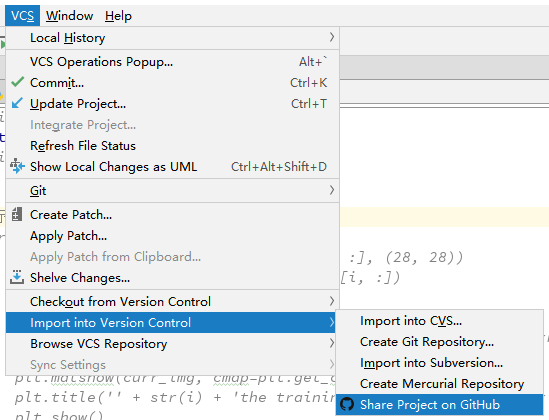
Then follow the prompts to enter the name of the remote warehouse and other information. It is recommended to use the default name the same as the local one. So far complete all configuration work.

SSH keys
This tutorial assumes you have already created an empty Repo in github(or similar) and have write access to that Repo. Also, I recommend using SSH keys for authentication and I will assume that is how you are authenticating for this tutorial as well. If you’re unfamiliar with how to work with SSH keys and Git, read the following first: https://www.digitalocean.com/community/tutorials/how-to-set-up-ssh-keys–2
https://help.github.com/en/articles/adding-a-new-ssh-key-to-your-github-account
In Pycharm go into VCS->Remotes and enter the url that is shown in github when you click Clone or Download. At this point, you should have added your SSH public key to your github account and added the identy using the SSH agent on your local machine.
Start investing in the stock market today with Robinhood. Join Robinhood with my link and we’ll both pick our own free stock 🤝 https://join.robinhood.com/hugog360

If you’re using GitHub, the clone url can be found when you click the Clone or Download button shown below:

You will be shown a popup like the one below. Hit the Plus sign and enter the URL of your git repository.

If you put a password on your SSH Key, enter it when you are prompted as shown below:

You might get this pop up asking you if you trust te RSA key fingerprint, click Yes

You’ll then want to clone the Repo. It may be empty, but there may also be readme or other important files you want to pull down.

Enter clone URL, and click through to clone the repo.
Add or create a few files to the directory, so that you have something to commit to the repo.
Now its time to commit some files! You’ll notice that all uncommitted files are shown in red text.

Select all of the files you want to add and right click to find the Git menu and select Add.

They will now show up in green text. Neat huh?!
You’ll notice that on the top right of the screen you’ll now see a small git toolbar. Click on the green check mark to make a commit.

This will actually show you something very similar to what you would see in other GUI based git tools. You will see many options here that will help you perform various tasks in the future. For the scope of this tutorial, all we want to do is get you started with source control in PyCharm, so we are just going to put in a simple commit message and click commit.

You may get this warning about your git user not being defined if it’s your first time. Enter you name and email and click Set and Commit button.

You should see something like this pop up on the bottom of your screen and now it’s time to push!

Before you push your code, do a quick VCS->Git->Fetch and VCS->Git-> Pull. Where it says Branches to merge, select origin/master.

You may have noticed that on the commit screen it gave you the option to commit and push at the same time, which is OK. You can also use the shortcut Ctrl+Shift+K. For this tutorial we are going to use the VCS->Git menu.

You’ll get one final screen with a Push button. Once you press that, viola! Code pushed to your Repo!

If all goes well, you should see the following message popup on the bottom of your screen.

I hope this short tutorial was helpful. If you have any questions about git and Pycharm, please feel free to leave them in the comments below!
Learn How to make money Flipping Websites!
I would like to use a specific SSH key when using Git through PyCharm on Windows.
Things I have tried:
-
Tried configuring SSH by adjusting the
~/.ssh/config(and permissions) as mentioned in these answers:- https://stackoverflow.com/a/31044770/8488985
- https://stackoverflow.com/a/11251797
- https://superuser.com/a/232406 (See for comments about permissions)
This enabled Git when used in the Git Bash command line, however, it did not work when using the IDE.
-
Tried adding the SSH key to the
ssh-agentas mentioned in here:- https://stackoverflow.com/a/4565746
Again, this enabled Git when used in the Git Bash command line, however, it did not work when using the IDE.
What else can I do?
asked Aug 11, 2021 at 8:41
![]()
Apparantly JetBrains IDEs (like PyCharm) use the Windows commandline to interact with git.
See here
So the first step is to startup the Windows Command Prompt and check if you can use Git with a specific SSH key that way.
In my case this was not possible, even though I had configured the config file located at ~/.ssh/config (when accessed through Git Windows) or C:\Users\<Me>\.ssh\config.
This is why the SO posts mentioned in my question did not solve my problem.
The second step is to figure out which config file instead is used by Git when accessed through the Windows Command Prompt.
This provided me the clue that Git on Windows can use an internal ssh config file called ssh_config (instead of config) and located near the git.exe (instead of in a subdir of your homedir).
I found Git’s location using where git which indicated C:\Program Files\Git-2.16.1\cmd\git.exe.
So the config I was looking for was located at C:\Program Files\Git-2.16.1\etc\ssh\ssh_config.
The third step is adjusting that ssh_config file similar to the config file.
For me this looked like this:
Host <some-name>
        HostName gitlab.com
        IdentityFile C:\Users\<Me>\.ssh\<my-non-default-key>
        # Prevents usage of the default IdentityFile
        # See: https://stackoverflow.com/a/11251797
        IdentitiesOnly yes
        # Prevents warning when pulling from Gitlab.
        # See: https://stackoverflow.com/a/67556915
        UpdateHostKeys no
The fourth and last step is to change the remote in the Git repository such that it uses the name <some-name> specified in the ssh_config file.
Get the original remote first using git remote -v.
This gives something like this:
[email protected]:some/subdirs/to/the/repository.git
Now swap out the gitlab.com part for <some-name> specified in the ssh_config file, like this:
git remote set-url origin git@<some-name>:some/subdirs/to/the/repository.git
Summary:
- When using a JetBrains IDE like PyCharm it uses Git over the Windows Command Prompt
- Find out the location of Git in the Windows Command Prompt
- Adjust the ssh_config file located at this Git location
- Set the remote url of the repository such that it uses the host name specified in the ssh_config file
answered Aug 11, 2021 at 8:43
![]()
MuadDevMuadDev
3923 silver badges12 bronze badges
1
To make a connection to a database more secure, some services require SSH or SSL usage.
SSL
The following procedure describes the SSL configuration that suits most databases. For some databases, you need to use another approach for a successful connection. You can see configuration examples for Cassandra and Heroku Postgres in the DataGrip documentation.
Connect to a database with SSL
-
Open data source properties. You can open data source properties by using one of the following options:
-
In the Database tool window ( ) , click the Data Source Properties icon
 .
. -
Press Control+Alt+Shift+S.
-
-
On the Data Sources tab, select a data source that you want to modify.
-
Click the SSH/SSL tab and select the Use SSL checkbox.
-
In the CA file field, navigate to the CA certificate file (for example, mssql.pem).
-
You can leave the certificate file fields empty and use a truststore to obtain a required certificate from the certificates that it contains. To do that, tick the Use truststore checkbox and select the truststore that you want to use.
-
IDE: Use the certificates that are accepted by the IDE. You can add new accepted certificates in .
-
JAVA: Use JAVA truststore certificates.
-
System: Use System truststore certificates.
-
-
In the Client certificate file field, navigate to the client certificate file (for example, client-cert.pem).
-
In the Client key file field, navigate to the client key file (for example, client-key.pem).
-
From the Mode list, select the verification mode:
Require
Verifies that the server recognizes the client certificate, if the certificate is provided.
Verify CA
-
Verifies that the server recognizes the client certificate, if the certificate is provided.
-
Verifies the server by checking the certificate chain up to the root certificate that is stored on the client.
Full Verification
-
Verifies that the server recognizes the client certificate, if the certificate is provided.
-
Verifies the server by checking the certificate chain up to the root certificate that is stored on the client.
-
Verifies the server host to ensure that it matches the name stored in the server certificate.
The SSL connection fails if either one of the certificates cannot be verified.
-
-
To ensure that the connection to the data source is successful, click Test Connection.


Disable SSL connection to a database
-
Open data source properties. You can open data source properties by using one of the following options:
-
In the Database tool window ( ) , click the Data Source Properties icon
. -
Press Control+Alt+Shift+S.
-
-
On the Data Sources tab, select a data source that you want to modify.
-
Click the SSH/SSL tab and clear the Use SSL checkbox.
-
Click Apply.
Copy SSL settings from other data sources
If you configured SSL settings for one data source, you can copy them for another data source.
-
Open data source properties. You can open data source properties by using one of the following options:
-
In the Database tool window ( ) , click the Data Source Properties icon
. -
Press Control+Alt+Shift+S.
-
-
On the Data Sources tab, select a data source that you want to modify.
-
Click the SSH/SSL tab and select the Use SSL checkbox.
-
Click the Copy from … link and select the configuration that you want to copy.
SSH
Secure Shell or SSH is a network protocol that is used to encrypt a connection between a client and a server.
In PyCharm, you can create an SSH connection one of the following ways:
-
Using the PyCharm SSH tunnel. The IDE will create an SSH tunnel using the SSH configuration that you set.
-
Creating an SSH tunnel manually using PuTTy, Pageant, or ssh-client.
PyCharm SSH tunnel
PyCharm can create an SSH tunnel based on the SSH configuration that you set. To access the SSH configuration settings, press Control+Alt+S to open the IDE settings and select Tools | SSH Configuration.
To use an SSH tunnel for the data source, select the Use SSH tunnel checkbox in the SSH/SSL tab of Data Sources and Drivers dialog (Command I).
All created SSH connections are shared between all the data sources that you have in a project. If you do not want to share a connection between projects, select the Visible only for this project checkbox in the SSH connection settings.
Connect to a database with SSH
-
Open data source properties. You can open data source properties by using one of the following options:
-
In the Database tool window ( ) , click the Data Source Properties icon
. -
Press Control+Alt+Shift+S.
-
-
Select a data source profile where you want to change connection settings.
-
Click the SSH/SSL tab and select the Use SSH tunnel checkbox.
-
Click the Add SSH configuration button (
). -
In the SSH dialog, click the Add button.
-
If you do not want to share the configuration between projects, select the Visible only for this project checkbox.
-
In Host, Username, and Port fields, specify your connection details.
-
From the Authentication type list, you can select an authentication method:
-
Password: Access the host with a password. To save the password in PyCharm, select the Save password checkbox.
-
Key pair (OpenSSH or PuTTY): Use SSH authentication with a key pair. To apply this authentication method, you must have a private key on the client machine and a public key on the remote server. PyCharm supports private keys that are generated with the OpenSSH utility.
Specify the path to the file where your private key is stored and type the passphrase (if any) in the corresponding fields. To have PyCharm remember the passphrase, select the Save passphrase checkbox.
-
OpenSSH config and authentication agent: Use a credentials helper application that manages your SSH keys, such as ssh-agent.
-
-
Click OK to confirm the new SSH configuration settings.
-
In the Local port field of Data Sources and Drivers dialog, specify the local port number from which you want to forward the connection. Otherwise, PyCharm selects the port dynamically.
 ).
).
Disable SSH connection to a database
-
Open data source properties. You can open data source properties by using one of the following options:
-
In the Database tool window ( ) , click the Data Source Properties icon
. -
Press Control+Alt+Shift+S.
-
-
Select a data source profile where you want to change connection settings.
-
Click the SSH/SSL tab and clear the Use SSH tunnel checkbox.
-
Click Apply.
Create SSH tunnel manually
Create the SSH tunnel with PuTTY (Windows)
-
Download and run the latest version of the PuTTY SSH and Telnet client (download the client from https://www.putty.org/).
-
In the PuTTY Configuration dialog, navigate to .
-
In the Private key file for authentication field, specify the path to your private key file and click Open.
-
In the command line window, specify the username that you use for the SSH tunnel and press Enter. Do not close the command line window.
-
In the Database tool window ( ) , click the Data Source Properties icon
on the toolbar. -
Select a data source profile where you want to change connection settings.
-
Click the SSH/SSL tab and select the Use SSH tunnel checkbox.
-
From the Auth type list, select OpenSSH config and authentication agent.
-
In Proxy host, Proxy user, and Port fields, specify connection details.
-
To ensure that the connection to the data source is successful, click Test Connection.
")
Create the SSH tunnel with Pageant (Windows)
Pageant is an SSH authentication agent for PuTTY, PSCP, PSFTP, and Plink. Pageant stores your private key, and as long as it is running, it provides the unlocked private key to PuTTY or other tools like PyCharm. You can find the Pageant icon in the Windows taskbar.
-
Download the latest version of Pageant (download the client from https://www.putty.org/).
-
In the Windows taskbar, right-click the Pageant icon and select Add Key.
-
In the Select Private Key File dialog, navigate to the private key file (the PPK file) and click Open.
-
(Optional) Enter the private key passphrase and press Enter.
-
In the Database tool window ( ) , click the Data Source Properties icon
on the toolbar. -
Select a data source profile where you want to change connection settings.
-
Click the SSH/SSL tab and select the Use SSH tunnel checkbox.
-
From the Auth type list, select OpenSSH config and authentication agent.
-
In Proxy host, Proxy user, and Port fields, specify connection details.
-
To ensure that the connection to the data source is successful, click Test Connection.
")
Create the SSH tunnel with the ssh-agent (macOS and Linux)
Run all commands for ssh-agent in the command line.
-
Ensure that ssh-agent is running.
ssh-agent
-
Add your key to the agent (in the following example, the key path is ~/.ssh/id_rsa).
ssh-add ~/.ssh/id_rsa
-
(Optional) On macOS, you can add
-Koption to thessh-addcommand to store passphrases in your keychain. On macOS Sierra and later, you need to create the config file in ~/.ssh/ with the following text:Host *
UseKeychain yes
AddKeysToAgent yes
IdentityFile ~/.ssh/id_rsaIf you have other private keys in the .ssh directory, add an
IdentityFileline for each key. For example, if the second key has the id_ed25519 name, addIdentityFile ~/.ssh/id_ed25519as an additional line for the second private key. -
List all added keys.
ssh-add -L
-
In the Database tool window ( ) , click the Data Source Properties icon
on the toolbar. -
Select a data source profile where you want to change connection settings.
-
Click the SSH/SSL tab and select the Use SSH tunnel checkbox.
-
From the Auth type list, select OpenSSH config and authentication agent.
-
In Proxy host, Proxy user, and Port fields, specify connection details.
-
To ensure that the connection to the data source is successful, click Test Connection.
")
Last modified: 20 September 2023