Сервер PXE (Preboot Execution Environment) является мощным инструментом для установки операционных систем на компьютеры в локальной сети. Он позволяет развернуть и настроить ОС на нескольких машинах одновременно, экономя время и упрощая процесс установки.
В этом полном руководстве мы разберем, как установить и настроить PXE сервер на операционной системе Windows 10. Мы охватим все шаги, начиная с установки и настройки необходимого программного обеспечения до добавления образов операционной системы и настройки клиентских компьютеров.
Мы познакомимся с различными инструментами, такими как TFTP сервер, DHCP сервер и WDS (Windows Deployment Services). Вы узнаете, как настроить каждый из них и как взаимодействовать между собой для полноценной работы PXE сервера.
Следуя этому руководству, вы сможете создать свой собственный PXE сервер на Windows 10 и легко устанавливать операционные системы на несколько компьютеров одновременно, что значительно упростит работу в IT-сфере и в других сферах, требующих массовой установки ОС.
Установка и настройка PXE сервера может показаться сложной задачей для начинающих, но благодаря этому руководству, вы сможете освоить этот процесс и начать использовать его в своей сети с минимальными затратами времени и усилий. Присоединяйтесь к нам и начнем.
Содержание
- Как установить и настроить PXE сервер на Windows 10
- Подготовка к установке
- Загрузка нужного ПО
- Установка и настройка DHCP сервера
- Установка и настройка TFTP сервера
Как установить и настроить PXE сервер на Windows 10
В этом руководстве вы узнаете, как установить и настроить PXE сервер на операционной системе Windows 10. PXE сервер позволяет загружать операционные системы и другие программы на удаленные компьютеры через сеть, что может быть особенно полезно при развертывании большого количества компьютеров в офисной сети или в образовательных учреждениях.
Для настройки PXE сервера на Windows 10 потребуется следующее:
-
Компьютер с операционной системой Windows 10.
-
Установленный и сконфигурированный DHCP сервер. DHCP сервер отвечает за предоставление IP-адресов и другой сетевой информации клиентам в сети.
-
Установленный и сконфигурированный TFTP сервер. TFTP сервер отвечает за передачу файлов по сети.
Процесс установки и настройки PXE сервера на Windows 10 можно разделить на следующие шаги:
-
Установка необходимых компонентов. Настройка DHCP сервера.
-
Установка TFTP сервера.
-
Создание необходимых директорий и файлов на TFTP сервере.
-
Настройка загрузочных файлов и образов операционной системы.
-
Проверка работоспособности PXE сервера.
Следуя этим шагам, вы сможете успешно установить и настроить PXE сервер на Windows 10, что позволит вам загружать операционные системы и программы на удаленные компьютеры через сеть. Такой сервер может быть особенно полезен в офисных сетях и образовательных учреждениях, где требуется развертывание большого количества компьютеров.
Подготовка к установке
Для установки и настройки PXE сервера на операционной системе Windows 10 необходимо выполнить несколько предварительных шагов. Ниже приведены основные инструкции для подготовки к установке сервера.
| Шаг | Описание |
|---|---|
| 1 | Удостоверьтесь, что ваш компьютер соответствует следующим требованиям:
— Windows 10 Pro или Windows 10 Enterprise — Доступ в сеть — Выделенный IP-адрес для сервера — Минимум 1 GB оперативной памяти — 20 GB свободного места на жестком диске |
| 2 | Установите операционную систему Windows 10 на ваш компьютер, если она еще не установлена. Убедитесь, что у вас есть административные права на установку программного обеспечения. |
| 3 | Загрузите последнюю версию Windows Assessment and Deployment Kit (Windows ADK) с официального сайта Microsoft. |
| 4 | Запустите загруженный файл Windows ADK и следуйте инструкциям мастера установки. Убедитесь, что установлены компоненты Deployment Tools и Windows Preinstallation Environment (Windows PE). |
| 5 | Скачайте и установите программу Serva с официального сайта. Serva — это бесплатная программа для настройки PXE сервера на Windows. |
После выполнения этих шагов вы будете готовы приступить к установке и настройке PXE сервера на Windows 10.
Загрузка нужного ПО
Прежде чем начать установку и настройку PXE сервера на Windows 10, вам необходимо загрузить несколько программ для успешной работы сервера. В этом разделе мы рассмотрим, какие программы вам понадобятся и где их можно скачать.
1. Windows Deployment Services (WDS) — это ролевая служба Windows Server, но существует официальная версия WDS для Windows 10. Вы можете скачать WDS для Windows 10 из официального сайта Microsoft.
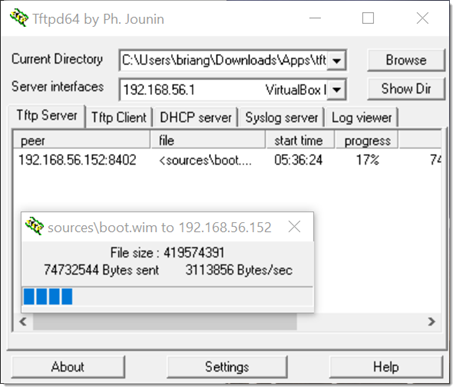
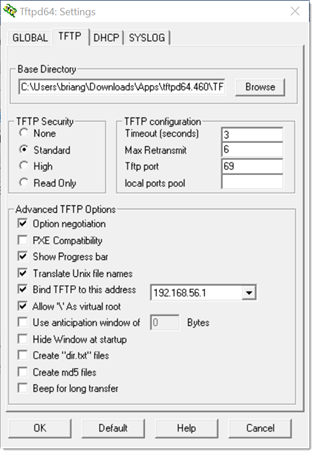
2. TFTP сервер — TFTP (Trivial File Transfer Protocol) сервер необходим для передачи файлов по сети. Существует много TFTP серверов, известных своей надежностью и простотой использования. Один из самых популярных TFTP серверов для Windows — Tftpd64. Вы можете скачать его с официального сайта разработчика.
3. DHCP сервер — DHCP (Dynamic Host Configuration Protocol) сервер необходим для автоматической настройки IP-адресов устройствам в сети. В Windows 10 встроен DHCP сервер, который может быть включен с помощью PowerShell команд. Для активации DHCP сервера на Windows 10 вам понадобится возможность взаимодействовать с PowerShell.
4. Образ операционной системы — конечно же, без операционной системы невозможно установить и настроить PXE сервер. Вам понадобится образ операционной системы, который будет развернут на клиентских компьютерах через PXE сервер. Вы можете загрузить образы операционных систем с официального сайта Microsoft или использовать свои собственные образы.
После загрузки всех необходимых программ вы будете готовы к установке и настройке PXE сервера на Windows 10. В следующих разделах мы рассмотрим каждую программу более подробно и дадим инструкции по установке и настройке.
Установка и настройка DHCP сервера
В операционной системе Windows 10 DHCP сервер можно установить и настроить с помощью роли DHCP Server. Для этого следуйте инструкции:
- Откройте «Управление компьютерами» и выберите «Установка ролей и компонентов».
- Выберите «Роли» и нажмите «Добавить роль».
- В появившемся окне выберите «DHCP Server» и нажмите «Далее».
- Прочитайте информацию о роли DHCP Server и нажмите «Далее».
- Выберите сетевой интерфейс, на котором будет работать DHCP сервер, и нажмите «Далее».
- Настройте параметры DHCP сервера, такие как диапазон IP-адресов, адрес шлюза по умолчанию, DNS-серверы и другие параметры. Нажмите «Далее», когда закончите настройку.
- Проверьте свои настройки и нажмите «Установить», чтобы установить DHCP сервер.
- После завершения установки DHCP сервера, настройте область DHCP на вашем сервере, чтобы определить различные параметры и настройки для подключаемых устройств.
После установки и настройки DHCP сервера, ваш PXE сервер будет автоматически назначать IP-адреса устройствам в сети и предоставлять им все необходимые настройки для загрузки по сети.
Установка и настройка DHCP сервера является шагом к созданию полноценного PXE сервера на Windows 10. Далее вы можете продолжить настройку других компонентов PXE сервера, таких как TFTP сервер и настройка загрузочного образа.
Установка и настройка TFTP сервера
Для установки и настройки TFTP сервера на Windows 10 следуйте этим шагам:
- Откройте «Панель управления» на вашем компьютере.
- Выберите «Программы» и «Возможности Windows».
- В разделе «Включение или отключение Windows» найдите «TFTP-клиент» и установите его.
- Нажмите «OK» и подождите, пока Windows установит TFTP-клиент.
- После установки TFTP-клиента перейдите в «Панель управления» и выберите «Административные инструменты».
- Откройте «Службы» и найдите «Службы TFTP».
- Щелкните правой кнопкой мыши на «Службы TFTP» и выберите «Свойства».
- Во вкладке «Общие» установите «Тип запуска» в «Автоматический».
- Перейдите во вкладку «Безопасность» и установите разрешения для TFTP-сервера, указав папку, где хранятся файлы для передачи по TFTP.
- Нажмите «OK», чтобы сохранить изменения.
Теперь TFTP сервер настроен и готов к использованию. Вы можете передавать файлы по TFTP, используя его IP-адрес и имя файла. Убедитесь, что ваш компьютер и устройство, с которым вы хотите обмениваться файлами, находятся в одной сети.
Hello World,
Today, I’ll provide you some information about building up a custom PXE Server. Microsoft offers deployment tools such as Windows Deployment Server or even Microsoft deployment Toolkit 2010 or even more advanced product such as SMS or SCCM.
They are all great tools but they have “heavy” dependencies mainly on Active Directory. You need to have a working Active Directory in order to take full advantages of all these products. In some scenarios, it’s not possible to use these technologies. But don’t panic ! You can create your own PXE Server/TFTP Server. Usin a PXE server, you can easily deploy through your network OS images to capable pxe workstations and improve the overall process.
SETUP YOUR INFRASTRUCTURE
I’m assuming that you have no Active Directory available or reacheable. Imagine a situation where you have to setup a staging area in a room with no network connection to the rest of your network. You will need a switch and at least one computer (stand-alone) to host the PXE/TFTP services.
You have 2 options in order to create your PXE/TFTP infrastructure :
- You can use ready to use tools such as TFTPD32.exe or TFTP Server from SolarWinds
- You can try to tweak your windows system and get a TFTP server up an running in Minutes (more fun but more challenging may be !). I’ll provide some scripts and utilities to smooth your installation.
Option 1 : Using TFTP Server From Solarwinds
If you want to configure a TFTP server only and you are about to use DHCP,DNS services from Windows Operating System, the TFTP server from SolarWinds might fit yours needs. With this free utility, you will be able to configure quickly your TFTP server. You simply download the free tool from their site (you need to register to have access to the download ). On your future TFTP Server, you perform the Setup installation routine. At the end of the procedure, you have shortcut on your desktop. Double-click on the shortcut and you will see the following window.

On the menu, click on File and select Configure. the following windows will be displayed. As you can see, you cannot configure much. You can simply start the TFTP server and specify where to store your TFTP/PXE Boot files.

In order to have a fully working PXE infrastructure, you will need to install DHCP server and configure it to support PXE technology. You will also need to populate the tftp root directory with your pxe files and bootable images. We will provide some explanation later in this post but first let’s check which other options do we have
Option 2 : Using TFTPD32.exe
You can download the tool from here. The tool includes DHCP,TFTP,DNS services. The tool can also be installed as a windows service if you need to. You have some advanced settings that can be configured but for this post we are just interested in the DHCP-TFTP Functionality.
Note: if you want to make TFTP32.exe a windows service, you need to download the correct package from their web site. You have 2 options: TFTP32.ex as stand alone and TFTP32.exe as service
Logon into your future TFTP Windows server and install the Tftpd32.exe software. Based on your configuration, you will need to configure the DHCP settings and the basic TFTP Server Settings.To ease the setup, I’m assuming that you will be using the DHCP feature of the TFTPD32.exe utilty. After the installation, you can click on the shortcut created on the desktop and you will see a screen similar to the following :

If you click on settings button, you will be redirected to the following dialog box. I have changed the Base TFTP Directory to c:\tftproot. You can accept default or point to another folder if you prefer to. Press OK when done

Finally, go to the DCHP server tab and fill in the requested information (if you intend to use the DHCP feature of TFTD32.exe)

As you can see, this is quite straightforward ! Using TFTPD32 can be useful, if you do not have the DHCP Service already installed on your Windows box. Like the previous option, we are not able to boot in PXE mode at this stage, we will need to populate the tftp root directory with the correct files. Note that in the DHCP configuration, you will need to provide the path of the boot file for the pxe server. Again no panic, we will explain that in the next lines.
Option 3 : Build up your “Custom” TFTP Server
With this option, we will try to use only windows components in order to build up your TFTP/PXE server. We will use a “old” recipe in order to have a working TFTP Server running on a Windows 2003 server. You can configure a TFTP Server by using the following procedure
Step 1 : installing and Configuring the TFTP service
- Copy the file tftpd.exe from %root%\system32\dllCache to %root%\system32 ( This is only possible for Windows 2003 Operating Systems. If you have Windows 2008 OS or later, you will need to copy the file from a Windows 2003 box.)
- using the resource kit instsrv.exe, create a service using the following command
intsrv tftpd c:\winnt\system32\tftpd. ( or you can use SC.exe)
- Start the service using the command net start tftpd
- Normally, after the service starts, it creates a folder in %root%\tftpdroot
- To start the service automatically at boot time, in services.msc change to start automatically option
Additional information : if the tftpdroot is not automatically created, you need to created it manually. You need to check that a registry key has been created as well. If not, you need to created it manually. Navigate to HKLM\system\CurrentControlSet\Services\tftpd\Parameters. Create (if not existing) the key directory and in the value specify the location of the tftpdroot folder
Step 2 : installing and Configuring the DHCP service
You install the DHCP service via the Add/remove program applet. You need to configure additional settings within the DHCP in order to have a working PXE server. The following options should be configured :
- Scope options : 066 Boot server value :host name or IP Address of the Tftp/DHCP server
- Scope options : 067 boot file name value:<%your pxeboot file%>)
- Restart the DHCP
- Scope option: 043 Vendor specific info Value : 01 04 00 00 00 00 ff.
- add additional option via Netsh
C:\WINDOWS\system32>netsh
netsh>dhcp
netsh dhcp>server \\<server name> *OR* <server IP address>
netsh dhcp server>add optiondef 60 PXEClient String 0 comment=PXE support
netsh dhcp server>set optionvalue 60 STRING PXEClient
To verify that the Option 060 was added successfully enter the command:
netsh dhcp server>show optionvalue
Exit issuing command exit and restart your DHCP server. You have a TFTP Server up and running with no third-party tools. That’s cool ! Again, in order to have a working PXE Server, you will need to populate the TFTP ROOT Directory and ensure that the bootfile name option in your DHCP is set correctly.
BONUS
I have explained the manual process. You will get a small bonus ! You can find a batch file sample here that will help you in automating the setup of your TFTPD and DHCP Server. The Batch file is valid on Windows 2003 at the moment. I’ll publish a little bit later a GUI that will be working with Windows XP or Windows 2003 and later (including Windows 2008)
Tftp directory content
Time to populate our tftp Directory. We will upload all the necessary files into the TFTP directory in order for our pxe clients to boot into WINPE 2.0 or 3.0 enviromnent. You can customize your WinPE boot image in order to add some additional tools and utilities and automate for example capture or dump of an image on a target PXE machine. This is out of scope of this post. but we will come back to that in some future posts.
So, what do you need to upload in this directory. I have tried to keep to a minimum the number of files to be uploaded. This is the content of my basic tftproot directory

As you can see, I’ve created a sub folder called Boot and copied there 5 files. Where do you find these files ? If you have a Windows VISTA/7 or windows 2008/R2 installation media, you can extract the following files from the boot folder at the root of the DVD media
- Boot.sdi
In the Source folder of your DVD, you have a boot.wim file as well. You will need to mount this image (using imagex.exe utility) and extract the following file
- pxeboot.0 (located in windows\boot\PXE inside the boot.wim )
- Bootmgr.exe (located in windows\boot\PXE inside the boot.wim)
Finally, you will need to create your own BCD file. You can copy the following text into a batch file and run it on a Windows VISTA/7 or windows 2008 R2. You will need then to upload a wim file into your directory. You can use the boot.wim file from the DVD media and rename it in order to reflect the name you want to use in your BCD File (in my case, I’ve renamed the boot.wim file in winpe.wim)
Rem Creates BCD (boot configuration data) for Windows PE 3.0
set BCD-File=c:\tftproot\boot\BCD
del %BCD-File%
Bcdedit /createstore %BCD-File%
Bcdedit /store %BCD-File% /create {ramdiskoptions} /d “Ramdisk options”
Bcdedit /store %BCD-File% /set {ramdiskoptions} ramdisksdidevice boot
Bcdedit /store %BCD-File% /set {ramdiskoptions} ramdisksdipath \boot\boot.sdi
for /f “tokens=1-3” %%a in (‘Bcdedit /store %BCD-File% /create /d “WinPE x86” /application osloader’) do set guid1=%%c
Bcdedit /store %BCD-File% /set %guid1% systemroot \Windows
Bcdedit /store %BCD-File% /set %guid1% detecthal Yes
Bcdedit /store %BCD-File% /set %guid1% winpe Yes
Bcdedit /store %BCD-File% /set %guid1% osdevice ramdisk=[boot]\boot\winpe.wim,{ramdiskoptions}
Bcdedit /store %BCD-File% /set %guid1% device ramdisk=[boot]\boot\winpe.wim,{ramdiskoptions}
Bcdedit /store %BCD-File% /create {bootmgr} /d “Windows Vista BootManager”
Bcdedit /store %BCD-File% /set {bootmgr} timeout 30
Bcdedit /store %BCD-File% /set {bootmgr} displayorder %guid1%
Bcdedit /store %BCD-File% /enum all
Download the CreateBCD.zip File
Final note: because I’ve created a boot sub folder, I had to change the boot file name value in the DHCP Server from pxeboot.0 to \boot\pxeboot.0
That’s it for this post ! This is a first step into deployment tasks. This infrastructure will be useful in many many scenarios
Till next time see ya

Search code, repositories, users, issues, pull requests…
Provide feedback
Saved searches
Use saved searches to filter your results more quickly
Sign up
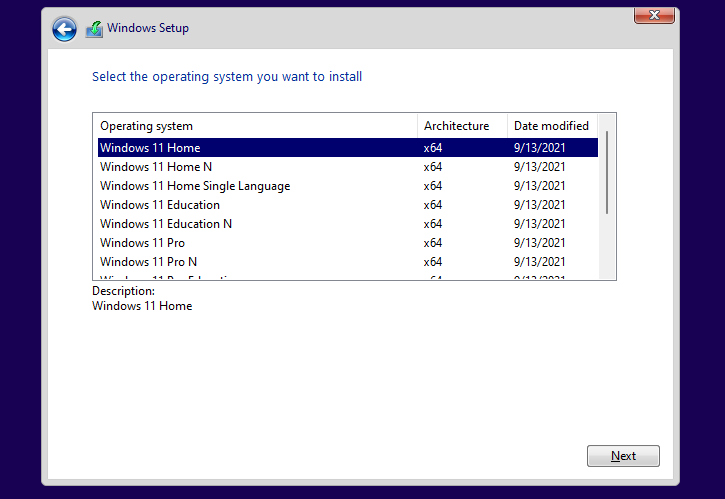
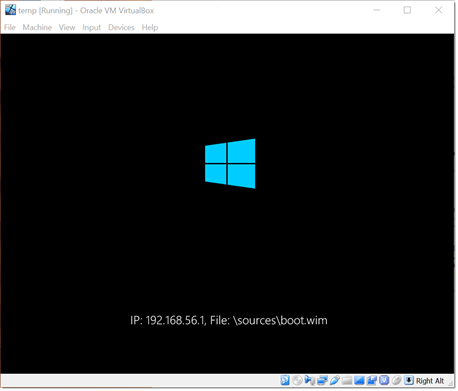
В этой статье мы рассмотрим, как установить Windows 10 или 11 по сети без использования загрузочной USB флешки (установочного DVD диска). Для загрузки компьютера по сети через PXE мы будем использовать небольшой Tiny PXE Server. Инструкция применима для установки Windows на устройствах как с UEFI, так и с BIOS прошивкой.
В корпоративных сетях для разливки образов Windows по сети используются более функциональные Windows Deployment Services (WDS) и Microsoft Deployment Toolkit (MDT). В этой статье мы покажем, как быстро запустить PXE сервер на любом имеющемся компьютере (будь то устройство с Windows или Linux) и использовать его для сетевой установки Windows на компьютеры в этой же LAN с помощью простых средств.
Нам понадобятся:
- Установочный ISO образ с Windows 10 или 11 (проще всего создать его с помощью Windows Media Creation Tool согласно инструкции https://winitpro.ru/index.php/2013/12/31/sozdaem-zagruzochnuyu-fleshku-s-windows-7-dlya-uefi-sistemy/ )
- Образ Windows PE — можно использовать свой образ WinPE, извлечь его из образа восстановления MS DART, получить оригинальный WinPE с помощью Windows Assessment and Deployment Kit (Windows ADK), или использовать готовый образ типа Hiren’s BootCD PE.
- Сервер Tiny PXE (http://reboot.pro/files/file/303-tiny-pxe-server/ )
Содержание:
- Создаем загрузочный образ Windows PE с помощью ADK
- Подготовка сервера сетевой установки TinyPXE
- Сетевая установка Windows 10 и 11 с PXE сервера
Создаем загрузочный образ Windows PE с помощью ADK
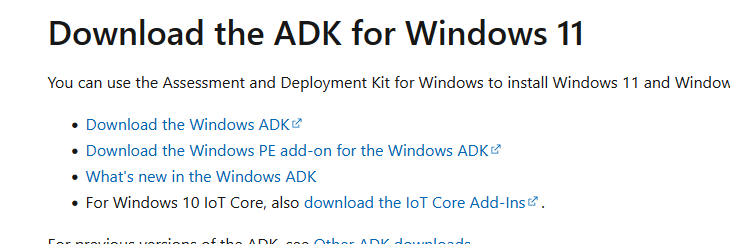
Скачайте Windows ADK для Windows 11 и Windows PE add-on for the Windows ADK по ссылкам на странице https://docs.microsoft.com/en-us/windows-hardware/get-started/adk-install .
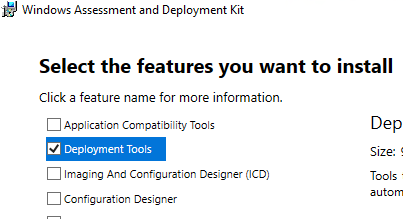
При установке Windows ADK выберите минимальную установку Deployment Tools.
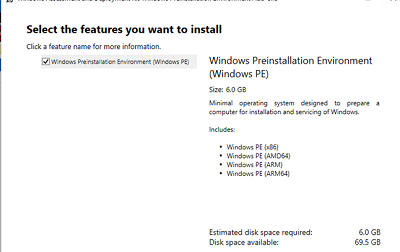
Затем аналогично установите Windows PE add-on for Windows ADK.
После окончания установки запустите Deployment and Imaging Tool из стартового меню Windows. Или запустите вручную команду:
"C:\Program Files (x86)\Windows Kits\10\Assessment and Deployment Kit\Deployment Tools\DandISetEnv.bat"
Теперь скопируйте файлы для среды WinPE в указанный каталог (создавать не нужно):
copype amd64 C:\tools\winpe
В данном случае я создаю файлы для среды WinPE x64. Можно использовать другие опции в зависимости от архитектуры: x86, arm или arm64.

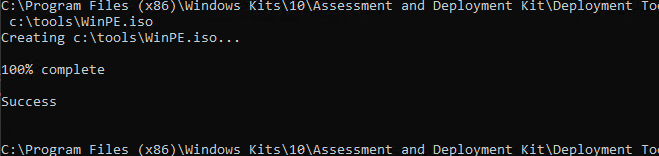
Теперь можно создать загрузочный ISO образ с WinPE:
MakeWinPEMedia /ISO C:\tools\winpe c:\tools\WinPE.iso
Подготовка сервера сетевой установки TinyPXE
Теперь нужно настроить ваш PXE сервер:
- Распакуйте архив pxesrv.zip в каталог C:\tools\pxesrv;
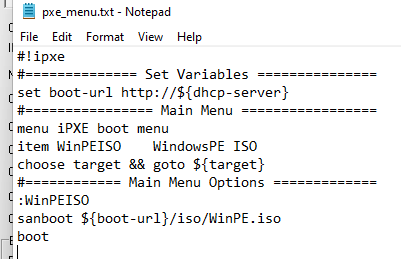
- Перейдите в каталог C:\tools\pxesrv и создайте текстовый файл pxe_menu.txt со следующим содержимым:
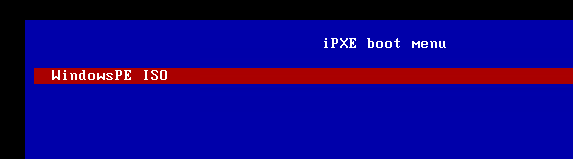
#!ipxe
set boot-url http://${dhcp-server}
 #================ Main Menu =================
menu iPXE boot menu
item WinPEISO WindowsPE ISO
choose target && goto ${target}
#============ Main Menu Options =============
:WinPEISO
sanboot ${boot-url}/iso/WinPE.iso
boot
- Скопируйте полученный ранее файл WinPE.iso в каталог C:\tools\pxesrv\files\iso;
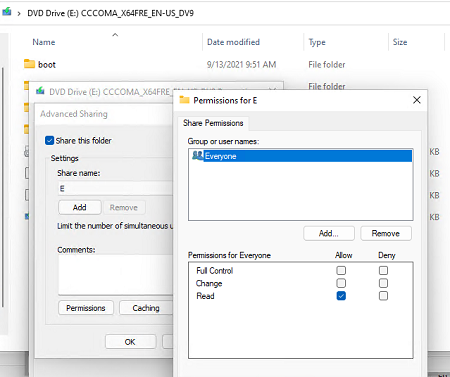
- Смонтируйте установочный ISO образ в виртуальный привод Windows и откройте общий сетевой доступ к нему (если хотите, можете открыть к нему анонимный доступ, но это не обязательно);
- Запустите файл pxesrv.exe с правами администратора;
- Включите опцию HTTPd;
- Если ваш компьютер сам будет раздавать IP адреса по DHCP (Tiny PXE это умеет), отключите опцию ProxyDHCP. Убедитесь, что в полях Option 54 DHCP Server и Next-Server указан IP адрес вашего компьютера. В поле IP Pool start указано начало диапазона DHCP, убедитесь что этот диапазон не занят в вашей сети;
- В разделе Boot File укажите ipxe.pxe (для загрузки на BIOS устройствах) или ipxe-x86_64.efi (для UEFI устройств);
- В поле Filename if user-class=gPXE or IPXE укажите имя файла меню, который вы создали ранее pxe_menu.txt;
- Запустите PXE сервер, нажав кнопку Online;
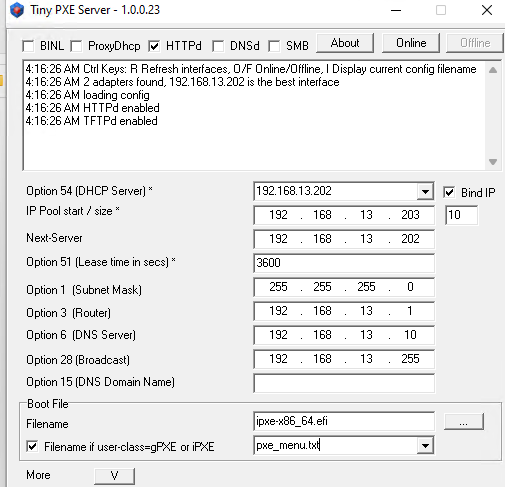
Итак, ваш PXE сервер запущен и готов к работе. Если в Windows включен брандмауэр (проще), отключите его или разрешите входящий трафик для процесса pxesrv.exe по протоколам DHCP, PXE, HTTP, TFTPS и SMB.
Сетевая установка Windows 10 и 11 с PXE сервера
Теперь вам нужно загрузить ваш компьютер, на который вы хотите установить Windows, с PXE сервера. Компьютер должен находится в той же локальной сети (VLAN), что и компьютер с PXE сервером.
В настройках BIOS/UEFI компьютера выберите в качестве первичного устройства загрузки PXE.
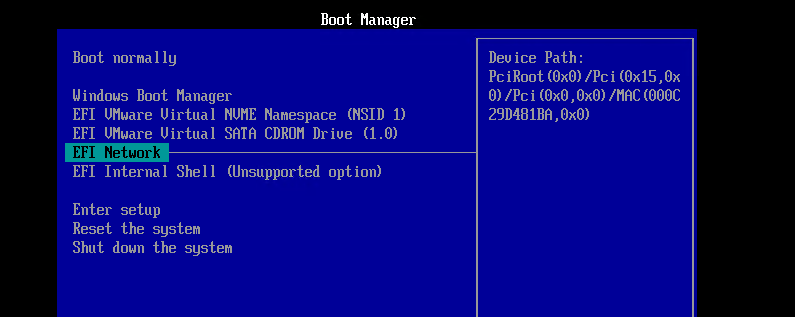
При запуске среды PXE компьютер обнаружит в сети DHCP сервер, получит IP адрес и получит доступных опции в меню iPXE.
Компьютер загрузится по сети в среде WinPE.
В моем случае при тестировании загрузки с PXE сервера виртуальной машины VMWare с UEFI прошивкой появилась ошибка:
Could not describe SAN devices: Operation not supported
Could not boot image: Operation not supported https://ipxe.org/err/3c2220
Как оказалось, в UEFI прошивки виртуальной машины на моем хосте VMware ESXi есть баг:
This error indicates that your UEFI firmware has a bug that prevents the installation of the iSCSI boot firmware table (iBFT). Switch to booting in “legacy” BIOS mode rather than UEFI mode.
Пришлось переключить ВМ в режим BIOS и запускать PXE сервер с опцией ipxe.pxe. После этого пошла нормальная установка Windows по сети.
Вам осталось подключить по SMB сетевой каталог, в котором хранится ваш установочный ISO образ Windows 11.
После инициализации среды командой
wpeinit
подключите ваш сетевой каталог, в который смонтирован установочный образ Windows. Выполните команду:
Net use E: \\192.168.13.202\e
Где
192.168.13.202
– имя компьютера на котором хранится установочный образ, а
E
– название общей папки.
Введите имя пользователя, с правами доступа к вашей Windows с PXE сервером.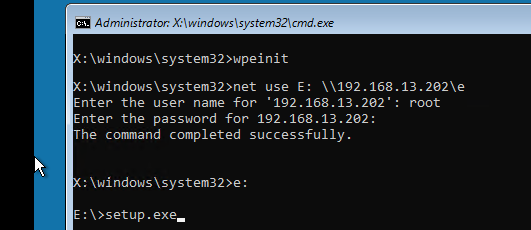
Запустите знакомый мастер установки Windows.
UPDATE – 04-03-2019: try serva https://www.vercot.com/~serva/ instead of tftpd32, it supports uefi.
Download the “Portable” version of the Tftpd32 software.
http://tftpd32.jounin.net/
All of my source files: https://drive.google.com/open?id=1FAIPPtIogFOk_uklAS_D7YxLrxI36Hly
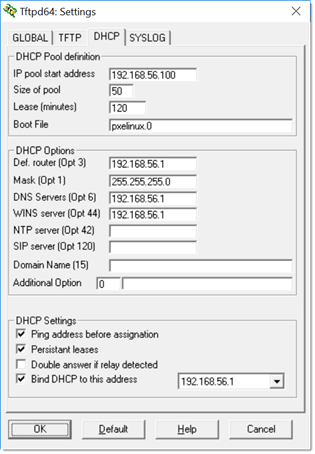
My TFTPROOT folder contents and source
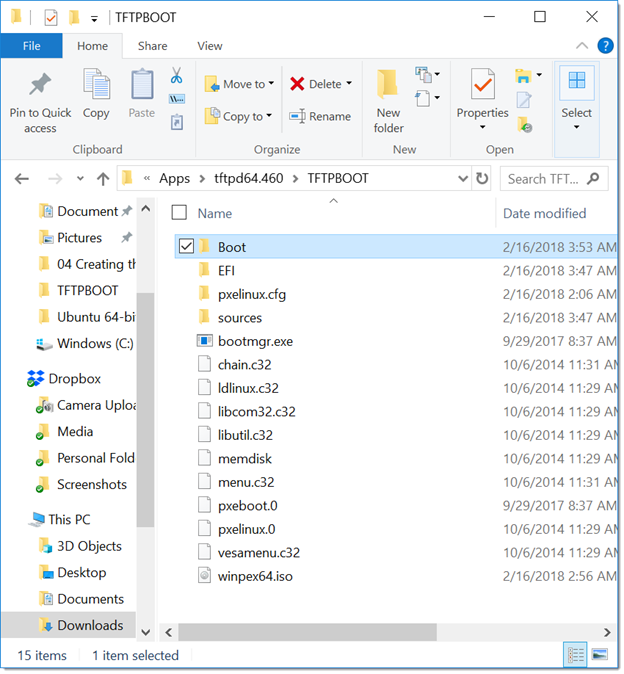
Files were pulled from Windows 10 ADK installation.
C:\Program Files (x86)\Windows Kits\10\Assessment and Deployment Kit\Windows Preinstallation Environment\amd64\Media =>
TFTPROOT\bootmgr.exe
TFTPROOT\Boot\en-us\bootmgr.exe.mui
TFTPROOT\Boot\en-us\memtest.exe.mui
TFTPROOT\Boot\Fonts\*.*
TFTPROOT\Boot\Resources\bootres.dll
..Media\EFI\Microsoft\Boot\BCD => TFTPROOT\Boot\BCD
..Media\EFI\Microsoft\Boot\boot.sdi => TFTPROOT\Boot\bood.sdi
Opened “C:\Program Files (x86)\Windows Kits\10\Assessment and Deployment Kit\Windows Preinstallation Environment\amd64\en-us\winpe.wim” with 7-zip and copied and renamed the following file:
TFTPROOT\pxeboot.n12 => \pxeboot.0
Copied “C:\Program Files (x86)\Windows Kits\10\Assessment and Deployment Kit\Windows Preinstallation Environment\amd64\en-us\winpe.wim” and renamed to “boot.wim”
winpe.wim => TFTPROOT\sources\boot.wim
Download the latest syslixuxXX.zip from https://www.kernel.org/pub/linux/utils/boot/syslinux/
Extracted with 7zip, searched and copied out the following files to the TFTPROOT folder:
TFTPROOT\ldlinux.c32
TFTPROOT\libcom32.c32
TFTPROOT\libutil.c32
TFTPROOT\memdisk
TFTPROOT\menu.c32
TFTPROOT\pxelinux.0
TFTPROOT\vesamenu.c32
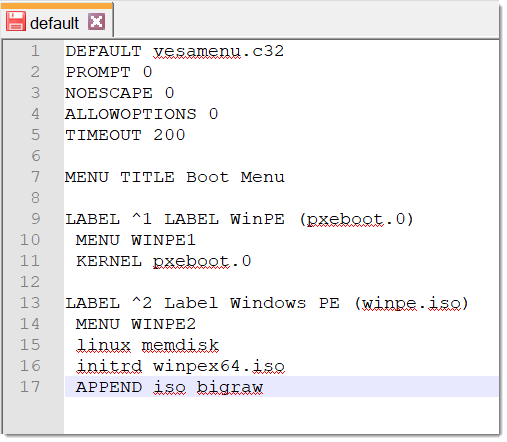
Lastly, I created a “default” file in a”pxelinux.cfg” folder with the following content:
DEFAULT vesamenu.c32
PROMPT 0
NOESCAPE 0
ALLOWOPTIONS 0
TIMEOUT 200

MENU TITLE Boot Menu
LABEL ^1 LABEL WinPE (pxeboot.0)
MENU WINPE1
KERNEL pxeboot.0

LABEL ^2 Label Windows PE (winpe.iso)
MENU WINPE2
linux memdisk
initrd winpex64.iso
APPEND iso bigraw