Время на прочтение
2 мин
Количество просмотров 292K
Так как приходиться уже не первый раз объяснять как это делается, решил оформить в виде How-To в картинках
Скачиваем архив putty отсюда putty.zip
1. Распаковываем и запускаем ssh-keygen

Выбираем ключ ssh-rsa и длину 2048 бит. Жмем «Generate».
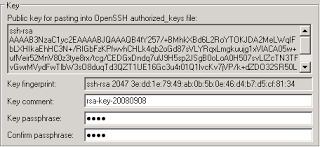
Ключ готов, заполняем кодовую фразу и комментарий к нему. Сохраняем приватный ключ как mykey.ppk и публичный как id_rsa.pub
2. Далее необходимо скопировать наш публичный ключ на сервер. Для этого запускаем psftp.
psftp: no hostname specified; use «open host.name» to connect
psftp> open myserver
The server’s host key is not cached in the registry. You
have no guarantee that the server is the computer you
think it is.
The server’s rsa2 key fingerprint is:
ssh-rsa 2048 XX:XX:XX:XX:XX:XX:XX:XX:XX:XX:XX:XX:XX:XX:XX:XX
If you trust this host, enter «y» to add the key to
PuTTY’s cache and carry on connecting.
If you want to carry on connecting just once, without
adding the key to the cache, enter «n».
If you do not trust this host, press Return to abandon the
connection.
Store key in cache? (y/n) y
login as: root
root@myserver’s password:
Remote working directory is /root
psftp>put id_rsa.pub /tmp/id_rsa.pub
local:id_rsa.pub => remote:/tmp/id_rsa.pub
psftp>
3. Ключ скопировался, теперь нужно добавить его в /root/.ssh/authorized_keys
Для этого логинимся еще раз по паролю, через putty и выполняем
ssh-keygen -i -f /tmp/id_rsa.pub >> /root/.ssh/authorized_keys
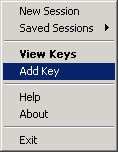
Теперь осталось добавить наш ключ в ssh-agent’a. После запуска он сидит в трее, чтобы добавить ключ кликаем правой кнопкой на «Add Key»
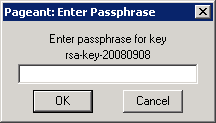
Вводим кодовую фразу:
Теперь логинимся в putty:
login as: root
Authenticating with public key "rsa-key-20080908" from agent
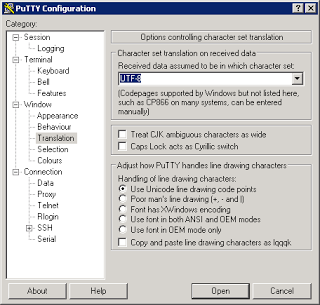
Практически все, чтобы устранить проблемы с кодировками, с кривым отображением mc в путти, исправляем локаль в настроках:
This tutorial explains how you can replace password-based SSH authentication with key-based authentication which is more secure because only the people that own the key can log in. In this example, we’re using PuTTY as our SSH client on a Windows system.
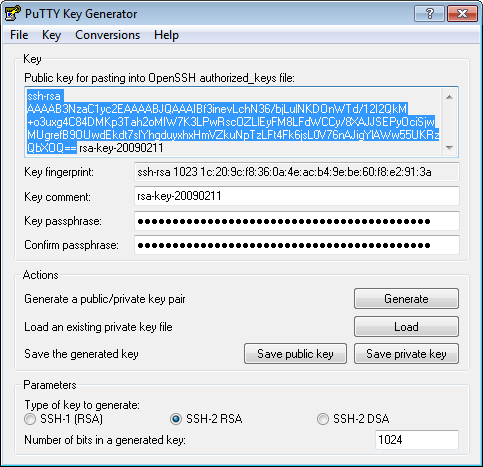
Generate a private and public key pair
Open PuTTYgen.exe, press Generate button, move mouse. Once the keys are generated, type your key passphrase (choose a «hard to guess» one). Save Public key. Save Private key.
Configure your Linux server (create user, save public key)
For this guide let’s assume you regular login name is us3r (replace it with one that you use regularly).
As root, on the shell, type:
adduser us3r --disabled-password
You will be asked to fill in some details such as the user’s real name (empty string is fine).
Now type:
su us3r
cd /home/us3r
mkdir .ssh
chmod 700 .ssh
cd .ssh
Then in that folder, create and edit a file called authorized_keys2.
In there, cut/paste your public ssh key, on ONE LINE (That is very important!!!)
- Do not add the email@example.com at the end of the line.
- Do not add the BEGIN PUBLIC KEY or END PUBLIC KEY.
- Do not add the rsa-key-20090211 at the end.
- Make sure, there is ssh-rsa at the beginning.
It should be something like:
ssh-rsa AAAAB3NzaC1yc2EAAAABJQAAAIBf3inevLchN36/bjLulNKDOnWTd/12I2QkM+o3uxg4C…
Type:
chmod 600 authorized_keys2
Add Private key to PuTTY SSH authentication agent
Start the PuTTY SSH authentication agent PAGEANT.EXE. When started, right-click its systray icon and select «add key». Select your private key file, and type in your passphrase when you add the key. The Pageant works as a passphrase keeper.
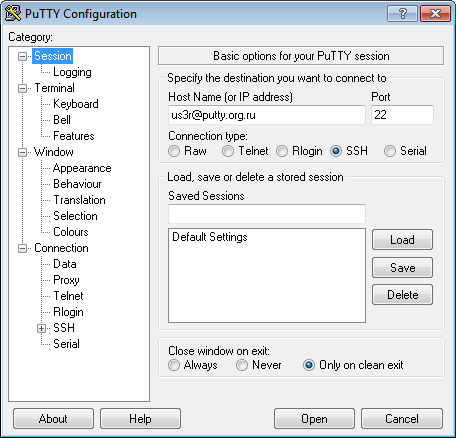
Use PuTTY to connect to your server
Open PuTTY and connect as us3r@putty.org.ru:
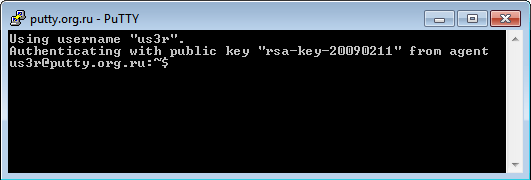
See that you log in without a password …
")
SFTP (SSH File Transfer Protocol)
Using SSH File Transfer Protocol (SFTP), you can transfer data bidirectionally within an authorized group of people in a particularly secure way. The transfer between the client and server takes place via an encrypted IP-based data tunnel. The basic File Transfer Protocol (FTP) has major security vulnerabilities, which were eliminated in the refined SSH File Transfer Protocol.
SFTP (SSH File Transfer Protocol)

How to generate SSH keys in Ubuntu
If you want a secure connection to your server or any another target host, then an SSH connection is just what you need. You can create SSH keys in Ubuntu in a few steps and they can be added just as quickly to the target system. How do you create an SSH key in Ubuntu and copy it to another device? Read on to find out.
How to generate SSH keys in Ubuntu
This tutorial on the open source PuTTY SSH client covers how to install it, its basic use, and step-by-step instructions for configuring key-based authentication.
Running multiple OSes is a common reality in today’s business environments. Take workstations and servers, for example. A Windows workstation may need to connect to Linux servers, IoT systems and network devices. The challenge faced, however, is connecting these environments securely and keeping data protected.
PuTTY is one tool that can help with this.
What is SSH? What is PuTTY?
SSH is a networking protocol that enables secure access to a computer or device over an unsecure network. Many Linux servers and network devices accept inbound SSH connections for remote configuration. Sysadmins use SSH to connect to remote devices and do the following:
- Audit log files in var/log.
- Edit configuration files in /etc.
- Update software using DNF (Dandified Yum) or APT (Advanced Package Tool).
- Connect to network devices, such as routers and managed switches to do the following:
- Enable or disable switch ports;
- Manage routing tables; and
- Configure routing protocols remotely using SSH.
PuTTY is an open source GUI implementation of the Secure Shell protocol that has long been used to run secure SSH tunnels to and from Windows computers. Initially released in 1999, PuTTY grew in popularity because Windows did not include the OpenSSH command line client and server until Windows 10 and later.
PuTTY remains a viable alternative to OpenSSH today because its GUI interface may be easier for admins to customize. Managing multiple SSH profiles is also simpler in PuTTY, as are other customizations, such as selecting encryption keys.
How to install PuTTY
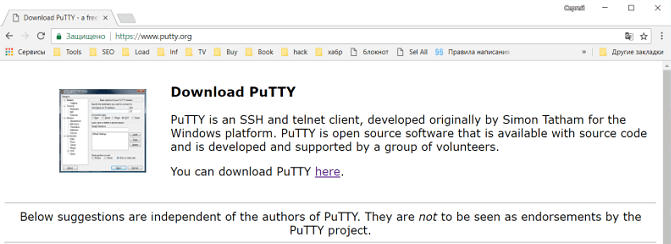
PuTTY can be downloaded here. Follow these steps to install it:
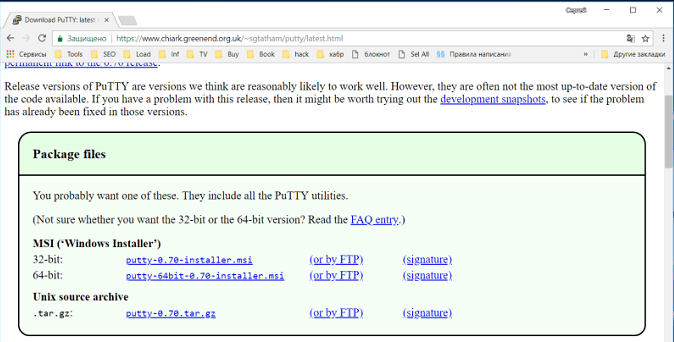
- Select the appropriate package file and download the installation executable. Supported Windows systems include 64-bit x86, 64-bit Arm and 32-bit x86. The general PuTTY installation includes all protocol client types. Downloadable clients that support a single protocol, such as Telnet, SCP and SFTP, are also available.
- Run the installer when the download completes.

- When the file has downloaded, double-click on the MSI package to launch the installer.
- Select Next on the Welcome page.
- Chose the destination location. The default is C:\Program Files\PuTTY\. Click Next.
- On the Products Features page, browse and select any additional nondefault options if desired. Click Install.
- If the Windows User Account Control asks to allow the app to make changes on your computer, select Yes.
Once complete, you can view the README file for basic guidance or exit. PuTTY is ready for use.
How to use PuTTY for a basic connection
Assume the targeted Linux system is configured for inbound SSH connections with no special settings. For example, root is allowed over SSH, the firewall permits TCP port 22, default password-based authentication is set, etc.
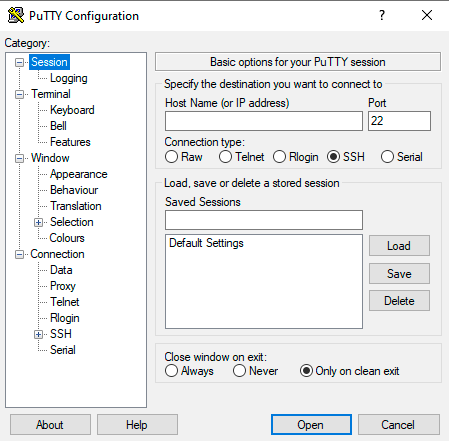
Launch PuTTY on a Windows workstation and type the destination IP address in the HOST Name (or IP address) box. Ensure SSH is selected from the Connection type radio options. Click Open.
The remote Linux system will prompt you for the name and password of a local user account. A new window will open and display your SSH session.
The first time you establish a connection, you will receive a PuTTY Security Alert informing you the remote server’s host key is not cached. It’s verifying the destination server is the device you believe it is. Click Accept if you’re confident of the identity of the remote system.
Save multiple connections
Saving connection specifications lets you quickly connect to frequently accessed remote servers. Type the remote system’s hostname or IP address, select the Saved Sessions box, and enter a name for the connection. You can use whatever descriptive name you want. Select Save, and the session name appears in the box. This can be done for multiple destinations. Select one and click Open to connect to it.

If you connect to many servers via PuTTY and must manage their keys, consider using Pageant, PuTTY’s authentication agent application.
How to configure SSH key-based authentication
Key-based authentication is strongly recommended. It’s a common requirement on Linux certification exams, a standard step in enterprise Linux configurations, and an industry best practice. Key-based authentication also makes automated tasks via scripting and Ansible easier.
Follow these three steps to configure key-based authentication in PuTTY:
1. Generate the key pair
PuTTY includes an application called PuTTYgen to create key pairs. Do the following on the Windows SSH client that will connect to the remote Linux SSH server:
- Run the PuTTY key generation tool from C:\Program Files\PuTTY\puttygen or using the puttygen command from the command line.
- Select Generate in the PuTTY Key Generator window. Move the mouse to create the random values used to develop the key.
- Select specific key types and bit lengths. Options include RSA, Digital Signature Algorithm, Elliptic Curve Digital Signature Algorithm and more.
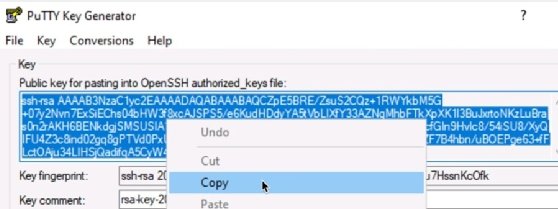
- Select the entire contents of the «Public key for pasting into OpenSSH authorized_keys file» from the Key window. This is the public key. Copy it to the clipboard to paste into a file later.

- Select Save private key. Select Yes in the PuTTYgen Warning window regarding passphrases.
- Close the PuTTYgen application.
2. Copy the public key to the remote device
On the Linux server, accessed from the local Windows client, do the following:
- Connect to the remote Linux server via a standard password-protected SSH/PuTTY session and log in.
- Use the command $ mkdir ~/.ssh to create a directory named ~/.ssh.
- Enter the command $ chmod 700 ~/.ssh. This gives users (owners) read, write and execute permissions.
- Use the command $ nano ~/.ssh/authorized_keys to create an empty text file named authorized_keys.
- Paste the contents of the «Public key for pasting into OpenSSH authorized_keys file» into the text file. Confirm you have pasted the key. Save and close the file.
- Enter the command $ chmod 600 ~/.ssh/authorized_keys. This setting provides the user with read and write permissions on the authorized_keys file.
- Type exit to close the SSH connection.
3. Configure the PuTTY client
Use the main PuTTY application to configure the PuTTY client to use key-based authentication.
- Launch PuTTY but do not connect to a remote system.
- In the Category window, browse to Connection>Data.
- Set the Auto-login username to the remote SSH username. This is the user for whom you created the ~/.ssh/authorized_keys file on the remote Linux system.
- Browse to Connection>SSH>Auth. Select Browse. Find the saved private key created with the PuTTYgen application.
Test key-based authentication
You are now ready to test the connection. Expect the connection to be established without a password challenge.
- At the top of the Category window, select Session to return to the main connection window. In the Host Name (or IP address) box, enter the destination hostname or IP address.
- Select Open to test the session. A message indicating «Authenticating with public key» will appear in the SSH connection window if key-based authentication was configured correctly.
You’ve successfully configured PuTTY to use key-based authentication.
Note that the private key can be protected with a passphrase, which will need to be entered each time the connection is made.
Other key authentication settings for SSH and PuTTY include the following:
- Consider editing the sshd configuration file on the remote Linux system to accept only key-based authentication and to deny password-based authentication.
- Do not permit root logins over SSH.
- Configure a nonstandard port number and block root authentication over SSH.
This was last published in October 2022
Dig Deeper on Network security
-

How to configure and customize Kali Linux
By: Kyle Johnson
-
SSH key management best practices and implementation tips
By: Peter Loshin
-
SSH2 vs. SSH1 and why SSH versions still matter
By: Peter Loshin
-
Use MicroK8s with Raspberry Pi in this tutorial
By: Stuart Burns


Содержание
- Применение и возможности PuTTY
- Установка на Windows
- Работа с программой
- Распространенные ошибки
![]()
PuTTY — программа, которая позволяет установить соединение с удаленным сервером или компьютером. Программу можно также применять для реализации следующих целей:
- удаленного администрирования;
- взаимодействия с VPS-серверами.
- работы с Telnet-терминалами;
- настройки маршрутизаторов через RS-232;
Работать рекомендуется через SSH, поскольку он обеспечивает высокий уровень безопасности соединения с другим компьютером. PuTTY поддерживает Telnet, реализующий текстовый интерфейс в терминале (только для отображения текстовой информации в режиме консоли).
Возможности программы
- Сохранение информации и конфигурационных параметров для многократного применения.
- Работа с SSH-ключами.
- Поддержка разных версий SSH-протокола.
- Встроенные клиенты SCP и SFTP, используемые для различных операций с файлами. Возможности первого ограничиваются только функцией копирования.
- Перенаправление портов через протокол SSH.
- Поддержка xterm, ECMA-48 и VT-102.
- Возможность соединения по IPv6.
- Работа с алгоритмами шифрования.
- Аутентификация через ключ, который расположен на удаленной машине.
- Соединение через proxy.
- Использование порта RS-232.
Установка на Windows
- Программа PuTTY для Windows 10 скачивается с официального сайта.

- Далее нужно перейти по ссылке, скачать пакет для архитектуры x86 или x64, а затем запустить установку.

- После установки необходимо проверить программу на работоспособность, запустив исполняемый файл на Windows.

Работа с программой
Интерфейс
Пользоваться программой PuTTY удобно, т. к. она имеет понятный интерфейс. Чтобы ее настроить, нужно знать назначение основных ее вкладок.
- Session позволяет задать параметры соединения, чтобы подключиться к серверу (IP-адрес, протокол и порт), а также сохранить настройки для многократного использования.
- Terminal: режим активации или деактивации терминала.
- Window: установка кодировки и изменение интерфейса.
- Connection отвечает за выбор шифрования, аутентификацию без ввода пароля и т. д.
Соединение с удаленным сервером
Принцип подключения не зависит от операционной системы. Это могут быть разные версии Windows (7, 10) или популярные дистрибутивы на основе Linux — Ubuntu, CentOS, Debian.
Подключиться по SSH через PuTTY просто. Для этого нужно следовать приведенной ниже инструкции.
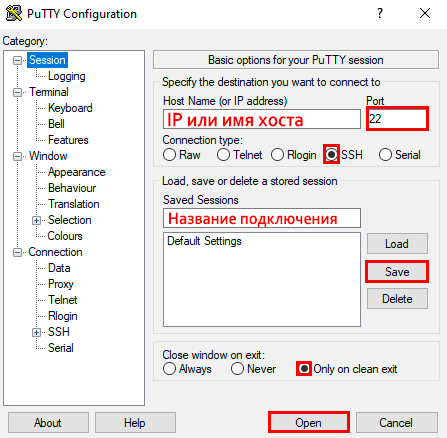
- Ввести IP-адрес или имя хоста, к которому необходимо подключиться.
- Указать порт (по умолчанию везде 22).
- Выбрать тип соединения SSH.
- Ввести название подключения и сохранить его, нажав кнопку «Save».
- Активировать соединение, нажав на «Open».

- Указать данные для авторизации (логин и пароль).
После этого работа с терминалом осуществляется, как на локальном компьютере. Чтобы узнать информацию о версии Ubuntu, нужно ввести команду:
sudo lsb_release -a.

Для удобства можно создать жесткую ссылку (ярлык) на программу для быстрого запуска.
Использование SSH-ключей
Чтобы постоянно не вводить данные авторизации для соединения с удаленным сервером, нужно установить ключ SSH-типа.
Для примера, продемонстрируем ниже, как подключиться через PuTTY, установленного в Windows 10, при помощи SSH-ключа к серверу на Ubuntu.
Шаг №1
Для начала, нужно выполнить ряд действий на компьютере с ОС Windows.
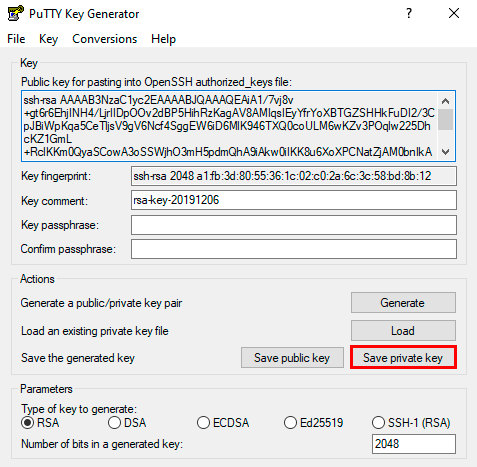
- Установить программу для генерации ключа «Putty Key Generator» и запустить ее.
- Задать параметр «RSA» и активировать процесс кнопкой «Generate». Нужно постоянно вводить указателем мыши в зоне окна выполнения операции для успешной генерации.

- Сохранить private key, для чего скопировать текст из консоли в документ. Предварительно нужно указать тип файла «.ppk».

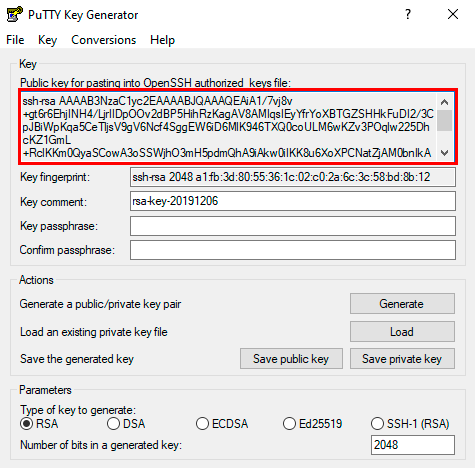
- Затем сохраняем public key. Для этого необходимо скопировать и вставить текст из буфера обмена в любой пустой текстовый файл.

- Свернуть программу.

Шаг №2
Далее необходимо перенести SSH-ключ на сервер Ubuntu, выполнив перечисленные ниже действия.
- Запустить программу PuTTY.
- Подключиться к серверу, используя его параметры для доступа (хост, порт и SSH-протокол).
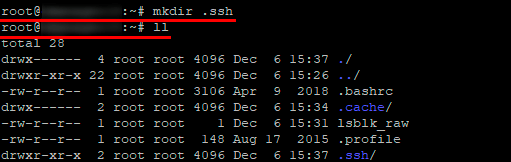
- Командой «mkdir .ssh» создаем папку «.ssh». Затем командой «ll» проверяем наличие папки.

- Прописываем права доступа для папки .ssh только для владельца, командой «сhmod 700 .ssh/».

- При помощи команды «cd .ssh» переходим в системную папку «./ssh».

- Создаем файл «authorized_keys», используя редактор nano, командой:
touch authorized_keys

- Прописываем права доступа для файла «authorized_keys», только для владельца, командой:
сhmod 600 authorized_keys

- Редактируем файл с помощью команды:
cat >> authorized_keys << EOF»
- Добавляем ваш public key и заканчиваем редактирование файла командой «EOF».


Шаг №3
Возвращаемся к программе PuTTY на Windows 10.
- Переходим в программу.
- Добавляем данные для подключения.
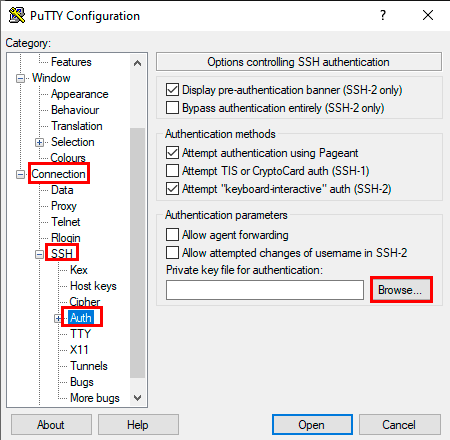
- Переходим во вкладку «Connection → SSH → Auth». Выбираем для аутентификации сохраненный файл «.ppk».

- Активируем соединение при помощи нажатия «Open».


Работа с файлами
Программа позволяет делать операции с файлами. Чтобы закачать файл на сервер, находящийся под управлением Linux Ubuntu (с компьютера на ОС Windows), нужно действовать по приведенной ниже инструкции.
- Сохранить тестовый файл «mydoc.txt» на диске C:\ вместе с исполняемым файлом для безопасного копирования — pscp.exe.
- Открыть командную строку Windows: «Win+R → cmd → Enter».
- Зайти в папку с программой pscp.exe, для чего ввести команду: «cd /d c:\Putty\pscp.exe»*, где «c:\Putty\» — путь к файлу pscp.exe.
* Путь к файлу «c:\Putty\pscp.exe» приведен в качестве примера.
- Далее можно приступать непосредственно к работе с файлом. Например, передать файл «mydoc.txt» на сервер «192.241.7.16»* со стандартным портом и пользователем Ubuntu74 в папку «root» можно командой:
* IP-адрес «192.241.7.16» приведен только в качестве примера.
pscp.exe mydoc.txt Ubuntu74@192.241.7.16:/root/
Если для соединения используется нестандартный порт (например, 25), то команда примет вид:
pscp.exe -P 25 mydoc.txt Ubuntu74@192.241.7.16:/root/
- Ввести пароль для Ubuntu74.
Скачать файл через PuTTY с сервера «192.241.7.16» в текущую папку можно с помощью команды:
pscp.exe Ubuntu@192.241.7.16:/root/mydoc.txt
Чтобы объединить файлы, нужно их загрузить на удаленную машину, а затем выполнить команду «sudo cat mydoc1.txt mydoc2.txt > mydoc.txt».
Распространенные ошибки
Проблемы с аутентификацией
PuTTY выдает при подключении сообщение: «Access denied». Это указывает на отказ в доступе, причиной которого являются ошибки при вводе логина или пароля.

Если соединение с удаленным сервером происходит при помощи SSH-ключа, то PuTTY выдаст в диалоговом окне такие строки:
Permission denied (publickey).
PuTTY Error output
Причины ошибки
Ошибка «Access denied» связана с некорректной аутентификацией на основе ключей. Вызвать ее может отсутствие соответствующих прав доступа к файлам или невозможность подтвердить права владельца.
Как решить
- Проверить параметры аутентификации (логин и пароль).
- Проверить наличие и правильность имени SSH-ключа в PuTTY.
- Выполнить проверку содержимого кода SSH-ключа в «authorized_keys».
Если ни один из вариантов не дал положительного результата, то нужно воспользоваться альтернативным графическим клиентом WinSCP. С его помощью нужно реализовать описанную ниже последовательность действий.
- Перейти в папку «/etc/ssh/», а затем открыть файл «sshd_config».
- Далее необходимо найти строки «PasswordAuthentication: YES» и «PermiRootLogin: NO». Значения переменных требуется поменять на противоположные значения, т. е. «PasswordAuthentication: NO» и «PermiRootLogin: YES».
- После сохранения изменений необходимо перезапустить PuTTY и соединиться с удаленным сервером.
Подробнее о том, как создать удаленное соединение для разных дистрибутивов Linux, можно узнать из отдельных руководств:
- Для Ubuntu;
- Для CentOS;
- Для Debian.
Ошибка подключения
Если программа PuTTY выдает ошибку «Unable to open connection to mysite.ru Host does not exist»*, то это свидетельствует о том, что ссылка на SSH-хост не соответствует сетевому адресу.
* Домен mysite.ru приведён для примера.
При истекшем времени подключения или отказе в соединении PuTTY выдаст сообщения «Network error: Connection timed out» и «Network error: Connection refused» соответственно.
Причины ошибки
- Отсутствие сетевого подключения.
- Неверно указан IP-адрес.
- Порт не поддерживается или его значение задано неверно.
- Блокировка исходящего подключения антивирусом или брандмауэром.
Как решить
Чтобы исправить ошибку, рекомендуется действовать по приведенной ниже инструкции.
- Проверить IP-адрес хоста.
- Убедиться, что порт не блокируется какой-либо программой. При необходимости внести его в список исключений.
- Проверить конфигурацию PuTTY во вкладках «Session» и «Connection».
- В список исключений антивируса или брандмауэра необходимо внести стандартный порт 22.