-
#1
My new Lenovo laptop with Windows11 home will not connect to a remote address using PuTTY. My main PC on the same home network works fine. On the laptop, I can ping the remote address, and can do a tracert to the remote address, and also I can use OpenSSH from the command line ( ssh xxx.xxx.xxx.xxx ) successfully. I even took the laptop to a WiFi hotspot, and got the same results. PuTTY will connect to local IP’s fine. I’m stumped, and need some hints on how to debug this. PS: WinSCP will not connect either.
Len, WB2HKK
Advertisements

-
#2
That’s strange — has the app been blocked by the firewall (perhaps mis-identified as a threat)? Do you have any other security software on the system other than Windows Defender?
Do you get any connection auth errors with PuTTY, or is it just a timeout? I’m using PuTTY on Windows 11 without a problem.
Advertisements
-
#3
Same problem.
Have you found a solution?
Want to reply to this thread or ask your own question?
You’ll need to choose a username for the site, which only take a couple of moments. After that, you can post your question and our members will help you out.
Ask a Question
PuTTY is a free and open-source terminal emulator. The software helps us to configure routers, switches, and other networking devices via the command line. It supports many network protocols, including SCP, SSH, Telnet, rlogin, and raw socket connection. However, a lot of users are reporting seeing PuTTy Fatal Error while trying to make the connection between devices. In this article, we will know the causes of this error and see what we can do if our computer says Network Error and the accompanying message could vary as follows:
PuTTy Fatal Error, Network Error
- Software caused connection abort
- Connection timed out
- Connection refused

If you encounter PuTTy Fatal Error, Network error, Software caused connection abort or Connection timed out or was refused on Windows 11/10, then follow the solutions mentioned below to resolve the issue:
- Check the Internet connection
- Make sure the port number and protocol are correct.
- Check if the SSH connection is enabled.
- Disable Firewall and Anti-virus temporarily
- Run a CLI Command
- Contact IT manager
Let’s get started.
1] Check the Internet connection
Sometimes basic tips can be the root cause of the issue and as the error code is related to the Internet connection, we’ll suggest you make sure that the Internet is stable, and cables are connected properly both to the PC and the router. First of all, check the network speed using one of the free Internet speed testers. In case the speed is slow, we should restart the router once, and lastly, if rebooting your router was of no help, then contact your ISP.
2] Make sure the port number and protocol are correct
The error code indicates that the server denied the network connection attempt PuTTY made to it, due to which PuTTy does not have access to the server. This is probably due to incorrect protocol and port number; therefore, it is advisable to make sure the port number and protocol (SSH, Telnet, or Rlogin) we are using are correct while accessing any device. However, one more thing to Keep in mind is that only a system administrator who has full control can resolve the error by restarting stopped telnet and SSH services. So, if we are a part of an organization, contact the administrator and ask them for the correct details.
3] Check if the SSH connection is enabled
It has been seen that even after the user had made sure that the port and protocol were correct, they were still unable to access the device. Usually, this issue occurs due to disabled SSH on the device. If it is already enabled, then we can see the next solutions; however, if it’s disabled, then we can resolve the issue by enabling this protocol on the device, and to do the same, follow the steps prescribed below.
- Press Windows + I key to open the Setting app.
- Click on the Apps option here.
- Click on Optional features.
- Click on View feature next to Add an optional feature.
- Now we can enable SSH from there.
Finally, see if the issue is resolved after enabling the SSH feature on the computer and if the problem continues to persist, see the next solution.
4] Disable Firewall and anti-virus temporarily
We know how important antivirus or Windows Security firewall is for our computers, both utilities can help our computers to work smoothly and safely from malware and viruses. A lot of time, anti-virus or the Windows Security firewall feature blocks some of the incoming connections resulting in the error in question. Now in this scenario, we need to turn off the firewall and anti-virus temporarily and then check if that can resolve the connection refused error.
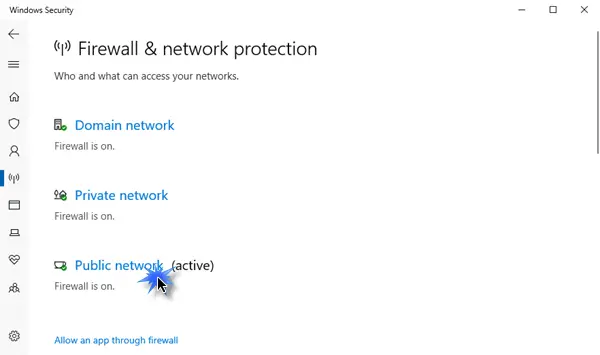
To turn off the Windows firewall, follow the prescribed steps.
- Press Windows + I key to open the Setting option.
- On the left side of the screen, click on Privacy & security option.
- Now, click on the Windows Security option there and then on Open Windows Security.
- Click on Firewall & network protection option and select Public Network.
- Under the Microsoft Defender Firewall, click on the toggle-off button.
Follow the given steps to disable the anti-virus on the Windows computer.
- Press the Windows key and type Setting in the search bar.
- On the left side of the screen, click on Privacy & security option.
- Now, click on the Windows Security option there and then click on Open Windows Security.
- Click on Virus & threat protection option.
- Click on Manage Setting under Virus & threat protection.
- Under the Real-time protection option, turn off the toggle.
If you use a 3rd-party security software, you will need to disable it too.
Hopefully, after disabling the anti-virus and firewall, the said error issue will be resolved.
5] Run a CLI Command
If there is some misconfiguration in the login process, there is a high chance that we can’t connect to ResberryPie, in that case, we need to execute the following command.
$ sudo rm /etc/ssh/ssh_host_* && sudo dpkg-reconfigure openssh-server
We can try logging in using this command and our issue will be resolved.
6] Contact the IT manager
The error in question can be due to a lack of access permission for the device, in such scenarios, we should contact our organization’s IT manager. We can also contact them if none of the solutions worked or if you don’t want to do all these steps.
Hopefully, you can resolve the issue using the solutions mentioned in this post.
Read: Best PuTTy alternative for SSH Clients for Windows computers.
PuTTY is a popular free and open-source terminal emulator, serial console, and network file transfer utility. It is one of the most useful tools when performing SSH connections, especially from Windows machines.
PuTTY also supports other protcols such as Telnet, and serial connections to remote devices such as servers, routers, and switches using a CLI based interface .
Key features of PuTTY include:
- SSH, Telnet, and Serial Support — PuTTY can connect to remote systems using SSH (Secure Shell) for secure encrypted communication, Telnet for unencrypted communication, and serial connections for configuring devices like routers and switches.
- Terminal Emulation — It provides terminal emulation capabilities, allowing you to interact with remote systems in a text-based interface that mimics various terminal types (e.g., VT100, xterm).
- X11 Forwarding — PuTTY can forward X11 graphical applications from a remote server to a local display, enabling the use of graphical applications over SSH.
- Port Forwarding — It supports port forwarding, allowing secure tunnel traffic from local ports to remote systems and vice versa.
- Session Management — PuTTY allows you to save session configurations, making it easy to connect to frequently used remote hosts.
PuTTY is known for its simplicity, lightweight nature, and wide adoption among developers, sysadmins, and geeks.
Windows 11 Install PuTTY.
Open your browser and head over to the PuTTY download page in the link below:
Download PuTTY — a free SSH and telnet client for Windows
Select the download PuTTY option to head over to the download page.

Next, under package files, locate the installer for your desired platform and click to download the msi file.

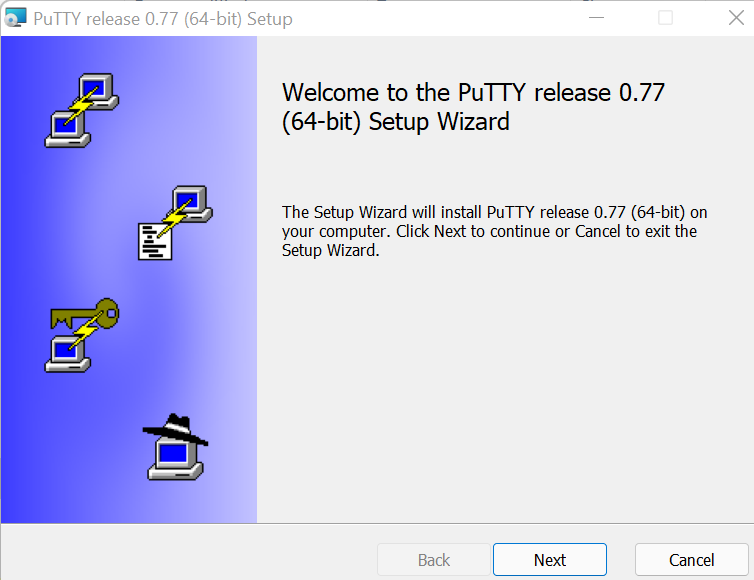
Once downloaded, double click the installer file to begin the installation process. Click Next to proceed with the installation proces.

Choose the installation location or press Next to accept the default.

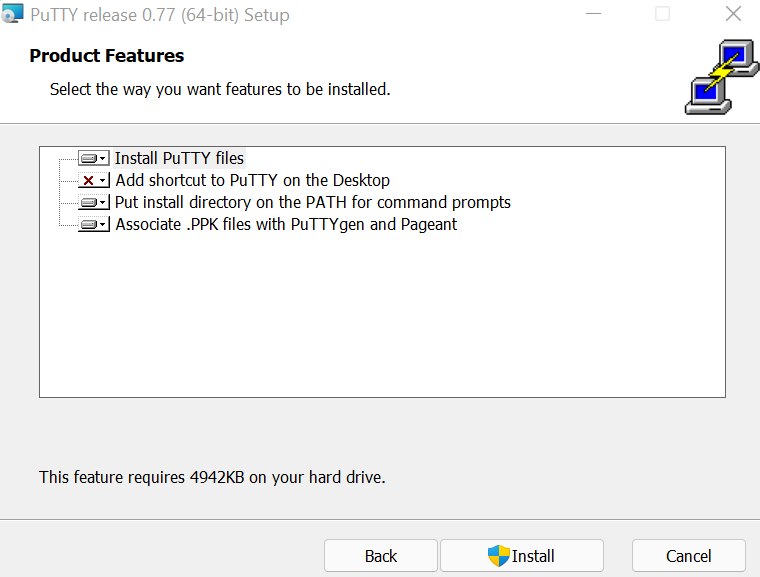
Finally, choose the features you wish to have installed and click install button.

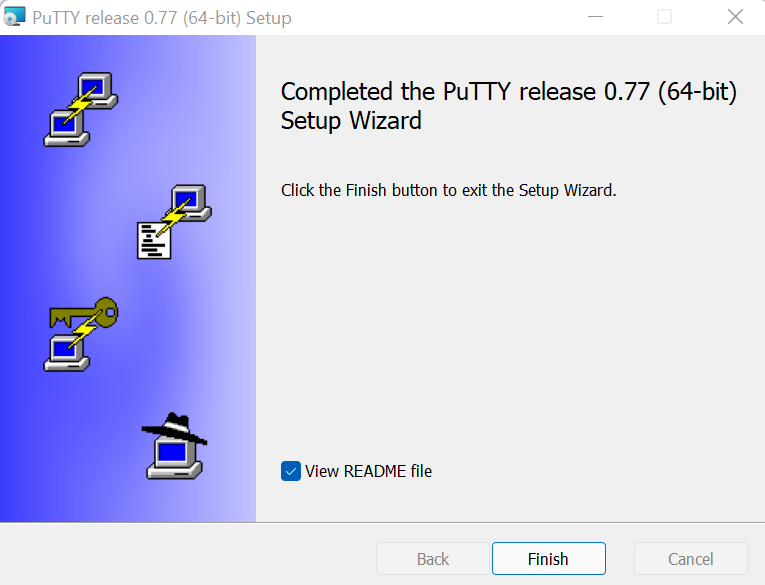
Once installed, Click Finish to close the installer. You have now successfully installed PuTTY on your Windows 11 machine.
You can launch PuTTY from the Windows Start Menu and configure it to your liking.
Conclusion
This post quickly walked you through the process of downloading and setting up PuTTY utility on Windows 11 based machine.
Published by

A highly-skilled software engineer with a passion for teaching and sharing knowledge. From development to hardware, get articles with
high technical accuracy, clarity, and an engaging writing style.
С огромной и внезапной революцией в технологии появился образ жизни. Теперь вы полностью независимы в том, с кем говорить и о чем говорить, не вовлекая никого и не нарушая вашу частную жизнь. Благодаря множеству компьютерных программ теперь мы можем подключить локальный компьютер к другому компьютеру без каких-либо задержек. В настоящее время программный инструмент Putty очень надежен, когда речь идет о создании любого соединения Secure Shell между двумя компьютерами или любого соединения через последовательный порт. Для этого процесса требуется конфигурация операционной системы Windows 11. Обязательно обновитесь до Windows 11, прежде чем применять это руководство на своей стороне. Давайте начнем с руководства сейчас.
Поиск замазки
Обязательно сначала загрузите «Putty» со страницы загрузки авторизованного веб-сайта, прежде чем пытаться установить его. По этой причине необходимо найти официальный сайт «putty.org» на новой вкладке вашего браузера. Официальный сайт открывается, как показано на следующем прикрепленном изображении. Вы увидите, что на официальной домашней странице его веб-сайта есть много разделов, которые предоставляют различную информацию о Putty. Вам нужно использовать опцию «Загрузить Putty», которая указана в верхней части всех разделов, предоставляющих информацию о том, что такое «Putty» на самом деле и для чего мы можем использовать его в нашей операционной системе Windows 11. система. Вам нужно нажать на выделенный синим цветом текст «Загрузить Putty» под абзацем, в котором содержится информация о Putty.

Скачать замазку
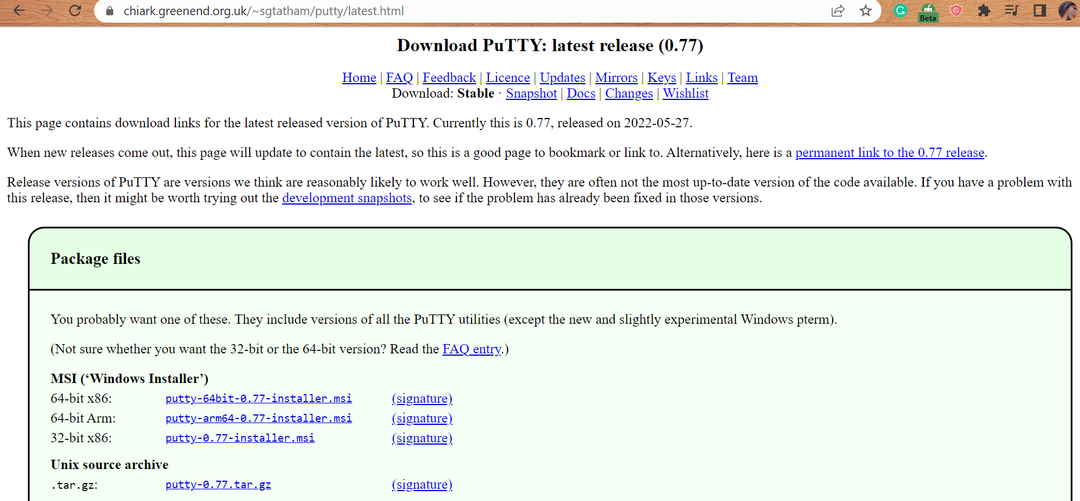
После нажатия на опцию «Загрузить Putty» на ранее указанной странице веб-сайта вы будете перенаправлены на другой веб-сайт. страница, где перечислены все последние выпуски Putty в разных форматах для разных операционных систем, таких как Windows и Линукс. Самый первый заголовок по центру показывает самый последний выпуск Putty, то есть 0.77.
После этого вы увидите различные разделы, в которых показаны различные типы выпусков для разных операционных систем в зеленых областях. Если вы являетесь пользователем Windows, используйте опцию «MSI (установщик Windows)» из списка. В противном случае используйте «исходный архив Unix», если вы пользователь Linux. В нашем случае мы используем опцию «MSI (установщик Windows)», потому что в настоящее время мы используем операционную систему Windows 11. Мы загружаем 64-битный установочный файл MSI, который указан на первом месте в опции «MSI (Windows Installer)». Нажмите на выделенный синим цветом MSI-файл перед типом системы «64-бит x86». Вы можете выбрать установочный файл Putty соответственно типу вашей системы.
Проверьте тип вашей системы с помощью следующего свойства «Система»:

Исполняемый файл MSI PUTTY начинает загружаться в выбранное место вашей операционной системы Windows 11. Это может занять до 1 минуты в зависимости от его размера и скорости сети. Через некоторое время он будет успешно загружен и его можно будет найти в системе.

Установить замазку
Загруженный файл MSI Putty вместе с его общим размером, датой и временем загрузки указан в списке, и его можно использовать из места, где он был загружен. Нажмите на него правой кнопкой мыши и используйте опцию «Открыть» или дважды нажмите на файл, чтобы начать установку в вашей системе Windows 11.

После этого может появиться синий экран с заголовком «SmartScreen сейчас недоступен». на вашем конце, который отображает некоторые советы / предложения для идеальной установки «Putty». Наряду с этим он представляет имя приложения и его издателя, такого как Саймон Тэтэм. Если вам сейчас не нужен инструмент «SmartScreen», просто быстро перейдите к нему, используя кнопку «Выполнить» в конце синего экрана.
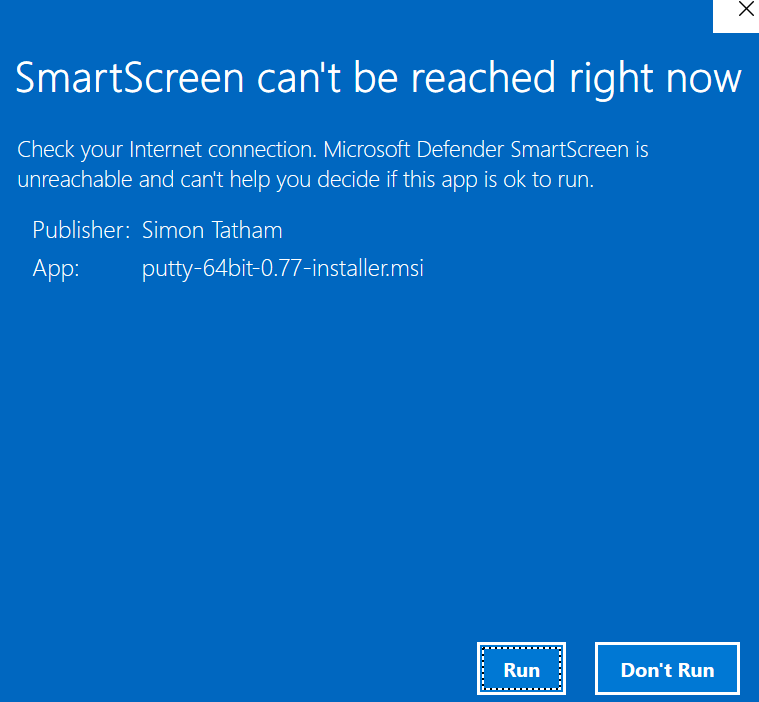
Вы можете выбрать вариант «Не запускать», чтобы избежать его установки. При выборе кнопки «Выполнить» на синем экране нам открывается новое окно с названием «Установка версии Putty 0.77 (64-разрядная версия)». Он показывает вам абзац инструкций по установке Putty за несколько шагов. Мы здесь, чтобы использовать кнопку «Далее» из доступных вариантов, чтобы начать правильную установку Putty с нашей стороны. В противном случае вы можете нажать кнопку «Отмена», чтобы завершить установку.
Теперь мы находимся на следующем и важном этапе установки Putty, который заключается в выборе папки назначения в нашей системе для установки. По умолчанию он мог создать новую папку с именем «PuTTy» в папке «Program Files» на диске «C» вашей системы. Если вы хотите изменить путь установки, вы можете использовать кнопку «Изменить», чтобы выбрать новое место для Putty. Мы продвигаемся вперед с тем же путем по умолчанию для установки. Снова нажмите кнопку «Далее», чтобы перейти к новому шагу.

На новом обновленном и представленном экране вы сможете увидеть список функций, которые можно выбрать для установки Putty. Вы можете выбрать любой вариант, который лучше всего подходит для вашей системы. Мы выбрали вариант «Установить файлы Putty» и продвинулись вперед с помощью кнопки «Установить» из списка в нижнем углу этого экрана установки.
В течение нескольких секунд или минут он будет полностью настроен в вашей системе без каких-либо проблем. Вы будете перенаправлены на другой тот же экран, на котором отображается статус установки «Завершено» новейшей версии Putty. Чтобы плавно завершить этот процесс после завершения, используйте кнопку «Готово», которая отображается в нижней части следующего окна:
Теперь, когда он уже установлен и полностью настроен в нашей системе Windows 11. Нам нужно подтвердить это. Для подтверждения просто напишите «Putty» и нажмите «Enter» в строке поиска, расположенной в самом левом углу или в центре экрана рабочего стола Windows 11. Вы увидите приложение «Putty», появляющееся из приложений вашей системы, как на следующем изображении, если оно уже установлено правильно. Дважды коснитесь или щелкните его правой кнопкой мыши, чтобы выбрать параметр «Запуск от имени администратора», или просто используйте параметр «Открыть», чтобы быстро открыть его.

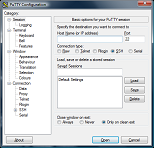
Приложение Putty Configuration успешно запущено. Теперь мы можем создать любой тип подключения с помощью Putty к другим нашим операционным системам, таким как клиент-сервер SSH или последовательная шина.

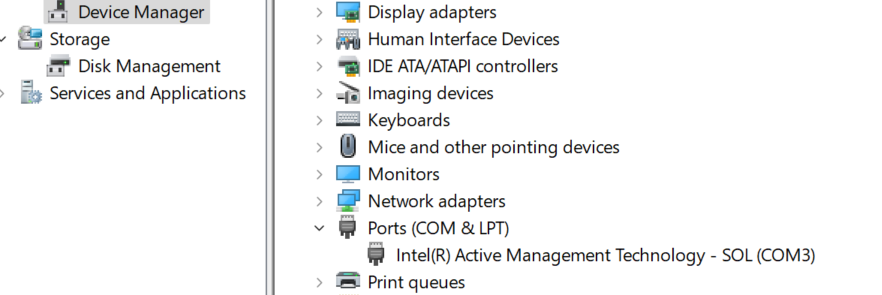
Откройте системный инструмент «Управление компьютером» в вашей системе Windows 11 и разверните параметр «Диспетчер устройств».
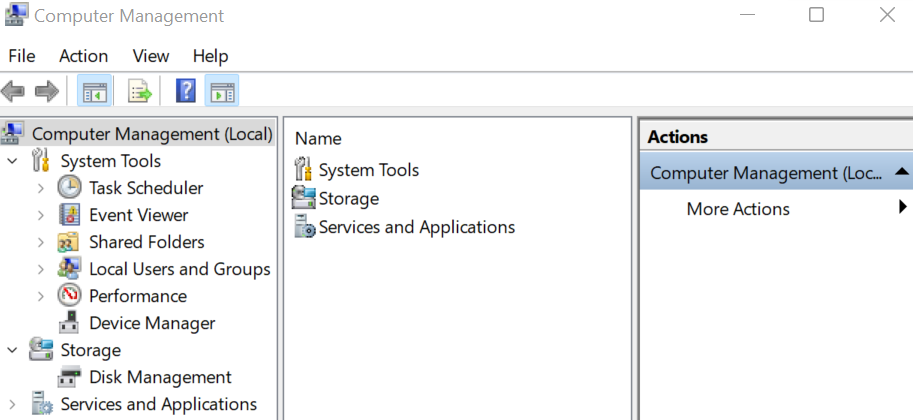
Изучите параметр «Порты» в разделе «Диспетчер устройств» и определите тип подключения, который он поддерживает.
Теперь, когда мы нашли подключение к порту, мы возвращаемся в окно конфигурации Putty и выбираем «Serial» вместо SSH. Вам не нужно обновлять скорость, необходимую для создания соединения. Чтобы создать SSH-соединение, выберите тип соединения «SSH» и напишите IP-адрес хоста. Нажмите на кнопку «Открыть», чтобы продолжить.
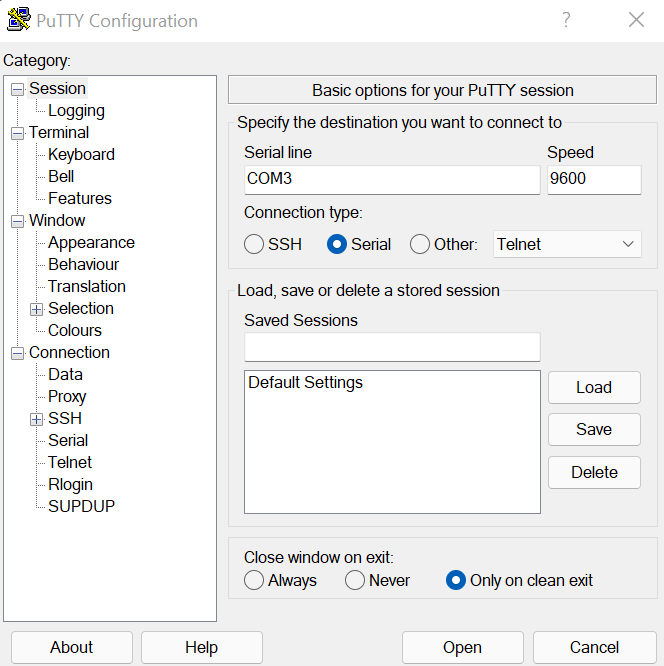
Соединение Putty теперь установлено с последовательным портом.

Заключение
В этом руководстве обсуждались шаги по установке программного обеспечения Putty в нашей обновленной операционной системе Windows 11. Мы начали это руководство с поиска программного обеспечения Putty на официальном сайте для загрузки и установки в нашей системе. Мы очень понятно все объяснили. После этого мы настроили и создали последовательное соединение между программным обеспечением Putty и портом, который мы используем в нашей системе Windows 11. Подводя итог, мы понятно объяснили все необходимое для создания безопасного соединения между компьютерами.
This post shows students and new users steps to configure PuTTY with SSH Key (no passwords) authentication with Windows 11. SSH supports various authentication methods. Using a public key is more secure and convenient than traditional password authentication.
Our previous post showed you how to set up SSH Key base authentication with Windows 11 without additional software. However, because of its simplicity, some people prefer to use PuTTY as their SSH client. If you want to use PuTTY to connect to an SSH server using key authentication with Windows 11, the steps below will show you how to do that.
The steps below will show you how to install, generate SSH key pair, and configure PuTTY to connect to an SSH server without a password.
In Ubuntu Linux and other Unix-like systems, generating and managing SSH keys and using key-based authentication is pretty easy. Below is a post that shows you how to create an SSH key pair in Ubuntu Linux and use the public key to authenticate to an SSH server.
How to create an SSH key for key authentication
To start configuring PuTTY in Windows 11 to connect to an SSH server without passwords, continue below.
How to download and install PuTTY on Windows 11
PuTTY is an SSH and telnet client originally developed for the Windows platform. It’s now available on other platforms, including Linux systems.
To download and install PuTTY in Windows 11, use the link below.
Download PuTTY on Windows 11
Select the 64-bit x86 .msi file and save. By default, in your Downloads folder.

In your Downloads folder, double-click the downloaded installer to initiate the installation process.

Follow the installer wizard until complete. On the screen below, choose to Add Shortcut to PuTTY on the Desktop, then click Install.

How to generate PuTTY SSH Key pair in Windows 11
Before generating a PuTTY key pair, you must download the PuTTYgen (key generator) app. On the same download page above, click the puttygen.exe link to download the app.
Download puttygen.exe

Once the file is downloaded to your Downloads folder, browse and double-click to open the app.
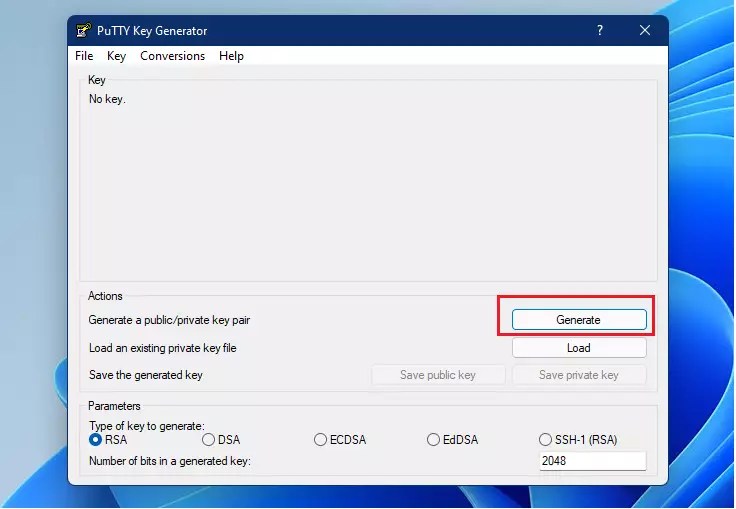
When the app opens, click the Generate button, then move the cursor randomly on the Putty Key Generator field window to begin generating the key pair. When you stop the cursor, the process will also stop. So continue moving the cursor until the process is complete.

After the keys are generated, add a descriptive Key comment to help you easily identify your Key and Save both keys (Public and Private keys) to a secure location.
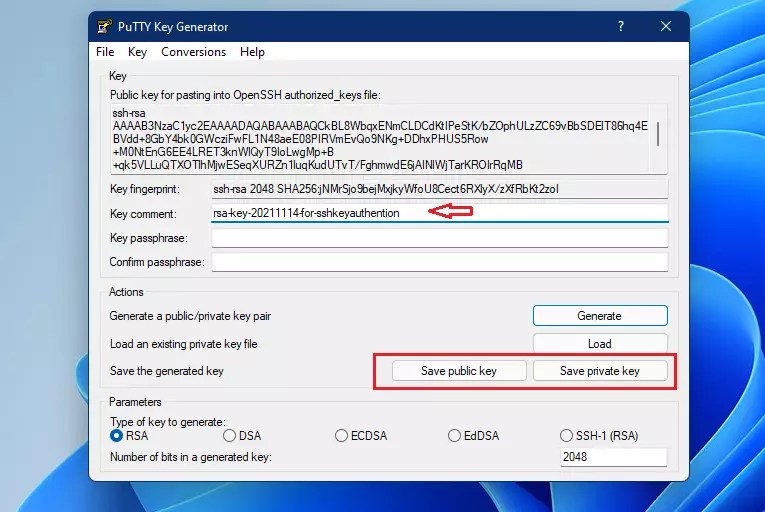
You’ll likely want to save your key pair in your home folder, usually at the path below.
C:\Users\<username>\.ssh
Replace <username> with your account name.

When saving the Private Key, you’ll be prompted with a message that you’re saving the private key without a passphrase. Click Yes.

Both the public_key and private_key files should be saved at the location specified.

How to copy your public Key to the SSH server with Windows 11
You will want to copy your public Key to the SSH server after you’ve generated your SSH key pair. On Unix-like systems, ssh-copy-id is a tool for copying SSH keys to the server.
However, Windows doesn’t have the ssh-copy-id tool installed. To get your public SSH to the server and enable password-less login, manually create an authorized_keys file on the remote server and paste the public Key into it.
In your home directory, create a .ssh folder and an authorized_keys file on the remote SSH server by running the commands below.
cd ~/
mkdir .ssh
nano ~/.ssh/authorized_keys
Then copy the public Key displayed in the PuTTY Key generator app. If you close the app, simply reopen it and load the private Key to display its public Key.

Then paste the content into the file created on the remote SSH server after running the commands above.

Save the file, and you’re done.
How to configure SSH for passwordless login
Now that you’ve copied over your public Key, the next step is to turn off password authentication.
Log on to the remote server with your password, then open the SSH configuration file by running the commands below.
sudo nano /etc/ssh/sshd_config
In the file, find the lines below and change the value to match these.
PasswordAuthentication no
ChallengeResponseAuthentication no
UsePAM no
Save the file and exit.
Restart the SSH server on the remote host.
sudo systemctl restart ssh
After that, password login should be disabled.
How to configure PuTTY client for password-less authentication with Windows 11
Finally, open the PuTTY client on your Desktop. Next, go to SSH –> Auth, and click the Browse button to browse for your private key (private_key) file saved above.

Finally, go to Session, type in the username and host IP or name (ex. username@10.0.2.19), provide a name for the Session, and click the Save button.

You can use the saved Session to log in to a remote SSH server without a password.

That should do it!
Conclusion:
This post showed you how to install, generate SSH key pair using PuTTY, and configure a key-based authentication with a remote SSH server. Please use the comment form below if you find any errors above or have something to add.