|
1 / 1 / 0 Регистрация: 13.04.2010 Сообщений: 17 |
|
|
1 |
|
|
13.04.2010, 13:38. Показов 57908. Ответов 13
Надо чтобы при нажатии кнопки «открыть» вылезло диалоговое окошко для открытия файла расширения *.txt, затем при нажатии «ОК» путь к файлу и его название записалось бы в строковую переменную… ну и тут же выполнялся бы другой мой код.
1 |

|
Mikant 1319 / 992 / 127 Регистрация: 08.12.2009 Сообщений: 1,299 |
||||
|
13.04.2010, 13:48 |
2 |
|||
|
Решение
3 |
 Сообщение было отмечено как решение
|
1272 / 973 / 113 Регистрация: 12.01.2010 Сообщений: 1,971 |
|
|
13.04.2010, 13:50 |
3 |
|
более подробно <Ссылка>
1 |
|
1 / 1 / 0 Регистрация: 13.04.2010 Сообщений: 17 |
|
|
13.04.2010, 14:06 [ТС] |
4 |
|
О! Спасибо, ребят.
0 |
|
1 / 1 / 0 Регистрация: 13.04.2010 Сообщений: 17 |
|
|
16.04.2010, 09:18 [ТС] |
5 |
|
Подскажите ещё плиз, как мне теперь найти файл с таким же именем, но уже в другой директории… Можно по сути преобразовать имя и отбросить лишние символы в извлечённом имени открытого файла… но я и это пока не знаю как.
0 |
|
M1kl3 1 / 1 / 0 Регистрация: 14.03.2010 Сообщений: 18 |
||||
|
05.06.2010, 15:09 |
7 |
|||
|
Если мы напишем эту строку:
в сообщении на выдаст только имя файла.
0 |
|
kirill29 2095 / 1260 / 171 Регистрация: 01.02.2009 Сообщений: 2,842 |
||||
|
05.06.2010, 15:18 |
8 |
|||
У меня выдается строка с путем к файлу.
1 |
|
1 / 1 / 0 Регистрация: 14.03.2010 Сообщений: 18 |
|
|
05.06.2010, 15:22 |
9 |
|
Сор) у мну скоро из-за этих диалогов крыша поедет… Все прокатила)
0 |
|
0 / 0 / 0 Регистрация: 05.04.2010 Сообщений: 41 |
|
|
05.06.2010, 17:55 |
10 |
|
Есть еше класный класс path поюзай его там есть много класных методов по твокму вопросу
0 |
|
LediDiana |
|
|
10.08.2011, 19:32 |
11 |
|
Подскажите пожалуйста как из имени файла с его расширением искоренить только расширение?? |
|
Mikant 1319 / 992 / 127 Регистрация: 08.12.2009 Сообщений: 1,299 |
||||
|
10.08.2011, 21:02 |
12 |
|||
3 |
|
LediDiana |
|||||||||
|
11.08.2011, 17:02 |
13 |
||||||||
|
Спасибо,огромное!!!!!!!!!!!!
|


|
kakabay 1 / 1 / 0 Регистрация: 25.04.2016 Сообщений: 2 |
||||
|
22.06.2016, 08:32 |
14 |
|||
1 |
How can I get the path of a file on my computer or on the local area network.
I would to show a window that allows me to browse the file system when I click a button, and I want to select a file and get the path to the file. How can I do this?
P.S. I’m not looking to upload the file; I just want to get the path.
![]()
asked Oct 5, 2011 at 18:26
![]()
2
The web application is running on the server, and you don’t have access to the client file system at all. Can you imagine how much of a vulnerability that would be? I know I don’t want the sites I visit inspecting my file system…
EDIT: Question is for a WinForms application
For a WinForms application, you can use the OpenFileDialog, and extract the path with something like this:
If you’re looking for the file path:
string path = OpenFileDialog1.FileName; //output = c:\folder\file.txt
If you’re looking for the directory path:
string path = Path.GetDirectoryName(OpenFileDialog1.FileName); //output = c:\folder
In general, the System.IO.Path class has a lot of useful features for retrieving and manipulating path information.
answered Oct 5, 2011 at 18:29
![]()
James JohnsonJames Johnson
45.5k8 gold badges73 silver badges110 bronze badges
0
To do this in VB.NET use the FolderBrowserDialog.
answered Oct 5, 2011 at 18:36
![]()
Jon AdamsJon Adams
24.5k18 gold badges82 silver badges120 bronze badges
Due to security restrictions browsers include for user safety, you can’t manipulate the client file system directly. You can only use to let them pick a file, and even then it only sends the filename, not the whole path.
The FileSystem API in HTML5 allows for file manipulation, but only within a sandbox for your site specifically, not browsing across the network or other files on the client system.
Instead, provide your users easy steps on how they should use My Computer (or whatever equivalent on other OS’s) to navigate to the file and copy & paste the path into a simple text input box.
answered Oct 5, 2011 at 18:31
![]()
Jon AdamsJon Adams
24.5k18 gold badges82 silver badges120 bronze badges
1
Have you taken a look at the Path class from System.IO ?
answered Oct 5, 2011 at 18:32
![]()
JesseJesse
8,2236 gold badges49 silver badges81 bronze badges
0
Последнее обновление: 31.10.2015
Окна открытия и сохранения файла представлены классами OpenFileDialog и SaveFileDialog.
Они имеют во многом схожую функциональность, поэтому рассмотрим их вместе.
OpenFileDialog и SaveFileDialog имеют ряд общих свойств, среди которых можно выделить следующие:
-
DefaultExt: устанавливает расширение файла, которое добавляется по умолчанию, если пользователь ввел имя файла без расширения -
AddExtension: при значенииtrueдобавляет к имени файла расширение при его отсуствии. Расширение берется из
свойстваDefaultExtилиFilter -
CheckFileExists: если имеет значениеtrue, то проверяет существование файла с указанным именем -
CheckPathExists: если имеет значениеtrue, то проверяет существование пути к файлу с указанным именем -
FileName: возвращает полное имя файла, выбранного в диалоговом окне -
Filter: задает фильтр файлов, благодаря чему в диалоговом окне можно отфильтровать файлы по расширению. Фильтр задается в следующем формате
Название_файлов|*.расширение. Например,Текстовые файлы(*.txt)|*.txt. Можно задать сразу несколько фильтров, для этого они разделяются
вертикальной линией |. Например,Bitmap files (*.bmp)|*.bmp|Image files (*.jpg)|*.jpg -
InitialDirectory: устанавливает каталог, который отображается при первом вызове окна -
Title: заголовок диалогового окна
Отдельно у класса SaveFileDialog можно еще выделить пару свойств:
-
CreatePrompt: при значенииtrueв случае, если указан не существующий файл, то будет отображаться сообщение о его создании -
OverwritePrompt: при значенииtrueв случае, если указан существующий файл, то будет отображаться сообщение о том, что файл будет перезаписан
Чтобы отобразить диалоговое окно, надо вызвать метод ShowDialog().
Рассмотрим оба диалоговых окна на примере. Добавим на форму текстовое поле textBox1 и две кнопки button1 и button2. Также перетащим с панели инструментов
компоненты OpenFileDialog и SaveFileDialog. После добавления они отобразятся внизу дизайнера формы. В итоге форма будет выглядеть примерно так:
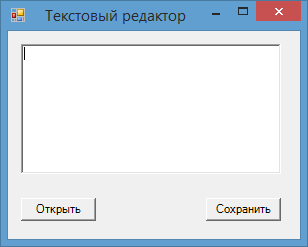
Теперь изменим код формы:
public partial class Form1 : Form
{
    public Form1()
    {
        InitializeComponent();

        button1.Click += button1_Click;
        button2.Click += button2_Click;
        openFileDialog1.Filter = "Text files(*.txt)|*.txt|All files(*.*)|*.*";
        saveFileDialog1.Filter = "Text files(*.txt)|*.txt|All files(*.*)|*.*";
    }
    // сохранение файла
    void button2_Click(object sender, EventArgs e)
    {
        if (saveFileDialog1.ShowDialog() == DialogResult.Cancel)
            return;
        // получаем выбранный файл
        string filename = saveFileDialog1.FileName;
        // сохраняем текст в файл
        System.IO.File.WriteAllText(filename, textBox1.Text);
        MessageBox.Show("Файл сохранен");
    }
    // открытие файла
    void button1_Click(object sender, EventArgs e)
    {
        if (openFileDialog1.ShowDialog() == DialogResult.Cancel)
            return;
        // получаем выбранный файл
        string filename = openFileDialog1.FileName;
        // читаем файл в строку
        string fileText = System.IO.File.ReadAllText(filename);
        textBox1.Text = fileText;
        MessageBox.Show("Файл открыт");
    }
}
По нажатию на первую кнопку будет открываться окно открытия файла. После выбора файла он будет считываться, а его текст будет отображаться в
текстовом поле. Клик на вторую кнопку отобразит окно для сохранения файла, в котором надо установить его название. И после этого произойдет сохранение
текста из текстового поля в файл.
For OpenFileDialog:
OpenFileDialog choofdlog = new OpenFileDialog();
choofdlog.Filter = "All Files (*.*)|*.*";
choofdlog.FilterIndex = 1;
choofdlog.Multiselect = true;

if (choofdlog.ShowDialog() == DialogResult.OK)
{
    string sFileName = choofdlog.FileName;
    string[] arrAllFiles = choofdlog.FileNames; //used when Multiselect = true
}
For FolderBrowserDialog:
FolderBrowserDialog fbd = new FolderBrowserDialog();
fbd.Description = "Custom Description";

if (fbd.ShowDialog() == DialogResult.OK)
{
    string sSelectedPath = fbd.SelectedPath;
}
To access selected folder and selected file name you can declare both string at class level.
namespace filereplacer
{
   public partial class Form1 : Form
   {
      string sSelectedFile;
      string sSelectedFolder;

      public Form1()
      {
         InitializeComponent();
      }

      private void direc_Click(object sender, EventArgs e)
      {
         FolderBrowserDialog fbd = new FolderBrowserDialog();
         //fbd.Description = "Custom Description"; //not mandatory

         if (fbd.ShowDialog() == DialogResult.OK)
               sSelectedFolder = fbd.SelectedPath;
         else
               sSelectedFolder = string.Empty;
      }

      private void choof_Click(object sender, EventArgs e)
      {
         OpenFileDialog choofdlog = new OpenFileDialog();
         choofdlog.Filter = "All Files (*.*)|*.*";
         choofdlog.FilterIndex = 1;
         choofdlog.Multiselect = true;

         if (choofdlog.ShowDialog() == DialogResult.OK)
             sSelectedFile = choofdlog.FileName;
         else
             sSelectedFile = string.Empty;
      }

      private void replacebtn_Click(object sender, EventArgs e)
      {
          if(sSelectedFolder != string.Empty && sSelectedFile != string.Empty)
          {
               //use selected folder path and file path
          }
      }
      ....
}
NOTE:
As you have kept choofdlog.Multiselect=true;, that means in the OpenFileDialog() you are able to select multiple files (by pressing ctrl key and left mouse click for selection).
In that case you could get all selected files in string[]:
At Class Level:
string[] arrAllFiles;
Locate this line (when Multiselect=true this line gives first file only):
sSelectedFile = choofdlog.FileName;
To get all files use this:
arrAllFiles = choofdlog.FileNames; //this line gives array of all selected files
C# OpenFileDialog
C# OpenFileDialog control allows us to browse and select files on a computer in an application. A typical Open File Dialog looks like Figure 1 where you can see Windows Explorer like features to navigate through folders and select a file.

Figure 1
Creating a OpenFileDialog
We can create an OpenFileDialog control using a Forms designer at design-time or using the OpenFileDialog class in code at run-time (also known as dynamically). Unlike other Windows Forms controls, an OpenFileDialog does not have and not need visual properties like others. The only purpose of OpenFileDialog to display available colors, create custom colors and select a color from these colors. Once a color is selected, we need that color in our code so we can apply it on other controls.
Again, you can create an OpenFileDialog at design-time but it is easier to create an OpenFileDialog at run-time.
Design-time
To create an OpenFileDialog control at design-time, you simply drag and drop an OpenFileDialog control from Toolbox to a Form in Visual Studio. After you drag and drop an OpenFileDialog on a Form, the OpenFileDialog looks like Figure 2.

Figure 2
Adding an OpenFileDialog to a Form adds following two lines of code.
private System.Windows.Forms.OpenFileDialog openFileDialog1;
this.openFileDialog1 = new System.Windows.Forms.OpenFileDialog();
Run-time
Creating a OpenFileDialog control at run-time is merely a work of creating an instance of OpenFileDialog class, set its properties and add OpenFileDialog class to the Form controls.
First step to create a dynamic OpenFileDialog is to create an instance of OpenFileDialog class. The following code snippet creates an OpenFileDialog control object.
OpenFileDialog openFileDialog1 = new OpenFileDialog(); ShowDialog method displays the OpenFileDialog.
openFileDialog1.ShowDialog(); Once the ShowDialog method is called, you can browse and select a file.
Setting OpenFileDialog Properties
After you place an OpenFileDialog control on a Form, the next step is to set properties.
The easiest way to set properties is from the Properties Window. You can open Properties window by pressing F4 or right click on a control and select Properties menu item. The Properties window looks like Figure 3.

Figure 3
Initial and Restore Directories
InitialDirectory property represents the directory to be displayed when the open file dialog appears first time.
openFileDialog1.InitialDirectory = @"C:\"; If RestoreDirectory property set to true that means the open file dialogg box restores the current directory before closing.
openFileDialog1.RestoreDirectory = true; Title
Title property is used to set or get the title of the open file dialog.
openFileDialog1.Title = "Browse Text Files";Default Extension
DefaultExtn property represents the default file name extension.
openFileDialog1.DefaultExt = "txt"; Filter and Filter Index
Filter property represents the filter on an open file dialog that is used to filter the type of files to be loaded during the browse option in an open file dialog. For example, if you need users to restrict to image files only, we can set Filter property to load image files only.
openFileDialog1.Filter = "txt files (*.txt)|*.txt|All files (*.*)|*.*"; FilterIndex property represents the index of the filter currently selected in the file dialog box.
openFileDialog1.FilterIndex = 2;Check File Exists and Check Path Exists
CheckFileExists property indicates whether the dialog box displays a warning if the user specifies a file name that does not exist. CheckPathExists property indicates whether the dialog box displays a warning if the user specifies a path that does not exist.
openFileDialog1.CheckFileExists = true;
openFileDialog1.CheckPathExists = true;
File Name and File Names
FileName property represents the file name selected in the open file dialog.
textBox1.Text = openFileDialog1.FileName; If MultiSelect property is set to true that means the open file dialog box allows multiple file selection. The FileNames property represents all the files selected in the selection.
this.openFileDialog1.Multiselect = true;
foreach (String file in openFileDialog1.FileNames)
{
  MessageBox.Show(file);
}
Read Only Checked and Show Read Only Files
ReadOnlyChecked property represents whether the read-only checkbox is selected and ShowReadOnly property represents whether the read-only checkbox is available or not.
openFileDialog1.ReadOnlyChecked = true;
openFileDialog1.ShowReadOnly = true;
Implementing OpenFileDialog in a C# and WinForms Applications
Now let’s create a WinForms application that will use an OpenFileDialog that has two Button controls, a TextBox, and a container control. The Form looks like Figure 4.

Figure 4
The Browse button click event handler will show an open file dialog and users will be able to select text files. The open file dialog looks like Figure 5.

Figure 5
The following code snippet is the code for Browse button click event handler. Once a text file is selected, the name of the text file is displayed in the TextBox.
private void BrowseButton_Click(object sender, EventArgs e)
{
    OpenFileDialog openFileDialog1 = new OpenFileDialog
    {
        InitialDirectory = @"D:\",
        Title = "Browse Text Files",

        CheckFileExists = true,
        CheckPathExists = true,

        DefaultExt = "txt",
        Filter = "txt files (*.txt)|*.txt",
        FilterIndex = 2,
        RestoreDirectory = true,

        ReadOnlyChecked = true,
        ShowReadOnly = true
    };

    if (openFileDialog1.ShowDialog() == DialogResult.OK)
    {
        textBox1.Text = openFileDialog1.FileName;
    }
}
The code for Browse Multiple Files button click event handler looks like following.
private void BrowseMultipleButton_Click(object sender, EventArgs e)
{
    this.openFileDialog1.Filter =
"Images (*.BMP;*.JPG;*.GIF,*.PNG,*.TIFF)|*.BMP;*.JPG;*.GIF;*.PNG;*.TIFF|" +
"All files (*.*)|*.*";

    this.openFileDialog1.Multiselect = true;
    this.openFileDialog1.Title = "Select Photos";

    DialogResult dr = this.openFileDialog1.ShowDialog();
    if (dr == System.Windows.Forms.DialogResult.OK)
    {
        foreach (String file in openFileDialog1.FileNames)
        {
            try
            {
                PictureBox imageControl = new PictureBox();
                imageControl.Height = 400;
                imageControl.Width = 400;

                Image.GetThumbnailImageAbort myCallback =
                        new Image.GetThumbnailImageAbort(ThumbnailCallback);
                Bitmap myBitmap = new Bitmap(file);
                Image myThumbnail = myBitmap.GetThumbnailImage(300, 300,
                    myCallback, IntPtr.Zero);
                imageControl.Image = myThumbnail;

                PhotoGallary.Controls.Add(imageControl);
            }
            catch (Exception ex)
            {
                MessageBox.Show("Error: " + ex.Message);
            }
        }
    }
}
public bool ThumbnailCallback()
{
    return false;
}
The output looks like Figure 6.

Summary
An OpenFileDialog control allows users to launch Windows Open File Dialog and let them select files. In this article, we discussed how to use a Windows Open File Dialog and set its properties in a Windows Forms application.