2023.1
This is a release targeting support for Windows 11 Moment 2, as well as adding several improvements in the process.
Bug fixes
- Support the Windows 11 Moment 2 taskbar
- Fix newly created windows thinking they where the active window when this wasn’t the case
- Fix hide tray being hit twice not showing the dialog anymore
Various improvements/changes
- New supported languages:
- German
- Spanish (United States)
- Turkish
- Indonesian
- Russian (Russia)
- Improved Simplified Chinese translation
- Localize more user-facing strings
- Add hidden configuration options to override the language used by TranslucentTB
- Add hidden configuration options to disable the new XAML context menu
- Update WinUI to 2.8.4
- Add a tooltip when the titlebar text overflows in windows
As always, you can download this release from the Microsoft Store, or by downloading and opening the TranslucentTB.appinstaller file below. Additionally, Windows 11 users can download the portable version by downloading TranslucentTB-portable-x64.zip.
2022.1
This is a release targeting support for Windows Sun Valley 2, as well as adding several improvements in the process.
New features
- Localization support
TranslucentTB can now be localized in different languages. Take a look at the contributor’s guide if you want to submit your own translation! Currently supported languages are:- Chinese (Simplified)
- Chinese (Traditional)
- Japanese
- English (United States)
- Portable mode
On Windows 11, TranslucentTB can now run without needing to be installed. Download theTranslucentTB-portable-x64.zipfile below to get started. - Rules
Exposed in the configuration file only, rules allow you to customize the taskbar’s appearance in a per-app manner: depending on the highest Z-order maximized window or the currently active window. - Remove the taskbar line/border
On Windows 11, you can now remove the taskbar line or border depending on which state is active.
Bug fixes
- Fix battery saver mode being active despite the user having disabled it.
- Made some changes that should significantly help with TranslucentTB not working after the computer resumes from sleep or when a display is unplugged or plugged in.
- Fix poor tray icon contrast in high contrast modes like «Desert».
- Hide empty document errors when the configuration file is empty.
- Fix tray icon turning blurry when the system DPI changes.
- Fix search opened and Start opened states on Windows 11.
- Fix an issue where TranslucentTB’s settings could end up being wiped when shutting down the computer.
- Fix TranslucentTB crashing if you uninstall it while the welcome dialog is open.
Various improvements/changes
- Allow blur to be picked again on Windows 11 RTM when KB5006746 is installed.
- Remove blur on Windows 11 SV2. This feature has been removed from the OS by Microsoft. It’s likely not coming back.
- When blur is not available on the user’s system, automatically upgrade them to acrylic.
- Enable XAML context menu on Windows 10 build 19041-19045 if KB5007253 is installed.
- Update WinUI to 2.8.
- Use the new Segoe UI Variable font on Windows 11 for XAML UI elements.
- Various code cleanups and modernization.
As always, you can download this release from the Microsoft Store, or by downloading and opening the TranslucentTB.appinstaller file below. Additionally, Windows 11 users can download the portable version by downloading TranslucentTB-portable-x64.zip.
2021.5
- Add battery saver state, disabled by default
- Fix error message being missing in logs when US english locale is missing
- Fix acrylic being broken on Windows 11
- Fix crash when a second instance is launched
- Restore blur option on Windows 11 build 22449 and higher
- Update to stable release of WinUI 2.7, reducing download size tenfold.
You can download this release from the Microsoft Store, or by downloading and opening the TranslucentTB.appinstaller file below.
Version 5
This release is a major rewrite (yet again) of the application! A lot of changes occured, so here’s a list of the major changes:
- Rewrite the entire UI in UWP XAML (hosted via XAML Islands), giving the TranslucentTB UI a much more modern look.
- On Windows 11, the context menu is also an UWP XAML flyout.
- New welcome UI, giving the user links to our Liberaypay page and Discord server.
- Unfortunately results in increased memory usage
- Acrylic!
- As a consequence, the minimum version is build 18362 (AKA 1903)
- New Fluent icon
- Light theme support: the TranslucentTB tray icon turns black when Windows light theme is enabled.
- Dark theme context menu is also available.
- Changed config file format to a standard JSON file.
- Changes to the config file are now automatically reloaded when the file is changed on disk.
- Instead of being constantly looping, TranslucentTB is now lazy and DLL injects into Explorer
- Flickering when start opens is completely gone!
- New defaults which address common user complaints
- The Peek button can now still be used even when not visible
- Increase reliability of hotplug detect. This should fix most cases of secondary monitors not being detected.
There are a few known issues as well! Many affecting Windows 11 only:
- There is a thin line on the taskbar in Windows 11. This is not a TranslucentTB-caused issue, this line is present even when it isn’t running. It’s just harder to notice.
- Acrylic color does not work correctly. It seems Microsoft changed the API in 11 and I’ve yet to figure out how it works now.
#1C230F00(or just using the normal appearance) works pretty decent for now. - Start Menu opened does not reliably detect on which monitor the Start Menu is opened in Windows 11. This mode is disabled by default in Windows 11, but can still be turned on. It will be fixed in a future update.
- Search opened does not work in Windows 11. It has been hidden from the context menu in Windows 11. It will be fixed in a future update.
- Blur causes significant lag when an Explorer window is dragged under the taskbar. This is a bug in Windows 11, it cannot be resolved by TranslucentTB. It has been hidden from the context menu in Windows 11, but can still be enabled by editing the config file. Resolved in Insider build 22449.
- Opening the app again when the welcome page is opened results in the welcome page being skipped.
- In some very rare occassions, the app may crash on monitor hotplug. This is being investigated.
- The XAML context menu in Windows 11 is missing some icons or uses outdated icons.
- Restoring Discord from its tray icon does not change the taskbar’s appearance accordingly until the window is dragged around or resized.
You can download this release from the Microsoft Store, or by downloading and opening the TranslucentTB.appinstaller file below.
NOTE: We switched to using exclusively MSIX for the app, so if you’ve installed it from the regular installer previously, you’re encouraged to uninstall it, as it won’t happen automatically.
Version 4 hotfix 5
Fix cortana detection in newer Windows builds.
To download, click on this link or select TranslucentTB-setup.exe below
Version 4 hotfix 4
This addresses issue #265.
Version 4 hotfix 3
This addresses issue #258.
Version 4 hotfix 2
This addresses the following issues:
- #192
- #199: if hardware isn’t capable of providing DirectX 11 support, WARP will be used.
- #209: temporary workaround until next version, in the context menu click on
Advanced>Refresh taskbar handles. - #228
- Silent error at first run about checking if a file exists.
Version 4 hotfix
NOTES FROM THE PREVIOUS RELEASE STILL APPLIES. In short, download TranslucentTB-setup.exe and close version 3 before upgrading from it.
Fixes:
- A couple of CPicker crashes
- Task Manager and general slowdowns while TranslucentTB is open
- Settings aren’t being saved on shutdown
- Softkills (
taskkill /im TranslucentTB.exe) now works
Changes:
- Added save settings context menu entry
A New Code
NOTES:
- If you download from GitHub, download
TranslucentTB-setup.exe. The other four downloads are debugging symbols and source code archives to aid developers. - Please close the older TranslucentTB version before upgrading. See the changelog for the reason why.
I am proud to announce, after a year-long hiatus, the next release of TranslucentTB! This version is also available freely on the Microsoft Store. By downloading it from the Microsoft Store for free, you benefit from background auto-updates for future releases and settings sync between devices at no additional cost.
Major changes:
- Command line arguments have been removed, the config file and dynamic windows blacklist now resides in
%AppData%\TranslucentTB(and are backwards compatible with V3) and pretty much everything is configurable via the tray icon context menu. - Fixed an issue where the config wouldn’t load at startup.
- New integrated color picker.
- Added Fluent taskbar mode.
- Fixed bug where UWP apps would make dynamic windows get «stuck» in the maximized state.
- New dynamic modes: dynamic Timeline and dynamic Cortana.
- Improved reliability of dynamic Start.
- Each dynamic state has now its own color and effect customization instead of being hard-coded to a mode.
- This release and the new color picker are per-monitor high DPI aware. The context menu shouldn’t look tiny anymore on high DPI monitors.
- We switched from an event to a mutex for single-instance detection. This also allows the installer to detect when TranslucentTB is running. When upgrading, it is required to close the older version before as it will cause a invalid handle error while trying to open the new version. This is because events and mutexes share the same namespace in the kernel object manager (as such a mutex cannot have the same name than an event, because they would conflict), and it’s not possible to open an event as if it was a mutex.
- Added error handling and logging everywhere.
This release is also the place of lot of internal changes that decouples and refactors code and will allow us to further evolve in a much more flexible and faster way.
Хотите получить полную прозрачность для окон? Тогда Вам просто необходимо скачать на свой компьютер программу bLend!
Она была разработана еще во времена Windows XP, но до сих пор отлично работает на всех версиях Windows 7, 8 и даже 10. Программа имеет крайне простой (хоть и на английском языке) интерфейс. Жмете на галочку «Set All Windows to be transparent» и устанавливаете уровень прозрачности ползунком. Жмете на «Conform to above list» и прозрачность отключается.
В интерфейсе предусмотрена возможность отдельного листа, куда можно внести не все, а только список определенных приложений, для которых будет (или не будет) действовать прозрачность. Для каждого приложения можно задать свои параметры, таким образом, некоторые приложения будут менее видны, другие — более.
Помимо прочего здесь есть возможность показывать или скрывать программу в трее, а также автозапуск при старте Windows.
Демонстрацию работы bLend можно увидеть не только на скриншотах ниже, но и в некоторых темах оформления. Например, она включена в скинпак iOS Dark Glass SkinPack для Windows 7/8/10.
Windows 11/10 comes with a Transparency effects feature to make the taskbar and Start menu translucent. But there is no built-in feature available in Windows 11/10 that makes the opened windows (like a folder, browser, application, etc.) or a selected window completely transparent. Therefore, we have covered some free tools in this article to help you make windows transparent in Windows 11/10. Some of the freeware on this list are portable and some are available as installer files.
We have covered 5 free tools in this list to make windows completely transparent in Windows 11/10 computers. These are:
- Glass2k
- Transparent windows
- TranspWnds
- Crystal XP
- Vitrite.
Let’s check these tools one by one.
1] Glass2k
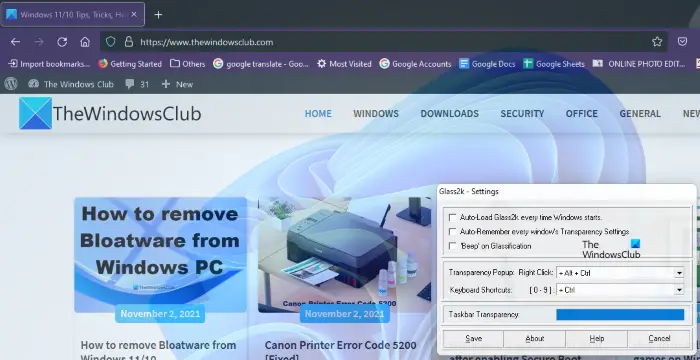
Glass2k is portable software. Simply download it from its official website and double-click on it to launch it. It starts running in the system tray of the taskbar. Now, right-click on the Glass2k system tray icon, and select Settings. After opening its Settings, you can change the hotkeys for making the windows transparent.
Glass2k offers a transparency level from 1 to 9. Number 1 is the highest degree of transparency and 9 is the lowest degree of transparency. 0 turns off the transparency effect.
It also has other settings that you can change as per your requirements. For example, the Taskbar Transparency slider of this tool lets you change the transparency level of your computer taskbar.
After launching Glass2k, it will run continuously in the background. Therefore, to close it, you need to right-click on its system tray icon and select Exit.
You can download Glass2k from chime.tv.
2] Transparent windows
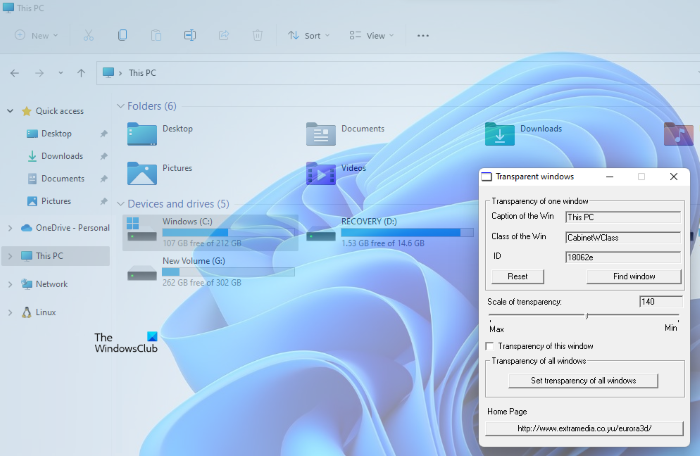
Transparent windows is a very simple software that has no advanced features. You can use it only to make windows transparent on your Windows 11/10 computer. It has a transparency slider that varies the transparency level from 0 to 255. While 255 is the minimum level of transparency, 0 is the highest level of transparency. You may find it a bit difficult to use for the first time. Therefore, we are explaining here how to use this tool.
It requires the caption, class, and ID of the window that you want to make transparent. Click on the Find Window button and then place your mouse cursor on the window that you want to make transparent. After that, it automatically detects the caption, class, and ID of that window.
It generally detects the window when you place your cursor either on its top or on its edges. When it detects the window, it shows its caption, class, and ID. Now, click on that window and adjust the transparency slider available on this tool.
If you want to make all the windows transparent, simply click on the Set transparency for all windows button.
This tool is available on softpedia.com for download.
3] TranspWnds
TranspWnds is another portable software on this list to make open applications or programs transparent.
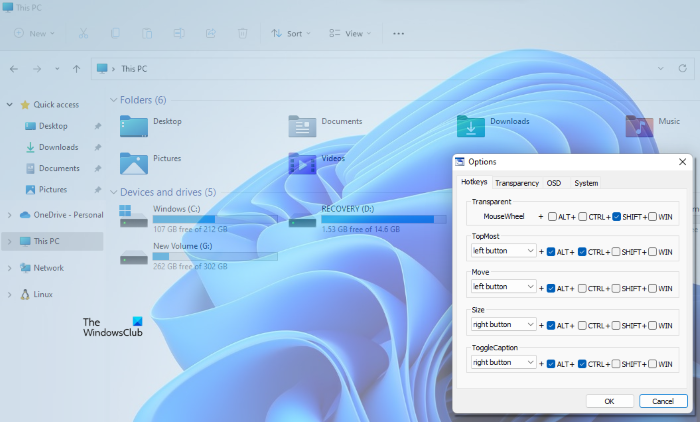
By default, the hotkeys to change the transparency effect on a particular window is Mouse scroll wheel + Alt. But, if you want, you can change the keyboard shortcut or hotkey to apply the transparency effect. For this, launch this tool, right-click on the system tray icon of this tool, and then select Options.
In the Options window, you can change the hotkeys for different actions, select the minimum level of transparency, select if this software should run on startup, etc.
Visit softpedia.com to download TransWnds.
4] Crystal XP
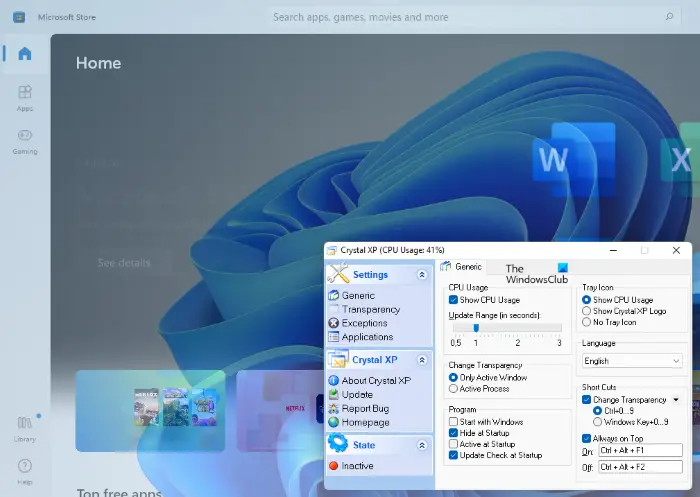
Using this Crystal XP tool, you can set the transparency level of opened applications between 1 (lowest) to 9 (highest). The 0 level turns off the transparency effect for a particular window.
By default, the hotkey to apply the transparency effect is Ctrl + (0 to 9). You can change this hotkey using the Settings of this tool. For this, launch this tool, right-click on its system tray icon, and select the Restore option. After that, you can set hotkeys and other options.
Crystal XP tool also displays the CPU usage percentage on hovering the mouse cursor on its system tray icon which is a nice feature. Grab it from softpedia.com.
5] Vitrite
Vitrite is a very simple and straightforward tool to make opened programs transparent. After installing it, double-click on the application file to run it. Like some other tools covered on this list, it also lets you set the transparency level between 9 to 1. Level 1 is the highest transparency effect and 9 is the least transparency effect. 0 turns off the transparency of a window.
The default hotkeys to apply the transparency effects to a particular window is Ctrl+Shift+(1 to 9). Press Ctrl+Shift+0 to turn off the transparent effect. However, that hotkey to turn off the transparency effect did not work for me. If it does not work for you too, simply close the transparent window. When you launch the same window the next time, the transparency effect for that will be 0.
Visit softpedia.com to download it.
How can I make my Windows screen transparent?
You can make any opened window transparent on your Windows 11/10 computer with the help of free tools available on the internet. Some of them are paid, whereas, some are free. We have listed some free tools to make windows transparent above in this article.
Related: How to make Taskbar transparent in Windows 11/10.
Does Windows 11 have transparency?
Yes, Windows 11 comes with an option to enable transparency on your interface. To enable transparency in Windows 11, you need to open the Windows Settings panel and go to the Personalize section first. Find the Colors option and toggle the Transparency effects button to turn it on.
That’s all. Hope it is helpful.
Содержание
- Способ 1: Настройки персонализации
- Способ 2: Специальные возможности
- Способ 3: Редактирование реестра
- Создание BAT-файла
- Способ 4: Включение прозрачности отдельных окон
- Вариант 1: Меню «Пуск» и панель задач
- Вариант 2: «Командная строка»
- Вариант 3: «Windows PowerShell»
- Вариант 4: Экран блокировки
- Способ 5: Aero Glass
- Вопросы и ответы
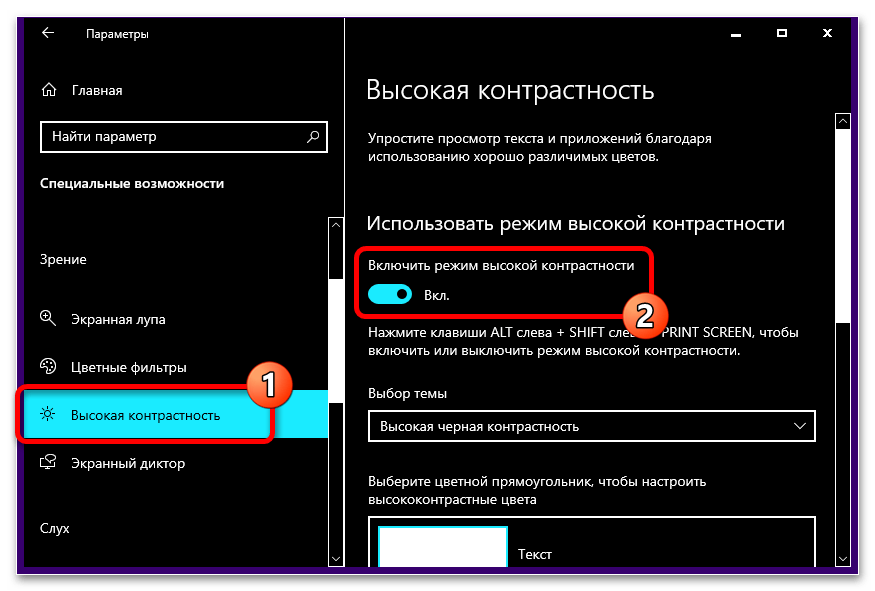
Важно! Для успешного выполнения представленных в статье инструкций в операционной системе должен быть отключен контрастный режим. В противном случае активировать прозрачность окон не удастся. Если вами используется высокая контрастность в Windows 10, но вы готовы ее отключить, обратитесь за помощью к другому материалу на нашем сайте, в котором предлагаются три способа выполнения поставленной задачи.
Подробнее: Как отключить контрастный режим в Windows 10
Способ 1: Настройки персонализации
Активировать режим прозрачности окон операционной системы можно путем изменения настроек персонализации. Делается это следующим образом:
- Откройте «Параметры» системы, например через «Пуск» и кнопку с шестеренкой.
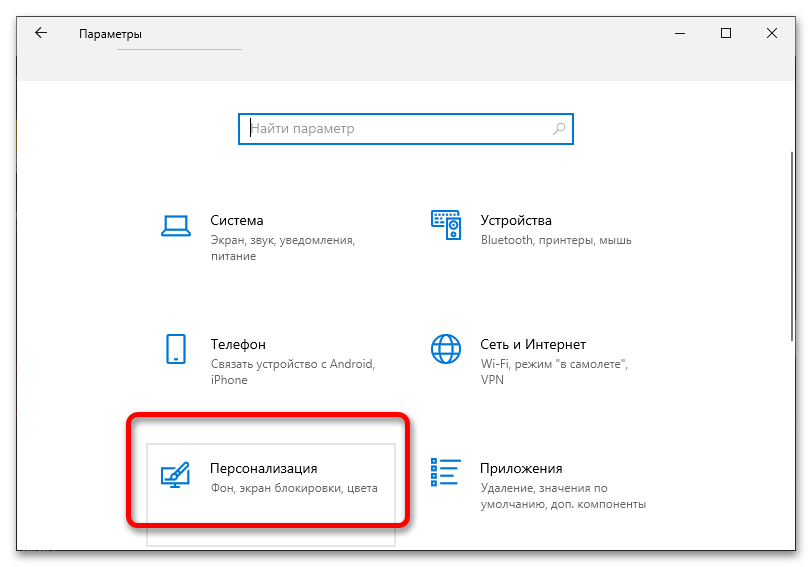
- Находясь в приложении, проследуйте в раздел «Персонализация», для чего кликните по одноименному элементу интерфейса.
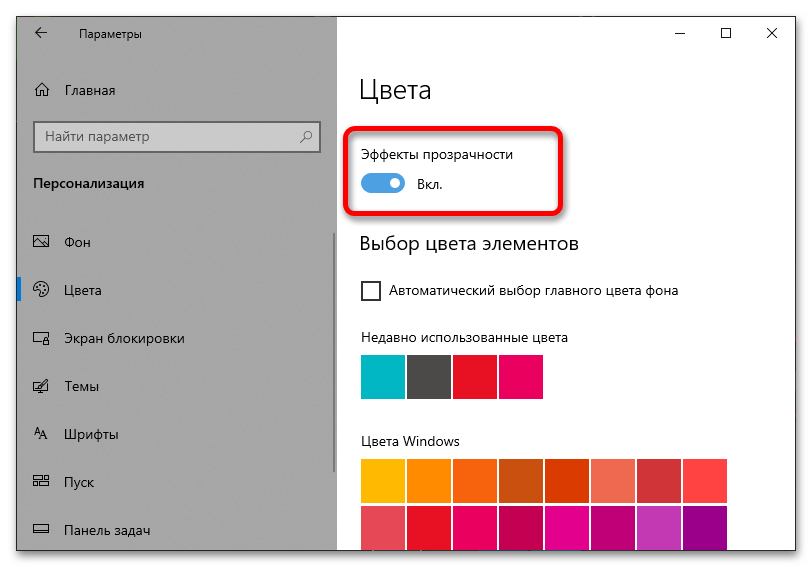
- Воспользовавшись навигационной панелью в левой части, перейдите на вкладку «Цвета».
- Найдите на странице параметр под названием «Эффекты прозрачности» и активируйте его, переведя переключатель в положение «Вкл».
Читайте также: Как открыть «Параметры» в ОС Windows 10
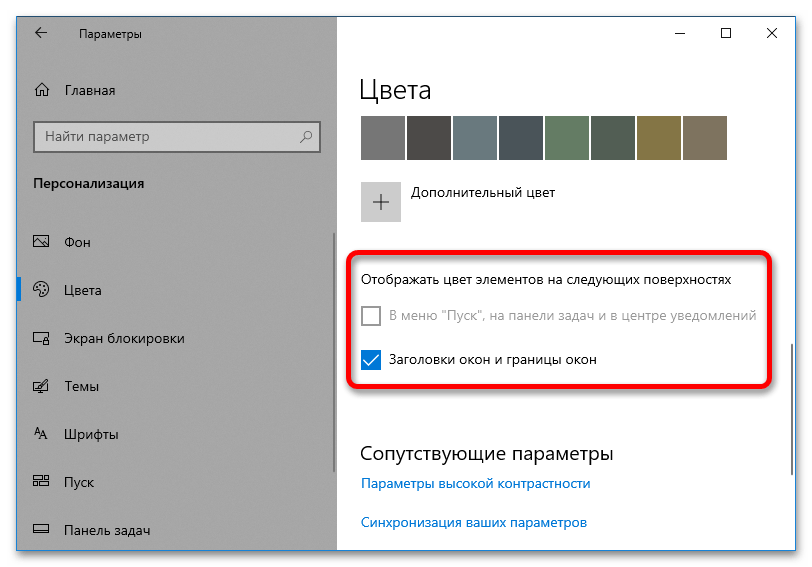
При желании вы можете изменить оттенок окон, чтобы посмотреть, как они будут выглядеть в других расцветках. Для этого спуститесь чуть ниже по странице и в блоке «Отображать цвета элементов на следующих поверхностях» установите отметку у пункта «Заголовки окон и границы окна».
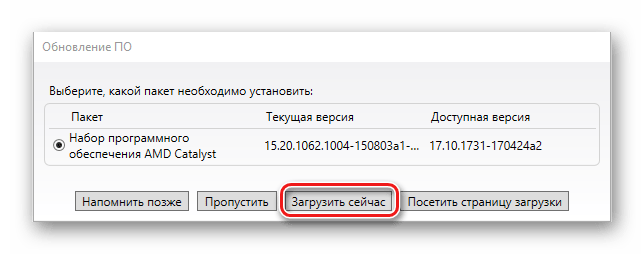
Важно! Если вы заметили, что функция прозрачности у вас неактивна, это означает, что в системе отсутствует проприетарный драйвер видеокарты. Его необходимо будет установить самостоятельно. Сделать это можно как с помощью штатных средств операционной системы, так и через стороннее программное обеспечение. Но предпочтительнее будет скачать инсталлятор с официального сайта компании-производителя. Таким образом вы получите драйвер последней версии без риска заразить компьютер вирусами. На нашем сайте есть отдельная инструкция, в которой все перечисленные способы описываются развернуто. При необходимости воспользуйтесь представленной ниже ссылкой для ознакомления с ее содержимым.
Подробнее: Как обновить драйвер видеокарты AMD / NVIDIA
Способ 2: Специальные возможности
Аналогичным образом активировать эффект прозрачности окон можно путем взаимодействия со «Специальными возможностями» — отдельным меню системных настроек. Для выполнения поставленной задачи:
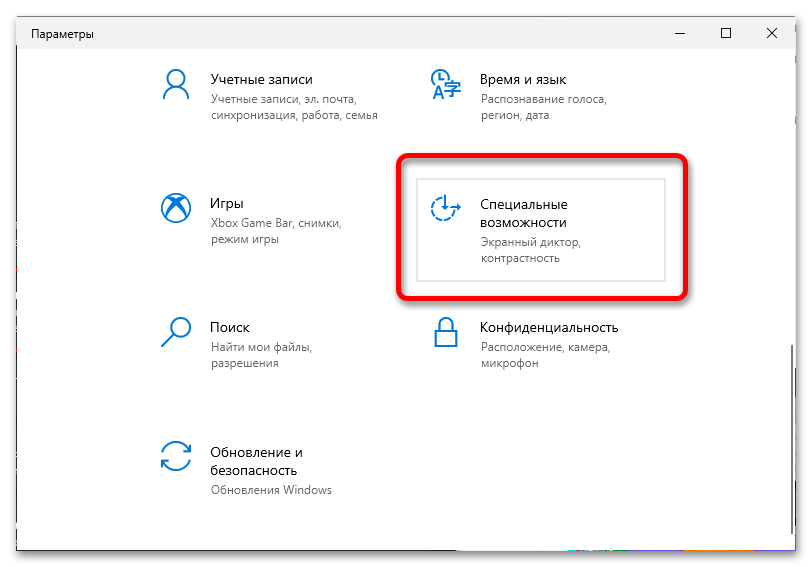
- Вызовите «Параметры», через них перейдите в раздел «Специальные возможности», кликнув по соответствующему пункту.
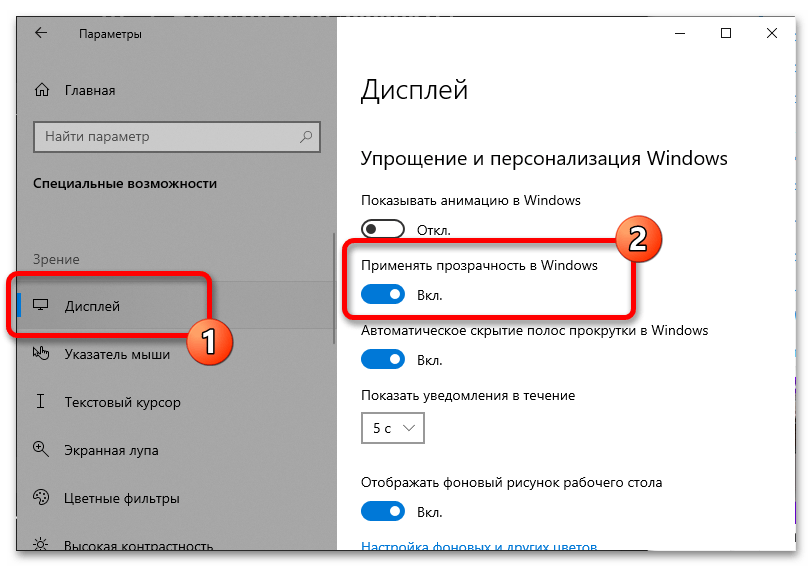
- Находясь на вкладке «Дисплей», найдите на странице параметр под названием «Применять прозрачность в Windows» и переведите переключатель под ним в положение «Вкл».
Как только это будет сделано, элементы интерфейса операционной системы станут прозрачными.
Способ 3: Редактирование реестра
Добиться эффекта прозрачности окон в Windows 10 можно посредством изменения параметров системного реестра. Вам понадобится перейти в нужный раздел и внести в него правки. Делается это следующим образом:
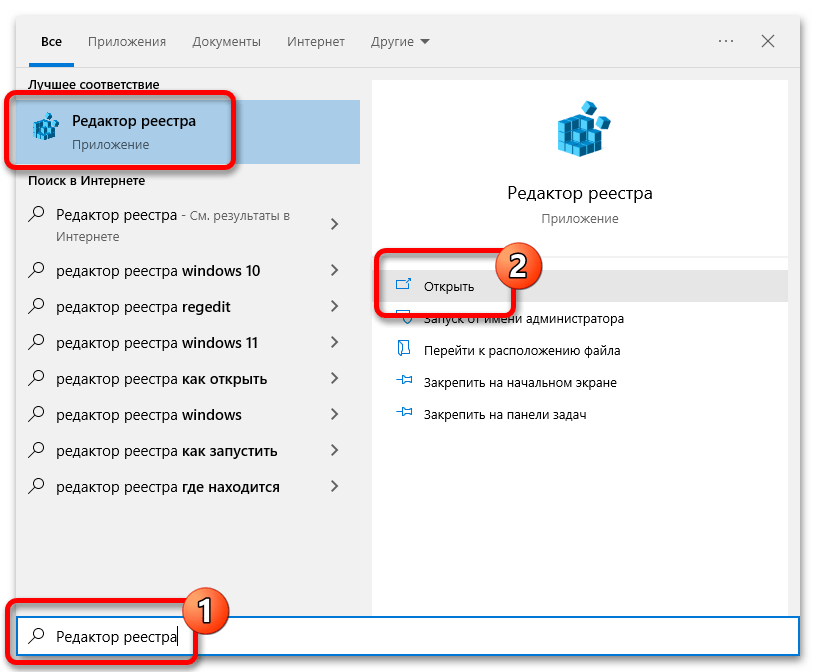
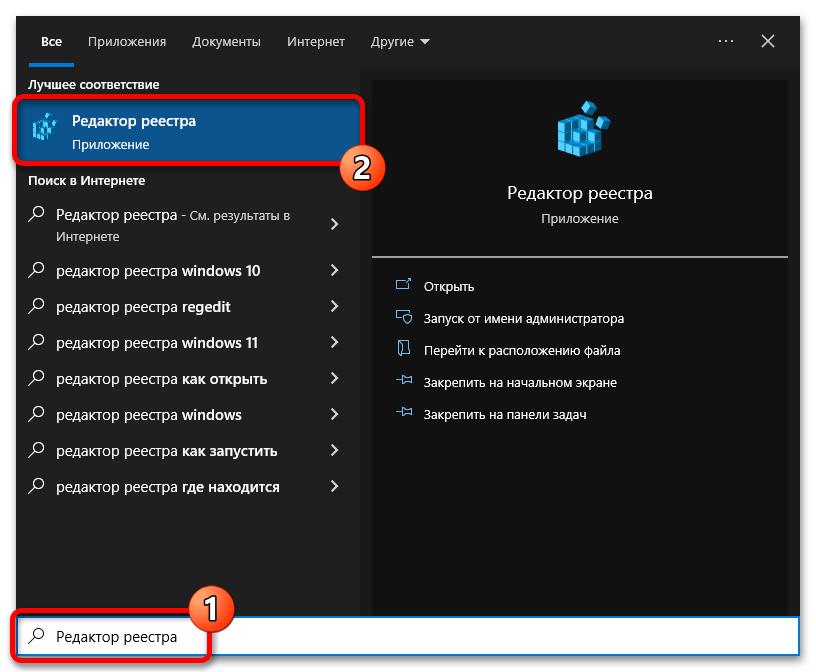
- Откройте «Редактор реестра» любым доступным способом. Например, сделать это можно через системный поиск. Установите курсор в соответствующее поле на панели задач, а затем введите запрос «Редактор реестра». В результатах кликните по одноименному приложению или по пункту «Открыть».
Если после этого появится диалоговое окно контроля учетных записей, кликните в нем по кнопке «Да».
Читайте также: Как открыть «Редактор реестра» в Windows 10
- Перейдите по указанному ниже пути. Для этого вы можете воспользоваться древовидной структурой каталогов в левой части интерфейса или вставить адрес в адресную строку, которая расположена в верхней части окна, и нажмите Enter.
HKEY_CURRENT_USER\SOFTWARE\Microsoft\Windows\CurrentVersion\Themes - Находясь в папке «Themes», перейдите в подкаталог «Personalize» и откройте в нем «Свойства» параметра «EnableTransparency». Для этого достаточно дважды кликнуть по его названию левой кнопкой мыши.
- В поле «Значение» впишите цифру «1», а затем сохраните изменения, щелкнув по кнопке «ОК».
- Перезапустите компьютер, чтобы активировать эффект прозрачности окон в операционной системе Windows 10.
Создание BAT-файла
Описанную в этом способе процедуру можно значительно упростить, создав специальный бинарный файл со скриптом для внесения нужных правок в системный реестр. Для этого необходимо воспользоваться «Блокнотом».
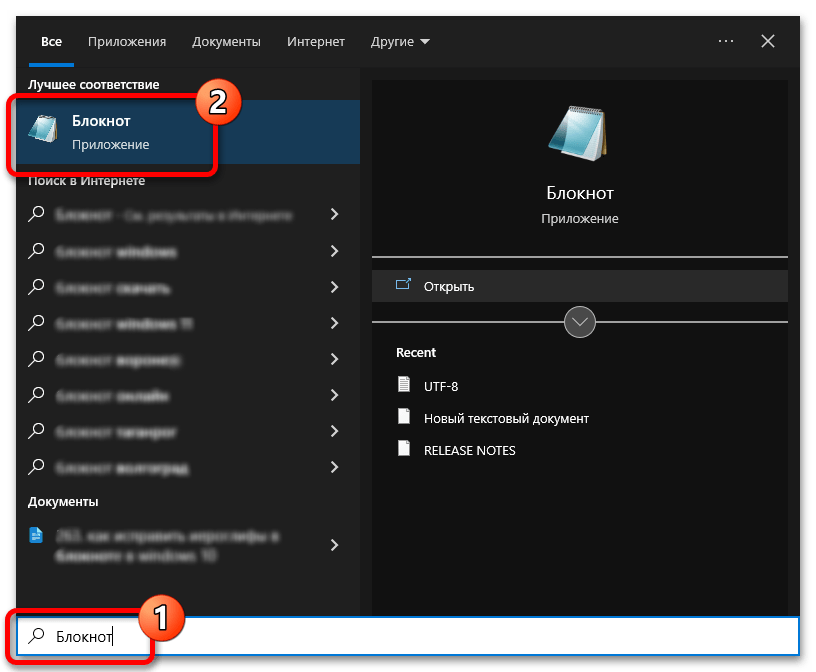
- Запустите текстовый редактор, воспользовавшись поиском по системе: в «Пуске» или поисковом поле введите запрос «Блокнот» и кликните по одноименному приложению в результатах.
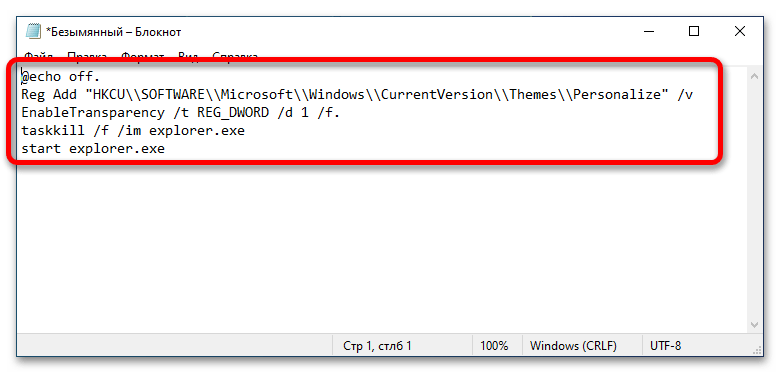
- В открывшееся окно текстового редактора поместите представленный ниже код. Для этого скопируйте его, воспользовавшись комбинациями клавиш Ctrl + C (копирование) и Ctrl + V (вставка).
@echo off
Reg Add "HKCU\\SOFTWARE\\Microsoft\\Windows\\CurrentVersion\\Themes\\Personalize" /v EnableTransparency /t REG_DWORD /d 1 /f.
taskkill /f /im explorer.exe
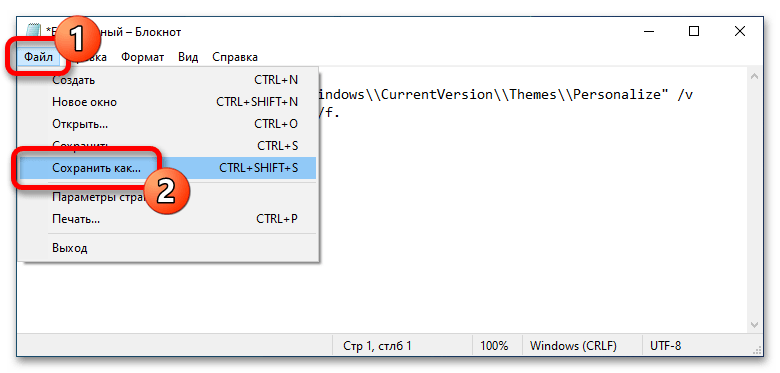
start explorer.exe - Сохраните содержимое, создав тем самым новый файл. Для этого сначала раскройте меню «Файл», расположенное в верхнем левом углу, а затем выберите пункт «Сохранить как».
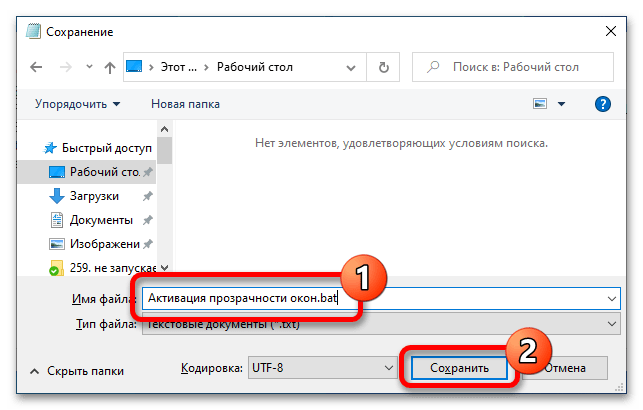
- Перейдите в директорию, куда будет сохранен файл, и введите в поле «Имя файла» любую строку. Единственное условие — она должна оканчиваться расширением «.bat» (без кавычек). На скриншоте вы можете увидеть пример создания файла «Активация прозрачности окон.bat». В завершение щелкните по кнопке «Сохранить».
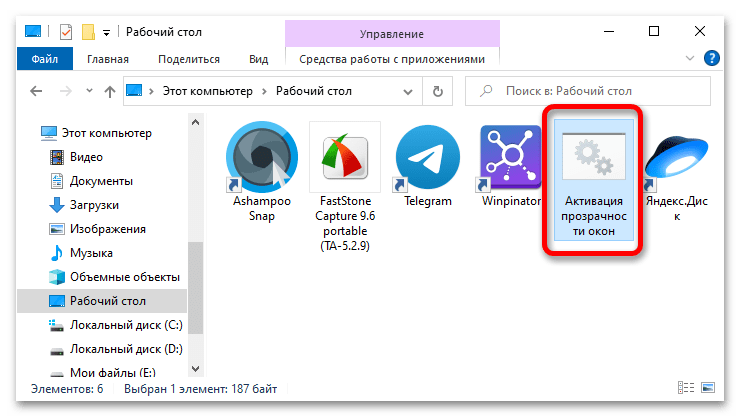
- Закройте окно «Блокнота» и перейдите через файловый менеджер в директорию, куда сохранили созданный файл.
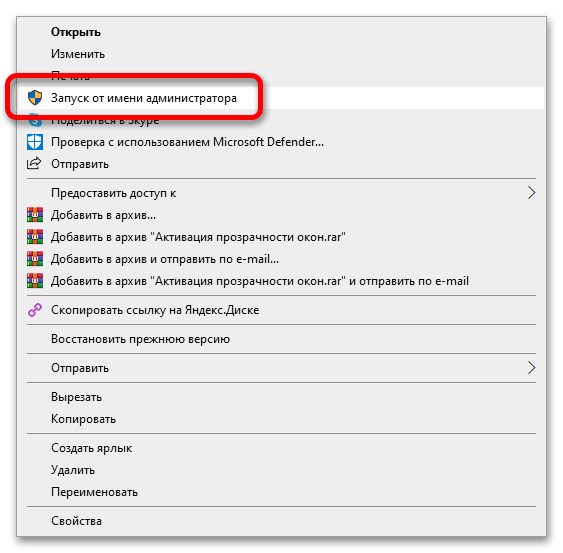
- Запустите его от имени администратора, чтобы программа имела права на внесение изменений в системный реестр. Сделать это можно через контекстное меню — откройте его правой кнопкой мыши и выберите пункт «Запуск от имени администратора».
- Как только это будет выполнено, интерфейс операционной системы на некоторое время исчезнет, а когда вернется, окна станут прозрачными.
Читайте также: Как создать BAT-файл в Windows 10
Способ 4: Включение прозрачности отдельных окон
Вы можете сделать прозрачными лишь отдельные окна, а не все подряд. Эта настройка выполняется посредством штатных инструментов операционной системы без использования программ от сторонних разработчиков.
Вариант 1: Меню «Пуск» и панель задач
Если вы хотите сделать прозрачными меню «Пуск» и панель задач, добиться этого можно путем внесения изменений в системный реестр, где потребуется создать специальный параметр.
Важно! Этот метод актуален только в том случае, если панель задач и меню «Пуск» не стали прозрачными после применения предыдущих способов из этой статьи. В противном случае никакого эффекта не будет.
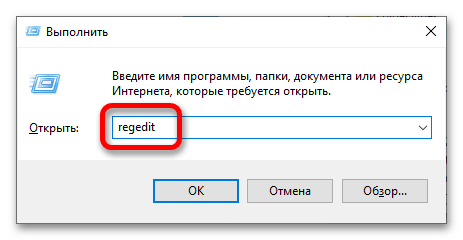
- Откройте «Редактор реестра» через системный поиск, как было показано выше, или с помощью утилиты «Выполнить». Вызовите ее сочетанием клавиш Win + R, а затем вставьте в поле «Открыть» команду
regeditи щелкните по Enter. - В появившемся окне проследуйте по указанному ниже пути. Сделать это можно посредством навигационной панели в левой части интерфейса или с помощью адресной строки сверху. Во втором случае понадобится вставить туда скопированный адрес и нажать Enter.
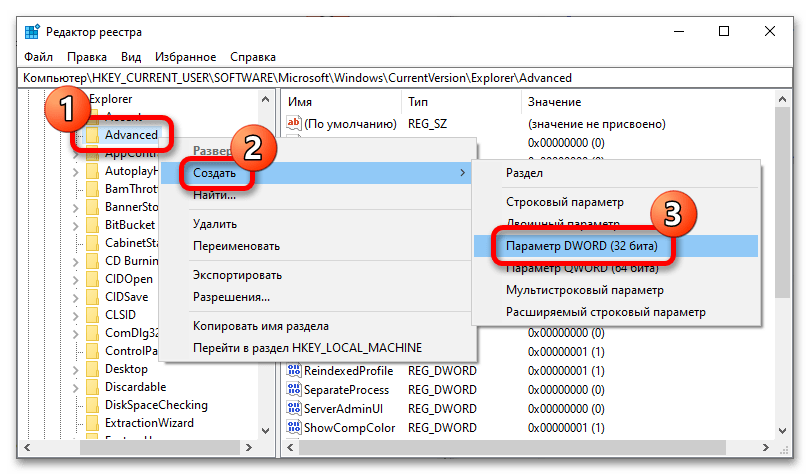
HKEY_CURRENT_USER\Software\Microsoft\Windows\CurrentVersion\Explorer - Находясь в директории «Explorer», создайте новый параметр в папке «Advanced». Для этого щелкните по ее названию ПКМ и из контекстного меню выберите «Создать» → «Параметр DWORD (32 бита)».
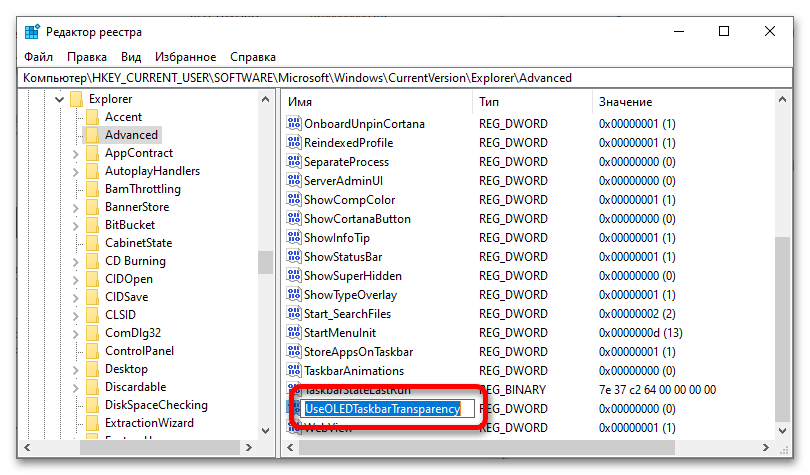
- Впишите название «UseOLEDTaskbarTransparency» (без кавычек) и нажмите Enter для его сохранения.
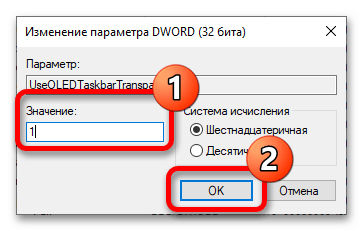
- Откройте «Свойства» только что созданного параметра, дважды щелкнув по его имени левой кнопкой мыши. После этого в новом окне в поле «Значение» напишите цифру «1» (без кавычек) и кликните по кнопке «ОК».
- Когда все действия будут выполнены, перезапустите компьютер, чтобы внесенные изменения зафиксировались в системе.
Вариант 2: «Командная строка»
В Windows 10 есть возможность отдельно сделать прозрачным окно «Командной строки», притом для этого не обязательно предварительно активировать прозрачность всей операционной системы. Для выполнения поставленной задачи необходимо сделать следующее:
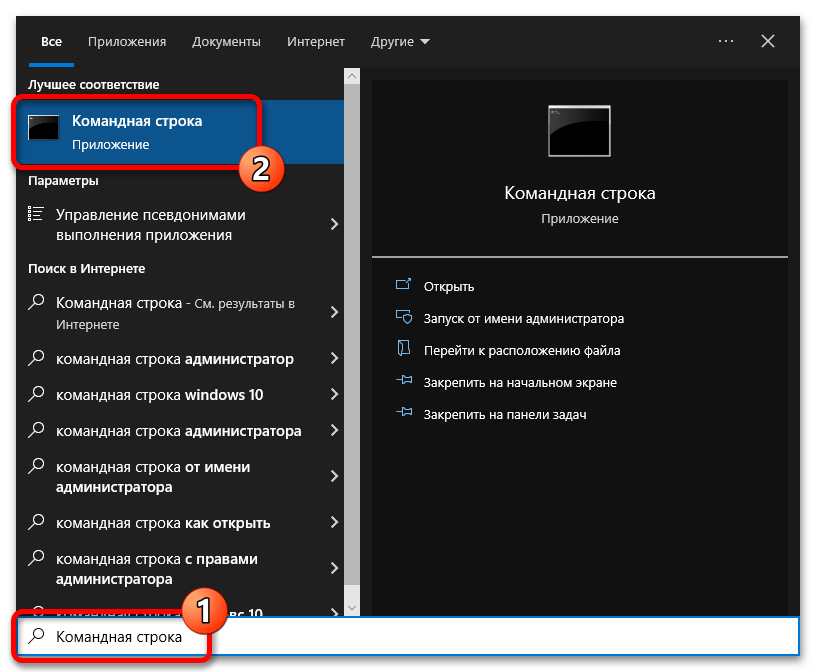
- Запустите «Командную строку» любым доступным способом.
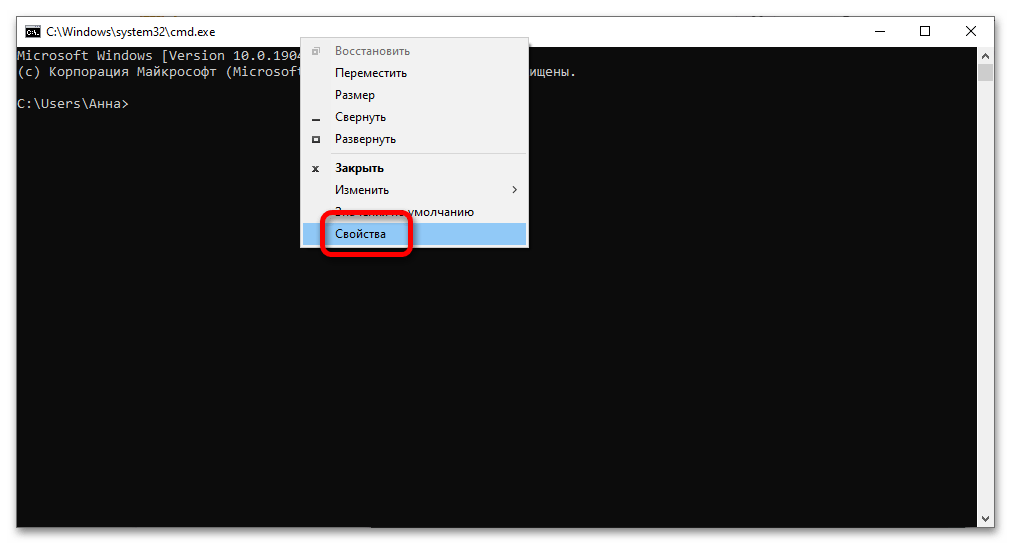
- В консоли щелкните правой кнопкой мыши по заголовку и из контекстного меню выберите пункт «Свойства».
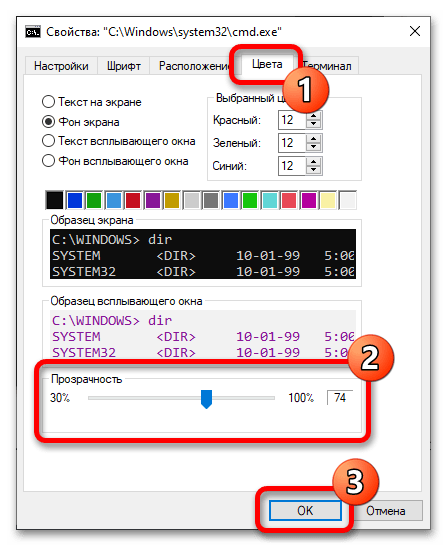
- В открывшемся окне переключитесь на вкладку «Цвета» и измените значение в блоке «Прозрачность». Вы можете сделать это вручную, введя число в соответствующее поле, или с помощью горизонтального ползунка. В завершение кликните по кнопке «ОК» для применения изменений.
После этого полностью все окно «Командной строки» станет прозрачным, как показано на изображении ниже.
Читайте также: Как открыть «Командную строку» в Windows 10

Вариант 3: «Windows PowerShell»
Аналогичным образом можно изменить степень прозрачности оболочки «Windows PowerShell».
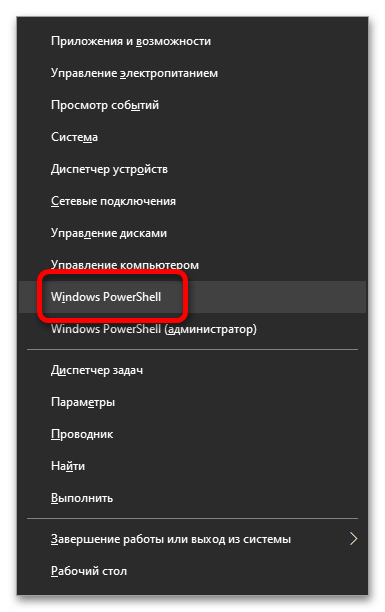
- Откройте оболочку через контекстное меню кнопки «Пуск». Вызовите его комбинацией клавиш Win + X, а затем кликните по пункту «Windows PowerShell».
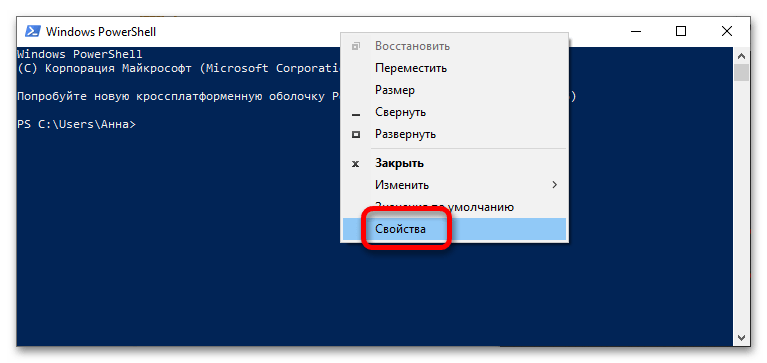
- В открывшемся приложении щелкните правой кнопкой мыши по заголовку и из появившегося контекстного меню выберите опцию «Свойства».
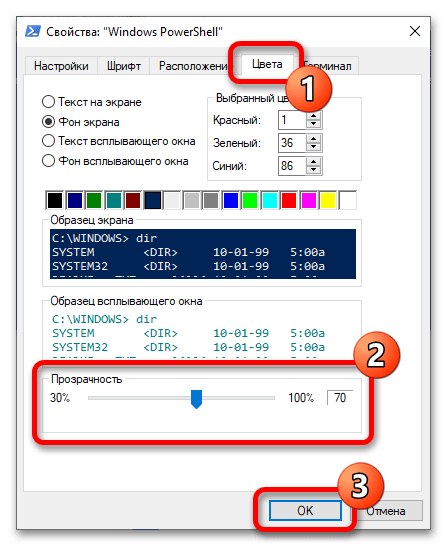
- Перейдите на вкладку «Цвета» и воспользуйтесь ползунком в блоке «Прозрачность» для изменения степени прозрачности окна. В завершение щелкните по кнопке «ОК», чтобы сохранить внесенные изменения.
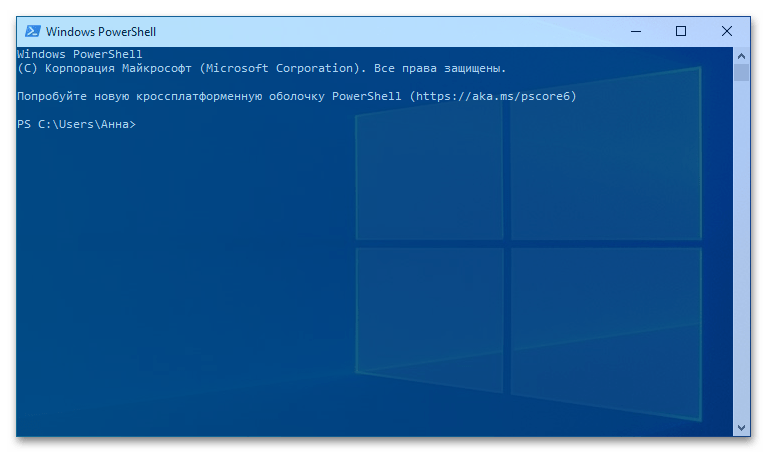
В результате все окно «Windows PowerShell» станет прозрачным.
Читайте также: Как открыть Windows PowerShell в Windows 10
Вариант 4: Экран блокировки
При необходимости сделать прозрачным можно даже экран блокировки. Правда, эта прозрачность не в прямом понимании слова — ее можно назвать скорее размытием. Для выполнения поставленной задачи потребуется внести правки в системный реестр.
- Вызовите «Редактор реестра», вписав название приложения в соответствующее поисковое поле или в «Пуске».
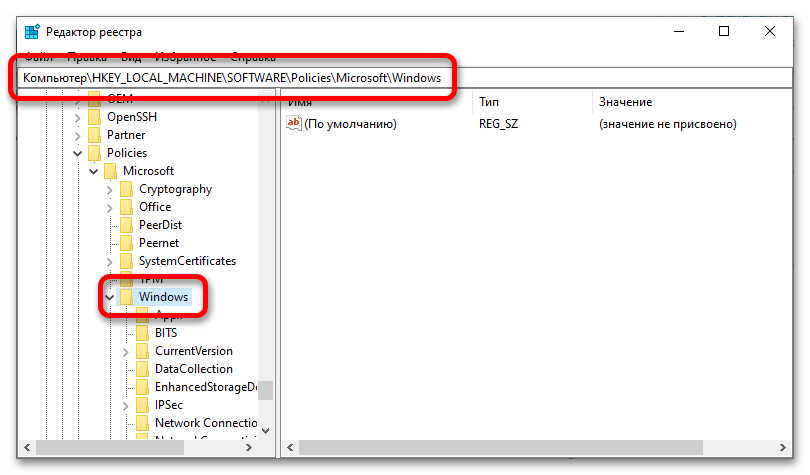
- Перейдите в
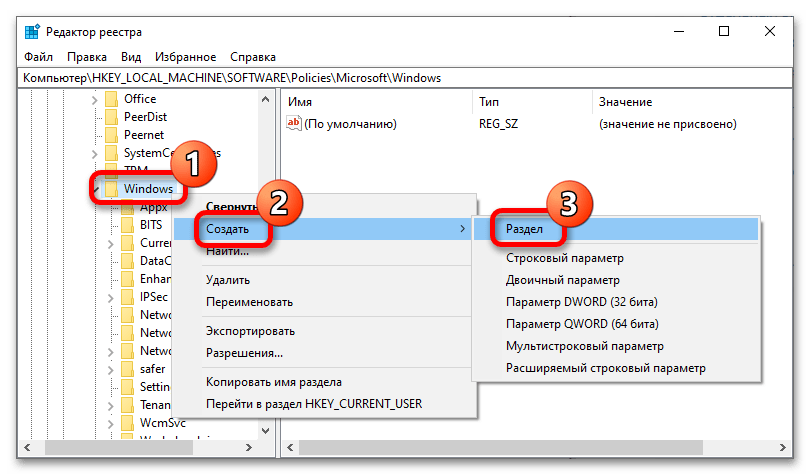
HKEY_LOCAL_MACHINE\SOFTWARE\Policies\Microsoft\Windows, последовательно развернув ветки через навигационную панель слева или вставив адрес в строку, расположенную вверху, а затем нажав Enter для подтверждения. - Создайте в папке «Windows» новый раздел, щелкнув по нему правой кнопкой мыши и выбрав «Создать» → «Раздел».
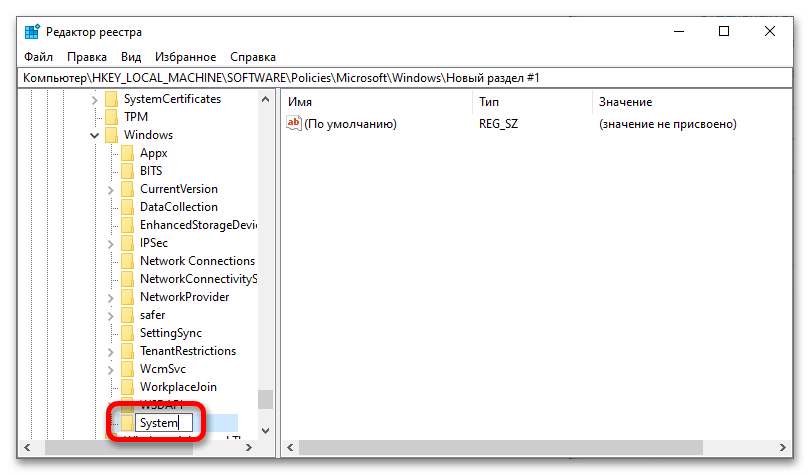
- В поле для ввода впишите название «System» (без кавычек) и нажмите Enter для сохранения изменений.
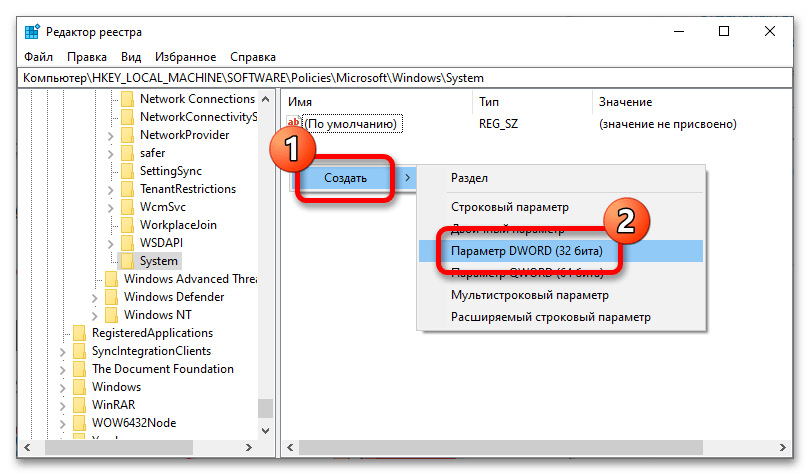
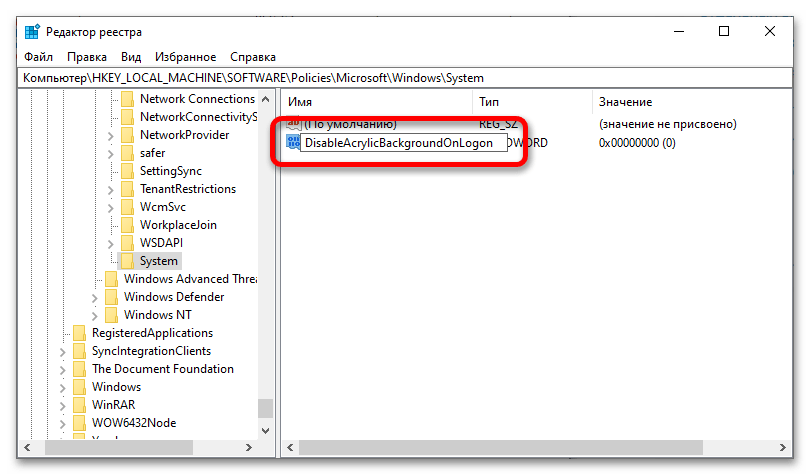
- Перейдите в только что созданный каталог и создайте там новый параметр, кликнув в пустом месте правой кнопкой мыши и выбрав «Создать» → «Параметр DWORD (32 бита)».
Задайте параметру название «DisableAcrylicBackgroundOnLogon», а затем воспользуйтесь клавишей Enter, чтобы сохранить его.
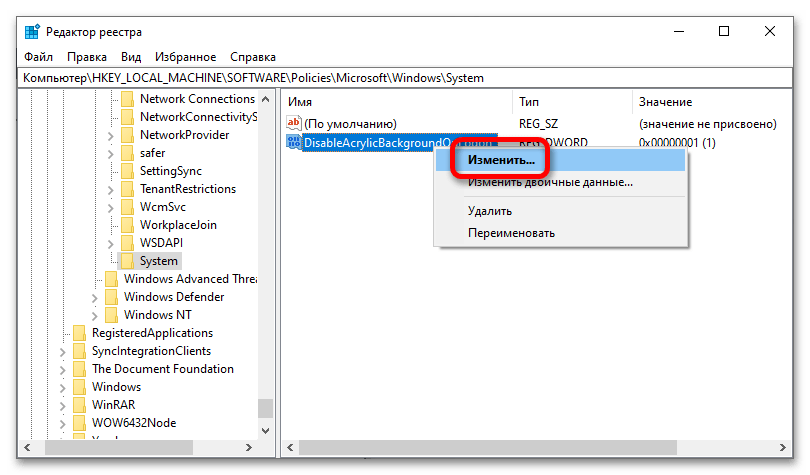
- Вызовите «Свойства» только что созданного параметра, нажмите по его названию правой кнопкой мыши и выберите пункт «Изменить».
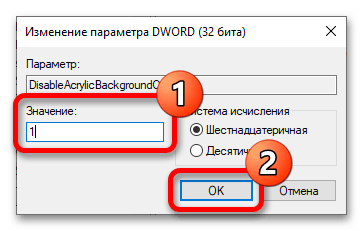
- Измените значение на «1» и примените изменения, щелкнув по «ОК».
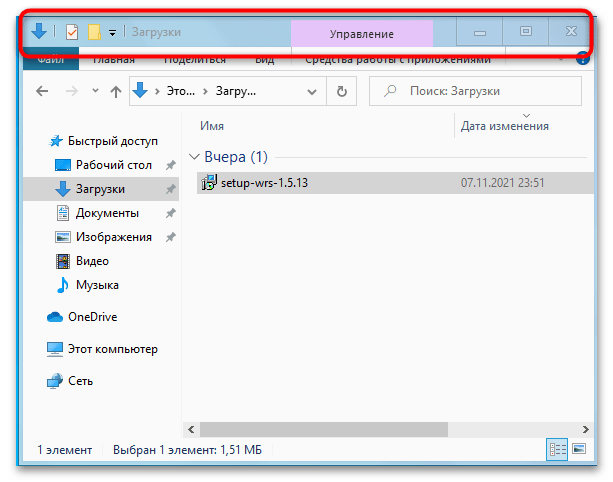
- Сразу после этого эффект прозрачности на экране блокировки активирован не будет, потребуется перезагрузить компьютер.
Способ 5: Aero Glass
Для того чтобы в Windows 10 сделать окна прозрачными, можно воспользоваться специальным приложением от сторонних разработчиков. Оно не является самостоятельным, а интегрируется в графическую оболочку операционной системы, добавляя свои параметры в настройки персонализации. На нашем сайте есть отдельная статья, в которой рассказывается о том, как скачать, установить и воспользоваться приложением Aero Glass. При необходимости воспользуйтесь ссылкой ниже, чтобы ознакомиться с изложенной там информацией.
Подробнее: Как сделать прозрачные окна в Windows 10 с помощью Aero Glass
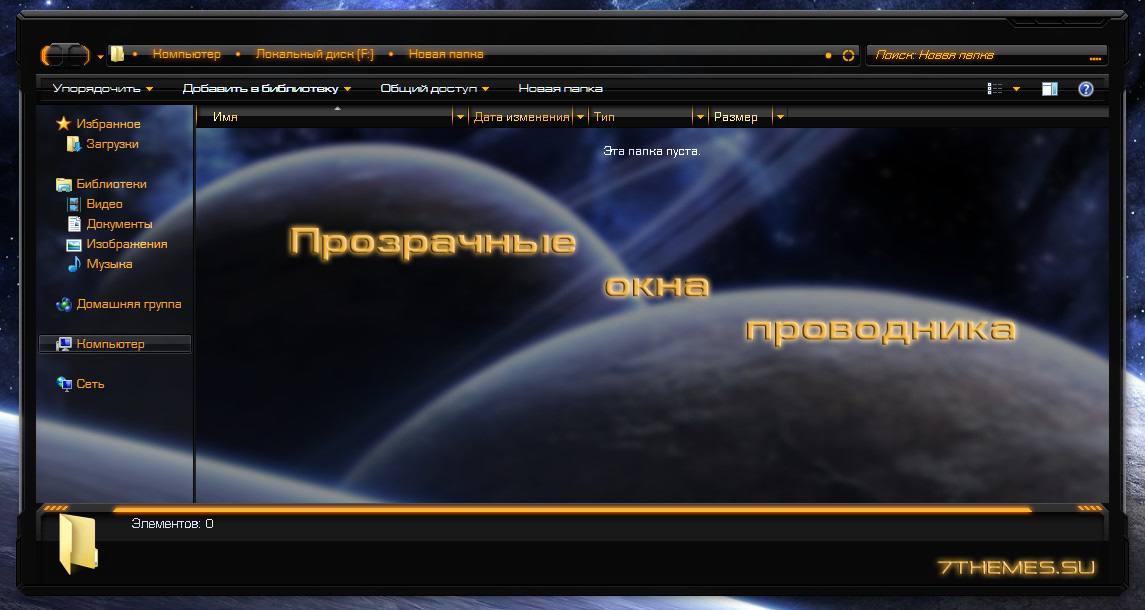
В комментариях под темными темами для Windows 7/8/8.1/10, не однократно спрашивали: как сделать прозрачным окно проводника? Ответ на этот вопрос один, скачиваем программу Full glass, запускаем, и все окна станут прозрачными. Если намерены пользоваться данной утилитой постоянно, то можете добавить ее в автозагрузку.
Внимание! Программа будет работать корректно только в том случае если фон проводника в темы оформления темного цвета.
На Windows 8/8.1/10 предварительно нужно установить Aero Glass.

Смотрите еще

