There is no MS solution for a proxy server any more. TMG was discontinued, and you could not purchase a license for it after December 2012.
There are other proxy servers you can use on Windows, such as our product WinGate, and others such as Squid, CCProxy, Kerio Control etc.
Disclaimer: I work for Qbik who are the authors of WinGate
Related videos on Youtube

19 : 00
5.2 Implementing Web Application Proxy in Windows Server 2016 (Step by Step guide)

22 : 42
Proxy Server on Server 2012 R2

01 : 45
Configure Proxy Settings in Windows Server 2012 R2

15 : 29
Proxy server Setting at client system via Group Policy at Server 2012 R2

26 : 09
How To Install & Configure Nginx Proxy Server In Windows Server 2019
Comments
-
I have installed Windows Server 2012 Data Center Edition at my server. I need to run a proxy server to filter and shape all the outgoing traffic from my server. I know that Microsoft FF TMG do that at Windows Server 2008. However, what is the Microsoft solution for proxy server at Microsoft Server 2012?
-
non of the above can be used for enterprise ! it should exist at ist a full features proxy system that be specially designed for microsoft solutions.
-
I don’t understand. Plenty of our customers are using WinGate in large enterprise networks.
-
Please describe the features that alternative products are missing.
Recents
Related
Продолжаем знакомиться с новыми возможностями ОС Windows Server 2012 R2. Ранее мы рассказывали о корпоративном аналоге DropBox в Windows Server 2012 R2 под названием Work Folders. Сегодня речь пойдет о еще одном новшестве новой серверной платформы – функции Web Application Proxy. Web Application Proxy – это новая функция роли Remote Access в Windows 2012 R2, позволяющая публиковать HTTP/ HTTPS приложения, расположенные в периметре корпоративной сети на клиентских устройствах (в первую очередь подразумеваются мобильные устройства) за ее периметром. Благодаря возможности интеграции c AD FS (служба может выступать в качестве ADFS-прокси), возможно обеспечить аутентификацию внешних пользователей, пытающихся получить доступ к опубликованным приложениям.
Web Application Proxy предоставляет такие же возможности публикации приложений, как и Forefront Unified Access Gateway (UAG), однако данная служба также позволяет взаимодействовать с другими серверами и сервисами, обеспечивая тем самым более гибкую и рациональную конфигурацию.
Web Application Proxy по сути выполняет функцию обратного прокси сервера (HTTP reverse proxy), организуя ретрансляцию запросов клиентов из внешней сети на внутренний сервер, и является межсетевым экраном на прикладном уровне.
Сервер со службой Web Application Proxy получает внешний HTTP/HTTPS трафик и терминирует его, после чего от своего имени инициирует новое подключение ко внутреннему приложению (веб-серверу). Т.е. внешние пользователи прямого доступа к внутреннему приложению реально не получают. Любой другой трафик, получаемый Web Application Proxy, отклоняется (в том числе отклоняются HTTP/HTTPS запросы, которые могут быть использованы при DoS, SSL и 0-day атаках).
Требования к организации Web Application Proxy и ключевые особенности:
- Систему можно развернуть на серверах с ОС Windows Server 2012 R2, включенных в домен Active Directory, с ролями AD FS и Web Application Proxy. Эти роли должны быть установлены на разных серверах.
- Необходимо обновить схему Active Directory до Windows Server 2012 R2 (обновлять контроллеры домена до Windows Server 2012 R2 не нужно)
- В качестве клиентских устройств поддерживаются устройства с ОС Windows, IOS (iPad и iPhone). Работы над клиентами для Android и Windows Phone пока еще не окончены
- Аутентификация клиентов осуществляется службой Active Directory Federation Services (ADFS), которая также выполняет функции ADFS – проксирования.
- Типовая схема размещения сервера с ролью Web Application Proxy представлена на рисунке. Данный сервер располагается в выделенной DMZ зоне и отделен от внешней (Интернет) и внутренней сети (Интранет) межсетевыми экранами. В этой конфигурации для работы Web Application Proxy требует наличия двух интерфейсов – внутреннего (Intranet) и внешнего (DMZ)

Для обеспечения дополнительной безопасности преаутентифкация внешних клиентов выполняется на сервере ADFS, в противном случае используется pass-through аутентификация на конечном сервере приложения (что менее секьюрно). Поэтому первый шаг при настройке Web Application Proxy – установка на отдельном сервере роли Active Directory Federation Services. 
При установке ADFS нужно выбрать SSL сертификат, который будет использоваться для шифрования, а также DNS имена, которые будут использоваться клиентами при подключении (соответствующие записи в DNS зоне придется создать самостоятельно).

Затем нужно указать сервисную учетную запись для службы ADFS. Необходимо учесть, что имя ADFS должно быть указано в атрибут Service Principal Name аккаунта. Сделать это можно командой:
setspn –F –S host/adfs.winitpro.ru adfssvc
 И, наконец, указать базу данных, в которой будет хранится информация: это может быть встроенная база на этом же сервере (WID — Windows Internal Database) или отдельная база на выделенном SQL-сервере.
Установка службы Web Application Proxy
Следующий этап, настройка самой службы Web Application Proxy. Напомним, что служба Web Application Proxy в Windows Server 2012 R2 является частью роли “Remote Access”. Установите службу Web Application Proxy и запустите мастер ее настройки.

На первом этапе мастер предложит Вам указать имя ADFS сервера и параметры учетной записи, имеющей доступ к данной службе.

Далее нужно указать сертификат (убедитесь, что в альтернативных именах сертификата содержится имя сервера ADFS).

Совет. Проверьте, что ваши DNSзоны настроены корректно: сервер с ролью WAP должен иметь возможность отрезолвить имя сервера ADFS, а он в свою очередь может разрешить имя прокси сервера. Сертификаты на обоих серверах должны включать имя службы федерации.
Публикация приложения через Web Application Proxy
После того, как установлены роли ADFS и Web Application Proxy (которая работает еще и как ADFS Proxy), можно перейти непосредственно к публикации наружу конкретного приложения. Сделать это можно с помощью консоли Remote Access Management Console.

Запустите мастер публикации и укажите, хотите ли вы использовать для преаутентификации службу ADFS (это именно наш вариант).

Затем нужно задать имя публикуемого приложения, используемый сертификат, внешний URL (имеенно его для подключения будут использовать внешние пользователи) и внутрений URL-адрес сервера, на который будут пересылаться запросы.
Совет. Если необходимо перенаправить внешнее приложение на альтернативный порт, необходимо задать его в URL, указаывающем на внутренний сервер. Например, если необходимо перенаправить внешние https запросы (443 порт) на 4443 порт, нужно указать:
Backend server URL: lync.winitpro.local:4443

Завершите работу мастера, и на этом публикация приложений окончена. Теперь, если попытаться с помощью браузера зайти на опубликованный внешний URL-адрес, то браузер сначала будет перенаправлен на службу аутентификации (ADFS Proxy), а после успешной аутентификации пользователь будет отправлен непосредственно на внутренний сайт (веб приложение).

Благодаря новой службе Web Application Proxy в Windows Server 2012 R2 возможно реализовать функционал обратного прокси сервера с целью публикации внутренних служб предприятия наружу без необходимости использования задействовать сторонние файерволы и продукты, в том числе такие, как Forefront и пр.
In this article, we’ll take a look at how to centrally configure proxy settings on Windows 10 computers in a domain using Group Policy. Most popular browsers (such as Microsoft Edge, Google Chrome, Internet Explorer, Opera) and most applications automatically use the proxy settings set in Windows to access the Internet. We’ll also look at how to set up WinHTTP proxy settings on Windows.
Contents:
- How to Set Proxy Settings on Windows via GPO?
- Configure Proxy Setting via Registry and GPO
- Change WinHTTP Proxy Settings via GPO
In this article, we will look at the specifics of configuring a proxy server through Group Policy in supported versions of Windows (Windows 10, 8.1, and Windows Server 2012/2016/2019). Note that proxy settings are set differently in Windows 7/Server 2008R2, Windows XP/Windows Server 2003 with discontinued support.
How to Set Proxy Settings on Windows via GPO?
Originally, to centrally configure Internet Explorer settings (including proxy settings) using Group Policies in the Active Directory domain environment, the Internet Explorer Maintenance (IEM) policy was used. This policy option was located in the user GPO section: User configuration –> Policies –> Windows Settings –> Internet Explorer Maintenance. But since Windows Server 2012/Windows 8, the IEM policy has been deprecated. This section is missing in modern versions of Windows 10/Windows Server 2016/2019.
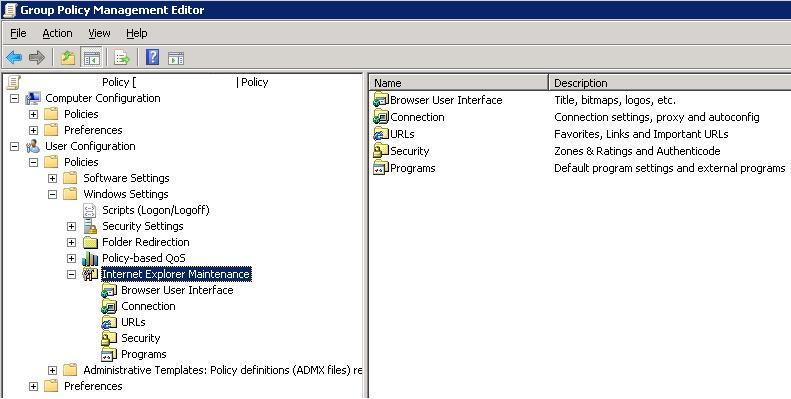
On the latest Windows versions, you must use Group Policy Preferences (GPP) to configure IE and proxy settings in the GPO Editor. There is also the option of using a special extension of Internet Explorer Administration Kit 11 (IEAK 11) – but it is rarely used.
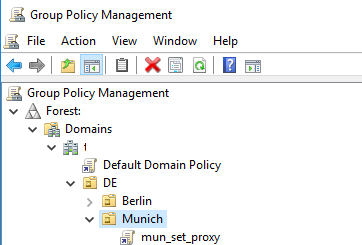
Open the domain GPO Editor console (Group Policy Management Console – GPMC.msc), select the OU with the users to which you want to apply proxy settings, and create a new policy Create a GPO in this domain, and Link it here.
Go to User Configuration -> Preferences -> Control Panel Settings -> Internet Settings. In the context menu, select New -> Internet Explorer 10.
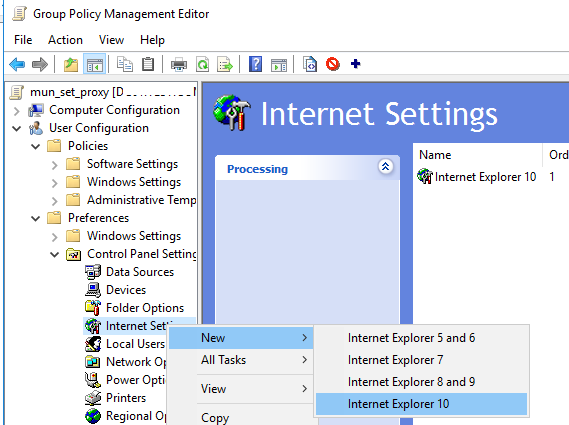
To configure proxy settings on Windows 10/Windows Server 2016, you need to use the Internet Explorer 10 item.
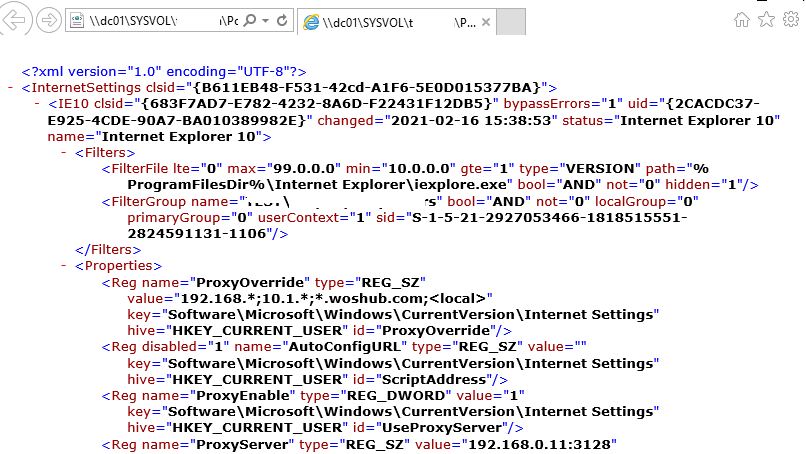
Tip. Although there is no separate option for Internet Explorer 11, the Internet Explorer 10 policy should apply to all versions of IE above 10 (in the InternetSettings.xml policy file, you can see that the option is valid to all IE versions from 10.0.0.0 to 99.0.0.0).
<FilterFile lte="0" max="99.0.0.0" min="10.0.0.0" gte="1" type="VERSION" path="%ProgramFilesDir%Internet Exploreriexplore.exe" bool="AND" not="0" hidden="1"/>
A special Group Policy Preferences IE form will appear in front of you, almost completely identical to the Internet Options settings in the Windows Control Panel. For example, you can specify a home page (General tab -> Home page field).
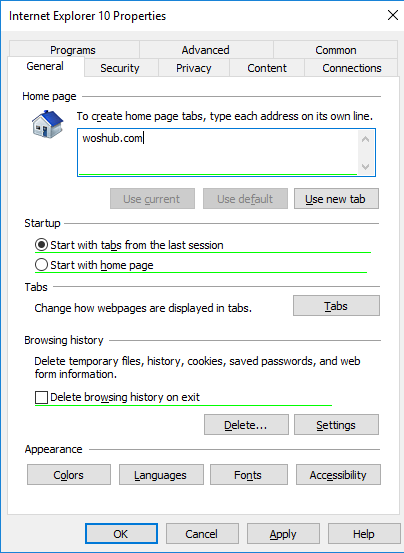
Important. It is not enough to simply save your changes in the Group Policy Editor. Notice the red and green underlines for the Internet Explorer 10 configurable settings. A red underline indicates that the setting won’t be applied. To save and apply a specific setting, press F5. A green underline of a parameter means that this IE parameter will be applied via GPP.
The following function keys are available:
- F5 – Enable all settings on the current tab
- F6 – Enable the selected setting
- F7 – Disable the selected setting
- F8 – Disable all settings in the current tab
To specify proxy settings, go to the Connections tab and click the Lan Settings button. The proxy server can be configured in one of the following ways:
- Automatically detect settings – automatic detection of settings using the wpad.dat file;
- Use automatic configuration script – auto-configuration script (proxy.pac);
- Proxy Server – the IP address or DNS name of the proxy server is specified directly in the policy settings. This is the easiest way, and we will use it.
Check the option Use a proxy server for your LAN, and specify the IP/FQDN name of the proxy server and the connection port in the corresponding Address and Port fields.
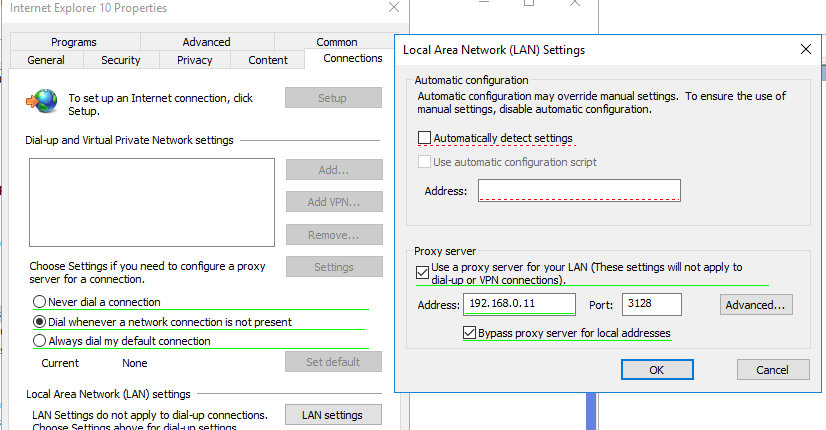
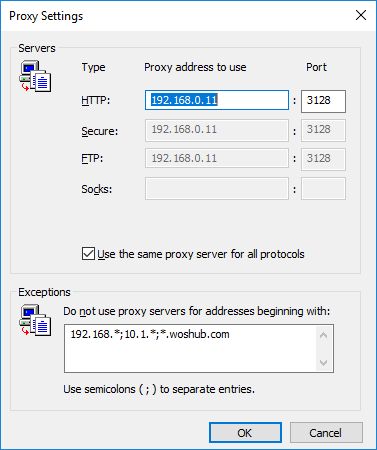
By enabling the Bypass proxy server for local addresses option, you can prevent applications (including the browsers) from using a proxy server when accessing local resources (in the format http://localnetwork). If you use resource addresses like http://web1.woshub.loc or http://192.168.1.5, then these addresses are not recognized by the Windows as local ones. These addresses and addresses of other resources, for access to which you do not need to use a proxy, must be specified manually. Press Advanced button and add this addresses to the field Do not use proxy servers for addresses beginning with in the following format: 10.1.*;192.168.*;*.woshub.loc;*.local.net.
Tip. Proxy settings in Google Chrome also can be set through the GPO using special administrative templates. Also, you can install the ADMX templates for Mozilla Firefox.
After you save the policy, you can view the InternetSettings.xml file with the specified browser settings in the policy folder on the domain controller:
\UKDC1SYSVOLwoshub.comPolicies{PolicyGuiID}UserPreferencesInternetSettingsInternetSettings.xml

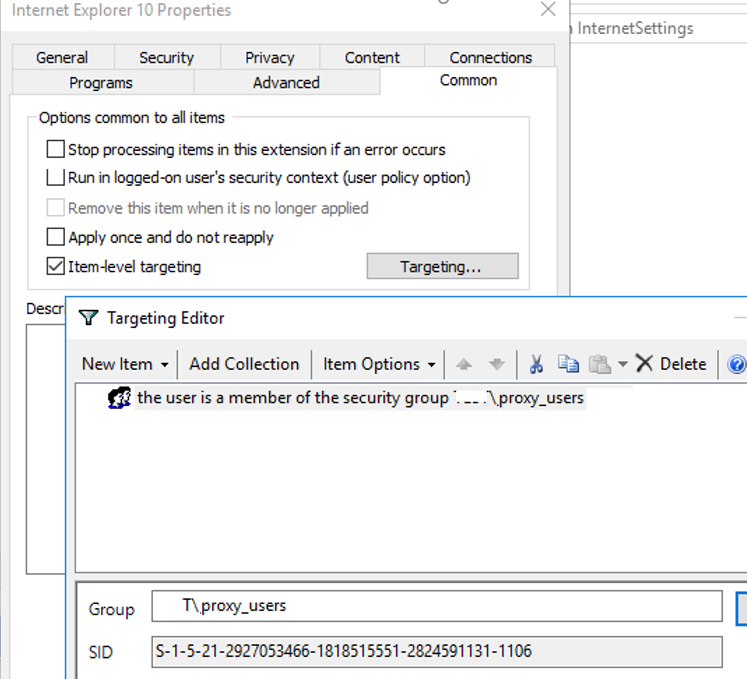
GPP allows you to more finely target policy to users/computers. For this, GPP Item Level Targeting is used. Go to the Common tab, enable the option Item-level targeting -> Targeting.
In the form that opens, specify the conditions for applying the policy. As an example, I indicated that the proxy configuration policy will be applied only to users who are members of the proxy_users domain security group. You can use your own logic for assigning proxy parameters.
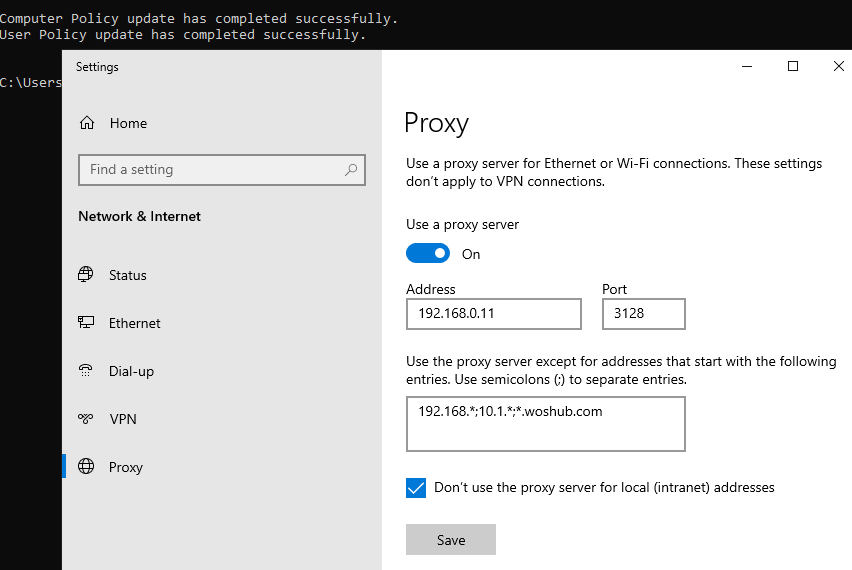
It remains to link the proxy policy to the AD container with the users and update policy settings on them. After applying policies on the users’ computers, new IE settings should be used. You can check the current proxy settings on Windows 10 in the Settings -> Network and Internet -> Proxy. As you can see, the computer now uses the proxy settings specified in the domain policy.
To prevent users from changing the proxy server settings, you can use this article.
Configure Proxy Setting via Registry and GPO
In addition, you can configure IE settings through the registry using GPP policies. For example, to enable proxy server, you need to configure the following registry parameter in the registry key HKEY_CURRENT_USERSoftwareMicrosoft WindowsCurrentVersionInternet Settings. In the GPO editor go to the section User Configuration -> Preferences -> Windows Settings -> Registry and create three registry parameters under the specified reg key:
ProxyEnable(REG_DWORD) =00000001ProxyServer(REG_SZ) =192.168.0.11:3128ProxyOverride(REG_SZ) =https://*.woshub.com;192.168.*;10.1.*;*.contoso.com;<local>
You can also use Item-level targeting here to target your policy settings for specific users/devices.
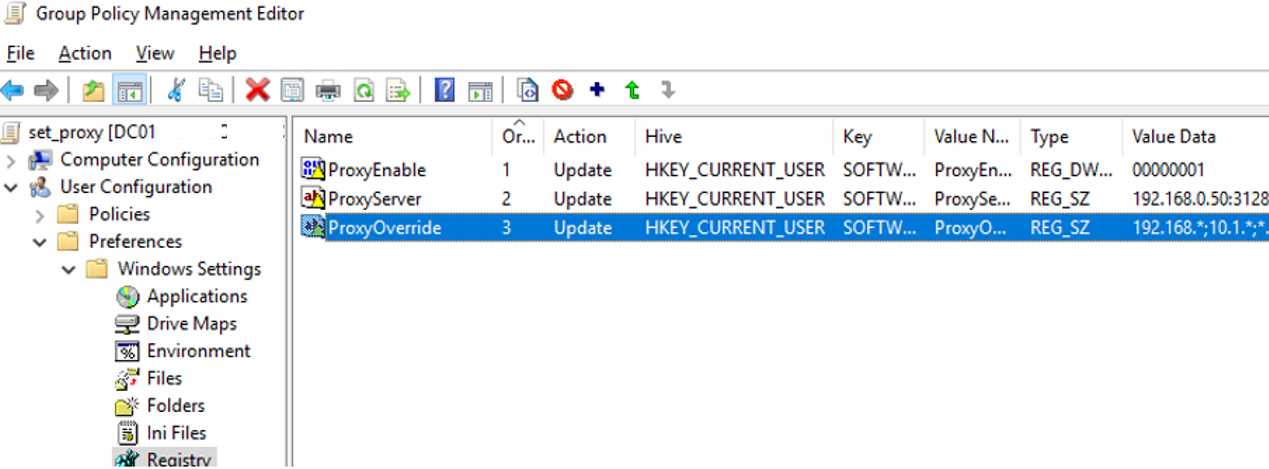
If you need to create proxy policies not per-user, but for the entire computer (per-computer), use the GPP settings from the GPO section Computer Configuration -> Preferences -> Windows Settings -> Registry. Set the same registry parameters under the registry key HKEY_LOCAL_MACHINESoftwarePoliciesMicrosoftWindowsCurrentVersionInternet Settings.
Change WinHTTP Proxy Settings via GPO
Some system services or applications (for example, the Wususerv update service or PowerShell) don’t use user’s proxy settings by default. For such applications to work correctly and access the Internet, you need to configure the WinHTTP proxy settings in Windows.
To check if WinHTTP proxy is configured on your computer, run the command:
netsh winhttp show proxy
The answer “Direct access (no proxy server)” means that no proxy is set. 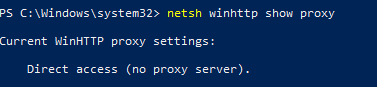
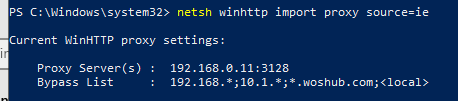
You can manually set a proxy for WinHTTP on your computer with the command:
netsh winhttp set proxy proxy.woshub.com:3128 "localhost;10.1.*;192.168.*;*.woshub.com"
Or import proxy settings from user’s Internet Explorer settings:
netsh winhttp import proxy source=ie
However, you won’t be able to configure WinHTTP through the GPO – there is no corresponding parameter in the GPO editor, and the parameter are stored in binary registry attribute that is not suitable for direct editing.
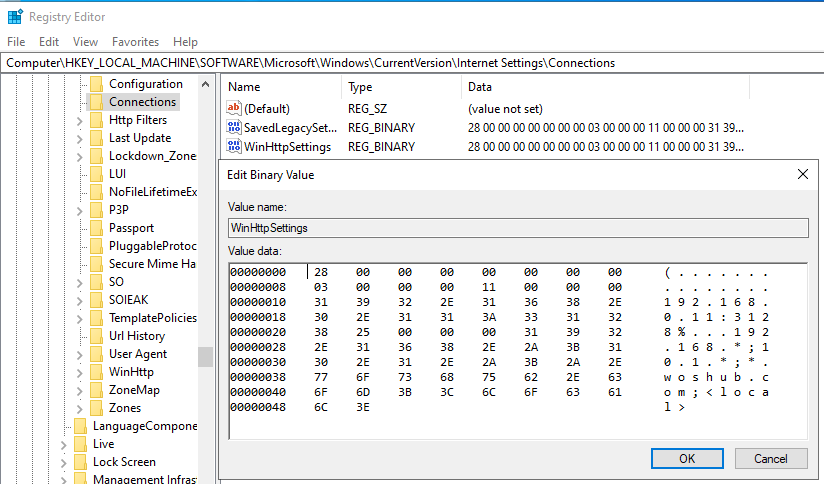
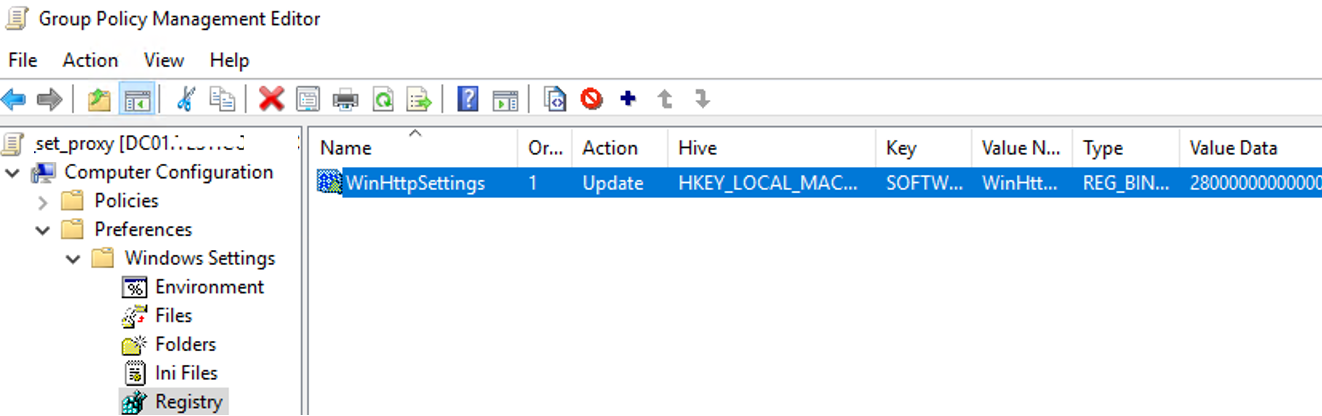
The only way to set WinHTTP proxy settings on Windows via GPO is to configure WinHTTP proxy on the reference computer, export the value of the WinHttpSettings parameter from the registry key HKLMSOFTWAREMicrosoftWindowsCurrentVersionInternet SettingsConnections, and deploy this parameter to domain computers through the GPP registry extension.
Setup of Web Application Proxy Server in Windows 2012 R2
When Microsoft discontinued
Threat
Management Gateway (which once was Proxy
and then ISA server)
I must admit I was disappointed; it was a relatively inexpensive authenticated reverse
proxy that worked with Exchange Server as well as many other complicated
products. In the interim we were told that Unified
Access Gateway would be the replacement, but that product isn’t as
well suited to the task.
Several alternatives are out there, including: Kemp, F5, Nginx, and Squid
but either the price or the relative difficulty of setup isn’t in line with
TMG. Fortunately starting in Windows 2012R2 Microsoft introduced Web
Application Proxy which largely fills the gap.

Web Application Proxy/Server 2012r2 release
party.Trust me, I paid big bucks for this insider photo.
What is Web Application Proxy?
Web Application Proxy
(WAP from henceforth) is based on and replaces Active
Directory Federation Services Proxy 2.0. In addition to the ADFS Proxy
functionality it also introduces the ability to expose internal resources to
external users. These users can be pre-authenticated (and then impersonated
for SSO) against
your Active Directory infrastructure using ADFS prior to being allowed
access to resources.
Wait, This is ADFS Proxy 3.0?
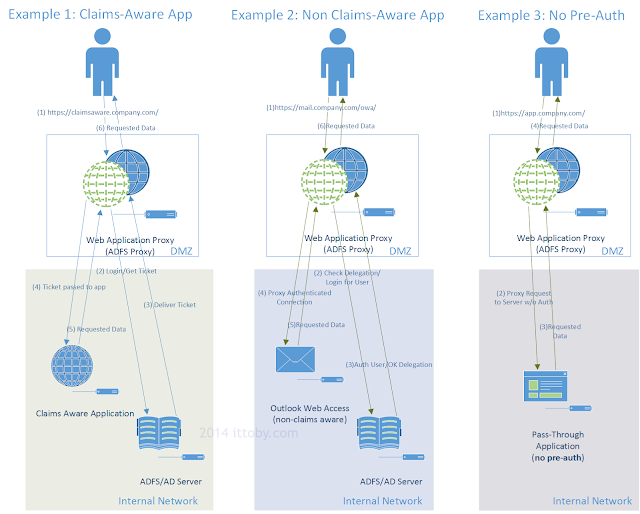
Yup! That and more. Here’s what you can do with it:
- Authorize external users for access to other claims-aware external or
internal resources (Generally SaaS). - Allow access (by «reverse» proxy) to multiple internal applications on
the same port. - Pre-Authenticate users against Active Directory via Kerberos
or NTLM
to facilitate SSO and access to internal applications (if desired) - Expose multiple internal resources on a single IP address/port
(generally 443) differentiated by hostname - Loadbalance using a session affinity based solution in front of WAP
Let’s Go!
This article will cover the following:
- WAP requirements
- Set up
- Forwarding a couple of sample applications
- Troubleshooting
Software Requirements
Web application proxy is available on Windows Server 2012 R2 and higher,
and it requires
ADFS 3.0 to be available on the back end. For assistance in setting
up ADFS 3.0, see my article here.
If you would like to proxy authentication for non-claims aware
applications, I.E. Exchange OWA pre-2013 SP1 (SP1
Claims) or Kerberos/NTLM apps, you will need to have the WAP server
joined to your domain.
Additionally, you’ll need the certificate (private and public key) from
your ADFS server and one certificate (again, private and public) for each
application you intend to proxy. These certificates must be trusted by
your clients, so generally external globally trusted (Digicert for
example) certificate authorities are preferred. The certificates need to
be installed under the «Personal» portion of the «Local Machine» store on
the machine you intend to use as your WAP proxy. If you only intend to
host internal resources to domain-joined computers connecting remotely you
can use an internal PKI provided your clients trust your issuing CA(s).
For information on how to setup an internal CA, see my article here.
If you need help exporting your public and private key from your ADFS
server and other services, see this
article. Note that if these certificates are marked as non-exportable you
will need new certificates for those services, so make sure you plan
accordingly.

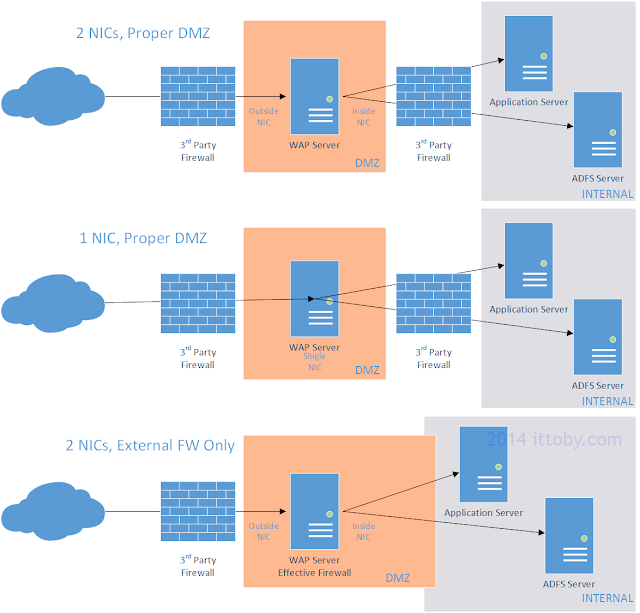
Connectivity and Hardware/VM Requirements
Preferably, your WAP server should be placed in a De-Militarized
Zone with a firewall on either side of it. The machine
can operate with either one or two Network Interface
Cards, but for proper security I recommend two NICs; one
internal and one external. Other connectivity options will work, including
branching into your internal network on the inside interface, but I won’t
be covering those scenarios in detail. For all connectivity options see
the following diagram:
As for the hardware you can use either real hardware or a VM assuming you
have a proper DMZ NIC setup on your Hyper-V/ESX/Xen/whatever host(s). WAP
is not a particularly demanding application and uses very little I/O. It
is also horizontally scalable with a network level load balancer (f5) so I
won’t give direct guidance on specifications since it would likely have
little relevance to your configuration. As in most cases, performance
evaluation and configuration change is the way to go.
After deciding on your hardware and installing the OS, you’ll need to
configure the NICs. We’ll cover that in the next section…
Installation
Now that the hardware and OS are ready to go, let’s configure the NICs:
Network Configuration
- First open the «Network and Sharing Center» and click «Change Adapter
Settings». Re-name the NICs «External» and «Internal» according to how
they are connected to avoid confusion during set up and troubleshooting.
- Give each NIC appropriate IP address settings. The subnet for each
will depend on your firewall/switch configuration. Some firewall
configurations may require communication stay on a single subnet but if
given a choice it is generally better to have them on different subnets.
(2 NICs) Leave the default gateway on the internal NIC blank. If your
WAP server is not domain joined because you intend on using only claims
auth or passthrough (not delegation) then leave your DNS servers blank
on the internal NIC as well and be sure to execute step 4. - If the WAP server needs to access resources (ADFS, DC, App) on a
subnet other than that the internal NIC is connected to, you will need
to add a static route to the server so it knows how to get to that
network. For example, if your WAP server is on 192.168.1.10/24, your
ADFS server is 192.168.2.5/24, and your gateway is 192.168.1.1, you
would issue the following command from an elevated command prompt: route
ADD 192.168.2.0 MASK 255.255.255.0 192.168.1.1 IF 192.168.1.10 -p .
For more information, see this
article. - <Only if you haven’t specified DNS servers on the internal
NIC>To look up the ADFS server for claims verification you will need
to add each internal ADFS server address to your
%SYSTEMROOT%system32driversetchosts file. Do this now; if you need
further instructions see this
article. - Now we’ll secure the external NIC. Open the properties of that NIC and
on the «Networking» tab unbind everything except for «QoS Packet
Scheduler» and the protocol you intend on using (IPv4 or IPv6). - If using IPv4, drill into the properties of that protocol and select
«Disable NetBIOS over TCP/IP» under the «WINS» tab. Also ensure you
disable «Register this connection’s address in DNS» on the «DNS» tab.

- On your external firewall, open the ports for the services you wish to
forward. (443 would be common) - On your internal firewall, open ports necessary for AD/other
communication. Here
is an excellent guide.


WAP Installation
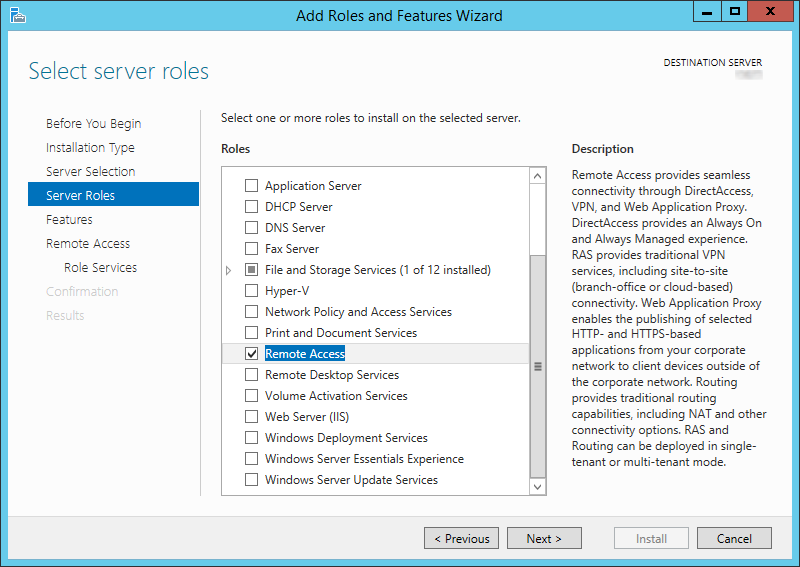
- In server manager, click «Manage->Add Roles and Features».
- Click «Next» on the «Before you begin» screen.
- For «Installation Type» select «Role-based or feature-based
installation» & click «Next».
- Select your desired WAP server and click «Next».
- On «Add Roles and Features Wizard», select the «Remote Access» role
and click «Next».
- You do not need to select any features; click «Next» on the «Select
features» page. - Read the dialog presented on the «Remote Access» screen and click
«Next». - Leave «Include management tools» checked and click «Add Features».
- On the «Select role services» page select «Web Application Proxy» and
click «Next». - When presented with the confirmation screen, click «Install».


WAP Configuration
Prerequisite Note: For this step you will need the
public and private key for your internal ADFS server(s) installed to the
«Personal» section of the «Local Computer» store on your WAP server. For
more information, refer to «Software Requirements» above.
- After installation, server manager will notify you that configuration
is required. Click the notification flag and select «Open the Web
Application Proxy Wizard».
- On the «Welcome» screen of the «Web Application Proxy Wizard» click
«Next». - On the «Federation Server» screen, enter the external
fully qualified domain name of your federation service. This needs to be
registered in external DNS (i.e. resolvable from the internet).
For more information, see my article linked under «Software
Requirements». Insert the username/password of a domain administrator
account to properly register this as a proxy server. This account will not
be used after this point, so a service account is not necessary. Click
«Next».
- Select the ADFS certificate you installed earlier from the dropdown
and click «Next». - You’ll be presented with the configuration details. If you intend on
setting up another WAP server for load balancing copy the powershell
command down for later use. Click «Configure» to continue. - You should see the message «Web Application Proxy was configured
successfully».


Setup Verification
To verify basic functionality:
- On the WAP server, open up Tools->Remote Access Management Console
- On the left-hand navigation pane, select «Operations Status»
- The status of the WAP server will be relayed in the middle pane. Do
not be surprised to see the server listed twice, once for the FQDN and
once for netbios. This is normal.
Now that setup is complete, let’s move on to publishing!
Example A: Proxying Exchange 2010 OWA (Pre-auth/Non-Claims/Delegated
Authentication)
Now that we’ve completed the ADFS/WAP setup, let’s walk through the setup
of a non-claims aware application using Kerberos/NTLM delegation. A
popular example would be Exchange Outlook Web Access; I’ll be using
version 2010 SP3.
Prerequisite Note: For this step you will need the
public and private key for the services you wish to host (Exchange OWA in
this case) installed to the «Personal» section of the «Local Computer»
store on your WAP server. Requests destined for your back-end service are
decrypted and re-encrypted at the WAP server. For more information, refer
to «Software Requirements» above.
Trust Setup
First, we must set up the new trust on the ADFS server. On your back-end
ADFS server (not the WAP server) do the following:
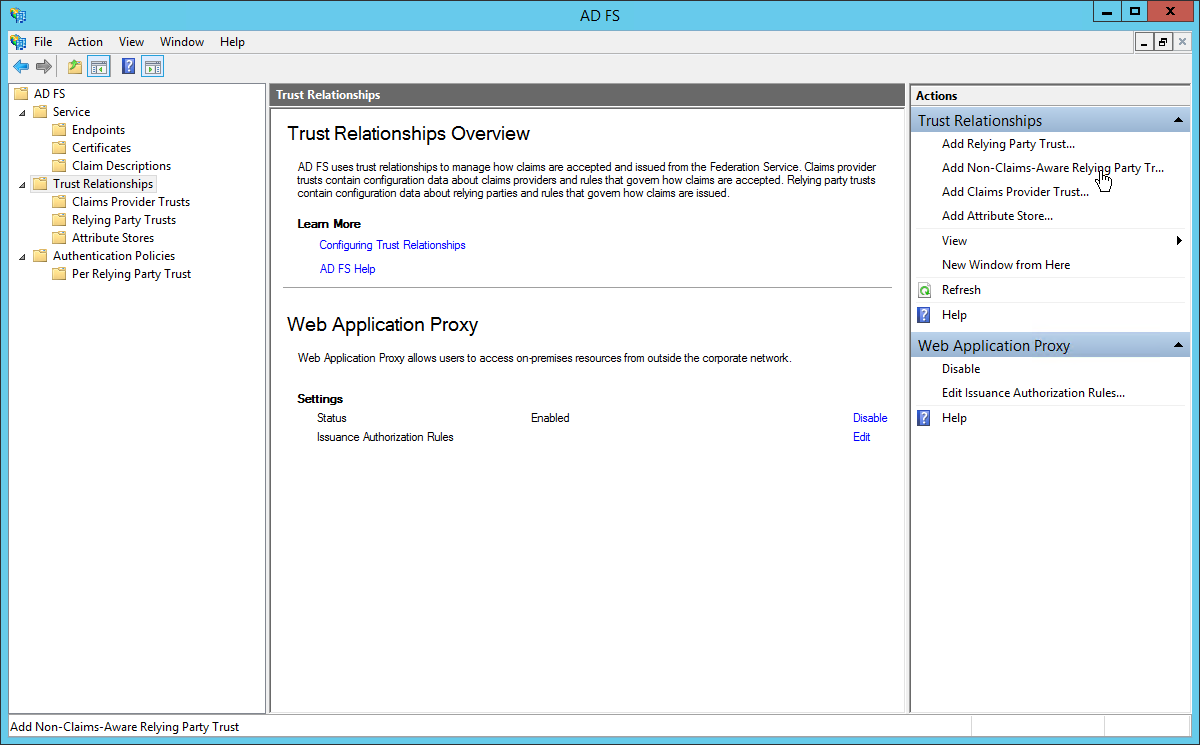
- Open the AD FS management tool and click the «Trust Relationships»
folder on the left hand navigation pane. - In the right hand action pane, click «Add Non-Claims-Aware Relaying
Party Trust».
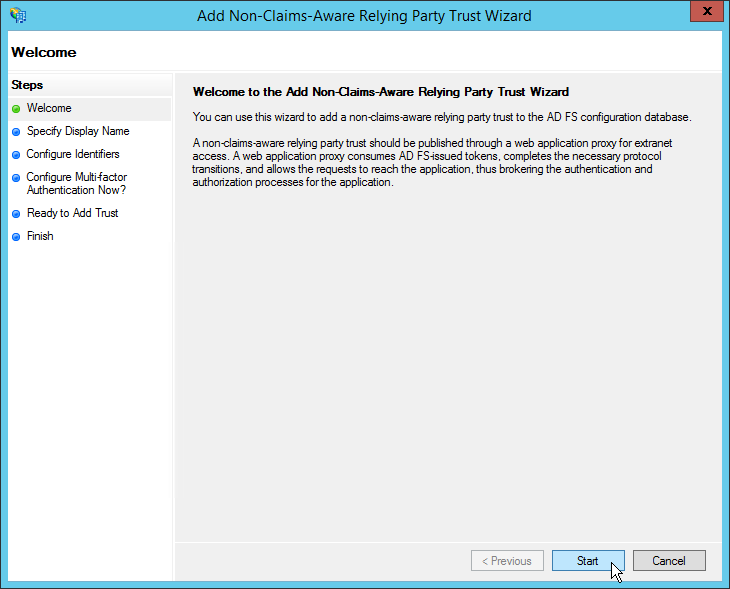
- A wizard will pop up; click «Start» on the welcome screen.

- Give this rule a (human) meaningful name, i.e.» <Servername>
Exchange OWA» along with a description if desired and click «Next». - Now we’ll add the non-claims aware relaying trust party identifier
(which in this case is simply a URL). Enter the external fully qualified
domain name of the server complete with url path ending in a trailing
forward slash, i.e. https://mail.company.com/owa/ and click «Next».
Note: WAP identifiers must end in a trailing slash even though the MSFT
example doesn’t look that way. - On the next screen, «Configure Multi-Factor Authentication Now?», you
can set up multi-factor authentication should you desire. I will not be
configuring multi-factor for this demonstration, but note you can always
set it up later if desired. Leave «I do not want to configure…»
selected and click «Next». - Review your configuration on the «Ready to Add Trust» screen and click
«Next». - The «Finish» screen will have a checkbox starting with «Open the Edit
Authorization Rules dialog…» that is checked by default. Leave it
checked because we will want to specify who is allowed access through to
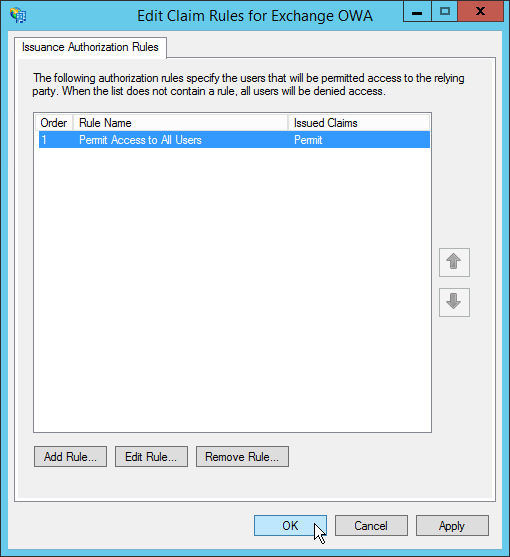
the back-end via this rule right away. Click «Finish». - A dialog box titled «Edit Claim Rules for <Rule Name>» will come
up allowing us to define who should be allowed access via this rule.
Click «Add Rule’.
- You will be asked to select a rule template. What you select here will
depend on what is reasonable for your environment. You should create (a)
rule(s) that correspond with the least access required possible as
anyone getting past this point will be able to attempt to authenticate
directly against the target internal resource. You may, for example,
want to use a specific Active Directory group with only the users that
need access to this resources. For the purposes of testing and this
article, however, I will be using a simple «Permit All Users» rule. This
will allow anyone in AD through and is suitable for testing or in
addition to other rules. Select the rule template and click «Next». - Click «Finish» to close the «Add Issuance Authorization Claim Rule
Wizard» - So long as you do not want any additional rules, click «OK» to close
the Edit Claim Rules dialog box.


Back-end Service Configuration
Now we need to configure our back-end service to accept the
authentication coming from the WAP server. In our case we will need to
change the authentication mechanism allowed by Exchange from forms
based to integrated authentication.Your steps here will differ depending
on what service you are offering up.
- Open the Exchange management console and Click on «Server
Configuration»->»Client Access» - For each server in your Exchange farm, click the «Outlook Web App»
tab, then right click «owa (Default Web Site)» and click «properties».
- Select the «Authentication» tab and click «Use one or more standard
authentication methods:» then select only «Integrated Windows
authentication».
- Click «OK» on the warning.
- Repeat steps 2 and 3 for the «ecp (Default Web Site)» under «Exchange
Control Panel» on each server. - Using an elevated command prompt or PowerShell, execute «iisreset
-noforce» to restart IIS. (This should be done in a maintenance
window)


Configure Delegation
Now we’ll configure the WAP server AD computer object so that it can pass
authentication to your back-end server(s). Note the SPNs referenced to not
need to be manually registered at a domain level.
- With domain administrator privileges, open the Active Directory
Administrative Center. (Active Directory Users and Computers if you
prefer) - Navigate to and open the properties of the WAP server computer object.

- Click or scroll down to the «Delegation» section of the object.

- Select «Trust this computer for delegation to specified servers only»
and «Use any authentication protocol» (since we’ll be using NTLM here;
select Kerberos only for applications that support it) then click
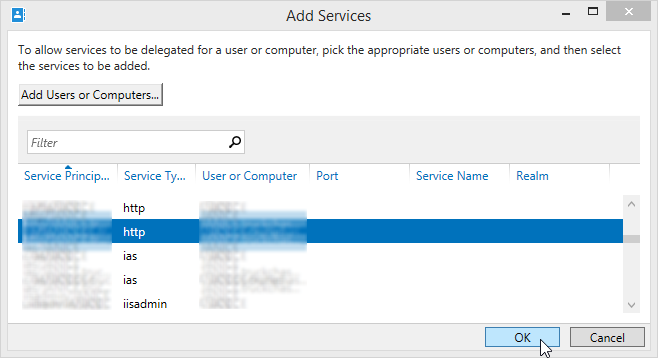
«Add…» - When presented with the «Add Services» dialog, click «Add Users or
Computers…».
- Type the name of the back-end Exchange server(s) and click «Check
Names» and then «OK» - Scroll to the http/SERVERNAME.domain.ext (since we’re serving up the
HTTP protocol; change if your app differs) and select it, then click
«OK». Note: If using Active Directory Administrative
Center you need to add the FQDN
name and the NETBIOS name; if using Active Directory Users
Computers you need only add the FQDN and both will be added.


Configure Application Publishing on WAP Server
Finally we’ll configure WAP publishing for this application.
- On the WAP server, open the Remote Access Management Console (can be
found in admin tools or tools from Server Manager) - In the left hand navigation plane, select «Configuration»->»Web
Application Proxy» - On the right hand action pane, click «Publish»

- A wizard will come up. Click «Next» on the welcome screen.
- When prompted for preauthentication type, select «Active Directory
Federation Services (AD FS)». This ensures requests are authenticated by
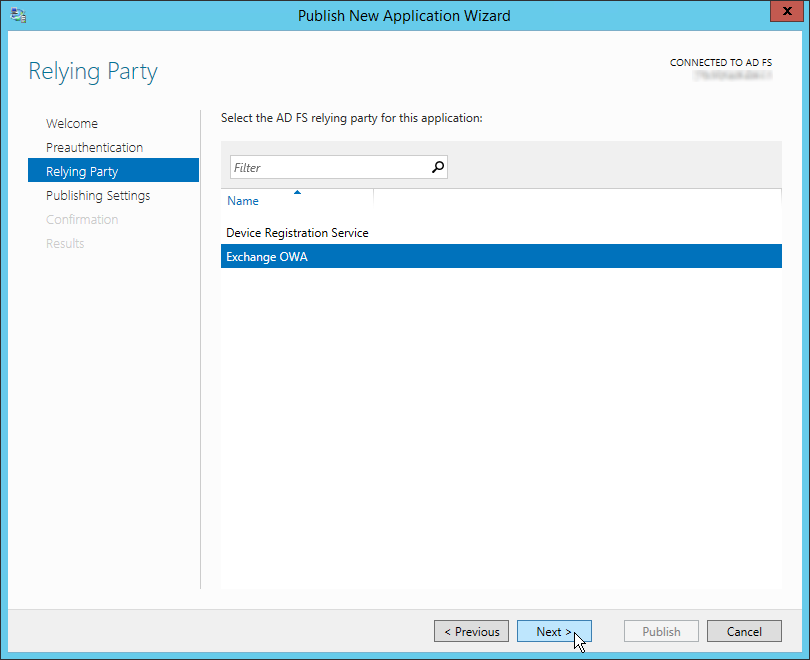
ADFS prior to being passed onto the back-end server. Click «Next». - For «Relying Party», select the trust rule we created earlier under
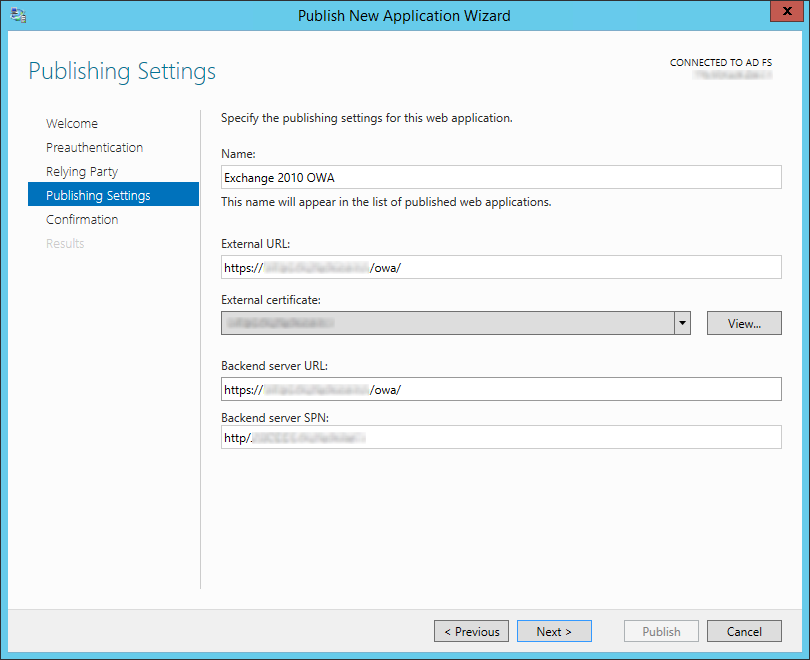
the «Trust Setup» section above and click «Next». - Now the meat of the settings; on the «Publishing Settings» step enter
a meaningful name for this connection (i.e. Exchange 2010 OWA), the
external URL it will be accessed by (i.e.
https://mail.company.com/owa/), select the external certificate for that
service (see «Software Requirements» above), the internal URL
(preferably should match the external but doesn’t have to in all cases),
and the server SPN that we specified on the step above, then click
«Next». - You will be shown the confirmation screen with the appropriate
PowerShell command line for the options you have configured. Should you
want to repeat a similar publishing step, copy and retain this command
line for use later. Click «Publish». - The results screen will display the publishing status. Assuming all is
well, click «Close» to close the wizard.


Example B: RDP Proxy (No Pre-auth/Passthrough)
Passthrough applications are substantially easier (and less secure)
because they do not require any set up in ADFS and do not subject the user
connection attempt to any authentication before passing it on. This isn’t
to say the back-end service won’t require authentication, however, but it
is still less secure since you are opening your back-end service up to
processing logon requests directly from the internet.
Publish RDP Proxy on WAP Server
In this example I will publish RDP proxy direct to the internet proxied
through the WAP server. This allows me to serve up this application on the
same IP address and port as other services assuming the hostname requested
is unique. Again, this section assumes the public and private keys
associated with the URL you intend to use installed in the WAP server’s
«personal» store. In my example I use a hostname of «rdp.company.com»
- On the WAP server, open the Remote Access Management Console (can be
found in admin tools or tools from Server Manager) - In the left hand navigation plane, select «Configuration»->»Web
Application Proxy» - On the right hand action pane, click «Publish»
- A wizard will come up. Click «Next» on the welcome screen.
- When prompted for preauthentication type, select «Pass-through» and
click «Next». - On the «Publishing Settings» step enter a meaningful name for this
connection (i.e. RDProxy), the external URL it will be accessed by (i.e.
https://rdp.company.com/), select the external certificate for that
service (see «Software Requirements» above), and the internal URL
(preferably should match the external but doesn’t have to in all cases).
Click «Next». - You will be given a summary of the publishing rule about to be created
and a Powershell command of it’s equivalent. If you are satisfied with
the details click «Publish».
Troubleshooting
Something not working? Check out the following locations:
Event Logs
Applications and Services Logs->AD FS/Admin
Applications and Services
Logs->Microsoft->Windows->WebApplicationProxy/Admin
Other
Should you need to enable debug logging, there is an excellent article here
demonstrating how to do so. One word of caution, however; should you edit
the C:WindowsADFSConfigmicrosoft.identityServer.proxyservice.exe.config
referenced therein I recommend backing it up first. If not formatted
correctly WAP will start up successfully with the values listed in the file,
but when it comes time to rotate the ADFS Proxy Trust certificate (an
automatic action that happens once every 3 weeks) the configuration of the
new cert will fail. In that case you would see an Event ID 422 logged to AD
FS/Admin stating «Unable to retrieve proxy configuration data from the
Federation Service.».
(Excellent!) References
Want more? Here are some wonderful resources!
Technet:
Web Application Proxy Overview
Technet:
Install and Configure the Web Application Proxy Server
Technet:
Installing and Configuring Web Application Proxy for Publishing Internal
Applications
Technet
Overview Guide: Connect to Applications and Services from Anywhere with
Web Application Proxy
Technet
Social: On WAP and IPv6
Technet Social: ADFS, WAP, and Logging
Technet
Blog: How to support non-SNI capable Clients with Web Application Proxy
and AD FS 2012 R2 (Needed to support Android clients for
Exchange ActiveSync or other clients that don’t support SNI hosted through
WAP)
Technet
Ask PFE: FAQ on ADFS Part 1, Excellent coverage of SQL vs. Internal DB and
certificates for AD FS (Not WAP per se)
Marc
Terblanche: Windows 2012 R2 Preview Web Application Proxy — Exchange 2013
Publishing Tests
Ask
the DS Team: Understanding the ADFS 2.0 Proxy (Not about WAP but
excellent coverage of AD FS proxy functionality)
Rob
Sanders: Troubleshooting ADFS 2.0 (Not about 3.0/WAP but too good not
to be mentioned)
Technet: Configure Event Logging on a Federation Server Proxy (Still
partially relevant)
Technet:
Things to check before troubleshooting ADFS 2.0 (Still partially
relevant)
Technet:
Configuring Computers for Troubleshooting AD FS 2.0 (Still partially
relevant)
Thanks for reading, if you have questions or comments leave them below!
Deploy Web Application Proxy Role in Windows Server 2012 R2 –Part I
Assumption:
I assume you have the following infrastructure ready.
- Domain Controller: DC1PVDC01
- Certificate Authority: DC1PVCA01
- AD FS Server: DC1PVADFS01
- Exchange Server: DC1PVEXCH01
Naming Convention:
- DC1= Data Center 1 (location)
- P=Production Systems
- V=Virtual Server
- DC=Domain Controller
So on so forth.
Proposed Web Application Proxy Server:
| Option | Description |
| Virtual Machine Name | DC1PVWAP01 |
| Memory | 4GB |
| vCPU | 1 |
| Hard Disk 1 | 50GB |
| Network Adapter | 2 |
| Guest Operating System | Windows Server 2012 R2 |
| Hyper-v Integration Service | Installed |
Windows Server Role:
| Role | Web Application Proxy |
Network Configuration
The network adapter name used within the operating system should be changed to closely match the associated WAP network name. The following binding order will be maintained within Windows operating systems:
- First in Order- WAP internal adapter connected to the trusted network.
- Second in Order- WAP external adapter connected to the un-trusted network.
The following are the network configuration for WAP server.
| Option | IP Address | Subnet | Default Gateway | DNS |
| Internal Network | 10.10.10.2 | 255.255.255.0 | Not required | 10.10.10.1 |
| External Network | 192.168.1.1 | 255.255.255.0 | 192.168.1.254 | Not required |
Important! External Network can be assigned public IP if WAP server isn’t placed behind frontend router/firewall. In an edge configuration WAP external network is configured with public IP and internal network is assigned an IP address of internal IP range.
Configuration Step 1 – Rename Network Adapters:
Rename all network adapters to descriptive names that ideally match the connection type and WAP wizard/console names. For example:
- WAP adapter connected to the trusted network: Internal Network
- WAP adapter connected to the un-trusted network: External Network
Configuration Step 2 – Configure Network Adapters:
The Internal Network adapter will normally be connected to your trusted environment. This could be your actual internal network (LAN) or could be a private DMZ (perimeter network) if using an intranet/back firewall.
Internal Network Adapter
- Default Gateway should not be defined
- DNS Servers should be defined
- Client for Microsoft Networks binding – Enabled
- File and Print Sharing for Microsoft Networks binding – Enabled
- Register this connection’s address in DNS – Enabled
- Enable LMHOSTS Lookup – Disabled
- NetBIOS over TCP/IP – Default
The External Network adapter will normally be connected to your un-trusted environment. This could be your actual Internet connection if using an edge deployment, or could be a public DMZ (perimeter network) if using an existing edge/front firewall.
External Network Adapter
- Default Gateway should be defined
- DNS Servers should not be defined
- Client for Microsoft Networks binding – Disabled
- File and Print Sharing for Microsoft Networks binding – Disabled
- Register this connection’s address in DNS – Disabled
- Enable LMHOSTS Lookup – Disabled
- NetBIOS over TCP/IP – Disabled
Please Note: The ‘File and Print Sharing for Microsoft Networks’ binding on the TMG internal adapter is left at the default settings of Enabled on the WAP Internal Network adapter. This allows for the use of the Internal Network adapter for intra-array services when using a WAP cluster.
Configuration Step 3 – Amend Bind Order:
Edit the network adapter bind order to place the Internal Network adapter at the top (highest) position and the External Network at the bottom (lowest) position. For example:
- Internal Network (Highest)
- External Network (Lowest)
To amend network binding follow the steps below:
1. Click Start, click Network, click Network and Sharing Center, and then click Change Adapter Settings.
2. Press the ALT key, click Advanced, and then click Advanced Settings. If you are prompted for an administrator password or confirmation, type the password or provide confirmation.
3. Click the Adapters and Bindings tab, and then, under Connections, click the connection you want to modify.
4. Under Bindings for <connection name>, select the protocol that you want to move up or down in the list, click the up or down arrow button, and then click OK.
DNS Forwarding:
The following Fully Qualified Domain Names (FQDN) will be forwarded from ISP to your router:
| Purpose | Public Host Name | Public IP Address |
| Exchange | webmail.yourdomain.com | 203.17.x.x |
| SharePoint | sharepoint.yourdomain.com | 203.17.x.x |
External Firewall Rules
The following NAT rules will be added into perimeter network to publish application and services through WAP. This rule is only apply if you please Web Application Proxy (WAP) behind a firewall or Cisco ASA otherwise you don’t need it.
| Rule(s) | Description | Source IP | Destination IP Address | Port | NAT Destination |
| 1 | Exchange | Any | 203.17.x.x | 443 | 192.168.1.2 |
| 2 | SharePoint | Any | 203.17.x.x | 443 | 192.168.1.3 |
Building Web Application Proxy Server on Windows Server 2012 R2 Steps:
- Install Windows Server 2012 R2.
- Configure TCP/IP of Windows Server 2012 R2
- Join Web Application Proxy server to Domain
- Install Web Application Proxy Role
- Configure Kerberos Constraint Delegation
- Configure the firewall to allow HTTPS traffic on port 443 for clients to communicate with the AD FS server
- Configure Firewall if WAP Server placed behind a Cisco ASA
- Install Public certificate into Web Application Proxy Server
- Publish Application
Configure Kerberos Constraint delegation
1. On the domain controller, open Server Manager. To do this, click Server Manager on the Start screen.
2. Click Tools, and then click ADSI Edit.
3. On the Action menu, click Connect To, and then on the Connection Settings dialog box, accept the default settings to connect to the default naming context, and then click OK.
4. In the left pane, expand Default naming context, expand DC=yourdomain, DC=com, expand CN=Computers, right-click CN=DC1PVWAP01, and then click Properties.
5. On the CN=DC1PVWAP01 Properties dialog box, on the Attribute Editor tab, in the Attributes list, select servicePrincipalName, and then click Edit.
6. On the Multi-valued String Editor dialog box, in Value to add, enter HTTP/DC1PVWAP01.yourdomain.com and click Add. Then enter HTTP/DC1PVWAP01 and click Add. The Values list now contains two new entries; for example, HTTP/DC1PVWAP01.yourdomain.com and HTTP/DC1PVWAP01.
7. On the Multi-valued String Editor dialog box, click OK.
8. On the CN=DC1PVWAP01 Properties dialog box, click OK.
9. In Server Manager, click Tools, and then click Active Directory Users and Computers.
10. In the navigation pane, under yourdomain.com, click Computers. In the details pane, right-click the Web Application Proxy server, and then click Properties.
11. On the DC1PVWAP01 Properties dialog box, on the Delegation tab, click Trust this computer for delegation to specified services only, and then click Use any authentication protocol.
12. Click Add, and on the Add Services dialog box, click Users or Computers.
13. On the Select Users or Computers dialog box, in Enter the object names to select, enter the name of the web servers that use Integrated Windows authentication; for example, WebServ1, and then click OK.
14. On the Add Services dialog box, in the Available services list, select the http service type, and then click OK.
15. On the DC1PVWAP01 Properties dialog box, click OK.
Configure AD FS (Optional when using pass-through pre-authentication)
1. On the Start screen, type AD FS Management, and then press ENTER.
2. Under the AD FSTrust Relationships folder, right-click Relying Party Trusts, and then click Add Relying Party Trust to open the Add Relying Party Trust Wizard.
3. On the Welcome page, click Start.
4. On the Select Data Source page, click Import data about the relying party published online or on a local network. In Federation metadata address (host name or URL), type the federation metadata URL or host name for the partner, and then click Next.
5. On the Specify Display Name page type a name in Display name, under Notes type a description for this relying party trust, and then click Next.
6. On the Choose Issuance Authorization Rules page, select either Permit all users to access this relying party then click Next.
7. On the Ready to Add Trust page, review the settings, and then click Next to save your relying party trust information.
8. On the Finish page, click Close. This action automatically displays the Edit Claim Rules dialog box. For more information about how to proceed with adding claim rules for this relying party trust, see the Additional references.
9. in the AD FS Management console, you must set the endpoint to be Proxy Enabled
Configure Certificate Template in CA
Note: This steps is only applicable when using Enterprise certificate authority.
1. Open the Certificate Templates snap-in.
2. In the details pane, right-click an existing certificate that will serve as the starting point for the new certificate, and then click Duplicate Template.
3. Choose whether to duplicate the template as a Windows Server 2003–based template or a Windows Server 2008–based template.
4. On the General tab, enter the Template display name and the Template name, and then click OK.
5. Define any additional attributes such as mark “private key exportable” for the newly created certificate template.
Export & Import Certificates into Web Application Proxy Server
This is a very important steps for published app to work correctly. You must export .pfx certificate from application servers (Exchange, SharePoint or Lync Server) to Web Application Proxy Server so that internet explorer, web application proxy server and application servers validate same certificates.
Exporting a .pfx File
- On the Start menu click Run and then type mmc.
- Click File > Add/Remove Snap-in.
- Click Certificates > Add.
- Select Computer Account and then click Next. Select Local Computer and then click Finish. Then close the add standalone snap-in window and the add/remove snap-in window.
- Click the + to expand the certificates (local computer) console tree and look for the personal directory/folder. Expand the certificates folder.
- Right-click on the certificate you want to backup and select ALL TASKS > Export.
- Choose Yes, export the private key and include all certificates in certificate path if possible.
Warning: Do not select the delete private key option. - Leave the default settings and then enter your password if required.
- Choose to save the file and then click Finish. You should receive an “export successful” message. The .pfx file is now saved to the location you selected.
Importing from a .pfx File
- On the Start menu click Run and then type mmc.
- Click File > Add/Remove Snap-in.
- Click Certificates > Add.
- Select Computer Account and then click Next. Select Local Computer and then click Finish. Then close the add standalone snap-in window and the add/remove snap-in window.
- Click the + to expand the certificates (local computer) console tree and look for the personal directory/folder. Expand the certificates folder.
- Right-click on the certificate you want to backup and select ALL TASKS > Import.
- Follow the certificate import wizard to import your primary certificate from the .pfx file. When prompted, choose to automatically place the certificates in the certificate stores based on the type of the certificate.
Install Web Application Proxy Role
1. On the Web Application Proxy server, in the Server Manager console, in the Dashboard, click Add roles and features.
2. In the Add Roles and Features Wizard, click Next three times to get to the server role selection screen.
3. On the Select server roles dialog, select Remote Access, and then click Next.
4. Click Next twice.
5. On the Select role services dialog, select Web Application Proxy, click Add Features, and then click Next.
6. On the Confirm installation selections dialog, click Install.
7. On the Installation progress dialog, verify that the installation was successful, and then click Close.
Configure Web Application Proxy
1. On the Web Application Proxy server, open the Remote Access Management console: On the Start screen, click the Apps arrow. On the Apps screen, type RAMgmtUI.exe, and then press ENTER. If the User Account Control dialog box appears, confirm that the action it displays is what you want, and then click Yes.
2. In the navigation pane, click Web Application Proxy.
3. In the Remote Access Management console, in the middle pane, click Run the Web Application Proxy Configuration Wizard.
4. On the Web Application Proxy Configuration Wizard, on the Welcome dialog, click Next.
5. On the Federation Server dialog, do the following, and then click Next:
- In the Federation service name box, enter the fully qualified domain name (FQDN) of the AD FS server; for example, fs.yourdomain.com.
- In the User name and Password boxes, enter the credentials of a local administrator account on the AD FS servers.
6. On the AD FS Proxy Certificate dialog, in the list of certificates currently installed on the Web Application Proxy server, select a certificate to be used by Web Application Proxy for AD FS proxy functionality, and then click Next.
7. The certificate you choose here should be the one that whose subject is the Federation Service name, for example, fs.yourdomain.com.
8. On the Confirmation dialog, review the settings. If required, you can copy the PowerShell cmdlet to automate additional installations. Click Configure.
9. On the Results dialog, verify that the configuration was successful, and then click Close.
Publish Application using AD FS Pre-Authentication
1. On the Web Application Proxy server, in the Remote Access Management console, in the Navigation pane, click Web Application Proxy, and then in the Tasks pane, click Publish.
2. On the Publish New Application Wizard, on the Welcome page, click Next.
3. On the Pre-authentication page, click Active Directory Federation Services (AD FS), and then click Next.
4. On the Relying Party page, in the list of relying parties select the relying party for the application that you want to publish, and then click Next.
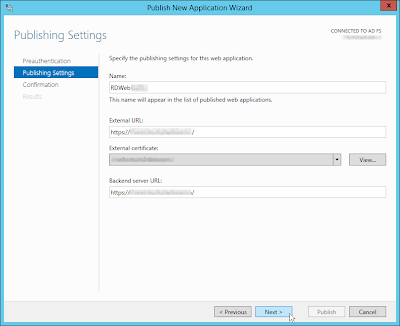
5. On the Publishing Settings page, do the following, and then click Next:
- In the Name box, enter a friendly name for the application.
- This name is used only in the list of published applications in the Remote Access Management console.
- In the External URL box, enter the external URL for this application; for example, https://sp.yourdomain.com/app1/.
- In the External certificate list, select a certificate whose subject covers the external URL.
- In the Backend server URL box, enter the URL of the backend server. Note that this value is automatically entered when you enter the external URL and you should change it only if the backend server URL is different; for example, http://sp/app1/.
- Web Application Proxy can translate host names in URLs, but cannot translate path names. Therefore, you can enter different host names, but you must enter the same path name. For example, you can enter an external URL of https://apps.yourdomain.com/app1/ and a backend server URL of http://app-server/app1/. However, you cannot enter an external URL of https://apps.yourdomain.com/app1/ and a backend server URL of https://apps.yourdomain.com/internal-app1/.
6. On the Confirmation page, review the settings, and then click Publish. You can copy the PowerShell command to set up additional published applications.
7. On the Results page, make sure that the application published successfully, and then click Close.
Publish an integrated Windows authenticated application
1. On the Web Application Proxy server, in the Remote Access Management console, in the Navigation pane, click Web Application Proxy, and then in the Tasks pane, click Publish.
2. On the Publish New Application Wizard, on the Welcome page, click Next.
3. On the Pre-authentication page, click Active Directory Federation Services (AD FS), and then click Next.
4. On the Relying Party page, in the list of relying parties select the relying party for the application that you want to publish, and then click Next.
5. On the Publishing Settings page, do the following, and then click Next:
- In the Name box, enter a friendly name for the application.
- This name is used only in the list of published applications in the Remote Access Management console.
- In the External URL box, enter the external URL for this application; for example, https://owa.yourdomain.com/.
- In the External certificate list, select a certificate whose subject covers the external URL.
- In the Backend server URL box, enter the URL of the backend server. Note that this value is automatically entered when you enter the external URL and you should change it only if the backend server URL is different; for example, http://owa/.
- Web Application Proxy can translate host names in URLs, but cannot translate path names. Therefore, you can enter different host names, but you must enter the same path name. For example, you can enter an external URL of https://apps.yourdomain.com/app1/ and a backend server URL of http://app-server/app1/. However, you cannot enter an external URL of https://apps.yourdomain.com/app1/ and a backend server URL of https://apps.yourdomain.com/internal-app1/.
- In the Backend server SPN box, enter the service principal name for the backend server; for example, HTTP/owa.yourdomain.com.
6. On the Confirmation page, review the settings, and then click Publish. You can copy the PowerShell command to set up additional published applications.
7. On the Results page, make sure that the application published successfully, and then click Close.
Publish Application using Client Certificate Pre-Authentication
You can publish an application using pre-authenticated client certificate. This steps only be performed using Windows PowerShell. Open Elevated Windows PowerShell prompt in WAP Server. Change the following command as required and issue the command.
Add-WebApplicationProxyApplication
-BackendServerURL ‘https://app.yourdomain.com/’
-ExternalCertificateThumbprint ‘1a2b3c4d5e6f1a2b3c4d5e6f1a2b3c4d5e6f1a2b’
-ExternalURL ‘https://app.yourdomain.com/’
-Name ‘Client certificate preauthentication application’
-ExternalPreAuthentication ClientCertificate
-ClientCertificatePreauthenticationThumbprint ‘123456abcdef123456abcdef123456abcdef12ab’
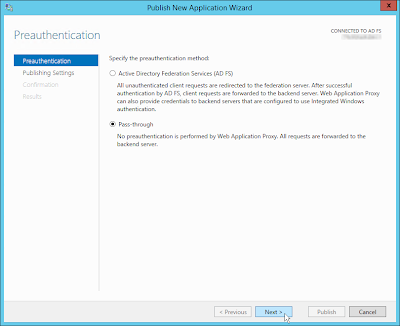
Publish Application using Pass-through Pre-Authentication
1. On the Web Application Proxy server, in the Remote Access Management console, in the Navigation pane, click Web Application Proxy, and then in the Tasks pane, click Publish.
2. On the Publish New Application Wizard, on the Welcome page, click Next.
3. On the Preauthentication page, click Pass-through, and then click Next.
4. On the Publishing Settings page, do the following, and then click Next:
- In the Name box, enter a friendly name for the application.
- This name is used only in the list of published applications in the Remote Access Management console.
- In the External URL box, enter the external URL for this application; for example, https://maps.yourdomain.com/.
- In the External certificate list, select a certificate whose subject covers the external URL.
- In the Backend server URL box, enter the URL of the backend server. Note that this value is automatically entered when you enter the external URL and you should change it only if the backend server URL is different; for example, http://maps/.
- Web Application Proxy can translate host names in URLs, but cannot translate path names. Therefore, you can enter different host names, but you must enter the same path name. For example, you can enter an external URL of https://apps.yourdomain.com/app1/ and a backend server URL of http://app-server/app1/. However, you cannot enter an external URL of https://apps.yourdomain.com/app1/ and a backend server URL of https://apps.yourdomain.com/internal-app1/.
5. On the Confirmation page, review the settings, and then click Publish. You can copy the PowerShell command to set up additional published applications.
6. On the Results page, make sure that the application published successfully, and then click Close.
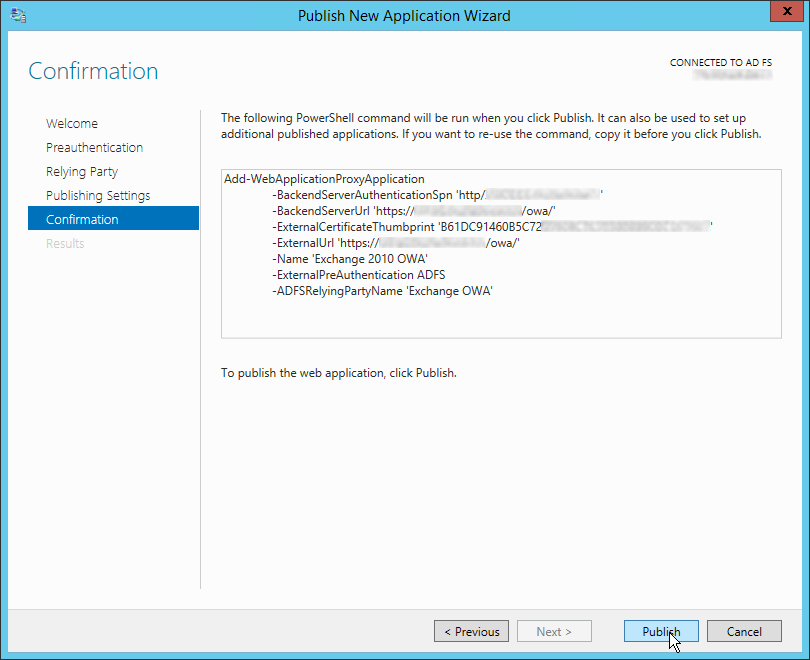
Publish Application using Windows Store App or Oauth2
You can publish an application using pre-authenticated Windows Store App. This steps only be performed using Windows PowerShell. Open Elevated Windows PowerShell prompt in WAP Server. Change the following command as required and issue the command.
Set-WebApplicationProxyConfiguration –OAuthAuthenticationURL ‘https://fs.yourdomain.com/adfs/oauth2/’
Add-WebApplicationProxyApplication
-BackendServerURL ‘https://storeapp.yourdomain.com/’
-ExternalCertificateThumbprint ‘1a2b3c4d5e6f1a2b3c4d5e6f1a2b3c4d5e6f1a2b’
-ExternalURL ‘https://storeapp.yourdomain.com/’
-Name ‘Windows Store app Server’
-ExternalPreAuthentication ADFS
-ADFSRelyingPartyName ‘Store_app_Relying_Party’
-UseOAuthAuthentication
Part 1: Install and Configure Forefront UAG Step by Step
Part 2: Publish RDS using Forefront UAG 2010 Step by Step
Part 3: Publish Exchange Server 2010 Using Forefront UAG 2010 Step by Step
Part 4: Redirect Web Application from HTTP to HTTPS using Forefront UAG 2010 Step by Step
Part 5: Publish SharePoint Server 2010 Using Forefront UAG 2010 Step by Step
Part 6: Forefront UAG Patching Order
Forefront TMG 2010: How to install and configure Forefront TMG 2010 —-Step by step
В этом видео настраиваем прокис на windows. Настраиваем сеть и поднимаем прокси на виндовс.
Сервер на базе windows server 2012 r2
ХОСТИНГ ДЛЯ ПОКУПКИ СЕРВЕРА
https://pinspb.ru (нет реферальной программы)
РЕГИСТРАЦИЯ
В качества благодарности прошу уточнить при покупки сервера мой ЛИЦЕВОЙ СЧЕТ:17726 личному менеджеру, связавшись по телеграмму для регистраиции и получения личного кабинета https://t.me/ndedikov
БЛОГ ПО НАСТРОЙКЕ ПРОКСИ
https://kak-podnyat-proksi-ipv6.ru
МАГАЗИН IPV4
http://funny-productru.deer.io
ПАМЯТКА ПО НАСТРОЙКЕ
1 Настрока сети
2 Скачиваем 3proxy с официального сайта для Windows (Распаковываем на рабочий стол архив)
3 Создаём конфиг 3proxy.txt в папке C:\Users\Администратор\Desktop\3proxy-0.8.11\bin
4 Переходим в командной строке в дирректорию cd C:\Users\Администратор\Desktop\3proxy-0.8.11\bin
5 Устанавливаем 3proxy как службу 3proxy.exe —install 3proxy.txt
6 Проверяем службу 3proxy через диспетчер задач
7 Окрываем порт (диапазон портов) Панель управления — Система и безопасность — Брандмауэр виндовс — Дополнительные параметры — Правила для входящих подключений — Создать правило — Для порта — Указываем порт — Даём имя правилу.
8 Проверяем прокси
ОБРАТНАЯ СВЯЗЬ В ТЕЛЕГРАМЕ
@residentmobile
ОБРАТНАЯ СВЯЗЬ ВКОНТАКТЕ
https://vk.com/borisbaktashev
Как поднять прокси сервер на виндовс https://youtu.be/uIwCecQ-Leo