Как в Windows 10 запускать обновления из командной строки
В некоторых случаях обновления Windows 10 не получается запустить из Параметров. Однако, как раз обновление может и починить эти проблемы системы. Итак, сегодня мы поговорим о другом способе запуска этих обновлений.
Запуск обновления Windows Update с помощью Windows PowerShell
Запуск обновлений Windows Updates в Windows PowerShell потребует от вас вручную установить модуль Windows Update, загрузить обновления и установить их.
Для этого откройте Windows PowerShell с правами администратора.
Наберите команду:
Install-Module PSWindowsUpdate
чтобы установить модуль Windows Update для Windows PowerShell.
Затем команду:
Get-WindowsUpdate
для подключения к серверам Windows Update и загрузки обновлений, если они найдены.
И, наконец:
Install-WindowsUpdate
для установки обновлений Windows, загруженных на компьютер.

Запуск обновления Windows Update с помощью командной строки
Откройте Командную строку с правами Администратора. Затем набирайте команды:
Проверьте обновления:
UsoClient StartScan
Запустите загрузку обновлений:
UsoClient StartDownload
Запустите установку обновлений:
UsoClient StartInstall
Перезапустите устройство после установки обновлений:
UsoClient RestartDevice
Проверьте, загрузите и установите обновления:
UsoClient ScanInstallWait
Стоит отметить, что упомянутые выше команды командной строки предназначены только для Windows 10. Для более старых версий Windows необходимо использовать следующие команды:
wuauclt /detectnow
wuauclt /updatenow
wuauclt /detectnow /updatenow

Спасибо, что читаете! На данный момент большинство моих заметок, статей и подборок выходит в telegram канале «Левашов». Обязательно подписывайтесь, чтобы не пропустить новости мира ИТ, полезные инструкции и нужные сервисы.
Респект за пост! Спасибо за работу!
Хотите больше постов в блоге? Подборок софта и сервисов, а также обзоры на гаджеты? Сейчас, чтобы писать регулярно и радовать вас большими обзорами, мне требуется помощь. Чтобы поддерживать сайт на регулярной основе, вы можете оформить подписку на российском сервисе Boosty. Или воспользоваться ЮMoney (бывшие Яндекс Деньги) для разовой поддержки:
Заранее спасибо! Все собранные средства будут пущены на развитие сайта. Поддержка проекта является подарком владельцу сайта.
Windows Update allows users to keep Windows OS up to date with the latest security patches, new features and bug fixes from Microsoft. You can access Windows Update from the Settings app on your PC.
Windows Update runs automatically in the background and installs new updates when they are available. However, you can also manually check for updates at any time. This will help you get the latest features and improvements faster.
By checking regularly for new Windows updates, you can ensure your PC is running smoothly and securely, ensuring you are safe from viruses, malware and other threats.
On this page, you will find several methods to force run Windows Update. Let’s start:
Quick Summary
Force Windows Update from CMD
Check for updates on all Windows versions
If you want to run Windows Update from Command Prompt, you can use the wuauclt.exe utility. This utility allows you to check for updates, download updates, and install updates from the command line. The only limitation of running Windows Update through the CMD is that it won’t show any progress. Only results are shown when the process is complete. Here is how to run Windows Update from CMD:
-
Open Command Prompt with administrative privileges
-
Run wuauclt /detectnow to check for new updates and download them
wuauclt /detectnow -
Run wuauclt /updatenow to install updates
wuauclt /updatenow -
(Optional) Run wuauclt /reportnow to report back to WSUS server (if available)
wuauclt.exe /reportnow
You can also use multiple switches in the same command:
wuauclt /detectnow /updatenowIf you want to disregard the already detected updates and force Windows Update to check for updates again immediately, you may run the following command:
wuauclt /resetauthorization /detectnowSince the command prompt does not show any progress, a better approach would be to check and install updates simultaneously. Here’s the command for this:
wuauclt /detectnow /updatenowCheck for Windows updates in Windows 11, 10
The above-mentioned command will work in all versions of Windows, including Windows 7 and Windows Server 2008 R2. But if you are using Windows 11, Windows 10 or Windows Server 2016, you can use the “UsoClient” command, which has more options than “wuauclt.” You can run UsoClient with the following switches:
-
Start checking for new updates
UsoClient /StartScan -
Start downloading updates
UsoClient /StartDownload -
Start installing updates
UsoClient /StartInstall
Force Windows Update Check using Run Command Box
I found out that the easiest way to force a Windows update check is to use a command in the Run dialog box. There are other commands from CMD and PowerShell as well, but let’s start with the easiest way to do it.
-
Open the Run Command box (Windows key + R).
-
Run the following command:
control update 1")
Check Windows update from the Run Command box
 1")
This will trigger the Windows Update graphical user interface which will start checking for new updates. This method works on all versions of Windows including Windows 10 and Windows 11.
There is another command that will trigger the same effect but only works in Windows 10 and 11:
ms-settings:windowsupdate 2")
Run Windows Update from PowerShell
There is no official Windows Update module for PowerShell. However, you can use “PSWindowsUpdate.” PSWindowsUpdate is a third-party module that can be used to configure Windows updates in Windows.
This module is not installed in Windows by default but you can download it from the PowerShell gallery and install and run the module to check for new updates.
Here are the three steps to run Windows Update through PowerShell:
-
Run the following command to install PSWindowsUpdate:
Install-Module PSWindowsUpdate 3")
Install PSWindowsUpdate module -
Check for available updates by running this cmdlet:
Get-WindowsUpdate 4")
Check for available Windows updates -
Now install these updates using this cmdlet:
Install-WindowsUpdate 5")
Install available Windows updates
 3")
 4")
 5")
The above-mentioned commands will only install Windows updates. If you want to update other Microsoft products, you’ll also need to enable the Microsoft Update Service. It’s pretty easy to enable it using PowerShell:
Add-WUServiceManager -MicrosoftUpdateIf you want to automatically restart your computer after installing all the updates, you can run the following command instead:
Install-WindowsUpdate -MicrosoftUpdate -AcceptAll -AutoRebootIf you don’t want to install a separate module, you can run the following command to force start Windows Update using PowerShell:
Start-Process -FilePath 'ms-settings:windowsupdate'Deploy Updates on Remote Computers
The PSWindowsUpdate PowerShell module can also be used to deploy Windows updates on remote computers. There are two commands involved in this process:
-
Create a list of computers and pass the list as a variable string using the computer names:
$computer = "comp1, comp2, comp3"You can add more computers to the string separated by commas. Replace “compX” with the name of each computer.
-
Run the following command to start checking for Windows updates on remote computers:
Invoke-WUJob -ComputerName $computer -Script {ipmo PSWindowsUpdate; Install-WindowsUpdate -MicrosoftUpdate -AcceptAll -AutoReboot} -RunNow -Confirm:$false | Out-File "\server\share\logs\$computer-$(Get-Date -f yyyy-MM-dd)-MSUpdates.log" -Force
Install Specific Updates Only
If you already know the article KB no. of the specific update you want to install, you can run the following command to install that particular update(s) only:
Get-WindowsUpdate - KBArticleID "KB5002324", "KB5002325" -InstallReplace the KB number with the one you want to install.
Prevent Specific Windows Updates from Installing
You can prevent specific updates from installing on your computer by replacing the KB numbers in the following command in PowerShell:
Install-WindowsUpdate -NotKBArticle "KB5002324, KB5002325" -AcceptAllCheck for Windows Updates using Windows Settings
To check for new updates and configure your Windows Update settings, follow the steps below:
-
Navigate to:
-
In Windows 11:
Settings app >> Windows Update
-
In Windows 10:
Settings app >> Update & Security >> Windows Update
-
-
Click “Check for updates.”
 6")
Check for pending updates
 6")
Force Windows Update to Download Already Downloaded Updates
There will be times when the updates become corrupted or for other reasons, you just don’t want to install the downloaded updates. In that situation, you can easily delete the already-downloaded updates, which will force Windows Update to run again and check for and download the updates again.
The only caveat in this situation is that the update must not have been installed on your computer. If the update is already installed, Windows will detect it as installed and will not download it again. In that case, you will need to uninstall the update first and then force Windows Update to run again.
If you want to force Windows Update to re-download all the updates again, you can do this using the steps below.
-
Navigate to the following directory using File Explorer:
C:\Windows\SoftwareDistribution\Download
This folder contains all the Windows update files that Windows OS is currently downloading or recently downloaded and installed.
-
Select and delete all the files from the “Download” folder.
 7")
Delete all files in the “Download” folder -
Run Windows Update again using the above-mentioned methods.
This will force Windows Update to check for the same updates and download them again. The download and install process for new updates is completely automated. You don’t need to do anything during the download and installation process.
 7")
Manage Windows Updates using Wuinstall
Using WuInstall, IT Administrators can automate Windows updates. Wuinstall can be used to enforce Windows Updates inquiries, downloads, and installations at times when they deem them appropriate, enabling them to make the entire update process more controlled and user-friendly.
WuInstall is a strong and flexible system management tool that can be used in a WSUS-based or standalone environment. To download the latest updates using Wuinstall, you will need to download and install Wuinstall first. Follow the steps below:
-
Go to http://www.wuinstall.com/ and install the latest free version of Wuinstall on your computer.
-
Open an elevated Command Prompt.
-
Run the following cmdlet to search for the latest available Windows updates:
wuinstall /searchThis will not only look for new updates but will also list them in the command window.
-
To download the updates, run the following command:
wuinstall /downloadThis will download all the available updates from Microsoft servers.
-
To install the updates, run the following command:
wuinstall /install
There are a few more switches that you can use with the install command:
- /quiet – will install updates without showing anything.
- /disableprompt – Disable any input from Windows.
- /autoaccepteula – Auto-accept any agreement during the update installation.
- /rebootcycle – Install updates on the next computer reboot.
Fix Corrupted Windows Updates
Sometimes Windows Update files get corrupted and the user is not able to download the files again or install the corrupted update files. In that case, we need to run a DISM command to fix the corrupted Windows Update. Here are the steps:
-
Launch the Command Prompt.
-
Run the following cmdlet:
dism.exe /Online /Cleanup-image /Restorehealth
After successfully running this command, try force downloading the updates again, and the Windows Update should start working again.
Hopefully, this will be useful in situations where you want to automate certain Windows functions. What other purposes do you want to use command line options to run Windows Update?
Run Windows Update FAQs
What is Windows Update?
Windows Update is a free Microsoft service that provides bug
fixes, security patches, and performance enhancements for Microsoft Windows operating systems. By installing these updates, users can ensure they have the latest features and security available for their operating system.
Can I use the command line to run Windows Update?
Yes, you can use Windows’ command line to run Windows Update.
What is the benefit of running Windows Update from the command line?
Running Windows Update from the command line offers flexibility,
automation, and convenience. For example, by using the command line, you can schedule updates to occur at a specific time or be triggered by an event, and even control which updates are installed.
How can I run Windows Update from the command line in Windows 10?
Follow the steps below to force Windows update with the command line:
Type cmd in the search box, choose Run as administrator, and click Yes to continue.
Type wuauclt.exe /updatenow and hit Enter.
This command will force Windows Update to check for updates and start downloading.
What is the command to run Windows Update from PowerShell?
To run Windows Update via PowerShell, enter the following command:
Start-Process -FilePath ‘ms-settings:windowsupdate’
What is “usoclient.exe” and how does it relate to Windows Update?
“Usoclient.exe” is a built-in command line tool for Windows Update that can be used to scan for updates, start updates, and even uninstall updates. It provides an alternative to Windows Update’s graphical user interface. This tool can be especially useful for IT administrators who need to run Windows Update simultaneously on multiple machines. It can be run from the command line and provides options for updating in managed environments. It also allows for more detailed control over the update process, such as setting which updates to install or uninstall.
Can Windows Update be automated using the command line?
Yes, Windows Update can be automated using the command line. This can be done by creating scripts that automatically execute Windows Update commands.
Windows Updates can be run from PowerShell and Command Prompt in Windows 11/10. In this article, we will be checking out how to do it. Windows Update is one of the most highlighted features of Windows 10. Because with the release of Windows 10, Windows was offered to the customers as a service rather than a product. Under the scenario of Software as a Service, this led to the Windows Updates on Windows 10 being on by default and without an option for anyone to disable it.
Now, while some criticized this move by Microsoft, ultimately this is a step towards the customer’s greater good. Because Windows Update helps the users stay secured against all kinds of threats and provide them with the latest and the greatest from Microsoft. So, for those who appreciate this service, today we are going to talk about another way to run these updates.
The following methods will be carried out to run Windows Update from Command Line on Windows 11/10-
- Using Windows Powershell.
- Using Command Prompt.
1] Run Windows Update using Windows Powershell
Running Windows Updates on Windows Powershell will require you to manually Install the Windows Update module, Get Windows Updates downloaded and Install Windows Updates. And for this, open Windows Powershell by searching for Powershell in the Cortana search box and run it with Administrator level privileges.
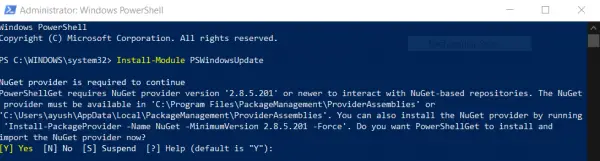
Install the PSWindowsUpdate Module
Type in,
Install-Module PSWindowsUpdate
to install the Windows Update module for Windows Powershell.
Check for Updates
After that,
Get-WindowsUpdate
to connect to the Windows Update servers and download the updates if found.
Install Updates
Finally, type in,
Install-WindowsUpdate
to install the Windows Updates downloaded on your computer.
Check for Microsoft Updates
Add-WUServiceManager -MicrosoftUpdate
Install specific updates only
Get-WindowsUpdate -KBArticleID "KB1234567" -Install
Hide specific Update
Install-WindowsUpdate -NotKBArticle "KB1234567" -AcceptAll
Skip Updates belonging to specific categories
Install-WindowsUpdate -NotCategory "Drivers","FeaturePacks" -AcceptAll
Related: Command-line switches to deploy Microsoft software Update packages
2] Run Windows Update using Command Prompt
Command Prompt on Windows Operating Systems exists since a very long time whereas Windows Powershell is comparatively new. Hence, it has similar capabilities to run Windows Updates, but the highlighting point here is that you do not need to download any module for Windows Updates.
First, open Command Prompt by searching for cmd in the Cortana search box and run it with Administrator level privileges.
Click on Yes for the UAC Prompt that you get.
Finally, type in the following commands and hit the Enter key in order to perform the respective operations,

Start checking for updates:
UsoClient StartScan
Start downloading Updates:
UsoClient StartDownload
Start installing the downloaded updates:
UsoClient StartInstall
Restart your device after installing the updates:
UsoClient RestartDevice
Check, Download and Install Updates:
UsoClient ScanInstallWait
It is worth noting that, the Command Prompt commands mentioned above are just meant for Windows 11/10 only.
How to enable the Windows Update service in Windows 11/10?
If the Windows Update service is disabled or is set to run manually, then you can enable the Windows Update service in Windows 11/10 using the following steps:
- Type services in the Search box and use Enter key
- In the Services window, double-click on Windows Update service to open its Properties
- In the Properties window, set the Startup type to Automatic
- Press the Start button to run the service
- Press Apply button and OK button to save the changes.
How do I know if Windows Update is installed in Command Prompt?
If you want to check the history of installed security updates or critical updates in Command Prompt on Windows 11/10, then first open the elevated Command Prompt window and execute wmic qfe list command. This will show the update description, update ID (or Hotfix ID), Installed by, Installed On, etc., information. Here, do note that not all Windows Updates are visible. So, it is better to access the Update history section in the Settings app of Windows 11/10 to see all the installed updates.
Related read: How to Update Drivers using Command Prompt.
Hope you find this post useful.

- Компьютеры
- IT
- Cancel
Как провести обновление Windows 10 через командную строку? Обновления Виндовс являются одной из самых известных опций Виндовс 10. Так как когда вышла Десятка, её пользователям предложили, как услугу, а не как товар. Из-за того, что ПО продолжили как услугу, обновления под Виндовс 10 внедрили по умолчанию в ОС. Часть пользователей стали критиковать подобную политику и данный метод Майкрософт. Но, в дальнейшем они поняли, то это делается в интересах пользователей. Так как обновления Виндовс помогают людям защищать их компьютеры от различных вредоносных внедрений в систему и возможных опасностей и дают им новейшие и одни из лучших решений от Майкрософта. Поэтому, ценителям обновлений мы расскажем в данной статье о методах запуска обновлений, используя командную строку и Виндовс PowerShell.
«>
Иногда бывает, что запуск обновлений Виндовс 10, применяя параметры — невозможен. Что интересно, именно обновления могут убрать данный сбой из ОС. Отсюда, мы будем говорить не только об командной строке, но и о иных методах.
Как запустить обновления Виндовс Update применив Виндовс PowerShell?
Для запуска обновлений Виндовс Апдейтес в Виндовс PowerShell нужно ручным методом произвести установку модуля Windows Update, произвести загрузку обновлений и их установку.
- Чтобы это сделать, открываем Виндовс PowerShell как администратор;
- Затем, в открывшемся окошке нам необходимо набрать следующее сочетание: Install-Module PSWindowsUpdate и нажать «Ввод» для установки модуля Виндовс Апдейт под Виндовс PowerShell;
- После этого вставляем выражение: Get-WindowsUpdate чтобы подключиться к серверам Виндовс Апдейт и загрузкам обновлений, в том случае, если они появились;
- Далее, нам необходимо вставить команду: Install-WindowsUpdate которая поможет установить обновления Виндовс, которые мы загрузили на ПК (Разумеется, после ввода каждой из этих команд нажимаем Enter).
Обновляем Виндовс Апдейп, применив командную строку
Необходимо открыть «Командную строку» как Администратор. После этого, нужно вставить в неё следующие сочетания и нажать «Ввод»:
- Чтобы проверить обновления вставим следующую команду: UsoClient StartScan;
- Для запуска загрузки обновлений набираем: UsoClient StartDownload и кликнем по Вводу;
- Для запуска установки обновлений нужно набрать следующую команду: UsoClient StartInstall;
- Для перезапуска компьютера после того, как мы установили обновления нужно набрать команду: UsoClient RestartDevice;
- Если же нам нужно сразу проверить, загрузить и установить обновления, нужно набрать следующую команду: UsoClient ScanInstallWait
Вывод: как провести обновление Windows 10 через командную строку вам теперь понятно. Рекомендуется проводить данную операцию, если не функционирует Центр Обновления Виндовс. Успехов!


https://info-kibersant.ru/obnovlenie-windows-10-cherez-ks.html
Оригинал записи и комментарии на LiveInternet.ru
It’s always recommended to regularly update Windows as the updates solve any existing bugs and bring about new features.
Usually, users use the graphical interface on the OS to search for and install updates. However, there are some cases where you may want to run this process from the Command-line (CLI) tools such as Command Prompt and Windows PowerShell.
For instance, you may need to manage updates, especially for other users on a Windows server. Or, you may be creating a script where you need such commands.
Table of Contents
There are a few ways to run Windows Update from the command line on a Windows system, which are as follows:
Using Command Prompt
On Windows 10 and 11, Microsoft uses the Update Session Orchestrator Client UsoClient.exe tool for updating your system components.
Previously, it was possible for users to use this program from the Command Prompt to check and install updates. However, in the latest versions, you can only check for updates. Regardless, you can try using the steps below and check if they work out for you:
- Open Run by pressing Win + R.
- Type
cmdand press Ctrl + Shift + Enter to open the Elevated Command Prompt.
- Enter the following commands depending on the corresponding operations:
UsoClient StartScan– Start the scan for available updatesUsoClient StartDownload– Download but not install the updates or patches you scanned for.UsoClient StartInstall– Install all downloaded updates.UsoClient ScanInstallWait– Scans, downloads, and installs the updatesUsoClient RestartDevice– Restarts your computer to complete the update installationUsoClient ResumeUpdate– Resumes the installation of update after rebootUsoClient RefreshSettings– Refresh the update settings to the default


You can also check which UsoClient commands you can use on your system by using the following command on the Elevated Windows PowerShell:
- Open Run.
- Type
powershelland press Ctrl + Shift + Enter to open the Elevated Windows PowerShell. - Copy and paste the following command and press Enter:
Get-ScheduledTask -TaskPath '\Microsoft\Windows\UpdateOrchestrator\' | Select-Object @{Expression={$_.TaskName};Label="TaskName"}, @{Expression={$_.Actions.Execute + ' ' + $_.Actions.Arguments};Label="CommandLine"}

On older Windows versions, you could use the Windows Update Agent WUAUCLT.exe to update Windows.
First, you need to enable Automatic Updates with scheduled installation through the Group Policy. Otherwise using the Windows Update Agent from Command Prompt won’t work. To do so,
- Open Run and enter
gpedit.mscto open the Local Group Policy Editor. - Go to Computer Configuration > Administrative Templates > Windows Components > Windows Update.
- If it doesn’t contain policies but expands to further folders, go to Manage end user experience.

- Double-click on Configure Automatic Updates.
- Check Enabled and set Configuring automatic updating to 4 – Auto download and schedule the install.
- You can choose any schedule you want. Then, click Apply and OK.


Then, you can use the following commands on Prompt to update Windows using the Update Agent:
wuauclt /detectnow– Scans for available updateswuauclt /updatenow– Installs the available updateswuauclt /detectnow /updatenow– Combines both the processes above

Microsoft didn’t exactly create the WUAUCLT.exe and UsoClient.exe tools for end users. So you won’t get any additional information for whether the commands are actually running when you use them on the Command Prompt. The Prompt will show that these commands have finished running even when they are still operating in the background.
You have to estimate the time it may take and wait until then. So, instead of this method, we recommend using Windows PowerShell as you can get more detailed information during the process.
Using PowerShell
Windows PowerShell is a very powerful Windows CLI with which you can do everything that Command Prompt allows and many more. Naturally, you can use it to run windows updates. Here’s what you need to do:
- Press Win + R to open Run.
- Type
powershelland press Ctrl + Shift + Enter to open the Elevated PowerShell. If you use PowerShell 7, you can open it by enteringpwshinstead ofpowershell - Enter the command below to download and install the Windows Update Module, which you need to run the actual commands for updating Windows:
Install-Module PSWindowsUpdate - On the prompts, type
Yand press Enter. - After installing it, enter the following update commands to perform the corresponding actions:
Get-WindowsUpdate– Scans for available updates and displays themInstall-WindowsUpdate– Downloads and installs all the available updatesGet-WindowsUpdate -AcceptAll -Install -AutoReboot– Downloads and installs all the available updates while automatically rebooting the PC after the installation if necessary.Get-WindowsUpdate -Install -KBArticleID 'KB5017859'– Install the KB5017859 update. You need to replace the update ID ‘KB5017859’ with the KB Article ID of the available updates from theGet-WindowsUpdatecommand.


Using Visual Basic Script
While the above command line methods can run Windows Update, they are not interactive and user-friendly. Microsoft’s platform contains some Visual Basic Script (VB script) to run an interactive update process from the CLI, especially as a sample for developers. However, you can also use this script for your purpose.
- Open Run and enter
notepadto launch this text editor. - Then, open a web browser and go to the following Microsoft pages depending on whether you want to install a particular update or all updates at once:
- All Available Updates
- Specific Updates
- Copy the script from the page to the notepad you just opened.
- Press Ctrl + S to save the file.
- Set Save as type to All files and File name to
UpdateInstall.vbs. You can use any name, but remember to use the.vbsextension. - Save it on any location by navigating there and clicking on Save.

- Then, open the Elevated Command Prompt.
- Enter the following command while replacing the path:
cscript “<Path to the folder>\UpdateInstall.vbs”
- You can also right-click on the script on your file explorer and select Copy as path. Then, paste it after typing
cscriptand the space to avoid manually typing the full path. - Then, follow the on-screen instructions on the CLI.


