Первое приложение с .NET CLI
Последнее обновление: 11.11.2022
Для создания графических интерфейсов с помощью платформы .NET применяются разные технологии — Window Forms, WPF, UWP.
Однако наиболее простой и удобной платформой до сих пор остается Window Forms или сокращенно WinForms. Данное руководство ставит своей целью дать понимание принципов создания графических интерфейсов с помощью технологии WinForms
и работы основных элементов управления.
Создадим первое приложение на C# и Windows Forms. Что нам для этого потребуется? Прежде всего необходим текстовый редактор для написания кода программы.
Можно взять любой понравившийся текстовый редактор, например, Visual Studio Code
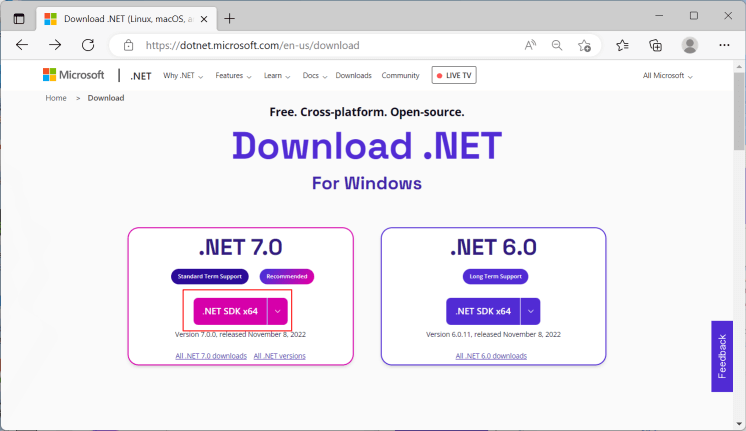
Также для компиляции и запуска программы нам потребуется .NET SDK. Для его установки перейдем на официальный сайт по ссылке
.NET SDK
После установки .NET SDK для первого проекта определим какую-нибудь папку. Например, в моем случае это будет папка C:\dotnet\winforms\helloapp.
Откроем терминал/командную строку и перейдем к созданной папке проекта с помощью команды cd
cd C:\dotnet\winforms\helloapp
В данном случае мы для создания и запуска проекта мы будем использовать встроенную инфраструктуру .NET CLI, которая устанавливается вместе с .NET SDK.
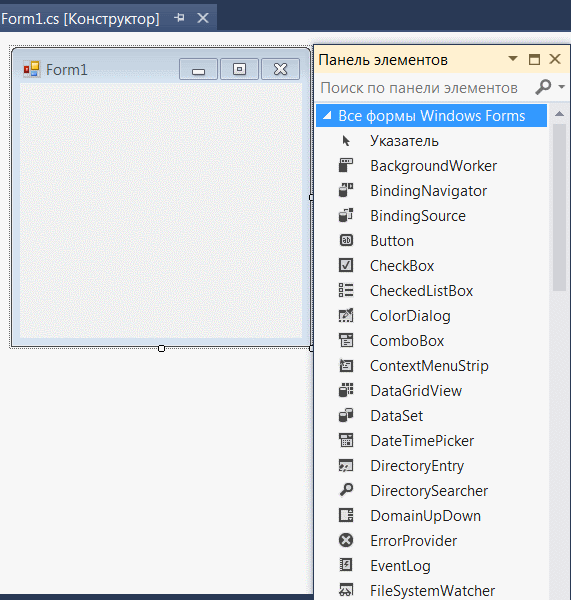
Для создания проекта в .NET CLI применяется команда dotnet new, после которой указывается тип проWindows Formsекта. Для создания проекта
Windows Forms применяется шаблон — winforms. Поэтому введем в терминале команду
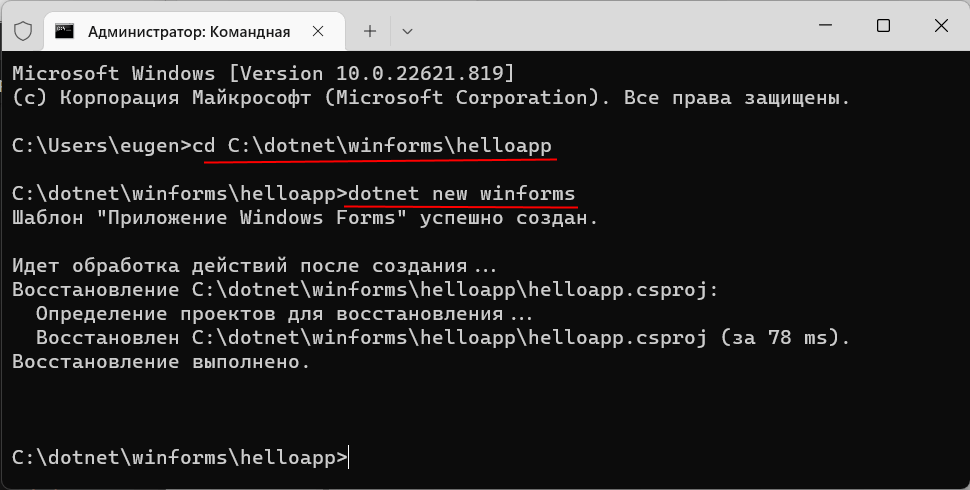
После выполнения этой команды у нас будет создан следующий проект:
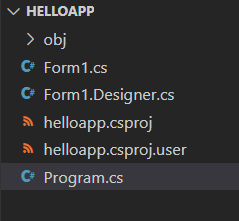
Структура проекта Windows Forms
Рассмотрим базовую структуру простейшего стандартного проекта Windows Forms:
-
helloapp.csproj: стандартный файл проекта C#, который соответствует назанию проекта (по умолчанию названию каталога) и описывает все его настройки.
-
helloapp.csproj.user: дополнительный файл проекта C#, который хранит специфичные для текущего пользователя настройки.
-
Form1.cs: содержит класс формы, которая по умолчанию запускается при старте приложения
-
Form1.Designer.cs: он содержит определение компонентов формы, добавленных
на форму в графическом дизайнере (графический дизайнер Windows Forms на данный момент официально доступен только в Visual Studio) -
Program.cs: определяет класс Program, который запускается при старте приложения и запускает форму Form1
Например, посмотрим на содержимое файла helloapp.csproj
<Project Sdk="Microsoft.NET.Sdk">

  <PropertyGroup>
    <OutputType>WinExe</OutputType>
    <TargetFramework>net7.0-windows</TargetFramework>
    <Nullable>enable</Nullable>
    <UseWindowsForms>true</UseWindowsForms>
    <ImplicitUsings>enable</ImplicitUsings>
  </PropertyGroup>

</Project>
Для компиляции приложения Windows Forms указаны следующие настройки:
-
OutputType: определяет выходной тип проекта. Должен иметь значение WinExe — то есть выполняемое приложение с
расширением exe под Windows -
TargetFramework: определяет применяемую для компиляции версию фреймворка .NET. Поскольку при создании проекта
была выбрана версия .NET 7, а сам проект зависит от компонентов Windows, то здесь должно быть значение net7.0-windows -
Nullable: подключает в проект функционалность ссылочных nullable-типов
-
UseWindowsForms: указывает, будет ли проект использовать Windows Forms (для этого устанавливается значение
true) -
ImplicitUsings: подключает в проект функциональность неявно подключаемых глобальных пространств имен
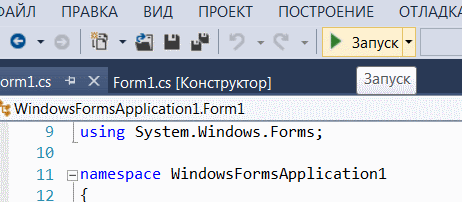
Запуск проекта
Проект по умолчанию не представляет какой-то грандиозной функциональности, тем не менее этот проект мы уже можем запустить. Итак, запустим проект. Для этого выполним команду
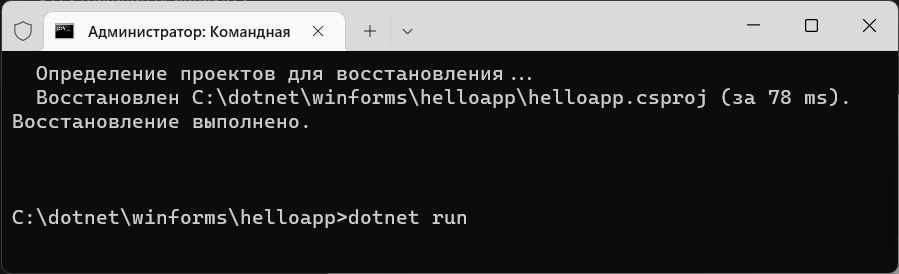
При запуске запускается графическая форма, код которой определяет класс Form1:
Запуск приложения
Файл Program.cs определяет точку входа в приложение:
namespace helloapp;

static class Program
{
    [STAThread]
    static void Main()
    {
        ApplicationConfiguration.Initialize();
        Application.Run(new Form1());
    }
}
Метод Main снабжен атрибутом [STAThread]. Этот атрибут, грубого говоря,
необходим для корректной работы компонентов Windows. В самом методе сначала вызывается метод
ApplicationConfiguration.Initialize()
который устанавливает некоторую базовую конфигурацию приложения
Затем вызывается метод
Application.Run(new Form1());
в который передается объект отображаемой по умолчанию на экране формы.
То есть, когда мы запустим приложение, сработает метод Main, в котором будет вызван метод Application.Run(new Form1()),
благодаря чему мы увидим форму Form1 на экране.
Определение формы
Теперь посмотрим на определение формы и немного изменим его. Для этого откроем файл Form1.cs в текстовом редакторе. По умолчанию он выглядит следующим образом:
namespace helloapp;

public partial class Form1 : Form
{
    public Form1()
    {
        InitializeComponent();
    }
}
Класс формы — Form1 представляет графическую форму — фактически то окно, которое мы увидим на экране при запуске проекта.
Этот класс определяется как частичный (с модификатором partial) и наследуется от встроенного класса Form,
который содержит базовую функциональность форм.
В самом классе Form1 определен по умолчанию только конструктор, где вызывается метод InitializeComponent(), который выполняет инициализацию компонентов формы из файла дизайнера
Form1.Designer.cs. По сути именно код этого файла передается выше через вызов InitializeComponent()
Теперь изменим его код следующим образом:
namespace helloapp;

public partial class Form1 : Form
{
    public Form1()
    {
        InitializeComponent();
        // определяем кнопку
        Button button = new Button();
        // текст кнопки
        button.Text ="Click";
        // положение кнопки
        button.Location = new Point(50, 50);
        // размер кнопки
        button.Size = new Size { Width = 80, Height = 30 };
        // обработчик нажатия кнопки
        button.Click += (o, e) => MessageBox.Show("Hello METANIT.COM!");
        // добавление кнопки на форму
        this.Controls.Add(button);
    }
}
В данном случае на форму добавляется кнопка, и у нее настраиваются различные свойства, как текст, положение на форме, размер, а также обработчик нажатия.
Заново запустим проект, и нам отобразится та же форма, которая теперь будет содержать кнопку. И по нажатию на кнопку появится маленькое окно с сообщением.

До сих пор мы создавали только консольные приложения.
Но программисты на C# широко используют формы для создания пользовательских интерфейсов.
И в сегодняшней статье мы создадим простое оконное приложение.
В примерах используем русскую версию программы Visual Studio 2012.
Первый шаг — начать новый проект и создать форму. Для чего откройте Visual Studio и выберите Файл-> Создать -> Проект, а в диалоговом окне нового проекта выберите Visual C#- Windows и выберите Приложение Windows Forms. Введите имя проекта в нижней части диалогового окна и нажмите кнопку ОК. На следующем рисунке показано, как создать новую форму в Visual Studio.
В диалоговом окне Новый проект выберите Приложение Windows Forms».
После выбора приложения Windows Forms вы можете увидеть форму по умолчанию (Form1) в своем новом проекте C#. Форма Windows Form, которую вы видите в представлении «Конструктор», представляет собой визуальное представление окна, которое открывается при открытии вашего приложения.
Каждый раз, когда вы создаете приложение Windows, Visual Studio будет отображать пустую форму по умолчанию, на которую вы можете перетащить элементы управления на основную форму приложения и настроить их размер и положение.
Если вы хотите установить какие-либо свойства формы, вы можете использовать окно свойств Visual Studio, чтобы изменить их. Есливы не видите окно Свойств, в меню ВИД щелкните Окно свойств. В этом окне перечислены свойства выбранной в данный момент формы Windows или элемента управления, и здесь вы можете изменить существующие значения.
Далее на вкладке ВИД открываем панель элементов. Находим там виджет Button и перетаскиваем его на форму. Дважды щелкаем по новому элементу и открываем окно с кодом кнопки.
private void button1_Click(object sender, EventArgs e)
{
// вводим следующий код
MessageBox.Show("Привет Мир");
}
Запускаем приложение.
При нажатии на кнопку на экране должно появиться приветствие.
Результат:
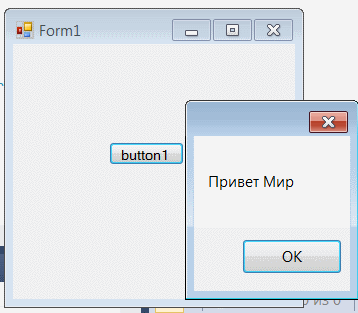
Таким образом мы наглядно увидели возвожности создания оконных приложений с C# и Visual Studio, а также привязали к форме кнопку реагирующей на нажатие.
-

Создано 12.10.2021 11:38:18
-
Михаил Русаков

Копирование материалов разрешается только с указанием автора (Михаил Русаков) и индексируемой прямой ссылкой на сайт (http://myrusakov.ru)!
Добавляйтесь ко мне в друзья ВКонтакте: http://vk.com/myrusakov.
Если Вы хотите дать оценку мне и моей работе, то напишите её в моей группе: http://vk.com/rusakovmy.
Если Вы не хотите пропустить новые материалы на сайте,
то Вы можете подписаться на обновления: Подписаться на обновления
Если у Вас остались какие-либо вопросы, либо у Вас есть желание высказаться по поводу этой статьи, то Вы можете оставить свой комментарий внизу страницы.
Если Вам понравился сайт, то разместите ссылку на него (у себя на сайте, на форуме, в контакте):
-
Кнопка:
Она выглядит вот так:
-
Текстовая ссылка:
Она выглядит вот так: Как создать свой сайт
- BB-код ссылки для форумов (например, можете поставить её в подписи):

Теперь пришло время создать наше первое оконное приложение.
Важные темы, рассматриваемые в данной части:
- Как создать новое оконное приложение в C# .NET
- Как добавить новые элементы на форму
- Как отследить перемещение мыши по форме
- Как реализуется генерация случайных чисел (random) в С# .NET
- Как определить разрешение экрана в С# .NET
Разрабатываемое приложение будет представлять собой небольшую форму, повторяющую идею давным-давно придуманной программы: на форме будет содержаться вопрос «Вы стремитесь сделать мир лучше?». При попытке наведения указателя мыши на кнопку «Да, конечно!» окно будет убегать от нас. Нажатие на кнопку «Нет» не будет ничем ограничено.
Создавая данную программу, мы рассмотрим основные принципы создания оконных приложений в C#, а также методы реализации с помощью них каких-либо конечных целей: в нашем случае — это забавно убегающее окно.
Создайте новый проект, в качестве типа шаблона установите приложение Windows Forms, как показано на рисунке 1:
 Рисунок 1. Создание нового проекта.
Назовите проект RandWindow и нажмите кнопку ОК.
Рабочее окно MS Visual Studio содержит следующие вспомогательные окна (рис. 2).
 Рисунок 2. Вспомогательные окна.
На рисунке цифрам отмечены:
- Окно Toolbox (Панель элементов управления) — элементы управления вы можете разместить на создаваемой форме.
- Окно Solution Explorer (Обозреватель решений) — здесь вы сможете увидеть следующие узлы: Properties — настройки проекта, Links (Ссылки) — подключенные к проекту библиотеки, а также созданные и подключенные к проекту файлы исходных кодов (с расширением .cs) и подключенные к проекту формы (например, Form1).
- Окно Class View (Окно классов) — здесь представлены все созданные в программе классы.
- Окно Properties (Свойства) — выбрав любой элемент управления или даже форму, вы сможете увидеть все параметры данного объекта, а также изменить значения, установленные в них по умолчанию.
Создание оконных приложений сводится к созданию всех необходимых диалоговых окон, а также к размещению на них необходимых элементов. В дальнейшем мы настраиваем обработку событий, создаваемых пользователем, и настраиваем технические аспекты работы программы. В нашем случае сначала разместим все необходимые элементы управления на главной форме, после чего добавим обработчик события перемещения мыши и обработку нажатия кнопок.
Добавление новых элементов управления на форму
Итак, после того как вы ввели имя проекта, установили необходимый шаблон и нажали кнопку ОК, MS Visual Studio автоматически создаст каркас оконного приложения, после чего мы сможем добавить на него новые оконные элементы.
Для этого необходимо перетащить необходимый оконный элемент из окна инструментов (ToolBox).
Нашему окну потребуется 2 элемента поля для ввода, в которые мы будем выводить координаты указателя мыши, что облегчит нам понимание работы программы.
В центре окна будет находиться надпись, которую мы создадим с помощью элемента Label.
Снизу будут расположены 2 кнопки.
Немного растяните заготовку окна. Если вы нажмете на него правой кнопкой, то откроется контекстное меню. В нем нажмите на пункте свойства, после чего вы сможете изучить различные параметры окна, которые вы можете изменить. На рисунке 3 изображены самые (как правило) необходимые свойства:
 Рисунок 3. Различные свойства окна (формы) в C# .NET.
Немного растяните заготовку окна и добавьте все необходимые элементы. На рисунке 4 вы можете увидеть их в окне ToolBox:
 Рисунок 4. Перетаскивайте необходимые элементы из окна Toolbox на создаваемую форму.
Перейдите в свойства строки Label1, где измените текст на «Вы стремитесь сделать мир лучше?». Также измените тип шрифта, для этого найдите свойство Font (рис. 5).
 Рисунок 5. Свойство Font элемента Label.
После чего установите тип шрифта Tahoma, ширину шрифта Bold и размер равный 16 (рис. 6).
 Рисунок 6. Установки шрифта.
Далее измените текст на кнопках, используя свойство Text.
Полученная заготовка окна программы будет выглядеть следующим образом (рис. 7).
 Рисунок 7. Форма будет выглядеть следующим образом.
Техническая часть работы программы
- Сначала мы добавим обработчик события перемещения мыши и реализуем вывод ее координат x и y в два созданных поля ввода.
- Далее мы создадим функции обработчики щелчка по каждой из клавиш мыши (особенно усердные пользователи все же смогут попасть по кнопке «Да, конечно!»).
- Далее мы добавим код, реализующий случайное перемещение окна в том случае, если курсор приблизиться к кнопке «Да, конечно!».
Определение перемещения указателя мыши по форме
Щелкните непосредственно на части формы создаваемого приложения (НЕ на одном из элементов).
Теперь перейдите к свойствам формы с помощью щелчка правой кнопки мыши -> контекстное меню свойства.
Теперь необходимо перейти к списку возможных событий, которые может получать данное окно. Для этого щелкните на кнопке «Event» (события), как показано на рисунке 8:
 Рисунок 8. Переход к списку возможных событий.
Когда пользователь передвигает указатель мыши по нашему окну, операционная система посылает сообщение программе с текущими координатами указателя. Они-то нам и нужны.
Чтобы назначить обработчик данного события, найдите строку MouseMove (рис. 9), после чего сделайте двойной щелчок в поле справа от нее – автоматически добавится обработчик события движения мыши и добавится функция Form1_MouseMove в коде нашей программы.
 Рисунок 9. После двойного щелчка справа от MouseMove появиться данная строка, и автоматически совершится переход к коду функции-обработчика данного события.
Добавьте в эту функцию 2 строки, чтобы ее код стал выглядеть следующим образом.
/*http://esate.ru, Anvi*/

private void Form1_MouseMove(object sender, MouseEventArgs e)
{
  // ппереводим координату X в строку и записывает в поля ввода
  textBox1.Text = e.X.ToString();
  // переводим координату Y в строку и записывает в поля ввода
  textBox2.Text = e.Y.ToString();
}
Данная функция, обрабатывающая событие перемещения указателя мыши над формой, получает 2 параметра: объект отправитель и экземпляр класса MouseEventsArgs, содержащий информацию о координатах указателя мыши и других текущих свойствах.
textBox1 и textBox2 это экземпляры класса textbox, реализующие управление нашими элементами поля для ввода.
Член данных экземпляров Text позволяет установить текст в данных полях.
Таким образом, если теперь откомпилировать программу (F5), при перемещении указателя мыши по форме окна мы будем видеть координаты указателя (внутри формы), которые будут непрерывно изменяться.
Теперь вернемся к заготовке нашей формы. Для это щелкните на соответствующей закладке (Form1.cs [Конструктор]), как показано на рисунке 10:
 Рисунок 10. Переход к конструктору форм C#.
Сделайте двойной щелчок по первой кнопке: Visual Studio автоматически добавит код обработки данной кнопки при нажатии.
Добавьте следующие строки кода:
/*http://esate.ru, Anvi*/

private void button1_Click(object sender, EventArgs e)
{
  // Вывести сообщение с текстом "Вы усердны"
  MessageBox.Show( "Вы усердны!!");
  // Завершить приложение
  Application.Exit();
}
Теперь снова вернитесь к конструктору и добавьте вторую кнопку, также с помощью двойного щелчка по ней.
Она будет содержать следующий код:
/*http://esate.ru, Anvi*/

private void button2_Click(object sender, EventArgs e)
{
  // Вывести сообщение, с текстом "Мы не сомневались в вешем безразличии"
  // второй параметр - заголовок окна сообщения "Внимание"
  // MessageBoxButtons.OK - тип размещаемой кнопки на форме сообщения
  // MessageBoxIcon.Information - тип сообщения - будет иметь иконку "информация" и соответствующий звуковой сигнал
  MessageBox.Show("Мы не сомневались в вешем безразличии","Внимание", MessageBoxButtons.OK, MessageBoxIcon.Information);
}
Как видите, здесь мы немного усложнили код вызова окна-сообщения, чтобы продемонстрировать то, как оно работает, более подробно. Все параметры передаваемые в функцию Show закомментированны в исходном коде.
Теперь нам осталось только реализовать перемещение окна в тот момент, когда мышь приближается к кнопке «Да, конечно».
Для этого мы добавим код в функцию:
private void Form1_MouseMove(object sender, MouseEventArgs)
Принцип очень прост: получая координаты движения мыши, мы проверяем не входят ли они в квадрат, очерчивающий нашу кнопку с небольшим запасом. Если да, то мы генерируем 2 случайных числа, которые будут использованы для перемещения окна.
Мы бы могли просто отслеживать сообщение о наведении указателя мыши на кнопку, но оно приходит с заметной задержкой, в связи с чем пользователь без особого труда нажмет на кнопку да, поэтому мы будем просто вычислять попадание курсора в зону вокруг кнопки.
Также нам понадобится объявить несколько «рабочих» переменных, которые мы будем в дальнейшем использовать.
Генерация случайных чисел
Класс Random в C# представляет собой генератор псевдослучайных чисел — т.е. данный класс отвечает за выдачу последовательности чисел, отвечающую определенным статистическим критериям случайности.
Random rnd = new Random();
Здесь мы объявили экземпляр класса Random (rnd), с помощью которого мы будем генерировать случайные числа. В дальнейшем мы будем использовать код, вида rnd.Next (диапазон_генерации) или rnd.Next (от, до -1) для генерации случайного числа.
Также мы объявим еще несколько переменных, часть из которых сразу будет инициализирована.
/*http://esate.ru, Anvi*/

Point tmp_location;
int _w = System.Windows.Forms.SystemInformation.PrimaryMonitorSize.Width;
int _h = System.Windows.Forms.SystemInformation.PrimaryMonitorSize.Height;
tmp_location объявляется для того, чтобы в будущем временно хранить текущее положение окна.
Также нам следует подумать о том, что при случайном перемещении, наше окно может выйти далеко за пределы экрана.
Чтобы определить разрешение экрана в C# .NET, мы будем использовать:
/*http://esate.ru, Anvi*/

System.Windows.Forms.SystemInformation.PrimaryMonitorSize
_h и _w будут хранить в себе размеры экрана пользователя, которые определяются при их инициализации.
Теперь код этой функции будет выглядеть следующим образом:
/*http://esate.ru, Anvi*/

private void Form1_MouseMove(object sender, MouseEventArgs e)
{

  // переводим координату X в строку и записывает в поля ввода
  textBox1.Text = e.X.ToString();
  // переводим координату Y в строку и записывает в поля ввода
  textBox2.Text = e.Y.ToString();

  // если координата по оси X и по оси Y лежит в очерчиваемом вокруг кнопки "да, конечно" квадрате
  if (e.X > 80 && e.X < 195 && e.Y > 100 && e.Y < 135)
  {
    // запоминаем текущее положение окна
    tmp_location = this.Location;

    // генерируем перемещения по осям X и Y и прибавляем их к хранимому значению текущего положения окна
    // числа генерируются в диапазоне от -100 до 100.
    tmp_location.X += rnd.Next(-100, 100);
    tmp_location.Y += rnd.Next(-100, 100);

    // если окно вылезло за пределы экрана по одной из осей
    if (tmp_location.X < 0 || tmp_location.X > (_w - this.Width / 2) || tmp_location.Y < 0 || tmp_location.Y > (_h - this.Height / 2))
    { // новыми координатами станет центр окна
      tmp_location.X = _w / 2;
      tmp_location.Y = _h / 2;
    }

    // обновляем положение окна, на новое сгенерированное
    this.Location = tmp_location;
  }

}
Вот, собственно, и все. Откомпеллировав приложение, можете попробовать нажать на кнопку «Да, конечно». Это будет крайне трудно.
Search code, repositories, users, issues, pull requests…
Provide feedback
Saved searches
Use saved searches to filter your results more quickly
Sign up
So far we have seen how to work with C# to create console based applications. But in a real-life scenario team normally use Visual Studio and C# to create either Windows Forms or Web-based applications.
A windows form application is an application, which is designed to run on a computer. It will not run on web browser because then it becomes a web application.
This Tutorial will focus on how we can create Windows-based applications. We will also learn some basics on how to work with the various elements of C# Windows application.
Windows Forms Basics
A Windows forms application is one that runs on the desktop computer. A Windows forms application will normally have a collection of controls such as labels, textboxes, list boxes, etc.
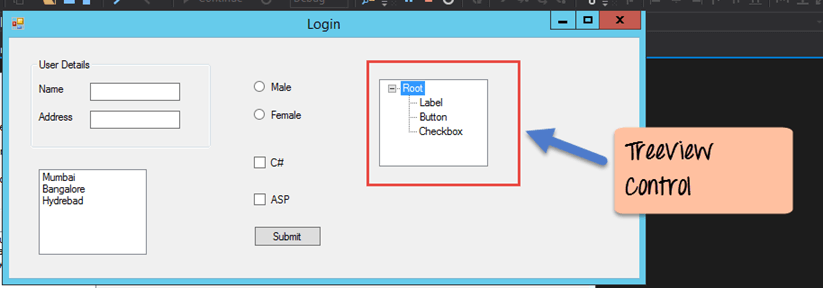
Below is an example of a simple Windows form application C#. It shows a simple Login screen, which is accessible by the user. The user will enter the required credentials and then will click the Login button to proceed.

So an example of the controls available in the above application
- This is a collection of label controls which are normally used to describe adjacent controls. So in our case, we have 2 textboxes, and the labels are used to tell the user that one textbox is for entering the user name and the other for the password.
- The 2 textboxes are used to hold the username and password which will be entered by the user.
- Finally, we have the button control. The button control will normally have some code attached to perform a certain set of actions. So for example in the above case, we could have the button perform an action of validating the user name and password which is entered by the user.
C# Hello World
Now let’s look at an example of how we can implement a simple ‘hello world’ application in Visual Studio. For this, we would need to implement the below-mentioned steps
Step 1) The first step involves the creation of a new project in Visual Studio. After launching Visual Studio, you need to choose the menu option New->Project.

Step 2) The next step is to choose the project type as a Windows Forms application. Here we also need to mention the name and location of our project.

- In the project dialog box, we can see various options for creating different types of projects in Visual Studio. Click the Windows option on the left-hand side.
- When we click the Windows options in the previous step, we will be able to see an option for Windows Forms Application. Click this option.
- We will give a name for the application. In our case, it is DemoApplication. We will also provide a location to store our application.
- Finally, we click the ‘OK’ button to let Visual Studio create our project.
If the above steps are followed, you will get the below output in Visual Studio.
Output:-

You will see a Form Designer displayed in Visual Studio. It’s in this Form Designer that you will start building your Windows Forms application.

In the Solution Explorer, you will also be able to see the DemoApplication Solution. This solution will contain the below 2 project files
- A Form application called Forms1.cs. This file will contain all of the code for the Windows Form application.
- The Main program called Program.cs is default code file which is created when a new application is created in Visual Studio. This code will contain the startup code for the application as a whole.
On the left-hand side of Visual Studio, you will also see a ToolBox. The toolbox contains all the controls which can be added to a Windows Forms. Controls like a text box or a label are just some of the controls which can be added to a Windows Forms.
Below is a screenshot of how the Toolbox looks like.

Step 3) In this step, we will now add a label to the Form which will display “Hello World.” From the toolbox, you will need to choose the Label control and simply drag it onto the Form.

Once you drag the label to the form, you can see the label embedded on the form as shown below.

Step 4) The next step is to go to the properties of the control and Change the text to ‘Hello World’.
To go to the properties of a control, you need to right-click the control and choose the Properties menu option

- The properties panel also shows up in Visual Studio. So for the label control, in the properties control, go to the Text section and enter “Hello World”.
- Each Control has a set of properties which describe the control.

If you follow all of the above steps and run your program in Visual Studio, you will get the following output
Output:-

In the output, you can see that the Windows Form is displayed. You can also see ‘Hello World’ is displayed on the form.
Adding Controls to a form
We had already seen how to add a control to a form when we added the label control in the earlier section to display “Hello World.”
Let’s look at the other controls available for Windows forms and see some of their common properties.
In our Windows form application in C# examples, we will create one form which will have the following functionality.
- The ability for the user to enter name and address.
- An option to choose the city in which the user resides in
- The ability for the user to enter an option for the gender.
- An option to choose a course which the user wants to learn. There will make choices for both C# and ASP.Net
So let’s look at each control in detail and add them to build the form with the above-mentioned functionality.
Group Box
A group box is used for logical grouping controls into a section. Let’s take an example if you had a collection of controls for entering details such as name and address of a person. Ideally, these are details of a person, so you would want to have these details in a separate section on the Form. For this purpose, you can have a group box. Let’s see how we can implement this with an example shown below
Step 1) The first step is to drag the Groupbox control onto the Windows Form from the toolbox as shown below

Step 2) Once the groupbox has been added, go to the properties window by clicking on the groupbox control. In the properties window, go to the Text property and change it to “User Details”.

Once you make the above changes, you will see the following output
Output:-

In the output, you can clearly see that the Groupbox was added to the form. You can also see that the text of the groupbox was changed to “User Details.”
Label Control
Next comes the Label Control. The label control is used to display a text or a message to the user on the form. The label control is normally used along with other controls. Common examples are wherein a label is added along with the textbox control.
The label indicates to the user on what is expected to fill up in the textbox. Let’s see how we can implement this with an example shown below. We will add 2 labels, one which will be called ‘name’ and the other called ‘address.’ They will be used in conjunction with the textbox controls which will be added in the later section.
Step 1) The first step is to drag the label control on to the Windows Form from the toolbox as shown below. Make sure you drag the label control 2 times so that you can have one for the ‘name’ and the other for the ‘address’.

Step 2) Once the label has been added, go to the properties window by clicking on the label control. In the properties window, go to the Text property of each label control.

Once you make the above changes, you will see the following output
Output:-

You can see the label controls added to the form.
Textbox
A textbox is used for allowing a user to enter some text on the Windows application in C#. Let’s see how we can implement this with an example shown below. We will add 2 textboxes to the form, one for the Name and the other for the address to be entered for the user
Step 1) The first step is to drag the textbox control onto the Windows Form from the toolbox as shown below

Step 2) Once the text boxes have been added, go to the properties window by clicking on the textbox control. In the properties window, go to the Name property and add a meaningful name to each textbox. For example, name the textbox for the user as txtName and that for the address as txtAddress. A naming convention and standard should be made for controls because it becomes easier to add extra functionality to these controls, which we will see later on.

Once you make the above changes, you will see the following output
Output:-

In the output, you can clearly see that the Textboxes was added to the form.
List box
A Listbox is used to showcase a list of items on the Windows form. Let’s see how we can implement this with an example shown below. We will add a list box to the form to store some city locations.
Step 1) The first step is to drag the list box control onto the Windows Form from the toolbox as shown below

Step 2) Once the list box has been added, go to the properties window by clicking on the list box control.

- First, change the property of the Listbox box control, in our case, we have changed this to lstCity
- Click on the Items property. This will allow you to add different items which can show up in the list box. In our case, we have selected items “collection”.
- In the String Collection Editor, which pops up, enter the city names. In our case, we have entered “Mumbai”, “Bangalore” and “Hyderabad”.
- Finally, click on the ‘OK’ button.
Once you make the above changes, you will see the following output
Output:-

In the output, you can see that the Listbox was added to the form. You can also see that the list box has been populated with the city values.
RadioButton
A Radiobutton is used to showcase a list of items out of which the user can choose one. Let’s see how we can implement this with an example shown below. We will add a radio button for a male/female option.
Step 1) The first step is to drag the ‘radiobutton’ control onto the Windows Form from the toolbox as shown below.

Step 2) Once the Radiobutton has been added, go to the properties window by clicking on the Radiobutton control.

- First, you need to change the text property of both Radio controls. Go the properties windows and change the text to a male of one radiobutton and the text of the other to female.
- Similarly, change the name property of both Radio controls. Go the properties windows and change the name to ‘rdMale’ of one radiobutton and to ‘rdfemale’ for the other one.
One you make the above changes, you will see the following output
Output:-

You will see the Radio buttons added to the Windows form.
Checkbox
A checkbox is used to provide a list of options in which the user can choose multiple choices. Let’s see how we can implement this with an example shown below. We will add 2 checkboxes to our Windows forms. These checkboxes will provide an option to the user on whether they want to learn C# or ASP.Net.
Step 1) The first step is to drag the checkbox control onto the Windows Form from the toolbox as shown below

Step 2) Once the checkbox has been added, go to the properties window by clicking on the Checkbox control.

In the properties window,
- First, you need to change the text property of both checkbox controls. Go the properties windows and change the text to C# and ASP.Net.
- Similarly, change the name property of both Radio controls. Go the properties windows and change the name to chkC of one checkbox and to chkASP for the other one.
Once you make the above changes, you will see the following output
Output:-

Button
A button is used to allow the user to click on a button which would then start the processing of the form. Let’s see how we can implement this with an example shown below. We will add a simple button called ‘Submit’ which will be used to submit all the information on the form.
Step 1) The first step is to drag the button control onto the Windows Form from the toolbox as shown below

Step 2) Once the Button has been added, go to the properties window by clicking on the Button control.

- First, you need to change the text property of the button control. Go the properties windows and change the text to ‘submit’.
- Similarly, change the name property of the control. Go the properties windows and change the name to ‘btnSubmit’.
Once you make the above changes, you will see the following output
Output:-

Congrats, you now have your first basic Windows Form in place. Let’s now go to the next topic to see how we can do Event handling for Controls.
C# Event Handling for Controls
When working with windows form, you can add events to controls. An event is something that happens when an action is performed. Probably the most common action is the clicking of a button on a form. In C# Windows Forms, you can add code which can be used to perform certain actions when a button is pressed on the form.
Normally when a button is pressed on a form, it means that some processing should take place.
Let’s take a look at one of the event and how it can be handled before we go to the button event scenario.
The below example will showcase an event for the Listbox control. So whenever an item is selected in the listbox control, a message box should pop up which shows the item selected. Let’s perform the following steps to achieve this.
Step 1) Double click on the Listbox in the form designer. By doing this, Visual Studio will automatically open up the code file for the form. And it will automatically add an event method to the code. This event method will be triggered, whenever any item in the listbox is selected.

Above is the snippet of code which is automatically added by Visual Studio, when you double-click the List box control on the form. Now let’s add the below section of code to this snippet of code, to add the required functionality to the listbox event.

- This is the event handler method which is automatically created by Visual Studio when you double-click the List box control. You don’t need to worry about the complexity of the method name or the parameters passed to the method.
- Here we are getting the SelectedItem through the lstCity.SelectedItem property. Remember that lstCity is the name of our Listbox control. We then use the GetItemText method to get the actual value of the selected item. We then assign this value to the text variable.
- Finally, we use the MessageBox method to display the text variable value to the user.
One you make the above changes, and run the program in Visual Studio you will see the following output
Output:-

From the output, you can see that when any item from the list box is selected, a message box will pops up. This will show the selected item from the listbox.
Now let’s look at the final control which is the button click Method. Again this follows the same philosophy. Just double click the button in the Forms Designer and it will automatically add the method for the button event handler. Then you just need to add the below code.

- This is the event handler method which is automatically created by Visual Studio when you double click the button control. You don’t need to worry on the complexity of the method name or the parameters passed to the method.
- Here we are getting values entered in the name and address textbox. The values can be taken from the text property of the textbox. We then assign the values to 2 variables, name, and address accordingly.
- Finally, we use the MessageBox method to display the name and address values to the user.
One you make the above changes, and run the program in Visual Studio you will see the following output
Output:-

- First, enter a value in the name and address field.
- Then click on the Submit button
Once you click the Submit button, a message box will pop, and it will correctly show you what you entered in the user details section.
Tree and PictureBox Control
There are 2 further controls we can look at, one is the ‘Tree Control’ and the other is the ‘Image control’. Let’s look at examples of how we can implement these controls
Tree Control
– The tree control is used to list down items in a tree like fashion. Probably the best example is when we see the Windows Explorer itself. The folder structure in Windows Explorer is like a tree-like structure.
Let’s see how we can implement this with an example shown below.
Step 1) The first step is to drag the Tree control onto the Windows Form from the toolbox as shown below

Step 2) The next step is to start adding nodes to the tree collection so that it can come up in the tree accordingly. First, let’s follow the below sub-steps to add a root node to the tree collection.

- Go to the properties toolbox for the tree view control. Click on the Node’s property. This will bring up the TreeNode Editor
- In the TreeNode Editor click on the Add Root button to add a root node to the tree collection.
- Next, change the text of the Root node and provide the text as Root and click ‘OK’ button. This will add Root node.
Step 3) The next step is to start adding the child nodes to the tree collection. Let’s follow the below sub-steps to add child root node to the tree collection.

- First, click on the Add child button. This will allow you to add child nodes to the Tree collection.
- For each child node, change the text property. Keep on repeating the previous step and this step and add 2 additional nodes. In the end, you will have 3 nodes as shown above, with the text as Label, Button, and Checkbox respectively.
- Click on the OK button
Once you have made the above changes, you will see the following output.
Output:-
You will be able to see the Tree view added to the form. When you run the Windows form application, you can expand the root node and see the child nodes in the list.
PictureBox Control
This control is used to add images to the Winforms C#. Let’s see how we can implement this with an example shown below.
Step 1) The first step is to drag the PictureBox control onto the C# Windows Form from the toolbox as shown below

Step 2) The next step is to actually attach an image to the picture box control. This can be done by following the below steps.

- First, click on the Image property for the PictureBox control. A new window will pops out.
- In this window, click on the Import button. This will be used to attach an image to the picturebox control.
- A dialog box will pop up in which you will be able to choose the image to attach the picturebox
- Click on the OK button
One you make the above changes, you will see the following output
Output:-

From the output, you can see that an image is displayed on the form.
Summary
- A Windows form in C# application is one that runs on the desktop of a computer. Visual Studio Form along with C# can be used to create a Windows Forms application.
- Controls can be added to the Windows forms C# via the Toolbox in Visual Studio. Controls such as labels, checkboxes, radio buttons, etc. can be added to the form via the toolbox.
- One can also use advanced controls like the tree view control and the PictureBox control.
- Event handlers are used to respond to events generated from controls. The most common one is the one added for the button clicked event.