I’m in the middle of migrating my Plex media server from my daily driver Windows 10 PC to Server 2019 Standard. I ran out of space (and hard drive bays) inside my desktop, so the time has come to migrate to a different OS. I purchased all the components with the intention of turning my server into a TrueNAS nas server, but after running TrueNAS for a week, I decided the time invested in learning/migrating to an unfamiliar operating system was more than I wanted to tackle at this point in time. I ultimately ended up purchasing a Fractal Design Node 804 case because of how many storage bays it has.

We earn a commission if you make a purchase, at no additional cost to you.
As a sysadmin, I’ve become really proficient with Windows operating systems, Powershell, Hyper-V, PFsense, etc, so I figured moving to a known OS would simplify things for me in the long run. However, I soon learned that there are a few things I wasn’t aware of on Server 2019. In particular, one of the things I learned was that the default “photo viewer” is set to Paint.
Fortunately, this was a quick fix. Follow the steps below if you’ve ran into the same issue.
If you’re curious about my server build, I am using
- (Case) Fractal Design Node 804
- (Harddrives x4) 8TB Seagate Barracuda
- Cooler Master Hyper 212 CPU Fan
- Gigabyte B450M DS3H AM4 motherboard
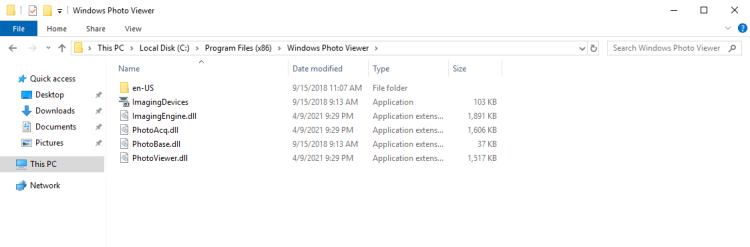
By default, Photo Viewer isn’t installed or active. The first thing we need to do is check whether or not the DLL’s exist on the server.
Step 1: Check if Photo Viewer DLL’s Exist
Browse to C:\Program Files (x86)\Windows Photo Viewer on the server. If you see .dll files there, that means the files exist but aren’t registered. It should look like this:

If you don’t see those files, simply browse to the path above from a Windows 10 PC & copy the folder contents to the same path on your server.
Step 2: Register the DLL’s
Now that we know the necessary files are present, we need to register them.
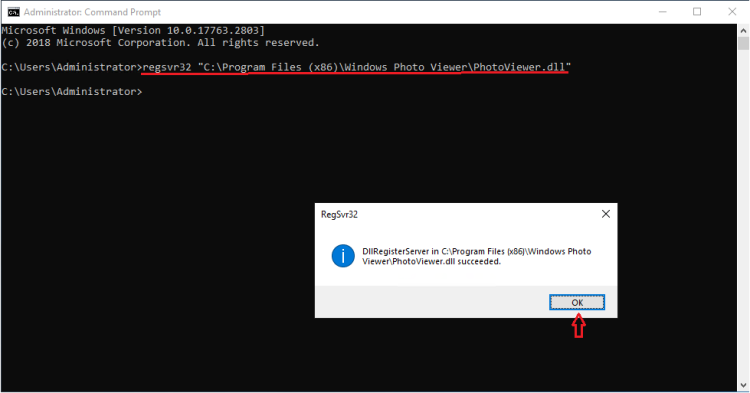
Open Command Prompt (type CMD into Start) and right-click to Run as Administrator. Then copy and paste the following code:
regsvr32 “C:\Program Files (x86)\Windows Photo Viewer\PhotoViewer.dll”Step 3: Download PhotoViewer Registry Keys
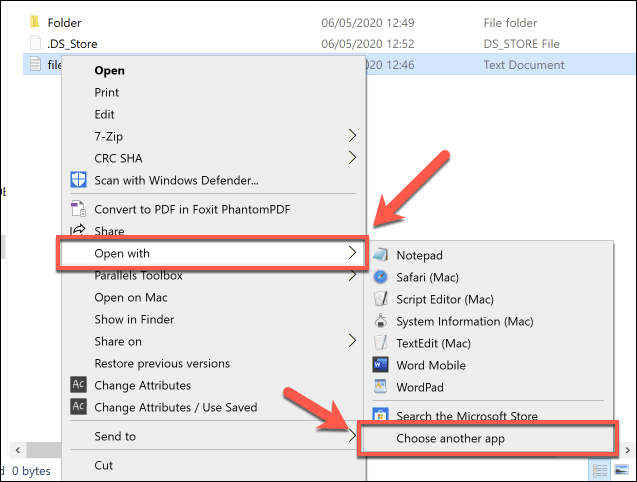
Now that the .dll’s are registered, we need to import the registry keys. This allows us to “Open With…” from File Explorer and choose Windows Photo Viewer, as well as set default file associations for various file types, such as .jpg, .jpe, or .jpeg.
Download registry files from here: MS Photoviewer Registry Files.zip
Once downloaded, right-click the .zip file and extract it to a temporary location.
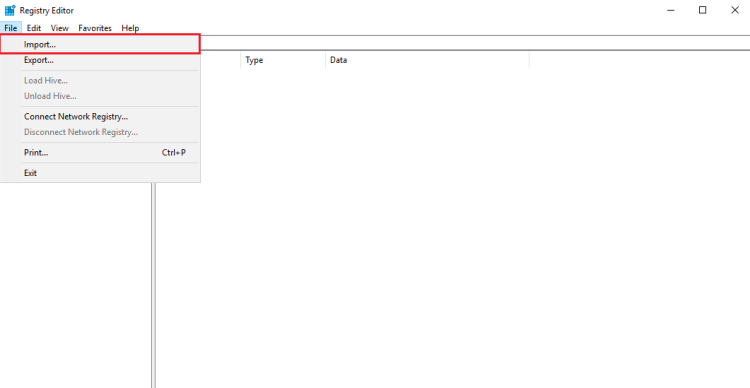
Step 4: Import Registry Keys
From Start, open Regedit.
File > Import > browse to the location you extracted the 4 registry files. You will need to import all 4 of them.
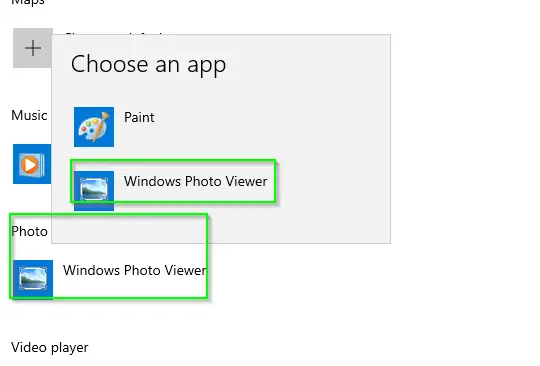
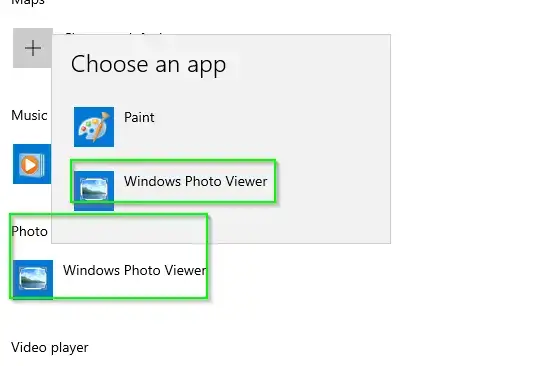
You should now be able to right-click an image file and Open With Windows Photo Viewer!
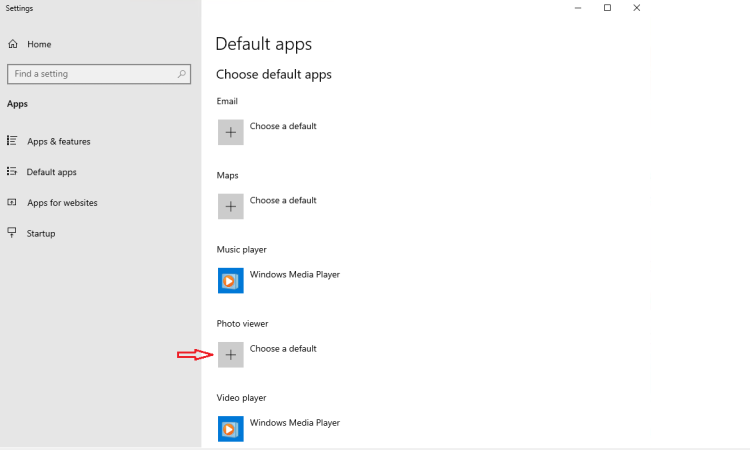
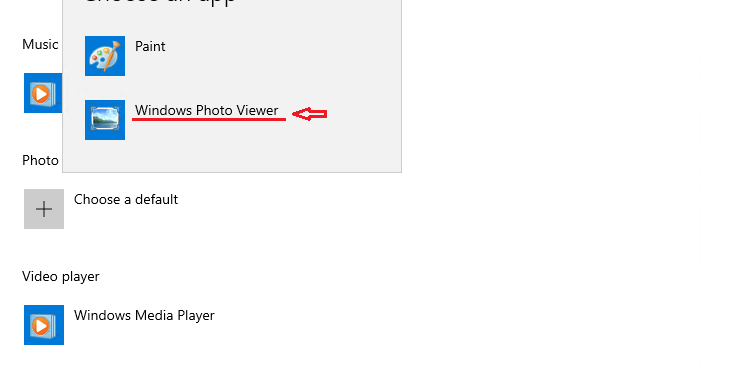
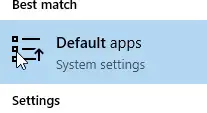
Step 5: Set Photo Viewer as Default App
If you’d like to make Photo Viewer your default photo viewing application, search Windows for “Default Apps” and then change Photos to Windows Photo Viewer.

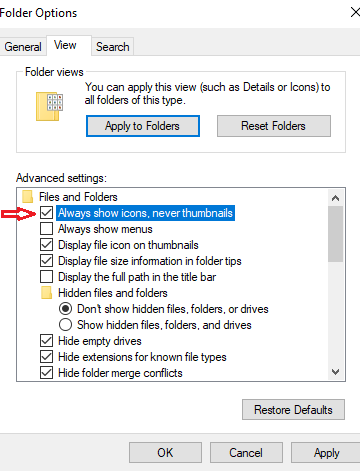
Step 6: Allow Images in Thumbnails
This step is optional, but if you’d like to see a preview of the images from File Explorer (instead of just icons), you can do that by changing the File Explorer options.
Search Windows for Folder Options. Change to the View tab and uncheck “Always show icons, never thumbnails”.
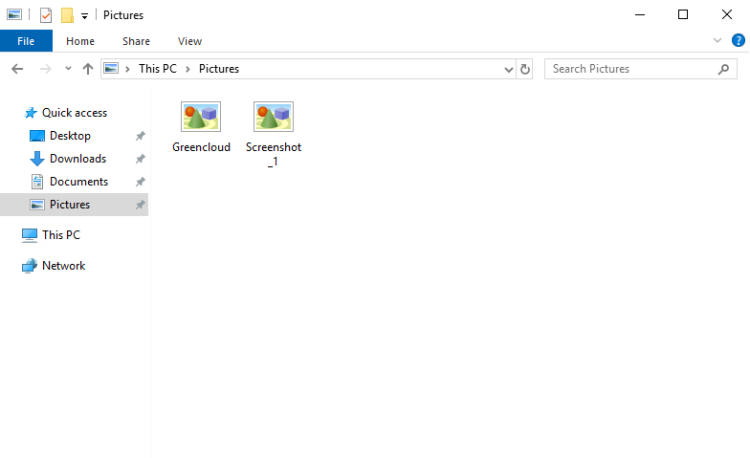
That will change it from looking like this:
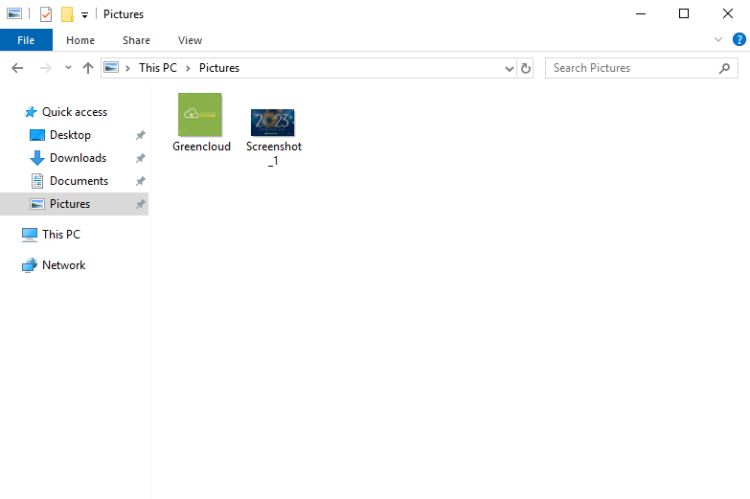
to looking like this:
That’s all there is to it! Hopefully this guide helped you out.
My Homelab Equipment
Here is some of the gear I use in my Homelab. I highly recommend each of them.
- Server 2019 w/ Hyper-V
- Case: Fractal Design Node 804
- Graphics Card: NVIDEA Quadro K600
- CPU: AMD Ryzen 7 2700
The full list of server components I use can be found on my Equipment List page.

Hey there! I’m Danny, owner and writer of Smart Home Pursuits. I’ve worked as an IT Manager for 8 years and enjoy using my knowledge to make my smart home «smarter».
Estimated reading: 3 minutes
0 views
As a sysadmin, I’ve become really proficient with Windows operating systems, Powershell, Hyper-V, PFsense, etc, so I figured moving to a known OS would simplify things for me in the long run. However, I soon learned that there are a few things I wasn’t aware of on Server 2019. In particular, one of the things I learned was that the default “photo viewer” is set to Paint.
Fortunately, this was a quick fix. Follow the steps below if you’ve ran into the same issue.
How to Enable Photo Viewer in Windows Server 2019
By default, Photo Viewer isn’t installed or active. The first thing we need to do is check whether or not the DLL’s exist on the server.
Step 1: Check if Photo Viewer DLL’s Exist
Browse to C:Program Files (x86)Windows Photo Viewer on the server. If you see .dll files there, that means the files exist but aren’t registered. It should look like this:
If you don’t see those files, simply browse to the path above from a Windows PC & copy the folder contents to the same path on your server.
Step 2: Register the DLL’s
Now that we know the necessary files are present, we need to register them.
Open Command Prompt (type CMD into Start) and right-click to Run as Administrator. Then copy and paste the following code:
regsvr32 “C:Program Files (x86)Windows Photo ViewerPhotoViewer.dll”
Step 3: Download PhotoViewer Registry Keys
Now that the .dll’s are registered, we need to import the registry keys. This allows us to “Open With…” from File Explorer and choose Windows Photo Viewer, as well as set default file associations for various file types, such as .jpg, .jpe, or .jpeg.
Download registry files from here: MS Photoviewer Registry Files.zip
Once downloaded, right-click the .zip file and extract it to a temporary location.
Step 4: Import Registry Keys
From Start, open Regedit.
File > Import > browse to the location you extracted the 4 registry files. You will need to import all 4 of them.
Step 5: Set Photo Viewer as Default App
If you’d like to make Photo Viewer your default photo viewing application, search Windows for “Default Apps” and then change Photos to Windows Photo Viewer.
Step 6: Allow Images in Thumbnails
This step is optional, but if you’d like to see a preview of the images from File Explorer (instead of just icons), you can do that by changing the File Explorer options.
Search Windows for Folder Options. Change to the View tab and uncheck “Always show icons, never thumbnails”.
That will change it from looking like this:
to looking like this:
That’s all there is to it! Hopefully this guide helped you out.
Good Luck!

By default, Photo Viewer isn’t installed or active. The first thing we need to do is check whether or not the DLL’s exist on the server.
Step 1: Check if Photo Viewer DLL’s Exist
Browse to C:\Program Files (x86)\Windows Photo Viewer on the server. If you see .dll files there, that means the files exist but aren’t registered. It should look like this:

If you don’t see those files, simply browse to the path above from a Windows 10 PC & copy the folder contents to the same path on your server.
Step 2: Register the DLL’s
Now that we know the necessary files are present, we need to register them.
Open Command Prompt (type CMD into Start) and right-click to Run as Administrator. Then copy and paste the following code:
regsvr32 “C:\Program Files (x86)\Windows Photo Viewer\PhotoViewer.dll”Step 3: Download PhotoViewer Registry Keys
Now that the .dll’s are registered, we need to import the registry keys. This allows us to “Open With…” from File Explorer and choose Windows Photo Viewer, as well as set default file associations for various file types, such as .jpg, .jpe, or .jpeg.
Download registry files from here: MS Photoviewer Registry Files.zip
Once downloaded, right-click the .zip file and extract it to a temporary location.
Step 4: Import Registry Keys
From Start, open Regedit.
File > Import > browse to the location you extracted the 4 registry files. You will need to import all 4 of them.
You should now be able to right-click an image file and Open With Windows Photo Viewer!
Step 5: Set Photo Viewer as Default App
If you’d like to make Photo Viewer your default photo viewing application, search Windows for “Default Apps” and then change Photos to Windows Photo Viewer.
Step 6: Allow Images in Thumbnails
This step is optional, but if you’d like to see a preview of the images from File Explorer (instead of just icons), you can do that by changing the File Explorer options.
Search Windows for Folder Options. Change to the View tab and uncheck “Always show icons, never thumbnails”.
That will change it from looking like this:
to looking like this:
That’s all there is to it! Hopefully this guide helped you out.
Стандартный просмотрщик изображений Windows Server 2019 — это удобное приложение, которое позволяет просматривать и организовывать фотографии и изображения на вашем сервере. С его помощью вы можете легко просматривать и редактировать изображения, а также выполнять другие операции, связанные с работой с этими файлами.
Одна из главных преимуществ стандартного просмотрщика изображений Windows Server 2019 заключается в его простоте использования. Вам не нужно устанавливать дополнительное программное обеспечение или проводить сложные настройки для начала работы. Просто откройте приложение и выберите изображение, которое хотите просмотреть или отредактировать.
Стандартный просмотрщик изображений Windows Server 2019 также предлагает широкий набор функций и инструментов для работы с изображениями. Вы можете изменять размер изображений, поворачивать их, обрезать, применять эффекты и фильтры, а также добавлять текст и рисунки на изображение. Более того, вы можете организовать свою коллекцию изображений с помощью альбомов и меток.
С помощью стандартного просмотрщика изображений Windows Server 2019 вы можете легко управлять, просматривать и редактировать свои фотографии и изображения на вашем сервере без необходимости устанавливать дополнительное ПО. Это интуитивно понятное приложение с множеством функций и инструментов для работы с изображениями.
Если вам нужно работать с изображениями на вашем сервере, стандартный просмотрщик изображений Windows Server 2019 — это отличное приложение, которое обеспечит вас всем необходимым для эффективной работы. Не тратьте время на поиск и установку других программных решений, просто воспользуйтесь этим удобным и мощным инструментом.
Стандартный просмотрщик изображений Windows Server 2019
Windows Server 2019 поставляется с встроенным стандартным приложением для просмотра фотографий и изображений. Это удобное и простое в использовании приложение позволяет легко просматривать изображения, а также осуществлять базовые операции с ними.
Для запуска стандартного просмотрщика изображений в Windows Server 2019, нажмите на иконку «Файлы» на панели задач и выберите папку, в которой хранятся ваши изображения. Затем выберите изображение и щелкните по нему дважды, чтобы открыть его в просмотрщике.
Стандартный просмотрщик изображений позволяет просматривать изображение в полноэкранном режиме, изменять масштаб, поворачивать и отражать изображение. Вы также можете выполнять базовые операции с изображением, такие как копирование, переименование и удаление.
Для настройки стандартного просмотрщика изображений в Windows Server 2019 вам нужно щелкнуть правой кнопкой мыши на пустом месте в окне просмотрщика и выбрать «Настройки». Здесь вы можете изменить параметры отображения, такие как фоновый цвет, начальный масштаб и дополнительные параметры.
| Клавиша | Описание |
|---|---|
| Стрелки влево/вправо | Переключение между изображениями |
| Стрелки вверх/вниз | Изменение масштаба изображения |
| Пробел | Переключение между полноэкранным и оконным режимами |
| Ctrl + стрелка влево/вправо | Поворот изображения |
| Ctrl + F | Отражение изображения по горизонтали |
| Delete | Удаление изображения |
Стандартный просмотрщик изображений Windows Server 2019 предоставляет удобные и интуитивно понятные возможности для просмотра и работы с изображениями. Он является идеальным инструментом для быстрого просмотра и организации ваших фотографий на сервере.
Установка и настройка
Стандартный просмотрщик изображений Windows Server 2019 предлагает удобные функции для просмотра и управления фотографиями и изображениями на сервере. Чтобы использовать это приложение, необходимо сначала установить его на сервер и затем настроить его параметры.
1. Установка:
Чтобы установить стандартный просмотрщик изображений Windows Server 2019, следуйте этим шагам:
— Откройте меню «Пуск» и выберите «Параметры».
— В меню «Параметры» найдите вкладку «Система» и откройте ее.
— В списке слева выберите «Приложения и функции».
— В окне «Приложения и функции» найдите «Стандартный просмотрщик изображений» и нажмите на него.
— Нажмите на кнопку «Установить».
2. Настройка:
После установки стандартного просмотрщика изображений Windows Server 2019 можно настроить его параметры для оптимального использования. Чтобы это сделать, выполните следующие шаги:
— Откройте стандартный просмотрщик изображений.
— Выберите «Настройки» в главном меню программы.
— В окне «Настройки» вы можете установить различные параметры, такие как язык интерфейса, параметры отображения и другие.
— После внесения необходимых изменений нажмите кнопку «Сохранить» или «Применить» для применения настроек.
Теперь стандартный просмотрщик изображений Windows Server 2019 установлен и настроен для просмотра и управления фотографиями и изображениями на сервере.
Hello friends, welcome to our blog, today we are going to tell you How To Enable Photo Viewer on Windows Server 2016 or 2019 in this blog, as well as today we are going to tell you about the alternative of Windows Server 2016 or 2019.
By default, Windows Server 2016 and 2019 do not have the Photo Viewer application installed. However, it is possible to enable the application using a few simple steps.
Here is a step-by-step guide to enabling Photo Viewer on Windows Server 2016 or 2019:
Step 1: Download the Microsoft Photos App The Microsoft Photos app is the new version of the classic Photo Viewer application. To download the app, follow these steps:
- Open the Microsoft Store app on your Windows Server 2016 or 2019 machine.
- Type “Microsoft Photos” in the search box and press Enter.
- Click on the “Microsoft Photos” app from the search results.
- Click on the “Get” button to download and install the app.
Step 2: Enable the App for All Users By default, the Microsoft Photos app is only enabled for the user account that installed it. To enable the app for all users on the machine, follow these steps:
- Open the Registry Editor by typing “regedit” in the search box and pressing Enter.
- Navigate to the following key: HKEY_LOCAL_MACHINE\SOFTWARE\Microsoft\Windows\CurrentVersion\Explorer\AppKey\18
- Right-click on the “ShellExecute” key and select “Modify.”
- In the “Value data” field, type the following: “C:\Program Files\WindowsApps\Microsoft.Windows.Photos_XXXX.XXX.XX.XX_x64__8wekyb3d8bbwe\Microsoft.Photos.exe” “%1” (Note: Replace “XXXX.XXX.XX.XX” with the version number of the Microsoft Photos app on your machine. You can find this by right-clicking on the Microsoft Photos app in the Start menu and selecting “More” -> “App settings.”)
- Click “OK” to save the changes.
Step 3: Add the App to the Open With List To make the Microsoft Photos app the default application for opening image files, you need to add it to the Open With list. Follow these steps:
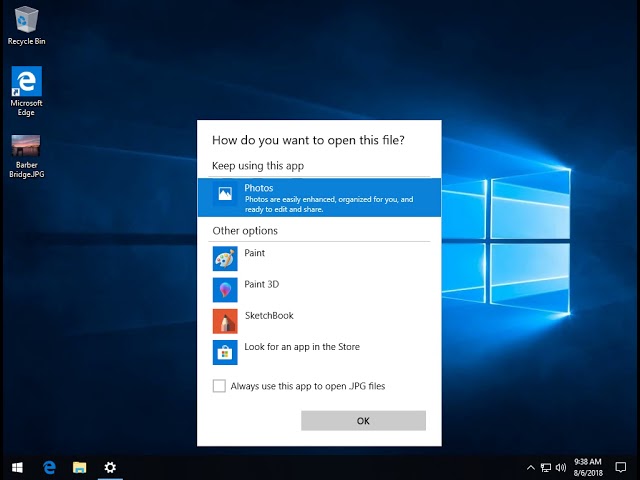
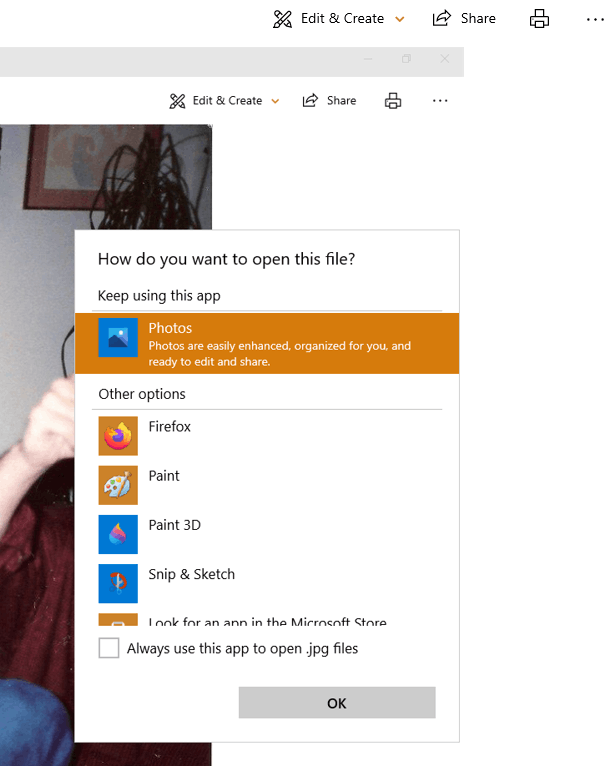
- Right-click on an image file (e.g. a .jpg or .png file) and select “Open with” -> “Choose another app.”
- In the “How do you want to open this file?” dialog box, click on “More apps.”
- Scroll down and click on “Look for another app on this PC.”
- Navigate to the following folder: C:\Program Files\WindowsApps\Microsoft.Windows.Photos_XXXX.XXX.XX.XX_x64__8wekyb3d8bbwe\
- Select the “Microsoft.Photos.exe” file and click “Open.”
- Check the box that says “Always use this app to open .xxx files” (replace .xxx with the file extension of the image file you selected).
- Click “OK” to save the changes.
Step 4: Test the App Once you have completed the above steps, you should be able to open image files using the Microsoft Photos app. To test the app, follow these steps:
- Double-click on an image file (e.g. a .jpg or .png file) on your Windows Server 2016 or 2019 machine.
- The Microsoft Photos app should open and display the image file.
Step 5: Troubleshooting If you are having issues enabling the Microsoft Photos app on your Windows Server 2016 or 2019 machine, here are some troubleshooting tips:
- Check that you have downloaded the correct version of the Microsoft Photos app for your machine. You can find the version number by right-clicking on the app in the Start menu and selecting “More” -> “App
Windows Server 2016- 2019 Photo Viewer Alternative

Windows Server 2016-2019 does not come with the classic Photo Viewer application pre-installed, and installing it involves several steps as described in a previous answer. However, there are several alternative image viewer applications that can be used on Windows Server 2019.
Here are some of the best photo viewer alternatives for Windows Server 2016-2019:
IrfanView
IrfanView is a lightweight and powerful image viewer that can handle a wide range of image formats. It also includes basic editing features such as crop, resize, and color adjustments. Additionally, it supports plugins for advanced features such as batch processing and support for additional file formats.
XnView
XnView is a popular and versatile image viewer that can handle over 500 different file formats, including RAW camera images. It also includes basic editing features and supports batch processing. XnView is available in a portable version, which can be useful if you need to use it on multiple machines.
FastStone Image Viewer
FastStone Image Viewer is another popular image viewer that supports a wide range of file formats. It includes basic editing features as well as batch processing and also has a range of advanced features such as image comparison, red-eye removal, and image stitching.
Nomacs
Nomacs is a lightweight and open-source image viewer that supports a wide range of file formats. It includes basic editing features such as crop and resize, and also has some advanced features such as support for multi-page TIFF files and the ability to view images in a slideshow.
Honeyview
Honeyview is a simple and lightweight image viewer that supports a wide range of file formats. It includes basic editing features such as crop and rotate, and also has some advanced features such as support for animated GIFs and the ability to view images in a slideshow.
All of these image viewer applications can be downloaded and installed on Windows Server 2019. They offer a range of features and options, so you can choose the one that best meets your needs. Additionally, they can all be set as the default application for opening image files, so you can easily view your images without having to go through additional steps.
In summary, while the classic Photo Viewer application is not available on Windows Server 2019 by default, there are several alternative image viewer applications that can be used instead. These applications offer a range of features and options and can be easily downloaded and installed on your machine.
Conclusion
We have told you in detail about How To Enable Photo Viewer on Windows Server 2016 or 2019 above, I hope you have got whatever information you need. If you have any other questions regarding this then you can ask us by commenting.
Also Read
- How To Connect to Home Assistant with SSH
- What is Hot Ground Reversal & How to Fixed It?
- How to find a fake profile on Facebook
- How to Reset Whirlpool Refrigerator in Different Ways?
- How to reset a Google Wi-Fi Device