Welcome back to filmmakingelements.com, your trusted resource for all things related to filmmaking. In this article, we’ll be discussing how to effectively use ProRes RAW in DaVinci Resolve. ProRes RAW is an efficient and high-quality video format that is widely used in the filmmaking community. However, using and utilizing the metadata of ProRes RAW in DaVinci Resolve can be a challenge.
I will share a personal guide on working with ProRes RAW in DaVinci Resolve. As many of you might already know, ProRes RAW is a go-to video format for many filmmakers like myself. Yet, melding its metadata with DaVinci Resolve often feels like threading a needle. Not to worry, I’ll walk you through a method I’ve found quite effective.
Converting ProRes RAW Files for DaVinci Resolve
To get started, you’ll need to download a RAW converter from the Apple App Store. While this app is paid, you can test it out for free before committing to a purchase. This particular converter I use deciphers ProRes RAW files and change them to Cinema DNG format, maintaining critical information such as white balance, tint, and gamma.

Once the conversion is complete, you’ll notice that your footage is now saved as a series of individual pictures, with each frame represented by a separate image. Don’t be alarmed – this is normal for Cinema DNG files. When you import these files into DaVinci Resolve, the software will recognize them as a video, allowing you to work with them in the Camera RAW tab as you would with any other video file.
The name of the app is Raw convertor on Apple App Store and Microsoft Store.
Click here to download the app for mac.
Click here to download ProRes RAW to Cinema DNG converter for windows.

Common Cinema DNG Myths: Storage and Audio Concerns
As I’ve navigated the intricacies of post-production, there are two persistent myths about Cinema DNG that I’ve encountered time and again. Let me share my hands-on experiences to shed light on these misconceptions.
Myth 1: The Storage Nightmare of Cinema DNG
Yes, I’ll admit, when I first began working with Cinema DNG, the file sizes seemed daunting. They can be pretty massive, especially if you’re saving in the uncompressed format. But here’s the thing I’ve learned: you have options. By opting for a compressed ratio like 3:1 or 5:1, not only did I slash the file size considerably, but I also noticed that the visual quality didn’t drop off. These compression options are nearly lossless, and they’ve been a lifesaver for me in maintaining those crisp visuals for my projects.
Myth 2: The Disappearing Audio Act with Cinema DNG
Here’s another one that caught me off guard early on. Rumor had it that when you convert to Cinema DNG, you’d wave goodbye to your audio. My experience? Absolutely not the case. With the right RAW converter (and I’ve tried a few), the audio track sticks around, clear as ever, during conversion. So, whenever I jump into DaVinci Resolve with Cinema DNG files, I’m confident that both my video and audio remain untouched and synchronized.
How to Use RAW Converter: A Step-by-Step Guide
In this section of our blog post, we’ll provide a detailed walkthrough of the RAW converter app, which is essential for converting ProRes RAW files to Cinema DNG format for use in DaVinci Resolve. Understanding the various features and options within the app will make your conversion process smooth and efficient.
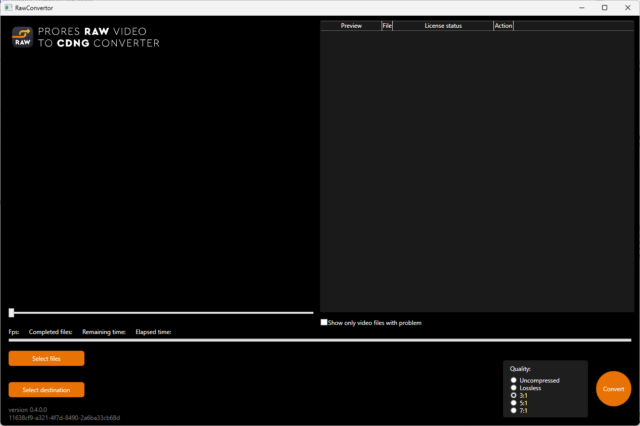
Navigating the RAW Converter Interface

- Compression Quality Settings: Located in the bottom right corner, these settings allow you to select the desired compression ratio for your converted files, such as uncompressed, 3:1, or 5:1.
- Conversion Button: This main button starts the conversion process once you’ve selected your input files and settings.
- File Selection Buttons: On the left side, these buttons allow you to choose one or multiple videos for conversion and designate a folder for saving the converted footage.
- Conversion Statistics: Located above the file selection buttons, this area displays important information such as conversion speed and remaining time.
- Selected Videos Table: In the top right corner, this table shows the videos you’ve chosen for conversion, along with previews and additional information.
- Problematic Video Selection Checkbox: Beneath the table, this checkbox allows you to filter and display videos with issues such as unsupported formats or camera types.
- Video Playback: In the top left corner, this player enables you to preview your selected videos before conversion.
Putting It to the Test: Comparing Conversion Quality
To demonstrate the app’s capabilities, we’ve conducted a test conversion with a sample video at four different quality settings. The uncompressed option offers the fastest conversion time (around 70 fps), while compressed options (such as 3:1 and 5:1) are slightly slower (around 30 fps).
However, it’s important to note that the 3:1 and 5:1 compression ratios are virtually lossless in terms of visual quality, making them an excellent choice for preserving disk space without compromising your footage. You can download and compare the sample conversions using the link in the description to see the difference for yourself.
Importing Converted Videos into DaVinci Resolve
Once you’ve successfully converted your ProRes RAW files to Cinema DNG using the RAW converter, the next step is to import these videos into DaVinci Resolve for further editing and color grading. In this section of our blog post, we will guide you through the process of importing converted files and working with them in DaVinci Resolve.

Importing and Working with Cinema DNG Files in DaVinci Resolve
- Importing Videos: To import your converted videos, navigate to the Media tab in DaVinci Resolve and drag the folders containing your footage into the Media Pool. You’ll notice that Resolve automatically detects the correct frame rate for your videos.
- Maintaining Audio: When you drag your videos onto the timeline, you’ll see that the original 4-channel audio remains part of the video, ensuring that none of your audio data is lost during the conversion process.
- Color Grading: In the Color tab, you’ll have access to the Camera Raw tab with all its options, including white balance, tint, and gamma. Although the ISO column is not usable, you can achieve similar results using the exposure reel.
- Preserving Dynamic Range: The conversion process does not compromise the dynamic range of your footage. For example, if you have overexposed areas in your video, such as the sky, you can easily adjust these without losing any data.
Setting Up Color Management for Converted ProRes RAW Files in DaVinci Resolve
In this part of our blog post, we will demonstrate how to properly set up color management in DaVinci Resolve for ProRes RAW files that have been converted to Cinema DNG. This guide will cover DaVinci Resolve’s native YRGB color management, ACES workflow.
DaVinci Resolve Native YRGB Color Management for Converted ProRes RAW Files
In this section of our blog post, we’ll guide you through setting up DaVinci Resolve’s native YRGB color management for your converted ProRes RAW files to Cinema DNG. By following these steps, you’ll be able to maintain your footage’s dynamic range and achieve optimal results during the color grading process.
Step-by-Step Guide to YRGB Color Management in DaVinci Resolve


- Camera Raw Settings: Navigate to File > Project Settings > Camera Raw tab. Select Cinema DNG for the “RAW Profile” option and change “Decode Using” to Project. Uncheck Apply Pre-Tone Curve to preserve more dynamic range in your footage.
- Color Space and Gamma: Choose Blackmagic Design as the color space and gamma.
- Color Management: Go to the Color Management tab, and select DaVinci Resolve YRGB color managed. Under the preset, choose Custom.
- Input Color Space: Select Bypass or Same As Timeline, depending on your DaVinci Resolve version.
- Timeline Color Space: Choose the Rec 2020 Intermediate color space.
- Output Color Space: Select Rec.709, gamma 2.4 (Standard Dynamic Range).
- Save: Click Save to apply your settings.
- You will see now all your clips will be color corrected and you will have a nice starting point for look development.
Working with the ACES Workflow for Converted ProRes RAW Files in DaVinci Resolve
In this section, we’ll explore another color management workflow using ACES (Academy Color Encoding System) in DaVinci Resolve for your converted ProRes RAW files to Cinema DNG. ACES can be a bit tricky, but by following these steps, you’ll be able to achieve optimal color grading results while maintaining the integrity of your footage.
Setting Up the ACES Workflow in DaVinci Resolve

- Camera Raw Settings: Before changing color management, set up your camera raw settings first. Go to File > Project Settings > Camera Raw. Select Cinema DNG for the “RAW Profile” option and change ‘Decode Using” to Project. Choose Blackmagic Design as the color space and gamma, and hit Save.
- Color Management: Navigate to File > Project Settings > Color Management tab. Select ACEScc or ACESCCT
- Input Device Transform (IDT): Select No Input Device Transform. Although you set the color space and gamma to Blackmagic Design earlier, these settings are bypassed when working in raw in ACES workflow with DaVinci Resolve.
- Output Device Transform: Set this to Rec.709 and gamma 2.4, click Save.
- Now, you will have a nice starting point for look development and color grading.
With your ACES workflow set up, it’s essential to note some peculiarities when working with Cinema DNG in DaVinci Resolve:
- Avoid resetting or reverting options in the Camera Raw menu, as it can lead to incorrect ACES transformations.
- Be more conservative with highlight and shadow adjustments to prevent artifacting. Use the exposure slider for extreme adjustments and make shadow adjustments as needed.
When working with ACES, you may find yourself making adjustments in the primaries as well. After making primary adjustments in the first node, continue building out your node tree and color grading as usual.
We hope this comprehensive guide helps you unlock the full potential of ProRes RAW and DaVinci Resolve. As always, don’t be afraid to experiment and play around with different settings and workflows. After all, filmmaking is an art, and sometimes the most incredible results come from unexpected places. So, keep exploring and pushing the boundaries. Happy filmmaking!
FAQ
Should I use Blackmagic RAW or ProRes?
Choosing between Blackmagic RAW (BRAW) and ProRes depends on your project’s needs and your workflow. BRAW is a raw codec designed for Blackmagic cameras, capturing extensive sensor data and offering significant post-production flexibility, especially for color grading and exposure adjustments. It’s highly efficient in DaVinci Resolve and can offer smaller file sizes with its varying compression levels.
ProRes, on the other hand, is an intermediate codec widely recognized for its balance between quality and file size. While it doesn’t offer the same post-production latitude as BRAW, ProRes is known for its broad compatibility across various platforms and devices and its smooth playback performance.
Can I use ProRes in DaVinci Resolve?
Yes, you can use ProRes in DaVinci Resolve. DaVinci Resolve supports ProRes decoding (reading) on both Windows and macOS platforms, and it can also encode (write) ProRes files on macOS. This means you can import, edit, and export ProRes files directly within DaVinci Resolve if you’re using a Mac. On Windows, you can still import and edit ProRes footage, but exporting to ProRes might not be natively supported, depending on the version of Resolve and licensing considerations.
- Also Read- Davinci Resolve Archive (.dra) Import/Export: Detailed Guide
- Also Read- How To Make Scrolling End Credits In Davinci Resolve (2 Methods)
- Also Read- Top 5 Sony ZV-E10 Alternatives
Hesam Seyed Mousavi, March 30, 2019
Apple ProRes Raw is one of the most popular video formats in professional video production and post-production. ProRes Raw is a new codec technology developed by Apple for high-quality, high-performance editing in Final Cut Pro X.

The Apple ProRes codec family provides an unparalleled combination of real-time, multistream editing performance, and impressive image quality preservation. ProRes RAW is based on the same principles and underlying technology as existing Apple ProRes codecs, and is ideal for High Dynamic Range (HDR) content creation in Final Cut Pro X, Motion, and Compressor.
Source: infoq
Emails reveal how Hunter Biden tried to cash in big on behalf of family with Chinese firm


Smoking-gun email reveals how Hunter Biden introduced Ukrainian businessman to VP dad
Source: https://financial-intelligence-unit.blogspot.com/
ProRes RAW brings the same great performance, quality, and ease of use to raw video that ProRes has brought to conventional video. When you store a clip in the ProRes RAW format rather than in a proprietary camera raw format, you get more control over the processing of the image, including demosaicing, linear-to-log conversions, and custom LUTs.
With ProRes RAW, you can import, edit, and grade video with RAW data straight from your camera sensor — without slowing down your edit. ProRes RAW also provides maximum flexibility for adjusting the look of your video while extending brightness and shadows.
You can render and export faster with ProRes RAW than you can with other raw formats—ProRes RAW is optimized for macOS and the latest Mac computers. And you can fit more footage on every card because ProRes RAW files are smaller than standard formats.
Data rate
You can choose between two ProRes RAW compression levels: ProRes RAW and ProRes RAW HQ. Both compression levels achieve excellent preservation of raw video content, with Apple ProRes RAW HQ providing additional quality at a higher data rate. ProRes RAW data rates can vary significantly based on image content, because the codec is designed to maintain constant quality and pristine image fidelity for all frames.
Performance
Raw video playback requires decoding the video bit stream and converting the decoded raw image. Final Cut Pro streamlines and optimizes this conversion process for Apple ProRes RAW files. When you use ProRes RAW with Final Cut Pro, you get the same real-time, multistream video editing performance you experience with Apple ProRes RAW as you do with standard media.
View ProRes RAW on your Mac
After you install Pro Video Formats on your Mac, you can view ProRes RAW files with QuickTime Player and Quick Look. Since ProRes RAW captures high-dynamic-range data directly from the camera sensor, footage may look overexposed on the display of your Mac.
Because ProRes RAW is an acquisition format created by cameras and video recorders with RAW data straight from your camera sensor, it’s not possible to create ProRes RAW files from video software. To export ProRes RAW files to other formats, use Final Cut Pro X, Motion, or Compressor. You can’t export ProRes RAW to other formats with QuickTime Player.
Digital camera sensors consist of an array of millions of light-sensitive elements called photosites that convert the light exposed to the sensor to an array of digital intensity values. To capture color, most current digital cameras use a color filter array that yields a single primary color value (such as red, green, or blue) at each photosite location. This color filter arrangement is known as a Bayer pattern, where each two-by-two group of photosites consists of one red, one blue, and two green sensor elements. In contrast, conventional RGB images consist of not one but three primary color values (red, green, and blue) at each pixel location.
The process of converting a Bayer pattern image to a conventional RGB image is known as demosaicing. For conventional video, demosaicing and other processing operations are performed within the camera to produce viewable RGB images that can be recorded into a video file.
At playback time, an application needs only to decode the conventional video file to produce RGB images that can be edited and displayed. The demosaicing and processing have already been performed by the camera at capture time and are “burned in.”In contrast, ProRes RAW directly encodes the Bayer pattern image. Demosaicing and processing are deferred to the time of playback and are performed by application software.
This requires more computation during playback but allows for greater flexibility. Just as different image and video codecs must make tradeoffs between compression rate, quality, and complexity, demosaicing algorithms must make tradeoffs between speed, quality, and other factors. Using ProRes RAW lets you defer the choice of demosaicing algorithm until post-production and allows you to take advantage of raw processing enhancements and demosaicing algorithm improvements in future software.
Using Log Conversion with Built-in Camera LUTsMost professional video cameras today support recording in a log format. Using log enables a higher dynamic range of light levels to be represented compared to standard video gamma functions. Because many color-grading workflows are based on working with log video, Final Cut Pro can automatically apply a log conversion setting to ProRes RAW media files during import. With log conversion applied, ProRes RAW files behave just like conventional log video and can be edited the same way.Using built-in log conversion allows you to color correct ProRes RAW video as if it were SDR or HDR video, depending on your library color-processing setting. When your library is set to Standard color processing, you can color correct ProRes RAW video as if it were SDR video. With your library set to Wide Gamut HDR, you can color correct ProRes RAW video as if it were HDR video.RAW to Log Conversion SettingDecoding ProRes RAW directly results in HDR linear values rather than log.
The Raw to Log Conversion setting in the Info inspector applies custom log functions created by different camera vendors so that you can color correct your ProRes RAW files as log video. Because ProRes RAW files contain metadata that identifies the camera manufacturer, Final Cut Pro can apply the correct log function (such as Canon Log 2, Panasonic V-Log, or Sony S-Log3) during import.You can also manually adjust the RAW to Log Conversion setting in the General, Extended, or Settings view of the Info inspector.
ProRes RAW Support in Premiere Pro CC
Premiere Pro now offers a comprehensive, cross-platform (Windows and macOS) solution for Apple ProRes workflows, from camera media through to delivery.
The following Adobe video applications support the import of ProRes RAW footage:
- Adobe After Effects
- Adobe Media Encoder
- Adobe Premiere Pro
- Adobe Premiere Rush
- macOS Catalina 10.15 or later
- macOS Mojave 10.14.5 or later
![]() ProRes RAW support on macOS Mojave 10.14.5 or later requires user-installation of Pro Video Formats 2.1.1 (or later) from Apple. Such Pro Video Formats are NOT licensed or supported by Adobe and are subject to Apple Terms and Conditions.
ProRes RAW support on macOS Mojave 10.14.5 or later requires user-installation of Pro Video Formats 2.1.1 (or later) from Apple. Such Pro Video Formats are NOT licensed or supported by Adobe and are subject to Apple Terms and Conditions.
Import of ProRes RAW footage is only supported when the Metal renderer is selected for use in the applications:
- Adobe After Effects: File > Project Settings… > Video Rendering and Effects > Mercury GPU Acceleration (Metal)
- Adobe Media Encoder: Preferences > General > Video Rendering > select Renderer: Mercury Playback Engine GPU Acceleration (Metal) – Recommended
- Adobe Premiere Pro: File > Project Settings > General > select Renderer: Mercury Playback Engine GPU Acceleration (Metal) – Recommended
-
NVIDIA Display card! with the latest drivers. 4GB or more Video Memory recommended.
- ProRes RAW Decoder from Apple
![]() ProRes RAW support on Windows requires user-installation of the ProRes RAW Decoder from Apple. ProRes RAW Decoder is NOT licensed or supported by Adobe and is subject to Apple Terms and Conditions.
ProRes RAW support on Windows requires user-installation of the ProRes RAW Decoder from Apple. ProRes RAW Decoder is NOT licensed or supported by Adobe and is subject to Apple Terms and Conditions.
Import of ProRes RAW footage is only supported when the CUDA renderer is selected for use in the applications:
- Adobe After Effects: File > Project Settings… > Video Rendering and Effects > Mercury GPU Acceleration (CUDA)
- Adobe Media Encoder: Edit > Preferences > General > Video Rendering > select Renderer: Mercury Playback Engine GPU Acceleration (CUDA) – Recommended
- Adobe Premiere Pro: File > Project Settings > General > select Renderer: Mercury Playback Engine GPU Acceleration (CUDA) – Recommended
The Exposure control for ProRes RAW footage is available in Adobe After Effects, Adobe Media Encoder and Adobe Premiere Pro.
How to Convert ProRes Raw in Windows PC, Hackintosh, Premiere Pro, and Final Cut Pro X ?
Edius 9.4.x on Windows!
It is not recomanded if you whant to export ProRes RAW into corresponding 12bit format truly. Actually you should convert them into ProRes XQ 4444 12bit for using in other NLE softwares like Davinci Resolve or Premiere Pro. Edius is not true choice in this case, because of assigning Camera LUT on ProResRAW and also corresponding Log LUT files such as specified S-Log3 or V-Log to convert a desired clip into ProRes XQ 4444 12bit idealy.
Final Cut Pro or Compressor can apply the correct log function (such as Canon Log 2, Panasonic V-Log, or Sony S-Log3) during import.
Sample ProRes RAW workflow:
Import to Final Cut Pro X -> Rough Cut -> Export to ProRes XQ 4444 12bit -> Import to Davinci Resolve
Compressor on Hackintosh!
It is recommanded if you whant to export ProRes RAW into corresponding 12bit format such as ProRes XQ 4444 12bit truly.
Final Cut Pro or Compressor can apply the correct log function (such as Canon Log 2, Panasonic V-Log, or Sony S-Log3) during import.
Hackintosh ProRes RAW Capable Guid: Gigabyte Z390 + Intel i7-9700K + AMD RX 580
➤➤ Hackintosh ProRes RAW Capable Guid: Gigabyte Z390 + Intel i7-9700K + AMD RX 580
Learn about the latest updates for Compressor 4.4.4.
Compatibility detection
ProRes RAW
Support for ProRes RAW and ProRes RAW HQ formats
Learn more
the 64 bit icon
64-bit
Modern 64-bit architecture takes advantage of all system memory and supports larger frame sizes
the caption icon
Closed captions enhancements
Export closed captions in the SRT format, used by a wide range of websites and services
Get complete step-by-step how-to instructions and information on all features in Compressor. For a detailed list of enhancements and fixes in Compressor, refer to the Compressor release notes.
New in Compressor 4.4.2
Compressor uses source media properties to automatically configure MXF and QuickTime settings. Learn more
New in Compressor 4.4.1
Import, view, adjust, and deliver closed captions in either iTT or CEA-608 format. Learn more
Support for multiple closed caption languages and formats in an iTunes Store package.
Embed captions in an exported video file or create a separate caption sidecar file.
Share captioned videos directly to YouTube and Vimeo.
Include audio description files in any iTunes Store package.
New in Compressor 4.4
Export 360° video in a wide range of formats and frame sizes, then save to your Mac or share on the web. Learn more
Deliver High Dynamic Range (HDR) video in Rec. 2020 PQ or HLG formats. Learn more
Encode with the High Efficiency Video Coding (HEVC) format for high quality at smaller file sizes. Learn more
Create MXF files using a variety of new export presets and parameter controls. Learn more
Export 360° video files with embedded industry-standard spherical metadata.
Support for monoscopic and stereoscopic 360° formats.
Deliver HDR video as P3 D65 PQ, and Rec. 2020 HLG, and Rec. 2020 PQ for HDR10.
Easily convert HDR to Standard Dynamic Range (SDR) video.
Create a custom HEVC export setting in Compressor and use it in Final Cut Pro.
Create a self-contained HEVC droplet for drag-and-drop encoding on the desktop.
New MXF presets include AVC-Intra, D-10 / IMX, ProRes, and XDCAM HD in a variety of frame rates and resolutions.
ProRes RAW Windows Codec.
Davinci Resolve.
Source: infoq
blog.mousavi.fr
Finally, Raw Converter is now not only available for macOS but also for Windows 10. The app can convert ProRes RAW files from any supported camera into CinemaDNG for native import into DaVinci Resolve. It provides batch conversion including audio and timecode and the output compression method can be selected between an uncompressed 16-bit format and various lossy compression levels.
Thanks to Atomos and their compact video recorders, and camera manufacturers enabling raw video output even for affordable mirrorless cameras, filmmakers can nowadays use Apple’s 12-bit compressed raw video codec – ProRes RAW – relatively easily. That is if they do not use Blackmagic’s DaVinci Resolve for the post-production. Unfortunately, the popular NLE still does not natively support ProRes RAW.
Though all hope is not lost, as there is an app that can convert ProRes RAW footage into CinemaDNG, which can then be imported into DaVinci Resolve while retaining the features of raw footage: Raw Converter. I first wrote about the Raw Converter app in December 2021 shortly after it was first launched, though it Initially only came out on macOS (12 or higher). No after many requests, the app creators recently added a Windows version.
As I said before, bringing the Raw Converter to the Windows platform was one of the most frequent requests since the macOS version came out in 2021. The Windows app, of course, works in the same way as the macOS version. It provides batch conversion of raw video files from ProRes RAW format into a CinemaDNG reel including audio and timecode. The output compression method can be selected between an uncompressed 16-bit format and a lossy compression of various compression levels.
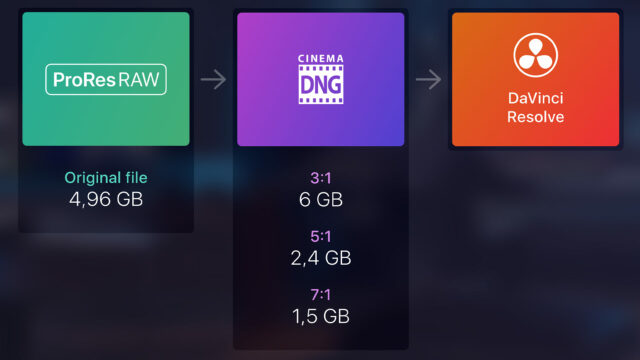
When it comes to the file size, the resulting cDNG files can even be smaller than the source ProRes RAW file depending on the compression. Here is an example of cDNG exports from a 4.96GB original ProRes RAW file:
- cDNG Lossless – 12.54GB
- cDNG 3:1 – 6.0 GB
- cDNG 5:1 – 2.43 GB
- cDNG 7:1 – 1.53 GB
- cDNG uncompressed – 24.18 GB
Raw Converter for Windows uses the x64 architecture and it is compatible with Windows 10 version 19041.0 or higher.
List of supported cameras growing continuously
Initially, the app only supported ProRes RAW files recorded by the Atomos Ninja V from a few Sony and Nikon mirrorless cameras. Over time, the app developers added support for many more camera models. Unfortunately, every camera requires individual calibration, so each new model needs to be added manually based on sample footage.
Right now, the following cameras are supported:
- Sony ILCE-7SM3 (Sony a7S III)
- Sony ILME-FX3 (Sony FX3)
- Sony ILME-FX6 (Sony FX6)
- Sony ILCE-1 (Sony a1)
- Sony ILME-FX30 (Sony FX30)
- Nikon Z6
- Nikon Z6 II
- Nikon Z7
- Nikon Z7 II
- Nikon Z9
- ZCAM E2
- ZCAM E2-F6
- ZCAM E2-M4
- ZCAM E2-S6
- ZCAM E2-S6G
- FUJIFILM GFX100
- FUJIFILM GFX100s
- FUJIFILM X-H2S
- SIGMA fp
- SIGMA fp L
- Canon EOS R5
- Canon EOS R5C
- DJI X7
- Olympus OM-D E-M1 Mark III
- Olympus OM-1
- Panasonic GH6
It is good to finally see Panasonic on the list as well. It seems, however, that adding support for any older Panasonic LUMIX camera (as requested many times) will not be possible due to technical reasons.
Pricing and availability
The Raw Converter for Windows is now available to download from the Microsoft store. The pricing remained the same as with the macOS version which is still available at the Apple app store. The app can convert 300 frames of footage (including audio) free of charge to test the capability. For full-length conversion, an in-app purchase is available. The license currently costs around $75 per camera.
It is unfortunate that in 2023, DaVinci Resolve users still have to go through this workaround instead of importing ProRes RAW natively into the NLE. But well, at least there is a solution. We can only hope that this will be possible natively soon.
Do you have to work with ProRes RAW footage in DaVinci Resolve? Did you try the Raw Converter to get cDNG files before? Let us know in the comments section underneath the article.
Благодаря Atomos и их компактным накамерным мониторам с функцией записи, а также производителям камер, позволяющим выводить необработанное видео даже для недорогих беззеркальных камер, кинематографисты теперь могут относительно легко использовать 12-битный сжатый необработанный видеокодек Apple — ProRes RAW — относительно легко. Это если они не используют Blackmagic DaVinci Resolve для постобработки. К сожалению, популярная технология нелинейного монтажа по-прежнему не поддерживает ProRes RAW.
Хотя все надежды еще не потеряны, поскольку существует приложение, которое может конвертировать кадры ProRes RAW в CinemaDNG, которые затем можно импортировать в DaVinci Resolve, сохраняя при этом функции необработанных кадров: Raw Converter. Изначально программа была доступна только для MacOS
Перенос Raw Converter на платформу Windows был одним из самых частых запросов с момента выхода версии для macOS в 2021 году. Разумеется, приложение для Windows работает так же, как и версия для macOS. Он обеспечивает пакетное преобразование необработанных видеофайлов из формата ProRes RAW в ролик CinemaDNG, включая аудио и тайм-код. Метод сжатия вывода может быть выбран между несжатым 16-битным форматом и сжатием с потерями различных уровней сжатия.

Что касается размера файла, полученные файлы cDNG могут быть даже меньше, чем исходный файл ProRes RAW, в зависимости от сжатия. Вот пример экспорта cDNG из исходного файла ProRes RAW размером 4,96 ГБ:
- cDNG без потерь — 12,54 ГБ
- cDNG 3:1 — 6,0 ГБ
- cDNG 5:1 — 2,43 ГБ
- cDNG 7:1 — 1,53 ГБ
- cDNG без сжатия — 24,18 ГБ
Raw Converter для Windows использует архитектуру x64 и совместим с Windows 10 версии 19041.0 или выше.
Первоначально приложение поддерживало только файлы ProRes RAW, записанные Atomos Ninja V с нескольких беззеркальных камер Sony и Nikon. Со временем разработчики приложения добавили поддержку многих других моделей камер. К сожалению, каждая камера требует индивидуальной калибровки, поэтому каждую новую модель необходимо добавлять вручную на основе образцов видеоматериалов.
На данный момент поддерживаются следующие камеры:
- Sony ILCE-7SM3 (Sony a7S III)
- Sony ILME-FX3 (Sony FX3)
- Sony ILME-FX6 (Sony FX6)
- Sony ILCE-1 (Sony a1)
- Sony ILME-FX30 (Sony FX30)
- Nikon Z6
- Nikon Z6 II
- Nikon Z7
- Nikon Z7 II
- Nikon Z9
- ZCAM E2
- ZCAM E2-F6
- ZCAM E2-M4
- ZCAM E2-S6
- ZCAM E2-S6G
- FUJIFILM GFX100
- FUJIFILM GFX100s
- FUJIFILM X-H2S
- SIGMA fp
- SIGMA fp L
- Canon EOS R5
- Canon EOS R5C
- DJI X7
- Olympus OM-D E-M1 Mark III
- Olympus OM-1
- Panasonic GH6
Приятно, наконец, увидеть Panasonic в списке. Однако кажется, что добавление поддержки любой старой камеры Panasonic LUMIX (как много раз просили) будет невозможно по техническим причинам.

Raw Converter для Windows теперь доступен для загрузки в магазине Microsoft . Цена осталась такой же, как и у версии для macOS, которая по -прежнему доступна в магазине приложений Apple . Приложение может бесплатно конвертировать 300 кадров отснятого материала (включая звук) для проверки возможностей. Для полной конвертации доступна покупка в приложении. В настоящее время лицензия стоит около 75 долларов за камеру. Интересно ещё и то, что это не просто конвертор, но и просмоторщик.
К сожалению, в 2023 году пользователям DaVinci Resolve все еще придется использовать этот обходной путь вместо того, чтобы изначально импортировать ProRes RAW в NLE. Но хорошо, по крайней мере, есть решение. Мы можем только надеяться, что это станет возможным в ближайшее время.
Про ProResRaw читайте у нас на сайте https://news.fidller.com/?s=ProRes+RAW
Приобрести apple box или заказать 3д печать/3д сканирование/переходник для объективов, а также изготовить оборудование под заказ очень просто, достаточно перейти в наш магазин — https://fidller.com или написать нам в telegram — https://t.me/fidller
мы в телеграме — https://t.me/fidller_com
мы вконтакте https://vk.com/club_fidller
Если вы нашли ошибку, пожалуйста, выделите фрагмент текста и нажмите Ctrl+Enter.
The following two tabs change content below.
- Bio
- Latest Posts

Фильммейкер, главный редактор, технический писатель
По вопросам статей и материалов писать сюда http://news.fidller.com/about-contact/
Наш магазин оборудования — http://fidller.com/

Topic: Proress Davinci Resolve Windows??? (Read 26175 times)
Hello everyone,
i have been trying to figure this one out for a while now, and it now comes down to the last few steps of post production and i want to bassicly render my RAW footage from davinci resolve into prores files on a windows machine, is this possible because i have been trying to figure this one out for weeks now.
P.S person that will fix my problem will be donated 10 dollars via paypal 
P.S i know DNxHD is a option but i heard proress (12 bit vs 10 bit dnxhd) i waayy better when it comes down to colors
Thanks alot

Logged
Not possible on windows , Unless you can «call up FFmeg» to export thought to 10bit prores.
A comparable Codec on Windows is Blackmagic RGB 10bit far better then DNxHD or export a 16bit Tiff image sequence
and use FFmeg to transcode to ProRes 10bit 4444 . Only Mac can write 12 & 16 bit ProRes files .
Or export XML from Resolve and render on a Mac and or «PC-Hackintoss» with Intel Cpu & Chip Set.
My Toshiba i7 2.4 Ghz P850 Laptop is setup with dual SSD’s one Windows 7 Pro & the other OS X Mavericks 10.9.3.
I use tonymacx86 MultiBeast-Mavericks 6.4.2 USB Bootloader to boot in to Windows 7 as I has Mac OSX as the default
1st OS, Work very Well . Check out http://www.tonymacx86.com/home.php , For more information.
I have 2 Hackintoss’s I built plus 2 Real MacPro’s but there are Older and are slower then my i7 Laptop Hackintoss.
Logged
Thank you very much,
right now i have this setup for my PC
— i7 2600k Overclocked to 4.8 Ghz (stable)
— Asus P8Z68 motherboard
— Radeon HD 6950
— 32GB RAM
i will see if i can get an extra SSD so i can dual boot this thing. For some reason DNxHD makes my footage a little bit more brighter and seemed to give it a green tint as well, also its not very HQ.
P.S my footage will be uploaded to vimeo+ account so i dont know how important image quality actually needs to be to be noticeable.
Logged
It should no problem , to get the Gen 2 i7 to run Mac.
Just read and follow the post there and you will have no problem.
My desktop Hackintoss is a Gen 3 i7 3770K over clocked to 4.7 Ghz
Corsair H60 Cpu water cooler , Gigabyte mother board — Z77X-UD5H
On Board Video Intel HD4000 & Gigabyte GTX 760 2GB
HyperX 4GB DDR3 1600 — 16 GB (but 32 would be better)
All the parts I used are or where recommended from tonymacx86 site.
I also run a AJA capture card «Lhi» plus an Atto R380 Raid card to a 6TB raid5 box on Mac OSX.
Runs All Apple & Adobe with Cuda and or open CL, no problem and of course Blackmagic software etc….. .
Logged
Would image quality degrade (too much) if i would convert 16 bit tiffs to prores?
Logged
Would image quality degrade (too much) if i would convert 16 bit tiffs to prores?
It all depends on the which type , if it a 10bit ProRes there well be some lost (16bit—>10bit) like 422 (LT or HQ)
Will it be noticeable ? Maybe, more then likely you will see it in the hi-lights & or in the shadows
FFmeg Prores 4444 on Windows is 10bit but still better then 10bit 422 HQ
The Apple ProRes 4444 12bit is very good and you be hard press to see the difference ,
but you are limited to Rec709 (HD Color Space 16-235) where the Cdng’s/Tiff’s would be linear (0-255) @ 16bit
If you want the least compressed intermediate video codec that is visual a direct copy of Raw/Tiff
Then there is only One, Apple ProRes 4444 XQ 16bit linear (0-255).
From Apple Support http://support.apple.com/kb/HT5151
Apple ProRes 4444 XQ — The highest-quality version of Apple ProRes for 4:4:4:4 image sources (including alpha channels). This format has a very high data rate to preserve the detail in high-dynamic-range imagery generated by today’s highest-quality digital image sensors. Apple ProRes 4444 XQ preserves dynamic ranges several times greater than the dynamic range of Rec. 709 imagery. This holds true even against the rigors of extreme visual effects processing in which tone-scale blacks or highlights are stretched significantly. Like standard Apple ProRes 4444, this codec supports up to 12 bits per image channel and up to 16 bits for the alpha channel.
ProRes 4444 XQ is supported on OS X Mountain Lion v10.8 or later.
This the Only Codec I use , I can not tell the difference between that and16 bit Cdng’s. I’m working on a Green Screen Music Video with that Codec.
If I can’t use ProRes 4444 XQ I will use ProRes 4444 .
Hope that helps
Logged
Thanks for helping me so much man,
I am only using it for Vimeo really ( vimeo + account ) but i hate having gamma shifts,color shifts so i am going to try converting them and see how i like it and it is also going to be my last project that i am going to be rendering on windows, i will buy a second ssd and do the rendering on mac and editing on windows i guess.
thanks alot man
Logged
Oh i think i kind of figured it out, Export 10bit DPX ( which is losless ) encode those DPX files into ProRes HQ 422 files? encode with a prores tool for windows:)
Logged
For some reason DNxHD makes my footage a little bit more brighter and seemed to give it a green tint as well, also its not very HQ.
But that’s nothing to do with DNxHD and everything to do with the media player you’re using and how you’re encoding the DNxHD, where do you see green tint and brighter output? Which apps? DNxHD is perfectly good intermediate at high bitrates.
The Apple ProRes 4444 12bit is very good and you be hard press to see the difference ,
but you are limited to Rec709 (HD Color Space 16-235) where the Cdng’s/Tiff’s would be linear (0-255) @ 16bit
That’s confusing and makes no sense, 12bit Rec709 with levels range 16-235. , I know what you mean, limited range but Rec709 is not rgb and it’s limited levels range correlates to 0 — 255 rgb, so they are the same.
Then there is only One, Apple ProRes 4444 XQ 16bit linear (0-255).
I’m lost I can’t find any reference to linear in the link http://support.apple.com/kb/HT5151 where are you getting that from?
Logged
I see if I can find the info again .
Logged
I’ve also been trying to solve this workflow issue. Found this codec pack http://www.miraizon.com/products/codecsoverview.html
It makes prores encoding possible on windows but resolve filters acessible codecs so I’ve had to export full range dnxhd and then convert those in Adobe media encoder to prores.
Logged
About possible gray values with different bit depths:
1 bit (2^1) = 2 tones
2 bits (2^2) = 4 tones
3 bits (2^3) = 8 tones
4 bits (2^4) = 16 tones
8 bits (2^8) = 256 tones
10 bits (2^10) = 1024 tones
12 bits (2^12) = 4096 tones
14 bits (2^14) = 16,384 tones
16 bits (2^16) = 65,536 tones
24 bits (2^24) = 16.7 million tones
Logged
I think this is the best way to do it :
Tiff 16 bit to prores 4444 (windows) = 12bit footage
Logged