DaVinci Resolve is a popular video editing software used by filmmakers and content creators. However, the Windows version of DaVinci Resolve lacks the ability to export projects in the ProRes format. This can be a problem, especially when working with collaborators who require this format for their part of the project. In this blog post, we’ll explore a solution that allows you to export ProRes in DaVinci Resolve for Windows, but keep in mind that this workaround is only applicable for the Studio version of the software.
DaVinci Resolve Studio users can access a free solution to export ProRes files on Windows. Although it’s possible to support the project and its creators through donations or Patreon, the basic functionality is available for free. Let’s dive into the easy process that unlocks additional export options in DaVinci Resolve Studio for Windows.
Overcoming the ProRes Export Limitation with Voukoder
In this section of the post, we’ll dive deep into the solution that allows you to export ProRes in DaVinci Resolve for Windows using Voukoder. Please note that this method is only applicable for DaVinci Resolve Studio version.
To begin, you need to download the Voukoder software from its official website. Voukoder is a plugin that enables additional codecs and formats, such as ProRes, in DaVinci Resolve Studio for Windows.
Step 1: Download Voukoder and DaVinci Resolve Studio Files

- Go to the official Voukoder website and navigate to the ‘Downloads’ section.
- Download two files:
- Voukoder App Latest Version
- DaVinci Resolve Studio Connector
Once you have downloaded both the Voukoder MSI file and the DaVinci Resolve Studio Connector ZIP file, you can proceed to install Voukoder on your computer.
Step 2: Install Voukoder
- Locate the downloaded Voukoder MSI file in your downloads folder or the location where you saved it.
- Run the Voukoder MSI file and follow the installation process. This process should be straightforward and typical of most Windows software installations.
With Voukoder installed on your computer, you can now proceed to integrate it with DaVinci Resolve Studio. This will enable you to export your projects in the ProRes format.
Integrating Voukoder with DaVinci Resolve Studio
Integrating Voukoder with DaVinci Resolve Studio involves extracting the downloaded DaVinci Resolve Studio Connector ZIP file and following the installation instructions provided in the included readme file.
- Locate the downloaded DaVinci Resolve Studio Connector ZIP file in your downloads folder or the location where you saved it.
- Extract the ZIP file, which will create a new folder containing a readme file and a subfolder.
Step 2: Follow the Installation Instructions in the Readme File

- Open the readme file included in the extracted DaVinci Resolve Studio Connector folder. This file contains instructions on how to integrate Voukoder with DaVinci Resolve Studio.
- The readme file will provide you with a path to copy the extracted folder. However, you may encounter an issue if the path doesn’t exist on your computer.
Step 3: Copy the Folder to the Correct Path


- Copy the path provided in the readme file, starting from ‘C’ and ending at ‘Support.’
- Paste the path into your file explorer and check if there is an ‘IOPlugins’ folder.
- If the ‘IOPlugins’ folder exists, open it and paste the extracted folder inside.
- If the ‘IOPlugins’ folder doesn’t exist, create it and then paste the extracted folder inside.
Once you have completed these steps, the integration process is complete, and you can now use Voukoder to export ProRes files in DaVinci Resolve Studio for Windows.
Setting Up and Exporting ProRes in DaVinci Resolve Using Voukoder
In this section of the blog post, we’ll walk you through the process of setting up and exporting a ProRes file in DaVinci Resolve for Windows using the Voukoder plugin. With this step-by-step guide, you’ll be able to export your projects in the ProRes format with ease.
Step 1: Open DaVinci Resolve and Load Your Project
- Launch DaVinci Resolve on your computer.
- Open an existing project or create a new one.
- Import a video file into the project by dragging and dropping it into the Media Pool, or by using the Import Media option from the File menu.
- Switch to the Edit page and drag the imported file onto the timeline to complete the editing process.
Step 2: Configure Export Settings in the Deliver Page

- Go to the Deliver page by clicking on the ‘Deliver’ tab at the bottom of the DaVinci Resolve interface.
- In the Render Settings panel on the left side of the screen, open the Format drop-down menu.
- Scroll down until you find the ‘Voukoder’ option. Select it.
Step 3: Configure Voukoder Settings
- Scroll down further in the Render Settings panel until you see the ‘Configure Voukoder’ button. Click on it to open the Voukoder settings window.
- In the Voukoder settings window, you will find: Video Options, Audio Options, Output Settings, and About.
Video Options

- In the Video Options tab, locate the ‘Codec’ dropdown menu.
- Select ‘ProRes’ from the list of available codecs.
- Click on the ‘Options’ button on the top of the codec dropdown menu to access additional settings, such as color format and profile.
Audio Options
- Switch to the Audio Options tab.
- Choose your desired audio codec from the ‘Codec’ dropdown menu.
- Adjust additional audio settings, such as bit rate and profile, as needed in the Options settings of Audio Tab.
Output Settings

- Go to the Output Settings tab.
- Choose the desired container format for your exported file, such as ‘QuickTime .MOV.’
- Click ‘OK’ to close the Voukoder settings window and return to the Render Settings panel in DaVinci Resolve.
Step 4: Name Your Exported File and Start Rendering
- In the Render Settings panel, enter a name for your exported file in the ‘File Name’ field.
- Choose a location to save the exported file by clicking the ‘Browse’ button next to the ‘Location’ field.
- Click ‘Add to Render Queue’ to add the export job to the Render Queue panel on the right side of the screen.
- In the Render Queue panel, click ‘Start Render’ or ‘Render All’ to begin exporting your project in the ProRes format.
Step 5: Verify the Exported File Format
- Once the render is complete, navigate to the location where you saved the exported file using your computer’s file explorer.
- Import the exported file back into DaVinci Resolve by dragging and dropping it into the Media Pool, or by using the Import Media option from the File menu.
- With the file selected in the Media Pool, check the file’s properties in the Metadata panel to confirm that the exported file is in the ProRes format.
By following these steps, you can easily export your projects in the ProRes format using DaVinci Resolve for Windows and the Voukoder plugin. The plugin is free to use, but supporting the developer through donations or contributions is encouraged, as they have done a great job in making this valuable tool available to the DaVinci Resolve community.
Now that you’re familiar with the process of exporting ProRes files in DaVinci Resolve using Voukoder, you can take advantage of this powerful codec in your video editing and post-production workflow. ProRes offers high quality, excellent performance, and is widely compatible, making it an ideal choice for professionals and enthusiasts alike.
Keep in mind that while this method allows you to export ProRes files in DaVinci Resolve for Windows, there may be limitations in color grading or visual effects processing that could potentially affect the final output. Always review your exported files to ensure they meet your desired quality standards and make any necessary adjustments in your project settings.
- Also Read- Making DCP In Davinci Resolve (Updated)
- Also Read- How To Export H.265 Videos From DaVinci Resolve: Explained
- Also Read- Davinci Resolve Archive (.dra) Import/Export: Detailed Guide
Apple owns all parts of ProRes. Encoding and decoding.
The decoding portion is easily accessible using the Quicktime engine on Windows or AVFoundation (Quicktime X) on OSX.
The encoding part is not quite easy. It is NOT automatic part of OSX. You need an Apple ProApp (FCPX, Compressor, Motion) to access the encoding portion of ProRes if you want to encode using AVFoundation libraries.
Some apps have internal native support for it, but that is a licensed part — Adobe as an obvious example. However, installing Adobe CC does not mean you can encode ProRes outside of the Adobe CC apps. It is true of any ProRes 3rd party encoding deployment AFAIK.
On Windows, there are a handful of ProRes encoders. It was only Telestream’s encoding server, but that was expensive. Now you have Adobe, Fusion, and other software — some offer it as a PAID option.
Avid’s implementation is different. They use ProRes in MXF container internally in Media Composer. On Windows, Avid cannot (yet) generate NEW ProRes media (no export, transcode, render, etc.). It can export ProRes Quicktime (.mov) if the original media is already in ProRes using the «Same as Source» option. It is a container rewrap instead of an actual new encoding. Both Apple and Avid did announce that ProRes native support (in a MOV container) will be coming soon to Media Composer and DNx will be native to FCPX.
How much the devs have to pay to use ProRes encoder? I don’t know. I’m sure it depends on the product, the duration, etc. — like any licensed IP.
Avid DNx codecs are not free either. From what I have heard, it is more money in the long term than ProRes. Apple seems to have a more hands-on approach to what apps can support ProRes.
FFMPEG is an open-source implementation of ProRes. It works, though some apps sometimes will flag it as not true ProRes or have a hard time reading the metadata/header portion of the codec. I’m not sure if that is by design by the apps or bug on FFMPEG. We stay away from it because it is quite costly to fail QC and looks terrible for in a client services perspective. But I do know some that swear by it and are successfully running their business with it.
Find out how to Write Apple ProRes on Windows PCs using Adobe Creative Cloud and Avid Media Composer. Encode and decode ProRes on Windows.
Arthur Ditner • Mar 25, 2022
Apple ProRes is one of the most popular video codecs used today in the film and television industry and with good reason; the quality is fantastic, the file sizes are manageable, and the ease of use for macOS users to view ProRes files in QuickLook or Quicktime. Recently Apple ProRes compatibility for Windows PC users has been greatly expanded, with Windows being able to read and write ProRes in several pieces of software. Check out our ProRes for Windows workflow below.
Decoding (playback)
If you only need to playback ProRes files but not write them, there are two good free solutions. The first is the VLC player. VLC is something of a Swiss-Army Knife when it comes to playing back video and audio files.
Another option is DaVinci Resolve which is a suite of full-blown video editing and color correction software. Now, this may exceed your needs, but it is a free solution and can playback other popular video files such as RED camera files, H264, H265, and even MKV. DaVinci Resolve on Windows cannot save ProRes files. Programs that can save ProRes on Windows are next on our list.
To view ProRes files in DaVinci Resolve, click on the Media tab along the bottom of the interface. Navigate to where your ProRes clips are saved in the Media Storage panel. Note that this panel can also see connected hard drives, networks, and camera cards. If you need full-screen playback in a pinch, the keyboard shortcut is “P” for… pinch? I’m not sure why “P” but that’s full-screen! Press “P” again to exit full-screen.
Encoding (writing)
The Adobe Creative Suite
Adobe Premiere Pro, Media Encoder, and After Effects can now natively read and write Apple ProRes on Windows thanks to a recent update. You will need an active subscription to Adobe Creative Cloud to access these features.
ADOBE PREMIERE
I have some edited videos in a timeline and would like to export this content as a ProRes QuickTime MOV. To save Apple ProRes files out of Adobe Premiere Pro:
- Click on the timeline panel to ensure it is selected.
- Select Menubar > File > Export > Media.
- Under Export Settings choose QuickTime.
- Under Preset choose Apple ProRes 422.
I chose ProRes 422 since it is a good catch-all setting and is ideal if filming was done on a DSLR, GoPro, or mirrorless camera. There are other presets which have special use-cases but for most projects, they are unnecessarily large.
ADOBE MEDIA ENCODER
Media Encoder is a great choice to convert multiple pieces of video at once. Often, files like H265 can be too difficult for some computers to play back smoothly, and so the Editor will want to convert them to ProRes for efficiency. Media Encoder presets are the exact same as Premiere Pro:
- Bring the files you which to convert into the Render Queue.
- Select QuickTime from the Export Settings column.
- Select Apple ProRes 422 from the Preset column.
- Click output file to set the destination for the render.
ADOBE AFTER EFFECTS
Apple ProRes can be particularly useful for After Effects artists as the format can save transparency information. In this animated title, the background is not really black, it’s see-thru. Let’s save it with transparency enabled so we can drop it into Premiere Pro for the edit. Follow these steps:
- Select Menubar > Composition > Add to Render Queue.
- Adjust the Output Module by clicking High Quality.
- Format Options…
- Select Video Codec: Apple ProRes 4444.
- Change Video Output > Channels to RGB + Alpha.
- Ensure Depth is Millions of Colors+.
- Specify an Output Path.
Now with my animation rendered, the transparency information is preserved. I can drop this clip straight into an editor like Premiere Pro and immediately see the results.
Avid Media Composer
Avid Media Composer, widely popular among feature film and newsroom editors around the world, can also decode and encode ProRes on the Windows platform. Avid also looks a lot prettier these days with a recent UI refresh. There are two ways to interact with the ProRes codec. The first is to change the default import settings to ProRes—this part is optional. But, when importing media you can transcode to ProRes straight away by selecting:
- Menubar > Edit > Preferences
- Project
- Media Creation
- Import
- Apple ProRes and the compression type from the pulldown (Note: ProRes 422, sometimes simply called ProRes, is a good catch-all setting if you are unsure.)
Finally, click “Apply to all.” Now, any media created inside Avid will be in this codec.
Alternatively, we can export standalone ProRes video files from Media Composer. To do this:
- Select Menubar > File > Output > Export to File.
- Open the Options Panel.
- Export As: MOV.
- Change Codec Family to Apple ProRes.
- Change Compression to Apple ProRes 422.
Recent additions
A few other video editing platforms have very recently added Apple ProRes encode support on Windows, these include Magix Vegas, Lightworks Pro, and Edius X.
Fake ProRes beware
It’s worth noting that there are some suspicious software packages available that promise ProRes encode on Windows, and will usually cost a few dollars. These suites are nothing new and are usually referred to as FFMPEG ProRes encodes. FFMPEG ProRes is a method of using open source tools to reverse engineer the codec.
The main issue with using FFMPEG ProRes is how metadata gets written in the video. One of the first lines of metadata in an Apple Approved ProRes file will state this, whereas the FFMPEG version will not. The best-case scenario is this won’t be a problem, but the worst-case scenario is a client could reject your film or television program because it doesn’t meet the criteria during a technical inspection. For safety, I recommend sticking with the list of software packages above.
Did I miss anything? Care to share your favorite Windows encoding workflow? Let me know in the comments, I’d love to hear it!
Other topics you might like

Contents
- 1 How To Export Prores In Davinci Resolve Studio For Windows Machines
- 2 How To Export Prores In Davinci Resolve Studio For Windows Machines
- 2.1 Conclusion
- 2.1.1 Related image with how to export prores in davinci resolve studio for windows machines
- 2.1.2 Related image with how to export prores in davinci resolve studio for windows machines
- 2.1 Conclusion
To stay up-to-date with the latest happenings at our site, be sure to subscribe to our newsletter and follow us on social media. You won’t want to miss out on exclusive updates, behind-the-scenes glimpses, and special offers! 0 windows 8 subscribers 5 on 7 2 Intro 2 6 0 quality settings export 1 4 best 3 4 6 bryan easy 2 5- 3 resolve victor 4 hack- in 9 17-4 1 3 prores 7 1 subscribe 8 9 export davinci 5 429
How To Export Prores In Davinci Resolve Studio For Windows Machines
How To Export Prores In Davinci Resolve Studio For Windows Machines
With a third party plugin support, you can now export prores codec on windows version davinci resolve studio 17 software using voukoder render engine plugins. more more this is game. 109 7.2k views 7 months ago how to this is a great way to export prores in davinci resolve studio for windows machines. this is a great software that allows you to export to.

How To Export Prores From Davinci Resolve On Windows Pc Easily And Fast
How To Export Prores From Davinci Resolve On Windows Pc Easily And Fast
Re: [urgent] prores export for windows. mon may 10, 2021 4:56 pm. apple will never open their render codec to windows for marketing reasons. they think they will sell more of their machines if there is such a need for prores. they only have a deal with adobe (and we don’t know what adobe pays for the patent). Intro export prores on windows in davinci resolve 17.4 (best quality export settings) easy hack. victor bryan 429 subscribers subscribe 1 2 3 4 5 6 7 8 9 0 1 2 3 4 5 6 7 8 9 0 1 2 3 4 5. Step 1. render quicktime from davinci resolve resolve calls this process ‘delivering’. resolve supports the following formats or wrappers: you can choose to render quicktime format. step 2. download and install prores encoder here we recommend brorsoft video converter to create prores on windows. Quicktime export.

Export Prores จาก Davinci Resolve บน Windows ด วย Voukoder Youtube
Export Prores จาก Davinci Resolve บน Windows ด วย Voukoder Youtube
Step 1. render quicktime from davinci resolve resolve calls this process ‘delivering’. resolve supports the following formats or wrappers: you can choose to render quicktime format. step 2. download and install prores encoder here we recommend brorsoft video converter to create prores on windows. Quicktime export. If you have subtitles, go to the video tab and scroll down to subtitle settings. check the export subtitle box. choose from the dropdown menu whether you would like your video exported as a separate file (such as an srt file) or to burn into video. 4. export presets. There is no way to get prores out of resolve on a windows pc. you have two options for technically and legally correct prores: get a mac ($3 5k for a decently powered one), or get the advanced panels and move to linux. ($31k for the panels.).

Best Way Of Exporting Your Videos In Davinci Resolve
Best Way Of Exporting Your Videos In Davinci Resolve
If you have subtitles, go to the video tab and scroll down to subtitle settings. check the export subtitle box. choose from the dropdown menu whether you would like your video exported as a separate file (such as an srt file) or to burn into video. 4. export presets. There is no way to get prores out of resolve on a windows pc. you have two options for technically and legally correct prores: get a mac ($3 5k for a decently powered one), or get the advanced panels and move to linux. ($31k for the panels.).

How To Export A Audio File In Davinci Resolve 15 Hướng Dẫn Xuất File
How To Export A Audio File In Davinci Resolve 15 Hướng Dẫn Xuất File
How To Export Prores In Davinci Resolve Studio For Windows Machines
How To Export Prores In Davinci Resolve Studio For Windows Machines
this is a great way to export prores in davinci resolve studio for windows machines. this is a great software that allows you to note: you will need resolve studio (the paid version) for this workflow. the prores codecs are a powerful and useful post davinciresolve #prores #windows hi guys! in this quick tutorial i’ll show you how to export apple prores video files, with your with a third party plugin support, you can now export prores codec on windows version davinci resolve studio 17 software do you want to learn how to edit awesome videos in davinci resolve? on this channel, you will learn the basics of davinci i have spent the past few days trawling the internet trying to come up with a solution to davinci resolve’s lack of compatibility with davinci resolve fusion page for noobs! ▶️ youtu.be xzcu0cvcqsq it’s about dang time, adobe. or should i direct my impatience at windows? anyway. comment below if you have any questions, after making you wait for far too long, i’m finally releasing my complete guides on building and setting up a remote render server there are 4x main type of renders we use for every commercial project and these are explained in this video. see below for these are the best render settings for davinci resolve 18 in 2023 for and web content! ultimate video creator the easiest way to export in prores 422 4444 others on windows. there’s allso the dnxhd codec if some one need. if you like
Conclusion
Having examined the subject matter thoroughly, it is evident that post offers useful knowledge regarding How To Export Prores In Davinci Resolve Studio For Windows Machines. Throughout the article, the author demonstrates a deep understanding about the subject matter. Notably, the section on Z stands out as a highlight. Thank you for taking the time to this post. If you have any questions, please do not hesitate to reach out via social media. I am excited about your feedback. Additionally, below are some similar articles that you may find useful:

Davinci Resolve cannot «officially» export ProRes, but we found many guys love ProRes as a format. It compresses video very mildly and is visually lossless across many generations. Something exciting, we’ve worked out the solution to help you export ProRes from Davinci Resolve on Windows as you want. Check it now.
Since you’re on Windows based platform, you have either lost or simply can’t find the option to export to ProRes from Davinci Resolve timeline! A reasonable alternative to ProRes exporting from Resolve is to export uncompressed preferably QuickTime from Davinci Resolve and then use a ProRes encoder to create ProRes on Windows. Below is the step-by-step guide.
How to Save ProRes from Davinci Resolve on Windows
STEP 1. Render QuickTime from Davinci Resolve
Resolve calls this process ‘Delivering’. Resolve supports the following formats or wrappers:

You can choose to render QuickTime format.
STEP 2. Download and install ProRes encoder
Here we recommend Brorsoft Video Converter to create ProRes on Windows.
Overall, this video converter is especially designed for Windows users to export ProRes 422, ProRes 422 HQ, ProRes 422 LT, ProRes 422 Proxy videos. With it, you will be able to export and save your video in Apple ProRes- the widespread and a wordwide «must have» format on Window 10/8/7/NT/2000/2003/XP/Vista, to deal with production, vfx, film companys, tv, spots agencies and media distributors. Of course, with Brorsoft Video Converter you can also convert any movie source/video clips to common video formats like MOV, AVI, MKV, WMV, MPG, FLV, etc without quality loss.

STEP 3. Convert Davinci Resolve export to ProRes on Windows
1. Add Source Videos
Launch the ProRes converter for Windows, and you can either click «Add» button to import your videos files, or directly drag and drop the files into this program
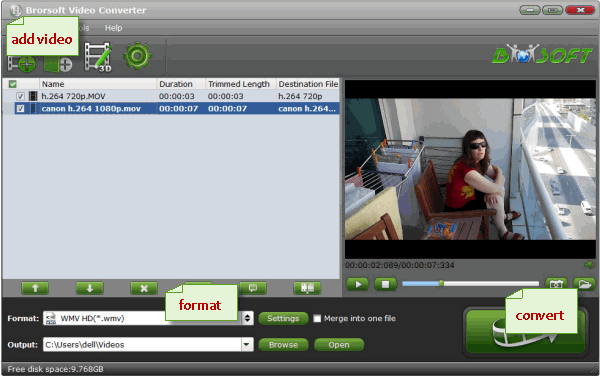
2. Choose PorRes Format
This Windows ProRes encoder offers optimized ProRes formats including Apple ProRes 422(*.mov), Apple ProRes 422(HQ) (*.mov), Apple ProRes 422(LT) (*.mov), and Apple ProRes 422(Proxy) (*.mov). Choose one as you need.
Tip: If the default settings do not fit you requirement, you can click «Settings» icon to and enter «Profile Settings» panel to adjust video size, bit rate, frame rate, sample rate and audio channels.
3. Start Conversion
Hit «Convert» button to start encoding Davinci Resolve video to ProRes for using, editing, playing on Windows PC with ease.