
Вопрос от пользователя
Здравствуйте.
Александр, подскажите пожалуйста с одной проблемой. Я никак не могу настроить видеодрайвер (у меня видеокарта Intel HD 620, интегрированная). Значка на панель управления в системном трее (рядом с часами) — нет, по правому клику на рабочем столе — тоже ничего нет.
Драйвера уже установил прямо с сайта Intel (два раза перепроверил). Что делать, как вернуть панель управления? Отчаялся…
Здравствуйте.
Да, в последнее время Intel «усложнила» жизнь пользователям (впрочем, подобная «проблема» случается и у обладателей AMD Radeon и nVidia видеокарт). Как я понял, последние версии драйверов от Intel получили возможность в опциях не показывать этот значок, и в ряде случаев он отключен по умолчанию…
Как бы там ни было, рассмотрим проблему в пошаговом режиме (и для разных производителей видеокарт).
*
Содержание статьи📎
- 1 Нет значка в трее на панель управления видеокартой: что делать
- 1.1 ШАГ 1: поиск «скрывшегося» значка
- 1.1.1 Вариант 1
- 1.1.2 Вариант 2
- 1.1.3 Вариант 3
- 1.1.4 Вариант 4
- 1.1.5 Вариант 5
- 1.1.6 Вариант 6 (для Intel HD)
- 1.2 ШАГ 2: обновление драйверов
- 1.1 ШАГ 1: поиск «скрывшегося» значка
→ Задать вопрос | дополнить
Нет значка в трее на панель управления видеокартой: что делать
ШАГ 1: поиск «скрывшегося» значка
Для начала порекомендовал бы проверить все «места», где может скрываться ссылка на панель управления. Рекомендую все действия (указанные ниже) — выполнять последовательно, так как приведено у меня… 👇
Вариант 1
Для начала обратите внимание на трей: дело в том, что там есть небольшая стрелочка (шторка), которая скрывает ряд значков. Попробуйте нажать на нее и посмотреть, нет ли там значка видеодрайвера (по умолчанию Windows его скрывает). 👇
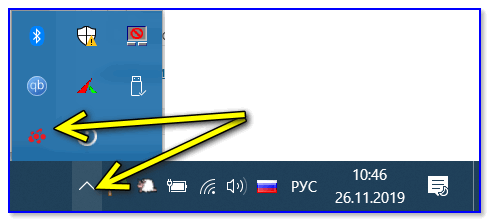
Стрелочка (шторка) в трее Windows 10
Если значка нет — попробуйте кликнуть правой кнопкой мышки по панели задач и откройте ее параметры.

Параметры панели задач
Далее откройте вкладку с отображаемыми значками (как это выглядит в Windows 10 — показано на скриншоте ниже). 👇
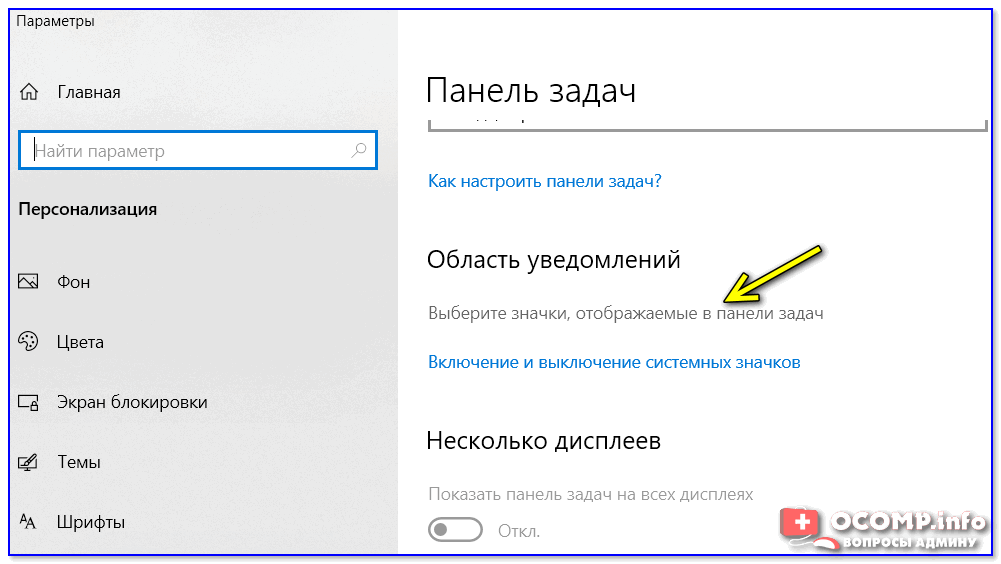
Выберите значки, отображаемые в панели задач
И проверьте, включен ли значок для вашего устройства: передвиньте ползунок вправо, и выбранный вами значок тут же отобразится на панели задач…
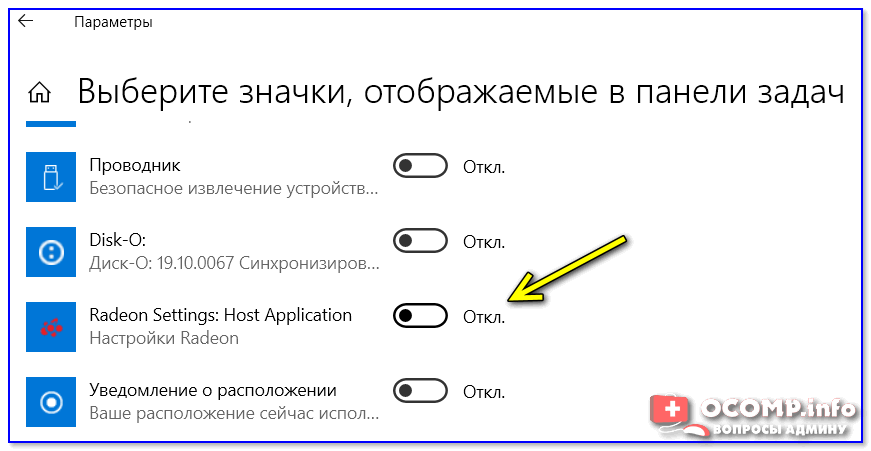
Включаем!
Вариант 2
Далее попробуйте нажать правой кнопкой мышки (ПКМ) в любом свободном месте рабочего стола (т.е. там, где нет ярлыков). В появившемся меню проводника, обычно, есть ссылка, вида:
- AMD Radeon Settings (как в моем примере ниже);
- nVidia Settings;
- Intel HD — настройка графики т.д.
Собственно, вам нужно просто выбрать этот пункт — через 2-3 сек. откроется панель управления драйвером…
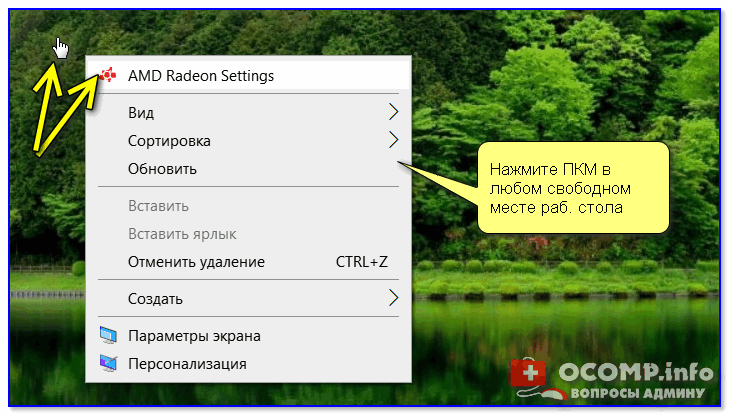
ПКМ в любом свободном месте раб. стола
Вариант 3
После, проверьте также панель управления (почти всегда в ее арсенале есть ссылки как на настройки драйвера звука, так и видео).
👉 В помощь!
Как открыть панель управления — [см. инструкцию]
Обратите внимание, что в панели управления режим отображения нужно изменить на «Крупные значки»!
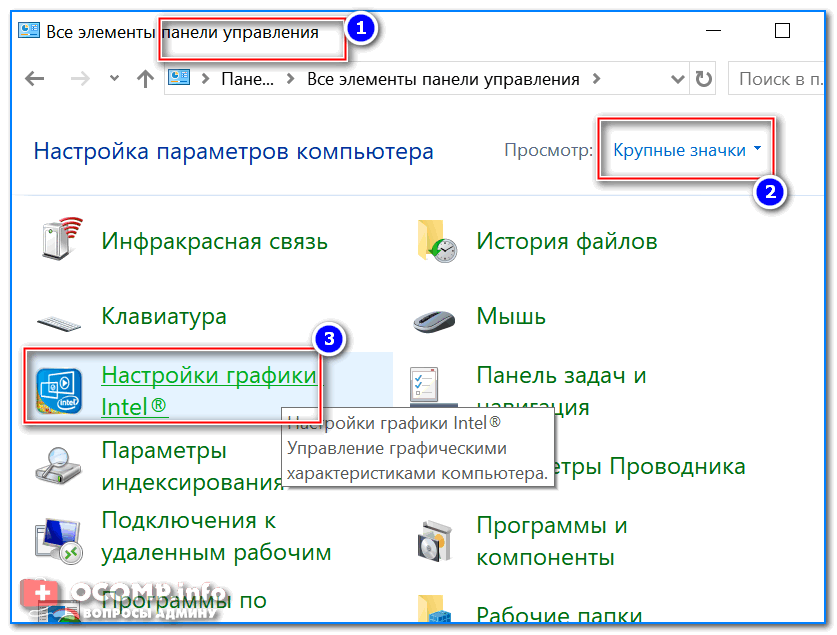
Панель управления — крупные значки — IntelHD настройки
Вариант 4
Последние версии драйверов Intel HD не отображаются в трее (почему-то…), но создают ярлык на открытие контрольной панели в меню ПУСК. Вам нужно просто найти букву «I» в списке стартового меню (см. пример на скриншоте ниже).
Примечание: Intel Graphics Control Panel — это и есть панель управления графики (настройки видеокарты).
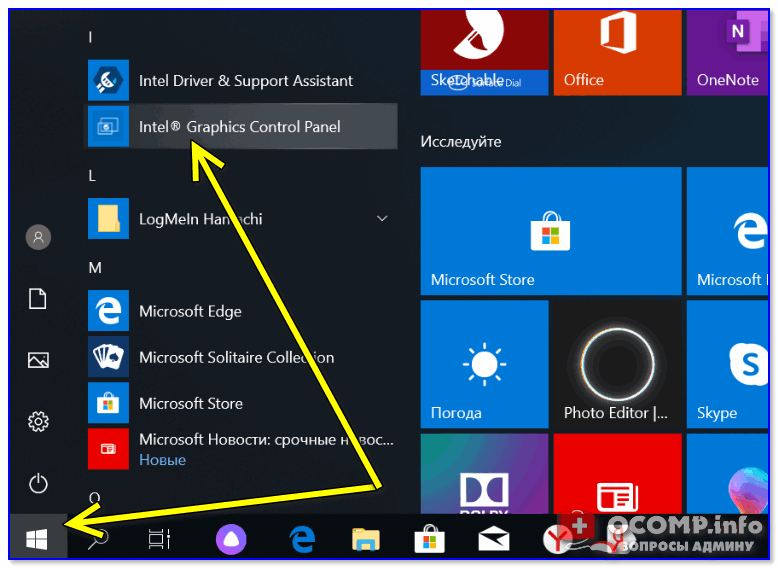
Intel Graphics Control Panel — ссылка в меню ПУСК
Вариант 5
В последних версиях ОС Windows очень не плохо реализован поиск.
Нажав по значку «лупы» и вписав в поисковую строку несколько первых букв вашей видеокарты (например, «Intel», «AMD», «nVidia») — ОС автоматически находит ссылку на контрольную панель (если, конечно, она у вас есть 👌).
Кстати, из меню поиска ссылку на драйвер видеокарты можно закрепить на начальном экране (см. скриншот ниже, правая часть).
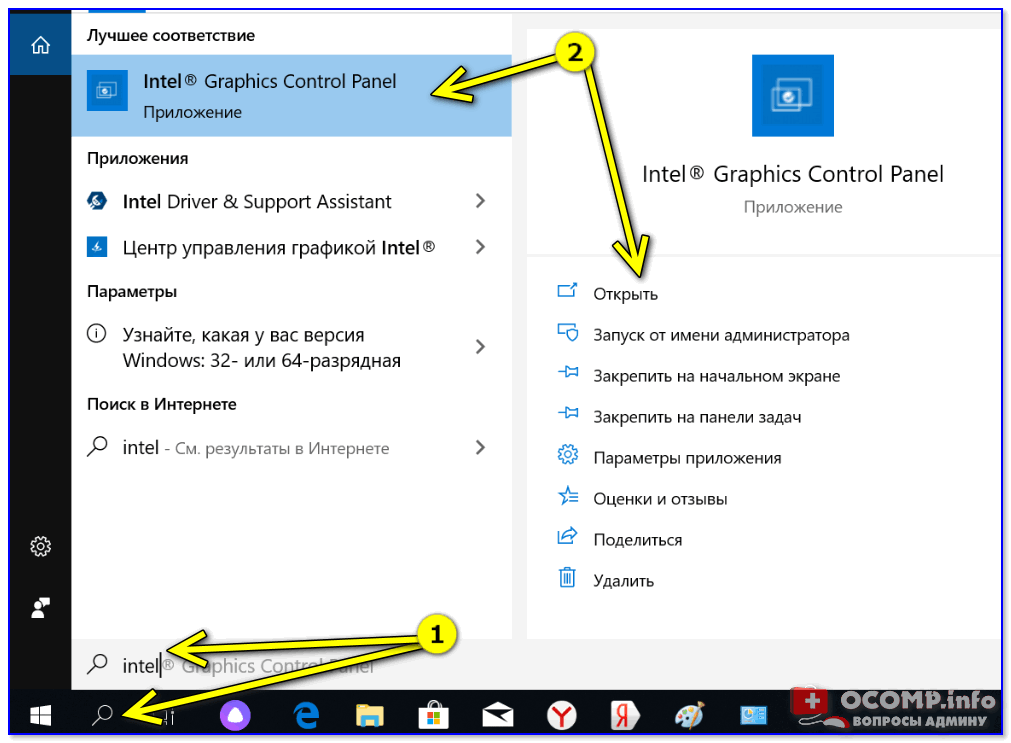
Открыть контрольную панель
Вариант 6 (для Intel HD)
Ну и последний вариант, актуальный для Intel HD видеокарт (последних версий). По умолчанию, в Intel включена возможность управления картой с помощью горячих клавиш. В том числе, есть сочетание и для вызова панели управления — Ctrl+Alt+F12.
👉 На ноутбуках в некоторых случаях нужно зажимать перед этим доп. клавишу Fn — т.е. будет Fn+Ctrl+Alt+F12
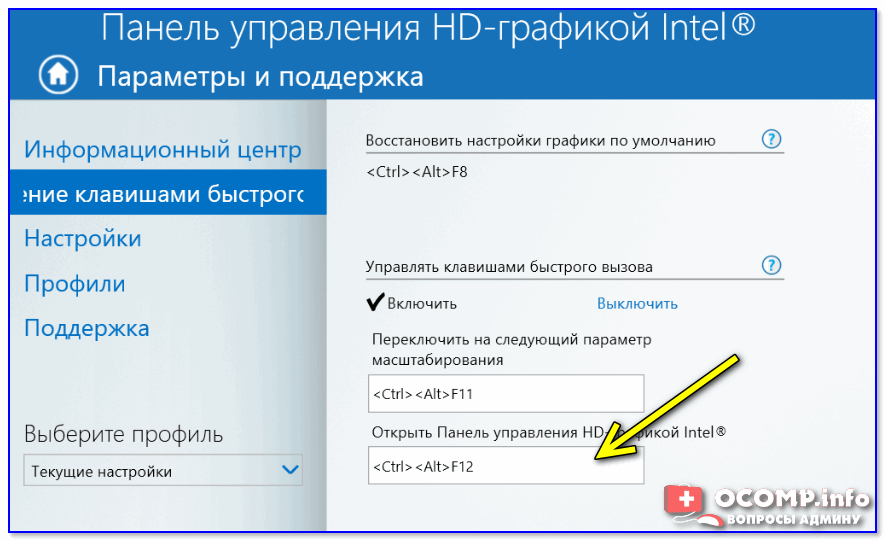
Быстро открыть панель управления — Ctrl+Alt+F12
*
ШАГ 2: обновление драйверов
Если все вышесказанное никак не помогло — скорее всего у вас просто не установлен драйвер. Попробуйте 📌 открыть диспетчер устройств и посмотреть вкладку «Видеоадаптеры» (и «Другие устройства», если она есть).
Если драйверов нет (не обновлены): вы увидите устройство с названием что-то вроде «Базовый адаптер». Напротив устройств, для которых не установлен драйвер — будет гореть восклицательный знак. Пару примеров приведено на скринах ниже.
📌 В помощь!
Как обновить драйвер на видеокарту AMD, nVidia и Intel HD: от А до Я — [см. инструкцию]
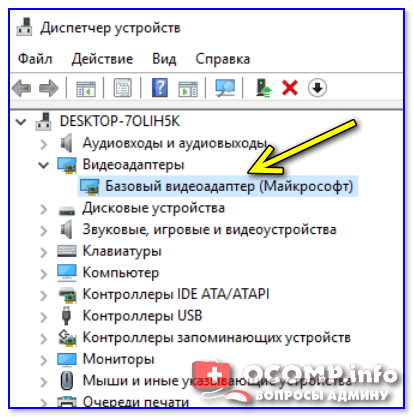
Базовый видеоадаптер Microsoft

Драйвер на видеокарту установлен (слева), драйвера нет (справа)
Обновить драйвера можно следующими способами:
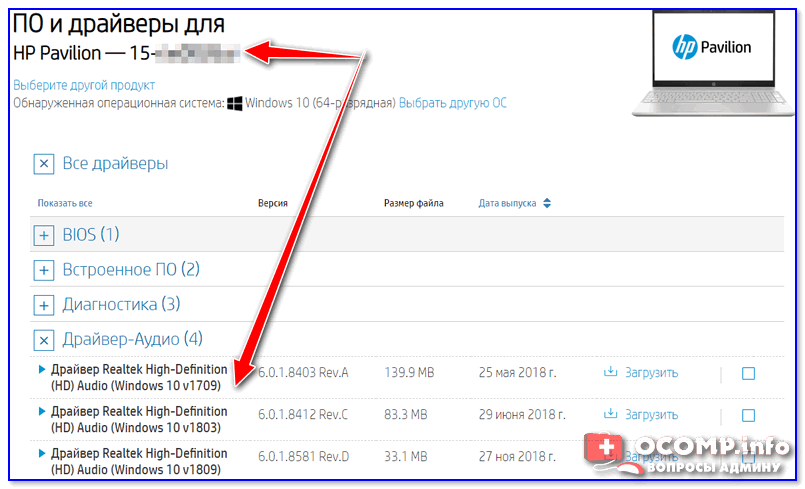
- если у вас ноутбук: 📌 определите его точную модель и на сайте производителя загрузите оптимизированные драйвера для именно этого устройства;

Драйверы — скриншот с сайта HP
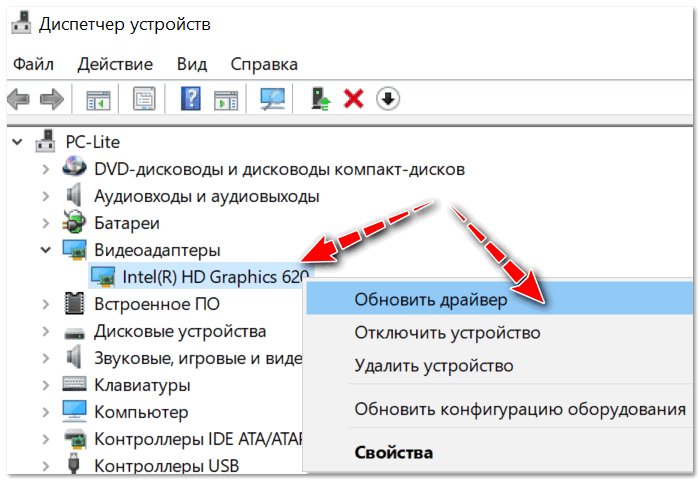
- если ваш ПК/ноутбук подключены к интернету (и у вас ОС Windows 10/11) — можно воспользоваться и штатной функцией 📌диспетчера устройств. Достаточно кликнуть правой кнопкой мышки по устройству (например, видеокарте) и в появившемся меню выбрать «Обновить драйвер». См. пример ниже. 👇

Диспетчер устройств — обновить драйвер
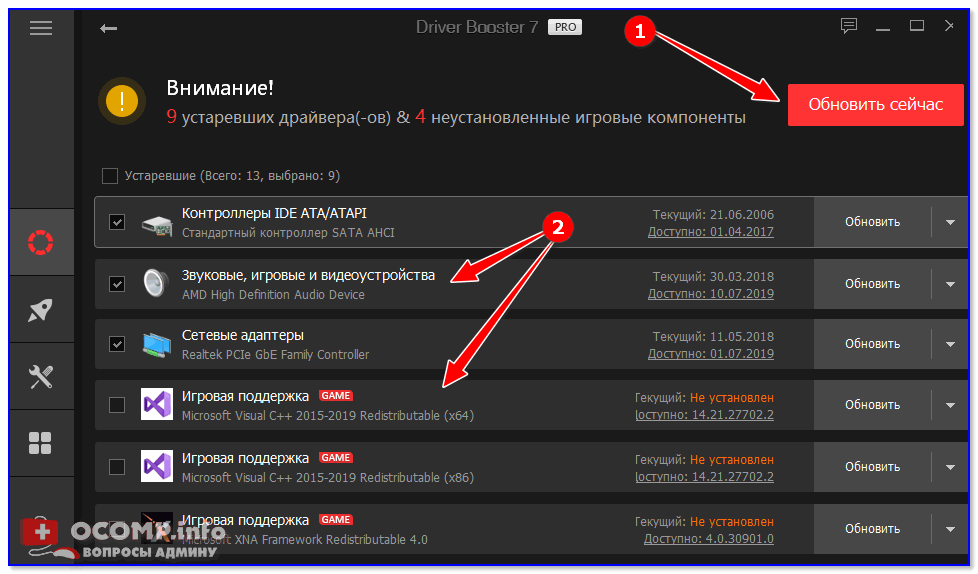
- существенно упростить процесс обновления можно прибегнув к специальным утилитам и сборникам драйверов (👉 Driver Booster, 👉 Driver Pack Solution, и др.).

Обновить всё — игровые компоненты, звуковые и игровые устройства и пр. / Driver Booster
*
Дополнения по теме приветствуются…
А у меня на сегодня всё.
Всего доброго!
👋
Первая публикация: 27.11.2019
Корректировка: 9.02.2022


-
Home
-
News
- Intel HD Graphics Control Panel Won’t Open? 6 Ways for You!
By Vera | Follow |
Last Updated
If Intel HD Graphics Control Panel won’t open or is missing on your Windows 10 PC, what should you do to get rid of the trouble? It is easy to fix and you can try solutions in this post from MiniTool Solution to easily help you out.
Intel HD Graphics Control Panel Not Opening
Intel Graphics Control Panel is an application in your Windows 10 that allows you to directly access the graphics driver features and settings. With it, you can customize your graphics settings to enhance your visual experience.
However, sometimes you run into some issues and the common is Intel HD Graphics Control Panel is not opening. Although it has initialized but finally won’t open. It’s a headache. The reasons for the issue of Intel HD Graphics Control Panel initializing but not opening includes issues with the UWP Intel Graphics app and an outdated Intel GPU driver.
How can you fix this issue on your PC? Multiple ways are introduced below.
Fixes – Intel HD Graphics Control Panel Won’t Open
Use Other Methods to Open Intel Graphics Control Panel
If you cannot open this app via right-clicking the desktop and choosing Graphics Settings, you can try other ways to launch HD Intel Graphics Control Panel:
- Type intel to the search bar and choose Intel Graphics Control Panel or Intel Graphics Command Center.
- If option 1 is not working, press Ctrl + Alt + F12 to open Intel Graphics Control Panel.
Update Your Intel GPU Driver
An outdated GPU driver can cause some issues and the issue – Intel HD Graphics Control Panel won’t open is an exception.
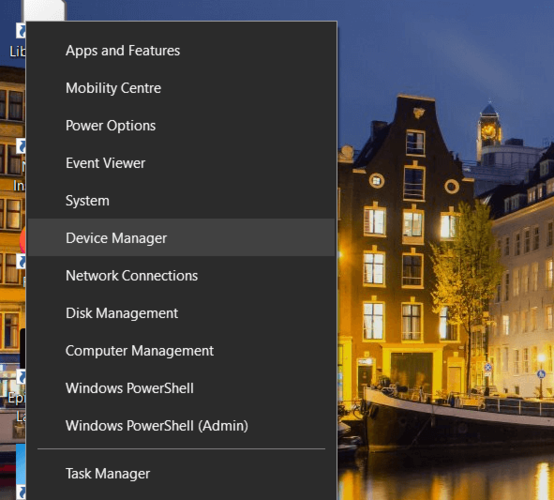
Step 1: Press Win + X and choose Device Manager.
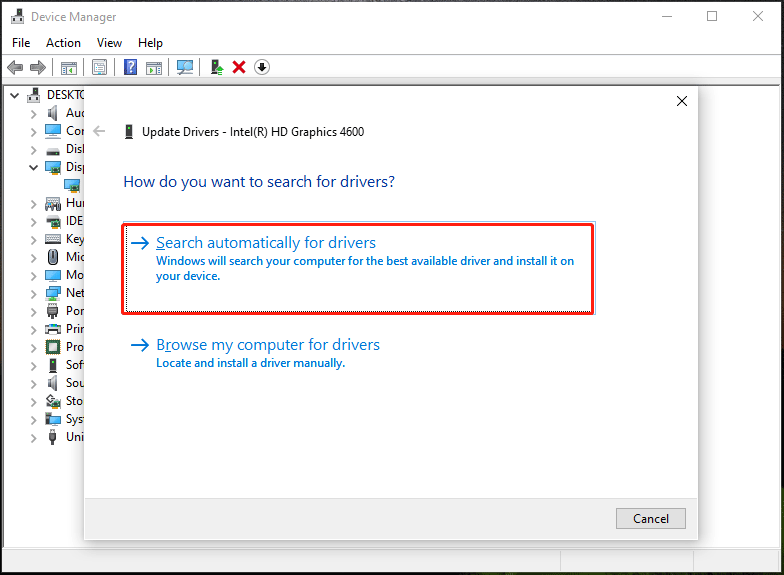
Step 2: Tap on Display adapters, right-click on your Intel graphics driver and choose Update driver.
Step 3: Click Search for automatically for drivers.
Tip: In addition, there are some other ways for you to perform a GPU driver update and you can find them in this related article – How to Update Graphics Card Drivers (NVIDIA/AMD/Intel).
Intel Graphics Control Panel Download and Install Manually
If the issue of Intel Graphics Control Panel missing or not opening happens on Windows 10, you can fix it by manually installing the Intel GPU driver.
Step 1: Launch Device Manager via the Win + X menu.
Step 2: Right-click your GPU driver under Display adapters and select Update driver.
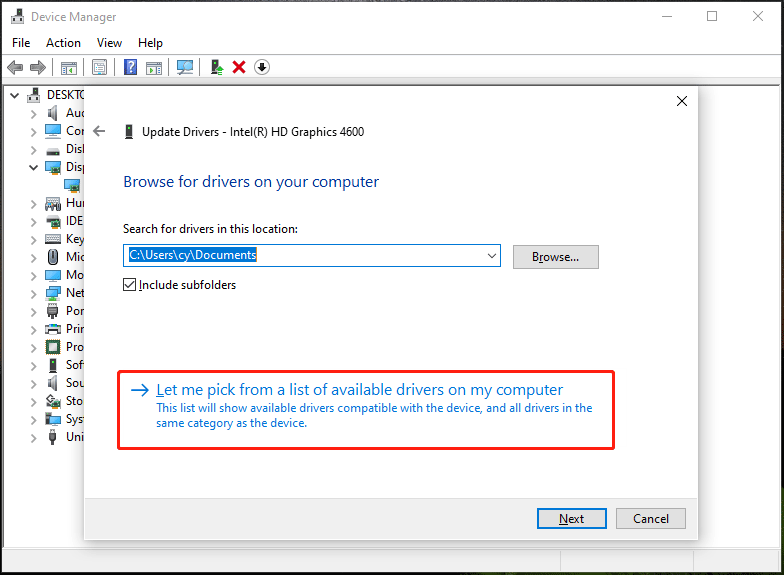
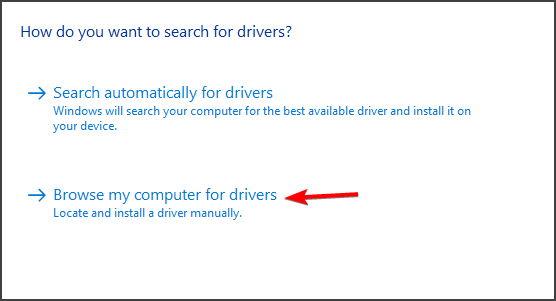
Step 3: Click Browser my computer for drivers.
Step 4: Tap on Let me pick from a list of available drivers on my computer.
Step 5: Choose a model like Intel(R) Graphics Control Panel, Intel HD Graphics 4600, or others and click Next to start installing. After that, re-launch the control panel app to see if it can run.
Reinstall Your Intel Graphics App
According to users, this can be a good option to fix your issue of Intel HD Graphics Control Panel initializing but not opening in Windows 10.
Step 1: Open Settings and click Apps.
Step 2: Under the Apps & features tab, scroll down to find the Intel Graphics app like Intel Graphics Command Center or Intel HD Graphics Control Panel, click it and choose Uninstall.
Step 3: After that, go to download Intel HD Graphics Command Center and install it on your PC.

Tip: Intel HD Graphics Control Panel is not available in Microsoft Store now.
Repair the UWP Intel Graphics App
If Intel HD Graphics Control Panel won’t open in Windows 10, you can also try this way to fix it.
Step 1: In Settings, go to Apps > Apps & features.
Step 2: Choose your Intel Graphics app and click Advanced options.
Step 3: Click the Repair button. If this won’t work, click Reset.
Run Windows Store Apps Troubleshooter
This is another way you can have a try and here is what you should follow:
Step 1: Launch Windows 10 Settings.
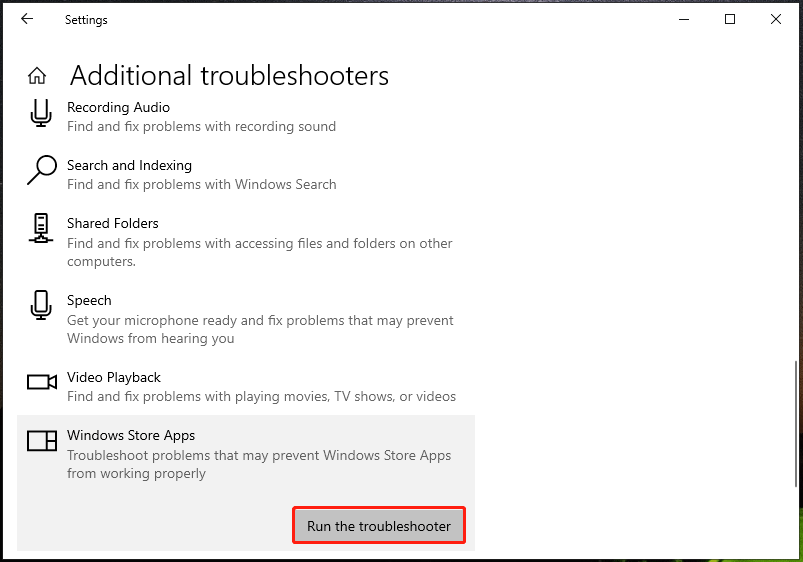
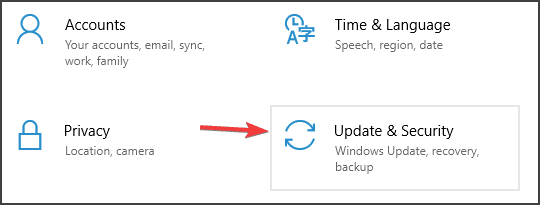
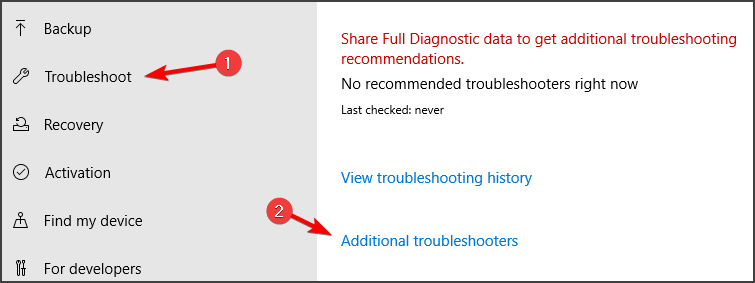
Step 2: Click Update & Security > Troubleshoot > Additional troubleshooter.
Step 3: Choose Windows Store Apps and click Run the troubleshooter.
These are all the solutions to fix Intel Graphics Control Panel not opening in Windows 10. If you have other ideas on this issue, leave a comment below.
About The Author

Position: Columnist
Vera is an editor of the MiniTool Team since 2016 who has more than 7 years’ writing experiences in the field of technical articles. Her articles mainly focus on disk & partition management, PC data recovery, video conversion, as well as PC backup & restore, helping users to solve some errors and issues when using their computers. In her spare times, she likes shopping, playing games and reading some articles.
by Matthew Adams
Matthew is a freelancer who has produced a variety of articles on various topics related to technology. His main focus is the Windows OS and all the things… read more
Updated on
- The Intel Graphics Control Panel not opening can be a problem, but there’s a way to fix it.
- One way to fix this issue is to update all your drivers with specialized software.
- You can also fix this issue simply by resetting the app to the default or by reinstalling it.
- If Intel Graphics Command Center is not opening, the solutions below will surely be able to fix it.

The Intel Graphics Control Panel enables users to change graphics settings for Intel GPUs. However, some users have reported that Intel Graphics Control Panel is not opening.
This issue can lead to other problems, such as Intel display audio not working therefore it’s crucial that you fix this problem as soon as possible.
Luckily for you, there’s a way to fix this problem, and in this article, we’re going to show you a couple of simple methods that you can use.
How can I fix the Intel Graphics Control Panel not opening?
1. Update your Intel GPU’s driver
First, try updating your Intel GPU’s driver after uninstalling the Intel Graphics Driver package and Graphics Control Panel app via Apps & features.
How we test, review and rate?
We have worked for the past 6 months on building a new review system on how we produce content. Using it, we have subsequently redone most of our articles to provide actual hands-on expertise on the guides we made.
For more details you can read how we test, review, and rate at WindowsReport.
You can update your Intel driver with driver updater software, which will include options for downloading and automatically installing the latest drivers.
Plus, the whole process works smoothly while updating any driver with almost no input from the user. Hence, manage GPU drivers effortlessly or any other driver on your PC using this software.
⇒ Get Outbyte Driver Updater
2. Manually install the Intel(R) Graphics Control Panel driver on your PC
- First, open the Win + X menu in Windows 10 with the Windows key + X hotkey.
- Click Device Manager to open that window.

- Double-click Software components to open that category.
- Next, right-click Intel(R) Graphics Control Panel (or Intel Graphics Command Center) and select Update driver to open the window shown directly below.

- Then click the Browse my computer for drivers option.

- Click the Let me pick from a list of available drivers on my computer option.

- Select the Intel(R) Graphics Control Panel, and click the Next button.
- Thereafter, restart Windows after reinstalling the driver.


NOTE
The above fix is for users who still can’t open the Intel Graphics app after they’ve installed the required DCH drivers on their PC. First, make sure your PC has a suitable Intel DCH driver installed on it.
Some users might only see Generic software listed in Software Components. If so, try right-clicking Generic software and installing the Intel(R) Graphics Control Panel driver as outlined above.
3. Try opening the Intel Graphics Control Panel with alternative methods
- Click the Type here to search taskbar button, and then enter Intel in the search box.
- Click the Intel Graphics Command Center (Control Panel) search result to launch that app.

If you can’t open the Intel Graphics Control Panel one way, try an alternative method. For example, you can open the Intel Graphics Control Panel with the Ctrl + Alt + F12 hotkey for it.
These are simple workarounds, but they might work if Intel Graphics Control Panel is not opening.
4. Repair and reset the UWP Intel Graphics app
- First, press the Windows and I keys at the same time to launch Settings.
- Click Apps to open that Settings tab.
- Then scroll down to and select your Intel Graphics app.
- Click Advanced options to open the buttons in the shot directly below.

- Then click the Repair option.
- If the Repair option doesn’t do the trick, try pressing the Reset button as well to clear the app’s data.

5. Reinstall your Intel Graphics app
- To reinstall an Intel Graphics app, open Apps & features in Settings as outlined for steps one and two of the previous resolution.
- Then select your Intel Graphics app in Apps & features.
- Click the Uninstall button to remove it.

- Open the Intel Graphics Command Center page in a browser.
- Press the Get button on that page.
- If a dialog box window pops up asking to open the MS Store, select the Open option.
- Then click the Get button within the MS Store app to reinstall Intel Graphics Command Center.

NOTE
The Intel® Graphics Control Panel is no longer available for download at MS Store. Users who need to reinstall the GCP app will have to replace it with the Intel Graphics Command Center.
If Intel Graphics Control panel is not opening, you can also remove it completely using specialized software with a built-in uninstaller. We recommend CCleaner because it will also clean junk files and registry entries.
⇒ Get CCleaner
6. Run the Windows Store Apps troubleshooter
- First, open the Settings window.
- Click Update & Security in Settings.

- Select the Troubleshoot on the left of Settings.
- Then click Additional troubleshooters to open the list shown directly below.

- Select Windows Store Apps to click its Run the troubleshooter button.
- Thereafter, go through the instructions provided by the troubleshooter to fix detected issues.

Those are some of the potential resolutions for fixing an Intel Graphics Control Panel (Command Center) app that doesn’t open. If the fixes above aren’t enough, however, you can contact support via Intel’s Customer Support page.
Did you manage to find the solution to this issue on your own? If you did, feel free to share it with us in the comments section.
![]()
Intel Graphics Control Panel missing on Windows 10 is one of the common issues that users are encountering. The desktop context menu and the system tray does not show item for the display card app. Some of them also tell getting BSOD errors while using certain applications like Photoshop.
The possible workaround to get back the Intel Graphics Control Panel is to manually update its driver. Experts around the corner also suggest downloading the UWP app of the same from Microsoft Store. However, for certain users, the app does not work but many are using it flawlessly. So, go through the below section and see the simple solution to get it back.
Here is how to fix Intel Graphics Control Panel missing on Windows 10 –
Step-1: Right-click on the Start icon and click Device Manager from the Win+X menu.
Step-2: From the list of devices in the console, find and expand Software components. Now, locate and right-click on the Intel(R) Graphics Control Panel. Select Update driver option.
Step-3: Choose the second option namely “Browse my computer for driver software” from the following window that opens up.
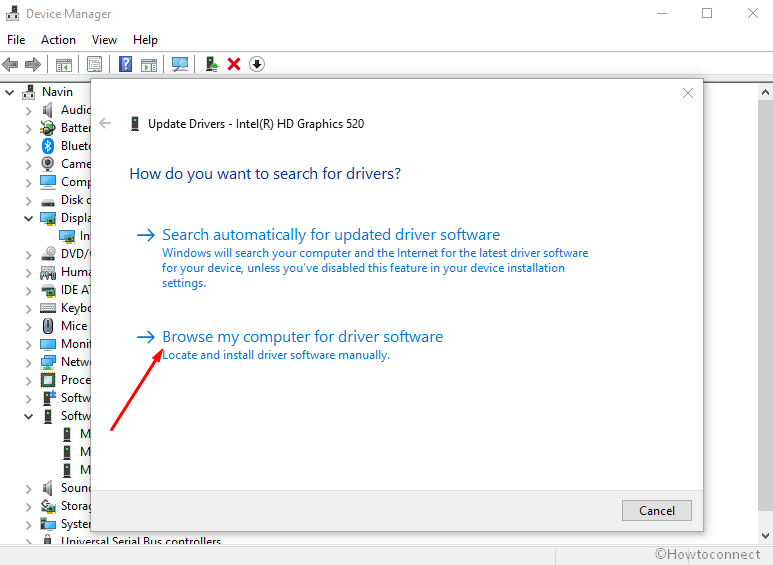
Step-4: Moving ahead, go with the option “Let me pick from a list of available drivers on my computer”.
Step-5: When a list shows up, choose Intel(R) Graphics Control Panel. Click Next.ho
Step-6: Wait and let the system reinstall the driver for your computer. Close the console and now try to open the Intel(R) Graphics Control Panel. This will eventually resolve Intel Graphics Control Panel missing on Windows 10 issue.
In addition, you can also try to download and install Intel(R) Graphics Control Panel app from Microsoft Store. Simply search for it and when you see in the list, select it. On the Store interface, click the Get button.
That’s all!!!
Repair any Windows problems such as Blue/Black Screen, DLL, Exe, application, Regisrty error and quickly recover system from issues using Reimage.
Download Windows Speedup Tool to fix errors and make PC run faster
In improving overall graphics infrastructure performance, Intel Graphics Control Panel has a key role to play. However, when you download the Intel Graphics Control Panel from the Microsoft Store and launch it from its location, the application may fail to launch. If you face this issue, then this post may help you.
![]()
Before proceeding to the solution, let us find why this error occurs in the first place. It is believed, the device manufacturer, sometimes, pushes and installs DC drivers through Windows Update service. As a result, the DC driver overwrites any DCH driver, installed earlier. Mind you, the Intel Graphics Control Panel application downloaded from the Microsoft Store is still not removed.
This leads to two instances of the Intel Graphics Control Panel trying to run on the system simultaneously, causing neither of them to open. Do the following and see if that helps you:
- Click Start.
- Got to the Settings.
- Chose Apps & Features.
- Locate Intel Graphics Control Panel and Intel Graphics Driver.
- Uninstall the two.
- Restart the computer.
- Go to Device Manager.
- Click Display Adapters.
- Right-click the Intel HD Graphics Adapter and click Update Driver.
Read the below description for more details!
Click the Start button, located at the bottom, and choose the Settings option.
Click the Apps tile to go to the Apps and Features section.

Here, locate the entries for Intel Graphics Control Panel and Intel Graphics Driver.
Uninstall the drivers and Restart the PC.
Open the Device Manager > Display Adapters.

Here, right-click the Intel HD Graphics Adapter and choose the Update Driver option.
Next, click Search automatically for the updated driver software link.
Wait for a few seconds as Windows Update will automatically search for, download, and install the latest graphics driver validated for your computer.
Alternatively, when the same error is followed by a message that says GfxUI.exe is missing, you can follow a different course of action to resolve the issue.
Right-click the Intel Graphics Control Panel shortcut and choose ‘Open file location.’ When directed to a new page, locate the shortcut file, right-click it again, and choose the ‘Open file location’ option one more time. You should be directed to a new folder like:
C:\WINDOWS\system32
Here, you should find a file called GfxUIEx.exe is highlighted. That’s the control panel you’re trying to open. Simply double-click the file to Intel Graphics Control Panel in Windows 11/10.
This should resolve the issue permanently.
Intel Graphics Control Panel Missing or Disappeared
If after installing the new DCH graphics driver the Intel Graphics Control Panel is missing and it cannot be launched using the context menu option or the tray icon, then you should know that the Intel Graphics Control Panel has now been replaced by the Intel Graphics Command Center for systems with 6th Generation Intel processors or newer. The Intel Graphics Command Center has the latest features and capabilities and will continue to be the user interface for future improvements.
Related: Intel Graphics Settings keep crashing
Intel Graphics Settings context menu item or tray icon missing
The Intel Graphics Settings context menu item or the system tray icon are no longer available when using Windows DCH Graphics drivers. The Intel Graphics Control Panel can be opened from the Windows Start menu or using the shortcut CTRL+ALT+F12.
Where to download Intel Graphics Control Panel or Intel Graphics Command Center?
You can download Intel Graphics Control Pane, now called, Intel Graphics Command Center from the Microsoft Store.
A post-graduate in Biotechnology, Hemant switched gears to writing about Microsoft technologies and has been a contributor to TheWindowsClub since then. When he is not working, you can usually find him out traveling to different places or indulging himself in binge-watching.