
Подскажите кто сталкивался, подключаю airpods 2 по синезубу к виндовс 10. До самого блютус передатчика в системнике максимум 40см расстояние. Звук бывает пропадает или заикается и лечится не на долго переключением с одного устройства вывода на другое в микшере windows. Пробовал обновлять драйвера, другие наушники работают без проблем. Может какие то опредленные настройки нужны или установка другого драйвера?
Intel(R) Wireless Bluetooth(R)
20.100.5.1
-
Вопрос задан
-
9539 просмотров
Пригласить эксперта
Это происходит из-за точек WIFI, как именно, пока не понятно. Если рядом лежит модем раздающий WIFI, звук начинает плавать… Должно быть фикс на аппаратном уровне, либо более новая версия блютуса.
Добрый день, была такая же проблема, мне помогло включение в настройках устройства (свойства наушников) пространственного звука (Windows Sonic) и Bass Boost в Enchancements (не знаю что конкретно помогло), но после этого наушники перестали «отклеиваться» и звук пропадать.
Добрый вечер пробуйте поменять адаптер на более высокую версию bluetooth.
Та же проблема на Win 10. В основном при просмотре видео на Youtube. Звук пропадает, но сразу возобновляется, если, например, поставить видео на паузу и снова запустить. Кто-то сталкивался? Есть решение?
-
Показать ещё
Загружается…
10 окт. 2023, в 13:36
2000 руб./за проект
10 окт. 2023, в 13:31
40000 руб./за проект
10 окт. 2023, в 13:21
3000 руб./за проект
Минуточку внимания
Попробуйте наш инструмент устранения неполадок
Выберите операционную систему
Выберите язык програмирования (опционально)
Если вы столкнулись с AirPods подключены, но нет звука вопрос, ты один. Многие пользователи Windows 10 жаловались, что при подключении AirPods к компьютеру звук идет из динамиков или вообще отсутствует звук. Не беспокойтесь. Мы собрали несколько исправлений, чтобы вы могли вернуть наушники в нормальное состояние.
Прежде чем начать:
Прежде чем пробовать что-то более сложное, вы можете выполнить описанные ниже шаги, чтобы исключить некоторые распространенные причины.
- Во-первых, убедитесь, что ваши AirPods не повреждены физически и полностью заряжены. Вы можете просто протестировать оборудование с помощью мобильного телефона или другого компьютера с Windows.
- Удалите AirPods и соедините их снова.
- Перезагрузите компьютер, чтобы устранить временный сбой системы.
- Отключите другие аудиоустройства от вашего ПК, чтобы избежать возможных помех.
Попробуйте эти исправления:
Если базовое устранение неполадок не помогает, возможно, вам придется поработать над более сложными методами. Вам не нужно пробовать их все. Просто продвигайтесь вниз по списку, пока не найдете тот, который поможет.
- Проверить наличие обновлений Windows Установите AirPods в качестве устройства по умолчанию Перезапустите службу поддержки Bluetooth. Обновите драйвер Bluetooth
Скриншоты взяты из Windows 10, но исправления также применимы к Windows 7 и 8.
Исправление 1 — проверьте наличие обновлений Windows
Когда ваши устройства внезапно начинают работать со сбоями на ПК, возможно, что-то не так с вашей операционной системой. Windows регулярно выпускает исправления для новых функций и исправлений ошибок, поэтому вы можете установить последние обновления, чтобы поддерживать свой компьютер в идеальном состоянии.
- На клавиатуре нажмите кнопку Windows logo key и я в то же время, чтобы открыть меню настроек. Затем нажмите Обновление и безопасность .

- Нажмите Проверить наличие обновлений .

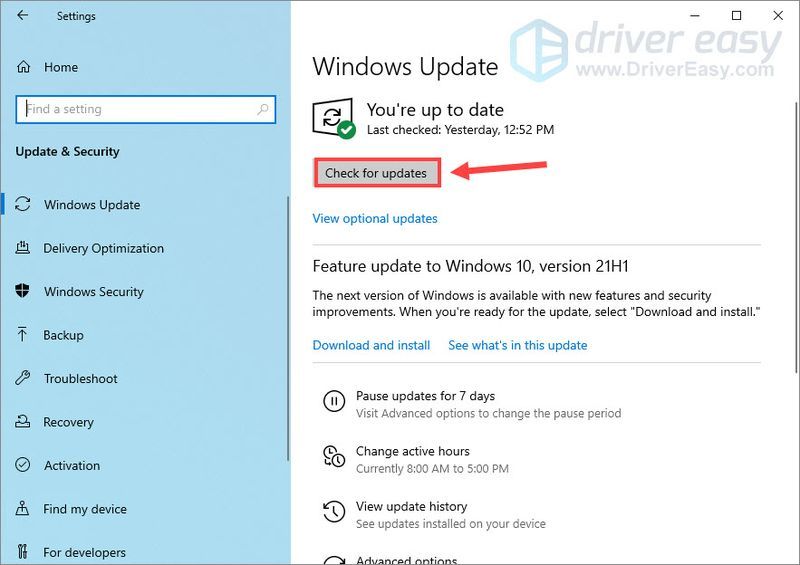
При наличии доступных обновлений загрузка и установка начнется автоматически. После завершения процесса перезагрузите компьютер, чтобы проверить проблему. Если проблема не исчезнет, перейдите ко второму решению.
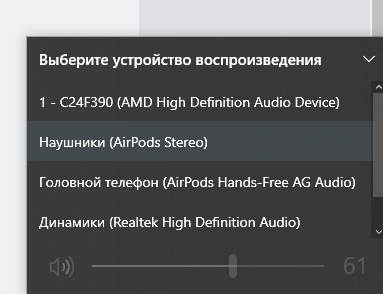
Исправление 2. Установите AirPods в качестве устройства по умолчанию.
Чтобы ваши AirPods всегда работали правильно в Windows, вы должны установить их в качестве устройства по умолчанию. Следуйте инструкциям, чтобы правильно настроить параметры.
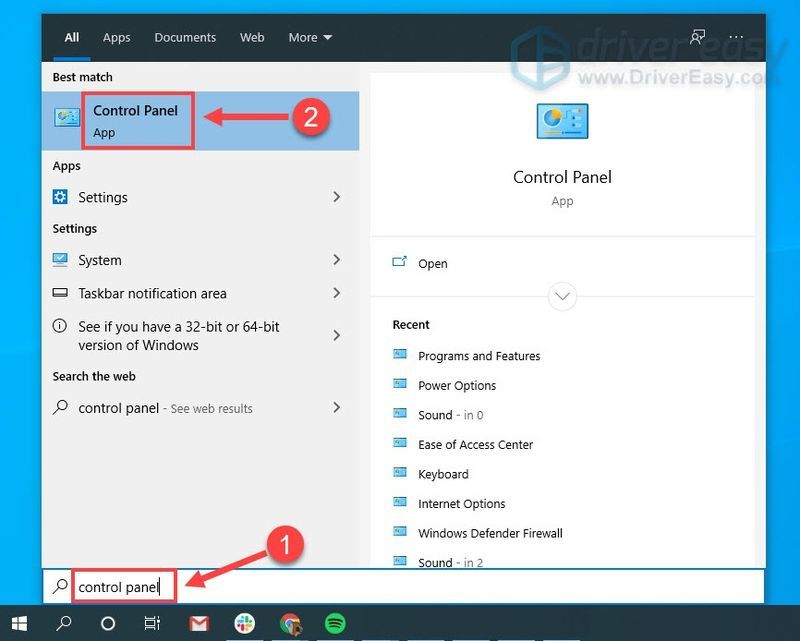
- Тип приборная доска в поле поиска Windows и выберите Приборная доска .
- Выбирать Маленькие значки рядом с пунктом Просмотреть и нажмите Звук .
- Под Воспроизведение Убедитесь, что ваши AirPods включены (должна стоять зеленая галочка). Затем нажмите AirPods и нажмите Установить по умолчанию .
- Перейдите к Запись вкладку, а также установите гарнитуру AirPods в качестве устройства по умолчанию.
- Нажмите В ПОРЯДКЕ чтобы сохранить изменения.
Если проблема со звуком в AirPods возникает только в определенных программах, вам следует проверить настройки в приложении и убедиться, что ваши наушники выбраны в качестве основного устройства как для ввода, так и для вывода звука.
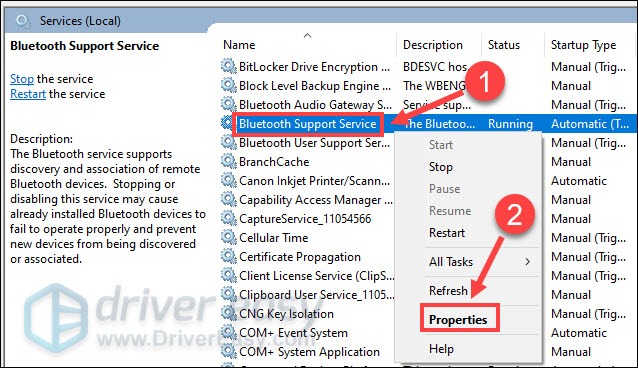
Исправление 3. Перезапустите службу поддержки Bluetooth.
Наушники Bluetooth, такие как AirPods, потребуют определенных служб для работы на вашем ПК с Windows. Если служба не запущена или не работает должным образом, при ее использовании возникнут различные проблемы.
- На клавиатуре нажмите кнопку Windows logo key и р в то же время, чтобы вызвать поле «Выполнить». Затем введите services.msc и нажмите В ПОРЯДКЕ .
- Щелкните правой кнопкой мыши Служба поддержки Bluetooth . Если он не запущен, нажмите Начинать ; если он уже запущен, нажмите Начать сначала .
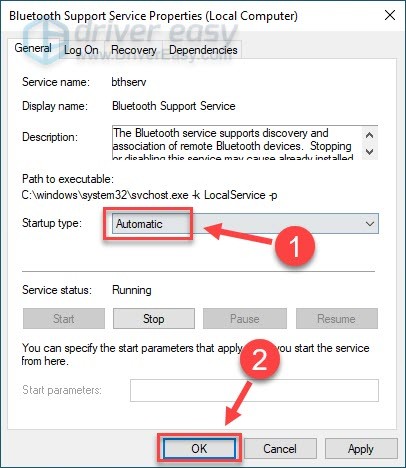
- После перезапуска службы снова щелкните ее правой кнопкой мыши и выберите Характеристики .
- Установить Тип запуска к автоматический и нажмите В ПОРЯДКЕ .

Посмотрите, воспроизводят ли ваши AirPods звук как обычно. Если нет, вам следует проверить, не связана ли проблема с драйверами устройств.
Исправление 4 — Обновите драйвер Bluetooth
Большинство сбоев устройства указывают на проблему с драйвером. Если вы используете устаревший или неисправный драйвер Bluetooth, AirPods могут не воспроизводить звук и работать случайным образом. Таким образом, вы можете установить последнюю версию драйвера Bluetooth, чтобы посмотреть, поможет ли это в вашем случае.
Драйвер Bluetooth можно обновить двумя способами: вручную или автоматически .
Если вы знакомы с компьютерным оборудованием, сначала определите производителя адаптера Bluetooth, например Intel, Qualcomm или Realtek и посетите их официальные сайты. Затем вам нужно загрузить правильный драйвер, соответствующий вашей версии Windows, и установить его вручную.
Если у вас нет времени, терпения или навыков работы с компьютером, чтобы обновить драйвер Bluetooth вручную, вместо этого вы можете сделать это автоматически с помощью Драйвер Легкий . Driver Easy автоматически распознает вашу систему и найдет правильный драйвер для вашего точного адаптера Bluetooth и вашей версии Windows, а также загрузит и установит его правильно:
- Скачатьи установите драйвер Easy.
- Запустите Driver Easy и нажмите кнопку Сканировать сейчас кнопка. Затем Driver Easy просканирует ваш компьютер и обнаружит проблемные драйверы.
- Нажмите на Обновлять кнопка рядом с помеченным Bluetooth драйвер для автоматической загрузки правильной версии этого драйвера, затем вы можете установить его вручную (вы можете сделать это с БЕСПЛАТНОЙ версией).
Или нажмите Обновить все для автоматической загрузки и установки правильной версии всех отсутствующих или устаревших драйверов в вашей системе. (Для этого требуется Про версия который поставляется с полной поддержкой и 30-дневной гарантией возврата денег. Вам будет предложено обновить, когда вы нажмете Обновить все .)

Pro-версия Driver Easy поставляется с полной технической поддержкой.
Если вам нужна помощь, обращайтесь Служба поддержки Driver Easy в support@drivereasy.com .
Протестируйте свои AirPods еще раз. Обновление драйвера должно восстановить звук в наушниках и заставить устройство оставаться в наилучшем состоянии.
Итак, это все простые исправления для подключенных AirPods, но без проблем со звуком. Надеюсь, вы найдете их полезными. Если у вас есть дополнительные вопросы или предложения, пожалуйста, не стесняйтесь оставлять комментарии ниже.
- аэродромы
- яблоко
- Bluetooth-гарнитура
- проблема со звуком
Как вернуть звук, когда AirPods отключаются в Windows 10 или 11.
AirPods — универсальный аудиоаксессуар. Их легко подключить и использовать практически с любым доступным на рынке устройством с поддержкой Bluetooth, включая ПК с ОС Windows.
Однако, некоторые пользователи сообщают что их AirPods иногда не издают звука, несмотря на правильное подключение к ПК. Это происходит из-за различных проблем, включая программные ошибки или неправильные настройки.
Не волнуйтесь: это можно легко исправить, сбросив настройки AirPods или изменив некоторые настройки. Итак, если вы хотите решить эту проблему с подключенными AirPods, но без звука в Windows 10 или 11, читайте дальше, чтобы узнать, как это сделать!
С другой стороны, если у вас проблемы со звуком в наушниках, у нас есть отдельное руководство по их устранению. Не стесняйтесь проверить это!
Всегда следите за тем, чтобы ваши AirPods были достаточно заряжены. Возможно, вы ничего не услышите, потому что вашим AirPods может не хватать мощности для передачи звука.
В отличие от iOS, Windows не отображает автоматически уровень заряда батареи ваших AirPods, поэтому нелегко увидеть, разряжаются ли они уже. Однако вы можете попробовать подключить AirPods к устройству iPhone или Android, чтобы проверить их аккумулятор.
Кроме того, вы можете использовать сторонние приложения, такие как Magic Pods, чтобы увидеть уровень заряда батареи ваших AirPods в Windows.
Волшебные стручки позволяет пользователям Windows пользоваться теми же преимуществами, что и пользователям iOS или macOS. Таким образом, когда вы открываете чехол AirPods, вы получаете такое же автоматическое всплывающее окно, показывающее уровень заряда батареи. Более того, есть даже полная движущаяся 3D-модель ваших AirPods, как при использовании их с iPhone.
Низкий заряд батареи ваших AirPods также может быть вызван проблемами с зарядкой. Убедитесь, что они могут правильно заряжаться при подключении к источнику питания. Вы можете исправить их, попробовав решения, перечисленные в нашем руководстве, когда ваши AirPods не заряжаются.
2. Возврат к заводским настройкам AirPods
Выполнение сброса к заводским настройкам или повторное сопряжение ваших AirPods — это универсальные решения, которые могут решить распространенные проблемы с AirPods. Например, это может включать проблему отсутствия звука при подключении к ПК с Windows.
Хотя это более техническая процедура, сброс к заводским настройкам возвращает ваши AirPods к заводским настройкам по умолчанию. Так же, как если бы они использовались только что из коробки. Однако не путайте это с повторным сопряжением, которое включает отсоединение ваших AirPods и повторное подключение их к ПК с Windows.
Вот как восстановить заводские настройки AirPods:
- Поместите свои AirPods обратно в чехол для зарядки. Откройте крышку.
Airpods внутри чехла для зарядки.
- Нажмите и удерживайте кнопку настройки на задней панели корпуса AirPods в течение 15 секунд. Индикатор состояния должен измениться с мигания желтым на белый.
Кнопка настройки Airpods.
- Закройте крышку. Ваши AirPods полностью сброшены.
Чехол для Airpods с закрытой крышкой.
У вас возникли проблемы со сбросом настроек AirPods? Вот удобное руководство о том, что делать, если ваши AirPods не сбрасываются.
3. Обновите прошивку AirPods.
Если ваши AirPods работают на устаревшей прошивке, это может вызвать проблемы совместимости при их использовании. Такие проблемы могут включать в себя отключение звука, случайные отключения или проблемы со звуком.
Во-первых, проверьте текущую версию прошивки, чтобы узнать, нужно ли ее обновить. Следуй этим шагам:
- Подключите наушники AirPods к устройству iOS.
Подключите наушники AirPods к устройству iOS.
- Откройте «Настройки» и коснитесь «Bluetooth».
«Bluetooth» в настройках iOS.
- В разделе «Мои устройства» щелкните значок информации (i) рядом с вашими AirPods, чтобы увидеть версию прошивки.
Значок информации (i)
По состоянию на май 2023 года последняя версия прошивки AirPods: 5Э135.
Спасибо Apple, все обновления прошивки автоматически установит на ваших AirPods всякий раз, когда выпускается новое обновление.
Однако ваши AirPods должны получить доступ к серверам Apple, чтобы обновить свою прошивку. В результате пользователям ПК с Windows потребуется использовать устройство Apple, чтобы получить последнюю версию прошивки AirPods.
Если по какой-либо причине прошивка ваших AirPods не обновляется автоматически, вы можете запустить процесс вручную. Ознакомьтесь с нашим полным руководством по обновлению AirPods, чтобы узнать, как это сделать.
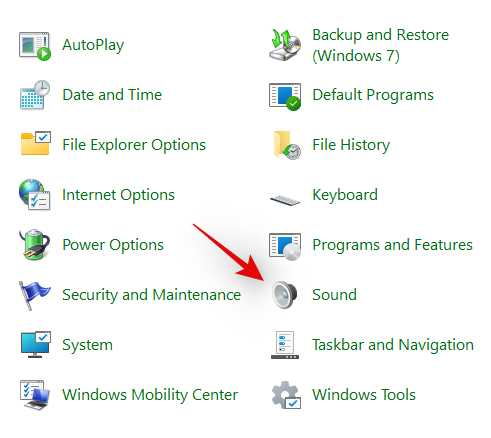
4. Установите AirPods в качестве устройства вывода звука по умолчанию.
Обычно, если вы не слышите звук на своих AirPods, это может быть связано с тем, что они не являются устройством вывода по умолчанию в Windows. В результате передаваемый звук поступает на динамики вашего компьютера или другие подключенные устройства, а не на ваши AirPods.
Выполните следующие действия, чтобы изменить настройки:
Для Windows 10:
- Открыть настройки.
«Настройки» на ПК с Windows.
- Щелкните Система.
«Система» в настройках.
- Щелкните Звук.
«Звук» в системе.
- В разделе «Вывод» выберите свои AirPods в качестве устройства вывода по умолчанию.
Выберите устройство вывода.
Для Windows 11:
- Открыть настройки.
«Настройки» на ПК с Windows.
- Нажмите «Система» в меню слева.
«Система» в настройках.
- Щелкните Звук.
«Звук» в системе.
- В разделе «Выберите, где воспроизводить звук» выберите свои AirPods.
Выберите AirPods.
- Нажмите на значок стрелки (>) рядом с вашими AirPods.
Щелкните значок стрелки.
- В разделе «Общие» нажмите «Установить в качестве звукового устройства по умолчанию» и выберите «Используется по умолчанию для звука».
Установить в качестве аудиоустройства по умолчанию.
5. Отрегулируйте баланс звука
Еще один способ — проверить баланс звука ваших AirPods. Возможно, вы случайно изменили настройки, сдвинув громкость в сторону левого или правого AirPods. В результате это может вызвать проблемы со звуком, например, один из ваших AirPods будет звучать тише, чем обычно, или не иметь звука с одной стороны.
Чтобы настроить баланс звука, выполните следующие действия:
Для Windows 10:
- Открыть настройки.
Откройте «Настройки» в Windows.
- Нажмите «Система», затем «Звук».
Нажмите «Звук» в системе.
- В разделе «Вывод» выберите свои AirPods.
Выберите устройство вывода.
- Щелкните Свойства устройства.
Нажмите «Свойства устройства».
- Установите ползунки на 50 на L и R, чтобы равномерно распределить громкость звука.
Отрегулируйте ползунки громкости.
Для Windows 11:
- Открыть настройки.
Откройте «Настройки» в Windows.
- Нажмите «Система» в меню слева.
Нажмите «Система» в настройках.
- Щелкните Звук.
Нажмите «Звук» в системе.
- В разделе «Выберите, где воспроизводить звук» выберите свои AirPods.
Выберите AirPods.
- Вручную отрегулируйте громкость левого и правого каналов.
Отрегулируйте ползунки громкости.
6. Сбросить настройки сети
AirPods обычно полагаются на стабильное соединение Bluetooth с вашим ПК с Windows для передачи звука. Следовательно, ошибка сетевого подключения может быть возможной причиной того, что вы не слышите звук на своих AirPods.
Самый простой способ исправить это — сбросить настройки сети в Windows. Затем перепроверьте подключение AirPods и посмотрите, решит ли это проблему. Вот как:
В Windows 10:
- Открыть настройки.
«Настройки» на ПК с Windows.
- Выберите Сеть и Интернет.
«Сеть и Интернет» в настройках.
- Щелкните Статус в меню слева.
«Статус» в сети и Интернете.
- Нажмите «Сброс сети», затем «Сбросить сейчас».
Нажмите «Сбросить сейчас».
- Нажмите Да для подтверждения. Ваш компьютер автоматически перезагрузится, чтобы изменения вступили в силу.
Нажмите «Да» для подтверждения.
В Windows 11:
- Открыть настройки.
Откройте «Настройки» в Windows.
- Выберите Сеть и Интернет.
Нажмите «Сеть и Интернет».
- Выберите Дополнительные параметры сети.
Нажмите «Дополнительные параметры сети».
- Нажмите «Сброс сети», затем «Сбросить сейчас».
Нажмите «Сбросить сейчас».
- Нажмите Да для подтверждения. Ваш компьютер автоматически перезагрузится, чтобы изменения вступили в силу.
Нажмите «Да» для подтверждения.
7. Перезапустите и перенастройте параметры службы поддержки Bluetooth.
В Windows несколько программ обычно работают в фоновом режиме в любое время. Они помогают контролировать систему, проверять наличие обновлений и предоставлять другие важные услуги. Например, Службы поддержки Bluetooth помогают регулировать и контролировать подключения удаленных устройств Bluetooth, включая ваши AirPods.
Если он работает неправильно или не запускается, это может вызвать проблемы с вашими AirPods при их использовании в Windows. Чтобы решить эту проблему, вы можете перезапустить службу вручную и настроить ее запуск при автоматическом включении компьютера.
Вот как это сделать:
В Windows 10:
- Щелкните правой кнопкой мыши «Пуск» и выберите «Выполнить».
Откройте диалоговое окно «Выполнить».
- Введите services.msc в диалоговое окно и нажмите OK.
Открытые службы.
- Дважды щелкните Служба поддержки Bluetooth и убедитесь, что состояние Службы указано «Работает». Если нет, нажмите Пуск.
Нажмите «Пуск».
- Щелкните раскрывающееся меню рядом с Тип запуска и выберите Автоматически.
Выберите «Автоматически».
- Нажмите «Применить», затем «ОК», чтобы выйти.
Нажмите «Применить».
В Windows 11:
- Нажмите клавишу Windows и S вместе, чтобы запустить панель поиска.
Запустите строку поиска.
- Введите services и запустите приложение Services.
Открытые службы.
- Дважды щелкните Служба поддержки Bluetooth.
Дважды щелкните Служба поддержки Bluetooth.
- На вкладке «Общие» нажмите «Остановить» в разделе «Статус службы». Затем нажмите Start, чтобы перезапустить его.
Нажмите «Пуск».
- Щелкните раскрывающееся меню рядом с Тип запуска и выберите Автоматически.
Выберите «Автоматически».
- Нажмите «Применить», затем «ОК», чтобы выйти.
Нажмите «Применить».
8. Запустите средство устранения неполадок устройства Bluetooth.
В Windows есть несколько встроенных средств устранения неполадок, помогающих пользователям с распространенными проблемами. К ним относятся устранение неполадок устройств Bluetooth, проблем с оборудованием и устройствами, а также ошибок воспроизведения звука. При запуске средство устранения неполадок автоматически обнаруживает проблемы с вашими устройствами Bluetooth и начинает их устранять.
Попробуйте запустить средство устранения неполадок устройства Bluetooth и посмотрите, решит ли оно проблему с вашими AirPods. Вот что нужно сделать:
В Windows 10:
- Открыть настройки.
Откройте «Настройки» в Windows.
- Выберите Обновление и безопасность.
Откройте «Обновление и безопасность».
- В разделе «Найти и устранить другие проблемы» нажмите «Bluetooth».
Нажмите «Bluetooth».
В Windows 11:
- Введите «Устранение неполадок» в строке поиска и нажмите «Устранение неполадок с настройками» в результатах поиска.
Откройте настройки устранения неполадок.
- Щелкните Другие средства устранения неполадок.
Нажмите «Другие средства устранения неполадок».
- Выберите «Выполнить» рядом со средством устранения неполадок Bluetooth.
Нажмите «Выполнить» рядом с Bluetooth.
9. Запустите средство устранения неполадок воспроизведения аудио
Проблема с AirPods может быть связана с повреждением аудиодрайверов, подключением наушников или неправильными настройками звука в Windows. Если это так, вы можете попробовать запустить средство устранения неполадок с воспроизведением звука, которое может решить распространенные проблемы с воспроизведением звука в Windows.
Выполните следующие действия, чтобы запустить средство устранения неполадок воспроизведения звука:
- Введите воспроизведение звука в строку поиска Windows.
Найдите «воспроизведение аудио».
- Выберите Найти и исправить проблемы с воспроизведением звука из результатов.
Нажмите «Найти и устранить проблемы с воспроизведением звука».
- Выберите свои AirPods из списка и нажмите «Далее», чтобы запустить средство устранения неполадок.
Нажмите “Далее’.
10. Проверьте и обновите ОС Windows
Windows часто выпускает исправления, которые исправляют ошибки и улучшают общую функциональность системы. Запуск устаревшей сборки Windows может привести к проблемам несовместимости с оборудованием и другими подключенными устройствами, такими как ваши AirPods.
В зависимости от ваших настроек эти обновления могут загружаться и устанавливаться автоматически. В противном случае вам, возможно, придется установить их вручную.
Проверьте наличие последних обновлений Windows и посмотрите, решит ли это проблему со звуком в ваших AirPods.
Вот что вам нужно сделать:
- Открыть настройки.
Нажмите «Настройки» в Windows.
- Выберите Центр обновления Windows.
Нажмите «Центр обновления Windows».
- Щелкните Проверить наличие обновлений. Если доступно новое обновление, оно должно начать загружаться и устанавливаться автоматически.
Нажмите «Проверить наличие обновлений».
Не выключайте компьютер и не отключайте его от сети во время обновления, так как это может повредить операционную систему.
11. Обновите драйвер Bluetooth
Если драйверы Bluetooth на вашем ПК устарели, это может повлиять на подключение Bluetooth. Более того, это также может объяснить, почему вы не слышите звука от своего AirPod.
Вы можете исправить это, обновив драйверы Bluetooth вашего ПК. Следуй этим шагам:
В Windows 10:
- Введите Диспетчер устройств в строке поиска и запустите его.
Откройте Диспетчер устройств.
- Выберите Bluetooth, затем щелкните правой кнопкой мыши AirPods и выберите «Обновить драйвер».
Щелкните правой кнопкой мыши «Bluetooth-адаптер».
- Щелкните Автоматический поиск драйверов. Windows начнет автоматический поиск последней версии драйвера.
Нажмите «Автоматический поиск драйверов».
- Если вы загрузили последний установочный файл драйвера с веб-сайта производителя, выберите Поиск драйверов на моем компьютере.
Нажмите «Выполнить поиск драйверов на моем компьютере».
- Нажмите «Обзор», чтобы найти, где вы сохранили установочный файл, затем нажмите «ОК».
Нажмите «Обзор».
- Выберите «Далее» и следуйте инструкциям по установке драйвера. После этого нажмите Закрыть.
Нажмите “Далее’.
- Перезагрузите компьютер, чтобы изменения драйвера вступили в силу.
Перезагрузите ПК.
В Windows 11:
- Введите Диспетчер устройств в строке поиска и запустите его.
Откройте Диспетчер устройств.
- Выберите Bluetooth, затем щелкните правой кнопкой мыши AirPods и выберите «Обновить драйвер».
Щелкните правой кнопкой мыши «Bluetooth-адаптер».
- Щелкните Автоматический поиск драйверов. Windows начнет автоматический поиск последней версии драйвера.
Нажмите «Автоматический поиск драйверов».
- Следуйте инструкциям по установке драйвера. После этого нажмите «Закрыть» и перезагрузите компьютер.
Нажмите «Закрыть».
12. Убедитесь, что стереозвук включен для AirPods
В Windows есть служба телефонии громкой связи, которая поддерживает гарнитуры Bluetooth для телефонных звонков. Однако иногда это может вызывать проблемы со звуком в ваших AirPods. Мы рекомендуем вам попробовать отключить эту функцию и вместо этого включить стереозвук, чтобы посмотреть, поможет ли это.
Вот шаги:
- Введите панель управления в строке поиска и запустите ее.
Запустите «Панель управления».
- Щелкните Устройство и принтеры.
«Устройства и принтеры» в настройках.
- Щелкните правой кнопкой мыши свои AirPods и выберите «Свойства».
Нажмите «Свойства».
- На вкладке «Услуги» снимите флажок «Handsfree Telephony».
Снимите флажок «Handsfree Telephony».
- Нажмите «Применить», затем «ОК».
Нажмите «Применить».
13. Отрегулируйте абсолютную громкость в редакторе реестра.
Абсолютная громкость — это функция Windows, которая помогает пользователям лучше контролировать громкость своих наушников Bluetooth. Однако иногда это может помешать вам отрегулировать громкость определенных устройств, таких как ваши AirPods.
Вам нужно будет использовать редактор реестра Windows, чтобы отключить эту функцию и посмотреть, слышите ли вы какой-либо звук в своих AirPods.
Будьте осторожны при редактировании записей реестра, так как это может сделать ваш компьютер нестабильным, если вы сделаете это неправильно. В качестве меры предосторожности сделайте резервную копию реестра, прежде чем продолжить.
Вот шаги, чтобы отключить абсолютный объем:
- Введите Редактор реестра в строке поиска и запустите его.
Откройте редактор реестра.
- На левой боковой панели в разделе «Компьютер» дважды щелкните HKEY_LOCAL_MACHINE.
Откройте HKEY_LOCAL_MACHINE.
- Дважды щелкните СИСТЕМА.
Открытая система.
- Дважды щелкните ControlSet001.
Откройте ControlSet001.
- Дважды щелкните элемент управления.
Откройте Управление.
- Дважды щелкните Bluetooth.
Откройте Bluetooth.
- Дважды щелкните Аудио.
Откройте Аудио.
- Дважды щелкните AVRCP.
Откройте AVRCP.
- Дважды щелкните КТ.
Откройте КТ.
- В правом окне щелкните правой кнопкой мыши DisableAbsoluteVolume и выберите Modify.
Измените DisableAbsoluteVolume.
- Измените значение данных на 1, чтобы отключить Абсолютный объем, затем нажмите OK.
Изменить данные значения.
- Перезагрузите компьютер, чтобы изменения вступили в силу.
Перезагрузите ПК.
Заключение
Хотя AirPods являются универсальными и популярными беспроводными аудиоустройствами, они никоим образом не идеальны.
При совместном использовании устройств разных производителей всегда будут технологические ограничения. К сожалению, иногда это может произойти с компьютерами AirPods и Windows.
Хорошая новость заключается в том, что теперь вы лучше подготовлены к решению проблемы отсутствия звука на ваших AirPods, когда они подключены к Windows. Таким образом, вы можете продолжать пользоваться своими AirPods без каких-либо помех.
Что вы думаете о наших предложениях? Вы нашли их полезными, или мы пропустили какой-то метод? Дайте нам знать в комментариях ниже!

If you’re encountering the AirPods connected but no sound issue, you’re alone. Many Windows 10 & 11 users complained that when they connected the AirPods to a computer, the sound comes from the speakers or there’s no sound at all. Don’t worry. We’ve put together several fixes for you to bring your earbuds back to normal.
Before getting started:
Before trying anything more complicated, you can go through the steps below to rule out some common causes.
- First, make sure your AirPods are not physically damaged and fully charged. You can simply test the hardware with a mobile phone or another Windows computer.
- Remove AirPods and pair them again.
- Restart your computer to resolve the temporary glitch of the system.
- Disconnect other audio devices from your PC to avoid potential interference.
Try these fixes:
If the basic troubleshooting doesn’t help, you may need to work on more advanced methods. You don’t have to try them all. Just work your way down the list until you find the one that does the trick.
- Check for Windows updates
- Set your AirPods as the default device
- Restart the Bluetooth Support service
- Update your Bluetooth driver
The screenshots are from Windows 10, but the fixes also apply to Windows 7, 8 and 11.
Fix 1 – Check for Windows updates
When your devices start to malfunction on PC all of a sudden, there may be something wrong with your operating system. Windows regularly push patches for new features and bug fixes, so you can install the latest updates to keep your computer in tip-top condition.
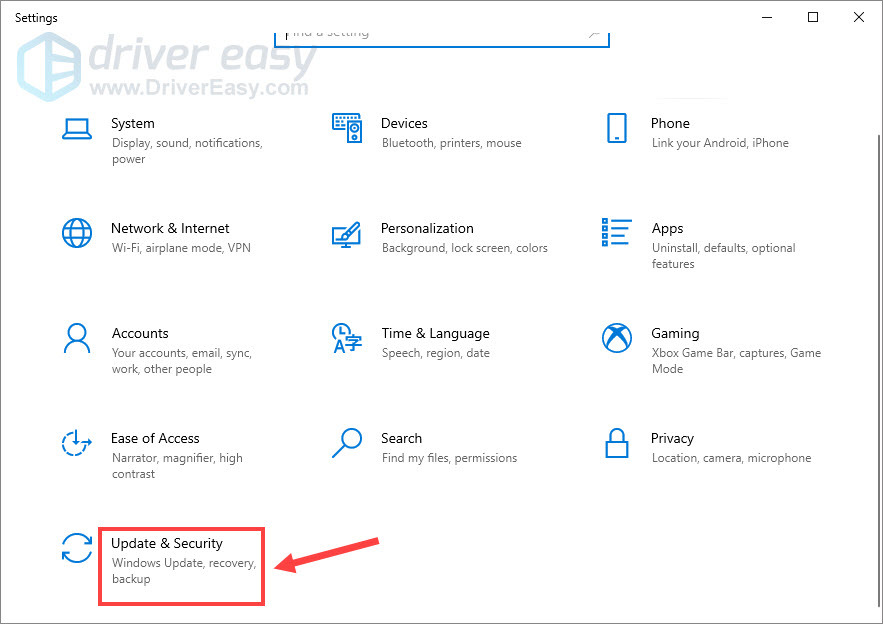
- On your keyboard, press the Windows logo key and I at the same time to open the Settings menu. Then click Update & Security.

- Click Check for updates.
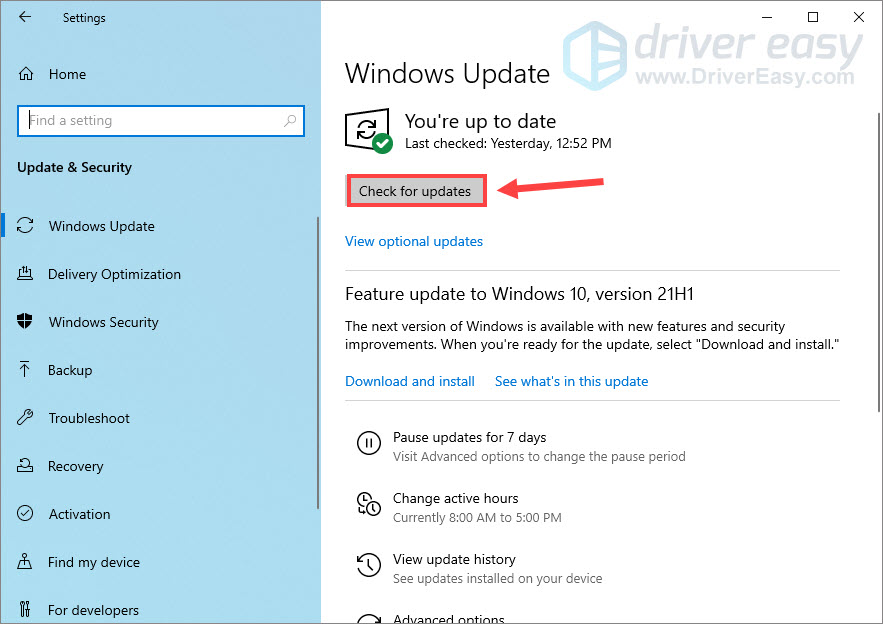
If there are any updates available, the download and installation will automatically initiate. After the process completes, restart your computer to test the issue. If it persists, move on to the second solution.
Fix 2 – Set your AirPods as the default device
To make sure your AirPods work properly at all times on Windows, you should set them as the default device. Follow the instruction to configure the settings correctly.
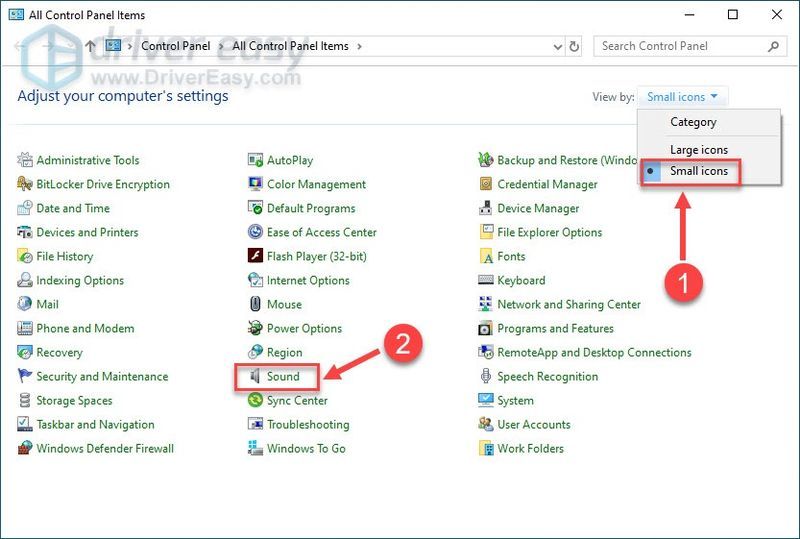
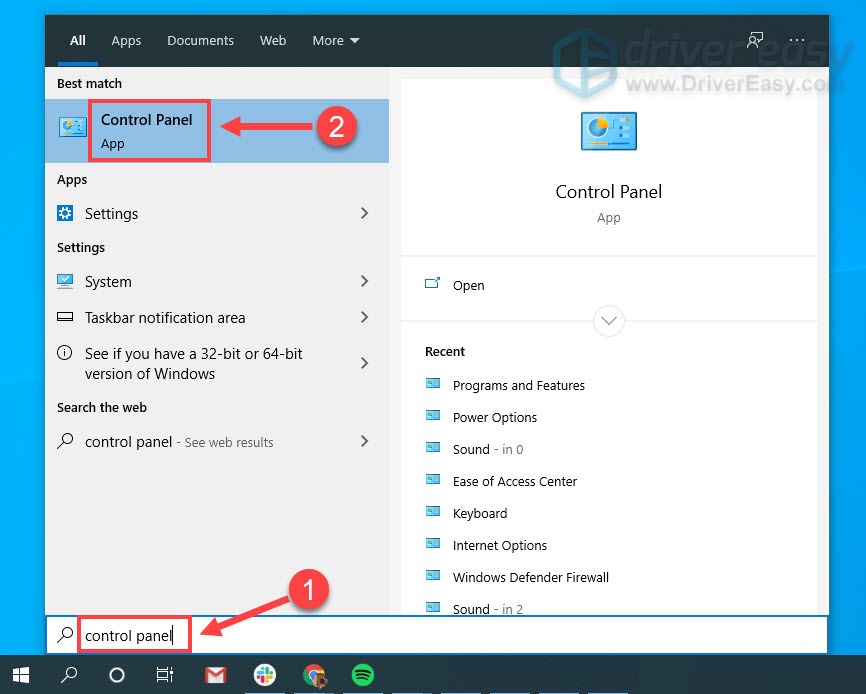
- Type control panel in the Windows search box and select Control Panel.

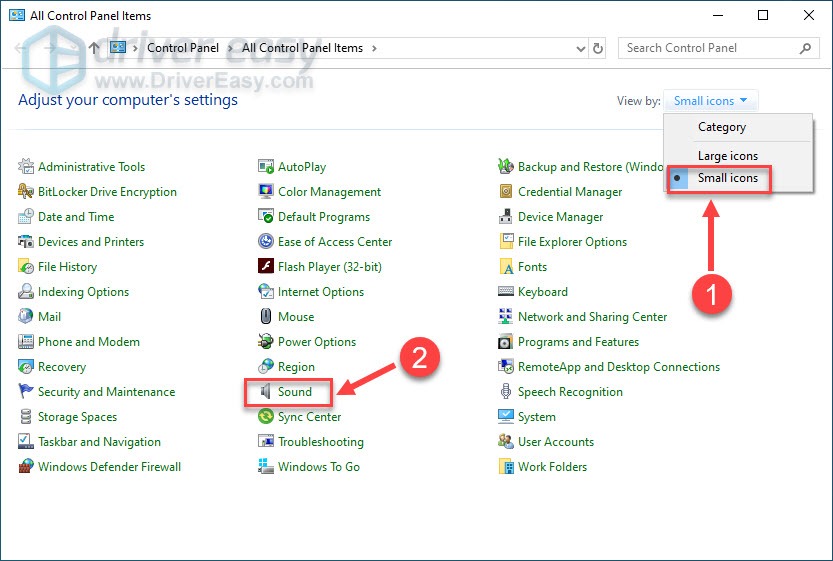
- Select Small icons next to View by, and click Sound.

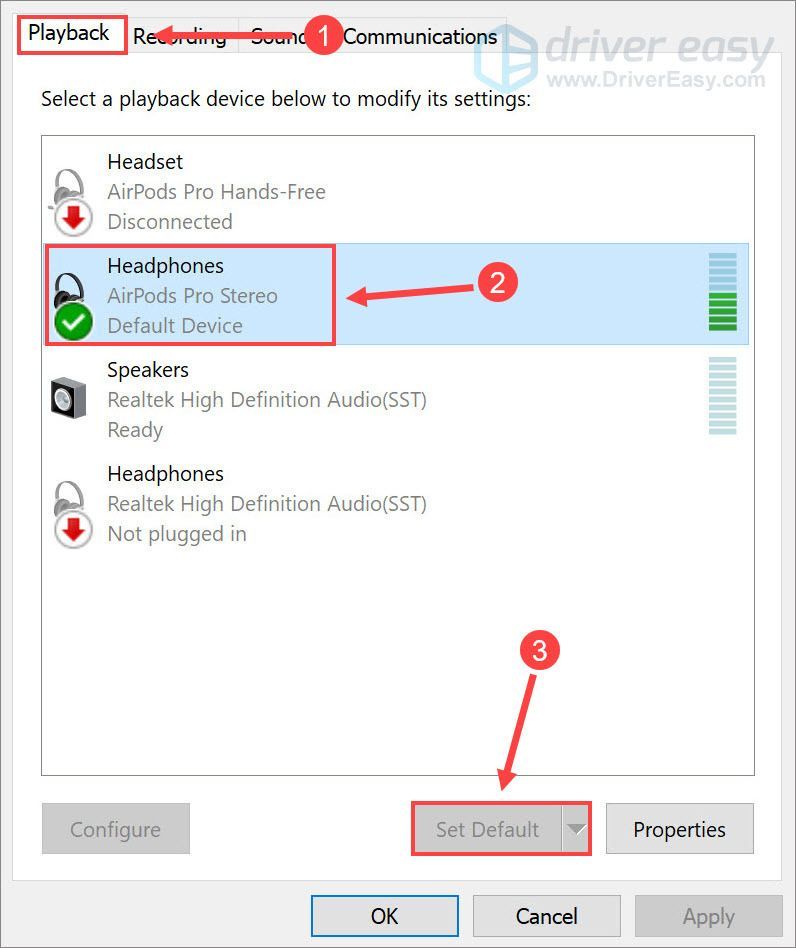
- Under the Playback tab, make sure your AirPods are enabled (there should be a green checkmark). Then click the AirPods and click Set as default.

- Navigate to the Recording tab, and also set your AirPods headset as the default device.
- Click OK to save the changes.

If the AirPods no sound issue only occurs in specific programs, you should check the in-app settings and ensure your earbuds are chosen as the primary device for both audio input and output.
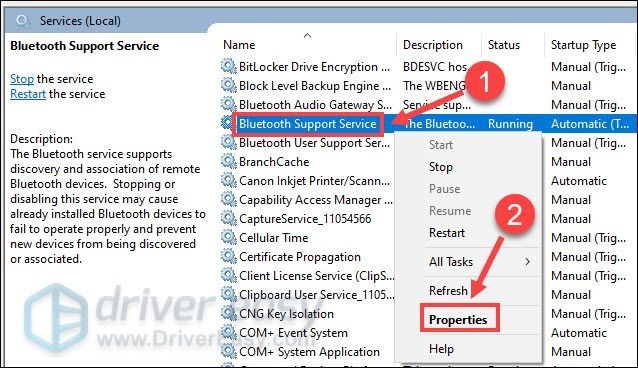
Fix 3 – Restart the Bluetooth Support service
A Bluetooth headphone like AirPods will require certain services to work on your Windows PC. If the service isn’t started or running properly, there will be various problems when you’re using it.
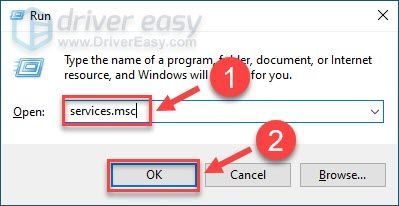
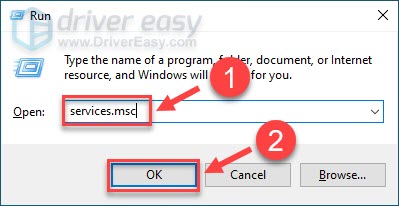
- On your keyboard, press the Windows logo key and R at the same time to invoke the Run box. Then, type services.msc, and click OK.

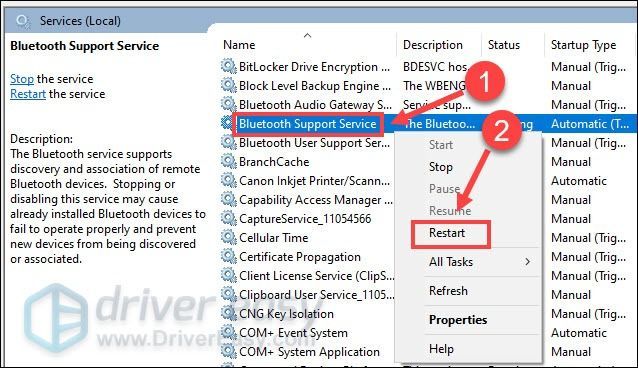
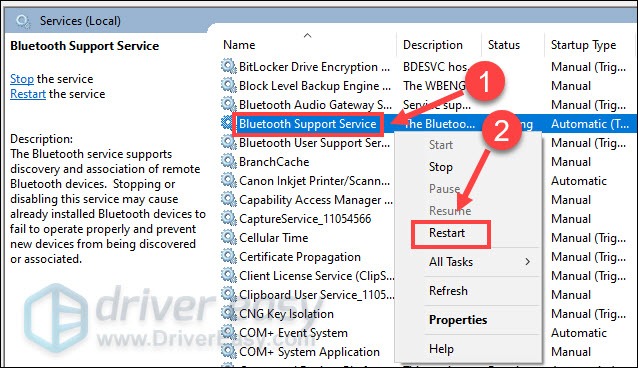
- Right-click Bluetooth Support Service. If it isn’t running, click Start; if it’s already running, click Restart.

- After the service restarts, right-click it again and click Properties.
- Set the Startup type to Automatic, and click OK.

See if your AirPods play sound as normal now. If not, you should check whether the problem is related to the device drivers.
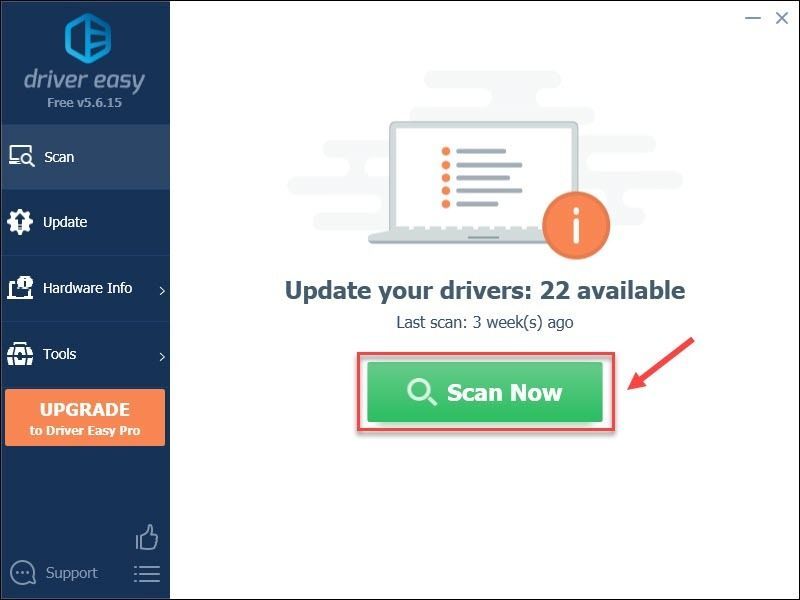
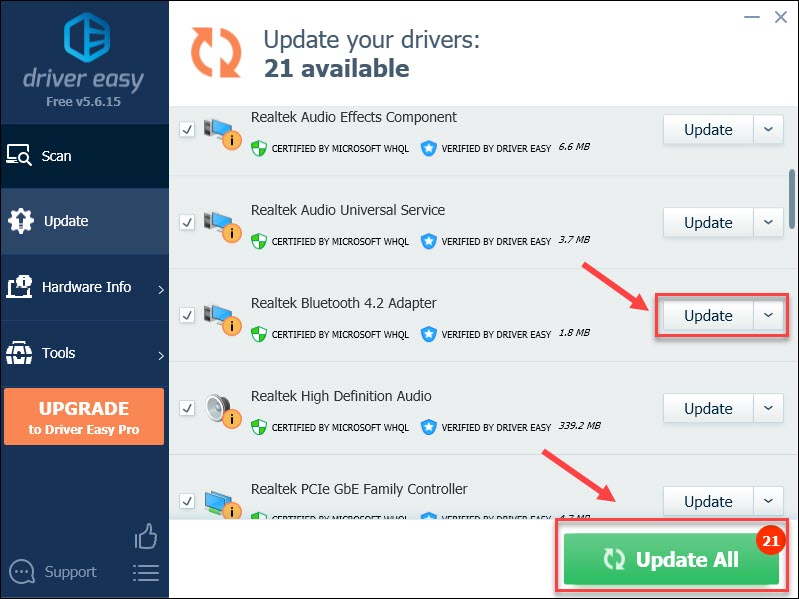
Fix 4 – Update your Bluetooth driver
Most device glitches indicate the driver issue. If you’re using an outdated or faulty Bluetooth driver, the AirPods may not produce sound and act up randomly. So you can install the latest Bluetooth driver to see if that helps your case.
There are two ways you can update the Bluetooth driver: manually or automatically.
If you’re familiar with computer hardware, first identify the manufacturer of the Bluetooth adapter, such as Intel, Qualcomm or Realtek, and visit their official websites. Then you need to download the correct driver corresponding with your specific flavor of Windows version and install it manually.
If you don’t have the time, patience or computer skills to update your Bluetooth driver manually, you can, instead, do it automatically with Driver Easy. Driver Easy will automatically recognize your system and find the correct driver for your exact Bluetooth adapter, and your Windows version, and it will download and install it correctly:
- Download and install Driver Easy.
- Run Driver Easy and click the Scan Now button. Driver Easy will then scan your computer and detect any problem drivers.

- Click the Update button next to the flagged Bluetooth driver to automatically download the correct version of that driver, then you can manually install it (you can do this with the FREE version).
Or click Update All to automatically download and install the correct version of all the drivers that are missing or out of date on your system. (This requires the Pro version which comes with full support and a 30-day money back guarantee. You’ll be prompted to upgrade when you click Update All.)


The Pro version of Driver Easy comes with full technical support.
If you need assistance, please contact Driver Easy’s support team at support@drivereasy.com.
Test your AirPods again. A driver update should recover the sound for your headphones and make the device stay in the best state.
So these are all the simple fixes for AirPods connected but no sound issue. Hopefully you’ll find them useful. If you have further questions or suggestions, please feel free to leave a comment below.
19
19 people found this helpful
Airpods are the go-to pair of earbuds if you are looking to get into the ecosystem. However, the experience is completely different when it comes to Windows. Windows 10 was notorious for the way it managed Airpods as a Bluetooth device. So have things changed? Are you still having Audio issues with Airpods on Windows 11? Then here’s all you need to know about them!
Why do I have audio issues when using Airpods on Windows 11?
Windows 11 has improved quite well when it comes to managing Airpods as a Bluetooth headset. You no longer have to switch between the headset profile and the stereo audio profile to get the best audio quality. It shows up as a single device however, things are still quite finicky when compared to the macOS or iOS experience. The OS seems to usually use multiple drivers while getting confused between each reconnect with the Airpods. Additionally, having to reconnect the Airpods from the Control Panel is still a thing however as a workaround now, you can enter the pairing mode and hit ‘Reconnect’ within the Settings app or Action Center as well. These and other reasons affecting your PC could be the reason you are facing Audio issues with Airpods on Windows 11. We recommend you use the fixes below to fix this issue on your system.
Use the first fix to ensure that everything is covered properly. As you may know, Airpods require smart switching between A2dp and hands-free which is something Windows 11 doesn’t do very well like its predecessor. Hence having everything set up according to your needs is vital and we recommend you perform the following checks before you proceed. Let’s get started.
Fix 1: Disable Telephony service (if you don’t need Mic)
We recommend you verify the audio quality currently set for Airpods. If you are happy using Airpods without the mic, then we recommend you disable the Telephony service as well (guide here).
Guide: How to disable telephony service on Airpods for better music quality
Fix 2: Restart the Bluetooth service
However, if you wish for maximum audio quality with the mic active then we recommend you restart the Bluetooth service on your PC and reconnect Airpods to get everything working by default.
The quality won’t be as good, but it’s the best you can get on Windows currently. Unlike Windows 10, you now don’t need to manually switch over your Audio device depending on what you wish to do, Windows 11 now helps do it for you. But now and then it needs a nudge, and a restart of the BT service should help do the trick.
Press Windows + R on your keyboard, type in the following, and press Enter.
services.msc
Now look for the following services, right-click on them, and hit ‘Restart’ one by one. The user Bluetooth User Support Service_NNNNN will usually show up when you have an ongoing session and probably have Airpods connected to your PC. If it does not show up, don’t worry, simply restart the other two services.
- Bluetooth Audio Gateway Service
- Bluetooth Support Service
- Bluetooth User Support Service_NNNNN
Once restarted, try reconnecting your Airpods to your PC again. Everything should now work as intended.
Fix 3: Turn off Enhanced Audio
Airpods use a single channel profile when using the headset profile and this means that you do not get good audio quality and it seems in Windows 11, it lets only a single bud be active at any given point in time.
While you might get stereo audio when watching content for the first time, connecting to a video or audio call will soon reveal things to be far more different. Airpods will default to single-channel audio and use the right one by default. You will get the option to choose which earbud you wish to use but this option doesn’t work very well depending on the app. You can find more information regarding the same, in the Video Conferencing apps section below.
Press Windows + i and click on ‘Sound’ on your right.

Now click on ‘Headphones’.

Turn on the toggle for ‘Enhance audio’ at the bottom. Try playing an audio file now and you should be able to get high res audio within Windows 11.

If not, then turn off the toggle and try again. Toggling this switch restarts background services dealing with Airpods audio enhancements which should help fix Audio issues for you.

If however, you’re still facing issues, you can try the last troubleshooting method below before re-pairing your Airpods.
We recommend you play something in the background and go back to the previous page within the Settings app. Now turn on the toggle for Mono audio.
The sound quality should now decrease on your end, we now recommend you disable this toggle again. This should re-establish a Stereo connection with your Airpods allowing you to enjoy high res audio on your device.
Fix 4: Reset Airpods
This can be inconvenient as you will have to re-pair your Airpods with every device you own however, this is a known fix for most issues that you might be having with Audio or Connection on Windows. Resetting your Airpods will allow you to start afresh and pairing them first with Windows should help get everything working as intended. Use the guide below to reset your pair and then connect it to Windows using the guide above.
Note: Make sure you remove Airpods from your PC as a device. We recommend you use the guides in this post to remove it from the Control Panel first and then subsequently from the Device Manager (if it shows up).

Resetting Airpods is a fairly simple process, place your Airpods in the case and leave it alone for a few minutes. Now come back, open the lid and hold down the Setup button at the back of your Airpods for around 15 seconds. You should then see the light flash Amber and then white. Now close the lid, enter pairing mode and try connecting them to your Windows 11 PC as a fresh device. If everything goes correctly, you should have audio and connection working on your device. You can now use the guide above to configure your Airpods as intended.
If L and R audio isn’t properly balanced:
This is a new issue that is specific to Windows 11. Unlike Windows 10, the balance shows up as correctly in Windows 11 even if it is messed up. This issue arises when Windows tries to manage your Airpods when it only detects a single bud or one of the buds runs out of battery while being connected to your PC. Unfortunately, the balance changes made to accommodate a single bud aren’t reverted in Windows 11 or maybe get reverted but aren’t reflected the next time you connect your Airpods. The best way to fix this is to simply adjust the balance according to your needs, disconnect, and reconnect the Airpods. If however, this does not work, then you will need to re-pair your Airpods to get everything working as intended. You can apply the following fixes from this guide to get this issue sorted on your system.
Fix 5: Adjust your Balance & Reconnect
Connect your Airpods to your PC and press Windows + i to open the Settings app. Now click on ‘Sound’ on your right.
Click on ‘Headphones’, they should read ‘Airpods’ beneath them.
Now play something in the background and adjust your Balance as needed for both the buds by using the sliders.

Once done, click on ‘Bluetooth and devices’ on your left.

Click on the ‘3-dot’ menu above Airpods and select ‘Disconnect’. Restart your PC for good measure at this point.

Place your AirPods in the case, close the case and leave it alone for a few minutes. Once a few minutes pass, open the case and hold down the setup button until you enter the pairing mode on your Airpods. Now go back to the ‘Bluetooth and devices’ settings on your PC and click on ‘Connect’ underneath Airpods at the top.

If everything goes well, your Airpods should now be balanced and connected to your PC. If you are still facing balance issues, then we recommend you Reset your pair of Airpods using the section in this guide. A reset is a known fix to help solve audio balance issues with Airpods on your PC.
Fix 6: Airpods and Video Conferencing services on Windows
This is quite finicky and depends on your BT driver version and whether you are using Windows 11 or Windows 10. If you are using Windows 10 then Airpods will show up as two different devices, one called ‘Airpods hands-free’ and the other called ‘Airpods stereo’. If you have the latest PC compatible with Windows 11 running the same, then in most cases Airpods will now show up as one device with smart switching already enabled. However, if you have an older BT adapter or older BT drivers then it will indeed show up as two devices on your system as well.
The trick here is to select ‘Airpods hands-free calling‘ when trying to use Airpods in video conferencing apps if you have two devices. If you have one, then you re-enable the Telephony service if you had disabled it earlier. Subsequently, you will have to increase your Mic levels to get manageable audio quality on your system. We tested the following video conferencing apps with Airpods (Gen 1) and here’s how the experience went.
We tested Google Meet first where Airpods showed up as three different devices, for both audio and video. Selecting either did absolutely nothing. The audio output and input defaulted to the right earbud and no amount of tinkering got either the input or output to switch over.
We then tested Microsoft Teams and things were similarly disappointing. Teams does a great job of automatically switching between stereo and mono audio on its own when you speak or listen, that is until it doesn’t happen too often. The mic then simply stops working and toggling the Mute button does seem to fix this after the first or second try. In the worst cases, you will have to put the buds back in the case, wait a few seconds, and wear them again to get everything working. This doesn’t sound bad, but if you’re having to do this every 10 minutes then the Airpods aren’t simply worth using. It would be better to have a single bud that works flawlessly than having two buds that rarely work. We’re sure that this is fairly new and Microsoft is looking to improve this over time.
If you are getting low volume:
If you’re getting low volume on Airpods then this is a known issue with them and there’s not much you can do about it. Airpods get dirty and clogged up with dirt quite too often. This is one of the reasons why Apple switched to the new in-ear style with the newer generations of Airpods but this issue is still prevalent. We recommend you clean your Airpods thoroughly first to try and fix this issue. Use this comprehensive guide from Apple to clean your Airpods thoroughly. Additionally, if you have compressed Air at hand, we recommend you use the same to clear out vents without pushing the dirt into the Airpods indefinitely. If you still end up facing issues after cleaning your Airpods then you can use a third-party EQ on your PC to get the audio exactly right according to your preferences. Use the section below to get you started.
Fix 6: Use 3rd party EQ
Third-party EQs will allow you to increase the Gain on your Airpods, apply filters, noise compressors, and more to get the Audio sounding exactly right. This takes some effort and tinkering on your part depending on your needs but the result is definitely worth it. We recommend you try Equalizer APO as it is completely free with tons of different tools and filters at your disposal. Use the link below to download and use Equalizer APO on your PC.
Fix 7: Use your OEM app
This isn’t a fix but more of a workaround if you are facing low audio quality, low volume, or similar issues. If you use any third-party audio enhancements app then we recommend you use the same to fine-tune your Audio output for Airpods on Windows. As discussed bandwidth and software limitations on Windows prevent you from enjoying the best possible audio quality when using AirPods.

This can be circumvented by fine-tuning your EQ, using compressors, and increasing the gain in rare cases. All of this should be possible through the OEM audio app offered by your manufacturer especially if you are using a pre-built system or a laptop. For example, Asus laptops come bundled with Sonic Studio in some cases which offers various enhancements to fine-tune your audio experience. If however, your PC does not have a dedicated app then you can use Equalizer APO instead from the link given below.
- EqualizerAPO | Download Link
Fix 8: Install Broadcomm BT drivers (if you have their hardware)
Broadcomm Bluetooth adapters were quite popular a few years ago and if you have an older system then it is probably the reason why you are facing audio issues with Airpods on your system. You will need to use a specific driver that helps solve this issue which was released by Lenovo for their devices a few years ago. This package contains .inf files for most Broadcomm adapters which is why you can use this driver on any PC. We recommend you use the link below to update your Broadcomm Bluetooth Adapter drivers.
- Broadcom Bluetooth Drivers | Download Link
If however, these drivers do not work for you then we recommend you use the oldest available Bluetooth drivers on your OEM support site. This usually ends up fixing the issue for users that have problems with the Broadcomm drivers linked above.
Fix 9: Test audio via Control panel (Troubleshoot)
We will now test the audio on your device and then troubleshoot it accordingly. Use the guides below to get you started.
This is another test that can help you identify connection issues with Airpods that might be causing issues with the audio. We recommend you use the guide below to test your Airpods and then re-pair them if you can’t hear the Test audio properly. We will also perform some basic troubleshooting to restart Windows services in the background that might be causing issues with Audio on Airpods as well. Use the guide below to get you started.
Note: Connect your Airpods and have them in your ears beforehand before proceeding with the guide below.
Launch the Start menu, search for Control Panel and launch the same from your search results.

Now click on the drop-down menu in the top right corner of your screen and select ‘Large icons’.

Click and launch the ‘Sound’ option.
Select ‘Headphones’ from the list and click on ‘Properties’ at the bottom.

Switch to the ‘Advanced’ tab by clicking on the same at the top.

Now click on ‘Test’.

Note: The Settings app seems to bug out whenever testing audio for Airpods hence we are using the Control Panel instead.
If you’re able to hear a chime in both the earbuds then everything is working as intended for your Airpods. You might be facing audio issues due to the current audio drivers on your PC or due to a third-party app. We recommend you troubleshoot your PC at this point if that is the case for you. \
We also recommend you try resetting your Bluetooth adapter if you are facing Bluetooth issues with other devices as well. If however, you are facing audio issues during the Test, then we recommend you try the following troubleshooting methods below and if nothing works, then proceed to re-pair your Airpods with Windows 11 to fix this issue.
Fix 10: Check for BT driver updates
Bluetooth exploits are quite common nowadays and apple releases multiple firmware updates for all their devices regularly as well. This means that you might be facing a driver and firmware conflict where the current firmware of your Airpods is incompatible with your older Bluetooth driver version.
We recommend you check for any driver updates or use your OEM support website to get the latest drivers for your Bluetooth Adapter. You can also check for optional driver updates within Windows 11 by going to Settings > Windows Update > Advanced options > Optional updates > Driver updates.
Fix 11: Check for Audio driver updates
We now recommend you check for Audio driver updates especially if you have a third-party sound card or integration into your system. Regular audio updates allow your adapters to be compatible with all the latest possible equipment and if you haven’t updated your drivers for some time then this is likely the reason why you are facing audio issues on your system. We recommend you check your OEM support site for updates as well as Windows updates for updates that might be related to your Audio drivers. If any are found, we recommend you install them at the earliest and restart your PC.
Fix 12: Re-connect Airpods
As you might have noticed, Airpods now efficiently reconnect to Windows 11 whenever the case is opened, however, this is only until you connect Airpods to another device. Once connected, Airpods will no longer connect with your Windows 11 device even if you have the case open and try to connect manually.
The trick here is that you need to enter pairing mode on your Airpods and then hit ‘Connect’ in the Settings app. Hold down the Setup button at the back of your Airpods with the lid open until you see a flashing white light. This means you have entered the pairing mode and you can now hit ‘Connect’ on your PC.
You won’t have to remove and re-pair Airpods every time on your PC when reconnecting, but you will have to enter pairing mode on Airpods to reconnect. In addition to this, if you do not connect Airpods to another device, then you can simply enjoy an automatic connection when you open the Airpods lid with Bluetooth turned on, on your PC.
Fix 13: Remove & Re-pair
If you are still facing Audio issues then we recommend you re-pair your Airpods to Windows 11. Use the guide below to get you started.
Launch the Start menu, search for ‘Control Panel’ and launch the same from your search results.
Click on the drop-down menu in the top right corner and select ‘Large icons’.
Now click on ‘Devices and Printers’.

Right-click on ‘Airpods’ and select ‘Remove device’.

Confirm your choice by clicking on ‘Yes’.

Wait for the device to be removed. Once removed, hit Windows + X on your keyboard and select ‘Device Manager’.

Now click on ‘View’ and the top and select ‘Show hidden devices’.

Double click on Bluetooth in the list and look for any entries related to Airpods. If you find any, right-click on it and select ‘Uninstall device’.

Click on ‘Uninstall’ again to confirm your choice.

Repeat the steps if you have any other entries related to Airpods in the Device manager, specifically under Bluetooth.
Airpods will now be removed from your device. You can now re-connect them with Windows as you normally would and disable the Telephony service to get high res audio on your device. Everything should work as intended after a re-pair.
Fix 14: Test Airpods with another device
Performing these checks will help us ensure that every device we are using is working as intended and is not facing a hardware or driver issue. If it is, then you will need to troubleshoot it first to get Airpods working with your PC. If however, everything is working as intended, then you can use the two methods below to appropriately fix your issue.
- Connect another audio output device to your PC via BT: This will verify your audio and BT drivers. If another speaker or headset can connect and deliver audio as intended then you are good to go.
- Connect Airpods to another Android or Windows PC: This is to test if audio issues are isolated only to your PC or affecting all BT non-Apple connections with the Airpods.
- Connect Airpods to an Apple device: This will help us verify the default capabilities of Airpods in its native environment. If you are getting great audio and everything is working as intended then your Airpods are probably fine.
If you fail either of these checks then you could be facing a hardware issue on the appropriate device. If Airpods have poor audio quality when connected to a macOS or iOS device as well then they are likely damaged and you will need to take them to a repair center to get everything back up and running again. If however, you pass all these checks then we recommend you use the fixes below to fix your issue.
Fix 15: Reconfirue Airpods on a Mac, iPhone or iPad, then re-pair to Windows
This is a known fix and changing the Airpods configuration and how each gesture and tap is translated seems to fix Audio and connection issues with Windows. You first need to pair your Airpods with an iOS or macOS device and then subsequently edit its conversation. We recommend changing gestures especially for unsupported features like volume control and Hey Siri. These can be finicky and Windows might not know how to address these commands which could be the reason for your Audio issues.
Once you have reconfigured Airpods we highly recommend you re-pair them to Windows 11 instead of reconnecting them. A fresh connection will not only carry over the existing configuration and customizations but also help establish a fresh connection with your PC.
We recommend you use the guide at the top to remove every instance of Airpods being paired to your PC. Once you are done, restart your PC for good measure and set up your Airpods as new. You can then use our comprehensive guide at this link to customize your experience as desired.
Fix 16: Reset PC (known fix, but the last resort!)
If by this point you haven’t fixed your Audio issues then you need to Reset your PC. This might sound a bit redundant but a Reset has been known to work for tons of Airpods users in the past. Most likely this issue stems from newer BT driver updates where older adapters are unable to keep up with the current requirements and newer devices. Another issue seems to be OEM bugs caused when issuing driver updates for Bluetooth over time. Either way, a Reset or Refresh of your PC will help reinstall all previously compatible drivers released by your OEM to solve any issues. A reset will also help remove driver conflicts and conflicting drivers which should help fix the issue on your PC. Use this comprehensive guide by us to reset your Windows 11 PC.
We hope you were able to get audio working with Airpods on Windows 11 using the guide above. If you’re still facing issues, feel free to drop more information for us in the comments section below.