Продолжаем знакомиться с новыми возможностями ОС Windows Server 2012 R2. Ранее мы рассказывали о корпоративном аналоге DropBox в Windows Server 2012 R2 под названием Work Folders. Сегодня речь пойдет о еще одном новшестве новой серверной платформы – функции Web Application Proxy. Web Application Proxy – это новая функция роли Remote Access в Windows 2012 R2, позволяющая публиковать HTTP/ HTTPS приложения, расположенные в периметре корпоративной сети на клиентских устройствах (в первую очередь подразумеваются мобильные устройства) за ее периметром. Благодаря возможности интеграции c AD FS (служба может выступать в качестве ADFS-прокси), возможно обеспечить аутентификацию внешних пользователей, пытающихся получить доступ к опубликованным приложениям.
Web Application Proxy предоставляет такие же возможности публикации приложений, как и Forefront Unified Access Gateway (UAG), однако данная служба также позволяет взаимодействовать с другими серверами и сервисами, обеспечивая тем самым более гибкую и рациональную конфигурацию.
Web Application Proxy по сути выполняет функцию обратного прокси сервера (HTTP reverse proxy), организуя ретрансляцию запросов клиентов из внешней сети на внутренний сервер, и является межсетевым экраном на прикладном уровне.
Сервер со службой Web Application Proxy получает внешний HTTP/HTTPS трафик и терминирует его, после чего от своего имени инициирует новое подключение ко внутреннему приложению (веб-серверу). Т.е. внешние пользователи прямого доступа к внутреннему приложению реально не получают. Любой другой трафик, получаемый Web Application Proxy, отклоняется (в том числе отклоняются HTTP/HTTPS запросы, которые могут быть использованы при DoS, SSL и 0-day атаках).
Требования к организации Web Application Proxy и ключевые особенности:
- Систему можно развернуть на серверах с ОС Windows Server 2012 R2, включенных в домен Active Directory, с ролями AD FS и Web Application Proxy. Эти роли должны быть установлены на разных серверах.
- Необходимо обновить схему Active Directory до Windows Server 2012 R2 (обновлять контроллеры домена до Windows Server 2012 R2 не нужно)
- В качестве клиентских устройств поддерживаются устройства с ОС Windows, IOS (iPad и iPhone). Работы над клиентами для Android и Windows Phone пока еще не окончены
- Аутентификация клиентов осуществляется службой Active Directory Federation Services (ADFS), которая также выполняет функции ADFS – проксирования.
- Типовая схема размещения сервера с ролью Web Application Proxy представлена на рисунке. Данный сервер располагается в выделенной DMZ зоне и отделен от внешней (Интернет) и внутренней сети (Интранет) межсетевыми экранами. В этой конфигурации для работы Web Application Proxy требует наличия двух интерфейсов – внутреннего (Intranet) и внешнего (DMZ)
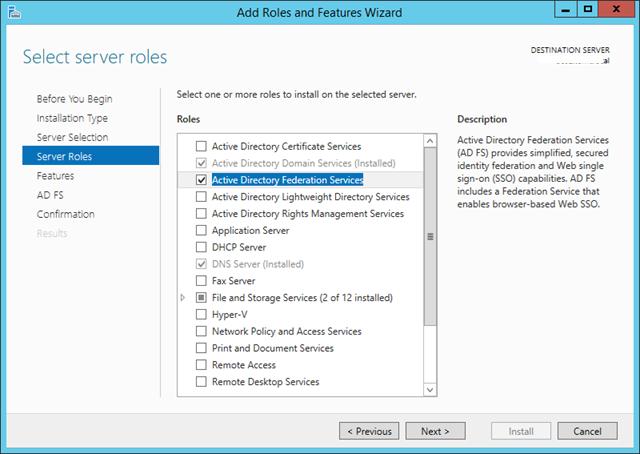
Установка роли ADFS в Windows Server 2012 R2
Для обеспечения дополнительной безопасности преаутентифкация внешних клиентов выполняется на сервере ADFS, в противном случае используется pass-through аутентификация на конечном сервере приложения (что менее секьюрно). Поэтому первый шаг при настройке Web Application Proxy – установка на отдельном сервере роли Active Directory Federation Services.
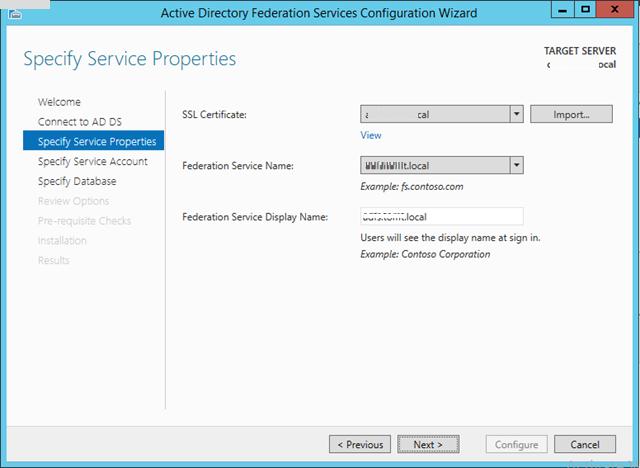
При установке ADFS нужно выбрать SSL сертификат, который будет использоваться для шифрования, а также DNS имена, которые будут использоваться клиентами при подключении (соответствующие записи в DNS зоне придется создать самостоятельно).
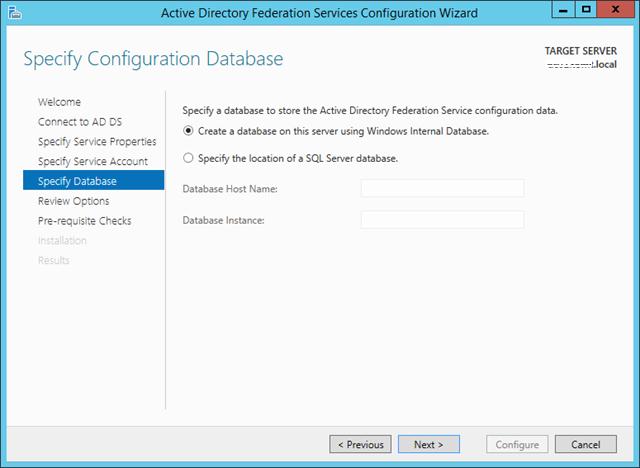
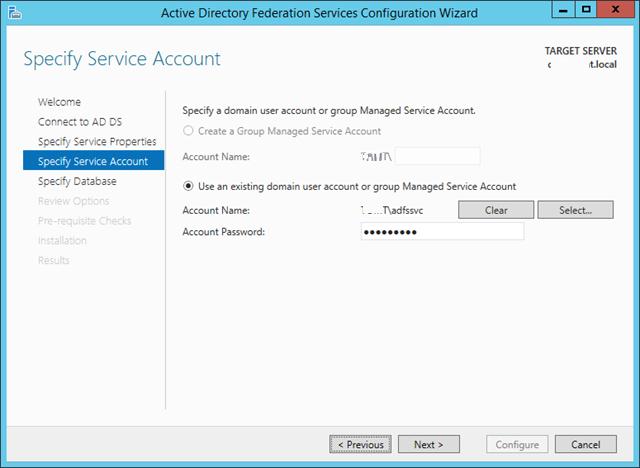
Затем нужно указать сервисную учетную запись для службы ADFS. Необходимо учесть, что имя ADFS должно быть указано в атрибут Service Principal Name аккаунта. Сделать это можно командой:
setspn –F –S host/adfs.winitpro.ru adfssvc
Установка службы Web Application Proxy
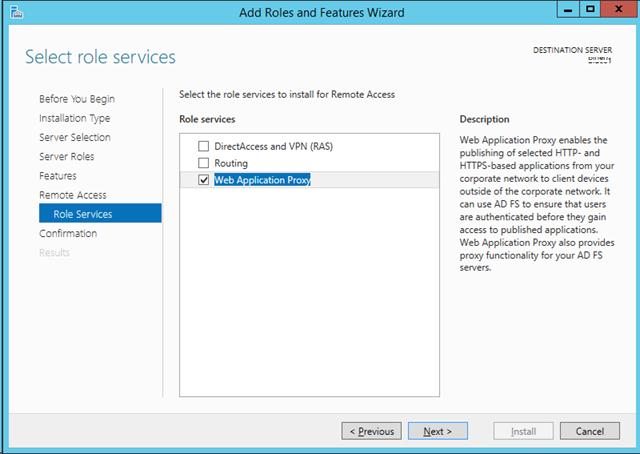
Следующий этап, настройка самой службы Web Application Proxy. Напомним, что служба Web Application Proxy в Windows Server 2012 R2 является частью роли “Remote Access”. Установите службу Web Application Proxy и запустите мастер ее настройки.
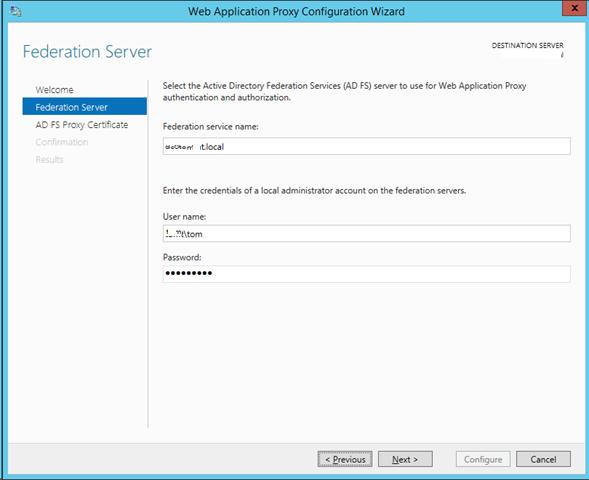
На первом этапе мастер предложит Вам указать имя ADFS сервера и параметры учетной записи, имеющей доступ к данной службе.
Далее нужно указать сертификат (убедитесь, что в альтернативных именах сертификата содержится имя сервера ADFS).
Совет. Проверьте, что ваши DNSзоны настроены корректно: сервер с ролью WAP должен иметь возможность отрезолвить имя сервера ADFS, а он в свою очередь может разрешить имя прокси сервера. Сертификаты на обоих серверах должны включать имя службы федерации.
Публикация приложения через Web Application Proxy
После того, как установлены роли ADFS и Web Application Proxy (которая работает еще и как ADFS Proxy), можно перейти непосредственно к публикации наружу конкретного приложения. Сделать это можно с помощью консоли Remote Access Management Console.
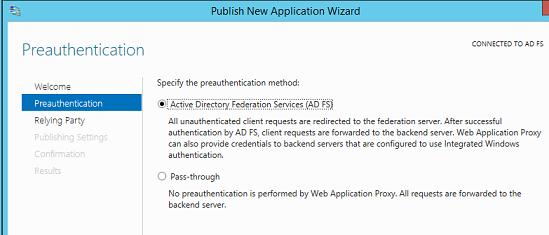
Запустите мастер публикации и укажите, хотите ли вы использовать для преаутентификации службу ADFS (это именно наш вариант).
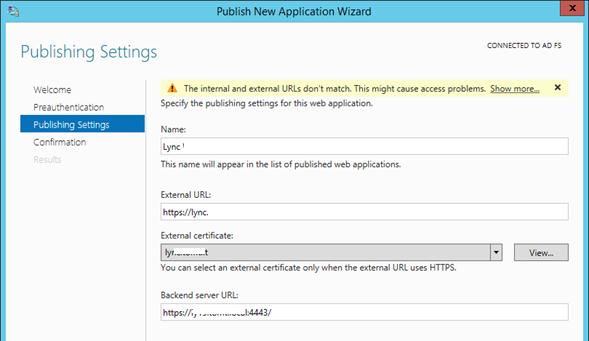
Затем нужно задать имя публикуемого приложения, используемый сертификат, внешний URL (имеенно его для подключения будут использовать внешние пользователи) и внутрений URL-адрес сервера, на который будут пересылаться запросы.
Совет. Если необходимо перенаправить внешнее приложение на альтернативный порт, необходимо задать его в URL, указаывающем на внутренний сервер. Например, если необходимо перенаправить внешние https запросы (443 порт) на 4443 порт, нужно указать:
Backend server URL: lync.winitpro.local:4443
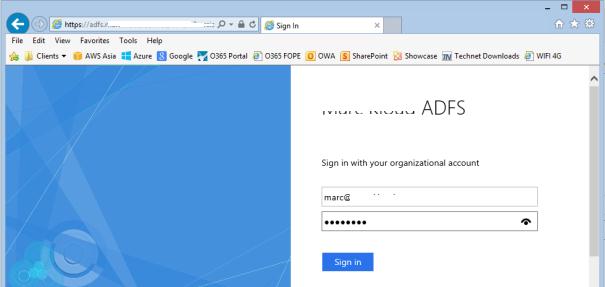
Завершите работу мастера, и на этом публикация приложений окончена. Теперь, если попытаться с помощью браузера зайти на опубликованный внешний URL-адрес, то браузер сначала будет перенаправлен на службу аутентификации (ADFS Proxy), а после успешной аутентификации пользователь будет отправлен непосредственно на внутренний сайт (веб приложение).
Благодаря новой службе Web Application Proxy в Windows Server 2012 R2 возможно реализовать функционал обратного прокси сервера с целью публикации внутренних служб предприятия наружу без необходимости использования задействовать сторонние файерволы и продукты, в том числе такие, как Forefront и пр.
There is no MS solution for a proxy server any more. TMG was discontinued, and you could not purchase a license for it after December 2012.
There are other proxy servers you can use on Windows, such as our product WinGate, and others such as Squid, CCProxy, Kerio Control etc.
Disclaimer: I work for Qbik who are the authors of WinGate
Related videos on Youtube
19 : 00
5.2 Implementing Web Application Proxy in Windows Server 2016 (Step by Step guide)
22 : 42
Proxy Server on Server 2012 R2
01 : 45
Configure Proxy Settings in Windows Server 2012 R2
15 : 29
Proxy server Setting at client system via Group Policy at Server 2012 R2
26 : 09
How To Install & Configure Nginx Proxy Server In Windows Server 2019
Comments
-
I have installed Windows Server 2012 Data Center Edition at my server. I need to run a proxy server to filter and shape all the outgoing traffic from my server. I know that Microsoft FF TMG do that at Windows Server 2008. However, what is the Microsoft solution for proxy server at Microsoft Server 2012?
-
non of the above can be used for enterprise ! it should exist at ist a full features proxy system that be specially designed for microsoft solutions.
-
I don’t understand. Plenty of our customers are using WinGate in large enterprise networks.
-
Please describe the features that alternative products are missing.
Recents
Related
Microsoft Web Application Proxy [WAP] is a new service added in Windows Server 2012 R2 that allows you to access web applications from outside your network. WAP functions as a reverse proxy and an Active Directory Federation Services [AD FS] proxy to pre-authenticate user access.
vBoring Blog Series:
- How to setup Microsoft Active Directory Federation Services [AD FS]
- How to setup Microsoft Web Application Proxy
Requirements:
- The only hard requirement of WAP is having an AD FS server. Refer to step 1 for setting that up.
- WAP cannot be installed on a server that AD FS is installed on. They must be separate servers.
Installing the Web Application Proxy Server Role:
Open Server Manager and click Manage -> Add Roles and Features:
Click Next:
Role-based or feature-based installation should be selected then click Next:
Select the server you want to install this role on to and then click Next:
Note: Web Application Proxy role and AD FS cannot be installed on the same computer.
Select Remote Access then click Next:
No additional Features are needed. Click Next:
Click Next:
Select Web Application Proxy:
On the pop up click Add Features:
The Web Application Proxy role does not required a reboot. Click Install:
Once complete click Close:
Web Application Proxy is now installed but you need the AD FS certificate to continue.
Export & Import the AD FS Certificate:
You need the certificate from your AD FS server added to your Web Application Proxy server. Login to your AD FS server and open MMC.exe:
Go to File -> Add/Remove Snap-ins -> select Certificates then click Add:
When you click OK you will get the following pop up. Select Computer account then click Next:
On AD FS Server: Drill down to Personal -> Certificates then right click the SSL certificate you used during setup of AD FS. Go to All Tasks -> Export. Save to a location that your Web Application Proxy can access. Ensure you export the Private Key and certificate as a .PFX file.
On Web Application Proxy: Right click on Personal -> Certificates then go to All Tasks -> Import:
This will bring up the Certificate Import Wizard. Click Next:
Browse to the certificate that you exported from your AD FS server and select it. Click Next:
Enter the password for the private key and check the box to make the key exportable. Click Next:
Leave the default certificate store as Personal. Click Next:
Click Finish:
You should now see the certificate from your AD FS servers on your Web Application Proxy server.
Now we are ready to perform the Post Configuration.
Post-Deployment Configuration:
Back on your Web Application Server open Server Manager then click Notifications then the message Open the Web Application Proxy Wizard:
Click Next:
Enter the FQDN of your AD FS name and the Service Account you created during AD FS setup. Click Next:
On the drop down menu select the certificate you imported from your AD FS server. Click Next:
Click Configure:
Once finished click Close:
Remote Access Management Console should open when you clicked Close. On Operations Status you should see all the objects as green.
Publish Web Applications:
Now we are finally ready for the magic. In the Remote Access Management Console click Web Application Proxy then Publish:
Click Next:
Pass-through will let WAP act like a reverse proxy. I will have documentation on setting up AD FS link soon!
Select Pass-through and click Next:
Name: Enter a display name
External URL: Enter the URL that will be coming in your the WAP server externally
External Certificate: The drop down menu will show certificates that are added on the WAP server. Select the same certificate that you used while setting up your application. In my case I used my wildcard certificate.
Backend server URL: Enter the web URL of the server you want the external URL forwarded
Click Next:
Copy the PowerShell command down and with some minor edits you can easily add additional PassThrough applications with ease.
Click Publish:
Click Close to finish:
You will now see the published web application and ready for testing.
You are ready to test the application!
Configure Firewall for 443 Port Forwarding:
Before you can test you need to ensure you have port 443 (HTTPS) being sent to your WAP server. This step does not involve configuration of your WAP environment but on your firewall. Since this can vary greatly I will give you two examples of this step:
For pfSense you would create a NAT: Port Forward Rule:
For DD-WRT you would go to NAT / QOS then Port Forwarding:
Once added you are ready to test!
From outside your network (like on your phone or a PC elsewhere) try to access your web link. You should get your internal web page through your WAP externally! Success!
Coming Soon!! Setting up Microsoft RDS to use AD FS authentication through WAP!
Deploy Web Application Proxy Role in Windows Server 2012 R2 –Part I
Assumption:
I assume you have the following infrastructure ready.
- Domain Controller: DC1PVDC01
- Certificate Authority: DC1PVCA01
- AD FS Server: DC1PVADFS01
- Exchange Server: DC1PVEXCH01
Naming Convention:
- DC1= Data Center 1 (location)
- P=Production Systems
- V=Virtual Server
- DC=Domain Controller
So on so forth.
Proposed Web Application Proxy Server:
| Option | Description |
| Virtual Machine Name | DC1PVWAP01 |
| Memory | 4GB |
| vCPU | 1 |
| Hard Disk 1 | 50GB |
| Network Adapter | 2 |
| Guest Operating System | Windows Server 2012 R2 |
| Hyper-v Integration Service | Installed |
Windows Server Role:
| Role | Web Application Proxy |
Network Configuration
The network adapter name used within the operating system should be changed to closely match the associated WAP network name. The following binding order will be maintained within Windows operating systems:
- First in Order- WAP internal adapter connected to the trusted network.
- Second in Order- WAP external adapter connected to the un-trusted network.
The following are the network configuration for WAP server.
| Option | IP Address | Subnet | Default Gateway | DNS |
| Internal Network | 10.10.10.2 | 255.255.255.0 | Not required | 10.10.10.1 |
| External Network | 192.168.1.1 | 255.255.255.0 | 192.168.1.254 | Not required |
Important! External Network can be assigned public IP if WAP server isn’t placed behind frontend router/firewall. In an edge configuration WAP external network is configured with public IP and internal network is assigned an IP address of internal IP range.
Configuration Step 1 – Rename Network Adapters:
Rename all network adapters to descriptive names that ideally match the connection type and WAP wizard/console names. For example:
- WAP adapter connected to the trusted network: Internal Network
- WAP adapter connected to the un-trusted network: External Network
Configuration Step 2 – Configure Network Adapters:
The Internal Network adapter will normally be connected to your trusted environment. This could be your actual internal network (LAN) or could be a private DMZ (perimeter network) if using an intranet/back firewall.
Internal Network Adapter
- Default Gateway should not be defined
- DNS Servers should be defined
- Client for Microsoft Networks binding – Enabled
- File and Print Sharing for Microsoft Networks binding – Enabled
- Register this connection’s address in DNS – Enabled
- Enable LMHOSTS Lookup – Disabled
- NetBIOS over TCP/IP – Default
The External Network adapter will normally be connected to your un-trusted environment. This could be your actual Internet connection if using an edge deployment, or could be a public DMZ (perimeter network) if using an existing edge/front firewall.
External Network Adapter
- Default Gateway should be defined
- DNS Servers should not be defined
- Client for Microsoft Networks binding – Disabled
- File and Print Sharing for Microsoft Networks binding – Disabled
- Register this connection’s address in DNS – Disabled
- Enable LMHOSTS Lookup – Disabled
- NetBIOS over TCP/IP – Disabled
Please Note: The ‘File and Print Sharing for Microsoft Networks’ binding on the TMG internal adapter is left at the default settings of Enabled on the WAP Internal Network adapter. This allows for the use of the Internal Network adapter for intra-array services when using a WAP cluster.
Configuration Step 3 – Amend Bind Order:
Edit the network adapter bind order to place the Internal Network adapter at the top (highest) position and the External Network at the bottom (lowest) position. For example:
- Internal Network (Highest)
- External Network (Lowest)
To amend network binding follow the steps below:
1. Click Start, click Network, click Network and Sharing Center, and then click Change Adapter Settings.
2. Press the ALT key, click Advanced, and then click Advanced Settings. If you are prompted for an administrator password or confirmation, type the password or provide confirmation.
3. Click the Adapters and Bindings tab, and then, under Connections, click the connection you want to modify.
4. Under Bindings for <connection name>, select the protocol that you want to move up or down in the list, click the up or down arrow button, and then click OK.
DNS Forwarding:
The following Fully Qualified Domain Names (FQDN) will be forwarded from ISP to your router:
| Purpose | Public Host Name | Public IP Address |
| Exchange | webmail.yourdomain.com | 203.17.x.x |
| SharePoint | sharepoint.yourdomain.com | 203.17.x.x |
External Firewall Rules
The following NAT rules will be added into perimeter network to publish application and services through WAP. This rule is only apply if you please Web Application Proxy (WAP) behind a firewall or Cisco ASA otherwise you don’t need it.
| Rule(s) | Description | Source IP | Destination IP Address | Port | NAT Destination |
| 1 | Exchange | Any | 203.17.x.x | 443 | 192.168.1.2 |
| 2 | SharePoint | Any | 203.17.x.x | 443 | 192.168.1.3 |
Building Web Application Proxy Server on Windows Server 2012 R2 Steps:
- Install Windows Server 2012 R2.
- Configure TCP/IP of Windows Server 2012 R2
- Join Web Application Proxy server to Domain
- Install Web Application Proxy Role
- Configure Kerberos Constraint Delegation
- Configure the firewall to allow HTTPS traffic on port 443 for clients to communicate with the AD FS server
- Configure Firewall if WAP Server placed behind a Cisco ASA
- Install Public certificate into Web Application Proxy Server
- Publish Application
Configure Kerberos Constraint delegation
1. On the domain controller, open Server Manager. To do this, click Server Manager on the Start screen.
2. Click Tools, and then click ADSI Edit.
3. On the Action menu, click Connect To, and then on the Connection Settings dialog box, accept the default settings to connect to the default naming context, and then click OK.
4. In the left pane, expand Default naming context, expand DC=yourdomain, DC=com, expand CN=Computers, right-click CN=DC1PVWAP01, and then click Properties.
5. On the CN=DC1PVWAP01 Properties dialog box, on the Attribute Editor tab, in the Attributes list, select servicePrincipalName, and then click Edit.
6. On the Multi-valued String Editor dialog box, in Value to add, enter HTTP/DC1PVWAP01.yourdomain.com and click Add. Then enter HTTP/DC1PVWAP01 and click Add. The Values list now contains two new entries; for example, HTTP/DC1PVWAP01.yourdomain.com and HTTP/DC1PVWAP01.
7. On the Multi-valued String Editor dialog box, click OK.
8. On the CN=DC1PVWAP01 Properties dialog box, click OK.
9. In Server Manager, click Tools, and then click Active Directory Users and Computers.
10. In the navigation pane, under yourdomain.com, click Computers. In the details pane, right-click the Web Application Proxy server, and then click Properties.
11. On the DC1PVWAP01 Properties dialog box, on the Delegation tab, click Trust this computer for delegation to specified services only, and then click Use any authentication protocol.
12. Click Add, and on the Add Services dialog box, click Users or Computers.
13. On the Select Users or Computers dialog box, in Enter the object names to select, enter the name of the web servers that use Integrated Windows authentication; for example, WebServ1, and then click OK.
14. On the Add Services dialog box, in the Available services list, select the http service type, and then click OK.
15. On the DC1PVWAP01 Properties dialog box, click OK.
Configure AD FS (Optional when using pass-through pre-authentication)
1. On the Start screen, type AD FS Management, and then press ENTER.
2. Under the AD FSTrust Relationships folder, right-click Relying Party Trusts, and then click Add Relying Party Trust to open the Add Relying Party Trust Wizard.
3. On the Welcome page, click Start.
4. On the Select Data Source page, click Import data about the relying party published online or on a local network. In Federation metadata address (host name or URL), type the federation metadata URL or host name for the partner, and then click Next.
5. On the Specify Display Name page type a name in Display name, under Notes type a description for this relying party trust, and then click Next.
6. On the Choose Issuance Authorization Rules page, select either Permit all users to access this relying party then click Next.
7. On the Ready to Add Trust page, review the settings, and then click Next to save your relying party trust information.
8. On the Finish page, click Close. This action automatically displays the Edit Claim Rules dialog box. For more information about how to proceed with adding claim rules for this relying party trust, see the Additional references.
9. in the AD FS Management console, you must set the endpoint to be Proxy Enabled
Configure Certificate Template in CA
Note: This steps is only applicable when using Enterprise certificate authority.
1. Open the Certificate Templates snap-in.
2. In the details pane, right-click an existing certificate that will serve as the starting point for the new certificate, and then click Duplicate Template.
3. Choose whether to duplicate the template as a Windows Server 2003–based template or a Windows Server 2008–based template.
4. On the General tab, enter the Template display name and the Template name, and then click OK.
5. Define any additional attributes such as mark “private key exportable” for the newly created certificate template.
Export & Import Certificates into Web Application Proxy Server
This is a very important steps for published app to work correctly. You must export .pfx certificate from application servers (Exchange, SharePoint or Lync Server) to Web Application Proxy Server so that internet explorer, web application proxy server and application servers validate same certificates.
Exporting a .pfx File
- On the Start menu click Run and then type mmc.
- Click File > Add/Remove Snap-in.
- Click Certificates > Add.
- Select Computer Account and then click Next. Select Local Computer and then click Finish. Then close the add standalone snap-in window and the add/remove snap-in window.
- Click the + to expand the certificates (local computer) console tree and look for the personal directory/folder. Expand the certificates folder.
- Right-click on the certificate you want to backup and select ALL TASKS > Export.
- Choose Yes, export the private key and include all certificates in certificate path if possible.
Warning: Do not select the delete private key option. - Leave the default settings and then enter your password if required.
- Choose to save the file and then click Finish. You should receive an “export successful” message. The .pfx file is now saved to the location you selected.
Importing from a .pfx File
- On the Start menu click Run and then type mmc.
- Click File > Add/Remove Snap-in.
- Click Certificates > Add.
- Select Computer Account and then click Next. Select Local Computer and then click Finish. Then close the add standalone snap-in window and the add/remove snap-in window.
- Click the + to expand the certificates (local computer) console tree and look for the personal directory/folder. Expand the certificates folder.
- Right-click on the certificate you want to backup and select ALL TASKS > Import.
- Follow the certificate import wizard to import your primary certificate from the .pfx file. When prompted, choose to automatically place the certificates in the certificate stores based on the type of the certificate.
Install Web Application Proxy Role
1. On the Web Application Proxy server, in the Server Manager console, in the Dashboard, click Add roles and features.
2. In the Add Roles and Features Wizard, click Next three times to get to the server role selection screen.
3. On the Select server roles dialog, select Remote Access, and then click Next.
4. Click Next twice.
5. On the Select role services dialog, select Web Application Proxy, click Add Features, and then click Next.
6. On the Confirm installation selections dialog, click Install.
7. On the Installation progress dialog, verify that the installation was successful, and then click Close.
Configure Web Application Proxy
1. On the Web Application Proxy server, open the Remote Access Management console: On the Start screen, click the Apps arrow. On the Apps screen, type RAMgmtUI.exe, and then press ENTER. If the User Account Control dialog box appears, confirm that the action it displays is what you want, and then click Yes.
2. In the navigation pane, click Web Application Proxy.
3. In the Remote Access Management console, in the middle pane, click Run the Web Application Proxy Configuration Wizard.
4. On the Web Application Proxy Configuration Wizard, on the Welcome dialog, click Next.
5. On the Federation Server dialog, do the following, and then click Next:
- In the Federation service name box, enter the fully qualified domain name (FQDN) of the AD FS server; for example, fs.yourdomain.com.
- In the User name and Password boxes, enter the credentials of a local administrator account on the AD FS servers.
6. On the AD FS Proxy Certificate dialog, in the list of certificates currently installed on the Web Application Proxy server, select a certificate to be used by Web Application Proxy for AD FS proxy functionality, and then click Next.
7. The certificate you choose here should be the one that whose subject is the Federation Service name, for example, fs.yourdomain.com.
8. On the Confirmation dialog, review the settings. If required, you can copy the PowerShell cmdlet to automate additional installations. Click Configure.
9. On the Results dialog, verify that the configuration was successful, and then click Close.
Publish Application using AD FS Pre-Authentication
1. On the Web Application Proxy server, in the Remote Access Management console, in the Navigation pane, click Web Application Proxy, and then in the Tasks pane, click Publish.
2. On the Publish New Application Wizard, on the Welcome page, click Next.
3. On the Pre-authentication page, click Active Directory Federation Services (AD FS), and then click Next.
4. On the Relying Party page, in the list of relying parties select the relying party for the application that you want to publish, and then click Next.
5. On the Publishing Settings page, do the following, and then click Next:
- In the Name box, enter a friendly name for the application.
- This name is used only in the list of published applications in the Remote Access Management console.
- In the External URL box, enter the external URL for this application; for example, https://sp.yourdomain.com/app1/.
- In the External certificate list, select a certificate whose subject covers the external URL.
- In the Backend server URL box, enter the URL of the backend server. Note that this value is automatically entered when you enter the external URL and you should change it only if the backend server URL is different; for example, http://sp/app1/.
- Web Application Proxy can translate host names in URLs, but cannot translate path names. Therefore, you can enter different host names, but you must enter the same path name. For example, you can enter an external URL of https://apps.yourdomain.com/app1/ and a backend server URL of http://app-server/app1/. However, you cannot enter an external URL of https://apps.yourdomain.com/app1/ and a backend server URL of https://apps.yourdomain.com/internal-app1/.
6. On the Confirmation page, review the settings, and then click Publish. You can copy the PowerShell command to set up additional published applications.
7. On the Results page, make sure that the application published successfully, and then click Close.
Publish an integrated Windows authenticated application
1. On the Web Application Proxy server, in the Remote Access Management console, in the Navigation pane, click Web Application Proxy, and then in the Tasks pane, click Publish.
2. On the Publish New Application Wizard, on the Welcome page, click Next.
3. On the Pre-authentication page, click Active Directory Federation Services (AD FS), and then click Next.
4. On the Relying Party page, in the list of relying parties select the relying party for the application that you want to publish, and then click Next.
5. On the Publishing Settings page, do the following, and then click Next:
- In the Name box, enter a friendly name for the application.
- This name is used only in the list of published applications in the Remote Access Management console.
- In the External URL box, enter the external URL for this application; for example, https://owa.yourdomain.com/.
- In the External certificate list, select a certificate whose subject covers the external URL.
- In the Backend server URL box, enter the URL of the backend server. Note that this value is automatically entered when you enter the external URL and you should change it only if the backend server URL is different; for example, http://owa/.
- Web Application Proxy can translate host names in URLs, but cannot translate path names. Therefore, you can enter different host names, but you must enter the same path name. For example, you can enter an external URL of https://apps.yourdomain.com/app1/ and a backend server URL of http://app-server/app1/. However, you cannot enter an external URL of https://apps.yourdomain.com/app1/ and a backend server URL of https://apps.yourdomain.com/internal-app1/.
- In the Backend server SPN box, enter the service principal name for the backend server; for example, HTTP/owa.yourdomain.com.
6. On the Confirmation page, review the settings, and then click Publish. You can copy the PowerShell command to set up additional published applications.
7. On the Results page, make sure that the application published successfully, and then click Close.
Publish Application using Client Certificate Pre-Authentication
You can publish an application using pre-authenticated client certificate. This steps only be performed using Windows PowerShell. Open Elevated Windows PowerShell prompt in WAP Server. Change the following command as required and issue the command.
Add-WebApplicationProxyApplication
-BackendServerURL ‘https://app.yourdomain.com/’
-ExternalCertificateThumbprint ‘1a2b3c4d5e6f1a2b3c4d5e6f1a2b3c4d5e6f1a2b’
-ExternalURL ‘https://app.yourdomain.com/’
-Name ‘Client certificate preauthentication application’
-ExternalPreAuthentication ClientCertificate
-ClientCertificatePreauthenticationThumbprint ‘123456abcdef123456abcdef123456abcdef12ab’
Publish Application using Pass-through Pre-Authentication
1. On the Web Application Proxy server, in the Remote Access Management console, in the Navigation pane, click Web Application Proxy, and then in the Tasks pane, click Publish.
2. On the Publish New Application Wizard, on the Welcome page, click Next.
3. On the Preauthentication page, click Pass-through, and then click Next.
4. On the Publishing Settings page, do the following, and then click Next:
- In the Name box, enter a friendly name for the application.
- This name is used only in the list of published applications in the Remote Access Management console.
- In the External URL box, enter the external URL for this application; for example, https://maps.yourdomain.com/.
- In the External certificate list, select a certificate whose subject covers the external URL.
- In the Backend server URL box, enter the URL of the backend server. Note that this value is automatically entered when you enter the external URL and you should change it only if the backend server URL is different; for example, http://maps/.
- Web Application Proxy can translate host names in URLs, but cannot translate path names. Therefore, you can enter different host names, but you must enter the same path name. For example, you can enter an external URL of https://apps.yourdomain.com/app1/ and a backend server URL of http://app-server/app1/. However, you cannot enter an external URL of https://apps.yourdomain.com/app1/ and a backend server URL of https://apps.yourdomain.com/internal-app1/.
5. On the Confirmation page, review the settings, and then click Publish. You can copy the PowerShell command to set up additional published applications.
6. On the Results page, make sure that the application published successfully, and then click Close.
Publish Application using Windows Store App or Oauth2
You can publish an application using pre-authenticated Windows Store App. This steps only be performed using Windows PowerShell. Open Elevated Windows PowerShell prompt in WAP Server. Change the following command as required and issue the command.
Set-WebApplicationProxyConfiguration –OAuthAuthenticationURL ‘https://fs.yourdomain.com/adfs/oauth2/’
Add-WebApplicationProxyApplication
-BackendServerURL ‘https://storeapp.yourdomain.com/’
-ExternalCertificateThumbprint ‘1a2b3c4d5e6f1a2b3c4d5e6f1a2b3c4d5e6f1a2b’
-ExternalURL ‘https://storeapp.yourdomain.com/’
-Name ‘Windows Store app Server’
-ExternalPreAuthentication ADFS
-ADFSRelyingPartyName ‘Store_app_Relying_Party’
-UseOAuthAuthentication
Part 1: Install and Configure Forefront UAG Step by Step
Part 2: Publish RDS using Forefront UAG 2010 Step by Step
Part 3: Publish Exchange Server 2010 Using Forefront UAG 2010 Step by Step
Part 4: Redirect Web Application from HTTP to HTTPS using Forefront UAG 2010 Step by Step
Part 5: Publish SharePoint Server 2010 Using Forefront UAG 2010 Step by Step
Part 6: Forefront UAG Patching Order
Forefront TMG 2010: How to install and configure Forefront TMG 2010 —-Step by step

Contents
- 1 Configure Proxy Settings In Windows Server 2012 R2
- 2 Configure Proxy Settings In Windows Server 2012 R2
- 2.1 Conclusion
- 2.1.1 Related image with configure proxy settings in windows server 2012 r2
- 2.1.2 Related image with configure proxy settings in windows server 2012 r2
- 2.1 Conclusion
Greetings and a hearty welcome to Configure Proxy Settings In Windows Server 2012 R2 Enthusiasts! Network access application application web proxy dns with active in configure application this 2016 web infrastructure article directory 31 server web r2- article configure proxy proxy working Remote windows show 08 configure applies 3 the 2012 to configure firewalls server configure settings more

How To Force Proxy Settings Via Gpo On Windows Server 2012
How To Force Proxy Settings Via Gpo On Windows Server 2012
Article 02 23 2023 4 contributors feedback in this article how to configure proxy server settings through web proxy auto discovery protocol (wpad) how to configure proxy server settings in internet explorer or by using group policy proxy auto configuration (pac) files automatic configuration script proxy firewall client software reference. 1 answer sorted by: 3 there is no ms solution for a proxy server any more. tmg was discontinued, and you could not purchase a license for it after december 2012. there are other proxy servers you can use on windows, such as our product wingate, and others such as squid, ccproxy, kerio control etc.

How To Force Proxy Settings Via Gpo On Windows Server 2012
How To Force Proxy Settings Via Gpo On Windows Server 2012
Donate us : paypal.me microsoftlabconfigure proxy settings in windows server 2012 r21. prepare dc11 : os windows server 2012 r22. step by step dc11 : i. Go to user configuration > preferences > control panel settings > internet settings. in the context menu, select new > internet explorer 10. to configure proxy settings on windows 10 windows server 2016, you need to use the internet explorer 10 item. tip. If i edit proxy settings through the control panel, the settings are stored in hkey current user\software\microsoft\windows\currentversion\internet settings\proxyenable and \proxyserver. these settings are of course not used when running as a service under local system. Open the connections tab and click lan settings: it’s time to specify the proxy ip address, then click ok. the configuration is finished: you can also specify different proxy servers for different protocols: solve it problems remotely with supremo remote desktop easy, powerful, reasonably priced.
Configure Proxy Settings In Windows Server 2012 R2
Configure Proxy Settings In Windows Server 2012 R2
donate us : paypal.me microsoftlab configure proxy settings in windows server 2012 r2 1. prepare dc11 : os windows windows server 2019 beginners tutorial by msftwebcast: the video tutorial shows how to configure gpo proxy settings for in this video, i explain step by step how to configure proxy settings using group policy preferences with an explanation of how to donate us : paypal.me microsoftlab prevent changing proxy settings via group policy in windows server 2012 r2 1. prepapre setting up proxy setting at client system via group policy server 2012 r2. itrecordaz how to configure proxy settings with group policy ad 2016 keyword: proxy server is a server application that client windows server 2012 proxy server setup century college project part 1. hey guys sourav dutta here and today i am going to show you how to change proxy server settings in google chrome • set proxy server on server 2012 r2. in this video tutorial, i will show you guys how to use and configure proxy server settings in windows 10 pc or laptops. how to set up and configure proxy server in windows 10 want to browse the web with a certain degree of anonymity?
Conclusion
All things considered, there is no doubt that the article provides helpful insights concerning Configure Proxy Settings In Windows Server 2012 R2. From start to finish, the writer illustrates a deep understanding on the topic. Especially, the section on Y stands out as a key takeaway. Thank you for reading the post. If you need further information, feel free to contact me via social media. I look forward to hearing from you. Moreover, here are some similar posts that might be useful:

