Setup Microsoft Web Application Proxy (WAP) on Windows Server 2019/2022. In this post, we introduce Web application proxy, its advantages and working principles. After that, we move onto how to set up Microsoft Web Application Proxy on Windows Server running 2019 or 2022.
What is Microsoft Web Application Proxy (WAP)

- Primarily, WAP is intended to offer highly secure access to online services like Exchange and SharePoint without a VPN connection. By functioning as a reverse proxy, it accomplishes this by taking inbound requests from the internet and then forwarding them to the proper internal server.
- Secondly, WAP is also an effective application for organizations that must offer protected access to web applications from external networks. Equally, it contributes to the security of internal networks by serving as a reverse proxy and offering secure authentication, authorization, encryption, and load balancing.
How Microsoft Web Application Proxy (WAP) Works

Mainly, Web Application Proxy (WAP) functions by providing web applications with reverse proxy functionality. In turn, this indicates that it serves as a gatekeeper for receiving requests and stands between the web and an internal network. Therefore, the following steps are used to break down how WAP operates:
- Processing a request: An external user attempts to access a web application hosted on the internal network.
- Authentication: WAP eliminates the requirement for each application to design its own authentication process by providing a safe, central location for user authentication.
- Authorization: Following user authentication, WAP determines whether the user is permitted access to the requested resource. In more detail, it ensures that only users with authorized device access the business applications.
- Encryption: Sensitive data is secured while being transmitted due to WAP’s ability to encrypt communication between the client and the internal network.
- Balanced loading: Incoming requests get split among several internal servers using WAP, which boosts performance and helps to guarantee high availability.
- Request transmission: The inbound request is forwarded by WAP to the proper internal server.
- Response: The client receives the response through WAP once the internal server has processed the request and returned it.
Advantages of Microsoft Web Application Proxy (WAP)
For businesses that must enable secure remote access to web applications, Web Application Proxy (WAP) offers several advantages, such as:
- Enhanced efficiency: Incoming requests are split among several internal servers using WAP, which boosts performance and helps to guarantee high availability. This makes it possible to maintain the responsiveness and accessibility of web applications for users even during periods of high traffic.
- Data protection: WAP assists in the security of internal resources and the protection of sensitive data by serving as an intermediary between the internal network and the internet. To guarantee that only authenticated and authorized users access the internal network, WAP provides security authentication, authorization, and encryption.
- Cost efficient: WAP assists enterprises in saving on the expense of building and maintaining VPN infrastructure by minimising the requirement for a VPN connection.
Setup Microsoft Web Application Proxy (WAP) on Windows Server 2019/2022
Follow these next steps to navigate how to set up Microsoft Web Application Proxy on a Windows server 2019 / 2022.
Prerequisites
- A server running Windows 2019 or 2022
- An administrator password is set up on your server.
Install Web Application Proxy
First, you need to install the Web Application Proxy server roles on your server. Follow the below guide:
Step 1 – Log in to your Windows server and open the server manager. You should see the server manager dashboard on the following screen.

Step 2 – Click on the Add roles and features. You should see the Before your begin screen.
 on Windows Server 2019/2022 before you begin")
Step 3 – Press the Next button. Select installation type screen appears.

Step 4 – Select Role-based or feature-based installation and click on the Next button. This should bring the option to Select destination server screen.

Step 5 – Choose Select a server from the server pool and click on the Next button. Next screen you see is to Select server roles screen.
 on Windows Server 2019/2022 -select server roles")
Step 6 – Select Remote Access and click on the Next button.

Step 7 – Click on the Next button.
 on Windows Server 2019/2022 – select remote access")
Step 8 – Now, click on the Next button. Roles service screen should appear next.

Step 9 – Select Web Application Proxy and click on the Next button. Confirm installation screen next.

Step 10 – Install button appears, which you click to start the installation. Installation progress screen appears next.

Step 11 – Click on the Close button to exit the installation windows. Your web application proxy is now installed on your server. Please proceed to the next step.
Import the ADFS Certificate
Now, you need to copy the ADFS certificate from your ADFS server to your web application proxy server and then import it to your server.
Furthermore, follow the below steps to import the ADFS certificate.
Step 1 – Type mmc.exe in the search bar and open the Microsoft Management Console as shown below.

Step 2 – Next, right click on Personal -> Certificates then go to All Tasks -> Import. This opens the Certificate Import Wizard as shown below.


Step 3 – Click on the Next button. See Certificate Window Wizard next step window.

Step 4 – Browse the ADFS certificate file that you exported from your AD FS server and click on the Next button. Likewise, you will be asked to provide password for the private key as shown below.

Step 5 – Provide your private key password, check the box to make the key exportable then click on the Next button.

Step 6 – Select “Place all certificates in the following store” and then click on the Next button.

Step 7 – Click on the Finish button. Given that, you should see your imported certificate on the following screen.

Configure Web Application Proxy
At this point, the Web Application Proxy is installed on your server. However, you need to perform post deployment configuration. Similarly, follow the below steps to configure Web Application Proxy.
Step 1 – Open the Server Manager and click Notifications.

Step 2 – Click on the Open the Web Application Proxy Wizard to start the configuration.

Step 3 – Click on the Next button. Then, ADFS server configuration screen appears.

Step 4 – Provide your ADFS server name, username, password, and click on the Next button. Server certificate selection screen appears next.

Step 5 – Select your server certificate and click on the Next button.

Step 6 – Click on the Configure button. Once the WAP is configured successfully, you should see the following screen.

Step 7 – Click on the Close button. Remote Access Management Console on the following screen appears next

Publish Web Application
In effect, you need to publish the web application from the Remote Access Management Console dashboard.
Step 1 – Click on the Web Application Proxy in the Remote Access Management Console.

Step 2 – Click on the Publish button.

Step 3 – Click on the Next button. Pre authentication screen apeears next.

Step 4 – Select Pass-through method and click on the Next button. Publishing settings screen appears next.

Step 5 – Provide the name, external URL, external certificate, and backend server URL then click on the Next button. Confirmation screen appears next.

Step 6 – Click on the Publish button. Once the Web Application has been published, you should see the following screen.

Step 7 – Click on the Close button. In essence, you should see your newly published web application on the following screen.

Thank you for reading Setup Microsoft Web Application Proxy (WAP) on Windows Server 2019/2022. We will conclude this article now.
Setup Microsoft Web Application Proxy (WAP) on Windows Server 2019/2022 Conclusion
In summary, this post explained how to set up Microsoft Web Application Proxy on Windows Server 2019 or 2022. Organizations provide secure and effective remote access to web applications via WAP. Lastly, WAP enables businesses to satisfy their demands while safeguarding sensitive data by enhancing security, performance, and remote access, as well as streamlining implementation and cutting expenses.
Client’s with a need to secure legacy servers behind a reverse proxy server have an option to use Microsoft IIS. While we typically recommend using a Linux server that has NGINX installed, we understand the need for such a use case and feel it’s important to demonstrate this basic technique.
We’ll be using a VM running Windows Server 2019 with IIS 10 installed. The IIS extension we’ll use is called URL Rewrite and has been around since IIS 7, so this technique should work well with older versions of IIS.
Assumptions
We won’t cover the basics of spinning up a VM running Windows Server on Microsoft Azure in this article. For more information on that topic, check out this great Microsoft Quickstart Tutorial on setting up a VM and installing IIS.
This article assumes you have the following items setup prior to starting this tutorial:
- Azure Portal — you will need a Microsoft Azure account.
- Azure Windows VM — we will be running Windows Server 2019 for this tutorial.
- IIS — we have installed IIS 10.
- Domain Name — you will need access to a domain or use a dynamic DNS service.
- DNS — we have setup azure-test.tevpro.com to point to the public IP of our VM.
Step 1: Install URL Rewrite
We have installed IIS 10 using a simple PowerShell command.
Doing so will setup and configure IIS using all the basic defaults that come with IIS.
Install-WindowsFeature -name Web-Server -IncludeManagementTools
The first thing we need to do is install an IIS extension called URL Rewrite. This will allow us to configure IIS to act as a reverse proxy server.
On the server you choose as your reverse proxy, download and install the URL Rewrite extension taking all the defaults when installing.
Step 2: Setup a Website
To begin, open up IIS manager and create a new website to use as your reverse proxy end-point. It should look like this:
Right click on Sites, then select Add Website.
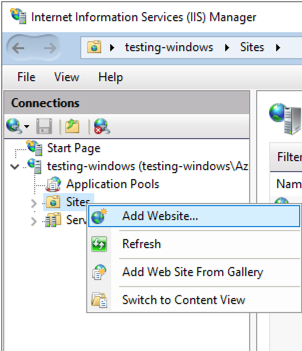
Next, fill in some details about the website. For our example, we will create a new sub-domain for our Tevpro.com website.
Note: Even though we aren’t setting up an actual website, we still need to create a folder somewhere for our dummy site. Here, we created a test folder under our websites folder.
Once you have completed the form, click OK.

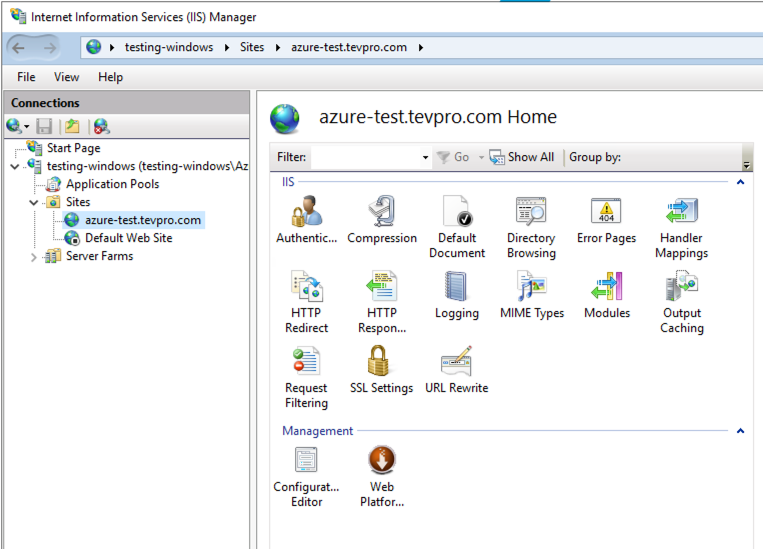
After clicking OK, we should see our website.
When selected, we should see the following options. Notice the URL Rewrite option that shows up after we successfully installed the extension. This is what we will use to configure our reverse proxy.
Step 3: Configure URL Rewrite
After we have setup our new website, that will act as our public end-point, we need to configure it as our reverse proxy.
To do this, double click on the URL Rewrite option under our website (shown in Figure 3).
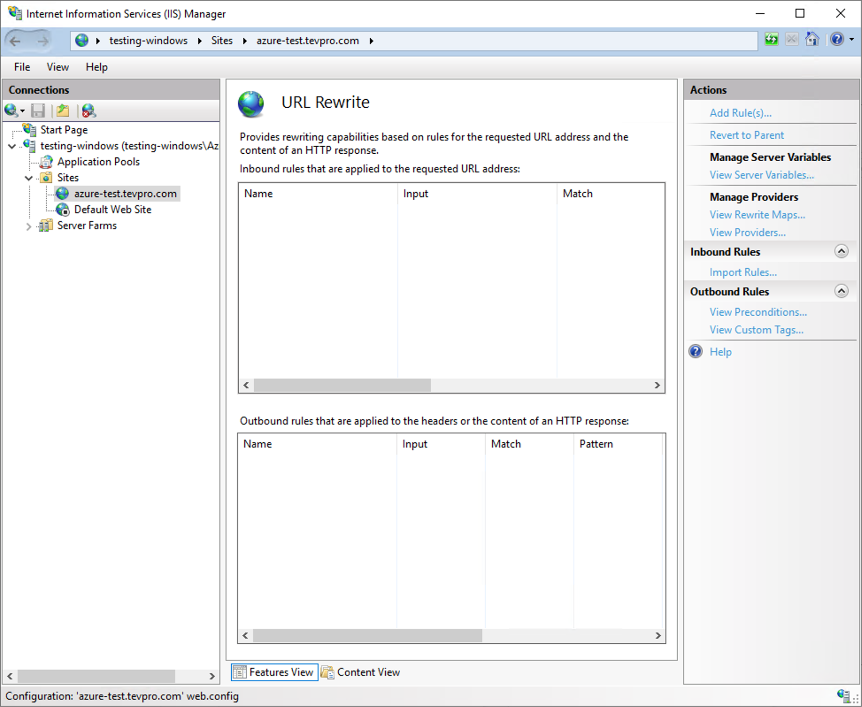
Next, click the Add Rule(s) item from the Actions section on the far right.
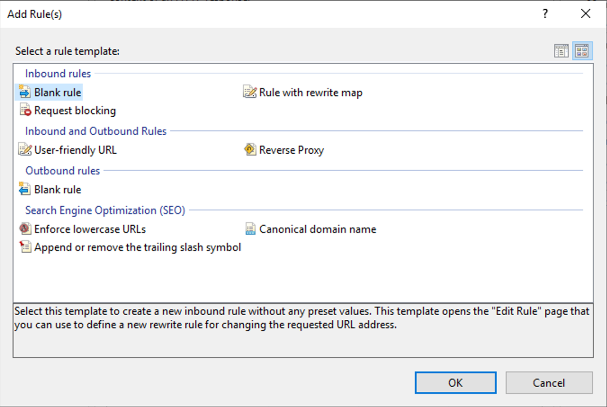
This will bring up the following dialog, under Inbound rules. Select Blank rule and click OK.
For our example, the configuration is pretty straightforward. It’s outside of the scope of this article, but know you can get more complex in the pattern matching and route handling.
First, we need to provide a name for our rule, add a pattern for how we want to match incoming request, and set the rewrite URL.
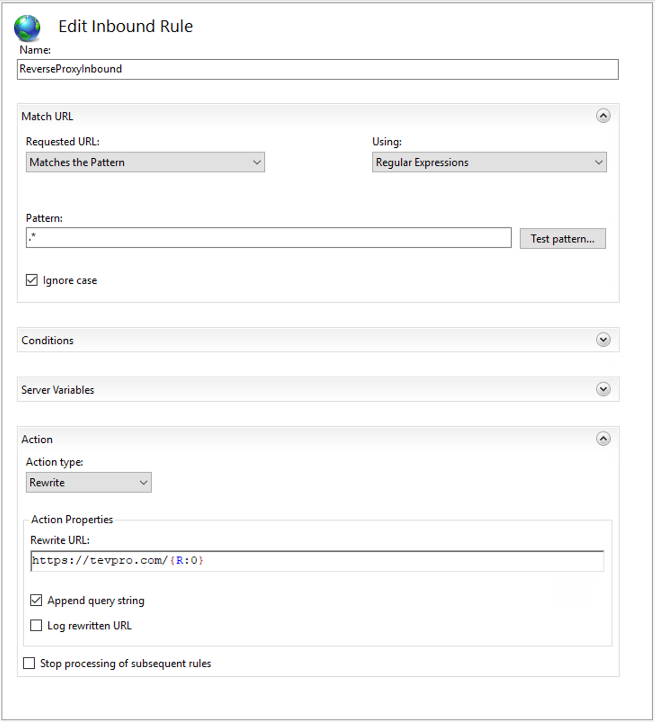
Breaking this step down a bit further, the pattern is how we want to handle capturing incoming request to the website we setup to act as our reverse proxy (azure-test.tevpro.com).
Since we want to be very broad and capture everything, our regex is quite simple. We want to match everything after the domain name, which is what «.*» will do for us.
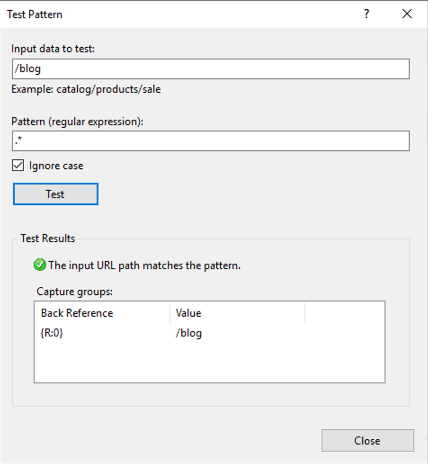
Click the Test pattern… button and a tool dialog pops up that allows us to test our pattern. We want to make sure that anytime someone visits azure-test.tevpro.com/blog, we capture anything after the domain name. This way we ensure when we rewrite the URL, we can point to the right location.
Take note of the capture group {R:0}. We will use this to configure our rewrite URL.
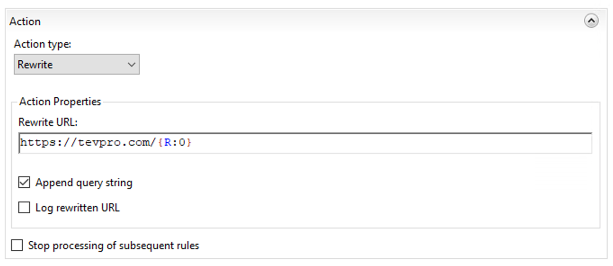
Taking a closer look at our action section, we see the Rewrite URL input field. This field indicates where we want our website to point. Since we want to route back to our website, we put in the URL and append the regex capture group {R:0} from the previous test pattern.
This will forward any request coming into our reverse proxy to the origin server tevpro.com keeping the URL fully intact.
Once you have finished setting up the new rule, click Apply.
And viola. We have configured our new website to act as a reverse proxy.
Note: Since we require SSL for our website, we configured SSL for our test server. That’s beyond the scope of this article, however we used Let’s Encrypt.
Step 4: Test the Reverse Proxy
Now that we have completed the reverse proxy configuration, we need to test our new website.
We expect that anytime a user visits the URL, azure-test.tevpro.com, we’ll automatically reroute the corresponding request to tevpro.com.
As you can see below, when we type the URL into our web browser, we see the Tevpro.com website. It is actually being masked behind our reverse proxy website. Pretty cool, right?

Conclusion
As you can see, it’s pretty simple technique to set up a reverse proxy server using IIS. The IIS extension does most of the heavy lifting and can be used for more complex routing when needed.
Whether you’re trying to protect a legacy system or add an extra layer in front of your existing website to make migrations easier, this approach has worked well over the years.
At Tevpro, we have helped countless clients improve their business with even the most basic techniques and technology solutions. We’re here to help clients discover their potential in a range of solutions, and weigh pros/cons, so that they are empowered to make the best decision for their business.
Feel free to reach out to us on Twitter or via email with any questions.
Photo by Science in HD
In this blog, we are covering steps on how to configure proxy settings using group policy preferences in windows server 2019 Active Directory.
A proxy server can act as an intermediary between the user’s computer and the Internet to prevent the attack and unauthorized access.
For this demo, as usual, I used my existing Domain Controller VM (ws2k19.dc01.mylab.local) and my Windows 10 Client VM (ws10-cli01.mylab.local).
For this example, I have created one OU name TechSupport. We are going to link the group policy object to this OU.
- User: Tech Support1
- Group: TechSupportUsers
Create a Group Policy Object to apply proxy server settings:
On server manager console, click on Tools and select Group Policy Management.

In the Group Policy Management Console, right-click on group policy objects and select new.

Specify a proper name (Configure Proxy Settings GPO) to the new group policy object. Click on OK.

On the newly created group policy object right-click and select the edit option.
(Note: You can apply this group policy setting to the User account and Computer account. But for this guide, we will apply this policy on user account only)

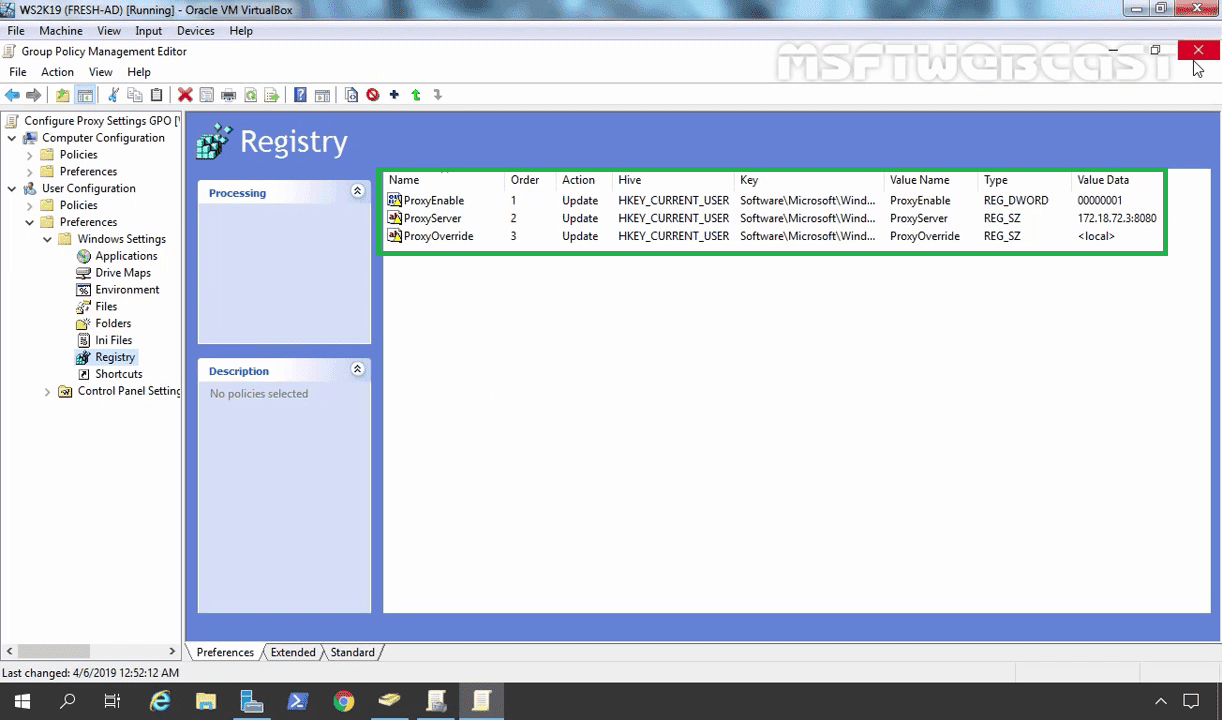
Navigate to User Configuration -> Preferences -> Windows Settings -> Registry.

1. Enable Proxy Settings:
Right-click on Registry, Select New –> Registry Item.

This step will enable proxy settings in the web browser.
In the New Registry Properties, fill the information fields as below:
- Key path: SoftwareMicrosoftWindowsCurrentVersionInternet Settings.
- Value name: ProxyEnable
- Value type: REG_DWORD
- Value data: 00000001
Click on Apply and OK to save the settings.

2. Specify the Proxy Server Address:
Right-click on Registry, Select New –> Registry Item.
This step will specify the proxy server’s IP address and port number.
In the New Registry Properties, fill the information fields as below:
- Key path: SoftwareMicrosoftWindowsCurrentVersionInternet Settings
- Value name: ProxyServer
- Value type: REG_SZ
- Value data: 172.18.72.3:8080 (Where 172.18.72.3 is the IP address of the proxy server and 8080 is the port of the proxy service.)
Click on Apply and OK to save the settings.

3. Bypass Proxy Server for Local Addresses:
Right-click on Registry, Select New –> Registry Item.
This step will enable the bypass proxy server for the local address setting. This step is optional.
- Key path: SoftwareMicrosoftWindowsCurrentVersionInternet Settings
- Value name: ProxyOverride
- Value type: REG_SZ
- Value data: <local>
Click on Apply and OK to save the settings.

Once configured, close the group policy editor console.
Link group policy object:
In the Group Policy Management Console, right-click on the Domain/OU where you want to link the group policy object. (In our case, OU will be TechSupport.)

Select Link an existing GPO. Select the GPO (In our, case it will be Configure Proxy Settings GPO).
Click on the OK button.

Test the result:
On the client computer, Login with the user account Tech Support1.

Open the Microsoft Edge web browser.
Click on three dots to open the settings menu.
Click on the Advanced button.
Click on open proxy settings.
Under Manual proxy setup, we can verify the proxy settings which we have configured using group policy preferences.

If the policy is not applying on the user account, manually update the group policy by using the gpupdate /force command.
Thank you for reading this blog post.
Post Views: 4,725
В этой статье мы рассмотрим, как централизованно задать настройки прокси на компьютерах с Windows 10 в домене Active Directory с помощью групповых политик. Большинство распространенных браузеров (таких как Microsoft Edge, Google Chrome, Internet Explorer, Opera) и большинство приложений автоматически используют для доступа в интернет параметры прокси сервера, заданные в Windows. Также мы рассмотрим, как задать параметры системного WinHTTP прокси.
Содержание:
- Как задать параметры прокси сервера в Windows через GPO?
- Настройка параметров прокси через реестр и GPO
- Настройка параметров WinHTTP прокси групповыми политиками
В этой статье мы рассмотрим особенности настройки прокси сервера политиками в поддерживаемых версиях Windows (Windows 10, 8.1 и Windows Server 2012/2016/2019). Обратите внимание, что в снятых с поддержки Windows 7/Server 2008R2, Windows XP/Windows Server 2003 параметры прокси сервера задаются по другому.
Как задать параметры прокси сервера в Windows через GPO?
До выхода Windows Server 2012/Windows 8 для настройки параметров Internet Expolrer (и в том числе настроек прокси) использовался раздел Internet Explorer Maintenance (IEM) из пользовательской секции GPO (User configuration –> Policies –> Windows Settings –> Internet Explorer Maintenance). В современных версиях Windows 10 /Windows Server 2016/2019 этот раздел отсутствует. 
В новых версиях Windows для настройки параметров IE и прокси в редакторе GPO нужно использовать предпочтения групповых политик GPP (Group Policy Preferences). Также есть вариант использования специального расширения Internet Explorer Administration Kit 11 (IEAK 11) – но применяется он редко.
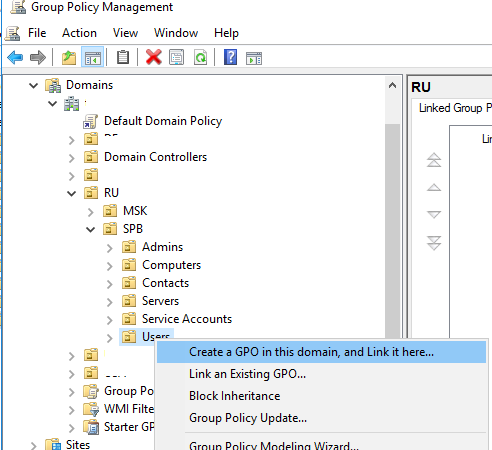
Откройте консоль редактора доменных GPO (Group Policy Management Console –
GPMC.msc
), выберите OU с пользователями, для которых нужно назначить параметры прокси-сервера и создайте новую политику Create a GPO in this domain, and Link it here.
Перейдите в раздел User Configuration -> Preferences -> Control Panel Settings -> Internet Settings. В контекстном меню выберите пункт New -> и выберите Internet Explorer 10.

Для настройки параметров прокси в Windows 10/Windows Server 2016 нужно использовать пункт Internet Explorer 10.
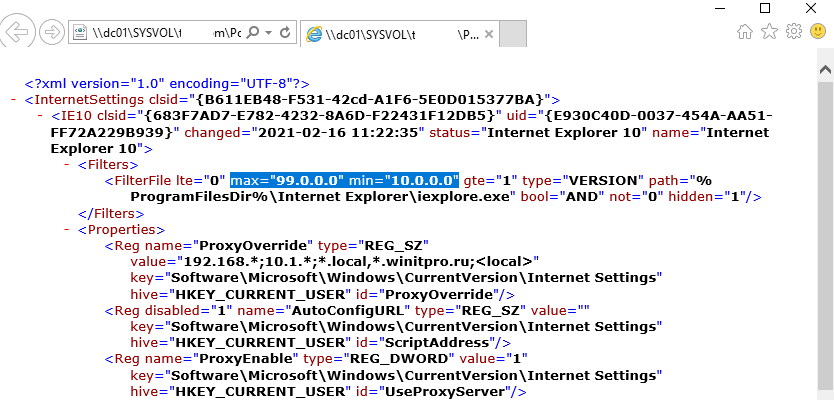
Совет. Несмотря на то, что отдельной настройки для Internet Explorer 11 нет, политика Internet Explorer 10 будет применяться на все версии IE >=10 (в файле политики InternetSettings.xml можно увидеть, что опция действительна для всех версии IE, начиная c 10.0.0.0 и заканчивая 99.0.0.0). Все версии Internet Explorer ниже 11 на данный момент сняты с поддержки Microsoft и более не обновляются.
<FilterFile lte="0" max="99.0.0.0" min="10.0.0.0" gte="1" type="VERSION" path="%ProgramFilesDir%Internet Exploreriexplore.exe" bool="AND" not="0" hidden="1"/>
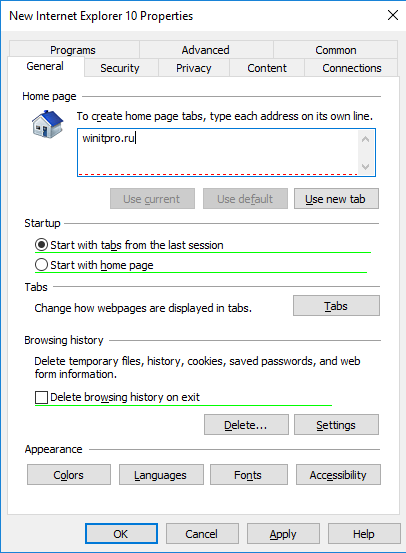
Перед вами появится специальная форма, практически полностью идентичная настройкам параметра обозревателя в панели управления Windows. Например, вы можете указать домашнюю страницу (Вкладка General, поле Home page).
Важно. Не достаточно просто сохранить внесенные изменения в редакторе политики. Обратите внимание на красные и зеленые подчеркивания у настраиваемых параметров Internet Explorer 10. Красное подчеркивание говорит о том, что эта настройка политики не будет применяться. Чтобы применить конкретную настройку, нажмите F5. Зеленое подчеркивание у параметра означает, что этот параметр IE будет применяться через GPP.
Доступные функциональные клавиши
- F5 – Включить все настройки на текущей вкладке
- F6 – Включить выбранный параметр
- F7 – Отключить выбранный параметр
- F8 – Отключить все настройки на текущей вкладке
Чтобы указать параметры прокси-сервера, перейдите на вкладку Connections и нажмите кнопку Lan Settings). Прокси сервер можно настроить одним из следующих способов:
- Automatically detect settings — автоматическое определение настроек прокси с помощью файла wpad.dat;
- Use automatic configuration script — скрипт автоконфигурации (proxy.pac);
- Proxy Server – можно вручную указать IP адрес или DNS имя прокси сервера и порт подключения. Это самый простой способ настроить прокси в Windows, его и будем использовать.
Поставьте галку Use a proxy server for your LAN, а в полях Address и Port соответственно укажите IP/FQDN имя прокси-сервера и порт подключения.
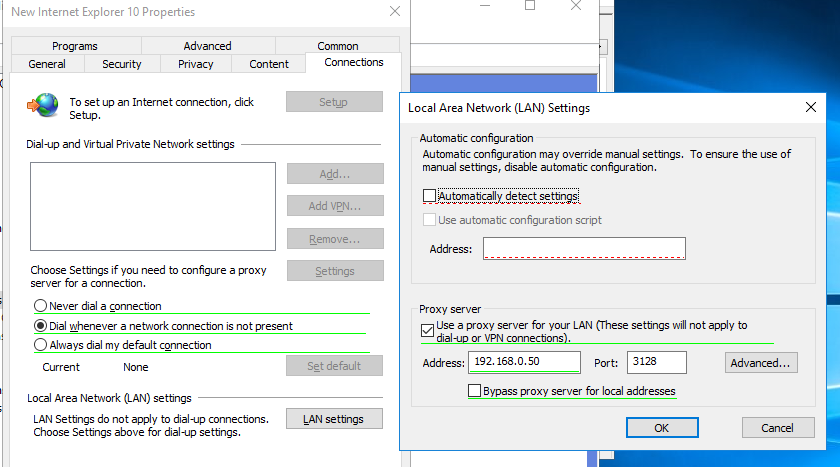
Включив опцию Bypass Proxy Server for Local Addresses можно запретить приложениям (в том числе браузеру) использовать прокси-сервер при доступе к локальным ресурсам (в формате
http://intranet
). Если вы используете адреса ресурсов вида
https://winitpro.ru
или
http://192.168.20.5
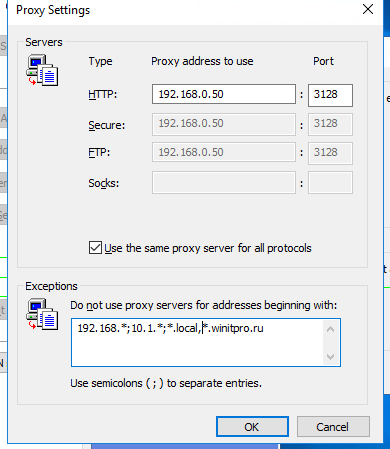
, то эти адреса не распознаются Windows как локальные. Эти адреса и адреса других ресурсов, для доступа к которым не нужно использовать прокси, нужно указать вручную. Нажмите кнопку Advanced и в поле Exceptions введите адреса в формате:
10.*;192.168.*;*.loc;*.contoso.com
Совет. Параметры прокси-сервера в Google Chrome можно задать централизованно через GPO с помощью специальных административных шаблонов. Для Mozilla Firefox можно использовать такое решение.
После сохранения политики вы можете просмотреть XML файл с заданными настройками браузера в каталоге политики на контроллере домена \DC1SYSVOLwinitpro.ruPolicies(PolicyGuiID) UserPreferencesInternetSettingsInternetSettings.xml

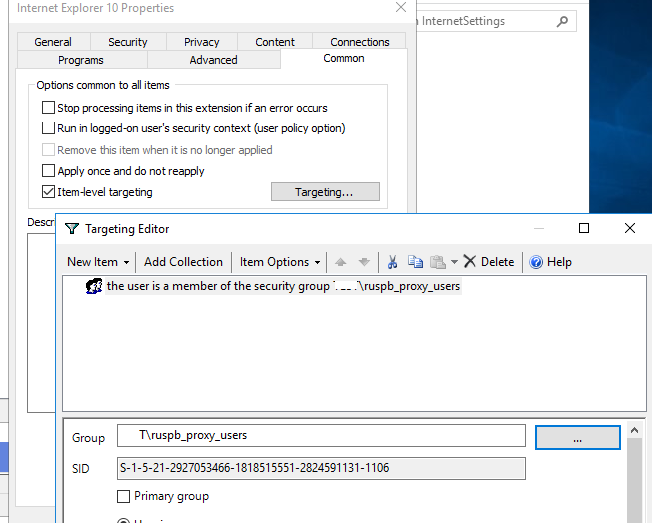
В GPP есть возможность более тонко нацелить политику на клиентов. Для этого используется GPP Item Level Targeting. Перейдите на вкладку Common, включите опцию Item-level targeting -> Targeting.
В открывшейся форме укажите условия применения политики. В качестве примера я указал, что политика настройки прокси будет применена только к пользователям, которые состоят в доменной группе ruspb_proxy_users. Вы можете использовать собственную логику назначения параметров прокси (в зависимости от IP подсети, сайта AD и т.д.).
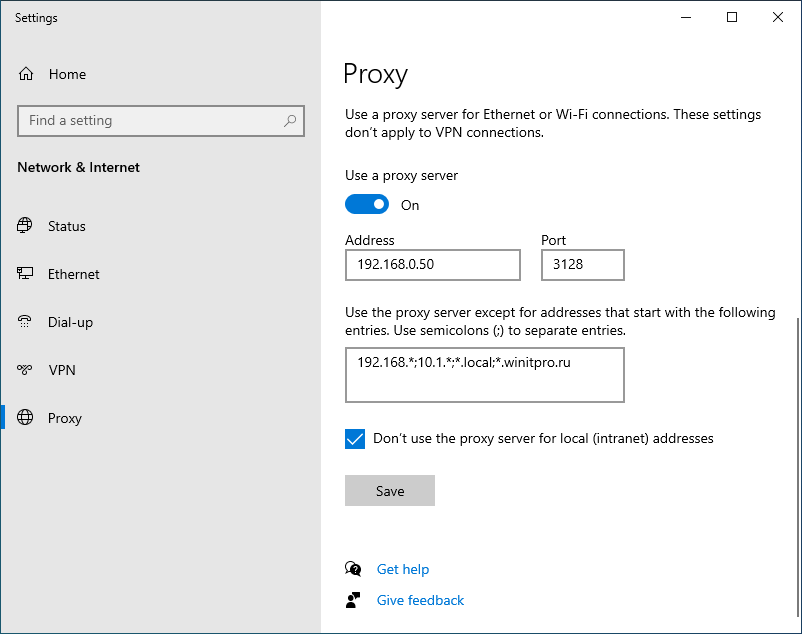
Осталось назначить политику IE на контейнер с пользователями и обновить политики на них. После обновления политики на компьютерах пользователей должны примениться новые настройки прокси в IE. В Windows 10 текущие параметры прокси можно посмотреть в разделе Settings -> Network and Internet -> Proxy. Как вы видите, на компьютере теперь заданы настройки прокси, указанные в доменной политике.
Чтобы запретить пользователям менять настройки прокси-сервера, воспользуйтесь этой статьей.
Настройка параметров прокси через реестр и GPO
Кроме того, настроить параметры IE можно и через реестр, политиками GPP. К примеру, чтобы включить прокси для пользователя нужно настроить следующие параметры реестра в ветке HKEY_CURRENT_USERSoftwareMicrosoft WindowsCurrentVersionInternet Settings.
Перейдите в редакторе GPO в раздел User Configuration -> Preferences -> Windows Settings -> Registry и создайте три параметра реестра в указанной ветке:
-
ProxyEnable
(REG_DWORD) =
00000001 -
ProxyServer
(REG_SZ) =
192.168.0.50:3128 -
ProxyOverride
(REG_SZ) =
*winitpro.ru;https://*.contoso.com;192.168.*;<local>
Здесь также можно использовать Item level targeting для более тонкого нацеливания политик. 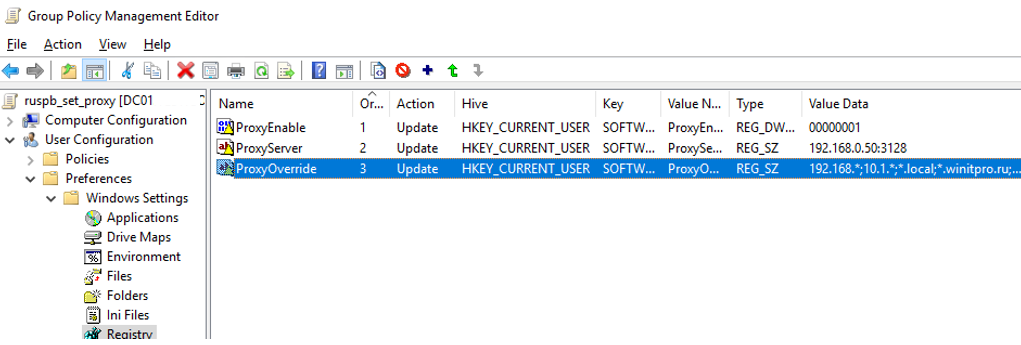
Если вам нужно создать политики не для каждого пользователя (per-user), а для всех пользователей компьютера (per-computer), используйте параметры GPP из раздела GPO Computer Configuration -> Preferences -> Windows Settings -> Registry. Используйте аналогичные параметры реестра в ветке HKEY_LOCAL_MACHINESoftwarePoliciesMicrosoftWindowsCurrentVersionInternet Settings.
Настройка параметров WinHTTP прокси групповыми политиками
Некоторые системные сервисы или приложения (например, служба обновлений Wususerv или PowerShell) по-умолчанию не используют пользовательские настройки прокси сервера из параметров Internet Explorer. Чтобы такие приложения работали корректно и получали доступ в интернет, вам нужно задать в Windows настройки системного прокси WinHTTP.
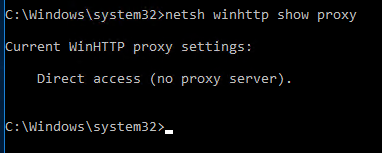
Чтобы проверить, настроен ли на вашем компьютере WinHTTP прокси, выполните команду:
netsh winhttp show proxy
Ответ “
Direct access (no proxy server)
” говорит о том, что прокси не задан, система использует прямой интернет доступ.
Вы можете задать на компьютере прокси для WinHTTP вручную командой:
netsh winhttp set proxy 192.168.0.50:3128 "localhost;192.168.*;*.winitpro.com"
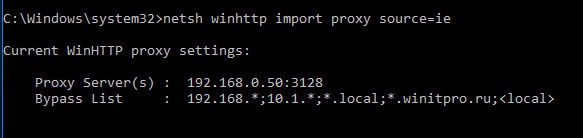
Или импортировать настройки прокси из параметров Internet Explorer теекщего пользователя:
netsh winhttp import proxy source=ie
Однако настроить WinHTTP через GPO не получится – в редакторе GPO нет соответствующего параметра, а в реестре параметры хранятся в бинарном виде и не подходят для прямого редактирования.
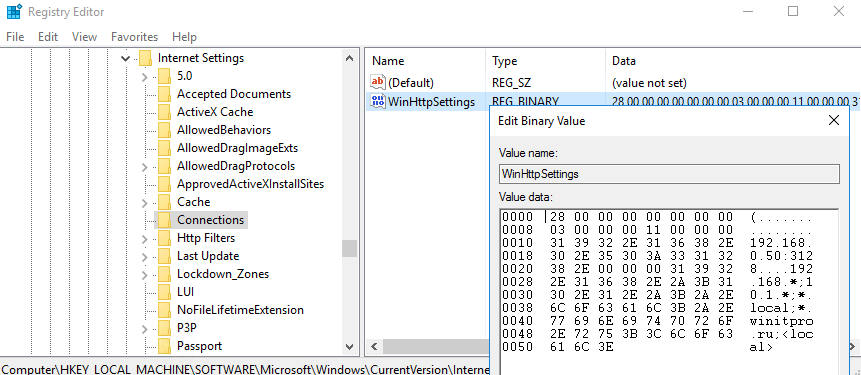
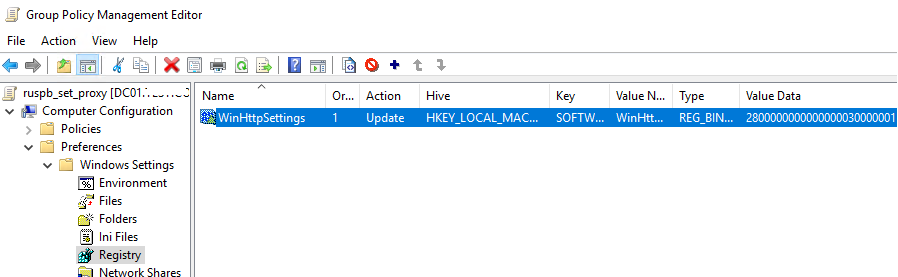
Единственный вариант задать параметры WinHTTP прокси – настроить их на эталонном компьютере, выгрузить значение параметра WinHttpSettings в ветке реестра HKLMSOFTWAREMicrosoftWindowsCurrentVersionInternet SettingsConnections в reg файл и распространить этот параметр на компьютеры в домене через GPP registry.
Client’s with a need to secure legacy servers behind a reverse proxy server have an option to use Microsoft IIS. While we typically recommend using a Linux server that has NGINX installed, we understand the need for such a use case and feel it’s important to demonstrate this basic technique.
We’ll be using a VM running Windows Server 2019 with IIS 10 installed. The IIS extension we’ll use is called URL Rewrite and has been around since IIS 7, so this technique should work well with older versions of IIS.
Assumptions
We won’t cover the basics of spinning up a VM running Windows Server on Microsoft Azure in this article. For more information on that topic, check out this great Microsoft Quickstart Tutorial on setting up a VM and installing IIS.
This article assumes you have the following items setup prior to starting this tutorial:
- Azure Portal — you will need a Microsoft Azure account.
- Azure Windows VM — we will be running Windows Server 2019 for this tutorial.
- IIS — we have installed IIS 10.
- Domain Name — you will need access to a domain or use a dynamic DNS service.
- DNS — we have setup azure-test.tevpro.com to point to the public IP of our VM.
Step 1: Install URL Rewrite
We have installed IIS 10 using a simple PowerShell command.
Doing so will setup and configure IIS using all the basic defaults that come with IIS.
Install-WindowsFeature -name Web-Server -IncludeManagementTools
The first thing we need to do is install an IIS extension called URL Rewrite. This will allow us to configure IIS to act as a reverse proxy server.
On the server you choose as your reverse proxy, download and install the URL Rewrite extension taking all the defaults when installing.
Step 2: Setup a Website
To begin, open up IIS manager and create a new website to use as your reverse proxy end-point. It should look like this:
Right click on Sites, then select Add Website.
Next, fill in some details about the website. For our example, we will create a new sub-domain for our Tevpro.com website.
Note: Even though we aren’t setting up an actual website, we still need to create a folder somewhere for our dummy site. Here, we created a test folder under our websites folder.
Once you have completed the form, click OK.
After clicking OK, we should see our website.
When selected, we should see the following options. Notice the URL Rewrite option that shows up after we successfully installed the extension. This is what we will use to configure our reverse proxy.
Step 3: Configure URL Rewrite
After we have setup our new website, that will act as our public end-point, we need to configure it as our reverse proxy.
To do this, double click on the URL Rewrite option under our website (shown in Figure 3).
Next, click the Add Rule(s) item from the Actions section on the far right.
This will bring up the following dialog, under Inbound rules. Select Blank rule and click OK.
For our example, the configuration is pretty straightforward. It’s outside of the scope of this article, but know you can get more complex in the pattern matching and route handling.
First, we need to provide a name for our rule, add a pattern for how we want to match incoming request, and set the rewrite URL.
Breaking this step down a bit further, the pattern is how we want to handle capturing incoming request to the website we setup to act as our reverse proxy (azure-test.tevpro.com).
Since we want to be very broad and capture everything, our regex is quite simple. We want to match everything after the domain name, which is what «.*» will do for us.
Click the Test pattern… button and a tool dialog pops up that allows us to test our pattern. We want to make sure that anytime someone visits azure-test.tevpro.com/blog, we capture anything after the domain name. This way we ensure when we rewrite the URL, we can point to the right location.
Take note of the capture group {R:0}. We will use this to configure our rewrite URL.
Taking a closer look at our action section, we see the Rewrite URL input field. This field indicates where we want our website to point. Since we want to route back to our website, we put in the URL and append the regex capture group {R:0} from the previous test pattern.
This will forward any request coming into our reverse proxy to the origin server tevpro.com keeping the URL fully intact.
Once you have finished setting up the new rule, click Apply.
And viola. We have configured our new website to act as a reverse proxy.
Note: Since we require SSL for our website, we configured SSL for our test server. That’s beyond the scope of this article, however we used Let’s Encrypt.
Step 4: Test the Reverse Proxy
Now that we have completed the reverse proxy configuration, we need to test our new website.
We expect that anytime a user visits the URL, azure-test.tevpro.com, we’ll automatically reroute the corresponding request to tevpro.com.
As you can see below, when we type the URL into our web browser, we see the Tevpro.com website. It is actually being masked behind our reverse proxy website. Pretty cool, right?
Conclusion
As you can see, it’s pretty simple technique to set up a reverse proxy server using IIS. The IIS extension does most of the heavy lifting and can be used for more complex routing when needed.
Whether you’re trying to protect a legacy system or add an extra layer in front of your existing website to make migrations easier, this approach has worked well over the years.
At Tevpro, we have helped countless clients improve their business with even the most basic techniques and technology solutions. We’re here to help clients discover their potential in a range of solutions, and weigh pros/cons, so that they are empowered to make the best decision for their business.
Feel free to reach out to us on Twitter or via email with any questions.
Photo by Science in HD
- Remove From My Forums
-
Вопрос
-
Добрый день. Чтобы не создавать еще один вопрос, как разрешить в Serve 2019 выполнение GPO для IE 1011 (прописать настройки proxy сервера), есть параметр реестра?
-
Разделено
2 марта 2019 г. 17:09
вопрос находился внутри несвязанного обсуждения
-
Разделено
Ответы
-
Добрый день. Чтобы не создавать еще один вопрос, как разрешить в Serve 2019 выполнение GPO для IE 1011 (прописать настройки proxy сервера), есть параметр реестра?
думаю что для 2019 сервера
ничего не поменялось в настройках проксинайти ваш вопрос про прокси и ответ на него проще, когда он выделен в отдельное обсуждение, поэтому если вопрос не касается вашего старого обсуждения лучше создайте новое
текущий вопрос я выделю сам в новое обсуждение
The opinion expressed by me is not an official position of Microsoft
-
Предложено в качестве ответа
Vector BCOModerator
5 марта 2019 г. 14:49 -
Помечено в качестве ответа
Petko KrushevMicrosoft contingent staff, Owner
6 марта 2019 г. 9:19
-
Предложено в качестве ответа
The article shows how to use Active Directory Group Policies (GPOs) to configure proxy server settings on domain-joined computers running Windows 10/11 and Windows Server 2022/2019/2016/2012R2. These proxy server settings are used by all modern browsers, including Internet Explorer 11 (reached end of support on June 2022), Google Chrome, Microsoft Edge, Opera, and Mozilla Firefox (with the option Use system proxy settings enabled by default).
How to Set Proxy Settings via Group Policy?
To manage the browser’s proxy server settings on a Windows computer, you can use Group Policy Preferences (GPP) or Internet Explorer Administration Kit 11 (IEAK 11). In order to set proxy settings via GPO on users’ computers in the AD domain, perform the following actions:
- Open Group Policy Management Console (gpmc.msc);
- Select the Active Directory OU for which you want to apply the new proxy settings. In this example, we want to apply a proxy settings policy to user OU (OU=Users,OU=California,OU=USA,DC=theitbros,DC=com);
- Right-click on OU and select Create a GPO in this domain and link it here;

- Specify a policy name, for example, CA_Proxy;

- Click on the policy and select Edit;

- Expand the following section: User Configuration > Preferences > Control Panel Settings > Internet Settings. Right-click and select New > Internet Explorer 10 (this policy will also be applied for the IE 11);
Note. In previous versions of Internet Explorer (6, 7, and 9) to configure Internet Explorer settings you needed to use the following section in the Group Policy Editor console: User configuration > Policies > Windows Settings > Internet Explorer Maintenance. However, in Internet Explorer 10 (which firstly appeared on Windows Server 2012 and Windowsthe Internet Explorer Maintenance (IEM) section was removed from GPO Editor. Moreover, this section also disappeared in Windows 7/Windows Server 2008 R2 after Internet Explorer 10 or 11 was installed. If you try to apply the IEM policy to a computer with IE 10 or 11, it won’t work;

- On the standard window with the Internet Explorer settings, go to the Connections tab and press the LAN Settings button;

- Tick the checkbox “Use a proxy server for your LAN” and specify the Address and Port of your proxy server (for example, 192.168.1.11, port 3128). To enable this option, press the F6 button (underline for that setting will change the color from red to green). To disable a specific policy setting press F7 (disable the option “Automatic detect settings” this way).Tip. The green underscore for the IE parameter means this setting is enabled and will be applied through Group Policy. Red underlining means the setting is configured, but disabled. To enable all settings on the current tab, press F5. To disable all policies on this tab use the F8 key. Note the Bypass Proxy Server for Local Addresses option. When this policy setting is enabled, local resources are always accessed directly, not through a proxy server. Windows automatically recognizes the address of the format http://theitbros as local and IE when accessing them bypasses the proxy (Local addresses are all URLs without a domain suffix). However, it is important to note that the addresses of the format http://forum.theitbros.local or http://192.168.0.50 can’t be recognized by the system as a local. In order to avoid using a proxy to access such resources, you need to configure exceptions for them using the policy Do not use proxy servers for addresses beginning with (see below);

- If you need to specify the list of address exceptions, click Advanced. In the field Do not use proxy servers for addresses beginning with specify the list of IP addresses or domains (this option allows you to bypass the proxy for the specified domains/IP addresses). You can use the wildcards in proxy exception list. The exclusion list is a simple string with the list of DNS names and/or IP addresses (values in the list must be separated by a semicolon). For example:
192.*;*.theitbros.com

- Press OK twice to save settings.


Note. This rule only works for Internet Explorer 10 and Internet Explorer 11. For earlier IE versions, you need to create separate rules.
It remains to update group policy settings on client computers (with the gpupdate command: gpupdate /force), and check proxy settings in IE (Control Panel > Network and Internet > Internet Options > Connections > LAN Settings).

If you want the proxy server settings to be applied to users based on the IP subnet where their devices are located, you can use the GPP Item Level-Targeting. To do this, switch to the Common tab in the policy settings and check the Item-Level Targeting option. Click on the Targeting button.

Select New Item > IP address ranges. Specify the range of IP addresses in your subnet for which you want to apply proxy settings.

Save the policy settings. Similarly, create several IE policies with proxy settings for different IP subnets.

As a result, the proxy settings for the users will be applied depending on the IP network (office) in which they work (convenient for mobile employees with laptops).
Tip. To configure the new IE policy from Windows Server 2008/R2, you need to download Administrative Templates for Internet Explorer, and copy files Inetres.admx and Inetres.adml to the folder %SYSTEMROOT%PolicyDefinitions.
When a policy with proxy server settings is applied to a user computer, it changes the values of the registry settings under the following key: HKEY_CURRENT_USERSOFTWAREMicrosoftWindowsCurrentVersionInternet Settings.
Note. Learn how to configure Edge GPO settings.

Accordingly, you can directly configure the IE proxy settings in registry. In order to configure proxy setting for a current user on your computer, you can use the following PowerShell script:
$proxyregkey = "HKCU:SoftwareMicrosoftWindowsCurrentVersionInternet Settings"

Set-ItemProperty -Path $proxyregkey -Name ProxyEnable -Value 1

Set-ItemProperty -Path $proxyregkey -Name ProxyServer -Value "192.168.1.11:3128"

Set-ItemProperty -Path $proxyregkey -Name ProxyOverride -Value '10.*;192.168.*;*.theitbros.com;<local>'

Set-ItemProperty -Path $proxyregkey-Name AutoDetect -Value 0

This means that you can deploy the same registry settings with your proxy configuration to domain-joined computers using GPO (Group Policy Preferences, to be more precise).
Create a new GPO and expand the GPP section User Configuration > Preferences > Registry and create 3 registry parameters in the registry key HKCUSOFTWAREMicrosoftWindowsCurrentVersionInternet Settings]:
- ProxyEnable (REG_DWORD) = 00000001;
- ProxyServer (REG_SZ) = 192.168.1.11:3128;
- ProxyOverride (REG_SZ) = 192.*;*.theitbros.com.

Proxy Settings for Computers in Group Policy
By default, IE proxy settings are per user. However, you can use the different GPO to apply proxy settings to all users of the computer. To do this, go to the following section in the GPO Editor console: Computer Configuration > Administrative Templates > Windows Components > Internet Explorer. Enable the policy Make proxy settings per-machine (rather than per user).
Note. The same setting can be enabled through the registry:
$proxyregkey = "HKLMSoftwarePoliciesMicrosoftWindowsCurrentVersionInternet Settings"
New-ItemProperty -Path $proxyregkey -Name ProxySettingsPerUser  -Value 0

To apply settings to computer objects, also enable the policy Configure user Group Policy loopback processing mode under the Computer Configuration > Policies > Administrative Templates > System > Group Policy. Select the Merge mode in the policy settings.
How to Apply WinHTTP Proxy Settings via GPO?
By default, the WinHTTP service does not use the proxy settings configured in Internet Explorer. As a result, some system services (including the Windows Update service: Wususerv) won’t be able to access the Internet.
Check current WinHTTP proxy settings with the command:
netsh.exe winhttp show proxy

Current WinHTTP proxy settings: Direct access (no proxy server).
To enable WinHTTP proxy for a computer through a GPO, you must configure a special registry parameter.
First, you need to configure a proxy for WinHTTP on the reference computer. The easiest way is to import proxy settings from IE:
netsh winhttp import proxy source=ie

These settings will be saved in the WinHttpSettings parameter under the registry key HKEY_LOCAL_MACHINESOFTWAREMicrosoftWindowsCurrentVersionInternet SettingsConnections.

Now open your proxy GPO and go to Computer Configuration > Preferences > Windows Settings > Registry > New > Registry Wizard.
Select Local computer and specify the full path to the WinHttpSettings parameter.

It remains to click Finish, update the policy on computers, and make sure the WinHTTP proxy settings are applied successfully.
How to Prevent Users from Changing Proxy Settings in Browsers?
By default, if you configure the proxy server settings in Windows through the GPO, computer users can change the proxy settings themselves.
Note that proxy settings in Windows can be edited using both IE options and the modern Settings control panel.

You can prevent users from changing proxy settings in Windows using the “Prevent changing proxy settings” additional GPO option. This parameter is present in both the user and computer GPO sections.
- Computer Configuration > Policies > Administrative Templates > Windows Components – Internet Explorer
- User Configuration > Policies > Administrative Templates > Windows Components Internet Explorer

If you enable this policy and apply it to the domain computer, then the fields with proxy settings in Windows will be blocked, and the caption will appear below: Some settings are managed by your system administrator.

Hint. Settings in the Computer Configuration section take precedence over user settings.
Typically, you want to use a more flexible way of granting permissions to change proxy settings on computers. For example, you can restrict proxy settings for all users except members of the ca_workstation_admins Active Directory group.
- Create a new GPO with proxy settings (or edit an existing one);
- Go to Group Policy Preferences (User Configuration > Preferences > Windows Settings > Registry) and create two registry values:
The first parameter prohibits changing proxy settings:
Hive: HKEY_CURRENT_USER

Key Path: SoftwarePoliciesMicrosoftInternet ExplorerControl Panel

Value name: Proxy

Value type: REG_DWORD

Value data: 00000001
The second parameter blocks the launch of the IE window with proxy settings:
Hive: HKEY_CURRENT_USER

Key Path: SoftwarePoliciesMicrosoftInternet ExplorerRestrictions

Value name: NoBrowserOptions

Value type: REG_DWORD

Value data: 00000001
- These policies will apply to all computer users;
- To prevent policies from applying to a specific security group, you need to copy these two parameters, set a larger Order, and change their values to 00000000;
- Then open the properties of each of these two registry settings, go to Common > Item level targeting > Targeting;
- Create a new targeting rule: New > Security Group > provide a group name (ca_workstation_admins);

- Create a similar targeting rule for the second registry parameter;
- As a result, if a user from the specified group logs on to the computer, the proxy settings for him won’t be locked.

It is also worth noting that for .NET Core 3.0 applications (including PowerShell Core 7.x) you can set proxy server settings using the following Windows environment variables:
- HTTP_PROXY:
- HTTPS_PROXY
- ALL_PROXY
- NO_PROXY
You can create and distribute these environment variables to domain user computers using GPP. Just create the required environment variables under Computer Configuration > Preferences > Windows Settings > Environment.


Cyril Kardashevsky
I enjoy technology and developing websites. Since 2012 I’m running a few of my own websites, and share useful content on gadgets, PC administration and website promotion.
В современном мире сетевые протоколы играют огромную роль в обмене данных. Они позволяют пользователям получать доступ к ресурсам сети, обмениваться информацией и взаимодействовать друг с другом. Но иногда возникают ситуации, когда нужно ограничить доступ к определенным ресурсам или контролировать трафик в сети. Именно для этого существуют прокси-серверы.
Прокси-сервер – это посредник между клиентским устройством и сервером. В основном, прокси-сервер выполняет функции фильтрации и контроля доступа, а также кэширования данных. Он может быть полезен для организации безопасности в сети, использования анонимайзеров для обхода ограничений, ускорения работы сети и других целей.
В данной статье мы рассмотрим, как установить и настроить прокси-сервер на операционной системе Windows Server 2019. Мы расскажем о разных типах прокси-серверов, их возможностях и способах настройки. Подробное руководство поможет вам разобраться в процессе установки и настройке прокси-сервера на вашем сервере и использовать его для достижения ваших целей и задач в сети.
Содержание
- Загрузка и установка необходимого программного обеспечения
- Настройка прокси-сервера
- Проверка работы прокси-сервера и дополнительные настройки
Загрузка и установка необходимого программного обеспечения
Перед установкой и настройкой прокси-сервера на Windows Server 2019 необходимо загрузить и установить несколько программ, чтобы обеспечить правильное функционирование прокси-сервера. Вот список необходимого программного обеспечения:
- Windows Server 2019: Убедитесь, что у вас установлена лицензированная версия Windows Server 2019. Если нет, загрузите и установите ее с официального сайта Microsoft.
- Internet Information Services (IIS): Прокси-сервер настраивается как расширение службы IIS, поэтому убедитесь, что IIS установлен и настроен на вашем сервере. Вы можете установить его через менеджер сервера или с помощью команды PowerShell.
- .NET Framework: Прокси-сервер требует .NET Framework для своей работы. Убедитесь, что у вас установлена последняя версия .NET Framework на вашем сервере. Вы можете загрузить и установить его с официального сайта Microsoft.
После загрузки и установки всех необходимых программных компонентов вы будете готовы приступить к установке и настройке прокси-сервера на Windows Server 2019.
Настройка прокси-сервера
Для начала необходимо установить роль «Прокси-сервер» на сервере. Это можно сделать с помощью утилиты «Управление сервером». После установки роли, следует приступить к настройке основных параметров прокси-сервера.
Перейдите в «Управление сервером», выберите роль «Прокси-сервер» в левой панели и откройте «Настройка прокси-сервера». Здесь можно задать основные параметры, такие как порты прокси-сервера, время ожидания запроса, фильтрацию URL-адресов и другие.
Порты прокси-сервера могут быть настроены в разделе «Параметры подключения». По умолчанию прокси-сервер использует порт 8080 для HTTP-трафика и порт 443 для HTTPS-трафика. Если необходимо, можно изменить данные порты на другие.
В разделе «Белый список URL» можно указать список разрешенных URL-адресов, к которым пользователи смогут получить доступ через прокси-сервер. Также можно добавить фильтрацию по ключевым словам или регулярным выражениям.
Раздел «Настройка безопасности» позволяет указать аутентификацию пользователей, передавших запрос через прокси-сервер. Это может быть полезно для повышения безопасности и контроля над доступом к сети.
После настройки всех параметров не забудьте сохранить изменения и перезапустить прокси-сервер. После этого пользователи смогут подключаться к интернету через настроенный прокси-сервер.
Проверка работы прокси-сервера и дополнительные настройки
После того, как вы установили и настроили прокси-сервер на Windows Server 2019, рекомендуется проверить его работоспособность. Существует несколько способов это сделать.
1. Проверка на внутреннем сервере:
Зайдите на внутренний сервер, который находится за прокси, и откройте любой веб-браузер. В адресной строке введите адрес сайта, который обычно блокируется на внутреннем сервере. В случае успешной работы прокси-сервера вы должны получить доступ к этому сайту.
2. Проверка на клиентском компьютере:
На клиентском компьютере, который находится вне локальной сети, откройте веб-браузер и введите адрес сайта, который также обычно блокируется. Если прокси-сервер работает корректно, вы должны получить доступ к заданному сайту.
Если прокси-сервер не работает, проверьте следующие дополнительные настройки:
1. Проверьте настройки брандмауэра:
Убедитесь, что прокси-серверу разрешен доступ к Интернету через брандмауэр. Проверьте настройки брандмауэра на сервере и убедитесь, что прокси-сервер имеет правильные разрешения.
2. Проверьте доступность портов:
Убедитесь, что необходимые порты для работы прокси-сервера не блокируются сетевым оборудованием или конфигурацией брандмауэра. Проверьте настройки маршрутизатора и брандмауэра, чтобы убедиться, что порты открыты и прокси-сервер может связываться с внешними ресурсами.
3. Проверьте настройки прокси-сервера:
Проверьте настройки прокси-сервера в Windows Server 2019. Убедитесь, что указаны корректные настройки прокси-сервера, такие как адрес и порт. Если настройки неправильные, исправьте их и перезапустите прокси-сервер.
Следуя этим рекомендациям, вы сможете проверить работу вашего прокси-сервера и внести необходимые дополнительные настройки для его корректной работы.
In this blog, we are covering steps on how to configure proxy settings using group policy preferences in windows server 2019 Active Directory.
A proxy server can act as an intermediary between the user’s computer and the Internet to prevent the attack and unauthorized access.
For this demo, as usual, I used my existing Domain Controller VM (ws2k19.dc01.mylab.local) and my Windows 10 Client VM (ws10-cli01.mylab.local).
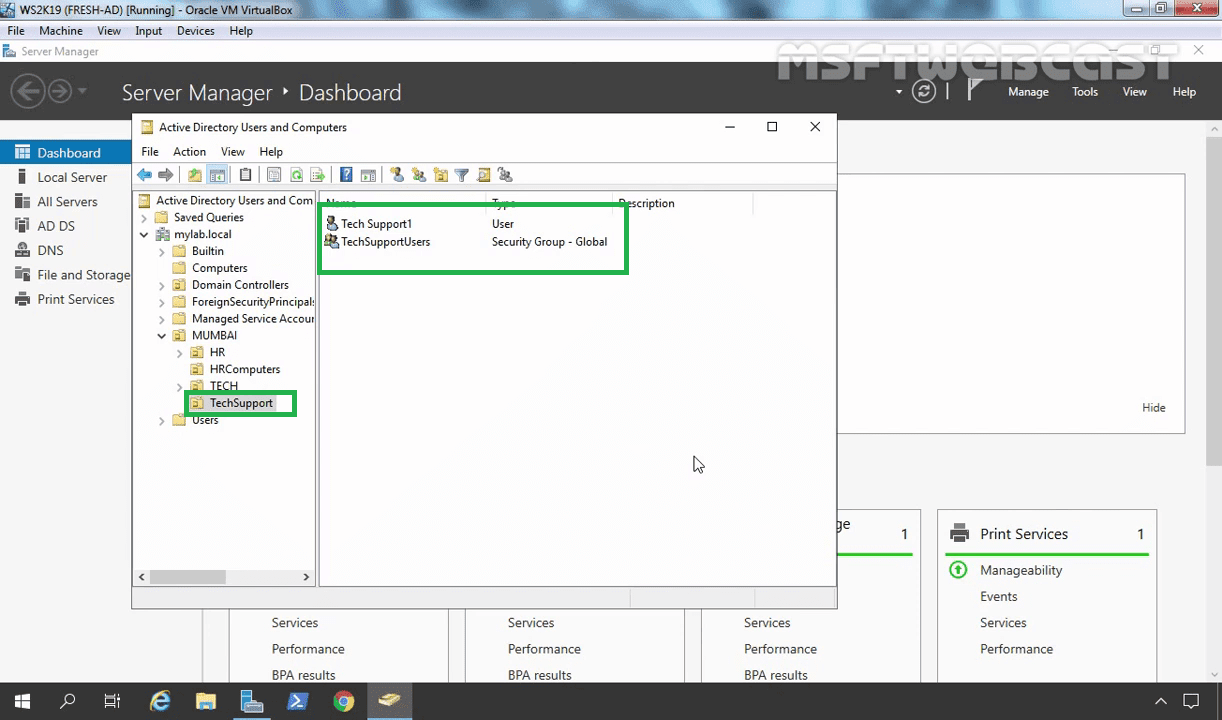
For this example, I have created one OU name TechSupport. We are going to link the group policy object to this OU.
- User: Tech Support1
- Group: TechSupportUsers
Create a Group Policy Object to apply proxy server settings:
On server manager console, click on Tools and select Group Policy Management.
In the Group Policy Management Console, right-click on group policy objects and select new.
Specify a proper name (Configure Proxy Settings GPO) to the new group policy object. Click on OK.
On the newly created group policy object right-click and select the edit option.
(Note: You can apply this group policy setting to the User account and Computer account. But for this guide, we will apply this policy on user account only)
Navigate to User Configuration -> Preferences -> Windows Settings -> Registry.
1. Enable Proxy Settings:
Right-click on Registry, Select New –> Registry Item.
This step will enable proxy settings in the web browser.
In the New Registry Properties, fill the information fields as below:
- Key path: SoftwareMicrosoftWindowsCurrentVersionInternet Settings.
- Value name: ProxyEnable
- Value type: REG_DWORD
- Value data: 00000001
Click on Apply and OK to save the settings.
2. Specify the Proxy Server Address:
Right-click on Registry, Select New –> Registry Item.
This step will specify the proxy server’s IP address and port number.
In the New Registry Properties, fill the information fields as below:
- Key path: SoftwareMicrosoftWindowsCurrentVersionInternet Settings
- Value name: ProxyServer
- Value type: REG_SZ
- Value data: 172.18.72.3:8080 (Where 172.18.72.3 is the IP address of the proxy server and 8080 is the port of the proxy service.)
Click on Apply and OK to save the settings.
3. Bypass Proxy Server for Local Addresses:
Right-click on Registry, Select New –> Registry Item.
This step will enable the bypass proxy server for the local address setting. This step is optional.
- Key path: SoftwareMicrosoftWindowsCurrentVersionInternet Settings
- Value name: ProxyOverride
- Value type: REG_SZ
- Value data: <local>
Click on Apply and OK to save the settings.
Once configured, close the group policy editor console.
Link group policy object:
In the Group Policy Management Console, right-click on the Domain/OU where you want to link the group policy object. (In our case, OU will be TechSupport.)
Select Link an existing GPO. Select the GPO (In our, case it will be Configure Proxy Settings GPO).
Click on the OK button.
Test the result:
On the client computer, Login with the user account Tech Support1.
Open the Microsoft Edge web browser.
Click on three dots to open the settings menu.
Click on the Advanced button.
Click on open proxy settings.
Under Manual proxy setup, we can verify the proxy settings which we have configured using group policy preferences.
If the policy is not applying on the user account, manually update the group policy by using the gpupdate /force command.
Thank you for reading this blog post.
Post Views: 5,853