
Below we may get step-by-step screenshots,
Step 1 — Verify and ensure appropriate IP addresses are assigned to all required fields.
Step 2 — Click on «Local Server«.
Step 3 — Click on «WORKGROUP«.
Step 4 — Click on «Change…«.
Step 5 — Click on «More…«.
Step 6 — Type the domain name and click on «OK«.
Step 10 — Click on «Close«.
Step 11 — Save rest of your background work, if any and click on «Restart Now«. If planning to restart after some time then click on «Restart Later«.
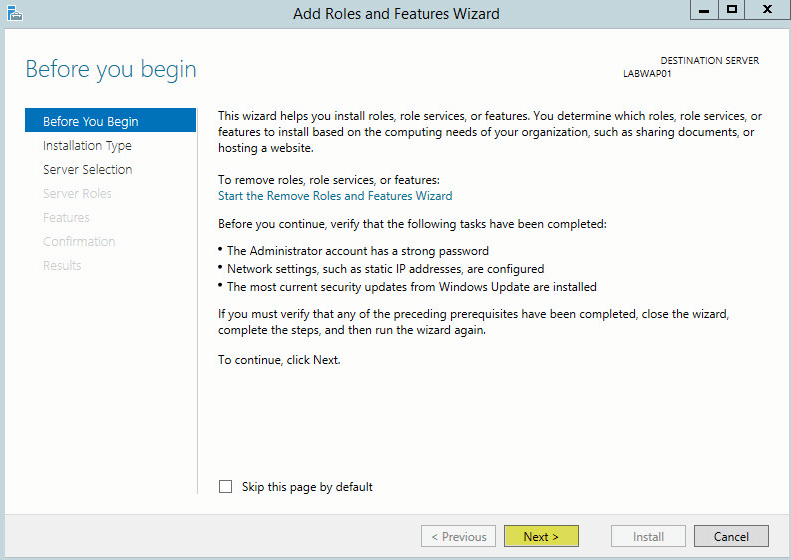
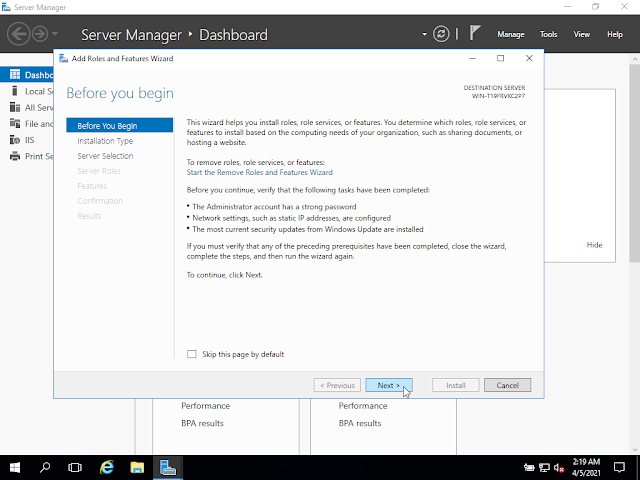
Step 12 — Click on «Add roles and features«.
Step 13 — Click on «Next«.
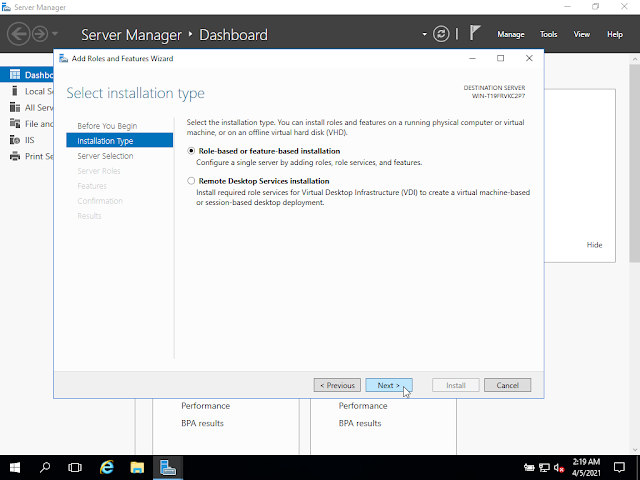
Step 14 — Keep selected «Role-based or feature-based installation» and click on «Next«.
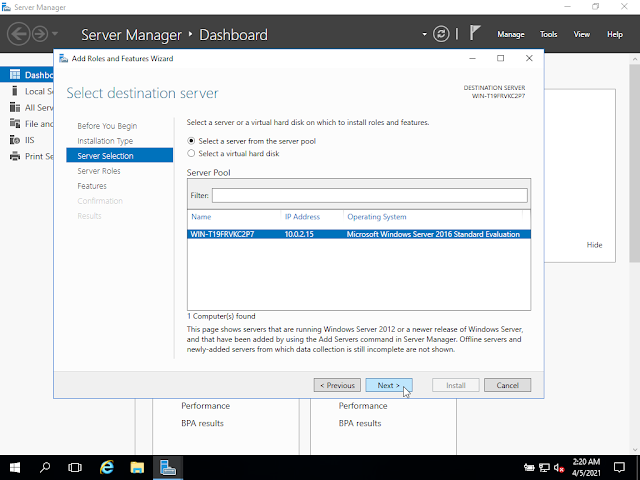
Step 15 — Select/Verify the server name and IP address, then click on «Next«.
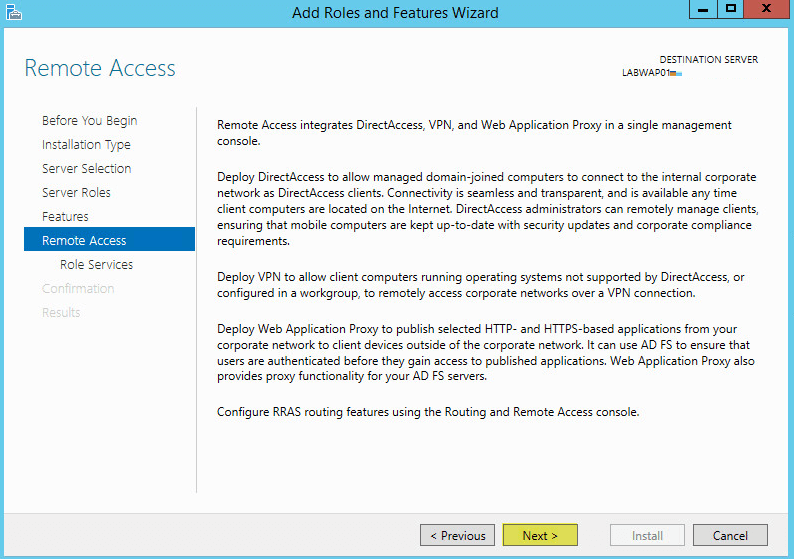
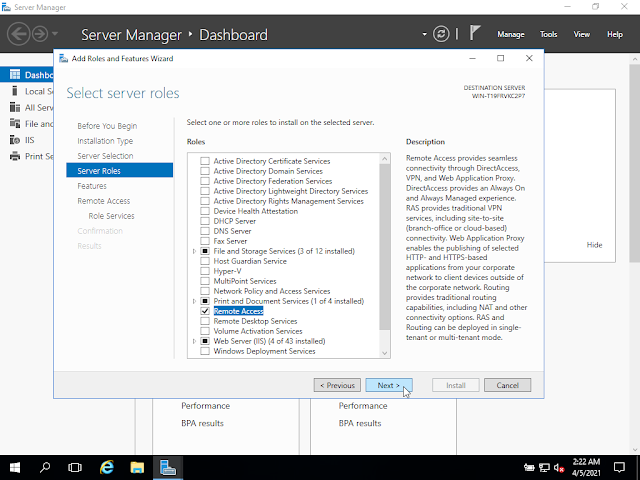
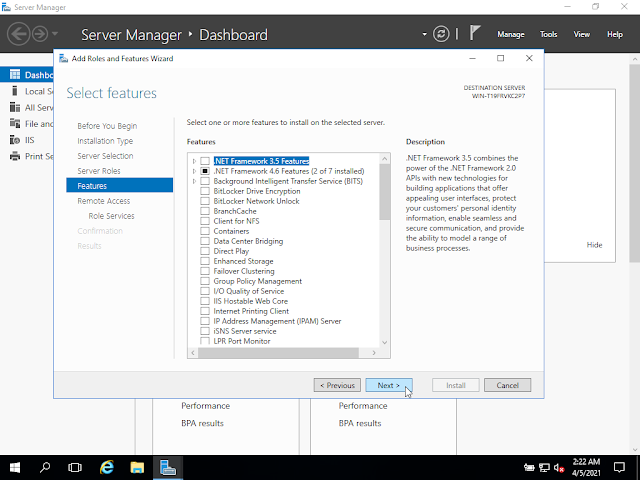
Step 16 — Locate «Remote Access» and click the check box.
Step 17 — Confirm the Tick mark and click on «Next«.
Step 18 — Click on «Next«.
Step 19 — Click on «Next«.
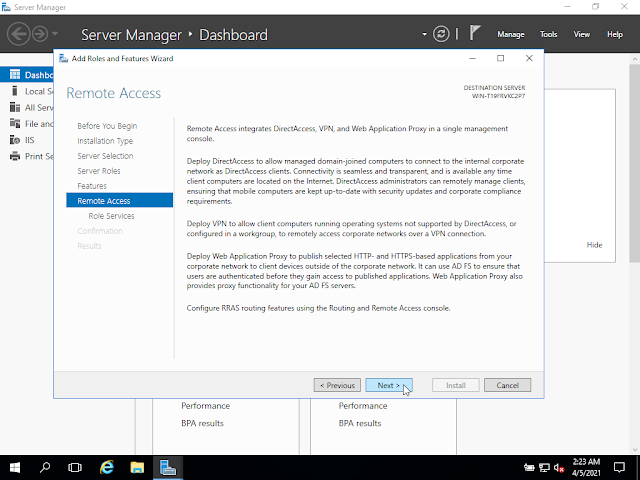
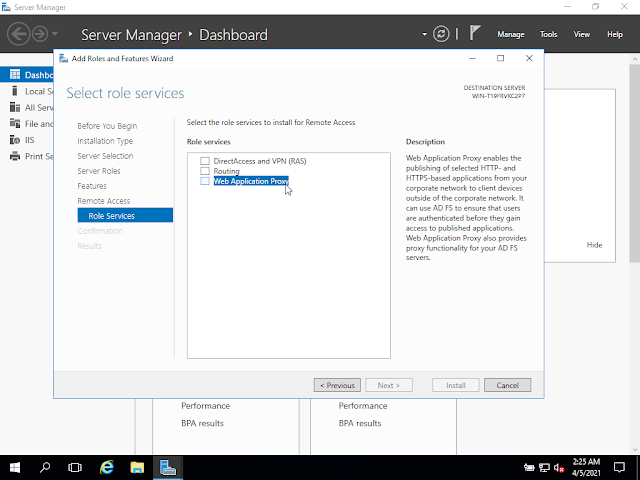
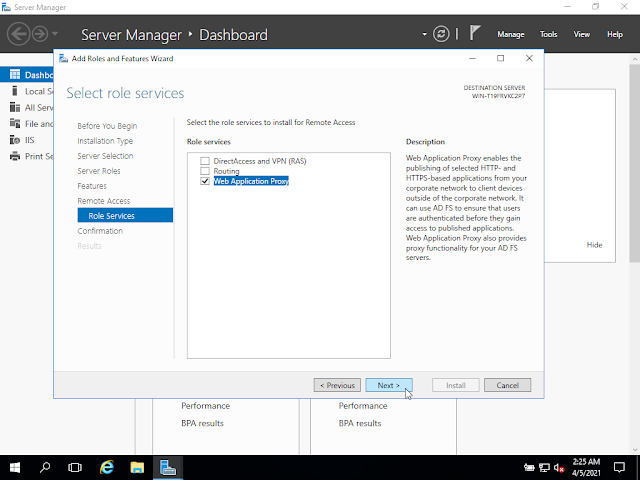
Step 20 — Locate «Web Application Proxy» and click the check box.
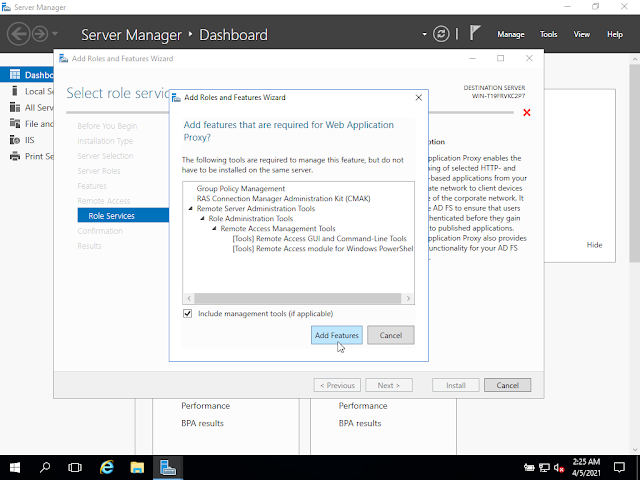
Step 21 — Click on «Add Features«.
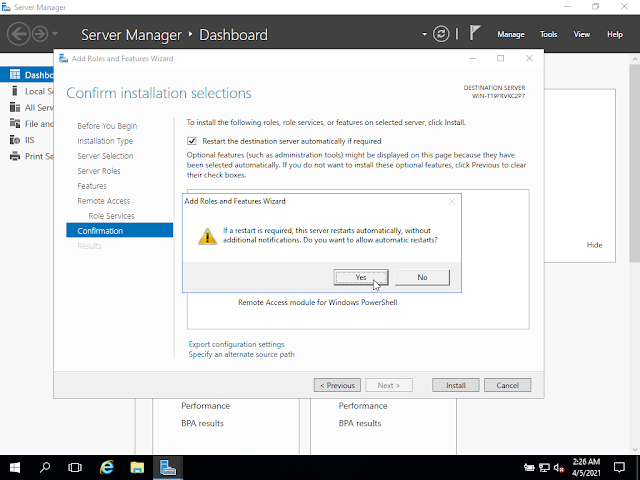
Step 22 — Confirm the Tick mark and click on «Next«.
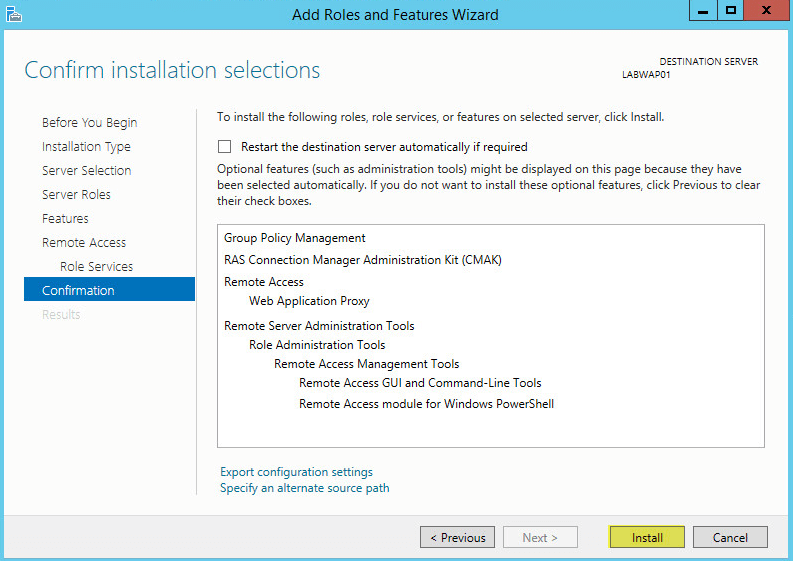
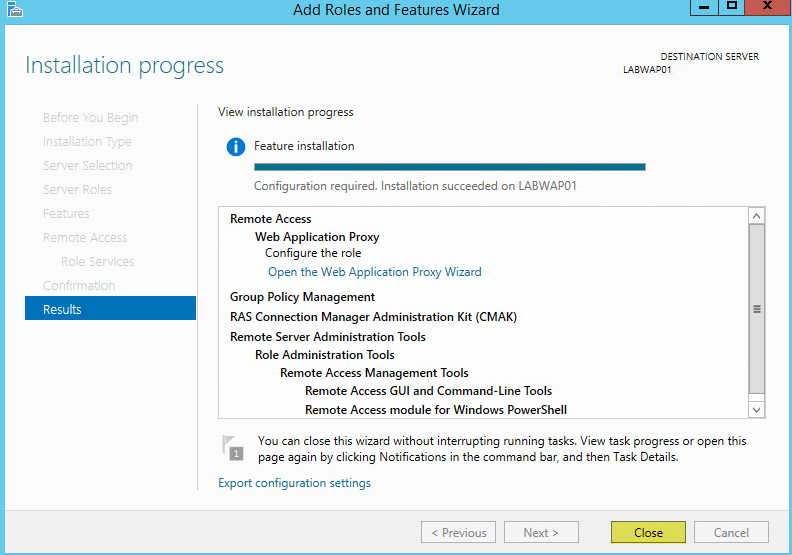
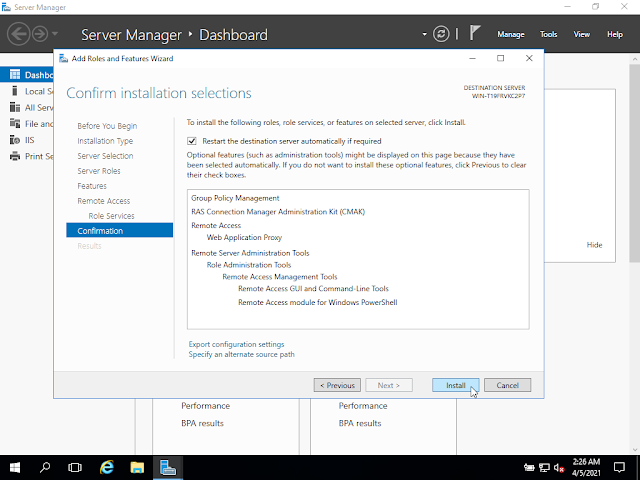
Step 23 — Click on «Install«.
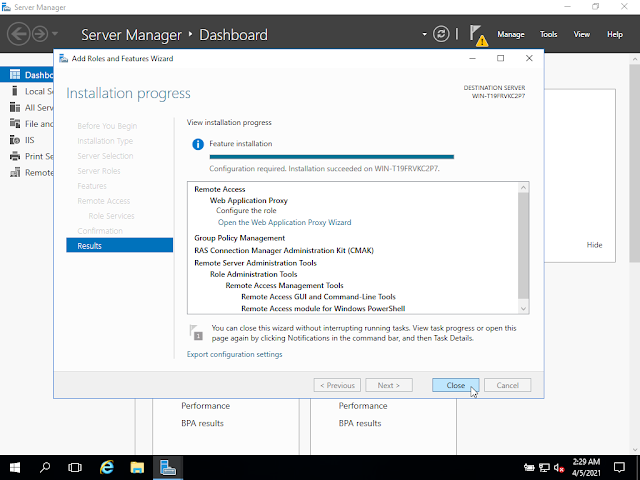
Step 24 — Wait for some time until installation completes.
Step 25 — Click on «Open the Web Application Proxy Wizard«.
Step 26 — Click on «Next«.
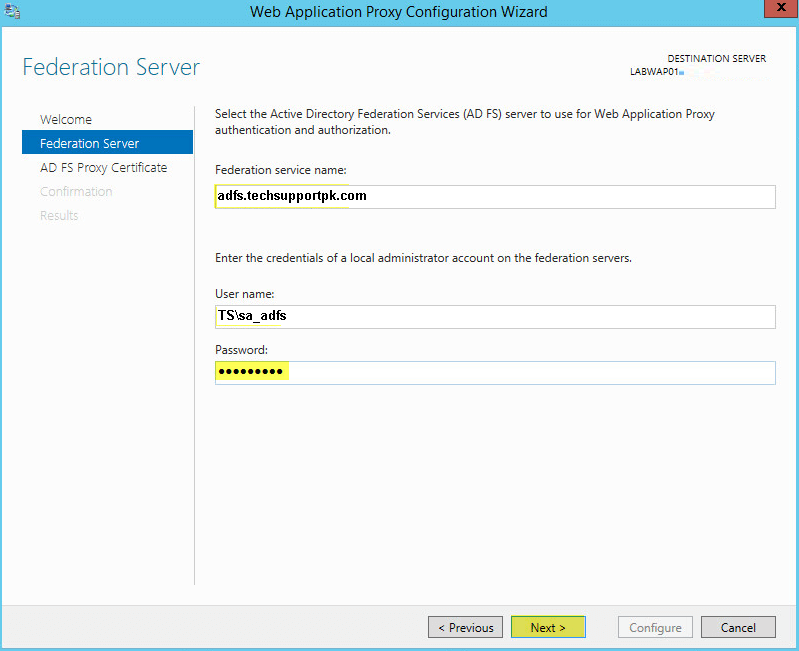
Step 27 — Type «Federation Service Name«, «User name and Password» of a local administrator account on the federation servers.
Step 28 — Click on «Next«.
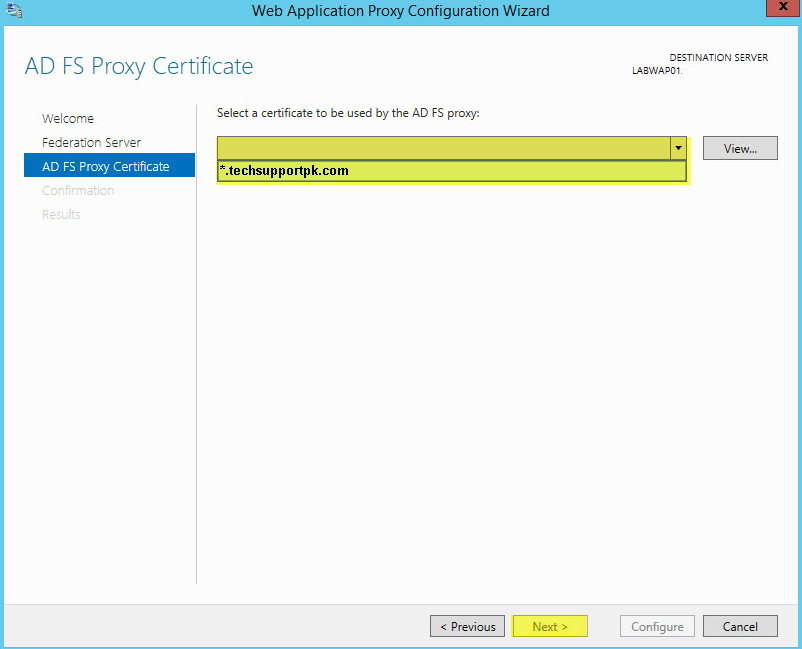
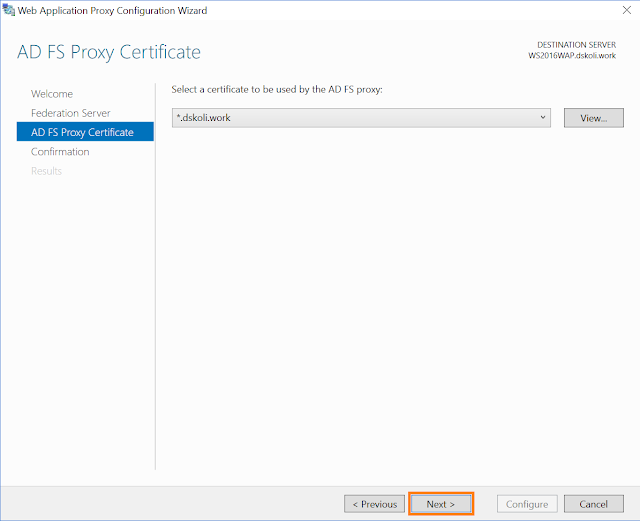
Step 29 — Select appropriate SSL Certificate from the drop down list and click on «Next«.
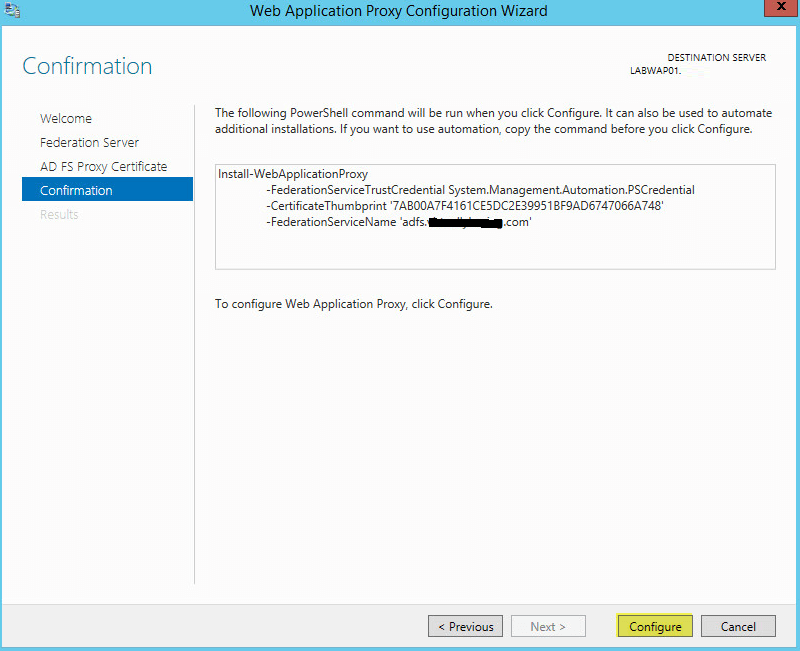
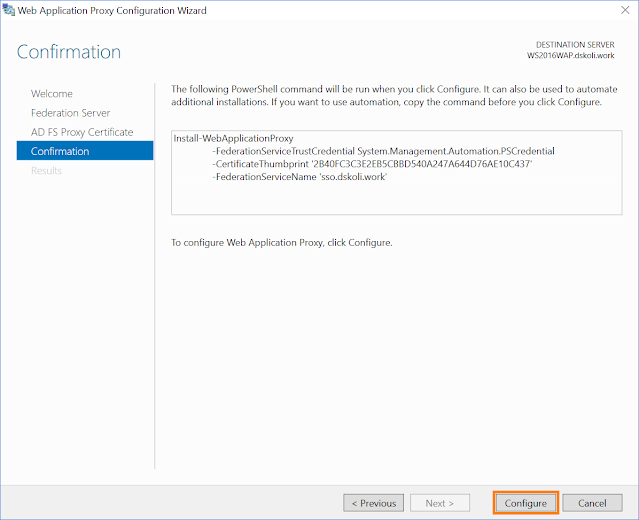
Step 30 — Review all selections and click on «Configure«.
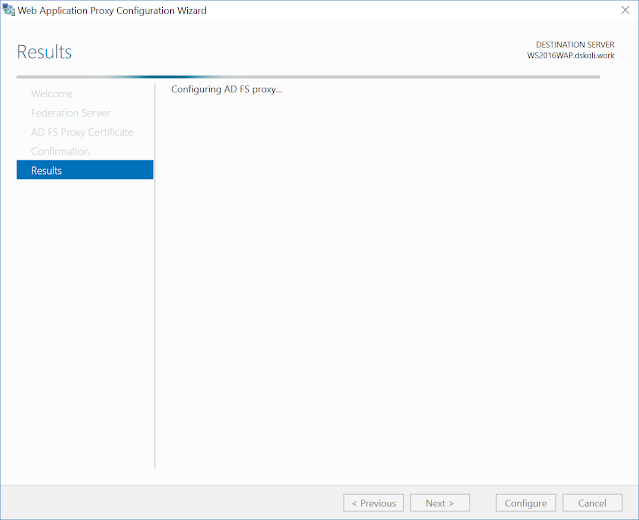
Step 31 — Wait for some time until configuration completes.
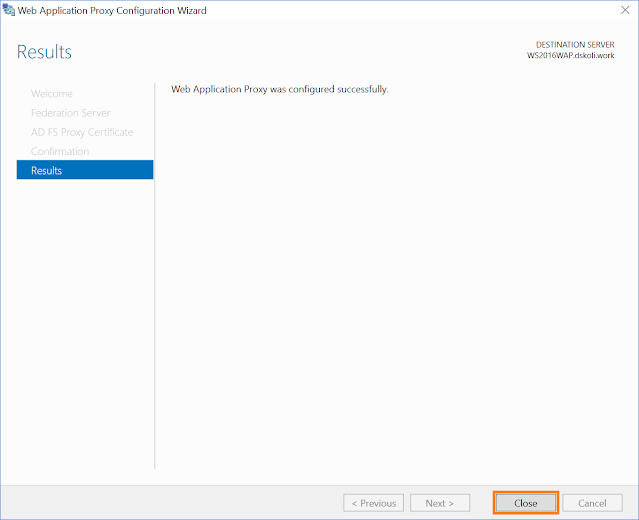
Step 32 — Click on «Close«.
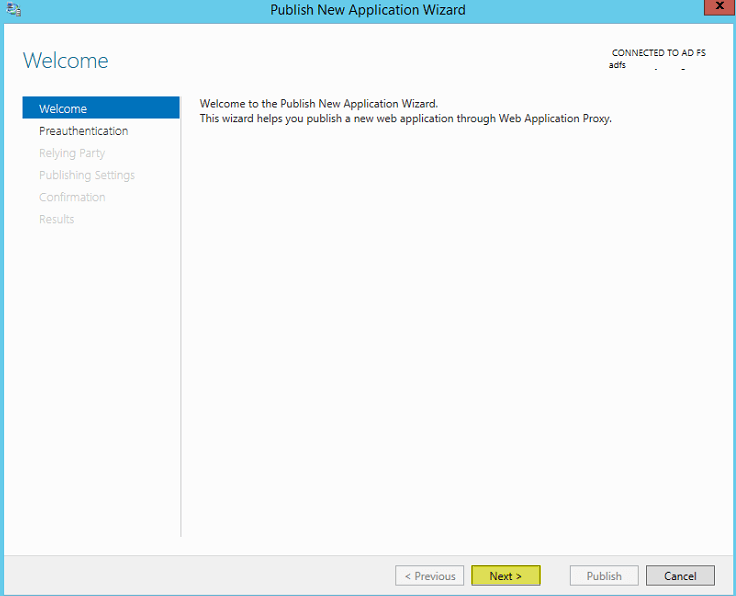
Step 33 — Click on «Publish«.
Step 34 — Click on «Next«.
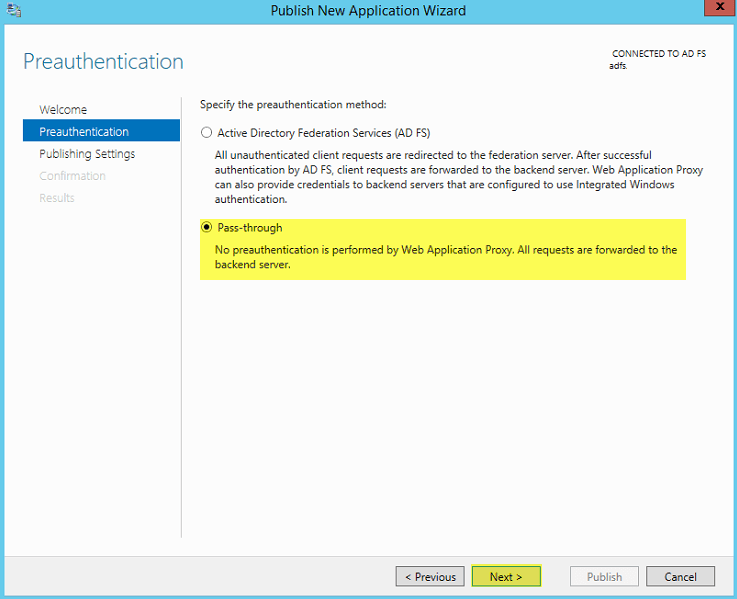
Step 35 — Click on «Pass-through«.
Step 36 — Click on «Next«.
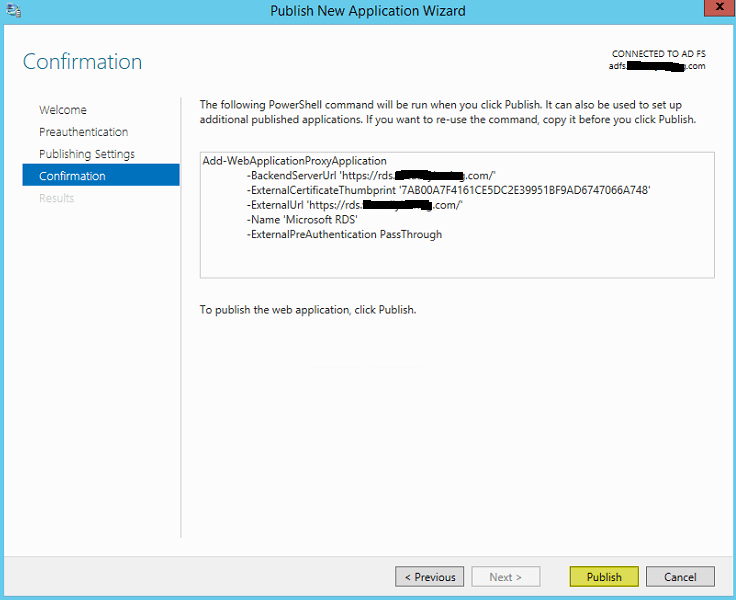
Step 37 — Type «Name«, «External URL» & «Backend server URL«, for example — «https://sso.dskoli.work/«, select appropriate «External certificate» from the drop down list.
Step 38 — Locate «Enable HTTP to HTTPS redirection«, click the check box, confirm the Tick mark and click on «Next«.
Step 39 — Review all selections and click on «Publish«.
Step 40 — Click on «Close«.
Step 41 — Published Web Application will be displayed in the list.
Step 42 — On the Public DNS Panel of domain, add «Host (A)» record for federation service name pointing to WAP server on Perimeter Network. For example, «sso.dskoli.work» pointing to Public IP.
“Thank You for being with me.”

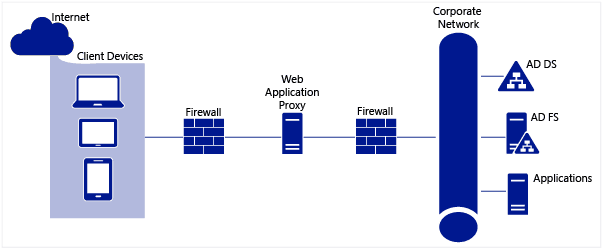
Microsoft Web Application Proxy was introduced in Windows Server 2012 R2. It allows you to access web applications from outside your network and it acts as a reverse proxy and an Active Directory Federation Services proxy to pre-authenticate user access.
This guide walks you through the steps to install and configure web application proxy role on Windows Server 2016.
Web Application Proxy New Features
- Preauthentication for HTTP Basic application publishing
- HTTP Basic is the authorization protocol used by many protocols, including ActiveSync, to connect rich clients, including smartphones, with your Exchange mailbox. Web Application Proxy traditionally interacts with AD FS using redirections which is not supported on ActiveSync clients. This new version of Web Application Proxy provides support to publish an app using HTTP basic by enabling the HTTP app to receive a non-claims relying party trust for the application to the Federation Service.
- Wildcard domain publishing of applications
- To support scenarios such as SharePoint 2013, the external URL for the application can now include a wildcard to enable you to publish multiple applications from within a specific domain, for example, https://*.sp-apps.contoso.com. This will simplify publishing of SharePoint apps.
- HTTP to HTTPS redirection
- In order to make sure your users can access your app, even if they neglect to type HTTPS in the URL, Web Application Proxy now supports HTTP to HTTPS redirection.
- HTTP Publishing
- It is now possible to publish HTTP applications using pass-through preauthentication
- Publishing of Remote Desktop Gateway apps
- New debug log for better troubleshooting and improved service log for complete audit trail and improved error handling
- Administrator Console UI improvements
- Propagation of client IP address to backend applications
The following diagram explains the architectural layout of Web Application Proxy.
Prerequisites
Web Application Proxy and Active Directory Federation Services can not be deployed on same server. You need an additional server to set up web proxy. We assume that the following services are already installed and configured accordingly.
- Active Directory Domain Services
- Active Directory Federation Services
Installing the Web Application Proxy Server Role
To begin, Open up Server Manager and click Manage click Add Roles and Features

Click Next:
Select Role-based or feature-based installation, click Next:

Select the server you want to install this role on to and then click Next:

Select Remote Access then click Next:

No additional Features are needed. Click Next:

Click Next:
Select Web Application Proxy:

On the pop up click Add Features

The Web Application Proxy role does not required a reboot. Click Install
Once complete click Close
Web Application Proxy is now installed but you need the AD FS certificate to continue.
You need the certificate from your AD FS server added to your Web Application Proxy server. Login to your AD FS server and open MMC.exe:

Go to File > Add/Remove Snap-ins > select Certificates then click Add:
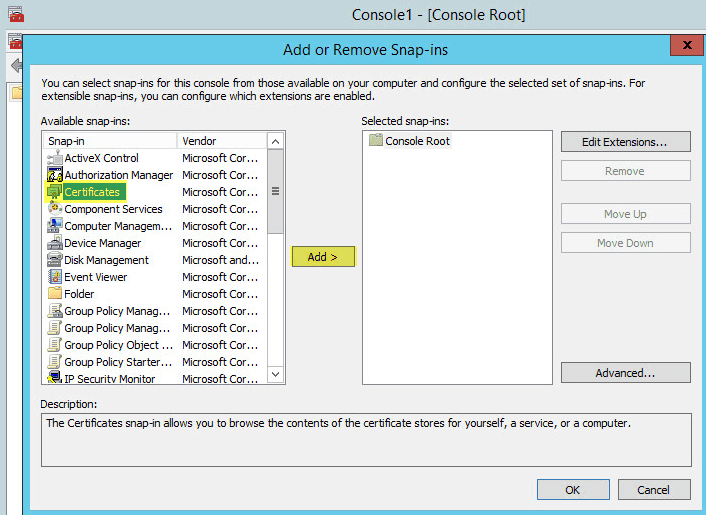
When you click OK you will get the following pop up. Select Computer account then click Next:

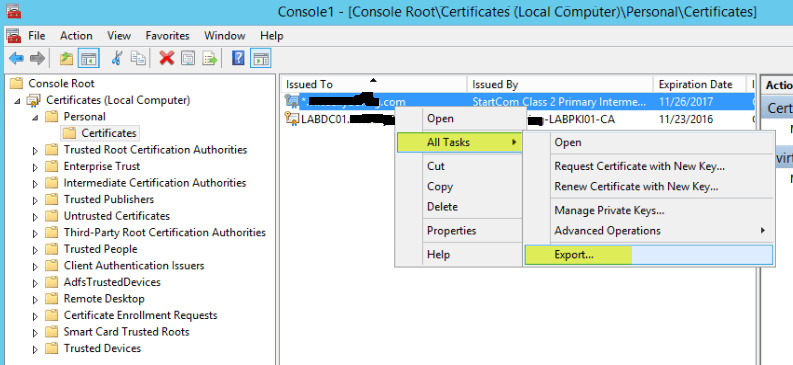
On AD FS Server: Scroll down to Personal > Certificates then right click the SSL certificate you used during setup of AD FS. Go to All Tasks > Export. Save to a location that your Web Application Proxy can access. Make sure you export the Private Key and certificate as a .pfx file format.
On Web Application Proxy: Right click on Personal > Certificates then go to All Tasks > Import:

This will bring up the Certificate Import Wizard. Click Next

Browse to the certificate that you exported from your AD FS server and select it. Click Next

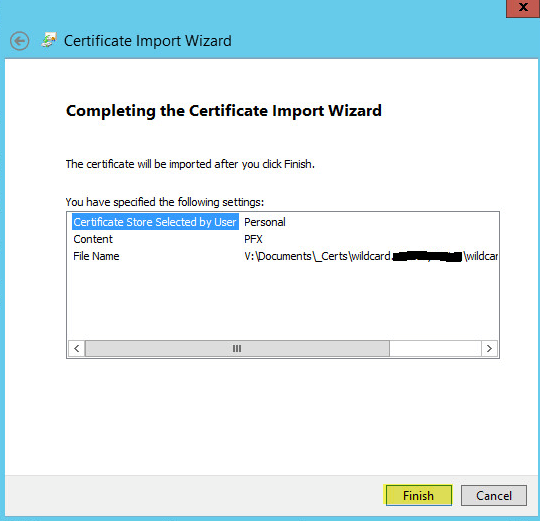
Enter the password for the private key and check the box to make the key exportable. Click Next

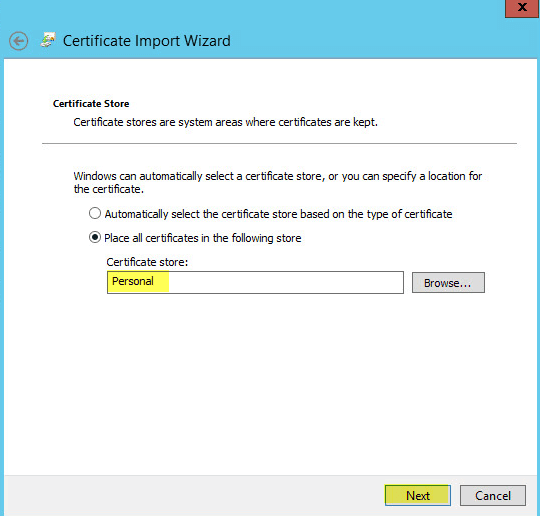
Leave the default certificate store as Personal. Click Next
Click Finish
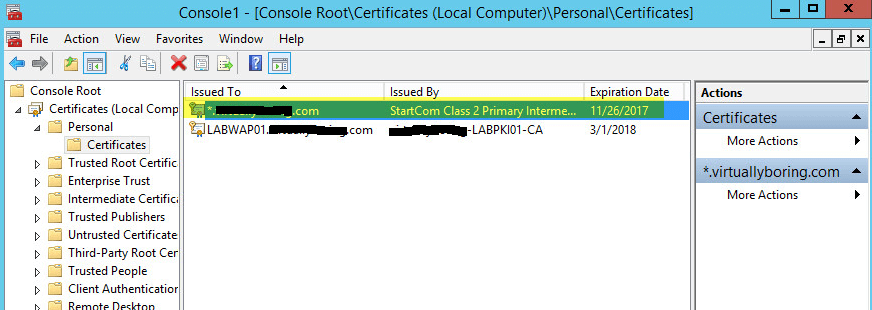
You should now see the certificate from your AD FS servers on your Web Application Proxy server
Now you are ready to start the Post Configuration settings.
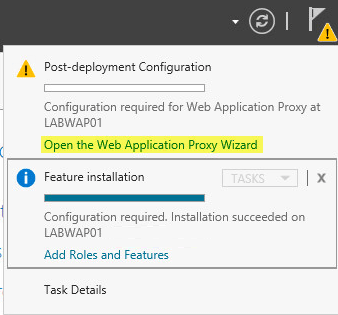
Back on your Web Application Server open Server Manager then click Notifications then the message Open the Web Application Proxy Wizard:
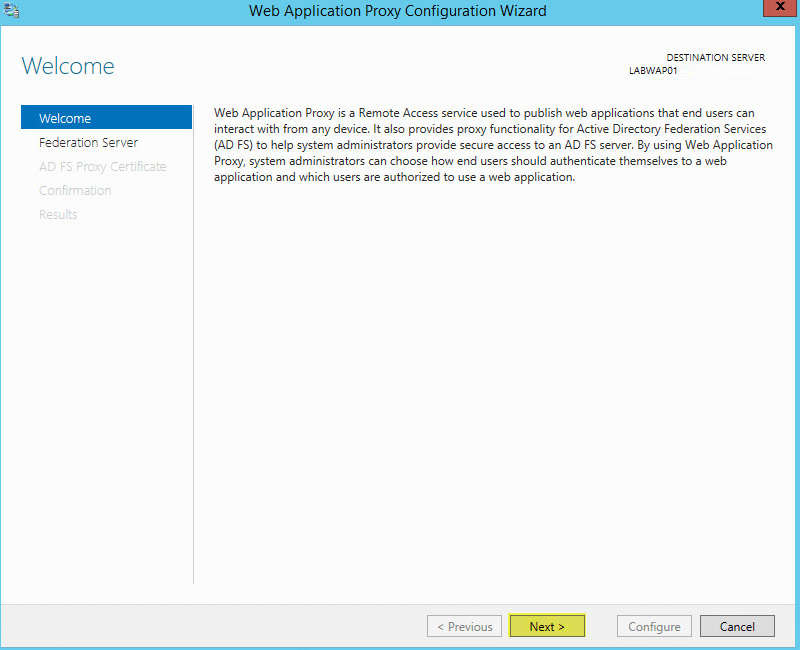
Click Next:
Enter the FQDN of your AD FS name and the Service Account you created during AD FS setup. Click Next:
On the drop down menu select the certificate you imported from your AD FS server. Click Next
Click Configure
Once finished click Close

Remote Access Management Console should open when you clicked Close. On Operations Status you should see all the objects as green

Finally, its time to publish apps. In the Remote Access Management Console click Web Application Proxy then Publish

Click Next:
Pass-through will let WAP act like a reverse proxy.
Here you have two options: (AD FS and Pass-through) self-explanatory. I have already set up AD FS in your environment then go with the first option otherwise 2nd is my choice since at the moment I don’t have AD FS.
Select Pass-through and click Next
Name: Enter a display name
External URL: Enter the URL that will be coming in your the WAP server externally
External Certificate: The drop down menu will show certificates that are added on the WAP server. Select the same certificate that you used while setting up your application. In my case I used my wildcard certificate.
Backend server URL: Enter the web URL of the server you want the external URL forwarded
Click Next:

Copy the PowerShell command down and with some minor edits you can easily add additional PassThrough applications with ease.
Click Publish:
Click Close to finish:

Here you can see the published web application is ready for testing.

Before you move to test your published app, ask your network guy to set up 443 port redirection to WAP server on firewall to make it possible to access web applications from the external network.
Once done.
Then from the external network (for example on your smartphone or a PC) from home, try to access your web link like https://rds.techsupportpk.com and the following page will show up.

You have successfully deployed Web Application Proxy in your environment.
В этой статье мы рассмотрим, как централизованно задать настройки прокси на компьютерах с Windows 10 в домене Active Directory с помощью групповых политик. Большинство распространенных браузеров (таких как Microsoft Edge, Google Chrome, Internet Explorer, Opera) и большинство приложений автоматически используют для доступа в интернет параметры прокси сервера, заданные в Windows. Также мы рассмотрим, как задать параметры системного WinHTTP прокси.
Содержание:
- Как задать параметры прокси сервера в Windows через GPO?
- Настройка параметров прокси через реестр и GPO
- Настройка параметров WinHTTP прокси групповыми политиками
В этой статье мы рассмотрим особенности настройки прокси сервера политиками в поддерживаемых версиях Windows (Windows 10, 8.1 и Windows Server 2012/2016/2019). Обратите внимание, что в снятых с поддержки Windows 7/Server 2008R2, Windows XP/Windows Server 2003 параметры прокси сервера задаются по другому.
Как задать параметры прокси сервера в Windows через GPO?
До выхода Windows Server 2012/Windows 8 для настройки параметров Internet Expolrer (и в том числе настроек прокси) использовался раздел Internet Explorer Maintenance (IEM) из пользовательской секции GPO (User configuration –> Policies –> Windows Settings –> Internet Explorer Maintenance). В современных версиях Windows 10 /Windows Server 2016/2019 этот раздел отсутствует. 
В новых версиях Windows для настройки параметров IE и прокси в редакторе GPO нужно использовать предпочтения групповых политик GPP (Group Policy Preferences). Также есть вариант использования специального расширения Internet Explorer Administration Kit 11 (IEAK 11) – но применяется он редко.
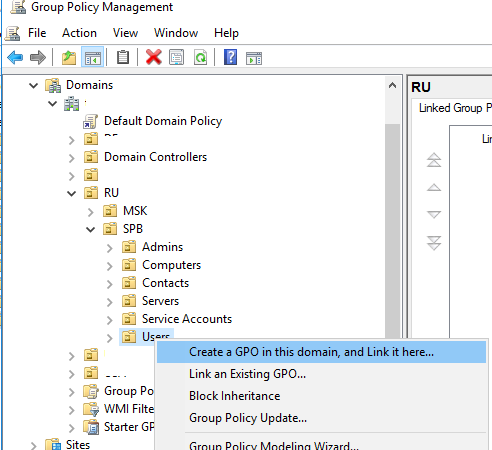
Откройте консоль редактора доменных GPO (Group Policy Management Console –
GPMC.msc
), выберите OU с пользователями, для которых нужно назначить параметры прокси-сервера и создайте новую политику Create a GPO in this domain, and Link it here.
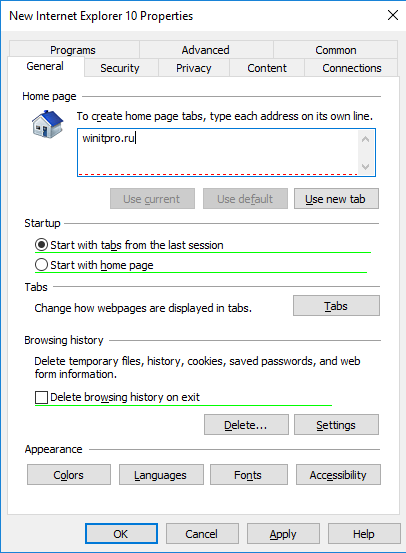
Перейдите в раздел User Configuration -> Preferences -> Control Panel Settings -> Internet Settings. В контекстном меню выберите пункт New -> и выберите Internet Explorer 10.

Для настройки параметров прокси в Windows 10/Windows Server 2016 нужно использовать пункт Internet Explorer 10.
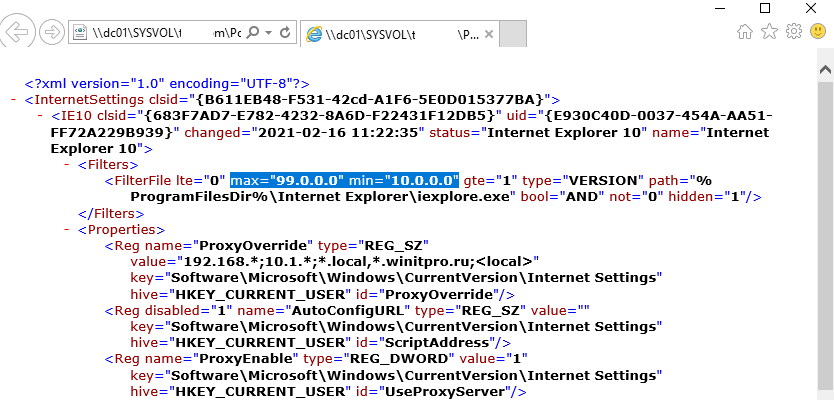
Совет. Несмотря на то, что отдельной настройки для Internet Explorer 11 нет, политика Internet Explorer 10 будет применяться на все версии IE >=10 (в файле политики InternetSettings.xml можно увидеть, что опция действительна для всех версии IE, начиная c 10.0.0.0 и заканчивая 99.0.0.0). Все версии Internet Explorer ниже 11 на данный момент сняты с поддержки Microsoft и более не обновляются.
<FilterFile lte="0" max="99.0.0.0" min="10.0.0.0" gte="1" type="VERSION" path="%ProgramFilesDir%\Internet Explorer\iexplore.exe" bool="AND" not="0" hidden="1"/>
Перед вами появится специальная форма, практически полностью идентичная настройкам параметра обозревателя в панели управления Windows. Например, вы можете указать домашнюю страницу (Вкладка General, поле Home page).
Важно. Не достаточно просто сохранить внесенные изменения в редакторе политики. Обратите внимание на красные и зеленые подчеркивания у настраиваемых параметров Internet Explorer 10. Красное подчеркивание говорит о том, что эта настройка политики не будет применяться. Чтобы применить конкретную настройку, нажмите F5. Зеленое подчеркивание у параметра означает, что этот параметр IE будет применяться через GPP.
Доступные функциональные клавиши
- F5 – Включить все настройки на текущей вкладке
- F6 – Включить выбранный параметр
- F7 – Отключить выбранный параметр
- F8 – Отключить все настройки на текущей вкладке
Чтобы указать параметры прокси-сервера, перейдите на вкладку Connections и нажмите кнопку Lan Settings). Прокси сервер можно настроить одним из следующих способов:
- Automatically detect settings — автоматическое определение настроек прокси с помощью файла wpad.dat;
- Use automatic configuration script — скрипт автоконфигурации (proxy.pac);
- Proxy Server – можно вручную указать IP адрес или DNS имя прокси сервера и порт подключения. Это самый простой способ настроить прокси в Windows, его и будем использовать.
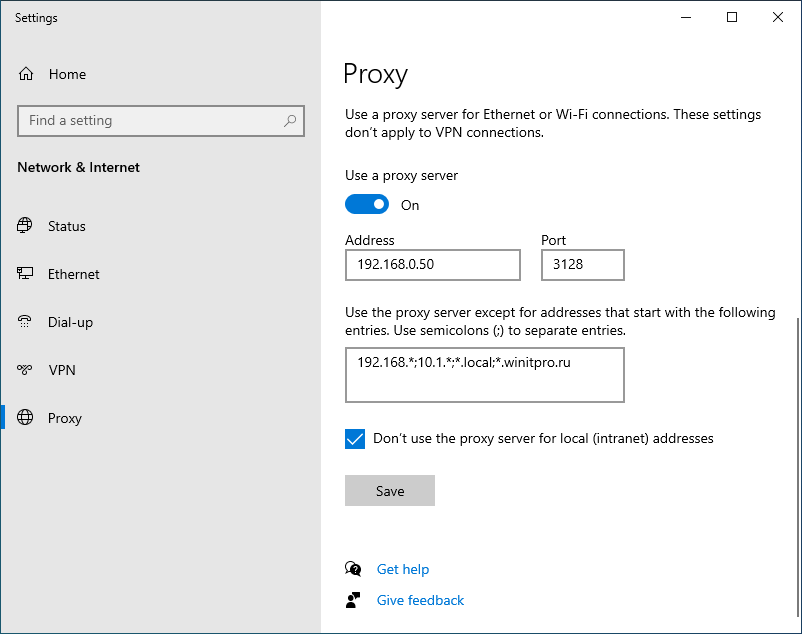
Поставьте галку Use a proxy server for your LAN, а в полях Address и Port соответственно укажите IP/FQDN имя прокси-сервера и порт подключения.
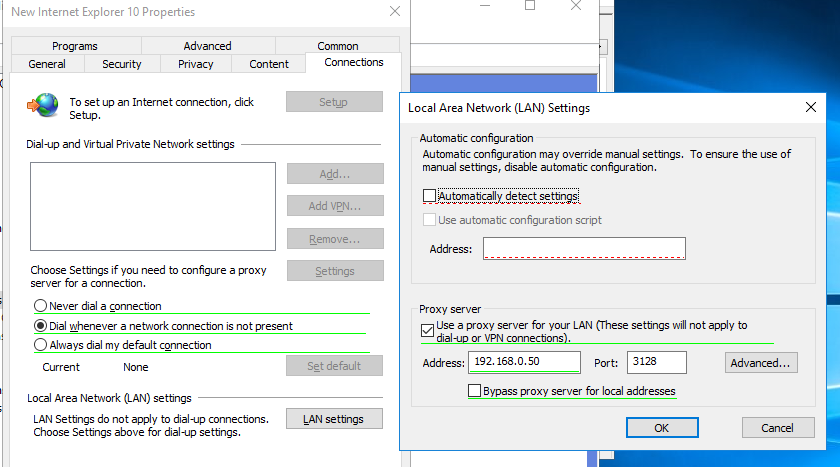
Включив опцию Bypass Proxy Server for Local Addresses можно запретить приложениям (в том числе браузеру) использовать прокси-сервер при доступе к локальным ресурсам (в формате
http://intranet
). Если вы используете адреса ресурсов вида
https://winitpro.ru
или
http://192.168.20.5
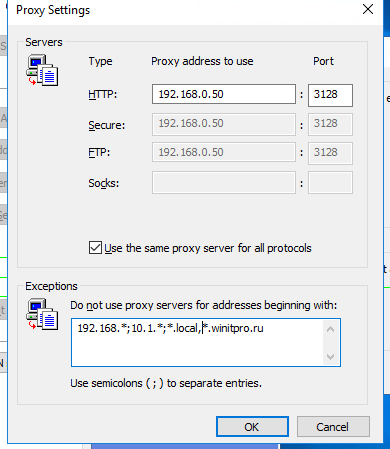
, то эти адреса не распознаются Windows как локальные. Эти адреса и адреса других ресурсов, для доступа к которым не нужно использовать прокси, нужно указать вручную. Нажмите кнопку Advanced и в поле Exceptions введите адреса в формате:
10.*;192.168.*;*.loc;*.contoso.com
Совет. Параметры прокси-сервера в Google Chrome можно задать централизованно через GPO с помощью специальных административных шаблонов. Для Mozilla Firefox можно использовать такое решение.
После сохранения политики вы можете просмотреть XML файл с заданными настройками браузера в каталоге политики на контроллере домена \\DC1\SYSVOL\winitpro.ru\Policies\(PolicyGuiID)\ User\Preferences\InternetSettings\InternetSettings.xml

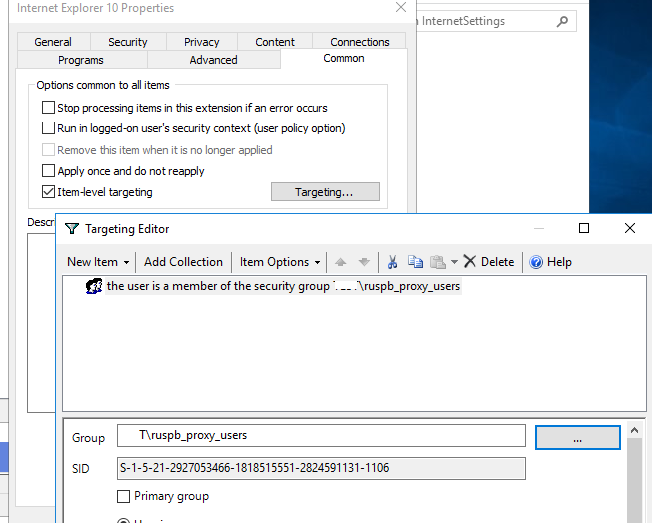
В GPP есть возможность более тонко нацелить политику на клиентов. Для этого используется GPP Item Level Targeting. Перейдите на вкладку Common, включите опцию Item-level targeting -> Targeting.
В открывшейся форме укажите условия применения политики. В качестве примера я указал, что политика настройки прокси будет применена только к пользователям, которые состоят в доменной группе ruspb_proxy_users. Вы можете использовать собственную логику назначения параметров прокси (в зависимости от IP подсети, сайта AD и т.д.).
Осталось назначить политику IE на контейнер с пользователями и обновить политики на них. После обновления политики на компьютерах пользователей должны примениться новые настройки прокси в IE. В Windows 10 текущие параметры прокси можно посмотреть в разделе Settings -> Network and Internet -> Proxy. Как вы видите, на компьютере теперь заданы настройки прокси, указанные в доменной политике.
Чтобы запретить пользователям менять настройки прокси-сервера, воспользуйтесь этой статьей.
Настройка параметров прокси через реестр и GPO
Кроме того, настроить параметры IE можно и через реестр, политиками GPP. К примеру, чтобы включить прокси для пользователя нужно настроить следующие параметры реестра в ветке HKEY_CURRENT_USER\Software\Microsoft\ Windows\CurrentVersion\Internet Settings.
Перейдите в редакторе GPO в раздел User Configuration -> Preferences -> Windows Settings -> Registry и создайте три параметра реестра в указанной ветке:
-
ProxyEnable
(REG_DWORD) =
00000001 -
ProxyServer
(REG_SZ) =
192.168.0.50:3128 -
ProxyOverride
(REG_SZ) =
*winitpro.ru;https://*.contoso.com;192.168.*;<local>
Здесь также можно использовать Item level targeting для более тонкого нацеливания политик. 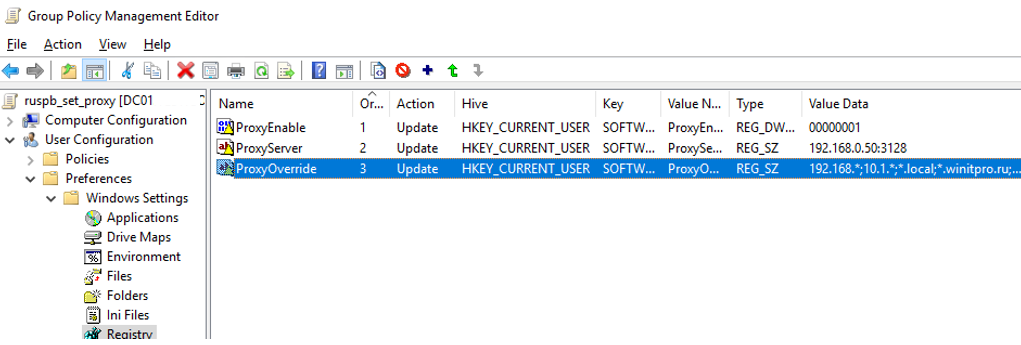
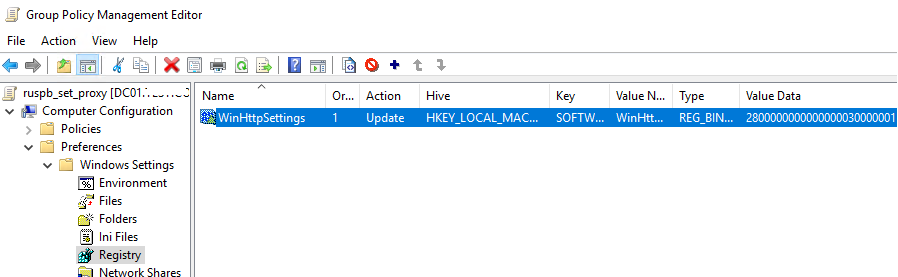
Если вам нужно создать политики не для каждого пользователя (per-user), а для всех пользователей компьютера (per-computer), используйте параметры GPP из раздела GPO Computer Configuration -> Preferences -> Windows Settings -> Registry. Используйте аналогичные параметры реестра в ветке HKEY_LOCAL_MACHINE\Software\Policies\Microsoft\Windows\CurrentVersion\Internet Settings.
Настройка параметров WinHTTP прокси групповыми политиками
Некоторые системные сервисы или приложения (например, служба обновлений Wususerv или PowerShell) по-умолчанию не используют пользовательские настройки прокси сервера из параметров Internet Explorer. Чтобы такие приложения работали корректно и получали доступ в интернет, вам нужно задать в Windows настройки системного прокси WinHTTP.
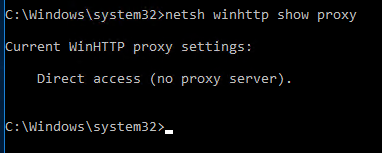
Чтобы проверить, настроен ли на вашем компьютере WinHTTP прокси, выполните команду:
netsh winhttp show proxy
Ответ “
Direct access (no proxy server)
” говорит о том, что прокси не задан, система использует прямой интернет доступ.
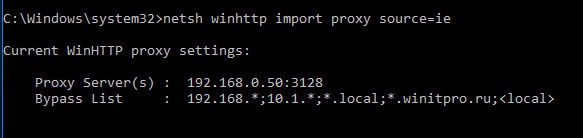
Вы можете задать на компьютере прокси для WinHTTP вручную командой:
netsh winhttp set proxy 192.168.0.50:3128 "localhost;192.168.*;*.winitpro.com"
Или импортировать настройки прокси из параметров Internet Explorer теекщего пользователя:
netsh winhttp import proxy source=ie
Однако настроить WinHTTP через GPO не получится – в редакторе GPO нет соответствующего параметра, а в реестре параметры хранятся в бинарном виде и не подходят для прямого редактирования.
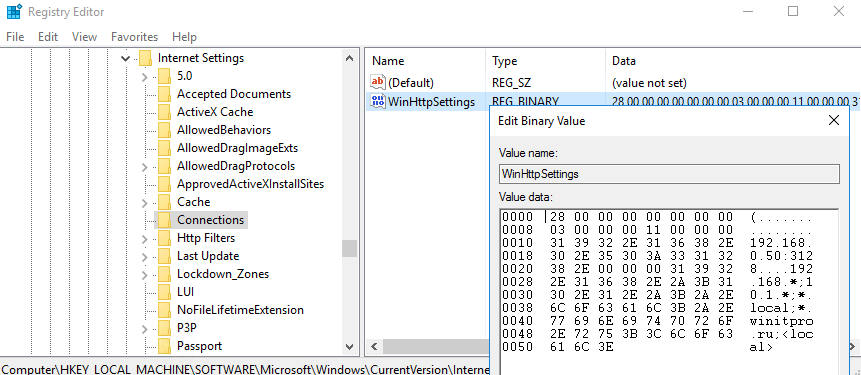
Единственный вариант задать параметры WinHTTP прокси – настроить их на эталонном компьютере, выгрузить значение параметра WinHttpSettings в ветке реестра HKLM\SOFTWARE\Microsoft\Windows\CurrentVersion\Internet Settings\Connections в reg файл и распространить этот параметр на компьютеры в домене через GPP registry.
Practical — 8 : How to Install and Configure Proxy Server in Windows Server 2016
How to Install and Configure Proxy Server in Windows Server 2016
Aim : How to Install and Configure Proxy Server in Windows Server 2016
Description :
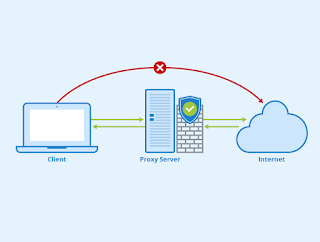
- A proxy server is a computer system or router that functions as a relay between client and server. It helps prevent an attacker from invading a private network and is one of several tools used to build a firewall.
Proxy Server Installation :
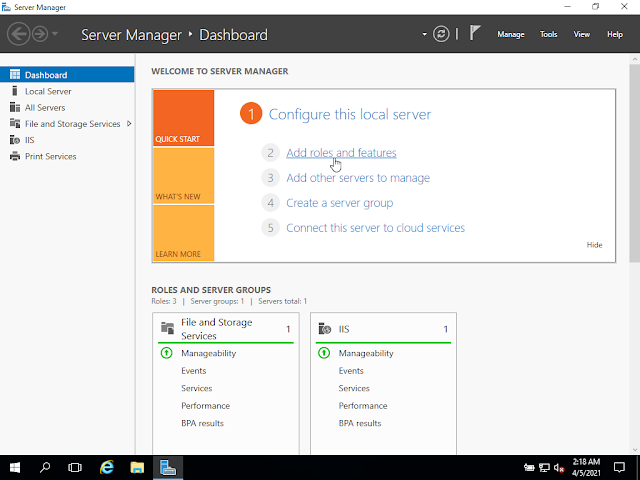
- Step — 1 : Open the server manager dashboard from the task bar. Click on Add roles and features.
- Step — 2 : Click on Next.
- Step — 3 : Select Role-based or Feature-based installation and click Next.
- Step — 4 : Click on Next.
- Step — 5 : Select Remote Access and click on Next.
- Step — 6 : Click on Next.
- Step — 7 : Click on Next.
- Step — 8 : Select the Web Application Proxy.
- Step — 9 : Click on Add Features.
- Step — 10 : Click on Next.
- Step — 11 : Select checkbox and New Window will popup then click Yes.
- Step — 12 : Click on Install.
- Installation Begins.

- Step — 13 : Click Close after Successful Installation.
Proxy Server Configuration :
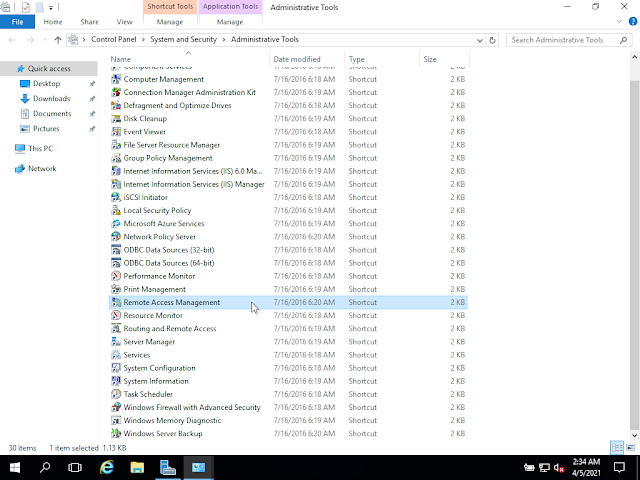
- Step — 14 : Control Panel -> All Control Panel Items -> Administrative Tools and Launch Remote Access Management.
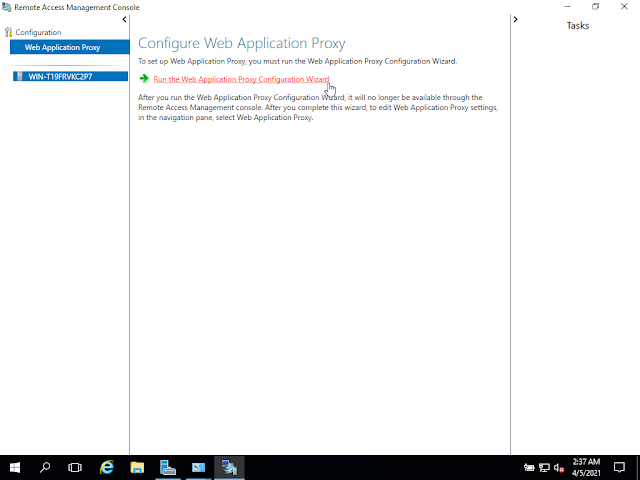
- Step — 15 : Select Run the Web Application Proxy Configuration Wizard.
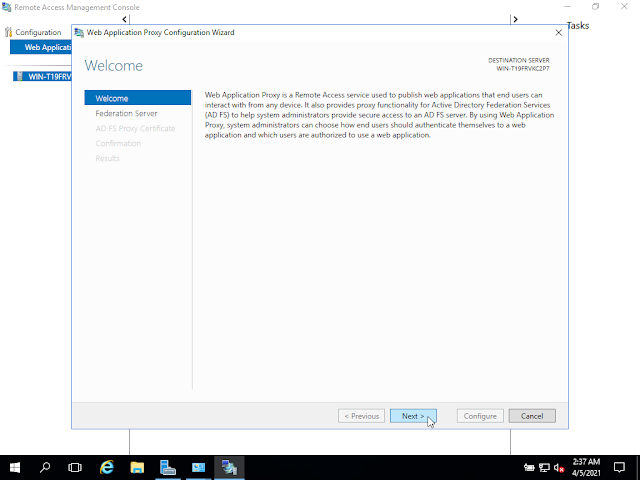
- Step — 16 : Click on Next.
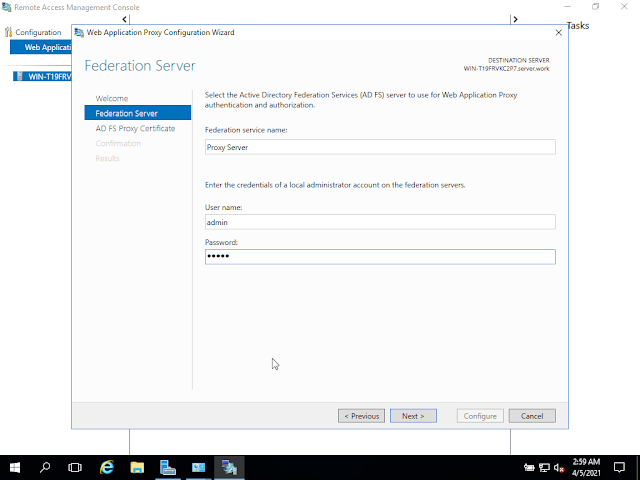
- Step — 17 : Enter Federation Service Name, User Name, Password and click on Next.
- Step — 18 : Select appropriate SSL Certificate from Dropdown list and click on Next.
- Step — 19 : Click on Configure.
- Configuration Begins.
- Step — 20 : Click on Close after Successful Configuration.
Result :
Proxy Server successfully Installed and Configured in Windows Server 2016 and ready for use.
Useful Links :
Get this all Images in PDF format to stick in Practical File — click here
Install Windows Server 2016 Image file (iso file) — click here
Install Virtual Box based on your OS — click here
Install PowerISO to make device bootable — click here
Install Rufus to make device bootable — click here
Referenced by :

Vikram Agrawal Sir
Lecturer in BBIT — V.V. Nagar, Anand.
Contact Number : 9727374744
Mail Id : agrawal.vm@gmail.com

Team B&B Institute of Technology, V.V. Nagar, Anand.
Popular posts from this blog
Practical — 11 : Install and Test Internet
How to Install and Configure Mail Server in Windows Server 2016

Contents
- 1 Configure Proxy Settings In Windows Server 2016
- 2 Configure Proxy Settings In Windows Server 2016
- 2.1 Conclusion
- 2.1.1 Related image with configure proxy settings in windows server 2016
- 2.1.2 Related image with configure proxy settings in windows server 2016
- 2.1 Conclusion
Uncover Hidden Gems and Plan Your Dream Getaways: Get inspired to travel the world with our Configure Proxy Settings In Windows Server 2016 guides. From awe-inspiring destinations to insider travel tips, we’ll help you plan unforgettable journeys and create lifelong memories. Technet-
Configure Proxy Settings In Windows Server 2016 Youtube
Configure Proxy Settings In Windows Server 2016 Youtube
02 23 2023 4 contributors feedback in this article how to configure proxy server settings through web proxy auto discovery protocol (wpad) how to configure proxy server settings in internet explorer or by using group policy proxy auto configuration (pac) files automatic configuration script proxy firewall client software reference. Manually. you’ll need to know the proxy server name or ip address and port (optional). if you don’t have this information, you might need to contact your it department. note: if you’re using a vpn connection and it uses a proxy server, you’ll need to set it up separately for that vpn connection.

Solved Windows Server 2016 How To Change Proxy Settings Experts
Solved Windows Server 2016 How To Change Proxy Settings Experts
Technet. 0:00 3:24 configure proxy settings in windows server 2016 microsoft lab 11.1k subscribers subscribe share 23k views 7 years ago install, setup, configure in windows server 2016 donate. Figure 1 select the connections tab. click the lan settings button, shown in figure 1. select the checkbox within the proxy server section (figure 2). brien posey figure 2 use this dialog box to enable proxy server use. enter your proxy server address and port number. make sure that the bypass proxy server for local addresses check box is selected. 1 i’m new to windows server and as i understand, a proxy server is an intermediary between a client computer and the internet. on client computer i can set proxy server address and port inside settings > network & internet > proxy page, but i don’t know how to obtain the address and the port from the server machine.

Configuring Proxy Settings Via Gpo On Windows 10 Windows Server 2016
Configuring Proxy Settings Via Gpo On Windows 10 Windows Server 2016
Figure 1 select the connections tab. click the lan settings button, shown in figure 1. select the checkbox within the proxy server section (figure 2). brien posey figure 2 use this dialog box to enable proxy server use. enter your proxy server address and port number. make sure that the bypass proxy server for local addresses check box is selected. 1 i’m new to windows server and as i understand, a proxy server is an intermediary between a client computer and the internet. on client computer i can set proxy server address and port inside settings > network & internet > proxy page, but i don’t know how to obtain the address and the port from the server machine. Well, yes, a proxy server is software just like anything else. windows server comes with iis which can act as a reverse proxy. otherwise you would need to install and configure one of the numerous other products that run on windows server. – squillman. aug 23, 2022 at 14:26. add a comment. Sp 61 jan 19, 2021, 3:57 pm in windows server 2016, i setup the proxy using below powershell script: set itemproperty path ‘hkcu:\software\microsoft\windows\currentversion\internet settings’ name proxyserver value «proxyhostname:proxyport»;.

Configuring Proxy Settings Via Gpo On Windows 10 Windows Server 2016
Configuring Proxy Settings Via Gpo On Windows 10 Windows Server 2016
Well, yes, a proxy server is software just like anything else. windows server comes with iis which can act as a reverse proxy. otherwise you would need to install and configure one of the numerous other products that run on windows server. – squillman. aug 23, 2022 at 14:26. add a comment. Sp 61 jan 19, 2021, 3:57 pm in windows server 2016, i setup the proxy using below powershell script: set itemproperty path ‘hkcu:\software\microsoft\windows\currentversion\internet settings’ name proxyserver value «proxyhostname:proxyport»;.

Configuring Proxy Settings Via Gpo On Windows 10 Windows Server 2016
Configuring Proxy Settings Via Gpo On Windows 10 Windows Server 2016
Configure Proxy Settings In Windows Server 2016
Configure Proxy Settings In Windows Server 2016
donate us : paypal.me microsoftlab configure proxy settings in windows server 2016 1. prepare dc31 : os windows windows server 2019 beginners tutorial by msftwebcast: the video tutorial shows how to configure gpo proxy settings for in this video, i explain step by step how to configure proxy settings using group policy preferences with an explanation of how to how to configure proxy autoconfigurl using group policy on windows server 2016 using group policy preference, we will in this video series i am going to implement and configure networking with windows server 2016. in the fifth video from the series i donate us : paypal.me microsoftlab prevent changing proxy settings via group policy in windows server 2016 1. prepapre in this video tutorial, i will show you guys how to use and configure proxy server settings in windows 10 pc or laptops. configure proxy settings in windows 10 1. prepare win1091 : os windows 10 2. step by step win1091 : start settings watch this video to learn how you can apply proxy settings to windows through the use of a *.reg file. this is just one of many configure proxy settings to decide how endpoint central is going to access the internet. accessing the internet allows endpoint hey guys sourav dutta here and today i am going to show you how to change proxy server settings in google chrome • set itrecordaz how to configure proxy settings with group policy ad 2016 keyword: proxy server is a server application that client
Conclusion
Taking everything into consideration, there is no doubt that the article offers helpful knowledge concerning Configure Proxy Settings In Windows Server 2016. Throughout the article, the author presents a deep understanding about the subject matter. Notably, the discussion of Y stands out as a key takeaway. Thanks for the article. If you have any questions, please do not hesitate to contact me via email. I look forward to your feedback. Furthermore, here are a few similar posts that might be helpful: