You can set up a personal proxy server and can use it for many purposes. This article will set up the proxy setup with the squid proxy on the windows server. In this guide, we will go over how to set up and configure a Squid Proxy on Windows Server.
Download & Install Squid Proxy
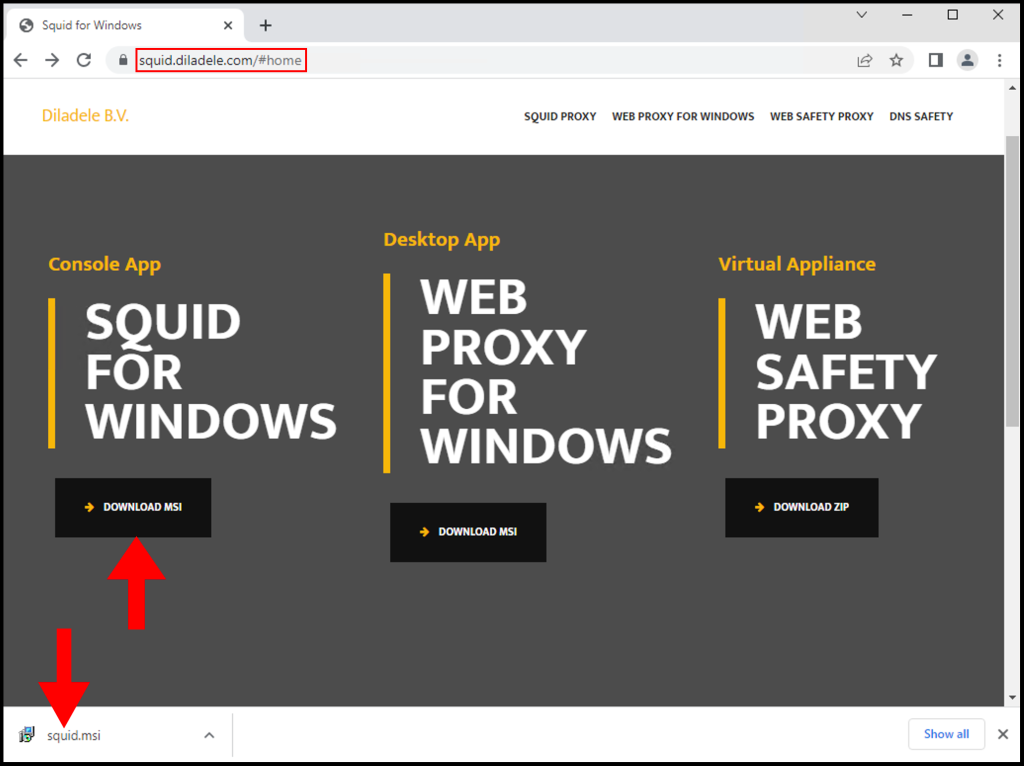
Download the Squid Proxy Installer from the following URL:
https://squid.diladele.com/#home
1. First, download the Squid Proxy application on your Windows server and open the .msi file to install Squid Proxy.
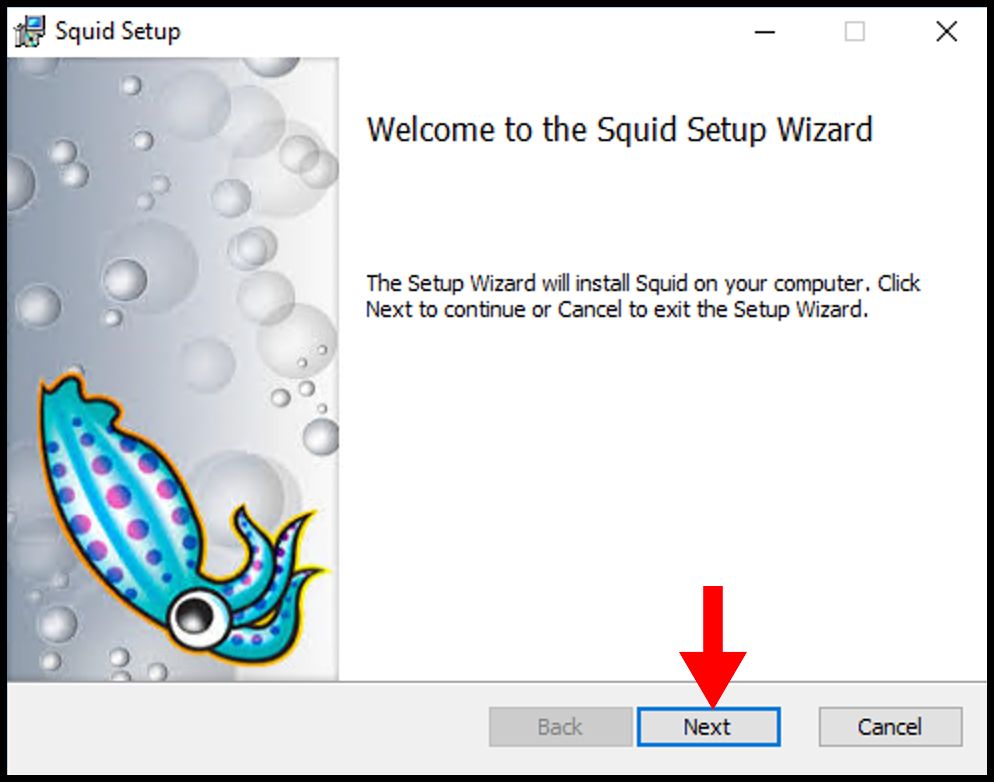
2. Once the Squid Setup window opens, click Next to begin the installation.
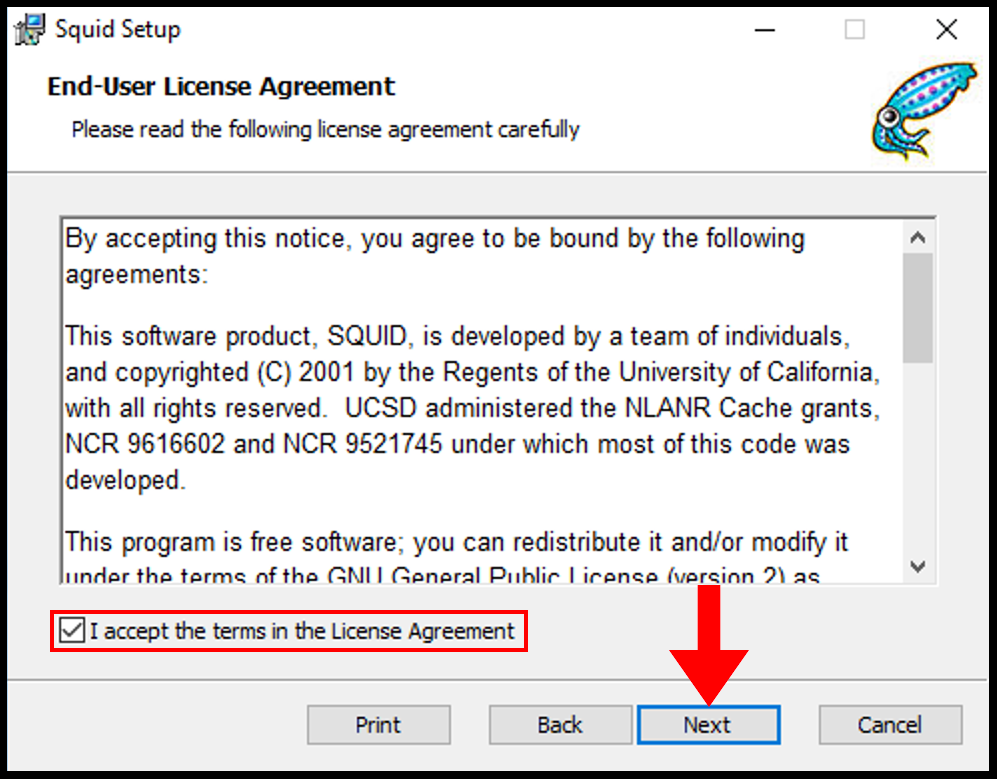
3. Next on the End-User License Agreement page, accept the terms and then click Next.
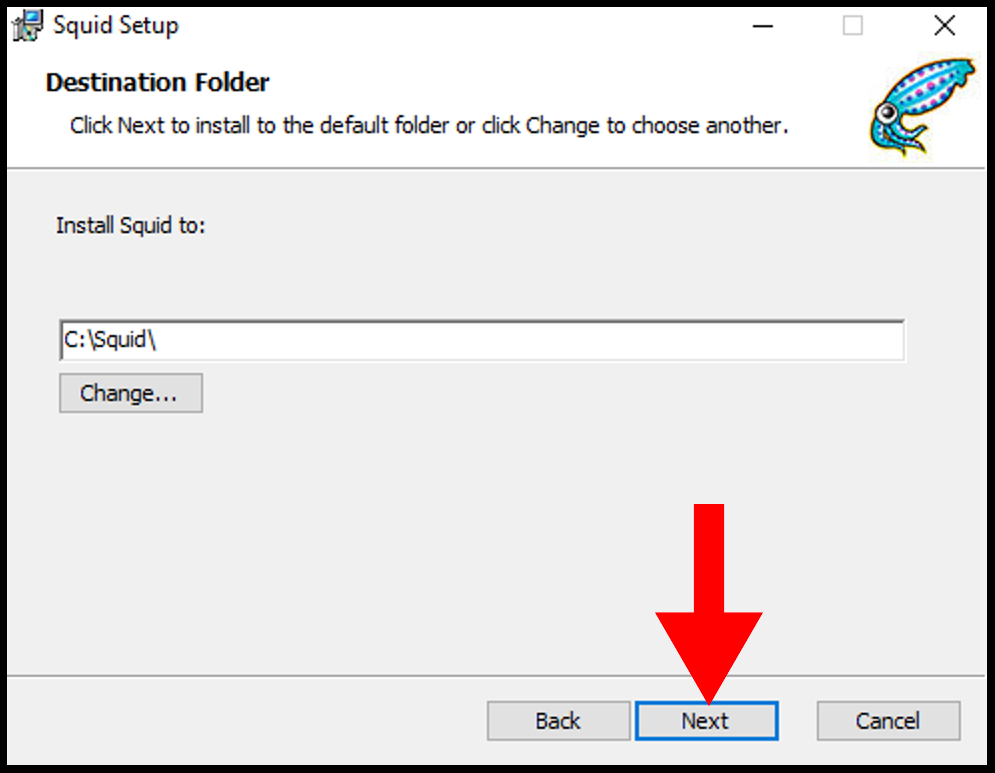
4. Then on the Destination Folder page, you can select the directory you want to install and once you are done click Next.
5. Then on the next page, click Install to begin the installation of Squid.

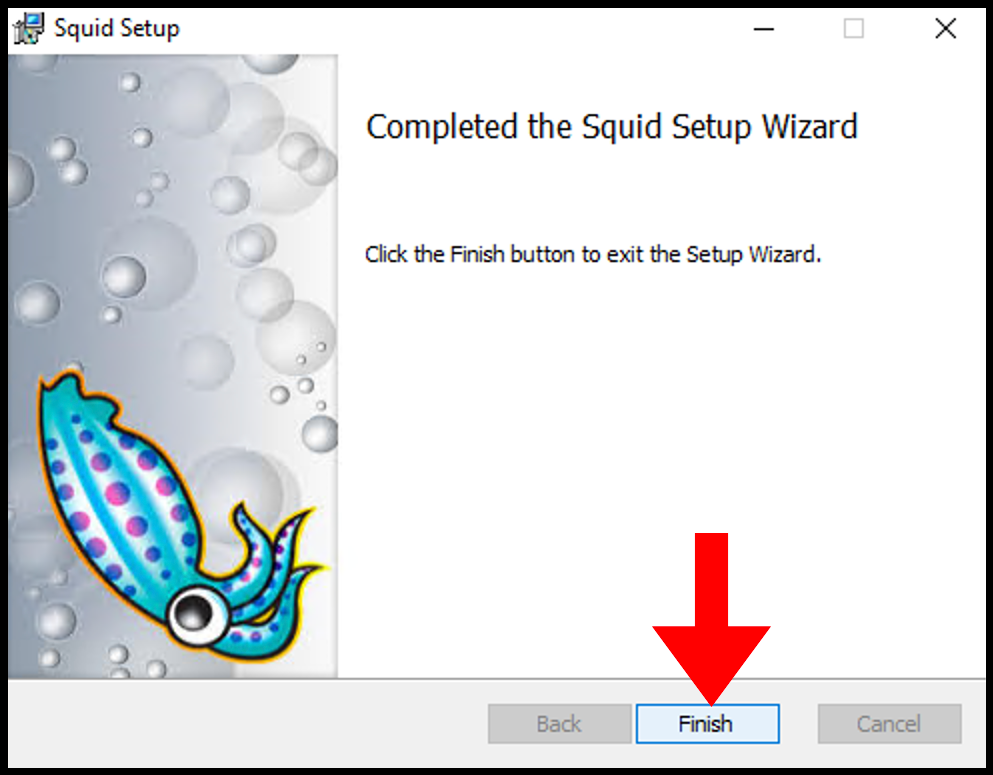
6. Once it’s done, you can close out of the setup window.
Allow Squid Port Through Firewall
Local network usage 3128 TCP port to connect through Squid Proxy. Let us first allow the 3128 TCP port in the firewall inbound rules.
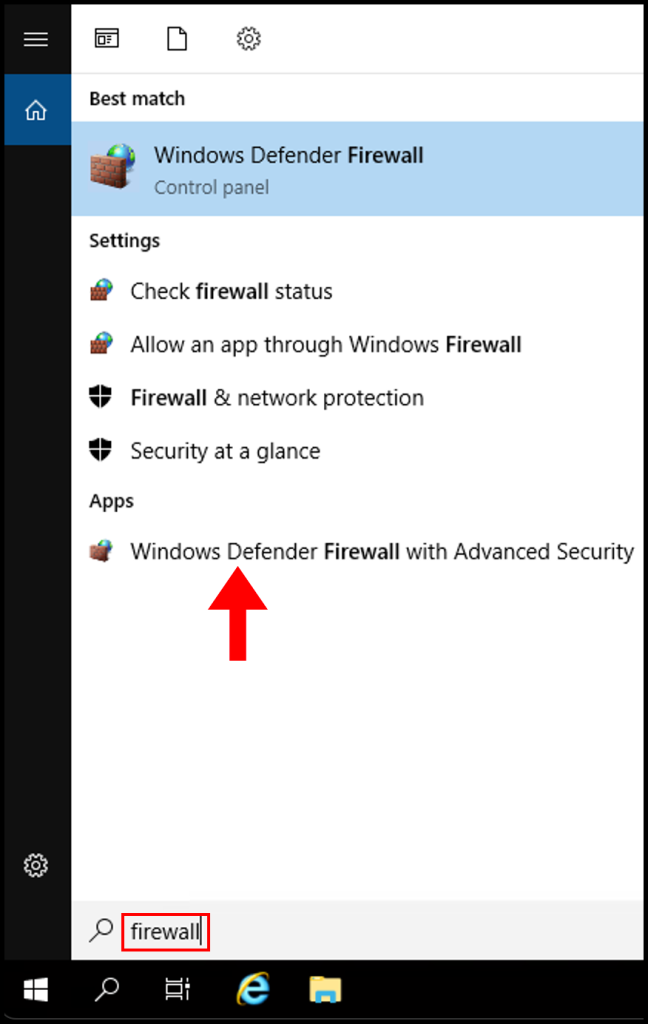
1. Log in to your Windows server, then search and open Windows Firewall with Advanced Security.
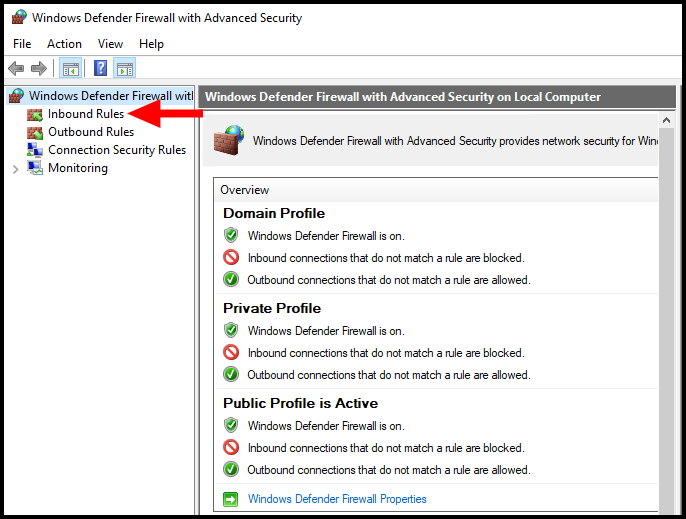
2. Then navigate to Inbound Rules on the left-side menu.
3. Next click New Rule from the right-hand menu.

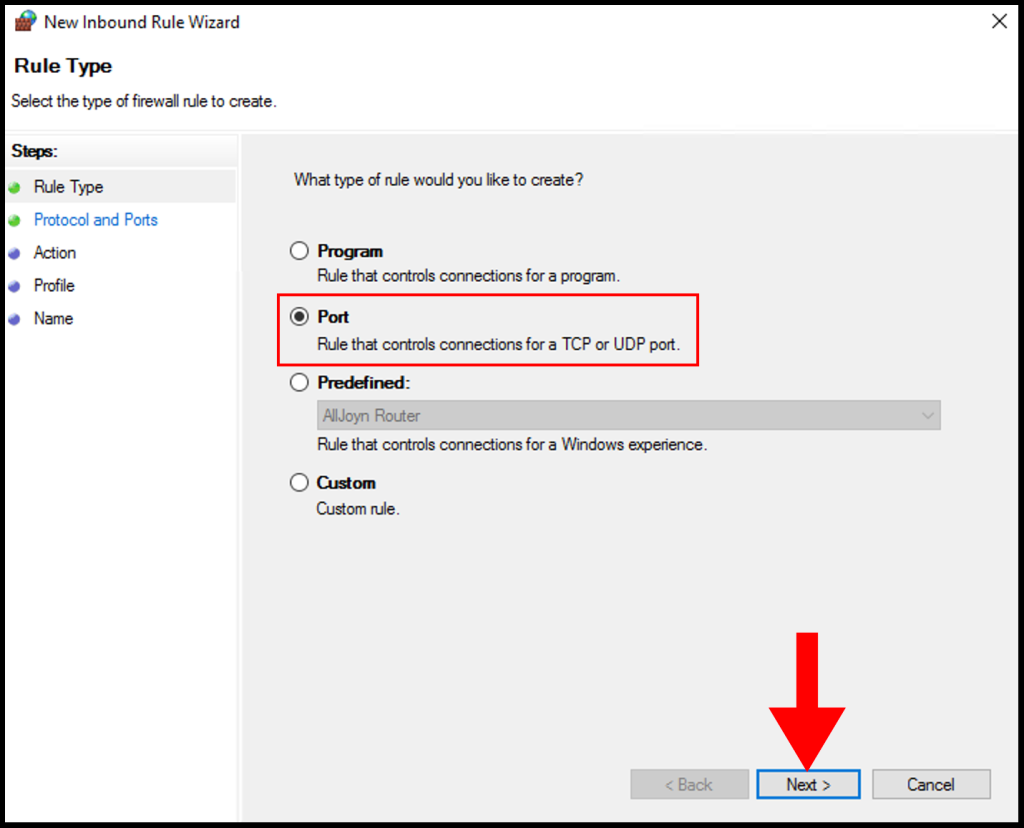
4. On the Rule Type page, select the button next to Port and click Next.
5. On Protocol and Ports, select TCP and select Specific local ports and enter 3128 then click Next.

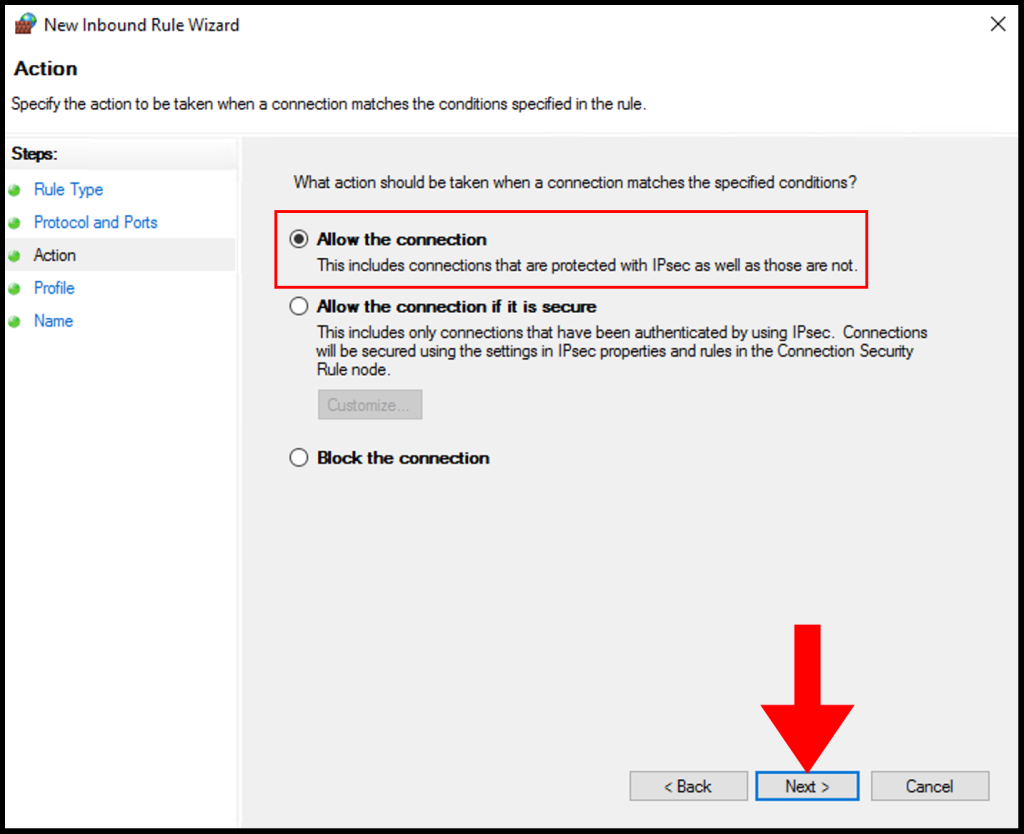
6. Next, click Allow the connection and click Next to move on.
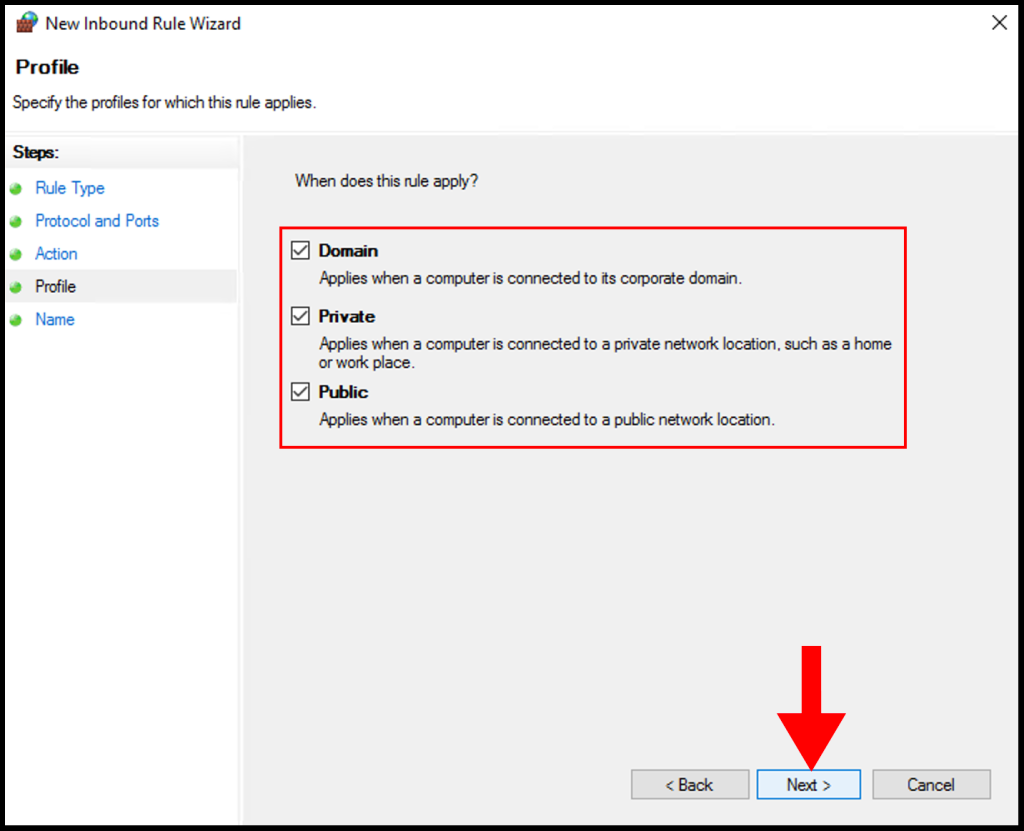
7. In the Profile tab, you need to select the below options and check the boxes for Domain, Private, and Public then click Next to move on.
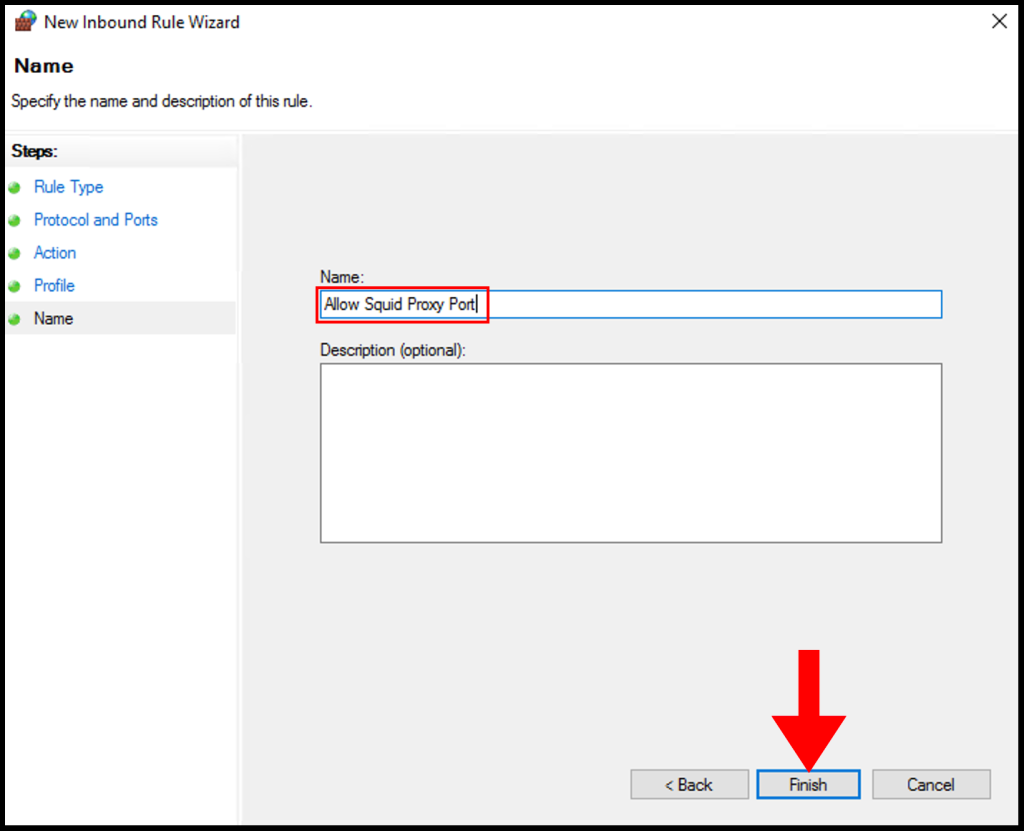
8. In the Name section, you can specify a name that is easily identifiable for the rule, then click Finish. We have successfully setup and configure a Squid Proxy on Windows Server.

Добрый день. На моем сайте открылся партнерский магазин от сайта gold-nm.ru и по случаю открытия партнер предлагает всем пользователям сайта скидку на товары в размере 10% (используйте промокод 84DE22AD1A164230), для того чтобы ознакомиться с перечнем товаров перейдите по ссылке — магазин. Но это еще не все изменения, скоро откроется еще один магазин. Подписывайтесь на обновления, чтобы узнать об этом вовремя;)
Теперь немного предыстории. Один мой товарищ переехал в Чехию на обучение и подкинул мне идею для очередной темы статьи. Суть проблемы была в том, что Steam отказывается принимать на счет рубли, если пользователь находится в Европе/Америке. Логичным решением было воспользоваться прокси сервером. Но прокси сервер так же помогает обойти блокировку сайтов на работе, к примеру vk.com:). Достаточно настроить сервер у себя дома, а на работе подключиться к нему. Для большего удобства можно настроить постоянное доменное имя для вашего компьютера. Немного изучив вопрос, я понял что для настройки простого сервера нужно потратить от силы пять минут:) И сейчас я расскажу вам, как это сделать.
Инструкция
- Нам понадобится бесплатный прокси-сервер под названием 3proxy. Для этого переходим на официальный сайт. И качаем самую свежую версию, я использую 0.8, вам тоже рекомендую именно ее.

- Разархивируем и идем в папку bin.

- Создаем текстовый файл и меняем ему имя на 3proxy.cfg.
- Открываем файл в блокноте или любом другом текстовом редакторе и записываем в него следующие три строчки:
auth none
log
proxy
Это отключит авторизацию и включит лог, который будет отображаться в командной строке программы.

-
Запускаем программу. Чтобы подключиться к прокси серверу используйте свой внешний IP-адрес(как его узнать) и порт 3128 (используется по-умолчанию).
.")


.")
Это простейший сервер, который удовлетворит потребности большинства пользователей. Для более точной настройки сервера изучите файл 3proxy.cfg.sample , находящийся в папке cfg в архиве с программой.
На этом всё. Надеюсь эта статья оказалась вам полезной, нажмите одну из кнопок ниже, чтобы рассказать о ней друзьям. Также подпишитесь на обновления сайта, введя свой e-mail в поле справа или подписавшись на группу в Вконтакте.
Спасибо за внимание!
Материал сайта Skesov.ru
- Распечатать
Оцените статью:
- 5
- 4
- 3
- 2
- 1
(20 голосов, среднее: 2.6 из 5)
Поделитесь с друзьями!
Setup Microsoft Web Application Proxy (WAP) on Windows Server 2019/2022. In this post, we introduce Web application proxy, its advantages and working principles. After that, we move onto how to set up Microsoft Web Application Proxy on Windows Server running 2019 or 2022.
What is Microsoft Web Application Proxy (WAP)

- Primarily, WAP is intended to offer highly secure access to online services like Exchange and SharePoint without a VPN connection. By functioning as a reverse proxy, it accomplishes this by taking inbound requests from the internet and then forwarding them to the proper internal server.
- Secondly, WAP is also an effective application for organizations that must offer protected access to web applications from external networks. Equally, it contributes to the security of internal networks by serving as a reverse proxy and offering secure authentication, authorization, encryption, and load balancing.
How Microsoft Web Application Proxy (WAP) Works

Mainly, Web Application Proxy (WAP) functions by providing web applications with reverse proxy functionality. In turn, this indicates that it serves as a gatekeeper for receiving requests and stands between the web and an internal network. Therefore, the following steps are used to break down how WAP operates:
- Processing a request: An external user attempts to access a web application hosted on the internal network.
- Authentication: WAP eliminates the requirement for each application to design its own authentication process by providing a safe, central location for user authentication.
- Authorization: Following user authentication, WAP determines whether the user is permitted access to the requested resource. In more detail, it ensures that only users with authorized device access the business applications.
- Encryption: Sensitive data is secured while being transmitted due to WAP’s ability to encrypt communication between the client and the internal network.
- Balanced loading: Incoming requests get split among several internal servers using WAP, which boosts performance and helps to guarantee high availability.
- Request transmission: The inbound request is forwarded by WAP to the proper internal server.
- Response: The client receives the response through WAP once the internal server has processed the request and returned it.
Advantages of Microsoft Web Application Proxy (WAP)
For businesses that must enable secure remote access to web applications, Web Application Proxy (WAP) offers several advantages, such as:
- Enhanced efficiency: Incoming requests are split among several internal servers using WAP, which boosts performance and helps to guarantee high availability. This makes it possible to maintain the responsiveness and accessibility of web applications for users even during periods of high traffic.
- Data protection: WAP assists in the security of internal resources and the protection of sensitive data by serving as an intermediary between the internal network and the internet. To guarantee that only authenticated and authorized users access the internal network, WAP provides security authentication, authorization, and encryption.
- Cost efficient: WAP assists enterprises in saving on the expense of building and maintaining VPN infrastructure by minimising the requirement for a VPN connection.
Setup Microsoft Web Application Proxy (WAP) on Windows Server 2019/2022
Follow these next steps to navigate how to set up Microsoft Web Application Proxy on a Windows server 2019 / 2022.
Prerequisites
- A server running Windows 2019 or 2022
- An administrator password is set up on your server.
Install Web Application Proxy
First, you need to install the Web Application Proxy server roles on your server. Follow the below guide:
Step 1 – Log in to your Windows server and open the server manager. You should see the server manager dashboard on the following screen.

Step 2 – Click on the Add roles and features. You should see the Before your begin screen.
 on Windows Server 2019/2022 before you begin")
Step 3 – Press the Next button. Select installation type screen appears.

Step 4 – Select Role-based or feature-based installation and click on the Next button. This should bring the option to Select destination server screen.

Step 5 – Choose Select a server from the server pool and click on the Next button. Next screen you see is to Select server roles screen.
 on Windows Server 2019/2022 -select server roles")
Step 6 – Select Remote Access and click on the Next button.

Step 7 – Click on the Next button.
 on Windows Server 2019/2022 – select remote access")
Step 8 – Now, click on the Next button. Roles service screen should appear next.

Step 9 – Select Web Application Proxy and click on the Next button. Confirm installation screen next.

Step 10 – Install button appears, which you click to start the installation. Installation progress screen appears next.

Step 11 – Click on the Close button to exit the installation windows. Your web application proxy is now installed on your server. Please proceed to the next step.
Import the ADFS Certificate
Now, you need to copy the ADFS certificate from your ADFS server to your web application proxy server and then import it to your server.
Furthermore, follow the below steps to import the ADFS certificate.
Step 1 – Type mmc.exe in the search bar and open the Microsoft Management Console as shown below.

Step 2 – Next, right click on Personal -> Certificates then go to All Tasks -> Import. This opens the Certificate Import Wizard as shown below.


Step 3 – Click on the Next button. See Certificate Window Wizard next step window.

Step 4 – Browse the ADFS certificate file that you exported from your AD FS server and click on the Next button. Likewise, you will be asked to provide password for the private key as shown below.

Step 5 – Provide your private key password, check the box to make the key exportable then click on the Next button.

Step 6 – Select “Place all certificates in the following store” and then click on the Next button.

Step 7 – Click on the Finish button. Given that, you should see your imported certificate on the following screen.

Configure Web Application Proxy
At this point, the Web Application Proxy is installed on your server. However, you need to perform post deployment configuration. Similarly, follow the below steps to configure Web Application Proxy.
Step 1 – Open the Server Manager and click Notifications.

Step 2 – Click on the Open the Web Application Proxy Wizard to start the configuration.

Step 3 – Click on the Next button. Then, ADFS server configuration screen appears.

Step 4 – Provide your ADFS server name, username, password, and click on the Next button. Server certificate selection screen appears next.

Step 5 – Select your server certificate and click on the Next button.

Step 6 – Click on the Configure button. Once the WAP is configured successfully, you should see the following screen.

Step 7 – Click on the Close button. Remote Access Management Console on the following screen appears next

Publish Web Application
In effect, you need to publish the web application from the Remote Access Management Console dashboard.
Step 1 – Click on the Web Application Proxy in the Remote Access Management Console.

Step 2 – Click on the Publish button.

Step 3 – Click on the Next button. Pre authentication screen apeears next.

Step 4 – Select Pass-through method and click on the Next button. Publishing settings screen appears next.

Step 5 – Provide the name, external URL, external certificate, and backend server URL then click on the Next button. Confirmation screen appears next.

Step 6 – Click on the Publish button. Once the Web Application has been published, you should see the following screen.

Step 7 – Click on the Close button. In essence, you should see your newly published web application on the following screen.

Thank you for reading Setup Microsoft Web Application Proxy (WAP) on Windows Server 2019/2022. We will conclude this article now.
Setup Microsoft Web Application Proxy (WAP) on Windows Server 2019/2022 Conclusion
In summary, this post explained how to set up Microsoft Web Application Proxy on Windows Server 2019 or 2022. Organizations provide secure and effective remote access to web applications via WAP. Lastly, WAP enables businesses to satisfy their demands while safeguarding sensitive data by enhancing security, performance, and remote access, as well as streamlining implementation and cutting expenses.

Below we may get step-by-step screenshots,
Step 1 — Verify and ensure appropriate IP addresses are assigned to all required fields.
Step 2 — Click on «Local Server«.
Step 3 — Click on «WORKGROUP«.
Step 4 — Click on «Change…«.
Step 5 — Click on «More…«.
Step 6 — Type the domain name and click on «OK«.
Step 10 — Click on «Close«.
Step 11 — Save rest of your background work, if any and click on «Restart Now«. If planning to restart after some time then click on «Restart Later«.
Step 12 — Click on «Add roles and features«.
Step 13 — Click on «Next«.
Step 14 — Keep selected «Role-based or feature-based installation» and click on «Next«.
Step 15 — Select/Verify the server name and IP address, then click on «Next«.
Step 16 — Locate «Remote Access» and click the check box.
Step 17 — Confirm the Tick mark and click on «Next«.
Step 18 — Click on «Next«.
Step 19 — Click on «Next«.
Step 20 — Locate «Web Application Proxy» and click the check box.
Step 21 — Click on «Add Features«.
Step 22 — Confirm the Tick mark and click on «Next«.
Step 23 — Click on «Install«.
Step 24 — Wait for some time until installation completes.
Step 25 — Click on «Open the Web Application Proxy Wizard«.
Step 26 — Click on «Next«.
Step 27 — Type «Federation Service Name«, «User name and Password» of a local administrator account on the federation servers.
Step 28 — Click on «Next«.
Step 29 — Select appropriate SSL Certificate from the drop down list and click on «Next«.
Step 30 — Review all selections and click on «Configure«.
Step 31 — Wait for some time until configuration completes.
Step 32 — Click on «Close«.
Step 33 — Click on «Publish«.
Step 34 — Click on «Next«.
Step 35 — Click on «Pass-through«.
Step 36 — Click on «Next«.
Step 37 — Type «Name«, «External URL» & «Backend server URL«, for example — «https://sso.dskoli.work/«, select appropriate «External certificate» from the drop down list.
Step 38 — Locate «Enable HTTP to HTTPS redirection«, click the check box, confirm the Tick mark and click on «Next«.
Step 39 — Review all selections and click on «Publish«.
Step 40 — Click on «Close«.
Step 41 — Published Web Application will be displayed in the list.
Step 42 — On the Public DNS Panel of domain, add «Host (A)» record for federation service name pointing to WAP server on Perimeter Network. For example, «sso.dskoli.work» pointing to Public IP.
“Thank You for being with me.”
| October 14, 2012 | Server 2003, Server 2008 |
I. Brief Introduction on Windows Server Proxy Server
Windows server proxy server is a proxy server which has been located on a Windows operating system, mostly the server version of Windows such as Windows Server 2003 and Windows Server 2008. So it’s also known as Windows server 2003 proxy server and Windows server 2008 proxy server. A Windows server proxy server can provide proxy service for clients with not only Windows operating system but also others such as Linux, Apple, Mobile OS and so on.Benifits of Windows server proxy server:
- Keep clients behind it so that they can surf anonymous, it’s mostly for security. Fox example, if a client visit yahoo via a Windows server proxy server, yahoo will get a request from this proxy server but not this client which makes it difficult for yahoo to track this client.
- Sharing Internet connection with your friends and colleagues. With a Windows server proxy server, computers can get access to the Internet, it’s a good solution for Internet connection sharing and makes saving for Internet connection fees.
- Speed up clients’ surfing. All requests from clients will reach the proxy server at first. If the proxy server has cached the resources, clients will get feedback directly from it, this will be more quickly.
- To circumvent regional restrictions. For example, a server using IP-based geolocation to restrict its service to a certain country can be accessed using a Windows server proxy server located in that country to access the service.
- Make you able to access blocked websites. For example, many work offices and schools have blocked facebook, myspace, youtube and some other websites. Fortunately, with the help of a Windows server proxy server you can bypass such restrictions easily.
II. Windows Server Proxy Server Setup Steps
CCProxy is an easy-to-use proxy server software based on Windows, it is compatible with both Windows Server 2003 and Windows Server 2008. The recommended Windows version are Windows Server 2003 Enterprise Edition with SP2 and Windows Server 2008 R2, both 32 bit and 64 bit are supported by CCProxy.
CCProxy provides 3-user free version for personal users and home users to build their own windows server proxy server efficiently and easily, bellow is a step by step instruction for you.
Before proceeding, let’s say that you want to build a Windows server proxy server with LAN. If you want your proxy server available for clients over Internet, please just refer to this article of Internet free proxy server.
Step 1 – Preparation for Windows server proxy server setup
- Install Windows Server 2003 Enterprise Edition with SP2 or Windows Server 2008 R2 on a pre-selected computer.
- Make sure this computer is able to access Internet directly.
- If you have enabled the Windows system firewall or have installed some other security software, please make sure the bellow ports are available.
HTTP: 808
FTP(Web): 808
FTP: 2121
Gopher: 808
Secure/SSL/HTTPS/RTSP: 808
SOCKS/MMS: 1080
News(NNTP): 119
SMTP: 25
POP3: 110
Telnet: 23
These are the default ports of CCProxy, you can change them as you wish according to the actual needs. - Make sure that all clients within LAN are able to access the Server.
Step 2 – Install CCProxy on the computer that will run as Windows server proxy server
- Suppose the server IP in the LAN is 192.168.0.1, and then 192.168.0.1 is the proxy server address.
- You can download CCProxy here. Run ccproxysetup.exe and follow the on-screen instructions to install CCProxy.
- Run CCProxy on the server (Figure 1).
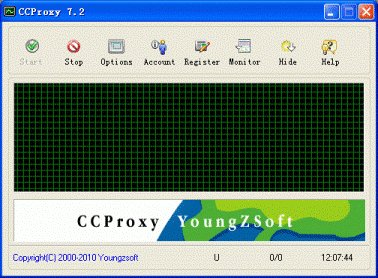 (Figure 1)
If you get problem in launch CCProxy, please refer to “CCProxy Start Problem“.
Step 3 – Add client’s IP into CCProxy on your Windows server proxy server
- Choose one computer in the LAN that needs to access the Internet. Suppose the IP address of the computer is 192.168.0.2.
- Open CCProxy main window, click “Account” button, then popup “Account Manager” dialog box.
- Select “Permit Only” in “Permit Category” and select “IP Address” in “Auth Type” (Figure 2).
- Click “New” button, fill “192.168.0.2” in the “IP Address/IP Range”, click “Save” and “OK” button (Figure 3, Figure 4).
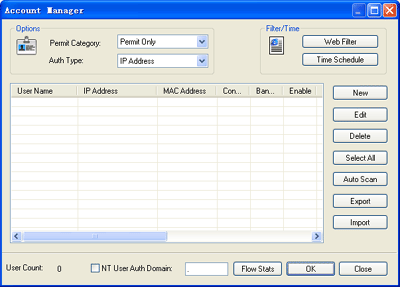 (Figure 2)
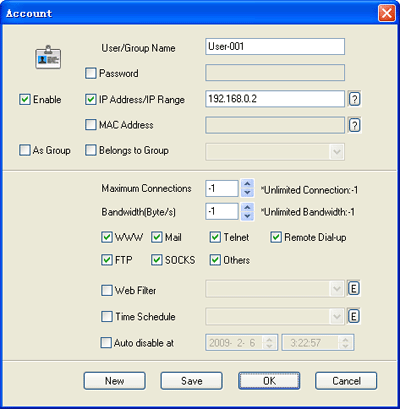
(Figure 3)
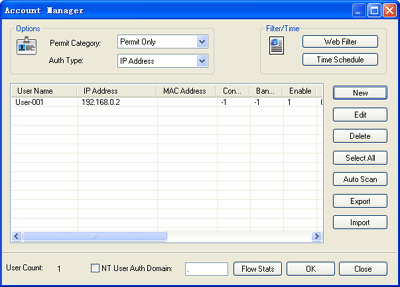
(Figure 4)
Step 4 – Make proxy server settings for IE on client
- Go to client computer and open IE window.
- Open “Tools” menu, select “Internet Options” and open the “Internet Options” dialog box.
- Select “Connections” tab (Figure 5), click “LAN Settings” button and open the “Local Area Network(LAN) Settings” dialog box.
- Check “Use a proxy server for your LAN”, Fill “192.168.0.1” in “Address” and “808” in “Port” (Figure 6).
- Click “OK” button in “Local Area Network (LAN) Settings” and “Internet Options” dialog boxes.
- Now you can browser Internet web sites in IE at the client.
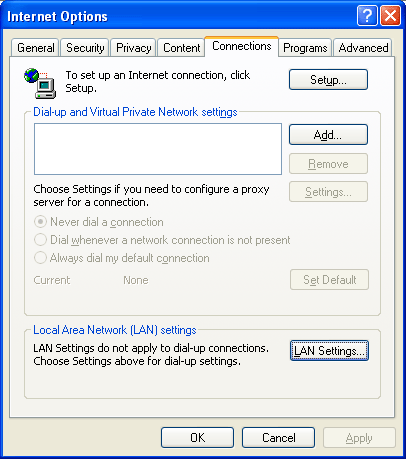 (Figure 5)
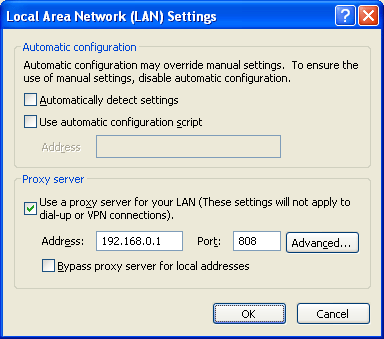
About The Author

AYYU
I am a blogger since 2010 and I’m the author of this website I’m a systems/network administrator and I enjoy solving complex problems and learning as much as I can about new technologies. I write tutorials based on my work experience and other IT stuff I find interesting.
since 2006 in online world also I am a troubleshooter for the well-known website like http://www.fixya.com and many more groups