Программирование MOTOROLA GM-300
Программирование MOTOROLA GM-300
Выдался свободный часок. Решил сделать еще один подход к мотороле. Почитал инструкции, всё вообщем понятно. Но выходит вот чего.
Запускаю прогу из DOS`a винды нет вообще, только ДОС.
Выбираю F3 GET/SAVE codeplug data 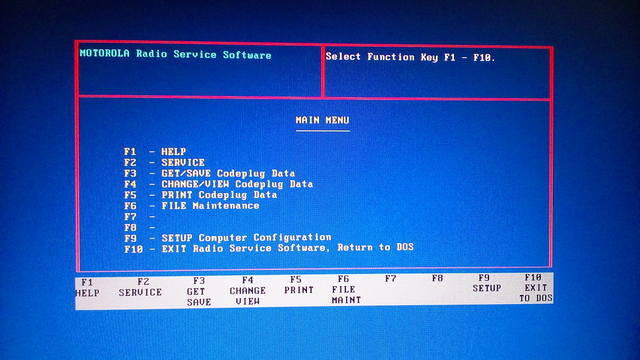
Потом F2 REED radio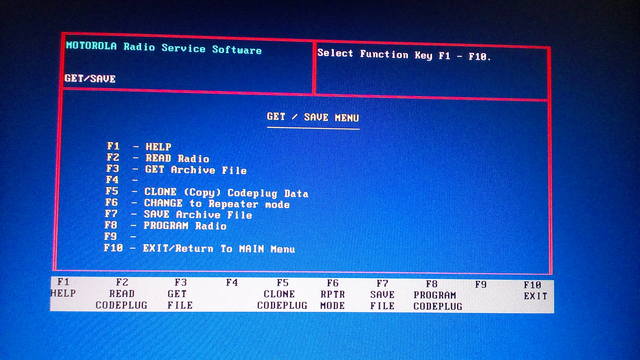
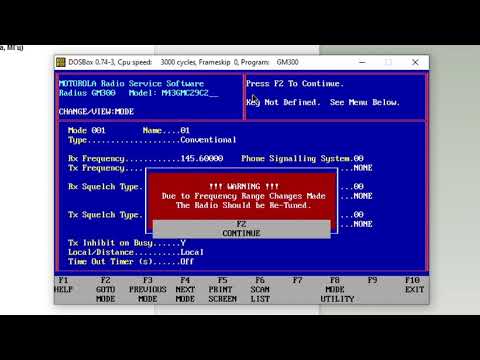
А в ответ выскакивает вот такое красное окно.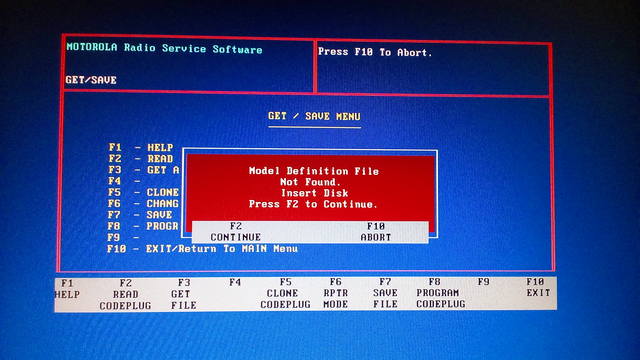
При выборе других пунктов такое же окно или тоже красное окно с сообщением что сначала нужно считать инфо из станции.
Собственно два вопроса.
1. Что такое codeplug? Это случайно не файл с информацией о назначении выводов сервисного разъема?
2. Что значит красное окно с Model difinition file. Мой скромный английский подсказывает что проге нужен файл как бы с описанием модели станции? Где взять его? И правильно ли я понимаю это сообщение?
При включении станция стоит на 1 канале и не на что не реагирует. На передачу проверить не могу, нет микрофона. 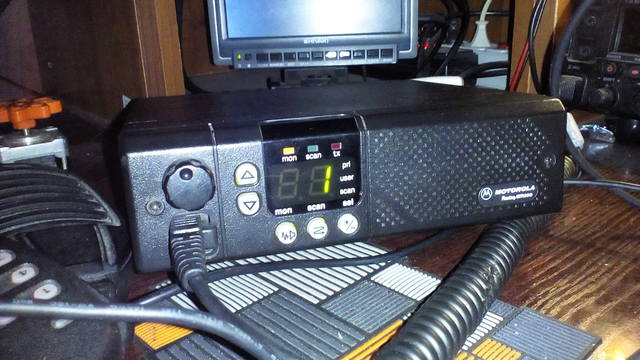
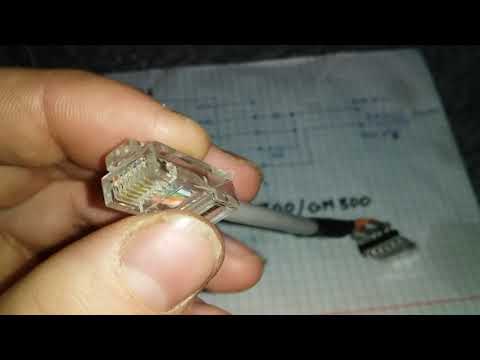
Программатор для СОМ порта.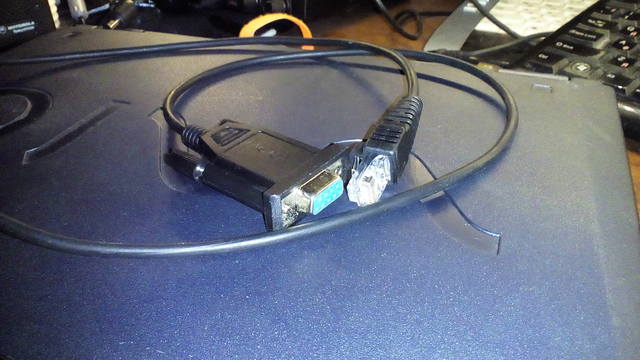

Продолжаю гуглить,буду рад любым советам.
Спасибо.
Мнения автора могут не совпадать с его точкой зрения.
-

Fantomas - пЕсатель
- Сообщения: 1584
- Зарегистрирован: 04 дек 2010, 17:39
- Откуда: МО г.Пушкино. Старый позывной R2AJB
- Имя: Алексей
- Официальный РАДИОЛЮБИТЕЛЬСКИЙ позывной: R2DVY

Re: Программирование MOTOROLA GM-300
![]() ra3age » 14 янв 2018, 00:30
ra3age » 14 янв 2018, 00:30
Примерная инструкция. ")
Привози, зашьём. :))
- Вложения
-
В жизни черная полоса? — да поффф, это взлетка!!!
-

ra3age - Заинтересовавшийся
- Сообщения: 207
- Зарегистрирован: 23 мар 2011, 00:02
- Откуда: Москва юзао-юао-вао (Теплый стан — Кантемировская,Некрасовка.)
- Имя: Александр УРАЛ
-
- Сайт

Re: Программирование MOTOROLA GM-300
![]() Fantomas » 14 янв 2018, 07:41
Fantomas » 14 янв 2018, 07:41
Привет, Саш.
Так вот в том то и дело, при нажатии F2 ничего не считывается. «Model difinition file not found» говорит.
Мнения автора могут не совпадать с его точкой зрения.
-
Fantomas - пЕсатель
- Сообщения: 1584
- Зарегистрирован: 04 дек 2010, 17:39
- Откуда: МО г.Пушкино. Старый позывной R2AJB
- Имя: Алексей
- Официальный РАДИОЛЮБИТЕЛЬСКИЙ позывной: R2DVY
Re: Программирование MOTOROLA GM-300
![]() ra3age » 14 янв 2018, 11:14
ra3age » 14 янв 2018, 11:14
Транковая плата стоит там походу. Надо выпаять её и востановить один микрофонный провод или дорожку (отпаяно или перерезано).
Попробуй програмно отключить транк плату с клавиатуры.
При нажатой # включаешь рацию.
Отпускаешь #, вводишь 5-значный код транка (по умолчанию 12345), затем #.
Если правильно ввел — короткий тон, если нет — немного другой. Далее программируешь полное отключение транкового режима, 40#2#.
Включение обратно в режиме SmarTrunk II, введите код 40#1#.
В жизни черная полоса? — да поффф, это взлетка!!!
-
ra3age - Заинтересовавшийся
- Сообщения: 207
- Зарегистрирован: 23 мар 2011, 00:02
- Откуда: Москва юзао-юао-вао (Теплый стан — Кантемировская,Некрасовка.)
- Имя: Александр УРАЛ
-
- Сайт
Re: Программирование MOTOROLA GM-300
![]() Леший » 14 янв 2018, 11:40
Леший » 14 янв 2018, 11:40
Если там прошито более 8 каналов, скорее всего шили альтернативным софтом, штатный потом не читает.
Кодеплаг файл конфига станции.
На сколько помню нужно вернуть количество каналов в шатное и потом прошить. Могу ошибаться.
Мир, труд — Вам; пиво, водка — Мне!
Блажен кто верует, ему жить легче.
FT1D, FT-100+LDG AT100proII, FT-8800, Alan9001, Handyc 924, Maycom EM-27,
TG-UV2, Alinco DR605. Sirio Tornado Mod, CityWindom, FT-857+Opek HVT400B, Optim Apollo rev.3 + WA-27.
-

Леший - Радиолюбитель
- Сообщения: 2169
- Зарегистрирован: 15 июн 2012, 21:25
- Откуда: Протвино-Серпухов
- Имя: Дмитрий
- Официальный РАДИОЛЮБИТЕЛЬСКИЙ позывной: RV3DOH
-
- ICQ

Re: Программирование MOTOROLA GM-300
![]() rt324 » 14 янв 2018, 12:31
rt324 » 14 янв 2018, 12:31
Леший писал(а):Если там прошито более 8 каналов
У него 16 каналка 40W 25KHz 438-470 
На радиосканере есть программка для расширенного программирования.
Ей считывайте и программируйте(там можно до 40 каналов в 300ку прошить) ")
Надеюсь историю с точками и запятыми в системе вы знаете. 
Каждый новичек мечтает обрезать ствол «трехлинейки» до длинны «маузера»,
и стрелять на 1.5 км с оптикой(и попадать в яблочко).
«Логическое мЫшление, часто заменяет недополученные знания»
-

rt324 - Знающий
- Сообщения: 1082
- Зарегистрирован: 19 янв 2011, 23:00
- Откуда: Город герой Москва. ЗАО. Солнцево.
- Имя: Петр

Re: Программирование MOTOROLA GM-300
![]() ra3age » 14 янв 2018, 13:39
ra3age » 14 янв 2018, 13:39
В моей коллекции программ погляди для gm-300 расширенную.
Скачать сборку с яндекс диска:
https://yadi.sk/d/DrlEa2C83RSE2N
В жизни черная полоса? — да поффф, это взлетка!!!
-
ra3age - Заинтересовавшийся
- Сообщения: 207
- Зарегистрирован: 23 мар 2011, 00:02
- Откуда: Москва юзао-юао-вао (Теплый стан — Кантемировская,Некрасовка.)
- Имя: Александр УРАЛ
-
- Сайт
Re: Программирование MOTOROLA GM-300
![]() Fantomas » 14 янв 2018, 17:11
Fantomas » 14 янв 2018, 17:11
Программа для расширенного программирования тоже работает из ДОС? Или это та которая под ХР?
Где то codeplug можно взять что бы подсунуть его программе которая его просит? Она же вроде просит вставит диск что бы его там найти.
Мнения автора могут не совпадать с его точкой зрения.
-
Fantomas - пЕсатель
- Сообщения: 1584
- Зарегистрирован: 04 дек 2010, 17:39
- Откуда: МО г.Пушкино. Старый позывной R2AJB
- Имя: Алексей
- Официальный РАДИОЛЮБИТЕЛЬСКИЙ позывной: R2DVY
Re: Программирование MOTOROLA GM-300
![]() Леший » 14 янв 2018, 17:34
Леший » 14 янв 2018, 17:34
она не кодеплаг просит а файл индента рации, который у вас не совпал.
Мир, труд — Вам; пиво, водка — Мне!
Блажен кто верует, ему жить легче.
FT1D, FT-100+LDG AT100proII, FT-8800, Alan9001, Handyc 924, Maycom EM-27,
TG-UV2, Alinco DR605. Sirio Tornado Mod, CityWindom, FT-857+Opek HVT400B, Optim Apollo rev.3 + WA-27.
-
Леший - Радиолюбитель
- Сообщения: 2169
- Зарегистрирован: 15 июн 2012, 21:25
- Откуда: Протвино-Серпухов
- Имя: Дмитрий
- Официальный РАДИОЛЮБИТЕЛЬСКИЙ позывной: RV3DOH
-
- ICQ
Re: Программирование MOTOROLA GM-300
![]() ra3age » 14 янв 2018, 18:15
ra3age » 14 янв 2018, 18:15
Fantomas писал(а):Программа для расширенного программирования тоже работает из ДОС? Или это та которая под ХР?
Где то codeplug можно взять что бы подсунуть его программе которая его просит? Она же вроде просит вставит диск что бы его там найти.
Всё из под доса на gm. Поковыряй, там разные под неё есть.
В жизни черная полоса? — да поффф, это взлетка!!!
-
ra3age - Заинтересовавшийся
- Сообщения: 207
- Зарегистрирован: 23 мар 2011, 00:02
- Откуда: Москва юзао-юао-вао (Теплый стан — Кантемировская,Некрасовка.)
- Имя: Александр УРАЛ
-
- Сайт
Вернуться в «Любительские» разговоры
Перейти:
Кто сейчас на конференции
Сейчас этот форум просматривают: нет зарегистрированных пользователей и гости: 0
Как запустить программное обеспечение GP88/GM300 в DosBox | Программирование DosBoxПодробнее
Программирование радиостанций Motorola GM300 и GP300Подробнее
Motorola gm300 программирование. RK50.RUПодробнее
Motorola gm300 Windows7 ile programlamakПодробнее
Программирование радиостанции Motorla GM300 в DOSBOXПодробнее
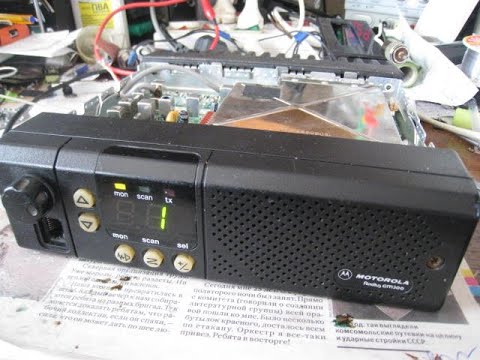
«MOTOROLA RADIUS- GM300». Обзор, прошивка, ремонт, тест.Подробнее
Прошивка / программирование Motorola GP300 windows 10/11Подробнее

USB UART CP2102 В качестве программатора MOTOROLA GM300-350Подробнее
Motorola GP300 / Новые Аккумуляторы и пример программирования / Ввод частоты ниже 146 МгцПодробнее
how to read Motorola GM 300 in win7!!!!!!!????!!?Подробнее
Ремонт приёмника MOTOROLA Radius GM 300Подробнее

Motorola GM 300 alapszinű programozásaПодробнее
APRS Gateway. Шлюз на основе WX3IN1 и Motorola GM300.Подробнее
Motorola GM300. Отключение trunk режима.Подробнее
Самодельный программатор для радиостанций из USB-TTL адаптераПодробнее

Новости
Programming the Motorola Radius was not easy to learn. It took me about a week to figure out how to accomplish this dreadful task. Let’s jump right in and start programming your Motorola Radius series (GM300/GR300/M10/M120/M130) radio!
Cables Required to Program the Motorola Radius
The cables and connectors required to program your Motorola Radius will vary from computer to computer. If you have a newer model computer, chances are that you do not have a serial port. If you have an older model computer, you are probably in luck.
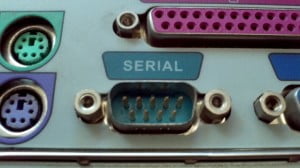
To see if you have a serial port on your computer, look at the connections for a port labeled “Serial”. It will have nine pins and look like the picture.
If you do have a serial port, you do not need to purchase the USB Serial Port Adapter listed below.
Recommended Cables & Connectors
Listed below are the recommended programming cables and connectors required to program the Motorola Radius. I have received a few conformations from others that they do work as expected.
- RIB for Motorola – https://amzn.to/2OsHVrD
- Power Supply for RIB – https://amzn.to/2AO1PK4
- Radio Programming Cable – https://amzn.to/2RzrQSQ
- USB to Serial Port Adapter – https://amzn.to/2Dp4koy (only needed if you don’t have a serial port connection on your computer)
Other Cables & Connectors
There are other programming cables that may or may not work to program your Motorola Radius. It is best to use the recommended cables and connectors listed above.
WARNING! – Some cheap USB serial port adapters do not work to program your Motorola Radius. I had to trash two different USB serial port adapters before I found one that worked for me.
Getting Setup to Program the Motorola Radius
The first thing you need to do is get your hardware setup. Plug in your USB Serial Port Adapter to your computer. Attach the Motorola RIB to the USB Serial Port Adapter. Finally, attach the programming cable to the RIB and your transceiver.
Note: If you have an existing serial port on your computer, just plug your Motorola RIB to the computer and the Motorola programming cable to the RIB and your transceiver.
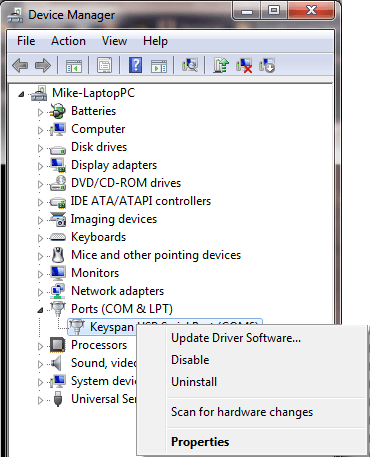
We now need to make sure that the USB Serial Port Adapter has been assigned port COM1 or COM2. This can be accomplished by checking the Device Manager. The Device Manager can be accessed by bringing up the Start Menu and typing “Device Manager” in the Search Programs and Files area.
How to Change the COM Port Number
If you plugged in your USB Serial Port Adapter and a COM port other then COM1 or COM2 was assigned in the Device Manager, follow the steps below.
Step #1 — (Changing the COM Port Number)
Open the “Device Manager”.

Step #2 — (Changing the COM Port Number)
Right click on the USB Serial Port and select Properties.
Step #3 — (Changing the COM Port Number)
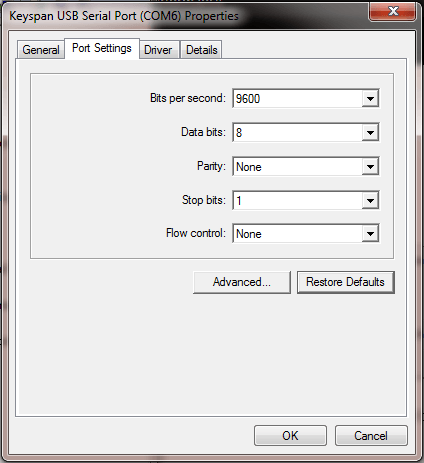
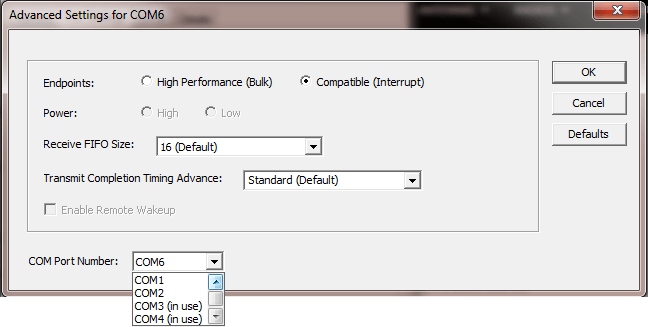
Click the “Port Settings” tab, and then select the button labeled “Advanced”.
Step #4 — (Changing the COM Port Number)
Click the drop-down menu from where it says “COM Port Number” and select “COM1” or “COM2”. Then click “OK” to save.
Note: If COM1 and COM2 are both in use, you must select one of them. It will give you a warning that the port was opened by another application, and may have an unpredictable effect (on the other application). You must select “Yes”.
Adjusting the COM Port Settings
The COM Port Settings will need to be adjusted in order to communicate with your Motorola Radius.
Step #1 — (Adjusting the COM Port Settings)
If you are not already there, open the “Device Manager”, right click on the USB Serial Port and select “Properties”.
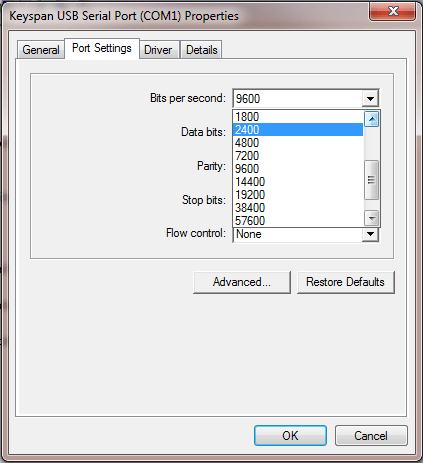
Step #2 — (Adjusting the COM Port Settings)
Click the “Port Settings” tab, and then change the “Bits per second” drop-down menu to 2400.
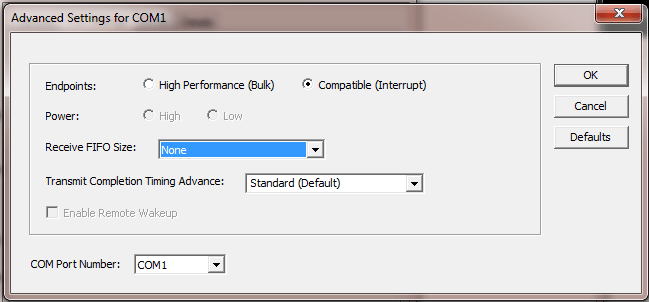
Step #3 — (Adjusting the COM Port Settings)
(You might not have to do this step. If you have problems, change this back to the default setting.) Click the “Advanced” button and change the “Receive FIFO Size” setting to “None” from the drop-down menu.
Step #4 — (Adjusting the COM Port Settings)
Confirm and close both boxes by clicking “OK”.
Configuring DOSBox to Run Motorola RSS
Now it’s time to configure DOSBox to run the Motorola RSS program. If you have not done so yet, download and install the DOSBox program. (Download link)
Step #1 — (Configuring DOSBox for Motorola RSS)
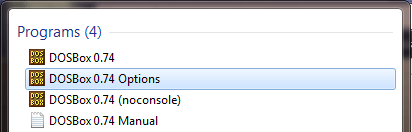
Click the “Start Menu” and in the “Search Programs and Files” area, type and select “DOSBox Options”.
Step #2 — (Configuring DOSBox for Motorola RSS)
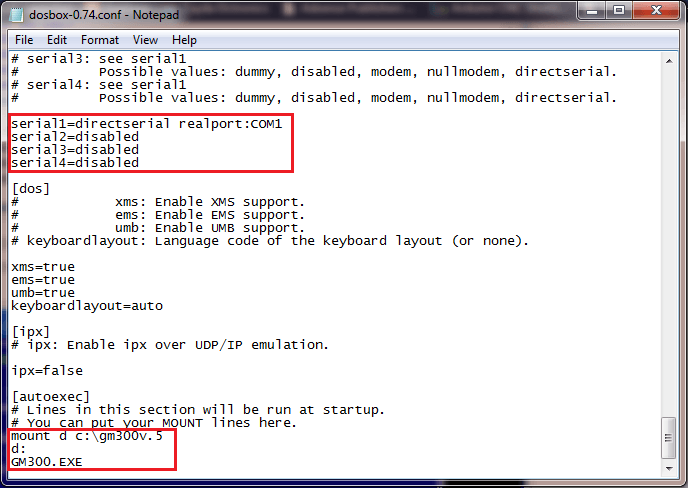
Your default text editor will open with the DOSBox conf file. Change the the conf files “serial” settings to:
[serial]
serial1=directserial realport:COM1
serial2=disabled
serial3=disabled
serial4=disabled
Note: Make sure if you are using COM2 that you change the above to:
[serial]
serial1=directserial realport:COM2
serial2=disabled
serial3=disabled
serial4=disabled
Step #3 — (Configuring DOSBox for Motorola RSS)
Change the the conf files “autoexec” settings to:
[autoexec]
mount d c:\gm300v.5
d:
GM300.EXE
Step #4 — (Configuring DOSBox for Motorola RSS)
Save the DOSBox conf file and exit your text editor.
Starting Motorola’s Radio Service Software
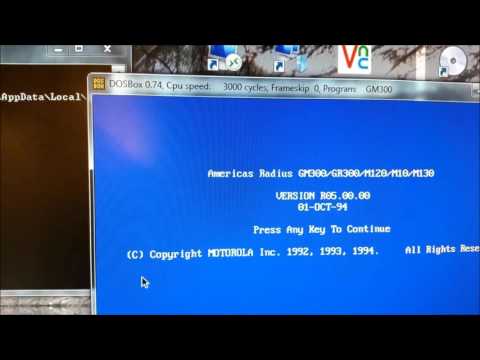
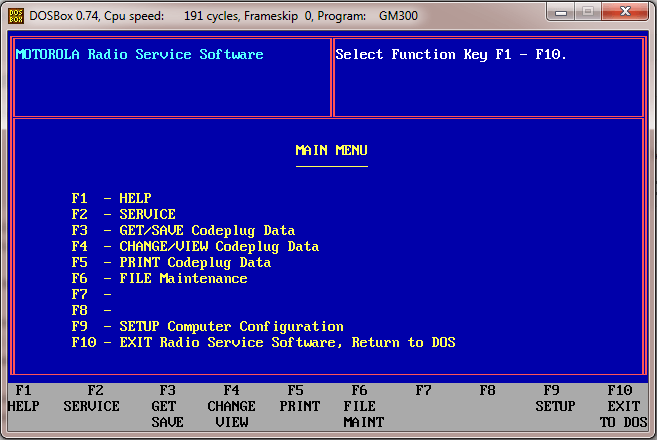
Now it’s time to see if we did so far is correct. Let’s start DOSBox and see what happens. You should see a welcome screen that tells you to push any button, and then the following screen below.
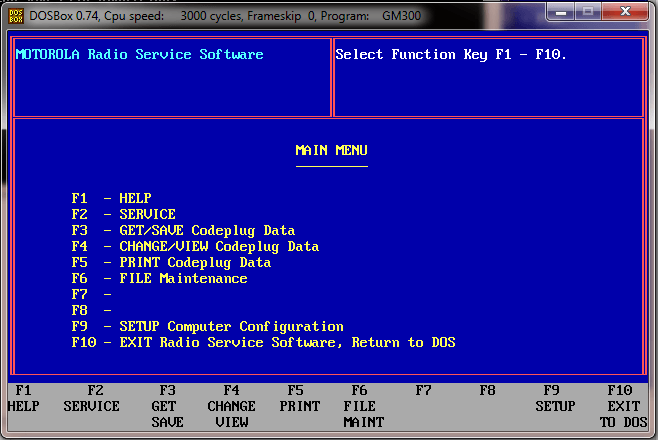
If you see this screen above, congratulate yourself! You have successfully configured DOSBox to run Motorola’s Radio Service Software.
Now comes the part that just about everyone has trouble with . . . getting your Motorola Radius to communicate with your computer. Cheap programming cables, and too fast of a CPU speed (on your computer/DOSBox) are the main cause of this problem. We already discussed what cables worked for me. Now let’s go over how to slow down the CPU speed.
Slowing Down the CPU Speed in DOSBox
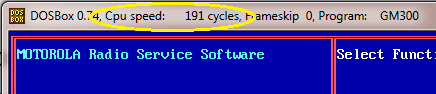
While DOSBox is running, hold down the “Ctrl” key and press “F11” until the CPU Speed (displayed in the title bar) reaches somewhere around 191 cycles. If you went too far, hold down the “Ctrl” key and press “F12” to raise the speed back up. I was able to successfully program with a CPU Speed of up to 400 cycles.
Configuring and Testing the Motorola RSS
Now it’s time to configure the RSS, and test the connection between your computer and your Motorola Radius.
Step #1 — (Configuring and Testing the Motorola RSS)
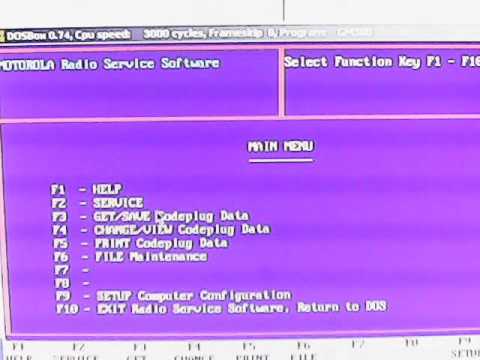
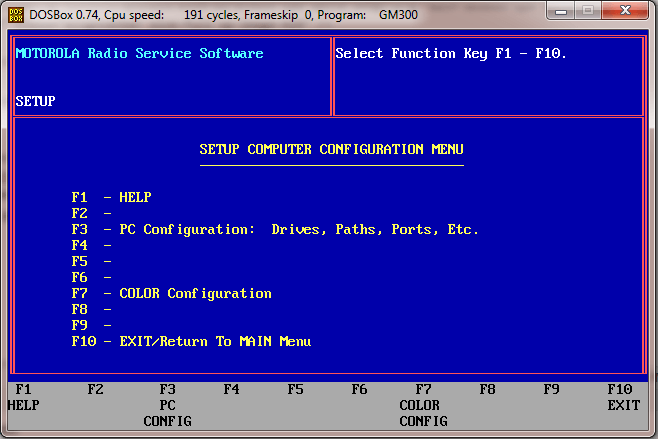
From the “Main Menu” of the Motorola RSS, press “F9” to get into the “Setup Computer Configuration Menu”.
Step #2 — (Configuring and Testing the Motorola RSS)
Now press “F3” to go into the “PC Configuration Menu”
Step #3 — (Configuring and Testing the Motorola RSS)
You will need type in the “Default Path Names” on this screen.
DEFAULT PATH NAMES
Archive D:\ARCHIVE
Backup D:\BACKUP
Repeater D:\REPEATER

SERIAL PORTS
RIB . . . . . . . . . . . . . . . COM1
Note: If you are using COM2, make sure to change the “RIB” setting to COM2.

Step #4 — (Configuring and Testing the Motorola RSS)
Now press “F8” to save your settings.
Step #5 — (Configuring and Testing the Motorola RSS)
Press “F3” to perform a “COMM TEST”. This is where you will find out if your computer and your radio will be able to communicate. Look to make sure you get the “Radio Communications OK” message. If you get any error messages, double check everything above, and make sure all the settings are correct.
Programming Frequencies, Tones, Offset, and the Time Out Timer
In this section, I will show you how to program frequencies, tones, offset, and the time-out-timer.
Step #1 — (Frequencies, Tones, Offset, and the Time Out Timer)
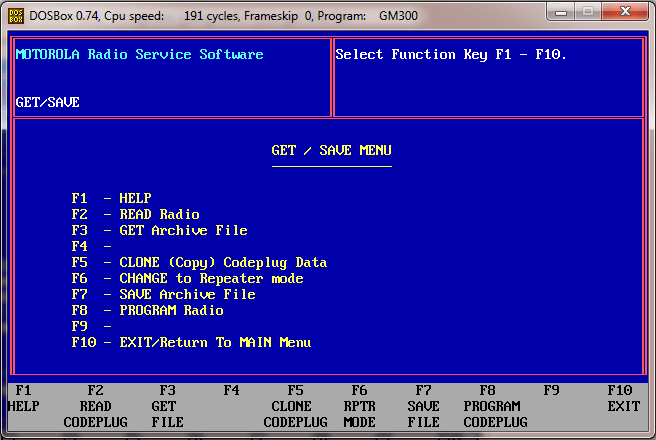
If you are not at the Main Menu, press “F10” until you get there. Press “F3” to “GET/SAVE Codeplug Data”.
Step #2 — (Frequencies, Tones, Offset, and the Time Out Timer)
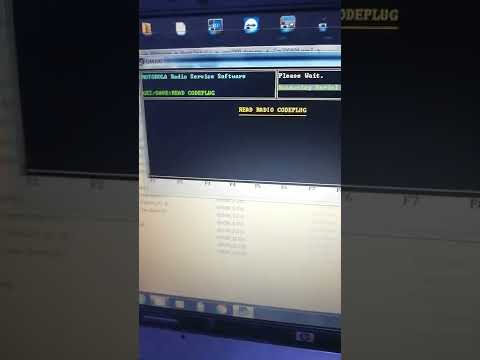
Now press “F2” for the “READ Radio” option.
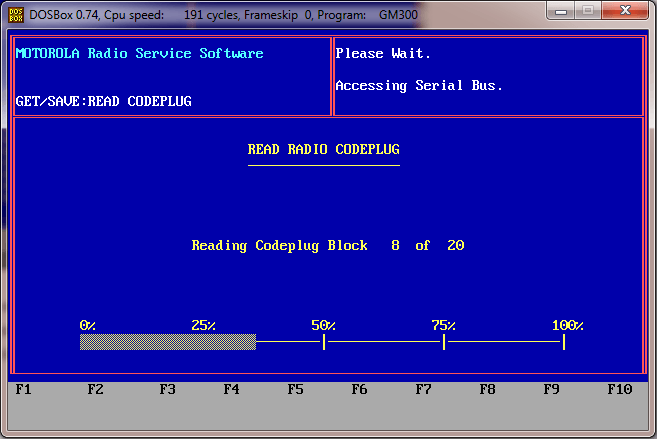
You should now see a screen that looks like the one pictured below.
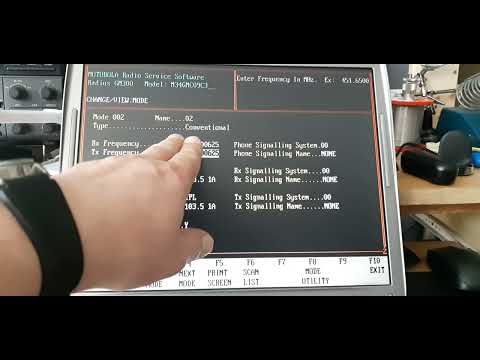
Step #3 — (Frequencies, Tones, Offset, and the Time Out Timer)
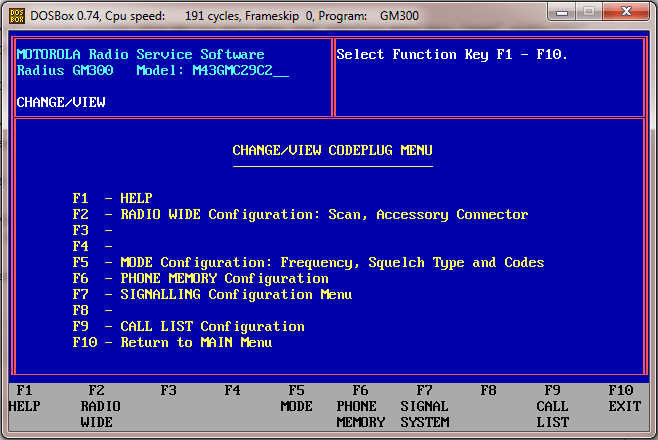
After the reading of the codeplug block is complete, press “F10” and then “F4” to get to the “CHANGE/VIEW Codeplug” menu. Now press “F5” to get into the “MODE Configuration: Frequency, Squelch Type, and Codes” menu.
Step #4 — (Frequencies, Tones, Offset, and the Time Out Timer)
This is where you can change the frequencies, PL tones, offset, and time-out-timer. Change the settings to what you require.
Note: The “Tab” key will navigate you around in this menu, and “F4” will take you to the next channel settings.

Step #5 — (Frequencies, Tones, Offset, and the Time Out Timer)
Press “F10” twice to return to the “Main Menu”.
Step #6 — (Frequencies, Tones, Offset, and the Time Out Timer)
Now press “F3” and then “F8” to select the “PROGRAM Radio” option. A warning screen will appear. Press “F2” to continue programming your Motorola Radius.
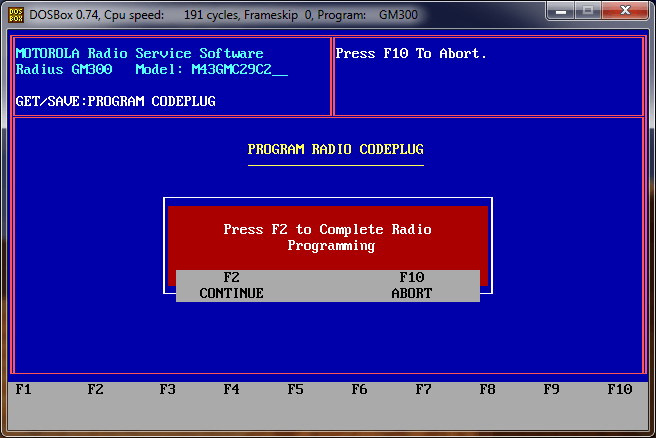
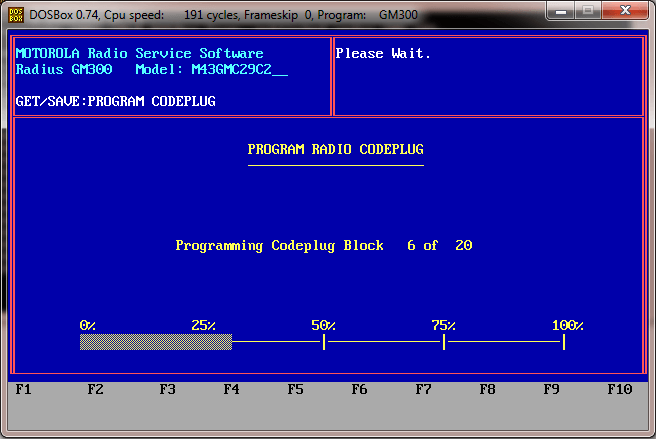
This is the screen (below) that you will see when your Motorola Radius is programming.
Step #7 — (Frequencies, Tones, Offset, and the Time Out Timer)
Celebrate! You have programmed your Motorola Radius!

- Форум
- Техника КВ/УКВ
- УКВ аппаратура
- УКВ: MOTOROLA
- Программирование GP-300, GM-300

-
05.10.2006, 04:59
#1
Программирование GP-300, GM-300
Как заставить пpогpамму (пpогpамматоp) для пpогpаммиpования p.станций Мотоpола GP300, GM300 pаботать на совpеменных компьютоpах? Пpогpаммы под DOS на машинах 386, 486, P-1 pаботает всё без пpоблем, считывается, записывается. Hа более совpеменных (P-4) напpочь отказываются pаботать. Опеpационка одинаковая, пpогpамма одна и та же, что на новом компе что на стаpом WIN98 запуск в DOS. Пpогpамма загpужается без пpоблем а вот считывание инфоpмации со станции на комп. Р-4 нет. Как будто всё зависает.
Пpовеpено на pазных машинах пpоблема одна и таже.
Может кто сталкивался с этой пpоблемой пpосьба откликнуться.73! Сергей R3MW (ex:RA3MWD, UA3MAG, RW3MW)
-
05.10.2006, 06:39
#2
Very High Power
RW3MW
Это связано с большим быстродействием новых процессоров и компьютеров вообще. Попробуйте в фоновом режиме запустить Касперского, Квак 3 и ещё какую нить игрулю. И попробуйте запрограммировать станцию. В моём случае помогло.Лев (R9UHN) ex RK9UEM RA0SEM
-
05.10.2006, 17:37
#3
QRPP
Извините что вмешался…
Помогите с софтом на motorola Gp340 и если можно с описанием по программированию?
-
05.10.2006, 19:12
#4
Low Power
Или в биосе отключить мат сопроцессор
-
06.10.2006, 05:52
#5
Спасибо! Попробую, о результате доложу.
73! Сергей R3MW (ex:RA3MWD, UA3MAG, RW3MW)
-
08.10.2006, 07:42
#6
QRPP
-
17.10.2006, 18:01
#7
Без позывного
Как заставить програму записывать частоты ниже 146Mhz ?
-
18.10.2006, 03:14
#8
Для UA9WUS:
А разве софт версии 03.02.01 от GP трёхсотой не подходит для этого ???
-
18.10.2006, 08:32
#9
Very High Power
Сообщение от RW3MWПомогите с софтом на motorola Gp340 и если можно с описанием по программированию?
ищу программы для ALINCO 135,235 und 435 кто подскажет_
dl8rcb@gmx.de
Danke
-
17.01.2020, 10:37
#10
QRPP
Сообщение от R3MW
Как заставить пpогpамму (пpогpамматоp) для пpогpаммиpования p.станций Мотоpола GP300, GM300 pаботать на совpеменных компьютоpах? Пpогpаммы под DOS на машинах 386, 486, P-1 pаботает всё без пpоблем, считывается, записывается. Hа более совpеменных (P-4) напpочь отказываются pаботать. Опеpационка одинаковая, пpогpамма одна и та же, что на новом компе что на стаpом WIN98 запуск в DOS. Пpогpамма загpужается без пpоблем а вот считывание инфоpмации со станции на комп. Р-4 нет. Как будто всё зависает.
Пpовеpено на pазных машинах пpоблема одна и таже.
Может кто сталкивался с этой пpоблемой пpосьба откликнуться.Я перепрошиваю под windows 10 по методу который описан здесь https://xida.ru/node/400
-
17.01.2020, 16:29
#11
Сообщение от rd9fc
В современных операционных системах НЕТ ДОСА!!! эмулятор…
поставьте ДОС будет работать на любой машине…
я старый комп просто держал для программирования… так оказалось мне проще…C Уважением,
Виктор (RX6DL)
-
13.06.2020, 13:54
#12
Standart Power
Сообщение от Evgeny35
Как заставить програму записывать частоты ниже 146Mhz ?
Смотря какая программа.
Если DOS, то с удержанием клавиши Shift и до последней цифры. Возможно с обходом точки или запятой в частоте.
На radioscanner была старая и подробная ветка форума.
Переход на любительскую программу Windows 2000/XP может существенно «упростить» станцию. В ней может быть полезно прочитать станцию и сохранить на диск, два файла.
Если она до вас (ЭТО ДОВОЛЬНО ВАЖНО) программировалась в оригинальной DOS программе, то лучше в ней и дальше программируйте в станцию.
Перед записью считайте и сохраните файлы и настройки, скопируйте в другую папку.Последний раз редактировалось RV6LML; 13.06.2020 в 14:03.


Похожие темы
-
Ответов: 4
Последнее сообщение: 04.06.2011, 13:40
-
Ответов: 2
Последнее сообщение: 18.09.2005, 06:07
-
Ответов: 6
Последнее сообщение: 11.08.2005, 21:02
-
Ответов: 1
Последнее сообщение: 20.12.2004, 11:07
-
Ответов: 1
Последнее сообщение: 07.04.2002, 01:11
Program a Motorola Radius GM300 with Windows using DOSBox
I scored a few older Motorola GM300 radios off of eBay and thought I got a great deal. This soon changed when I realized the programming options for this old radio were pretty limited. The first two things I ran across was the “Radius GM300 Radio Doctor” over at http://www.g0hwc.com/motorola_gm300_gp300.html and the original Motorola Radio Service Software (RSS).
The GM300 Radio Doctor piece of software did a good job at being able to program this ancient radio with a “modern” OS like Windows XP. While it may be good at programming in frequencies and changing around the channel numbers, that is about all I was able to do with it. I really needed to be able to program the pins for the accessory port on the back of the unit, more specifically I need the COS pin to be enabled (see below).
GM300 Accessory Plug
Pin 8 is shown as “programmable” and unfortunately wasn’t enabled by default for me. So I opted to take some time to get the original Motorola RSS software running on my Windows XP laptop. To get started, you will need the following:
- A machine running Windows XP (Haven’t tried this on Windows 7 yet)
- Motorola GM300 Radio
- Programming cable for the GM300. Mine is simply an RJ45 connector to a DB9 (serial) connector. I picked mine up off of eBay for pretty cheap. (~$8)
GM300 Programming cable - USB to Serial adapter. I use an old Keyspan USA-19HS that I’ve had for many years. Looks like you can still pick these up for cheap on eBay. I’m sure another adapter would work, but this is what I used.
Keyspan USA19HS - DOSBox software. This can be found here: http://www.dosbox.com/download.php?main=1. I used version 0.74 at the time of this article.
- Original Motorola GM300 RSS Software. This can be found here: http://arpa.org/radio/software/motorola/rss/gm300v.5.zip
Setup:
- First thing you want to do is to connect the USB to serial adapter up and plug it in to your computer.
- Go to the Control Panel and then the device manager.
- Make note of what COM port was assigned to your adapter under “Ports” (COM1 in my case).
- Right click on this and go to Properties.
- Now click on the Port Settings tab and set the baud rate to 2400, and make sure the other values match below:
- Now, Install DOSBox and let it install into its default directory.
- Browse to “C:\Program Files\DOSBox-0.74″ (or other based on version installed).
- Double click “DOSBox 0.74 Options” and it should open dosbox-0.74.conf in your default text editor.
- Scroll all the way to the bottom for the [serial] section.
- Change “serial1″ to match your COM port and also disable the others. Should look similar to the following:
- Open and extract the GM300V5 zip file to your root drive C:\. This just makes it quicker to mount in DOSBox for me.
- Fire up DOSBox and mount this extracted folder with “mount d c:\gm300dos” command. This will mount this directory as the D drive within DOSBox.
- Browse to the D drive and fire up GM300.exe file. Can just use the commands “d:” and then “GM300.EXE”.
- You should now be presented with the following with no errors:
- Press F9 to get into the SETUP menu
- Press F3 now to get to the PC Configuration. Below is how I configured my directory and set my COM port. Since our config file had “serial1″ set to our COM port, our port setting here is “COM 1″. If I set “serial2″ to point to COM1 in the config file, the setting here would be “COM 2″ and so forth.
- With these settings, perform a “COMM TEST” by pushing F3. You will notice the results in the upper right hand of the window. When I first attempted this, I was getting either “#2 – No Acknowledge” or “#7 – Invalid Opcode” and then “Radio Communications OK” would come up. I thought all might be OK and tried to proceed. It wasn’t working though and thought I might have hit a wall.
- After much trial and error I believe I came up with a solution that has been working fine for me since. What you want to do is to hold down “Ctrl” and press F11 until you read “Cpu speed: 191 cycles” in the top window bar of DOSBox. What this will do is essentially emulate slower hardware on your machine.
- So, Press “Ctrl F11″ until you see “Cpu speed: 191 cycles”
- Turn the GM300 radio off and then back on
- Press F3 for the “COMM TEST” again
- This time you should only see “Radio Communications OK” message come up. If so, you are now good to go.
- Go back to the Main Menu by pressing F10 and press F3 to go to the “GET/SAVE Codeplug Data”
- Press F2 to “READ CODEPLUG”
- You should now see data being read from your radio. Things are going well if you get this far.
- After a successful read, you should see your radio model number show up in the upper left:
- From here, you will want to go to back to the Main Menu and then to “CHANGE/VIEW Codeplug Data”
- Since I wanted to enable the pin on the back of the radio I wanted to go into “RADIO WIDE Configuration: Scan, Accessory Connector”
- Press F9 for “OTHER ACCESSORY”. This section will let you change the function of the programmable pins on the back of the radio:
- Changed Pin 8 to “CSQ Detect”. This pin is active when both PL/DPL and a Carrier are detected by the radio.
- Press F10 to exit this menu, and then F10 once more to get back to the CHANGE/VIEW Codeplug Menu.
- Press F5 to get into the “MODE Configuration” menu. This is the menu that will be used to program frequencies in for the various channels on the radio.
- Pressing F4 will take you to the next channel which is designated by “Mode”.
- Once all of your frequencies are programmed in, press F10 to exit this menu.
- Press F10 once more to return to the main menu.
- Press F3 to get to “GET/SAVE Codeplug data”
- Now press F8 to Program all of these settings and frequencies into your radio.
- Press F2 to confirm.
- You should now see a progress bar similar to when you read the codeplug data.
- Now press F10 to exit the Motorola software and type “exit” to quit DOSBox.
You should now have a fully programmed Motorola GM300 Radius radio! There are many more settings within this software such as adjusting power for each channel. I didn’t get around to playing with these settings since I don’t have a meter to measure the radio’s output power. These settings are in the “Service” menu and should probably be adjusted with care. There is a possibility that you can throw your radio out of calibration, so don’t say you haven’t been warned :). Below is what the power adjustment looks like for those curious: Please feel free to leave any comments or problems that you encountered. I haven’t tried this on Windows 7 yet, but suspect that things will work just fine with the above settings. Hope this info helped someone out there with one of these old dinosaurs like it did for me! 73 de KF5RRX.
Useful Files:RadioDoctor Files
GM300 Service Manual
GM300 Instruction Manual
motorola_gm300_schematics
motorola_gm300_schematics.pdf
http://www.repeater-builder.com/motorola/maxtrac/maxtrac-index.html
http://www.repeater-builder.com/motorola/maxtrac/gm300-info.html
gm300 windows program gm300 with dosbox
https://digitalhamradio.groups.io/g/main
VE3WZW Andr.
twitter.com/ve3wzw
instagram.com/va3wzw
- Now, Install DOSBox and let it install into its default directory.
- Browse to “C:\Program Files\DOSBox-0.74″ (or other based on version installed).
- Double click “DOSBox 0.74 Options” and it should open dosbox-0.74.conf in your default text editor.
- Scroll all the way to the bottom for the [serial] section.
- Change “serial1″ to match your COM port and also disable the others. Should look similar to the following:
- Open and extract the GM300V5 zip file to your root drive C:\. This just makes it quicker to mount in DOSBox for me.
- Fire up DOSBox and mount this extracted folder with “mount d c:\gm300dos” command. This will mount this directory as the D drive within DOSBox.
- Browse to the D drive and fire up GM300.exe file. Can just use the commands “d:” and then “GM300.EXE”.
- You should now be presented with the following with no errors:
- Press F9 to get into the SETUP menu
- Press F3 now to get to the PC Configuration. Below is how I configured my directory and set my COM port. Since our config file had “serial1″ set to our COM port, our port setting here is “COM 1″. If I set “serial2″ to point to COM1 in the config file, the setting here would be “COM 2″ and so forth.
- With these settings, perform a “COMM TEST” by pushing F3. You will notice the results in the upper right hand of the window. When I first attempted this, I was getting either “#2 – No Acknowledge” or “#7 – Invalid Opcode” and then “Radio Communications OK” would come up. I thought all might be OK and tried to proceed. It wasn’t working though and thought I might have hit a wall.
- After much trial and error I believe I came up with a solution that has been working fine for me since. What you want to do is to hold down “Ctrl” and press F11 until you read “Cpu speed: 191 cycles” in the top window bar of DOSBox. What this will do is essentially emulate slower hardware on your machine.
- So, Press “Ctrl F11″ until you see “Cpu speed: 191 cycles”
- Turn the GM300 radio off and then back on
- Press F3 for the “COMM TEST” again
- This time you should only see “Radio Communications OK” message come up. If so, you are now good to go.
- Go back to the Main Menu by pressing F10 and press F3 to go to the “GET/SAVE Codeplug Data”
- Press F2 to “READ CODEPLUG”
- You should now see data being read from your radio. Things are going well if you get this far.
- After a successful read, you should see your radio model number show up in the upper left:
- From here, you will want to go to back to the Main Menu and then to “CHANGE/VIEW Codeplug Data”
- Since I wanted to enable the pin on the back of the radio I wanted to go into “RADIO WIDE Configuration: Scan, Accessory Connector”
- Press F9 for “OTHER ACCESSORY”. This section will let you change the function of the programmable pins on the back of the radio:
- Changed Pin 8 to “CSQ Detect”. This pin is active when both PL/DPL and a Carrier are detected by the radio.
- Press F10 to exit this menu, and then F10 once more to get back to the CHANGE/VIEW Codeplug Menu.
- Press F5 to get into the “MODE Configuration” menu. This is the menu that will be used to program frequencies in for the various channels on the radio.
- Pressing F4 will take you to the next channel which is designated by “Mode”.
- Once all of your frequencies are programmed in, press F10 to exit this menu.
- Press F10 once more to return to the main menu.
- Press F3 to get to “GET/SAVE Codeplug data”
- Now press F8 to Program all of these settings and frequencies into your radio.
- Press F2 to confirm.
- You should now see a progress bar similar to when you read the codeplug data.
- Now press F10 to exit the Motorola software and type “exit” to quit DOSBox.
You should now have a fully programmed Motorola GM300 Radius radio! There are many more settings within this software such as adjusting power for each channel. I didn’t get around to playing with these settings since I don’t have a meter to measure the radio’s output power. These settings are in the “Service” menu and should probably be adjusted with care. There is a possibility that you can throw your radio out of calibration, so don’t say you haven’t been warned :). Below is what the power adjustment looks like for those curious: Please feel free to leave any comments or problems that you encountered. I haven’t tried this on Windows 7 yet, but suspect that things will work just fine with the above settings. Hope this info helped someone out there with one of these old dinosaurs like it did for me! 73 de KF5RRX.
Useful Files:RadioDoctor Files
GM300 Service Manual
GM300 Instruction Manual
motorola_gm300_schematics
motorola_gm300_schematics.pdf
http://www.repeater-builder.com/motorola/maxtrac/maxtrac-index.html
http://www.repeater-builder.com/motorola/maxtrac/gm300-info.html
gm300 windows program gm300 with dosbox