На чтение 3 мин Просмотров 5.5к. Опубликовано
Обновлено
Последовательные порты полюбились разработчикам за их простоту в обслуживании и использовании.
И конечно же писать в консоль терминальной программы это всё хорошо, но хочеться своё приложение, которое по нажатии клавиши на экране выполняет нужные вам действия 😉
В этой статье опишу как работать с com портом на языке Си++.
Решение простое, но почемуто рабочий пример найден был не сразу. За сим сохраняю его тут.
Конечно вы можете использовать кроссплатформенные решения вроде QSerial — библиотеки в составе Qt, я наверное так и сделаю, но в будующем. Сейчас же речь о «чистом» виндовском C++. Писать будем в Visual Studio. У меня 2010, хотя роли это никакой не играет…
Создаём новый консольный Win32 проект.
Инклудим header файлы:
#include <windows.h>
#include <iostream>
using namespace std;
Объявляем обработчик com порта:
HANDLE hSerial;
Я делаю это глобально, чтобы не заморачиваться с указателями при передаче его в функции.
Дальше начинаем формировать функцию main:
int _tmain(int argc, _TCHAR* argv[])
{
Терпеть не могу виндовский стиль программирования. Обозвали всё посвоему и сидят радуются…
Теперь магия объявления строки с именем порта. Дело в том, что char оно преобразовывать само не умеет.
LPCTSTR sPortName = L"COM1";
Работа с последоавательными портами в Windows проходит как с файлом. Открываем первый ком порт для записи/чтения:
hSerial = ::CreateFile(sPortName,GENERIC_READ | GENERIC_WRITE,0,0,OPEN_EXISTING,FILE_ATTRIBUTE_NORMAL,0);
Проверяем работоспособность:
if(hSerial==INVALID_HANDLE_VALUE)
{
                if(GetLastError()==ERROR_FILE_NOT_FOUND)
        {
                cout << "serial port does not exist.\n";
        }
        cout << "some other error occurred.\n";
}
Теперь нужно настроить параметры соединения:
DCB dcbSerialParams = {0};
dcbSerialParams.DCBlength=sizeof(dcbSerialParams);
if (!GetCommState(hSerial, &dcbSerialParams))
{
        cout << "getting state error\n";
}
dcbSerialParams.BaudRate=CBR_9600;
dcbSerialParams.ByteSize=8;
dcbSerialParams.StopBits=ONESTOPBIT;
dcbSerialParams.Parity=NOPARITY;
if(!SetCommState(hSerial, &dcbSerialParams))
{
        cout << "error setting serial port state\n";
}
На msdn советуют сначала получить параметры, а затем менять их. Мы ещё только учимся, поэтому делаем как просят.
Теперь объявим строку, которую будем передавать и переменные необходимые для этого:
char data[] = "Hello from C++";  // строка для передачи
DWORD dwSize = sizeof(data);   // размер этой строки
DWORD dwBytesWritten;    // тут будет количество собственно переданных байт
Посылаем строку. Напомню, что пример простейший, поэтому никаких особо проверок я не делаю:
BOOL iRet = WriteFile (hSerial,data,dwSize,&dwBytesWritten,NULL);
Также я решил вывести для контроля размер строки и количество отосланных байт:
cout << dwSize << " Bytes in string. " << dwBytesWritten << " Bytes sended. " << endl;
В конце программы делаем бесконечный цикл чтения данных:
        while(1)
        {
                ReadCOM();
        }
        return 0;
}
Теперь функция чтения:
void ReadCOM()
{
      DWORD iSize;
      char sReceivedChar;
      while (true)
      {
            ReadFile(hSerial, &sReceivedChar, 1, &iSize, 0);  // получаем 1 байт
                        if (iSize > 0)   // если что-то принято, выводим
                                cout << sReceivedChar;
      }
}
Вот собственно и весь пример.
Я создал виртуальный com порт. И слал из COM1 в COM2:
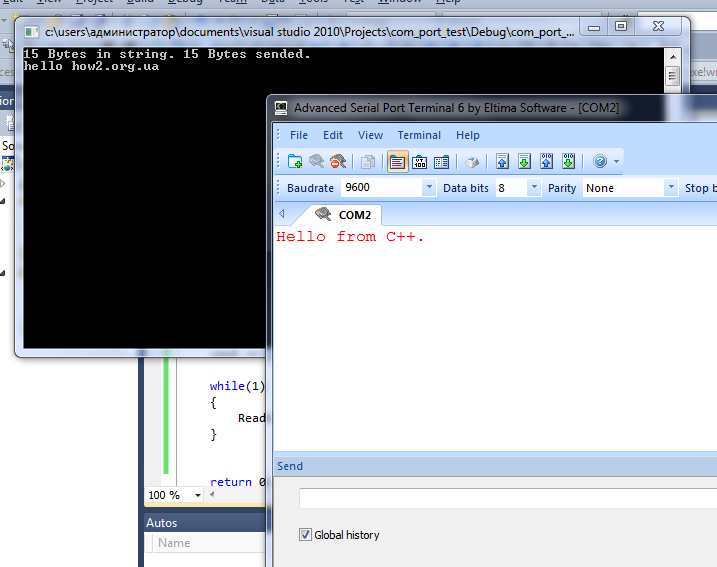
Из нашей программы было отправлено «Hello from C++», а из терминала «hello how2.org.ua».
Скачать пример.
Похожий код:

Программист, разработчик с 5 летним опытом работы. Учусь на разработчика игр на Unity и разработчика VR&AR реальности (виртуальной реальности). Основные языки программирования: C#, C++.
Написать программу, управляющую устройством через COM-порт, для MS-DOS не так сложно.
С платформой Win32 дело обстоит сложнее. Но только на первый взгляд. Конечно напрямую работать с регистрами портов нельзя, Windows это не позволяет, зато можно не обращать внимания на тонкости различных реализаций (i8251, 16450, 16550A) и не возиться с обработкой прерываний.
Открытие порта[править]
С последовательными и параллельными портами в Win32 работают как с файлами. Для открытия порта используется функция CreateFile. Эта функция предоставляется Win32 API. Ее прототип выглядит так:
  HANDLE CreateFile(
     LPCTSTR               lpFileName,
     DWORD                 dwDesiredAccess,
     DWORD                 dwShareMode,
     LPSECURITY_ATTRIBUTES lpSecurityAttributes,
     DWORD                 dwCreationDistribution,
     DWORD                 dwFlagsAndAttributes,
     HANDLE                hTemplateFile
  );
lpFileName[править]
Указатель на строку с именем открываемого или создаваемого файла. Формат этой строки может быть очень «хитрым». В частности можно указывать сетевые имена для доступа к файлам на других компьютерах. Можно открывать логические разделы или физические диски и работать в обход файловой системы.
Последовательные порты имеют имена «COM1», «COM2», «COM3», «COM4», «COM5», «COM6», «COM7», «COM8», «COM9». Для доступа к портам, чей номер больше 9, необходимо указывать имя порта как «\\.\COMx», где x — номер порта. Например, «\\.\COM72» (в нотации языка C/C++ строка будет выглядеть «\\\\.\\COM72»). Такой синтаксис подходит для любого номера порта. Точно так же они назывались в MS-DOS. Параллельные порты называются «LPT1», «LPT2» и так далее.
dwDesiredAccess[править]
Задает тип доступа к файлу. Возможно использование следующих значений:
0Опрос атрибутов устройства без получения доступа к нему.GENERIC_READФайл будет считываться.GENERIC_WRITEФайл будет записываться.GENERIC_READ|GENERIC_WRITEФайл будет и считываться и записываться.
dwShareMode[править]
Задает параметры совместного доступа к файлу. Коммуникационные порты нельзя делать разделяемыми, поэтому данный параметр должен быть равен 0.
lpSecurityAttributes[править]
Задает атрибуты защиты файла. Поддерживается только в Windows NT. Однако при работе с портами должен в любом случае равняться NULL.
dwCreationDistribution[править]
Управляет режимами автосоздания, автоусечения файла и им подобными. Для коммуникационных портов всегда должно задаваться OPEN_EXISTING.
dwFlagsAndAttributes[править]
Задает атрибуты создаваемого файла. Также управляет различными режимами обработки. При работе с портом этот параметр должен быть или равным 0, или FILE_FLAG_OVERLAPPED. Нулевое значение используется при синхронной работе с портом, а FILE_FLAG_OVERLAPPED при асинхронной, или, другими словами, при фоновой обработке ввода/вывода. Подробнее про асинхронный ввод/вывод я расскажу позже.
hTemplateFile[править]
Задает описатель файла-шаблона. При работе с портами всегда должен быть равен NULL.
При успешном открытии файла, в данном случае порта, функция возвращает дескриптор (HANDLE) файла. При ошибке [[|INVALID HANDLE VALUE]]. Код ошибки можно получитить вызвав функцию [[|GetLastError]].
Закрытие порта[править]
Открытый порт должен быть закрыт перед завершением работы программы. В Win32 закрытие объекта по его дескриптору выполняет функция CloseHandle:
BOOL CloseHandle(
     HANDLE hObject
     );
При успешном завершении функция возвращает не нулевое значение, при ошибке нуль.
Пример открытия/закрытия на языке C[править]
   #include <windows.h>
   //. . .
   HANDLE Port;
   //. . .
   Port = CreateFile(L"\\\\.\\COM2", GENERIC_READ | GENERIC_WRITE, 0, NULL, OPEN_EXISTING, 0, NULL);
   if (Port == INVALID_HANDLE_VALUE) {
      MessageBox(NULL, "Невозможно открыть последовательный порт", "Error", MB_OK);
      ExitProcess(1);
   }
   //. . .
   CloseHandle(Port);
   //. . .
В данном примере открывается порт СОМ2 для чтения и записи, используется синхронный режим обмена. Проверяется успешность открытия порта, при ошибке выводится сообщение и программа завершается. Если порт открыт успешно, то он закрывается.
Структура DCB[править]
Основные параметры последовательного порта описываются структурой DCB. Временные параметры — структурой COMMTIMEOUTS. Существует еще несколько информационных и управляющих структур, но они используются реже. Настройка порта заключается в заполнении управляющих структур и последующем вызове функций настройки.
Основную информацию содержит структура DCB:
  typedef struct _DCB {
      DWORD DCBlength;            // sizeof(DCB)
      DWORD BaudRate;             // current baud rate
      DWORD fBinary:1;            // binary mode, no EOF check
      DWORD fParity:1;            // enable parity checking
      DWORD fOutxCtsFlow:1;       // CTS output flow control
      DWORD fOutxDsrFlow:1;       // DSR output flow control
      DWORD fDtrControl:2;        // DTR flow control type
      DWORD fDsrSensitivity:1;    // DSR sensitivity
      DWORD fTXContinueOnXoff:1;  // XOFF continues Tx
      DWORD fOutX:1;              // XON/XOFF out flow control
      DWORD fInX:1;               // XON/XOFF in flow control
      DWORD fErrorChar:1;         // enable error replacement
      DWORD fNull:1;              // enable null stripping
      DWORD fRtsControl:2;        // RTS flow control
      DWORD fAbortOnError:1;      // abort reads/writes on error
      DWORD fDummy2:17;           // reserved
      WORD  wReserved;            // not currently used
      WORD  XonLim;               // transmit XON threshold
      WORD  XoffLim;              // transmit XOFF threshold
      BYTE  ByteSize;             // number of bits/byte, 4-8
      BYTE  Parity;               // 0-4=no,odd,even,mark,space
      BYTE  StopBits;             // 0,1,2 = 1, 1.5, 2
      char  XonChar;              // Tx and Rx XON character
      char  XoffChar;             // Tx and Rx XOFF character
      char  ErrorChar;            // error replacement character
      char  EofChar;              // end of input character
      char  EvtChar;              // received event character
      WORD  wReserved1;           // reserved; do not use
  } DCB;
Эта структура содержит почти всю управляющую информацию, которая в реальности располагается в различных регистрах последовательного порта.
DCBlength[править]
Задает длину, в байтах, структуры DCB. Используется для контроля корректности структуры при передаче ее адреса в функции настройки порта.
BaudRate[править]
Скорость передачи данных. Возможно указание следующих констант: CBR_110, CBR_300, CBR_600, CBR_1200, CBR_2400, CBR_4800, CBR_9600, CBR_14400, CBR_19200, CBR_38400, CBR_56000, CBR_57600, CBR_115200, CBR_128000, CBR_256000. Эти константы соответствуют всем стандартным скоростям обмена. На самом деле, это поле содержит числовое значение скорости передачи, а константы просто являются символическими именами. Поэтому можно указывать, например, и CBR_9600, и просто 9600. Однако рекомендуется указывать символические константы, поскольку при компиляции программы проверяется корректность их имен.
fBinary[править]
Включает двоичный режим обмена. Win32 не поддерживает недвоичный режим, поэтому данное поле всегда должно быть равно 1, или логической константе TRUE (что предпочтительней). В Windows 3.1, если это поле было равно FALSE, включался текстовый режим обмена. В этом режиме поступивший на вход порта символ, заданный полем EofChar, свидетельствовал о конце принимаемых данных.
fParity[править]
Включает режим контроля четности. Если это поле равно TRUE, то выполняется проверка четности, при ошибке, в вызывающую программу, выдается соответствующий код завершения.
fOutxCtsFlow[править]
Включает режим слежения за сигналом [[|CTS]]. Если это поле равно [[|TRUE]] и сигнал [[|CTS]] сброшен, передача данных приостанавливается до установки сигнала CTS. Это позволяет подключеному к компьютеру прибору приостановить поток передаваемой в него информации, если он не успевает ее обрабатывать.
fOutxDsrFlow[править]
Включает режим слежения за сигналом [[|DSR]]. Если это поле равно TRUE и сигнал DSR сброшен, передача данных прекращается до установки сигнала DSR.
fDtrControl[править]
Задает режим управления обменом для сигнала [[|DTR]]. Поле может принимать следующие значения:
- DTR_CONTROL_DISABLE Сигнал DTR снимается при открытии порта. У открытого порта может быть изменён функцией EscapeCommFunction.
- DTR_CONTROL_ENABLE Сигнал DTR устанавливается при открытии порта. У открытого порта может быть изменён функцией EscapeCommFunction.
- DTR_CONTROL_HANDSHAKE Сигнал DTR автоматически устанавливается/снимается в ходе работы с портом. Не может быть изменён функцией EscapeCommFunction.
fDsrSensitivity[править]
Задает чувствительсть коммуникационного драйвера к состоянию линии [[|DSR]]. Если это поле равно TRUE, то все принимаемые данные игнорируются драйвером (коммуникационный драйвер расположен в операционной системе), за исключением тех, которые принимаются при установленом сигнале DSR.
fTXContinueOnXoff[править]
Задает, прекращается ли передача при переполнении приемного буфера и передаче драйвером символа XoffChar. Если это поле равно TRUE, то передача продолжается, несмотря на то, что приемный буфер содержит более XoffLim символов и близок к переполнению, а драйвер передал символ XoffChar для приостановления потока принимаемых данных. Если поле равно FALSE, то передача не будет продолжена до тех пор, пока в приемном буфере не останется меньше XonLim символов и драйвер не передаст символ XonChar для возобновления потока принимаемых данных. Таким образом это поле вводит некую зависимость между управлением входным и выходным потоками информации.
fOutX[править]
Задает использование XON/XOFF управления потоком при передаче. Если это поле равно TRUE, то передача останавливается при приеме символа XoffChar, и возобновляется при приеме символа XonChar.
fInX[править]
Задает использование XON/XOFF управления потоком при приеме. Если это поле равно TRUE, то драйвер передает символ XoffChar, когда в приемном буфере находится более XoffLim, и XonChar, когда в приемном буфере остается менее XonLim символов.
fErrorChar[править]
Указывает на необходимость замены символов с ошибкой четности на символ задаваемый полем ErrorChar. Если это поле равно TRUE, и поле fParity равно TRUE, то выполняется замена.
fNull[править]
Определяет действие выполняемое при приеме нулевого байта. Если это поле TRUE, то нулевые байты отбрасываются при передаче.
fRtsControl[править]
Задает режим управления потоком для сигнала RTS. Поле может принимать следующие значения:
- RTS_CONTROL_DISABLE Сигнал RTS снимается при открытии порта. У открытого порта может быть изменён функцией EscapeCommFunction.
- RTS_CONTROL_ENABLE Сигнал RTS устанавливается при открытии порта. У открытого порта может быть изменён функцией EscapeCommFunction.
- RTS_CONTROL_HANDSHAKE Сигнал RTS автоматически устанавливается/снимается в ходе работы с портом. Не может быть изменён функцией EscapeCommFunction. Сигнал RTS устанавливается, когда приемный буфер заполнен менее, чем на половину, и снимается, когда буфер заполняется более чем на три четверти.
- RTS_CONTROL_TOGGLE Задаёт, что сигнал RTS установлен, когда есть данные для передачи. Когда все символы из передающего буфера переданы, сигнал снимается.
fAbortOnError[править]
Задает игнорирование всех операций чтения/записи при возникновении ошибки. Если это поле равно TRUE, драйвер прекращает все операции чтения/записи для порта при возникновении ошибки. Продолжать работать с портом можно будет только после устранения причины ошибки и вызова функции ClearCommError.
fDummy2[править]
Зарезервировано и не используется.
wReserved[править]
Не используется, должно быть установлено в 0.
XonLim[править]
Задает минимальное число символов в приемном буфере перед посылкой символа XON.
XoffLim[править]
Определяет максимальное количество байт в приемном буфере перед посылкой символа XOFF. Максимально допустимое количество байт в буфере вычисляется вычитанием данного значения из размера приемного буфера в байтах.
ByteSize[править]
Определяет число информационных бит в передаваемых и принимаемых байтах. Число информационных бит может быть в диапазоне от 4 до 8.
Parity[править]
Определяет выбор схемы контроля четности. Данное поле должно содержать одно из следующих значений:
- EVENPARITY Дополнение до четности
- MARKPARITY Бит четности всегда 1
- NOPARITY Бит четности отсутствует
- ODDPARITY Дополнение до нечетности
- SPACEPARITY Бит четности всегда 0
StopBits[править]
Задает количество стоповых бит. Поле может принимать следующие значения:
- ONESTOPBIT Один стоповый бит
- ONE5STOPBIT Полтора стоповых бита
- TWOSTOPBITS Два стоповых бита
XonChar[править]
Задает символ XON используемый как для приема, так и для передачи. Обычно 0x11 (17).
XoffChar[править]
Задает символ XOFF используемый как для приема, так и для передачи. Обычно 0x13 (19).
ErrorChar[править]
Задает символ, использующийся для замены символов с ошибочной четностью.
EofChar[править]
Задает символ, использующийся для сигнализации о конце данных.
EvtChar[править]
Задает символ, использующийся для сигнализации о событии.
wReserved1[править]
Зарезервировано и не используется.
Замечания[править]
Если структура DCB содержит конфигурацию для последовательного порта, совместимого с 8250, то к значениям полей ByteSize и StopBits применяются следующие ограничения:
- Количество информационных бит должно быть от
5до8. - Не допускается использование
5информационных бит с2стоповыми битами, также как6,7или8информационных бит с1,5стоповыми битами.
Заполнение структуры DCB[править]
Структура COMMTIMEOUTS[править]
winbase.h
typedef struct _COMMTIMEOUTS {
    DWORD ReadIntervalTimeout;          /* Maximum time between read chars. */
    DWORD ReadTotalTimeoutMultiplier;   /* Multiplier of characters.        */
    DWORD ReadTotalTimeoutConstant;     /* Constant in milliseconds.        */
    DWORD WriteTotalTimeoutMultiplier;  /* Multiplier of characters.        */
    DWORD WriteTotalTimeoutConstant;    /* Constant in milliseconds.        */
} COMMTIMEOUTS,*LPCOMMTIMEOUTS;
ReadIntervalTimeout — время в миллисекундах, задающее максимальное время, для интервала между поступлением двух символов по линии связи. Если интервал между поступлением каких-либо двух символов будет больше этой величины, операция ReadFile завершается и любые буферизированные данные возвращаются.
Чтобы операция ReadFile немедленно возвращала управление со всеми полученными данными (асинхронный режим) следует задавать следующие значения:
ReadIntervalTimeout=0xFFFFFFFF;
ReadTotalTimeoutConstant=0;
ReadTotalTimeoutMultiplier=0;
ReadTotalTimeoutMultiplier — Множитель, используемый, чтобы вычислить полный период времени простоя для операций чтения, в миллисекундах. Для каждой операции чтения, это значение умножается на затребованное число байтов, которые читаются.
ReadTotalTimeoutConstant — Константа, используемая, чтобы вычислить полный (максимальный) период времени простоя для операций чтения, в миллисекундах. Для каждой операции чтения, это значение добавляется к произведению члена структуры ReadTotalTimeoutMultiplier и прочитанного числа байтов.
Значение нуля и для члена ReadTotalTimeoutMultiplier, и для члена ReadTotalTimeoutConstant указывает, что полное время простоя не используются для операций чтения.
WriteTotalTimeoutMultiplier — Множитель, используемый, чтобы вычислить полный период времени простоя для операций записи, в миллисекундах. Для каждой операции записи, это значение умножается на число записываемых байтов.
WriteTotalTimeoutConstant — Константа, используемая, чтобы вычислить полный период времени простоя для операций записи, в миллисекундах. Для каждой операции записи, это значение добавляется к произведению члена структуры WriteTotalTimeoutMultiplier и записанного числа байтов.
Значение нуля и для члена WriteTotalTimeoutMultiplier, и для члена WriteTotalTimeoutConstant указывает, что полное время простоя не используются для операций записи.
Заполнение структуры COMMTIMEOUTS[править]
Вариант 1: (максимальная задержка при чтении и записи = TIMEOUT)
 	COMMTIMEOUTS CommTimeOuts;
 	CommTimeOuts.ReadIntervalTimeout = 0xFFFFFFFF;
 	CommTimeOuts.ReadTotalTimeoutMultiplier = 0;
 	CommTimeOuts.ReadTotalTimeoutConstant = TIMEOUT;
 	CommTimeOuts.WriteTotalTimeoutMultiplier = 0;
 	CommTimeOuts.WriteTotalTimeoutConstant = TIMEOUT;
Вариант 2: Инициализация значениями (без задержки при чтении)
COMMTIMEOUTS CommTimeOuts={0xFFFFFFFF,0,0,0,1500};
Пример настройки порта[править]
Структура COMMPORT[править]
Стандартный диалог настройки порта[править]
Для настройки параметров COM — порта может быть вызвано штатное окно Windows. Вызов осуществляется функцией CommConfigDialog(), которая в качестве параметров принимает имя настраиваемого порта, хендл родительского окна и указатель на структуру COMMCONFIG.
Следует отметить, что для корректного вызова окна, структура COMMCONFIG должна быть заполнена значениями заранее.
Настройку структуры можно выполнить вручную или при помощи функции GetCommConfig().
Например:
/* Получение существующих настроек */
unsigned long new_size = 0;
if (!GetCommConfig(port->handle, &port->settings,&new_size))
	goto error;
/* Вызов окна и установка новых параметров */
if (CommConfigDialog(port->name, 0, &port->settings)) {
	if (SetCommConfig(port->handle, &port->settings, port->settings.dwSize))
		return 1;
	goto error;
}
Выделение памяти для структуры COMMPORT[править]
Прием и передача данных[править]
Прием и передача данных для последовательного порта может выполнятся в синхронном или асинхронном режимах. Асинхронный режим позволяет реализовать работу по событиям, в то время как синхронный лишен этой возможности, но является более простым в реализации.
Для работы в синхронном режиме, порт должен быть открыт следующим образом:
CreateFile("COM1", GENERIC_READ | GENERIC_WRITE, 0, NULL, OPEN_EXISTING, 0, NULL);
Предпоследний параметр dwFlagsAndAttributes должен быть равен 0.
После успешного открытия порта, данные могут быть считаны или записаны при помощи функций ReadFile() и WriteFile().
HANDLE port = CreateFile("COM1", GENERIC_READ | GENERIC_WRITE, 0, NULL,
			OPEN_EXISTING, 0, NULL);
unsigned char dst[1024] = {0};

unsigned long size = sizeof(dst);
if(port!= INVALID_HANDLE_VALUE)
	if(ReadFile(port,dst,size, &size,0))
		printf("\nRead %d bytes",size);
Функция ReadFile/WriteFile осуществляет чтение/запись из файла (устройства) начиная с текущей позиции после окончания чтения обновляет указатель в файле.
BOOL ReadFile(
 HANDLE hFile, // хендл файла
 LPVOID lpBuffer, //указатель на буфер
 DWORD nNumberOfBytesToRead, // размер данных
 LPDWORD lpNumberOfBytesRead, //размер считанных данных
 LPOVERLAPPED lpOverlapped //структура OVERLAPPED
);
Недостатком этого способа является то, что вызывая функцию ReadFile(), мы не знаем есть ли данные для чтения. Можно циклически проверять их наличие, но это приводит к дополнительным расходам времени ЦП.
Поэтому на практике часто удобней использовать асинхронный режим. Для этого при вызове функции CreateFile() параметр dwFlagsAndAttributes должен быть равен FILE_FLAG_OVERLAPPED.
CreateFile("COM1", GENERIC_READ | GENERIC_WRITE, 0, NULL,
		OPEN_EXISTING, FILE_FLAG_OVERLAPPED, NULL);
Далее, необходимо настроить реакцию порта на события при помощи функции SetCommMask() и используя функции WaitCommEvent() и WaitForSingleObject() ожидать событие или тайм аут.
Например:
const int READ_TIME = 100;
OVERLAPPED sync = {0};
int reuslt = 0;
unsigned long wait = 0, read = 0, state = 0;

/* Создаем объект синхронизации */
sync.hEvent = CreateEvent(NULL,TRUE,FALSE,NULL);

/* Устанавливаем маску на события порта */
if(SetCommMask(port, EV_RXCHAR)) {
	/* Связываем порт и объект синхронизации*/
	WaitCommEvent(port, &state, &sync);
	/* Начинаем ожидание данных*/
	wait = WaitForSingleObject(sync.hEvent, READ_TIME);
	/* Данные получены */
	if(wait == WAIT_OBJECT_0) {
		/* Начинаем чтение данных */
		ReadFile(port, dst, size, &read, &sync);
		/* Ждем завершения операции чтения */
		wait = WaitForSingleObject(sync.hEvent, READ_TIME);
		/* Если все успешно завершено, узнаем какой объем данных прочитан */
		if(wait == WAIT_OBJECT_0)
			if(GetOverlappedResult(port, &sync, &read, FALSE))
				reuslt = read;
	}
}
CloseHandle(sync.hEvent);
Сброс порта[править]
Пример настройки порта и выполнения чтения/записи данных[править]
Код для работы с COM-портом. Многострадальный, соответственно относительно простой и понятный, при этом обходит основные подводные камни. Надеюсь, может быть полезен.
tty.h[править]
 #ifndef TTY_H
 #define TTY_H

 #define NOMINMAX //иначе API windows определит макросы min и max, конфликтующие с std::max и std::min в vector
 #include <windows.h>

 #include <vector>
 #include <string>

 using namespace std;

 struct TTY {

 	TTY();
 	virtual ~TTY();

 	bool IsOK() const;

 	void Connect(const string& port, int baudrate);
 	void Disconnect();

 	virtual void Write(const vector<unsigned char>& data);
 	virtual void Read(vector<unsigned char>& data);

 	HANDLE m_Handle;

 };

 struct TTYException {
 };

 #endif
tty.cpp[править]
 #include "tty.h"
#include <iostream>
#include <assert.h>
#include <windows.h>

  using namespace std;

 static int TIMEOUT = 1000;

 TTY::TTY() {
 	m_Handle = INVALID_HANDLE_VALUE;
 }

 TTY::~TTY() {
 	Disconnect();
 }

  bool TTY::IsOK() const {
      return m_Handle != INVALID_HANDLE_VALUE;
  }

 void TTY::Connect(const string& port, int baudrate) {

 	Disconnect();

 	m_Handle =
 		CreateFile(
 		port.c_str(),
 		GENERIC_READ | GENERIC_WRITE,
 		0,
 		NULL,
 		OPEN_EXISTING,
 		FILE_ATTRIBUTE_NORMAL,
 		NULL);

 	if(m_Handle == INVALID_HANDLE_VALUE) {
 		throw TTYException();
 	}

 	SetCommMask(m_Handle, EV_RXCHAR);
 	SetupComm(m_Handle, 1500, 1500);

 	COMMTIMEOUTS CommTimeOuts;
 	CommTimeOuts.ReadIntervalTimeout = 0xFFFFFFFF;
 	CommTimeOuts.ReadTotalTimeoutMultiplier = 0;
 	CommTimeOuts.ReadTotalTimeoutConstant = TIMEOUT;
 	CommTimeOuts.WriteTotalTimeoutMultiplier = 0;
 	CommTimeOuts.WriteTotalTimeoutConstant = TIMEOUT;

 	if(!SetCommTimeouts(m_Handle, &CommTimeOuts)) {
 		CloseHandle(m_Handle);
                m_Handle = INVALID_HANDLE_VALUE;
 		throw TTYException();
 	}

 	DCB ComDCM;

 	memset(&ComDCM,0,sizeof(ComDCM));
 	ComDCM.DCBlength = sizeof(DCB);
 	GetCommState(m_Handle, &ComDCM);
 	ComDCM.BaudRate = DWORD(baudrate);
 	ComDCM.ByteSize = 8;
 	ComDCM.Parity = NOPARITY;
 	ComDCM.StopBits = ONESTOPBIT;
 	ComDCM.fAbortOnError = TRUE;
 	ComDCM.fDtrControl = DTR_CONTROL_DISABLE;
 	ComDCM.fRtsControl = RTS_CONTROL_DISABLE;
 	ComDCM.fBinary = TRUE;
 	ComDCM.fParity = FALSE;
 	ComDCM.fInX = FALSE;
        ComDCM.fOutX = FALSE;
 	ComDCM.XonChar = 0;
 	ComDCM.XoffChar = (unsigned char)0xFF;
 	ComDCM.fErrorChar = FALSE;
 	ComDCM.fNull = FALSE;
 	ComDCM.fOutxCtsFlow = FALSE;
 	ComDCM.fOutxDsrFlow = FALSE;
 	ComDCM.XonLim = 128;
 	ComDCM.XoffLim = 128;

 	if(!SetCommState(m_Handle, &ComDCM)) {
 		CloseHandle(m_Handle);
 		m_Handle = INVALID_HANDLE_VALUE;
 		throw TTYException();
 	}

 }

 void TTY::Disconnect() {

 	if(m_Handle != INVALID_HANDLE_VALUE)
        {
 	   CloseHandle(m_Handle);
           m_Handle = INVALID_HANDLE_VALUE;
 	}

 }

 void TTY::Write(const vector<unsigned char>& data) {

 	if(m_Handle == INVALID_HANDLE_VALUE) {
 		throw TTYException();
 	}

 	DWORD feedback;
 	if(!WriteFile(m_Handle, &data[0], (DWORD)data.size(), &feedback, 0) || feedback != (DWORD)data.size()) {
 		CloseHandle(m_Handle);
 		m_Handle = INVALID_HANDLE_VALUE;
 		throw TTYException();
 	}

 	// In some cases it's worth uncommenting
 	//FlushFileBuffers(m_Handle);

 }

 void TTY::Read(vector<unsigned char>& data) {

 	if(m_Handle == INVALID_HANDLE_VALUE) {
 		throw TTYException();
 	}

 	DWORD begin = GetTickCount();
 	DWORD feedback = 0;

 	unsigned char* buf = &data[0];
 	DWORD len = (DWORD)data.size();

 	int attempts = 3;
 	while(len && (attempts || (GetTickCount()-begin) < (DWORD)TIMEOUT/3)) {

 		if(attempts) attempts--;

 		if(!ReadFile(m_Handle, buf, len, &feedback, NULL)) {
 			CloseHandle(m_Handle);
 			m_Handle = INVALID_HANDLE_VALUE;
 			throw TTYException();
 		}

 		assert(feedback <= len);
 		len -= feedback;
 		buf += feedback;

 	}

 	if(len) {
 		CloseHandle(m_Handle);
 		m_Handle = INVALID_HANDLE_VALUE;
 		throw TTYException();
 	}

 }

using namespace std;

int main(int argc, char *argv[])
{
    TTY tty;
    tty.Connect("COM4",9600);

    for(int i=0;i<1000;i++) {

        std::vector<unsigned char> the_vectsor;
        the_vectsor.push_back(5);
        tty.Read(the_vectsor);


        std::cout << (char)(the_vectsor[0]); //output text

    }

    system("PAUSE");
    return EXIT_SUCCESS;
}
Sometimes we require to communicate with an external device like a printer, microcontroller board or any serial device using the serial port of a windows machine. There is a lot of serial application available like Hercules, HyperTerminal, Docklight, ..etc.
We can use any one of them for serial communication but sometimes we require to create our own custom serial application for communication. In windows, it is easy to create the custom serial application using the win32 API.
In this blog post, we will learn serial port programming using the Win32 API. In Windows, serial port programming is very easy, MSDN provide all the required win32 API information which require for the serial port programming.
You can also see the below articles that how to change the properties of com-port like baud rate, parity using the Windows API.
- Change properties of COM Port Using win32 API
- Get COM PORT of USB Serial Device using the VID and PID
Finding COM port Number of a Device
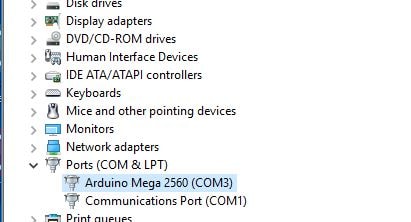
In windows, the serial device will display in com port section of device manager with name as COM1, COM2, COM3, COM4.. etc. Generally, COM1 and COM2 refer to the hardware serial ports present in the PC and another com port number is export when any serial device or USB to serial device attached to PC. It also possible that com id could be virtual ( for example static virtual com port).
In my laptop, I have attached an Arduino board (Atmega 2560) and its COM id would be shown in com port section (Control Panel > Device Manager > Ports).
Compilers and IDE’s used
Here I have used Visual Studio 2013. You can also use MinGW (Minimalist GNU for Windows) an Open Source programming tool. Here I am assuming that you know how to create the console application using the visual studio and familiar with win32 API.
Opening a Serial Port
In Windows using the CreateFile(), we can open the serial port. The CreateFile() is a Win32 API that creates or opens a file or I/O device.
On success CreateFile() returns a handle that can be used to access the file or device depending on the flags and attributes specified.
HANDLE CreateFile(
    LPCTSTR lpFileName,          // pointer to name of the file
    DWORD dwDesiredAccess,       // access (read-write) mode
    DWORD dwShareMode,           // share mode
    LPSECURITY_ATTRIBUTES lpSecurityAttributes,
    // pointer to security attributes
    DWORD dwCreationDisposition,  // how to create
    DWORD dwFlagsAndAttributes,  // file attributes
    HANDLE hTemplateFile         // handle to file with attributes to
    // copy
);
Closing a Serial Port
You should remember that after opening the com port using the CreateFile(), you have to close it by calling the CloseHandle() otherwise it will be unavailable to other applications.
BOOL CloseHandle(
  HANDLE hObject
);
On success CloseHandle() returns zero.
Serial port communication Application
Let see an example code where I am talking with a Mega2560 Arduino device. I have written a small code for mega2560 in which it receives serial data. If received data is “aticleworld” then it will send a message “Welcome to AticleWorld !” or otherwise it will send the message “Please Send Correct Message”.
Mega2560 serial code,
#include <SoftwareSerial.h>

void setup()
{
    // initialize serial ports
    Serial.begin(9600);    // USB serial port 0
}


void loop()
{
    String msg = "";
    // check for data byte on USB serial port
    if (Serial.available())
    {
        // get byte from USB serial port
        while(Serial.available())
        {
            msg = Serial.readString();// read the incoming data as string
        }
        if( msg == "aticleworld")
        {
            //Send data to usb serial port
            Serial.write(" Welcome to AticleWorld !");
        }
        else
        {
            //Send data to usb serial port
            Serial.write("Please Send Correct Message");
        }
    }
}
You can purchase Mega2560 from Amazon, Click here

![]()
Serial Application for the console,
In the below console application, I am using the win32 API to open the com port and sending the data to the open COM port. See the below video where I have downloaded the Arduino code in the Arduino board and communicating with this board using the console application.
#include "stdafx.h"
#include <Windows.h>
#include <stdio.h>
#include <string.h>

int main(void)
{

    HANDLE hComm;  // Handle to the Serial port
    BOOL   Status; // Status
    DCB dcbSerialParams = { 0 };  // Initializing DCB structure
    COMMTIMEOUTS timeouts = { 0 };  //Initializing timeouts structure
    char SerialBuffer[64] = { 0 }; //Buffer to send and receive data
    DWORD BytesWritten = 0;          // No of bytes written to the port
    DWORD dwEventMask;     // Event mask to trigger
    char  ReadData;        //temperory Character
    DWORD NoBytesRead;     // Bytes read by ReadFile()
    unsigned char loop = 0;
    wchar_t pszPortName[10] = { 0 }; //com port id
    wchar_t PortNo[20] = { 0 }; //contain friendly name


    //Enter the com port id
    printf_s("Enter the Com Port: ");
    wscanf_s(L"%s", pszPortName, (unsigned)_countof(pszPortName));
    swprintf_s(PortNo, 20, L"\\\\.\\%s", pszPortName);

    //Open the serial com port
    hComm = CreateFile(PortNo, //friendly name
                       GENERIC_READ | GENERIC_WRITE,      // Read/Write Access
                       0,                                 // No Sharing, ports cant be shared
                       NULL,                              // No Security
                       OPEN_EXISTING,                     // Open existing port only
                       0,                                 // Non Overlapped I/O
                       NULL);                             // Null for Comm Devices

    if (hComm == INVALID_HANDLE_VALUE)
    {
        printf_s("\n Port can't be opened\n\n");
        goto Exit2;
    }

    //Setting the Parameters for the SerialPort
    dcbSerialParams.DCBlength = sizeof(dcbSerialParams);

    Status = GetCommState(hComm, &dcbSerialParams); //retreives  the current settings
    if (Status == FALSE)
    {
        printf_s("\nError to Get the Com state\n\n");
        goto Exit1;
    }

    dcbSerialParams.BaudRate = CBR_9600;      //BaudRate = 9600
    dcbSerialParams.ByteSize = 8;             //ByteSize = 8
    dcbSerialParams.StopBits = ONESTOPBIT;    //StopBits = 1
    dcbSerialParams.Parity = NOPARITY;      //Parity = None

    Status = SetCommState(hComm, &dcbSerialParams);
    if (Status == FALSE)
    {
        printf_s("\nError to Setting DCB Structure\n\n");
        goto Exit1;
    }

    //Setting Timeouts
    timeouts.ReadIntervalTimeout = 50;
    timeouts.ReadTotalTimeoutConstant = 50;
    timeouts.ReadTotalTimeoutMultiplier = 10;
    timeouts.WriteTotalTimeoutConstant = 50;
    timeouts.WriteTotalTimeoutMultiplier = 10;
    if (SetCommTimeouts(hComm, &timeouts) == FALSE)
    {
        printf_s("\nError to Setting Time outs");
        goto Exit1;
    }


    printf_s("\n\nEnter your message: ");
    scanf_s("%s", SerialBuffer, (unsigned)_countof(SerialBuffer));


    //Writing data to Serial Port
    Status = WriteFile(hComm,// Handle to the Serialport
                       SerialBuffer,            // Data to be written to the port
                       sizeof(SerialBuffer),   // No of bytes to write into the port
                       &BytesWritten,  // No of bytes written to the port
                       NULL);
    if (Status == FALSE)
    {
        printf_s("\nFail to Written");
        goto Exit1;
    }

    //print numbers of byte written to the serial port
    printf_s("\nNumber of bytes written to the serail port = %d\n\n", BytesWritten);

    //Setting Receive Mask
    Status = SetCommMask(hComm, EV_RXCHAR);

    if (Status == FALSE)
    {
        printf_s("\nError to in Setting CommMask\n\n");
        goto Exit1;
    }


    //Setting WaitComm() Event
    Status = WaitCommEvent(hComm, &dwEventMask, NULL); //Wait for the character to be received
    if (Status == FALSE)
    {
        printf_s("\nError! in Setting WaitCommEvent()\n\n");
        goto Exit1;
    }

    //Read data and store in a buffer
    do
    {
        Status = ReadFile(hComm, &ReadData, sizeof(ReadData), &NoBytesRead, NULL);
        SerialBuffer[loop] = ReadData;
        ++loop;
    }
    while (NoBytesRead > 0);

    --loop; //Get Actual length of received data

    printf_s("\nNumber of bytes received = %d\n\n", loop);

    //print receive data on console
    printf_s("\n\n");
    int index = 0;
    for (index = 0; index < loop; ++index)
    {
        printf_s("%c", SerialBuffer[index]);
    }

    printf_s("\n\n");

Exit1:
    CloseHandle(hComm);//Closing the Serial Port
Exit2:
    system("pause");
    return 0;
}
Recommended Posts for you:
- Best 5 C Books.
- Get COM PORT of USB Serial Device using the VID and PID.
- Reading And Writing Windows Registry Using WinAPI
- Install the port monitor silently without user interaction.
- C++ Interview Questions with Answers.
- C-Sharp Interview Questions.
- Python Interview Questions with Answer.
- Memory Layout in C.
- 100 C interview questions, your interviewer might ask.
- C Interview Questions for the experience.
- 10 questions about dynamic memory allocation
- File handling in C, in few hours.
Reference: https://docs.microsoft.com/en-us/windows/desktop/api/fileapi/nf-fileapi-createfilea
Serial communication is a method of transmitting data as a continuous stream of bits through a single communication line or serial port. It’s commonly used in a wide range of applications, such as data transfer between a computer and an external device, and in networking and other communications systems. In C programming language, opening, reading, and writing to a serial port can be done through system calls and functions provided by the operating system. In this article, you will learn how to open, read, and write from a serial port in C.
Method 1: Using termios Library
Here is a step-by-step guide on how to open, read, and write from a serial port in C using the termios library.
#include <stdio.h>
#include <stdlib.h>
#include <fcntl.h>
#include <termios.h>
#include <unistd.h>
#include <string.h>
Step 2: Define the serial port
#define SERIAL_PORT "/dev/ttyUSB0" // Change this to your serial portStep 3: Open the serial port
int serial_port = open(SERIAL_PORT, O_RDWR);
if (serial_port < 0) {
    printf("Error opening serial port\n");
    exit(1);
}
Step 4: Configure the serial port
struct termios serial_settings;
tcgetattr(serial_port, &serial_settings);
cfsetispeed(&serial_settings, B9600); // Set the baud rate
cfsetospeed(&serial_settings, B9600);
serial_settings.c_cflag &= ~PARENB; // Disable parity
serial_settings.c_cflag &= ~CSTOPB; // Set stop bits to 1
serial_settings.c_cflag &= ~CSIZE; // Clear data size bits
serial_settings.c_cflag |= CS8; // Set 8 data bits
tcsetattr(serial_port, TCSANOW, &serial_settings); // Apply the settings
Step 5: Read from the serial port
char buffer[255];
int n = read(serial_port, buffer, sizeof(buffer));
if (n < 0) {
    printf("Error reading from serial port\n");
    exit(1);
}
Step 6: Write to the serial port
char* message = "Hello, World!";
int len = strlen(message);
int n = write(serial_port, message, len);
if (n < 0) {
    printf("Error writing to serial port\n");
    exit(1);
}
Step 7: Close the serial port
That’s it! You now know how to open, read, and write from a serial port in C using the termios library.
Method 2: Using WinAPI in Windows
To open, read, and write from a serial port in C using WinAPI in Windows, you can follow these steps:
- First, you need to include the necessary header files:
#include <windows.h>
#include <stdio.h>- Next, you can use the CreateFile function to open a handle to the serial port:
HANDLE hSerial;
hSerial = CreateFile("COM1", GENERIC_READ | GENERIC_WRITE, 0, NULL, OPEN_EXISTING, FILE_ATTRIBUTE_NORMAL, NULL);
In this example, we are opening the first serial port (COM1) with read and write access. You can replace «COM1» with the name of the serial port you want to use.
- Once you have a handle to the serial port, you can configure it using the DCB structure and the SetCommState function:
DCB dcbSerialParams = {0};
dcbSerialParams.DCBlength = sizeof(dcbSerialParams);
dcbSerialParams.BaudRate = CBR_9600;
dcbSerialParams.ByteSize = 8;
dcbSerialParams.StopBits = ONESTOPBIT;
dcbSerialParams.Parity = NOPARITY;

SetCommState(hSerial, &dcbSerialParams);
In this example, we are setting the baud rate to 9600, the data bits to 8, the stop bits to 1, and the parity to none. You can adjust these values to match the configuration of your serial device.
- Now that the serial port is configured, you can use the ReadFile and WriteFile functions to read and write data:
DWORD dwBytesRead, dwBytesWritten;
char data[] = "Hello, world!";

WriteFile(hSerial, data, sizeof(data), &dwBytesWritten, NULL);

char buffer[128];
ReadFile(hSerial, buffer, sizeof(buffer), &dwBytesRead, NULL);
In this example, we are writing the string «Hello, world!» to the serial port and then reading up to 128 bytes of data into a buffer.
- Finally, when you are finished using the serial port, you should close the handle using the CloseHandle function:
And that’s it! Here is the complete code:
#include <windows.h>
#include <stdio.h>

int main()
{
    HANDLE hSerial;
    DCB dcbSerialParams = {0};
    DWORD dwBytesRead, dwBytesWritten;
    char data[] = "Hello, world!";
    char buffer[128];

    hSerial = CreateFile("COM1", GENERIC_READ | GENERIC_WRITE, 0, NULL, OPEN_EXISTING, FILE_ATTRIBUTE_NORMAL, NULL);

    if (hSerial == INVALID_HANDLE_VALUE)
    {
        printf("Error opening serial port\n");
        return 1;
    }

    dcbSerialParams.DCBlength = sizeof(dcbSerialParams);
    dcbSerialParams.BaudRate = CBR_9600;
    dcbSerialParams.ByteSize = 8;
    dcbSerialParams.StopBits = ONESTOPBIT;
    dcbSerialParams.Parity = NOPARITY;

    if (!SetCommState(hSerial, &dcbSerialParams))
    {
        printf("Error configuring serial port\n");
        CloseHandle(hSerial);
        return 1;
    }

    if (!WriteFile(hSerial, data, sizeof(data), &dwBytesWritten, NULL))
    {
        printf("Error writing to serial port\n");
        CloseHandle(hSerial);
        return 1;
    }

    if (!ReadFile(hSerial, buffer, sizeof(buffer), &dwBytesRead, NULL))
    {
        printf("Error reading from serial port\n");
        CloseHandle(hSerial);
        return 1;
    }

    printf("Received %d bytes: %s\n", dwBytesRead, buffer);

    CloseHandle(hSerial);

    return 0;
}
Method 3: Using PySerial in Python
Step 1: Import PySerial Library
Step 2: Create Serial Port Object
ser = serial.Serial('COM1', 9600, timeout=1)Here, COM1 is the name of the serial port and 9600 is the baud rate. You can change these values according to your requirements.
Step 3: Open Serial Port
Step 4: Check if Serial Port is Opened
if ser.isOpen():
    print('Serial port is open')
Step 5: Write Data to Serial Port
ser.write(b'Hello World')Here, b before the string indicates that the string is in bytes format.
Step 6: Read Data from Serial Port
data = ser.readline()
print(data)
Step 7: Close Serial Port
These are the basic steps to open, read, and write from a serial port in C using PySerial in Python. You can modify the code according to your requirements.

This tutorial teaches you to program your Windows PC to communicate with an external peripheral like data acquisition boards, USB GPIO Boards,Relay boards etc through its serial port (Virtual or Real).
Here i am assuming that you are using a Virtual COM port based any of the numerous IC’s available on the market.
The tutorial is aimed at Software/Embedded developers who may want to interface real world sensors like DAQ’s,USB Relays,USB GPIO boards ,Temperature sensors,Humidity sensors etc to Windows PC .
The software is written using C language and communicates with the Serial Port using Win32 API.
All codes have been tested on a 64bit Windows 10 System.
All the codes in this tutorial are licensed under MIT License making it eligible to be used for developing proprietary software applications.
Join Our Youtube Channel for more Info
|
Isolated USB to Serial Converters
One major issue with interfacing real word devices with your PC’s is that High voltage spurious transients can couple on to your USB or RS232 or RS485 lines.These high voltage transients can cause severe damage to your computer or its ports.
It is highly recommended to use an
- Isolated USB port or
- Isolated USB to Serial/RS232/RS485 converter
to protect your PC .
Sourcecodes

- Please note that the source codes on the website show only the relevant sections to highlight the process of programming the serial port.
- Contact Us to Enquire about the full Source codes
Compilers and IDE’s used
Since we are developing on Windows platform,
- Recommended IDE is Visual Studio (Professional or Community Edition).
In Visual Studio,there is no longer an option for creating a C project.
So create a Win32 C++ project and save your source file with a .C extension (Eg: MySourceFile.C).Compiler would automatically do the rest.
GCC/MinGW
You can also compile the code using GCC or MinGW after a few tweaks.
The Code uses some Microsoft specific safe C functions like
- strcat_s() and
- scanf_s()
which are used to get the COM number from the user and create the COM port address string (Eg «\\.\COM9» ).The code will compile on GCC after removing those functions.
Make sure that variables referenced by those functions are also changed.
Finding out your COM port Number
A little bit of History,
Serial ports are simple 9 pin legacy ports used by the PC to communicate with external peripherals like Printers,Data Acquisition Sytems,Printers etc.
The simple protocol and the 3 pin hardware physical lines (RX,TX,GND) made it quite popular among manufacturers who wanted an easy way to connect their devices with a computer.
In the 2020’s, the old DB9 Serial port is found only on industrial motherboards and old PC’s.The once ubiquitous serial port have been completely replaced by the familiar USB standard.
The arrival of cheap USB to UART chips like FTD FT232RL,TUSB3410,CP2102 have made it quite easy to upgrade the existing software that used to talk over serial to USB protocol.These chips provide a virtual serial port that behaves like a real one but transmits the data through USB.
If your PC does not have any hardware serial ports (RS232 DB9 ports), you can use USB to Serial Converter’s like USB2SERIAL.(non Isolated).
In Windows ,
Serial ports are named as COM1,COM2 ,COM3.. etc .COM1 and COM2 usually refer to the hardware serial ports present in the PC (quite rare now)
while COM numbers in double digits like COM32,COM54,COM24.. etc are given to USB to Serial Converters or PCI serial port extenders.
To find out the COM number corresponding to your serial port,
- Open Device Manager by right clicking on My Computer icon and selecting Manage → Device Manager.or
- by typing «Device Manager» on the taskbar search box in Windows 10
Under Ports(COM & LPT) you can see the parallel and serial ports (COM) detected by your system.

If your PC has any hardware ports, it will be shown either as COM1 or COM2 under the Ports Section.
I am using a FTDI based USB to Serial Converter (USB2SERIAL)which is recognized as COM24 (this may be different under your system).
If you double click on COM24,you can see the details of the corresponding port.

Windows10 Accounts
The codes/executables are able to open the connection to the serial port under both Administrator Account and Standard User Account in Windows 10.
Opening and Closing a Serial Port
we use the CreateFileA() function to open a serial port.
CreateFile() is a Win 32 function which is used to create or open a file, stream or an IO device like serial port.
On success CreateFileA() will return a handle which is then used to refer the connection in all subsequent operations.
After opening a serial port using the CreateFileA() function you should close it with CloseHandle() function, otherwise port will become unavailable to other programs.
Now let’s write a small program to open and close a serial port on Windows.
Open a text editor like notepad and type the below code and save it as “serial.c”.If you are using IDE like VS Express, use the one integrated with it.
#include<windows.h>
#include<stdio.h>
int main()
{
HANDLE hComm;
hComm = CreateFileA(“\\\\.\\COM24”, //port name
GENERIC_READ | GENERIC_WRITE, //Read/Write
0, // No Sharing
NULL, // No Security
OPEN_EXISTING,// Open existing port only
0, // Non Overlapped I/O
NULL); // Null for Comm Devices
if (hComm == INVALID_HANDLE_VALUE)
printf(“Error in opening serial port”);
else
printf(“opening serial port successful”);
CloseHandle(hComm);//Closing the Serial Port
return 0;
}
Configuring the DCB Structure
In Windows ,settings like Baud rate ,Number of start/Stop bits,data formats etc for the serial port are controlled by the DCB structure.
To Configure the DCB structure we use two functions,
GetCommState() function which retrieves the current control settings of the serial port and
SetCommState() function which configures the serial port with the new values in DCB structure provided by us.
ReadIntervalTimeout Specifies the maximum time interval between arrival of two bytes. If the arrival time exceeds these limits the ReadFile() function returns.
ReadTotalTimeoutConstant is used to calculate the total time-out period for read operations. For each read operation, this value is added to the product of the ReadTotalTimeoutMultiplier member and the requested number of bytes.
ReadTotalTimeoutMultiplier is used to calculate the total time-out period for read operations. For each read operation, this value is multiplied by the requested number of bytes to be read.
WriteTotalTimeoutConstant similar to ReadTotalTimeoutConstant but for write operation.
WriteTotalTimeoutMultiplier similar to ReadTotalTimeoutMultiplier but for write operation.
After this you have to set the values using SetCommTimeouts() function.
Writing Data to Serial Port
Writing data to the opened serial port is accomplished by the WriteFile() function. WriteFile() function can be used to write both into the files and I/O ports.
Status = WriteFile(hComm, // Handle to the Serial port
lpBuffer, // Data to be written to the port
dNoOFBytestoWrite, //No of bytes to write
&dNoOfBytesWritten, //Bytes written
NULL);
If your PC does not have any hardware serial ports you can use any USB to Serial Converters(I am using USB2SERIAL).
Microcontroller Interface
I have interfaced a microcontroller MSP430G2553/ATmega328P to the serial port like this

You can use any microcontroller of your choice like 8051,AVR or ARM(LPC2148).
The Controller waits for a character to be received and lights up the corresponding LED.
The code for interfacing MSP430 is available in the Github repo.
.If you want to know how to configure the MSP430 controller UART you can check this tutorial.

We have also included code for
- interfacing your PC with ATmega328P microcontroller using Serial port
in the Repo too. The connection setup is similar to the MSP430.
Please note that if you are using a DB9 RS232 Serial Port of your PC, you will have to build a RS232 signal level converter at the microcontroller side to decode the RS232 signal.
Directly connecting the PC’s RS232 Serial port to MSP430 ‘s pins will damage the chip.
Here is the screen shot of the Program writing into serial port of Windows 7 Computer
Please note that i have changed the names of the C files in the latest release.
Use the files in the «PC_Transmits» folder.

Here is the screen shot of the Program writing into serial port of Windows 10Computer

Reading from the Serial Port
Reading from the serial port is accomplished by the ReadFile() function.
One way to do that is to use polling where the ReadFile() continuously reads from the serial port and checks for any received characters.
Other way is to setup an event and let windows notify us when a character is received.
We are going to use the second method here, following are the steps.
1. Create an Event for a particular action like character reception, change in modem lines etc using SetCommMask() function .
2. Ask windows to wait for the event set by SetCommMask() function using WaitCommEvent() and notify us when the condition happens.
3. Call ReadFile () to read the received data from the Serial port.
Functions used are
SetCommMask() is used to set the events to be monitored for a communication device
WaitCommEvent() is used to wait for the events set by SetCommMask() to happen, i
Codes running on Windows 7 PC.
Please note that i have changed the names of the C files in the latest release.
Use the files in the «PC_Receives» folder.

Reset the Micro controller to transmit the string “Hello from MSP430”.

Codes running on Windows 10 PC.

Check out our next section,
If you want to know how to control the RTS and DTR pins of the serial port .