A successful PC or system startup requires a series of Microsoft services(in some cases there is also the need for some non-Microsoft-related services) to be on the Windows Startup list.
Without these essential Startup services, your system will not function properly or in serious cases, it will crash before Startup.
In this article, you will learn about Windows Command Processor. And some of its related errors that some Windows users have faced. To make a short introduction, the Windows Command Processor is a necessary Windows service related to CMD that starts automatically on Startup.
Any mishandling such as stopping the process or removing it from the Startup list can lead to system freezing or in some serious cases the system will crash.
Now some viruses or malware are programmed to infiltrate your system, take the name of the Command Processor(cmd.exe), avoid detection from Windows Defender and other Antivirus or Antispyware.
These viruses or malware programs upon execution will pop up error messages stating “Windows Command Processor has stopped Working”.
Windows Command Processor or cmd.exe is a command interpreter and executioner for an operating system like Microsoft Windows(Windows NT & Windows CE), OS2, eComStation, ArcaOS, and ReactOS. “cmd.exe” is the name of the executable file for the Command Processor.
The commonly referred to name CMD or Command Prompt and most Windows users mainly relate to these two titles.
The cmd.exe is the counterpart to DOS in Windows 9X systems and is similar to Unix Shells in Unix-like systems. Although in different systems the implementations in cmd.exe are different, the basic set of commands and behavior pattern remains consistent.
Causes Behind The Error
As we have learned some of the basic information about the Windows Command Processor(cmd.exe) in the previous section, we can say that it is a legitimate Windows file then why does the system show pop-ups or error messages?
The presence of malware is the main reason behind the error messages that keep flashing on your screen. Once a malware program infiltrates your computer or system it will take the same name as your Windows Command Processor i.e “cmd.exe” and once executed pop-up messages will show on your screen asking permission to open the Command Processor.
Moreover, you cannot simply close these messages if you click on cancel, it will pop up from time to time and this consistent flashing of pop-up is the most annoying part of this “Command Processor” Malware.
Some other features that this malware has shown are
- Antivirus/Antimalware Resistant
Antivirus programs like Norton, Avira, and AVG can’t stop the malware from executing its function of showing continuous pop-ups.
- Automatic Registry Entry
The malware can make its own entry into the computer registry and add its name on the Startup list so that it can automatically start every time you start your system.
- Attracts more Cyberthreats
This Malware doesn’t affect your computer i.e it is in a dormant state if the network connection is turned off. But when the Internet connection is established the malware starts attracting Cyberthreats through the internet leading to further system vulnerabilities such as system freezing, slowing down the computer speed, etc.
Solutions To Fix The Windows Command Processor On Startup Error
- Remove The Malware/Virus Files Manually
- Disable All Non-Microsoft Services
- Run A System Scan
Solution 1- Remove The Malware/Virus Files Manually.
To delete the Virus files manually first, you need to know their storage location. The “AppData” folder contains most of these replicating malware files and is named in random letters.
Also, you need to identify these files carefully lest you delete other files that have nothing to do with the viruses or malware.
Step 1- Open the Task Manager(Right-click on the taskbar and select the Task manager option).
Step 2- Now in the Processes tab, search for suspicious processes with random letters(Example of such file names are “sadfiscixg” or “gsdodpgsd” or “gfdigd” or “fsayopkpmiicu” or “ladhtv”). By searching for these random file names make it easy to spot suspicious files.
Step 3- Open the Run dialog box(press Windows + R), type “regedit” and hit the Enter button.
Step 4- Navigate to “HKEY_CURRENT_USER\Software\Microsoft\Windows\CurrentVersion\Run”.
Here you can find suspicious files that have made an unofficial entry into your system Registry.

Step 5- Now that you are aware of these suspicious virus/malware files, you need to restart your computer in Safe Mode.
To start your Windows 10 computer in Safe Mode follow this step-by-step guide.
- By pressing the Shift key, click on Power-> Restart.
- When the screen starts and shows the Windows recovery console and a list of options to choose from, navigate to Troubleshoot-> Advanced Options-> Startup Settings-> Restart.
- After the computer restarts and a list of options show up on the screen, select the 4 or F4 key to start your computer in Safe Mode.
Step 6- Now delete all the suspicious files and other data related to them(related folders, logs, .txt documents, etc.) that might be viruses or malware from these following directories:
- C:\Users\’xxx’\AppData\Roaming
- C:\Users\’xxx’\AppData\Local
- C:\Users\’xxx’\AppData\Local\Temp
Note- For most Users, the AppData folder is in Hidden status.

Step 7- After the process is completed, restart your computer.
Solution 2- Disable All Non-Microsoft Services
A successful system startup requires a bunch of Microsoft programs/services as well as other third-party services that are on the Startup programs list. Now, this solution requires you to disable all non-Microsoft programs from the System Configuration window and test the other third-party services individually and figure out which of these services is causing the error.
Step 1- Open the Run dialog box. Type “msconfig” and hit the Enter button.
Step 2- In the Services tab, click on the check box “Hide all Microsoft services”. Upon doing the screen will show you a list of all third-party non-Microsoft programs that are on your Startup sequence.

Step 3- Now click on the “Disable all” button. By doing this all the previous non-Microsoft programs/services that are on the list of Startup programs will stop working.
Step 4- Click on “Apply” then on “Ok”.
Step 5- Now close the System Configuration window and restart your computer when a message pops up asking you to restart your computer to apply the changes.
Step 6- After the successful restart of your system and there is a sign of pop-ups stating “Your Windows Command Processor has stopped working” then you can definitely say that third-party service(s) are responsible for this error.
Step 7- Now test each of these third-party programs one by one and identify the one which is responsible for the error.
- Repeat the above Step 1 and Step 2.
- Select a non-Microsoft service and re-enable it.
- Restart your computer. If you still don’t receive the error message then start the same process again until you find that one third-party service is causing trouble.
Step 8- Now that you have found the third-party service that is responsible for the error then you need to figure out if it is a malware file or a normal file. If it is malware then you can follow Solution 1 and erase the malware manually.
Step 9- If it is a normal file then try to update the said service online and observe if you are still receiving the error message or not.
Solution 3- Run A System Scan
Step 1- Open the CMD in Administrator mode.

Step 2- Type in the following command “chkdsk c: /f /r /x”. Since the Disk Drive you are checking is the boot drive then the system will ask for restart confirmation. Type “y” and hit the Enter button.

Step 3- During the boot process, the system will run the following command. It will take some time for the process to complete. After a successful restart of your PC open the CMD in administrator mode again.
Step 4- Type the command “Dism /Online /Cleanup-Image /RestoreHealth”. The scan will take several minutes to complete. If the scan results show error messages then some of your Windows 10 files are corrupt.

Step 5- Type in the command “sfc /scannow” and hit Enter. This command may be able to fix some of the corrupted files.

Step 6- After the scan is completed and you still receive error messages then you have to Refresh or Reset your Windows 10 system to solve the problem.
Step 7- Now that you have scanned and fixed all corrupted system files then it is time to Run a full scan on your PC to find out about all your malware programs.
Step 8- Once the Malware scan is completed restart your PC and the error regarding the “cmd.exe” is solved. Hopefully!
Several users have reported to seeing the Windows Command Processor on Startup of their computer and have been wondering as to why this occurs. In this article, we have written in detail, below, about what this is and what it means if the process is launching itself on the startup of your computer. Not only that, but we have also listed the detailed methods that you can adopt to fix this issue completely. Therefore, go through the step by step process that we have mentioned below to rid yourself of this issue.
The Windows Command Processor is supposed to be a legitimate program that runs on your computer in case you want to execute some commands or access the command line terminal. Not only that, this terminal is often used to run some scans and to access certain features that are not available in the Graphical User Interface of your operating system.
However, keep in mind that if you are getting the Windows Command Processor on Startup of your Windows, it probably means that a malware or virus has hijacked your computer and is now executing some commands or injecting itself on your computer at its startup. We have compiled and written a step by step process below that will help you in getting rid of the issue on your computer.
Fixing the Windows Command Processor on Startup:
Fix 1: Launching in Safe Mode
- Press “Window + R”, type in “msconfig” and press Enter on your keyboard to launch the configuration window.

Typing in “Msconfig” - After that, Go to the “Services” tab from the top and tick the “Hide all Microsoft services” option and then select the “Disable all” option.
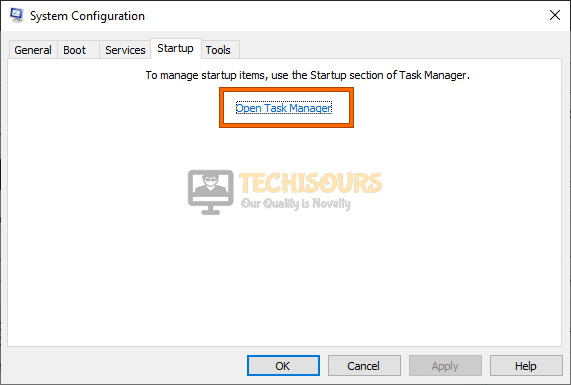
- Select “Apply” and then move on to the “Startup” tab.
- From here, click on the “Open Task Manager” option.

Open Task Manager - Inside the Task Manager, right-click the enabled apps one by one and select the “Disable” button to prevent them from launching at startup.
- Restart your computer and check to see if doing so fixes the Windows Command Processor on Startup issue.
- If it is resolved then it probably means that one of your app/services is responsible for this issue and to identify the culprit, you can try to enable the applications one by one and check to see which one makes the issue come back on your computer.

Fix 2: Removing Malware from Windows
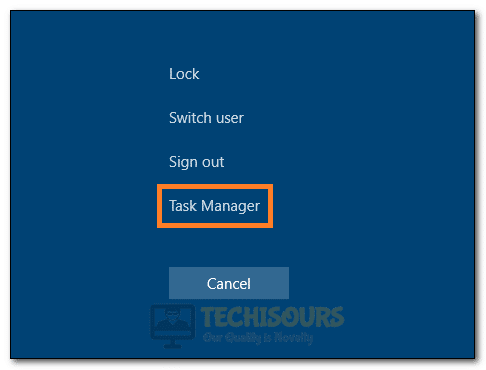
- Press “Ctrl + Shift + Esc” on your keyboard and select the “Task Manager” option from there.

Launching Task Manager - In the “Processes” tab, look for anything suspicious with a strange name or in a different language, right-click on it and select the “End Task” button to prevent the process from running on your computer.
- Now, press “Window + R”, type in “Regedit” and press Enter to launch into the registry editor.

Typing “regedit” - Inside here, make sure to navigate to the following path.
HKEY_CURRENT_USER\Software\Microsoft\Windows\CurrentVersion\Run
- In here, remove any entries that you don’t recognize and are suspicious.
- Now, click on the “Start” button, select the “Power” icon, hold down the “Shift” key and click on the “Restart” button to restart your computer.
- Now, after the computer starts, you should see different options, make sure to select the “Troubleshoot > Advanced Options > Startup Settings” options and then press the key for “Safe Mode with Networking” to restart your computer in the safe mode.

Selecting “Safe Mode with Networking” - After that, navigate down to the following path from your File Explorer.
C:\Users\’Your UserName’\AppData\Roaming
- In here, look for any files that seem suspicious to you or ones that you don’t recognize from your applications and remove them from the computer.
- After that, head to the following two paths and do the same as we did before.
C:\Users\’Your UserName’\AppData\Local

C:\Users\’Your UserName’\AppData\Local\Temp
- After removing such files, restart your computer and check to see if you have fixed the Windows Command Processor on Startup issue.


Fix 3: Performing SFC and DISM Scans
- Press “Window + R”, type in “cmd” and press “Ctrl + Shift + Enter” on your keyboard.

Typing in cmd - From there, type in the following commands one by one and press “Enter” to execute them on the computer.
sfc /scannow

DISM /Online /Cleanup-Image /CheckHealth

DISM /Online /Cleanup-Image /ScanHealth

DISM /Online /Cleanup-Image /RestoreHealth
- Restart your PC afterwards and see if the issue is resolved now

Fix 4. Performing a Scan Using third-party apps
Sometimes, the issue might be fixed simply by running a malware scan to remove any viruses and malware from your computer that might be causing this command processor to run at the Windows startup. For that, you can use any of the different software that we have used.
Scan with Combofix:
- Download the Combofix software on your computer from here and run the executable to install it on your computer.
- Make sure that the Antivirus and malware software other than Combofix on your computer has been disabled beforehand to ensure maximum compatibility.
- Run the software and it will prompt you to conduct a scan to check for any virus and malware.
- Approve this prompt and wait for the scan to be finished and the log file for the scan will be created in its installation folder. Make sure to take a look at this file to ensure that the scan ran smoothly.
- You can later remove this software from the computer if you don’t have any need for it.
- Check to see if the Windows Command Processor on Startup issue has been fixed.
- It will thoroughly scan your PC and output a log file afterwards
- The first run might not work out for you but have a look at the log file, it might help
- Now, to uninstall it you need to press “Window + R”, type in “ComboFix /uninstall” and press Enter
- This will remove Combofix from your PC
Scan with Junkware Removal Tool:
- Download the Junkware Removal Tool from here and install it.
- Disable all other antivirus and antimalware apps and run JRT.exe as administrator.
- The software will now automatically start scanning your computer for any junkware, wait for the scan to run and check to see if the issue is now fixed.
- Take the actions that have been recommended by the tool and check to see if the Windows Command Processor on Startup issue is now fixed.
Scan with Malwarebytes and AdwCleaner
- Download AdwCleaner from here and MalwareBytes from here.
- After downloading, make sure to run the executable to install this software on your computer and restart to complete the installation.
- Run both AdwCleaner and Malwarebytes one by one and make sure to perform a “Full Scan” to check for any viruses and malware.
- After removing the malware, restart your PC and check if the Command Processor still launches on startup.
Scan With Sophos Free Virus Removal Tool:
- Download it from here and install it.
- Launch the program and click “Start Scanning”.
- Wait for it to complete and take any necessary actions.
- Reboot your PC and see if the issue is resolved now.
Scan with Farbar Recovery Scan Tool:
- Download it from here and install it.
- Launch the program and click “Scan”.
- Wait for the scan to complete and take any necessary recommended actions.
- Restart your PC afterwards and see if the issue is resolved.
Fix 5: Perform a System Restore
- Press “Windows + R” to launch into the Run prompt, type in “rstrui.exe” and press “Enter” to launch into the restore management window.
Typing in “rstrui” - From here, click on the “Choose a Different Restore Point” and click on the “Next” option.
- From there, select a restore point that lies before the date on which this issue started occurring and click on the “Next” button to move ahead with the restore.
- Now, follow the on-screen instructions to complete the System Restore and check to see if the Windows Command Processor on Startup issue is resolved on your computer.

Fix 6: Updating Windows
- Press “Window + S”, type in “Check for updates” and press Enter on your keyboard.

Check for updates - Click “Check for updates” and windows will automatically download and install the latest available updates or click “Download and install” if the update does not start automatically.
- Restart your PC afterwards and see if the issue is resolved now.

Fix 7: Running Some Commands
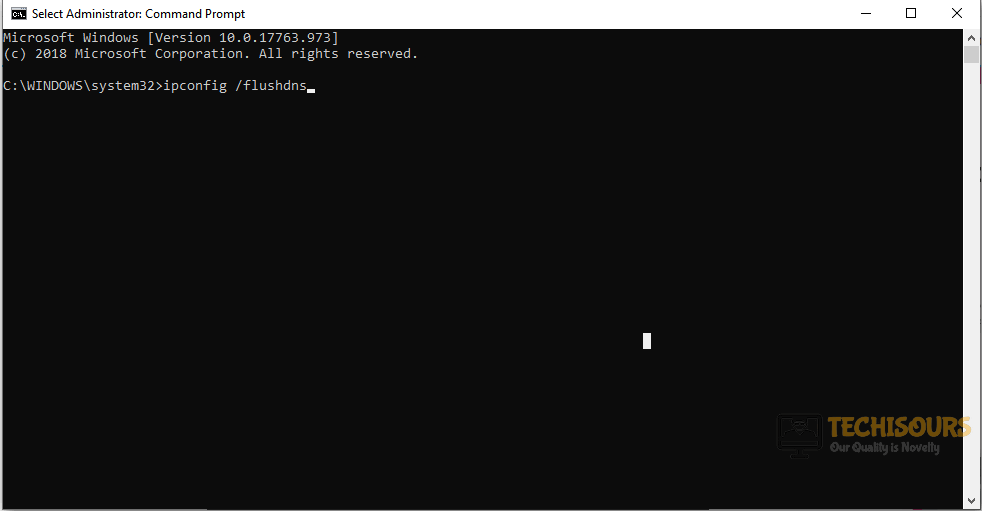
- Press “Window + R”, type in “cmd” and press “Ctrl + Shift + Enter” on your keyboard.
Typing in cmd - Type in the following command and press Enter after each to execute them on the computer.
ipconfig /flushdns
nbstat -R
arp -d *
netsh branchcache reset
netsh advfirewall reset
netsh winsock
netsh int ipv4 reset
netsh int ipv6 reset
netsh int ip reset c:\resetlog.txt
- After running all the above commands, shut down your PC and router and turn them back on after a couple of minutes
- Run the following commands in cmd afterwards:
netsh interface tcp show global
IPCONFIG /ALL
- Additionally, type in the following command:
Powershell -ExecutionPolicy Unrestricted Add-AppxPackage -DisableDevelopmentMode – Register $Env:SystemRoot\camera\AppManifext.xml powershell -ExecutionPolicy Unrestricted Add-AppxPackage -DisableDeveopmentMode -Register $Env:SystemRoot\FileManager\AppxManifext.xml powershell -ExecutionPolicy Unrestricted Add-AppxPackage -DisableDevelopmentMode -Register $Env:SystemRoot\ImmersiveControlPanel\AppxManifext.xml
- Restart your PC afterwards and see if the issue is resolved now
Fix 8: Performing a Windows Defender Scan
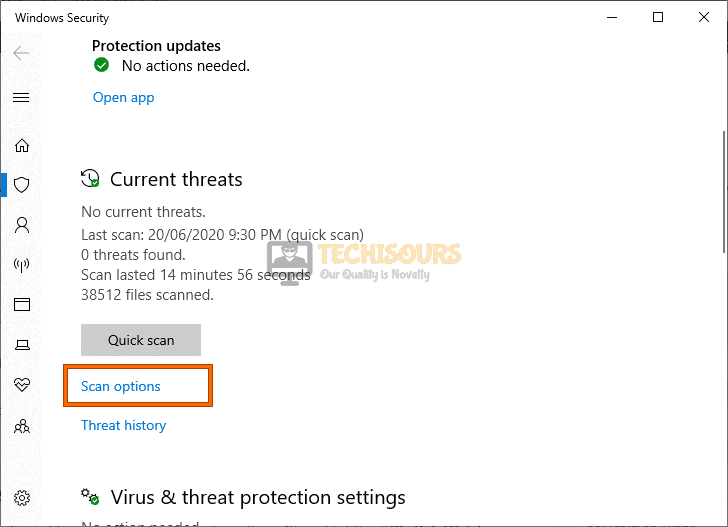
- Press “Window + S”, type in “Windows Security” and press Enter on your keyboard.
- Click “Virus & threat protection” and select “Scan options”.
Scan options - Make sure to check the “Full Scan” or “Microsoft Defender Offline Scan” option and click on the “Scan Now” option.
- Restart your computer and check to see if the issue is fixed.
Fix 9: Checking Hard Disk Integrity
- Press “Window + R”, type in “cmd” and press “Ctrl + Shift + Enter” on your keyboard to launch with admin permissions.
Typing in cmd - Type in the following in cmd and press Enter afterwards to execute it on your computer.
CHKDSK [volume[[path]filename]] [/F] [/V] [/R] [/X] [/I] [/C] [/L[:size]]
- Restart your PC afterwards and see if the issue is resolved
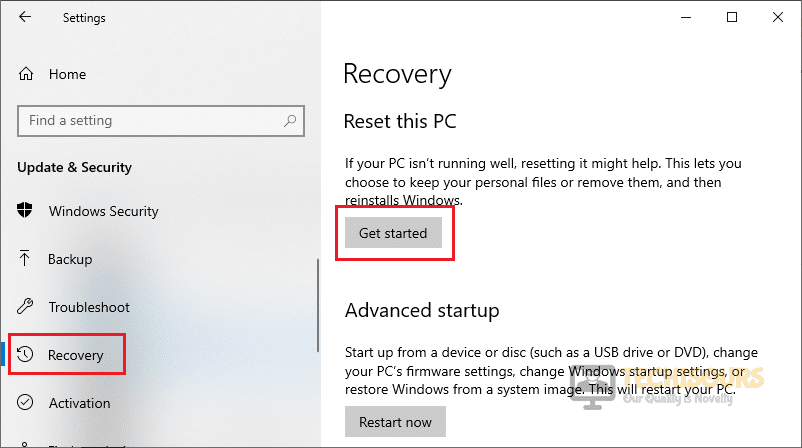
Fix 10:Resetting the PC
- Press “Window + S”, type in “Reset this PC” and press Enter on your keyboard.

Reset this PC - Select the “Get started” option and then click on the “Keep my files” option.
- Wait for it to complete and restart your PC.
- Check to see if the Windows Command Processor on Startup issue is now fixed.
Fix 11: Creating a New User Account
- Press “Window + R”, type in “cmd” and press “Ctrl + Shift + Enter” on your keyboard.
Typing in cmd - Type in the following command and press Enter.
-
net user USERNAME PASSWORD /add
- Make sure to enter in your Username and password that you want to configure for the new account instead of the actual words.
- Log out of your current account and log into the new one.
- Check to see if doing so fixes the Windows Command Processor on Startup issue.
If the issue still persists, contact us for further information.

Alan is a hardcore tech enthusiast that lives and breathes tech. When he is not indulged in playing the latest video games, he helps users with technical problems that they might run into. Alan is a Computer Science Graduate with a Masters in Data Science.

- Remove From My Forums
-
Question
-
After I put the computer into hibernate mode several times, and now every time i start the windows I will get the error message «windows
command processor stopped working» and then it give an option..
either check for the online solution…
or just closed the program…and then i choose the first 1…and nothings happen …
please tell me what i need to do to solve this problem ?Thank You


Answers
-
-
Marked as answer by
Karen Hu
Monday, September 30, 2013 1:15 AM
-
Marked as answer by
All replies
-
-
Marked as answer by
Karen Hu
Monday, September 30, 2013 1:15 AM
-
Marked as answer by
-
After I put the computer into hibernate mode several times, and now every time i start the windows I will get the error message «windows command
processor stopped working» and then it give an option..
either check for the online solution…
or just closed the program…and then i choose the first 1…and nothings happen …
please tell me what i need to do to solve this problem ?Thank You
I’M HAVING THE SAME EXPERIENCE….HELP! THIS IS WHAT MY ERROR MESSAGE SAYS:
Windows Command Processor
Windows Command Processor has stopped working.
A problem caused the program to stop working correctly.
Windows will close the program and notify you if a solution is available.I CLOSE THE MESSAGE AND CONTINUE WORKING WITHOUT ANY APPARENT PROBLEMS. WHAT SHOULD I DO??
Вопрос
Проблема: как исправить ошибку «Командный процессор Windows перестал работать»?
Недавно после запуска системы появляется сообщение о том, что «Командный процессор Windows перестал работать». Я попытался решить эту проблему, щелкнув по первому варианту. Но Интернет не предлагает никаких решений. Я не понимаю, где мне следует искать причину такого явления. Можешь мне помочь?
Решенный ответ
«Командный процессор Windows перестал работать» ошибка может быть случайной в операционных системах с поврежденным реестром или файлами запуска. Кроме того, пользователи, столкнувшиеся с проблемой, не должны исключать возможность заражения своих устройств. Некоторые пользователи сообщили, что после этой проблемы они заметили другие ошибки. Кроме того, если вы установили обновление для Windows из дополнительных источников, вполне вероятно, что исходный ISO файл был поврежден, в нем отсутствуют необходимые элементы или сам процесс установки был прерван третьим стороны. Хотя проблема часто встречается в Windows 10, пользователи других версий также могут столкнуться с той же проблемой. Таким образом, мы представляем несколько вариантов решения проблемы. Чтобы убедиться, что все файлы реестра работают нормально, запустите
RegCure Pro.
Опция 1. Запуск средства проверки системных файлов
Исправить это сейчас!Исправить это сейчас!
Для восстановления поврежденной системы необходимо приобрести лицензионную версию Reimage Reimage.
1. Нажмите Начинать кнопка, а затем cmd и нажмите Enter.
2. Во вновь открывшемся окне введите sfc / scannow.
3. Если сканирование завершится без обнаружения вредоносных или поврежденных файлов, перейдите к следующему методу.
Вариант 2. Проверка целостности жестких дисков и дисков
Исправить это сейчас!Исправить это сейчас!
Для восстановления поврежденной системы необходимо приобрести лицензионную версию Reimage Reimage.
Можно проверить все диски одним и тем же Командная строка окно. Не забудьте запустить его от имени администратора. Когда окно откроется, введите
CHKDSK [том [[путь] имя файла]] [/ F] [/ V] [/ R] [/ X] [/ I] [/ C] [/ L [: size]]
Эта команда проверит наличие ошибок на всех дисках. Убедитесь, что все приложения закрыты, и ни один из дисков не используется.
Вариант 3. Обновите операционную систему
Исправить это сейчас!Исправить это сейчас!
Для восстановления поврежденной системы необходимо приобрести лицензионную версию Reimage Reimage.
Возможно, вы захотите обновить или просто сбросить систему, чтобы решить проблему. Если вы не можете завершить процесс из-за появления другой системной ошибки, введите DISM / онлайн / очистка-образ / восстановление здоровья в открытом окне Командная строка.
Вариант 4. Отключение всех сторонних приложений, работающих в фоновом режиме
Исправить это сейчас!Исправить это сейчас!
Для восстановления поврежденной системы необходимо приобрести лицензионную версию Reimage Reimage.
1. Нажмите Начинать кнопка, а затем msconfig.
2. Перейдите к Услуги вкладка, а затем отметьте поле, сказав Скрыть все службы Microsoft.
3. Теперь вы видите список сторонних программ, которые автоматически запускаются при каждом запуске.
4. Нажмите Отключить все.
5. После этих шагов нажмите «Применить» и выйдите из инструмента «Конфигурация системы». Потребуется перезагрузка системы.
Исправляйте ошибки автоматически
Команда ugetfix.com делает все возможное, чтобы помочь пользователям найти лучшие решения для устранения их ошибок. Если вы не хотите бороться с методами ручного ремонта, используйте автоматическое программное обеспечение. Все рекомендованные продукты были протестированы и одобрены нашими профессионалами. Инструменты, которые можно использовать для исправления ошибки, перечислены ниже:
Предложение
сделай это сейчас!
Скачать Fix
Счастье
Гарантия
сделай это сейчас!
Скачать Fix
Счастье
Гарантия
Совместим с Майкрософт ВиндоусСовместим с OS X По-прежнему возникают проблемы?
Если вам не удалось исправить ошибку с помощью Reimage, обратитесь за помощью в нашу службу поддержки. Сообщите нам все подробности, которые, по вашему мнению, нам следует знать о вашей проблеме.
Reimage — запатентованная специализированная программа восстановления Windows. Он диагностирует ваш поврежденный компьютер. Он просканирует все системные файлы, библиотеки DLL и ключи реестра, которые были повреждены угрозами безопасности.Reimage — запатентованная специализированная программа восстановления Mac OS X. Он диагностирует ваш поврежденный компьютер. Он просканирует все системные файлы и ключи реестра, которые были повреждены угрозами безопасности.
Этот запатентованный процесс восстановления использует базу данных из 25 миллионов компонентов, которые могут заменить любой поврежденный или отсутствующий файл на компьютере пользователя.
Для восстановления поврежденной системы необходимо приобрести лицензионную версию Reimage инструмент для удаления вредоносных программ.

Нажмите
Условия использования Reimage | Политика конфиденциальности Reimage | Политика возврата денег за товар | Нажмите
VPN имеет решающее значение, когда дело доходит до конфиденциальность пользователя. Онлайн-трекеры, такие как файлы cookie, могут использоваться не только платформами социальных сетей и другими веб-сайтами, но также вашим интернет-провайдером и правительством. Даже если вы примените самые безопасные настройки через веб-браузер, вас все равно можно будет отслеживать через приложения, подключенные к Интернету. Кроме того, браузеры, ориентированные на конфиденциальность, такие как Tor, не являются оптимальным выбором из-за пониженной скорости соединения. Лучшее решение для вашей максимальной конфиденциальности — это Частный доступ в Интернет — быть анонимным и безопасным в сети.
Программное обеспечение для восстановления данных — один из вариантов, который может вам помочь восстановить ваши файлы. После удаления файла он не исчезает в воздухе — он остается в вашей системе до тех пор, пока поверх него не записываются новые данные. Восстановление данных Pro это программа для восстановления, которая ищет рабочие копии удаленных файлов на вашем жестком диске. Используя этот инструмент, вы можете предотвратить потерю ценных документов, школьных заданий, личных фотографий и других важных файлов.
Infopackets Reader Bill S. writes:
» Dear Dennis,
I just upgraded to Windows 10. Every time I boot my computer, I receive an error message that says ‘Windows Command Processor has stopped working’. There are at least 3 of these notifications whenever I sign into Windows 10, and they only happen after I login. I have searched high and low to try and figure out why I keep receiving this error message but I’m completely stumped. Can you help? «
My response:
This is a good question. When I first upgraded to Windows 10, I also received
the error message that ‘Windows Command Processor has stopped working’ and was
able to fix it by removing some programs from launching at the startup — but it
requires a little bit of detective work. That said, the ‘Windows Command
Processor has stopped working’ error may also indicate a much more deeply rooted
problem; as such, I have provided an exhaustive approach to fixing the error.
Option #1: Disable All Non-Microsoft Programs in the Startup and Test
The Windows startup contains Microsoft services, as well as third party programs that automatically launch whenever you sign into Windows. By temporarily disabling all non-Microsoft programs in the Windows startup, you should be able to determine if in fact one
(or more) of your startup programs is causing the ‘Windows Command Processor has stopped working’ error.
IMPORTANT: bookmark this page in your browser so you can come back to it,
because your computer will need to reboot multiple times using this guide.
Then, do the following:
- Click Start and type in «msconfig» (no quotes). This will bring up the System Configuration utility.
- Click the Services tab and then click the check box that says «Hide all Microsoft services». Once the box is ticked, a list of
all your third-party programs that run at startup will be displayed in the window.
- Next, click the «Disable all» button. All the non-Microsoft programs that were previously selected to run at startup will no longer launch at startup.
- Click the Apply button, and then click OK.
- Close any other open windows on the system and save your work. Then, click the close button at the top right of the System Configuration window. A window will pop up asking you to reboot
in order to apply the changes; click Yes.
- Once the computer reboots, sign on as usual. If you don’t see the ‘Windows Command Processor has stopped working’ error, then you have verified that it is one or more non-Microsoft programs in your startup that is causing the error. In that case do the following:
(a) Open the System Configuration utility again (refer to Steps #1 and #2
above).(b) Check mark one program in your Startup list to re-enable it again.
(c) Test to see if that one program you re-enabled is causing the error by
rebooting the computer (refer to Step #5 above).(d) If after you reboot, you receive the ‘Windows Command Processor has stopped working’ error message, then you will have successfully identified which program is causing the error. In this case, you can now try and run the program as Administrator to see if that fixes the ‘Windows Command Processor has stopped working’ error.
To do so:
(a) Click Start and locate the program in question via the Start menu, then right click its icon and select Properties.
(b) Go to the Compatibility tab and look for the «Compatibility mode» heading, then
tick the box that says «Run this program in compatibility mode for:», and choose «Windows 7». Finally, under the «Settings» heading, tick the box that says «Run this program as Administrator», then click Apply and OK,
and reboot the computer as you normally would.(c) If after rebooting the computer you still receive the ‘Windows Command Processor has stopped working’ error,
go online and see if you can find an updated version of the program to
download. If so, download it, reinstall the program, and see if that fixes
the problem by rebooting the computer once again. If not, you will need to
disable that program from your startup (refer to Step #1 and Step #2 above).(d) Move onto the next program to test (refer to Steps #1 and #2 above). Keep moving down the list of programs to test until you find out which ones can run properly
with Administrator access / reinstalling the program, and which ones can’t.
Disable the programs in the startup that simply can’t run without giving you
an error.
If you have gone through the entire list of programs in your startup but that still does not fix it, then you may have a more deeply rooted problem. In that case, proceed to Option #2 below.
Option #2: Scan the System and Check for Errors
The ‘Windows Command Processor has stopped working’ error may also be the result of a malware infection or corrupt Windows files.
To rule out these possibilities, do the following:
- Open up an administrative command prompt. Click Start and type in «cmd» (no quotes) and do NOT press Enter on the keyboard; wait for the «CMD.EXE» or «Command Prompt» to appear in the list. When the icon appears, right click it and select «Run as Administrator».
- Using your mouse, highlight the text below:
echo y|chkdsk c: /f /r /x
shutdown /r /t 5 - Right click over the highlighted text and select Copy from the dialogue menu.
- Go to the administrative command prompt, then right click in the middle of the window and select Paste. You will need to press Enter on the keyboard to execute the last command. Note: when the last command is entered, your computer will reboot
in roughly 5 seconds. When Windows starts to boot, it will check the hard drive for errors;
this will likely take a while to complete. Once that finishes, sign onto Windows as normal and then come back to this page and proceed to Step #5 below.
- After the computer reboots, open up an administrative command prompt again as described in Step #1. Then, use your mouse to copy the command below:
Dism /Online /Cleanup-Image /RestoreHealth
- Right click the highlighted text above and select Copy. Then, go to the administrative command prompt, right click in the middle of the window and select Paste. Press Enter on the keyboard to execute the command; the scan will take up to 20 minutes to complete. If you receive error messages from DISM then most likely your Windows 10 is corrupt. In that case, the ‘sfc /scannow’ command may fix it (described next).
- Once the DISM scan has completed, use your mouse to highlight the command below:
sfc /scannow
- Right click the highlighted text above and select Copy. Then, go to the administrative command prompt and right click in the middle of the window and select Paste. Press Enter on the keyboard to execute the command; the scan will take up to 20 minutes to complete. If you receive error messages
after running ‘sfc /scannow’, then most likely your Windows is corrupt. In
that case, you will have to do a Windows 10 Refresh or Reset to fix the problem (described in Option #3, further down).
- Now that you’ve scanned the system for errors, the next step is to run a malware scan. Download
Malwarebytes Antimalware (free) and perform a full system scan. Tip: do not agree to use the trial ‘Pro’ version of the program
when you first run it, otherwise the program will stop working after 30 days unless you revert back to the ‘free’ version.
- Once the malware scan has completed, reboot the system and hopefully you
won’t see the ‘Windows Command Processor has stopped working’ error.
If that doesn’t work, proceed to Option #3.
Option #3: Refresh Windows; Uninstall Programs; Reset Windows
If Option #1 and #2 don’t work for you, then the only options left are the following:
- Ignore the error and keep using Windows the way it is. Note: if «DISM» and «sfc /scannow» reported errors, then most likely your Windows is corrupt. In that case you should issue a Refresh (described next), because most likely other parts of Windows are also broken.
- Issue a
Windows Refresh and hope that fixes the problem. A
Refresh will keep your user data and programs in tact but will effectively reinstall Windows 10 over top of Windows 10. I recommend
backing up the entire system before you
issue a Refresh in case something goes wrong. For this task I recommend
Acronis True Image as it can backup your entire system (including the operating system); if the Refresh
fails, you can always revert the system using a restore.
- If after a Refresh you still have issues, you have the option to uninstall all your programs one at a time (using process of elimination) until you come across the program that is causing the error. Once you find the culprit(s), you can begin reinstalling your programs again
— but this time, don’t reinstall the ones causing the issue. Instead, find a replacement program that performs the same task.
To uninstall programs, click Start and type in «programs and features» (no
quotes). Wait for the Programs and Features to appear in the list, then
click it. Once the window appears, start uninstalling programs one at a
time, reboot, then test to see if the error has gone away. This process will
surely take a while.
- If that still doesn’t fix it, the final option is to
backup your entire system and issue a
Windows Reset. This will effectively format your hard drive and reinstall Windows 10. You will not be able to keep any of your user data or installed programs. After the Reset you will then have to reinstall all your programs and any user data. This is a very extreme choice to make but should most definitely fix the problem.
Hope that helps.
Additional 1-on-1 Help: from Dennis
If all of this is too technical, you can contact me and I will do it for you using my
remote desktop
support service. Simply send me an email using the
contact form and we’ll set up a time to meet online.
About the author: Dennis Faas is the owner and operator of Infopackets.com.
With over 30 years of computing experience, Dennis’ areas of expertise are a
broad range and include PC hardware, Microsoft Windows, Linux, network
administration, and virtualization. Dennis holds a Bachelors degree in Computer
Science (1999) and has authored 6 books on the topics of MS Windows and PC
Security. If you like the advice you received on this page, please up-vote /
Like this page and share it with friends. For technical support inquiries,
Dennis can be reached via Live chat online this site using the Zopim Chat
service (currently located at the bottom left of the screen); optionally, you
can contact Dennis through the website
contact form.