Содержание
- Способ 1: Журнал событий
- Способ 2: Сторонние приложения
- WinDbg
- BlueScreenView
- Вопросы и ответы
Способ 1: Журнал событий
Простой, но не самый удобный способ определения кода синего экрана, так как он предполагает выполнение дополнительных действий.
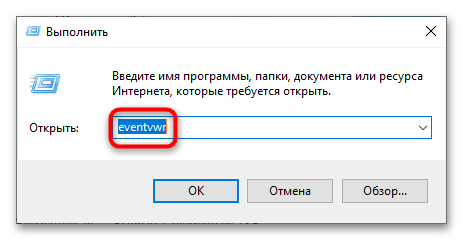
- Откройте системный «Журнал событий» командой
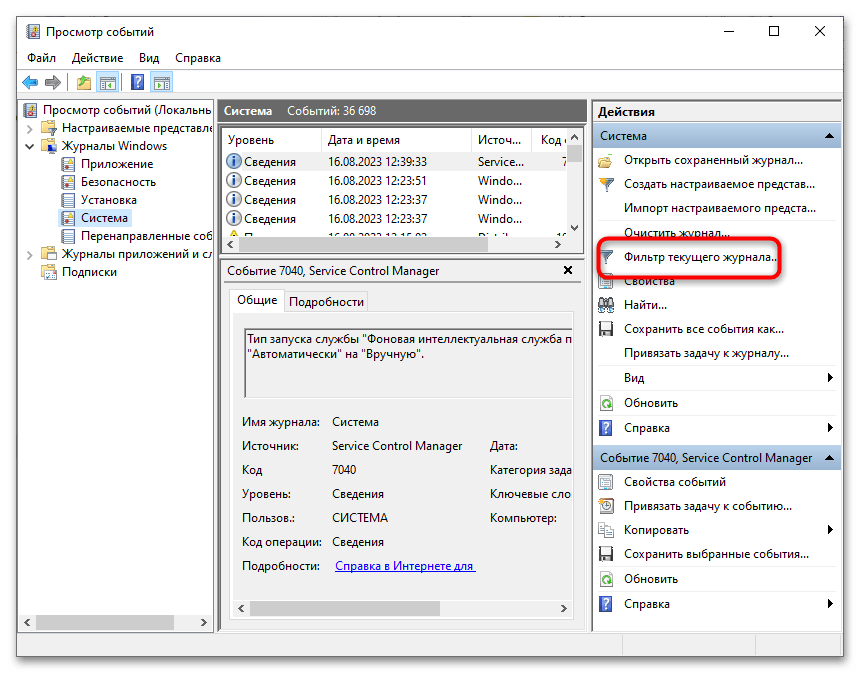
eventvwr.msc, выполненной в вызванном нажатием клавиш Win + R диалоговом окошке быстрого запуска. - Нажмите в правой колонке ссылку «Фильтр текущего журнала».
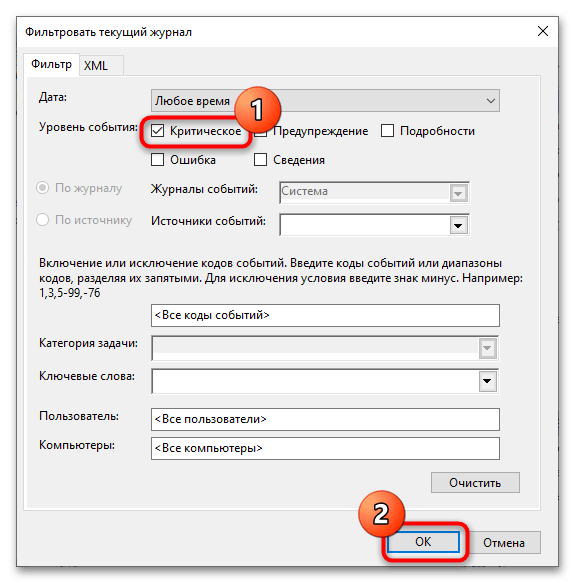
- В открывшемся окне отметьте флажком пункт «Критическое» и нажмите «ОК», чтобы отфильтровать события.
- Выберите последнюю запись об ошибке и откройте ее свойства двойным по ней кликом.
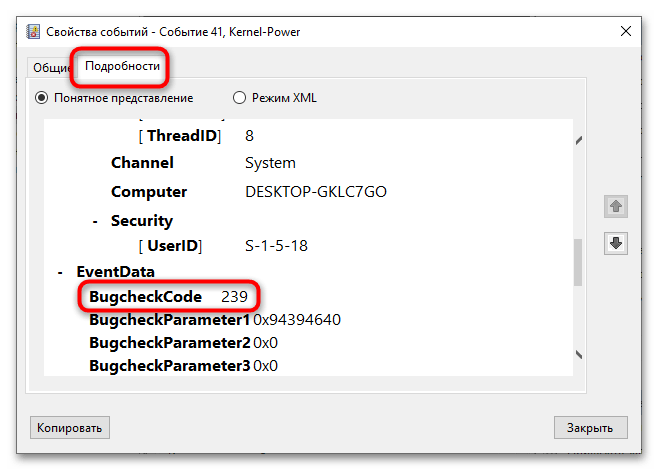
- Переключитесь на вкладку «Подробности», отыщите в списке параметр «BugCheckCode» и посмотрите его значение. Это и будет код ошибки в десятичном счислении.
- Переведите его в шестнадцатеричную систему счисления, воспользовавшись штатным «Калькулятором» Windows, переключив его в режим «Программист» (через меню, вызванное нажатием по кнопке меню слева вверху). Результат будет указан в строке «HEX» без нулей, которые понадобится добавить. Например, EF = 0x000000EF.
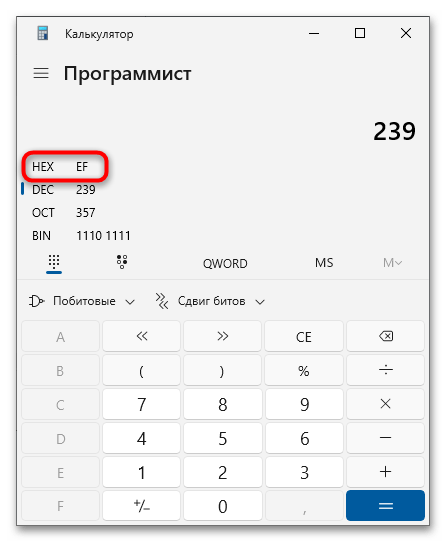
Теперь можно выполнить поиск решения проблемы в интернете, указав полученный шестнадцатеричный код ошибки BSOD.
Способ 2: Сторонние приложения
Удобнее определять ошибку через специальные приложения, работающие с файлом дампа. По умолчанию его создание включено в Windows, но если вы отключали его создание вручную, то просмотреть стоп-код таким образом не получится из-за отсутствия файла для анализа сбоя.
WinDbg
Синий экран со стоп-ошибками в Windows 10 не отличается информативностью и нередко содержит только название ошибки, но не ее код. Чтобы определить ее код, необходимо проанализировать файл минидампа. Сделать это можно средствами фирменной утилиты Microsoft WinDbg.
Скачать WinDbg с официального сайта
- Скачайте приложение для анализа дампов с Microsoft Store или официальной страницы разработчика и установите.
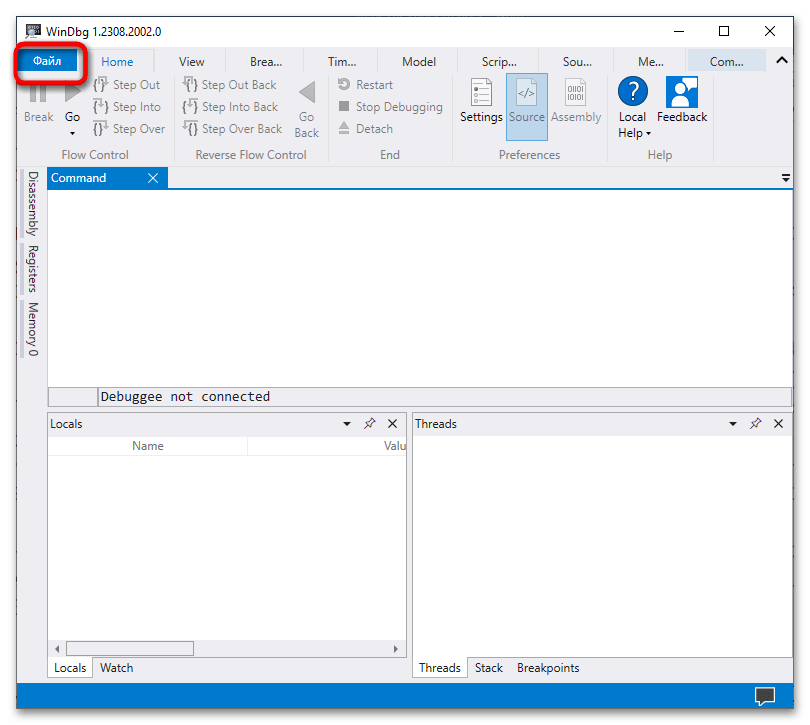
- Запустите программу от имени администратора и нажмите в левом верхнем углу кнопку «Файл».
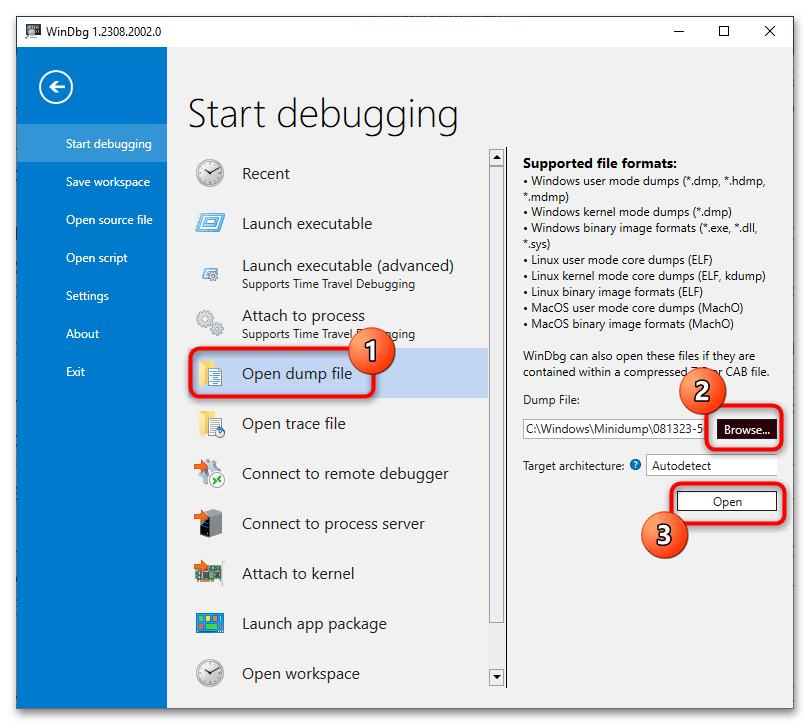
- Выберите в меню опцию «Open dump file», нажмите кнопку «Browse», укажите путь к анализируемому файлу дампа в папке
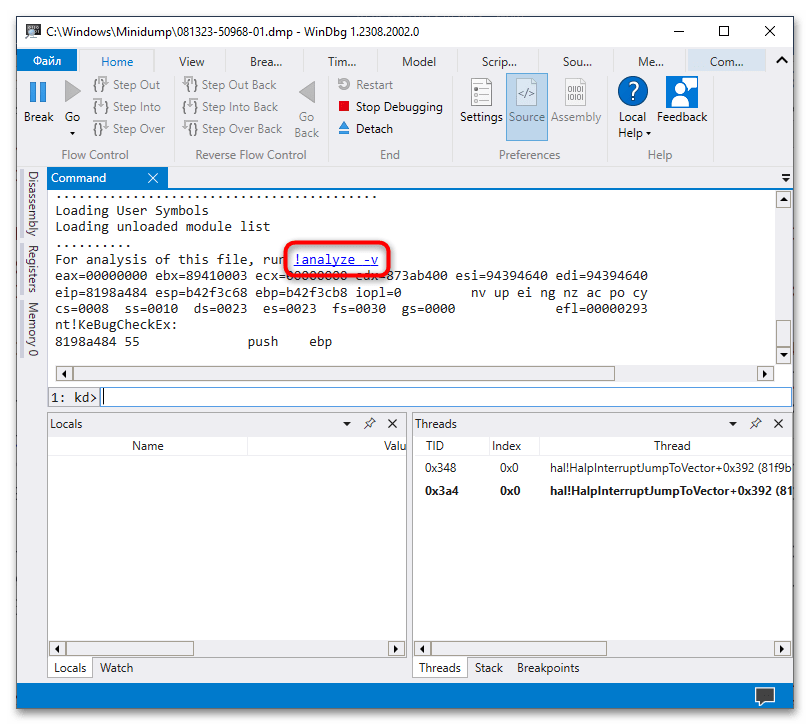
C:\Windows\Minidumpи нажмите «Open». Папка Minidump может содержать несколько файлов c расширением DMP, из них следует выбирать тот, который имеет название, соответствующее дате и времени ошибки синего экрана. - Прокрутите содержимое блока «Command» вниз, найдите ссылку «!analyze -v» и кликните по ней. Вместо этого можно вставить команду
!analyze -vв поле под блоком «Command» и нажать клавишу ввода. - Отладчик выполнит анализ файла дампа и выведет в блок «Command» подробные сведения об ошибке. Ищите ее название – код будет указан напротив него в полном или сокращенном виде, например 139, 0x139 или 0x00000139.
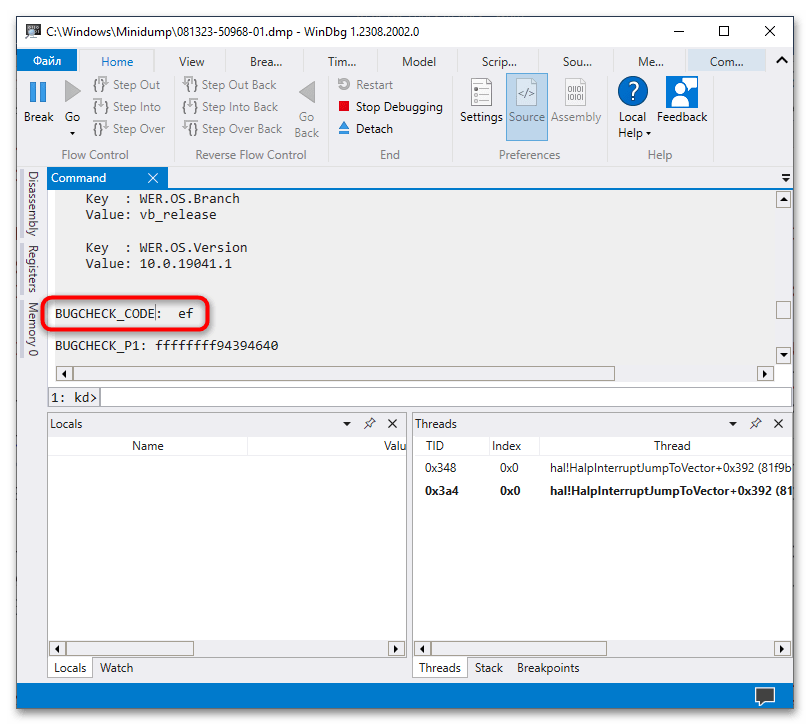
Кроме кода WinDbg позволяет получать множество других полезных сведений об ошибке, в частности аргументы и имя исполняемого файла, вызвавшего критический сбой.
BlueScreenView
Для получения кода ошибки экрана BSOD также можно использовать стороннюю утилиту BlueScreenView. Она не настолько функциональна как WinDbg, но намного проще и меньше инструмента от Microsoft.
Скачать BlueScreenView с официального сайта
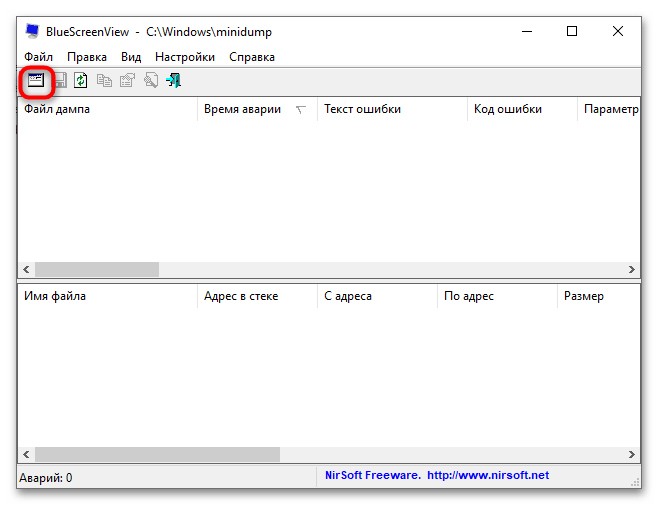
- Скачайте архив с утилитой с сайта разработчика, распакуйте его и запустите исполняемый файл. Там можно скачать и языковой файл — для русификации интерфейса поместите языковой файл в папку с исполняемым файлом «BlueScreenView.exe».
- По умолчанию утилита автоматически считывает все файлы дампов в папке
C:\Windows\Minidump, но если в вашем случае файл дампа находится в другом месте, откройте дополнительные параметры утилиты комбинацией клавиш Ctrl + 0. - В открывшемся окошке выберите пункт «Загрузить один файл МиниДампа» и укажите путь к файлу DMP.
- Просмотрите содержимое колонки «Код ошибки» — в нем будет указан искомый код в шестнадцатеричном формате.
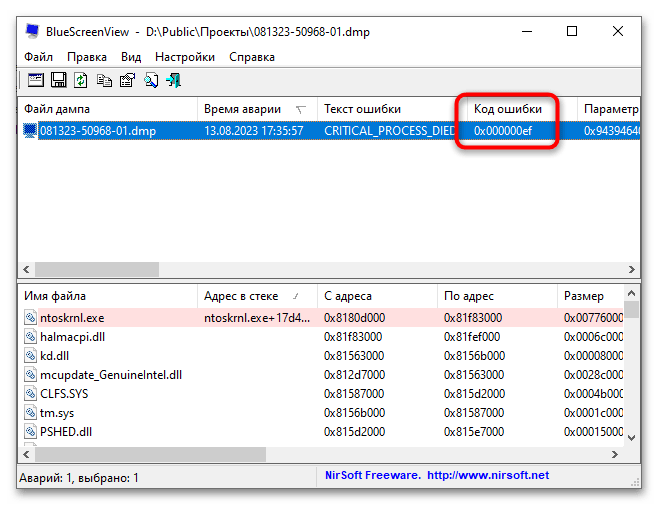
Помимо кода ошибки синего экрана, утилита BlueScreenView показывает сбойный драйвер, список связанных файлов, параметры, стеки адресов и другие отладочные сведения.
Еще статьи по данной теме:
Помогла ли Вам статья?

Подробным анализом дампов памяти занимаются разработчики, но и для рядового пользователя, столкнувшегося с синими экранами в Windows это может оказаться полезным: адреса в памяти ему ничего не дадут, но часто можно обнаружить имя файла приложения или драйвера, вызывающее сбой. Здесь помогут специальные программы для анализа дампов памяти, о которых и пойдёт речь далее.
WinDbg
У Майкрософт имеется собственный инструмент отладки и анализа дампов памяти — WinDbg (пока Preview). Скачать его для Windows 11 и Windows 10 можно из Microsoft Store, используя поиск в магазине приложений или прямую ссылку.
Пример простого анализа дампа памяти для обычного пользователя с целью выявления процесса, вызвавшего BSoD с помощью WinDbg:
- Запустите WinDbg от имени Администратора (правый клик по ярлыку в меню «Пуск» — «Запуск от имени администратора»).
- В главном меню программы выберите «Файл» — «Open dump File» и укажите путь к нужному мини-дампу, обычно находящемуся в папке C:\Windows\Minidump, нажмите кнопку «Open».
- Введите команду
!analyze -v
в поле ввода команд (либо нажмите по ссылке с командой в верхней панели WinDbg) и дождитесь завершения анализа.
- В панели «Command» в верхней части окна программы будет отображен результат анализа, где, при удаче, вы сможете найти информацию о том, каким процессом был инициирован сбой (PROCESS_NAME).
- Может быть информация о файле драйвера (.sys) в поле IMAGE_NAME и другая информация, позволяющая найти источник проблемы.
Далее полученную информацию можно использовать для того, чтобы найти, каким устройствам соответствуют драйверы в Интернете, выяснить назначение процессов вызвавших сбой, предпринять те или иные действия с целью их устранения.
BlueScreenView
BlueScreenView — очень простая утилита, которая позволяет выбрать файла дампа памяти в списке и посмотреть, какие файлы драйвера и процессы привели к сбою: в окне программы они будут выделены красным цветом.
Скачать BlueScreenView можно с официального сайта разработчика https://www.nirsoft.net/utils/blue_screen_view.html
WhoCrashed
Ещё одна программа для анализа дампов памяти — WhoCrashed. В бесплатной версии предоставляет не так много информации.
После нажатия кнопки «Analyze» имеющиеся дампы памяти анализируются, и на вкладке «Report» выводятся коды ошибок, а также текстовое описание на английском языке о том, что означает этот код и о возможных причинах сбоя.
Официальный сайт WhoCrashed https://www.resplendence.com/whocrashed, судя по всему, не открывается из РФ, но утилиту легко найти и скачать из сторонних источников.
BlueScreenView
для Windows
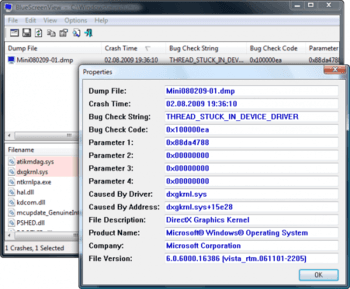
BlueScreenView — небольшая бесплатная утилита, которая сканирует все файлы аварийных дампов памяти и отображает информацию о всех сбоях в сводной таблице. Для каждого сбоя предоставляется масса полезной для пользователя информации, как например имя файла дампа, дата/время сбоя, базовые сведения, выводимые на экран во время BSOD и сведения о драйвере/модуле, который привел к сбою.
Также программа позволяет просматривать список загруженных драйверов, в котором отмечаются те драйверы, которые были найдены в стеке минидампа, что дает возможность обнаружить драйвер, вызвавший критическую ошибку.
Основные возможности:
- Выяснение причин сбоя системы.
- Отображение подробной информации об ошибке.
- Вывод данных о драйверах.
- Экспорт информации в файл, сохраненный в формате: TXT, HTML, HTM, XML, CSV.
- Поиск информации в интернете по готовым шаблонам.
- Поддержка режима перетаскивания.
- Поддержка командной строки.
- Русификатор интерфейса (2 Кб)
ТОП-сегодня раздела «Мониторинг»
MSI Afterburner 4.6.5
MSI Afterburner — настоящая находка для истинного оверклокера, с помощью которой можно…
SpeedFan 4.52
SpeedFan — бесплатный и удобный в использовании инструмент для контроля за температурой и…
Speccy 1.32.803
Speccy — небольшая бесплатная программа, позволяющая узнать массу полезной информации об…
BlueScreenView 1.55
BlueScreenView — небольшая бесплатная утилита, которая сканирует все файлы аварийных дампов…
FPS Monitor 5440
Приложение отслеживает состояние компонентов ПК и отображает информацию поверх экрана…
Отзывы о программе BlueScreenView
Stanmay про BlueScreenView 1.55 [13-03-2016]
Из архива русификатора извлекаем файл и копируем его в папку с программой. И все, прога русифицирована.
23 | 17 | Ответить
мишка про BlueScreenView 1.52 [15-09-2013]
закинуть в папку с прогой
26 | 11 | Ответить
ieheg про BlueScreenView 1.52 [26-08-2013]
Русификатор есть на сайте программы — http://www.nirsoft.net/utils/trans/bluescreenview_russian.zip
20 | 16 | Ответить
виктор про BlueScreenView 1.47 [04-05-2013]
как русифицироваь эту хрень
24 | 49 | Ответить

| BlueScreenView v1.55 Copyright (c) 2009 — 2015 Nir Sofer |
Related Utilities
- WinCrashReport — Displays a report about crashed Windows application.
- WhatIsHang — Get information about Windows software that stopped responding (hang)
- AppCrashView — View application crash information on Windows 7/Vista.
See Also
- NK2Edit — Edit, merge and fix the AutoComplete files (.NK2) of Microsoft Outlook.
Description
BlueScreenView scans all your minidump files created during ‘blue screen of death’ crashes, and displays the information about all crashes in one table.
For each crash, BlueScreenView displays the minidump filename, the date/time of the crash, the basic crash
information displayed in the blue screen (Bug Check Code and 4 parameters), and the details of the driver or module
that possibly caused the crash (filename, product name, file description, and file version).
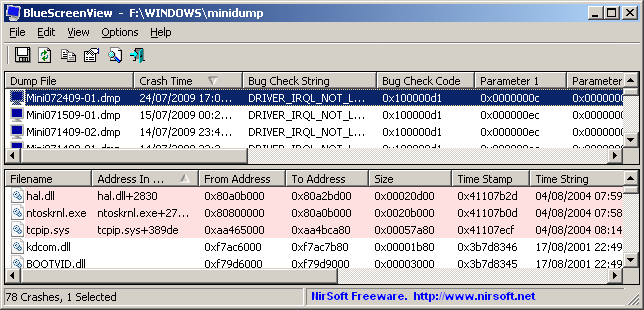
For each crash displayed in the upper pane, you can view the details of the device drivers loaded during the crash in the lower pane.
BlueScreenView also mark the drivers that their addresses found in the crash stack, so you can easily locate the suspected drivers that possibly caused the crash.
Download links are on the bottom of this page
Versions History
- Version 1.55:
- Added Drag & Drop support: You can now drag a single MiniDump file from Explorer into the main window of BlueScreenView.
- Fixed bug: BlueScreenView failed to remember the last size/position of the main window if it was not located in the primary monitor.
- Version 1.52:
- Added ‘Google Search — Bug Check’ and ‘Google Search — Bug Check + Parameter 1’ options.
- Version 1.51:
- Added automatic secondary sorting (‘Crash Time’ column).
- Added 64-bit build.
- Version 1.50:
- The ‘Crash Time’ now displays more accurate date/time of the crash.
In previous versions, the value of ‘Crash Time’ column was taken from the date/time of dump file, which actually represents that time that Windows loaded again, after the crash.
The actual crash time is stored inside the dump file , and now the ‘Crash Time’ displays this value. - Added ‘Dump File Time’ column, which displays the modified time of the dump file.
- The ‘Crash Time’ now displays more accurate date/time of the crash.
- Version 1.47:
- Added ‘Auto Size Columns+Headers’ option, which allows you to automatically resize the columns according to the row values and column headers.
- Version 1.46:
- Fixed issue: The properties and the ‘Advanced Options’ windows opened in the wrong monitor, on multi-monitors system.
- Version 1.45:
- You can now choose to open only a specific dump file — from the user interface or from command-line.
- You can now also specify the MiniDump folder or MiniDump file as a single parameter, and BlueScreenView
will be opened with the right dump file/folder, for example:
BlueScreenView.exe C:\windows\minidump\Mini011209-01.dmp
- Version 1.40:
- Added ‘Raw Data’ mode on the lower pane, which displays the processor registers and memory hex dump.
- Version 1.35:
- Added ‘Crash Address’ column.
- Added 3 columns that display that last 3 calls found in the stack
(Only for 32-bit crashes)
- Version 1.32:
- Added ‘Mark Odd/Even Rows’ option, under the View menu. When it’s turned on, the odd and even rows are displayed in different color, to make it easier to read a single line.
- Version 1.31:
- Added ‘Google Search — Bug Check+Driver’ for searching in Google the driver name and bug check code of the selected blue screen.
- Version 1.30:
- Added ‘Dump File Size’ column.
- Version 1.29:
- You can now send the list of blue screen crashes to stdout by specifying an empty filename («») in the command-line of all save parameters.
For example: bluescreenview.exe /stab «» > c:\temp\blue_screens.txt
- You can now send the list of blue screen crashes to stdout by specifying an empty filename («») in the command-line of all save parameters.
- Version 1.28:
- Added ‘Add Header Line To CSV/Tab-Delimited File’ option. When this option is turned on, the column names are added
as the first line when you export to csv or tab-delimited file.
- Added ‘Add Header Line To CSV/Tab-Delimited File’ option. When this option is turned on, the column names are added
- Version 1.27:
- Fixed issue: removed the wrong encoding from the xml string, which caused problems to some xml viewers.
- Version 1.26:
- Fixed ‘DumpChk’ mode to work properly when DumpChk processing takes more than a few seconds.
- Version 1.25:
- Added ‘DumpChk’ mode, which displays the output of Microsoft DumpChk utility (DumpChk.exe).
You can set the right path and parameters of DumpChk in ‘Advanced Options’ window.
By default, BlueScreenView tries to run DumpChk from ‘%programfiles%\Debugging Tools for Windows’ - The default MiniDump folder is now taken from HKEY_LOCAL_MACHINE\SYSTEM\CurrentControlSet\Control\CrashControl
- Added ‘DumpChk’ mode, which displays the output of Microsoft DumpChk utility (DumpChk.exe).
- Version 1.20:
- Added 3 new columns in the upper pane: Processors Count, Major Version, Minor Version.
- Added ‘Explorer Copy’ option, which allows you to copy dump files to the clipboard and then paste them into Explorer window.
- Version 1.15:
- Added option to view the blue screen list of multiple computers on your network.
The computer names are specified in a simple text file. (See below). - Added Combo-Box to easily choose the MiniDump folders available in the hard-disks currently attached to your computer.
- Added ‘Computer Name’ and ‘Full Path’ columns.
- Added option to view the blue screen list of multiple computers on your network.
- Version 1.11:
- Added /sort command-line option.
- Version 1.10:
- Added accelerator keys for allowing you to toggle between modes more easily.
- Added command-line options for saving the crash dumps list to text/csv/html/xml file.
- Added command-line option for opening BlueScreenView with the desired MiniDump folder.
- Fixed focus problems when opening the ‘Advanced Options’ window.
- Added ‘default’ button to the ‘Advanced Options’ window.
- Added ‘processor’ column — 32-bit or x64.
- Version 1.05 — Added support for x64 MiniDump files.
- Version 1.00 — First release.
BlueScreenView Features
- Automatically scans your current minidump folder and displays the list of all crash dumps, including crash dump date/time and crash details.
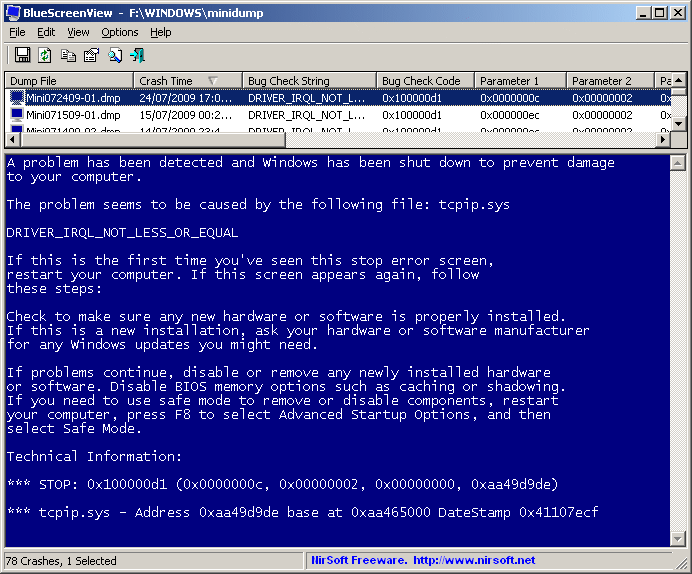
- Allows you to view a blue screen which is very similar to the one that Windows displayed during the crash.
- BlueScreenView enumerates the memory addresses inside the stack of the crash, and find all drivers/modules that might be involved in the crash.
- BlueScreenView also allows you to work with another instance of Windows, simply by choosing the right minidump folder (In Advanced Options).
- BlueScreenView automatically locate the drivers appeared in the crash dump, and extract their version resource information, including product name, file version, company, and file description.
System Requirements
- BlueScreenView works with Windows XP, Windows Server 2003, Windows Server 2008, Windows Vista, Windows 7, Windows 8, Windows 10,
as long as Windows is configured to save minidump files during BSOD crashes.
If your system doesn’t create MiniDump files on a blue screen crash,
try to configure it according to the following article:
How to configure Windows to create MiniDump files on BSOD - BlueScreenView can read the MiniDump files of both 32-bit and x64 systems.
- Be aware that on Windows 10, some of the created MiniDump files might be empty and BlueScreenView will not display them.
Using BlueScreenView
BlueScreenView doesn’t require any installation process or additional dll files.
In order to start using it, simply run the executable file — BlueScreenView.exe
After running BlueScreenView, it automatically scans your MiniDump folder and display all crash details in the upper pane.
Crashes Information Columns (Upper Pane)
- Dump File: The MiniDump filename that stores the crash data.
- Crash Time: The created time of the MiniDump filename, which also matches to the date/time that the crash occurred.
- Bug Check String: The crash error string. This error string is determined according to the Bug Check Code, and it’s also displayed in the blue screen window of Windows.
- Bug Check Code: The bug check code, as displayed in the blue screen window.
- Parameter 1/2/3/4: The 4 crash parameters that are also displayed in the blue screen of death.
- Caused By Driver: The driver that probably caused this crash.
BlueScreenView tries to locate the right driver or module that caused the blue screen by looking inside the crash stack.
However, be aware that the driver detection mechanism is not 100% accurate, and you should also look in the lower pane, that display all drivers/modules found in the stack.
These drivers/modules are marked in pink color. - Caused By Address: Similar to ‘Caused By Driver’ column, but also display the relative address of the crash.
- File Description: The file description of the driver that probably caused this crash.
This information is loaded from the version resource of the driver. - Product Name: The product name of the driver that probably caused this crash.
This information is loaded from the version resource of the driver. - Company: The company name of the driver that probably caused this crash.
This information is loaded from the version resource of the driver. - File Version: The file version of the driver that probably caused this crash.
This information is loaded from the version resource of the driver. - Crash Address:The memory address that the crash occurred. (The address in the EIP/RIP processor register)
In some crashes, this value might be identical to ‘Caused By Address’ value, while in others,
the crash address is different from the driver that caused the crash. - Stack Address 1 — 3:
The last 3 addresses found in the call stack.
Be aware that in some crashes, these values will be empty.
Also, the stack addresses list is currently not supported for 64-bit crashes.
Drivers Information Columns (Lower Pane)
- Filename: The driver/module filename
- Address In Stack: The memory address of this driver that was found in the stack.
- From Address: First memory address of this driver.
- To Address: Last memory address of this driver.
- Size: Driver size in memory.
- Time Stamp: Time stamp of this driver.
- Time String: Time stamp of this driver, displayed in date/time format.
- Product Name: Product name of this driver, loaded from the version resource of the driver.
- File Description: File description of this driver, loaded from the version resource of the driver.
- File Version: File version of this driver, loaded from the version resource of the driver.
- Company: Company name of this driver, loaded from the version resource of the driver.
- Full Path: Full path of the driver filename.
Lower Pane Modes
Currently, the lower pane has 4 different display modes.
You can change the display mode of the lower pane from Options->Lower Pane Mode menu.
- All Drivers:
Displays all the drivers that were loaded during the crash that you selected in the upper pane.
The drivers/module that their memory addresses found in the stack, are marked in pink color. - Only Drivers Found In Stack:
Displays only the modules/drivers that their memory addresses found in the stack of the crash.
There is very high chance that one of the drivers in this list is the one that caused the crash. - Blue Screen in XP Style:
Displays a blue screen that looks very similar to the one that Windows displayed during the crash. - DumpChk Output:
Displays the output of Microsoft DumpChk utility.
This mode only works when Microsoft DumpChk is installed on your computer and
BlueScreenView is configured to run it from the right folder (In the Advanced Options window).
You can get DumpChk from the installation CD/DVD of Windows or
with the installtion of Debugging Tools for Windows.
Crashes of Remote Network Computer
If you have multiple computers on your network and you have full administrator access to them
(e.g: you have access to \\ComputerName\c$), you can also view the crashes of the other computers on your network remotely.
In order to do that, simply go to ‘Advanced Options’ (Ctrl+O) and type the MiniDump folder of the remote
computer, for example: \\MyComp\c$\Windows\MiniDump.
Notice: If you fail to get full administrator access to the remote computer, you should read the instructions in the following Blog post:
How to connect a remote Windows 7/Vista/XP computer with NirSoft utilities.
Watching the crashes of multiple computers on your network
If you have a network with multiple computers, and you have full admin access to these computers, you can
view the blue screens list of all these computers in one table, and easily detect computers with recurring BSOD problems.
In order to use this feature, prepare a list of all computer names/IP addresses that you want to inspect, and save it to a simple text file.
The computer names in the list can be delimited by comma, semicolon, tab character, or Enter (CRLF).
Example for computer names list:
comp01
comp02
192.168.0.1
192.168.0.2
192.168.0.4
After you have a text file contains the computers list, you can go to Advanced Options window (Ctrl+O), choose the second option and type the computers list filename.
Command-Line Options
| /LoadFrom <Source> |
Specifies the source to load from. 1 -> Load from a single MiniDump folder (/MiniDumpFolder parameter) 2 -> Load from all computers specified in the computer list file. (/ComputersFile parameter) 3 -> Load from a single MiniDump file (/SingleDumpFile parameter) |
| /MiniDumpFolder <Folder> |
Start BlueScreenView with the specified MiniDump folder.
|
| /SingleDumpFile <Filename> | Start BlueScreenView with the specified MiniDump file. (For using with /LoadFrom 3) |
| /ComputersFile <Filename> | Specifies the computers list filename. (When LoadFrom = 2) |
| /LowerPaneMode <1 — 3> |
Start BlueScreenView with the specified mode. 1 = All Drivers, 2 = Only Drivers Found In Stack, 3 = Blue Screen in XP Style. |
| /stext <Filename> | Save the list of blue screen crashes into a regular text file. |
| /stab <Filename> | Save the list of blue screen crashes into a tab-delimited text file. |
| /scomma <Filename> | Save the list of blue screen crashes into a comma-delimited text file (csv). |
| /stabular <Filename> | Save the list of blue screen crashes into a tabular text file. |
| /shtml <Filename> | Save the list of blue screen crashes into HTML file (Horizontal). |
| /sverhtml <Filename> | Save the list of blue screen crashes into HTML file (Vertical). |
| /sxml <Filename> | Save the list of blue screen crashes into XML file.
|
| /sort <column> |
This command-line option can be used with other save options for sorting by the desired column. If you don’t specify this option, the list is sorted according to the last sort that you made from the user interface. The <column> parameter can specify the column index (0 for the first column, 1 for the second column, and so on) or the name of the column, like «Bug Check Code» and «Crash Time». You can specify the ‘~’ prefix character (e.g: «~Crash Time») if you want to sort in descending order. You can put multiple /sort in the command-line if you want to sort by multiple columns.
Examples: |
| /nosort | When you specify this command-line option, the list will be saved without any sorting. |
Translating BlueScreenView to other languages
In order to translate BlueScreenView to other language, follow the instructions below:
- Run BlueScreenView with /savelangfile parameter:
BlueScreenView.exe /savelangfile
A file named BlueScreenView_lng.ini will be created in the folder of BlueScreenView utility. - Open the created language file in Notepad or in any other text editor.
- Translate all string entries to the desired language.
Optionally, you can also add your name and/or a link to your Web site.
(TranslatorName and TranslatorURL values) If you add this information, it’ll be
used in the ‘About’ window. - After you finish the translation, Run BlueScreenView, and all translated
strings will be loaded from the language file.
If you want to run BlueScreenView without the translation, simply rename the language file, or move
it to another folder.
License
This utility is released as freeware.
You are allowed to freely distribute this utility via floppy disk, CD-ROM,
Internet, or in any other way, as long as you don’t charge anything for this.
If you distribute this utility, you must include all files in
the distribution package, without any modification !
Disclaimer
The software is provided «AS IS» without any warranty, either expressed or implied,
including, but not limited to, the implied warranties of merchantability and fitness
for a particular purpose. The author will not be liable for any special, incidental,
consequential or indirect damages due to loss of data or any other reason.
Feedback
If you have any problem, suggestion, comment, or you found a bug in my utility,
you can send a message to nirsofer@yahoo.com
BlueScreenView is also available in other languages. In order to change the language of
BlueScreenView, download the appropriate language zip file, extract the ‘bluescreenview_lng.ini’,
and put it in the same folder that you Installed BlueScreenView utility.
| Language | Translated By | Date | Version |
|---|---|---|---|
| Arabic | Fcmam5 | 23/02/2013 | 1.47 |
| Brazilian Portuguese | cslibraga | 20/02/2016 | 1.10 |
| Bulgarian | Евгений Кабакчиев | 05/06/2015 | 1.55 |
| Czech | Pavel Konečný | 04/01/2015 | 1.52 |
| Danish | Gustav Brock | 15/01/2011 | 1.30 |
| Dutch | Jan Verheijen | 03/02/2015 | 1.55 |
| Farsi | Hamed Babaei (ÍÇãÏ ÈÇÈÇíí) | 18/03/2014 | 1.52 |
| Finnish | S. J. Liimatainen | 03/06/2020 | 1.55 |
| French | EtoileFilante® Corp. | 24/08/2015 | 1.55 |
| French | Eric FICHOT | 27/07/2013 | 1.52 |
| French | xb70walkyrie [v. 1.55] | 31/07/2016 | |
| German | «Latino» auf WinTotal.de | 29/01/2015 | 1.55 |
| Greek | geogeo.gr | 11/10/2014 | 1.52 |
| Hungarian | Timinoun | 12/12/2022 | 1.55 |
| Italian | Roberto B.WSS | 14/05/2015 | 1.55 |
| Italian | Daniele Cultrera & bovirus | 01/04/2014 | 1.52 |
| Japanese | iLEƒÖEj | 17/07/2013 | 1.52 |
| Korean | J. K. Lee(Wave) | 04/02/2015 | 1.55 |
| Latvian | Nizaury | 15/01/2012 | 1.45 |
| Persian | Shadima.com | 26/04/2020 | 1.55 |
| Polish | Wojciech Sabaj | 25/06/2012 | 1.45 |
| Polish | Tomasz Janiszewski | 04/08/2009 | 1.00 |
| Romanian | Jaff (Oprea Nicolae) | 08/05/2015 | 1.55 |
| Russian | Dmitry Posunko && Dm.Yerokhin | 21/01/2016 | 1.55 |
| Simplified Chinese | CuiPlaY | 14/03/2013 | 1.47 |
| Simplified Chinese | EaiLFly | 28/01/2012 | 1.45 |
| Simplified Chinese | Edison Chen | 27/05/2014 | 1.52 |
| Slovak | Fero Fico | 29/01/2015 | 1.55 |
| Slovenian | Darko Kenda | 22/01/2014 | 1.52 |
| Spanish | Amadeo García Torrano | 07/05/2020 | 1.55 |
| Swedish | Bernt Janhäger | 06/08/2012 | 1.45 |
| Swedish | Tommy Kellerman | 29/03/2011 | 1.32 |
| Traditional Chinese | 發夢 King | 04/08/2009 | 1.00 |
| Traditional Chinese | 丹楓(虫二電氣診所) | 08/10/2013 | 1.52 |
| Turkish | Saner Apaydin | 16/03/2010 | 1.20 |
| Turkish | HARUN ARI | 16/09/2011 | 1.40 |
| Ukrainian | Lembergman, August 2017 | 19/08/2017 | 1.5.5.0 |
| Ukrainian | vmsoft77 | 20/11/2013 | 1.52 |
| Valencian | vjatv | 25/08/2009 | 1.05 |
Choose the best tool to get rid of BSoD for good
by Radu Tyrsina
Radu Tyrsina has been a Windows fan ever since he got his first PC, a Pentium III (a monster at that time). For most of the kids of… read more
Updated on
- Using a professional Blue Screen of Death fixer utility could help you save your personal data.
- We’ve tested the BSoD repair tools from our list to give you only the best options.
- System crashes during Windows 10 updates, faulty drivers or even problems with your hardware are the most common causes for BSoD errors.
XINSTALL BY CLICKING THE DOWNLOAD
FILE
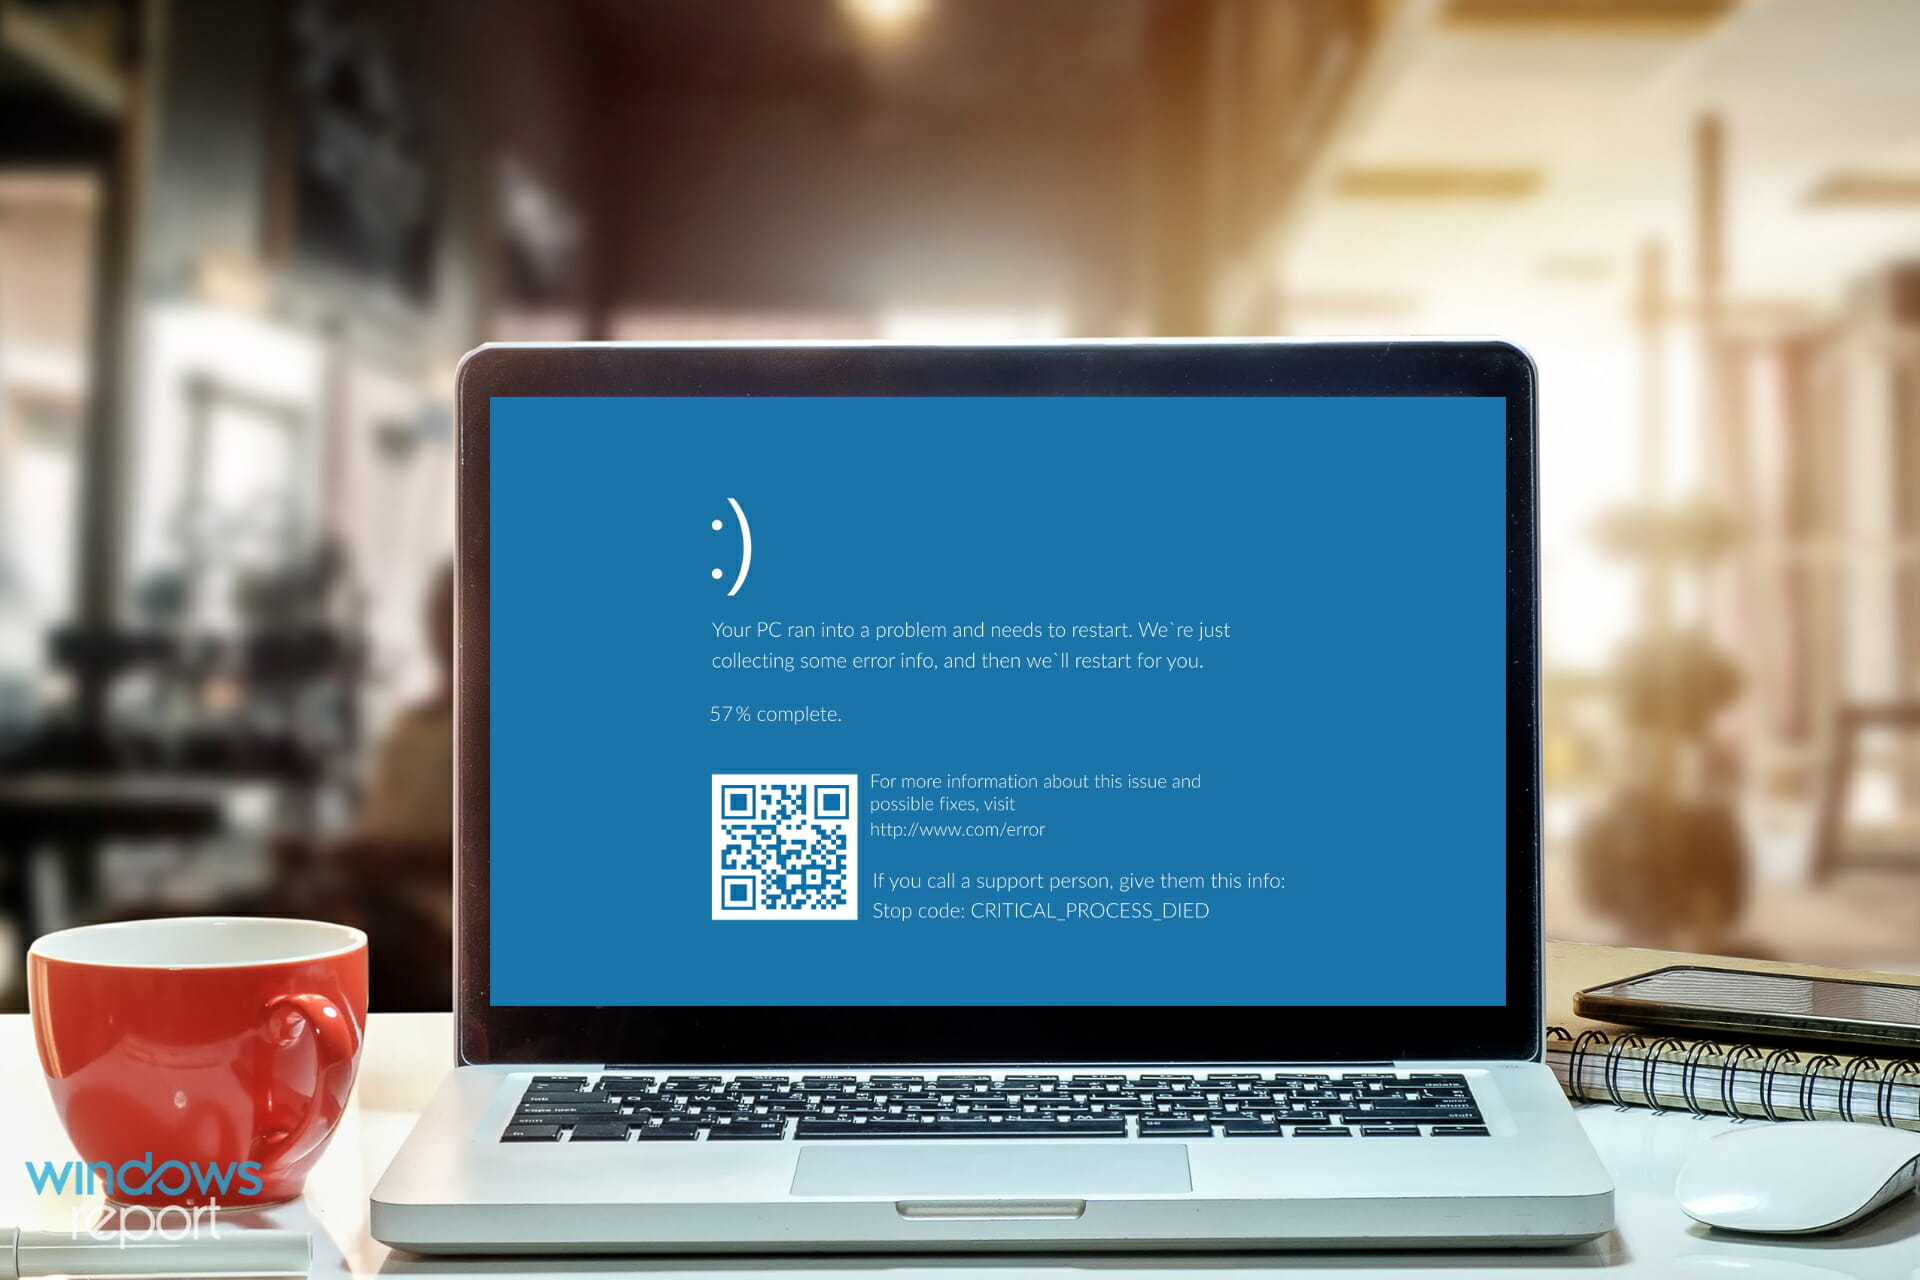
Installing the latest Windows 10 updates can often make some users’ computers go straight into the blue screen of death. Having a reliable BSoD fixer is the best way to avoid disaster.
This can happen with older operating system versions, and the catalysts have various natures.
One of the causes that can lead to BSOD can be hardware-related, outdated driver software or the issue can be due to low-level software running in the Windows kernel.
Sometimes, a regular app can cause this nightmare and corrupted files and data loss. Faulty memory power can also lead to this.
A STOP error is a catalyst for the appearance of the blue screen, and when this happens, there’s a complete crash involved, and Windows cannot perform anymore.
Your computer will restart, but the bad news is that your previously unsaved data will be lost because programs did not get a chance to save it.
What causes BSOD errors?
➡ Hardware malfunction
This issue can arise whether you’ve recently installed a new SSD or have existing hardware problems. Malfunctions can start from improper component connections, power loss, or broken elements, often leading to common BSOD errors like PFN_LIST_CORRUPT. Hardware damage can occur due to extreme temperature or voltage conditions.

To ensure that this is not a possible problem, it is recommended that you use a good computer monitoring tool that allows you to check these factors whenever you need to.
➡ Corrupted DLLs or system files
DLL files are the instruction manual of your system, so when and if one or more get corrupted, this can affect how your PC works.
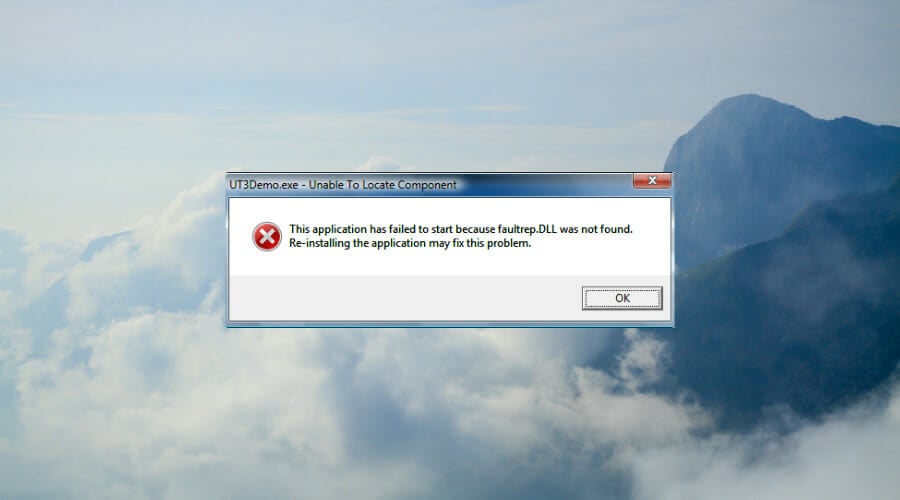
Damage to DLLs can appear because of mistakenly deleting one, malware attacks, and faulty application installations.
The damaged DLL must be replaced with a fresh new one for the system to function without issues.
➡ Device drives improperly written
Sometimes, whenever you create a new partition or during the installation process of a new OS, some drives might encounter errors while being written.
This can happen because of issues with your HDD or the partition software that you’re using. A BSOD can appear, stopping you from accessing your files entirely.
➡ Power supply issues
If your power supply has issues, then this will cause the voltage required for running the hardware on your motherboard to fluctuate. This, in turn, causes the components to malfunction; thus, a BSOD error can appear on your screen.
➡ Full PC memory
Having your PC memory full will hinder the OS’s ability to process information promptly and thus cause issues with the software, which in turn could cause issues with the hardware.
To avoid this problem, it is recommended that you use a PC optimization tool that can quickly identify any clutter and resolve it promptly.
How we test, review and rate?
We have worked for the past 6 months on building a new review system on how we produce content. Using it, we have subsequently redone most of our articles to provide actual hands-on expertise on the guides we made.
For more details you can read how we test, review, and rate at WindowsReport.
Fortunately, you don’t have to worry about finding an effective method to fix blue screen issues or prevent the file loss triggered by them because some third-party BSoD fixer tools can cover all the risk factors mentioned above.
Fortect – Great OS reconditioning
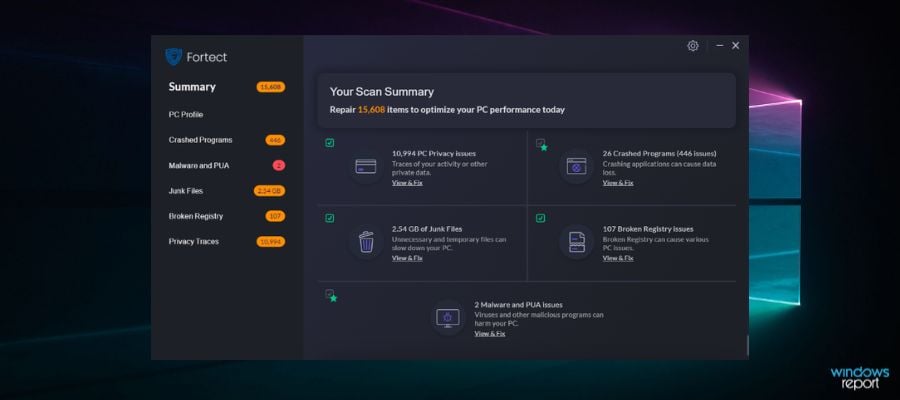
Next on the list is Fortect, an excellent program designed to repair and optimize your computer with multiple helpful features.
With this software, you can run a meticulous scan of your device to find its exact condition and deficiencies, such as BSoD errors, that slow down your PC performance.
Fortect is able to show you a comparison between your operating system and a system in an excellent state to see all the irregularities that can cause damage and ultimately correct them.
It can help you fix or replace corrupted or missing files, including DLLs and Registry keys, and automatically ensure an optimal state for your computer.
You can easily free up space and perform a PC cleanup by removing junk files, build-ups, and other files that clog your folders, disk, and hard drive.
Furthermore, Fortect will safeguard your system due to its ability to scan for faulty and incompatible hardware that may lead to errors that cause the blue screen of death.
Take a look at Fortect’s best features:
- Windows damage repairing
- Restore the OS
- Boost Windows Registry
- Plans for protecting multiple PCs
- PC scan and assessment

Fortect
Easily fix multiple errors and keep your computer in a great state with this amazing software.
Wondershare Recoverit – User-friendly interface
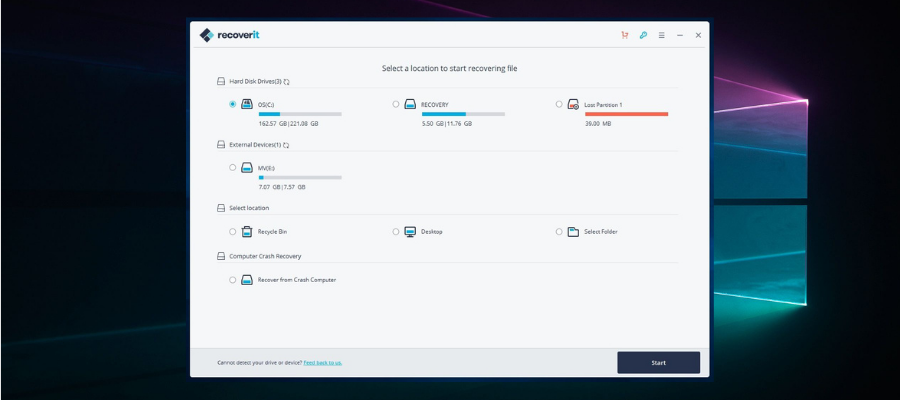
Recoverit from Wondershare is a useful piece of software that will help greatly when dealing with Blue Screen of Death errors on your computer.
This safe and reliable computer data recovery software was designed with ease of use, thus allowing you to control all aspects of how the program is run from a user-friendly main hub.
Recoverit can restore any lost files, whether audio, photos, or normal files, thus being an important step in bouncing back from a BSOD that affected your PC’s storage.
Here are some specific formats this software can easily recover to your system:
- Audio: AIF/AIFF, M4A, MP3, WAV, WMA, MID/MIDI, OGG, AAC, etc.
- Photo: JPG, TIFF/TIF, PNG, BMP, GIF, PSD, CRW, CR2, NEF, etc.
- Documents: DOC/DOCX, XLS/XLSX, PPT/PPTX,/XLSX, etc.
- Video: AVI, MOV, MP4, M4V, 3GP, 3G2, WMV, ASF, FLV, etc.
- Message and Emails: PST, DBX, EMLX, etc.
- Archives: ZIP, RAR, SIT, etc.
To ensure that you will not be missing any files, no matter where they are stored, the developers also included a feature that recovers data from an external HDD or SSD, memory cards, flash drives, and even digital cameras. Besides that, you can also recover files that have been deleted by mistake and are found in the Recycle bin.
A tool that offers these features can be a lifesaver, as it will ensure that no matter if you’re experiencing a drive getting formatted, a corrupted sector of data, virus attacks, or system crashes, Recoverit will be able to help.
Here are some other useful features:
- Quick processing of data
- Easy-to-understand user interface
- Selective recovery features
- Covers a wide range of data loss scenarios
Wondershare Recoverit is a licensed-based software with three different packages available. Each plan is available as a 1-year license, a one-month license, or a perpetual license.

Wondershare Recoverit
Quickly restore lost and deleted files and overcome BSOD problems with this intuitive tool.
Tweaking Windows Repair – Automatic updates
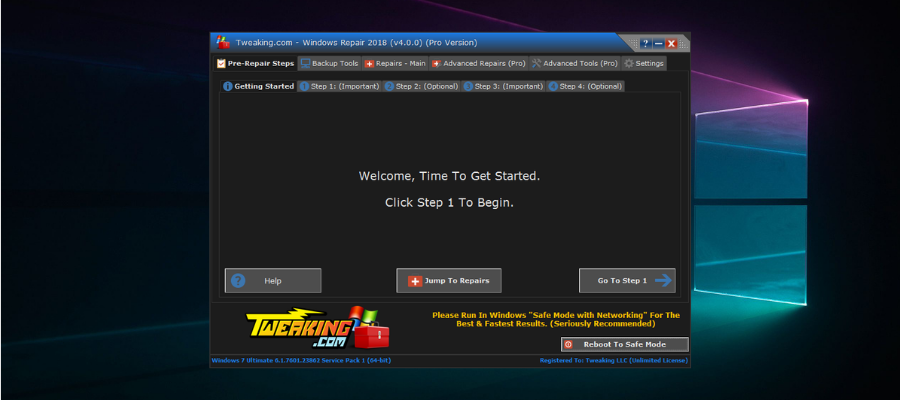
Tweaking Windows Repair is an astonishingly useful software that has the capability to resolve any BSoD errors within just a few minutes.
The step-by-step design of the BSoD repair tool was created in this manner to ensure that no elements are skipped, and this simplifies the actions the user needs to take as well.
To start the software, all you have to do is click on Step 1 and follow the on-screen instructions. You will be guided all the way to the very end of the process, where all the issues that caused the BSOD will be resolved.
As a bonus, the main hub of the software offers you quick access to any of its menus and gives you a useful overview of all the elements contained in this powerful software.
This software from Tweaking is capable of resolving BSoD errors and can tackle almost any type of error or problem you might encounter on a Windows platform.
You can easily resolve problems like registry errors, file permissions problems, Internet Explorer issues, Internet connection problems, and many more.
Even though the interface is not polished and beautifully designed like in the case of other software options, Tweaking Windows Repair makes up for it when it comes to usability.
There is only a small advantage to having slick-looking software, but the goal of this program is to ensure that your system works correctly, and isn’t created with looks in mind.
Other notable features:
- Permissions backup and restore of the registry files
- Cleans up entries in Windows Firewall
- Unhides files to thoroughly identify malware
- Enables access to Windows services tools
Tweaking Windows Repair is a licensed product with packages available for one or multiple PCs.

Tweaking Windows Repair
Resolve BSOD errors with this powerful software that thoroughly scans and fixes system issues.
Smart Blue Screen of Death Fixer Pro – Registry backup
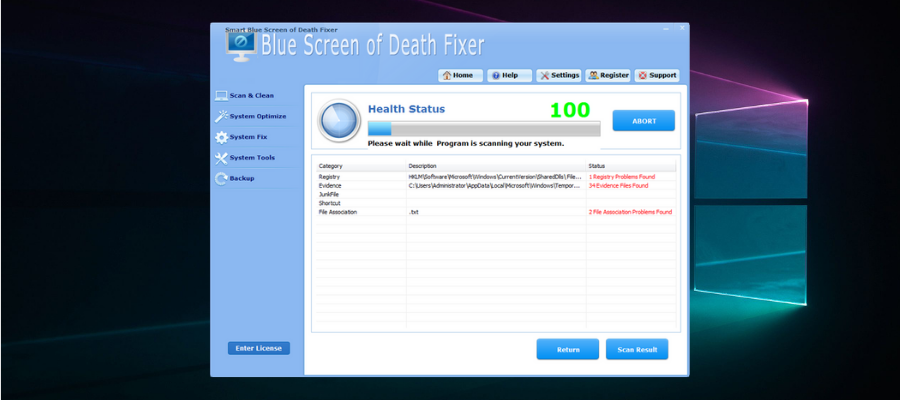
Smart Blue Screen of Death Fixer Pro is another excellent tool that comes in handy for dealing with a BSOD issue.
This great BSoD repair software is one of the world’s top award-winning registry cleaners, boasting millions of downloads now.
Smart Blue Screen of Death Fixer scans the entire drive to ensure there’s no unwanted fragment of software left behind, and it automatically downloads the brand-new program you might need.
The software is so popular due to its great set of features, which not only thoroughly scans and identifies issues, but is also capable of replacing files, fixing them, and optimizing their usage on your system.
This tool is equivalent to using eight separate products, as you get access to unrelated features, but all deal with system stability and stabilizability.
The developers ensured that the application doesn’t take much space on your hard drive, is easy to install, and is even easier to use. The menus and options are designed for simplicity, but that doesn’t take away from the actual capabilities found in the backend.
Using the tool regularly will result in smaller risks for data loss and an extended lifespan for your hard drive.
Other useful features:
- Optimizes menus, desktop environments, networks, services, and start-up features
- Scans and cleans registries, junk files, shortcuts, etc.
- Variety of system tools including an uninstaller manager, file splitter, disk defragmentation, etc.
- Backs up your registry, system restore, folders, files, etc.
⇒ Get Smart Blue Screen of Death Fixer Pro
WhoCrashed – Detailed analysis
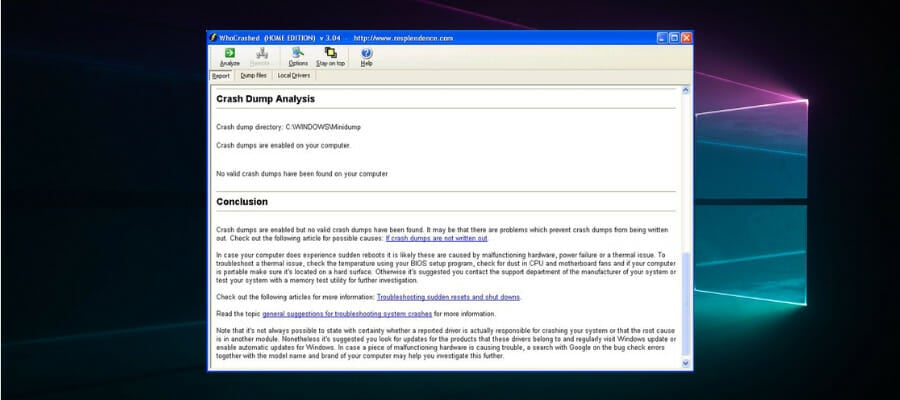
WhoCrashed is an excellent program that can reveal the drivers responsible for your computer’s crash, allowing you to fix the issue and acting as a preventive measure.
Even though it has a simple user interface, don’t get fooled by appearances, as this old-school-looking application can pack a punch.
WhoCrashed will show you the drivers that have been crashing your computer with just a single click of the mouse, thus eliminating the need for the user to go through laborious processes to initiate the recovery.
This tool performs a so-called post-mortem crash dump analysis as described above, presenting all the gathered data most comprehensively for the user while offering guidance in tracing the cause of the problem.
The best part about this process is that you won’t need any debugging skills to be able to know what drivers are troubling your computer running Windows and also how to fix them.
This tool is available as a free download, and it’s packed with lots of useful features:
- Scans your dump files, and it provides an estimation of what exactly caused your system to crash
- Predicts whether the fault was the computer’s hardware or if it was software-related
- Provides a bug check code, the error message, and the path of the file that ultimately caused the error
- Comes with a more advanced version that provides a more detailed analysis via symbol resolution.
⇒ Get WhoCrashed
You can pick any of these tools from the list to fix BSoD errors like Critical_structure_corruption and restore your system to normal functionality.
What can you do to prevent BSODs?
➡ Keep your drivers updated
Even though this might seem like an obvious part of our day-to-day usage of PCs, most of us forget how important drivers are.
Driver issues are the elements that don’t allow your software and hardware to function as intended, and it is one of the most common reasons for BSOD errors.
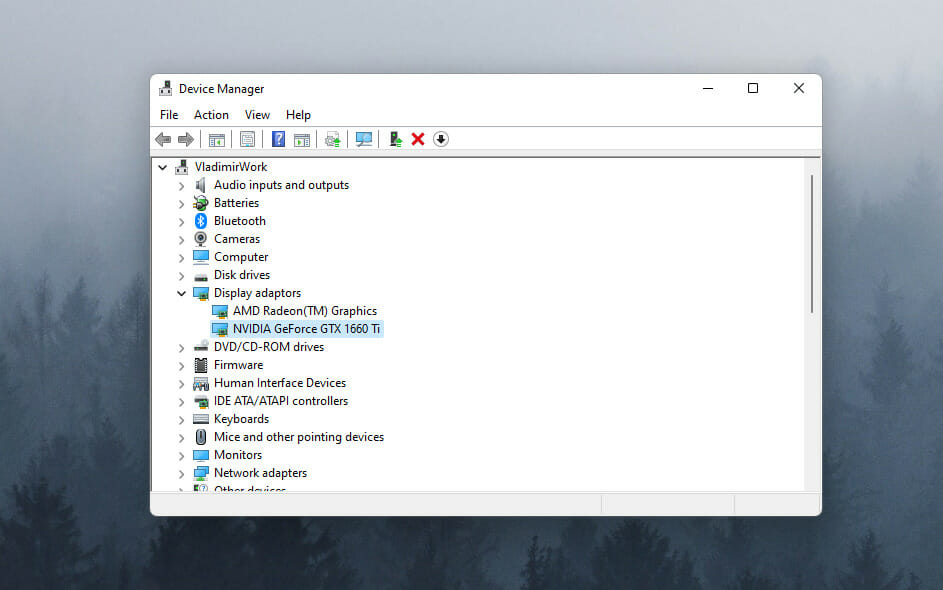
You can update your drivers by right-clicking Start and opening the Device Manager. Then, right-click the hardware components and choose the Update driver options.
If you want to simplify this process further and ensure that drivers are updated automatically across time, then a specialized driver updater software like Outbyte Driver Updater can help.
➡ Only install compatible software
Running incompatible software on your PC can cause system instability. The bad effect this will have on your system is related to the importance of the software you installed.
To avoid causing BSOD errors in the future, make sure that the software you’re installing is made to run optimally in your version of Windows, whether it’s Windows 7, Windows 10, or the latest Windows 11.
In case you already have incompatible software installed on your PC, you can access the Add or Remove programs app on your computer by using the Start search to find it.
If you want to be entirely sure that all traces of said programs have been removed from your system, you can also use a third-party uninstaller tool.
Finally, you can also use the integrated tools to diagnose your system and help it recover from a BSoD.
- Fix: System Service Exception BSOD error on Windows 10
- 5+ best Windows update repair tools for Windows 10/11
- Pfn List Corrupt Blue Screen error in Windows 10/11 [FIXED]
- Where is the BSOD log file located and how to read it?
- Fix: NMI HARDWARE FAILURE on Windows 10/11
How to fix a BSoD on Windows 10 using Command Prompt?
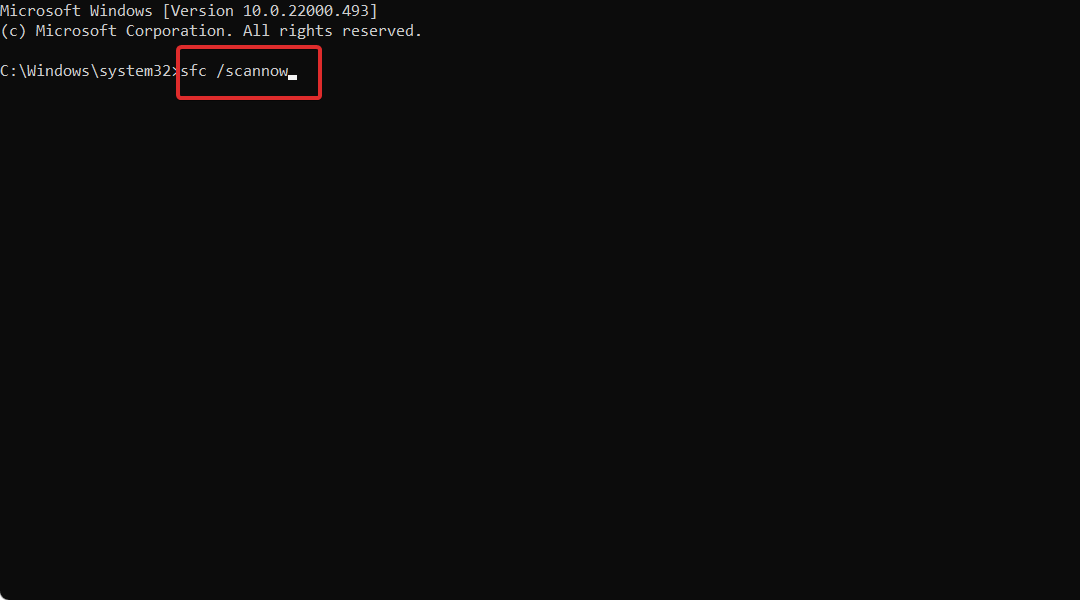
- Open the Command Prompt with administrative privileges.
- Type the following command in the prompt windows:
sfc /scannow - This will scan your system for signs of corruption.
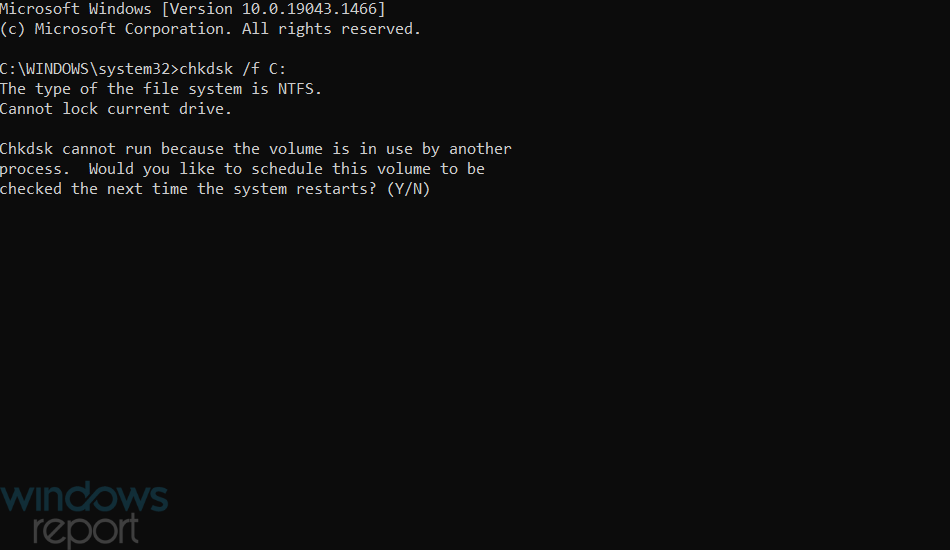
- Then, insert this line:
chkdsk /f C: - Note that this command will check the disk where Windows is installed for errors. Make sure to replace C: with the letter corresponding to your drive if it is different.
- This tool will find damaged system files and replace them with sain ones if it can.
- Finally, restart your PC and check if the BSoD has disappeared.
Some users have a hard time opening the CMD as admins; if that’s your case, we got your back. If the native tools fail to solve your issue, your best bet is to use a professional BSoD fixer like the recommended ones.
As you can see from this guide, a wide range of possible software options can resolve BSoD issues on your Windows device. However, if your intent is to force a BSoD error, restarting your system should do the trick.
We recommend you work your way down the list and choose the best fit for your situation. For more options to pick from, take a look at this best PC repair tools article as well.
Feel free to contact us by using the comments section below this guide.
