Acronis® True Image™ OEM – это комплексный программный пакет, позволяющий выполнять резервное копирование всего накопителя или выбранных разделов, клонировать операционную систему, восстанавливать ранее сохраненные резервные копии и создавать загрузочные носители из USB-накопителей или дисков CD/DVD.
Системные требования
- Windows® 11, 10 и 8.1 (требуются права администратора)
- 16-символьный короткий ключ
- Доступ к Интернету для активации продукта
Примечание: Ключ активации Acronis True Image входит в комплект поставки некоторых продуктов Kingston
Загрузка
Щелкните Загрузить Acronis и следуйте инструкциям для установки ПО.
Загрузить Acronis
Инструкции по установке
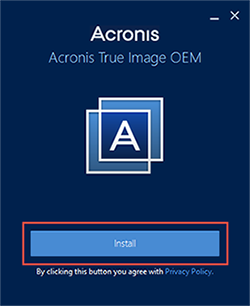
Перейдите к загруженному Acronis® и дважды щелкните файл для запуска установки.
Щелкните Установить для установки приложения.
Щелкните Запустить приложение после завершения установки.
Прочитайте Лицензионное соглашение и примите его, чтобы продолжить.
Инструкции по активации
Шаг 1 – Активация продукта
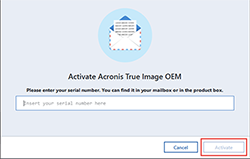
Если вы приобрели продукт Kingston, в комплект поставки которого входит лицензия Acronis, она потребуется вам для активации программного обеспечения. Найдите 16-значный ключ, затем введите информацию в поле Activation (Активация) и нажмите Activate (Активировать).

Примечание. Если вы введете неверный 16-значный ключ, на экране входа в систему будет указано, что ваш серийный номер недействителен.

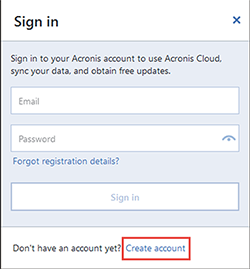
Шаг 2 – Вход в систему или создание учетной записи
Если у вас уже есть учетная запись, вы можете воспользоваться ей.
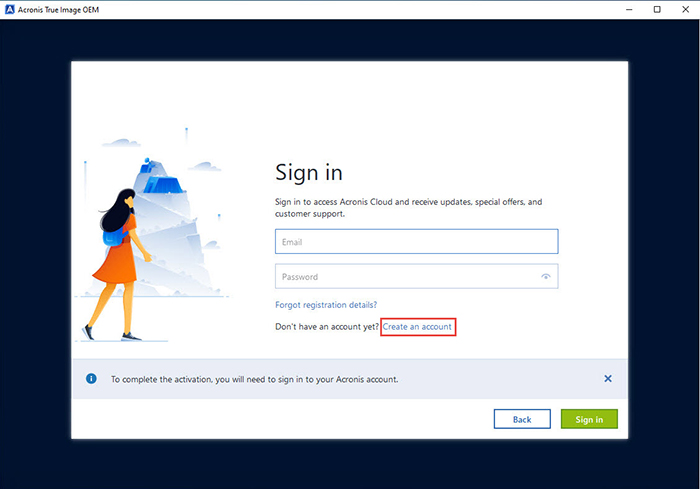
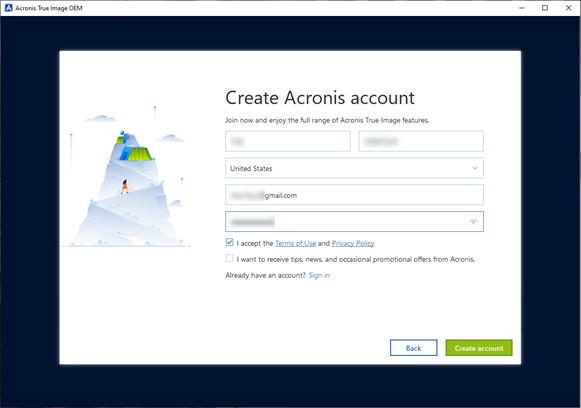
Если у вас нет учетной записи, ее потребуется создать. Щелкните Create account (Создать учетную запись) для создания новой учетной записи.
Для создания учетной записи необходимо ввести следующие данные:
- Ваше имя
- Ваш адрес электронной почты
- Пароль
Щелкните кнопку Создать учетную запись после ввода этой информации.
Шаг 3 – Подтверждение соответствия электронной почты учетной записи Acronis
Войдите в учетную запись электронной почты, которую вы использовали в информации учетной записи Acronis, и активируйте новую учетную запись, нажав Activate Account (Активировать учетную запись) и выполнив необходимые действия.

Краткое руководство
Подключив SSD Kingston к системе, вы сможете начать процесс клонирования.
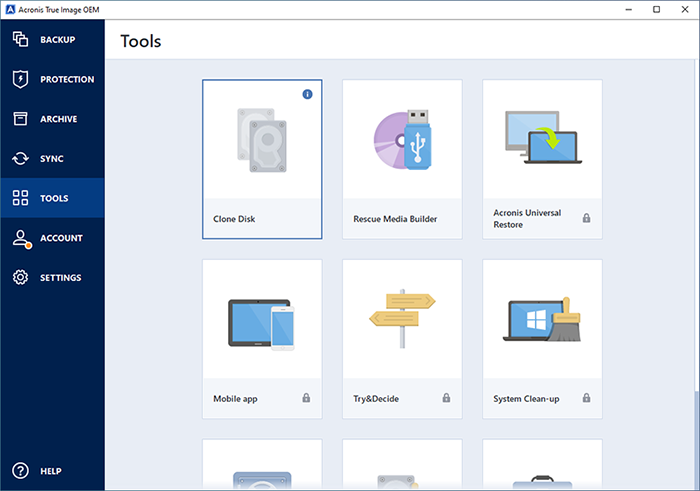
Шаг 1 – Запуск приложения
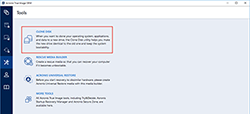
Запустите приложение Acronis® True Image OEM, выберите Tools (Инструменты) и щелкните Clone Disk (Клонировать диск).
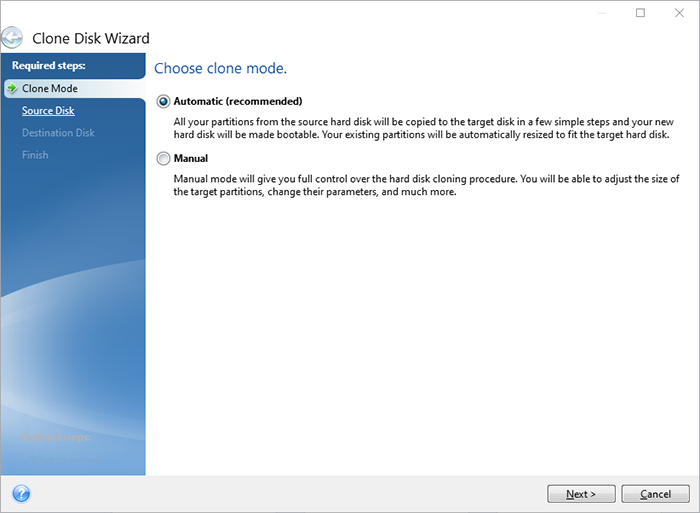
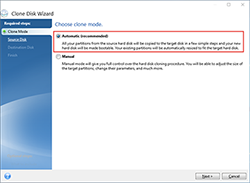
Шаг 2 – Выбор способа клонирования
Выберите способ клонирования Автоматический и щелкните Далее.
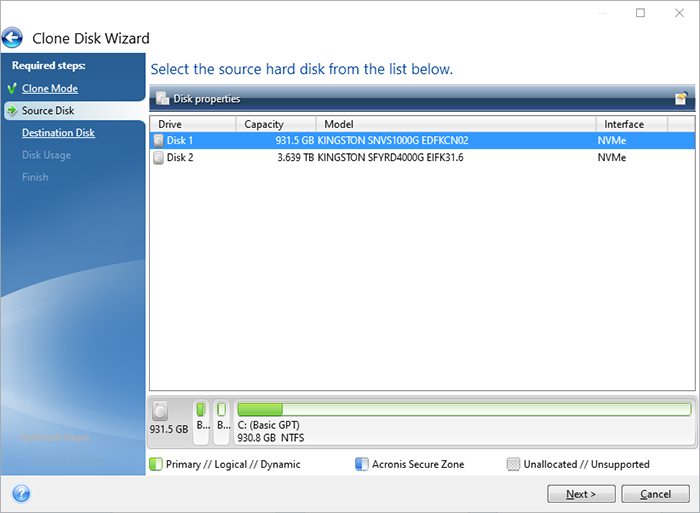
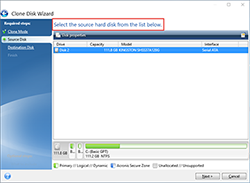
Шаг 3 – Выбор исходного диска
Выберите исходный диск, который нужно клонировать, и щелкните Далее.
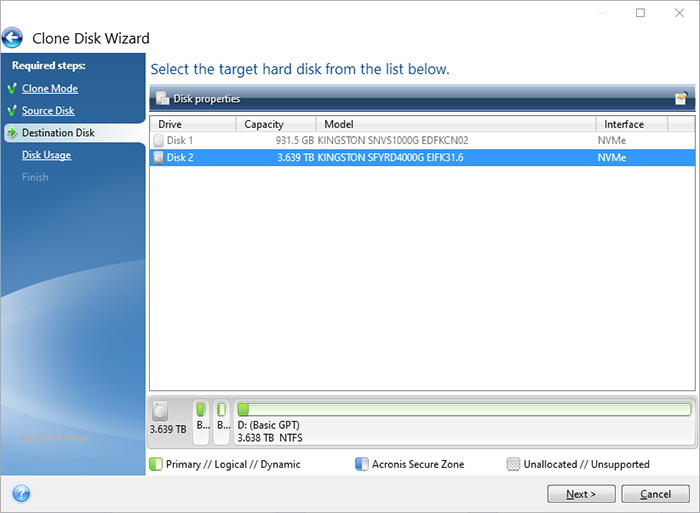
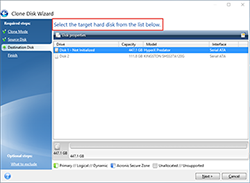
Шаг 4 – Выбор целевого диска
Выберите целевой диск, на который нужно клонировать данные, и щелкните Далее.
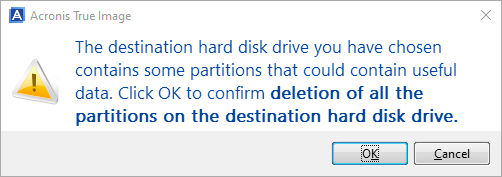
Примечание. Если целевой диск содержит данные, вы можете увидеть предупреждение. Убедитесь, что вы выбрали правильные исходный и целевой диски, и продолжайте только в том случе, если уверены, что вам больше не нужны данные, находящиеся на целевом диске.
Шаг 5 – Выбор способа клонирования
Выберите один из способов клонирования. Если вы планируете заменить текущий диск операционной системы на новый, выберите этот вариант.

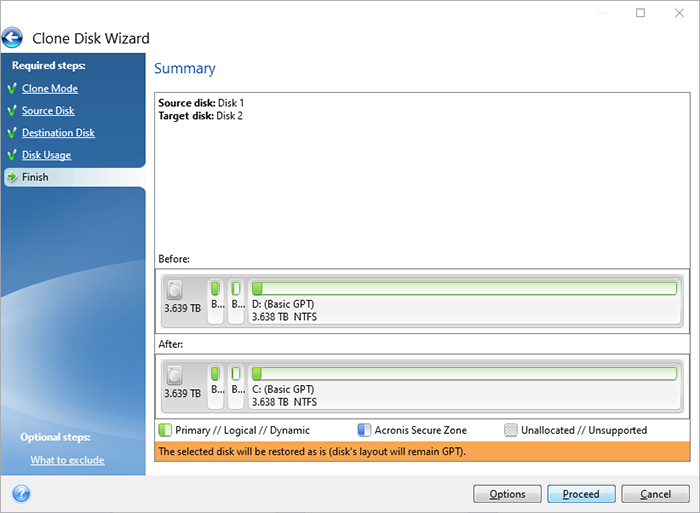
Шаг 6 – Итоговые сведения
После выбора способа клонирования откроется экран с итоговыми сведениями. Еще раз проверьте, что вы выбрали правильные исходный и целевой диски. Также можно просмотреть изменения в целевом диске в разделах Before (До) и After (После). Щелкните Proceed (Продолжить), чтобы начать операцию переноса данных.
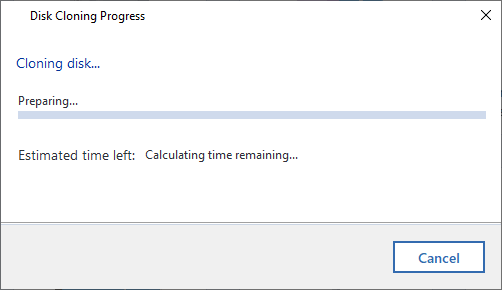
Шаг 7 – Перенос данных
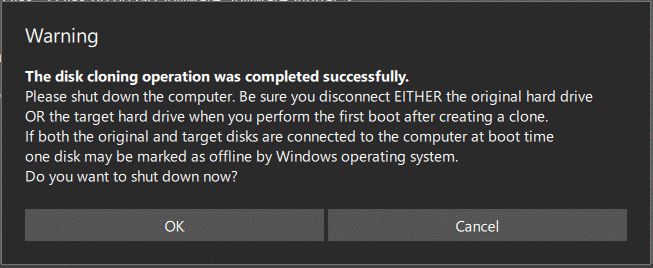
Откроется оповещение о начале процесса клонирования. После завершения процесса клонирования закройте все открытые приложения и выключите компьютер, когда будете готовы.
Шаг 8 – Завершение клонирования
Процесс клонирования на этом завершен. После выключения компьютера вы можете отключить исходный диск от компьютера. Затем включите компьютер, и он загрузится с твердотельного накопителя Kingston.
Дополнительная информация
Дополнительную информацию, связанную с ПО Acronis® True Image™ OEM, см. в соответствующем руководстве пользователя.
Руководство пользователя Acronis
Примечание для пользователей MAC и Linux
ПО Acronis® True Image™ OEM несовместимо с пакетами Mac OS и Linux.
Инструкции по загрузке, установке и активации Acronis® True Image™ OEM
Описание
Acronis® True Image™ OEM – это комплексный программный пакет, позволяющий выполнять резервное копирование всего накопителя или выбранных разделов, клонировать операционную систему, восстанавливать ранее сохраненные резервные копии и создавать загрузочные носители из USB-накопителей или дисков CD/DVD.
Системные требования
- Windows® 10, 8.1, 8, 7 (SP1), Vista (SP2) (требуются права администратора)
- 16-символьный короткий ключ
- Доступ к Интернету для активации продукта

Загрузка
Щелкните Загрузить Acronis и следуйте инструкциям для установки ПО.
Загрузить Acronis
Инструкции по установке
Перейдите к загруженному Acronis® и дважды щелкните файл для запуска установки.
Щелкните Установить для установки приложения.
Щелкните Запустить приложение после завершения установки.
Прочитайте Лицензионное соглашение и примите его, чтобы продолжить.
Инструкции по активации
Шаг 1 – Создание учетной записи
Щелкните Создать учетную запись для создания новой учетной записи. Также можно просто выполнить вход, если вы уже создали учетную запись.
Для создания учетной записи необходимо ввести следующие данные:
- Ваше имя
- Ваш адрес электронной почты
- Пароль
Щелкните кнопку Создать учетную запись после ввода этой информации.
Будет запрошен длинный ключ из 64 символов. Завершите следующие шаги для получения длинного ключа.
Примечание. также можно создать учетную запись с помощью ссылки ниже.
https://www.acronis.com/en-us/my/box/oem/
Этап 2 – Проверка электронной почты
Acronis® отправит электронное письмо с подтверждением на адрес электронной почты, указанный в предыдущем шаге.
Найдите это электронное письмо, откройте его и щелкните кнопку Confirm Your Account. Для выполнения этого шага у вас будет 5 дней.

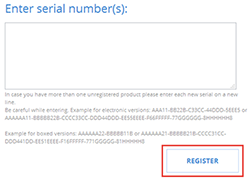
Шаг 3 – Регистрация продукта
Затем будет выполнен переход к онлайновой учетной записи Acronis®. Щелкните Регистрация продукта слева и правильно введите короткий ключ из 16 символов в поле. Затем щелкните Зарегистрировать.
Для продолжения прочитайте и примите Положения и условия Acronis®.
Длинный ключ из 64 символов станет доступным в онлайновой учетной записи Acronis®. Также вы получите длинный ключ из 64 символов по электронной почте.
Шаг 4 – Активация продукта
Найдите длинный ключ из 64 символов. Скопируйте и вставьте ключ в приложение Acronis® и щелкните Активировать.
Краткое руководство
Подключив SSD Kingston к системе, вы сможете начать процесс клонирования.
Этап 1 – Запуск приложения
Запустите приложение Acronis® True Image OEM и щелкните Клонировать диск.
Шаг 2 – Выбор способа клонирования
Выберите способ клонирования Автоматический и щелкните Далее.
Этап 3 – Выбор исходного диска
Выберите исходный диск, который нужно клонировать, и щелкните Далее.
Этап 4 – Выбор целевого диска
Выберите целевой диск, на который нужно клонировать данные, и щелкните Далее.
Шаг 5 – Итоговые сведения
Убедитесь, что выбраны правильные исходный и целевой диски. Также можно просмотреть изменения в целевом диске в разделах До и После. Щелкните Продолжить, чтобы начать операцию переноса данных.

Шаг 6 – Перенос данных
Появится уведомление, сообщающее о необходимости перезапуска компьютера. Закройте все другие открытые приложения и щелкните Перезапустить, когда будете готовы.
Система загрузится в приложение клонирования Acronis® и начнется операция переноса данных.
После завершения операции переноса данных компьютер будет отключен.
![]()
Шаг 7 – Завершение клонирования
Процесс клонирования на этом завершен. После отключения компьютера вы можете отключить исходный диск от компьютера. Затем включите компьютер и он загрузится с SSD Kingston.
Дополнительная информация
Дополнительную информацию, связанную с ПО Acronis® True Image OEM, см. в соответствующем руководстве пользователя.
Руководство пользователя Acronis
Примечание для пользователей MAC и Linux
ПО Acronis® True Image™ OEM несовместимо с пакетами Mac OS и Linux.
Have a need to upgrade hard drive, and backup disk data or system data? Here, you need to use a Kingston SSD utility for disk cloning. In this post, we show you the best Kingston SSD clone software, helping you to clone HDD to SSD so that your computer gets better performance.
Why Clone Disk to Kingston SSD
In order to upgrade disk to a larger one when the hard drive will be running out of space, replace old HDD with SSD for better performance, backup disk data without data loss, or avoid OS installation when having a batch of computers with the same configuration, you may choose to clone the disk.
Before cloning disk, it is essential to prepare a target disk to save this disk copy. SSD has become a popular hard drive due to its advantages, for example, lower power consumption, no noise, fast read-write speed, etc.
Among so many kinds of SSDs, Kingston SSD is a famous brand. Thus, in order to get a better computer performance, to clone disk to Kingston SSD should be chosen, but how to do disk cloning? Usually, you can turn to a piece of cloning software for SSD.
The Best Kingston SSD Clone Software
In the market of clone software for Kingston SSD, the software kinds are various.
Which one should you use?
Here we will recommend you to use two professional Kingston SSD clone tools – MiniTool ShadowMaker and MiniTool Partition Wizard.
MiniTool ShadowMaker
MiniTool ShadowMaker, the professional backup software for Windows 10/8/7, offers you highlighted features helping to back up file/folder, system, partition or disk. Besides, you are allowed to clone a system disk or data disk to another hard drive.
It has a Trial Edition which supports 30-day free trial. Now download this Kingston SSD cloning software. Or you can directly use MiniTool ShadowMaker Pro Edition for a try.
MiniTool ShadowMaker TrialClick to Download100%Clean & Safe
Tip: Some of you may search for Acronis True Image to clone HDD to SSD. Actually, it requires purchase and always fails to work. MiniTool ShadowMaker – Kingston clone software can be an alternative. Refer to this post to learn more: The Best Alternative to Acronis Clone Software.
How to use this clone software for Kingston SSD to clone hard drive to SSD free? Follow the guide below.
Preparatory work
- Make sure your SSD has been connected to your computer.
- The storage disk space of SSD should be large enough so that all data of the source disk can be transferred.
You had better prepare an empty disk since all the data on the target SSD will be destroyed during the process of disk cloning or OS migration. If there are some important data on SSD, please guarantee that there is a backup to avoid data loss.
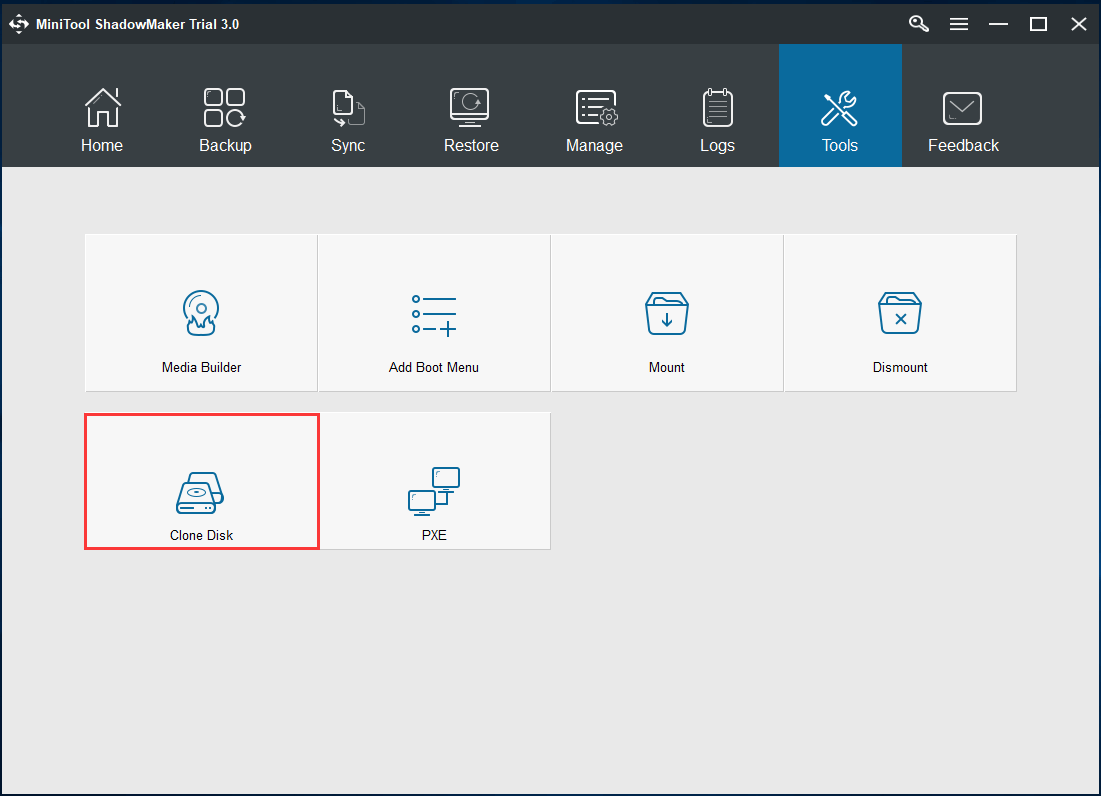
Step 1: Launch MiniTool ShadowMaker to its main interface.
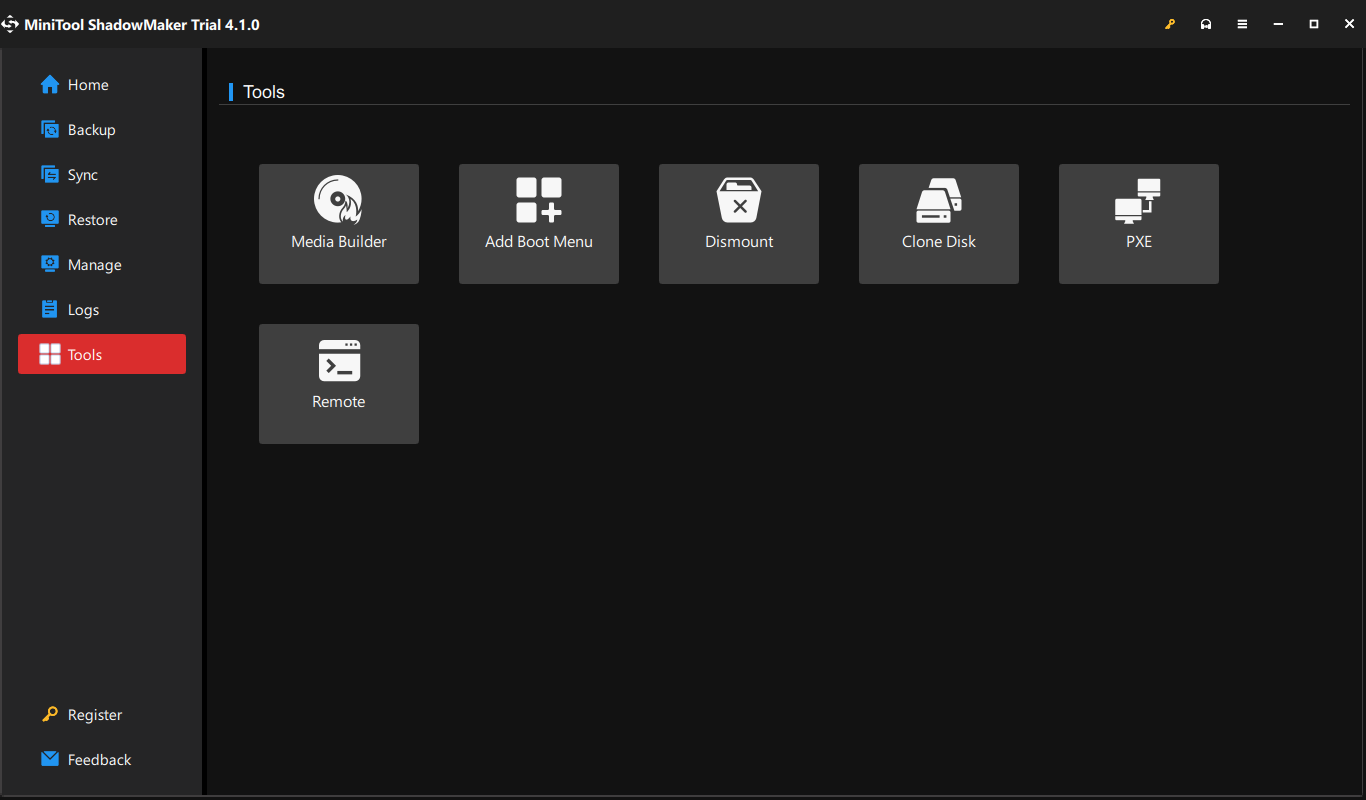
Step 2: Enter the Tools page, and choose the Clone Disk feature as shown below.
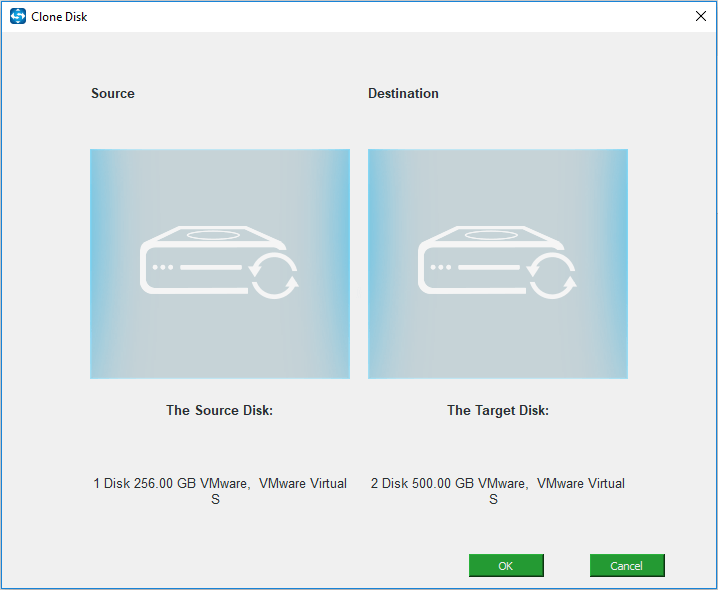
Step 3: In the pop-up window, enter the corresponding section to choose a source disk and target disk for the disk cloning.
Tip: It is recommended to clone system disk to your Kingston SSD for better performance. So, choose system disk as the source disk and Kingston SSD as the destination disk.
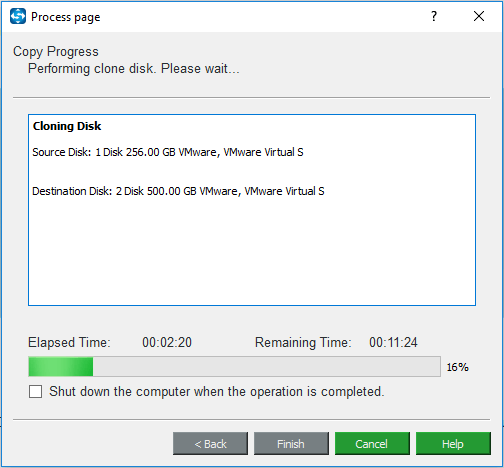
Step 4: See the following screenshot: this Kingston SSD clone software is performing the cloning operation. And you need to wait for a few minutes until it completes.
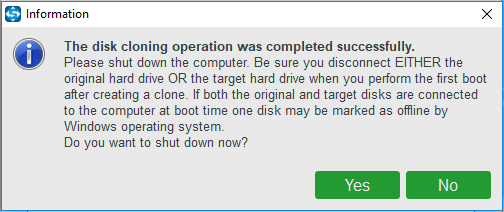
Step 5: Later, a piece of information will appear, recommending you to disconnect either the original disk or the target disk since Windows operating system may mark one as offline.
If you want to replace your system disk with the Kingston SSD, please shut down your computer, remove the system disk and put the SSD to the original place.
Then, the operating system can boot up quickly. If you clone disk to SSD only for backup, to remove the SSD after the disk cloning is OK.
Interested in this SSD drive clone software Now, get MiniTool ShadowMaker Trial Edition to have a free trial now!
MiniTool ShadowMaker TrialClick to Download100%Clean & Safe
“I’m looking for Kingston SSD clone software to clone HDD to SSD. Luckily, MiniTool ShadowMaker helps me to do this work effectively. “Click to Tweet
MiniTool Partition Wizard
This partition manager provides you with many powerful features for disk and partition management, such as resize/extend/format/delete/wipe partition, manage dynamic disk, migrate OS to SSD/HD, copy disk, copy partition, recover lost partitions, rebuild MBR, etc.
If you want to clone hard drive to SSD free, it is very easy with the Copy Disk feature of this program.
Due to its rich-featured functions, MiniTool Partition Wizard has earned a great reputation from users in the world. Therefore, for most users, it seems to be the best free cloning software for SSD.
Tip:
• For OS disk, the Free Edition doesn’t allow you to copy disk or migrate OS from MBR to GPT. Fortunately, the Professional or the more advanced edition is available. Learn more edition comparison.
• Before you do, please download the free Kingston HDD to SSD software or purchase its Professional Edition.
MiniTool Partition Wizard FreeClick to Download100%Clean & Safe
Clone Hard Drive to SSD
How do you clone a hard drive with this hard drive cloning software? Actually, it is very easy. Just follow the guidance below.
Step 1: Launch MiniTool Partition Wizard to its main interface. In order to clone data to Kingston SSD with this Kingston SSD clone software, please use Copy Disk feature. There are three ways to activate this function:
- Select it from the Wizard menu.
- Right-click on the OS disk and select Copy.
- Select the disk you want to clone, and then click this feature from Convert Disk.
Here take the first way as an example.
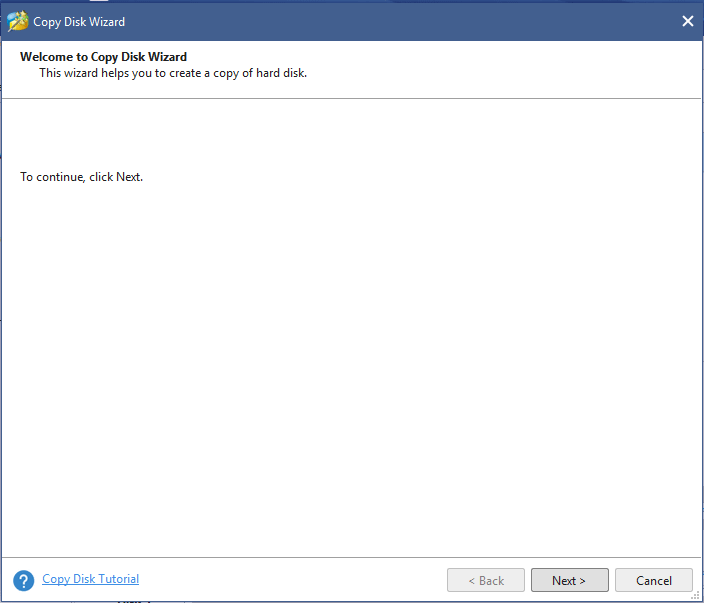
Step 2: After selecting this wizard, you will enter an interface to tell you this feature can create a copy of the hard disk. Then click Next to continue.
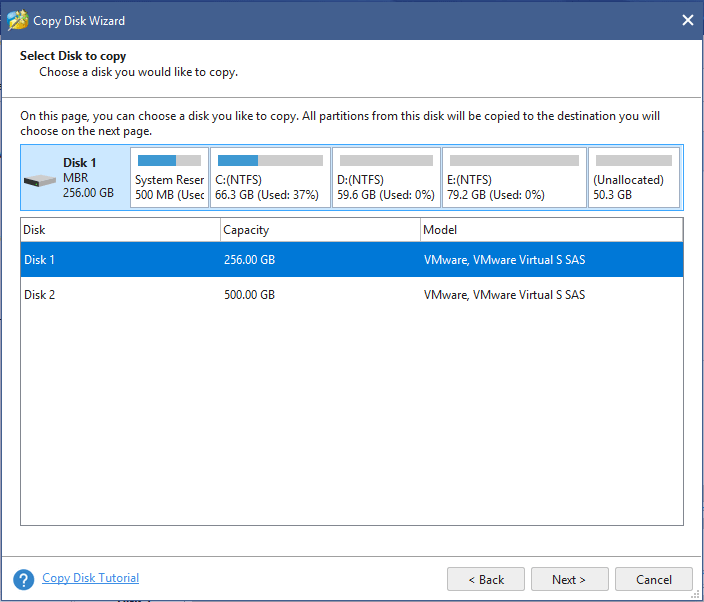
Step 3: Then on this page, you can choose a disk you like to copy. (Here choose to clone OS disk.) All partitions from this disk will be copied to the target disk that you will choose on the next page. Click the Next button in the bottom right corner.
Step 4: Next select a disk to copy the source content to. Here we choose SSD. All data from the source disk will be copied to SSD for better performance. You also need to click Next.
Step 5: Then in the pop-up window, two copy options are offered by this HDD to SSD cloning software:
- Fit partitions to entire disk: all your partitions will occupy the entire disk space of the SSD proportionally.
- Copy partitions without resizing: the partition size of your SSD won’t be changed. (Here we choose this way as an example.)
Recommendations:
- Here your target disk is SSD, so Align partitions to 1MB option should be chosen since it could improve your computer performance.
- If you want to migrate disk partitions to a GPT disk with this Kingston SSD clone software, please check Use GUID Partition Table for the target disk.
Step 6: Then this Kingston SSD utility will tell you to change BIOS setting and ensure the new disk is the default boot disk. Click Finish to return to the main interface.
Step 7: Then hit Apply to execute this disk cloning operation.
Now with the help of this professional Kingston SSD clone software, you can effectively finish data migration from HDD to SSD. If you only want to migrate Windows system to SSD, please read the following part.
Migrate OS to SSD
This feature is designed to migrate OS from HDD to SSD. And it offers two migration methods: one is to only copy the system required partitions. Another is to copy all partitions on the system disk to another disk and this way is equal to disk cloning.
Let’s see how to use this feature to do OS migration.
Step 1: Run the best Kingston SSD migration software, and then click Migrate OS to SSD/HD from the above wizards in the toolbar.
Step 2: Then choose one migration method and here we choose B as an example. This can help you to only copy the system required partitions.
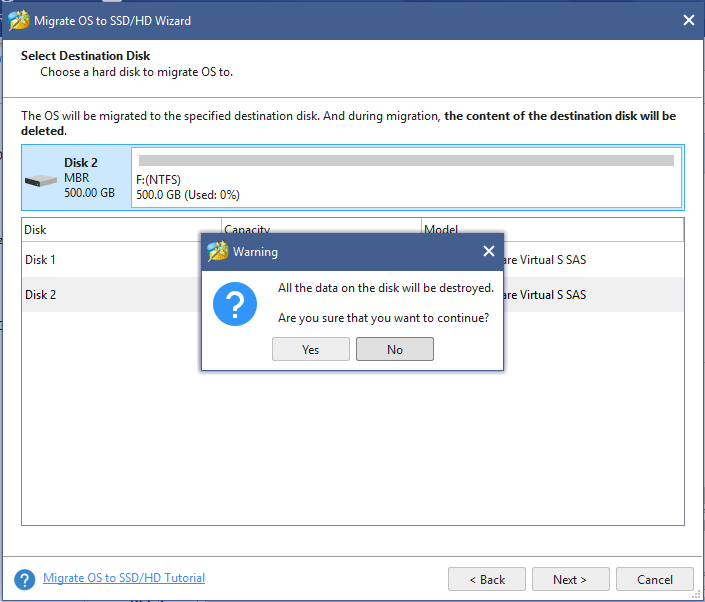
Step 3: Then you will enter an interface to select a disk as the destination disk. Please ensure no important data is saved on your SSD.
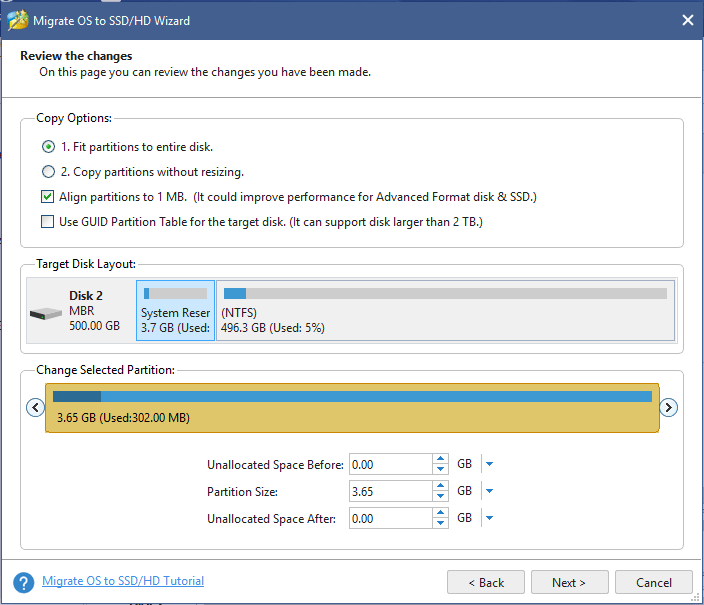
Step 4: Also, two copy options are provided by this Kingston SSD migration software, just choose one according to your requirement.
Step 5: Then this Kingston SSD software will remind you to change BIOS setting if you want to boot your computer from SSD.
Step 6: Finally, execute this OS migration operation by hitting “Apply”.
Note: After finishing moving OS to SSD, someone may encounter a case: the computer fails to boot from SSD. How to solve this issue? Check this post – Cloned Drive Won’t Boot | How to Make Cloned Drive Bootable?
Now we have introduced you two cloning ways offered by MiniTool Partition Wizard – clone disk and OS migration from HDD to SSD. And if you like this Kingston SSD software, please share it with your friends.
Click to Tweet
Tips about Disk Cloning
After introducing how to clone disk and migrate OS from HDD to SSD, now let’s learn more information about the difference between copy & paste and clone disk.
When referring to disk cloning, some of you think it means to copy & paste all files of the hard drive.
As a matter of fact, a simple copy only transfers all files to another disk but not contains the file allocation table, master boot record, and more additional data.
Therefore, if you want to boot your computer from the new hard drive, you must fail.
However, disk cloning can achieve this aim. Cloning means to copy all partition data from a disk to another disk by sector-by-sector mode.
Besides, data on the destination disk will be identical to the source drive. Thus, this ensures the integrality of data and your computer can boot from the destination disk.
So, disk cloning will be a good choice. Just choose a piece of professional Kingston solid-state drive software to migrate all data to SSD or move OS to SSD for a better performance or disk upgrade.
Conclusion
In this post, we show you why clone disk to Kingston SSD, two professional Kingston SSD clone software, how to clone disk/migrate OS from HDD to SSD and some tips of disk cloning.
If you want to clone a disk or do OS migration, please get the Kingston HDD to SSD software from the following button for a try.
MiniTool ShadowMaker TrialClick to Download100%Clean & Safe
Should you have any question or suggestion to this article or our Kingston clone software, welcome to contact us by leaving a comment in the text box below or sending an email via [email protected]. Much appreciated!
Kingston SSD Clone Software FAQ
Does Kingston SSD have cloning software?
The Kingston SSD doesn’t come with cloning software. If you need one, get MiniTool ShadowMaker or MiniTool Partition Wizard to have a try.
How do I clone a Kingston SSD?
You can download MiniTool ShadowMaker or MiniTool Partition Wizard to easily clone your Kingston SSD. Just launch one hard drive cloning software, choose a cloning feature, and follow the on-screen instructions to finish the cloning.
What is the best SSD cloning software?
MiniTool ShadowMaker and MiniTool Partition Wizard are the best SSD cloning software. You can get one of them to clone your SSD.
How can I clone my SSD for free?
- Launch MiniTool ShadowMaker.
- Choose Clone Disk from Tools.
- Choose source disk and target disk.
- Start cloning your SSD.
If you want to play PC games for better performance or boot Windows faster, cloning the disk to a Kingston SSD is a good choice for you. In this guide on MiniTool Website, we will introduce some best Kingston SSD clone software to you.
Why Do You Need to Clone Disk to Kingston SSD?
SSD (Solid-State Drive) and HDD (hard disk drive) are two common types of computer hard drives. When you plan to get a new computer, you need to decide to choose either an SSD or HDD as the storage component. Which one is better? It depends on your needs.
If you want an economical product and need a lot of storage capacity, an HDD is the best choice for you. However, an SSD tends to replace a traditional HDD with its excellent properties like speed, performance, ruggedness, noise and more.
Among so many SSDs on the market, which one do you choose? Kingston is a famous storage device brand and its SSDs are highly valued for their reliable performance and quality.
To get a better computer performance, you can consider cloning disk. Under the circumstances below, you need to resort to Kingston SSD migration software:
- Upgrade disk to a larger Kingston SSD
- Transfer data from HDD to Kingston SSD
- Back up disk data without data loss
- Migrate operating system to Kingston SSD without reinstalling
How to perform a disk cloning on Windows 10/11? It is a good idea to turn to some clone software for Kingston SSD. In the second part, we will show you some free methods to clone your HDD to Kingston SSD.
Best Kingston SSD Clone Software
Some Kingston SSDs offer a license for the SSD migration tool – Acronis True Image OEM to help you migrate OS to Kingston SSD. However, you may find Acronis clone disk failed while cloning sometimes. If you are unable to fix this error, you can turn to some free Kingston SSD clone software – MiniTool ShadowMaker and MiniTool Partition Wizard.
Option 1: MiniTool ShadowMaker
MiniTool ShadowMaker is a piece of free and professional Windows backup software. This powerful tool comes with multiple features, enabling you to create a file backup, system backup, disk backup, partition backup, and sync your files.
MiniTool ShadowMaker TrialClick to Download100%Clean & Safe
What’s more, MiniTool ShadowMaker even supports cloning a data disk or system disk to another hard drive. This useful allows you to transfer all data from HDD to SSD without reinstallation. Here, let’s see how to clone your HDD to the Kingston SSD with this tool:
Step 1. Download and install MiniTool ShadowMaker for free.
Step 2. Launch this tool and hit Clone Disk in the Tools Page.
Step 3. Choose the system disk as the source disk and Kingston SSD as the target disk.
Step 4. After hitting Start, you will be prompted by a warning message saying that Data on the target disk will be destroyed. Hit OK to confirm this action.

Step 5. MiniTool ShadowMaker doesn’t need a reboot even when you are cloning the system disk, that’s why we recommend this Kingston SSD clone software. Once the cloning process is complete, you had better disconnect the source disk or the target disk because they have the same signature.
Warning:
Windows operating system doesn’t allow two hard drive disks to work at the same time if they have the same disk signature, or else you will encounter disk signature collision on your computer.
Option 2: MiniTool Partition Wizard
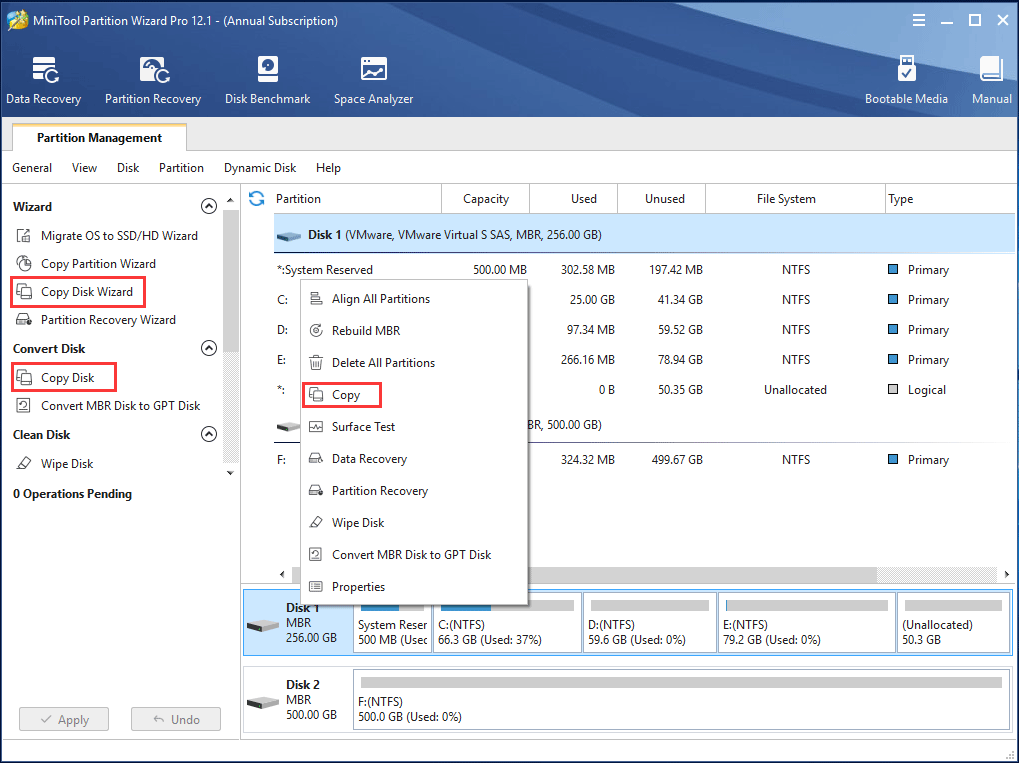
Apart from cloning HDD to SSD with MiniTool ShadowMaker, you can also rely on another Kingston SSD clone software – MiniTool Partition Wizard. This free partition manager offers two features for you to clone your hard drive:
- Copy Disk Wizard – is designed for both system disk clone and data disk clone.
- Migrate OS to SSD/HD Wizard – is only aimed at OS migration.
Here, we will show you how to use the two features to clone a hard drive with MiniTool Partition Wizard respectively:
# Copy Disk Wizard
This feature is similar to the Clone Disk feature in MiniTool ShadowMaker, which helps to copy all partitions and data from one disk to another. Whether you want to copy a system disk or data disk, it can meet your needs. Here’s how to use this feature to clone your disk:
Step 1. Launch MiniTool Partition Wizard to enter the main interface.
MiniTool Partition Wizard DemoClick to Download100%Clean & Safe
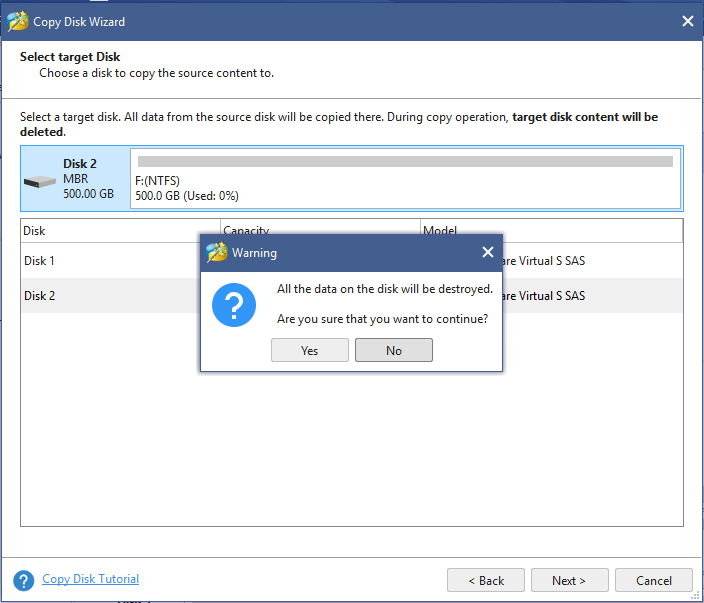
Step 2. In the left pane, click on Copy Disk Wizard and choose the source disk.
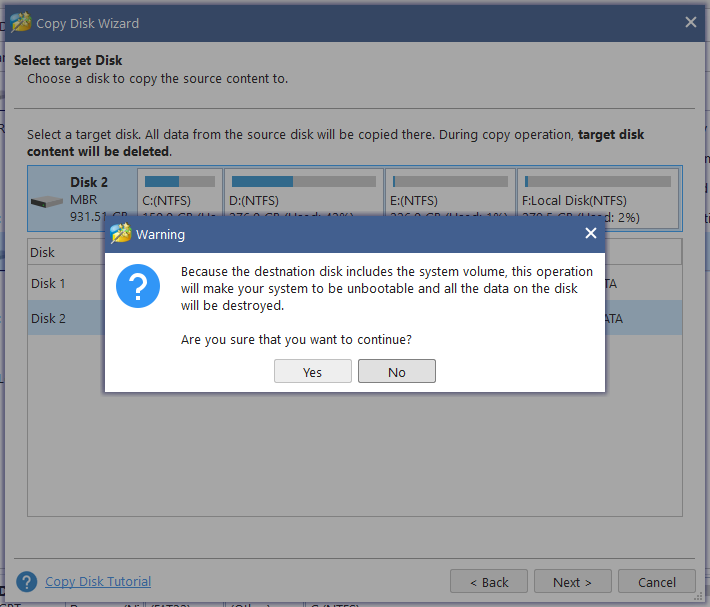
Step 3. Choose your Kingston SSD as the destination disk and hit Yes to confirm this action.
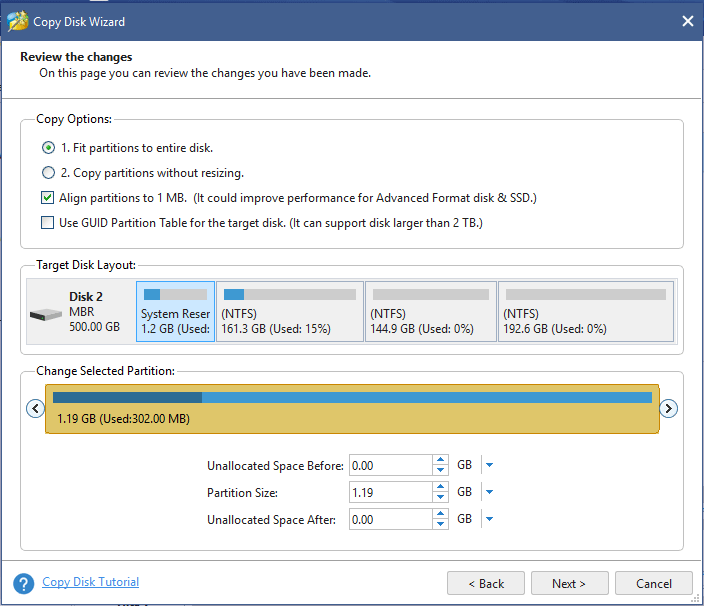
Step 4. Choose one copy option:
- Fit partition to entire disk – all the partitions will occupy the entire disk of the SSD proportionally.
- Copy partitions without resizing – the partition size of Kingston SSD won’t be changed. Here, we select this option as an example.
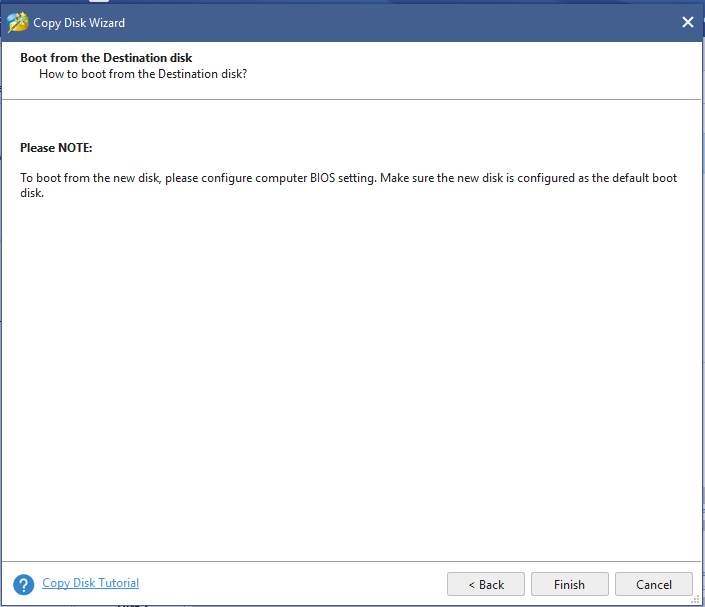
Step 5. Since MiniTool Partition Wizard will need a reboot to complete this cloning process, you should change BIOS settings and ensure the new disk is the default boot disk.
Tips:
It is noted that if you need to clone the system disk or migrate the system to an SSD with MiniTool Partition Wizard, you need to register it with a license to apply the last cloning operation. If you want to clone a data disk, it is totally free.
Click Finish to go back to the main interface and hit Apply to begin the disk cloning process.
Tips:
How long does your disk cloning process take? If it takes much more time than expected, you can seek some solutions in this guide — [Full Fixed!] Disk Clone Slow on Windows 10/11.
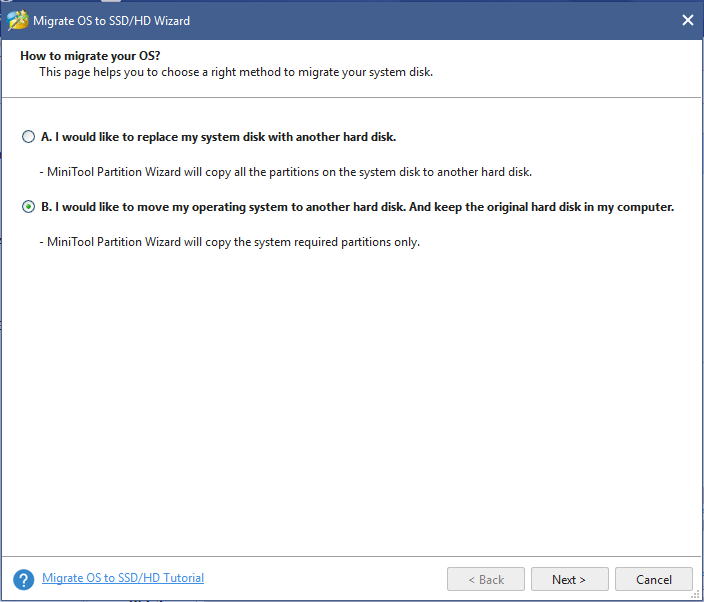
# Migrate OS to SSD/HD Wizard
As the name suggests, this feature allows you to migrate OS from HDD to SSD. It also provides you with two migration methods – either to copy the system required partitions or copy all the partitions on the system disk to another disk. Let’s see how it works:
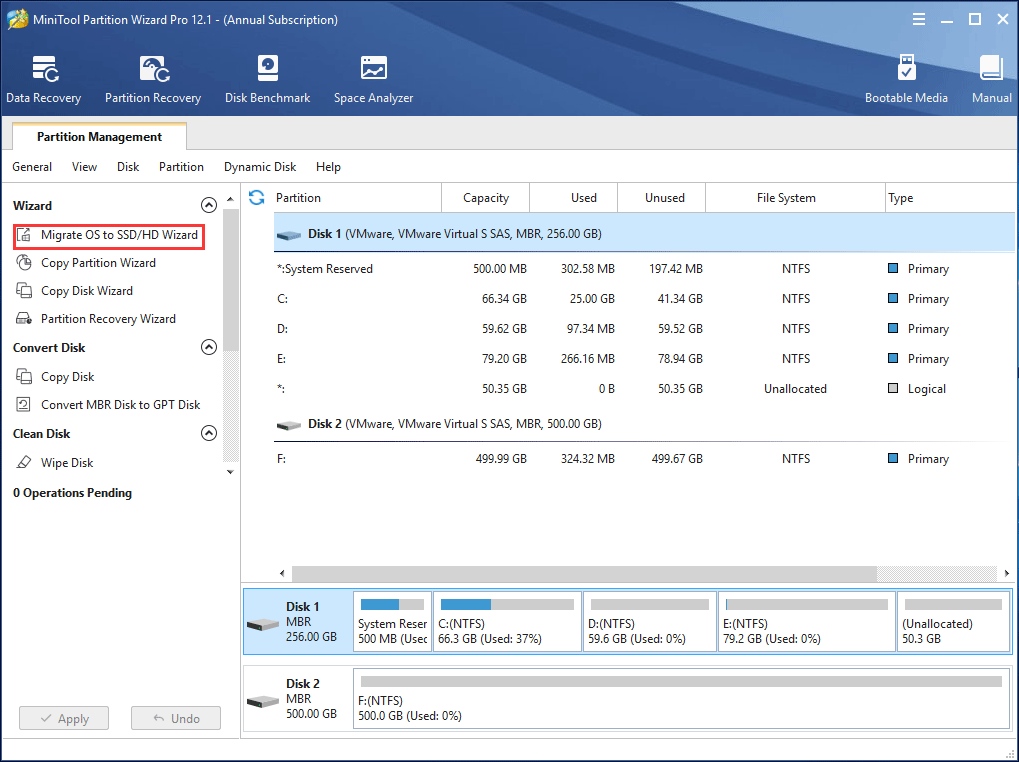
Step 1. Launch this Kingston SSD software and select Migrate OS to SSD/HD Wizard from the left pane.
MiniTool Partition Wizard DemoClick to Download100%Clean & Safe
Step 2. Choose a method to migrate your system disk. Here, we choose the second method as an example.

Step 3. Then, you need to choose the Kingston SSD as the destination disk and make sure there is no important data on it.
Step 4. Choose one of the copy options according to your actual need.
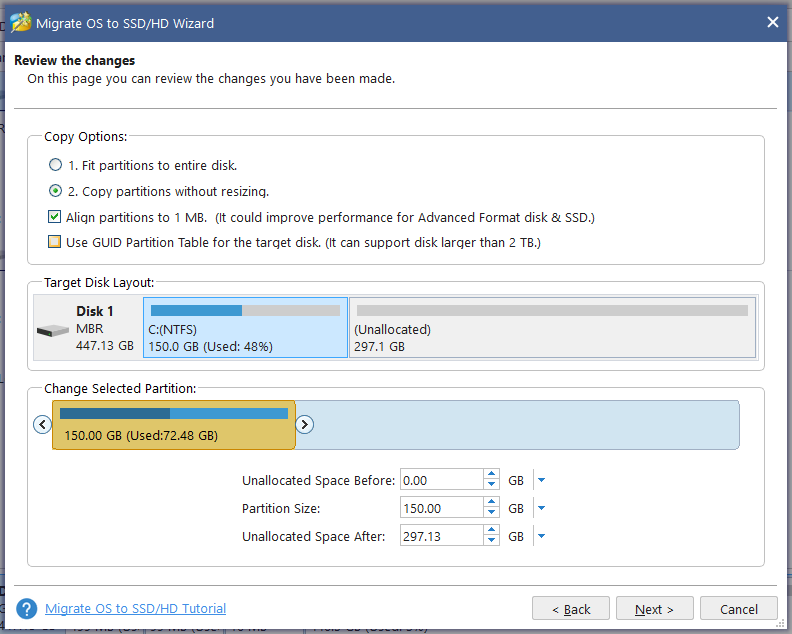
Step 5. Then MiniTool Partition Wizard will require you to change the boot order in BIOS to boot your PC from the target Kingston SSD.
Step 6. Click on Apply to start the OS migration.
Are you looking for reliable Kingston SSD clone software at the moment? MiniTool ShadowMaker and MiniTool Partition Wizard can meet your need! This guide teaches you how to migrate OS to Kingston SSD with them easily. Click to Tweet
How to Deal with the Old Drive After Cloning?
Some of you might wonder what to do with your old drive after cloning the operating system from an HDD to your Kngston SSD. Usually, you have two options: one is to sell it to others, the other is to use it as a data disk.
Before selling the old drive to others, you had remove all the data on it to avoid data or privacy leakage. If you want to use the old drive as a data storage device, you need to format it and re-partition it.
See this guide: Does Partitioning a Hard Drive Affect Performance? Get Answer
# Further Reading: Kingston SSD Not Detected
Some of you might find that Kingston SSD is not detected on your computer. Don’t worry! This issue might be associated with the drive or some wrong settings below:
- A missing or conlicting drive letter
- Memory issues
- Uninitialized SSD
- Faulty disk driver
Fix 1: Assign the New Driver Letter
Step 1. Right-click on the Start icon and select Disk Management from the quick menu.
Step 2. Right-click on your SSD can choose Change Drive Letter and Paths.

Step 3. If the drive letter doesn’t exist, hit Add. Also, you can hit Change to tweak the current drive letter.
Step 4. Choose the new drive letter from the drop-down menu and hit OK.
Fix 2: Initialize Kingston SSD
Step 1. Open Disk Management and right-click on the SSD that is not detected to select Initialize Disk.
Step 2. In the Initialize Disk screen, choose the disk you want to initialize and select the partition style.
Step 3. Click on OK to start the initialization process.
Step 4. After your Kingston SSD is initialized, right-click on your SSD volume in Disk Management and select New Simple Volume.
Step 5. Follow the onscreen guidelines to assign the SSD volume and drive letter.
Fix 3: Update Disk Driver
Step 1. Type device manager in the search bar and hit Enter.
Step 2. Expand the Disk drives option and right-click on your Kingston SSD to choose Update driver.

Step 3. Select Search automatically for drivers and download & install any update available.
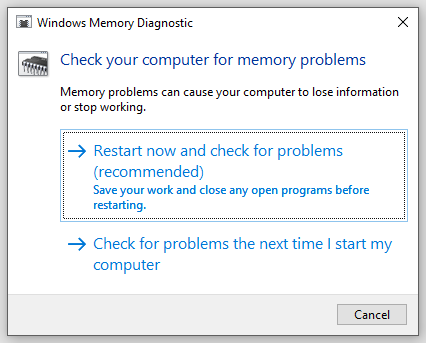
Fix 4: Run Memory Diagnostic Tool
Step 1. Press Win + R to evoke the Run dialog box.
Step 2. Type mdsched.exe and hit Enter to launch Windows Memory Diagnostic.
Step 3. Select Restart now and check for problems (recommended) and wait for the process to complete. After completion, your computer will reboot automatically and display the test results for you.
We Need Your Voice
In conclusion, when it comes to Kingston SSD clone software, there are two recommended options for you to choose from: MiniTool ShadowMaker and MiniTool Partition Wizard. Both of them are free, reliable and easy to use, so you can choose one when you need to clone a disk.
We are sincerely looking forward to receiving any ideas about MiniTool ShadowMaker or MiniTool Partition Wizard. If you need any help when using the two Kingston SSD clone software, feel free to leave a comment below or directly contact us via [email protected].
Kingston SSD Clone Software FAQ
Does Kingston SSD come with cloning software?
Some Kingston SSDs come with clone software, but not all of them include a clone tool. To clone a Kingston SSD or clone a hard drive to it, you can try two freeware — MiniTool ShadowMaker and MiniTool Partition Wizard.
How to clone Windows 10 to Kingston SSD?
To clone Windows 10 to Kingston SSD, you can perform a disk cloning with MiniTool ShadowMaker and MiniTool Partition Wizard, or you can directly migrate your OS to SSD with MiniTool Partition Wizard.
Does SSD come with cloning software?
A few SSDs come with clone software, for example, a Samsung SSD has the cloning software called Samsung Data Migration. However, most SSDs don’t come with clone software. MiniTool ShadowMaker and MiniTool Partition Wizard are the best software to clone a disk to an SSD from Kingston, Samsung, WD and more, and they are really worth giving a shot.
Is Acronis True Image free?
Unfortunately, Acronis True Image does not offer a free plan. In order to use the advanced features, you must pay for a license or subscription.
SSD-накопители становятся все более популярными в мире компьютеров и ноутбуков. Они обладают высокой скоростью работы и большей надежностью по сравнению с обычными жесткими дисками. Если вы решили установить SSD Kingston в свой компьютер и перенести на него операционную систему Windows, то этот пошаговый гайд поможет вам разобраться в процессе переноса и избежать возможных проблем.
Перенос Windows на SSD Kingston состоит из нескольких основных этапов. Вначале необходимо подготовить SSD и компьютер к установке. Затем следует скопировать все файлы операционной системы на накопитель. После этого нужно настроить BIOS для загрузки с SSD Kingston. И, наконец, убедиться, что Windows успешно запускается и работает на новом диске.
Прежде всего, перед установкой SSD Kingston убедитесь, что ваш компьютер или ноутбук поддерживает данный тип накопителя. Убедитесь, что у вас достаточно свободного места на SSD для установки Windows. Также рекомендуется сохранить все важные данные из операционной системы, чтобы исключить их потерю в процессе переноса.
Когда все необходимые подготовительные мероприятия сделаны, можно приступить к переносу Windows на SSD Kingston. Используйте специальные программы для клонирования дисков, такие как AOMEI Backupper, Macrium Reflect или Acronis True Image. Подключите SSD к компьютеру, запустите программу и выберите необходимые опции для клонирования. После завершения данной процедуры, отсоедините старый жесткий диск и подключите SSD Kingston к компьютеру вместо него.
Важно отметить, что процесс переноса Windows на SSD Kingston может быть немного сложным для неопытных пользователей. Если вы не уверены, что справитесь с задачей самостоятельно, лучше обратиться к специалисту. Неверные действия могут повредить данные и операционную систему.
После установки SSD Kingston и переноса Windows на него, вам остается только настроить загрузку операционной системы через BIOS. Зайдите в BIOS, выберите диск с установленным Windows и сделайте его основным загрузочным устройством. После всех настроек сохраните изменения и перезагрузите компьютер. Если все было сделано правильно, Windows успешно загрузится и начнет работать с SSD Kingston.
Теперь, когда Windows успешно перенесена на SSD Kingston, вы сможете наслаждаться преимуществами более быстрой и стабильной работы операционной системы. SSD существенно повысит производительность вашего компьютера. Пользуйтесь вашей новой системой на SSD Kingston с уверенностью и наслаждайтесь высокой скоростью работы своего ПК.
Содержание
- Перенос Windows на SSD Kingston: зачем это нужно?
- Основные преимущества SSD Kingston перед обычным жестким диском
- Как подготовить SSD Kingston для установки Windows
- Подробная инструкция по переносу операционной системы на SSD Kingston
Перенос Windows на SSD Kingston: зачем это нужно?
Популярность SSD-накопителей растет с каждым годом, поскольку они предлагают более надежное хранение информации и ускоряют работу всей системы в целом. Благодаря передаче данных по электронным цепям, а не по вращающимся магнитным дискам, SSD-накопители имеют намного большую скорость доступа к данным, что позволяет улучшить опыт работы с компьютером, уменьшить время загрузки операционной системы и повысить производительность приложений.
Перенос операционной системы Windows на SSD Kingston поможет значительно уменьшить время загрузки системы, запуска программ и произвольных операций. Кроме того, вы получите надежное и долговечное хранение данных, так как SSD-накопители не имеют подвижных частей и не подвержены физическому износу, присущему жестким дискам.
Если вы хотите повысить производительность своего компьютера, сократить время загрузки системы и сделать работу с приложениями более быстрой и беззаботной, перенос Windows на SSD Kingston – это отличное решение. Следуйте нашей подробной инструкции и наслаждайтесь улучшенной производительностью вашего компьютера.
Основные преимущества SSD Kingston перед обычным жестким диском
1. Скорость загрузки и работы системы.
SSD Kingston обеспечивает значительно более быструю загрузку операционной системы и приложений в сравнении с обычным жестким диском. Благодаря использованию флеш-памяти вместо механических дисковых пластин, SSD значительно сокращает время доступа к данным, что позволяет операционной системе работать гораздо более отзывчиво и ускоряет выполнение различных задач.
2. Повышенная надежность работы.
В отличие от обычных жестких дисков, SSD Kingston не содержит подвижных частей, таких как вращающиеся пластинки и механический считывающий головок. Это делает их значительно более надежными, поскольку они менее подвержены износу и механическим повреждениям. Кроме того, SSD устойчивы к сотрясениям и ударам, что делает их идеальным решением для переносных компьютеров и ноутбуков.
3. Более низкое энергопотребление.
SSD Kingston потребляют гораздо меньше энергии по сравнению с обычными жесткими дисками. Это позволяет увеличить время автономной работы ноутбука или уменьшить электроэнергию, потребляемую на компьютерах и серверах в офисных условиях.
4. Бесшумная работа.
За счет отсутствия подвижных частей, SSD Kingston работают практически бесшумно, что особенно актуально для пользователей, которым важно сохранить тихую атмосферу на своем рабочем месте или домашнем компьютере.
5. Компактность и небольшой вес.
SSD Kingston являются компактными и легкими устройствами, благодаря чему они могут быть установлены в разные типы компьютеров, включая ультрабуки и нетбуки, где нет места для установки обычного жесткого диска. Это позволяет увеличить мобильность и удобство использования портативных компьютеров.
Итак, преимущества SSD Kingston над обычными жесткими дисками очевидны: быстрая загрузка и работа системы, повышенная надежность, низкое энергопотребление, бесшумная работа, компактность и лекота. Переход на SSD Kingston позволит вам получить новый уровень производительности и комфорта в использовании вашего компьютера.
Как подготовить SSD Kingston для установки Windows
Перед установкой операционной системы Windows на новый SSD Kingston необходимо выполнить несколько предварительных шагов. Правильная подготовка диска позволит избежать возможных проблем и гарантированно настроить его для работы с Windows.
1. Проверка совместимости
Прежде всего, убедитесь, что выбранный SSD Kingston совместим с вашей системой. Проверьте требования по интерфейсу и формфактору SSD, чтобы убедиться, что он подходит для вашего компьютера или ноутбука. Обратите внимание на поддерживаемые операционные системы и версии Windows.
2. Резервное копирование данных
Перед установкой Windows на SSD Kingston рекомендуется создать резервные копии всех важных данных с текущего жесткого диска. Это поможет вам сохранить ваши файлы и настроенные программы, а также избежать их потери в случае неудачной установки.
3. Форматирование SSD Kingston
Следующим шагом является форматирование SSD Kingston. Откройте «Диспетчер дисков» в Windows, найдите ваш новый SSD и удалите все разделы на нем. Затем создайте новый раздел и выберите файловую систему NTFS. Подтвердите все изменения и дождитесь завершения процесса.
4. Обновление ПО SSD Kingston
Для достижения максимальной производительности SSD Kingston рекомендуется обновить его программное обеспечение до последней версии. Проверьте официальный сайт производителя, скачайте и установите последний драйвер и утилиту для вашей модели SSD. Это позволит вам получить все возможности SSD и обеспечить его стабильную работу.
5. Проверка подключения SSD Kingston
Перед установкой Windows убедитесь, что SSD Kingston правильно подключен к вашей материнской плате и питанию. Проверьте правильность подключения кабелей SATA и питания, а также убедитесь, что контакты на SSD и разъеме вставлены без повреждений. Это позволит вам избежать проблем с распознаванием диска в процессе установки операционной системы.
Следуя этим простым инструкциям, вы подготовите SSD Kingston для установки операционной системы Windows и сможете наслаждаться быстрой и стабильной работой вашего компьютера.
Подробная инструкция по переносу операционной системы на SSD Kingston
С переносом операционной системы на SSD Kingston можно значительно ускорить работу компьютера и повысить его общую производительность. Чтобы успешно выполнить эту задачу, следуйте инструкциям ниже:
1. Подготовьте все необходимые материалы и инструменты для переноса операционной системы на SSD Kingston. Вам потребуется компьютер со встроенным HDD (жесткий диск),
SSD Kingston, USB-кабель с поддержкой типа подключения SSD (например, SATA или M.2) и программное обеспечение для клонирования диска, например, Acronis True Image.
2. Подключите SSD Kingston к своему компьютеру с помощью USB-кабеля.
3. Запустите программу для клонирования диска на компьютере. В данном примере мы будем использовать программу Acronis True Image.
4. В программе Acronis True Image выберите функцию «Клонировать диск» и выберите исходный HDD, на котором установлена операционная система.
5. Выберите SSD Kingston в качестве целевого диска для клонирования операционной системы. Убедитесь, что SSD Kingston имеет достаточно свободного места для переноса всех данных.
6. Перейдите к настройке параметров клонирования. Убедитесь, что выбрана опция «Клонировать весь диск» и что операционная система является основным разделом на исходном HDD.
7. Перед тем, как начать процесс клонирования, убедитесь, что все необходимые данные из исходного HDD сохранены в безопасном месте, так как процесс клонирования может стереть все данные.
8. Начните процесс клонирования операционной системы на SSD Kingston и дождитесь его завершения.
9. После завершения процесса клонирования выключите компьютер и отсоедините исходный HDD.
10. Подключите SSD Kingston к компьютеру в качестве основного диска и включите компьютер.
11. Убедитесь, что операционная система успешно загружается с SSD Kingston.
12. Проверьте, работает ли все корректно на новом диске. Если возникают какие-либо ошибки или проблемы, проверьте настройки BIOS и установите SSD Kingston в качестве первого загрузочного устройства.
13. После установки, не забудьте обновить драйверы для SSD Kingston, чтобы использовать его на максимальной производительности.
Теперь ваша операционная система успешно перенесена на SSD Kingston, и вы можете наслаждаться его быстротой и производительностью.