Magic Mouse – не самое эргономичное устройство на планете, но вы просто не можете отрицать, насколько хорошо она работает на Mac. Он безупречно подключается и очень удобен в настройке. Но что, если вы хотите использовать его на ПК или Mac под управлением Windows 10 через Boot Camp?
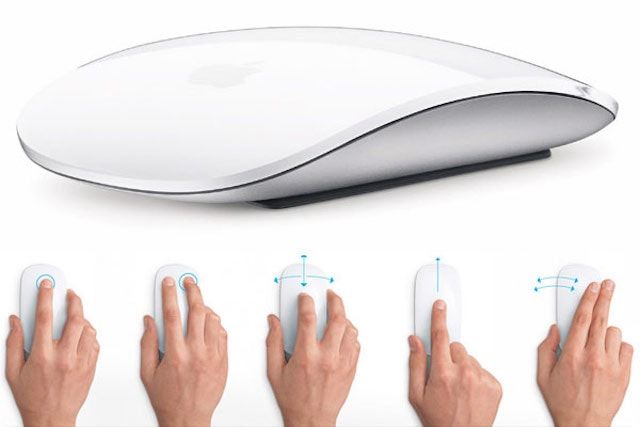
Magic Mouse использует Bluetooth для подключения, поэтому вы можете без проблем подключить ее к Windows и использовать для базовой навигации. Однако сенсорная природа устройства ввода означает, что вы не можете никуда прокручивать, пока не установите соответствующие драйверы.

Ниже вы узнаете все, что вам нужно знать о настройке Magic Mouse на ПК или Mac под управлением Windows 10.
Вы можете подключить Magic Mouse через USB к ПК или Mac под управлением Windows 10, как любое другое устройство Bluetooth. Если ваш компьютер не поддерживает Bluetooth, вы можете подключить его используя вместо этого адаптер Bluetooth.
- Откройте меню «Пуск» и выберите «Настройка».
- Выберите «Устройства».
- Переключитесь на Bluetooth и другие устройства на боковой панели.
- Включите переключатель рядом с Bluetooth (если он отключен) и выберите Добавить Bluetooth или другое устройство.
- Выберите Bluetooth.
- В появившемся списке Bluetooth-устройств выберите Magic Mouse.
- Выберите Готово, чтобы завершить процесс сопряжения.
Примечание. Если ваша мышь Magic Mouse не отображается в списке, просто выключите устройство ввода, а затем снова включите. Этого должно быть достаточно, чтобы Windows могла его обнаружить.
Теперь вы можете использовать Magic Mouse для навигации в Windows. Кликните левой стороной мыши, чтобы выполнить обычный клик, и правой стороной, чтобы выполнить клик правой кнопкой мыши.
Вы также можете поменять местами кнопки и отрегулируйте скорость курсора с помощью элементов управления в разделе Пуск> Настройки> Устройства> Мышь. Вы также найдете варианты для изменения скорости прокрутки, но вы не сможете прокручивать в Windows, пока не добавите драйвер Apple Wireless Mouse на свой компьютер.
Не забудьте выбрать «Дополнительные параметры мыши» (расположенные справа от экрана), чтобы настроить скорость двойного клика, точность указателя и т. д.
Установите драйвер Magic Mouse на ПК
Вы должны вручную установить драйвер Apple Wireless Mouse, если хотите прокручивать с помощью Magic Mouse на ПК. Есть два способа получить файлы драйвера.
Загрузите драйвер прямо из Apple
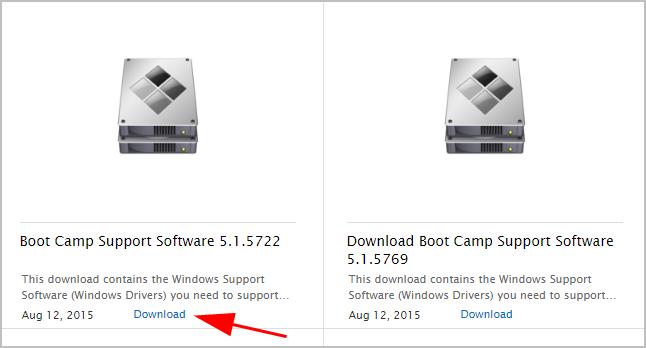
Apple предоставляет пакет программного обеспечения поддержки Boot Camp, который содержит драйвер Magic Mouse, необходимый для прокрутки на ПК. Однако он довольно устарел и может не поддерживать прокрутку на некоторых компьютерах под управлением Windows 10.
- Перейти к Страница загрузок Apple и найдите программное обеспечение для поддержки учебного лагеря. Затем загрузите самую последнюю версию программного обеспечения поддержки Boot Camp на свой компьютер.
- Извлеките загруженный ZIP-файл.
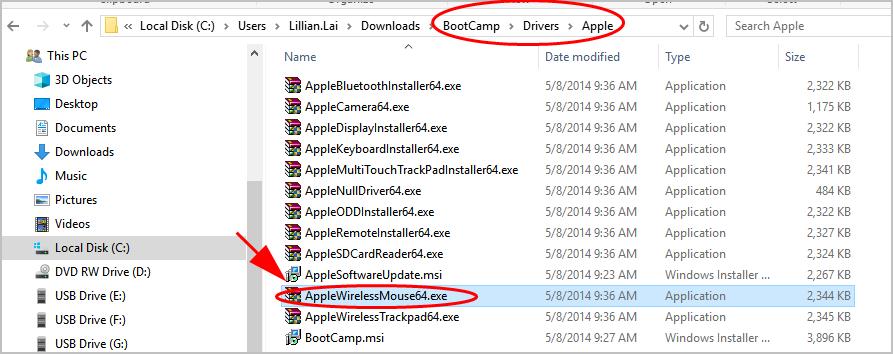
- Откройте извлеченную папку и перейдите в BootCamp> Драйверы> Apple.
- Дважды кликните файл с надписью AppleWirelessMouse64 и следуйте всем инструкциям на экране, чтобы установить драйверы для беспроводной мыши Apple.
- Перезагрузите компьютер и проверьте, можете ли вы выполнять вертикальную или горизонтальную прокрутку в Windows с помощью Magic Mouse. Если нет, попробуйте следующий метод.
Загрузите драйвер с Apple, используя Brigadier
Brigadier – это скрипт Python, который может получить последнюю версию программного обеспечения поддержки Boot Camp от Apple, идентифицировав ваш компьютер как Mac. Драйвер Apple Wireless Mouse, входящий в комплект поставки, совместим практически со всеми компьютерами под управлением Windows 10.
- Скачать Бригадный генерал из GitHub и скопируйте файл Brigadier.exe на рабочий стол.
- Откройте меню «Пуск», введите cmd и выберите «Открыть».
- Введите приведенную ниже команду в консоль командной строки и нажмите Enter:
cd Desktop
- Введите команду ниже и нажмите Enter:
brigadier.exe -m MacBookPro16,3
Приведенная выше команда включает идентификатор модели Mac – MacBookPro16,3, который определяет ваш ПК как 13-дюймовый MacBook Pro 2020 года выпуска. Вы можете поменять его местами с другим идентификатором, но рекомендуется использовать один из самых последних моделей Mac, поддерживающих Windows через Boot Camp.
- Подождите, пока Brigadier загрузит и распакует последние версии драйверов с Apple на рабочий стол.
Примечание. Если Brigadier не удается загрузить файлы (или если вы видите пустую папку на рабочем столе), установите 7-молния на вашем ПК и попробуйте еще раз.
- Откройте папку BootCamp на рабочем столе и перейдите в $ WinPEDriver $> AppleWirelessMouse.
- Кликните правой кнопкой мыши файл AppleWirelessMouse64.inf и выберите «Установить».
Совет: Если вы не видите расширения файлов в проводнике, откройте меню «Файл» и выберите «Изменить папку и параметры поиска». Затем переключитесь на вкладку «Просмотр» и снимите флажок «Скрыть расширения для известных типов файлов».
- Выберите Да и ОК, чтобы завершить установку драйвера.
- Перезагрузите компьютер. Теперь у вас должна быть возможность прокручивать как по горизонтали, так и по вертикали с помощью Magic Mouse.
Установите драйвер Magic Mouse на Mac
Когда ты настроить Windows 10 с помощью Boot Camp, ваш Mac автоматически установит пакет программного обеспечения поддержки Boot Camp, который содержит все драйверы, необходимые для работы устройств Apple в Windows. Однако в большинстве случаев Magic Mouse не будет прокручиваться, пока вы не установите ожидающие обновления драйверов через Apple Software Update.
- Откройте меню «Пуск», введите «Обновление программного обеспечения Apple» и выберите «Открыть».
Примечание. Обновление программного обеспечения Apple предварительно установлено в Windows, запущенной через Boot Camp. Его не нужно устанавливать отдельно.
- Подождите, пока Apple Software Update выполнит поиск доступных обновлений.
- Установите флажки рядом с «Обновление устройства ввода Apple» и «Обновление Boot Camp». Также рекомендуется выбрать любые другие перечисленные обновления.
- Выберите «Установить», чтобы загрузить и применить обновления.
- Перезагрузите ваш Mac. Magic Mouse должна начать правильно работать в Windows.
Даже после правильной настройки Magic Mouse в Windows 10 она не ощущается по сравнению с использованием устройства вместе с macOS. Но именно здесь на сцену выходит Magic Mouse Utilities.
Magic Mouse Utilities – это сторонняя программа, которая поддерживает Windows как на ПК, так и на Mac. Он вводит несколько жестов, которые позволяют перемещаться между страницами, переключаться между рабочими столами, вызывать представление задач и т.д.
Он также позволяет управлять работой прокрутки, вводит настраиваемое действие при нажатии средней кнопки мыши, помогает легко менять кнопки и т. д.
Утилиты Magic Mouse Utilities стоят 14,90 долларов за годовую подписку, но вы можете получить 28-дневную бесплатную пробную версию, чтобы все тщательно протестировать. Это максимально приближено к эмуляции Magic Mouse, подобной Mac, в Windows.
The magic mouse is Apple’s answer to the word for wireless mouse and though the company has not intentionally launched it to be used separately and is mainly for Mac desktop PCs, there are users who also use it on other devices, like on Windows.
Yes, Apple’s Magic use can be used on Windows PCs as well, and if you are wondering how then stick around to this guide and I’ll show you how you can set up and use Apple Magic Mouse on Windows 11 or Windows 10 PCs.

How to add and setup Apple Magic Mouse on Windows
The Magic Mouse also uses Bluetooth connectivity in order to get connected as an input device and hence connecting to the Windows PC is no big deal. It is a pretty straightforward and simple procedure just like connecting any other Bluetooth mouse. Here is how you can add and set up the Magic Mouse on Windows via Bluetooth.
On Windows 11
1. Press Win + I on the keyboard to open the Windows Settings.
2. Go to Bluetooth & devices from the left.
3. Make sure the Bluetooth is turned on and then click on Add Device right next to the Devices option.
4. On the Add a device window, click on Bluetooth. This will start your PC to search for available nearby Bluetooth devices.
5. Make sure your Magic Mouse is turned on. If it is not then toggle on its switch located at the bottom.
5. Your Magic Mouse will get appear on the Add a device on your Windows PC. Click on it to connect it to your PC.
On Windows 10
1. Open Windows Settings by pressing Win + I.
2. Go to Devices.
3. Select Bluetooth & other devices option from the left.
4. Here, make sure the Bluetooth is on and then click on Add Bluetooth or other devices.
5. The Add a device will appear. Click on Bluetooth.
6. Now, Windows will start searching for available Bluetooth devices. Hence make sure the tour Magic Mouse is turned on. If it’s not, then switch it on from the toggle at the bottom.
7. Now, your Magic Mouse will appear in the list of available Bluetooth devices. Click on it to connect it to your PC.
And that’s it. You have successfully connected your Magic Mouse to your Windows PC. You can now use the Magic Mouse on your Windows PC just like any other Bluetooth mouse. You even customize the Magic Mouse, like swapping the right and left clicks and the speed of the cursor. You can even change the scrolling speed of the mouse.
But here is a catch, you can’t scroll on Windows using the Magic Mouse on your Windows PC. And to solve this issue you’ll have to install the Apple Wireless drivers on your PC.
Installing Apple Wireless Mouse Drivers
There is no direct single driver file that can be downloaded and installed on your PC right away. Instead, there are two manual ways by which you can get the Apple Wireless Mouse Drivers installed on your PC, and here are those methods.
Apple provides a Boot Camp Support Software program that also contains the Apple Wireless Mouse drivers. These driver files can be used on your Windows PC to enable scrolling. This method is a bit outdated and there are chances that this method may not work on your Windows 11 or even the Windows 10 PC. But you give it a try.
Install drivers using Boot Camp Support Software
1. Head over to Apple’s official Boot Camp Support Software download page and click on the Download button to begin the download process.
2. Once the Boot Camp zip file is downloaded, extract it.
3. Once extracted, go to BootCamp > Drivers > Apple.
4. In the Apple folder, look for the file by the name AppleWirelessMouse64.
5. Right-click on the AppleWirelessMouse64 file and select Run as administrator.
6. This will open the installation window of the Apple Wireless Mouse drivers. Follow the on-screen instructions and install the drivers.
Once done, restart your PC and check if you are able to scroll up and down properly using your Magic Mouse or not. If not, then head over to the next method.
Install drivers From Apple Using Brigadier
Brigadier is a Python script that can download the latest Boot Camp Support Software on your Windows PC by identifying it as a Mac machine. There are high chances that this method will work more prominently than the previous one as in this method we can download the Boot Camp for the latest possible MacBook and can extract its components and install the Apple Wireless Mouse drivers from it.
1. Head over to this GitHub link and download Brigadier on your desktop location.
2. Now open Command Prompt.
3. Type the following command in the command prompt and hit enter:
cd Desktop
4. Now, execute the following command after that:
brigadier.exe -m MacBookPro17,1
5. This command consists of the Mac identifier i.e. MacBookPro17,1. That means your Windows PC is being identified as the 13-inch MacBook Pro 2020 with Apple M1 Chip. You can change this Mac identifier but I would recommend you to use the identifier of the latest possible MacBook Pro.
6. Wait for the brigadier to download and extract the latest drivers on your Windows desktop. If Brigadier failed to download the files or if the folder created by Brigadier is empty, try installing 7-Zip and try again.
7. Once done, open the BootCamp folder and navigate to WinPEDriver$ > AppleWirelessMouse.
8. In the AppleWirelessMouse folder right-click on the AppleWirelessMouse64.inf file and select Install.
9. Follow the on-screen instructions and install it.
Once done, finally restart your PC and you should now be able to scroll using your Magic Mouse on your Windows PC.
Installing Apple Wireless Mouse Drivers on Mac
There are many Mac that uses Windows on their system using Boot Camp and generally when you set up Windows using Boot Camp, it automatically installs the Boot Camp Support Software package containing all the required drivers for Apple hardware to work properly on Windows. But in many cases, the Magic Mouse will not scroll items until the pending driver updates are not done. You can do this by using the Apple Software Update.
1. Search and open the Apple Software Update.
2. Wait for the Apple Software Update to check for the pending updates.
3. Check to mark the Apple Input Device Update and Boot Camp Update. You can also checkmark the other options that are available there to update.
4. Finally, click on the Install button to download and install the updates.
Try Magic Mouse Utilities
This is a well-experienced thing that the Magic Mouse doesn’t;t work as fluently as it works with Mac. And if you are concerned about this and seeking a solution, then you can give Magic Mouse Utilities a try.
The Magic Mouse Utilities is a 3rd-party utility software that can be used to improve the Magic Mouse’s functioning on Windows on both PC and Mac. It provides a ton of functionality that you can add to your Magin Mouse, like multiple gestures that allow you to switch b/w desktops, pages, etc. You can also manage the scrolling, introduces customizable middle-click, etc.
Magic Mouse Utilities is a paid software but it initially offers a 28-days free trial period so that you can properly test and use the software if it suits you or not.
Also Read:
- How To Fix Steam Not Opening In Windows
- Fix Microsoft Teams Left/Right Arrow key not working in Windows
- Fix (0x803F8001) Minecraft Launcher Is Currently Not Available In Your Account
- Fix: The L2TP Connection Attempt Failed Because the Security Layer Encountered a Processing Error
- Fix mds_stores high CPU usage on Mac [Monterey & BigSur]
Apple Magic Mouse – возможно, самая необычная компьютерная мышь в мире. Почему? У неё есть всего одна кнопка, а поверхность распознает мультитач-жесты, так что происходящим на экране компьютера можно управлять жестами – так же, как на iPhone или iPad. Хотите попробовать такую мышку на своём ПК на Windows?
Подключить Magic Mouse к компьютеру на Windows просто – достаточно включить на ПК модуль Bluetooth. Но после сопряжения мыши и компьютера вы получите самую обыкновенную мышку, да к тому же ещё и однокнопочную. Все «сочные» фишки вроде нажатия в любой точке, нажатия правой кнопки мыши двумя пальцами, скроллинга веб-страниц и фотографий двумя пальцами, импульсной прокрутки протестировать не получится. В чём дело?
В позиции Apple, которая сделала Magic Mouse официально совместимой только с компьютерами Mac. Но не расстраивайтесь – уникальные жесты «яблочной» мышки все-таки можно перенести на ПК. Сразу несколько способов по настройке Magic Mouse под Windows предлагается ниже.
Способ I – Magic Mouse Utilities
Самый простой вариант «подружить» мышь Apple с вашим компьютером – набор бесплатных сторонних программ от разработчика Trackpadmagic.
1. Убедитесь, что на вашем ПК есть модуль Bluetooth. Если его нет, приобретите специальный Bluetooth-адаптер. Рекомендуемая модель для покупки – IOGEAR Bluetooth 4.0 USB Micro Adapter (GBU521), он проверен на работу с Magic Mouse. Пожалуйста, имейте в виду – с «яблочной» мышью совместим не каждый адаптер. Так что при прочих равных следует отдать предпочтение именно модели, приведенной выше.
2. Скачайте драйвер Magic Mouse. C его помощью вы сможете подключить мышь к компьютеру на Windows и получить базовую функциональность.
3. Скачайте и установите Magic Mouse Utility. C её помощью вы получите доступ к «продвинутым» функциям вроде скроллинга и возможности следить за уровнем заряда батареи. Условие – утилита должна быть включена всякий раз, когда вы пользуетесь чудо-мышкой Apple. Для этого зайдите в настройки и активируйте автозапуск сразу же после загрузки Windows.
4. Подключите Magic Mouse к ПК через Bluetooth. Если во время сопряжения возникнут проблемы, попробуйте провести сопряжение устройств с кодом 0000.
Способ II – установка драйверов Bootcamp
Bootcamp – набор драйверов для работы «железа» Apple в окружении Windows. Обычно их используют для установки «винды» второй системой на Mac, но подойдут они и в нашем случае.
Идеальный вариант для установки – последовательная установка версий драйверов Bootcamp.
Сделайте следующее:
1. Скачайте Bootcamp 3.0, смонтируйте его образ на диске и запустите файл Setup. После окончания установки перезагрузите ПК.
2. Установите версию Bootcamp 3.1 (32-разрядные ПК, 64-разрядные ПК). Затем снова перезагрузите ПК.
3. Установите Bootcamp версии 3.2 (32-разрядные ПК, 64-разрядные ПК). Перезагрузите компьютер.
Если желания «накатывать» все версии Bootcamp у вас нет, установите два драйвера: AppleWT и AppleMultiTP
Если Magic Mouse по-прежнему не работает:
1. Откройте на компьютере раздел настроек Bluetooth, выберите Добавить устройство.
2. Включите Magic Mouse.
3. Когда Windows распознает мышь, добавьте её в список устройств.
Готово! Теперь вы можете опробовать Magic Mouse в действии. Доступны будут не все функции, но самое интересное – жесты, клики, скроллинг – доступны Windows.
Смотрите также:
- Parallels Desktop 11 – улучшенная производительность, поддержка OS X El Capitan и Windows 10.
- Сервис KeyMe или как проникнуть в чужую квартиру при помощи приложения для iPhone.
- Как покупать игры или приложения в App Store без привязки карты.
- Диктовка, или как перевести речь в текст на iPhone и iPad.
- Как просматривать тексты песен из Apple Music на iPhone.

If you want to use the Apple Magic Mouse in Windows 10, you should download and install the Magic Mouse driver for Windows 10. And this post will show you how to download and install the Magic Mouse driver for Windows 10.
There are two ways you can download and install your Magic Mouse driver:
Option 1 – Manually – You’ll need some computer skills and patience to update your drivers this way, because you need to find exactly the right the driver online, download it and install it step by step.
OR
Option 2 – Automatically (Recommended) – This is the quickest and easiest option. It’s all done with just a couple of mouse clicks – easy even if you’re a computer newbie.
Option 1 – Download and install the Magic Mouse driver manually
Since the mouse is offered by Apple, Apple keeps releasing updated Magic Mouse drivers for Windows 10, and you can download your driver from Apple.
Here’s what you need to do:
- Visit the Apple Support page.
- Choose the latest version of the driver, then click Download.

- Unzip the downloaded file, then go to BootCamp > Drivers > Apple > Apple WirelessMouse64.exe.

- Double click the AppleWirelessMouse64.exe file to run.
- Follow the on-screen instructions to finish the install.
Then you can connect your Magic Mouse and it should be working in Windows 10.
Option 2 – Download and install Magic Mouse driver automatically
If you don’t have the time, patience or computer skills to update the Magic Mouse driver manually, you can do it automatically with Driver Easy.
Driver Easy will automatically recognize your system and find the correct drivers for it. You don’t need to know exactly what system your computer is running, you don’t need to risk downloading and installing the wrong driver, and you don’t need to worry about making a mistake when installing.
You can update your drivers automatically with either the FREE or the Pro version of Driver Easy. But with the Pro version it takes just 2 clicks (and you can get 30-day money back guarantee):
- Download and install Driver Easy.
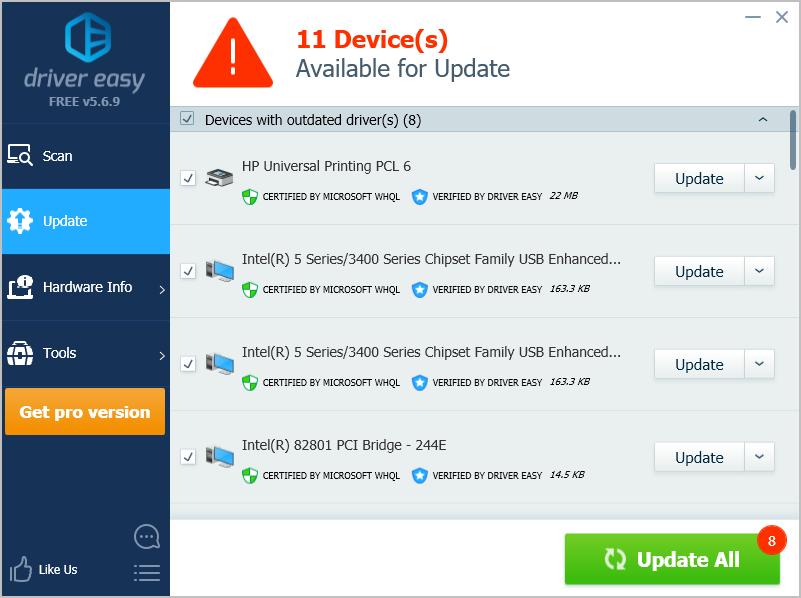
- Run Driver Easy and click the Scan Now button. Driver Easy will then scan your computer and detect any problem drivers.

- Click Update All to automatically download and install the correct version of all the drivers that are missing or out of date on your system (this requires the Pro version – you’ll be prompted to upgrade when you click Update All).

4) Restart your computer to take effect.
If you need further assistance, please feel free to contact Driver Easy support team at support@drivereasy.com.
A detailed downloading guide on how to install and update Apple Magic mouse driver for Windows 10. Read the entire document for complete details!
From the information gathered online, we learned that many users have experienced issues while using Apple Magic Mouse in Windows 10, 8, 7. Are you also struggling with the same trouble?
In order to use Apple Magic Mouse in Windows 10, you need to install the most suitable magic mouse Windows driver. As you may know, a driver is an essential software component that channels the communication between your computer, connected hardware devices, and Windows OS. The same methodology goes regarding the Apple Magic Mouse.
Therefore, to help you we have created this downloading and installation guide. Here we have mentioned the best ways to perform the driver update.
Easy & Quick Methods to Download, Install and Update Apple Magic Mouse Driver for Windows 10
There are mainly two ways to download Apple Magic Mouse driver for Windows 10 i.e, manually or automatically. Let’s read them below:
Method 1: Automatically Download and Install Apple Magic Mouse Driver through Bit Driver Updater
There are numerous driver updater tools available in the marketplace to update outdated drivers automatically within a few clicks. Out of all, Bit Driver Updater is one of the most dedicated driver updater software.
This software boasts some of the premium and advanced features like single-click driver update, PC optimizer, and driver scan scheduler. Bit Driver Updater will automatically scan your PC for outdated, broken, or faulty drivers and replace them with the correct drivers.
This is the most convenient way to perform driver download and update tasks. Now, have a look at the below-mentioned steps to update Apple Magic Mouse drivers for Windows 10 via Bit Driver Updater:
Step 1: First and foremost, download the Bit Driver Updater from the download button below.

Step 2: Double click the downloaded file to run it and then follow the on-screen instructions to get the software installed on your computer.
Step 3: Launch the Bit Driver Updater on your computer and let the software scan your machine for faulty or out-of-date drivers.
A point to remember: Once you install the software and launch it on your computer, then it automatically starts scanning your system for the drivers that need to be installed and updated. But, if you want to run a scan manually, then you can also do so. For this, you are required to click on the Scan button from the left pane.

Step 4: After the scanning, it provides you with a detailed list of outdated drivers, you need to go through the entire list and then find the Apple Magic Mouse Windows 10 driver, and click on the Update Now button presented next to the driver.

Step 5: Alternatively, you have an option to update all outdated drivers within one click and that’s by clicking the Update All button.
The user can update drivers automatically either with the free or paid version of Bit Driver Updater. Although, keep in mind that the pro version takes only one click to update all faulty, missing, broken, or outdated drivers. Plus, you also receive a 60-day money-back guarantee. So, you can get your full value without giving a reason but only within 60-days of the purchase period.
Moreover, the pro version of Bit Driver Updater automatically creates a backup of currently installed drivers and allows its users to restore them when required.
Also Read: How to Download & Update Microsoft Mouse Driver on Windows 10
Method 2: Use Official Apple Support to Download Apple Magic Mouse Driver Manually
If you don’t want to use any third-party software for installing the latest version of the Apple Magic Mouse Windows driver. Then, you have to download the drivers manually from the official source. Since the magic mouse is produced by Apple, and Apple keeps releasing new drivers for themselves. So, to install Apple Magic mouse drivers for Windows 10 you need to visit Apple’s official website. Here is how to do that!
Step 1: Go to the official support page of Apple.
Step 2: Then, select the newest version of the driver and click on the Download option.

Step 3: After downloading finished, unzip the driver downloaded file, then navigate to BootCamp, Drivers, and Apple.
Step 4: Thereafter, find the AppleWirelessMouse64.exe file and double click on it to run the file.

Step 5: Execute the instructions appearing on your screen to complete the driver installation.
Congrats! There you have installed the Apple Magic mouse Windows 10 driver. While using this method, do keep in mind that you must have complete technical knowledge, especially about the drivers and the device for which you wish to install and update the drivers. Along with this, you should have enough time as the manual method takes a lot of time.
Also Read: Bluetooth Mouse Not Working on Windows 10/8/7 [FIXED]
Download and Install Apple Magic Mouse Driver for Windows 10: DONE
Thus, how to make Apple Magic Mouse work on Windows 10. The post discussed the effective methods to download and install Apple Magic Mouse driver for Windows 10. We hope you have liked the information shared in this article.
In our view, you should get the latest drivers installed automatically since the manual approach is error-prone and time-consuming.
Was this downloading guide helpful for you? Do tell us in the comments below. Also, mention your doubts and further suggestions in the comments section below. We will try to serve you best.
And, for reading more installation as well as troubleshooting guides do subscribe to our Newsletter. In addition to this, follow us on Facebook, Twitter, Instagram, and Pinterest for instant technical support.