Встроенный Защитник Windows, если не был отключен или заменен другим антивирусом, обновляется автоматически, но ничто не мешает вам выполнить обновление сигнатур альтернативными путями или даже вручную, скачать их со специальной страницы Microsoft. Второй вариант может пригодится, когда нужно обновить вирусные базы устройства, не подключенного к интернету.
Через Центр обновления
Наиболее очевидным для обновления сигнатур Windows Defender является использование стандартного Центра обновления Windows в приложении Параметры.

Если обновления будут им найдены, из останется только установить.
Из центра управления безопасностью
Еще проще проверить и получить обновления Защитника из контекстного меню его иконки в трее, кликнув по ней ПКМ и выбрав соответствующий пункт.
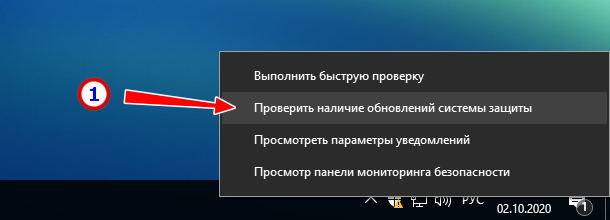
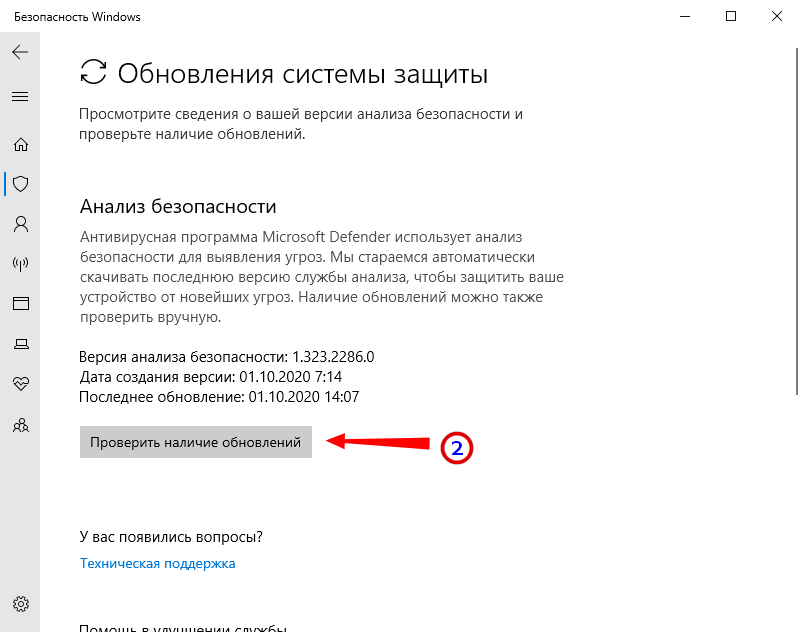
Откроется окно безопасности, а вам останется только нажать кнопку поиска обновлений и дождаться результата.
Из командной строки
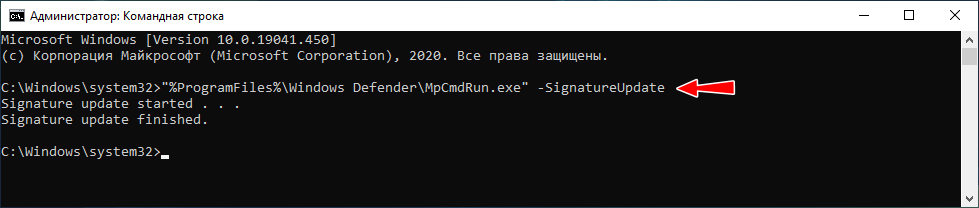
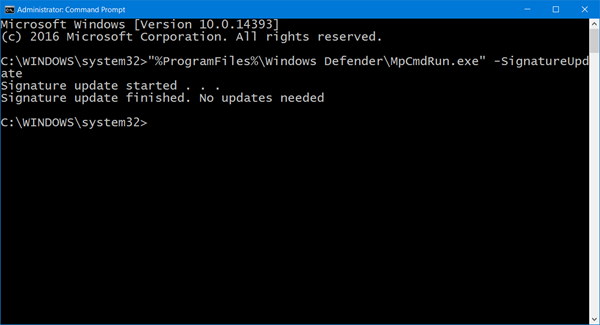
Также для обновления вирусных баз Защитника можно воспользоваться запущенной от имени администратора командной строкой.
Для поиска и установки сигнатур выполните в консоли такую команду:
«%ProgramFiles%\Windows Defender\MpCmdRun.exe» –SignatureUpdate
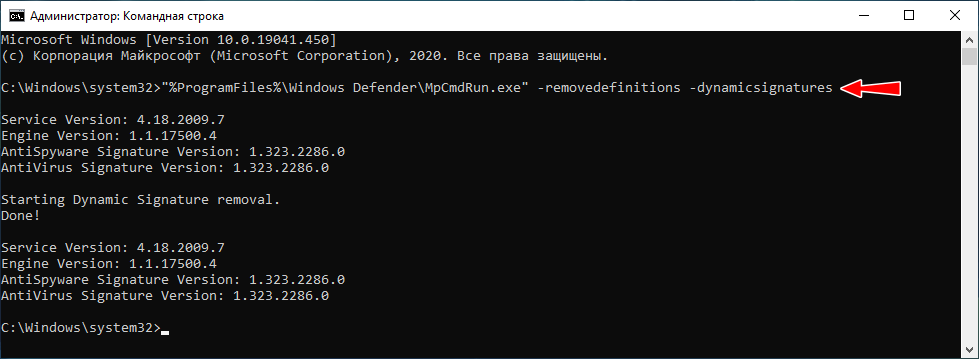
В случае ошибки бывает полезно очистить кэш определений перед их обновлением такой командой:
«%ProgramFiles%\Windows Defender\MpCmdRun.exe» -removedefinitions –dynamicsignatures
Впрочем, многое зависит от типа ошибки. Если это ошибка с кодом 0х80070422, скорее всего, у вас принудительно отключен Центр обновления.
Из PowerShell
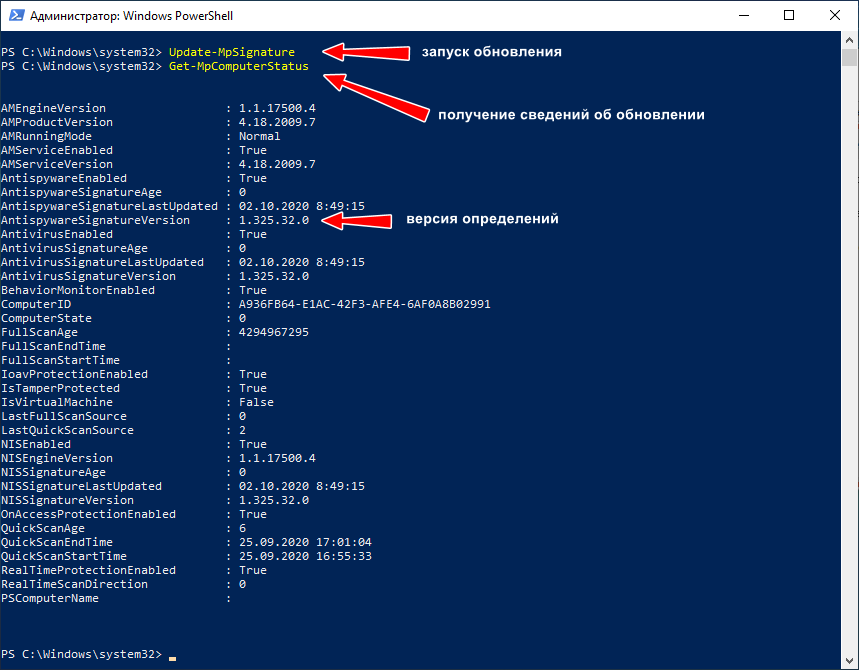
Вместо классической командной строки можно использовать и PowerShell, выполнив в нём команду Update-MpSignature. Командлет же Get-MpComputerStatus покажет вам текущую версию определения и дату обновления.
Как и в случае с командной строкой, Центр обновления должен быть включен, желательно также проверить активность служб «Установщик модулей Windows» и «WaaSMedicSvc».
В автономном режиме
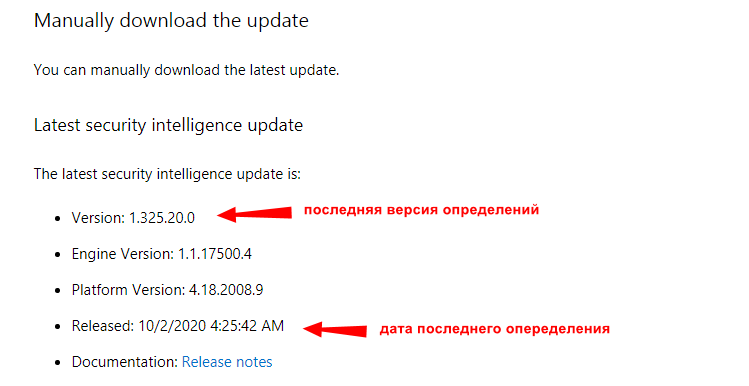
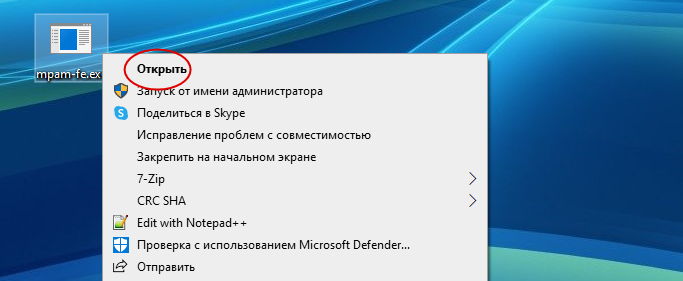
Наконец, обновить Защитник можно в автономном режиме, запустив на компьютере файл mpam-fe.exe соответствующей разрядности, скачанный с официальной страницы www.microsoft.com/en-us/wdsi/definitions.

Пакет не использует графический режим, не требует прав администратора и включения Центра обновления Windows. Просто запустите его и, выждав минутку, проверьте текущую версию опеределения.
![]() Загрузка…
Загрузка…
Download Windows Speedup Tool to fix errors and make PC run faster
Windows Defender on Windows 11/10 has the ability to scan, update, or run other tasks from the command prompt. The application MpCmdRun.exe is situated in the %ProgramFiles%\Windows Defender folder respectively and is called the Microsoft Antimalware Service Command Line Utility. You can use this tool to automate and troubleshoot Microsoft Antimalware Service.

To do so, open the command prompt as an administrator. Type the following to get the entire list of commands:
"%ProgramFiles%\Windows Defender\MpCmdRun.exe"
Run Defender Quick scan from the command line
So for instance if you wish to run a Quick scan from the command line, you can use -Scan 1 parameter:
"%ProgramFiles%\Windows Defender\MpCmdRun.exe" -Scan -ScanType 1
Run Defender Full scan from the command line
To perform a Full scan, use:
"%ProgramFiles%\Windows Defender\MpCmdRun.exe" -Scan -ScanType 2
Purge Windows Defender Definitions cache
At a command prompt (admin) enter the following command and hit Enter:
%ProgramFiles%\Windows Defender\MpCmdRun.exe -removedefinitions -all
Update Windows Defender Quick from the command line
To Update Windows Defender or to create a shortcut to update your Windows Defender you can use the following command:
"%ProgramFiles%\Windows Defender\MpCmdRun.exe" –signatureupdate
You can also create desktop shortcuts to run the following commands.
Read: You can also update Windows Defender definitions using Windows PowerShell.
MpCmdRun.exe process
Here is the entire list which I have copy-pasted from the command prompt results:
MpCmdRun.exe [command] [-options]
Command Descriptions:
- -? / -h : Displays all available options for this tool
- -Trace [-Grouping #] [-Level #] : Starts diagnostic tracing
- -RemoveDefinitions [-All] : Restores the installed signature definitions to a previous backup copy or to the original default set of signatures
- -RestoreDefaults : Resets the registry values for Microsoft Antimalware Service settings to known good defaults
- -SignatureUpdate [-UNC] : Checks for new definition updates
- -Scan [-ScanType] : Scans for malicious software
- -Restore -Name <name> [-All] : Restore the most recently or all quarantined item(s) based on name
- -GetFiles : Collects support information
- -Restore : Restore or list quarantined item(s)
- -AddDynamicSignature : Loads a dynamic signature
- -ListAllDynamicSignatures : List the loaded dynamic signatures
- -RemoveDynamicSignature : Removes a dynamic signature.
Hope this helps you get started. For details, you may visit Microsoft.
Anand Khanse is the Admin of TheWindowsClub.com, a 10-year Microsoft MVP (2006-16) & a Windows Insider MVP (2016-2022). Please read the entire post & the comments first, create a System Restore Point before making any changes to your system & be careful about any 3rd-party offers while installing freeware.
Windows Defender, now known as Windows Security, is the default antivirus software in Windows and no less capable than any third-party antivirus software. In fact, when it comes to system resource usage, Windows Security is one of the best. Though its GUI is pretty easy to use, you can also use Windows Security features via Command Prompt. Follow this tutorial to learn how.
Content
- Getting Started
- List of Windows Defender Scan Types
- Run Windows Defender Scan From Command Prompt
- Applications of Windows Defender With Command Prompt
- Frequently Asked Questions
Getting Started
Wondering why you should go through so much trouble to use Windows Security options from Command Prompt? Windows Security with Command Prompt is quite useful when you are creating your own scripts or scheduled tasks. It also allows you to have greater control over individual files and processes compared to GUI.
- You need administrative privileges, so type Command Prompt in the search box, and select the «Run as Administrator» option.

- Running Windows Security inside cmd also requires a small utility program called Microsoft Malware Protection Command Line Utility, or «MpCmdRun.exe.» This is a powerful tool that automates all Windows Security tasks. Most of the methods below use «MpCmdRun.exe.»
- Instead of the default «C:\Windows\System32,» the Command Prompt application needs to point to the folder where «MpCmdRun.exe» is located. Therefore, first locate the Windows Defender folder on your PC.

- The path for «MpCmdRun.exe» is usually «C:\Program Files\Windows Defender,» but if it’s slightly different on your device, you should jot down this location. It will be very useful in the next few sections.

Tip: Windows Security not opening? Find the solutions in this guide.
List of Windows Defender Scan Types
If you’ve used Windows Security GUI, you will know that it has four scan types. Below are some quick explanations of the different scan types.
- Quick scan: as the name suggests, Quick scan is fast and only looks in the most common places, like registry keys and start-up folders, where the malware or virus could have an effect. Typically, Quick scan is completed within minutes or even seconds. In the command line, Quick scan is denoted by
-ScanType 1. - Full scan: performs an in-depth scan of your entire system. Depending on how many files you have in your system, the scan can take hours to complete. In the command line, Full scan is denoted by
-ScanType 2. - Custom scan: lets you perform an in-depth scan on a specific drive, folder, or file. In the command line, Custom scan is denoted by
-ScanType 3and has additional switches to tell which file or folder to scan. - Offline scan: a few variants of malware can be particularly difficult to remove from your computer. Microsoft Defender Antivirus’s offline scan helps you get rid of them using up-to-date threat definitions. Offline scan doesn’t have a number attached to it.
Apart from these, there are some additional scan types we will get into one by one.
Good to know: you can test the efficacy of your antivirus against real malware.
- Before doing any of the scans, change the Command Prompt folder path to the Windows Defender folder location shown in the above step. It should be something similar to «C:\Program Files\Windows Defender.»
cd C:\Program Files\Windows Defender
- To run the scans in cmd, use the «MpCmdRun.exe» application in each case, as shown below.
Quick Scan
- If you want to perform a quick scan, use the below command. It will have a «scan started» and «scan finished» message indication.
MpCmdRun -Scan -ScanType 1

- You will see a Windows Security notification alert on the right side of the System Tray, indicating that the quick scanning is over.

- Once you check the Windows Security window, you will observe the most recent scans, such as a quick scan activity in Command Prompt.

Full Scan
For a full scan, replace «1» in the above command with «2.» It usually takes an hour or more.
MpCmdRun -Scan -ScanType 2

Tip: you can permanently disable Microsoft Defender if you would like.
Custom Scan
A custom scan can be based on a custom location on any drive on your computer, including external drives.
- In this example, we are copying and pasting the path of a folder named «Videos» stored on the D drive.

- To perform a custom scan, use the below command while replacing «FolderPath» with the actual folder or file path you want to scan. The scannable path in our example is simply «D:\», as there are no other folders in the D drive.
MpCmdRun -Scan -ScanType 3 -File "FolderPath"

Offline Scan
- The offline scan is initiated as a PowerShell command in the Windows Defender Offline (WDO) utility. It requires a restart of your PC and takes around 15 minutes. Use the following command:
PowerShell Start-MpWDOScan

- As soon as you enter the command as shown above, your Windows PC will restart, and the offline scan window will be visible on your screen. Wait a few minutes for the process to finish.

- The offline scan will continue in the Command Prompt window while the process is running. You can see the number of items scanned and the percentage completed.

Tip: get up to speed with these essential PowerShell commands that you need to know.
Boot Sector Scan
Windows Defender has another scan type that checks the system boot sector for any infections. A boot sector virus can infect the Master Boot Record, which in turn infects the entire system when you boot it up.
- To perform a boot sector scan, use the below command.
MpCmdRun.exe -Scan -ScanType -BootSectorScan

- To cancel the scan, press the keyboard shortcut Ctrl + C or type
^C.

Applications of Windows Defender With Command Prompt
The Windows Defender command line lets you do a number of other things, as shown below.
1. Listing and Restoring Quarantined Files
When Windows Security finds a threat, it moves it to Quarantine so that it doesn’t infect your system. However, false positives can happen, and if you think Windows Defender moved a legitimate file to Quarantine, you can restore it quite easily.
- Use the below command to list all the Quarantined Files.
MpCmdRun.exe -Restore -ListAll

- From the list, identify the file and note its name. In the above example, no quarantined items were found, so the next step of restoring is not needed.
- If you found a quarantined file, you can restore it easily by executing the below command. To do this, replace «FileName» with the actual file name you want to restore. If the command is executed successfully, the file will be restored to its original location.
MpCmdRun.exe -Restore -Name "FileName"

Tip: learn how to install unsigned drivers in Windows.
2. Doing Signature Updates
In general, Windows Security automatically updates itself with the latest antivirus definitions. However, if you want to make sure Windows Security is up to date, execute the below command.
MpCmdRun.exe -SignatureUpdate

3. Verify Windows Defender Antivirus Cloud Service
Is your Windows Security even connected to the cloud? Otherwise, there is no use in running any scans. This is something that you can only verify using the Command Prompt – not the GUI. For this purpose, we are using the following command. If there is a cloud connection, you will see a message, such as, «ValidateMapsConnection successfully established a connection to MAPS.»
MpCmdRun.exe -ValidateMapsConnection

4. Recover Files Deleted by Windows Defender
This is the hardest part of having Windows Security on your computer. Sometimes the antivirus will delete an important file or two, and you cannot recover it easily from the Recycle Bin. The best way to go about it is to use the Command Prompt.
- Use the
-GetFilescommand as shown below. This will generate a list of files deleted by the program that are still recoverable. Wait for the entire list to populate your screen.

- These files are saved in a file path shown at the bottom of the screen. Copy-paste the file name, which is a .CAB extension (Cabinet File System).

- Navigate to the above path using File Explorer, and right-click on the .CAB file to open it with Windows Explorer. You can also use online programs.

- You can find an entire list of deleted files that you can now extract to return them to where they were. (You can’t copy and paste them.)

FYI: experiencing issues after a Windows update? Check out our post on the latest Windows update problems to find your fix.
5. Remove and Restore Security Updates
If you’re testing apps or doing a bit of scripting, you may want to see how Windows interacts with the latest security updates, as well as those from the previous Windows update. Using the Command Prompt, you can remove, then restore security definitions.
Note: we strongly recommend that you restore the definitions to the latest ones after removing them so that your PC stays protected against the latest threats.
With that in mind, follow these steps to roll back your virus definitions:
- To restore definitions to the defaults or those stored in the last backup copy (automatically created by Windows when updating to the latest ones), enter this command:
MpCmdRun.exe -RemoveDefinitions -All

- Also, you can only remove the dynamically downloaded security signatures using this command:
MpCmdRun.exe -RemoveDefinitions -DynamicSignatures

- Once you’re done dallying around removing security definitions, it’s time to restore them with this command:
MpCmdRun.exe -SignatureUpdate

6. Reset Your Windows Security
If Windows Security is experiencing errors, too many false positives, and failure to detect new malware threats, it is time to reset the platform to its default installed version.
- Use the following command:
MpCmdRun.exe -ResetPlatform

- Sometimes, instead of a reset, you just want to revert to the previously installed version, as shown below.
MpCmdRun.exe -RevertPlatform

Tip: SFC throwing up an error as you’re trying to run the scan? Learn how to fix it.
Frequently Asked Questions
How can I stop Windows Defender Scan from taking too long?
If a scan seems stuck or not moving beyond a certain number, you may have too many files and folders or a large program holding it back. More often than not, you did not perform a PC scan in a very long time.
It is better to automate running Quick scan on a regular basis by scheduling it. This can be done by opening the Task Scheduler app. When it opens, go to «Task Scheduler Library -> Microsoft -> Windows -> Windows Defender.» Select «Windows Defender Scheduled Scan,» right-click to view its Properties, and follow it by clicking the «Trigger» tab. You must click the «New» button to create a new scheduled task.
Are there any risks associated with using Windows Defender with Command Prompt?
Windows Defender is generally safe to use with Command Prompt, but you may accidentally download malicious files by running the wrong script or restoring a quarantined file that was exploiting your PC security gaps. However, on a normal basis, you should not encounter these issues.
Image credit: Unsplash. All screenshots by Sayak Boral.

Sayak Boral is a technology writer with over eleven years of experience working in different industries including semiconductors, IoT, enterprise IT, telecommunications OSS/BSS, and network security. He has been writing for MakeTechEasier on a wide range of technical topics including Windows, Android, Internet, Hardware Guides, Browsers, Software Tools, and Product Reviews.
Subscribe to our newsletter!
Our latest tutorials delivered straight to your inbox
Защитник Windows, а также Microsoft Security Essentials могут сканировать, обновлять или запускать другие задачи из командной строки. Приложение MpCmdRun.exe находится в папке % ProgramFiles% \ Windows Defender или % ProgramFiles% \ Microsoft Security Essentials соответственно и называется как служебная программа командной строки Microsoft Antimalware .
Вы можете использовать этот инструмент для автоматизации и устранения неполадок службы Microsoft Antimalware. Здесь мы поговорим о Защитнике Windows на Windows 10.
Запустите Защитник Windows из командной строки
Для этого откройте командную строку от имени администратора. Введите следующее, чтобы получить полный список команд:
"% ProgramFiles% \ Защитник Windows \ MpCmdRun.exe"

Например, если вы хотите выполнить быстрое сканирование из командной строки, вы можете использовать параметр -Scan 1 :
"% ProgramFiles% \ Защитник Windows \ MpCmdRun.exe" -Scan -ScanType 1
Чтобы выполнить полное сканирование , используйте:
"% ProgramFiles% \ Защитник Windows \ MpCmdRun.exe" -Scan -ScanType 2
Чтобы обновить Защитника Windows или создать ярлык для обновления Защитника Windows, вы можете использовать следующую команду:
«% ProgramFiles% \ Защитник Windows \ MpCmdRun.exe» –signatureupdate

MpCmdRun.exe
Вот весь список, который я скопировал из результатов командной строки:
Использование: MpCmdRun.exe [команда] [-опции]
Описание команд:
- -?/-h : отображает все доступные опции для этого инструмента
- -Trace [-Grouping #] [-Level #] : запускает диагностическую трассировку
- -RemoveDefinitions [-All] : восстанавливает установленные определения сигнатур в предыдущую резервную копию или в исходный набор сигнатур по умолчанию
- -RestoreDefaults . Сбрасывает значения реестра для параметров службы Microsoft Antimalware на известные хорошие значения по умолчанию.
- -SignatureUpdate [-UNC] . Проверяет наличие новых обновлений определений.
- -Scan [-ScanType] . Сканирование на наличие вредоносного программного обеспечения.
- -Restore -Name [-All] . Восстановление самого последнего или всех помещенных в карантин элементов на основе имени
- -GetFiles : собирает информацию о поддержке
- -Восстановление . Восстановите или перечислите элементы на карантине
- -AddDynamicSignature : загружает динамическую подпись
- -ListAllDynamicSignatures : список загруженных динамических подписей.
- -RemoveDynamicSignature : удаляет динамическую подпись.
Надеюсь, это поможет вам начать.
In this article, I will show you how to reset Microsoft Antivirus update engine definitions using MpCmdRun. You can reset the Microsoft Defender antivirus update definitions using the MpCmdRun command line tool.
There are many other ways to reset Microsoft antivirus update definitions but MpCmdRun.exe utility is the easiest method out of all.
MpCmdRun.exe is the Malware protection command line utility for Windows Defender. It is an important part of Microsoft’s Windows Security system that helps protect your PC from online threats and malware.
This utility is useful when you want to automate Microsoft Defender Antivirus tasks and even reset Microsoft antivirus update definitions.
The MpCmdRun utility is located in %ProgramFiles%\Windows Defender\MpCmdRun.exe. Run it from a command prompt to manage Windows Defender.
If you want to quickly reset the Microsoft antivirus update definitions, MpCmdRun utility is the only option you should consider.
Listed below are some common reasons why you should consider resetting Microsoft antivirus update engine.
- You see error messages related to Windows Defender updates have failed.
- When you check for Windows Defender updates, you receive an error message that the virus and spyware definition updates can’t be checked, downloaded, or installed.
- Even though you’re connected to the Internet, the updates fail to download.
- Updates don’t automatically install as scheduled.
How To Reset Microsoft Antivirus Update Engine
Let’s look at the steps to Reset Microsoft Antivirus update definitions:
- Click Start and type Command Prompt, and then select Run as administrator.
- In the Command Prompt window, type the following commands and press Enter after each command:
- Cd\
- Cd “Program Files\Windows Defender”
- Mpcmdrun –removedefinitions –all
- Exit
- Restart your PC.

After you have reset Microsoft Antivirus updates, launch the Windows Security app. You will now notice that the virus and threat protection updates are reset, and it shows Engine unavailable.

If you select the Protection updates option, you’ll notice that the last updates are not downloaded. This confirms that Microsoft antivirus updates that we reset using MpCmdRun worked.

To download the latest updates for Microsoft Antivirus, click Check for Updates. This action downloads the most recent intelligence updates to protect your devices against new threats.
The computer must be connected to internet to download the latest protection updates for Windows Security.

In a few minutes, the latest security intelligence updates are downloaded. The security intelligence version, version created date and time, and last update date and time are also updated.

Under the Virus & threat protection updates, we see “Security intelligence is up-to-date” along with last updated date and time.
After you reset Microsoft antivirus update definitions using MpCmdRun, the Windows Security should get updated automatically every time.


Prajwal Desai is a Microsoft MVP in Intune and SCCM. He writes articles on SCCM, Intune, Windows 365, Azure, Windows Server, Windows 11, WordPress and other topics, with the goal of providing people with useful information.