Время на прочтение
5 мин
Количество просмотров 36K
INTRO
Все мы знаем что PHP предназначен для быстрого создания динамических Web страниц. Во всяком случае именно это написано на официальном сайте разработчиков PHP. Однако почему бы не попробовать найти PHP «немного» иное применение, например, попробовать создать полноценное приложение для Windows? Заинтересовал? Тогда понеслась!
Чёрный квадрат
Приложения делятся на консольные и оконные. Начнём с создания первых, так как это проще. Итак, для начала нужно определиться с тем, что мы будем писать… я предлагаю написать простой MD5 & Base64 Encoder — вещь в хозяйстве нужная и полезная, тем более здесь всё достаточно просто. Для запуска PHP скрипта из командной строки и передачи ему нужных параметров используется следующая конструкция:
php.exe [опции] [-f] <наш скрипт> [параметры]
Что касается содержания самого скрипта, то количество переданных параметров хранится в переменной $argc, а сами параметры хранятся в массиве $argv. На этом краткий инструктаж по консольным приложениям закончен и пришла пора приступить к активным действиям.
Чтобы не утруждать Вас написанием скрипта, я решил написать его за Вас. Вот что у меня
получилось:
<?php
if($argc!=3) { echo «
+—————————————+
| Create MD5 hash: enc md5 string |
| Create Base64 hash: enc b64 string |
+—————————————+\n»;
} else {
echo «\n»;
if($argv[1]==’md5′) { // MD5 encode
echo md5($argv[2]).»\n\n»; die();
}
if($argv[1]==’b64′) { // Base64 encode
echo base64_encode($argv[2]).»\n\n»; die();
} else { echo «Unknown command. Type \»enc\» for help.\n\n»; }
}
?>
<img src=«habrastorage.org/getpro/habr/olpictures/cf6/1d1/61b/cf61d161b4a795fc4c658d661d96fdae.gif» width=450 height=186 border=0 alt=Демонстрация работы скрипта» hspace=10 vspace=10>
Скрипт написан и теперь самое интересное — компиляция в EXE приложение. Для компиляции консольных приложений я использую Roadsend Compiler Studio. Его можно скачать на сайте www.roadsend.com после бесплатной регистрации. Скачали? Теперь открываем Roadsend IDE, создаём новый проект (Project -> New), прописываем необходимые параметры (наш скрипт рекомендую кинуть именно в директорию проекта), жмём «OK» и наконец даём заветное Project -> Build. Теперь направляемся в папку с проектом и если Вы всё правильно сделали — в ней Вы найдёте готовый EXE. Это всё? Да. Всё просто, если знать некоторые нюансы. Единственное что я рекомендовал бы — иногда полезно пошаманить с подключаемыми библиотеками, а так же можно упаковать наш EXE UPX`м, хотя эту тему я затрону чуть ниже. Теперь перейдём к оконным приложениям…
Окошки
Как Вы наверное уже догадались — при создании оконных приложений штатными средствами PHP уже не обойтись, поэтому для начала нужно выбрать инструмент для разработки нашего окошка. Среди всех инструментов больше всего выделяются два — это достаточно раскрученый PHP-GTK (www.gtk.php.net) и менее раскрученный, но не менее функциональный WinBlider (www.winbinder.org). Здесь как раз тот случай, когда более раскрученный и известный оказывается не так уж и хорош (это моё имхо), поэтому для разработки нашей первой форточки на PHP мы будем использовать WinBlinder. Для начала его нужно скачать. Готово? Окей, двигаемся дальше…
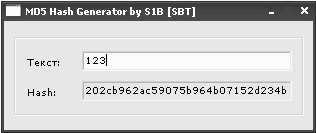
Винблиндер имеет свой собственный формат данных — phpw, который Вы можете сразу смело привязывать к вашему любимому редактору кода. По умолчанию при запуске phpw файла открывается содержащийся в нём PHP скрипт и прогоняется через интерпретатор с уже подключеными библиотеками блиндера. Как Вы наверное поняли — учится программировать на этой балалайке Вам придётся самим, однако в это нет ничего сложного, особенно человеку хоть немного знакомому с ООП в PHP. Однако даже незнакомый тоже сможет на нём кодить, так как по сути блиндер (в отличии от PHP-GTK) поддерживает и процедурное программирование. Кроме того WinBlinder весьма неплохо документирован, а инсталл архив уже содержит в себе несколько весьма любопытных примеров (особое внимание прошу обратить на редактор форм). У блиндера есть ещё куча фишек, функций и интересностей, но рамки данной статьи не позволяют мне на них останавливаться. Теперь пожалуй самое подходящее время вспомнить о нашем кодере. Чтобы не перегружать всё кодом я решил написать лишь MD5 Encoder:
<?php
// Подключаем основную библиотеку
include «include/winbinder.php»;// Даём метки окнам редактирования
define(‘IDC_EDITBOX1002’, 1002);
define(‘IDC_EDITBOX1003’, 1003);// Рисуем окошко
$winmain = wb_create_window(null,
AppWindow,
‘MD5 Hash Generator by S1B [SBT]’,
WBC_CENTER, WBC_CENTER, 315, 134,
0x00000000, 0);// Шпигуем окошко кнопками
# Рисуем рамочку
wb_create_control($winmain, Frame, », 10, 10, 290, 85, 0, 0x00000000, 0, 0);
# Рисуем надписи (лейблы)
wb_create_control($winmain, Label, ‘Текст:’, 23, 35, 45, 15, 0, 0x00000000, 0, 0);
wb_create_control($winmain, Label, ‘Hash:’, 23, 65, 45, 15, 0, 0x00000000, 0, 0);
# Рисуем окошки редактирования (нижнее будет неактивным), и загоняем их данные в переменные
$text=wb_create_control($winmain, EditBox, », 78, 30, 210, 20, IDC_EDITBOX1002, 0x00000000, 0, 0);
$hash=wb_create_control($winmain, EditBox, », 78, 60, 210, 20, IDC_EDITBOX1003, 0x00000040, 0, 0);// Две необходимые надписи =)
wb_set_handler($winmain, «process_main»);
wb_main_loop();function process_main($window,$id) {
# Объявляем данные окошек редактирования глобальными
global $text,$hash;
switch($id) {
case IDC_EDITBOX1002:
wb_set_text($hash,md5(wb_get_text($text)));
break;
case IDCLOSE:
wb_destroy_window($window);
break;
}
}
?>
Код достаточно прост и думаю посидев с документацией 1-2 часа Вы начнёте разбираться в нём так же, как и я. Ну а теперь кульминация — собираем форточку… Для этого предлагаю создать отдельную директорию и перенести наш скрипт туда. Так же нужно перенести туда папку include из phpcode директории винблиндера. Готово? Теперь компилируем! Эээ… стоп не нужно хвататься за Roadsend IDE. Как? А вот так! Он не поддерживает блиндер, а поддерживает только GTK, причём судя по туманным ответам разработчиков Roadsend на их форуме — поддержку блиндера можно ещё долго ждать. Однако вытрем сопли, и будем искать другие пути, и имя этим путям Bamcompile (www.bambalam.se/bamcompile/). Однако по каким-то причинам версия 1.21 не всегда верно работает и иногда компилирует всё в неработающее приложение, однако версия 1.1 такими глюками не страдает, поэтому рекомендую использовать её. Теперь щедро выделяем для нашего компилятора отдельную папку, заходим в командную строку и гордо командуем:
bambalam -w -c C:\PHP_Projects\MD5_Hash_Generator\ md5.phpw md5.exe
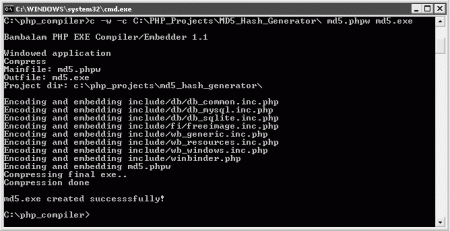
Если всё сделано правильно, то в директории с компилятором будет лежать свежесколоченое оконное приложение. Всё. Добавлю лишь, что все приложения я ещё рекомендовал бы упаковывать UPX`ом (который идёт сразу с Bamcompile).
Волшебный ларец
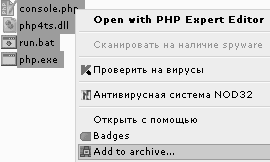
Все вышесказанное конечно весьма интересне и познавательно, однако бывают моменты когда нужных инструментов под рукой нет… Что делать тогда? Специально для такого случая есть один весьма любопытный приём получения EXE через шаманство в опциях SFX архива WinRAR. В качестве примера я буду использовать наш первый скрипт для консоли. Для начала помещаем наш скрипт в отдельную папку, туда же копируем php.exe и php*ts.dll. Далее создаём в этой же папке run.bat следующего содержания:
@echo off
php.exe -q console.php %1 %2
Теперь нам необходимо это добро упаковать, для этого выделяем все файлы, жмём правой кнопкой и выбираем «Add to archive…».
В появившемся окне выбираем формат архива RAR, выставляем максимальное сжатие и ставим галочку «Create SFX archive».

После этого переходим во складку «Advanced -> SFX Options», там выставляем переключатель на «Create in curent folder» и в «Run after extraction» прописываем «run.bat», а так же во вкладке «Modes» выставляем галочку «Unpack to temporary folder», а так же выставляем переключатели «Hide all» и «Overwrite all files».

По вкусу можете прилепить свою иконку в соответвующей вкладке. Теперь подтверждаем создание архива и на выходе получаем EXE без всяких компиляторов.
OUTRO
Итак, сегодня я показал Вам, как легко и просто можно раздвинуть границы использования PHP. Конечно кто-то всё это назовёт бредом, скажет мол размер у приложений большой, и память у них течет, и муторно всё это. Пусть говорят, однако никто не призывает Вас писать все оконные приложения на PHP, а данная статья лишь неплохое подспорье для пхп кодеров и всех интересующихся. На сим я закончу. Удачи.
Hi, welcome to this special tutorial. In here, I will be showing you how you can create a web-based desktop application using PHP, CSS, HTML, and JavaScript with the help of PHP Desktop.
In fact, PHP Desktop is an easy and simple solution we can use to create a very powerful and complex desktop application.
What is PHP Desktop?
According to the official definition,
PHP Desktop is an open-source project founded by Czarek Tomczak in 2012 to provide a way for developing native desktop GUI applications using web technologies such as PHP, HTML5, JavaScript and SQLite.
— Source : Official Page of PHP Desktop
Mind you, the development workflow you are used to while creating web applications remains the same. The step of turning an existing website into a desktop application is basically a matter of copy and paste.
PHPDesktop is an all-made container that will just swallow your project. With that, you can easily transform an existing website into a desktop application without any modification. When you download PHP Desktop, you will have some set of files and folders; among them, you will have a folder called www in which you will just paste your entire application.
For those who have used WampServer, Xamp or EasyPhp, it won’t be a problem to understand the concept. When you are using these local servers, you usually create your projects into a particular folder called www, htdocs, or localweb. It differs from one server to another, but the concept remains the same. That particular folder helps your webserver to know where to run your application (website) from.
PHP Desktop works the same way. The difference is that PHP Desktop does not require any particular installation; it is an all-in-one portable set of all these local servers have and it does all you can do with WampServer or Xamp and others in the same family.
PHP Desktop comes with a .exe file. Whenever you run that .exe, it will go into the www folder and run your index file. I am going to explain this process later in this tutorial.
A bit of story
Back in 2005, I remember once I was called for a store management application. The principle was simple, the manager should be able to add records of new stock and all sales. In the end, the owner should be able to have a clean report of each day and if possible he can select a date or a period.
I told the client I could do it but it will be web-based, so it will be using their browser to work. Even though I knew they don’t understand what difference that makes it was necessary for me to try to make it clear for them. Fortunately, the client accepted it that way.
I made the application using EasyPhp. So to run the application, I had to install EasyPhp on the client’s PC. You may tell me oh yeah there is no problem in that. Indeed, it seems like there is no problem, but such system/methodologies encounter a lot of problems such as:
- EasyPhp must be ON before the application runs otherwise they will receive a 404 error.
- I had to install the entire EasyPhp with all its modules while I needed just a few.
- Whenever EasyPhp refuses to start, they have to call me
- If somebody mistakenly uninstalls EasyPhp thinking it is a strange software, the entire application goes with all the records. Pffff.
- My database could easily be accessed.
- My application could be hacked by anyone using my URLs because they were visible.
- If they needed the same application in another store, I would have had to make the same process in that store by myself because they cannot install it themselves.
- Etc.
Definitely, it wasn’t the perfect solution. Even though I did not have any problem, I cannot consider it as a good solution. I was just lucky. After that I had two others I did in the same way but I was never satisfied with my work until I have come to meet PHP Desktop.
I think you can understand the real problem we can face when it comes to desktop applications with PHP. I knew they must be a way; otherwise, my skills in PHP would have been used only for websites.
PHP Desktop comes to reduce (if not to solve) all these problems and gives a new horizon of software development experience:
- There is no need again to embed all modules for nothing, only required ones.
- No need to install any web server before, everything is embedded
- No need to worry about browser compatibility because PHP Desktop comes with an embedded browser
- The browser is very light and does not have all boring tools such as address bar, favorites bar, history bar, etc. After all, we will not need them.
- You can make the entire application a
.exefile and send it to your clients so that they can install it themselves - PHP Desktop can also act as a packager for pure HTML5/JS applications
- No memory leaks
- You can use it for Perl, Ruby, and Python
- Etc.
Not wonderful ?!
What do we want?
Basically any PHP programmer would have liked to create any desktop application. Create an executable (.exe) application that he can easily share or sent to his client(s). Any client can simply install the application following an installation wizard without any struggle or any need of the programmer.
Unfortunately, if you are really into PHP programming you should know by now that isn’t actually possible. Since PHP is an interpreted programming language you can’t compile your project files into a single executable (.exe) file, and that’s where the big problem is.
Most programming languages that are specialized in desktop application like Java have some libraries that provide then some set of elements (button, menus, color, shapes, etc.) to help create a software interface. Actually PHP doesn’t have such thing, PHP is fully a scripting language. People have tried to create some extensions ( like PHP-GTK ) to provide such ability to the language, but still the problem is remains not totally solved.
Furthermore, PHP can be combined with HTML and JavaScript. And we know HTML tags can be styled with CSS… getting better. We can’t imagine the limits of CSS in terms of designing. So, that’s where PHP Desktop takes its power from.
How does it work?
PHP Desktop takes advantage of most web technologies to help PHP achieve our goal. PHP Desktop itself is a software that can embed yours in itself. So when you install PHP Desktop, you will now put your own application in PHP Desktop’s folders. When you launch PHP Desktop it will go and read/parse your application therefor display/run it.
PHP Desktop Embeds all services your application may need before running. The main elements are the web server (Mongoose), the PHP Server, and a database Engine (Sqlite). To provide universal interfacing it embeds a browser (actually Chrome or Internet Explorer). The browser now can help us interpret JavaScript, HTML, and CSS.
So there is no need to install any other server or parser before using it.

Create your very first desktop application with PHP
It is very simple to create a desktop application with PHP.
- Download PHP Desktop (with Chrome or Internet Explorer)
- Create a new folder and name it
MyApp - Unzip the content of PHP Desktop Inside
You should have something like this in your folder MyApp:
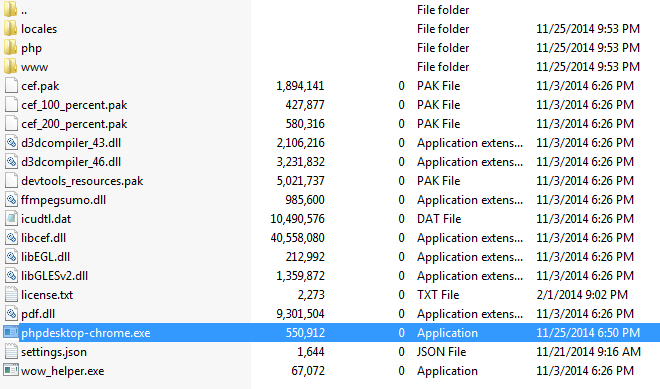
I downloaded the one embedding Chome. No matter the one you have downloaded, what matters the most is the highlighted file, it is an executable (.exe) file.
- Double click on that file to run it
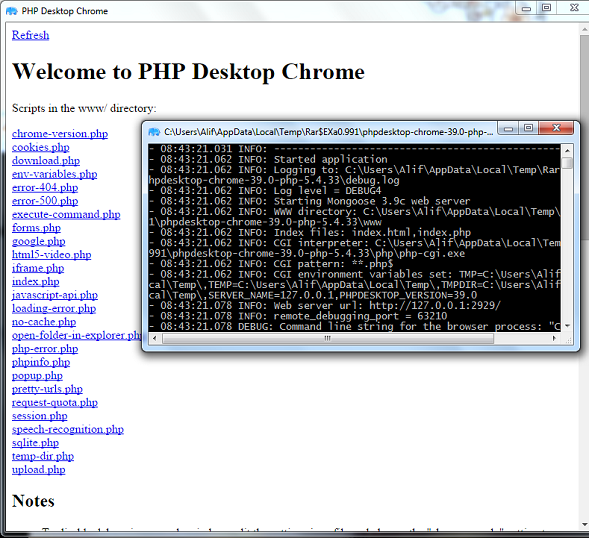
You should get something like this:
— What happened?
PHP Desktop is very smart. When you clicked on the launcher, it went in a special folder to look for any available application, and this special folder is nothing than the www folder. Go ahead and open the www folder you should see something like this:
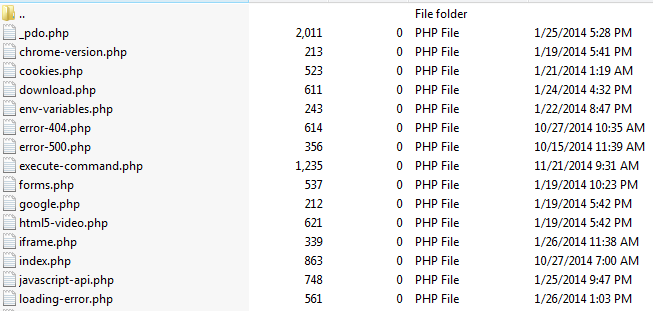
Surprised!, these files are what PHP Desktop listed when we clicked on the launcher.
Note: These files are .php files.
Click on any of them. You should see its content.
These files are sample file to help you know that PHP Desktop can do everything these files are doing. Among them, you have functionalities like cookies, environment variables, forms, iframes, javascript, etc. That means your PHP application can do almost everything.
— Why two windows prompted and what are they for?
By default, PHP Desktop prompts up two windows. The first one (bigger) is chrome/explorer. This is where your application will reside. Users will interact with it through that window. You will be able to change it if you like.
The second window (small and black console) is the debugging interface (log console). It helps you see if any error occurred while running your application, very useful in development phase.
— Another thing to notice
You should know that in production we won’t need that black console, and we may also need to resize the main window, etc; these are settings.
PHP Desktop comes with a special file called settings.json. This file will help us configure some behaviors of PHP Desktop.
So, for example if we don’t want PHP Desktop to prompt the log console, we can open the settings.json file with any text editor and locate this:
"debugging": {
"show_console": true,
"subprocess_show_console": false,
"log_level": "DEBUG4",
"log_file": "debug.log"
}
Then change the value of show_console into false like that:
"debugging": {
"show_console": false,
"subprocess_show_console": false,
"log_level": "DEBUG4",
"log_file": "debug.log"
}
Then run PHP Desktop again. pfff gone!
— Now, let’s us add our own application
Go in the www folder in your MyApp folder and delete all files inside.
Create a simple file and name it index.php with the following content:
<html>
<head>
    <title>MyApp</title>
</head>
<body>

    <h1>PHP Desktop is awesome</h1>

    <div style="background-color:blue; color:white; padding:2em; font-size:3em">
        <?= "And PHP agrees!" ?>
    </div>

</body>
</html>
now move your index.php file in the www (if you didn’t create it inside www) folder and launch PHP Desktop.
You should get something like this:

You can see that PHP Desktop has recognized your index.php as the first file to launch. That’s the job of the Mongoose server (the embedded webserver). Plus, Our HTML and CSS codes were parsed, and the PHP code too was interpreted. So you are good to go, try it with other codes.
Note: Look at Mongoose as Apache Server
Note: Our title in title tag doesn’t show. The title of our application window should be set in the settings.json in the following object:
 "main_window": {
        "title": "PHP Desktop Chrome",
        "icon": "",
        "default_size": [1024, 768],
        "minimum_size": [800, 600],
        "maximum_size": [0, 0],
        "disable_maximize_button": false,
        "center_on_screen": true,
        "start_maximized": false,
        "start_fullscreen": false
    }
You can see this object can help you influence the application’s window.
So, What now?
Yes, you have your application ready? you can just take your folder MyApp drop it anywhere in your computer. Anytime you want to start it just click on the launcher, or create a shortcut to it.
Bahh, that’s not what we said we wanted. We need one executable file that we can send to the client then he can install the application himself.
Yes, of course. I was forgetting it lol.
In order to do that we will need another special and little software called Inno Steup.
What does that one do again?!
We will simply ask Inno Setup take the content of our folder MyApp and transform it into a self-installing package. And at the end, we will have a simple setup.exe file that can be sent to our client for installation.
In order to do that, follow the steps bellow:
-
Download Inno Setup
-
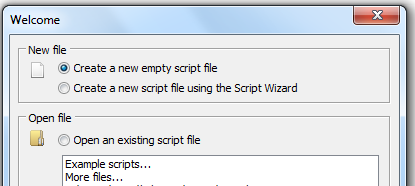
Install it
If something like this shows up, choose «Create a new empty script file»

-
now go to
File > NewThis wizard will appear:
Do not check the «Create a new empty script file»
-
Click on
NextThis wizard will appear:
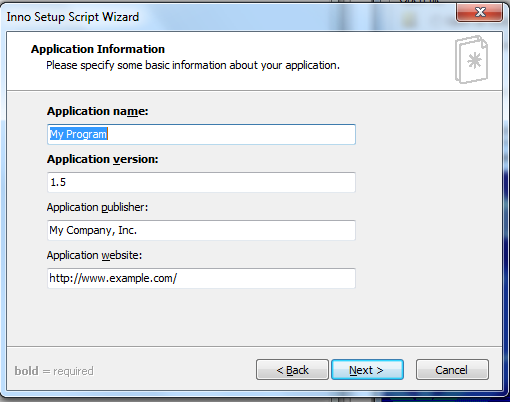
Here we need to make some settings for your application:
Application name:
MyAppApplication version:
0.0.1Application publisher:
iT Tutors Age Ltd(Your company or your name)Application website:
www.phpocean.com(Or your website) -
Now click on
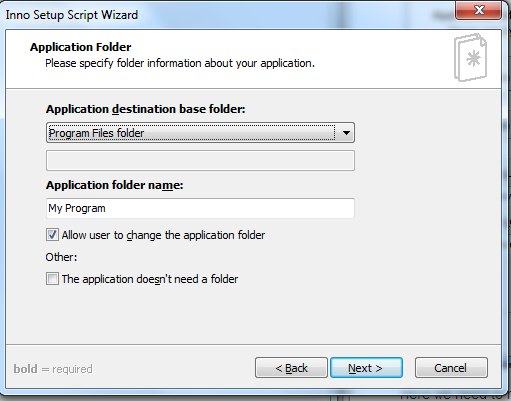
NextagainThis wizard will appear:
Here we need to precise the name of the folder that will contain our application once installed in the user’s computer. When you install an application, it usually goes in the
C:\Program FilesorC:\Program Files (x86). So we will keep the Application destination folder by default.Now let’s change Application folder name into
MyApp -
Click on
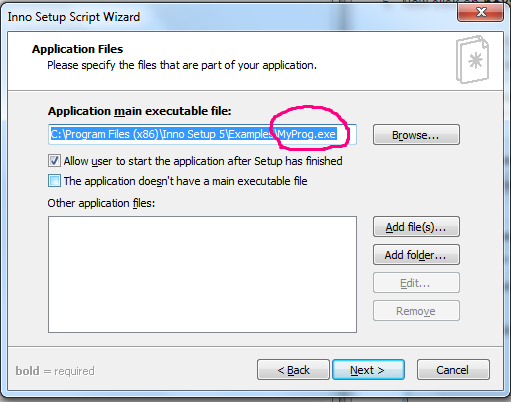
NextThis wizard will appear:
Here is where serious things happen. First Application main executable name. On the wizard, we have
MyProg.exe(The encircled area). This is a default testing file from Inno Setup. We need to change it otherwise when we launch our application it will go and launch Inno Setup’s test application.So click on
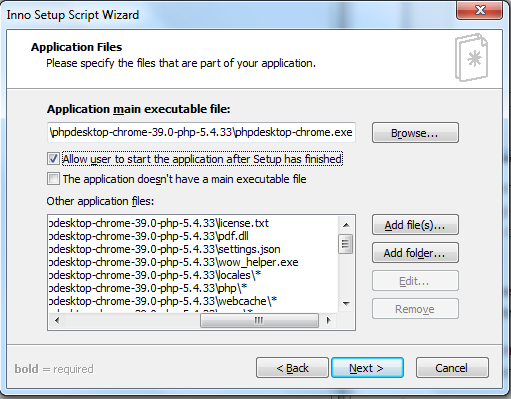
Browse, browse your folder to ourMyAppfolder, and double click onphpdesktop-chrome.exe.Next is the small white area with the label Other application files.
This part too is very important and very delicate to manage. First, it means:If you have other files that make up your application apart from the executable file added on top, add all of them here.
So normally you have to bring all files in the
MyAppfolder in here except thephpdesktop-chrome.exefile one by one What is something hard and slow.I personally usually go in my folder and highlight all files, except the
phpdesktop-chrome.exethen drag all and drop it in the small area. Simple and fast.So in the end, you should have something like this:
-
Then click
NextagainThis wizard will appear:
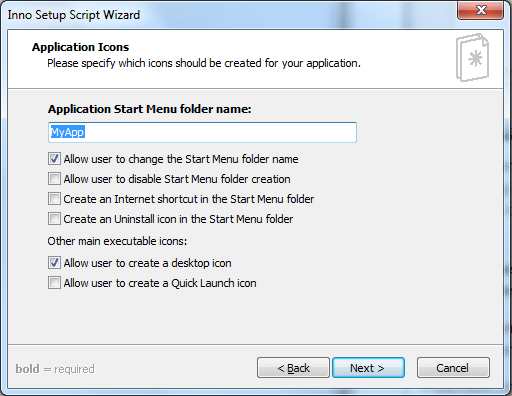
this one is self-explanatory. It is the name on which you will click to launch the application after you’ve clicked on windows
startmenu. There are other options you can activate too. -
Click
NextagainThis wizard will appear:
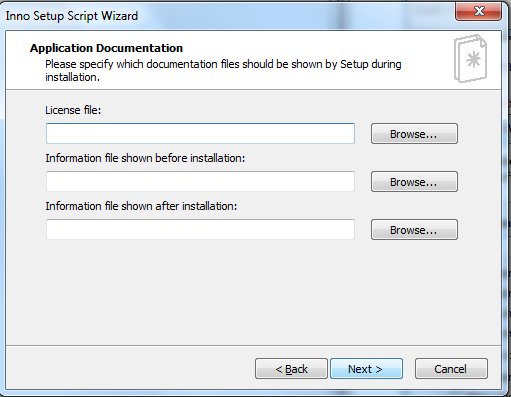
These are your application’s documentation files: The license file, the instructions file before installation and the instruction file at the end of the installation.
While this is not a must but if you want a serious software you can add it. To create three different text files(
license.txt,before-install.txt, andend-install.txt) somewhere in your computer. Then browse each one and add them to the respective fields.Whatever content you put in each, the user will see it while installing your software — try it and see.
-
Then click on
nextThis wizard will appear:
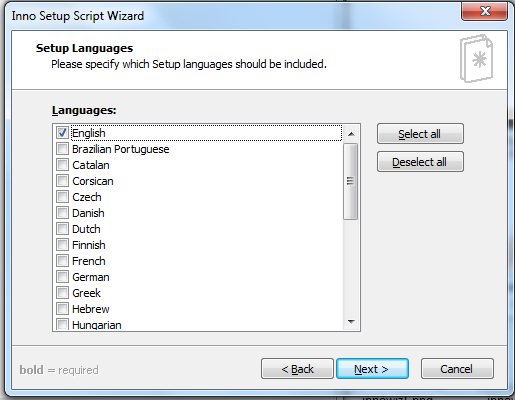
These are the languages you offer your clients for the installation wizard of your software. So, when they’re about to install it, they can choose the language the installation wizard should show instructions.
You can choose French and English or more.
-
Click on
NextagainThis wizard will appear:
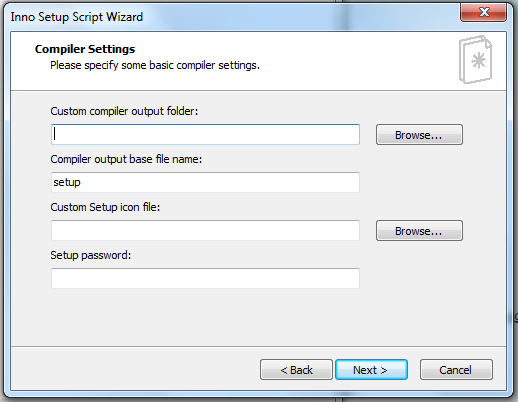
The Custom compiler output folder is where you want Inno Setup to place your finale Executable file at the end for you. So Browse it and choose a folder in your computer (I chose my desktop folder).
The Compiler output base file name is the name you want your finale executable to have. You can keep the
setupor change it intoMyAppSetuplike me.The Custom Setup icon is the icon for your executable file. The file has to be a
.icofile. For now, just leave it.And leave the password field too then
click on nextthennext againthenfinish

After that Inno Setup will prompt this:
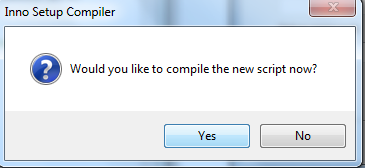
Just click Yes
It will ask you again if you want to save the generated code somewhere for further use. Say Yes if you want to keep it, choose where to save it on your computer and save. If you don’t want, just click on no.
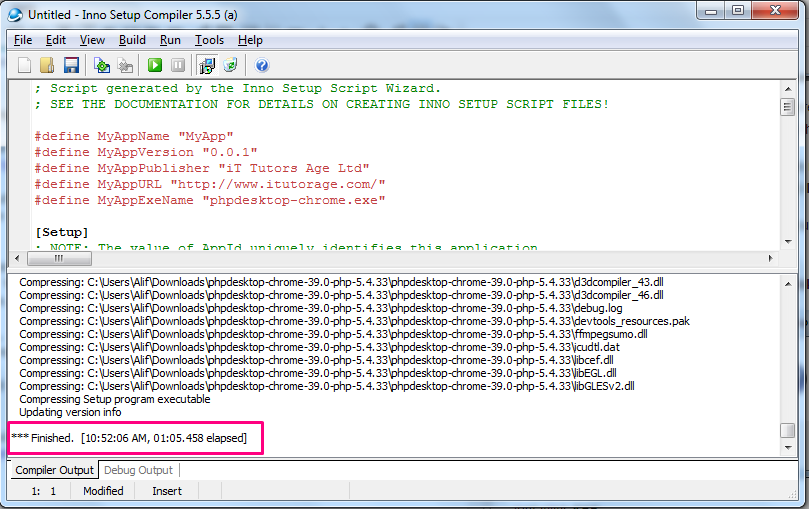
Then Inno Setup will start compiling our files into an executable file.
Make sure you close PHP Desktop before getting here otherwise it will prompt an error that the elements are being used somewhere else.
If everything happens fine, you should get something like this:
Now go in the folder where you asked Inno Setup to save your executable file. In my case, I chose my desktop.
So, this is what I got there:
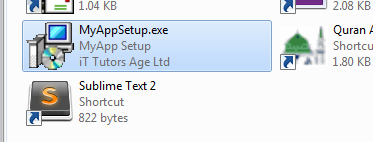
I have my executable file called MyAppSetup and when I hover my mouse on it I have this:
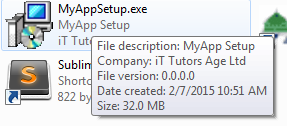
All details are considered. Cool!
To install it just double click it and follow the instructions of the install wizard.
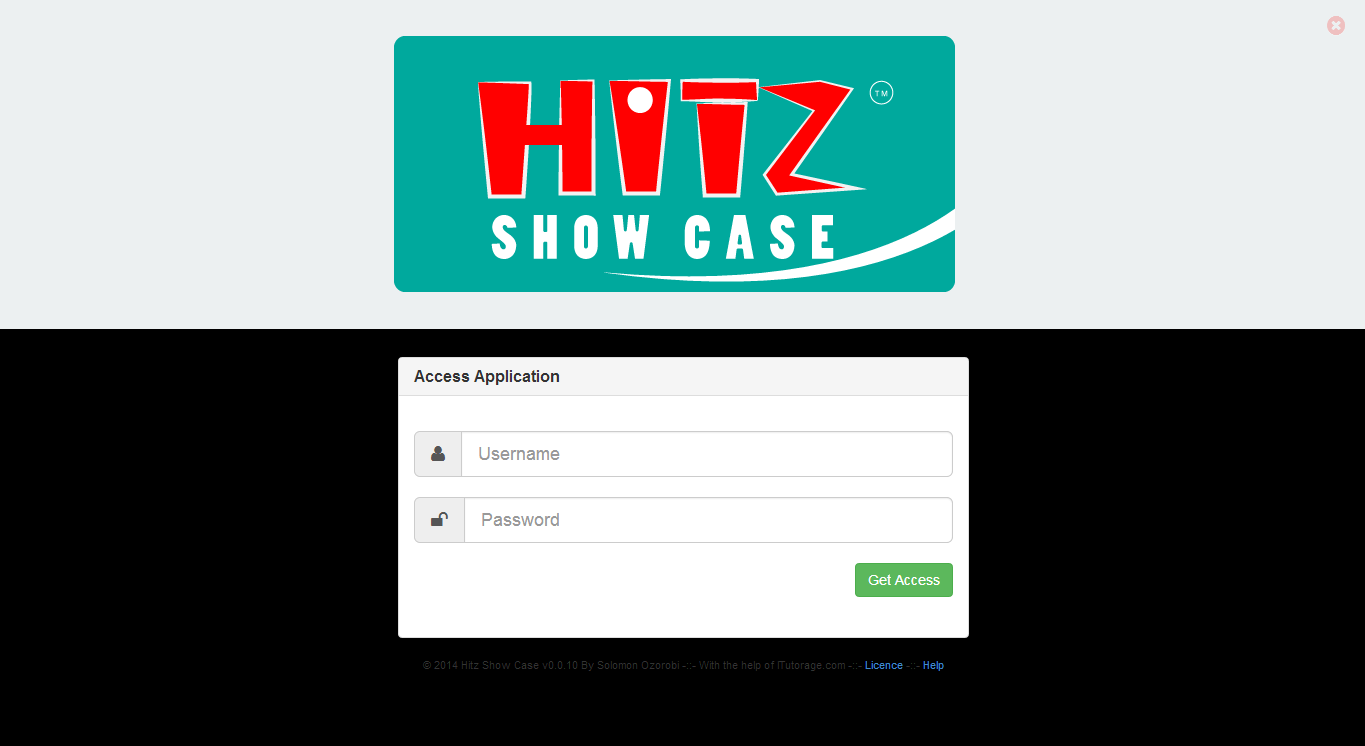
Samples [EDIT]
People asked me to provide them some sample of application done with PHP Desktop for real use case.
Download a sample of an executable file here[38.9 MB].
Once installed to access the application use: Username: admin — password: admin
Bellow is some screenshot of applications I did:

Conclusion
Hope you enjoyed this long tutorial. I did not want to miss something because it is something very tricky. But, still, they may be something you couldn’t get well. just ask it down here in the comments section.
This tutorial is a very simple one in this process. They are many things you need to consider when using PHP Desktop, like the window settings, environment settings, Usage of frameworks, accessing the computer files and hardware, etc.
We’ll try our best to make another tutorial that shows you how you can actually create a full software with PHP Desktop considering some advanced aspects of it.
So, do not hesitate to sign up and subscribe to our newsletters to get our news.
Thanks for following.
Статья написана для Windows, но актуальна и для Linux, достаточно установить PHP, выполнить в терминале команду из папки приложения и всё будет работать, для Windows достаточно кликнуть один ярлык.
Вы сразу спросите почему PHP, почему не Electron или Python, да все потому что нет времени изобретать что-то новое, если логика уже реализована в админке сайта например, или же уже сформирована достаточная кодовая база на PHP, если нужно разработать новое приложение, тогда да, можно его писать на чем-то с нуля, но тут просто скопировал, вставил, запаковал в архив и пользуйся.
Графическим интерфейсом для проекта будет тот же веб-сервер, достаточно в bat-скрипте после запуска сервера вписать открытие например localhost:10000 и готово. В идеале можно взять портативный браузер, сконфигурировать его правильным образом и запускать с правильными параметрами, чтобы не было никаких панелей, только окно сайта, но об этом позже вероятно расскажу.
В качестве веб-сервера будет использоваться тот, что встроен в PHP, ради однопользовательского приложения можно не ставить Apache или Nginx.
В качестве хранилища данных можно использовать файлы или SQLite, это по сути тот же MySQL, только чуть проще и не нужно отдельный сервер запускать, приложение просто дергает файл и оперирует данными из него.
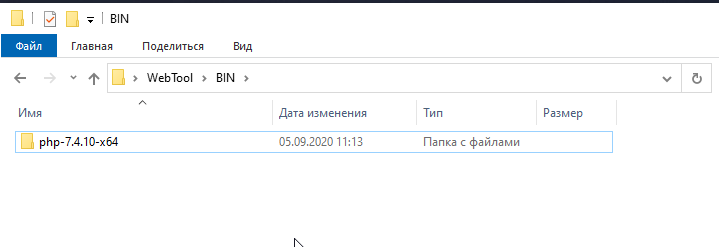
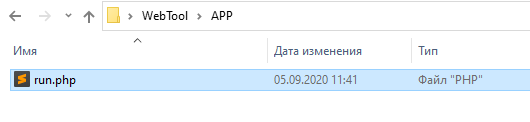
Итак, начнем, создаем папку, например, WebTool, в этой папке создадим папку BIN и положим туда распакованный PHP для Windows, в моем случае это 7.4.10
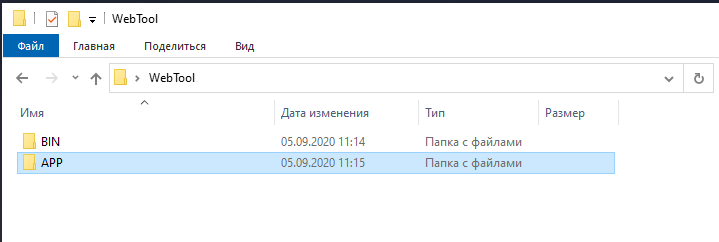
Внутри WebTool, рядом с BIN создадим APP, там будет наше веб-приложение..
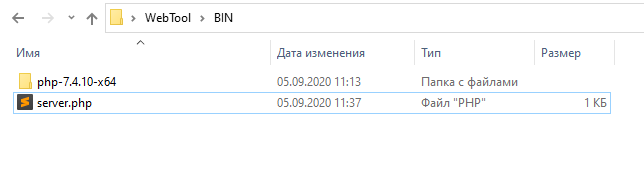
Но внутрь BIN мы положим еще один файлик, хоть он и php, но будет этаким роутером, вместо .htaccess и веб-сервера.
Назовем его server.php и положим в папку BIN
<?php
//echo $_SERVER['REMOTE_ADDR']; exit();
//if($_SERVER['REMOTE_ADDR']!='::1') exit("ONLY LOCAL");

$path = parse_url($_SERVER["REQUEST_URI"], PHP_URL_PATH);
$ext = pathinfo($path, PATHINFO_EXTENSION);
$__DOC = $_SERVER["DOCUMENT_ROOT"];

$__full = realpath($__DOC . $path);
$path = rtrim($path,"/");


// все php и несуществующие пути обрабатываем приложением
if ((!is_file($__full) || $ext=='php')|| empty($path))
    include $__DOC.'/run.php';
//остальное, типа картинок отдаем пользователю напрямую
else
return false;А в папку APP положим пока просто файл run.php c текстом типа
<?php phpinfo();
Теперь первый тестовый запуск, в папку WebTool создадим файл start.bat
С таким содержимым важно путь до PHP правильный
start /MIN "WebTool" BIN\php-7.4.10-x64\php.exe -S localhost:10000 -t APP\ BIN\server.php
start "" http://localhost:10000Достаточно будет кликнуть по start.bat и у нас откроется наше веб-приложение в браузере, а перед этим запустится сервер, тут нужно будет доработать, чтобы он дважды не запускался, но это потом… Дважды он итак не запускается, при втором запуске строчка с php не выполняется, выдает ошибку, а строчка с открытием странички в браузере срабатывает…
Чтобы остановить сервер — нужно закрыть свернутый терминал с сервером!
Если все правильно, то в браузере увидим примерно такую старничку
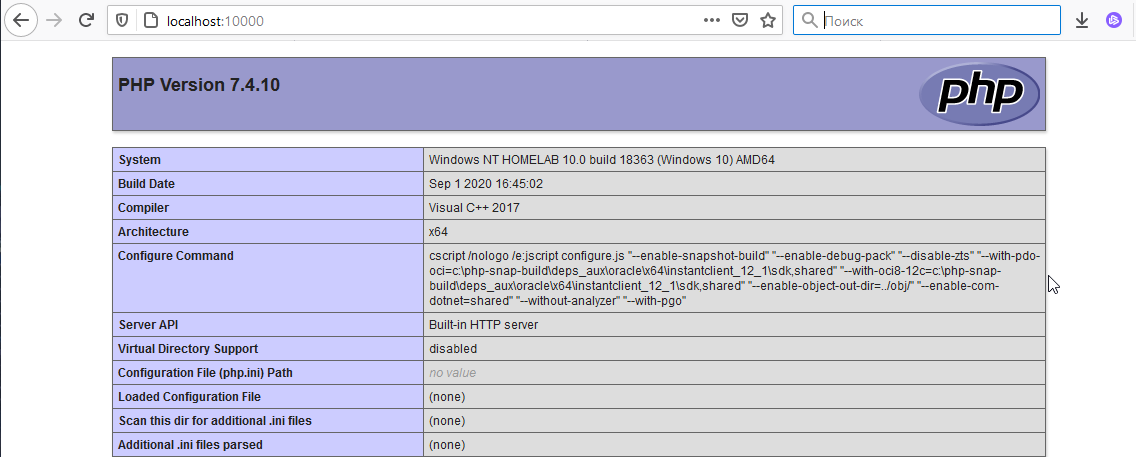
Дальше нам нужно привести в порядок php.ini, копируем внутри папки BIN/php-xxxx/ файл php.ini-development переименовываем копию в php.ini
Наводим порядки в файле, можно удалить всё лишнее, все равно это можно достать из оригинального файла из которого скопировали, у меня получилось типа такого:
[PHP]
engine = On
short_open_tag = On
precision = 14
output_buffering = 4096
;output_handler =
zlib.output_compression = Off
implicit_flush = Off
unserialize_callback_func =
serialize_precision = -1
disable_functions =
disable_classes =
zend.enable_gc = On
zend.exception_ignore_args = Off
expose_php = On
max_execution_time = 120
max_input_time = 60
memory_limit = 1280M
error_reporting = E_ALL
display_errors = On
display_startup_errors = On
log_errors = On
log_errors_max_len = 1024
ignore_repeated_errors = Off
ignore_repeated_source = Off
report_memleaks = On
variables_order = "GPCS"
request_order = "GP"
register_argc_argv = Off
auto_globals_jit = On
post_max_size = 800M
auto_prepend_file =
auto_append_file =
default_mimetype = "text/html"
default_charset = "UTF-8"
doc_root =
user_dir =
extension_dir = "ext"
enable_dl = Off
file_uploads = On
;upload_tmp_dir =
upload_max_filesize = 800M
max_file_uploads = 20
allow_url_fopen = On
allow_url_include = Off
default_socket_timeout = 60

extension=bz2
extension=curl
extension=ftp
extension=fileinfo
extension=gd2
extension=intl
extension=imap
extension=mbstring
extension=mysqli
extension=oci8_12c
;extension=odbc
extension=openssl
;extension=pdo_firebird
;extension=pdo_mysql
extension=pdo_oci
;extension=pdo_odbc
;extension=pdo_pgsql
extension=pdo_sqlite
;extension=pgsql
extension=sockets
extension=sqlite3


[CLI Server]
cli_server.color = On

[Date]
date.timezone = UTC

[bcmath]
bcmath.scale = 0

[Session]
session.save_handler = files
session.use_strict_mode = 0
session.use_cookies = 1
session.use_only_cookies = 1
session.name = PHPSESSID
session.auto_start = 0
session.cookie_lifetime = 0
session.cookie_path = /
session.cookie_domain =
session.cookie_httponly =
session.cookie_samesite =
session.serialize_handler = php
session.gc_probability = 1
session.gc_divisor = 1000
session.gc_maxlifetime = 1440
session.referer_check =
session.cache_limiter = nocache
session.cache_expire = 180
session.use_trans_sid = 0
session.sid_length = 26
session.trans_sid_tags = "a=href,area=href,frame=src,form="
session.sid_bits_per_character = 5


[mbstring]
mbstring.language = Russian
mbstring.internal_encoding = UTF-8

[Tidy]
tidy.clean_output = Off

[soap]
soap.wsdl_cache_enabled=1
soap.wsdl_cache_dir="/tmp"
soap.wsdl_cache_ttl=86400
soap.wsdl_cache_limit = 5

[sysvshm]
; A default size of the shared memory segment
;sysvshm.init_mem = 10000

[opcache]
opcache.enable=1
opcache.enable_cli=1
opcache.memory_consumption=256
opcache.max_accelerated_files=100000
opcache.validate_timestamps=1
opcache.revalidate_freq=5
opcache.save_comments=0Перезапускаем сервер, дальше делаем этакое приложение, сразу скажу, у меня с прошлой работы очень много наработок завалялось, из этого начнем лепить приложение, итак, что нам нужно?
1. Парсер URL для подгрузки нужных модулей
2. Система работы с модулями, систему контроля доступа можно упустить.
3. Базовая библиотека с обертками для выполнения типовых операций и работы системы.
4. Простенький шаблонизатор, чтоб не мешать логику и представление.
5. Контроллер для модулей.
6. UI-библиотека, состоящая из php+css+js, чтобы в пару строчек слепить форму…
7. Всякие классы типа для работы с БД…
Можно по идее взять готовый фреймворк, но я обойдусь несколькими файлами.
Если вам тема интересна — заходите в мою группу в вк, подписывайтесь, пишите в личку, на почту.
Сверху есть ссылка поддержать проект, если вдруг захотите.
PHP Desktop
Table of contents:
- Introduction
- Downloads
- Support
- Fundings for new features
- Support development
- Seeking sponsors
Introduction
PHP Desktop is an open source project founded by Czarek Tomczak
in 2012 to provide a way for developing native desktop GUI applications
using web technologies such as PHP, HTML5, JavaScript and SQLite. Think
of it as Electron for PHP. It is a convienient tool for converting PHP
web apps and PHP CLI tools to desktop applications with little effort.
The development workflow you are used to while creating web applications
remains the same, there is no new framework / API to learn. The process
of turning an existing website into a desktop application is basically
a matter of copying it to the «phpdesktop/www/» directory.
In a certain sense phpdesktop acts as a PHP to EXE compiler. It embeds
a web browser, a multi-threaded web server and a PHP interpreter. All
embedded into a single application, a portable folder that you can easily
distribute to end users by packing it to zip archive or by making an
installer for your application.
The web server embedded is a custom edition of
Mongoose,
a web server used by NASA on the International Space Station.
Supported browsers are Internet Explorer and Google Chrome via
open source Chromium. The package with Chrome embedded has no
external dependencies, everything is included in phpdesktop binaries
and works out of the box on a user’s computer.
All popular PHP frameworks are supported, see the
PHP frameworks support wiki page
for example configurations for CakePHP, CodeIgniter, Laravel, Symfony, Yii
and Zend Framework. You can create a standalone executable for
distribution with the help of the
Inno Setup installer.
PHP sources can be protected with the many of the available
PHP encoders.
PHP Desktop is released under non-restrictive license, thus it is
free for commercial use.
It is one of the top goals for PHP Desktop to be stable, to work reliably.
PHP Desktop does not suffer from memory leaks. PHP by design was never
intended for running long hours/days, as desktop applications usually do.
This is not a concern when using PHP Desktop, as it is running an internal
web server and serving pages through CGI. So when PHP script execution
ends, PHP-CGI process is killed and all memory is always freed.
Lots of other useful information can be found on the
Knowledge Base wiki page and on the
PHP Desktop Forum.
Downloads
- Windows
- PHP Desktop v57.0 for Windows
release
- PHP Desktop MSIE v1.14
wiki page
- PHP Desktop v57.0 for Windows
- Linux
- PHP Desktop v72.1 for Linux
release
- PHP Desktop v72.1 for Linux
- Mac
- No release yet, see the ongoing funding in
Issue #208
- No release yet, see the ongoing funding in
There are two ways to be notified about new releases:
- Watch the project with the «Releases only» option checked
- Subscribe to the RSS/Atom feed
Support
- Documentation is on the Wiki Pages. Start with the
Knowledge Base, Settings
and Chrome settings wiki pages. - Ask questions and report problems on the
PHP Desktop Forum - See also this externally maintained tutorial:
Create your first Desktop Application with PHP and PHP Desktop
Fundings for new features
Here is a list of ongoing fundings for new features in PHP Desktop:
| Feature | Funds gathered | Issue | Status |
|---|---|---|---|
| Chrome v100 release for Windows | $1000 of $2,000 | Issue #227 | Ongoing funding |
| Initial Mac release | $2,000 of $2,000 | Issue #208 | Work started |
Below is a list of completed fundings with features already implemented:
| Feature | Funds gathered | Issue | Status |
|---|---|---|---|
| Initial Linux release | $1,500 of $1,500 | Issue #221 | Done |
Fundings for other features submitted in the issue tracker and the ones presented on the
PHP Desktop Pro
wiki page are also possible, just let know Czarek.
Support development
If you would like to support PHP Desktop general development efforts by
making a donation please click the Donate button below:

Seeking sponsors
PHP Desktop is seeking companies to sponsor further development of the project.
There are many proposals for new features submitted in the issue tracker and
on wiki pages. Most notable are:
- Monthly releases with latest Chrome
- An automated build system
- Cross-platform support with full functionality on Mac and Linux
- More Javascript and PHP API exposed for accomplishing desktop specific tasks
- Better integration with desktop, taskbar and systray
- HTTPS/SSL support
- Custom window themes
- Running app in background
- SQLite encryption
- Desktop notifications
If your company would like to sponsor PHP Desktop development efforts
then please contact Czarek.
Long term sponsorships are welcome and Czarek is open to ideas about
the project. He would love to spend more time on developing this project,
but he can’t afford doing so in his free time.
One of the reasons why Java is so popular is because it can be used to build applications, Web pages, applets and beans that can run on several platforms including Windows, Linux and Solaris. Java runs a virtual machine called JVM, and code is compiled into an intermediate format known as Java byte code, which is platform independent. When that particular piece of code is executed within the JVM, the JVM optimizes the code for the platform on which it is running as it is compiled.
Microsoft’s latest technology, .NET, follows the same principles. Code is compiled into Microsoft Intermediate Language (MSIL) and is then executed within the .NET framework as an application domain. Microsoft is hoping to standardize C# and MSIL so that .NET code can run cross-platform.
So what has all of this got to do with PHP-GTK? Well, both Java and .NET can be used to build windowed applications and Web pages. Thanks to PHP-GTK, we can now build cross-platform windowed applications with PHP as well.
In this article we’re going to take a look at PHP-GTK: what it is, how to download and install it, and how to use it to build cross-platform interactive GUI applications. To test the PHP-GTK samples in this article, you should have PHP 4.1.1 or later installed on a Windows, Linux or Unix machine.
What is PHP-GTK?
Personally, I’d call PHP-GTK an excellent set of classes that can be used to build applications that contain buttons, windows, toolbars, menus, scroll bars, database access, lists and more. The team that developed PHP-GTK defines it as a PHP extension that allows us to easily write cross-platform GUI based applications.
Funnily enough, PHP-GTK was written to prove that PHP could actually be used to build stuff other that Web pages, and let me tell you that they’ve succeeded.
No doubt you’re familiar with the PHP acronym, but what does GTK mean? GTK stands for GIMP Tool Kit, and it’s basically just a set of widgets that we can use to create applications. A widget is the equivalent of a control (such as a button, list box, frame or radio button) in «Linux speak».
GIMP is an acronym for GNU Image Manipulation Program, and is a fully featured graphics editing program that runs on Linux. It has many (if not all) of the features of popular Windows programs such as Photoshop and Paintshop. It’s the graphics editor of choice for most Linux users.
GTK is actually part of a set of libraries that was written in C, called GTK+. GTK+ was built up over time and is now a main part of Gnome, which is a Linux GUI desktop environment. GTK+ has an object-oriented nature and also includes two other libraries:
- GLib: A library of tools that can be used to help developers create applications with GTK+.
- GDK: Similar to GDI for Win32, GDK is the standard for GIMP drawing kit and wraps a set of lower level drawing functions into classes that make developing applications with GTK+ easier. If you’re thinking along the lines of MFC for C++ then you’re making a fair comparison: MFC wraps several controls and hides the calls to the underlying Windows API’s from the developer. GDK does the same thing for GTK+.
Although GTK is used in many other applications and projects, in terms of PHP-GTK, it’s an advanced set of classes which can be referenced to create widgets that we can then manipulate programmatically. PHP-GTK’s programming style is similar to event driven programming languages such as Visual Basic and C++, in that it fires off signals. These signals can be captured and specific functions (called callback functions) can be defined to handle them.
I know that we haven’t even looked at PHP-GTK yet, but consider the following PHP code:
$button = &new GtkButton("Click me");

$button->connect("clicked", "buttonClicked");
In the code above I’ve instantiated a new GtkButton class. I’ve then called its connect function passing in two parameters: the name of the signal to capture (clicked) as well as the name of a call-back function to execute when this signal is caught (buttonClicked). This tells PHP-GTK that when the button emits a «clicked» signal, the buttonClicked function should be called.
So if we added a buttonClicked function like this:
function buttonClicked()

{

 echo "You clicked the button";

}
Then «You clicked the button» would be echoed to the screen when the button was clicked on.
That brings me to another point: PHP-GTK apps are run by calling them up with the normal PHP interpreter. The console window in which you called the PHP-GTK GUI app sits in the background and the app sits on top. While the app is running you can still output to the console window using echo, print, etc.
In my opinion this is excellent, because it means you can set a debug flag and treat the console window as a debug window, outputting debugging statements while you build your PHP GTK GUI app. When you’re ready to distribute the app, simply set the debug flag to false or remove the echo commands.
Hopefully now you have a bit of an understanding of what PHP-GTK is. The next step is to actually download and install PHP-GTK, so let’s go!
Downloading and Installing PHP-GTK
As with all GPL licensed software, PHP-GTK is a completely free download. Visit the GTK site and choose the version of PHP-GTK that matches your operation system. At the time of writing, you could choose to download the source, windows binary, as well as the concurrent versions system (CVS) download.
Installing PHP-GTK for Windows
I’m running Windows 2000 with PHP-GTK, so I’ll give you my overview of installing PHP-GTK on Windows. Firstly, make sure you’re equipped with an unzip program such as WinZip. Next, locate the directory where PHP is installed. If you installed PHP using the default options it will be c:php4.
Extract all the files in the downloaded zip file to a directory such as c:temp. Copy all of the files from the php4 directory to your current PHP extensions directory, which can be found in your php.ini file (typically it’s either the directory where you installed PHP, such as c:php4, or the extensions directory of your PHP installation, such as c:php4extensions).
You’ll notice a file called php_win.exe. This executable can be used to run PHP-GTK scripts by simply double clicking on them. Before continuing, let’s set up Windows so that our PHP-GTK scripts will be run automatically when we double click on them.
Double click on any PHP script on your computer. When the «Open With…» dialog appears, choose other and browse to c:php4php_win.exe. Make sure the «Always use this program» checkbox is ticked and click OK. You’ll notice that all your PHP files now have the PHP-GTK icon.
Ok, back to the installation. The winnt directory in your PHP-GTK download contains a php.ini file. If you don’t have a php.ini file in your windows directory already (which is c:windows for Windows 95 and 98 and c:winnt for Windows NT, 2000 and XP), then copy that php.ini file there.
Next, copy all of the files from the winntsystem32 directory of your download to your Windows system directory, which is c:windowssystem for Windows 95 and 98 users and c:winntsystem32 for Windows NT, 2000 and XP users.
Run sysedit (Start -> Run -> «sysedit») and add the following line to the end of your autoexec.bat file:
path=%path%;c:php4Lastly, copy the test directory to the same directory where PHP is installed. The test directory contains a couple of PHP-GTK scripts that demonstrate how to create and interact with the various PHP-GTK files. Change into the c:php4test directory and double click on hello.php. You should see a PHP-GTK window that contains one button. If everything worked OK, then you’ve successfully installed PHP-GTK.
It might also be a good idea to restart Windows at this point.
Installing PHP-GTK for Linux
I’m going to show you how to download PHP-GTK using PHP’s CVS server. Before you can install PHP-GTK, make sure you have PHP version 4.1.1 or later, CVS, and The Linux GTK+ libraries, as well as:
- libtool 1.3.3 or later,
- automake 1.4 or later,
- autoconf 2.12 or later, bison 1.28 or later, and
- flex 2.54 or later
installed and working correctly.
Firstly, login to the CVS tree using phpfi as your password:
cvs --d :pserver:cvsread@cvs.php.net:/repository loginNext, download PHP-GTK to your machine from PHP’s CVS server:
0

cvs -d :pserver:cvsread@cvs.php.net:/repository co php-gtk
Change into the directory where PHP-GTK was downloaded:
cd php-gtkRun the phpize tool, which should’ve been installed when you installed PHP. It should be in the directory pointed to by your phpize path.
phpizeNow you’ll need to configure, make and install PHP-GTK:
./configure && make && make installLastly, run the following command to execute the hello.php script that was installed when you downloaded PHP-GTK. You should be presented with a PHP-GTK window that contains one button:
php --q test/hello.phpBuilding Our First PHP-GTK App
Now that PHP-GTK’s installed, we’re ready to create our first GUI application. Create a new PHP script called window.php and enter the following code into it:
<?php

 // Load the PHP-GTK extension

 $extension = "php_gtk" . (strpos(PHP_OS, "WIN") >= 0 ? ".dll" : ".so");

 dl($extension);

 // Create a new window

 $window = &new GtkWindow();

 $window->set_title("Test App");

 $window->set_usize(300, 100);

 $window->set_position(GTK_WIN_POS_CENTER);

 $window->set_policy(false, false, false);

 // Set a callback function for the destroy signal

 $window->connect("destroy", "killwin");

 function killwin()

 {

 echo("Window Destroyed!n");

 gtk::main_quit();

 }

 // Show the window

 $window->show_all();

 // Start the main PHP-GTK listener loop

 gtk::main();

?>
Change into the directory where you created window.php and use the following command to execute it:
php --q window.phpHere’s the result of window.php on my Windows 2000 machine:
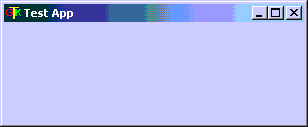
Our First PHP-GTK Window
If you play around with the window, then you’ll notice that you can’t resize or maximize it, because of the calls that window.php makes to various GTK functions. When you close the window, you’ll notice that some text has been output to the console window:
C:>php -q window.php

Window Destroyed!
Let’s run through the code we used to create window.php.
// Load the PHP-GTK extension

$extension = "php_gtk" . (strpos(PHP_OS, "WIN") >= 0 ? ".dll" : ".so");

dl($extension);
As the comment indicates, we load the PHP-GTK extension. The PHP_OS variable contains a word that represents your operating system. On my machine, PHP_OS is «WINNT». We set the value of the $library variable to either php_gtk.dll (for Windows) or php_gtk.so (for Linux), depending on whether or not PHP_OS contains the string «WIN». We then call the dl() function to load the extension into memory.
// Create a new window

$window = &new GtkWindow();

$window->set_title("Test App");

$window->set_usize(300, 100);

$window->set_position(GTK_WIN_POS_CENTER);

$window->set_policy(false, false, false);
The most important aspect of any application is the user interface. PHP-GTK defines a class called GtkWindow, which we can instantiate by reference to create a new window. The GtkWindow class includes several functions that we can use to specify how the window will look, where it will be located, etc. In our example I’ve set the windows title using set_title, set its width and height using set_usize, set its position to the center of the screen, and also used set_policy to tell PHP-GTK that the window can’t be resized.
// Set a callback function for the destroy signal

$window->connect("destroy", "killwin");

function killwin()

{

 echo("Window Destroyed!n");

 gtk::main_quit();

}
Most PHP-GTK widgets include a method called connect(), which allows us to specify callback functions that should be executed when a specific event is captured. The PHP-GTK library monitors our application in much the same way as any other object-orientated, event-driven programming language. PHP-GTK is based on the concept of signals and callbacks, which means that if we move the mouse over a button, for example, a signal will be emitted. We can register a callback function to tell PHP-GTK which function(s) to run when this specific signal is emitted.
In our example, I’ve used the connect function to tell PHP-GTK that when our window emits the «destroy» signal (which is emitted when we close the window) that it should execute our killwin function. Our killwin function contains a call to the static function main_quit of the gtk class, which unloads our window and terminates our application.
// Show the window

$window->show_all();

// Start the main PHP-GTK listener loop

gtk::main();
The show_all() function displays our window, and if it contained any widgets then these would be displayed as well. The main function of the gtk class is called statically, and tells the PHP-GTK library to begin its listener loop.
Registering Multiple Callback Functions
One of the great things about PHP-GTK is that you can register multiple callback functions for any signal. This can come in handy if you need to perform multiple tasks when a button is clicked, a window is closed, a tree is expanded, etc.
Let’s take a quick look at how to register multiple callback functions for the destroy signal of the window we created in window.php:
// Set a callback function for the destroy signal

$window->connect("destroy", "function1");

$window->connect("destroy", "killwin");

function function1()

{

 echo("This is some output before the killwin function is called.n");

}

function killwin()

{

 echo("Window Destroyed!n");

 gtk::main_quit();

}
As you can see, I’ve added another call to our windows connect function, specifying that it should also call the function1 function when it is destroyed. I’ve placed the call to connect("destroy", "function1") before the call to connect("destroy", "killwin"). This is an important point to remember: the order in which you register the callback functions is the order in which they will be executed.
The output to my console window from running window.php with the new callback handler and function looks like this:
C:>php -q window.php

This is some output before the killwin function is called.

Window Destroyed!
Adding GTK Widgets to Our Window
So, we’ve created a basic PHP-GTK window and set up the GTK loop, but what good is our application when we can’t even interact with it? Let’s add a text box and button to our window. When we click on the button, any text in the text box will be reversed using PHP’s strrev function.
Before we look at the code to do this, we need to know about the GtkEntry and GtkButton classes. The GtkEntry class is a single-lined text box that allows us to enter, copy, paste, and delete text from it. The GtkButton class is a button that can be clicked, double clicked, etc. Both the GtkEntry and GtkButton classes support the connect event to register callback functions.
Create a new file called reverse.php and enter the following code into it:
<?php

 // Load the PHP-GTK extension

 $extension = "php_gtk" . (strpos(PHP_OS, "WIN") >= 0 ? ".dll" : ".so");

 dl($extension);

 // Create a new window

 $window = &new GtkWindow();

 $window->set_title("Test App");

 $window->set_usize(300, 50);

 $window->set_position(GTK_WIN_POS_CENTER);

 $window->set_policy(false, false, false);

 // Set a callback function for the destroy signal

 $window->connect("destroy", "killwin");

 function killwin()

 {

 echo("Window Destroyed!n");

 gtk::main_quit();

 }

 // Add a GtkVBox class to our window

 $box = &new GtkVBox();

 $window->add($box);

 // Add a GtkEntry class to our window

 $entry = &new GtkEntry();

 $entry->set_text("Hello World");

 $box->pack_start($entry);

 // Add a GtkButton class to our window

 $button = &new GtkButton("Reverse Text");

 $button->connect("clicked", "reverseText", $entry);

 $box->pack_start($button);

 function reverseText($theButton, $theEntry)

 {

 $text = strrev($theEntry->get_text());

 $theEntry->set_text($text);

 }

 // Show the window

 $window->show_all();

 // Start the main PHP-GTK listener loop

 gtk::main();

?>
Run reverse.php. When you click on the button, the text in the text box will be reversed, like this:
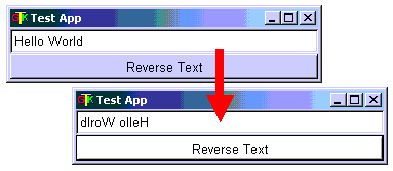
It’s time to introduce a new concept regarding PHP-GTK. Put simply, PHP-GTK doesn’t support absolute positioning of widgets, which means that we can’t add a text box 10 pixels from the left of a window and 20 pixels down. PHP-GTK only supports relative positioning, which requires us to define areas into which widgets can be placed.
The GtkHBox and GtkVBox classes create horizontal and vertical boxes that act as containers for other widgets. In our example above, we create a new GtkVBox object, adding it to our window, like this:
// Add a GtkVBox class to our window

$box = &new GtkVBox();

$window->add($box);
All GTK widgets that are containers (i.e. can hold other widgets) expose the add function, which accepts one parameter: a widget. This widget is then displayed within that container.
The GtkVBox widget inherits many of its functions from its base classes. All GTK widgets are derived from base classes, so most of the widgets share similar functionality. Here’s the hierarchy of the GtkVBox class:
GtkObject

|-- GtkWidget

|---- GtkContainer

|------ GtkBox

|-------- GtkVBox
The GtkBox class exposes a pack_start function. This function is used to add a widget to a GtkBox class or derived class. In our example, we create a new GtkEntry and GtkButton class, adding them to our GtkVBox object using its pack_start function, like this:
// Add a GtkEntry class to our window

$entry = &new GtkEntry();

$entry->set_text("Hello World");

$box->pack_start($entry);

// Add a GtkButton class to our window

$button = &new GtkButton("Reverse Text");

$button->connect("clicked", "reverseText", $entry);

$box->pack_start($button);
As you can see in the example above, we register a callback function for the «clicked» signal of our button. Remember back to our first window.php example where our call to connect contained only two arguments. In the example above, we specify a third parameter, which is our GtkEntry widget, $entry. The callback function we specify is reverseText, which looks like this:
function reverseText($theButton, $theEntry)

{

 $text = strrev($theEntry->get_text());

 $theEntry->set_text($text);

}
The reverseText function accepts two arguments: the widget that emitted the signal (which in our case is the button) as well as a custom argument (which is our GtkEntry widget). The first argument, $theButton is passed in implicitly by PHP-GTK, and we have manually passed in the second argument when we defined our callback function for the buttons «clicked» signal.
Our reverseText function gets the text from our GtkEntry object by calling its get_text function. This text is reversed using PHP’s strrev function, and is then put back into our GtkEntry object by calling its set_text function.
Other PHP-GTK Widgets
PHP-GTK has dozens of other widgets that we can instantiate and use in our application. Here’s a list:
- GtkButton: A button that can be clicked on.
- GtkCalendar: A calendar that shows dates that can be selected.
- GtkCheckButton: A check box that can be toggled on and off.
- GtkCList: A list with several columns that can be scrolled.
- GtkColorSelection: A very cool widget that can be used to select colors.
- GtkCombo: A dropdown list that can also accept typed in text.
- GtkCTree: A tree list that can contain nodes that can expand and collapse.
- GtkDialog: A popup dialog that can be modal.
- GtkEntry: A text box with text that can be changed.
- GtkFileSelection: Similar to Windows common dialog control, the GtkFileSelection control displays a dialog allowing us to choose a file on our local machine.
- GtkFontSelection: A widget that allows us to select various font properties.
- GtkFrame: A frame that can contain a caption.
- GtkHRuler: A horizontal ruler.
- GtkHScrollBar: A horizontal scrollbar.
- GtkImage: A widget for displaying an image.
- GtkMenu: A container widget that can hold menu items.
- GtkNoteBook: A tabbed control that can display multiple tabs.
- GtkProgressBar: A bar that can be used to display the progress of some event.
- GtkRadioButton: A radio button that can be grouped.
- GtkSpinButton: Used to increment/decrement a value using arrows.
- GtkToolTips: Used to add tooltips to other widgets.
- GtkVBox: Vertical box container.
- GtkVScrollBar: A vertical scrollbar.
- GtkWindow: An application window.
As you can see from the classes shown above, PHP-GTK contains all of the necessary classes to facilitate the development of a complete cross-platform GUI application.
Building a Database App with PHP-GTK
One of the cool things about PHP-GTK is that it integrates seamlessly with PHP, so we can still use all PHP’s regular functions in our PHP-GTK applications. The most popular database to use with PHP is MySQL, so let’s create a PHP-GTK app that connects to a MySQL database and retrieves some records.
Enter the following commands at the MySQL console application:
create database people;

use people;

create table programmers

(

 pId int auto_increment,

 pName varchar(50),

 pAge tinyint,

 primary key(pId),

 unique id(pId)

);
Add some people to our programmers’ table with the following insert commands:
insert into programmers values(0, 'Bill Smith', 23);

insert into programmers values(0, 'James Black', 45);

insert into programmers values(0, 'Lyonel Jones', 18);

insert into programmers values(0, 'Phil Brown', 22);

insert into programmers values(0, 'Michael Clay', 56);
Now let’s create a PHP-GTK app that connects to our database and retrieves the records from our programmers’ table. The app is a bit large to post here in its entirety, so download the support material for this article if you want to test it on your machine.
Our app starts by creating several labels and text boxes, as well as one command button, which, when clicked will connect to a MySQL server:
$button = &new GtkButton("Connect and Get Rows");

$button->connect("clicked", "getdata");

$box->pack_start($button);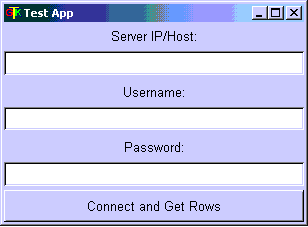
The getdata function connects to MySQL using the host, username and password values from the GtkEntry controls in our app:
function getdata($theButton)

{

global $server;

global $user;

global $pass;

...

$dServer = $server->get_text();

$dUser = $user->get_text();

$dPass = $pass->get_text();

$s = mysql_connect($dServer, $dUser, $dPass) or die("Couldn't

connect to database server");

$d = mysql_select_db("people", $s);
Next, all of the controls that occupy our GtkVBox widget are hidden:
// Hide all controls

$label1->hide();

$label2->hide();

$label3->hide();

$server->hide();

$user->hide();

$pass->hide();

$button->hide();
It then queries the programmer’s table, looping through each result and adding it to a string variable:
$result = mysql_query("select * from programmers order by pName asc");

$pList = "";

while($row = mysql_fetch_array($result))

{

 // Create a string array

 $pList .= $row["pName"] . " is " . $row["pAge"] . "n";

}
It then creates a new GtkLabel widget and assigns the value of the $pList variable to the label by passing it to the labels constructor. The label is then added to the GtkVBox widget, which is part of our main window:
// Create a GtkCList and show it

$p = &new GtkLabel("$pList");

$box->add($p);

$p->show();
Here’s how the window looks before:
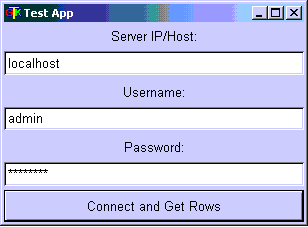
…and after I click the connect button:
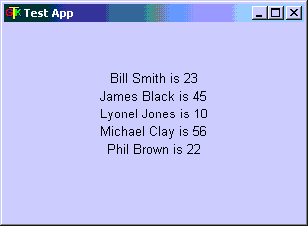
As you can see, the GtkLabel and GtkEntry objects are hidden, and the new label is displayed inside of out GtkVBox object.
Conclusion
In this article we’ve covered everything you need to know to start creating cross platform GUI applications with PHP and the PHP-GTK library. We’ve seen how to download and install PHP-GTK, as well as several ways to create simple apps with it.
Of course PHP-GTK contains heaps of other functionality and widgets, so make sure you check out the links below if you’re after more information on PHP-GTK. You can also download the support material for this article using the link shown below.
- The PHP-GTK Manual
- Sourceforge, the world’s largest open source development site.
- This article’s support materials.